
SHFD 2150 A3 - Deep fryer SILVERCREST - Free user manual and instructions
Find the device manual for free SHFD 2150 A3 SILVERCREST in PDF.

| Product type | XL Digital Hot Air Fryer |
| Brand | SilverCrest |
| Model | SHFD 2150 A3 |
| Color | White/Black |
| Power supply | 220-240 V~, 50-60 Hz |
| Power consumption | 2150 W |
| Standby power consumption | 0.4 W |
| Protection class | I |
| Temperature range | 60 °C to 200 °C |
| Timer | 1 to 60 minutes |
| Maximum capacity (food + utensils) | 1.4 kg |
| Package contents | Fryer, basket, pot, instruction manual |
| Main functions | 8 preset programs, keep warm, delayed programming, shake alarm, recommended preheating |
| Display | Digital LED with menu selection |
| Care and cleaning | Basket and pot dishwasher safe; housing cleanable with a damp cloth |
| Safety | Automatic shut-off, fan cooling, overheating protection, hot surface indication |
| Warranty | 3 years |
| After-sales service France | Tel: 0800904879, Email: owim@lidl.fr |
| After-sales service Belgium | Tel: 080071011, Email: owim@lidl.be |
| Weight (approx.) | 6.5 kg |
| Dimensions (approx.) | 38 x 30 x 35 cm |
Frequently Asked Questions - SHFD 2150 A3 SILVERCREST
User questions about SHFD 2150 A3 SILVERCREST
0 question about this device. Answer the ones you know or ask your own.
Ask a new question about this device
Download the instructions for your Deep fryer in PDF format for free! Find your manual SHFD 2150 A3 - SILVERCREST and take your electronic device back in hand. On this page are published all the documents necessary for the use of your device. SHFD 2150 A3 by SILVERCREST.
USER MANUAL SHFD 2150 A3 SILVERCREST
natural_image
Black air fryer with open lid and plastic bag filled with food inside (no visible text or symbols)DIGITALE HEISSLUFT-FRITTEUSE XL/DIGITAL XL AIR FRYER/FRITEUSE À AIR CHAUD NUMÉRIQUE XL SHFD 2150 A3
DE AT CH
flowchart
graph TD
    A["13"] --> B["Car"]
    C["14"] --> D["Car"]
    E["15"] --> F["Car"]
    G["16"] --> H["MIN"]
    I["28"] --> J["+"]
    K["27"] --> L["−"]
    M["18"] --> N["+"]
    O["19"] --> P["−"]
    Q["2023 2122242526"] --> R["Control Button"]
    S["Motor Icon"] --> T["Light Bulb Icon"]
    U["Motor Icon"] --> V["Light Bulb Icon"]
    W["Motor Icon"] --> X["Light Bulb Icon"]
    Y["Motor Icon"] --> Z["Light Bulb Icon"]
    AA["Motor Icon"] --> AB["Light Bulb Icon"]
    AC["Motor Icon"] --> AD["Light Bulb Icon"]
B
natural_image
Line drawing of a hand inserting a small electronic device into a multi-tiered air fryer (no text or symbols)C
natural_image
Line drawing of a hand holding a cooking pan with food inside, marked with an 'X' symbol (no text or symbols on the diagram itself)D
E
natural_image
Line drawing of a hand inserting a hair into a square oven with heat exchanger (no text or symbols)natural_image
Line drawing of a hand holding a tool next to a multi-tiered air fryer (no text or symbols present)Warnings and symbols used Page 29
Introduction Page 29
Intended use.... Page 29
Scope of delivery.... Page 30
Description of parts Page 30
Technical data Page 30
Safety instructions.... Page 30
Before first use Page 34
Operation.... Page 34
Standby mode Page 35
Preparation. Page 35
Selecting a program.... Page 36
Starting cooking.... Page 37
Pausing cooking.... Page 37
Cancelling cooking Page 37
Keep warm.... Page 38
Delay timer.... Page 38
Detaching the basket from the bowl. Page 38
Removing the food.... Page 39
Cooking table Page 39
Recipe suggestions ...... Page 41
Crispy cheese hot dog.... Page 41
Mushroom, onion and cheese pie.... Page 41
Spicy chicken.... Page 41
Bell pepper rings ...... Page 42
Baked egg with bacon and spinach Page 42
Spring chicken Page 42
Jacket potatoes Page 43
Small cake Page 43
Dinner roll.... Page 43
Fish fillet Page 44
Troubleshooting Page 44
Cleaning and care Page 45
Maintenance Page 46
Storage Page 46
Disposal Page 46
Warranty Page 46
Warranty claim procedure.... Page 47
Service Page 47
| Warnings and symbols usedThe following warnings are used in the instruction manual, short manual and on the packaging: | |||
 | DANGER! This symbol with the signal word “Danger” indicates a hazard with a high level of risk which, if not avoided, will result in serious injury or death. | Warning! Burning hazard: This symbol indicates a hot surface. | |
 | WARNING! This symbol with the signal word “Warning” indicates a hazard with a medium level of risk which, if not avoided, could result in serious injury or death. | Food safeThis product has no adverse effect on taste or smell. | |
| ~ | Alternating current/voltage | ||
 | NOTE: This symbol with the signal word “Note” provides additional useful information. | The basket 2 and the bowl 5 are suitable for the dishwasher. | |
 | Never leave children unattended with packaging materials or the product. | CE | CE mark indicates conformity with relevant EU directives applicable for this product. |
| Safety informationInstructions for use | |||
DIGITAL XL AIR FRYER
● Introduction
We congratulate you on the purchase of your new product. You have chosen a high quality product. The instructions for use are part of the product. They contain important information concerning safety, use and disposal. Before using the product, please familiarise yourself with all of the safety information and instructions for use. Only use the product as described and for the specified applications. If you pass the product on to anyone else, please ensure that you also pass on all the documentation with it.
Intended use
This product is intended for preparing foods that require a high cooking temperature and would otherwise require deep-frying. The product is intended only for preparing foods.
The product is designed solely for domestic use. It is not intended for commercial use.
Use the product in moderate climates only. Use of the product in tropical climates is not recommended.
Any other use not mentioned in these instructions may cause a damage to the product or create a serious risk of injury.
The manufacturer accepts no liability for damages caused by improper use.
- Scope of delivery
After unpacking the product, check if the delivery is complete and if all parts are in good condition. Remove all packaging materials before use:
□ Packaging material used to cover the product (e.g. polybag)
□ Materials placed inside the bowl and basket (e.g. protection board)
Contact customer service if parts are missing or damaged.
1 Digital XL air fryer
1 User manual
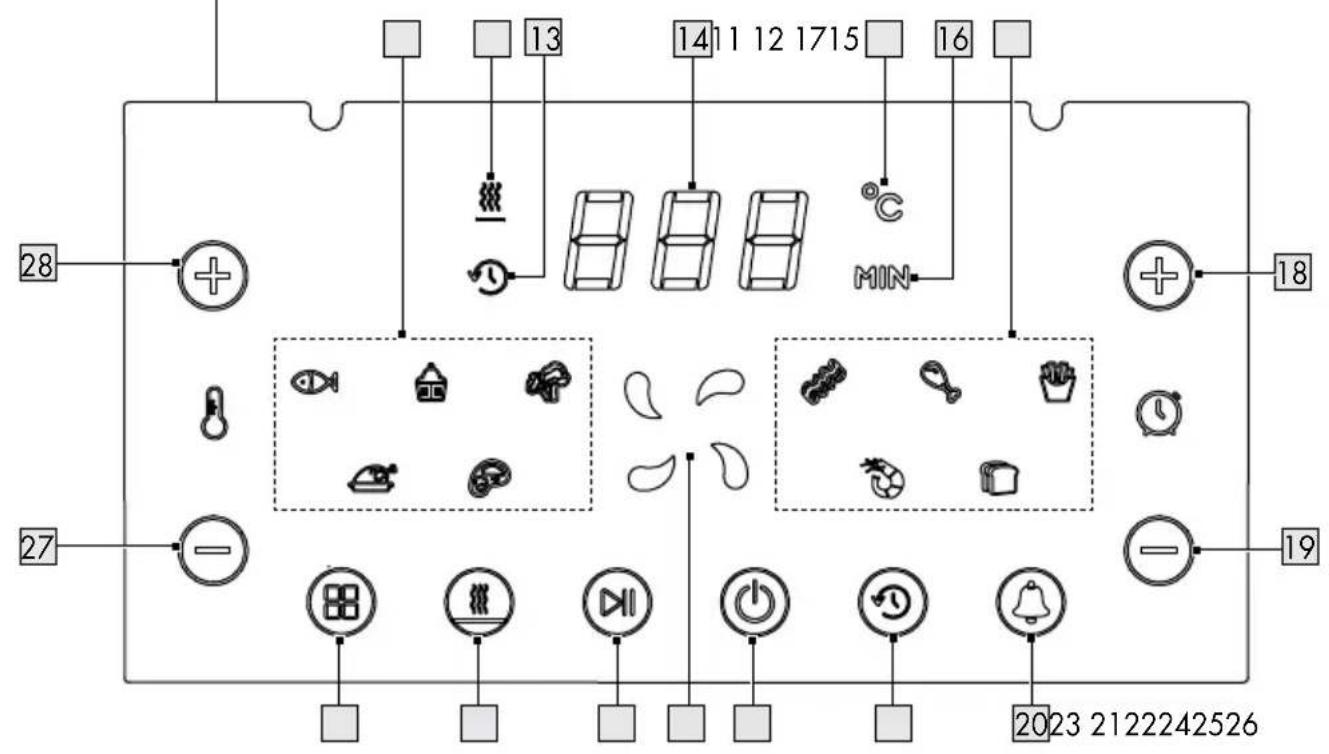
● Description of parts
1 Display (with control panel)
2 Basket
3 Basket release (with protective cover)
4 MAX fill line (inside)
5 Bowl
6 Cooking chamber
7 Handle
8 Air vents
9 Cable winder
10 Power cord with plug
Display (with control panel)
11 Menu selection display
12 Keep warm functioning display
13 Delay timer functioning display
14 Value display (temperature and timer)
15 Temperature unit display
16 Minute unit display
17 Menu selection display
18 button (increase cooking time)
19 button (decrease cooking time)
20 button (alarm)
21 button (delay timer)
22 button (standby)
23 Fan functioning display
24 button (start/pause)
25 button (keep warm)
26 button (menu selection)
27 button (decrease temperature)
28 button (increase temperature)
- Technical data
| Input voltage: 220-240 | V~,50-60 Hz |
| Protection class: I | |
| Power consumption: 2,1 | 50 W |
| Standby power consumption: | 0.4 W |
| Cooking temperature: | 60 °C to 200 °C |
| Cooking time: | 1 to 60 minutes |

Safety instructions
BEFORE USING THE PRODUCT, FAMILIARISE YOURSELF WITH ALL OF THE SAFETY INFORMATION AND INSTRUCTIONS FOR USE! WHEN PASSING THIS PRODUCT ON TO OTHERS, ALSO INCLUDE ALL THE DOCUMENTS!
In the case of damage resulting from non-compliance with these operating instructions the guarantee claim becomes invalid! No liability is accepted for consequential damage! In the case of material damage or personal injury caused by incorrect handling or non-compliance with the safety instructions, no liability is accepted!
Children and persons with disabilities

⚠️ DANGER OF DEATH AND ACCIDENTS FOR TODDLERS AND CHILDREN!
Never leave children unsupervised with the packaging material. The packaging material represents a danger of suffocation. Children frequently underestimate the dangers. Keep children away from the product and packaging material at all times.
This product may be used by children over 8 years of age and persons with reduced physical, sensory or mental capabilities if they have been given supervision or instruction concerning the safe use of the product and have understood the hazards involved.
■ User cleaning and maintenance may not be carried out by children unless they are over 8 years of age and under supervision.
■ The product and the power cord must be kept out of reach of children below 8 years of age.
■ Children shall not play with the product.
Electrical safety
⚠️ DANGER! Risk of electric
shock! Do not attempt to repair the product yourself. In case of malfunction, repairs are to be conducted by qualified personnel only.
⚠ WARNING! Risk of electric shock! Do no
immerse the product in water or other liquids. Do not hold the product under running water.
⚠ WARNING! Risk of
electric shock! Never use a damaged product. Disconnect the product from the power supply and consult your retailer if the product is damaged.
⚠ WARNING! Risk of
electric shock! Do not set up the product next to a sink or in moist areas.
Before connecting the product to the power supply, check that the voltage and current rating corresponds with the power supply details shown on the product's rating label.
■ Connect the product only to an earthed socket-outlet. Always make sure that the plug is inserted into the wall socket properly.
■ To avoid damaging the power Fire/burn hazard and heat
cord, do not squeeze, bend or chafe it on sharp edges. Keep it away from hot surfaces and open flames as well.
- Lay out the power cord in such a way that no unintentional pulling or tripping over is possible.
If the supply cord is damaged, it must be replaced by the manufacturer, its service agent or similarly qualified persons in order to avoid a hazard.
Pull the plug and not the cable itself to disconnect the product from the power supply.
- Do not wrap the power cord around the product. Connect the product to an easily reachable electrical outlet so that in case of an emergency the product can be unplugged immediately.
This product is not intended to be operated by means of an external timer or separate remote-control system.
- Do not operate the product with wet hands. Do not touch the product with wet hands.

WARNING! HOT
the outer surface may
get hot when the product is operating. Keep children and pets away from the product while it is in operation or cooling down. The accessible parts are hot.
⚠️ CAUTION! Burn hazard!
Never touch the inside of the product while it is operating or still hot.
CAUTION! Fire hazard!
Do not place the product in the vicinity of inflammable materials (e.g. curtains, tablecloths).
⚠️ CAUTION! Fire hazard!
To prevent overheating, do not cover the product during operation.
⚠️ CAUTION! Burn hazard!
Do not use the product with boiling liquids or hot grease.
⚠️ CAUTION! Burn hazard!
During operation hot steam is released through the air outlet openings. Keep your hands and face at a safe distance from the steam and from the air outlet openings.
⚠️ CAUTION! This product is not a toy for children!
Children are not aware of the dangers associated with handling electrical products.
⚠️ CAUTION! Burn hazard!
Hot steam may rise when you open the product.
If you notice any smoke or unusual noises, immediately disconnect the product from the power supply. Have the product checked by a specialist before continued use.
In the event of a fire, first pull the plug from the power outlet or disconnect the product from the power supply before taking appropriate firefighting measures.
- Do not cover the product's air vents. Make sure the product has sufficient ventilation. Do not place the product in a cabinet.
- Do not place anything on top of the product.
Leave at least 10 cm of space in all directions around the product to ensure sufficient ventilation.
Setup instructions
- Do not set up the product directly beneath a socket-outlet.
- Do not set up the product on hotplates (gas, electric, coal, etc.).
■ Always operate the product on an even, stable, clean, heat-resistant and clean surface.
Leave the product to cool before using it in a different location.
Operation
⚠️ Filling the bowl directly with oil may cause a fire hazard.
■ Never touch the inside of the product while it is operating.
- Keep all ingredients in the basket to prevent any contact from heating elements.
■ Never leave the product unattended while it is in use.
- Do not overfill the product.
Do not fill the product above the MAX fill line 4. This is important so that neither food, aluminium foil or an inserted container comes in direct contact with the heating element.
Do not place more than 1.4 kg of food and loading (e.g. aluminium foil or an inserted container) into the basket 2. This could damage the product.
Cleaning and storage
■ The product shall not be exposed to any dripping or splashing water.
■ Disconnect the product from power outlet during periods of disuse and before cleaning.
■ Refer to the "Cleaning and care" section for instructions on how to clean the product.
Before first use
- Remove all the packaging materials.
NOTE: Possible production residues lead to the formation of odours during initial start-up. This is normal and does not indicate a the malfunction of the product.
- Operate the product with an empty bowl 5 for approx. 10 to 15 minutes at 200 °C to remove any production residues. Ensure sufficient ventilation.
- Clean the product (see "Cleaning and care").
Operation
| Indicator Status | Press(Yes/No) | Function | |
| Button18 19 22 27 28 | On (Lights up) Yes | Press once to activate the function. 1 beep sounds. | |
| Button24 26 | On (Lights up) and flashes | Yes | During a paused program, press once to edit the function or resume the program. |
| Functional settingbutton 20 21 25 | Flashes Yes | The corresponding function is activated and being edited. Press and hold for 3 seconds to cancel the function. 1 beep sounds. | |
| On (Lights up) Yes | In program selection mode, the function is available for selection.In cooking mode, the function is activated.Press once to edit the function. Press and hold for 3 seconds to cancel the function. 1 beep sounds. | ||
| Menu selectiondisplay 11 17 | On (Lights up) No | In program selection mode, the function is available for selection.In cooking mode, the function is activated. | |
| Flashes Yes | The corresponding function is activated and being edited. | ||
| 23 | On (Lights up) No | Heating element and fan are operating. | |
| Flashes No Only fan is operating. | |||
| 12/13 | On (Lights up) No | The corresponding function is operating. | |
i NOTES:
☐ You can remove the bowl 5 at any time, even during cooking.
- The heating element and fan switch off when the bowl 5 is removed.
- If the bov5 is reinserted within 3 minutes after the bowl has been removed, the product returns to the previous operating mode. - If the bov5 is reinserted after the bowl has been removed for more than 3 minutes, the product switches to standby mode.
☐ Large amounts of food usually need a longer cooking time than small amounts of food.
☐ Refer to the "Cooking table" section which food needs to be shaken during the cooking process. For even cooking results, we recommend shaking the food after approximately one third and two thirds of the total cooking time. Shake for 5 to 10 seconds each time.
For better cooking results, you may shake/flip the food multiple times according to the shake alarm during cooking (shaking for 3 to 4 times is suggested for cooking French fries).
If you find it difficult to shake, use an aid (e.g. spoon).
Hint: We highly recommend to use an alarm as a reminder (see "Setting the alarm").
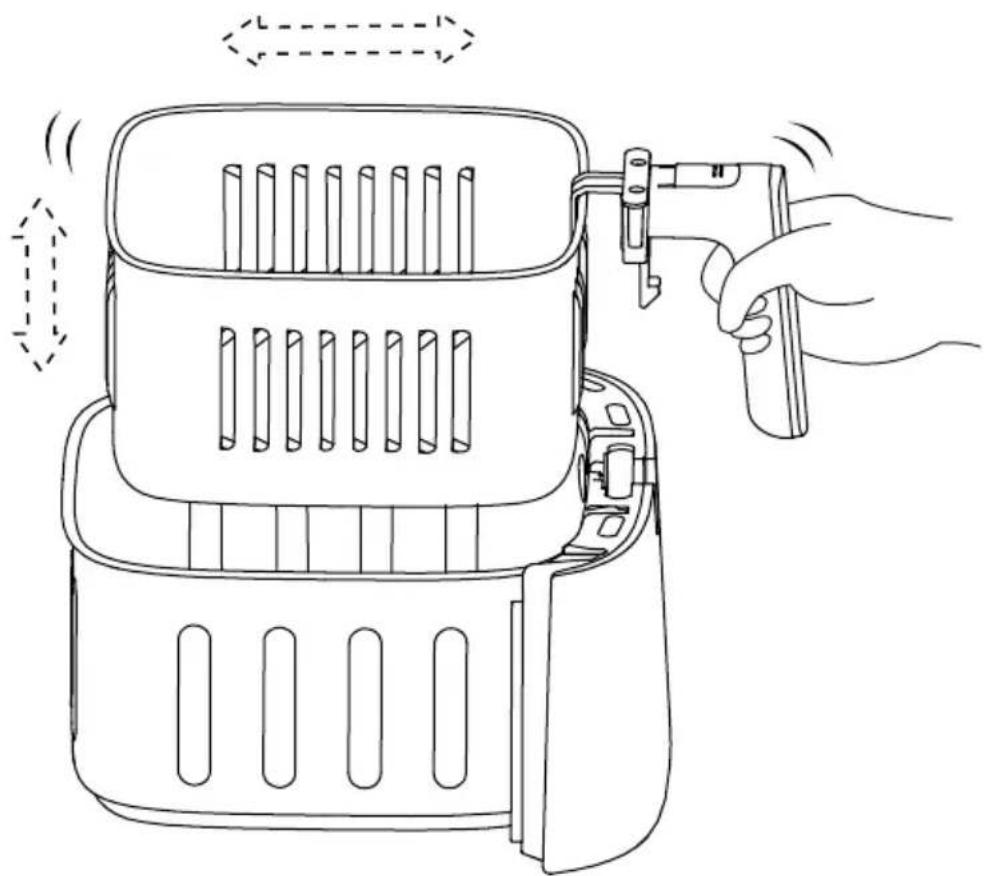
Follow below steps to shake the food (Fig.E):
- Hold the han 7 and pull out the bowl 5. Put the bowl on a heat-resistant surface.
Press on basket relec 3 and take out the basket 2.
■ Shake the food back and forth. (Repeat Fig.E here)
E
natural_image
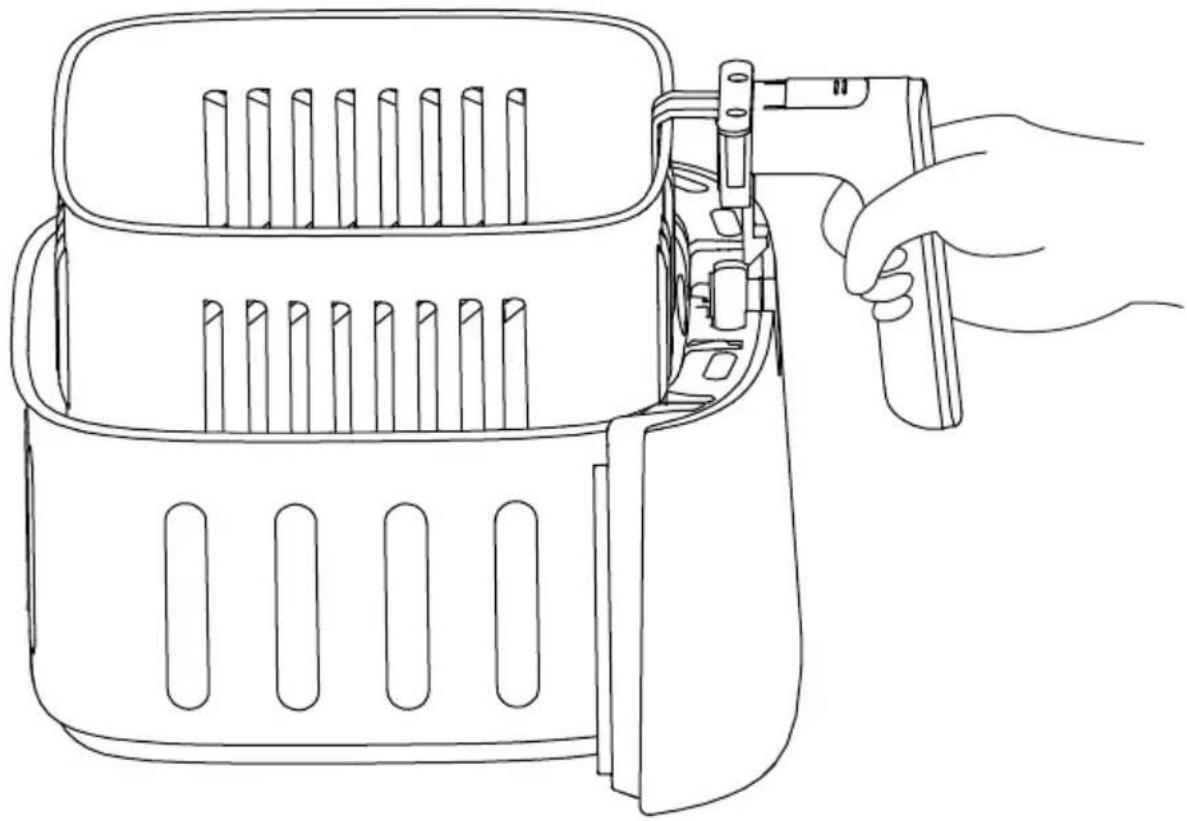
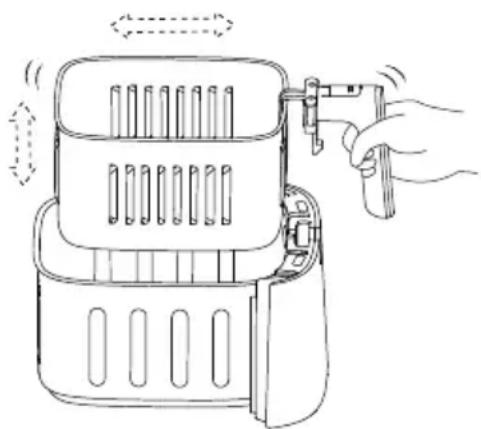
Line drawing of a hand holding a flat tool next to a multi-tiered air fryer (no text or symbols)☐ To remove the bowl 5 and the basket 2 from the cooking chamber 6, carefully hold back the upper part of the housing with one hand. With the other hand, pull the handle 7 to remove the bowl and the basket.
□ Always insert the basket 2 horizontally and without pressure into the bowl 5. You can hear and feel the locking mechanism click into place (Fig. B).
Do not place more than 1.4 kg of food and loading (e.g. baking tin) into the basket 2. This could damage the product.
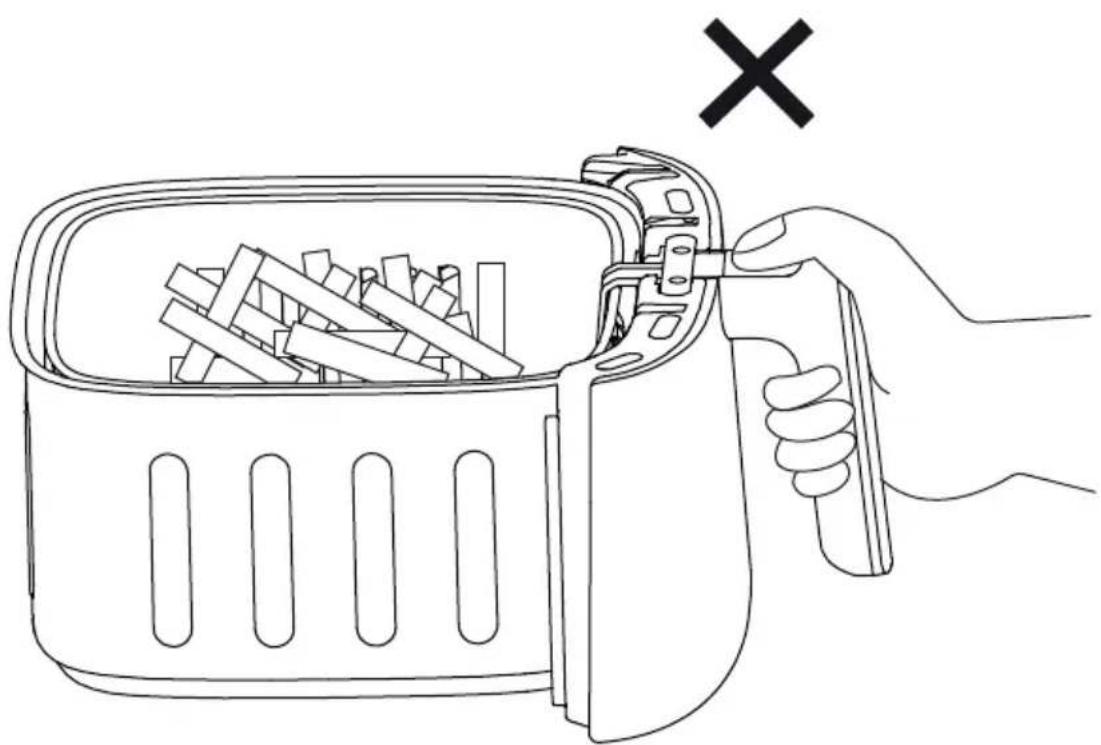
⚠️ ATTENTION! Risk of product
damage! Never press the basket release 3 while holding the basket 2 and the bowl 5 in the air. The released bowl would fall to the ground uncontrolled (Fig. C).
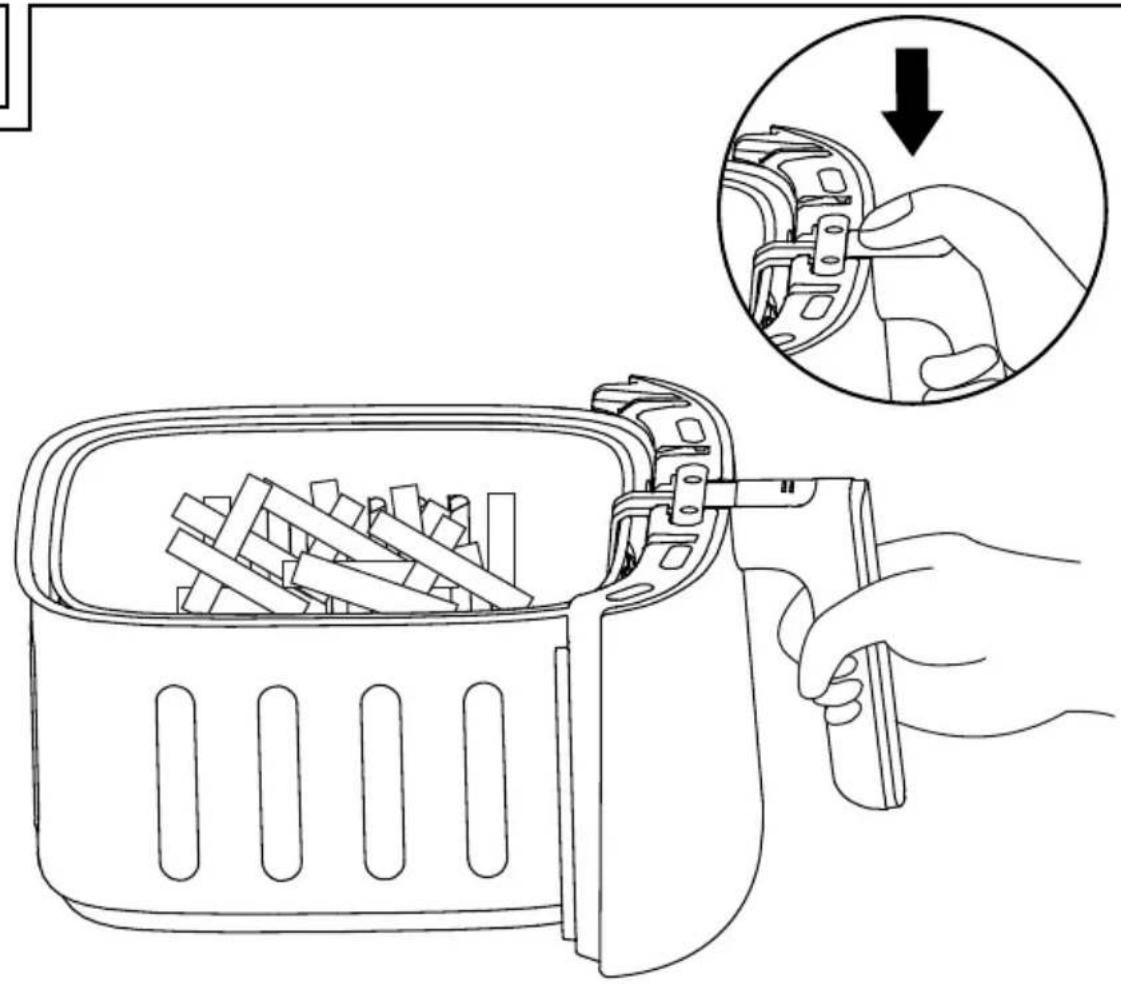
☐ To engage the basket release 3, first slide its protective cover forward. Then, press the basket release (Fig. D).
Standby mode
☐ The product enters standby mode automatically once it is connected to the mains supply. The value display 14 shows “---”.
☐ If no button is pressed for 60 seconds in program selection mode, the product switches to standby mode.
● Preparation
- Connect the product to a suitable power outlet. ⓑ 22 lights up and the value display 14 shows “---”. 1 beep sounds.
- Fill the basket 2 with your food. Do not fill above the MAX fill line 4 (on the inside of the basket).
- Insert the bowl 5 with the filled basket 2 into the cooking chamber 6.
⚠️ ATTENTION! Risk of product
damage! Do not pour any liquids (e.g. oil or water) into the bowl 5. This could impair the product's functionality.
- Selecting a program
□ Switch to program selection mode:
- Press 22.
- All indicators light up, except 12, 13, and 23.
☐ The temperature is preset to 180 °C and the cooking time to 15 minutes.
You can adjust the temperature (with 5 °C intervals) and the cooking time (with 1 minute intervals):
| Button Function (temperature) | |
| Increase temperature (max. 200 °C) | |
| Decrease temperature(min. 60 °C) | |
| Button Function (time) | |
| Increase time (max. 60 minutes) | |
| Decrease time (min. 1 minute) | |
Selecting a program
You can also select a program that suits your food.
☐ Press Ⓤ26 to select one of the programs. The selected program 11 17 flashes. The non-selected programs light up.
| Food °C | min | Optimal quantity | Interval* | |
| Preset | 180 | 15 | - | - |
| Fish | 160 | 25 | 500 g | every 10 min |
| Cake | 160 | 15 | 6 x 50 g | - |
| Vegetables | 180 | 10 | 400 g | every 3 min |
| Bacon | 200 | 8 | 200 g | every 4 min |
| Chicken drumstick | 200 | 25 | 500 g | every 7 min |
| French fries | 180 | 20 | 500 g | every 5 min |
| Chicken | 200 | 35 | 1000 g | every 10 min |
| Food °C | min | Optimal quantity | Interval* | |
| Steak | 180 | 15 | 500 g | every 7 min |
| Shrimps | 160 | 20 | 600 g | every 5 min |
| Bread | 180 | 10 | 200 g | every 5 min |
| * Interval: Shake, flip, turn | ||||
i NOTES:
☐ For better cooking results we recommend to preheat the product for 3 minutes.
☐ Refer to the "Cooking table" section which food needs to be shaken during the cooking process. The cooking table also contains the suggested minimum/maximum quantity of different food.
☐ The shaking reminder is preset to the program. You can cancel the alarm by pressing the button Ⓐ20 for 3 seconds. Then reset the alarm as desired.
Setting the alarm
You can set an alarm to remind you to thoroughly mix the food at set intervals.
☐ Preparation: Make the settings (see "Selecting a program").
□ Activate the alarm: Press ⚙ 20. ◎ 20 is flashing. The alarm is preset to every 5 minutes.
Available intervals: 1 to 60 minutes with 1 minute intervals.
| Button Function (time) | |
| Increase time (max. 60 minutes) | |
| Decrease time (min. 1 minute) | |
□ After setting the alarm time, it is not necessary to press any button to reactivate the alarm.
After setting the alarm: If you want to edit the cooking temperature/time, or select another menu, press Ⓧ26 or wait for 10 seconds to resume main program settings.
☐ If you want to activate/edit the keep warm function or the delay timer function, press ☐ 25 or ☑ 21.
☐ When cooking starts, the alarm function starts directly. Ⓐ 20 remains lit.
☐ Cancel the alarm: Press ⏻24 to pause cooking. Then, press and hold ⏱20 for 3 seconds.
i NOTES:
☐ Cooking is NOT paused while the alarm sounds. The alarm resets and sounds again after the set interval elapses.
- Operation is only paused when you remove the bowl 5 from the cooking chamber 6.
- When you reinsert the bow 5, cooking continues automatically.
☐ If the combined weight of the basket 2, bowl 5 and food is too heavy to shake it thoroughly: Set down the bowl on a heat-resistant surface and remove the basket (Fig. E).
Starting cooking
Once you have made the desired settings, press Ⓞ24. Cooking begins.
i NOTES:
☐ During cooking, the following indicators are active: - 23 lights up - The selected menu selection display 11 17 lights up. The remaining unselected menu goes off.
☐ To cancel all settings and operation, press and hold ☐26 for 3 seconds. The product switches to program selection mode.
☐ During cooking, the display 1 toggles between the set temperature and the remaining cooking time. Temperature 18 19 and timer 27 28 can be adjusted any time during cooking.
☐ After cooking has ended, the fan continues to run for 1 minute to cool down the product. The value display 14 shows the countdown time (in seconds). ⏻22 and ⚪23 are flashing during cool down.
☐ To switch to the standby mode during cooling down period, press and hold ⏻ 22 for 3 seconds.
☐ After the cooling down period has ended, the product switches to standby mode. A double beep sounds 5 times.
☐ You can remove the bowl 5 at any time and do not need to wait for the fan to turn off.
All indicators go off and the value display shows "---".
Pausing cooking
You can pause cooking e.g. if you wish to change a setting.
☐ Pausing cooking (pause mode): Press Ⓞ24.
☐ When cooking is paused: ☐ 23, ☑ 24, ☒ 26 and the selected menu selection display 11, 17 are flashing.
□ Continuing cooking: Press ⬇24 again.
i NOTES:
☐ The heating element and the timer are stopped when cooking is paused. The fan keeps on running in order to prolong the life expectancy of the product.
☐ When cooking is paused: If the bowl 5 is removed from the cooking chamber 6, the fan goes off as well.
□ When cooking is paused:
- the following settings can be made:
• edit cooking temperature/time
• activate/edit alarm intervals
• activate/edit keep warm function
- the following settings cannot be made:
- Menu selection
- Delay timer (already passed/completed)
- Cancelling cooking
☐ Press and hold ⏻22 for 3 seconds during cooking.
☐ After cooking has been cancelled, the fan continues to run for 1 minute to cool down the product.
□ Alternatively, press and hold Ⓚ26 for 3 seconds to cancel all settings and operation. The product switches to program selection mode. The product skips the cool down function in this case.
- Keep warm
☐ Press Ⓐ25 after pausing cooking by pressing ⏻24 to activate the keep warm function automatically when cooking ends. Ⓐ25 flashes when editing keep warm time, and lights up when activated.
☐ At the beginning, temperature is set to 80 °C and the time is set to 30 minutes.
Only the time can be adjusted:
| Button Function (time) | |
| 18 | Increase time (max. 60 minutes) |
| -19 | Decrease time (min. 1 minute) |
☐ After setting the keep warm time, it is not necessary to press any button to reactivate the keep warm function.
☐ After setting the keep warm function: If you want to edit the cooking temperature/time, or select another menu, press 38 26 or wait for 10 seconds to resume main program settings.
☐ If you want to activate/edit the alarm function or the delay timer function, press ⏻20 or ⏻21.
☐ ③25 lights up during cooking to indicate that the keep warm function has been activated.
□ After cooking has ended, the product switches to keep warm mode automatically.
A double beep sounds 5 times. 12 lights up.
☐ Cancel the activation of keep warm function: Press ⏻24 to pause cooking. Then, press and hold ⏻25 for 3 seconds.
☐ Cancelling keep warm mode: Press and hold ⏻22 for 3 seconds.
Delay timer
You can start the cooking process after a countdown. The delay timer setting can be made at any time during program selection, same as alarm and keep warm functions.
☐ Press Ⓞ21 to activate the delay timer. The delay time is preset to 5 minutes.
☐ After setting the delay timer: If you want to edit the cooking temperature/time, or select another menu, press 26 or wait for 10 seconds to resume main program settings.
☐ If you want to activate/edit the alarm function or the keep warm function, press Ⓞ20 or ⏻25.
| Button Function (time) | |
| Increase time (max. 60 minutes) | |
| Decrease time (min. 1 minute) | |
☐ Press Ⓧ24. ⏻-27 and ⏻+28 go off. The function time can be adjusted by pressing ⏻+18 and ⏻-19. Ⓧ13 lights up during countdown. The remaining time is shown in the value display 14.
☐ The cooking process starts after the countdown has ended. ⓞ21 and ⏻13 go off.
💡23 lights up. 1 beep sounds.
- Detaching the basket from the bowl
The basket 2 and the bowl 5 can be detached. This can be helpful to better mix the food or clean the individual parts.
- Remove the bowl 5 with the basket 2 from the cooking chamber 6.
- Set down the bowl 5 on a suitable surface (even, stable, heat-resistant).
- Slide the cover of the basket release forward.
- Press the button of the basket release 3.
- Lift the basket 2 by the handle 7 from the bowl 5.
- You should feel and hear the basket 2 click into place when you return it to the bowl 5.
Removing the food
☐ We recommend removing the food with a suitable kitchen utensil (e.g. kitchen tongs).
☐ If you want to shake the food from the basket 2, first detach it from the bowl 5. Hot liquid may have gathered in the bowl that could pour out unintentionally.
● Cooking table
| Food | Recommended quantity (g) | Cooking time (min) | Temp. (°C) | Shake required | Preparation |
| Potatoes and fries | |||||
| Frozen fries (thin) 500-140 | 0 20-30 180 Y | ||||
| Frozen fries (thick) 500-140 | 00 20-30 180 Y | ||||
| Home-made fries (8 x 8 mm) | 500-1400 | 20-30 180 Y | |||
| Home-made potato wedges | 300-800 | 18-22 180 Y | |||
| Home-made potato cubes | 300-750 | 12-18 180 Y | |||
| Fried grated potatoes 500 | 20 180 Y | ||||
| Potato gratin 500 30-40 | 60 Y | ||||
| Meat and poultry | |||||
| Steak3 | 100-500 | 7-15 | 180 Y | ||
| Lamb chop3 | 100-500 | 10-14 180 | N | ||
| Hamburger3 | 100-500 | 7-14 | 180 | N | |
| Sausage3 | 100-500 | 8-10 | 180 | N | |
| Drumsticks3 | 300-1000 | 25 200 Y | |||
| Chicken breast3 | 100-500 | 10-15 180 | N | ||
| Fish and seafood | |||||
| Shrimps3 | 100-600 | 20 160 Y | |||
| Salmon fillet1,3 | 100-500 | 16-21 160 | N | ||
| Capelin1,3 | 300 | 15 160 Y | |||
| Cod fish fillet1,3 | 100-500 | 20-25 160 | N | ||
| ^1 =add + 12 teaspoon of oil ^2 =use baking tin ^3 =marinate with seasoning (depending on user's preference)Vegetables | |||||
| Okra1 | 100-200 | 8 160 N | Cut off the head and cut in half. | ||
| Asparagus1 | 100-500 | 6-10 180 N Cut | in half. | ||
| Corn1 | 200-600 | 6-9 200 Y | Husk and remove the corn silk. | ||
| Bell pepper1 | 200-400 | 8 200 Y | Remove head and seeds.Cut into 2-4 pieces. | ||
| Snacks | |||||
| Samosas 100-400 12-15 | 200 Y | ||||
| Frozen chicken nuggets | 100-700 | 6-10 200 Y | |||
| Frozen fish fingers 100-400 | 6-10 200 N | ||||
| Frozen bread crumbed cheese snacks | 100-400 | 8-12 180 N | |||
| Stuffed vegetables 100-400 | 10 180 N | ||||
| Baking | |||||
| Cake2 | 6 x 50 - 9 x 50 | 15 160 N | |||
| Sandwich 2 sets 4-6 180 N | |||||
| Croutons 400 6-10 180 N | |||||
| 1= add +1⁄2 teaspoon of oil2= use baking tin3= marinate with seasoning (depending on user's preference) | |||||
☐ Regularly check the ingredients until they are cooked or have obtained the desired browning level. The required cooking time may be actually shorter or longer than stated in the recipes.
☐ To avoid a prolonged cooking time, the ingredients should not be too thick.
☐ The height of the baking tin or the oven dish must not exceed the MAX fill line 4 inside the basket 2.
- Recipe suggestions
● Crispy cheese hot dog
Ingredients
| 4 Sausages | |
| 4 Hot dog buns | |
| To taste Shredded cheddar cheese | |
| Optional Ketchup | |
| Optional Mustard | |
Preparation
- Preheat the product to 180 °C.
- Place the sausages in the basket 2. Cook for 8 minutes at 180 °C. Remove the sausages from the basket.
- Place the cooked sausages inside the hot dog buns.
- Add the shredded cheddar cheese on sausages and hot dog buns.
- Place the hot dog into the basket 2 again. Cook for 1 to 2 minutes until the cheese has melted.
- When cooking is completed, place the hot dog on a dish.
- Optional: Serve with ketchup and mustard.
● Mushroom, onion and cheese pie
Ingredients
| 3 Eggs | |
| 2 cups Mushrooms, cleaned | |
| 1 Red onion | |
| 1 tbsp Olive oil | |
| 3 tbsp Cheese, crumbled | |
| 1 pinch Salt | |
Preparation
- Peel and slice a red onion into 5 mm thin slices. Clean mushrooms; then cut into 5 mm thin slices.
-
In a sauté bowl with olive oil, sweat onions and mushrooms under a medium flame until tender. Remove from heat and place on a dry kitchen towel to cool.
-
Preheat the product to 180 °C.
- In a mixing bowl crack 3 eggs. Whisk thoroughly and vigorously. Add a pinch of salt.
- In a heat-resistant baking dish, coat the inside and bottom with a light coating of bowl spray.
- Pour eggs into the baking dish, then the onion and mushroom mixture and then the cheese.
- Place the baking dish in the basket 2 and cook in the product for 20 minutes.
☐ Hint: 5 to 8 minutes before the cooking is done: Add more cheese on the top of the pie, if desired.
☐ The pie is done when you can stick a knife into the middle, and the knife comes out clean.
Spicy chicken
Ingredients
| 6 Chicken drum sticks | |
| 1 Garlic clove | |
| 1 tsp | Mustard |
| 3 tsp | Sugar |
| 2 tsp | Chilli powder |
| 2 tsp | Olive oil |
| To taste Pepper and salt | |
Preparation
- Preheat the product to 200 °C.
- In a bowl, crush the garlic and mix with sugar, olive oil, chilli powder, and mustard.
- Season with salt and pepper.
- Rub the marinade over the drumsticks and leave for 20 minutes.
- Place the drumsticks in the product and cook for 10 minutes.
- Adjust heat to 140 °C and cook for an additional 10 minutes.
- When cooking is completed, put the drumsticks on dish to serve.
Bell pepper rings
Ingredients
| 50 g Flour | |
| 2 Eggs | |
| 20 ml Water | |
| 2 tbsp Vegetable oil | |
| 1 tsp Salt | |
| 1 tsp Pepper | |
| 1 tsp Paprika | |
| 50 g Dry bread crumbs | |
| 2 Bell peppers | |
Preparation
- Preheat the product to 200 °C.
- Put the flour in a small bowl.
- Whisk the eggs with water in another small bowl.
-
Mix the vegetable oil, salt, pepper, paprika and the dry bread crumbs in another bowl until the ingredients become well mixed.
-
Cut off the bell pepper heads and remove the seeds.
-
Slice each bell pepper into 4 pieces and remove the bottom.
-
Toss the sliced bell peppers with flour.
-
Dip the bell peppers in the whisked egg.
-
Dip the bell peppers in the crumb mixture until the bell peppers are fully covered.
-
Place the bell peppers in the basket 2. Cook each side for 5 minutes.
● Baked egg with bacon and spinach
☐ Required: 6 muffin cups
Ingredients
| 4 slices | Bacon |
| A few drops | Vegetable oil |
| 6 Eggs | |
| 6 tbsp Milk | |
| 30 g Spinach |
| To taste | Shredded cheddar cheese |
| To taste | Salt and pepper |
Preparation
- Preheat the product to 200 °C.
- Place the bacon into the basket 2. Cook each side for 2 minutes.
- Take out the bacon, cut it into pieces and set aside.
-
Grease the muffin cups with oil.
-
Crack 1 egg into each muffin cup. Do not whisk the eggs.
-
Add milk, spinach and bacon into each muffin cup.
-
Add shredded cheddar cheese, salt and pepper into each muffin cup.
-
Place the muffin cups in the basket 2. Cook for 8 minutes at 160 °C.
Spring chicken
Ingredients
| 1000 g | Spring chicken |
| 5 tsp Olive oil | |
| 30 g Butter | |
| 40 g Honey | |
| To taste | Pepper and salt |
Preparation
- Rub the spring chicken with olive oil, pepper and salt. Marinate for 1 hour.
- Preheat the product to 200 °C.
- Melt the butter and mix it with the honey.
- Rub the spring chicken with the butter and honey mixture.
- Place the spring chicken into the basket 2. Cook for 20 minutes at 200 °C.
- Flip the spring chicken. Cook for another 20 minutes.
- Jacket potatoes
Ingredients
| 3 Potatoes (200-300 g) | |
| 60 g Onion | |
| 80 g Bacon | |
| 3 tsp Olive oil | |
| 30 g Cheese | |
| 30 g Mayonnaise | |
| To taste Pepper and salt | |
Preparation
- Clean the potatoes using a brush.
- Rub the potatoes with olive oil.
- Cut the bacon and onion into small pieces.
-
Wrap the potatoes in aluminium foil to avoid overcooking.
-
Place the potatoes in the basket 2. Cook for 30 minutes at 200 °C.
-
Stick a fork into the potatoes. The potatoes are ready, if the fork can be stuck in and pulled out easily.
-
Take out the potatoes and cut them half way through. Do not cut the potatoes all the way through.
-
Season with pepper and salt.
-
Put the bacon, onion and cheese into the potatoes.
-
Place the potatoes in the basket 2. Cook for 10 minutes at 180 °C.
-
Serve the potatoes with the mayonnaise.
Small cake
☐ Required: 6 small cupcake papers
Ingredients
| 110 g Salted butter | |
| 110 g Caster sugar | |
| 3 Eggs | |
| 150 g White wheat flour | |
| 5 g | Baking powder |
| 18 tsp | Salt |
Preparation
- Beat the eggs and then mix with sugar.
- Soften the butter and mix with all ingredients until the mixture is soft and pale in colour.
- Pour the mixture into the cupcake papers.
- Preheat the product to 160 °C.
- Place the cupcake papers with the mixture in the basket 2.
- Select the auto-programme for cake and cook for 15 minutes at 160^ C.
Dinner roll
Ingredients
| 230 g Bread flour | |
| 1 Egg | |
| 25 g Sugar | |
| 3 g | Yeast |
| 100 ml | Milk |
| 10 g Cream | |
| 15 g Butter | |
Preparation
- Beat the egg and mix with flour, sugar and yeast.
- Add milk and cream to the dough. Knead for 15-20 minutes.
- Set aside for about 1 hour (until the size has doubled).
- Cut the dough into 7 pieces. Knead for 10–15 minutes.
- Place the 7 pieces in the basket 2. Wait for another 30 minutes.
- Cook for 15 minutes at 160 °C.
- Melt the butter and brush it on the dinner rolls. Cook for another 5 minutes.
Fish fillet
Ingredients
| 300 g Fish fillet | |
| 1 Lemon | |
| 2 Garlic cloves | |
| 1 Shallot | |
| 20 g Butter | |
| To taste Pepper and salt | |
Preparation
- Season the fish with pepper and salt.
- Cut the lemon in half. Slice half of the lemon and put it under the fish fillet.
- Crush 1 garlic clove, slice the shallot and put them on the fish fillet.
- Place the fish fillet in the basket 2. Cook for 15 minutes at 180^ C.
- Melt the butter and add 1 garlic clove.
- Pour the garlic butter onto the fish fillet. Cook for 3 minutes at 180 °C.
- Squeeze the other half of the lemon over the fish fillet.
● Troubleshooting
| Error Possible cause Solution | ||
| Not functioning. No power supply. Make sure the product is plugged in. | ||
| Food too raw or unevenly cooked. | Too much food. | Reduce the amount of food and spread evenly. |
| The cooking temperature is too low. | Increase the cooking temperature. | |
| The food was not mixed at intervals. | Mix the food well at least 1x in the first half of cooking. For even cooking results, we recommend shaking the food after approximately one third and two thirds of the total cooking time. Shake for 5 to 10 seconds each time. We highly recommend to use a alarm as a reminder (see “Setting the alarm”).For better cooking results, you may shake/flip the food multiple times according to the shake alarm during cooking (shaking for 3 to 4 times is suggested for cooking French fries). | |
| The food is not crispy. | Some meals are traditionally prepared in a deep fryer. | Dab these foods with oil before cooking. |
| French fries are not cooked or crispy. | Wrong type of potato. Use another type of potato. | |
| Fries were not rinsed after cutting. | Thoroughly rinse the fries after cutting to remove any starch. | |
| Fries were not dried after rinsing. | Dry the fries after rinsing (e.g. with paper towels). | |
| Fries were not coated in oil. Dab | the fries with a little oil before cooking. | |
| Fries are too large. Cut the fries into smaller or thinner fries. | ||
| The bowl 5 will not insert into the cooking chamber. | The bowl 5 was not inserted in the middle. | Insert the bowl 5 at a right angle to the housing. |
| White smoke rises continuously from the product. | Grease has dripped into the bowl 5 and is vaporizing. | Use less oil when preparing your meals. |
| Prepare meals with less fat. | ||
| Decrease the temperature or cooking time. | ||
● Cleaning and care
NOTE: To maintain the product's functionality and appearance, it should be cleaned thoroughly after each use.
| Part Cleaning | |
| ☐ Product and all accessories☐ Housing☐ Cooking chamber 6☐ Power cord with plug 10 | ⚠ WARNING! Do not immerse the product in water or other liquids while cleaning or operating it. Do not hold the product under running water.☐ Always disconnect the product from the power supply before cleaning.☐ Do not use any abrasive, aggressive cleaners or hard brushes to clean the product.☐ Clean the product with a slightly damp cloth. You can use a little dish soap if necessary. |
| ☐ Basket 2☐ Bowl 5 | ☐ Clean the bowl and the basket by hand like normal dishes: Clean both parts thoroughly with hot water and dish soap. Carefully hold back the upper product housing with one hand. Pull the handle 7 with the other hand to remove the bowl and the basket.☐ If there is any residue stuck to the basket or to the floor of the bowl, fill the bowl with hot water and some dish soap. Set the basket in the bowl and let both soak for approx. 10 minutes.☐ The bowl and the basket are dishwasher-safe. |
☐ Before continued use and storage: Rub all parts dry with a clean cloth.
Maintenance
Before each use check the product for any visible damage.
□ Apart from the occasional cleaning, the product is maintenance-free.
Storage
☐ When not in use, store the product in its original packaging.
□ Store the product in a dry, secure location away from children.
● Disposal
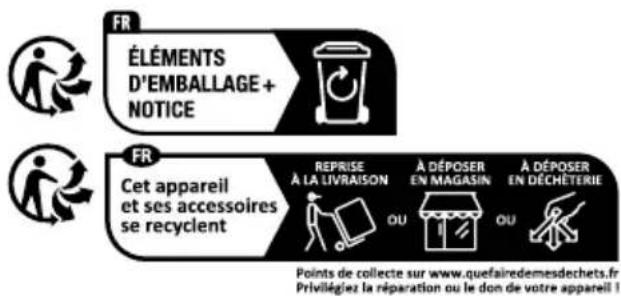
The packaging is made entirely of recyclable materials, which you may dispose of at local recycling facilities.

the marking of the packaging materials for waste separation, which are marked with abbreviations (a) and numbers (b) with following meaning: 1–7: plastics/20–22: paper and fibreboard/80–98: composite materials.
Product:
The product incl. accessories and packaging materials are recyclable and are subject to extended producer responsibility.
Dispose them separately, following the illustrated Info-tri (sorting information), for better waste treatment.
The Triman logo is valid in France only.

Contact your local refuse disposal authority for more details of how to dispose of your worn-out product.
To help protect the environment, please dispose of the product properly when it has reached the end of its useful life and not in the household waste. Information on collection points and their opening hours can be obtained from your local authority.
Warranty
The product has been manufactured to strict quality guidelines and meticulously examined before delivery. In the event of material or manufacturing defects you have legal rights against the retailer of this product. Your legal rights are not limited in any way by our warranty detailed below.
The warranty for this product is 3 years from the date of purchase. The warranty period begins on the date of purchase. Keep the original sales receipt in a safe location as this document is required as proof of purchase.
Any damage or defects already present at the time of purchase must be reported without delay after unpacking the product.
Should the product show any fault in materials or manufacture within 3 years from the date of purchase, we will repair or replace it - at our choice - free of charge to you. The warranty period is not extended as a result of a claim being granted. This also applies to replaced and repaired parts.
This warranty becomes void if the product has been damaged, or used or maintained improperly.
The warranty covers material or manufacturing defects. This warranty does not cover product parts subject to normal wear and tear, thus considered consumables (e.g. batteries, rechargeable batteries, tubes, cartridges), nor damage to fragile parts, e.g. switches or glass parts.
● Warranty claim procedure
To ensure quick processing of your claim, observe the following instructions:
Make sure to have the original sales receipt and the item number (IAN 500732_2407) available as proof of purchase.
You can find the item number on the rating plate, an engraving on the product, on the front page of the instruction manual (bottom left), or as a sticker on the rear or bottom of the product.
If functional or other defects occur, contact the service department listed below either by telephone or by e-mail.
Once the product has been recorded as defective you can return it free of charge to the service address that will be provided to you. Ensure to enclose the proof of purchase (sales receipt) and a short, written description outlining the details of the defect and when it occurred.
Service
GB Service Great Britain
Tel.:08000569216
E-Mail:owim@lidl.co.uk
IE Service Ireland
Tel.:1800200736
E-Mail:owim@lidl.ie
CE