M100 - Audio Equipment TC ELECTRONIC - Free user manual and instructions
Find the device manual for free M100 TC ELECTRONIC in PDF.
| Product type | Multi-effects processor for instruments and vocals |
| Brand | TC Electronic |
| Model | M100 |
| Power supply | 9 V DC power adapter (included) |
| Power consumption | ~ 5 W (estimate) |
| Audio inputs | 2 x 6.35 mm jack (L/Mono, R) – mono or stereo |
| Audio outputs | 2 x 6.35 mm balanced jacks (L, R) |
| MIDI connector | 5-pin DIN (MIDI input) |
| Control pedal | Footswitch input (6.35 mm mono jack) |
| Number of effects | 16 (including reverbs, delays, modulation, pitch shift) |
| Bypass | Bypass button and LED, remote control via footswitch possible |
| Tap tempo | TAP/SELECT button with flashing LED |
| Adjustable parameters | PARAMETER knob, TAP/SELECT button for second parameter |
| MIDI | Control via CC and firmware update via SYSEX |
| Firmware update | Via MIDI in bootloader mode (hold TAP/SELECT while powering on) |
| Dimensions (approx.) | 14.4 x 12 x 5.5 cm (estimate) |
| Weight (approx.) | ~ 0.8 kg (estimate) |
| Care and cleaning | Clean with a soft dry cloth. Do not use solvents. |
| Safety | Do not open, do not modify. Use only the supplied adapter. Observe the specified voltage. |
| Spare parts and repairability | Contact an authorized Music Tribe service center for any repairs. Do not disassemble yourself. |
Frequently Asked Questions - M100 TC ELECTRONIC
User questions about M100 TC ELECTRONIC
0 question about this device. Answer the ones you know or ask your own.
Ask a new question about this device
Download the instructions for your Audio Equipment in PDF format for free! Find your manual M100 - TC ELECTRONIC and take your electronic device back in hand. On this page are published all the documents necessary for the use of your device. M100 by TC ELECTRONIC.
USER MANUAL M100 TC ELECTRONIC
Stereo Multi-Effects Processor with Legendary TC Reverbs and Effects

Caution
To reduce the risk of fire or electric shock, do not expose this appliance to rain and moisture. The apparatus shall not be exposed to dripping or splashing liquids and no objects filled with liquids, such as vases, shall be placed on the apparatus.

Caution
instructions are for use by qualified service personnel only. To reduce the risk of electric shock do not perform any servicing other than that contained in the operation instructions. Repairs have to be performed by qualified service personnel.

Warning
Please refer to the information on the exterior of bottom enclosure for electrical and safety information before installing or operating the device.
- Please read and follow all instructions and warnings.
- Keep the apparatus away from water (except for outdoor products).
- Clean only with dry cloth.
-
Do not block ventilation openings. Do not install in a confined space. Install only according to manufacturer's instructions.
-
Protect the power cord from damage, particularly at plugs and appliance socket.
- Do not install near any heat sources such as radiators, heat registers, stoves or other apparatus (including amplifiers) that produce heat.
- Do not defeat the safety purpose of the polarized or grounding-type plug. A polarized plug has two blades with one wider than the other (only for USA and Canada). A grounding-type plug has two blades and a third grounding prong. The wide blade or the third prong are provided for your safety. If the provided plug does not fit into your outlet, consult an electrician for replacement of the obsolete outlet.
- Use only attachments and accessories recommended by the manufacturer.

- Use only specified carts, stands, tripods,
brackets, or tables. Use caution to prevent tip-over when moving the cart/apparatus combination.
-
Unplug during storms, or if not in use for a long period.
-
Only use qualified personnel for servicing, especially after damage.
-
The apparatus with protective earthing terminal shall be connected to a MAINS socket outlet with a protective earthing connection.
- Where the MAINS plug or an appliance coupler is used as the disconnect device, the disconnect device shall remain readily operable.
- Avoid installing in confined spaces like bookcases.
- Do not place naked flame sources, such as lighted candles, on the apparatus.
- Operating temperature range 5^ to 45^ (41^ to 113^)
LEGAL DISCLAIMER
The information contained in this Quick Start Guide and accompanying manual is provided for general guidance only. While every effort has been made to ensure the accuracy and reliability of the content at the time of publication, Music Tribe Global Brands Ltd. ("Music Tribe") makes no representations or warranties, express or implied, as to the completeness, accuracy, or suitability of the information, descriptions, illustrations, or technical specifications herein.
Music Tribe accepts no liability for any direct, indirect, incidental, or consequential loss or damage arising from reliance on the information contained in this document, including but not limited to loss of data, income, profits, or business opportunities. Use of the product remains the sole responsibility of the user. Product features, design, specifications, and visual representations may be updated or modified without prior notice in the interest of continuous product improvement.
All third-party trademarks referenced in this guide are the property of their respective owners. Midas, Klark Teknik, Lab Gruppen, Lake, Tannoy, Turbosound, TC Electronic, TC Helicon, Behringer, Bugera, Aston Microphones, and Coolaudio are trademarks or registered trademarks of Music Tribe Global Brands Ltd. © 2025 Music Tribe Global Brands Ltd. All rights reserved. No part of this document may be reproduced, transmitted, or used in any form or by any means without prior written permission from Music Tribe.
LIMITED WARRANTY
For the terms, conditions, and limitations applicable to your product, including coverage, exclusions, and the duration of the limited warranty, please refer to the complete Music Tribe Limited Warranty Policy, available online at: community. musicrob.com/support Please retain your proof of purchase, as it may be required for warranty service.

Instrucciones de
seguridad


Las terminales
M100 in a mixer's Aux path
M100 in a mixer's insert path
Using the M100 as an effects device for instruments
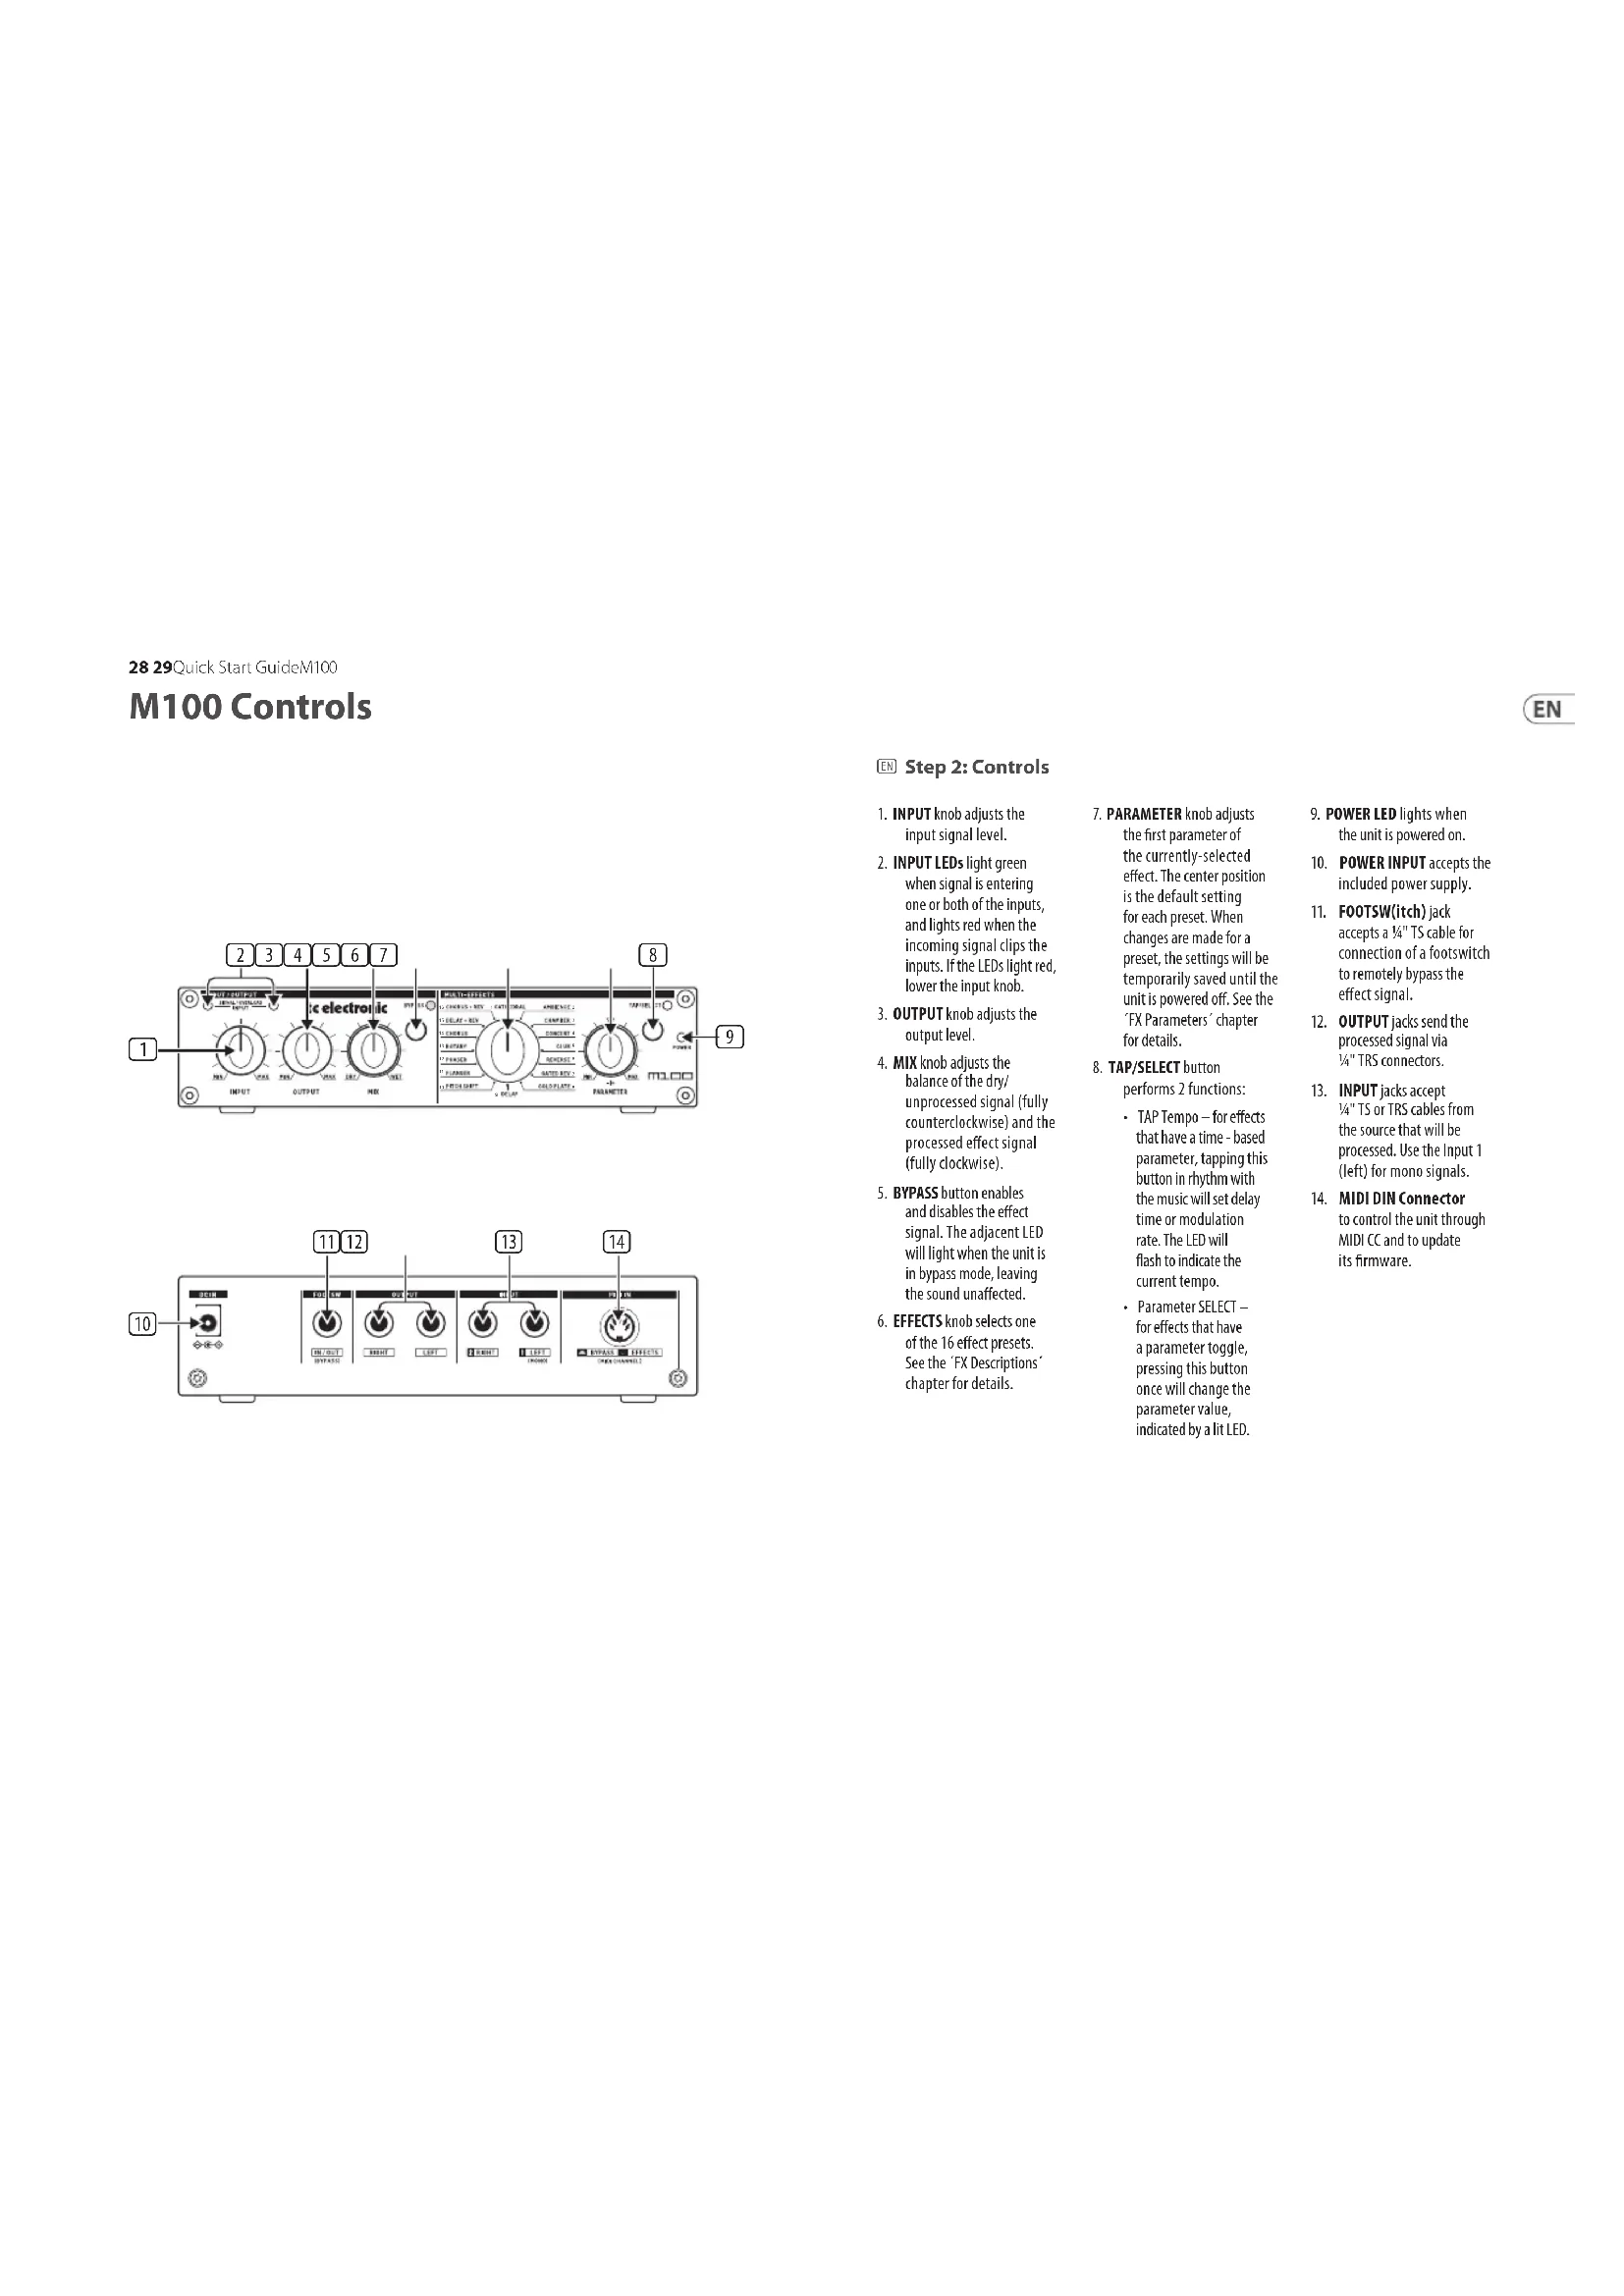
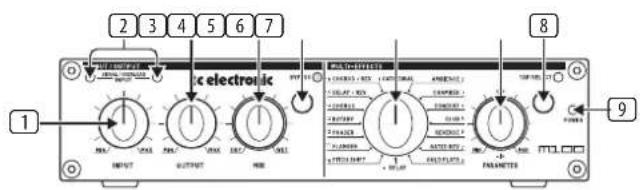
- INPUT knob adjusts the input signal level.
- INPUT LEDs light green when signal is entering one or both of the inputs, and lights red when the incoming signal clips the inputs. If the LEDs light red, lower the input knob.
- OUTPUT knob adjusts the output level.
- MIX knob adjusts the balance of the dry/ unprocessed signal (fully counterclockwise) and the processed effect signal (fully clockwise).
- BYPASS button enables and disables the effect signal. The adjacent LED will light when the unit is in bypass mode, leaving the sound unaffected.
-
EFFECTS knob selects one of the 16 effect preset. See the FX Descriptions chapter for details.
-
PARAMETER knob adjusts the first parameter of the currently-selected effect. The center position is the default setting for each preset. When changes are made for a preset, the settings will be temporarily saved until the unit is powered off. See the 'FX Parameters' chapter for details.
- TAP/SELECT button performs 2 functions:
TAP Tempo - for effects that have a time-based parameter, tapping this button in rhythm with the music will set delay time or modulation rate. The LED will flash to indicate the current tempo.
Parameter SELECT for effects that have a parameter toggle, pressing this button once will change the parameter value, indicated by a lit LED.
- POWER LED lights when the unit is powered on.
- POWER INPUT accepts the included power supply.
- FOOTSW(itch) Jack accepts a ¼"TS cable for connection of a footswitch to remotely bypass the effect signal.
- OUTPUT Jacks send the processed signal via 14 "TRS connectors.
- INPUT Jacks accept 4^ 4^ TS or TRS cables from the source that will be processed. Use the Input 1 (left) for mono signals.
- MIDI DIN Connector to control the unit through MIDI CC and to update its firmware.
EN
FX Descriptions
| Effects Description | |
| Cathedral | Simulates the reverberation heard in big cathedrals. This effect is characterized by a long reverb and very specific echoes. It works well with solo instruments and vocals. |
| Concert | Simulates the reverberation in a mid-size concert hall. The preset is well suited for all natural instruments such as piano. When used sparingly, it also gives vocals an interesting touch, for example, in ballads. |
| Club | Simulates the cozy atmosphere of a mid-size jazz club or theater. This reverb is characterized by its early reflections and short decay. The preset works well with vocals, electric piano, drums, saxophone and other instruments. |
| Chamber | Simulates the typical characteristics of a chamber. The preset is well suited for drums, guitars and vocals or whenever you need an unobtrusive reverb to breathe some life into a signal. |
| Gold Plate | Simulates the legendary sound of a gold foil reverb plate as used in former studio reverb units. This effect features a very dense sound of its own and is particularly suited to produce a very distinct reverb, e.g. for drums and vocals. |
| Gated Reverb | Simulates the reverb type cut off by a gate, which was very popular in the 80's. This effect was typically used with snare or kick drums, but can be used to achieve interesting effects with other instruments too. |
| Reverse Reverb | Produces a reverb which has its reverb tail reversed. Consequently, the reverb volume does not decrease over time but increases. This preset can be used for unusual effects with the most varied kinds of signals. A very popular application is to use it for snare drums. |
| Ambience | Provides the signal with spatial information, however, does not produce an audible reverb. The preset works well with drums, keyboards, guitars and vocals or whenever you need an unobtrusive room sound without reverb. |
| Delay | Produces several echoes/delays of the input signal, reduces them in level and adds them to the original signal (echo effect). Use the Delay preset to create effects which are very interesting in terms of rhythm. This preset can be used for virtually any instrument. It is particularly useful for keyboards, guitars and vocals. |
| Chorus | Adds a warm touch to the original signal, giving more body and width. Chorus can be used for virtually any signals which should sound a bit fuller. |
EN
| Flanger | Gives a signal a wonderful "retro" touch. Flanger has always been a popular effect for guitars and keyboards, but you can also produce interesting sounds in combination with drums, vocals or other signals. |
| Phaser | This effect adds a copy of the input signal, however, shifted in phase. Phaser is a traditional guitar, electric piano and keyboard effect, but you can also produce distinctive effect sounds in combination with drums or other signals. |
| Rotary | Simulates the accelerating, braking and rotating movements of a Leslie loudspeaker system. The fast rotation produces a characteristic tremolo effect. Traditionally, this is an effect for electronic organ, however, it can also be used for other signals. |
| Pitch Shift | This effect adds another signal to the original signal, below or above the original pitch. This effect is particularly suited to enhance the sound of guitars and vocals by a soft detuning, or can be used for extreme voice effects heard in comic or animated movies. |
| Delay + Reverb | This is a useful combination of the Delay and Concert effects which works particularly well with guitars, keyboards and vocals. |
| Chorus + Reverb | Combines the Chorus and Club effects, providing a classic effect for guitars and electric pianos. |
FX Parameters
| Effect PARAMETER kobTAP/SELECT button TAP/SELECT LED | |||
| Cathedral | Reverb time | Brilliance | Off/On |
| Concert | Reverb time | Brilliance | Off/On |
| Club | Reverb time | Brilliance | Off/On |
| Chamber | Reverb time | Brilliance | Off/On |
| Gold Plate Reverb time | Brilliance Off/On | ||
| Gated Rev | Reverb time | Brilliance | Off/On |
| Reverse Rev | Reverb time | Brilliance | Off/On |
| Ambience | Room size | Brilliance | Off/On |
| Delay | Repeats | Time interval TAP | Flashing (tempo) |
| Chorus | Intensity | Tempo TAP | Flashing (tempo) |
| Flanger Intensity Tempo TAP Flashing (tempo) | |||
| Phaser | Intensity | Tempo TAP | Flashing (tempo) |
| Rotary | Intensity | Rotary speed | On/Off |
| Pitch Shift | Semitone steps (+/- 12) | Detune | Off/On |
| Delay + Rev | Delay vs Reverb ratio | Time interval TAP | Flashing (tempo) |
| Chorus + Rev | Chorus vs Reverb ratio | Reverb time | Off/On |
Quick Start Guide 33

Firmware Update Procedure
To ensure your M100 unit operates with the latest features and improvements, follow these steps to update its firmware. Please read the entire procedure before beginning to ensure a smooth update process.
1.Prepare for Firmware Update
Software Requirement: You will need MIDI communication software like MIDI-OX to upload the firmware update file (.sxy) through SYSEX command. Ensure this software is installed and properly configured on your computer before proceeding.
2. Enter Firmware Update Mode
Connect the MIDI Interface: Connect a MIDI cable from your computer to the MIDI IN connector located on the rear panel of the M100.
Power Up the M100 in Update Mode: While pressing and holding the TAP/SELECT button on the M100, plug in the DC power jack to power on the unit. Continue holding the TAP/SELECT button until you observe the following indicator lights:
The TAP/SELECT LED should be lit in yellow.
- The SIGNAL INDICATOR LEDs and BYPASS LED should be lit in red.
if the LEDs light up as described, your M100 is now in firmware update mode and ready to receive the new firmware file.
3. Upload the Firmware
Open the Firmware File: On your computer, launch the MIDI communication software (e.g., MIDI-0X) and open the .syx firmware update file you wish to upload.
Start the Upload Process: Begin the upload process using your MIDI software SYSEX file send procedure. Carefully monitor the progress of the upload.
Important: Do not turn off or disconnect the M100 during the upload process. Interrupting the update could result in firmware corruption, requiring you to start over.
4. Confirm Update Completion
Successful Update: Upon successful completion of the upload, the LEDs on the M100 will stop blinking, indicating that the firmware update was successful.
Update Failure: If the SIGNAL INDICATOR LEDs and BYPASS LED remain lit in red and do not turn off, the update process has failed. In this case, you must restart the process from the beginning by powering off the M100 and repeating steps 2 and 3.
5. Troubleshooting
If the Firmware Update Fails:
A) Ensure all connections are secure and that your MIDI software is correctly configured.
B) Double-check that the correct.pyx file is being used and that no interruptions occurred during the upload.
Repeat the entire process, starting from step 2.
By following these steps carefully, you can successfully update the firmware of your M100, ensuring optimal performance and access to the latest features.

MIDI Communication Guide
This section provides instructions on how to set the MIDI channel and control various parameters on your M100 unit via MIDI Continuous Controller (CC) commands.
Setting the MIDI Channel
To set the MIDI channel on your M100, follow these steps:
- Press and Hold the BYPASS Button: While holding the BYPASS button, rotate the EFFECT SELECTOR knob.
- Select the MIDI Channel: The position of the EFFECT SELECTION knob corresponds to the MIDI channel number. The selected effect number will become the new MIDI channel.
Note: The unit will not provide any visual or auditory feedback to confirm the channel change. Once the channel has been set, you can start sending MIDI CC commands.
MIDI Continuous Controller (CC) Commands
Once the MIDI channel is set, you can control various parameters on the M100 using MIDI CC commands. The table below lists the available CC commands, their corresponding parameters, and the values you can send.
| CC NUMBER PARAMETER VALUES | ||
| 102 Bypass | 0 = Bypass Off 1 = Bypass On | |
| 103 Effect 0-15 = Effect to apply | ||
| 106 Mix 0-127: 0 Dry, 127 Wet | ||
| 105 Tap/Select | TAP: 1-127 = One Tap SELECT: 0 = Off, 1 = On | |
104 Effect Parameter 0-127 Effect Parameter Value
Use these commands to manipulate the M100's settings in real-time via MIDI, enhancing your performance or recording sessions with precise control over the unit's features.
Always refer to this table when setting or modifying your MIDI control setup to ensure accurate communication between your MIDI controller and the M100 unit.
M100 Controles

Paso 2: Controles
Comandos MIDI Continuous Controller (CC)
| CC NUMBER PARAMETER VALUES | ||
| 102 Bypass | 0 = Bypass Off 1 = Bypass On | |
| 103 Effect 0-15 = Effect to apply | ||
| 106 Mix 0-127: 0 Dry, 127 Wet | ||
| 105 Tap/Select | TAP: 1-127 = One Tap SELECT: 0 = Off, 1 = On | |
104 Effect Parameter 0-127 Effect Parameter Value
Commandes MIDI Continuous Controller (CC)
| CC NUMBER PARAMETER VALUES | ||
| 102 Bypass | 0 = Bypass Off 1 = Bypass On | |
| 103 Effect 0-15 = Effect to apply | ||
| 106 Mix 0-127: 0 Dry, 127 Wet | ||
| 105 Tap/Select | TAP: 1-127 = One Tap SELECT: 0 = Off, 1 = On | |
104 Effect Parameter D-127 Effect Parameter Value
| CC NUMBER PARAMETER VALUES | ||
| 102 Bypass | 0 = Bypass Off 1 = Bypass On | |
| 103 Effect 0-15 = Effect to apply | ||
| 106 Mix 0-127: 0 Dry, 127 Wet | ||
| 105 Tap/Select | TAP: 1-127 = One Tap SELECT: 0 = Off, 1 = On | |
104 Effect Parameter 0-127 Effect Parameter Value
Comandos MIDI Continuous Controller (CC)
| CC NUMBER PARAMETER VALUES | ||
| 102 Bypass | 0 = Bypass Off 1 = Bypass On | |
| 103 Effect 0-15 = Effect to apply | ||
| 106 Mix 0-127: 0 Dry, 127 Wet | ||
| 105 Tap/Select | TAP: 1-127 = One Tap SELECT: 0 = Off, 1 = On | |
104 Effect Parameter 0-127 Effect Parameter Value
Comandi MIDI Continuous Controller (CC)
| CC NUMBER PARAMETER VALUES | ||
| 102 Bypass | 0 = Bypass Off 1 = Bypass On | |
| 103 Effect 0-15 = Effect to apply | ||
| 106 Mix 0-127: 0 Dry, 127 Wet | ||
| 105 Tap/Select | TAP: 1-127 = One Tap SELECT: 0 = Off, 1 = On | |
104 Effect Parameter 0-127 Effect Parameter Value
| CC NUMBER PARAMETER VALUES | ||
| 102 Bypass | 0 = Bypass Off 1 = Bypass On | |
| 103 Effect 0-15 = Effect to apply | ||
| 106 Mix 0-127: 0 Dry, | 127 Wet | |
| 105 Tap/Select | TAP: 1-127 = One Tap SELECT: 0 = Off, 1 = On | |
| 104 Effect Parameter | 0-127 Effect Parameter Value | |
Firmware-Uppateringsprocedur
3. Ladda app Firmware
| CC NUMBER PARAMETER VALUES | ||
| 102 Bypass | 0 = Bypass Off 1 = Bypass On | |
| 103 Effect 0-15 = Effect to apply | ||
| 106 Mix 0-127: 0 Dry, 127 Wet | ||
| 105 Tap/Select | TAP: 1-127 = One Tap SELECT: 0 = Off, 1 = On | |
104 Effect Parameter 0-127 Effect Parameter Value
Polecenia MIDI Continuous Controller (CC)
| CC NUMBER PARAMETER VALUES | ||
| 102 Bypass | 0 = Bypass Off 1 = Bypass On | |
| 103 Effect 0-15 = Effect to apply | ||
| 106 Mix 0-127: 0 Dry, 127 Wet | ||
| 105 Tap/Select | TAP: 1-127 = One Tap SELECT: 0 = Off, 1 = On | |
104 Effect Parameter 0-127 Effect Parameter Value
APROD-1P0S 500000000000000000000000000000000000000000000000000000000000000000000000
MIDI Continuous Controller (CC) 曰
| CC NUMBER PARAMETER VALUES | ||
| 102 | Bypass | 0 = Bypass Off 1 = Bypass On |
| 103 | Effect | 0-15 = Effect to apply |
| 106 | Mix | 0-127:0 Dry, 127 Wet |
| 105 | Tap/Select | TAP: 1-127 = One Tap SELECT: 0 = Off, 1 = On |
| 104 | Effect Parameter | 0-127 Effect Parameter Value |
| CC NUMBER PARAMETER VALUES | ||
| 102 Bypass | 0 = Bypass Off 1 = Bypass On | |
| 103 Effect 0-15 = Effect to apply | ||
| 106 Mix 0-127: 0 Dry, 127 Wet | ||
| 105 Tap/Select | TAP: 1-127 = One Tap SELECT: 0 = Off, 1 = On | |
104 Effect Parameter 0-127 Effect Parameter Value
SpecificationsSpecifications
| Inputs | |
| Type 14" TS connectors, unbalanced | |
| Impedance approx. 7.5 kΩ | |
| Output | |
| Type 14" TRS connectors, impedance balanced | |
| Impedance approx. 220 Ω | |
| Max. output level +10 dBi | |
| In/Out | |
| Type 14" TS footswitch connector | |
| Digital Processing | |
| Converters 24-bit Delta-Sigma, 128-times oversampling | |
| Sampling rate 48 kHz | |
| System Specifications | |
| Frequency response 10 Hz to 22 kHz, -3 dB | |
| Dynamic range 96 dB, 10 Hz to 22 kHz | |
| Distortion 0.01% typ. @ 0 dBFS | |
| Crosstalk | -76 dB @ 1 kHz |
| Signal-to-noise ratio | 10 Hz to 22 kHz >86 dB @ 0 dBi, A-weighted |
| Power Supply | |
| Mains connection | external power supply, 12 VDC, 400 mA |
| Mains voltage | |
| USA/Canada | 120 V~, 60 Hz |
| U.K./Australia 240 V~, 50 Hz | |
| China | 220 V~, 50 Hz |
| Europe | 230 V~, 50 Hz |
| Japan | 100 V~, 50-60 Hz |
| Power consumption approx. 3.5 W | |
| Physical | |
| Dimensions (H x W x D) | 46 x 191 x 99 mm (1.8 x 7.5 x 3.9") |
| Weight | 0.6 kg (1.3 lbs) |
EN
118 119Quick Start GuideM100
技术参数
Other important information
EN Important information
3. Unauthorized Repairs AND WORRIFATIONS
1. Product Registration
To ensure optimal service and support, we encourage you to register your Music Tribe product immediately after purchase at musictribe.com. Registration allows us to provide faster and more efficient assistance in the event of a service request or warranty claim. It also ensures that you receive important product updates, safety notices, and documentation relevant to your product.
During registration, you will also have access to the full terms and conditions of our Limited Warranty. Please note that warranty coverage and consumer rights may vary by country or jurisdiction. Refer to the terms applicable in your region at the time of registration or via our support portal.
2. Technical Support and Malfunctions
If you experience a malfunction or require assistance, and a Music Tribe Authorized Reseller is not available in your area, please refer to the list of Authorized Fulfillers available under the "Support" section at musictribe.com.
If your country is not listed, we recommend using our Online Support resources as a first step, which may help resolve your issue without the need for a return. For warranty-related matters, please ensure you submit an online warranty claim before returning the product. Unauthorized returns or unregistered claims may result in processing delays or denial of warranty coverage.
To preserve warranty coverage, do not open, disassemble, or attempt to repair the product yourself. Repairs or modifications performed by unauthorized persons or service centers will void the warranty and may compromise product safety or performance.
Before connecting your unit to a power source, ensure that the input voltage matches the rating indicated on your product. Incorrect voltage may cause permanent damage and void the warranty. If the fuse requires replacement, only use fuses of the same type and rating. Use of incorrect fuses may create a fire or safety hazard and will invalidate all warranty protection.
4. Proper Use
and Environment Ensure that your Music Tribe product is used in accordance with the product manual and within the recommended operating conditions. Exposure to excessive moisture, dust, heat, or impact may result in malfunction and void the warranty.
ES
Other important information

Other important information
Other important information

の他の要報
1.製品登錄
Responsible Party Name: Empower Tribe Innovations US Inc.
Address: 901 Grier
Dr. Las Vegas,
NV,89119,USA
Email Address:
legal@musictribe.com
M100
This equipment has been tested and found to comply with the limits for a Class B digital device, pursuant to part 15 of the FCC Rules. These limits are designed to provide reasonable protection against harmful interference in a residential installation. This equipment generates, uses and can radiate radio frequency energy and, if not installed and used in accordance with the instructions, may cause harmful interference to radio communications. However, there is no guarantee that interference will not occur in a particular installation. If this equipment does cause harmful interference to radio or television reception, which can be determined by turning the equipment off and on, the user is encouraged to try to correct the interference by one or more of the following measures:
Reorient or relocate the receiving antenna.
increase the separation between the equipment and receiver.
- Connect the equipment into an outlet on a circuit different from that to which the receiver is connected.
念 Consult the dealer or an experienced radio/TV technician for help.
This equipment complies with Part 15 of the FCC rules. Operation is subject to the following two conditions:
(1) this device may not cause harmful interference, and
(2) this device must accept any interference received, including interference that may cause undesired operation.
Important information:
Changes or modifications to the equipment not expressly approved by Music Tribe can void the user's authority to use the equipment.

Hereby, Music Tribe declares that this product is in compliance with Directive 2014/35/EU, Directive 2014/30/EU, Directive 2011/65/EU and Amendment 2015/863/EU, Directive 2012/19/EU, Regulation 519/2012 REACH SVHC and Directive 1907/2006/EC.
Full text of EU DoC is available at https://community. musictribe.com/
EU Representative: Empower Tribe Innovations DE GmbH
Address: Otto-Brenner-Strasse 4a, 47877 Willich, Germany
UK Representative: Empower Tribe Innovations UK Ltd.
Address: S Brindley Road Old Trafford, Manchester, United Kingdom, M16 9UN

Correct disposal of this product: This symbol indicates that this product must not be disposed of with household waste, according to the WEEE Directive (2012/19/EU) and your national law. This product should be taken to a
collection center licensed for the recycling of waste electrical and electronic equipment (EEE). The mishandling of this type of waste could have a possible negative impact on the environment and human health due to potentially hazardous substances that are generally associated with EEE. At the same time, your cooperation in the correct disposal of this product will contribute to the efficient use of natural resources. For more information about where you can take your waste equipment for recycling, please contact your local city office, or your household waste collection service.