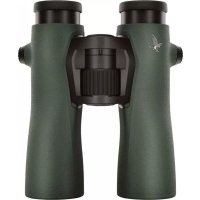
Swarovision EL - Binoculars SWAROVSKI OPTIK - Free user manual and instructions
Find the device manual for free Swarovision EL SWAROVSKI OPTIK in PDF.

| Product Type | High-end binoculars |
| Brand | Swarovski Optik |
| Model | Swarovision EL |
| Magnification | 10x (estimated) |
| Objective Lens Diameter | 42 mm (estimated) |
| Interpupillary Distance Adjustment | Yes, by opening the two eyepieces |
| Diopter Correction | Yes, adjustable with 180° lock |
| Eyecups | Rotating, 4 positions (with/without glasses) |
| Focusing | Central focusing wheel |
| Minimum Focusing Distance | Approx. 2.5 m (estimated) |
| Optical Coating | SWAROVISION (multi-layer coating) |
| Waterproofing | Yes, waterproof with nitrogen filling |
| Weight | Approx. 770 g (10x42 model) |
| Dimensions (L x W x H) | Approx. 150 x 130 x 60 mm |
| Included Accessories | Functional case, cleaning cloth, strap, protective caps |
| Serial Number | Under the focusing wheel (remove the wheel) |
| Maintenance | Clean with microfiber cloth, brush for large particles; body with a soft damp cloth |
| Storage | In the case, dry and ventilated place; in humid areas, use a waterproof case with silica gel |
| Safety | Do not look directly at the sun; do not use while walking |
| Warranty | International 10 years (5 years labor included), subject to conditions |
| Repairs | Only by SWAROVSKI OPTIK Absam (Austria) or SWAROVSKI OPTIK North America |
Frequently Asked Questions - Swarovision EL SWAROVSKI OPTIK
User questions about Swarovision EL SWAROVSKI OPTIK
0 question about this device. Answer the ones you know or ask your own.
Ask a new question about this device
Download the instructions for your Binoculars in PDF format for free! Find your manual Swarovision EL - SWAROVSKI OPTIK and take your electronic device back in hand. On this page are published all the documents necessary for the use of your device. Swarovision EL by SWAROVSKI OPTIK.
USER MANUAL Swarovision EL SWAROVSKI OPTIK
text_image
Labeled diagram of binoculars with numbered parts for identificationnatural_image
Diagram of a mechanical device with a rotating wheel and fan, showing motion direction (no text or symbols)natural_image
Diagram of two mechanical components with rotating arrows indicating motion (no text or symbols)natural_image
Diagram of a mechanical device with two circular components and directional arrows indicating motion (no text or symbols)natural_image
Diagram of binoculars with rotational arrows indicating motion (no text or symbols)natural_image
Illustration showing two hand-to-hand binoculars with curved arrows indicating rotational motion, alongside a diagram of three birds flying around them (no text or symbols)7
3.3 FIXIEREN UND LÖSEN DER DIOPTRIESPERRE

natural_image
Abstract diagram with concentric circles and a central lock icon, no text or symbols presentnatural_image
Illustration of hands holding binoculars with a curved line indicating eyepiece (no text or symbols)natural_image
Diagram of a rope being inserted into a cable, showing rope routing and a downward arrow (no text or symbols)natural_image
Diagram showing mechanical components with rotational arrows indicating motion (no text or symbols)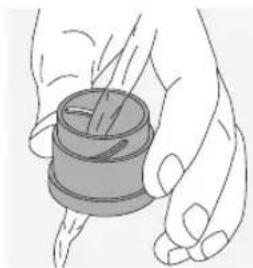
natural_image
Illustration of a hand holding a spool of thread (no text or symbols)natural_image
Illustration of a person using a protractor with a sun symbol above (no text or symbols present)natural_image
Simple line drawing of a person holding a device with a prohibition symbol (no text or labels)natural_image
Simple line drawing of a bicycle with a wheel and lane markings (no text or symbols)natural_image
Illustration of a hand holding binoculars with a circular target symbol overlay (no text or symbols present)We thank you for choosing this product from SWAROVSKI OPTIK. If you have any questions, please consult your specialist dealer or contact us directly at WWW.SWAROVSKIOPTIK.COM.
1. OVERVIEW
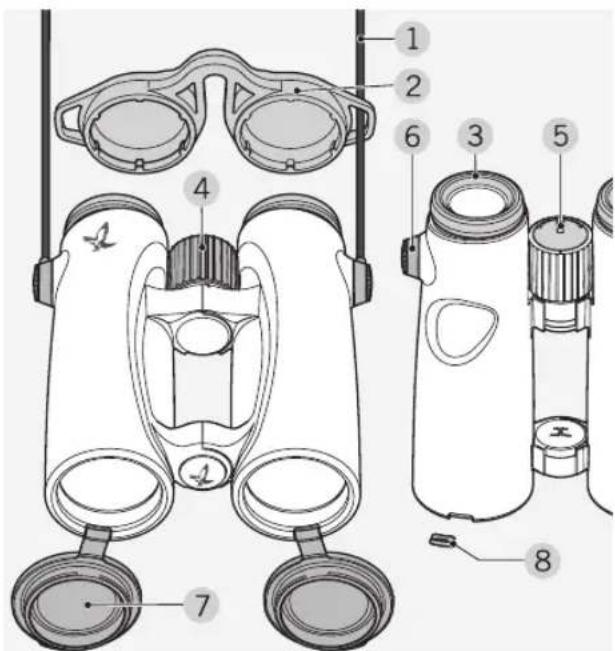
text_image
Labeled diagram of binoculars with numbered parts for identification1 Carrying strap
2 Eyepiece cover
3 Twist-in eyecup
4 Focusing wheel
5 Diopter lock
6 Strap connector cover
7 Objective lens cover
8 Objective lens cover cap
Supplied with the EL: Field bag, lens-cleaning cloth.
The strap is not attached to the EL during delivery. You can easily attach the strap or special accessories.
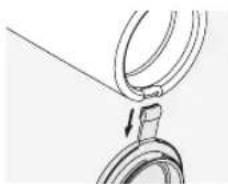
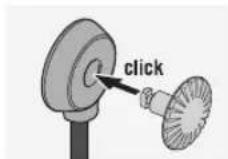
2. ATTACHING THE STRAP
Press the button inwards and turn it counterclockwise (90°).
Pull out the button.
Detach the pin from the ring.
To attach a rain guard or other accessory, first pull the strap through the loop of the respective cover.
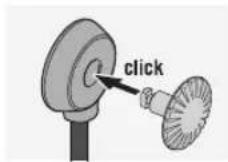
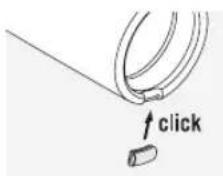
Align the button pin with the strap connector ring and press until it clicks.
natural_image
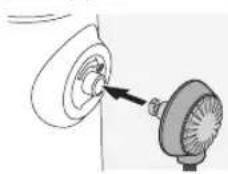
Simple line drawing of a mechanical component with a pointer indicating direction (no text or symbols)Insert the button strap into the buttonhole on the binoculars.
text_image
clickPress the pin in firmly and turn slightly clockwise.
Note:
If the pin can no longer be turned without pressing it, it is securely in place.

text_image
SWAROVSKI OPTIK ① ② ③ ④3.
OPERATION
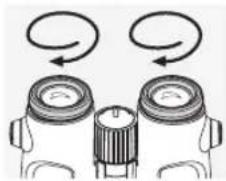
3.1 ADJUSTING THE TWIST-IN EYECUPS
In principle, you can choose between four different setting positions that provide varying distances between your eye and the lens. You can set the optimal distance according to your personal preference.

natural_image
Illustration of two identical optical lenses with rotating arrows indicating rotation (no text or symbols)Pos. A: Initial position without spectacles: Twist out the eyecups anticlockwise to the full extent.
natural_image
Illustration of two binoculars with one emitting a circular motion arrow (no text or symbols)Pos. B: Initial position with spectacles: Twist in the eyecups clockwise until they stop.
natural_image
Diagram of two binoculars with rotating arrows indicating rotational motion (no text or symbols)Pos. C and D: Alternative positions or interim adjustment stages for spectacle wearers and non-spectacle wearers.
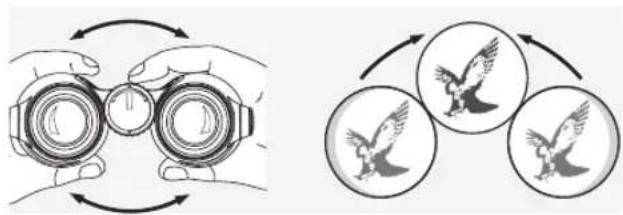
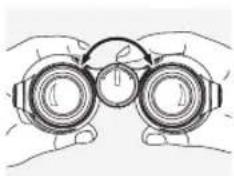
3.2 ADJUSTING THE INTERPUPILLARY DISTANCE
To see a single round image, adjust the separation between the two halves of the binoculars until the irritating shadows disappear.
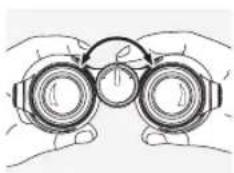
natural_image
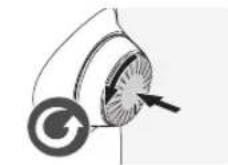
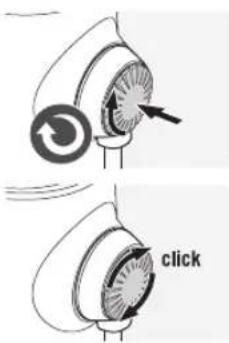
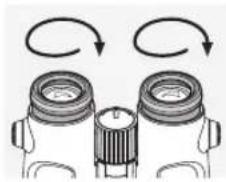
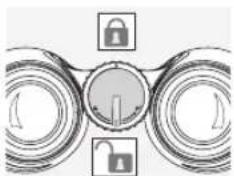
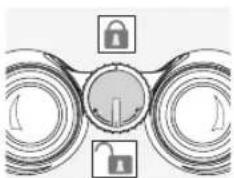
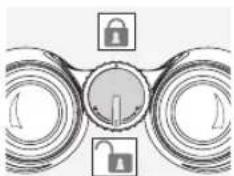
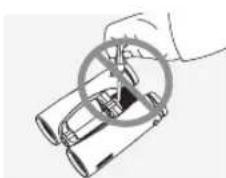
Illustration of two hand encircling binoculars and three bird silhouettes (no text or symbols)3.3 SECURING AND RELEASING THE DIOPTER LOCK

natural_image
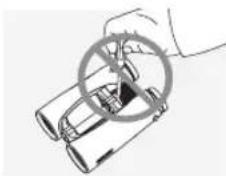
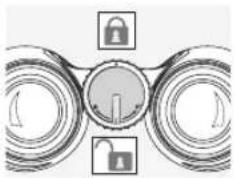
Abstract diagram with concentric circles and a central lock icon, no text or symbols presentThe diopter lock is secured by turning it 180° in a clockwise direction. Turning it 180° in a counterclockwise direction releases it again.
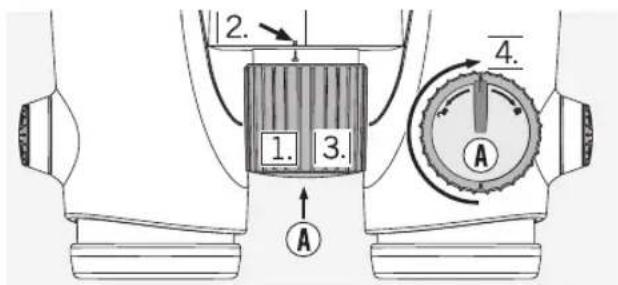
3.4 DIOPTRIC COMPENSATION
To achieve optimal image quality, it is necessary to correct any varying visual acuity between the left and right eye.
Use with equal acuity of both eyes:
If the diopter lock is secured, release it as described in section 3.3.
text_image
1. 2. 3. 4. A A- Pull the focusing wheel outwards.
- By turning the focusing wheel, set the dioptric scale to "0".
- Push the focusing wheel back in.
- Secure the diopter lock (see section 3.3).
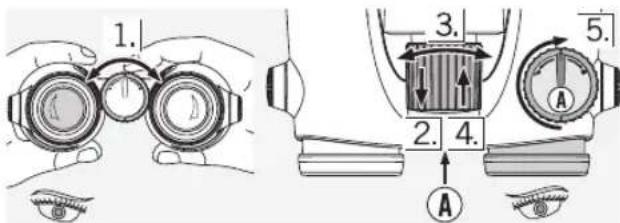
Use with varying acuity of both eyes:
If the diopter lock is secured, release it as described in section 3.3.
text_image
1. 2. 3. 4. 5. A A- Look through the left ocular with your left eye and turn the focusing wheel to focus sharply on a selected object.
- Pull the focusing wheel outwards.
- Now look at the same object through the right ocular with your right eye and again adjust the focusing wheel to attain optimal clarity.
- Press the focusing wheel back in again.
- Secure the diopter lock (see section 3.3).
3.5 ADJUSTING THE FOCUS
natural_image
Illustration of hands holding binoculars with a circular motion arrow (no text or symbols)To get your object into focus, simply turn the focusing wheel from the shortest focusing distance (see technical data sheet) to infinity.
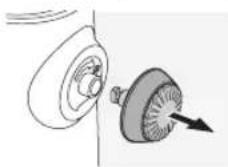
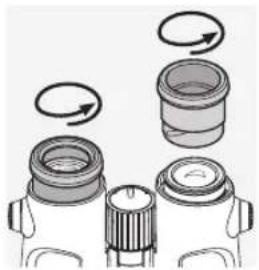
4. REMOVING THE OBJECTIVE LENS COVER
natural_image
Mechanical diagram showing a rope being inserted into a ring, with an arrow indicating the direction (no text or symbols present)-
Open the objective lens cover.
-
Pull the objective lens cover firmly downwards.
- Push the protective gap cover provided onto the metal ring. The gap cover is not firmly attached until a click can be heard.
Note:
If you want to reattach the objective lens cover again, push the protective gap cover off the metal ring with your thumb and then repeat step 3 with the objective lens cover.
5.
GENERAL INFORMATION
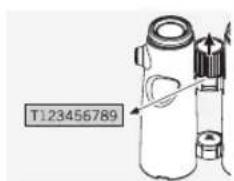
5.1 SERIAL NUMBER
text_image
T123456789You will find the serial number of your EL binoculars underneath the focusing wheel. In order to be able to read it, the focusing wheel must be pulled out.
5.2 FURTHER INFORMATION

You will find comprehensive information and tips at: WWW.SWAROVSKIOPTIK.COM.
6.
MAINTENANCE AND CARE
6.1 LENS-CLEANING CLOTH
You can clean high sensitive lens surfaces with the enclosed special microfibre cloth. It is suitable for objective lens, ocular lens and spectacles.
Please keep the cloth clean, as dirt can damage the lens surface. If the cloth becomes soiled it can be washed in lukewarm soapy water and left to dry. Please only use for cleaning lens surfaces!
6.2 CLEANING
We have designed all elements and surfaces to require little care.
To ensure the long-lasting optical brilliance of your binoculars, you should keep the glass surfaces free of dirt, oil and grease. When cleaning the lenses, first remove larger particles with an optical lens brush. For the subsequent thorough cleaning we recommend breathing onto the lens surface to form a coat of condensation and then cleaning it with a soft, moist cloth.
The housing is best cleansed with a soft, moist cloth (don't use the lens-cleaning cloth).
natural_image
Diagram showing mechanical components with rotating arrows indicating motion (no text or symbols)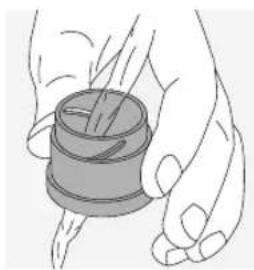
natural_image
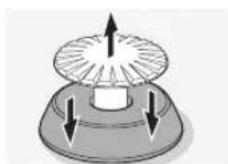
Illustration of a hand holding a spool with a handle, no text or symbols presentIn the event of hard-to-remove dirt (e.g. sand) the eye cups can be unscrewed and cleaned easily.
6.3 STORAGE
You should keep your binoculars in their bag in a dry, well ventilated place.
If the instrument is wet, it must be dried prior to storage.
In tropical regions or regions with a high humidity the best place to store the instrument in is an air-tight receptacle along with a
moisture-absorbing agent (e.g. silica gel).
7. FOR YOUR SAFETY!
natural_image
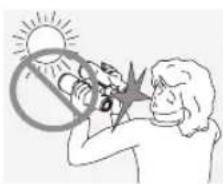
Illustration of a person looking at a sun with a lightning bolt symbol (no text or symbols present)Never look directly at the sun with the binoculars! This will damage your eyes!
natural_image
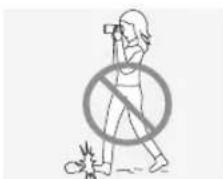
Simple line drawing of a person walking with a prohibition symbol (no text or labels)Never look through the binoculars when walking, you could encounter obstacles!
natural_image
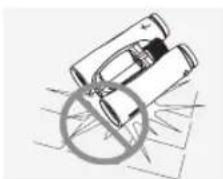
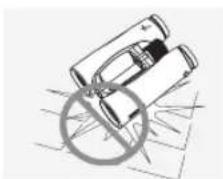
Simple line drawing of binoculars with a diagonal line crossing through them (no text or symbols)Please protect your binoculars from jolts and jars.
natural_image
Illustration of a hand holding a circular object over binoculars (no text or symbols)Repair and service work shall only be carried out by either SWAROVSKI OPTIK Absam (Austria) or SWAROVSKI OPTIK North America and any work by non-authorised parties shall render the warranty void.
All data are typical values.
We reserve the right to make changes regarding design and delivery. We accept no liability for printing errors.
text_image
Labeled diagram of binoculars with numbered parts for identificationnatural_image
Two diagrams showing a mechanical component with arrows indicating motion or force direction (no text or symbols present)natural_image
Illustration of two types of eyeglasses: top shows a circular object with arrows indicating direction, bottom shows a pair of eyeglasses with arrows indicating force or movement (no text or symbols)natural_image
Three-panel diagram showing mechanical components with rotational arrows indicating motion (no text or symbols)natural_image
Illustration showing two hand gestures with binoculars and three bird silhouettes inside circles (no text or symbols)3.3 BLOQUER ET DEBLOQUER LE VERROUILLAGE DE CORRECTION DIOPTRIQUE
natural_image
Abstract diagram with three circular elements and a central lock icon, no text or symbols presentnatural_image
Illustration of two hands holding binoculars with a circular arrow indicating rotation (no text or symbols)natural_image
Simple line drawing of a rope knot with a hook and chain (no text or symbols)natural_image
Diagram showing mechanical components with rotational arrows indicating motion (no text or symbols)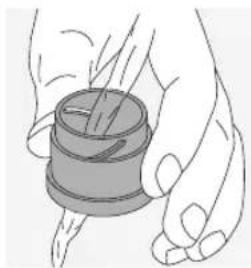
natural_image
Illustration of a hand holding a cylindrical object with a string, no text or symbols presentnatural_image
Illustration of a person lighting a sun with a lightning bolt, no text or symbols presenttext_image
Safety warning symbol showing a person without a phone and a crossed-out circle, indicating no smoking or fire.natural_image
Simple line drawing of two stacked cylindrical objects with a diagonal line and a circle crossed out, no text or symbols present.natural_image
Illustration of a hand holding binoculars with a circular overlay (no text or symbols)text_image
Labeled diagram of binoculars with numbered parts for identificationnatural_image
Two diagrams showing a mechanical component with arrows indicating motion or force direction (no text or symbols present)natural_image
Illustration of two types of eyeglasses: top shows a circular object with arrows indicating direction, bottom shows a pair of eyeglasses with arrows indicating force or movement (no text or symbols)natural_image
Three-panel diagram showing mechanical components with rotational arrows indicating motion (no text or symbols)natural_image
Illustration showing two hand gestures with binoculars and three bird silhouettes inside circles (no text or symbols)3.3 BLOCCO E SBLOCCO DEL FERMO PER LA COMPENSAZIONE DIOTTRICA
natural_image
Abstract diagram with three circular elements and a central lock symbol (no text or labels)natural_image
Line drawing of two hands holding binoculars (no text or symbols)natural_image
Simple line drawing of a rope tied to a ring, with an arrow indicating direction (no text or symbols)natural_image
Diagram showing mechanical components with rotational arrows indicating motion (no text or symbols)
natural_image
Illustration of a hand holding a cylindrical object with a string, no text or symbols presentnatural_image
Illustration of a person using a megaphone to interact with a sun (no text or symbols)text_image
Safety warning symbol showing a person with a crossed-out circle and a broken tool, indicating no hazard or injury.natural_image
Simple line drawing of a mechanical component with a circular cross symbol (no text or labels)natural_image
Illustration of a hand holding binoculars with a magnifying glass overlay (no text or symbols)text_image
Labeled diagram of binoculars with numbered parts for identificationnatural_image
Two diagrams showing mechanical components with arrows indicating direction, no text or symbols presentnatural_image
Illustration of a device with a fan-shaped component and a pair of eyeglasses (no text or symbols)Tire del botón.
natural_image
Diagram of mechanical components with rotating arrows indicating rotational motion (no text or symbols)natural_image
Diagram of two optical lenses with directional arrows indicating light paths (no text or symbols)natural_image
Diagram showing two identical camera lenses with rotating arrows indicating rotation (no text or symbols)natural_image
Illustration showing two hand gestures with binoculars and three bird silhouettes inside circles (no text or symbols)3.3 FIJAR Y SOLTAR EL BLOQUEO DE DIOPTRÍAS
natural_image
Abstract diagram with concentric circles and a central lock icon, no text or symbols presentnatural_image
Illustration of hands holding binoculars with a curved arrow indicating rotation (no text or symbols)natural_image
Close-up of a mechanical hook with a metal loop and a pull rod (no text or symbols visible)natural_image
Diagram showing mechanical components with rotational arrows indicating motion (no text or symbols)
natural_image
Illustration of a hand holding a spool of thread (no text or symbols)natural_image
Illustration of a person using a megaphone to interact with a sun (no text or symbols)natural_image
Simple line drawing of a person walking with a prohibition symbol (no text or labels)natural_image
Simple line drawing of two binoculars with a diagonal line crossing through them (no text or symbols)natural_image
Illustration of a hand holding binoculars with a magnifying glass overlay (no text or symbols)text_image
Labeled diagram of binoculars with numbered parts for identificationnatural_image
Simple line drawing of a mechanical component with a circular base and a fan-like structure, no text or symbols present.natural_image
Diagram of mechanical components with rotating arrows indicating rotational motion (no text or symbols)natural_image
Illustration of two binoculars with one emitting a double-headed arrow (no text or symbols)natural_image
Diagram of two binoculars with rotating arrows indicating rotational motion (no text or labels)natural_image
Illustration showing two hand gestures with binoculars and three birds inside circles (no text or symbols)3.3 VERGRENDELEN EN ONTGRENDELEN VAN DE DIOPTRIEVERGRENDELING
natural_image
Abstract diagram with concentric circles and a central lock symbol, no text or labels presentnatural_image
Illustration of two hands holding binoculars with a circular arrow indicating rotation (no text or symbols)natural_image
Simple line drawing of a rope knot securing a ring, no text or symbols presentnatural_image
Diagram showing mechanical components with rotational arrows indicating motion (no text or symbols)
natural_image
Illustration of a hand holding a cylindrical object with a handle, no text or symbols presentnatural_image
Illustration of a person using a radio with a sun symbol above, no text or symbols presentnatural_image
Simple line drawing of a person holding a phone with a prohibition symbol (no text or labels)natural_image
Simple line drawing of a pair of binoculars with a diagonal line crossing through them (no text or symbols)natural_image
Illustration of a hand holding binoculars with a circular overlay (no text or symbols)text_image
Labeled diagram of binoculars with numbered parts for identificationnatural_image
Simple line drawing of a mechanical component with a pointer indicating direction (no text or symbols)natural_image
Three-panel diagram showing mechanical components with rotational arrows indicating motion (no text or symbols)natural_image
Illustration showing two hand gestures with binoculars and three bird silhouettes inside circles (no text or symbols)3.3 STÄNGA OCH ÖPPNA DIOPTERLÅSET

natural_image
Abstract diagram with concentric circles and a central lock icon, no text or symbols presentnatural_image
Line drawing of hands holding binoculars (no text or symbols)natural_image
Simple line drawing of a rope knot with a hook and chain (no text or symbols)natural_image
Diagram showing mechanical components with rotating arrows indicating motion (no text or symbols)
natural_image
Illustration of a hand holding a cylindrical object with a spool, no text or symbols presentnatural_image
Illustration of a person using a protractor to measure a sun (no text or symbols present)natural_image
Simple line drawing of a person holding a camera with a prohibition symbol (no text or labels)Titta aldrig genom instrumentet medan du går! Du kan missa nagot hinder!
natural_image
Simple line drawing of two stacked containers with a circular object and diagonal lines, no text or symbols present.Skydda ditt instrument mot stotar.
natural_image
Illustration of a hand holding binoculars with a magnifying glass overlay (no text or symbols)text_image
Labeled diagram of binoculars with numbered parts for identificationnatural_image
Simple line drawing of a mechanical component with a circular base and a fan-like structure, no text or symbols present.natural_image
Three-panel diagram showing mechanical components with rotational arrows indicating motion (no text or symbols)natural_image
Illustration showing two hand gestures with binoculars and three bird silhouettes inside circles (no text or symbols)3.3 DIOPTERIN LUKON KIINNITYS JA VAPAUTUS

natural_image
Abstract diagram with concentric circles and a central lock icon, no text or symbols presentnatural_image
Illustration of hands holding binoculars with a circular arrow indicating rotation (no text or symbols)natural_image
Simple line drawing of a rope tied to a ring, with a downward arrow indicating direction (no text or symbols)natural_image
Diagram showing mechanical components with rotating arrows indicating motion (no text or symbols)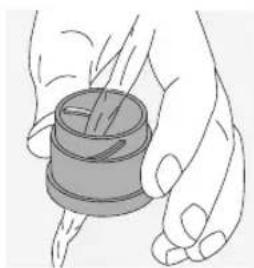
natural_image
Illustration of a hand holding a cylindrical object with a pointer, no text or symbols presentnatural_image
Illustration of a person lighting a sun with a prohibition symbol (no text or symbols present)natural_image
Simple line drawing of a person holding a camera with a prohibition symbol (no text or labels)natural_image
Simple line drawing of a mechanical component with a circular cross symbol (no text or labels)natural_image
Illustration of a hand holding binoculars with a circular overlay (no text or symbols)text_image
Labeled diagram of binoculars with numbered parts for identificationnatural_image
Simple line drawing of a mechanical component with a circular base and a fan-like structure, no text or symbols present.natural_image
Three-panel diagram showing mechanical components with rotational arrows indicating motion (no text or symbols)natural_image
Illustration showing two hand gestures with binoculars and three bird silhouettes inside circles (no text or symbols)3.3 SÅDAN LÅSES OG ÅBNES DIOPTRI-LÅSEN

natural_image
Abstract diagram with concentric circles and a central lock icon, no text or symbols present3.5 INDSTILLING AF SKARPHED
natural_image
Illustration of hands holding binoculars (no text or symbols)natural_image
Simple line drawing of a rope knot with a hook and chain (no text or symbols)natural_image
Diagram showing mechanical components with rotational arrows indicating motion (no text or symbols)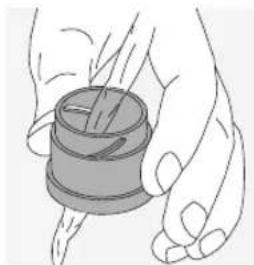
natural_image
Illustration of a hand holding a spool of thread, no text or symbols presentnatural_image
Illustration of a person with a sun symbol above their face, showing no text or symbols on the figures (no readable text or symbols)natural_image
Simple line drawing of a person holding a phone with a prohibition symbol (no text or labels)natural_image
Illustration of binoculars with a circular symbol indicating no detected objects (no text or symbols present)natural_image
Illustration of a hand holding a circular object with a handle, partially enclosed in a container (no text or symbols visible)text_image
Labeled diagram of binoculars with numbered parts for identificationnatural_image
Simple line drawing of a mechanical component with a pointer indicating direction (no text or symbols)natural_image
Diagram of two mechanical components with rotating arrows indicating motion (no text or symbols)natural_image
Diagram of two optical lenses with directional arrows indicating light paths (no text or symbols)natural_image
Diagram showing two binoculars with rotating arrows indicating rotational motion (no text or labels)natural_image
Illustration showing two hand gestures with binoculars and three birds inside circles (no text or symbols)natural_image
Abstract diagram with concentric rings and a central circular element, no text or symbols presentnatural_image
Illustration of hands holding binoculars with a circular arrow indicating rotation (no text or symbols)natural_image
Simple line drawing of a rope knot securing a ring, no text or symbols presentnatural_image
Diagram showing mechanical components with rotational arrows indicating motion (no text or symbols)
natural_image
Illustration of a hand holding a cylindrical object with a string, no text or symbols presentnatural_image
Illustration of a person lighting a sun with a prohibition symbol (no text or symbols present)natural_image
Illustration of a person holding a camera with a prohibition symbol (no text or labels)natural_image
Simple line drawing of a car with a circular cross symbol (no text or labels)natural_image
Illustration of a hand holding a car with a circular diagram overlay (no text or symbols)In procuring this optical product from SWAROVSKI OPTIK you now own a top-quality instrument for which we grant a worldwide warranty of 10 years from the date of purchase in accordance with the following conditions:
If defects in material and/or workmanship appear, we will take over material costs for the entire warranty period. We reserve the right in such instances to repair or replace the instrument or the defective part at our discretion. During the first five years we will take over the costs for materials and work.
This guarantee in no way limits the statutory warranty obligations.
In the event that the range of products is changed, we reserve the right to repair defective instruments or to replace them with those of equal value.
We undertake no liability for repairs carried out by a repair shop which has not been authorized by us, nor for damages caused by improper use, nor for direct or indirect damages brought about by defects on the instrument. In addition, all parts are excluded from the warranty which are subject to natural wear, such as eye cups, carry straps, cases, armouring, etc.
This warranty is valid only when this warranty/service document has been duly dated, stamped and signed by the Authorized dealer on the day of purchase.
In a warranty case and as well for service and/or repair work please present the instrument to your authorized SWAROVSKI OPTIK dealer together with this warranty/service document or send it, delivery-free, directly to our address. Instruments sent without the warranty/service document enclosed will be repaired and the costs charged to the customer. The return shipment of the instrument, insured (means of transport at our discretion), is free of charge in the case of repairs covered under warranty, otherwise charged to the customer. For shipments to foreign countries any foreign customs duties or fiscal charges are charged to the recipient.
This warranty is given by SWAROVSKI OPTIK KG, Absam, Austria. The place of jurisdiction is Innsbruck; Austrian law applies.
Insofar as other guarantees/warranties (whether legally or voluntary) are pledged in individual countries, these must be fulfilled by the respective importer or authorized dealer. SWAROVSKI OPTIK KG, Absam, Austria, can therefore accept liability only when a legal obligation exists to do so.
Remarks for the United States of America:
For warranty services all products purchased in the United States, our only warranty authorized service is through SWAROVSKI OPTIK North America. For further information please call 1-800-426-3089.