
PLANEX LHSE 225 - Grinder FESTOOL - Free user manual and instructions
Find the device manual for free PLANEX LHSE 225 FESTOOL in PDF.

| Product type | Self-propelled extension sander |
| Brand | Festool |
| Model | PLANEX LHSE 225 |
| Power | 400 W |
| No-load speed | 400 - 920 rpm |
| Sanding pad diameter | 215 mm |
| Abrasive diameter | 225 mm |
| Length | 1.59 m |
| Weight (without mains cable, with pad) | 4 kg |
| Protection class | II (double insulation) |
| Dust extraction connection | 36 mm (adaptable 27 mm) |
| Tool holder | D 13/10 |
| Electronics | EC-TEC brushless motor, soft start, constant speed, overload protection, variable speed control, temperature monitoring |
| Main functions | Sanding of interior walls and ceilings (drywall, plaster, paint, glue, render), sanding close to edges thanks to removable brush segment |
| Power supply | Mains, Plug-IT cable |
| Maintenance and cleaning | Regularly clean the ventilation slots and ventilation filter; use only original Festool parts |
| Safety | Overload and overheating protection, automatic shut-off with acoustic signal (3 beeps), mandatory use of a suitable extractor |
| Spare parts and repairability | Sanding pads, StickFix abrasive discs, brush segment, ventilation filter; repairs only by an authorized Festool workshop |
| General information | Original operating instructions, CE declaration of conformity, emission values: noise LpA 69 dB(A), vibration <2.5 m/s² |
Frequently Asked Questions - PLANEX LHSE 225 FESTOOL
User questions about PLANEX LHSE 225 FESTOOL
0 question about this device. Answer the ones you know or ask your own.
Ask a new question about this device
Download the instructions for your Grinder in PDF format for free! Find your manual PLANEX LHSE 225 - FESTOOL and take your electronic device back in hand. On this page are published all the documents necessary for the use of your device. PLANEX LHSE 225 by FESTOOL.
USER MANUAL PLANEX LHSE 225 FESTOOL
natural_image
Close-up of a black and silver cleaning tool with adjustable handle and base (no text or symbols visible)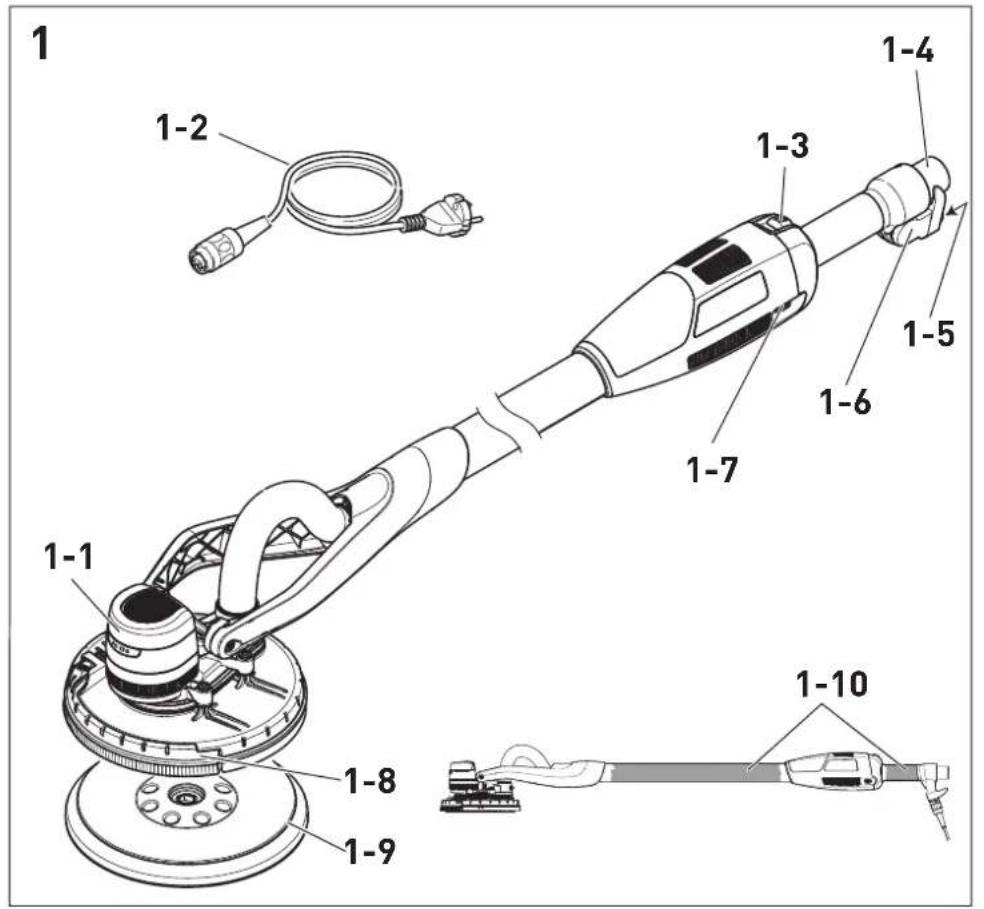

Head of Research, Development and Technical Documentation
Wendlingen, 2016-10-21
Original operating manual
1 S y m b o
Symbol Significance
 | Warning of general danger |
 | Risk of electric shock |
 | Read operating instructions and safety notices! |
 | Wear ear protection. |
 | Wear a dust mask. |
 | Wear protective goggles. |
 | Disconnect from the power supply! |
 | Do not dispose of as domestic waste. |
 | Tip or advice |
 | Handling instruction |
 | Safety class II |
2 Safety instructions
2.1 General safety instructions
WARNING! Read all safety warnings, instructions, illustrations and specifications provided with this power tool. Failure to follow all instructions listed below may result in electric shock, fire and/or serious injury.
Save all warnings and instructions for future reference.
The term "power tool" in the warnings refers to your mains-operated (corded) power tool or battery-operated (cordless) power tool.
2.2 Machine-related safety instructions
General safety instructions for sanding:
a. This power tool is designed to be sander with sandpaper. Read all safety instructions, information, illustrations and technical data enclosed with the machine. If the following instructions are not observed, this may lead to electrical shock, fire and/or serious injuries.
b. This power tool is not suitable for coarse sanding, sanding with a wire brush, abrasive cutting or polishing. Applications for which the power
tool is not intended can pose a serious risk and cause injuries.
c. Do not use any accessories that the manufacturer has not specially designed or recommended for this power tool. Just because you can attach accessories to your power tool does not guarantee that they can be used safely.
d. The permissible speed of the insertion tool must be at least the maximum speed specified on the tool itself. Accessories that rotate faster than the permitted speed can break and fly off.
e. The outer diameter and thickness of the insertion tool must correspond to the dimensions of your power tool. Insertion tools which are measured incorrectly cannot be sufficiently shielded or controlled.
f. Sanding discs, flanges, sanding pads and other accessories must be fully compatible with the rotary spindle on your power tool. Insertion tools which are not fully compatible with the rotary spindle on the power tool will rotate unevenly, vibrate strongly and may lead to a loss of control.
g. Do not use insertion tools that are damaged. Before each use, check insertion tools such as sanding discs for chipping and cracks and sanding pads for cracks, wear or heavy abrasive wear. If the power tool or insertion tool is dropped, check whether it is damaged. Damaged insertion tools will generally break after a short time.
h. Make sure that any other persons in the vicinity are at a safe distance from your work area. Anyone entering the work area must wear personal protective equipment. Fragments of the workpiece may fly off and even cause injuries outside the immediate work area.
i. Keep the mains cable away from rotating insertion tools. If you lose control of the machine, the mains cable may be severed or caught and your hand or arm could get caught in the rotating insertion tool.
j. Never place the power tool down before the insertion tool has come to a complete halt. The rotating insertion tool may make contact with the storage area, which could cause you to lose control of the power tool.
k. Do not leave the power tool running when you are carrying it. Your clothing may accidentally come into contact with and get caught in the rotating insertion tool.
l. Clean the vents in your power tool on a regular basis. The fan draws dust into the housing and a
large accumulation of metal dust may create electrical hazards.
Kickbacks and corresponding safety instructions: A kickback occurs as a result of using the power tool incorrectly or misguidedly. It can be prevented by taking appropriate precautions, as described below.
a. Hold the power tool firmly with both hands and move your body and arms into a position that allows you to intercept the kickback forces. Always use the additional handle, if there is one, so that you have the best possible control over the kickback forces or torque reactions during start-up. The operator can control the kickback and reaction forces by taking suitable precautionary measures.
b. Never place your hands near rotating tools. The power tool may move across your hand event of a kickback.
c. Take particular care when working on corners and sharp edges, for example. Prevent the insertion tool from rebounding away from the workpiece and jamming. The rotating insertion tool tends to get jammed when working on corners and sharp edges, or if it rebounds in the process. This results in loss of control or kickbacks.
Special safety instructions for sanding
a. Do not use oversized sanding discs. Follow Festool's specifications when selecting sanding discs. A sanding disc that is too large and protrudes over the sanding pad represents a cutting injury hazard and can cause catching, disc breakage or kickback.
Further safety instructions
- Harmful/toxic dust can be produced during your work (e.g. lead-containing paint, some types of wood and metal). Contact with this dust, especially inhaling it, can represent a hazard for operating personnel or persons in the vicinity. Comply with the safety regulations that apply in your country. Connect the electric power tool to a suitable extraction system.

To protect your health, wear a P2 protective mask.

Always wear protective goggles to protect against sanding hazards.
-If potentially explosive or self-igniting dust is produced during sanding, the machining instructions issued by the material manufacturer must always be followed.
- Attention: Risk of fire! Avoid overheating the grinding material and the sander. Always empty the dust container before taking a break. Swarf in the filter bag or filter of the mobile dust extractor may self-ignite in unfavourable conditions such as flying sparks when grinding metals. Particular danger exists if the swarf is mixed with paint, polyurethane residue or other chemical materials and the grinding material is hot after long periods of work.
- Hold the power tool firmly with both hands and assume a stable stance when performing work. Using both hands ensures that the power tool is guided safely.
- Always use an antistatic suction hose with the power tool. A slight electric shock may cause you to panic briefly and become distracted, which may result in an accident.
- Always use original Festool sanding pads. Foreign pads are not suitable for the speed of the sander and may break.
- Keep the carry bag out of reach of children. Children may suffocate or be strangled when playing with the carry bag.
- Only for AS/NZS: The tool shall always be supplied via residual current device with a rated residual current of 30 mA or less.
2.3 Emission levels
Typically, the noise levels that are determined in accordance with EN 62841 (see EC declaration of conformity) are as follows:
Sound pressure level L _PA = 69 dB(A)
Noise level L _WA = 80 dB(A)
Uncertainty K = 3 dB

CAUTION
Noise generated when working
Damage to hearing
▶ Always use ear protection.
Vibration emission value a_h (vector sum for three directions) and uncertainty K measured in accordance with EN 62841 (see EU Declaration of Conformity):
Vibration emission level a_h<2,5 m/s^2 (3 directions) K=1,5 m/s^2
The specified emission values (vibration, noise)
GB LHS-E 225
- are used to compare machines.
- They are also used for making preliminary estimates regarding vibration and noise loads during operation.
- They represent the primary applications of the power tool.
Increase possible for other applications, with other insertion tools or if not maintained adequately. Take note of idling and downtimes of machine!
3 Intended use
The long-reach sander is designed for sanding primed drywall constructions, ceilings and walls indoors and also for removing carpet residue, coats of paint, coverings, adhesives and loose plaster. When sanding outside or in damp rooms, an isolating transformer must be used.
Always use an appropriate mobile dust extractor. The Festool CTL/M 36 E ACP L A N E X mobile dust extractor is optimally designed for large quantities of dust.
The long-reach sander is not suitable for wet sanding.
The user is liable for damage and accidents caused by improper and non-intended use.
4 T e c h n
Long-reach sander LHS-E 225EQ
| Power 400 W | |
| No-load speed 400 - 920 rpm | |
| Sanding pad diameter 215 mm | |
| Abrasive diameter 225 mm | |
| Tool holder | D 13/10 |
| Dust extractor connection | 36 mm (27 mm) |
| Length | 1,59 m |
| Weight (without mains cable, with sanding pad) | 4 kg |
| Safety class | ☐ /II |
5 Machine features
[1-1] Sanding head
[1-2] plug it mains cable
[1-3] On/Off switch
[1-4] Extractor connector
[1-5] Plug it-connection
[1-6] Suction sleeve stop
[1-7] Speed control
[1-8] Detachable brush segment
[1-9] Insertion tool/sanding pad
[1-10] Gripping surfaces
The specified illustrations appear at the beginning of the Operating Instructions.
6 Commissioning

WARNING
Unauthorised voltage or frequency!
Risk of accident
The mains voltage and the frequency of the power source must correspond with the specifications on the machine's name plate.
▶ In North America, only Festool machines with the voltage specifications 120 V/60 Hz may be used.
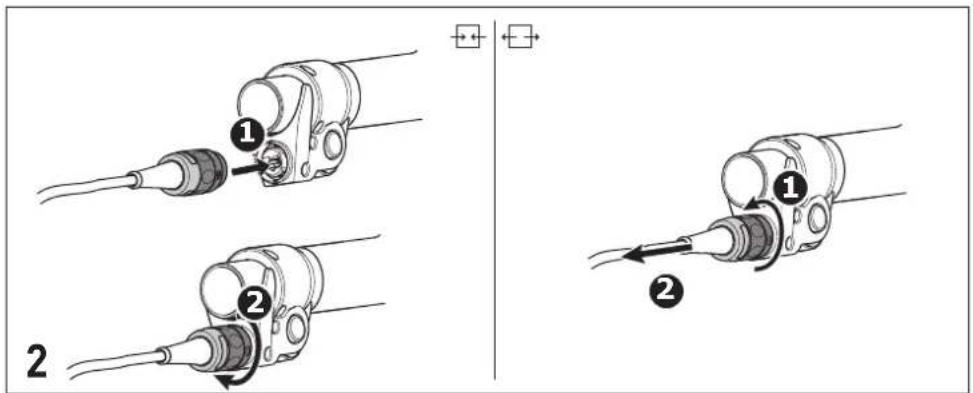
▶ Connecting and disconnecting the mains cable - [2]

Before switching on the power tool, make sure that the bayonet fitting at the mains cable is closed fully and locked.
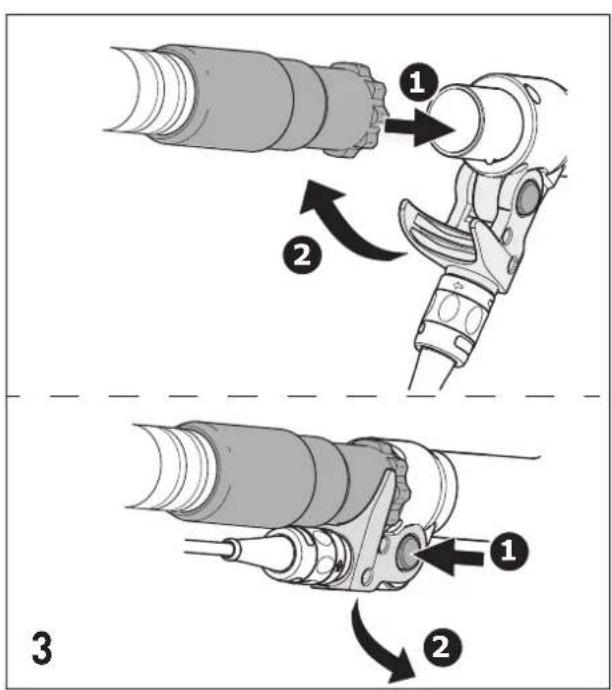
▶ To connect the suction hose [3], see also Section 7.5.
i Using a special vacuum sleeve, the PL A A I E X suction hose guarantees a permanent fixing and better protection against kinking.
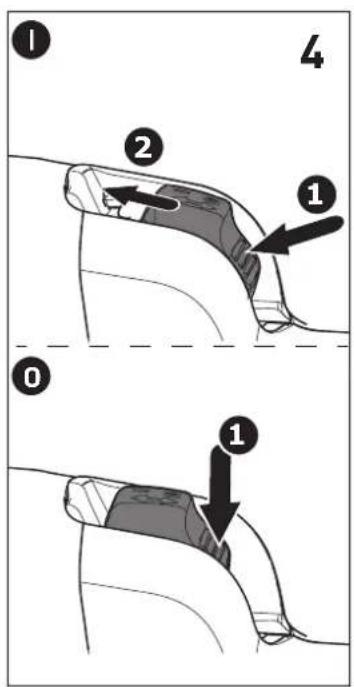
ON/OFF button [4]
ON (I) Push the on/off switch [1-3] down and forward.
On/off switch is locked.
OFF (0) Push the on/off switch [1-3] down and unlock it.
On/off switch moves back to the 0 position.
7 Settings


WARNING
Risk of injury, electric shock
▶ Always pull the mains plug out of the socket before performing any type of work on the machine!
7.1 Electronics
The power tool is equipped with a brushless EC-TEC motor for a long service life and power electronics with the following properties:
Smooth start-up
The electronically controlled smooth start-up ensures that the machine starts up jolt-free.
Constant speed
The preselected motor speed is kept constant through electronic control to ensure a uniform sanding speed up to a certain load.
Overload protection
If the pressure becomes too high while working, the power of the machine will be automatically reduced to prevent overheating.
Speed control
You can regulate the speed steplessly within the speed range using the adjusting wheel [1-7] (see Technical data).
This enables you to optimise the sanding speed to suit the material you are working on.
Overheating protection
Overheating protection is triggered when the pressure is too high or the cool air openings are dirty. The power tool beeps three times and switches off. Let the power tool cool down for approx. 15 minutes before using it again.
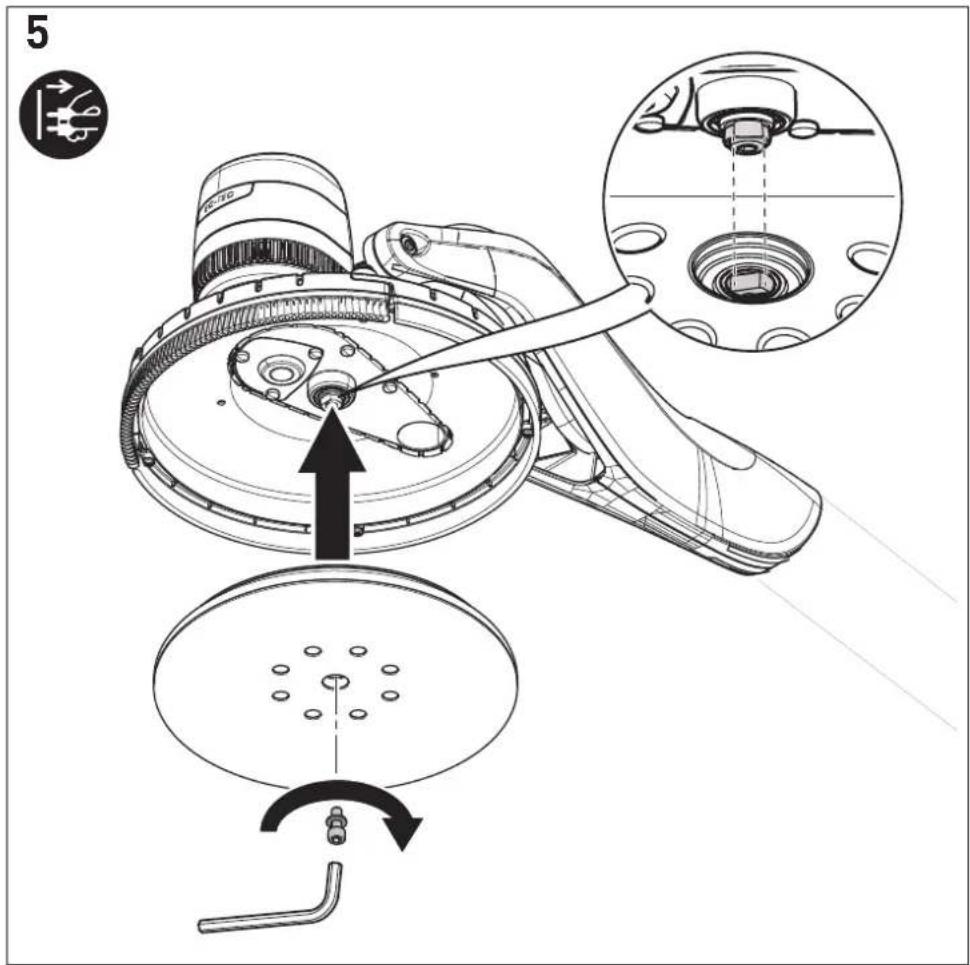
7.2 Replacing the sanding pad [5]
Observe the following instructions:
- An optimal work result can only be achieved using original accessories and consumables. The use of non-original accessories or consumables invalidates the right to claim under warranty.
- Only fit and remove the sanding pads using the tool supplied.
- Make sure that both flat edges engage in the opening on the sanding pad.
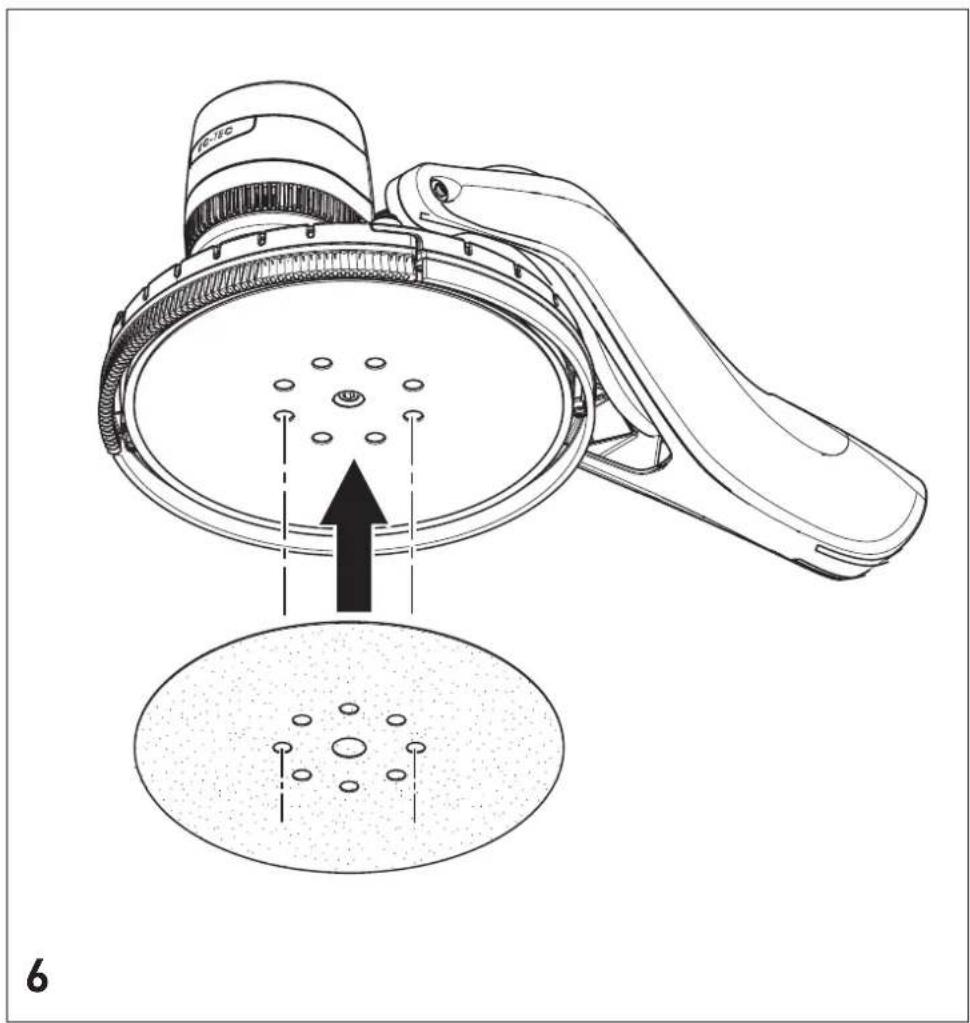
7.3 Changing the sanding discs [6]
Compatible StickFix sanding discs are quick and easy to attach to the StickFix sanding pad.
![FESTOOL PLANEX LHSE 225 - Changing the sanding discs [6] - 1](/content/2026/03/557539/images/5a9f4283f1a09fa7ff4a1e15bf6c68f4693574f53608f5cf74e1357c173304e7.jpg)
CAUTION! The holes in the sanding disc must be aligned with the holes in the sanding pad. Otherwise, the suction power is impaired and there is more exposure to dust.
Do not use interface pads.
7.4 Sanding close to edges [7]
The removable brush segment means that the distance at the side between the wall/ceiling and the sanding pad is reduced.
![FESTOOL PLANEX LHSE 225 - Sanding close to edges [7] - 1](/content/2026/03/557539/images/51f0e089acc4a10c2cdaf0453e4c2f4dccb8f6112448d4f72b3b0a1c09a87829.jpg)
CAUTION! Without a brush segment, there is more exposure to dust: Only remove it for specific applications.
The brush segment is fitted in reverse order to the process for removing it.
7.5 Dust extraction


WARNING
Heath hazard posed by dust
▶ Always work with an extractor.
▶ Comply with national regulations.
▶ Wear a dust mask.
A Festool mobile dust extractor with an extractor hose diameter of 27 mm or 36 mm (36 mm recommended due to the reduced risk of clogging) can be connected to the extractor connector [1-4].
① Festool CTL/M 36 E ACP L A N E X mobile dust extractors are adapted to the quantity of dust generated and permanently ensure the necessary suction power.
Recommendation: Use an antistatic suction hose. This helps reduce the electric charge.
8 Working with the power tool

WARNING
Risk of injury
▶ Do not hold the power tool by the sanding head.
▶Hold the power tool with both hands using the gripping surfaces [1-10].
▶ To switch on the power tool, see Section 6.
▶ Carefully place the sanding head onto the sanding surface.
▶ Perform the sanding work.
Do not apply too much pressure on the power tool as this will cause overloading. The best sanding results are achieved with moderate application pressure. The sanding performance and quality depend mainly on selecting the correct abrasive.
After finishing work
▶ Once you have finished the sanding work, set the power tool down.

CAUTION! Do not set the power tool down with the sanding head facing downwards – always lay it on the floor so that it is on its side with the brush ring facing down. Otherwise the sanding pad could be deformed.
GB LHS-E 225
To protect the sanding pad and the sanding head, always transport and store the power tool in the accompanying carry bag without the sanding discs.
9 Service and maintenance

WARNING
Risk of injury, electric shock
▶ Always disconnect the mains plug from the socket before performing maintenance work on the machine!
▶ All maintenance and repair work which requires the motor housing to be opened must only be carried out by an authorised service workshop.

Customer service and repair only through manufacturer or service workshops: Please find the nearest address at: www.festool.com/service
Only use original Festool spare parts! Order No. at: www.festool.com/service
- Check the plug and the cable regularly and should either become damaged, in order to avoid a hazard, have them replaced by an authorised after-sales service workshop.
To ensure constant air circulation, always keep the cooling air openings in the motor housing clean and free of any obstruction.
In the event of a slowdown in performance or increased vibrations, blow and clean cooling air openings.
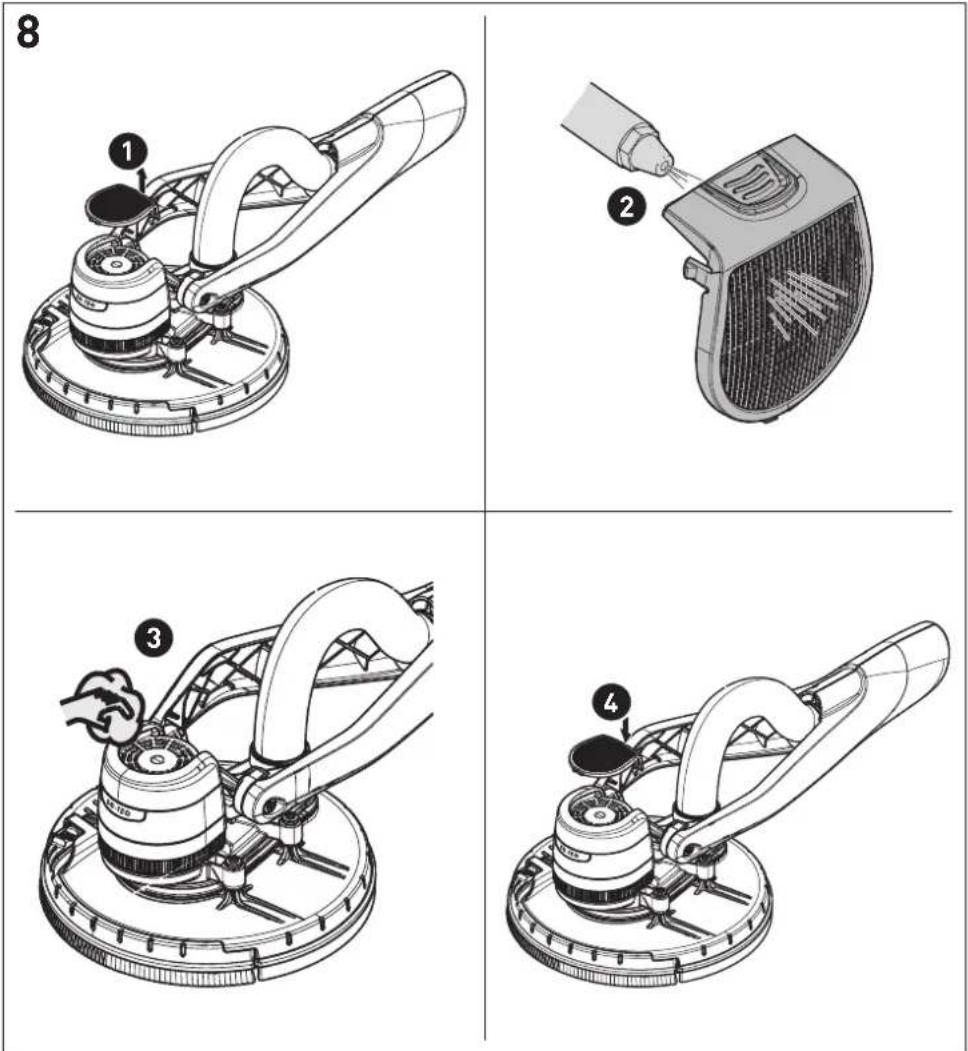
9.1 Cleaning the cool air filter [8]
If the cool air filter is blocked, the motor may not be sufficiently cooled and the power tool may switch off after three beeps because the temperature is too high.
▶ Clean all cool air openings on a regular basis.
▶ 1 Remove the filter sieve on the sanding head.
▶ 2 Remove any deposits in the sieve.
▶ 3 Remove any deposits in the openings in the housing.
▶ 4 Insert the filter sieve until it engages.
Let the power tool cool down for approx. 15 minutes before using it again.
10 Accessories
Use only original Festool sanding pads. Low-quality sanding and polishing pads may cause serious machine imbalances that decrease the quality of the work results and increase wear on the power tool.
Festool provides comprehensive accessories which allow you to use your power tool effectively and for diverse applications, e.g.
• Additional hand grip ZG-LHS 225
- Harness TG-LHS 225
- Mobile dust extractor CTL/M 36 E AC P L A N E X
The order numbers of the accessories and tools can be found in the Festool catalogue or on the Internet under "www.festool.com".
11 Environment
Do not dispose of electric power tools in household waste! Recycle devices, accessories and packaging. Observe applicable country-specific regulations.
EU only: In accordance with European Directive on waste electrical and electronic equipment and implementation in national law, used electric power tools must be collected separately and handed in for environmentally friendly recycling.
Information on REACH: www.festool.com/reach
12 Troubleshooting
| Problem Possible causes | Remedy | |
| LHS-E 225 does not run smoothly over the surface. | Hard spackling paste or hard sub-layers | Reduce speed. |
| Deformed sanding pad Use a new sanding pad. | ||
| Extraction power is insufficient. | Filter element on the CTL/M 36 E ACPLANEX is blocked/clogged. | Clean the filter element regularly:Option 1:Set the suction power adjustment to maximum. Using the surface of your hand, keep the nozzle, suction hose or suction opening on the mobile dust extractor covered for 10 seconds until automatic cleaning begins.Option 2:Manually clean the filter element (dust extraction).Option 3:Check the filter element for damage and clogging. Use a new filter element regularly. |
| Disposal bag inserted incorrectly. | The holes punched in the disposal bag must be inside the container. | |
| Filter bag inserted instead of disposal bag. | Always work with the disposal bag when operating the PLANEX (grey bag). | |
| The suction power on the CTL/M 36 E ACPLANEX is set too low. | Adjust the suction power to a higher setting. | |
| LHS-E 225 speed too high Reduce | speed. | |
| Suction hose blocked or kinked. | Remove blockage and straighten hose. | |
| Disposal bag full Dispose of the bag. | g. | |
| Brush segment open/not fitted. Only | remove the brush segment when sanding close to edges, refit it, see Section 7.4. | |
| The holes in the sanding discs are not aligned with the holes in the sanding pads. | Fit the sanding discs correctly, see Section 7.3. | |
| Excessive material removed from workpiece | LHS -E 225 speed too high Reduce | the speed, see Section 7.1 |
| Grit on abrasive too coarse Select | a finer grit. | |
| Surface quality not perfect | Incorrect abrasive grit Select a finer grit. | |
| Drying times of the spackling paste not observed. | Read the technical data sheets and manufacturer's recommendations. | |
| Spackling paste with a high percentage of filler/soft filler | Select a finer grit, e.g. P180. | |
| Power tool running when set down on the surface (groove formation). | Place the power tool in position and then switch it on. | |
| Always use a detachable brush segment when working on the surface. | ||
| Sanding marks on the surface | Sanding pad is placed down on the surface at an angle | Place the sanding pad down so that it is level. |
| The abrasive grit is too coarse for very soft spackling paste. | Choose a finer abrasive grit (abrasive Brilliant 2 available up to grit P 320). | |
| LHS-E 225 switches off while working and after three beeps | Cool air filter on the LHS-E 225 is blocked. | Clean the cool air filter on the LHS-E 225, see Section. 9.1. |
| Excessive pressure -> power tool activates overheating protection. | Let the power tool cool down for approx. 15 minutes and then apply less pressure. | |
| LHS-E 225 not working plug | it is not connected correctly. Check that the plug it is securely connected. | |
| Interruption to power supply Switch the power tool off and on again. | ||
| LHS-E 225 not working and beeps three times when an attempt is made to switch it on | Overheating protection active Let the power tool cool down for approx. 15 minutes before switching it back on again. | |
If problems other than those listed occur, please contact your Festool service workshop or your local specialist dealer.
Information on data protection
The power tool contains a chip which automatically stores machine and operating data (RFID). This data saved cannot be traced back directly to an individual.
The data can be read using special (contactless) devices and shall only be used by Festool for fault diagnosis, repair and warranty processing and for quality improvement or enhancement of the power tool. The data shall not be used in any other way without the express consent of the customer.
No utilizar Interface-Pads.
Äänenpainetaso L PA = 69 dB(A)
Äänentehotaso L _WA = 80 dB(A)
Epävarmuus K = 3 dB

HUOMIO
Declaration of Conformity
We as the manufacturer Festool GmbH, Wertstraße 20, 73240 Wendlingen, Germany declare under our sole responsibility that the product(s):
Designation:
Designation of Type(s):
Serial number(s) 11:
Long reach sander
LHS-E 225 EQ
10025499, 10016584
fulfills all the relevant provisions of the following UK Regulations:
S.I. 2008/1597
S.I. 2016/1091
S.I. 2012/3032
Supply of Machinery (Safety) Regulations 2008
Electromagnetic Compatibility Regulations 2016
Restriction of the Use of Certain Hazardous Substances in Electrical and Electronic Equipment Regulations 2012
and are manufactured in accordance with the following designated standards:
• BS EN 62841-1: 2015
• BS EN 62841-2-4: 2014
• BS EN 55014-1:2017
• BS EN 55014-2:2015
• BS EN IEC 61000-3-2:2019
• BS EN 61000-3-3:2013
• BS EN IEC 63000:2018
11 in the specified serial number range (S-Nr.) from 400000000 - 499999999

Place and date of declaration: Wendlingen, 15.04.2021
Signed on behalf of and in name of Festool GmbH

i.V. Q. Brandt
Ralf Brandt
Head of Productconformity


- Original operating manual
- Safety instructions
- General safety instructions
- Machine-related safety instructions
- Special safety instructions for sanding
- Further safety instructions
- Emission levels
- CAUTION
- Noise generated when working
- Damage to hearing
- GB LHS-E 225
- Intended use
- T e c h n
- Machine features
- Commissioning
- WARNING
- Unauthorised voltage or frequency!
- Risk of accident
- ON/OFF button [4]
- Settings
- Risk of injury, electric shock
- Electronics
- Smooth start-up
- Constant speed
- Overload protection
- Speed control
- Overheating protection
- Replacing the sanding pad [5]
- Observe the following instructions:
- Changing the sanding discs [6]
- Sanding close to edges [7]
- Dust extraction
- Heath hazard posed by dust
- Working with the power tool
- Risk of injury
- After finishing work
- Service and maintenance
- Cleaning the cool air filter [8]
- Accessories
- Environment
- Information on data protection
- HUOMIO
- Declaration of Conformity
Brand : FESTOOL
Model : PLANEX LHSE 225
Category : Grinder