SoundComm B40 - Wireless Earbuds BOSE - Free user manual and instructions
Find the device manual for free SoundComm B40 BOSE in PDF.
| Product Type | Wired Professional Communication Headset |
| Brand | Bose |
| Model | SoundComm B40 |
| Weight (single-ear model) | 284 g |
| Weight (dual-ear model) | 360 g |
| Cable Length (headset to control module) | 1.25 m |
| Cable Length (module to XLR connector) | 25.4 cm |
| Power Supply | 2 AA alkaline batteries |
| Battery Life (single-ear model) | Up to 56 hours |
| Battery Life (dual-ear model) | Up to 48 hours |
| Ambient Noise Reduction | Yes, on/off switchable |
| Microphone Type | Dynamic ambient noise reduction microphone (150 ohms) |
| Microphone Sensitivity | -71 dBV/Pa at 1 kHz |
| Input Impedance (mono, single ear) | 120 ohms ± 10% |
| Input Impedance (mono, dual ear) | 80 ohms ± 10% |
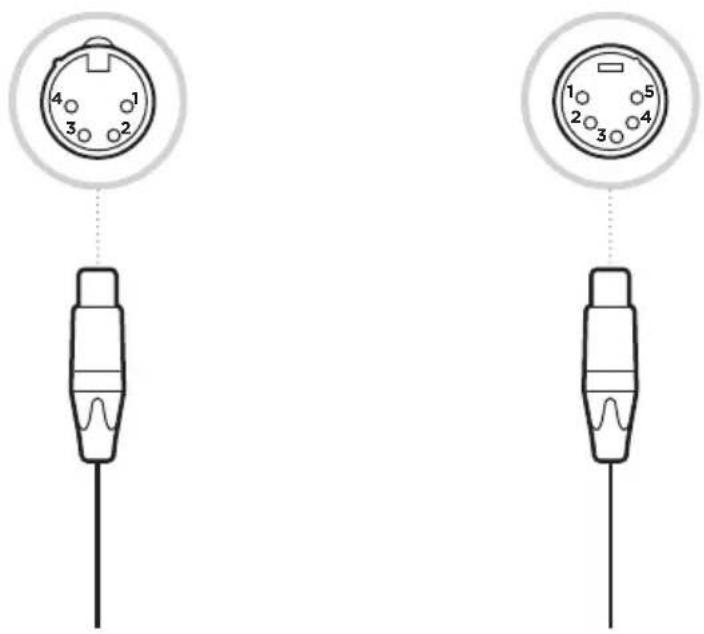
| Connector | 4-pin XLRF and 5-pin XLRM |
| User-Replaceable Parts | Ear cushions, microphone windscreen, batteries, side pad (single-ear model) |
| Maintenance | External cleaning with a dry cloth; do not disassemble interior |
| Important Safety Instructions | Do not use at high volume for extended periods, do not drive while wearing the headset, do not use in aviation, do not expose to water |
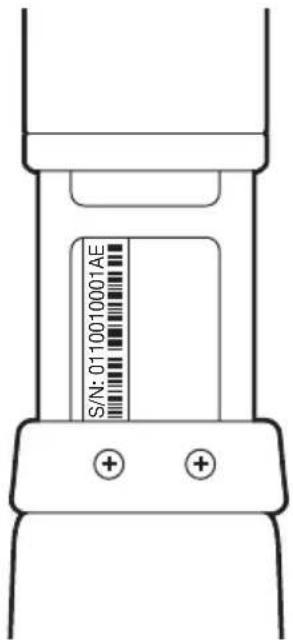
| Serial Number | Located under the left side of the headband (open fully) |
Frequently Asked Questions - SoundComm B40 BOSE
User questions about SoundComm B40 BOSE
0 question about this device. Answer the ones you know or ask your own.
Ask a new question about this device
Download the instructions for your Wireless Earbuds in PDF format for free! Find your manual SoundComm B40 - BOSE and take your electronic device back in hand. On this page are published all the documents necessary for the use of your device. SoundComm B40 by BOSE.
USER MANUAL SoundComm B40 BOSE
Please read and keep all safety and use instructions.

This product conforms to all applicable EU directive requirements. The complete declaration of conformity can be found at: www.Bose.com/compliance

This product conforms to all applicable Electromagnetic Compatibility Regulations 2016 and all other applicable UK regulations. The complete declaration of conformity can be found at: www.Bose.com/compliance
Bose Corporation hereby declares that this product is in compliance with the essential requirements per Radio Equipment Regulations 2017 and all other applicable UK regulations. The complete declaration of conformity can be found at: www.Bose.com/compliance
Important Safety Instructions
- Read these instructions.
- Keep these instructions.
- Heed all warnings.
- Follow all instructions.
- Do not use this apparatus near water.
- Clean only with a dry cloth.
- Only use attachments/accessories specified by the manufacturer.
- Refer all servicing to qualified personnel. Servicing is required when the apparatus has been damaged in any way, such as power-supply cord or plug is damaged, liquid has been spilled or objects have fallen into the apparatus, the apparatus has been exposed to rain or moisture, does not operate normally, or has been dropped.
WARNING/CAUTION
- Do NOT use the headset at a high volume for any extended period.
- To avoid hearing damage, use your headset at a comfortable, moderate volume level.
- Turn the volume down on your device before placing the headset on your ears, then turn the volume up gradually until you reach a comfortable listening level.
-
Focus on your safety and that of others if you use th headset while engaging in any activity requiring your attention, e.g., while riding a bicycle or walking in or near traffic, a construction site or railroad, etc. Remove the headset or adjust your volume to ensure you can hear surrounding sounds, including alarms and warning signals.
-
Do NOT use your headset while driving or at any time the inability to hear surrounding sounds may present a danger to yourself or others.
- Remove the headset immediately if you experience a warming sensation or loss of audio.
- Do NOT use the headset as an aviation communication headset.
- Do NOT use the headset if they emit any loud unusual noise. If this happens, turn the headset off and contact Bose customer service.
- Do NOT use mobile phone adapters to connect the headset to airplane seat jacks, as this could result in injury or property damage due to overheating.

Contains small parts which may be a choking hazard. Not suitable for children under age 3.

This product contains magnetic material. Consult your physician on whether this might affect your implantable medical device.
- Do NOT expose this product to dripping or splashing, and do not place objects filled with liquids, such as vases, on or near the product.
- Keep the product away from fire and heat sources. Do NOT place naked flame sources, such as lighted candles, on or near the product.
- Do not expose products containing batteries to excessive heat (e.g. from storage in direct sunlight, fire or the like).
- Do NOT make unauthorized alterations to this product.
NOTE: This equipment has been tested and found to comply with the limits for a Class B digital device, pursuant to Part 15 of the FCC Rules. These limits are designed to provide reasonable protection against harmful interference in a residential installation. This equipment generates, uses, and can radiate radio frequency energy and, if not installed and used in accordance with the instructions, may cause harmful interference to radio communications. However, there is no guarantee that interference will not occur in a particular installation. If this equipment does cause harmful interference to radio or television reception, which can be determined by turning the equipment off and on, the user is encouraged to try to correct the interference by one or more of the following measures:
- Reorient or relocate the receiving antenna.
- Increase the separation between the equipment and receiver.
- Connect the equipment into an outlet on a circuit different from that to which the receiver is connected.
- Consult the dealer or an experienced radio/TV technician for help.
Changes or modifications not expressly approved by Bose Corporation could void the user's authority to operate this equipment.
This device complies with part 15 of the FCC Rules and with Industry Canada license-exempt RSS standard(s).
Operation is subject to the following two conditions: (1) This device may not cause harmful interference, and (2) this device must accept any interference received, including interference that may cause undesired operation.
This symbol means the product must not be discarded as household waste, and should be delivered to an appropriate collection facility for recycling. Proper disposal and recycling helps protect natural resources, human health and the environment. For more information on disposal and recycling of this product, contact your local municipality, disposal service, or the shop where you bought this product.
Please complete and retain for your records
The serial and model numbers are located beneath the left side of the headband.
Serial number:
Model number:
Please keep your receipt with your owner's guide. Now is a good time to register your Bose product.
You can easily do this by going to global.Bose.com/register
Date of Manufacture: The eighth digit in the serial number indicates the year of manufacture; "8" is 2008 or 2018.
EU Importer: Bose Products B.V., Gorslaan 60, 1441 RG Purmerend, The Netherlands
UK Importer: Bose Limited, Bose House, Quayside Chatham Maritime, Chatham, Kent, ME4 4QZ, United Kingdom
©2021 Bose Corporation. No part of this work may be reproduced, modified, distributed or otherwise used without prior written permission.
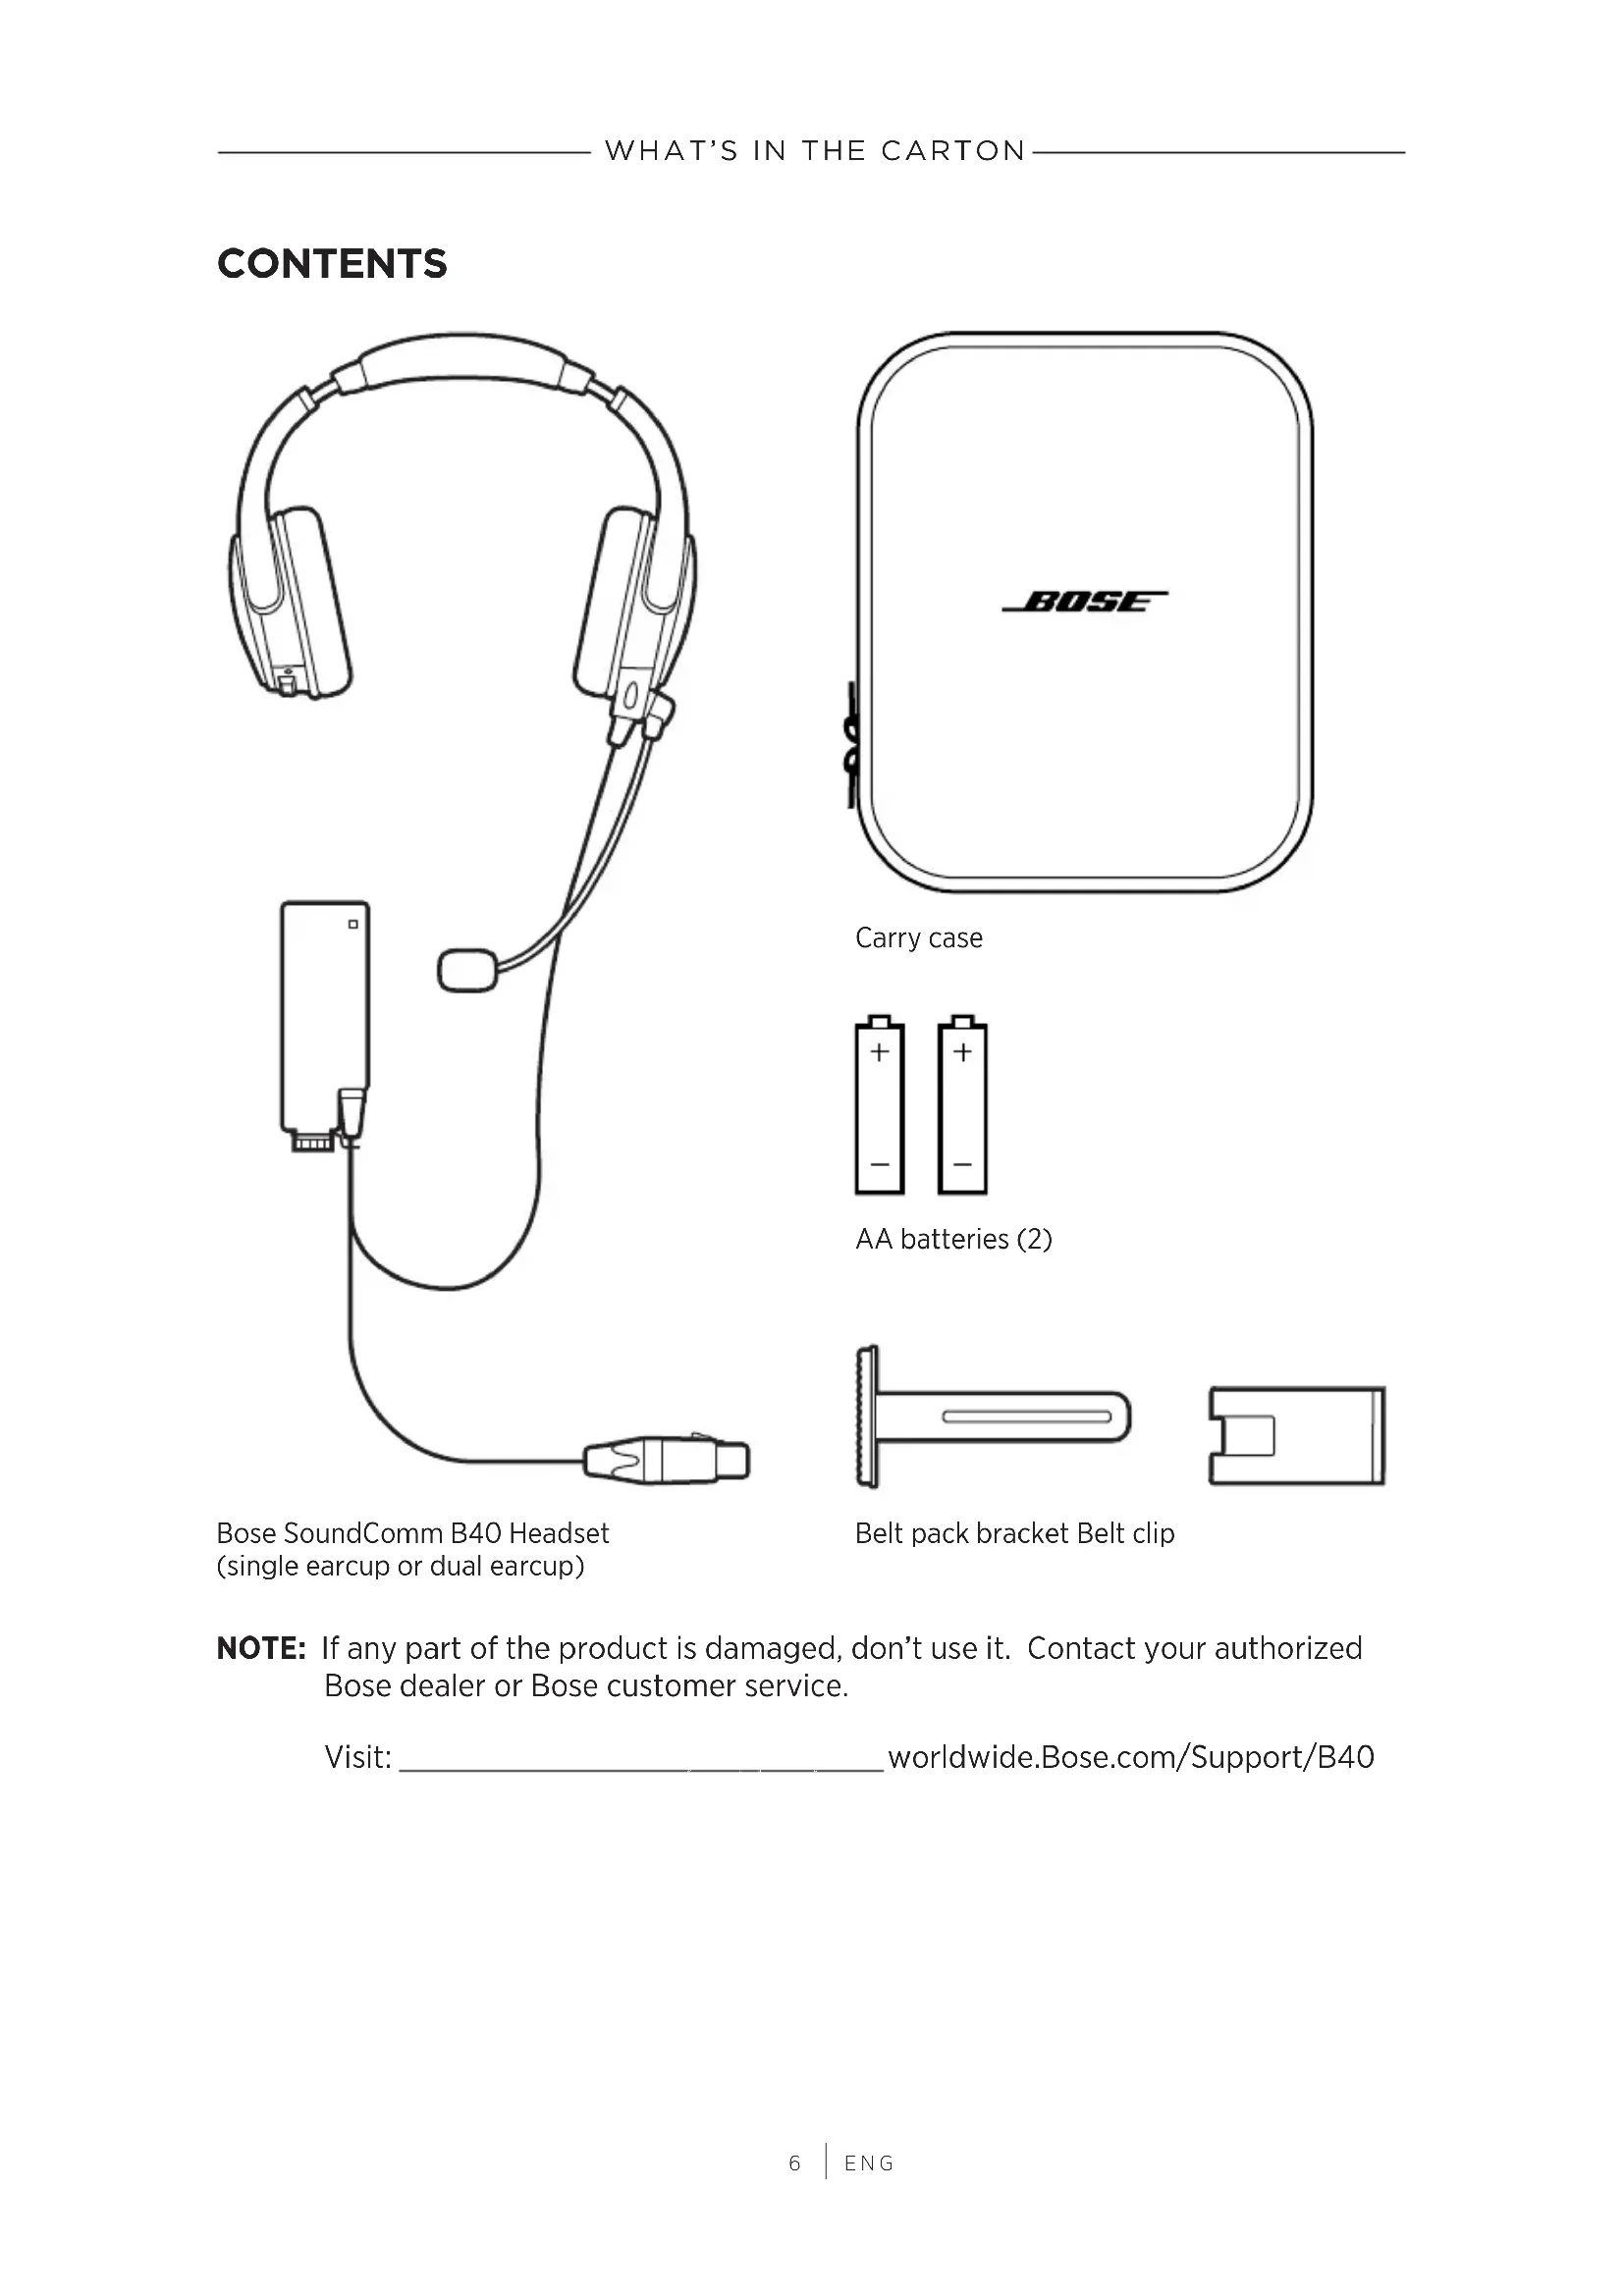
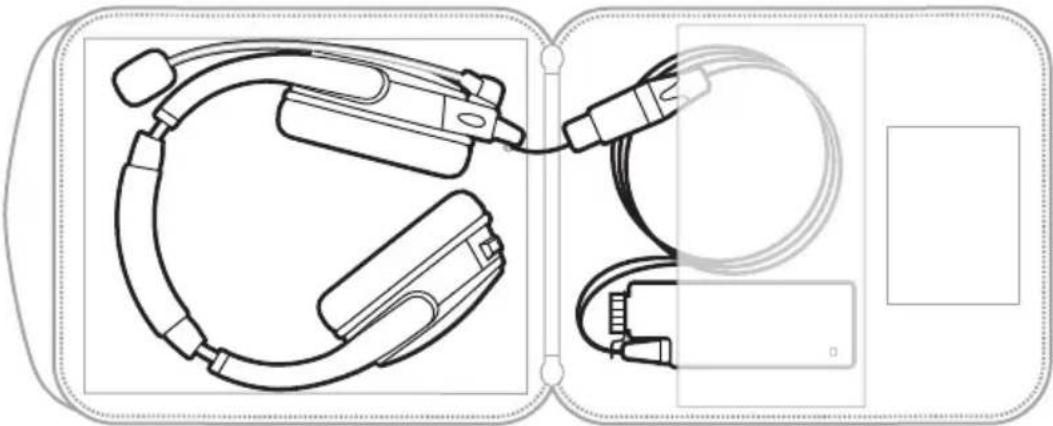
WHAT'S IN THE CARTON
Contents 6
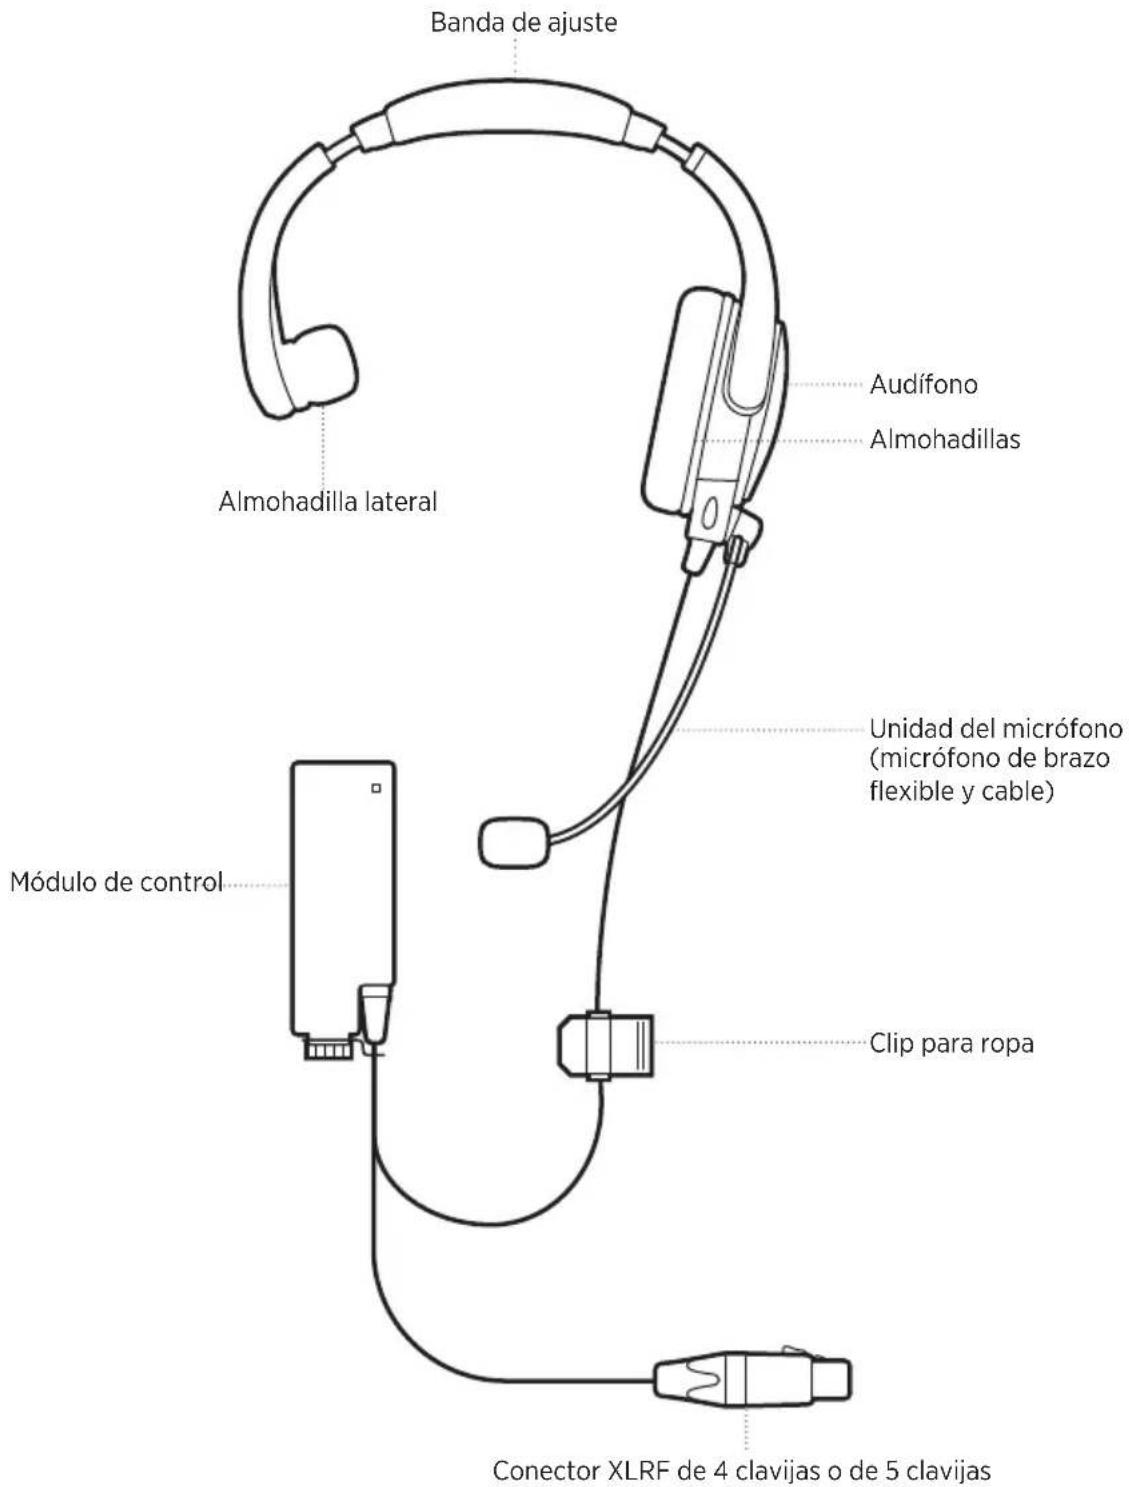
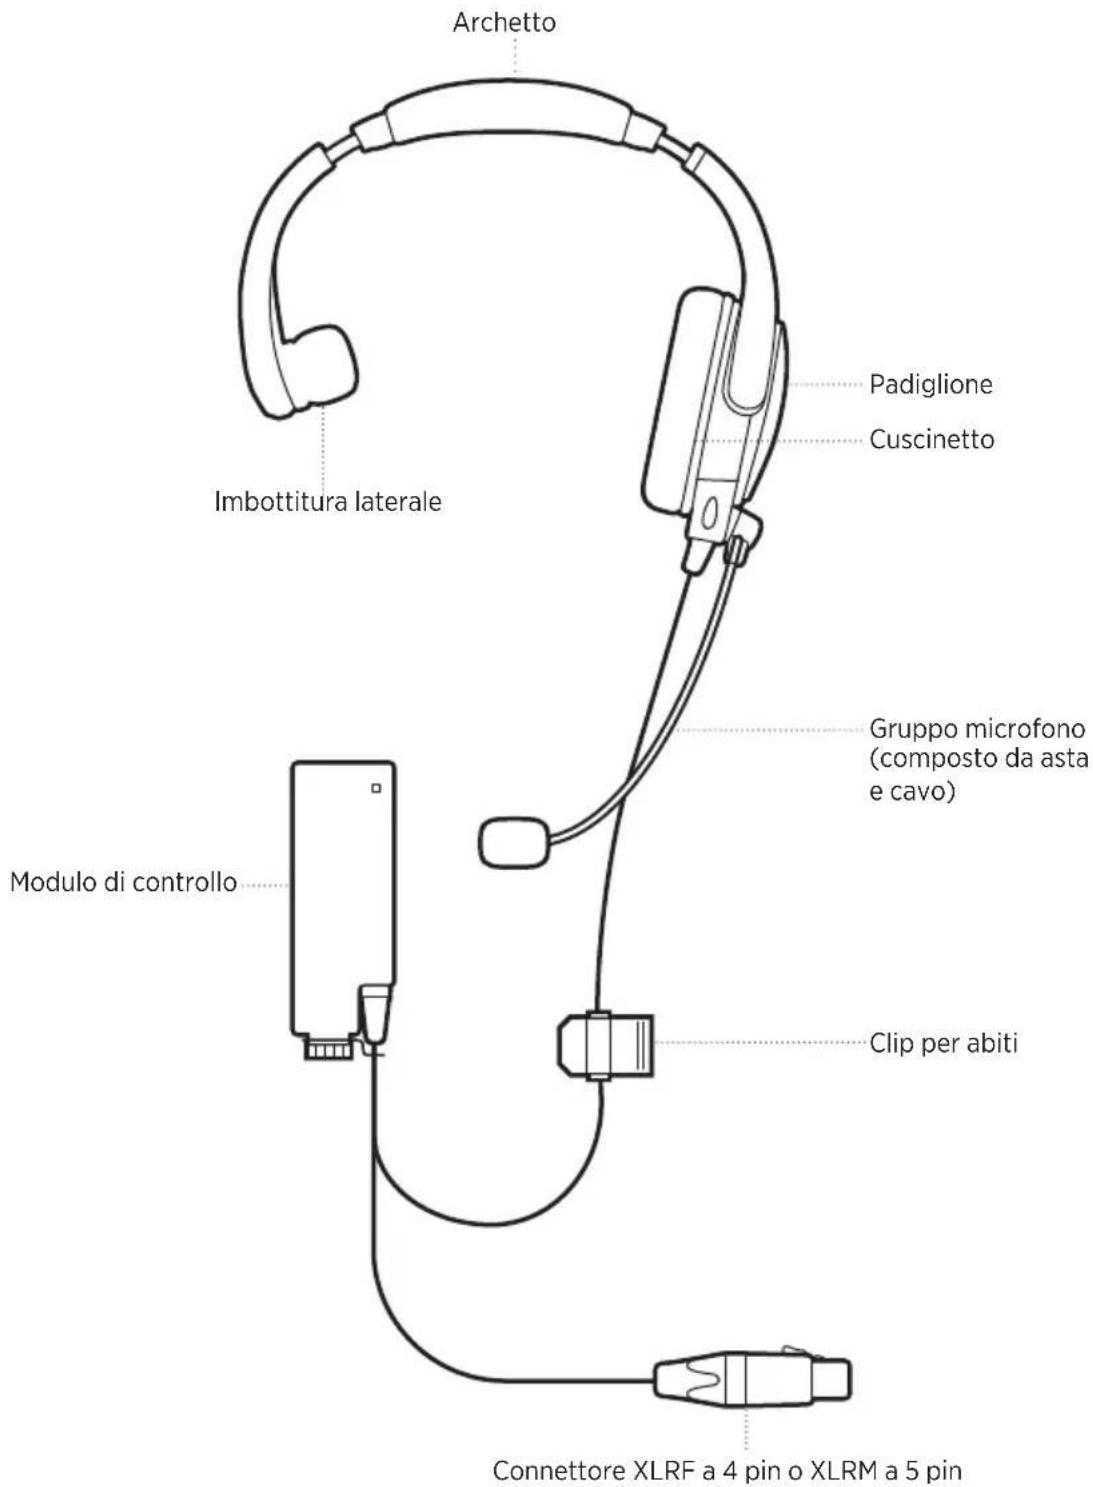
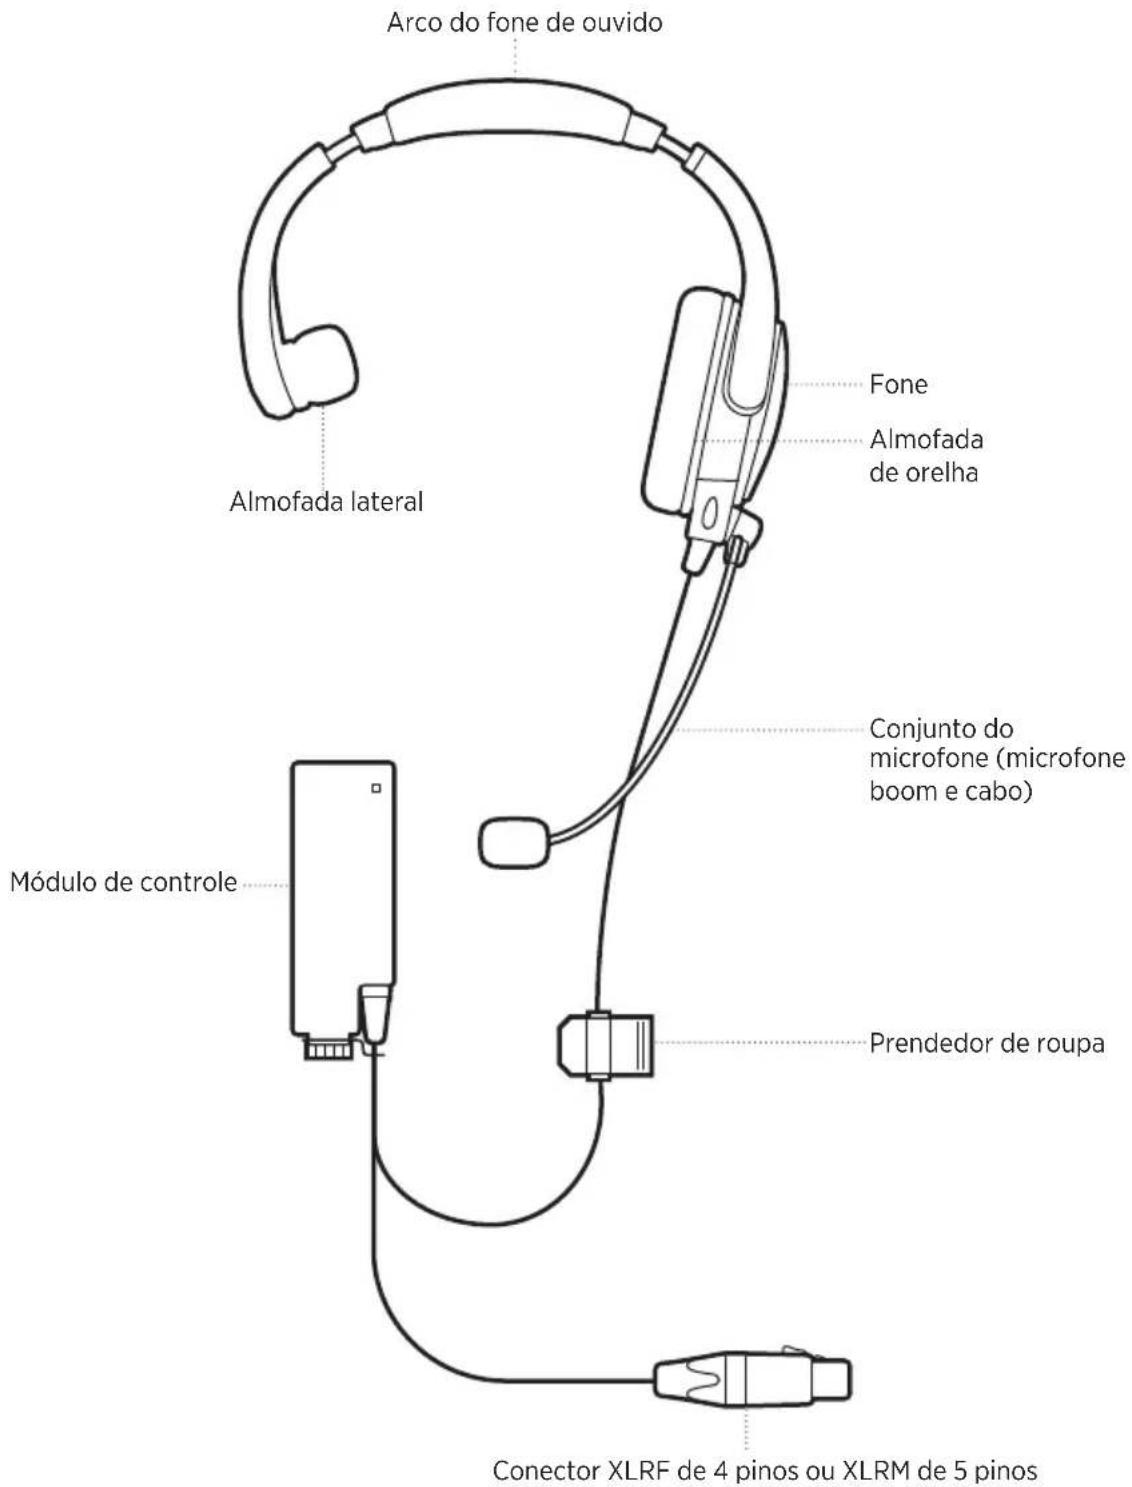
HEADSET COMPONENTS
Headset.... 7
HOW TO WEAR THE HEADSET
Fit the headset.... 8
Adjust the headset fit.... 8
MICROPHONE
Adjust the microphone.... 9
Move the microphone assembly (dual headset only) 10
HOW TO WEAR THE CONTROL MODULE (OPTIONAL)
Use the belt clip.... 12
Disconnect the belt clip 12
Use the belt pack bracket 13
Attach the bracket to your radio/belt pack.... 13
Attach the control module to your radio/belt pack.... 14
Connect the control module 14
Disconnect the control module.... 15
ACOUSTIC NOISE CANCELLATION
Power on 16
Power off.... 16
BATTERIES
Install the batteries.... 17
Battery life 17
HEADSET STATUS
Battery Status 18
CARE AND MAINTENANCE
Store the headset 19
Clean the headset.... 20
Replacement parts and accessories.... 21
Replacement Instructions.... 21
TECHNICAL INFORMATION
Serial number location.... 23
Limited warranty 23
Headset Specification 24
Microphone Specifications.... 24
On head Weight 25
Cable length 25
Headset variants.... 25
TROUBLESHOOTING
Try these solutions first 26
Other solutions 26
CONTENTS
natural_image
Line drawing of a headset and audio device (no text or symbols)Bose SoundComm B40 Headset (single earcup or dual earcup)

Carry case

AA batteries (2)
natural_image
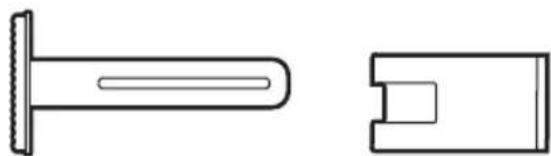
Technical line drawing of a mechanical component with two views: top view shows a cylindrical shaft and side view shows a rectangular cutout (no text or symbols)Belt pack bracket Belt clip
NOTE: If any part of the product is damaged, don't use it. Contact your authorized Bose dealer or Bose customer service.
Visit: ____ worldwide.Bose.com/Support/B40
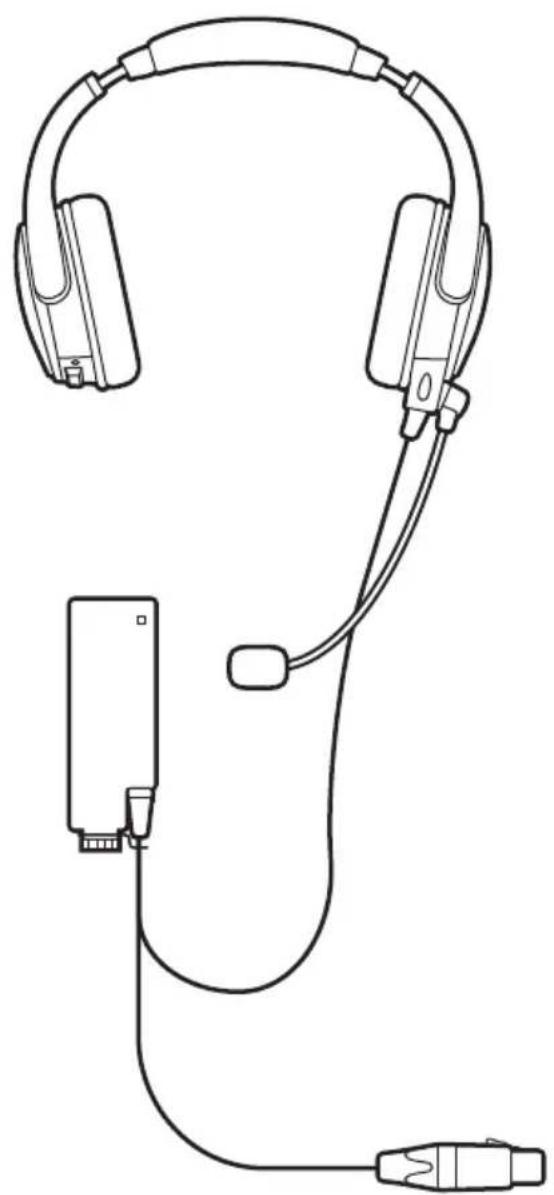
HEADSET
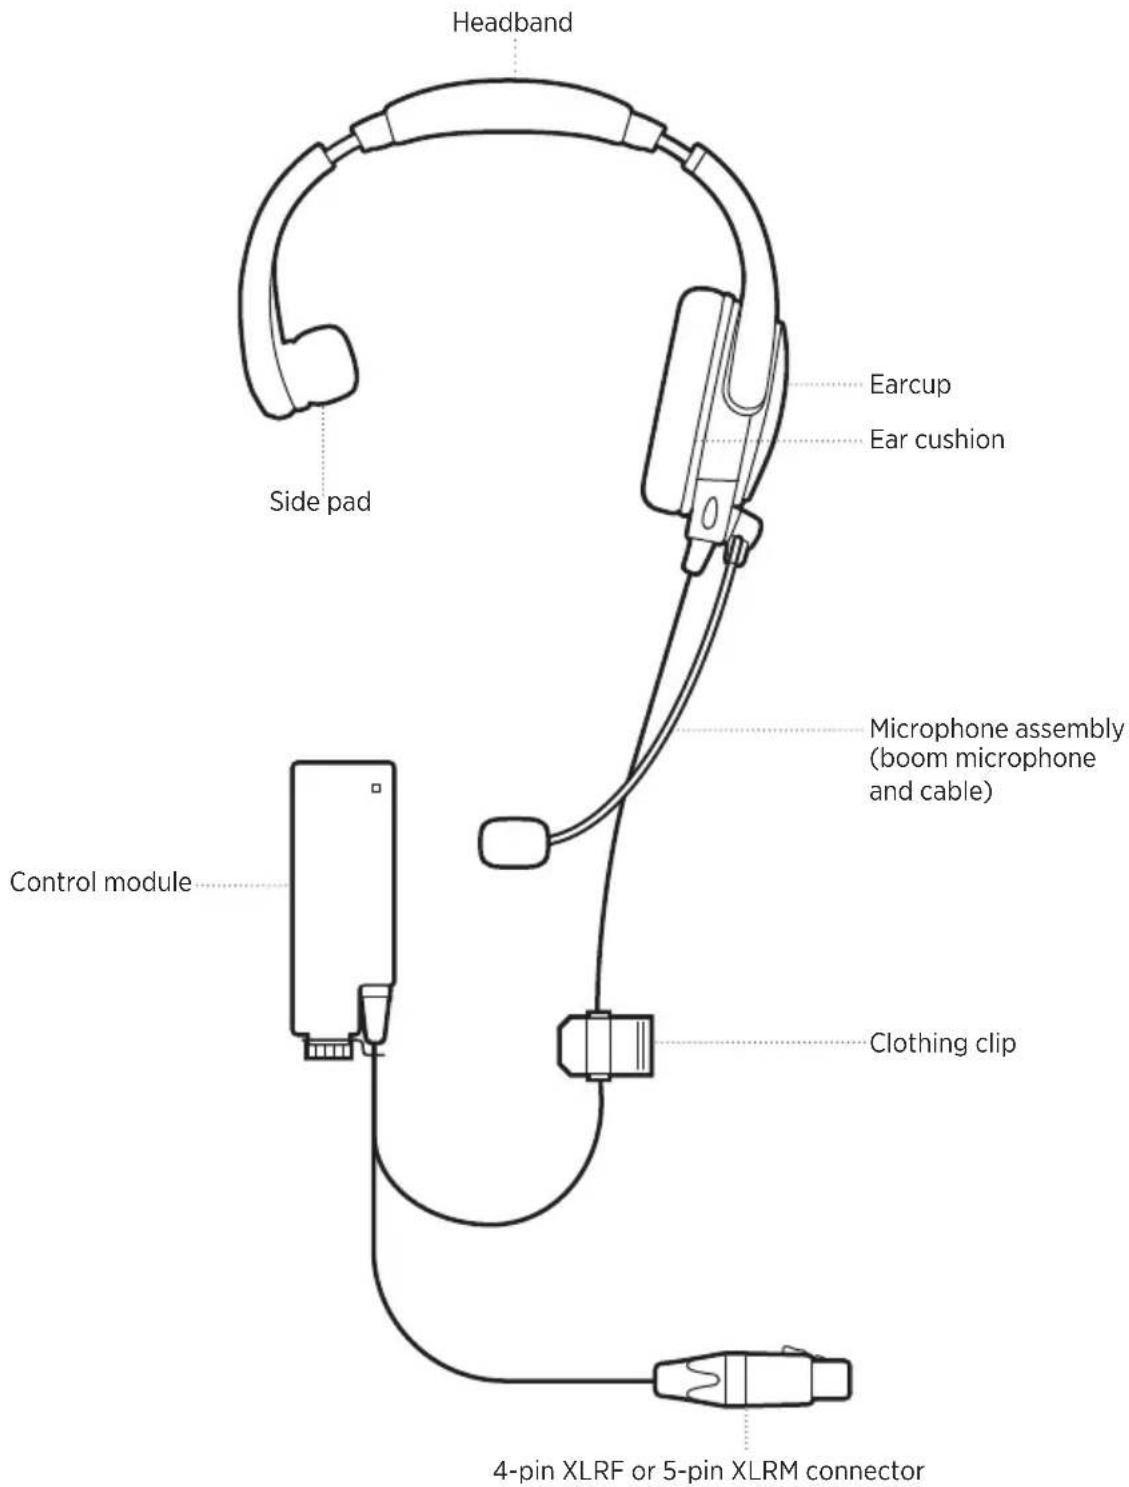
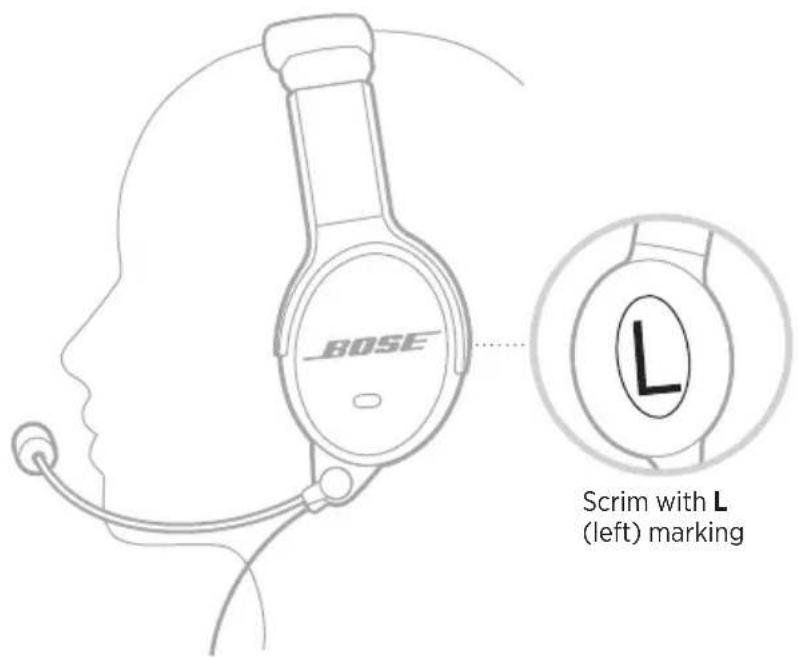
NOTES: Left earcup model pictured.
Dual earcup headset pictured on page 6.
FIT THE HEADSET
As you put the headset on, adjust each earcup so its cushion is completely over your ear. You should feel an even, gentle pressure all around each ear.
NOTE: Make sure you wear the headset in the correct orientation. Inside of each earcup (scrim) is clearly marked with an L (left) or an R (right).
Adjust the headset fit
If you need to adjust the headband, make sure the headband is evenly centered on top of your head. The headband should rest gently on your head.
NOTE: For best comfort, make your final adjustments with noise cancellation powered on in a noisy environment.
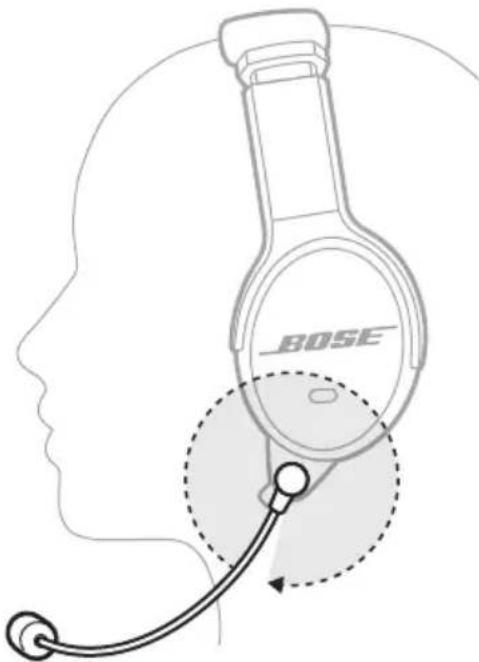
Microphone placement is important for clear communications.
NOTE: On the dual headset, the microphone assembly comes attached to the left earcup. To move the microphone to the other earcup, see page 10.
- Grasp the microphone with your fingers and adjust so it is level with your mouth.
- Position the microphone so it is 0.25" (6.35 mm) from your lips.
NOTE: The microphone should not be touching your lips.
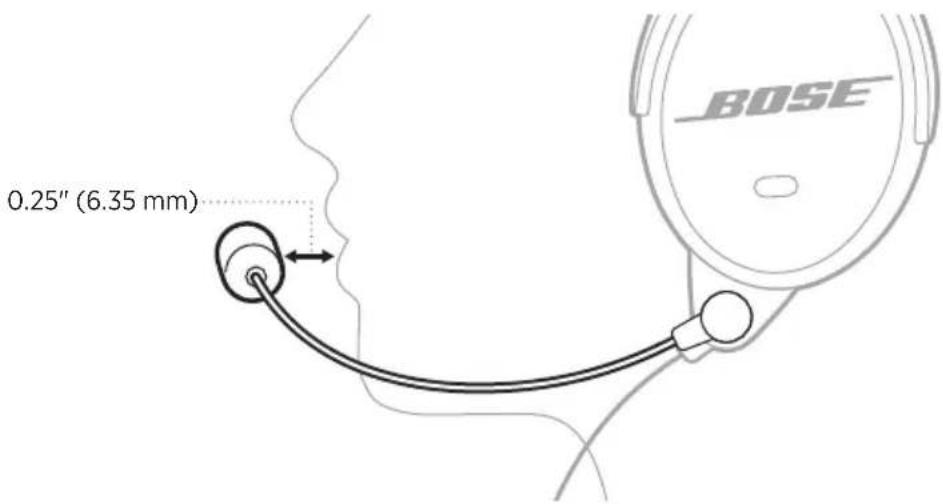
CAUTION: The microphone can rotate up to 320^ . Do NOT force the microphone beyond the intended rotation or damage could occur.
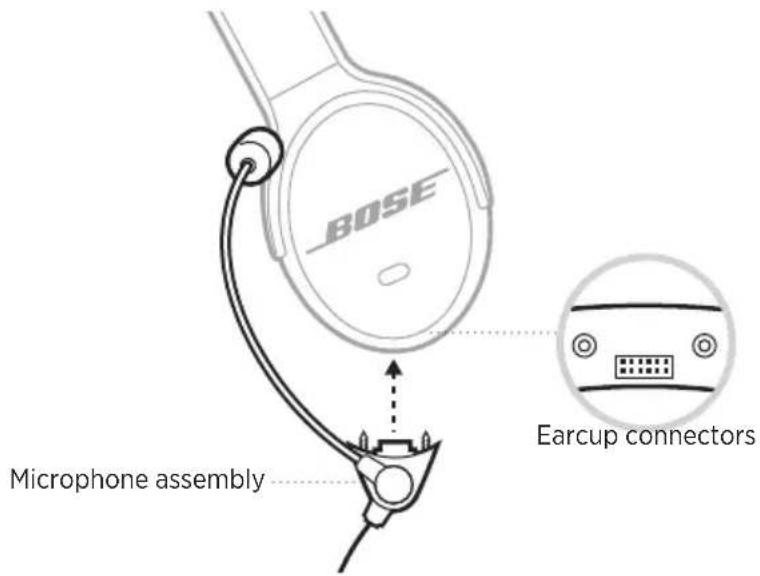
MOVE THE MICROPHONE ASSEMBLY (DUAL HEADSET ONLY)
The dual earcup headset has a reversible microphone assembly that can be worn on the left or right side of the headset.
- Using a Phillips screwdriver (not provided), loosen the two screws on the microphone assembly base on the bottom of the earcup.
NOTE: Rotate the microphone up towards the headband for additional space to loosen the screws.
- Pull the microphone assembly down to remove from the earcup.

-
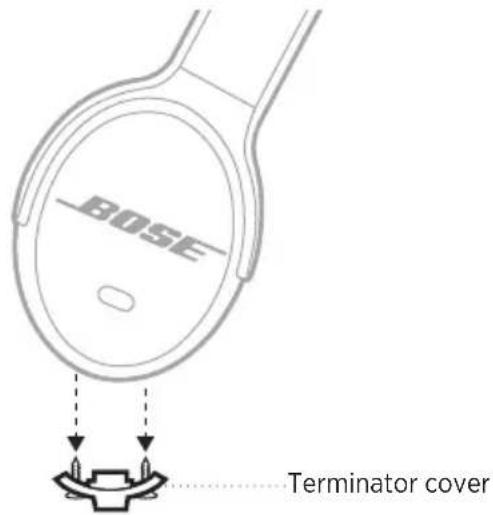
On the other earcup, loosen the two screws on the terminator cover.
-
Pull the terminator cover down to remove from the earcup.
- Align and attach the microphone assembly to the connectors on the preferred earcup.
CAUTION: Do NOT force the connectors or the earcup may be damaged.
-
On the microphone assembly base, tighten the two screws until the assembly is secure to the headset.
-
Align and attach the terminator cover to the other earcup.
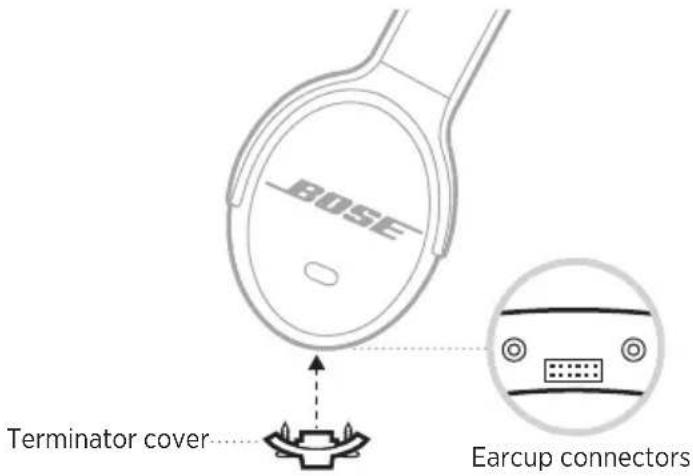
- On the terminator cover, tighten the screws until the cover is secure to the headset.
NOTE: In order to use the headset, the terminator cover must be securely attached to the headset.
USE THE BELT CLIP
- Align the dual lock tab on the belt clip to the dual lock tab on the control module.
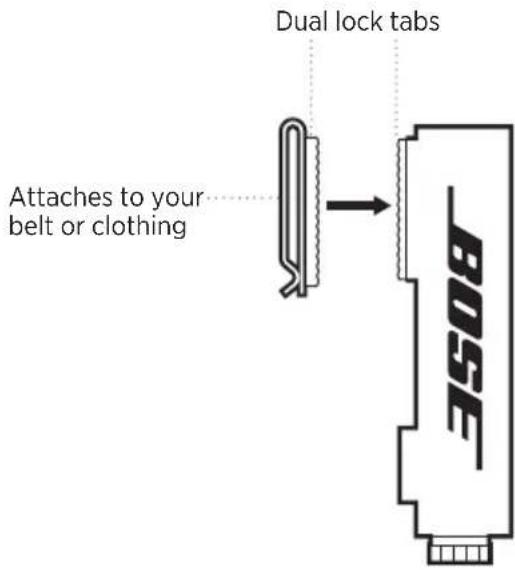
- Press firmly to attach.
Disconnect the belt clip
Starting from the top, pull the belt clip away from the control module.

USE THE BELT PACK BRACKET
Attach the bracket to your radio/belt pack
- On the back of your radio/belt pack, loosen the two screws and remove the belt clip.
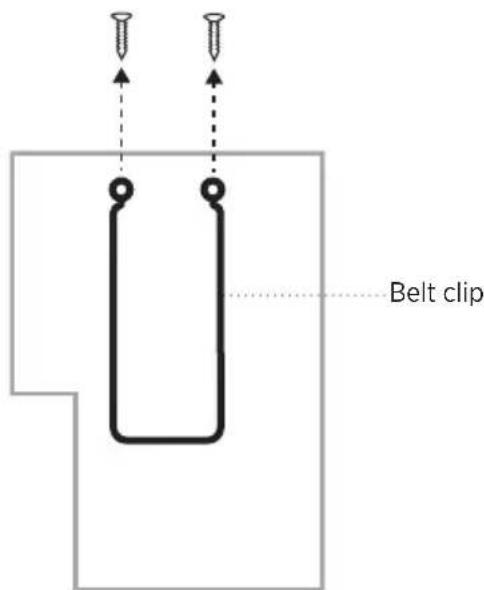
- Aligning the screw holes, place the bracket on top of your radio/belt pack.
NOTE: The belt pack bracket can be attached to the left or right side of your radio/belt pack.
- Aligning the screw holes, place the belt clip on top of the bracket.
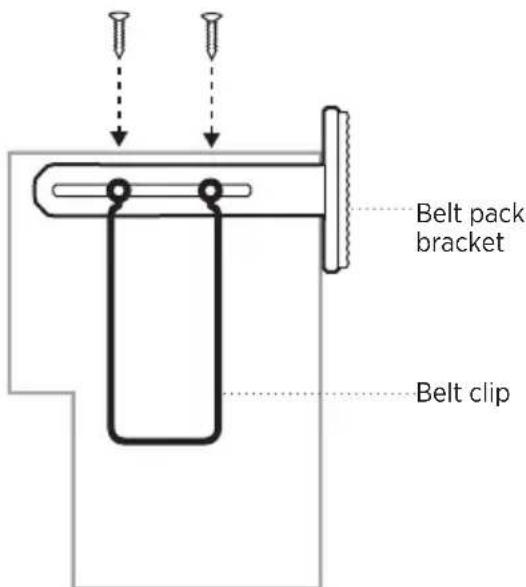
- Re-insert the two screws from your radio/belt pack and tighten until secure.
ATTACH THE CONTROL MODULE TO YOUR RADIO/BELT PACK
- Align the dual lock tab on the control module with the dual lock tab on the belt pack bracket.
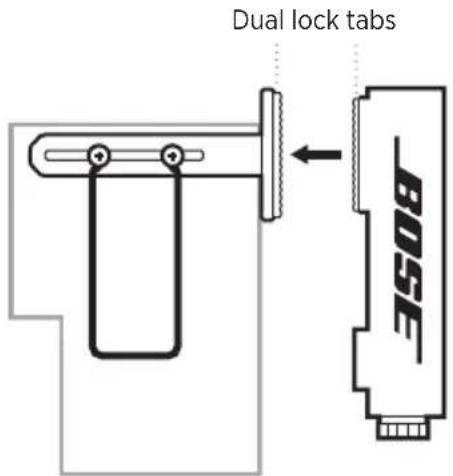
- Press firmly until you hear a click.
CONNECT THE CONTROL MODULE
- Align the XLR connector with the pins on your radio/belt pack connector.
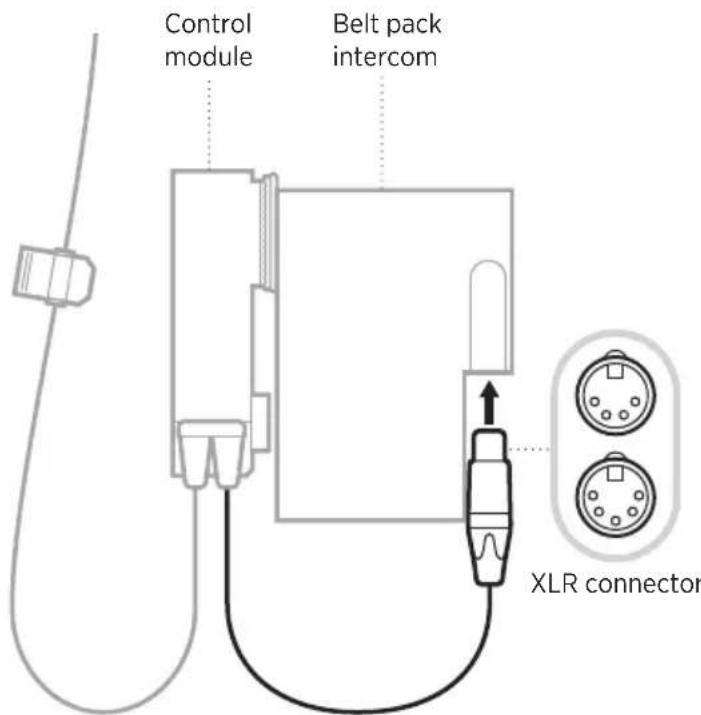
- Press firmly until you hear a click.
NOTE: The headset can also connect to a camera using the XLR connector. Refer to your camera owner's guide for connection instructions.
DISCONNECT THE CONTROL MODULE
- On the XLR connector, press down on the metal tab and gently pull the cable away from the belt pack.
NOTE: Most belt packs have a locking mechanism.
- Starting at the bottom, pull the control module away from the dual lock tab on the belt pack.

POWER ON
On the top of the control module, push the Power switch away from the battery light.
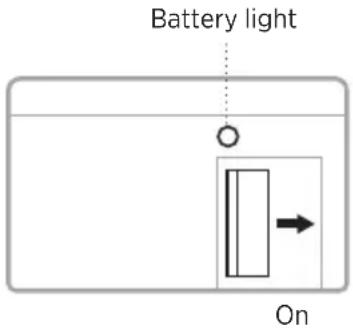
The battery light glows red for three seconds then shows the battery status (see page 18).
POWER OFF
On the top of the control module, push the Power switch towards the battery light.
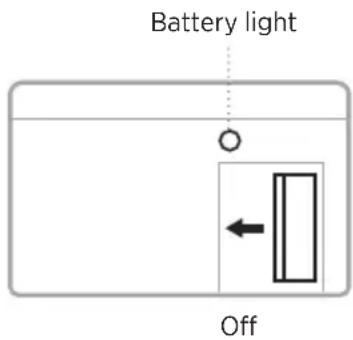
NOTE: When acoustic noise cancellation is off, the headset still provides audio and communications. To conserve battery, power off noise cancellation when the headset is not in use.
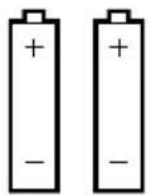
INSTALL THE BATTERIES
- On the top of the control module, twist the cap to the left (counter-clockwise) to open the battery compartment.
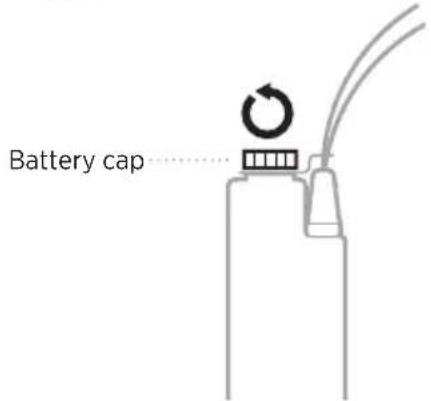
-
Insert the two AA alkaline batteries into the battery compartment. Match the + and - symbols on the batteries with the + and - markings on the control module.
-
Twist the cap to the right (clockwise) until secure.
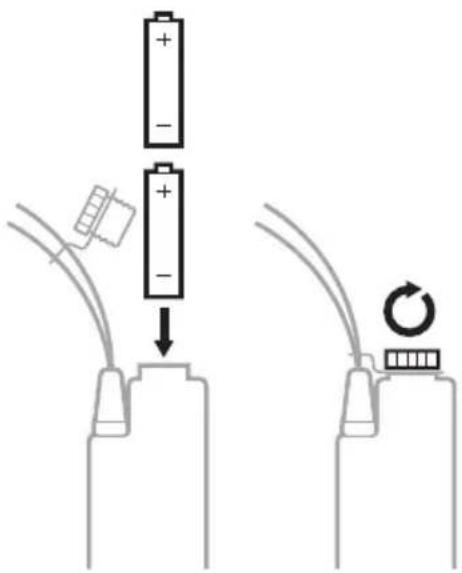
CAUTION: Only use AA alkaline batteries.
Battery life
Single earcup: up to 56 hours
Dual earcup: up to 48 hours
NOTE: For more information about battery status, see page 24.
BATTERY STATUS
The Battery light is located on the top of the control module, next to the Power switch.

LIGHT ACTIVITY BATTERY STATUS
| Blinking green Full charge | |
| Blinking red (slow) Medium charge (10 hours or less remaining) | |
| Blinking red (fast) Low charge (2.5 hours or less remaining) |
STORE THE HEADSET
The headset should be stored in the supplied carry case.
- Rotate the microphone assembly up, so the microphone gently rests next to the headband.
- Place the headset in the case with the cable laying across the center hinge of the case.
natural_image
Technical line drawing of a medical device with connectors and cables, no text or symbols presentNOTE: When storing the headset for an extended period, remove the batteries.
CLEAN THE HEADSET
The headset may require periodic cleaning.
WARNING: Do NOT attempt to disassemble or clean the inside of the earcups or other parts of the headset. Only the microphone windscreen, side pad (single earcup), batteries, and ear cushions are replaceable by the user.
COMPONENT CLEANING PROCEDURE
| Headset/earcups | Wipe the outside surfaces with a soft, dry cloth.Carefully use tweezers, if necessary, to remove foreign matter that may be in the openings.Do NOT to force any dirt or debris into the openings.Do NOT blow air into or vacuum the openings as this may damage the headset.Do NOT allow moisture to get inside the earcups or the audio input connector. |
| Ear cushions | To extend the life of the ear cushions, perform regular cleaning.Remove the ear cushions (see page 21) and allow them to air dry.Using a dry cloth, clean the flange surface located underneath the ear cushions of any debris.Do NOT immerse the ear cushions in water or any other liquid. |
| Earcup inner screens (scrim) | Air dry the earcup inner screen (scrim) if it becomes damp from environmental moisture such as light rain, dew, perspiration, or condensation.Do NOT use electric heaters or blowers to dry the earcup inner screen.Do NOT attempt to remove, replace, repair, or clean this component. If the screen appears damaged or worn out, contact Bose customer service. |
| Microphone windscreen | Wipe the windscreen using a damp cloth and mild soap. |
REPLACEMENT PARTS AND ACCESSORIES
Replacement parts and accessories can be ordered through Bose customer service.
Visit: ____ worldwide.Bose.com/Support/B40
WARNING: Do NOT attempt to disassemble or service the inside of the earcups or other parts of the headset.
Replacement Instructions
Only the side pad (single earcup), microphone windscreen, batteries, and ear cushions are replaceable by the user.
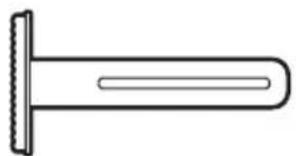
Side pad (single earcup)
The side pad is attached to the headband with a dual lock tab.
- Gently pull the old side pad away from the headband.
- Align the new side pad with the dual lock tab and firmly press until secure.
Microphone windscreen
The microphone windscreen can be removed and replaced.
- Carefully slide the windscreen off of the microphone.
- Slide the replacement windscreen on and make sure it fits completely over the microphone.
Ear cushion
Ear cushions should be replaced every 3 – 6 months. Replace the ear cushions if you see:
- Flaking of the outer covering
- Cuts or tears
- Flattening of the cushion
You may have to replace the ear cushions more often if you:
- Have a full beard or thick facial hair
- Use the headset in extreme temperatures
- Damage the cushions because of improper storage
NOTE: Replacement instructions are also provided with the ear cushion replacement kit.
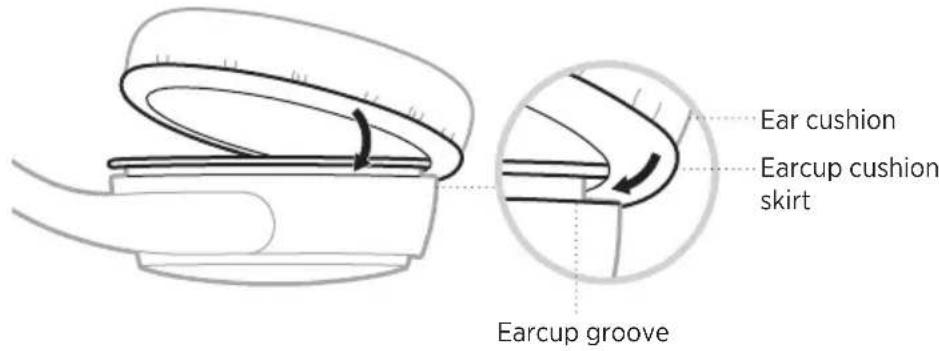
- Gently pull the ear cushion up and away from the earcup.

natural_image
Simple line drawing of a curved object with a scroll and arrow indicating rotation (no text or symbols)- Remove the two adhesive strips from the earcup and clean the flange surface of any debris with a dry cloth.
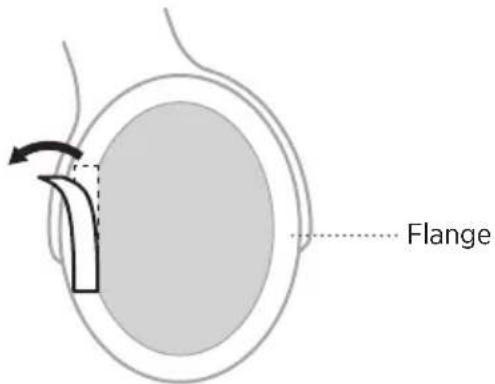
- Align the new adhesive strips onto the left and right sides of the flange surface and press down.

NOTE: Make sure you remove the paper backing from the adhesive strips.
- Tuck the ear cushion skirt into the earcup groove and gently stretch the ear cushion around the earcup.
- Press the ear cushion down over the two adhesive strips.
SERIAL NUMBER LOCATION
To locate the serial number, extend the left side of the headband to its largest size. The serial number is located beneath the left side of the headband.
LIMITED WARRANTY
The headset is covered by a limited warranty. Visit our website at ____global.Bose.com/warranty for details of the limited warranty.
To register your product, visit ____ global.Bose.com/register for instruction. Failure to register will not affect your limited warranty rights.
HEADSET SPECIFICATION
| HEADSET VARIANT | INPUT IMPEDANCE | HEADSET SENSITIVITY @1mW @1kHz | ABSOLUTE MAX POWER RATING* |
| Monaural 4-pin XLR (single earcup) | 120 ohm ± 10% 107 ± 3db SPL 500 mW | ||
| Monaural 4-pin XLR (dual earcup) | 80 ohm ± 10% 104 ± 3db SPL 1000 mW | ||
| Binaural 5-pin XLR (per earcup) | 260 ohm ± 10% 107 ± 3db SPL 500 mW | ||
*Absolute maximum ratings indicate limits beyond which damage to the device may occur.
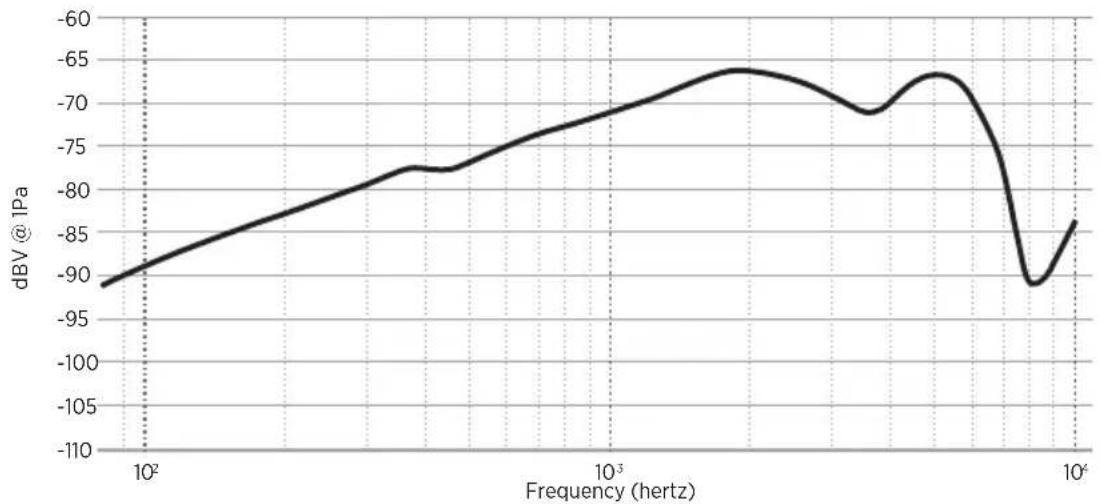
MICROPHONE SPECIFICATIONS
150 ohm Dynamic Noise Canceling
Frequency Response is optimized for improved intelligibility in noisy environments
line
| Frequency (hertz) | dBV @ 1Pa | | ----------------- | --------- | | 100 | -90 | | 200 | -85 | | 500 | -80 | | 1000 | -75 | | 2000 | -70 | | 5000 | -65 | | 10000 | -90 | | 20000 | -85 |Microphone sensitivity: -71 dBV/Pa @ 1kHz*
*Open circuit signal level measured at the headset connector with no external load.
ON HEAD WEIGHT
Dual earcup: 12.7 oz.
Single earcup: 10 oz.
CABLE LENGTH
Headset to control module: 4 feet 10 inches
Control module to XLR connector: 10 inches
HEADSET VARIANTS
4-pin XLRF 5-pin XLRM
Pin 1 Microphone Low Pin 1 Microphone Low Pin 2 Microphone High Pin 2 Microphone High Pin 3 Headphone Low Pin 3 Headphone_GND Pin 4 Headphone High Pin 4 Headphone_L
Pin 5 Headphone_R
natural_image
Two identical electrical connector pinout diagrams with numbered pins, shown from different angles (no text or symbols)TRY THESE SOLUTIONS FIRST
If you experience problems with the headset, try these solutions first:
- Change the batteries in the control module (see page 17)
- Make sure the microphone assembly and terminator cover are secure (see page 10)
- Check that the connection to your radio/belt pack is secure.
WARNING: Do NOT use the headset if it emits a loud squeal or other loud noise. Contact Bose customer service if the headset emits any loud or unusual noise.
OTHER SOLUTIONS
If you could not resolve your issue, see the table below to identify symptoms and solutions to common problems. If you are unable to resolve your issue, contact Bose customer service.
Visit: ____ worldwide.Bose.com/Support/B40
PROBLEM WHAT TO DO
| No audio/communications | Check the volume setting on your radio/belt pack.Make sure the headset cable is securely connected to your radio/belt pack.Check the internal settings on your radio/belt pack.Try a different radio/belt pack.Try using the headset in a different seat location.Unplug all non-Bose headsets from the communications system to determine if there is an uneven load (wired intercom system only). |
| No audio from one earcup (dual headset only) | Make sure you are using the correct XLR connector configuration for your radio/belt pack. |
| No noise cancellation | Make sure noise cancellation is powered on (see page 16).Make sure the batteries are not drained and correctly installed (see page 17).Make sure the battery terminals are clean.Make sure the battery cap is secure.Check the batteries in your radio/belt pack.Try using the headset in a different seat location.Remove the microphone assembly and terminator cover to make sure there is no damage to the connectors or pins. |
PROBLEM WHAT TO DO
| Reduced noise cancellation, or unusual sounds | Make sure there are no air gaps around the ear cushion seals. NOTE: If the ear cushions appear worn, they should be replaced (see page 21). |
| Low volume of incoming communications | Check the volume setting on your radio/belt pack. Unplug all other headsets and check if the volume level improves (for wired intercom system only). Try a different radio/belt pack. Move closer to the radio base station. NOTE: A typical wireless belt pack range is 30-50 yards. |
| Squealing or whistling sound when noise cancellation is powered on | Make sure you're wearing the headset in the correct orientation. Use the L (left) and R (right) markings inside the earcups for reference. Check that the seal between the ear cushion skirt and the earcup fit properly and there aren't any gaps. Replace any ear cushions that appear to be worn out. Adjust the headset fit so that your ears are completely inside the ear cushions. Make sure that a hat or eyeglasses do not interfere with the seal. Make sure the headset ear cushions, internal ear cup foams and scrims are dry. If not, air dry all parts and retry the headset. If the problem persists, contact Bose customer service. |
| Low rumbling sound with the headset turned on in a quiet environment | Check that the seal between the ear cushion skirt and the earcup fit properly and there aren't any gaps. Replace any ear cushions that appear to be worn out. |
| Crackling sound audible with headset turned on in a loud environment, or noise reduction is intermittent | Make sure the headset orientation is correct. Use the L (left) and R (right) markings inside the earcups to correctly orient the headset. Adjust the headset fit (see page 8). Replace the batteries in the control module. Check that the seal between the ear cushion skirt and the earcup fit properly and there aren't any gaps. Replace any ear cushions that appear to be worn out. Try a different radio/belt pack. Move closer to the radio base station. NOTE: A typical wireless belt pack range is 30-50 yards. |
HVAD INDEHOLDER ÅESKEN
Indhold 6
HEADSETKOMPONENTER
Headset.... 7
SÅDAN BÆRES HEADSETTET
natural_image
Line drawing of a headset and audio device (no text or symbols)natural_image
Technical line drawing of a mechanical component with two views: top view shows a cylindrical rod, bottom view shows a rectangular housing (no text or symbols)FORSIGTIG: Brug kun AA alkaliske batterier.
Batterilevetid
natural_image
Diagram of medical or electronic device components with no visible text or symbolsnatural_image
Simple line drawing of a hand holding a curved object with an arrow indicating rotation (no text or symbols)BEGRÄNSET GARANTI
natural_image
Diagram of a connector with numbered pins and a wire, no text or symbols present
PR∅V DISSE L∅SNINGER F∅RST
natural_image
Line drawing of a headset and audio device (no text or symbols)natural_image
Technical line drawing of a mechanical component with two views: top view shows a cylindrical rod, bottom view shows a rectangular housing (no text or symbols)natural_image
Simple line drawing of a rectangular frame with a vertical slot and a circular hole at the top (no text or symbols)AKTIVITÄT DER LÄMPCHEN BATTERIESTATUS
natural_image
Diagram of electronic devices with connectors and cables, no text or symbols presentnatural_image
Simple line drawing of a hand holding a device with a scroll wheel, showing motion direction (no text or symbols)EINGESCHRÄNKTE GARANTIE
4-polig XLRF 5-polig XLRM
Pin 1 Mikrofon niedrig Pin 1 Mikrofon niedrig
natural_image
Diagram of a connector pinout showing four pins (1-4) connected to a terminal cable (no text or symbols)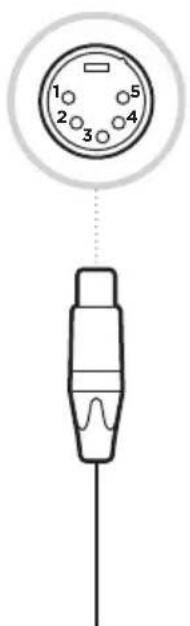
natural_image
Line drawing of a headset and audio device (no text or symbols)Bose SoundComm B40 Headset (enkeloors of dubbeloors)

Draagetui

AA-batterijen (2)

natural_image
Technical line drawing of a mechanical component with two views: top view shows a cylindrical shaft and side view shows a rectangular cutout (no text or symbols)Beltpackbeugel Riemclip
natural_image
Technical line drawing of a medical device with connectors and cables, no text or symbols presentnatural_image
Diagram of a medical or surgical device with a curved arrow indicating rotation (no text or symbols)BEPERKTE GARANTIE
4-pins XLRF 5-pins XLRM
natural_image
Diagram of a connector with numbered pins and a wire, no text or symbols present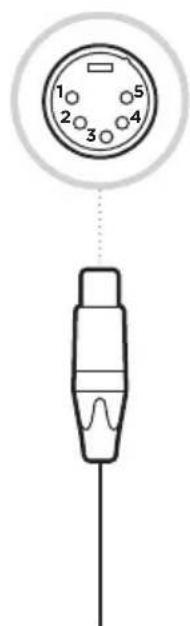
PROBEER DEZE OPLOSSINGEN EERST
natural_image
Line drawing of a headset and audio device (no text or symbols)Auriculares Bose SoundComm B40 (audifono individual o dual)
Estuche

Baterías AA (2)
natural_image
Simple line drawing of a test tube with a flanged tip (no text or symbols)Visite: ____ worldwide.Bose.com/Support/B40
AURICULARES
natural_image
Diagram of electronic devices with connectors and cables, no text or symbols presentVisite: ____ worldwide.Bose.com/Support/B40
natural_image
Simple line drawing of a medical or anatomical device with a curved arrow indicating rotation (no text or symbols)GARANTÍA LIMITADA
natural_image
Diagram of a connector pinout showing four pins (1-4) connected to a terminal cable (no text or symbols)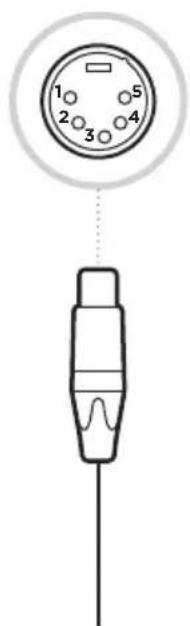
Visite: ____ worldwide.Bose.com/Support/B40
PROBLEMA QUÉ HACER
natural_image
Line drawing of a headset and audio device (no text or symbols)natural_image
Technical line drawing of two mechanical components: a T-shaped tool and a rectangular housing (no text or symbols)natural_image
Simple line drawing of a rectangular frame with a vertical slot and a circular hole at the top (no text or symbols)MERKKIVALON TOIMINTA PARISTOJEN TILA
natural_image
Technical line drawing of a medical device with connectors and cables (no text or symbols)natural_image
Simple line drawing of a hand holding a device with a scroll and arrow indicating rotation (no text or symbols)RAJOITETTU TAKUU
natural_image
Line drawing of a headset and audio device (no text or symbols)natural_image
Simple line drawing of a test tube with a flanged tip (no text or symbols)natural_image
Technical line drawing of a medical device with attached cables and connectors (no text or symbols)natural_image
Simple line drawing of a hand holding a device with a scroll and arrow indicating rotation (no text or symbols)GARANTIE LIMITÉE
natural_image
Line drawing of a headset and audio device (no text or symbols)natural_image
Simple line drawing of a test tube with a flanged tip (no text or symbols)Visitare: ____ worldwide.Bose.com/Support/B40
CUFFIE
natural_image
Technical line drawing of a medical device with attached cables and connectors (no text or symbols)Visitare: ____ worldwide.Bose.com/Support/B40
natural_image
Simple line drawing of a mechanical component with an arrow indicating rotation (no text or symbols)GARANZIA LIMITATA
XLRF a 4 pin XLRM a 5 pin
PROVARE PRIMA QUESTE SOLUZIONI
Visitare: ____ worldwide.Bose.com/Support/B40
PROBLEMA AZIONE
natural_image
Line drawing of a headset and audio device (no text or symbols)natural_image
Technical line drawing of a mechanical component with two views: top view shows a cylindrical shaft and side profile, bottom view shows a rectangular cutout (no text or symbols)natural_image
Simple line drawing of a rectangular room with a vertical door and a circular hole, no text or symbols present.FÉNYJELZÉS ELEM ÁLLAPOTA
natural_image
Technical line drawing of a medical device with attached cables and connectors (no text or symbols)natural_image
Simple line drawing of a hand holding a curved object with an arrow indicating rotation (no text or symbols)KORLÁTOZOTT GARANCIA
STELL OG VEDLIKEHOLD
natural_image
Line drawing of a headset and audio device (no text or symbols)Bose SoundComm B40-hodetelefoner (en eller to øreklokker)

Etui
AA-batterier (2)

natural_image
Technical line drawing of a mechanical component with two views: top view shows a cylindrical shaft, bottom view shows a rectangular housing (no text or symbols)Brakett for beltepakke Belteklips
FORSIKTIG: Bruk bare alkaliske AA-batterier.
Batteriets levetid
En øreklokke: opptil 56 timer
To øreklokker: opptil 48 timer
LYSAKTIVITET BATTERISTATUS
natural_image
Diagram of medical or electronic device components with no visible text or symbolsMERKNAD: Ta ut batteriene när hodetelefonene skal lagres i lengre tid.
RENGJ∅RING AV HODETELEFONENE
natural_image
Simple line drawing of a medical or anatomical component with an arrow indicating rotation (no text or symbols)BEGRENSET GARANTI
4-pinners XLRF 5-pinners XLRM
Importer — Wielka Brytania: Bose Limited, Bose House, Quayside Chatham Maritime, Chatham, Kent, ME4 4QZ, United Kingdom
natural_image
Line drawing of a headset and audio device (no text or symbols)natural_image
Simple line drawing of a test tube with a flanged tip (no text or symbols)natural_image
Diagram of electronic devices with connectors and cables, no text or symbols presentnatural_image
Simple line drawing of a medical or anatomical component with an arrow indicating rotation (no text or symbols)OGRANICZONA GWARANCJA
natural_image
Line drawing of a headset and audio device (no text or symbols)natural_image
Technical line drawing of a mechanical component with two views: top view shows a cylindrical rod, bottom view shows a rectangular housing (no text or symbols)Visite: ____ worldwide.Bose.com/Support/B40
FONE DE OUVIDO
natural_image
Technical line drawing of a medical device with attached cables and connectors (no text or symbols)Visite: ____ worldwide.Bose.com/Support/B40
natural_image
Simple line drawing of a hand holding a device with a scroll and arrow indicating rotation (no text or symbols)GARANTIA LIMITADA
natural_image
Diagram of a connector with numbered pins (1-4) and a wire, no text or symbols present.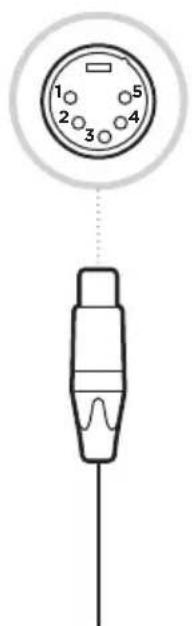
EXPERIMENTE ESTAS SOLUÇÕES PRIMEIRO
Visite: ____ worldwide.Bose.com/Support/B40
PROBLEMA O QUE FAZER
UK-importör: Bose Limited, Bose House, Quayside Chatham Maritime, Chatham, Kent, ME4 4QZ, United Kingdom
VAD FINNS I FÖRPACKNINGEN
Innehåll.... 6
HEADSETKOMPONENTER
Headset.... 7
SÅ HÄR BÄR DU HEADSETET
natural_image
Line drawing of a headset and audio jack connector (no text or symbols)natural_image
Technical line drawing of a mechanical component with two views: top view shows a cylindrical shaft, bottom view shows a rectangular cutout (no text or symbols)TÄNK PÅ: Använd bara AA alkaline-batterier.
Batteritid
natural_image
Technical line drawing of a medical device with attached connectors and cables (no text or symbols)natural_image
Simple line drawing of a hand holding a device with a scroll and arrow indicating rotation (no text or symbols)BEGRÄNSAD GARANTI
4-stifts XLRF 5-stifts XLRM
natural_image
Diagram of a connector pinout showing four pins (1-4) connected to a terminal cable (no text or symbols)