N6P8H - VCR Tenda - Free user manual and instructions
Find the device manual for free N6P8H Tenda in PDF.
User questions about N6P8H Tenda
0 question about this device. Answer the ones you know or ask your own.
Ask a new question about this device
Download the instructions for your VCR in PDF format for free! Find your manual N6P8H - Tenda and take your electronic device back in hand. On this page are published all the documents necessary for the use of your device. N6P8H by Tenda.
USER MANUAL N6P8H Tenda
NVRx1
Power adapter x 1
- Mouse x 1
- Installation package x 1
(Screw: thread diameter: 3.5mm , length: 5mm ; head diameter: 6.5mm )
- Quick installation guide
Appearance
These series of NVRs include plastic shell NVR and metal shell NVR.
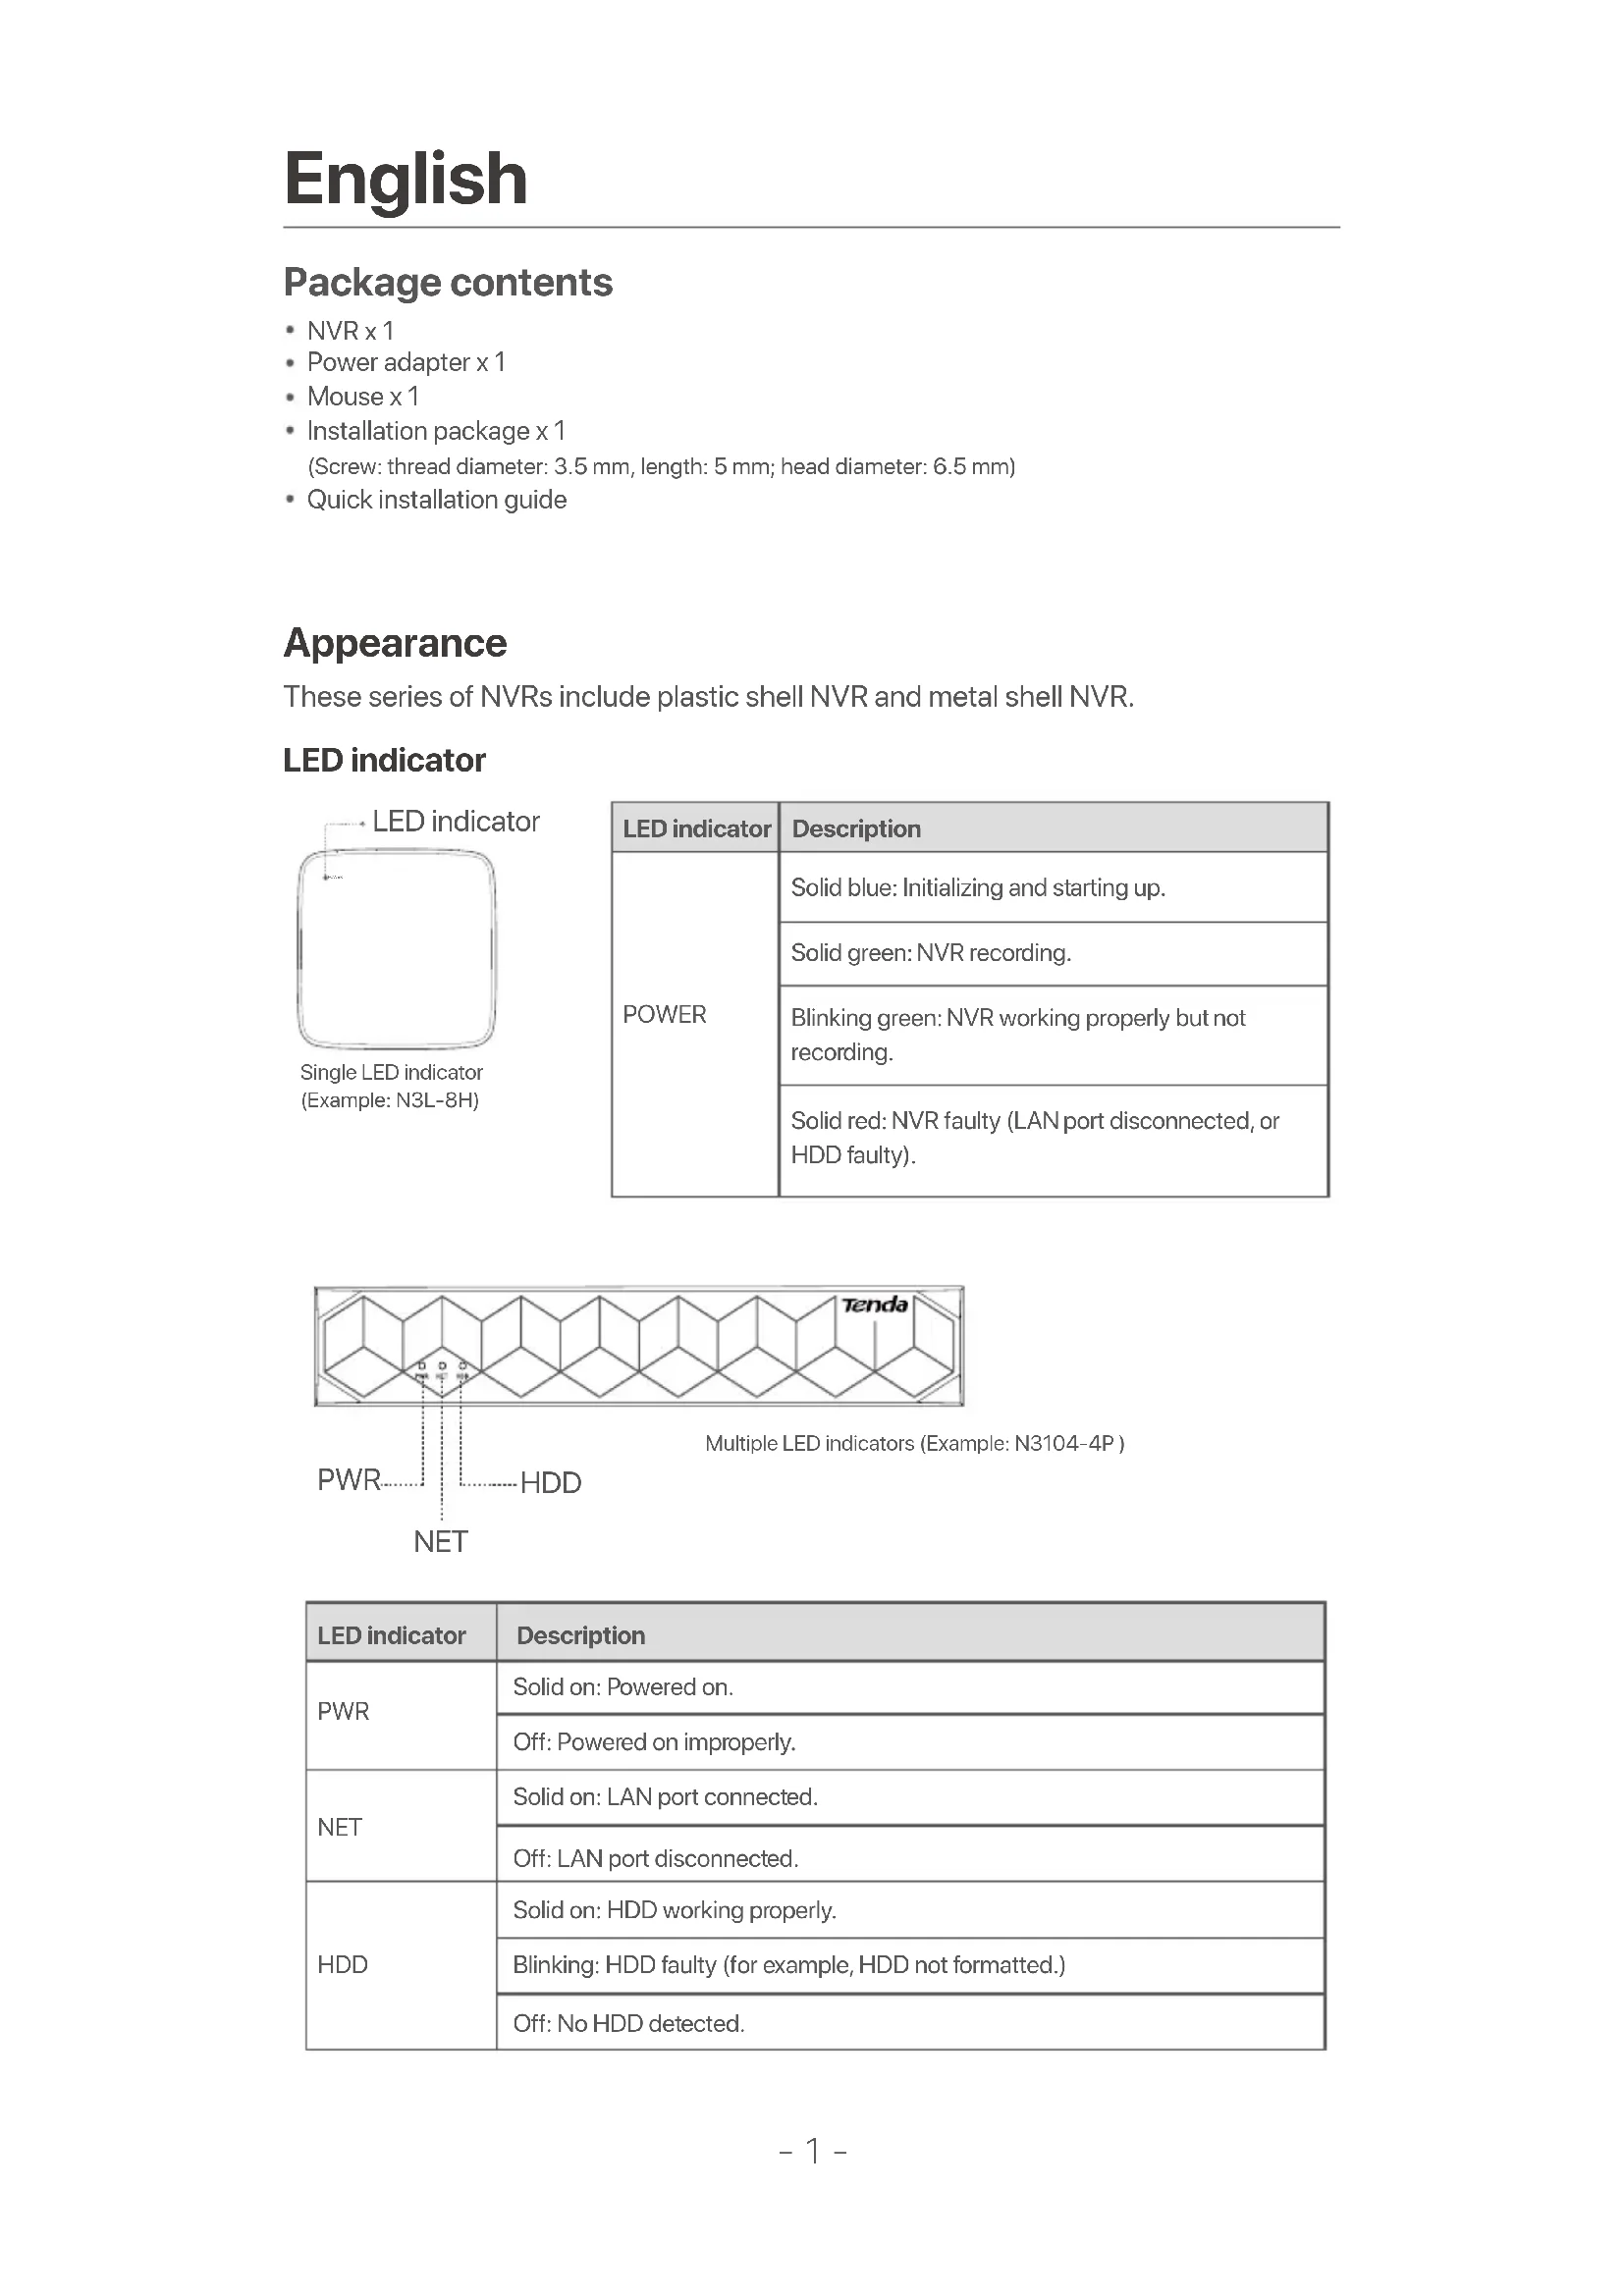
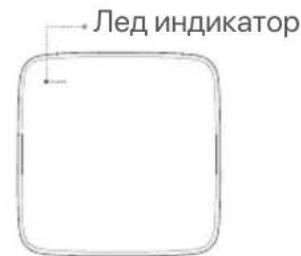
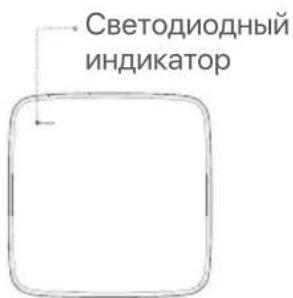
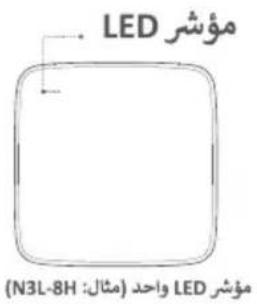
LED indicator

Single LED indicator (Example: N3L-8H)
| LED indicator | Description |
| POWER | Solid blue: Initializing and starting up. |
| Solid green: NVR recording. | |
| Blinking green: NVR working properly but not recording. | |
| Solid red: NVR faulty (LAN port disconnected, or HDD faulty). |
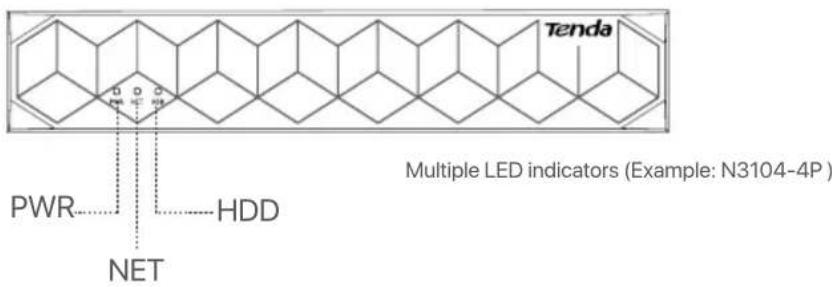
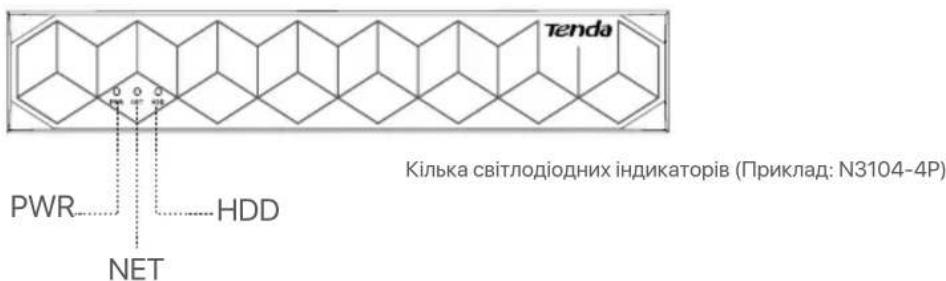
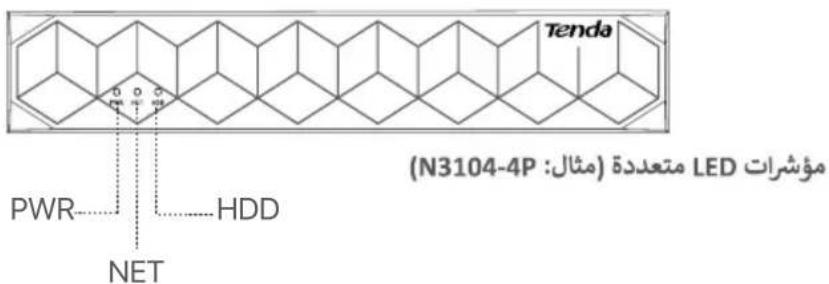
| LED indicator | Description |
| PWR | Solid on: Powered on. |
| Off: Powered on improperly. | |
| NET | Solid on: LAN port connected. |
| Off: LAN port disconnected. | |
| HDD | Solid on: HDD working properly. |
| Blinking: HDD faulty (for example, HDD not formatted.) | |
| Off: No HDD detected. |
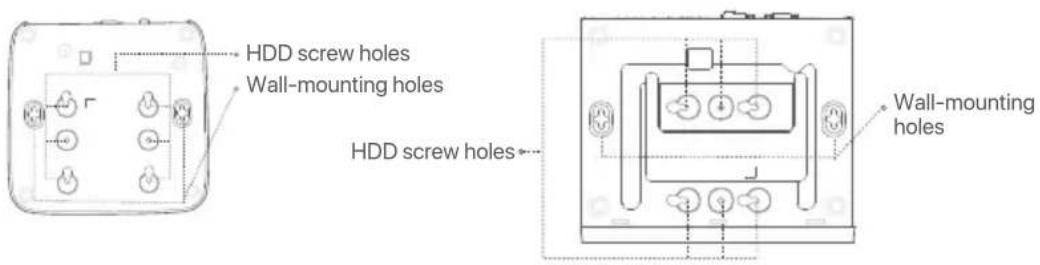
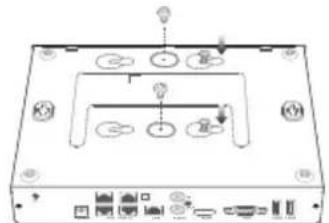
Bottom panel
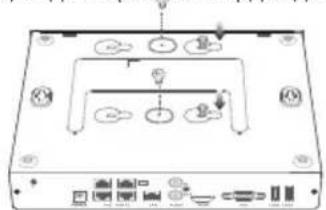
Wall-mounting holes: Used to fix the device to the wall. Wall-mounting materials are self-prepared. Recommended specifications of the plastic screws and anchors: Screws: thread diameter: 3 mm, length: 14 mm; head diameter: 5.2 mm. Plastic anchor: inner diameter: 6.0 mm; length: 26.4 mm
Tips
Plastic shell NVR (Example: N3L-8H) Metal shell NVR (Example: N3104-4P)
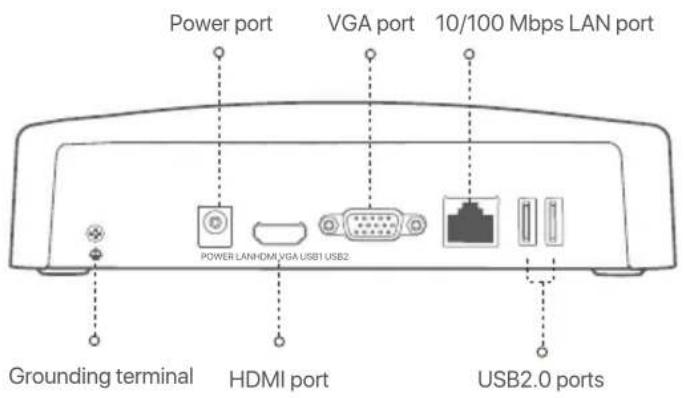
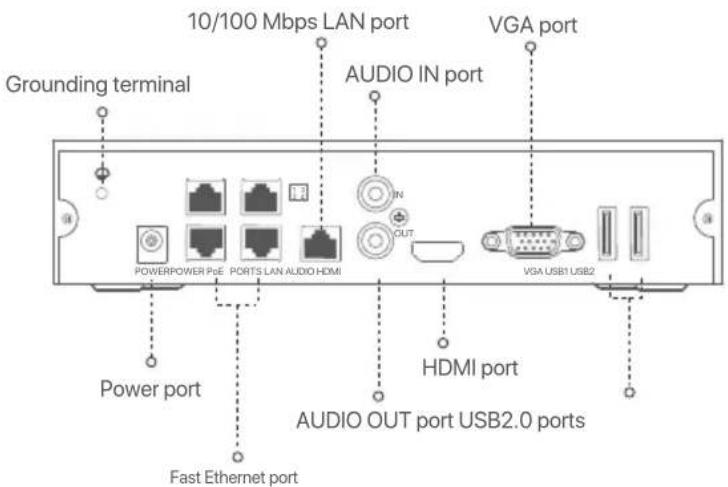
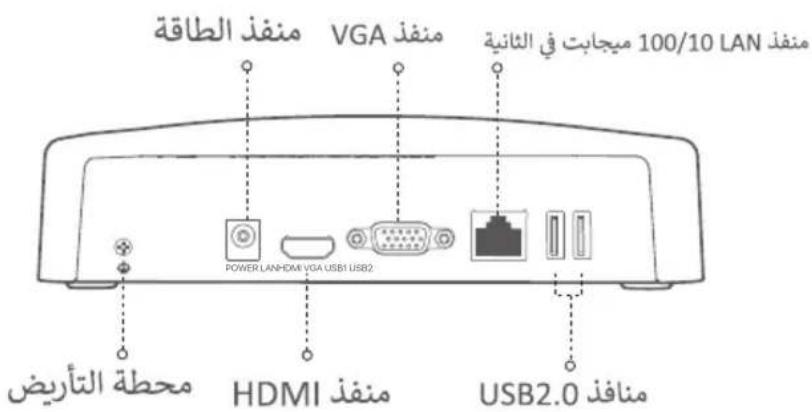
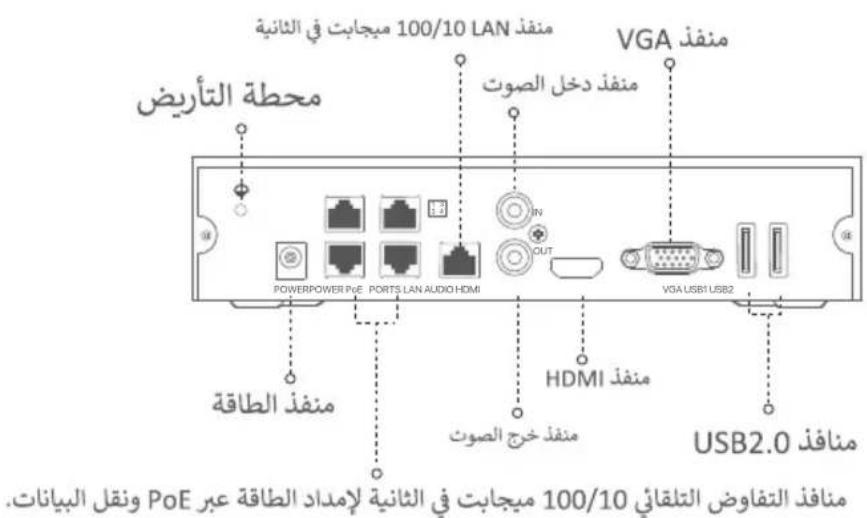
Rear panel
Ordinary NVR (Example: N3L-8H)
PoE NVR (Example: N3104-4P)
| DescriptionPort | |
| Grounding terminal. Connect the grounding terminal of the NVR to the earth or the ground terminal of the building with a grounding cable to prevent static electricity or lightning from damaging the NVR. | |
| POWER | Power port. Use the included power adapter to power on the NVR. |
| PoE PORTS | Fast Ethernet port, which supports IEEE 802.3af/at PoE power supply. Used to connect to cameras. - Tips - Recommended Ethernet cable: CAT 5 or better. - Power supply distance: - Normal Mode (default): Up to 100m - Long-range Mode: Up to 250m |
| LAN | Fast Ethernet LAN port. Used to connect to such devices as the router and switch. |
| AUDIO IN | Audio input port. Used to connect to the audio input devices, such as pickups. |
| AUDIO OUT | Audio output port. Used to connect to audio output devices, such as active speakers. |
| HDMI | HDMI port. Connect your monitor or TV to this port using an HDMI cable for audio and video output. |
| VGA | VGA port. Connect your monitor to this port using a VGA cable for video output. |
| USB | USB 2.0 port. Used to connect to such devices as a mouse and a USB storage device. |
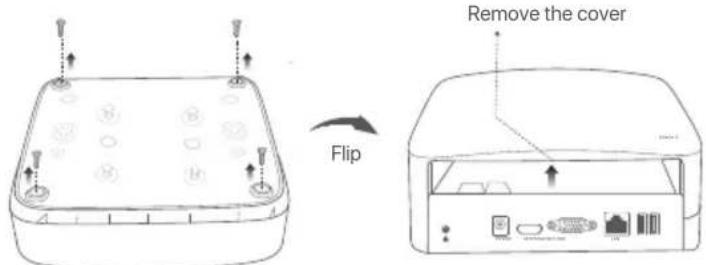
I Install the HDD
The appearance NVRs may vary with models. The following information is only for reference. Please install the HDD matching the model you actually purchased.
This product does not include any HDD, and the HDD dedicated for surveillance is recommended. You may need a screwdriver during installation. Please prepare it by yourself.

Tips
When installing or replacing the HDD, please cut off the power supply of the NVR, otherwise the HDD may not be detected or even be damaged.
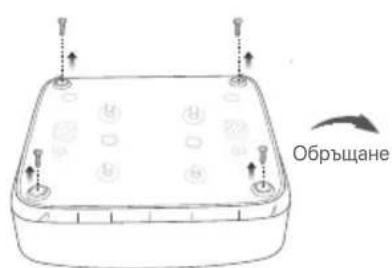
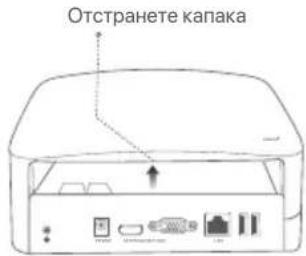
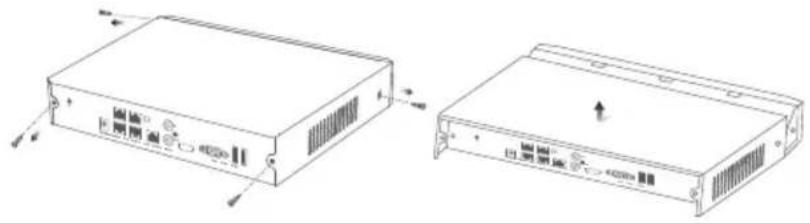
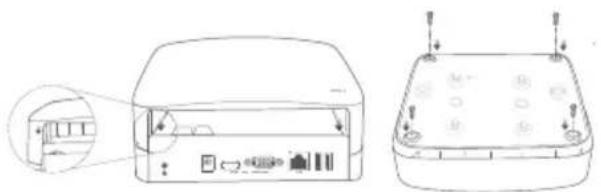
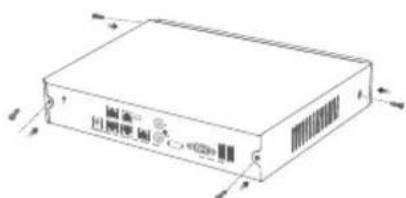
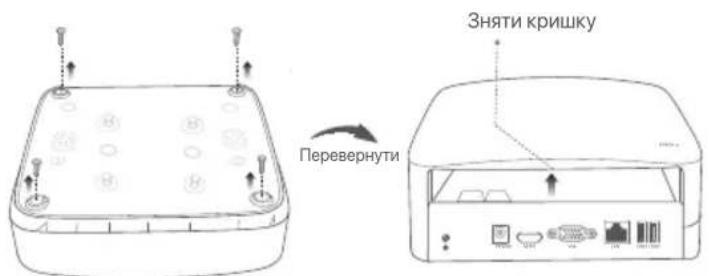
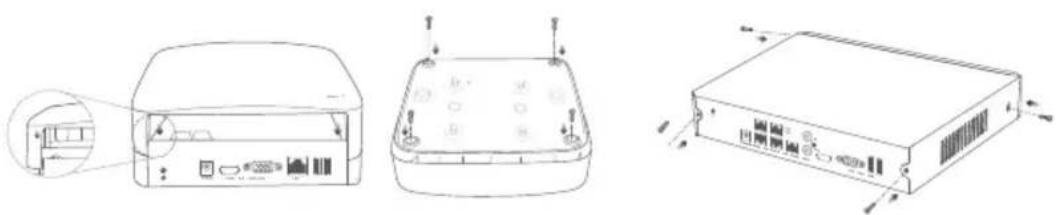
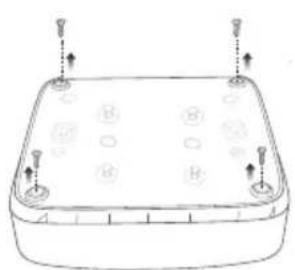
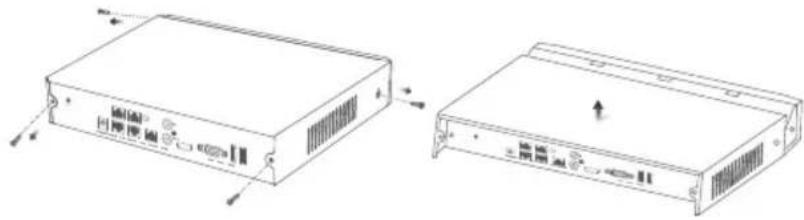
Use a screwdriver to unfasten the screws, then remove the cover of the NVR. Reserve the screws for later use.
Plastic shell NVR (Example: N3L-8H)
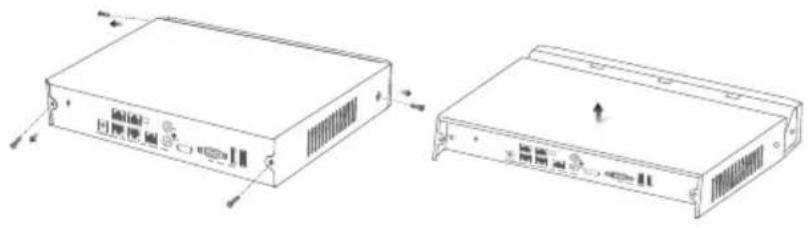
Metal shell NVR (Example: N3104-4P)
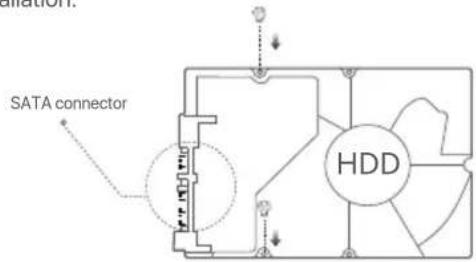
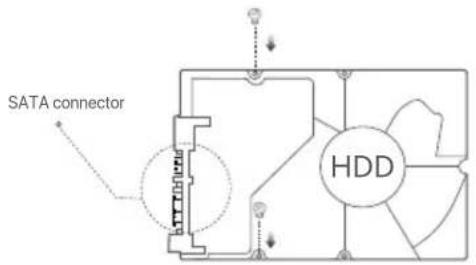
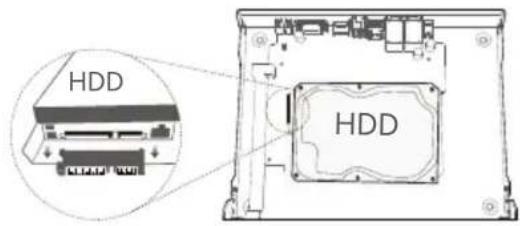
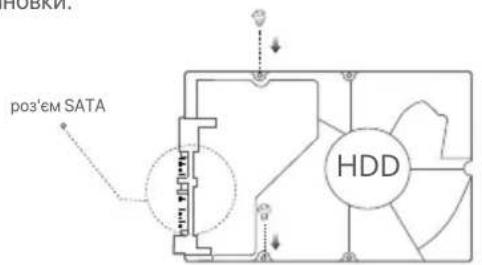
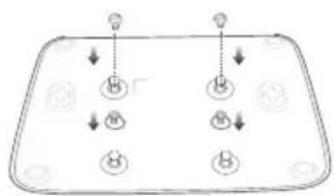
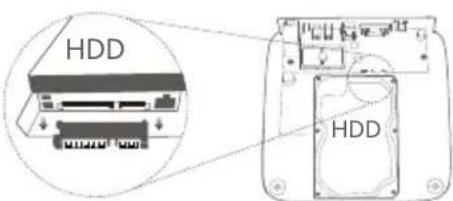
Take out 2 screws from the NVR installation package, and screw them into the two screw holes closest to the SATA connector. Reserve about 2mm between the screws head and the HDD for subsequent installation.
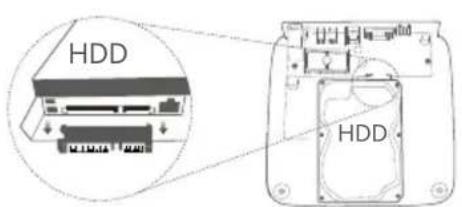
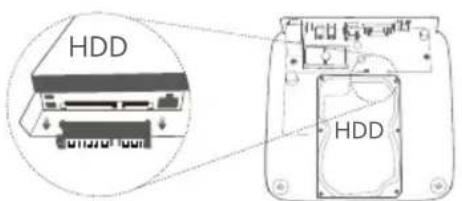
Align the SATA connector of the HDD with the SATA slot on the motherboard of the NVR, and then insert the HDD into the slot until it is tightly fixed.

Plastic shell NVR (Example: N3L-8H)
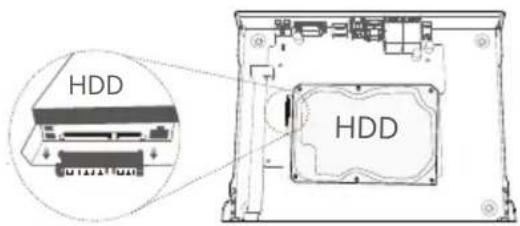
Metal shell NVR (Example: N3104-4P)
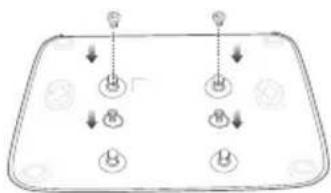
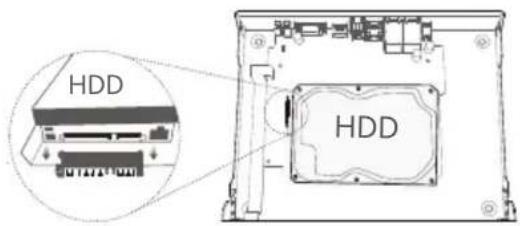
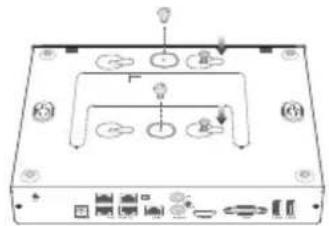
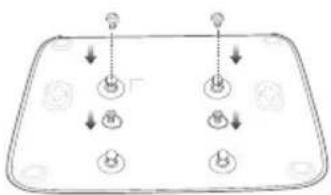
Take out the remaining screws from the NVR installation package, and screw them into the HDD screw holes to fix the HDD.
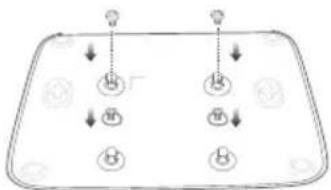
Plastic shell NVR (Example: N3L-8H)
Metal shell NVR (Example: N3104-4P)
Mount the cover with the previously removed screws.

Plastic shell NVR (Example: N3L-8H)
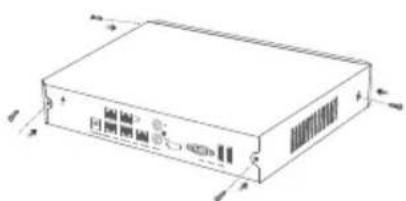
Metal shell NVR (Example: N3104-4P)
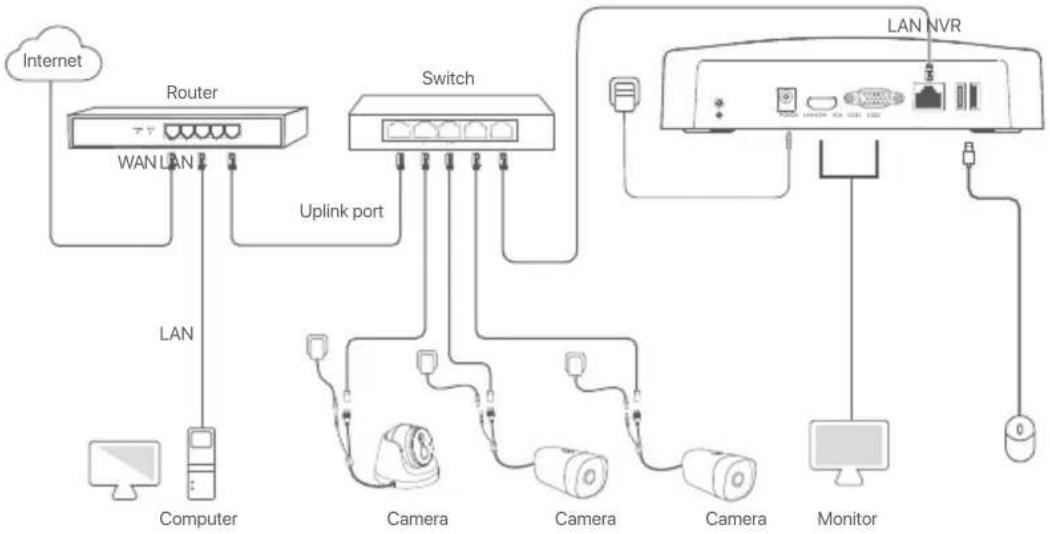
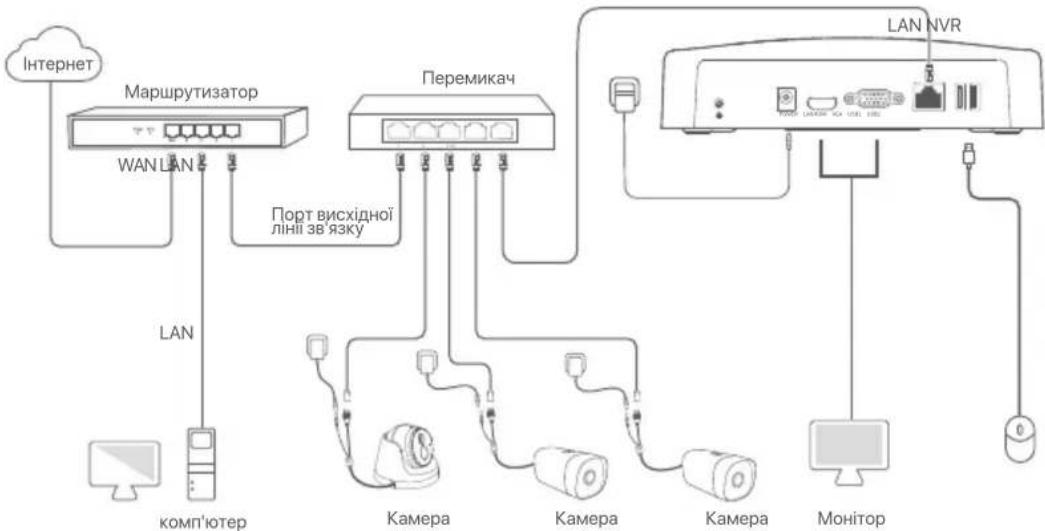
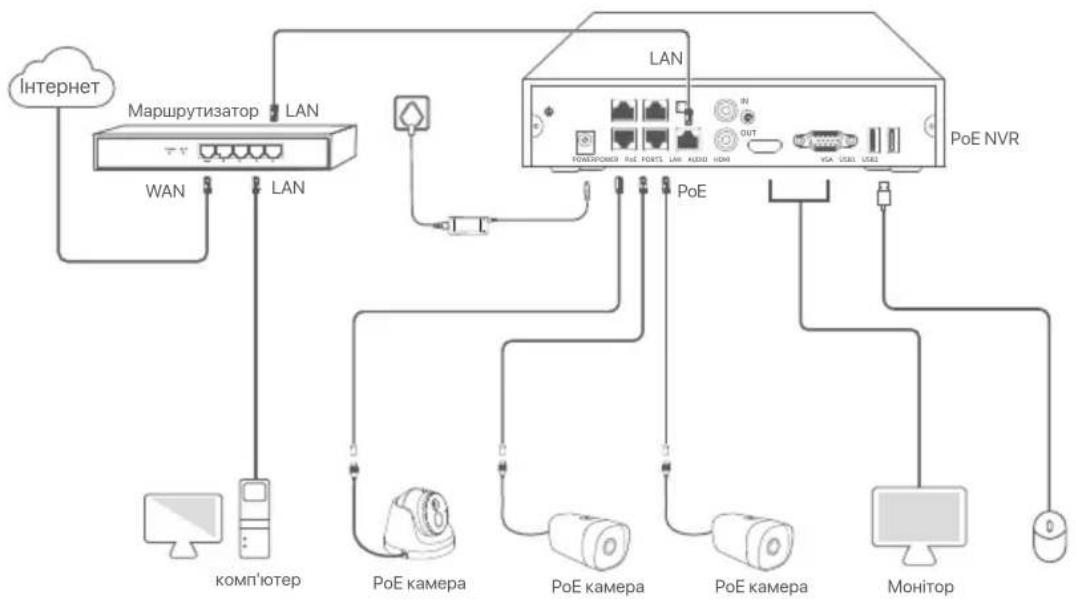
II Connect the device
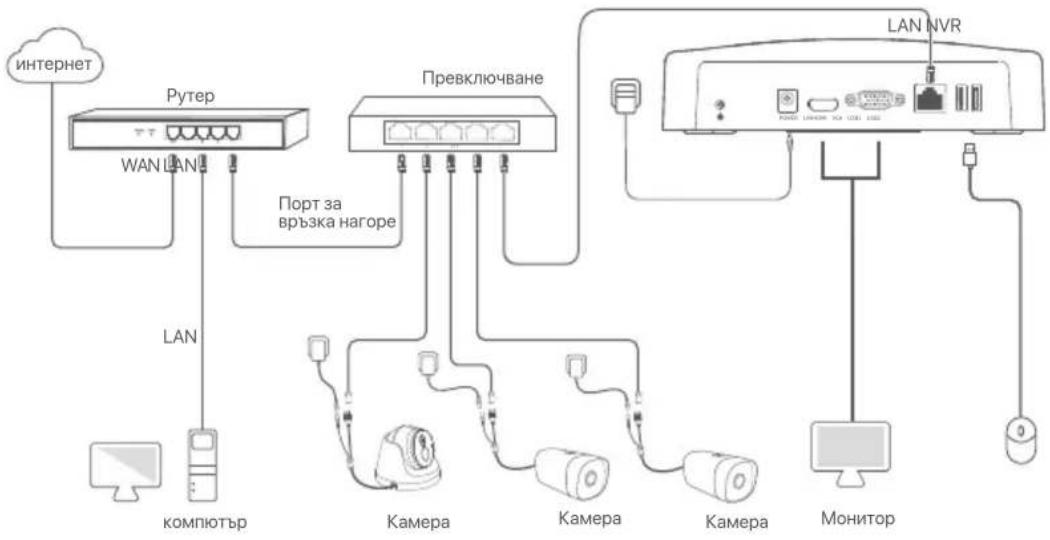
Ordinary NVR topology (Example: N3L-8H)
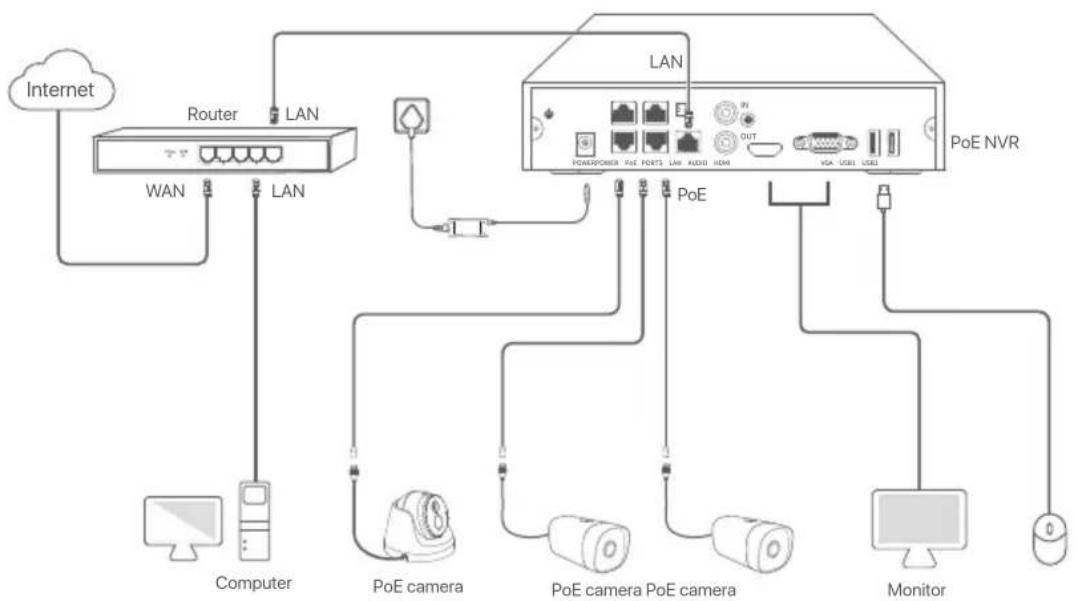
PoE NVR topology (Example: N3104-4P)
III Basic configuration
Local management
Startup

Use the included power adapter to power on the NVR. The NVR may fail to work normally or even be damaged due to abnormal power supply.
Connect the included power adapter to the power port of the NVR, and plug the power adapter into the power socket to start up the NVR.
Shutdown
A Note
Do not directly cut off the power supply of the NVR to force a shutdown; otherwise, the HDD may be damaged, videos may be lost, or even the NVR may be damaged.
After connecting the mouse and monitor to the NVR, perform the following settings on the NVR's web UI (exit the Full Screen interface): Click in the upper right corner, click Shutdown , and then click OK.
When The Device is Shut Down. Please Cut Off the Power appears on the screen, unplug the power adapter of the NVR.
Quick setup
After connecting the mouse and monitor to the NVR, you can perform quick setup.
The GUI of the NVR may vary with models. The actual GUI prevails. The N3L-8H is taken as an example here.
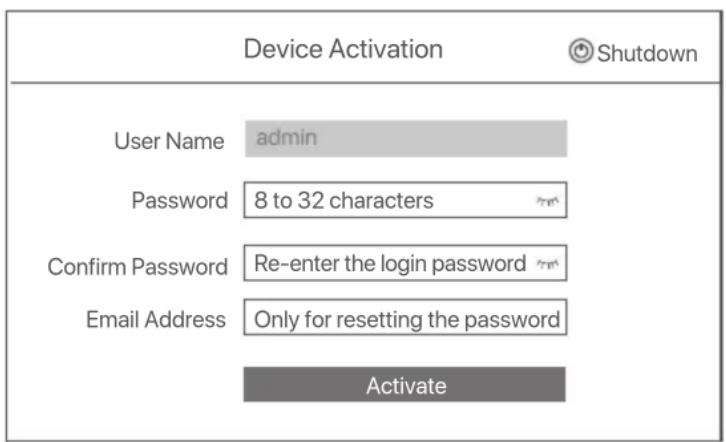
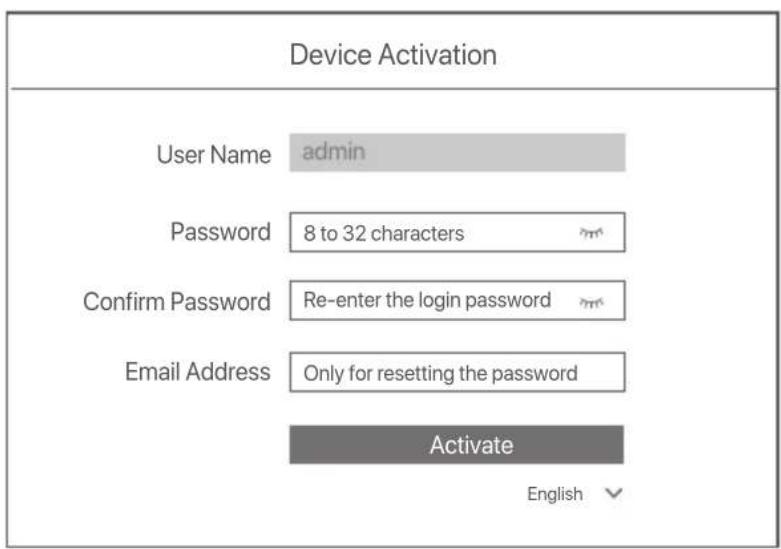
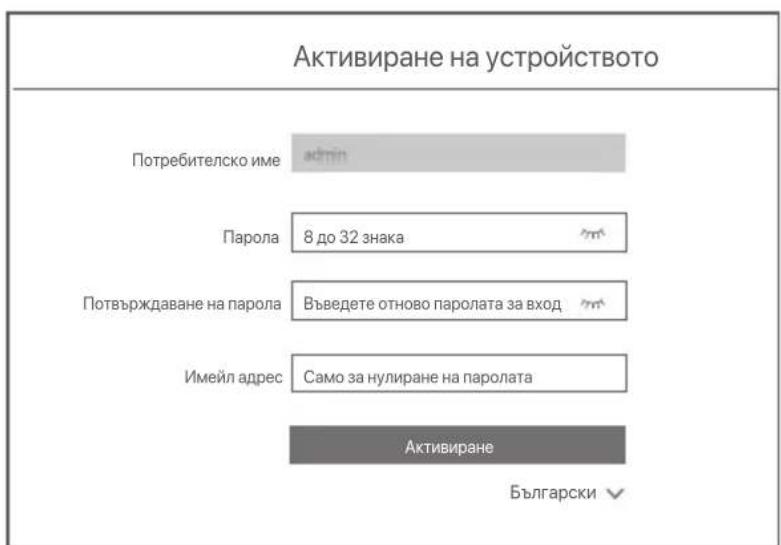
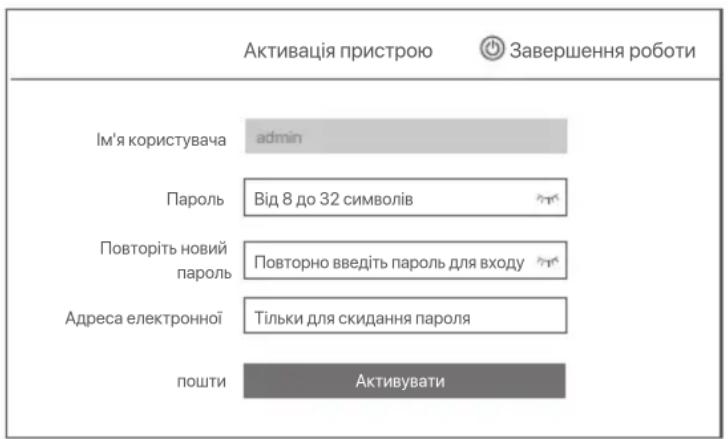
Set Login Password, enter your Email Address, then click Activate.
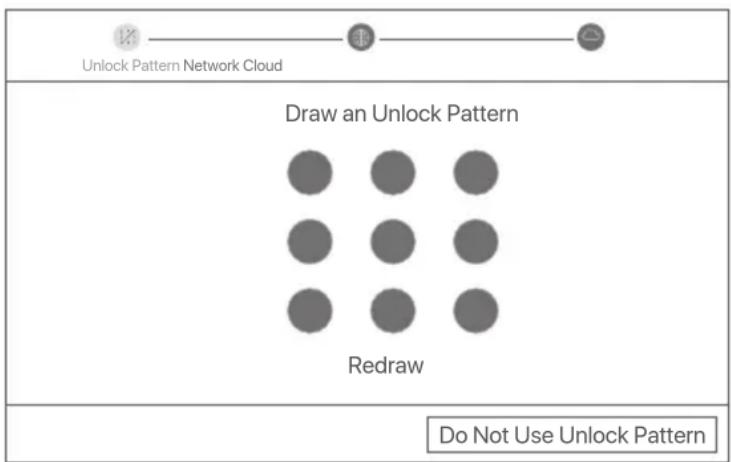
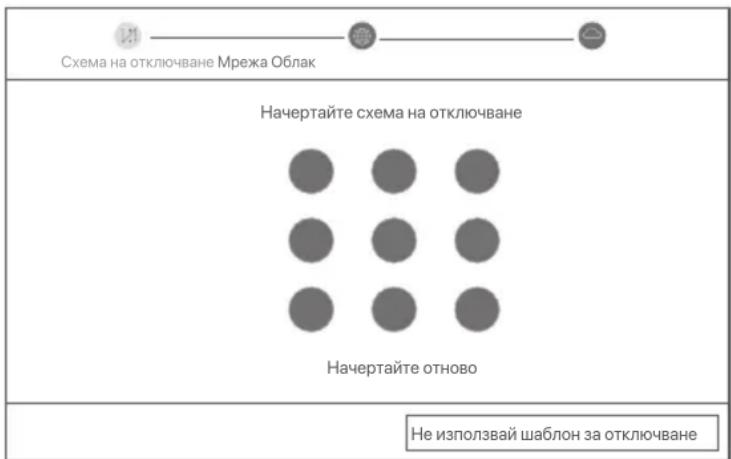
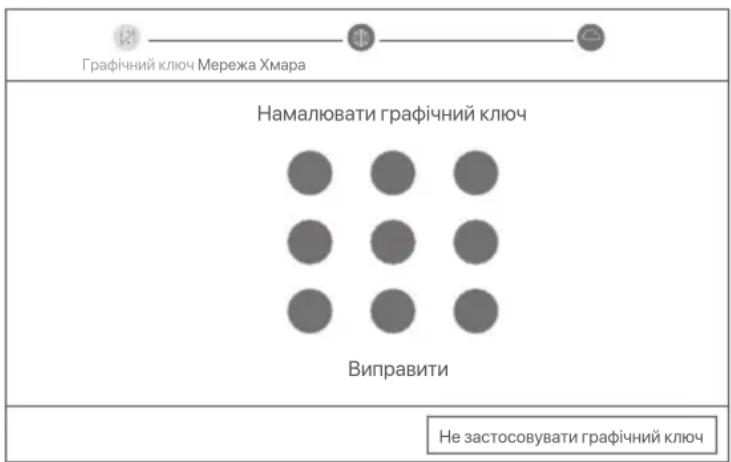
If you want to use a pattern to unlock the web UI, draw an unlock pattern. Otherwise, click Do Not Use Unlock Pattern and skip to step ③.
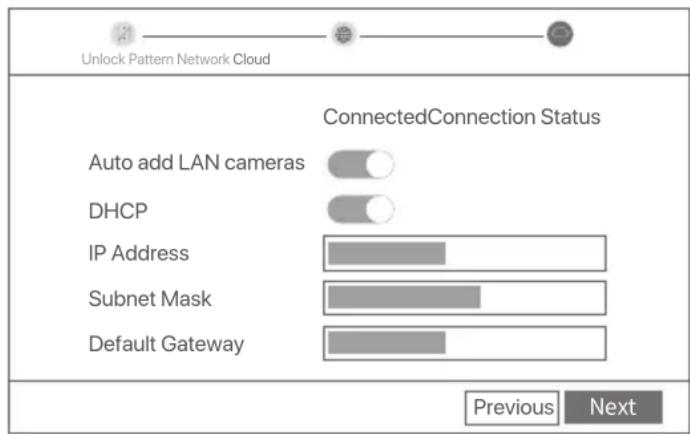
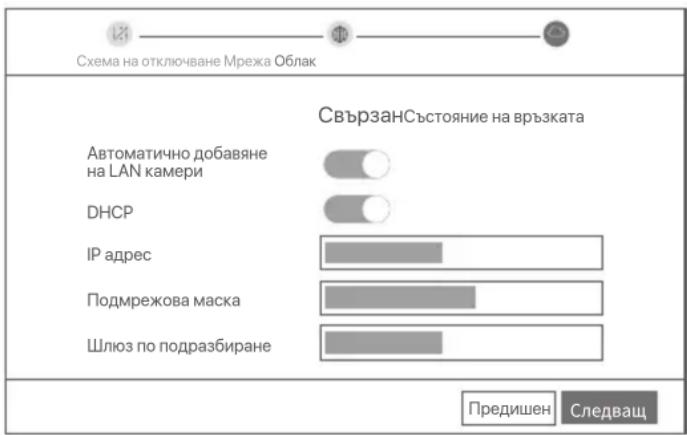
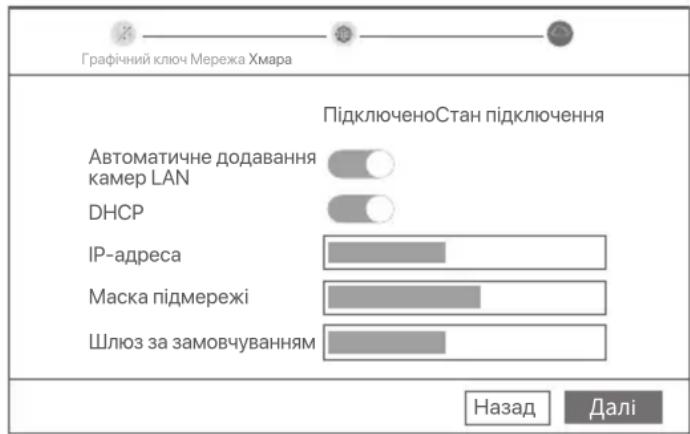
Ensure that the connection status is Connected, and enable or disable the Auto add LAN cameras function as required.
- If you want to automatically add cameras on the LAN side of the NVR, click Next. Skip to step ③.
- If you want to manually add cameras on the LAN side of the NVR, you can disable the Auto add LAN cameras function, and click Next.
Tips
If the connection status is Disconnected, try the following solutions:
- Ensure that the LAN port connection of the NVR is normal.
- Ensure that the DHCP server function of the router to which the NVR is connected is enabled.
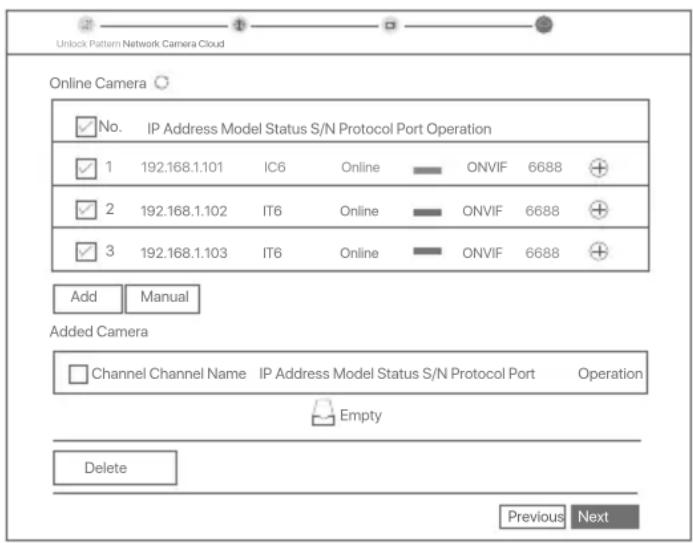
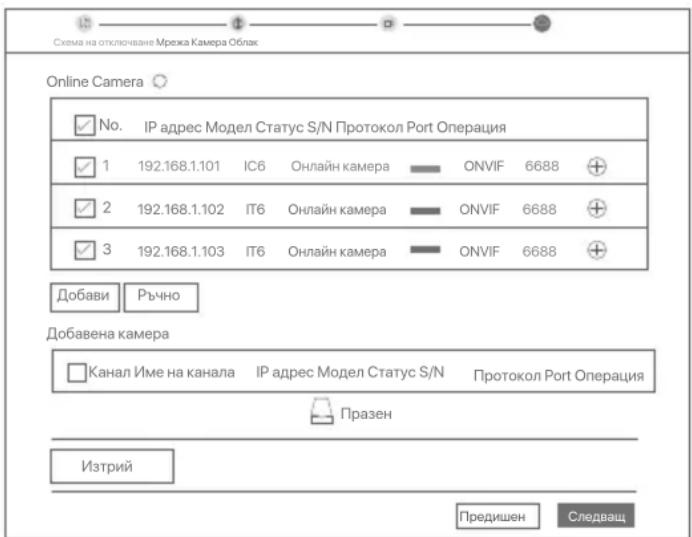
Add the camera.
Select the camera that you want to add to the Online Camera list, and click Add. When the cameras appear in the Added Camera list and the status is Online, click Next.
Tips
If the camera you want to add has been connected to the switch or router that is connected to the LAN port of the NVR, please ensure that the IP address of the camera and the NVR are in the same network segment.
- If the NVR supports PoE ports, and the camera you want to add has been connected to the PoE port of the NVR, please ensure that the DHCP function of the camera is enabled.
- If the camera that you want to add is activated and the user name and password are different from those of the NVR, click , to enter the relevant information, and click Add.
Ensure that the cloud status is Online and click OK.
Tips
- If the cloud status is Offline, please ensure that the router to which the NVR is connected can access the internet and the filter function is disabled.
- You can also manage the NVR through the TDSEE App. Please refer to App management in this guide for details.
Completed.
You can preview real-time videos, play back the recordings and manage monitoring devices.
App management
After the cloud service of the NVR is enabled and the cloud status is online, you can add and manage the NVR through the TDSEE App.
Download the TDSEE App.
After the smartphone is connected to the internet successfully, download and install the TDSEE App onto your mobile phone by scanning the QR code or by searching for TDSEE in Google Play or App Store.


QR Code
Ensure that the NVR is powered on and working properly.
- Run the TDSEE App and follow the instructions to complete user registration. Enter the Home page, then tap Add a device or in the upper right corner of the home page.
Tips
To ensure that the login password of the NVR can be reset through the TDSEE App, please register using the email address you used to activate the NVR.
Scan the QR code on the label at the bottom of the NVR or scan the QR code on the Cloud Service page, then follow the instructions in the App.
After adding the NVR, you can remotely preview real-time video, play back the recordings and check alarm messages through the TDSEE App.
Web management
These series of NVRs can be managed on the web UI.
Activate
If the NVR is not activated, you can activate it through the web UI. When the activation is completed, you need to log in again.
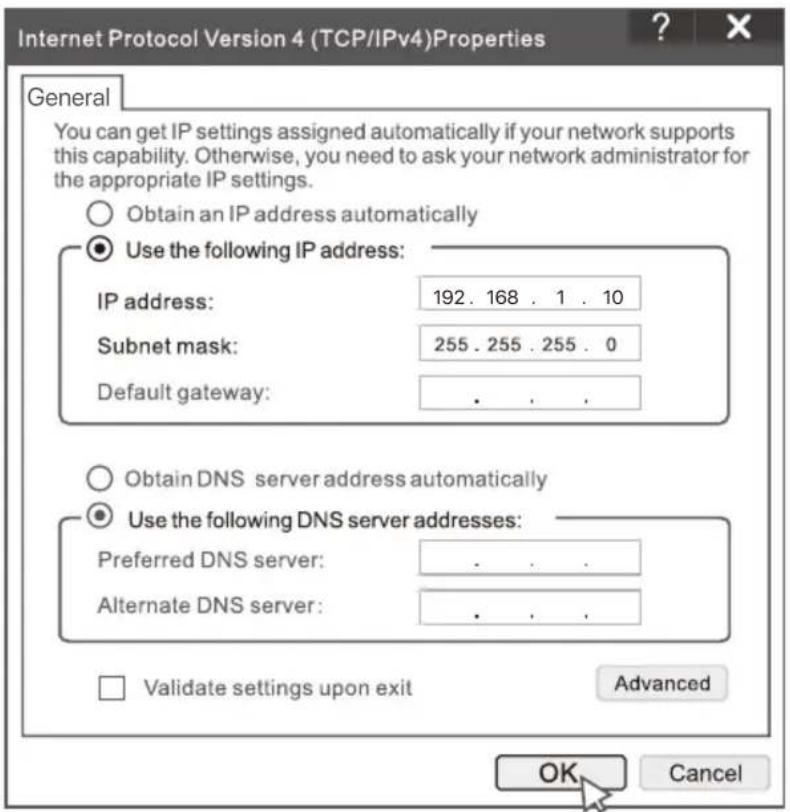
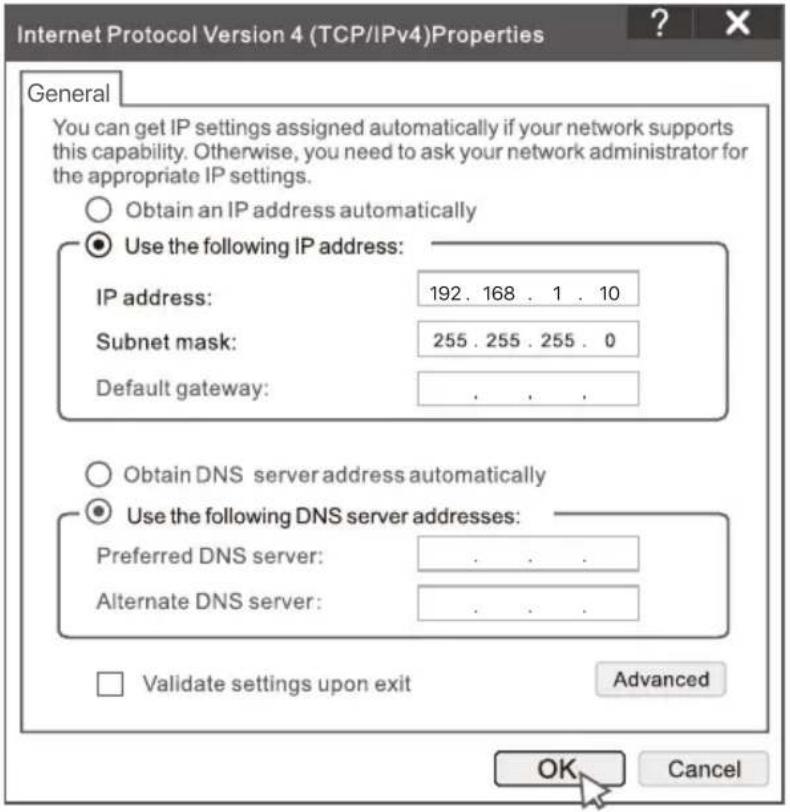
Connect the computer to the switch or router that is connected to the NVR.
Set the IP address of the computer to an unused one belonging to the same network segment as the IP address of the NVR but different from the IP address of the NVR.
The default login IP address of the NVR is 192.168.1.254, please set the IP address of the computer to 192.168.1.X (X indicates 2 to 253, and is unused by other devices).
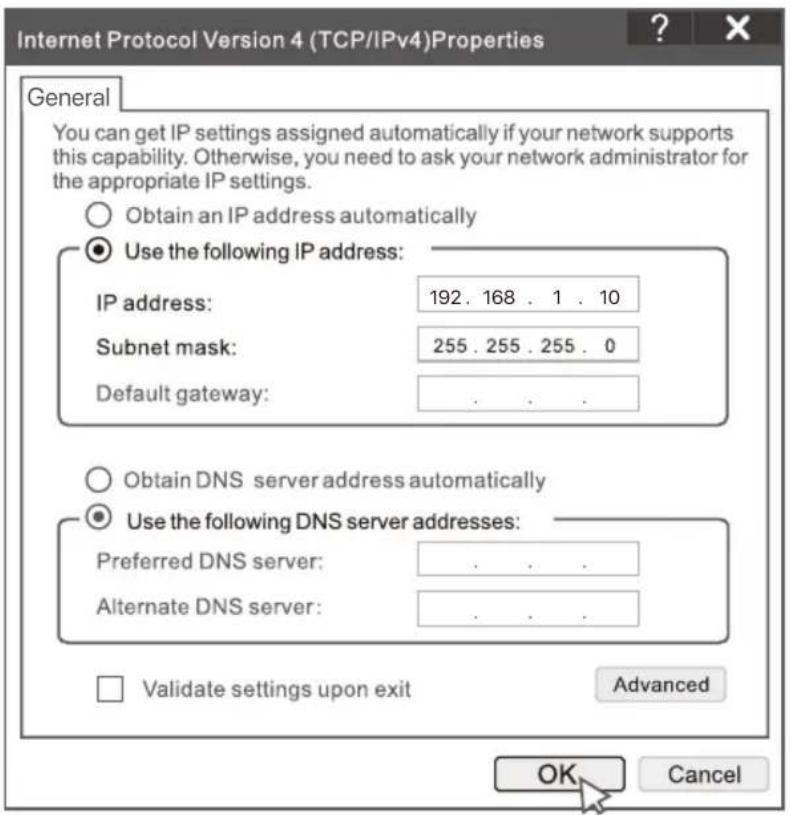
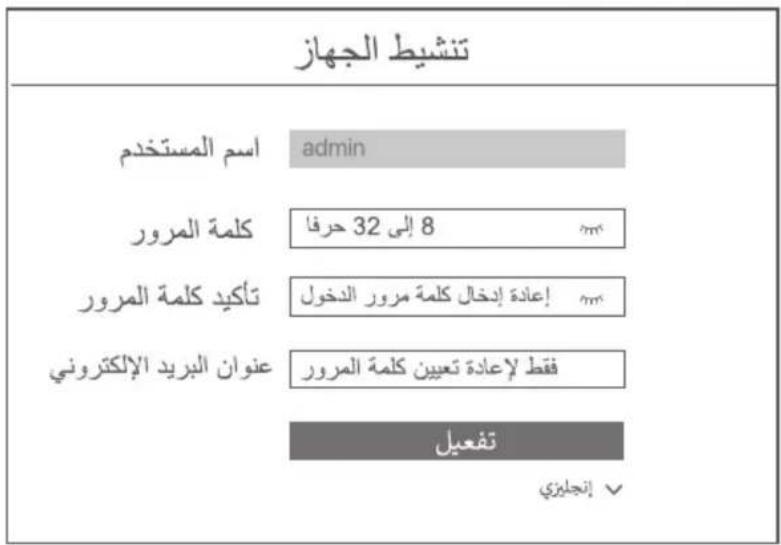
Launch a browser and enter the default IP address 192.168.1.254 of the NVR in the address bar. Set Password, enter your Email Address, and click Activate.
Tips
The NVR supports HTTPS login. When you access its management page, the browser may prompt that the web address is not secure, just ignore it and continue.
Done. You can re-enter the web UI of the NVR to preview real-time videos or configure the NVR as required.
The DHCP function of the NVR is enabled. If there is a DHCP server in the network, the IP address of the NVR may be changed. Please refer to the actual IP address assigned to the NVR by the DHCP server.
Log in to web UI
Refer to step 1 to 3 in Activate to operate.
FAQ
Q1. What should I do if there are no playback videos on the NVR?
A1.
- Ensure that the HDD is working properly.
Navigate to Configuration > Storage > HDD:
- If the HDD is not detected, shut down the NVR first, reinstall the HDD and start up the NVR.
- If the HDD is abnormal, shut down the NVR first, reinstall the HDD and start up the NVR. If the problem persists, format the HDD.
-
If the formatting fails, shut down the NVR first, replace the HDD and start up the NVR.
-
Ensure that the recording plan is proper.
Navigate to Configuration > Storage > Schedule, and ensure that:
- The channel recording schedule is enabled.
- The recording time and recording type have been set properly. If not, set and save them as required.
Q2. What should I do if the TDSEE App fails to add the NVR?
A2. Navigate to Configuration > Network > Cloud Service of the NVR to ensure that the cloud service function is enabled.
- If Cloud Status is Online, ensure that the mobile phone (with the App installed) is connected to the internet.
-
If Cloud Status is Offline, try the following solutions:
-
Navigate to Configuration > Network > Internet to ensure that the internet parameters configuration is correct.
- Ensure that the LAN port of the NVR is correctly connected to the peer side (switch or router).
- Ensure that the router is connected to the internet and the filter function is disabled (such as MAC filter and blacklist).
- Ensure that the DHCP server function of the router is enabled.
Q3. What should I do if there is no image display on the NVR channel?
A3. Navigate to Configuration > Channel> Camera of the GUI of the NVR, find Added Camera, and check the camera status of the channel.
- If the camera status of the channel is Online, navigate to Configuration > Channel > Image, and ensure that the Brightness and Contrast under the Image Parameters are not both 0.
-
If the camera status of the channel is Error, hover the mouse over to check the exception reason, and try the following solutions:
-
If the exception reason is Incorrect user name or password, click and re-enter the login user name and password.
- If the exception reason is Disconnected, ensure that the connection between the NVR and the camera is normal, and the Ethernet cable is not loose.
- Delete or reset the camera and add it again.
- Power off the camera and restart it.
Q4. What should I do if the NVR cannot find the camera?
A4: If the NVR supports PoE port, and the camera has been connected to the PoE port of the NVR, try the following solutions:
- Connect the computer and the camera to the same network, and enable DHCP function of the camera (through client management tool, such as ONVIF Device Manager or Web UI of the camera for configuration).
- If the camera is a third-party camera, ensure that the camera supports ONVIF, and ONVIF is enabled, and an administrator with the username admin has been added to the user list.
If the camera has been connected to the LAN side of the NVR, try the following solutions:
- Ensure that the camera is working properly, and the camera is connected properly to the switch or router that is connected to the NVR, and the Ethernet cable is tight.
- Ensure that the IP address of the camera is in the same network segment as the LAN IP address of the NVR (through client management tool, such as ONVIF Device Manager or Web UI of the camera for configuration).
- If the camera is a third-party camera, ensure that the camera supports ONVIF, and ONVIF is enabled, and an administrator with the username admin has been added to the user list.
If the problem persists, please contact Tenda technical support.
Pakkens indhold
NVR×1
- Strömadapter x1
Mus x 1
- Installationspakke x 1
(Skrue: gevindddiameter: 3,5 mm, laengde: 5 mm; hoveddiameter: 6,5 mm)
Web management (Internet management)
EINHnHeI LED INnKaTOp (PnPmep: N3L-8H)
I INcTaJInpaIe TBbPdIaNck HDD
Bb3MOxHO e BbHnHnT BnHa NVR da ce pa3nUaBa B 3aBncmocT OT MoJeA. CJeHnata
HHOpMaunr cLyJn cAmo 3a cnpaBka. MoJ, HcTaInpaTe HDD, cbOTBeTCTBaH Ha MoJeA, KoTo
BCbUHOC TcE 3akynnn.
To3n npOyKT He BKJIouBa HDD. IpenopbYBa ce da n3noI3BaTe HDD npedna3NaueH 3a Ha6IIOHeH
MoKe Ja Imate HxJa ot OTBeptKa. MoJ, npiroTBeTe ro cami.

Korato Hnctanipate nn noMmte Tbbpnn DaCK HDD, moia n3knoye 3axpaHbaHeTo Ha mpeXOBn BIndeo pekopdep NVR, BNpOtnBEN cnUaya TBbpnn TaCK HDD MoKe da He 6Je OTKPnT n dopn da 6Je nobpehen.
Pa3xla6eTe BnHTOBeTe HaNbHTo, CneI ToBa MaxHeTe KaNaKa Ha MpeKobna BnJeO peKOpdep NVR. 3ana3eTe BnHTOBeTe 3a NocJeDaUo NOn3BaHe.
NVR c nlaactMacOBkopnyc (PpImep:N3L-8H)
NVRcMeTalHaOBBvBa(PiPmEe:N3104-4P)
2 13BaTe 2 BnHTa OT INHCTaNaUOHnnaKeT Ha MpeXOBnBnDeo peKOpdep n rN 3aBnHTe T BdBATA OTbopa 3a BnHTOBe, KOnTO ca Na-6IIn3o Do SATA KOHeKTopa. 3ana3e To OKOTo 2 MM. MeKdy IraBnKaTa Ha BnHTa N TBbpDnA DnCK HDD 3a NoCleDaBa a HnCTaNaUa.
3 IopapBHeTe SATA KOHeKTopa Ha TBbpDnA DnCK HDD cbc SATA Cnota Ha DbHHata Pnata Ka Ha MpeXOBn BIneo pekopdep NVR nCleT TOBa BkapaTte TBbpDnA DnCK HDB Cnota,doKaTo ce FIKCnpa PnTHO.
NVR c nlaactmacob Kopnyc (Ppimep: N3L-8H)
NVR c MeTalHa o6BvBa (Ipnmep: N3104-4P)
4 3BaIeTe OCTaBauIte BnHTOBe OT INHCTaIauIOHHNnaKet Ha MPexKOBn BInDeo peKOpDep NVR n 3aBnHTeB OTBOPnTe 3a BnHTOBe Ha TBbpIy IINCK HDD, 3a Da 3akpeIte TBbpIy IINCK HDD.
NVR c nlaactmacOB Kopnyc (Ppimep: N3L-8H)
NVRcMeTaHaOBBvBa(PpMnep:N3104-4P)
MohtaKaHa Kaapa C npedBapnteHIO n3BaJeHHTe BnHTOBe.
NVR c nlaactmacob Kopnyc (Ppimep: N3L-8H)
NVRcMeTalHaOBBvBa(PnMmep:N3104-4P)
II CbpxKeTe yctpoNCTBOTO
O6nKHOBeHa NVR TOnoJIoRna (PpIMep: N3L-8H)
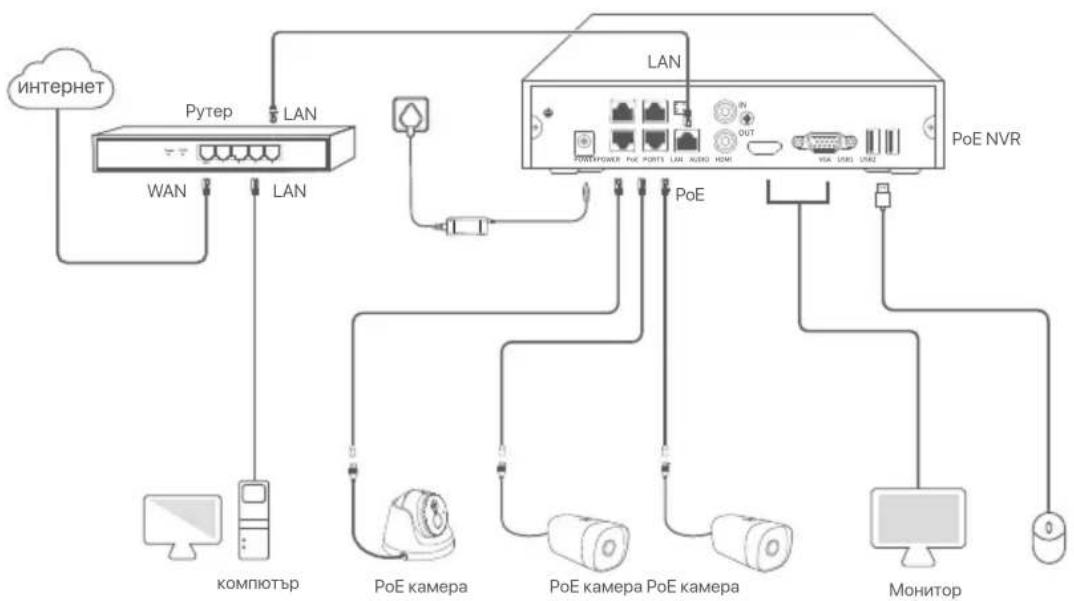
PoENVR tonolorna (PnpMep: N3104-4P)
III OchOBHa KOHΦnrgupaçna
Mectho ynpabJIeHne
CTapTbn

CcbETM
NvIINIOJIe BVKIOUChENHa aIaNTep 3a 3axpaHbAne, 3a da BVKIOUChTE NVR. HeOpMaJIHO 3axpaHbAne ue IOBoeDe DO HeIpaBnHa pa6Ota Ha NVR IIN dOpN NVR MoKeJa ce Nobpei.
Cbpxte BkIoueHn 3axpaHbaa aanTep KbM 3axpaHbaa nopT Ha NVR i BKIOueTe 3axpaHbaa n aanTep B KOtakTa, 3a da cTaptnape NVR.
N3KJIIOUBAHe

3a6eJekka
He npekcbai Te npektho 3axpaanbaheTo h NVR 3a npnHytdTeHNO H3KIOUVAbe; B npotuBEN cnyaM oMeJa de neobpeHn HDD, da ce 3ary68T BVdeoklnnoBe nnDopn da ce nobpeDu npnNVR.
CneI KaTO CbPKeTe MUsKkTa I MOHITopa KbM NVR, n3nBJIHeTe CJeDHNTE HacTPOIKN B ye6 INHTepFeiCa Ha NVR (n3Je3Te O T cEJIra ekpaHa INHTepFeiCa):
KlnkheTe B ropnna deceen bbl, KlnkheTe N3KIOUbaHe , n cneToba KlnkheTe OK. Korato
YcTpoIcTBOTO e n3KJIIOUeHO. MoIa, n3KJIIOUeTe 3axpaHbaHeTo n3KJIIOUeTe eNeKTpueckn aadanTep Ha mpeKOBn BInDeo peKOpDep NVR.
Бьрзанстpoиka
CneI KaTo CbPjKeTe MUsKaTa I MOHITopa KbM MPeXOBn BnDeo peKOpJep NVR, MoXeTe da n3IbLnHnte 6bp3a HacTpoiKa.
Ye6 notpe6nteLcknT nHTepfecn Ha NVR Moje da Bapnpa B 3aBcIMoCT OT pa3JIuHnTe MoJeI.
IeIcTBnTeHnIaYe6 nHTepFeic pneo6laJaBa. 3a npimep tyk e N3L-8H ha NVR.
3aandaTe napola, BbBeJeTe Baunia Meinl apec, CneToBA KInKHeHa AKTUBipahe.

Ako nCKaTe da n3nON3BaTe 7a6JIOH 3a OTKJIIOUBAHe Ha ye6 INTEppeiCa, MoJIa, HapcCyBaIte 7a6JIOH 3a OTKJIIOUBAHe. B npOTuBEN cLyuay a JpaKaHHe TBpXy He n3nON3BaIte cxema Ha OTKJIIOUBAHeIPpeMInHeTe KbM CTbPKa 3.
8YbepeTeCe,ueCbctOHaHb3KaTae Cbbp3aH,nAaKTINBpaIte NnIeAaKTINBpaIte. yHKUraTAtOMatuHO Do6abReHa LAN kamepncnopeH HyKdTe Ha yKHuaTAt.
-Ako nckaTe aBtOMaTnHNo da IobabYe KaMepn ot LAN cTpaHaTa ha NVR, upaKaHete Bbpxy CneBaA. IpemHeTe KbM CTbIka 6.
-AKO nCKaTe pBHyD a do6abNTe KaMepn ot LAN cTpaHata Ha NVR,MOKeTe da deakTNbPaTe ABTomatuHO do6abYHe h LAN kAmepeyHKLny,HaTNChe TcJeBaU.

Ako cboTOnHHeTo Ha Bpb3kata e PpeKbchata Bpb3ka, ONnTaHTe CneHnTe peWeHnHa:
- YBepete ce, ue LAN nopT Bpb3kata Ha mpekoBn Bndeo pekopdep NVR e hopmaHa.
- YBepete Ce, Ye FyHKUraHa DHCPcbpBbP Ha pyTepa, KbM KOIto MpeKOBn BIneO peKOpDn NR V e CbP3aH, e aKTbnpaHa.
Добаяне на kaMepaTa.
I36epTe KaMepaTa, KOrTo NCKaTe Da Do6aBnTe KbM CnncbKa OHnaH KaMepa, N ⅡpaKHeTe Bbpxy D06abAhe . Korato KaMepuTe Ce No8Brt B CnncbKa Do6aBeHa KaMepa N CbCToHnETo e OHnaH, ⅢpaKHeTe Bbpxy CneBau.

- Ako KaMepa, KaTo IscKate Da IdoabnTe, e 6ila CbBp3Ha KbM KOMyTaTopa Hn npyTepa, KoToe CbBp3An KbM LAN npTa Ha NVR, MoIra, yBepete Ce, ye IP aApcebt Ha KaMepa n NVR ca B eEINH n CbUnmpekob cerment.
Ako NVR noIbIbPka POe NOptobre KaKemepata, KOTo ICKate da do6BaIte, cBb3aHa KbM PoE npota H NVR, MoIy, yBepeTe ce, ye DHCP Fynkuieta ha KaKemepata e AKTIBuPAHa.
-Ako kamepata, kato ICKaTe da Do6abite, e aKTHBnupaHa nIOTpe6nteKcTo hme nnapoA ca pa3mHn OT Te3n HA NVR, upaKaHETe Bbpyx (%) , BBBeTe cBoTBeTHATA HOpMaunu HpaKHe Tbpyx Do6abHe.
YBepTeCe,YeCbCToHHeTo Ha o6naka e OHaH N KInKHeTe Bbpxy OK.

-Ako cbctoHneto Ha oBnaka e OfmaH MoJIy, yBepe Ce, ye pyetbT, KbM KOIT MpeXOBaR T BIneo peKOpDpNVR e Cbbp3an, Ima doCTbn Do nHTepHET N fHKUra 3a fNtPnPAne e DeakTNBpuHa.
Bne moke cbyo da ynpablaabe Mepekobna BVide pekopdep NVR npes npinloxeneTo TDSEE. MoI, o6bphete ce KbM YnpablenHe Ha npinloxene B TO3n HapbHnK 3a nOpno6hocTn.
3aBpseH.
Mokete da npereIeKdaTe Bndeo BpeaHOBpeMe, da Bb3npOn3BexJaTe 3anCite n da ynpablaBaTe yctpoiCTBa 3a Na6IIOJeHne n T.H.
- UnpaBHeHne Ha npInIOxKeHneTo
Clek KaTo ycnyrata B o6Iak Ha MPeXOBnB VInDeo peKOpDep NVR e aKTbBupaHa n cStOHNHeTo Ha 6Iaka e OHnaH, MoKe da IobabTe u npablaBaTe MPeXOBnB VInDeo peKOpDep NVR npes npINOxKeHneTo TDSEE.
CbaneTe npinoxeHneTo TDSEE.
Cnei KaTo Mo6nHnT TeJeFOH e CbIp3aH ycNeuHO C nHTepHeT, CbaJIeTe N nHCTaIIpaIe TDSEE npIoJxHeNoTo Ha Ba7n4 Mo6nIeN TeJeFOH Upe3 cKaHnpaHe Na QR KoJa IIN TbpceHe Ha TDSEE B Google Play IINI App Store.


Unn

QR KoI
YBepete ce,Ye mpekOBnT BnIeOp pekopdep NVR e BkIouen np6oTu npabuHIO.
OTbOpTe npnloKeHneTo TDSEE n cIeBaiTe HNCTpyKcHnTe, 3a da 3abbpHnTe peRNCtpaunraHa notpe6nteHa Haualna Ctpanuca, cIeT ToBa DOKOCHete Doabn yctpoiCTBOnn B rOpHnA deceh bIbn Ha HauJIHATA CTPANuca.
CbBETN
3a da cte cnrgyn, 3e npolata 3a bxOd Ha mpeXOBnBn BnDoe peKOpdep NVR moze da 6bJe noDHOBeA ue3 npilooHneTo TDSEE, moJI, peRcTnpaIte ce c pe3epBvapnna HmEIn aDPEC, KOrato MPeXOBnBn BnDoe peKOpdep NVR e 6bnakTBNpAH.
CkaHpaTe QR kOda Bbpxy etnkeTa B donHaT auct Ha MpeXOBnB nDeo peKOpdep NVR nn cKaHpaTe QR kOda HcTpaHncaTa 06naUHa ycnyra CneI TOBa CneDbaiTe IHcTpYkUnTe B npiloxKeHneto.
Cnei KaTo MpeKOBnB vIeO peKOpDep NVR e do6aBeH, MoKeTe da npeJIeXdaTe dIcTaHcIOHO BVEo BpeALHO BpeMe, Bb3PpON3BExJaTe 3aIncn I npOBepBaTe aIapMeHn CbOSeHn Ype3 npINOxKeHnTo TDSEE.
Ye6 ynpaBneHne
Te3n cepnn NVR moraT da ce ynpablaBaT bye notpe6nteJckna INTEPfeic.
AknBupaHe
Ako NVR He e aKtBnupaH, MoKeTe da ro aKtBnupate ue3e ye6 nOTpe6ntckn yHTepfneC. Korato aKtBaCaIyTA npIKLIOuN, Tp6Ba da ce IOrHeTe OTHOBO.
CbpxkTe KOMIOIbpa KbM pIpeBKnIOyBaTeI IIN pyTepa, KOITc e Cbbp3aH KbM NVR.
3aJaIe IP aDpeca Ha KOMNIObpa Ha HeH3No3BaH, npHaJdEkaUc KbM cbuIy MpekoB cerMeHT KaTO IP aDpeca Ha NVR, Ho pa3JIueH ot IP aDpeca Ha NVR.
По поразьране IPадесьт 3a впсване на NVR e 192.168.1.254, моля задаite IPадра на КOMПЮТьра дьбдe 192.168.1.X (X e 3a стойости ot 2do 253, Heизплзвани ot дуги устюпства).
CTapTnpaIte 6pay3bp n BBBeTe IP aDpeca 192.168.1.254 Ha NVR B aDpecha Ta IeHTa.3aJaIte PApOla, BBBeTe MeMn aDpeca cn, IN KInKHe T Bbpxy AkTbBupahe.
CbBETN
NVR noDbpxa HTTPS Bn3ane. Korato Bne3eTe B Herobata cTpaHua 3a ynpabHe,6pay3bpt MoKe Da noKaH,ye ye6 aDpeCbT He e 3auTeH, npocTo ro nHopmaTe H npoBnxkeTe.
Hacpoiknte ca 3aBbpseHH. MokeTe da Bne3eTe bye6 notpe6ntcKna nHTepceic Ha NVR, 3a da BV3yaIIN3npaTe BnDcEo BpeJIHO BpeMe IIN da KOHfNpypapTe NVR cnopeJ Hyxndte.
ФункцятahDCHP ha NVR e akTbnpaHa. Ako B Мржа ta nMa DHCP cbpBbp, IP apecbt ha NVR moKe da 6bnde npomehen. MoJr, BnKTe DeiCTBnteHnIg IP aDpec, 3aadan Ha NVR ot DHCP cbpbpa.
Bne3TeBye6 nOtpe6ntenckn INHTeppeic
BnKTe CtbIKNOT 1D0 B AKTbBnpaHe,3a da pa6oTne.
43B
B.1. KaKbTO Tp6Ba Da HanpaB, aKa Na NVR Hma B3pnO3BExKaHn BuDeokmnoBe?
0.2
-YBepete ce,ye HDD pa60n npabuHIO.
OTnTeIo KOnHpyaun> CbxaHene> HDD:
- Ako HDD He 6bnde OTkpuT, nbpBO u3KJIIOUe TNEVRIHCTaIINPAIte OTHOBODNCTAPTNPAIte NVR.
- Ako HDD e HeHOpMaJIeH, IIpbBO u3KJIouTe NVR, npEnHCTaInpaIte HDD i cTapTnpaIte NVR. Ako npo6JIembT npOdbJIkaba, foPmaTnpaIte HDD.
-
Ako φορmaṭηραπeTo ce npobαπi, ΠβρΒο ΙεκλιουγeTe NVR, πρεηνισαταπuρaίte HDD i Κταρισαπe NVR.
-
YBepTeCe, Ye nIaHbT 3a 3aInc e npabIneH.
OTnTe Do KOnHpyaun> CbXpaHene> rpaK n ce yBepTe,Ye:
-「PapaKbT 3a 3anC Ha KaHana e aKTbUpaH.
BpeMeTo 3a 3anic n BnBbT ha 3aPiNca 3aandaen npabuHNo. Ako He, 3aaiTe n rna3a3eTe, KaKTo e Heo6xoIIMO.
B.2.KakBo Tp86Ba Da HanpaB, Ako npiloxeHneTo TDSEE He ycnee da doabn NVR?
0.2.OTnndeTe Do KonPhnpyaun >Mpexa > O6naUHa ycnyra Ha NVR, 3a da ce yBepnte, ye fynkncyraTa 3a o6naHaa ycnyra e akTbVipana.
-
Ako CtaTcybT ha 6naka e OhnaH, yBepTe ce, ye MoBunHnT TelefoH (c HCTaInpaHO npiloxHe) e CBbp3AH KbM INTEpHET.
-AKo CtaTycbTHa o6naka e OfnaH, onTuTaTe cneHNte peSeHnA: -
HabuHpaIte do KoHpyaun > Mpeka > INTepHeT, 3a da ce yBepnTe, ye KOHpyaunTa Ha INTepHeT npametpnte e npabInHa.
- YBepeTe ce, ue LAN nopTbT ha NVR e npaBnIO Cbbp3aH KbM cTpaHaTa ha napThbopa (cunu nIu pyTeP).
- YBepeTe Ce, Ye pyTepbTe cBbP3aH KbM INHTepHeT N φyHKUraTa 3a ΦIITpnpaHe e DeakTbBpaHa (KaTo MAC ΦIITbp N cepeH cPiCbK).
- YBepeTe ce, ye fynKuIyTa DHCPcbpBbP ha pyTepa e aktINBupaHa.
B.3.KaKBO Tp86Ba Da HappaBra Ako HMa NokaAHH N3o6paXeHn Ha NVR KaHaJa?
0.3. OTiJeTe Do KOnHnrypaua> KaHaI> KaMepa Ha GUI Ha NVR, HamepeTe IobabEHa KaMepa I npOBePeTe CbCToRHeNo Ha KaMepaTa Ha KaHaJa.
-Ako cbcTcHHeTo Ha KaMePaTa Ha KaHaJa e OHaJn, oTBopTe KoHfHypaZra> KaHaJ > N3o6paxKeHne n ce yBepTe, ye ApkocCTTa KOnTpaTbT npd napametprte Ha N3o6paxHeNo He ca 0.
-AKcBCTOHeToHaKaMepaTaHaKaHaJa ePeuKa,3aIpbXTe KypCopa Ha MIIkaTaHaI 3a Da npOBepTe npHnHata 3a N3KIOUeHne I ONITaTE CNEHNITE peueHn:
- Akpo npuHaTa 3a n3KIOUeHHe e HnpeabUNHO nOTpe6bTeNcKO hme nI npOla, upaKHe TBpy U BBeDeTe OTHOBo Ntpe6bTeNcKO To hme n napOlaTa 3a Bn3aHe.
- Ako npuHaTa 3a n3KJIouHe n e PpeKbChata, yBepTe ce, ye Bpb3kaTmexy NVR n KaMePaTa e HopMaJIHa n Ethernet ka6eIbT He e pa3xla6eH.
-ИЗтурипей симпесаргд Камерда и я добаве отно.
-ИЗкlioуeteКamepaТЯпестатийTe.
B.4. KaKBO TpI6Ba Da HappaB aKO NVR He MoKe da OTKpe KamepaTa?
0.4: Ako NVR noiNbpbXa PoE npT i KaMepaTa e 6nla cBbP3Ha KbM PoE npTa Ha NVR, oniTaiTe cIeHNITE peuHnra:
-СбьржerteКOMПИТьраи КамераТа КБМ edha И сьда Мржа и akтупайтЕ DHCP Фуннцята на КамераТа (уразинсчимent 3a управление на Клиеньta, кato ONVIF Device Manager улуе винтөдүс на КамераТа зконфигурпаhe).
- Ako kamepata e kamepa Ha Tpe Ta pana, ybepeTe ce, ye kamepata noDbpxa ONVIF, ONVIF e aktubpan an admHHCTpaToc nTopeBnteJcKIOme admin e doaben KbM nTopeBnteJcKIA cnncbk.
Ako KaemepaTa e 6nla CbBp3Ha KbM LAN cTpaHaTa Ha NVR, OnntaiTe CneIHNHe peeHnE:
- YBepTe ce,Ye KaMepaTa pa6Otn npAwnIHO u Ye cBbP3aHa npAwnIHO KbM npEbkIIOUyBaTeIa IIN pyTepa, KoITo e Cbbp3An KbM NVR, n Ye Ethernet ka6eIbTe cTeHnat.
- YBepete ce, ye IP aDpecbT ha KaMepaTa e B cbSna MpeKob cerMeNT kaTo LAN IP aDpeca Ha NVR (pe3 nHCTprpEmTA 3a ynpabIeHne Ha KIneHTa, kaTo hAnpImep ONVIF Device Manager nIy e6 nHTepFeicn Ha KaMepaTa 3a KOhФuRpyipaHe).
-Ako KaMepaTa e KaMepa Ha TpeTa cTpaHa, yBepeTe ce, ye KaMepaTa noDdbpKa ONVIF, ONVIF e akTbIpaHn aDMNHCTpaTOP c Ntpe6nteNcKO hme admin e do6abEN KbM nOtpe6nteNcKN Cmncbk.
Ako npo6lembT npoDbIjkaBA, MoJIa, CbByPKeTe ce c TeXHHueckata noDpBjxKa Ha Tenda.
Obsah baleni
KpaTkoepykoBOdCTBO no yctaHOBke x 1
PonBJIeHne
3TN cepIN ceTeBbIX BnDeoperncTpaTopoB BKJIouaIOT NVR B nlaactNKOBOM Kopnyce INNVR B MetaJIInueckom Kopnyce.
CBeToODnOdHbI INHdNkTaOp
OdINH CBEToIDNoIDHbI INDnKaTOp (npIMep: N3L-8H)
IyctaHObKa JecTKoro DnCKa
BheHnBn BVn NVRs MoKet pa3nuaTbC B 3aBncmocTn OT MoeN. CneDyUoJra INΦopMaZn npedHa3NaueHa TolbKO IaIcPabKn. PoXaLyuCTa, yCTaHOBtE HDD COOTBeTCTByIOUeM OmeN, KOTOpYU Bb fakTuYeCKn Ppno6peN.
B KOMPJIeKT He BXoNT JxecTkN DnCK. PekomeHdyETcA NcIOnb3OaTb CneuaIbHbY JxcETKNI DnCK DnB VDHeOHa6JIoDeHnR. Bam MoKeT INoHaO6uTbCt OTBepTKa. IOnrToOBtBe CamOCTOReTbHo.

HnCTpykUIN
Bo Bpemr yctaHOBK nIIN 3aMeHbI JxekTkoI Oncka OTKIOUaHTe NcTOHNI KNTAHNA CeTeBO rBnDEoperntpaTopa. B npTNBHom cIyae 3To MoKet IpnBeCTN K C6OIO o6hApJxehn I daxe IOBpeXdEHNO BnDEoperntpaTopa.
OTKpyTte BnHTbB HIXKHeuactu CeTeBOrO BNDeOpErNCtpaTopa N CHIMNTE KpbIshky. CoXpaHNTe BnHTbI DnlaDaJIbHeNeIero IcNoJIb3OBaHnIy.
Q1. Yto deIaTb, ecn Ha BundeopernctpaTope He T BoCpOn3BeHeHra BInDeo?
A1.
- Y6eIntecb, yTo JeCTKm DnCK pa6oTaET npABINbHO.
You can preview real-time videos, play back the recordings and manage monitoring devices.
Upravljanja aplikacije
CbitloiodHn iHdkaTop
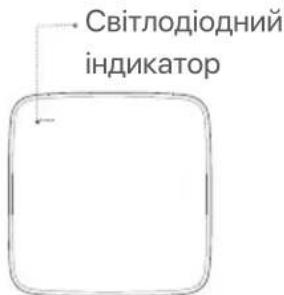
OdINH cBIITIOIOIDHH iHNKaTOp (PpIKlaI: N3L-8H)
| Свитlando dendri iIndikatop | Опс |
| POWER | Свитва синим: ihiцалizаця. |
| Свитва селени: заимс NVR. | |
| Блимае зелени: NVR пацюс наlexнem чином, аile не заимсус. | |
| Свитва чер boнim: NVR поравни (napr LAN Вid'энано, abo поравни жорсткий дисk). |
I BctaHOBJIeHHJ XOpCTKOrO DnCKy
3obhihi BnIgNVRs MoKe Biip3HraTcB 3aJeKHOCTi BiJ MoJI. HabepeHa HxKHe iHOpMaicj IInue dIy DoBiKn. BcTaHOItb HDD, kN BiDIOJaE oakTuHO npd6aHm MoJI.
Ley npodykT He BkIIOUaE JxOpCTKOrO DnCKa. PeKOMeHnyETbC8 BnKOpNCTOBByBaTH JxOpCTKn IINCK, np3NaueHn IJr CnOCTepeXeHHa. MoKJIuBO, Bam 3HaNO6tbc8 BnKpyTKa. PIdroTyIte NOro camocTiHo.
Iiuc BCTaHOBnEHn a6o 3amHn JokcTKO nCKa, 6yNb IacKa, BmKHiB JxNBHeHH NVR, y iHouMy BnApKy JOKcTKn DnCK MoKe 6yTu He BnABHeHH a6o HabiB noKOJxHeHH.
BiikpytIb rBnHTn 3Hn3y, a notim 3HiMitb kpiuKy 3 NVR. 36epexitb rBnHTn nla noaIbwo BnKOpNCtAHn.
NVR i3 nlaactNKoBOIO 06OIOHOIO (PnKna:N3L-8H)

NVR 3 MeTaNBeIOO oBolONKIOI (PnPKna; N3104-4P)
2 Bi3bMItb 2 rBnHTn 3 MOHTaXHoro Ha6opy NVR Ta BkpyTt bix B Dba rBnHTOBnx OTbOpn, po3TaWobahi 6iIpa03'emy SATA. 3aIInTe 6n3bKO 2 MM mixrroIOBkoIO rBnHTa Ta XOpCTKm DnCKOM nIra IoanbwoYcTAHOBKn.
BupiBnIe po3'em SATA JokcTKoRO ncky 3 rhi3dOM SATA Ha MaTePunHcbki nnati NVR, a noTIM BCTaHOBiTB JopcTkni DnCK y rhi3do, DOKN BiH He 6yde uJbHo 3akpInneHn.
NVR i3 pIaTkoBOIO o6oJHOIO (PpIKnaI: N3L-8H)
NVR 3 MeTaneBOIO o6oJIoHKOIO (Ppknad: N3104-4P)
Bibmitb rHNTn, 0o 3aIIuIINc y moHTaxHomy Habopi NVR, Ta BkpyiTb ix B rHHTOBI OTBOpN JopCTKOrO DnCKy, u6 3akpiINr XopCTKn DnCK.
NVR i3 nlaactNKoBOIO oboIoHOIO (PnKnaI; N3L-8H)
NVR 3 MeTaNBeIOO o6oJIoHO (Pnukna; N3104-4P)
BctaHObit KpUk Ky 3a DOnOMOrOIO NonepeHbO 3rHnX GBHTIB.
NVR i3 nlaactNKoBOIO o6oJHOKOIO (PnKnaI: N3L-8H)
NVR 3 MeTaNBeOIO o6oJIoHKOIO (PnKnaI; N3104-4P)
IIПiДКЛЮУЕнЯпсстpoI O
3BnuaHa TonoIoria NVR (Ppuklaad: N3L-8H)
TonoIoria PoE NVR (PnpKlaad: N3104-4P)
III Ochobha konphiirypaizia
IokaJIbHe ynpaBnIHn
Nyck
Iopadn
Bukopictobyte aadantep kXNBLEHNA, 0o daaetbcra, dna XNBLEHNA NVR. Henpabnblhe XNBLEHNA npn3bepe Do He npabnblhoi po60tn NVR, abo habt do no oto nookdojckenHHA.
ПиклочьаадпетжИнгня,шо BXODNTьdoKOMPЛКТУЖИВLEння,дЯ пikлочьнь BiodeopeectpaTopa Ta NiIcklchitb aadntepжИВLEнняdo pO3eTKN.
BidklioueHH
Pnmitka
He BIXKIOUaIe 63nocepeHbO XINBHeHHN NR pI npMycOBOro BmKHeHH;IHAKLe JoxpCTKN DnCK MoKe 6yTN nOuKOJKeHN, BiDeo MoKe 6yTN BTPaehNo, a60 HabItb NVR MoKe 6yTN noUKoDKeHN.
Iicnai nikluoyenmni moHitopa do NVR 3po6iTb taki hanaHTyBaHHa y BeiHTepfeci NVR (BnDITb i3 NOBHOeKpaHHoro iHTepeiny):
HaTnCHiB (O) y npabOMy BepxHbOMy KyTi, haTnCHiB BmKHeHHa (O), a NOTIM HaTnCHiB OK. Koni Ha ekpaHI 3'YBIAETbcrPiIac BmKHeHH npucpTO. Byb IaCKa, BmKHiB XuBJIeHHa, BiIeJHaIte 6Iok XuBJIeHHN NVR.
Ubnke HanaawybaHH
Псяпдкюченя Mшій моитopa до NVR BИ може ВИКОHAТи ШВIDKE HaIaWtYBaHЯ. BeiHTeppeic NVR може BiДріЗЯТSCЗаlexЖHO bɪd pi3нх модаел. Пepeвaxае ФakTчнь BeiHTeppeic.Як риклад,туг ВЗЯTO N3L-8H NVR.
YcTaHOBITb IapoJIb Ira BxOdy y cncTeMy, BKaKITb CBOIO AApecy eNeKtpoHoiI noHTn i HaTNCiTB AKTbByBaTu.
2KIO BxOyTe BVKnOpNCToBvBaTn rpaicHn KIOU dIra po36IOkyBaHHcTOpIHKN ynpabJIHH, 6yIb IacKa, HamaJIIOte rpaicHn KIOU. B iHOMy BnAaKy HaTnCHITb He BVKnOpNCToBvBaTn rpaicHn KIOU i nepeiDITb DO KpOKy ③.
IpekeohaiTeca, 0C tAn NiKIIHueHHIiKIOeHo i YbIMKHITb a6o BIMKHITb fYHKUIO ABTomatNHe DoaBaHHKaMep JIM, kIIO HeO6XiHO.
-Якшо Вихочete abTomatuHNo DoaBaTn KaMepn Ha cToPOHi JIM NVR,HaTnciItbДani.IpeeJitbdo KpOKy
-Якwo BxOyTe BpyHydoaBaTnKaMepnHa CTopoHJIM NVR, Bu MoKTe BiKJIouHTnФyHKciIO ABTomatUHe DoaBaHnKaMep JIM i HaTNCHTnДani.
Topadn
Ypazi kuo CTan iKluuHnBikluuHn, BkOHaTe HAcTyNHi Dii
- Ipekeohntec, 1o LAN-noptniiknuehen do NVR.
- IpekeohaiTeca, 10 yHKzj DHCP-cepBepy poyTepa, do koro nid'edhann NVR, yBMkHeHa.
Dóatn Kaemy.
Bn6epitbKaempy,ky Bn xOyTe IdoaTn Do cnncky OhnaH-Kamepa i HATNCHTb DoaTn. KOni Kaempi 3'ABTbcra B CnCKy DogaHi Kamepu, a cTaTc OHnaH, HATNCHTb Dani.
-Поради
-Якшкамеру,яквбжаэтдд,在оКOMyTATopaaboMapwpyntaTopaPiKIOHOrOdo npTyLANNVR, nepekoahTeca,io IP-aDpeca kamepn Ta NVR 3haxoatbC B ODHOMY cermenti mepeki.
-Якso NVR niDTPMmE nopTn PoE,i kamepa,ky Bn xOyete doaTn,6yla NiKIOUeHa do npTy PoE NVR,nepeKoHaITeCs,io fynKcJH DHCPRkemr BBIMKHeHa.
-Kaepa,kyu BxOHTe DoaTn,akTNBOBaHa,aIM'KOpNCTyBaTa Ta napoB Biip3HIOTBc BiD NVR,HaTNCiTb(),BBeditB BiNOBHy HOpMaio Ta HaNTCHiTb DoaTn.

Nepebipte, xO xMapHe cxOBnIe 3HaxoINtbc y pexMI oHnaH Ta HaTnCHiTb KHOkKy OK.
Iopadn
JxMaphe CxOBHnE 3haxOuHTBCB PexKmIOoAaH,6yIb IaNcA,peKoHaTeC8,io poyTep,do koro nIKUoyen NVR,mae do iTEpHTpy, npu bomy fynkui piNbTaP NOINHb 6yTN BmKHeha.
-Bn taKoK moKeTe ynpabJIaTI NVR 3a donOMorIO DoaTky TDSEE. IInI OTpIMaHH 6iNb DeTaIbHO iHOpMaJIi, 6yNb NaCKa, INB. YnpabIIHHdoaTkAMN B cObMy nociHNIky.
3abepueho.
Bn mojTe nepeTnaTn BiJeO B peaHOMy yaci, BiTbOpUbaTn 3aIncn Ta KepyBaTn npicTpOMy CnoCTepExeHHN, ToIO.
KepyBaHHaDDaTkAMN
Picnpiikniouhenno xMapnoro cxobuca NVR y pexkmi OHnaH BN MOKeTe DoaTn Ta KepyBaTN NVR 3a dOnomoroIO DoaTaKDSEE.
3aBaHTaxTeIoTaTOKTDSEE.
3aHTaH2 2 10 p6ntn, kI nporpaT DSEe He bdaetbca daT NVR?
Bidnoib2
3aHHTaHH 3 Ioo pO6bntn, kKIO Ha KaHani NVR He bIO6paXaTeBcra 3o6paXeHH?
Bidnoi3IpeinDb KoKphiirpaia> Kaan> Kamepa rpaicHoro iHTepFeSy KopncTyBaay NVR,3aHnDItb
Iodana Kaemepa Ta nepebipTe cTaTc KaMeepn KaHaany.
-JaKIO CTaH KAMepn KaHany OHaAH, nepeiDITb DO KonHphiypaiaJ > KaHAN > 3o6paxeHHa Ta napekoHaTecra, npnapamtpn RaKpabicI b I KOHTpact y Pnapamtpax 3o6paxeHHa He dopBHOOTb O.
-JaKIO CTaH KAMepn KaHany POMILKa, HABedITb Kypcop MUsi Ha 1, 106 nepeBipuTn npuHy npo6lemi, i cnpo6yIte Taki piueHH:
-Якшпричнюю рpoбLEMи И Неравильно IM'я користувача abo napony, haTnCHiTb i nobToPno BBeDITb IM'я korpnsTuBaNo Ta napony dny.
- Jkso npinyHOIO np6bEMn E BiKloueHo, nepekoHaTeCs, 0o 3'edHaHnMIX NVR i kamepoIO HopMaJIbHe, a Kaebb Ethernet He 3akpinneHn.
- Bùndaɪntu a 60 c kɪnhytɪ n kæmepy Ta dədətɪ n 3hɒby.
BumkhItb kamepy Ta nepe3anycttib II.
3aHTaHn4 4 lo po6ntu, kN0 NVR He MoKe 3aHTKamepy?
Bidnoib 4 JaKuo NVR niDtpmmy nopT PoE, a kamepy 6yIoo nikJIOueHo do npTy PoE NVR, cnpObyTe taki piweHHa:
-ПдклioчыКOMN'IOTeP i KaMepуdoOndHieiМepeKi I BBIMKnHbФyHKcIIO DHCP KaMepn (3a DonomorOIO IHCTpyMeHTa ynpablinna KlieiHToM, takoro JK dinCneTpe npicStpoB ONVIF a6o Be6-iHTepeic KaMepn dlya HanaTuBaHHa.
-Якuto kamepa ε kamepoio CTopoHbOro Bnpo6hNka,nepekoHaItecya,io kamepa nIDtpmYe ONVIF,ONVIF yBIMKHeHO,a admHicTpap03 im'am KOpncTyBaHa admindoHaNO do cnNCKy KopncTyBaivib.
Kkpo kamepy 6yno nikloucho do lokailhoI mepeki NVR, cnpooyte Taki piueHHa
-ПepeKoHaITeCЯ,ио KaMepa npaioe npabunbHo,KaMepa npabunbHo nikKIOUeHa Do KOMyTaTopa a60 MapuTy3aTopa,piKlIoHEno do NVR,ta Ka6elb Ethernet 3aTaryto.
-ПepekaHaiTeCay,Io IP-aPeca KaMepn 3haxoOnTbCBy TOMy Jx CeImeHtI MepeXi,Io IP-aPeca MepeXeBOrB iDeopeeEcTaTopa B IokaBnHi MepeXi (3a DOnOMOrIO IHCTpyMeHtA ynpabNHHK NJIeHTOM, TaKOrO Jk DInCneTep npncTroOB ONVIF a6o Be6-iHTepFeic Kapepn dHaJauStyBaHH).
-Якuto kamepa ε камеро CTOPOHbOrO Bnpo6hNka, nepekoHaITeCs, οι кamepa πιДтчмye ONVIF, ONVIF yBIMKHeNo, a admiHCTpaTop 3 im'Яm KOpncTyBaHa admin doJaHo Do cnNCKy KOpncTyBaivB.
Kpno6nMa He 3HnKae, 3BepHtbcra Do TxHiHoPiTpumKn Tenda.
(N3104-4P:J)gaiu
NVR×1·
1x4aJgxxo
1xwglal
(aa6.5:JyjIyjIyjIy:a05:Ljgl,a03.5:JyjIyjIyj:Jawal)1xCuiuillao
1x
2ab = 8
NVR 8.8g NVR 8.8g NVR 8.8g
LED
| LED | Description |
| POWER | .ahyaehjj:JJJJ |
| .NVR JJJJJJJJJJJJJJJJJJJJJJJJJJJJJJJJJJJJJJJJJJJJJJJJJJJJJJJJJJJJJJJJJJJJJJJJJJJJJJJJJJJJJJJJJJJJJJJJJJJJJJJJJJJJJJJJJJJJJJJJJJJJJJJJJJJJJJJJJJJJJJJJJJJJJJJJJJJJJJJJJJJJJJJJJJJJJJJJJJJJJJJJJJJJJJJJJJJJJJJJJJJJJJJJJJJJJJJJJJJJJJJJJJJJJJJJJJJJJJJJJJJJJJJJJJJJJJJJJJJJJJJJJJJJJJJJJJJJJJJJJJJJJJJJJJJJJJJJJJJJJJJJJJJJJJJJJJJJJJJJJJJJJJJJJJJJJJJJJJJJJJJJJJJJJJJJJJJJJJJJJJJJJJJJJJJJJJJJJJJJJJJJJJJJJJJJJJJJJJJJJjjJJJJJJJJJJJJJJJJJJJJJJJJJJJJJJJJJJJJJJJJJJJJJJJJJJJJJJJJJJJJJJJJJJJJJJJJJJJJJJJJJJJJJJJJJJJJJJJJJJJJJJJJJJJJJJJJJJJJJJJJJJJJJJJJJJJJJJJJJJJJJJJJJJJJJJJJJJJJJJJJJJJJJJJJJJJJJJJJJJJJJJJJJJJJJJJJJJJJJJ JJJJJJJJJJJJJJJJJJJJJJJJJJJJJJJJJJJJJJJJJJJJJJJJJJJJJJJJJJJJJJJJJJJJJJJJJJJJJJJJJJJJJJJJJJJJJJJJJJJJJJJJJJJJJJJJJJJJJJJJJJJJJJJJJJJJJJJJJJJJJJJJJJJJJJJJJJJJJJJJJJJJJJJJJJJJJJJJJJJJJJJJJJJJJJJJJJJJJJjj JJJJJJJJJJJJJJJJJJJJJJJJJJJJJJJJJJJJJJJJJJJJJJJJJJJJJJJJJJJJJJJJJJJJJJJJJJJJJJJJJJJJJJJJJJJJJJJJJJJJJJJJJJJJJJJJJJJJJJJJJJJJJJJJJJJJJJJJJJJJJJJJJJJJJJJJJJJJJJJJJJJJJJJJJJJJJJJJJJJJJJJJJJJJJJJJJJJJJJ JJjjjjjjjjjjjjjjjjjjjjjjjjjjjjjjjjjjjjjjjjjjjjjjjjjjjjjjjjjjjjjjjjjjjjjjjjjjjjjjjjjjjjjjjjjjjjjjjjjjjjjjjjjjjjjjjjjjjjjjjjjjjjjjjjjjjjjjjjjjjjjjjjjjjjjjjjjjjjjjjjjjjjjjjjjjjjjjjjjjjjjjjjjjjjjjjjjjjjjjjj JJjjjjjjjjjjjjjjjjjjjjjjjjjjjjjjjjjjjjjjjjjjjjjjjjjjjjjjjjjjjjjjjjjjjjjjjjjjjjjjjjjjjjjjjjjjjjjjjjjjjjjjjjjjjjjjjjjjjjjjjjjjjjjjjjjjjjjjjjjjjjjjjjjjjjjjjjjjjjjjjjjjjjjjjjjjjjjjjjjjjjjjjjjjjjjjjjjjjj jjjjjjjjjjjjjjjjjjjjjjjjjjjjjjjjjjjjjjjjjjjjjjjjjjjjjjjjjjjjjjjjjjjjjjjjjjjjjjjjjjjjjjjjjjjjjjjjjjjjjjjjjjjjjjjjjjjjjjjjjjjjjjjjjjjjjjjjjjjjjjjjjjjjjjjjjjjjjjjjjjjjjjjjjjjjjjjjjjjjjjjjjjjjjjjjjjjjjjjj jj JJ JJ JJ JJ JJ JJ JJ JJ JJ JJ JJ JJ JJ JJ JJ JJ JJ JJ JJ JJ JJ JJ JJ JJ JJ JJ JJ JJ JJ JJ JJ JJ JJ JJ JJ JJ JJ JJ JJ JJ JJ JJ JJ JJ JJ JJ JJ JJ JJ JJ JJ JJ JJ JJ JJ JJ JJ JJ JJ JJ JJ JJ JJ JJ JJ JJ JJ JJ JJ JJ JJ JJ JJ JJ JJ JJ JJ JJ JJ JJ JJ JJ JJ JJ JJ JJ JJ JJ JJ JJ JJ JJ JJ JJ JJ JJ JJ JJ JJ JJ BB BB BB BB BB BB BB BB BB BB BB BB BB BB BB BB BB BB BB BB BB BB BB BB BB BB BB BB BB BB BB BB BB BB BB BB BB BB BB BB BB BB BB BB BB BB BB BB BB BB BB BB BB BB BB BB BB BB BB BB BB BB BB BB BB BB BB BB BB BB BB BB BB BB BB BB BB BB BB BB BB BB BB BB BB BB BB BB BB BB BB BB BB BB BB BB BB BB BB BBBB BB BB BB BB BB BB BB BB BB BB BB BB BB BB BB BB BB BB BB BB BB BB BB BB BB BB BB BB BB BB BB BB BB BB BB BB BB BB BB BB BB BB BB BB BB BB BB BB BB BB BB BB BB BB BB BB BB BB BB BB BB BB BB BB BB BB BB BB BB BB BB BB BB BB BB BB BB BB BB BB BB BB BB BB BB BB BB BB BB BB BB BB BB BB BB BB BB BB BB bb BB BB BB BB BB BB BB BB BB BB BB BB BB BB BB BB BB BB BB BB BB BB BB BB BB BB BB BB BB BB BB BB BB BB BB BB BB BB BB BB BB BB BB BB BB BB BB BB BB BB BB BB BB BB BB BB BB BB BB BB BB BB BB BB BB BB BB BB BB BB BB BB BB BB BB BB BB BB BB BB BB BB BB BB BB BB BB BB BB BB BB BB BB BB BB BB BB BB BBbb BB BB BB BB BB BB BB BB BB BB BB BB BB BB BB BB BB BB BB BB BB BB BB BB BB BB BB BB BB BB BB BB BB BB BB BB BB BB BB BB BB BB BB BB BB BB BB BB BB BB BB BB BB BB BB BB BB BB BB BB BB BB BB BB BB BB BB BB BB BB BB BB BB BB BB BB BB BB BB BB BB BB BB BB BB BB BB BB BB BB BB BB BB BB BB BB BB BB BB BT BT BT BT BT BT BT BT BT BT BT BT BT BT BT BT BT BT BT BT BT BT BT BT BT BT BT BT BT BT BT BT BT BT BT BT BT BT BT BT BT BT BT BT BT BT BT BT BT BT BT BT BT BT BT BT BT BT BT BT BT BT BT BT BT BT BT BT BT BT BT BT BT BT BT BT BT BT BT BT BT BT BT BT BT BT BT BT BT BT BT BT BT BT BT BT BT BT BT BTBT BT BT BT BT BT BT BT BT BT BT BT BT BT BT BT BT BT BT BT BT BT BT BT BT BT BT BT BT BT BT BT BT BT BT BT BT BT BT BT BT BT BT BT BT BT BT BT BT BT BT BT BT BT BT BT BT BT BT BT BT BT BT BT BT BT BT BT BT BT BT BT BT BT BT BT BT BT BT BT BT BT BT BT BT BT BT BT BT BT BT BT BT BT BT BT BT BT BT BT BEB BBA BBA BBA BBA BBA BBA BBA BBA BBA BBA BBA BBA BBA BBA BBA BBA BBA BBA BBA BBA BBA BBA BBA BBA BBA BBA BBA BBA BBA BBA BBA BBA BBA BBA BBA BBA BBA BBA BBA BBA BBA BBA BBA BBA BBA BBA BBA BBA BBA BBA B BA BBA BBA BBA BBA BBA BBA BBA BBA BBA BBA BBA BBA BBA BBA BBA BBA BBA BBA BBA BBA BBA BBA BBA BBA BBA BBA BBA BBA BBA BBA BBA BBA BBA BBA BBA BBA BBA BBA BBA BBA BBA BBA BBA BBA BBA BBA BBA BBA BBA BHA BBA BBA BBA BBA BBA BBA BBA BBA BBA BBA BBA BBA BBA BBA BBA BBA BBA BBA BBA BBA BBA BBA BBA BBA BBA BBA BBA BBA BBA BBA BBA BBA BBA BBA BBA BBA BBA BBA BBA BBA BBA BBA BBA BBA BBA BBA BBA BBA BBA BAA BBA BBA BBA BBA BBA BBA BBA BBA BBA BBA BBA BBA BBA BBA BBA BBA BBA BBA BBA BBA BBA BBA BBA BBA BBA BBA BBA BBA BBA BBA BBA BBA BBA BBA BBA BBA BBA BBA BBA BBA BBA BBA BBA BBA BBA BBA BBA BBA BBA BCA BBA BBA BBA BBA BBA BBA BBA BBA BBA BBA BBA BBA BBA BBA BBA BBA BBA BBA BBA BBA BBA BBA BBA BBA BBA BBA BBA BBA BBA BBA BBA BBA BBA BBA BBA BBA BBA BBA BBA BBA BBA BBA BBA BBA BBA BBA BBA BBA BBA BNA BBA BBA BBA BBA BBA BBA BBA BBA BBA BBA BBA BBA BBA BBA BBA BBA BBA BBA BBA BBA BBA BBA BBA BBA BBA BBA BBA BBA BBA BBA BBA BBA BBA BBA BBA BBA BBA BBA BBA BBA BBA BBA BBA BBA BBA BBA BBA BBA BBA BGA BGA BGA BGA BGA BGA BGA BGA BGA BGA BGA BGA BGA BGA BGA BGA BGA BGA BGA BGA BGA BGA BGA BGA BGA BGA BGA BGA BGA BGA BGA BGA BGA BGA BGA BGA BGA BGA BGA BGA BGA BGA BGA BGA BGA BGA BGA BGA BGA BGA B GA BGA BGA BGA BGA BGA BGA BGA BGA BGA BGA BGA BGA BGA BGA BGA BGA BGA BGA BGA BGA BGA BGA BGA BGA BGA BGA BGA BGA BGA BGA BGA BGA BGA BGA BGA BGA BGA BGA BGA BGA BGA BGA BGA BGA BGA BGA BGA BGA BGA BBA BGA BGA BGA BGA BGA BGA BGA BGA BGA BGA BGA BGA BGA BGA BGA BGA BGA BGA BGA BGA BGA BGA BGA BGA BGA BGA BGA BGA BGA BGA BGA BGA BGA BGA BGA BGA BGA BGA BGA BGA BGA BGA BGA BGA BGA BGA BGA BGA BBA BBA BBA BBA BBA BBA BBA BBA BBA BBA BBA BBA BBA BBA BBA BBA BBA BBA BBA BBA BBA BBA BBA BBA BBA BBA BBA BBA BBA BBA BBA BBA BBA BBA BBA BBA BBA BBA BBA BBA BBA BBA BBA BBA BBA BBA BBA BBA BBA BPA BBA BBA BBA BBA BBA BBA BBA BBA BBA BBA BBA BBA BBA BBA BBA BBA BBA BBA BBA BBA BBA BBA BBA BBA BBA BBA BBA BBA BBA BBA BBA BBA BBA BBA BBA BBA BBA BBA BBA BBA BBA BBA BBA BBA BBA BBA BBA BBA BBA BKA BBA BBA BBA BBA BBA BBA BBA BBA BBA BBA BBA BBA BBA BBA BBA BBA BBA BBA BBA BBA BBA BBA BBA BBA BBA BBA BBA BBA BBA BBA BBA BBA BBA BBA BBA BBA BBA BBA BBA BBA BBA BBA BBA BBA BBA BBA BBA BBA BBA BTA BBA BBA BBA BBA BBA BBA BBA BBA BBA BBA BBA BBA BBA BBA BBA BBA BBA BBA BBA BBA BBA BBA BBA BBA BBA BBA BBA BBA BBA BBA BBA BBA BBA BBA BBA BBA BBA BBA BBA BBA BBA BBA BBA BBA BBA BBA BBA BBA BBA BXA BXA BXA BXA BXA BXA BXA BXA BXA BXA BXA BXA BXA BXA BXA BXA BXA BXA BXA BXA BXA BXA BXA BXA BXA BXA BXA BXA BXA BXA BXA BXA BXA BXA BXA BXA BXA BXA BXA BXA BXA BXA BXA BXA BXA BXA BXA BXA BXA BXA BxaBxaBxaBxaBxaBxaBxaBxaBxaBxaBxaBxaBxaBxaBxaBxaBxaBxaBxaBxaBxaBxaBxaBxaBxaBxaBxaBxaBxaBxaBxaBxaBxaBxaBxaBxaBxaBxaBxaBxaBxaBxaBxaBxaBxaBxaBxaBxaBxaBxaBxaBBxaBxaBxaBxaBxaBxaBxaBxaBxaBxaBxaBxaBxaBxaBxaBxaBxaBxaBxaBxaBxaBxaBxaBxaBxaBxaBxaBxaBxaBxaBxaBxaBxaBxaBxaBxaBxaBxaBxaBxaBxaBxaBxaBxaBxaBxaBxaBxaBxaBxa |
| LED\(\hat{a}\) | \(\hat{a}\) |
| PWR | \(\hat{J}\) |
| \(\hat{J}\) | |
| NET | \(\hat{J}\) |
| \(\hat{J}\) | |
| HDD | \(\hat{J}\) |
| \(\hat{J}\) | |
| \(\hat{J}\) |
yai 1
. jalall de jlgll cuiil paxi: jalll dc uill cia
: aaiuall ciitg f gai yogai caiol gail .lilb dao jali lde cuii algo
pa 5.2: ujla jai : pa 14: ujball , pa 3: ujall jai: jnll
pa 26.4: ujall: pa 6.0: ujll ujali: ayss

a>glU
NVR (JU: N3L-8H)
PoENVR (Jta:N3104-4P)
| الع證明 | الع證明 |
| . . . . . . . . . . . . . . . . . . . . . . . . . . . . . . . . . . . . . . . . . . . . . . . . . . . . . . . . . . . . . . . . . . . . . . . . . . . . . . . . . . . . . . . . . . . . . . . . . . . . . . . . . . . . . . . . . . . . . . . . . . . . . . . . . . . . . . . . . . . . . . . . . . . . . . . . . . . . . . . . . . . . . . . . . . . . . . . . . . . . . . . . . . . . . . . . . . . . . . . . .. . . . . . . . . . . . . . . . . . . . . . . . . . . . . . . . . . . . . . . . . . . . . . . . . . . . . . . . . . . . . . . . . . . . . . . . . . . . . . . . . . . . . . . . . . . . . . . . . . . . . . . . . . . . . . . . . . . . . . . . . . . . . . . . . . . . . . . . . . . . . . . . . . . . . . . . . . . . . . . . . . . . . . . . . . . . . . . . . . . . . . . . . . . . . . . . . . . . . . . . . . . . . . . . . . . . . . . . . . . . . . . . . . . . . . . . . . . . . . . . . . . . . . . . . . . . . . . . . . . . . . . . . . . . . . . . . . . . . . . . . . . . . . . . . . . . . . . . . . . . . ? . . . . . . . . . . . . . . . . . . . . . . . . . . . . . . . . . . . . . . . . . . . . . . . . . . . . . . . . . . . . . . . . . . . . . . . . . . . . . . . . . . . . . . . . . . . . . . . . . . . - . . . . . . . . . . . . . . . . . . . . . . . . . . . . . . . . . . . . . . . . . . . . . . . . . . . . . . . . . . . . . . . . . . . . . . . . . . . . . . . . . . . . . . . . . . . . . . . . . . . ; . . . . . . . . . . . . . . . . . . . . . . . . . . . . . . . . . . . . . . . . . . . . . . . . . . . . . . . . . . . . . . . . . . . . . . . . . . . . . . . . . . . . . . . . . . . . . . . . . . . -. . . . . . . . . . . . . . . . . . . . . . . . . . . . . . . . . . . . . . . . . . . . . . . . . . . . . . . . . . . . . . . . . . . . . . . . . . . . . . . . . . . . . . . . . . . . . . . . . . . • 2.0 USB 1234567890123456789012345678901234567890123456789012345678901234567890123456789012345678901234567890123456789123456789012345678901234567890123456789012345678901234567890123456789012345678901234567890123456789 . USB 2.0 USB 123456789012345678901234567890123456789012345678901234567890123456789012345678901234567890123 |
山
HDD 1
jaily jzjj jll jll
a aal aal alal alal alal alal alal alal
aay la yao a yy y
aJnll jaii 1y 2 y 1, NVR j4y 0y 4y Sll aay y Jaiy
JALY galsiunly Jauuunally NVR jae cieh aill jy pia glaall o jai yalannll dai.

NVR Suiy (Jia: N3L-8H)
NVR (JUo:N3104-4P)
J 2

NVR 1SATA 1sall wjll wai jwai jwai jwai
NVR

NVR juao Jx (Jta: N3104-4P)
sall sall lallll 15 NVR 2
NVR
NVR jaiy jaiy aagai yajgai gaii i jayn NVR jaiy aaiy ayaiy
:(a)
aollll 25 1000000000000000000000000000000000000000000000000000000
3g jai(+):2alj3g jaiy.2aalllcagallj

gge biaai aiaa i 1
eall
jNVR jaii gall gall jay jay jay jay
Cloud Service
Jilu jin jin jin jin jin jin jin jin jin jin jin jin jin jin jin jin jin jin jin jin jin jin jin jin jin jin jin jin jin jin jin jin jin jin jin jin jin jin jin jin jin jin jin jin jin jin jin jin jin jin j
.TDSEE
四
y
1
Jn 1111111111111111111111111111
= = 35
NVR jaii jyj yj yj yj yj
IP jie iie euee aee 1y yaa jn piaa n jie jyssly oas IP jie ie any.
NVR
192.168.1.254 NVR 1NvI IIP
.(sj21a jzj11 253 2x)192.168.1.x
J 11111111111111111111111111
yeknaii 111111111111111111111111111111111
1
LaS NVR
IP 16000000000000000000000000000000000000000000000000000000000000000000
DHCP 12 NVR 1 11 IP 11 NVR
ygl piaa aagglgld
Jia will bai 8 11 0 jabi 11
#
SNVR 1Jauuui uIg gblao Jus Jai Jua Ila.1
.1
Jusu Juaa all oall 256
:HDD<wwjll<wwjll
NVR JH HDD Cg NVR Jaua aH HDD uaiH
[5].NVR JauuHDD uJg NVR Jauu aag HDD uS [5]
. HDD a a a a a a a a a a a
NVR JH HDD UZUg NVR Jauu gla p
.4220 Jusunill ab> U 105t
0g 1g2g2g<0g2g<0g2g
.0dall Juaaui Ug2> uSai p
gao laosagbeogaginaa a 15uS uolb.
SNVR aol TDDEE juJ12] JaI Islo .2 w
.2
aewll aobg aoNVR J awwll aosll <aswnl <nsll
aicuill) uagall ul no sll jia wcll 1s
jaiyLao (gabill)
aJull Uglll jyj yu Juae yu uUcUd 13
wJyI clalg ySg aoo sll wjy1 <aSll <gssll
.(agggljgxxll)jullwllNVR jgovolllLAN jiaio jogno 5
.(eagallgMACjio)alaoaailabgugjyJiaogall
a>gall aolll DHCP o1slaabg sso
SNVRolgulgulgeJusjLisla
e cui g .NVR aolll aogwjll oaiioll ag>lg 1oals <oalll <gSill JaiJ.3
.0laJ1,2oSJIaJIaJI> 0o gaozig aolall J
<olll<wSill Jawg,wwuJauo aolul uolLc1s
.0LoLIS LwJgAJI cIaJe nn JwJg EgbWU U
11111111 0000000000000000000000000000000000000000000
:JUJUJUJUUU
gag jai 1000 gaj gaj gaj aol gl oai wail pwl gaoi wai uls
Jgssll Jaxwul jgall aolSg oosuall owl Jls
Jls Ug,naab IouSJIg NVR uu Jauu ul o sIg Juaa g aee
.
.5j0jpaolwoglsu
Lpueu wclg JmolSJI Jueuw aegi
1salsI sIe jglll NVR sIe jei |Jei uI sIe Isl .4 w
:JUJI UJUJI JNVR POE jaiy IuolSJI Jogj oig POE iaio acv NVR uls 14
01d1 UU 100) lssu DHCP aagbg saig aSulw mawl yolSg jguosuJ Jnogu o
.(gUuU uUuUgUo a>lg ONVIF USeJoo Jio Jaoell
ONVIFUg.ONVIFauiuuiuuaauiuauuuaauiuuaauiu
aaii aaii aai iiaai
:JUJI UJUJI NVR 0o LAN wu JALIO JOLIS
agall gJgazjG Jsuiiaio IolSll uig, Goo Jssuui Jaui JolSll uo ssti
.0Soo ooiuui uis uig,NVR JuaaiJl
LAN IP uligc go aSulw u wu wu wu wu wu wu wu wu wu wu wu wu wu wu wu wu wu wu wu wu wu wu wu wu wu wu wu wu wu wu wu wu wu wu wu wu wu wu wu wu wu wu wu wu wu wu wu wu wu wu wuuw
.(gSILIgSLUgllpssuoo g>lg ONVIF Udo JiaJuaell o|ds|UsN)NVR
Tenda J aal aluaiy alaal aiwaii
Get support and services

https://www.tendacn.com/service/default.html
English
Get support and services
For technical specifications, user guides and more information, please visit the product page or service page on www.tendacn.com. Multiple languages are available. You can see the product model on the product.
Polski
賊藥對者賊藥忘藥皂藻燥藻藻藻藻藻藻藻藻藻藻藻藻藻藻藻藻藻藻藻藻藻藻藻藻藻藻藻藻藻藻藻藻藻藻藻藻藻藻藻藻藻藻藻
Slovencina
Floor 6-8, Tower E3, No.1001, Zhongshanyuan Road, Nanshan District, Shenzhen, China. 518052
Website: www.tendacn.com
E-mail: tendasecurity@tenda.cn
support.us@tenda.cn (North America)
support.uk@tenda.cn (United Kingdom)
© 2023 Shenzhen Tenda Technology Co., Ltd. All rights reserved.
V1.1 Keep for future reference.