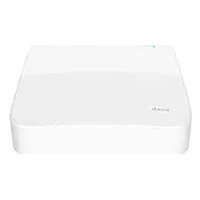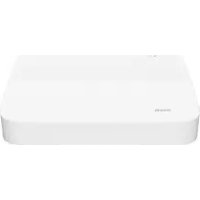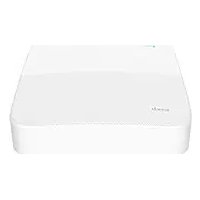
N3L16H - VCR Tenda - Free user manual and instructions
Find the device manual for free N3L16H Tenda in PDF.



| Product Type | NVR (Network Video Recorder) |
| Brand | Tenda |
| Model | N3L16H |
| Number of Channels | 16 |
| Video Connectors | 1x HDMI, 1x VGA |
| Audio Connectors | Audio input (RCA), Audio output (RCA) (depending on model) |
| USB Ports | 2x USB 2.0 |
| Network Interface | 1x Ethernet port 10/100 Mbps |
| Power Supply | AC adapter included |
| Storage | 1x SATA hard drive (not included) |
| Recording Resolution | Up to 5 MP (depending on camera) |
| Supported Protocols | ONVIF, HTTP, TCP/IP, DHCP, etc. |
| Main Features | Continuous or motion-triggered recording, real-time viewing, remote playback, alerts |
| Remote Management | TDSEE app (iOS/Android), Web interface |
| Security | Admin password, unlock pattern, grounding |
| Maintenance | Clean with a soft dry cloth. Avoid liquids. |
| Repairability | User-replaceable hard drive (mounting kit included) |
| Operating Temperature | -10°C to 55°C (estimated) |
| Operating Humidity | 10% to 90% (non-condensing) |
| General Information | Manual available in multiple languages. Technical support: support.fr@tenda.cn |
Frequently Asked Questions - N3L16H Tenda
User questions about N3L16H Tenda
0 question about this device. Answer the ones you know or ask your own.
Ask a new question about this device
Download the instructions for your VCR in PDF format for free! Find your manual N3L16H - Tenda and take your electronic device back in hand. On this page are published all the documents necessary for the use of your device. N3L16H by Tenda.
USER MANUAL N3L16H Tenda
- NVR x 1
• Power adapter x 1 - Mouse x 1
• Installation package x 1
(Screw: thread diameter: 3.5 mm, length: 5 mm; head diameter: 6.5 mm) - Quick installation guide
Appearance
These series of NVRs include plastic shell NVR and metal shell NVR.
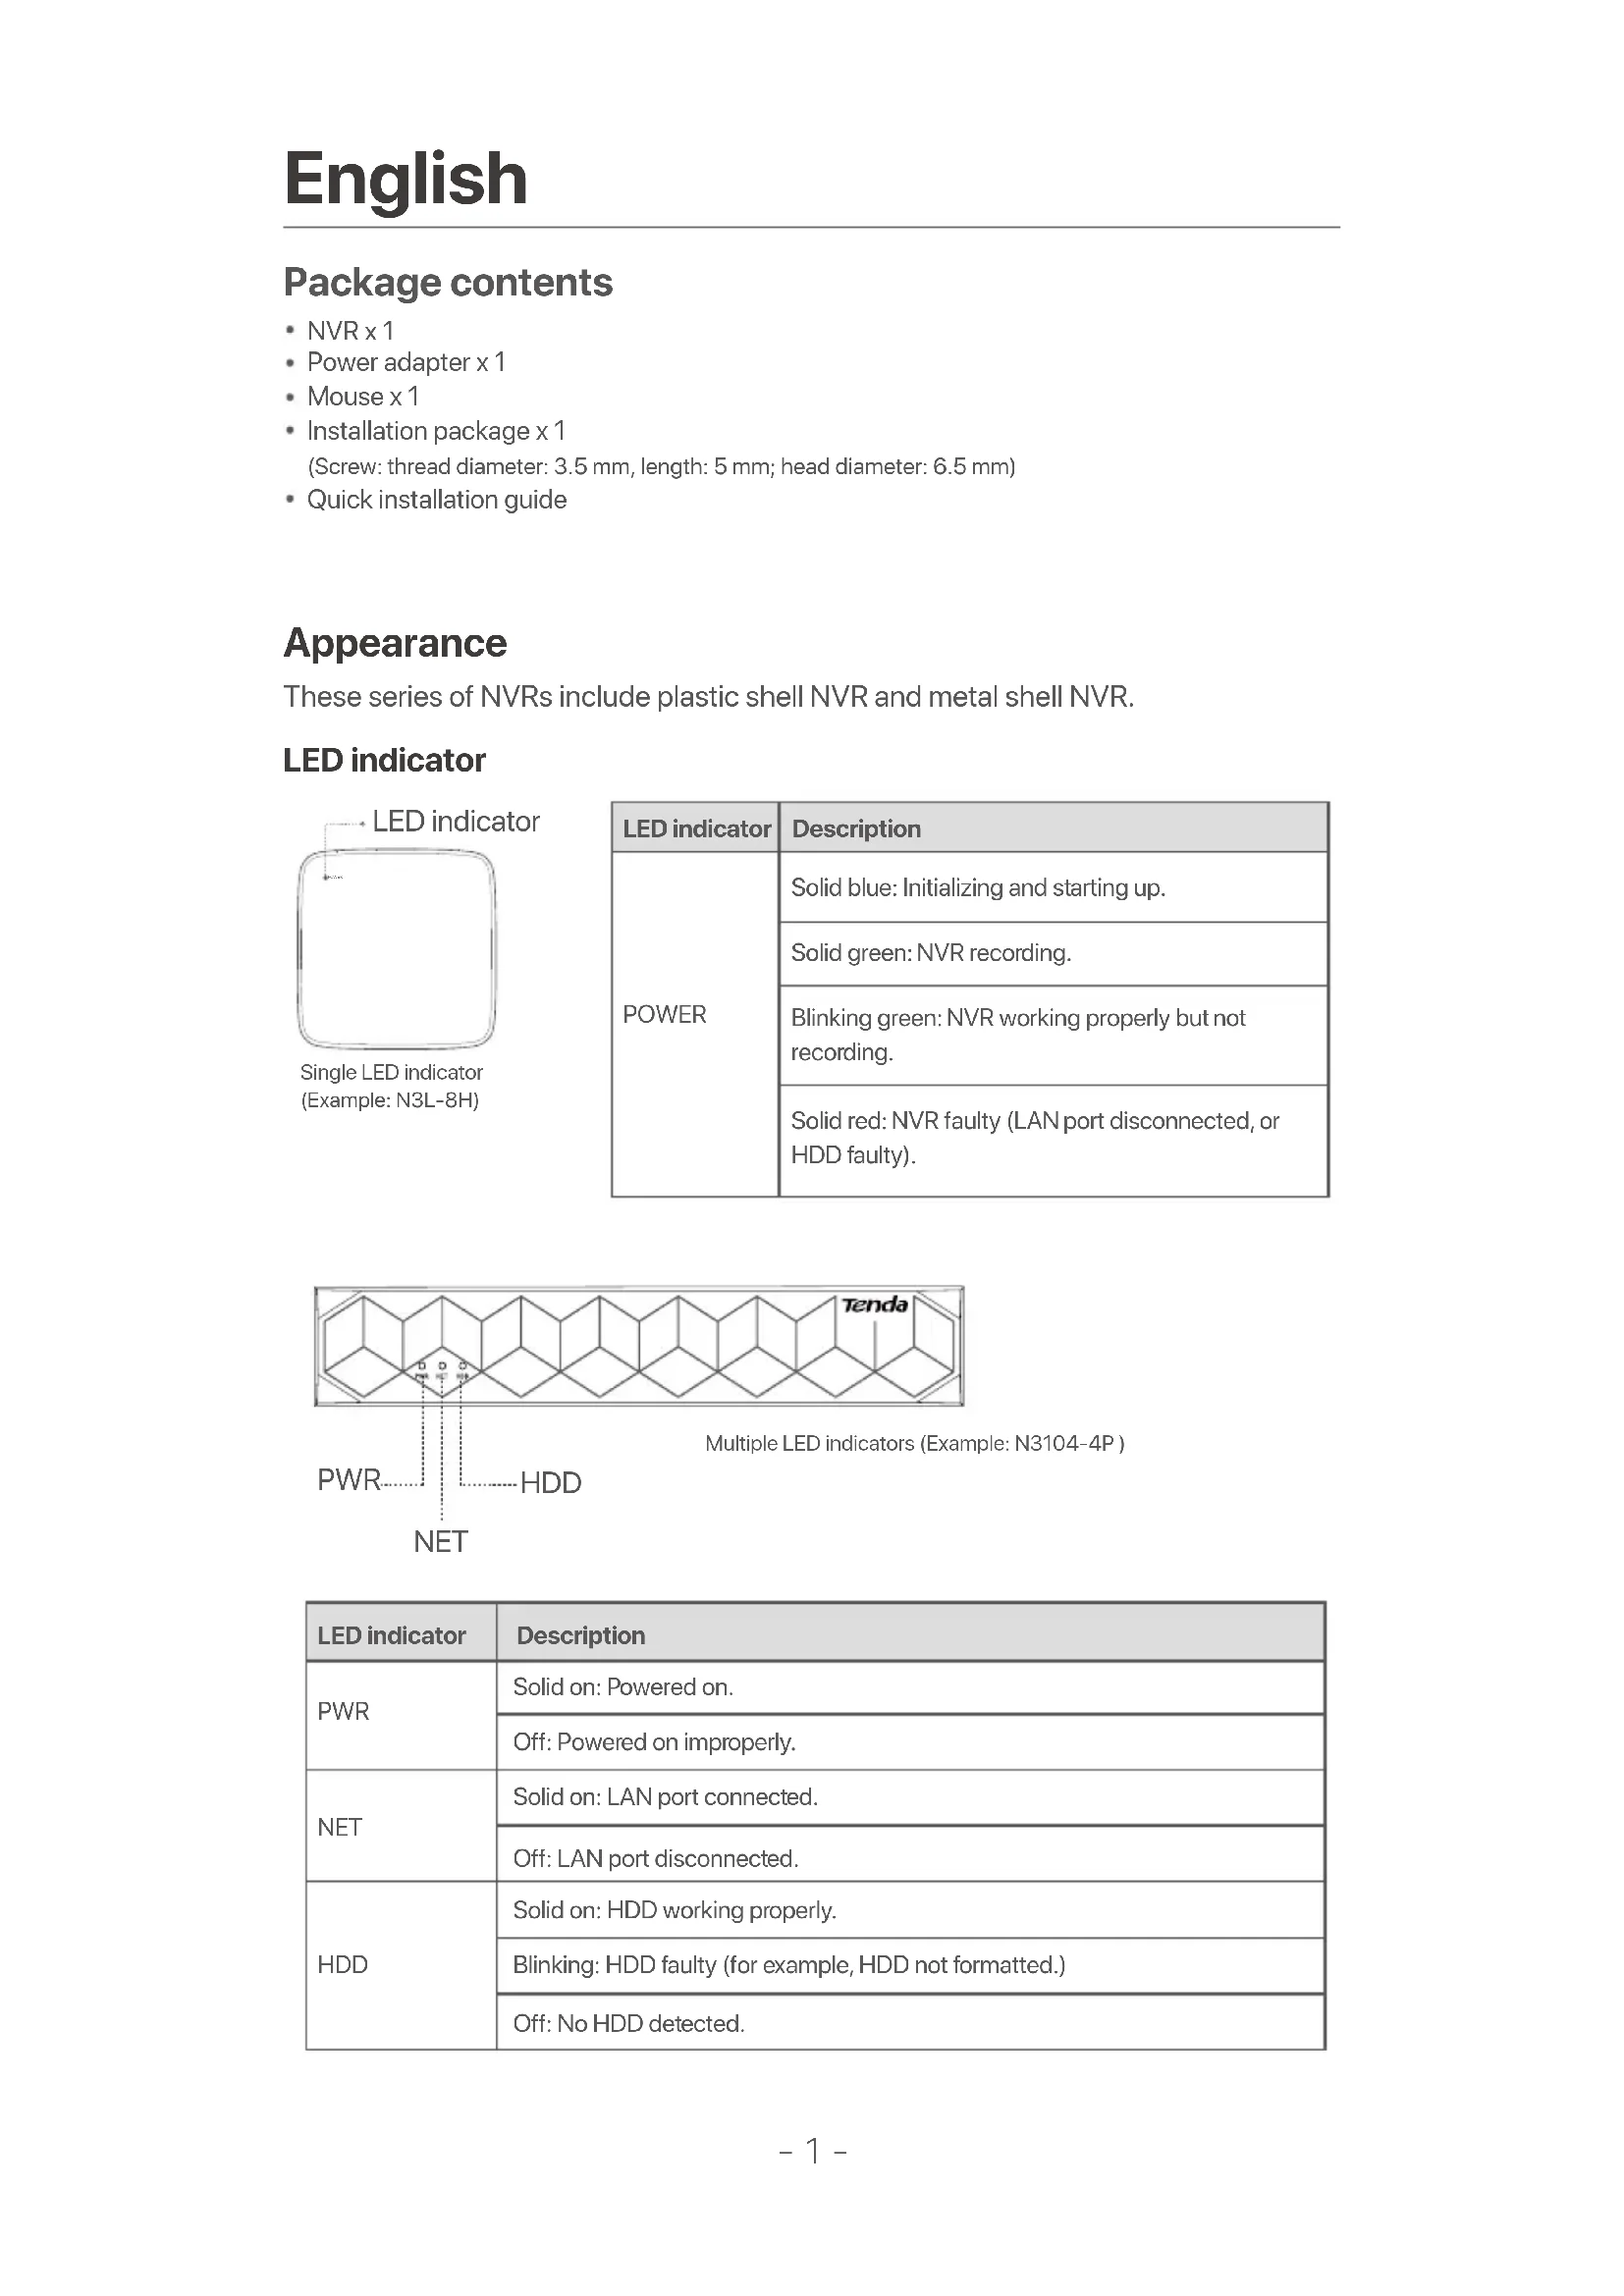
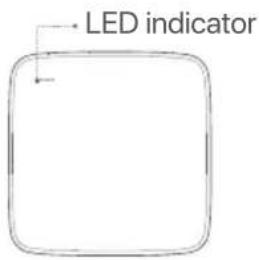
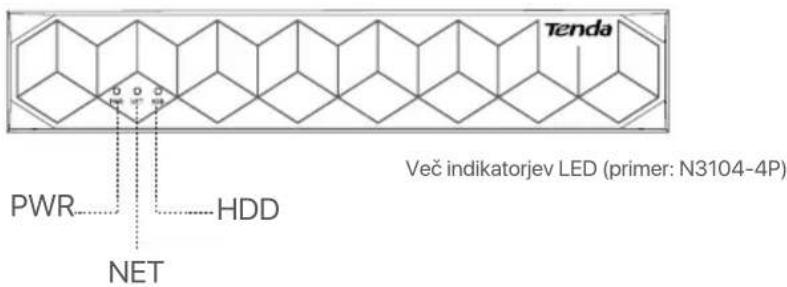
LED indicator
text_image
LED indicatorSingle LED indicator (Example: N3L-8H)
| LED indicator | Description |
| POWER | Solid blue: Initializing and starting up. |
| Solid green: NVR recording. | |
| Blinking green: NVR working properly but not recording. | |
| Solid red: NVR faulty (LAN port disconnected, or HDD faulty). |
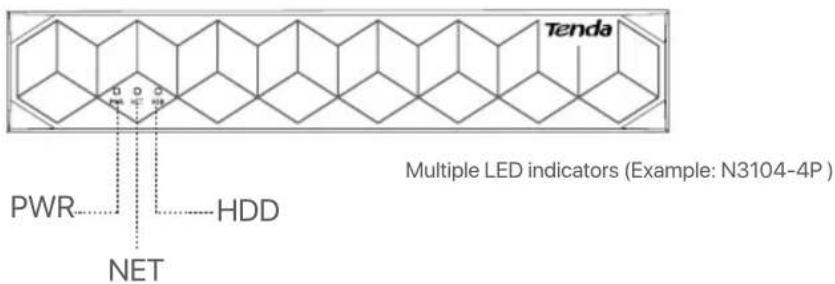
text_image
Tenda PWR HDD NET Multiple LED indicators (Example: N3104-4P)| LED indicator | Description |
| PWR | Solid on: Powered on. |
| Off: Powered on improperly. | |
| NET | Solid on: LAN port connected. |
| Off: LAN port disconnected. | |
| HDD | Solid on: HDD working properly. |
| Blinking: HDD faulty (for example, HDD not formatted.) | |
| Off: No HDD detected. |
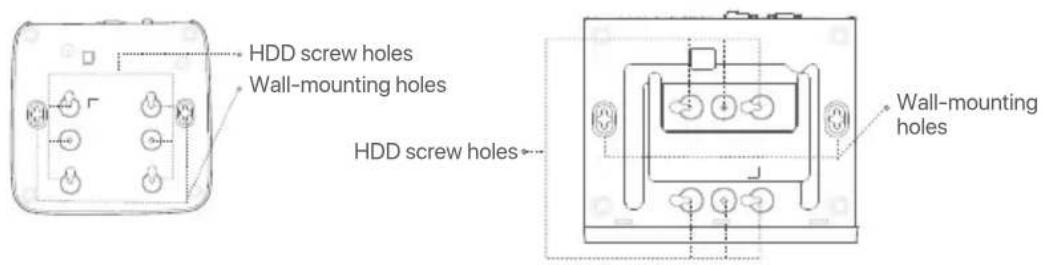
Bottom panel

Tips
Wall-mounting holes: Used to fix the device to the wall. Wall-mounting materials are self-prepared. Recommended specifications of the plastic screws and anchors: Screws: thread diameter: 3 mm, length: 14 mm; head diameter: 5.2 mm. Plastic anchor: inner diameter: 6.0 mm; length: 26.4 mm
text_image
HDD screw holes Wall-mounting holes HDD screw holes Wall-mounting holesPlastic shell NVR (Example: N3L-8H) Metal shell NVR (Example: N3104-4P)
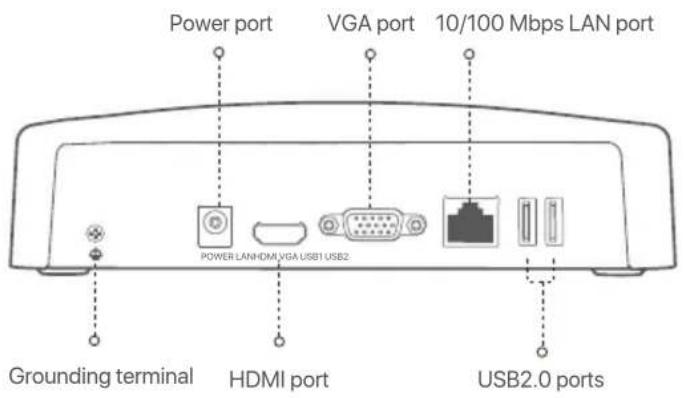
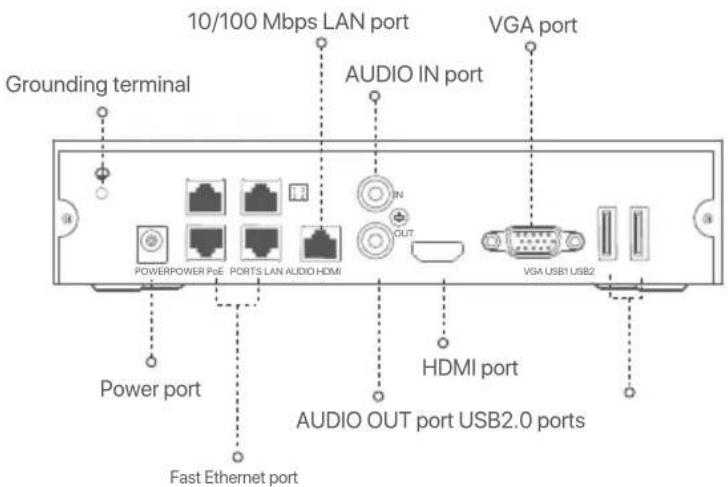
Rear panel
Ordinary NVR (Example: N3L-8H)
text_image
Power port VGA port 10/100 Mbps LAN port POWER LANHDMI VGA USB1 USB2 Grounding terminal HDMI port USB2.0 portsPoE NVR (Example: N3104-4P)
text_image
Grounding terminal 10/100 Mbps LAN port AUDIO IN port VGA port POWERPOWER PoE PORTS LAN AUDIO HDMI IN OUT VGA USB1 USB2 Power port HDMI port AUDIO OUT port USB2.0 ports Fast Ethernet port| DescriptionPort | |
| Grounding terminal.Connect the grounding terminal of the NVR to the earth or the ground terminal of the building with a grounding cable to prevent static electricity or lightning from damaging the NVR. | |
| POWER | Power port.Use the included power adapter to power on the NVR. |
| PoE PORTS | Fast Ethernet port, which supports IEEE 802.3af/at PoE power supply. Used to connect to cameras.- Recommended Ethernet cable: CAT 5 or better.- Power supply distance:Normal Mode (default): Up to 100mLong-range Mode: Up to 250m |
| LAN | Fast Ethernet LAN port.Used to connect to such devices as the router and switch. |
| AUDIO IN | Audio input port.Used to connect to the audio input devices, such as pickups. |
| AUDIO OUT | Audio output port.Used to connect to audio output devices, such as active speakers. |
| HDMI | HDMI port.Connect your monitor or TV to this port using an HDMI cable for audio and video output. |
| VGA | VGA port.Connect your monitor to this port using a VGA cable for video output. |
| USB | USB 2.0 port.Used to connect to such devices as a mouse and a USB storage device. |
I Install the HDD
The appearance NVRs may vary with models. The following information is only for reference. Please install the HDD matching the model you actually purchased.
This product does not include any HDD, and the HDD dedicated for surveillance is recommended. You may need a screwdriver during installation. Please prepare it by yourself.

Tips
When installing or replacing the HDD, please cut off the power supply of the NVR, otherwise the HDD may not be detected or even be damaged.
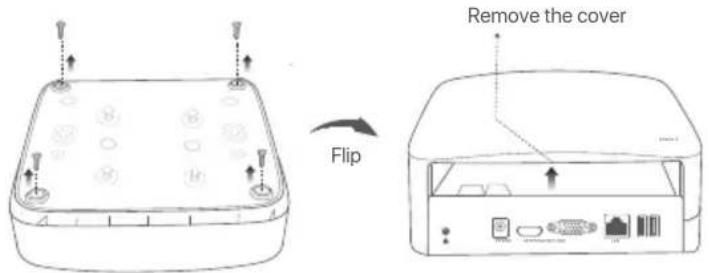
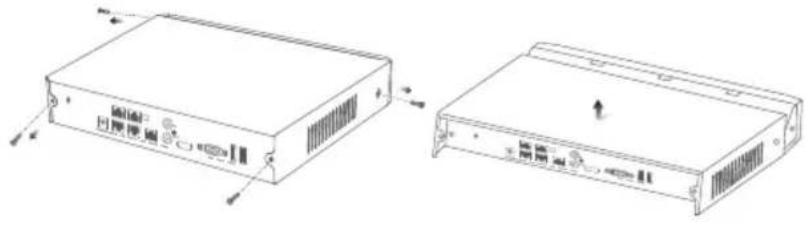
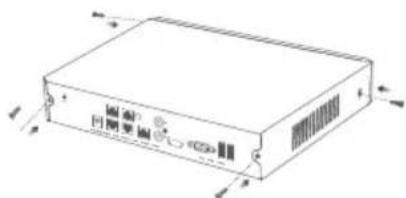
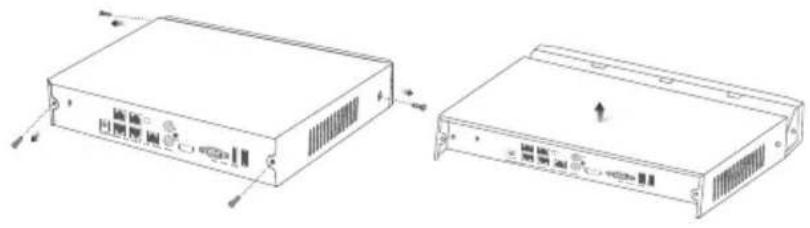
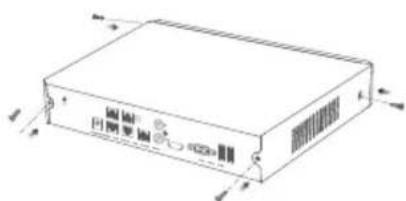
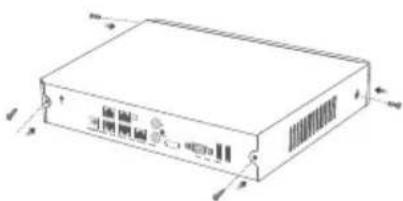
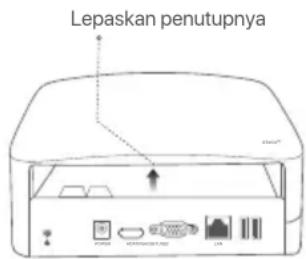
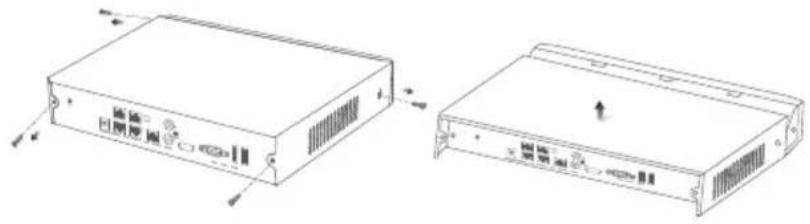
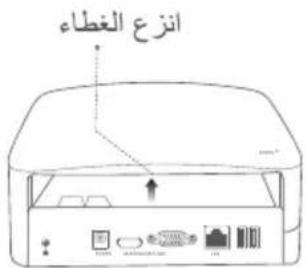
① Use a screwdriver to unfasten the screws, then remove the cover of the NVR. Reserve the screws for later use.
text_image
Flip Remove the coverPlastic shell NVR (Example: N3L-8H)
natural_image
Technical line drawing of two electronic device modules with ventilation slots and mounting brackets (no text or symbols)Metal shell NVR (Example: N3104-4P)
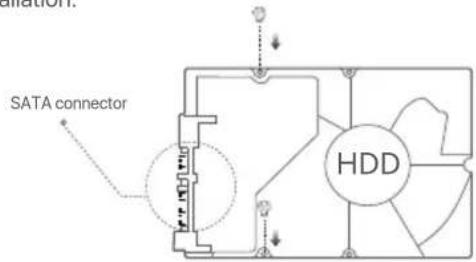
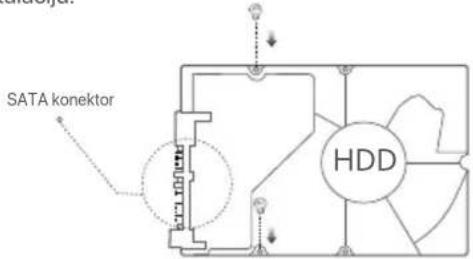
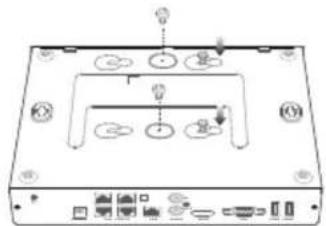
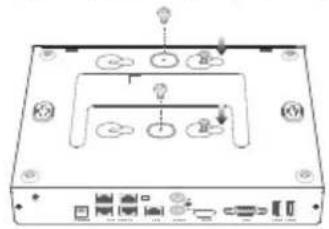
② Take out 2 screws from the NVR installation package, and screw them into the two screw holes closest to the SATA connector. Reserve about 2 mm between the screws head and the HDD for subsequent installation.
text_image
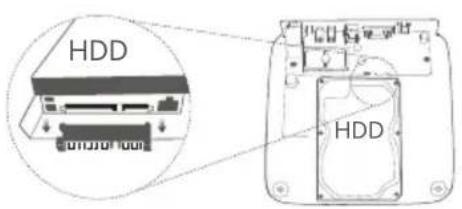
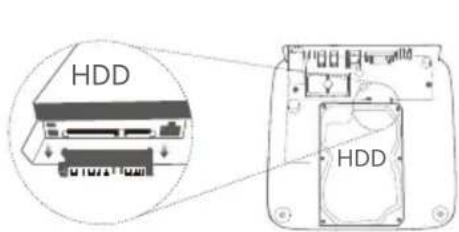
SATA connector HDD③ Align the SATA connector of the HDD with the SATA slot on the motherboard of the NVR, and then insert the HDD into the slot until it is tightly fixed.
text_image
HDD HDDPlastic shell NVR (Example: N3L-8H)
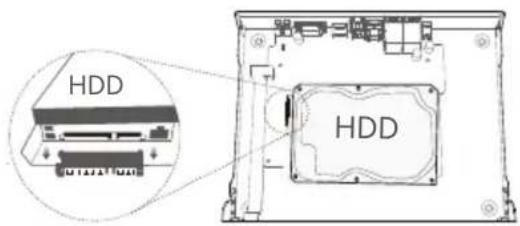
text_image
HDD HDDMetal shell NVR (Example: N3104-4P)
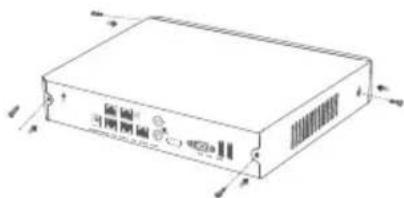
4 Take out the remaining screws from the NVR installation package, and screw them into the HDD screw holes to fix the HDD.
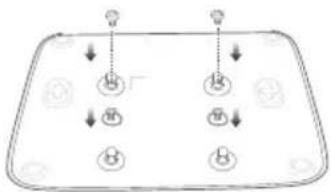
flowchart
graph TD
    A["14"] --> B["14"]
    B --> C["14"]
    C --> D["14"]
    D --> E["14"]
    E --> F["14"]
    F --> G["14"]
    G --> H["14"]
    H --> I["14"]
    I --> J["14"]
    J --> K["14"]
    K --> L["14"]
    L --> M["14"]
    M --> N["14"]
    N --> O["14"]
    O --> P["14"]
    P --> Q["14"]
    Q --> R["14"]
    R --> S["14"]
    S --> T["14"]
    T --> U["14"]
    U --> V["14"]
    V --> W["14"]
    W --> X["14"]
    X --> Y["14"]
    Y --> Z["14"]
Plastic shell NVR (Example: N3L-8H)
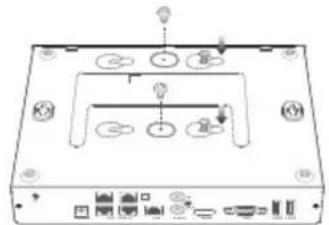
text_image
Diagram of a device rear panel with labeled ports and indicator lightsMetal shell NVR (Example: N3104-4P)
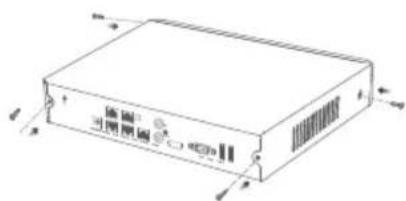
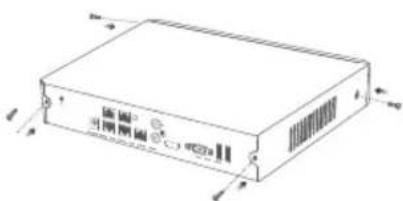
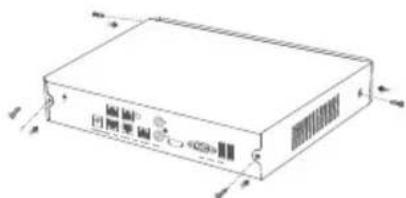
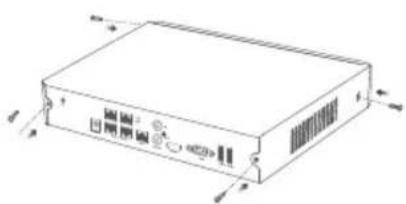
⑤ Mount the cover with the previously removed screws.
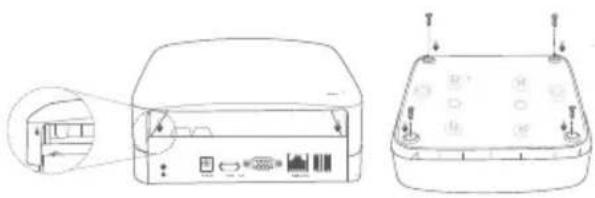
natural_image
Technical line drawing of a device rear panel with ports and buttons, showing front and side views (no text or symbols)Plastic shell NVR (Example: N3L-8H)
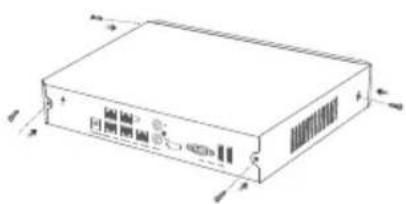
natural_image
Line drawing of a rectangular electronic device with ports and connectors (no text or symbols)Metal shell NVR (Example: N3104-4P)
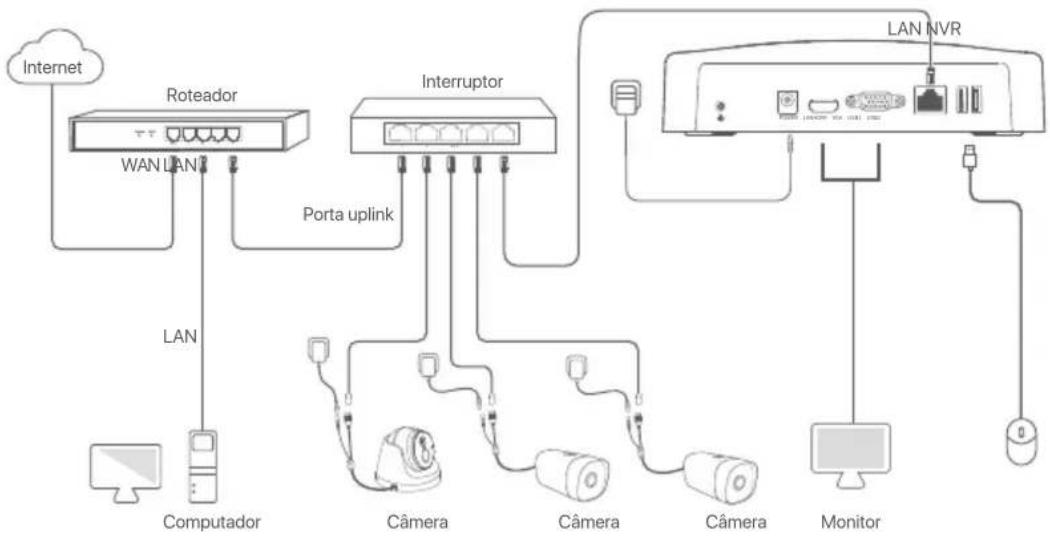
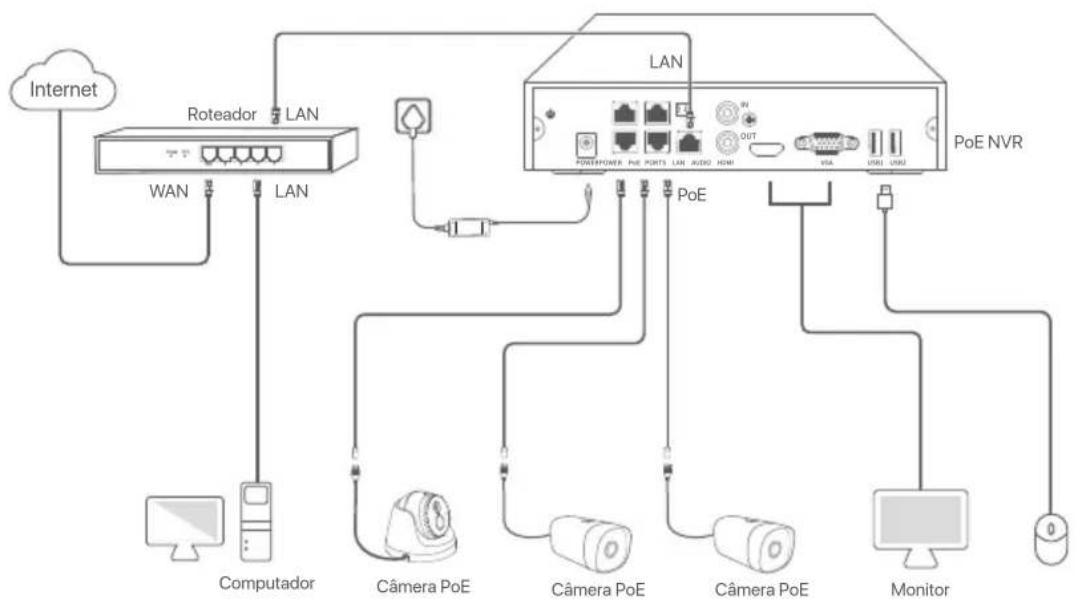
II Connect the device
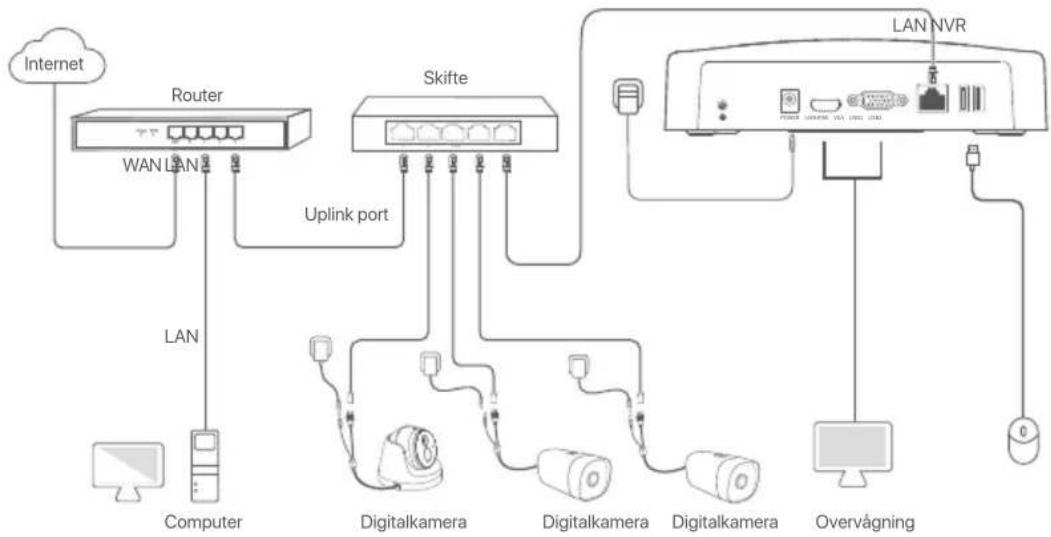
Ordinary NVR topology (Example: N3L-8H)
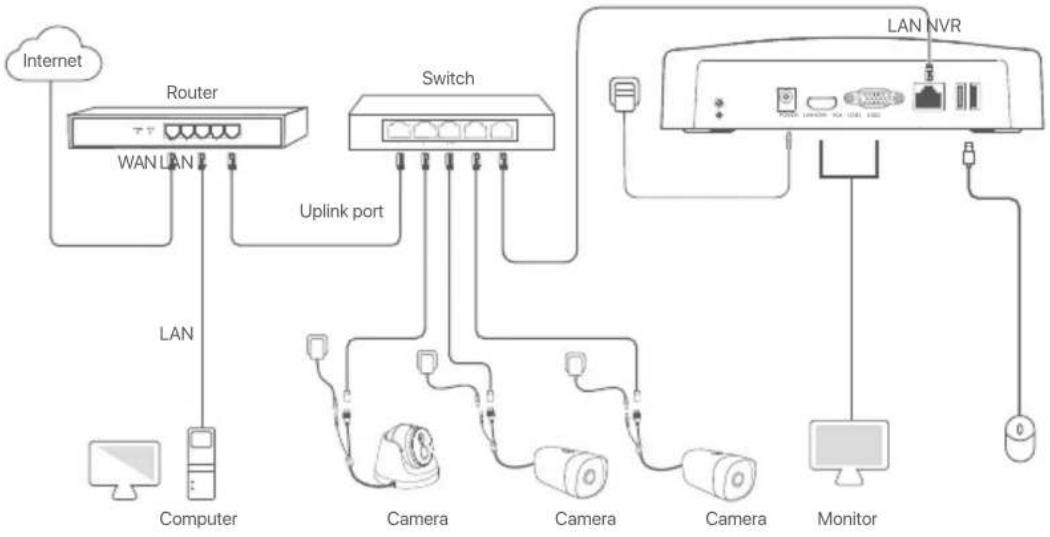
flowchart
graph TD
    A["Internet"] --> B["Router"]
    B --> C["WAN LAN"]
    B --> D["Computer"]
    B --> E["Switch"]
    E --> F["Uplink port"]
    E --> G["Camera"]
    E --> H["Camera"]
    E --> I["Camera"]
    E --> J["Monitor"]
    E --> K["LAN NVR"]
    K --> L["Network Port"]
    style A fill:#f9f,stroke:#333
    style B fill:#ccf,stroke:#333
    style E fill:#cfc,stroke:#333
    style K fill:#fcc,stroke:#333
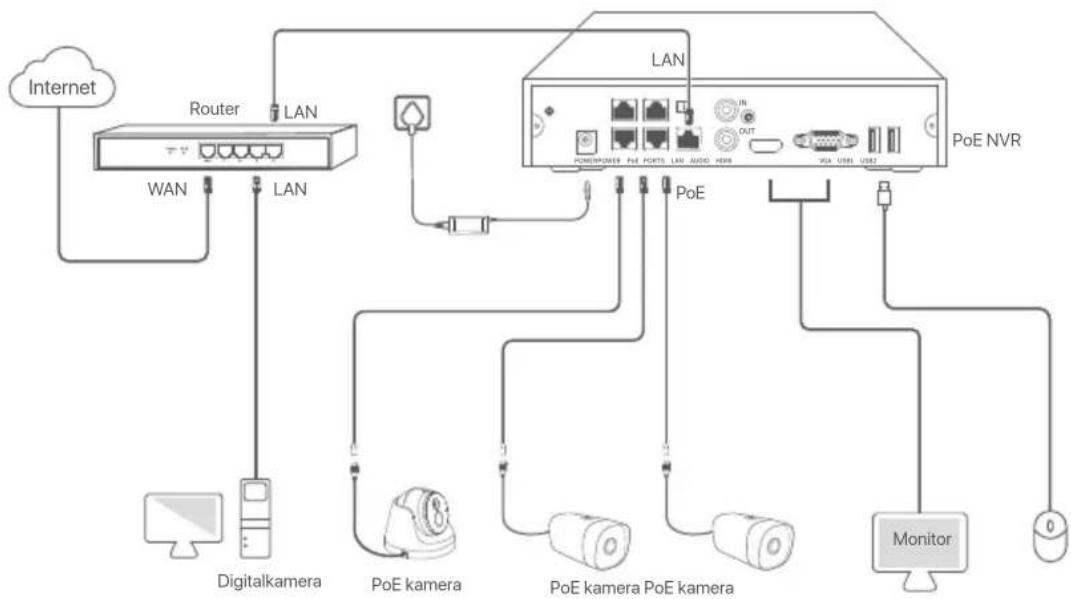
PoE NVR topology (Example: N3104-4P)

flowchart
graph TD
    A["Internet"] --> B["Router"]
    B --> C["WAN"]
    B --> D["LAN"]
    D --> E["Computer"]
    B --> F["LAN"]
    F --> G["PoE camera"]
    G --> H["PoE camera"]
    H --> I["Monitor"]
    F --> J["POE NVR"]
    J --> K["POWER/POWER"]
    J --> L["FUEL POINTS"]
    J --> M["LANK AUDIO HDMI"]
    J --> N["VGA USB1 USB2"]
    J --> O["OUT"]
    style A fill:#f9f,stroke:#333
    style B fill:#ccf,stroke:#333
    style F fill:#cfc,stroke:#333
    style J fill:#fcc,stroke:#333
III Basic configuration
■ Local management
Startup

Tips
Use the included power adapter to power on the NVR. The NVR may fail to work normally or even be damaged due to abnormal power supply.
Connect the included power adapter to the power port of the NVR, and plug the power adapter into the power socket to start up the NVR.
Shutdown

Note
Do not directly cut off the power supply of the NVR to force a shutdown; otherwise, the HDD may be damaged, videos may be lost, or even the NVR may be damaged.
After connecting the mouse and monitor to the NVR, perform the following settings on the NVR's web UI (exit the Full Screen interface): Click ⏻ in the upper right corner, click Shutdown ⏻, and then click OK.
When The Device is Shut Down. Please Cut Off the Power appears on the screen, unplug the power adapter of the NVR.
Quick setup
After connecting the mouse and monitor to the NVR, you can perform quick setup.
The GUI of the NVR may vary with models. The actual GUI prevails. The N3L-8H is taken as an example here.
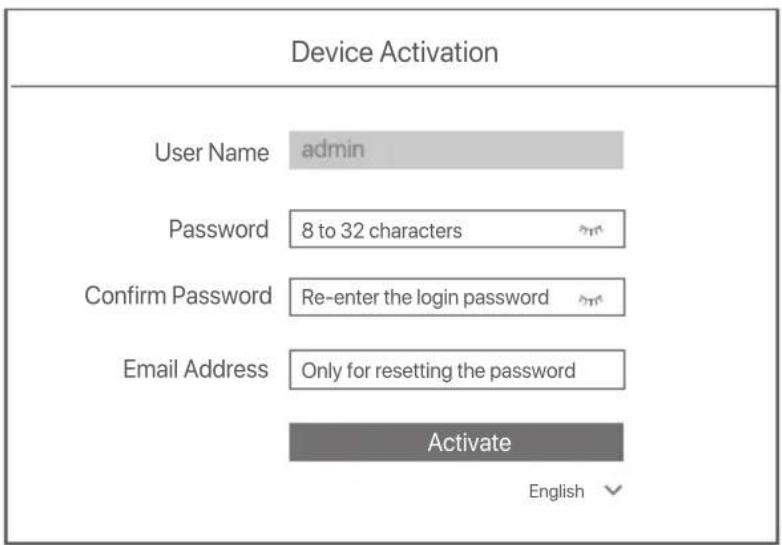
① Set Login Password, enter your Email Address, then click Activate.
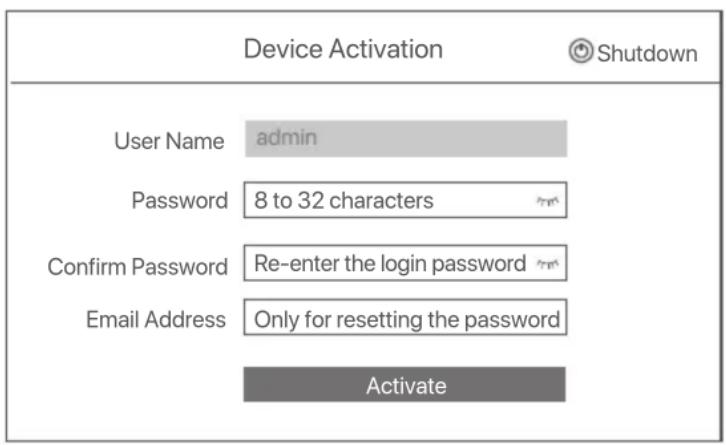
text_image
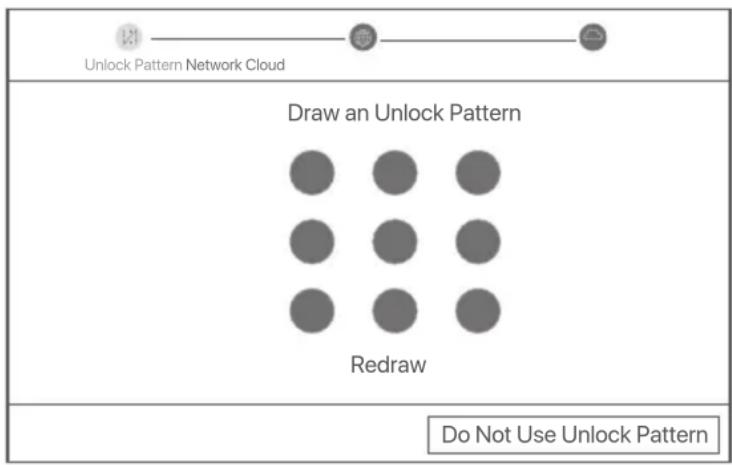
Device Activation Shutdown User Name admin Password 8 to 32 characters Confirm Password Re-enter the login password Email Address Only for resetting the password Activate② If you want to use a pattern to unlock the web UI, draw an unlock pattern. Otherwise, click Do Not Use Unlock Pattern and skip to step ③.
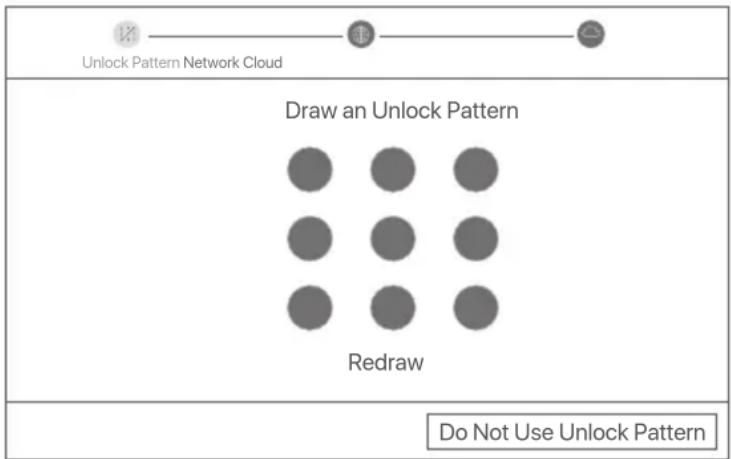
text_image
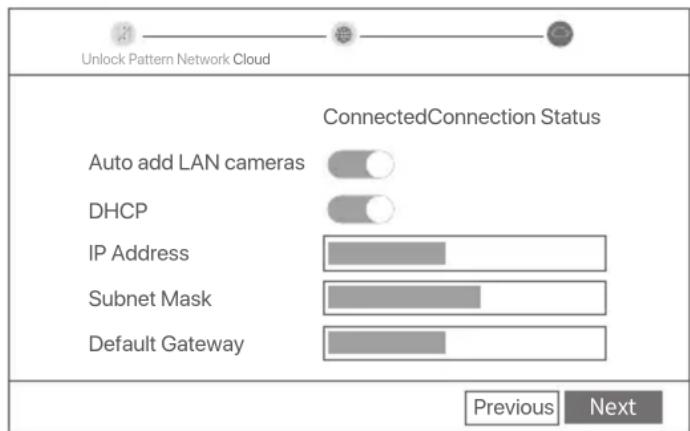
Unlock Pattern Network Cloud Draw an Unlock Pattern Redraw Do Not Use Unlock Pattern③ Ensure that the connection status is Connected, and enable or disable the Auto add LAN cameras function as required.
- If you want to automatically add cameras on the LAN side of the NVR, click Next. Skip to step ⑤.
- If you want to manually add cameras on the LAN side of the NVR, you can disable the Auto add LAN cameras function, and click Next.
Tips
If the connection status is Disconnected, try the following solutions:
– Ensure that the LAN port connection of the NVR is normal.
- Ensure that the DHCP server function of the router to which the NVR is connected is enabled.
text_image
Unlock Pattern Network Cloud ConnectedConnection Status Auto add LAN cameras DHCP IP Address Subnet Mask Default Gateway Previous Next4 Add the camera.
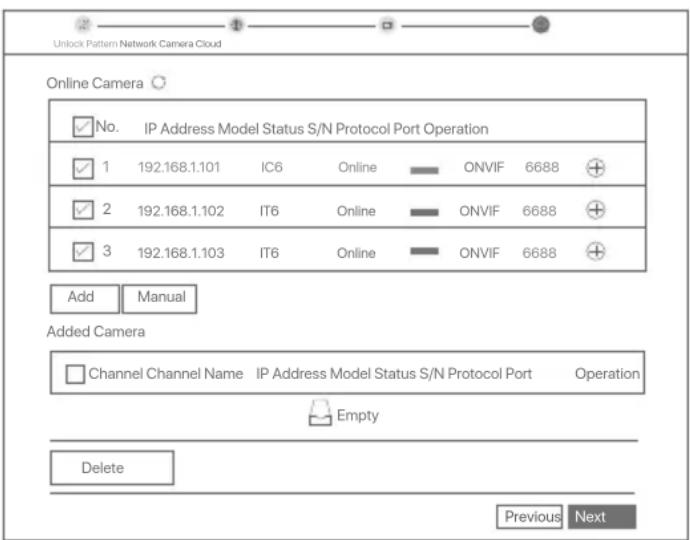
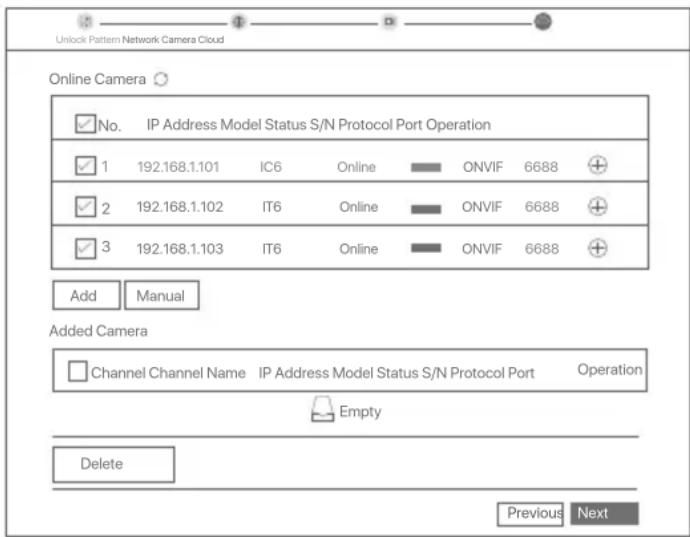
Select the camera that you want to add to the Online Camera list, and click Add. When the cameras appear in the Added Camera list and the status is Online, click Next.
Tips
- If the camera you want to add has been connected to the switch or router that is connected to the LAN port of the NVR, please ensure that the IP address of the camera and the NVR are in the same network segment.
- If the NVR supports PoE ports, and the camera you want to add has been connected to the PoE port of the NVR, please ensure that the DHCP function of the camera is enabled.
- If the camera that you want to add is activated and the user name and password are different from those of the NVR, click , to enter the relevant information, and click Add.
text_image
Unlock Pattern Network Camera Cloud Online Camera ✓ No. IP Address Model Status S/N Protocol Port Operation ✓ 1 192.168.1.101 IC6 Online ONVIF 6688 + ✓ 2 192.168.1.102 IT6 Online ONVIF 6688 + ✓ 3 192.168.1.103 IT6 Online ONVIF 6688 + Add Manual Added Camera Channel Channel Name IP Address Model Status S/N Protocol Port Operation Empty Delete Previous Next⑤ Ensure that the cloud status is Online and click OK.
Tips
- If the cloud status is Offline, please ensure that the router to which the NVR is connected can access the internet and the filter function is disabled.
- You can also manage the NVR through the TDSEE App. Please refer to App management in this guide for details.
Completed.
You can preview real-time videos, play back the recordings and manage monitoring devices.
■ App management
After the cloud service of the NVR is enabled and the cloud status is online, you can add and manage the NVR through the TDSEE App.
① Download the TDSEE App.
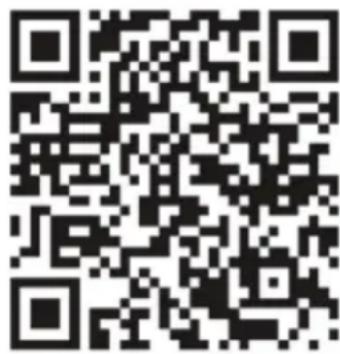
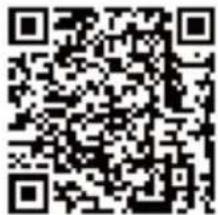
After the smartphone is connected to the internet successfully, download and install the TDSEE App onto your mobile phone by scanning the QR code or by searching for TDSEE in Google Play or App Store.
text_image
QR code image containing encoded data, no visible human-readable textOr
text_image
GET IT ON Google Play Download on the App StoreQR Code
② Ensure that the NVR is powered on and working properly.
③ Run the TDSEE App and follow the instructions to complete user registration. Enter the Home page, then tap Add a device or in ⊕ the upper right corner of the home page.
Tips
To ensure that the login password of the NVR can be reset through the TDSEE App, please register using the email address you used to activate the NVR.
4 Scan the QR code on the label at the bottom of the NVR or scan the QR code on the Cloud Service page, then follow the instructions in the App.
After adding the NVR, you can remotely preview real-time video, play back the recordings and check alarm messages through the TDSEE App.
■ Web management
These series of NVRs can be managed on the web UI.
Activate
If the NVR is not activated, you can activate it through the web UI. When the activation is completed, you need to log in again.
1 Connect the computer to the switch or router that is connected to the NVR.
② Set the IP address of the computer to an unused one belonging to the same network segment as the IP address of the NVR but different from the IP address of the NVR.
The default login IP address of the NVR is 192.168.1.254, please set the IP address of the computer to 192.168.1.X (X indicates 2 to 253, and is unused by other devices).
General
-
-
- 10
-
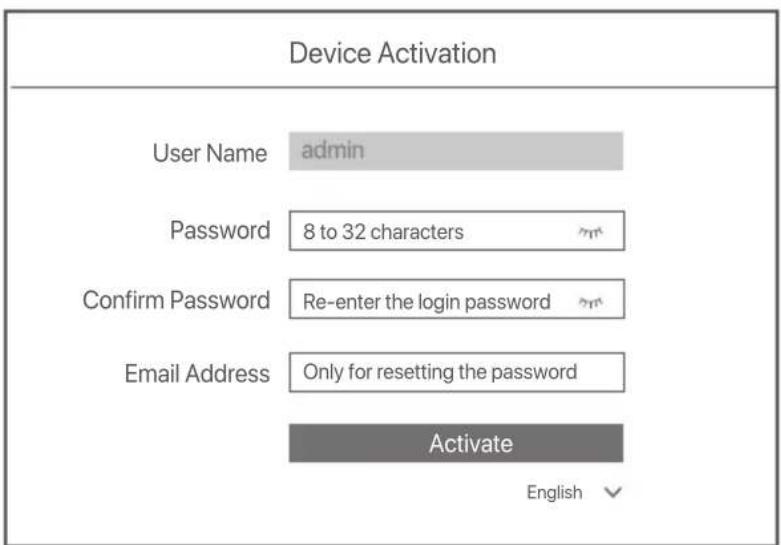
Launch a browser and enter the default IP address 192.168.1.254 of the NVR in the address bar. Set Password, enter your Email Address, and click Activate.
Tips
The NVR supports HTTPS login. When you access its management page, the browser may prompt that the web address is not secure, just ignore it and continue.
Device Activation
User Name
Password 8 to 32 characters
Confirm Password Re-enter the login password
Email Address Only for resetting the password
English
Done. You can re-enter the web UI of the NVR to preview real-time videos or configure the NVR as required.
The DHCP function of the NVR is enabled. If there is a DHCP server in the network, the IP address of the NVR may be changed. Please refer to the actual IP address assigned to the NVR by the DHCP server.
Log in to web UI
Refer to step ① to ③ in Activate to operate.
FAQ
Q1. What should I do if there are no playback videos on the NVR?
A1.
- Ensure that the HDD is working properly.
Navigate to Configuration > Storage > HDD:
- If the HDD is not detected, shut down the NVR first, reinstall the HDD and start up the NVR.
- If the HDD is abnormal, shut down the NVR first, reinstall the HDD and start up the NVR. If the problem persists, format the HDD.
- If the formatting fails, shut down the NVR first, replace the HDD and start up the NVR.
- Ensure that the recording plan is proper.
Navigate to Configuration > Storage > Schedule, and ensure that:
- The channel recording schedule is enabled.
- The recording time and recording type have been set properly. If not, set and save them as required.
Q2. What should I do if the TDSEE App fails to add the NVR?
A2. Navigate to Configuration > Network > Cloud Service of the NVR to ensure that the cloud service function is enabled.
– If Cloud Status is Online, ensure that the mobile phone (with the App installed) is connected to the internet.
– If Cloud Status is Offline, try the following solutions:
- Navigate to Configuration > Network > Internet to ensure that the internet parameters configuration is correct.
- Ensure that the LAN port of the NVR is correctly connected to the peer side (switch or router).
- Ensure that the router is connected to the internet and the filter function is disabled (such as MAC filter and blacklist).
- Ensure that the DHCP server function of the router is enabled.
Q3. What should I do if there is no image display on the NVR channel?
A3. Navigate to Configuration > Channel> Camera of the GUI of the NVR, find Added Camera, and check the camera status of the channel.
- If the camera status of the channel is Online, navigate to Configuration > Channel > Image, and ensure that the Brightness and Contrast under the Image Parameters are not both 0.
-
If the camera status of the channel is Error, hover the mouse over ⏻ to check the exception reason, and try the following solutions:
-
If the exception reason is Incorrect user name or password, click 📋 and re-enter the login user name and password.
- If the exception reason is Disconnected, ensure that the connection between the NVR and the camera is normal, and the Ethernet cable is not loose.
- Delete or reset the camera and add it again.
• Power off the camera and restart it.
Q4. What should I do if the NVR cannot find the camera?
A4: If the NVR supports PoE port, and the camera has been connected to the PoE port of the NVR, try the following solutions:
- Connect the computer and the camera to the same network, and enable DHCP function of the camera (through client management tool, such as ONVIF Device Manager or Web UI of the camera for configuration).
- If the camera is a third-party camera, ensure that the camera supports ONVIF, and ONVIF is enabled, and an administrator with the username admin has been added to the user list.
If the camera has been connected to the LAN side of the NVR, try the following solutions:
- Ensure that the camera is working properly, and the camera is connected properly to the switch or router that is connected to the NVR, and the Ethernet cable is tight.
- Ensure that the IP address of the camera is in the same network segment as the LAN IP address of the NVR (through client management tool, such as ONVIF Device Manager or Web UI of the camera for configuration).
- If the camera is a third-party camera, ensure that the camera supports ONVIF, and ONVIF is enabled, and an administrator with the username admin has been added to the user list.
If the problem persists, please contact Tenda technical support.
Pakkens indhold
text_image
LED indicatorEnkelt LED-indikator (eksempel: N3L-8H)
natural_image
Technical line drawing of two electronic device modules with ventilation slots and mounting features (no text or symbols)Metalskal NVR (eksempel: N3104-4P)
text_image
Diagram of a device rear panel with labeled ports and connections, including icons for ports, switches, and indicators.Metalskal NVR (eksempel: N3104-4P)
natural_image
Technical line drawing of a device rear panel with ports and buttons, showing front and side views (no text or symbols)Plastskal NVR (eksempel: N3L-8H)
text_image
Technical diagram of an electronic device with labeled ports and directional arrows indicating orientationMetalskal NVR (eksempel: N3104-4P)
II Tilslut enheden
Almindelig NVR-topologi (Eksempel: N3L-8H)
flowchart
graph TD
    A["Internet"] --> B["Router"]
    B --> C["WAN LAN"]
    B --> D["LAN"]
    D --> E["Computer"]
    B --> F["Skifte"]
    F --> G["Uplink port"]
    F --> H["Digitalkamera"]
    F --> I["Digitalkamera"]
    F --> J["Digitalkamera"]
    F --> K["Overvågning"]
    F --> L["LAN NVR"]
    L --> M["Power Supply"]
    L --> N["USB"]
    L --> O["Computer"]
PoE NVR-topologi (Eksempel: N3104-4P)
flowchart
graph TD
    A["Internet"] --> B["Router"]
    B --> C["WAN"]
    B --> D["LAN"]
    D --> E["Switch"]
    E --> F["PoE NVR"]
    F --> G["Monitor"]
    G --> H["VoE kamera"]
    H --> I["PoE kamera"]
    I --> J["Digitalkamera"]
    J --> K["Wi-Fi"]
    F --> L["POE"]
    L --> M["Power/Power"]
    L --> N["PoE"]
    L --> O["PoE"]
    L --> P["Output"]
    style A fill:#f9f,stroke:#333
    style B fill:#ccf,stroke:#333
    style F fill:#cfc,stroke:#333
    style G fill:#fcc,stroke:#333
    style H fill:#cff,stroke:#333
    style I fill:#ffc,stroke:#333
    style J fill:#cfc,stroke:#333
    style K fill:#fcc,stroke:#333
    style L fill:#ffc,stroke:#333
    style M fill:#fcc,stroke:#333
    style N fill:#ffc,stroke:#333
    style O fill:#fcc,stroke:#333
    style P fill:#ffc,stroke:#333
text_image
Device Activation Ⓧ Shutdown User Name admin Password 8 to 32 characters Confirm Password Re-enter the login password Email Address Only for resetting the password Activateflowchart
graph TD
    A["Unlock Pattern Network Cloud"] --> B["Draw an Unlock Pattern"]
    B --> C["Redraw"]
    C --> D["Do Not Use Unlock Pattern"]
text_image
Unlock Pattern Network Cloud ConnectedConnection Status Auto add LAN cameras DHCP IP Address Subnet Mask Default Gateway Previous Next④ Tilføj kameraet.
text_image
QR code image containing encoded data, no visible human-readable textQR-kode
eller
text_image
GET IT ON Google Play Download on the App Store■ Web management (Internet management)
text_image
Internet Protocol Version 4 (TCP/IPv4)Properties General You can get IP settings assigned automatically if your network supports this capability. Otherwise, you need to ask your network administrator for the appropriate IP settings. Obtain an IP address automatically Use the following IP address: IP address: 192. 168 . 1 . 10 Subnet mask: 255. 255. 255. 0 Default gateway: . Obtain DNS server address automatically Use the following DNS server addresses: Preferred DNS server: . Alternate DNS server: . Validate settings upon exit Advanced OK Canceltext_image
Device Activation User Name admin Password 8 to 32 characters Confirm Password Re-enter the login password Email Address Only for resetting the password Activate EnglishGjort. Du kan genindtaste NVR 'ens INTERNETGRÅENSEFLADE for at få vist videoer i realtid eller konfigurere NVR efter behov.
natural_image
Technical line drawing of two electronic devices with ventilation grilles and mounting holes (no text or symbols)Metallist kestaga NVR (näide: N3104-4P)
text_image
Diagram of a device rear panel with labeled ports and indicator lightsMetallist kestaga NVR (näide: N3104-4P)
natural_image
Technical line drawing of a device rear panel with ports and connectors, showing front and side views (no text or symbols)natural_image
Line drawing of a rectangular electronic device with ventilation slots and control buttons (no text or symbols)Metallist kestaga NVR (näide: N3104-4P)
II Ühendage seade
text_image
Device Activation Shutdown User Name admin Password 8 to 32 characters Confirm Password Re-enter the login password Email Address Only for resetting the password Activatetext_image
Unlock Pattern Network Cloud ConnectedConnection Status Auto add LAN cameras DHCP IP Address Subnet Mask Default Gateway Previous Next④ Lisage kaamera.
text_image
QR code image containing encoded data, no visible human-readable textVõi
QR kood
text_image
Internet Protocol Version 4 (TCP/IPv4)Properties General You can get IP settings assigned automatically if your network supports this capability. Otherwise, you need to ask your network administrator for the appropriate IP settings. Obtain an IP address automatically Use the following IP address: IP address: 192. 168 . 1 . 10 Subnet mask: 255. 255. 255. 0 Default gateway: . Obtain DNS server address automatically Use the following DNS server addresses: Preferred DNS server: . Alternate DNS server: . Validate settings upon exit Advanced OK Cancel3 Käivitage brauser ja sisestage aadressiribale NVR-i vaike-IP-aadress 192.168.1.254. Määrake Password (Parool), sisestage oma Email Address (e-posti aadress) ja klöpsake nuppu Activate (Aktiveeri).
Tips
text_image
Device Activation User Name admin Password 8 to 32 characters Confirm Password Re-enter the login password Email Address Only for resetting the password Activate Englishnatural_image
Technical line drawing of two electronic device modules with ventilation slots and ports (no text or symbols)Metalinio apvalkalo NVR (pavyzdys: N3104-4P)
text_image
Diagram of a device rear panel with labeled ports and connectors, showing internal layout and connections.Metalinio apvalkalo NVR (pavyzdys: N3104-4P)
natural_image
Technical line drawing of a device rear panel with ports and connectors, showing internal components and mounting points (no text or symbols)Plastikinio korpuso NVR (pavyzdys: N3L-8H)
natural_image
Isometric line drawing of a rectangular electronic device with ports and connectors (no text or symbols)Metalinio apvalkalo NVR (pavyzdys: N3104-4P)
Il Irenginio prijungimas
Jprasta NVR topologija (pavyzdys: N3L-8H)
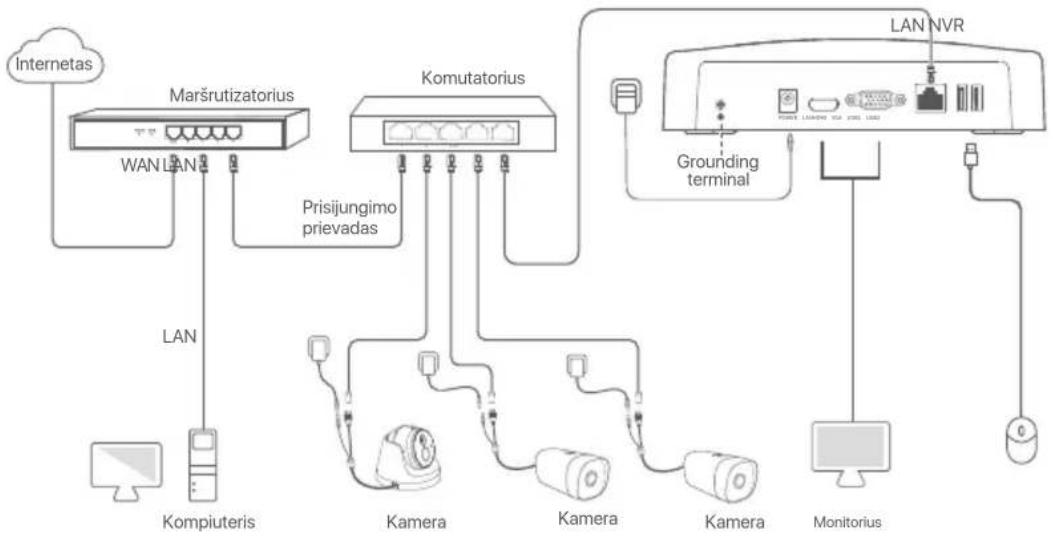
flowchart
graph TD
    A["Internetas"] --> B["Maršrutizatorius"]
    B --> C["Komutatorius"]
    C --> D["Kompiuteris"]
    C --> E["Kamera"]
    C --> F["Kamera"]
    C --> G["Kamera"]
    C --> H["Monitorius"]
    C --> I["LAN NVR"]
    B --> J["WAN LAN"]
    B --> K["Prisijungimo prievadas"]
    C --> L["Grounding terminal"]
    C --> M["Computer"]
PoE NVR topologija (pavyzdys: N3104-4P)
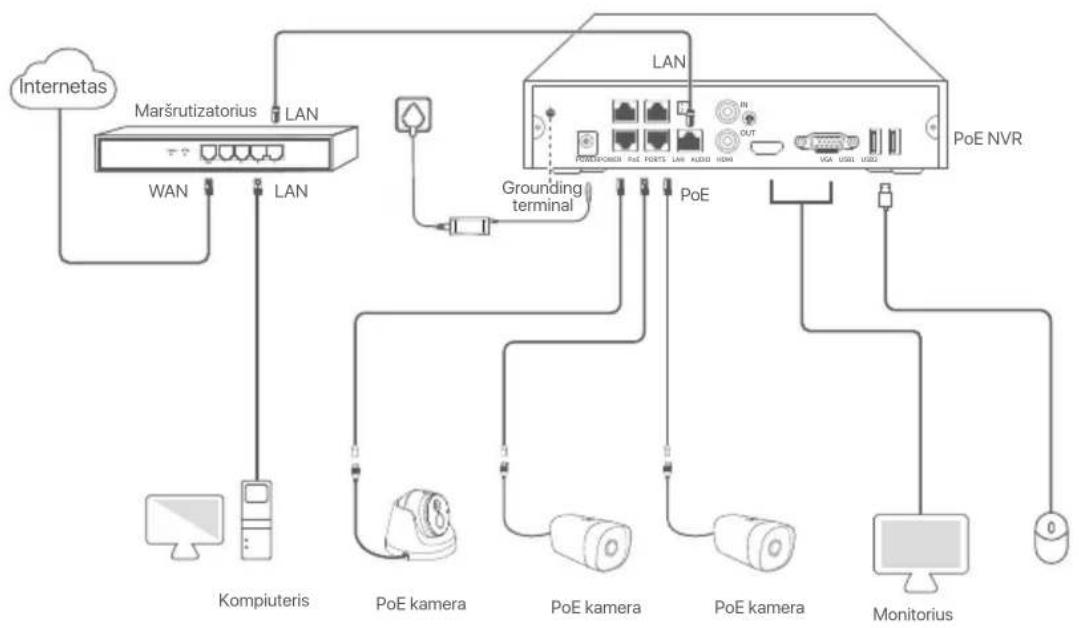
flowchart
graph TD
    A["Internetas"] --> B["Maršrutizatorius LAN"]
    B --> C["WAN"]
    B --> D["LAN"]
    C --> E["Kompiuteris"]
    D --> F["POE kamera"]
    D --> G["POE kamera"]
    D --> H["POE kamera"]
    D --> I["Monitorius"]
    D --> J["POE NVR"]
    B --> K["Grounding terminal"]
    K --> L["POE NVR"]
    L --> M["POE NVR"]
    L --> N["POE NVR"]
    L --> O["POE NVR"]
    L --> P["POE NVR"]
    L --> Q["POE NVR"]
    L --> R["POE NVR"]
    L --> S["POE NVR"]
    L --> T["POE NVR"]
    L --> U["POE NVR"]
text_image
Device Activation Shutdown User Name admin Password 8 to 32 characters Confirm Password Re-enter the login password Email Address Only for resetting the password Activateflowchart
graph TD
    A["Unlock Pattern Network Cloud"] --> B["Draw an Unlock Pattern"]
    B --> C["Redraw"]
    C --> D["Do Not Use Unlock Pattern"]
text_image
Unlock Pattern Network Cloud ConnectedConnection Status Auto add LAN cameras DHCP IP Address Subnet Mask Default Gateway Previous Next4 Pridėkite kamera.
text_image
QR code image containing encoded data, no visible human-readable textArba
QR kodas
text_image
Internet Protocol Version 4 (TCP/IPv4)Properties General You can get IP settings assigned automatically if your network supports this capability. Otherwise, you need to ask your network administrator for the appropriate IP settings. Obtain an IP address automatically Use the following IP address: IP address: 192 . 168 . 1 . 10 Subnet mask: 255 . 255 . 255 . 0 Default gateway: . Obtain DNS server address automatically Use the following DNS server addresses: Preferred DNS server: . Alternate DNS server: . Validate settings upon exit Advanced OK Canceltext_image
Device Activation User Name admin Password 8 to 32 characters Confirm Password Re-enter the login password Email Address Only for resetting the password Activate English √text_image
LED indicatornatural_image
Technical line drawing of two electronic devices with ventilation grilles and ports, shown from front and side views (no text or symbols)text_image
SATA connector HDDnatural_image
Diagram of a device rear panel with ports and connectors (no text or labels)natural_image
Technical line drawing of a device rear panel with ports and connectors (no text or symbols)text_image
Device Activation Shutdown User Name admin Password 8 to 32 characters Confirm Password Re-enter the login password Email Address Only for resetting the password Activatetext_image
Unlock Pattern Network Cloud Draw an Unlock Pattern Redraw Do Not Use Unlock Patterntext_image
Unlock Pattern Network Cloud ConnectedConnection Status Auto add LAN cameras DHCP IP Address Subnet Mask Default Gateway Previous Next4 Lisää kamera.
text_image
QR code image containing encoded data, no visible human-readable textQR koodi
Tai
text_image
GET IT ON Google Play Download on the App StorePassword 8 to 32 characters
Confirm Password Re-enter the login password
Email Address Only is receiving the password
English
FAQ
text_image
LED indicatorViens LED indikators (piemērs: N3L-8H)
natural_image
Technical line drawing of two electronic devices with ventilation slots and ports, shown from front and side views (no text or symbols)text_image
Diagram of a device rear panel with labeled ports and indicator lightsnatural_image
Technical line drawing of a device rear panel with ports and buttons, showing front and side views (no text or symbols)Plastmasas apvalka NVR (piemërs: N3L-8H)
text_image
固相 回相复固text_image
Device Activation Shutdown User Name admin Password 8 to 32 characters Confirm Password Re-enter the login password Email Address Only for resetting the password Activateflowchart
graph TD
    A["Unlock Pattern Network Cloud"] --> B["Draw an Unlock Pattern"]
    B --> C["Redraw"]
    C --> D["Do Not Use Unlock Pattern"]
text_image
Unlock Pattern Network Cloud ConnectedConnection Status Auto add LAN cameras DHCP IP Address Subnet Mask Default Gateway Previous Next4 Pievienojiet kameru.
text_image
QR code image containing encoded data, no visible human-readable textVai
text_image
GET IT ON Google Play Download on the App StoreQR kods
text_image
Internet Protocol Version 4 (TCP/IPv4)Properties General You can get IP settings assigned automatically if your network supports this capability. Otherwise, you need to ask your network administrator for the appropriate IP settings. Obtain an IP address automatically Use the following IP address: IP address: 192. 168 . 1 . 10 Subnet mask: 255.255.255.0 Default gateway: . Obtain DNS server address automatically Use the following DNS server addresses: Preferred DNS server: . Alternate DNS server: . Validate settings upon exit Advanced OK Cancel3 Palaidiet pārlūkprogrammu un ievadiet noklusējuma IP adresi 192.168.1.254 NVR adreses joslā. lestatiet Password (Parole), ievadiet savu Email Address (e-pasta adresi), un noklikškiniet Activate (Aktivizēt).

Tips
NVR atbalsta HTTPS pieteikšanos. Kad pieklüstat timekja lietotäja saskarnei, pärlükprogramma var pazinot, ka timekja adrese nav droša, vienkärši ignorëjiet to un turpiniet.
text_image
Device Activation User Name admin Password 8 to 32 characters Confirm Password Re-enter the login password Email Address Only for resetting the password Activate English √text_image
LED indicatorEnkel LED-indikator (exempel: N3L-8H)
text_image
Ta bort locket FlipPlastskal NVR (Exempel: N3L-8H)
natural_image
Technical line drawing of two electronic devices with ventilation grilles and ports, shown from front and side views (no text or symbols)Metallskal NVR (Exempel: N3104-4P)
text_image
Diagram of a device rear panel with labeled ports and indicator lightsMetallskal NVR (Exempel: N3104-4P)
natural_image
Technical line drawing of a device rear panel with ports and buttons, showing front and side views (no text or symbols)Plastskal NVR (Exempel: N3L-8H)
text_image
固磁 凹陷复固Metallskal NVR (Exempel: N3104-4P)
II Anslut enheten
text_image
Device Activation Shutdown User Name admin Password 8 to 32 characters Confirm Password Re-enter the login password Email Address Only for resetting the password Activatetext_image
Unlock Pattern Network Cloud Draw an Unlock Pattern Redraw Do Not Use Unlock Patterntext_image
Unlock Pattern Network Cloud ConnectedConnection Status Auto add LAN cameras DHCP IP Address Subnet Mask Default Gateway Previous Next4 Addera kamera.
text_image
QR code image containing encoded data, no visible human-readable textEller
text_image
GET IT ON Google Play Download on the App StoreQR-kod
text_image
Internet Protocol Version 4 (TCP/IPv4)Properties General You can get IP settings assigned automatically if your network supports this capability. Otherwise, you need to ask your network administrator for the appropriate IP settings. Obtain an IP address automatically Use the following IP address: IP address: 192. 168 . 1 . 10 Subnet mask: 255.255.255.0 Default gateway: . Obtain DNS server address automatically Use the following DNS server addresses: Preferred DNS server: . Alternate DNS server: . Validate settings upon exit Advanced OK Canceltext_image
Device Activation User Name admin Password 8 to 32 characters Confirm Password Re-enter the login password Email Address Only for resetting the password Activate Englishnatural_image
Technical line drawing of two electronic device modules with ventilation grilles and ports (no text or symbols)Metal shell NVR (Example: N3104-4P)
text_image
Diagram of a device rear panel with labeled ports and connections, including icons for ports, switches, and indicators.natural_image
Technical line drawing of a device rear panel with ports and buttons, shown from front and side views (no text or symbols)natural_image
Line drawing of a rectangular electronic device with ports and control buttons (no text or symbols)text_image
Device Activation Shutdown User Name admin Password 8 to 32 characters Confirm Password Re-enter the login password Email Address Only for resetting the password Activatetext_image
Unlock Pattern Network Cloud Draw an Unlock Pattern Redraw Do Not Use Unlock Patterntext_image
Unlock Pattern Network Cloud ConnectedConnection Status Auto add LAN cameras DHCP IP Address Subnet Mask Default Gateway Previous Next4 Pridat' kameru.
Vyberte kameru, ktorú chcete pridat' do zoznamu Online Camera (Kamera online), a kliknite na Add (Pridat'). Ked' sa kamery zobrazia v zozname Added Camera (Pridaná kamera) a stav je Online, kliknite na Next (Čalej).

text_image
QR code image containing encoded data, no visible human-readable textAlebo
QR kód
text_image
Internet Protocol Version 4 (TCP/IPv4)Properties General You can get IP settings assigned automatically if your network supports this capability. Otherwise, you need to ask your network administrator for the appropriate IP settings. Obtain an IP address automatically Use the following IP address: IP address: 192. 168 . 1 . 10 Subnet mask: 255. 255. 255. 0 Default gateway: . . . . Obtain DNS server address automatically Use the following DNS server addresses: Preferred DNS server: . . . . Alternate DNS server: . . . . Validate settings upon exit Advanced OK Cancel③ Spustite prehliadač a do panela s adresou zadajte IP adresu zariadenia NVR 192.168.1.254. Nastavte Password (heslo), zadajte svoju Email Address (E-mailovú adresu) a kliknite na Activate (Aktivovat').

text_image
Device Activation User Name admin Password 8 to 32 characters Confirm Password Re-enter the login password Email Address Only for resetting the password Activate Englishnatural_image
Technical line drawing of two electronic device boxes with ventilation slots and ports (no text or symbols)text_image
Diagram of a device rear panel with labeled ports and buttons, showing internal layout and connections.natural_image
Line drawing of a device rear panel with ports and buttons, showing front and side views (no text or symbols)natural_image
Isometric line drawing of a rectangular electronic device with ventilation slots and ports (no text or symbols)text_image
Device Activation Shutdown User Name admin Password 8 to 32 characters Confirm Password Re-enter the login password Email Address Only for resetting the password Activatetext_image
Unlock Pattern Network Cloud Draw an Unlock Pattern Redraw Do Not Use Unlock Patterntext_image
Unlock Pattern Network Cloud ConnectedConnection Status Auto add LAN cameras DHCP IP Address Subnet Mask Default Gateway Previous Nexttext_image
QR code image containing encoded data, no visible human-readable textOf
text_image
GET IT ON Google Play Download on the App StoreQR code
text_image
Internet Protocol Version 4 (TCP/IPv4)Properties General You can get IP settings assigned automatically if your network supports this capability. Otherwise, you need to ask your network administrator for the appropriate IP settings. Obtain an IP address automatically Use the following IP address: IP address: 192. 168 . 1 . 10 Subnet mask: 255. 255. 255. 0 Default gateway: . Obtain DNS server address automatically Use the following DNS server addresses: Preferred DNS server: . Alternate DNS server: . Validate settings upon exit Advanced OK Canceltext_image
Device Activation User Name admin Password 8 to 32 characters Confirm Password Re-enter the login password Email Address Only for resetting the password Activate Englishnatural_image
Technical line drawing of two electronic devices with ventilation grilles and ports, shown from front and side views (no text or symbols)NVR s metalnim kućištem (primjer: N3104-4P)
2 Izvadite 2 vijka iz instalacijskog paketa NVR-a (mrežnog snimača za video nadzor) i zavijte ih u dva otvora za vijke najbliža SATA konektoru. Ostavite oko 2 mm između glave vijka i HDD-a (tvrdog diska) za naknadnu instalaciju.
text_image
SATA konektor HDD3 Poravnajte SATA konektor HDD-a (tvrdog diska) s SATA utorom na matičnoj ploči NVR-a (mrežnog snimača za video nadzor), a zatim umetnite HDD (tvrdi disk) u utor dok se čvrsto ne fiksira.
text_image
HDD HDDtext_image
Diagram of a device rear panel with labeled ports and control buttons, showing connections and status indicators.NVR s metalnim kućištem (primjer: N3104-4P)
natural_image
Technical line drawing of a device rear panel with ports and connectors, shown from front and side views (no text or symbols)text_image
Device Activation Shutdown User Name admin Password 8 to 32 characters Confirm Password Re-enter the login password Email Address Only for resetting the password Activate② Ako želite koristiti uzorak za otključavanje internetskog korisničkog sučelja, nacrtajte uzorak za otključavanje. U suprotnom, kliknite na Do Not Use Unlock Pattern (Nemoj koristiti uzorak za otključavanje) i preskočite ovaj korak ③.
flowchart
graph TD
    A["Unlock Pattern Network Cloud"] --> B["Draw an Unlock Pattern"]
    B --> C["Redraw"]
    D["Do Not Use Unlock Pattern"] --> E["●"]
    D --> F["●"]
    D --> G["●"]
    D --> H["●"]
    D --> I["●"]
    D --> J["●"]
③ Provjerite je li status veze Connected (Povezano) i omogućite ili onemogućite značajku Auto add LAN cameras (Automatski dodaj LAN kamere) po potrebi.
- Ako želite automatski dodati kamere na LAN strani NVR-a (mrežnog snimača za video nadzor), kliknite na Next (Dalje). Preskočite na korak ⑤.
- Ako želite ručno dodati kamere na LAN strani NVR-a (mrežnog snimača za video nadzor), možete onemogućiti značajku Auto add LAN cameras (Automatski dodaj LAN kamere) i kliknite na Next (Dalje).
Savjeti
text_image
Unlock Pattern Network Cloud ConnectedConnection Status Auto add LAN cameras DHCP IP Address Subnet Mask Default Gateway Previous Next④ Dodajte kameru.
Odaberite kameru koju želite dodati na popis Online Camera (mrežnih kamera) i kliknite na Add (Dodaj). Kada se kamera pojavi na popisu Added Camera (Dodana kamera) i kada je status Online (Na mreži), kliknite na Next (Dalje).
Savjeti
- Ako je kamera koju želite dodati spojena na preklopnik ili usmjerivač koji je spojen na LAN priključak NVR-a, provjerite jesu li IP adresa kamere i NVR-a u istom segmentu mreže.
- Ako NVR podržava PoE priključke, a kamera koju želite dodati je spojena na PoE priključak NVR-a, provjerite je li DHCP funkcija kamere omogućena.
- Ako je kamera koju želite dodati aktivirana, a korisničko ime i lozinka se razlikuju od onih za NVR (mrežni snimači za video nadzor), kliknite na , unesite relevantne informacije i kliknite na Add (Dodaj).
text_image
Unlock Pattern Network Camera Cloud Online Camera ✓ No. IP Address Model Status S/N Protocol Port Operation ✓ 1 192.168.1.101 IC6 Online ONVIF 6688 + ✓ 2 192.168.1.102 IT6 Online ONVIF 6688 + ✓ 3 192.168.1.103 IT6 Online ONVIF 6688 + Add Manual Added Camera Channel Channel Name IP Address Model Status S/N Protocol Port Operation Empty Delete Previous Next⑤ Provjerite je li status oblaka Online (Na mreži) i kliknite na OK (U redu).
Savjeti
text_image
QR code image containing encoded data, no visible human-readable textQR kod
Ili
text_image
Internet Protocol Version 4 (TCP/IPv4)Properties General You can get IP settings assigned automatically if your network supports this capability. Otherwise, you need to ask your network administrator for the appropriate IP settings. Obtain an IP address automatically Use the following IP address: IP address: 192. 168 . 1 . 10 Subnet mask: 255. 255. 255. 0 Default gateway: . Obtain DNS server address automatically Use the following DNS server addresses: Preferred DNS server: . Alternate DNS server: . Validate settings upon exit Advanced OK Cancel③ Pokrenite preglednik i u adresnu traku unesite IP adresu 192.168.1.254 NVR-a (mrežnog snimača za video nadzor). Postavite Password (Lozinku), unesite svoju Email Address (e-adresu) i kliknite na Activate (Aktiviraj).
Savjeti
NVR podržava HTTPS prijavu. Kada pristupite njegovoj stranici za upravljanje, preglednik može obavijestiti da web adresa nije sigurna, samo je zanemarite i nastavite.
text_image
Device Activation User Name admin Password 8 to 32 characters Confirm Password Re-enter the login password Email Address Only for resetting the password Activate English √Postavljanje je završeno. Možete ući na internetsko korisničko sučelje NVR-a (mrežnog snimača za video nadzor) za pregled videozapisa u stvarnom vremenu ili po potrebi konfigurirati NVR (mrežni snimač za video nadzor).
DHCP funkcija NVR-a je omogućena. Ako u mreži postoji DHCP poslužitelj, IP adresa NVR-a može se promijeniti. Pogledajte stvarnu IP adresu koju je NVR-u dodijelio DHCP poslužitelj.
natural_image
Technical line drawing of two electronic devices with ventilation grilles and ports, shown from front and side views (no text or symbols)NVR с метална обвивка (Пример: N3104-4P)
text_image
SATA connector HDDnatural_image
Technical line drawing of a device rear panel with ports and buttons, showing front and side views (no text or symbols)text_image
QR code image containing encoded data, no visible human-readable textИли
QR код
text_image
Internet Protocol Version 4 (TCP/IPv4)Properties General You can get IP settings assigned automatically if your network supports this capability. Otherwise, you need to ask your network administrator for the appropriate IP settings. Obtain an IP address automatically Use the following IP address: IP address: 192. 168 . 1 . 10 Subnet mask: 255. 255 . 255 . 0 Default gateway: . Obtain DNS server address automatically Use the following DNS server addresses: Preferred DNS server: . Alternate DNS server: . Validate settings upon exit Advanced OK Cancelnatural_image
Technical line drawing of two electronic devices with ventilation grilles and ports, shown from front and side views (no text or symbols)text_image
Diagram of a device rear panel with labeled ports and internal components, showing connections and indicators.natural_image
Technical line drawing of a device rear panel with ports and connectors, shown from front and side views (no text or symbols)natural_image
Line drawing of a rectangular electronic device with ventilation slots and ports (no text or symbols)text_image
QR code image containing encoded data, no visible human-readable textQR kód
Nebo
text_image
Internet Protocol Version 4 (TCP/IPv4)Properties General You can get IP settings assigned automatically if your network supports this capability. Otherwise, you need to ask your network administrator for the appropriate IP settings. Obtain an IP address automatically Use the following IP address: IP address: 192 . 168 . 1 . 10 Subnet mask: 255 . 255 . 255 . 0 Default gateway: . Obtain DNS server address automatically Use the following DNS server addresses: Preferred DNS server: . Alternate DNS server: . Validate settings upon exit Advanced OK Cancelnatural_image
Technical line drawing of two electronic device modules with ventilation slots and ports (no text or symbols)text_image
Diagram showing magnetic field lines and circular elements in a rectangular container with labeled points A and B.text_image
Diagram of a device rear panel with labeled ports and internal components, showing connections and arrows indicating flow or movement.natural_image
Technical line drawing of a device rear panel with ports and buttons, shown from front and side views (no text or symbols)text_image
QR code image containing encoded data, no visible human-readable textQR-Code
Oder
text_image
Internet Protocol Version 4 (TCP/IPv4)Properties General You can get IP settings assigned automatically if your network supports this capability. Otherwise, you need to ask your network administrator for the appropriate IP settings. Obtain an IP address automatically Use the following IP address: IP address: 192. 168 . 1 . 10 Subnet mask: 255. 255. 255. 0 Default gateway: . Obtain DNS server address automatically Use the following DNS server addresses: Preferred DNS server: . Alternate DNS server: . Validate settings upon exit Advanced OK Canceltext_image
LED indicatortext_image
Remove the cover Flipnatural_image
Technical line drawing of two electronic device modules with ventilation slots and ports (no text or symbols)text_image
SATA connector HDDnatural_image
Diagram of a device rear panel with ports and connectors (no text or labels)natural_image
Technical line drawing of a device rear panel with ports and buttons, showing front and side views (no text or symbols)natural_image
Isometric line drawing of a rectangular electronic device with ports and ventilation slots (no text or symbols)text_image
QR code image containing encoded data, no visible human-readable textO
text_image
GET IT ON Google Play Download on the App StoreCódigo QR
text_image
Internet Protocol Version 4 (TCP/IPv4)Properties General You can get IP settings assigned automatically if your network supports this capability. Otherwise, you need to ask your network administrator for the appropriate IP settings. Obtain an IP address automatically Use the following IP address: IP address: 192, 168, 1, 10 Subnet mask: 255, 255, 255, 0 Default gateway: . . . . Obtain DNS server address automatically Use the following DNS server addresses: Preferred DNS server: . . . . Alternate DNS server: . . . . Validate settings upon exit Advanced OK Cancelnatural_image
Technical line drawing of two electronic device modules with ventilation slots and ports (no text or symbols)natural_image
Diagram of a device rear panel with ports and connectors (no text or labels)natural_image
Technical line drawing of a device rear panel with ports and connectors, shown from front and side views (no text or symbols)natural_image
Line drawing of a rectangular electronic device with ports and connectors (no text or symbols)text_image
QR code image containing encoded data, no visible human-readable textOu
QR Code
text_image
Internet Protocol Version 4 (TCP/IPv4)Properties General You can get IP settings assigned automatically if your network supports this capability. Otherwise, you need to ask your network administrator for the appropriate IP settings. Obtain an IP address automatically Use the following IP address: IP address: 192, 168, 1, 10 Subnet mask: 255, 255, 255, 0 Default gateway: . Obtain DNS server address automatically Use the following DNS server addresses: Preferred DNS server: . . . . Alternate DNS server: . . . . Validate settings upon exit Advanced OK Cancelnatural_image
Technical line drawing of two electronic device modules with ventilation grilles and ports (no text or symbols)text_image
SATA connector HDDtext_image
Diagram of a device rear panel with labeled ports and connectors, showing internal layout and connections.natural_image
Diagram showing two views of a device rear panel with ports and connectors, no text or symbols present.Műanyag héjú NVR (Példa: N3L-8H)
natural_image
Technical line drawing of a rectangular electronic device with ports and connectors (no text or symbols)text_image
QR code image containing encoded data, no visible human-readable textVagy
QR-kód
text_image
Internet Protocol Version 4 (TCP/IPv4)Properties General You can get IP settings assigned automatically if your network supports this capability. Otherwise, you need to ask your network administrator for the appropriate IP settings. Obtain an IP address automatically Use the following IP address: IP address: 192 . 168 . 1 . 10 Subnet mask: 255 . 255 . 255 . 0 Default gateway: . Obtain DNS server address automatically Use the following DNS server addresses: Preferred DNS server: . Alternate DNS server: . Validate settings upon exit Advanced OK Cancel- Ensure that the DHCP server function of the router is enabled.
natural_image
Simple line drawing of a rectangular container with circular indentations and two vertical posts (no text or symbols)
natural_image
Technical line drawing of two electronic devices with ventilation grilles and ports, shown from front and side views (no text or symbols)NVR cangkang logam (Contoh: N3104-4P)
text_image
Diagram of a device rear panel with labeled ports and internal components, showing connections and status indicators.NVR cangkang logam (Contoh: N3104-4P)
natural_image
Technical line drawing of a device rear panel with ports and connectors, showing front and side views (no text or symbols)NVR cangkang plastik (Contoh: N3L-8H)
natural_image
Line drawing of a rectangular electronic device with ports and connectors (no text or symbols)NVR cangkang logam (Contoh: N3104-4P)
text_image
QR code image containing encoded data, no visible human-readable textAtau
Kode QR
text_image
Internet Protocol Version 4 (TCP/IPv4)Properties General You can get IP settings assigned automatically if your network supports this capability. Otherwise, you need to ask your network administrator for the appropriate IP settings. Obtain an IP address automatically Use the following IP address: IP address: 192 . 168 . 1 . 10 Subnet mask: 255 . 255 . 255 . 0 Default gateway: . Obtain DNS server address automatically Use the following DNS server addresses: Preferred DNS server: . Alternate DNS server: . Validate settings upon exit Advanced OK Cancel③ Mulai browser dan masukkan alamat IP 192.168.1.254 NVR di address bar. Atur Kata Sandi, masukkan Email Anda, dan klik Aktifkan.

natural_image
Technical line drawing of two electronic device modules with ventilation slots and ports (no text or symbols)text_image
Diagram of a device rear panel with labeled ports and internal components, showing connections and status indicators.natural_image
Technical line drawing of a device rear panel with ports and connectors, showing front and side views (no text or symbols)natural_image
Technical line drawing of a rectangular electronic device with ventilation slots and ports (no text or symbols)text_image
QR code image containing encoded data, no visible human-readable text0

text_image
GET IT ON Google Play Download on the App StoreQR Code
text_image
Internet Protocol Version 4 (TCP/IPv4)Properties General You can get IP settings assigned automatically if your network supports this capability. Otherwise, you need to ask your network administrator for the appropriate IP settings. Obtain an IP address automatically Use the following IP address: IP address: 192 . 168 . 1 . 10 Subnet mask: 255 . 255 . 255 . 0 Default gateway: . Obtain DNS server address automatically Use the following DNS server addresses: Preferred DNS server: . Alternate DNS server: . Validate settings upon exit Advanced OK Cancelnatural_image
Technical line drawing of two electronic devices with ventilation grilles and ports, shown from different angles (no text or symbols)text_image
Diagram of a device rear panel with labeled ports and connectors, showing internal layout and connections.Metal shell NVR (Example: N3104-4P)
natural_image
Technical line drawing of a device rear panel and front panel with ports and connectors (no text or symbols)natural_image
Line drawing of a rectangular electronic device with ports and connectors (no text or symbols)text_image
QR code image containing encoded data, no visible human-readable textLub

Kod QR
text_image
Internet Protocol Version 4 (TCP/IPv4)Properties General You can get IP settings assigned automatically if your network supports this capability. Otherwise, you need to ask your network administrator for the appropriate IP settings. Obtain an IP address automatically Use the following IP address: IP address: 192 . 168 . 1 . 10 Subnet mask: 255 . 255 . 255 . 0 Default gateway: . Obtain DNS server address automatically Use the following DNS server addresses: Preferred DNS server: . Alternate DNS server: . Validate settings upon exit Advanced OK Canceltext_image
Indicator LEDIndicador LED único (Exemplo: N3L-8H)
text_image
Virar Remova a capaInvólucro de plástico NVR (Exemplo: N3L-8H)
natural_image
Technical line drawing of two electronic device modules with ventilation grilles and ports (no text or symbols)Revestimento de metal NVR (Exemplo: N3104-4P)
text_image
conector SATA HDDnatural_image
Pure diagram of a tray with circular elements and downward arrows, no text or symbols presentInvólucro de plástico NVR (Exemplo: N3L-8H)
natural_image
Diagram of a device rear panel with ports and connectors (no text or labels)Revestimento de metal NVR (Exemplo: N3104-4P)
natural_image
Technical line drawing of a device rear panel and front panel with ports and connectors (no text or symbols)Invólucro de plástico NVR (Exemplo: N3L-8H)
natural_image
Line drawing of a rectangular electronic device with ports and control buttons (no text or symbols)Revestimento de metal NVR (Exemplo: N3104-4P)
Il Conectar o dispositivo
Topologia NVR comum (Exemplo: N3L-8H)
flowchart
graph TD
    A["Internet"] --> B["Roteador"]
    B --> C["WAN LAN"]
    B --> D["Computador"]
    B --> E["LAN"]
    B --> F["Interruptor"]
    F --> G["Câmera"]
    F --> H["Câmera"]
    F --> I["Câmera"]
    F --> J["Monitor"]
    F --> K["LAN NVR"]
    F --> L["Porta uplink"]
    F --> M["Wireless Connection"]
    style A fill:#f9f,stroke:#333
    style B fill:#ccf,stroke:#333
    style F fill:#cfc,stroke:#333
    style G fill:#fcc,stroke:#333
    style H fill:#fcc,stroke:#333
    style I fill:#fcc,stroke:#333
    style J fill:#fcc,stroke:#333
    style K fill:#fcc,stroke:#333
    style L fill:#fcc,stroke:#333
Topologia PoE NVR (Exemplo: N3104-4P)
flowchart
graph TD
    A["Internet"] --> B["Roteador"]
    B --> C["LAN"]
    C --> D["LAN"]
    D --> E["POE NVR"]
    E --> F["Câmera PoE"]
    E --> G["Câmera PoE"]
    E --> H["Câmera PoE"]
    E --> I["Monitor"]
    B --> J["WAN"]
    B --> K["LAN"]
    D --> L["POWER"]
    D --> M["PUE"]
    D --> N["PORTS"]
    D --> O["LAN"]
    D --> P["AUDIO"]
    D --> Q["HDMI"]
    D --> R["OUT"]
    E --> S["VA"]
    E --> T["USB"]
    E --> U["LINE"]
    E --> V["USB"]
    E --> W["USB"]
    E --> X["USB"]
    E --> Y["USB"]
    E --> Z["USB"]
    E --> AA["USB"]
    E --> AB["USB"]
    E --> AC["USB"]
    E --> AD["USB"]
    E --> AE["USB"]
    E --> AF["USB"]
    E --> AG["USB"]
    E --> AH["USB"]
    E --> AI["USB"]
    E --> AJ["USB"]
    E --> AK["USB"]
    E --> AL["USB"]
    E --> AM["USB"]
    E --> AN["USB"]
    E --> AO["USB"]
text_image
QR code image containing encoded data, no visible human-readable textOu
Código QR
text_image
Internet Protocol Version 4 (TCP/IPv4)Properties General You can get IP settings assigned automatically if your network supports this capability. Otherwise, you need to ask your network administrator for the appropriate IP settings. Obtain an IP address automatically Use the following IP address: IP address: 192 . 168 . 1 . 10 Subnet mask: 255 . 255 . 255 . 0 Default gateway: . Obtain DNS server address automatically Use the following DNS server addresses: Preferred DNS server: . Alternate DNS server: . Validate settings upon exit Advanced OK Cancelnatural_image
Technical line drawing of two electronic device modules with ventilation slots and ports (no text or symbols)text_image
conector SATA HDDtext_image
Diagram of a device rear panel with labeled ports and indicator lightsnatural_image
Technical line drawing of a device rear panel with ports and buttons, shown from front and side views (no text or symbols)natural_image
Technical line drawing of a rectangular electronic device with ports and control buttons (no text or symbols)text_image
QR code image containing encoded data, no visible human-readable textSau
Cod QR
text_image
Internet Protocol Version 4 (TCP/IPv4)Properties General You can get IP settings assigned automatically if your network supports this capability. Otherwise, you need to ask your network administrator for the appropriate IP settings. Obtain an IP address automatically Use the following IP address: IP address: 192. 168 . 1 . 10 Subnet mask: 255. 255. 255. 0 Default gateway: . Obtain DNS server address automatically Use the following DNS server addresses: Preferred DNS server: . Alternate DNS server: . Validate settings upon exit Advanced OK Cancelnatural_image
Technical line drawing of two electronic devices with ventilation grilles and ports, shown from front and side views (no text or symbols)text_image
SATA connector HDDtext_image
Diagram of a device rear panel with labeled ports and internal components, including icons for ports, cables, and switches.natural_image
Technical line drawing of a device rear panel with ports and buttons, shown from front and side views (no text or symbols)natural_image
Line drawing of a rectangular electronic device with ports and ventilation slots (no text or symbols)text_image
QR code image containing encoded data, no visible human-readable textИли
QR код
text_image
Internet Protocol Version 4 (TCP/IPv4)Properties General You can get IP settings assigned automatically if your network supports this capability. Otherwise, you need to ask your network administrator for the appropriate IP settings. Obtain an IP address automatically Use the following IP address: IP address: 192 . 168 . 1 . 10 Subnet mask: 255 . 255 . 255 . 0 Default gateway: . Obtain DNS server address automatically Use the following DNS server addresses: Preferred DNS server: . Alternate DNS server: . Validate settings upon exit Advanced OK Canceltext_image
LED indicatorEn indikator LED (primer: N3L-8H)
| LED indikator | Opis |
| POWER | Sveti modro: Inicializacija. |
| Sveti zeleno: snemanje NVR. | |
| Utripa zeleno: NVR deluje pravilno, vendar ne snema. | |
| Sveti rdeče: NVR je v okvari (vrata LAN so prekinjena, ali okvara trdega diska). |
text_image
Tenda PWR HDD NET Več indikatorjev LED (primer: N3104-4P)| LED indikator | Opis |
| PWR | Sveti: vklopljen. |
| Ne sveti: Nepravilno vklopljen. | |
| NET | Sveti: vrata LAN so povezana. |
| Ne sveti: vrata LAN so prekinjena. | |
| HDD | Sveti: HDD deluje pravilno. |
| Utripa: trdi disk je v okvari (na primer, trdi disk ni formatiran.) | |
| Ne sveti: trdi disk ni zaznan. |
Spodnja plošča

Nasveti
text_image
Odstranite pokrov Flipnatural_image
Technical line drawing of two electronic device boxes with ventilation grilles and ports, shown from front and side views (no text or symbols)natural_image
Diagram of a device rear panel with ports and connectors (no text or labels)natural_image
Technical line drawing of a device rear panel with ports and connectors, showing front and side views (no text or symbols)natural_image
Line drawing of a rectangular electronic device with ports and connectors (no text or symbols)You can preview real-time videos, play back the recordings and manage monitoring devices.
■ Upravljanje aplikacije
text_image
QR code image containing encoded data, no visible human-readable textOZ
koda QR
text_image
Internet Protocol Version 4 (TCP/IPv4)Properties General You can get IP settings assigned automatically if your network supports this capability. Otherwise, you need to ask your network administrator for the appropriate IP settings. Obtain an IP address automatically Use the following IP address: IP address: 192, 168, 1, 10 Subnet mask: 255, 255, 255, 0 Default gateway: . . . . Obtain DNS server address automatically Use the following DNS server addresses: Preferred DNS server: . . . . Alternate DNS server: . . . . Validate settings upon exit Advanced OK Cancelnatural_image
Technical line drawing of two electronic devices with ventilation grilles and ports, shown from front and side views (no text or symbols)text_image
SATA connector HDDnatural_image
Technical line drawings of a device chassis showing front, top, and side views with ports and connectors (no text or symbols)text_image
QR code image containing encoded data, no visible human-readable text'H
Κωδικός QR
text_image
Internet Protocol Version 4 (TCP/IPv4)Properties General You can get IP settings assigned automatically if your network supports this capability. Otherwise, you need to ask your network administrator for the appropriate IP settings. Obtain an IP address automatically Use the following IP address: IP address: 192. 168 . 1 . 10 Subnet mask: 255.255.255.0 Default gateway: . Obtain DNS server address automatically Use the following DNS server addresses: Preferred DNS server: . Alternate DNS server: . Validate settings upon exit Advanced OK Cancelnatural_image
Technical line drawing of two electronic device modules with ventilation grilles and ports, shown from front and side views (no text or symbols)Metal kabuk NVR (Örnek: N3104-4P)
text_image
Diagram of a device rear panel with labeled ports and connections, including icons for ports, switches, and indicators.Metal kabuk NVR (Örnek: N3104-4P)
natural_image
Technical line drawing of a device rear panel with ports and connectors, shown from front and side views (no text or symbols)Plastik kabuk NVR (Örnek: N3L-8H)

natural_image
Line drawing of a rectangular electronic device with ventilation slots and ports (no text or symbols)Metal kabuk NVR (Örnek: N3104-4P)
II Cihazı bağlama
text_image
QR code image containing encoded data, no visible human-readable textVeya
QR kod
text_image
Internet Protocol Version 4 (TCP/IPv4)Properties General You can get IP settings assigned automatically if your network supports this capability. Otherwise, you need to ask your network administrator for the appropriate IP settings. Obtain an IP address automatically Use the following IP address: IP address: 192. 168 . 1 . 10 Subnet mask: 255. 255. 255. 0 Default gateway: . Obtain DNS server address automatically Use the following DNS server addresses: Preferred DNS server: . Alternate DNS server: . Validate settings upon exit Advanced OK Cancelnatural_image
Technical line drawing of two electronic devices with ventilation grilles and ports, shown from front and side views (no text or symbols)text_image
Diagram of an electronic device rear panel with labeled ports and indicator lightsnatural_image
Technical line drawings of a device chassis showing front, top, and side views with ports and connectors (no text or symbols)text_image
QR code image containing encoded data, no visible human-readable textA60
QR-код
text_image
Internet Protocol Version 4 (TCP/IPv4)Properties General You can get IP settings assigned automatically if your network supports this capability. Otherwise, you need to ask your network administrator for the appropriate IP settings. Obtain an IP address automatically Use the following IP address: IP address: 192 . 168 . 1 . 10 Subnet mask: 255 . 255 . 255 . 0 Default gateway: . Obtain DNS server address automatically Use the following DNS server addresses: Preferred DNS server: . Alternate DNS server: . Validate settings upon exit Advanced OK Cancelnatural_image
Simple line drawing of a rectangular container with four circular indentations and three protruding pins (no text or symbols)
natural_image
Technical line drawing of two electronic devices with ventilation grilles and ports, shown from front and side views (no text or symbols)NVR (mean: N3104-4P)
natural_image
Pure diagram of a tray with four circular buttons and downward arrows, no text or symbols presentNVR (mean: N3L-8H)
text_image
Diagram of a device rear panel with labeled ports and connectors, showing internal layout and connections.natural_image
Technical line drawing of a device rear panel with ports and connectors, shown from front and side views (no text or symbols)NVR (mean: N3L-8H)
natural_image
Isometric line drawing of a rectangular electronic device with ports and connectors (no text or symbols)NVR (mean: N3104-4P)
II قم بتوصيل الجهاز
(N3L-8H : مثال NCAA NVR طوبولوجيا
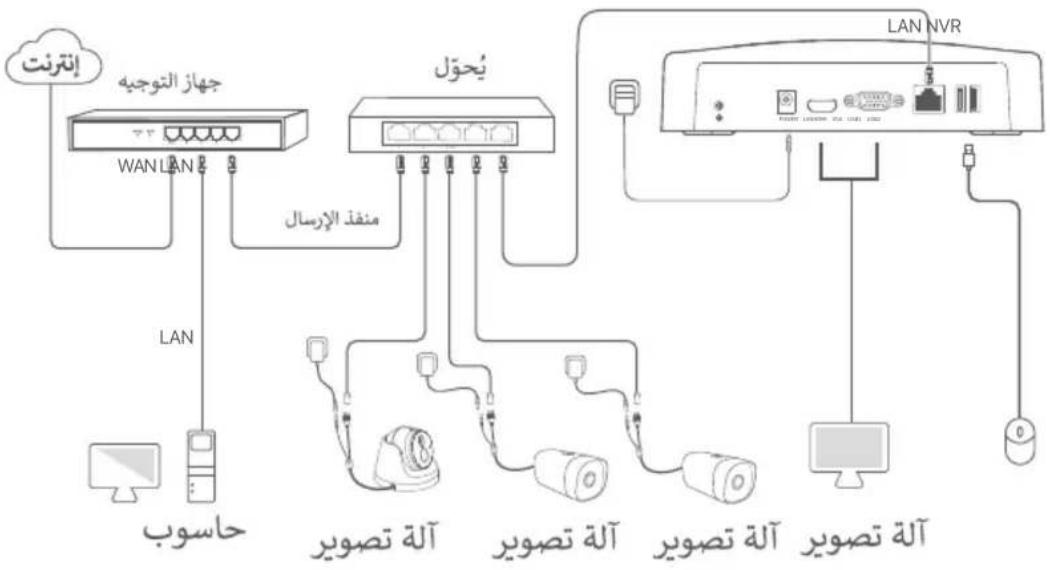
flowchart
graph TD
    A["Internet"] --> B["WAN LAN"]
    B --> C["LAN"]
    C --> D["Wi-Fi LAN"]
    D --> E["Wi-Fi LAN"]
    E --> F["LAN NVR"]
    F --> G["Computer"]
    F --> H["Computer"]
    B --> I["جهاز التوجيه"]
    I --> J["CAN"]
    J --> K["Wi-Fi LAN"]
    K --> L["LAN"]
    L --> M["Wi-Fi LAN"]
    M --> N["LAN NVR"]
    N --> O["Wi-Fi LAN"]
    O --> P["LAN NVR"]
    P --> Q["Wi-Fi LAN"]
    Q --> R["LAN NVR"]
    R --> S["Wi-Fi LAN"]
    S --> T["LAN NVR"]
    T --> U["Wi-Fi LAN"]
    U --> V["LAN NVR"]
    V --> W["Wi-Fi LAN"]
    W --> X["LAN NVR"]
    X --> Y["Wi-Fi LAN"]
    Y --> Z["LAN NVR"]
(N3104-4P : مثال) PoE NVR طوبولوجيا
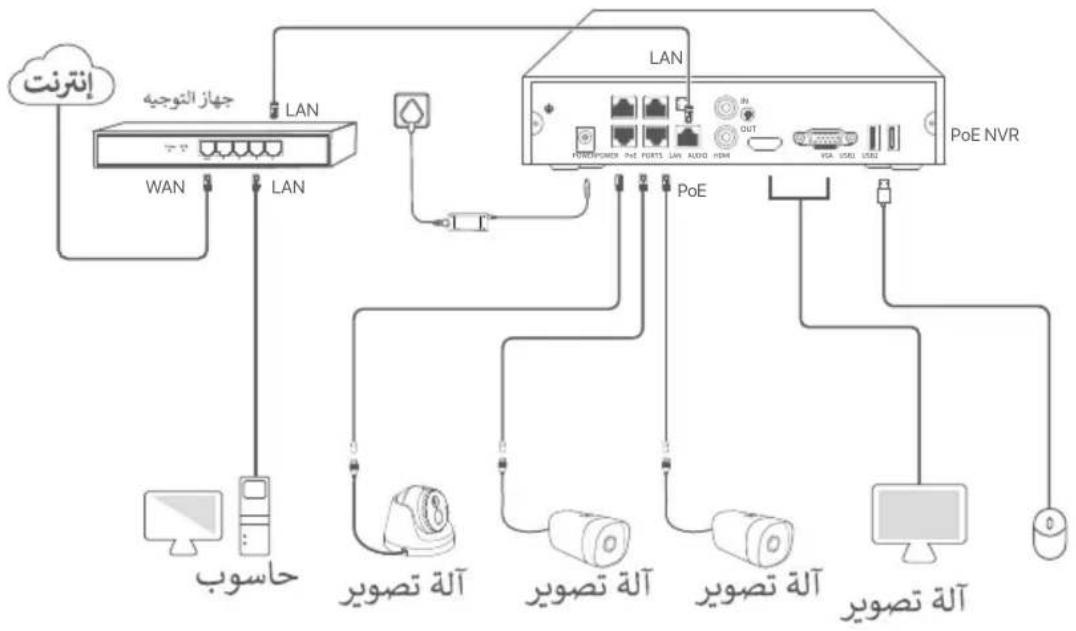
flowchart
graph TD
    A["Internet"] --> B["WAN"]
    B --> C["LAN"]
    C --> D["PoE NVR"]
    D --> E["Computer"]
    D --> F["Alathe Tcsoyir"]
    D --> G["Alathe Tcsoyir"]
    D --> H["Alathe Tcsoyir"]
    D --> I["Alathe Tcsoyir"]
    B --> J["Wi-Fi"]
    C --> K["LAN"]
    D --> L["POWER/Power"]
    D --> M["PC Ports"]
    D --> N["Audio HDM"]
    D --> O["VGA USB"]
    D --> P["USB2"]
text_image
QR code image containing encoded data, no visible human-readable textأو
text_image
GET IT ON Google Play Download on the App Storetext_image
Internet Protocol Version 4 (TCP/IPv4)Properties General You can get IP settings assigned automatically if your network supports this capability. Otherwise, you need to ask your network administrator for the appropriate IP settings. Obtain an IP address automatically Use the following IP address: IP address: 192 . 168 . 1 . 10 Subnet mask: 255 . 255 . 255 . 0 Default gateway: . Obtain DNS server address automatically Use the following DNS server addresses: Preferred DNS server: . Alternate DNS server: . Validate settings upon exit Advanced OK CancelGet support and services
text_image
QR code image containing encoded data, no visible human-readable texthttps://www.tendacn.com/service/default.html
English
Get support and services
For technical specifications, user guides and more information, please visit the product page or service page on www.tendacn.com. Multiple languages are available. You can see the product model on the product.
Polski
Floor 6-8, Tower E3, No.1001, Zhongshanyuan Road, Nanshan District, Shenzhen, China.
518052
Website: www.tendacn.com
E-mail: tendasecurity@tenda.cn
support.us@tenda.cn (North America)
support.uk@tenda.cn (United Kingdom)
© 2023 Shenzhen Tenda Technology Co., Ltd. All rights reserved.
V1.1 Keep for future reference.