
CP2010 - Steam cleaner Concept - Free user manual and instructions
Find the device manual for free CP2010 Concept in PDF.

| Product type | Steam cleaner |
| Brand | Concept |
| Model | CP2010 |
| Voltage | 220-240 V ~ 50/60 Hz |
| Power | 1500 W |
| Heating time | Approximately 25 seconds |
| Continuous runtime | Approximately 12 minutes |
| Water tank capacity | Not specified (estimated ~0.5 L) |
| Water filter | Replaceable, every 6 months or 80-100 hours |
| Included accessories | Floor nozzle, textile bonnet, carpet glider, window squeegee, round brush, iron brush, concentrated jet nozzle (45°), compact round brush, large brush, squeegee, precision brush, extension tube, flexible hose, extension handle |
| Suitable surfaces | Tile, ceramic, glass, stone, marble, concrete, vinyl, linoleum, varnished wood, parquet, carpet |
| Unsuitable surfaces | Silk, leather, velvet, thin plastics, floors without cracks, plasterboard, car varnish, electrical appliances |
| Textile bonnet cleaning | Machine washable at 40°C, without bleach or fabric softener |
| Safety | Do not use without water, do not direct steam at people or animals, unplug before maintenance |
| Warranty | 24 months |
Frequently Asked Questions - CP2010 Concept
User questions about CP2010 Concept
0 question about this device. Answer the ones you know or ask your own.
Ask a new question about this device
Download the instructions for your Steam cleaner in PDF format for free! Find your manual CP2010 - Concept and take your electronic device back in hand. On this page are published all the documents necessary for the use of your device. CP2010 by Concept.
USER MANUAL CP2010 Concept
(smaityextinympotanom)
W1 Drotenaketa W2
W2Dy2a(45)
WSIaaguiatake
W4Vekag
W6Kefanakki
CP2000 CP2010
NAVOD NA OBSLUHU
Zlozenie
Vybaltevsetkycastispotrebicaaprisluenstvo.

m = 311
Please study the Operating Manual carefully before you start using the product. Keep them unal in a safe place for future reference. Make sure that any persons handling the vacuum cleaner are also familiar with this Operating Manual.
| Technical parameters CP2000 | CP2010 | |
| Voltage | 220-240 V ~ 50/60 Hz |
| Input power | 1500 W |
IMPORTANT SAFETY INSTRUCTIONS
Do not leave the appliance unattended when plugged into the mains. When using an electric appliance, the following precautions should always be followed:
- Do not leave the appliance unattended when plugged into the mains. Always disconnect the device from the mains before maintenance or if it is not in use.
- Do not use outdoors or on wet surfaces.
- Do not put the device in operation when in the upright or locked position.
- Do not let the device run while it is stationary. Keep the device moving when it is in use.
- Do not allow the device to be used as a toy. Close attention is necessary when the device is used near children.
- Use the device only as described in this manual. Always use only manufacturer's recommended attachments.
- Always unplug the device from the mains when filling with water, emptying it or if the appliance is not in use.
- Do not use the device if the cord or plug is damaged. If the device does not work as it should, it may have been dropped, damaged, left outdoors, or immersed in water, contact an authorized service centre.
- Do not pull on the power cord, do not carry the device by holding the power cord, do not use the cable as a handle, do not close the cable in the door, or rotate it around sharp edges or corners.
- Keep the cord away from heat sources.
- Do not run the device over the cord.
- To unplug the appliance, grasp the power plug and pull it out. Do not pull the power cord.
- Do not touch the plug or the device with wet hands.
EN
concept
concept
- Do not use the device without the water tank cap in place.
- Do not use the steam function with an empty water tank.
- Empty the water tank when the steam cleaner is not in use.
- Do not put any object into the device's openings. Do not use the device with any opening blocked; keep it free of dust, lint, hair and anything that may reduce performance.
- Contact the manufacturer/retailer (see warranty and service terms). Incorrect installation and repair can cause electrical shock to the user.
- Keep your hair, clothing, fingers and all parts of body away from openings and moving parts of the device.
- Do not ever aim the steam cleaner on yourself or another person. Steam is very hot and can cause burns. Do not use the appliance in the presence of explosive or flammable vapours.
- Turn off all controls before unplugging.
- Do not use the device to clean hot or smoking objects, such as cigarettes, matches, or hot ash.
- Use extra care when cleaning the stairs.
- Do not use the device to clean up flammable or combustible liquids, such as gasoline or lighter fluid. Do not use the device areas where such liquids may be present.
- Do not use to pick up flammable or combustible liquids, such as gasoline or lighter fluid, or use in areas where they may be present.
- Do not use the device in an enclosed space where flammable, explosive or toxic vapours may be released from oil base paint, diluent, moth preparations, or in areas where flammable dust is present.
- Use of chemicals may damage the appliance and you will lose your warranty.
- Do not use the device to clean up toxic solutions such as chlorine bleach, drain cleaner, gasoline, etc.
- Never put additives (such as perfume, stain remover or products containing alcohol) in water as they may damage the steam cleaner or make it dangerous to you.
- Ensure that the water tank cap has been properly screwed down before use.
- Do not touch hot parts of the device. It is normal for the device to get hot during operation.
- Do not use the device to clean clothes while being worn.
- The impact of the steam may have an adverse effect on some materials. Always test the steamer on a small area to determine if the particular material is suitable for treatment with the steam cleaner.
- Never aim the device at people, animals or plants (risk of scalding!).
-
Do not aim the appliance at electrical systems or wires.
-
Do not repair the appliance yourself. Contact an authorized service centre.
- This appliance may be used by children 8 years of age and older and by persons with physical or mental impairments or by inexperienced persons if they are properly supervised or have been informed about how to use the product in a safe manner and understand the potential dangers. Children must not play with the appliance. This appliance may be cleaned by children 8 years of age and older if they are properly supervised. Keep this appliance and the power cord out of reach of children younger than 8 years of age.
If you fail to follow the manufacturer's instructions, repairs cannot be recognized as a warranty.
Household use only
The steam vacuum cleaner with a mop is designed for use on hard surfaces such as ceramic, glass, stone, marble, concrete, vinyl, linoleum and sealed hardwoods and carpet. The appliance is not designed for use on fine silks, leather, velour, or other delicate steam-sensitive materials such as waxed polished furniture, very thin plastics, unsealed hardwoods, ceilings, drywall and exterior paint of automobiles, electronics or items using electricity.
NOTE: The heat and steam may not be suitable for some steam or heat-sensitive floor types. If unsure, we recommend checking the use and care instructions from the floor manufacturer and testing on an inconspicuous area prior to use.
concept
concept
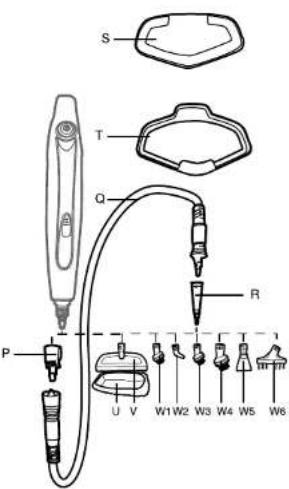
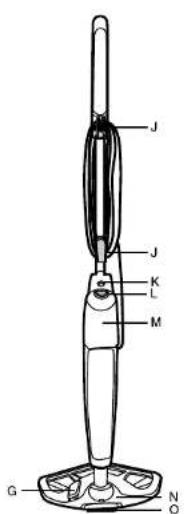
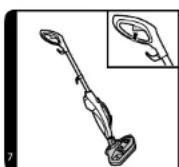
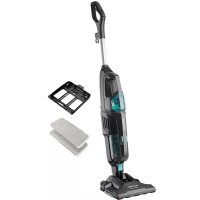
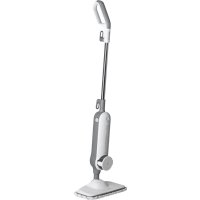
PRODUCT DESCRIPTION
ASteam trigger
BHandle
CPower cord
D Power On/Off button
Manual cleaner handle
FManual cleaner steam trigger
GCleaningsolutionfoot peda
HCleaning solution tank cap
Cleaning solution tank
JHookforattachingapowercord
KManual cleaner release button
LWater tank release button
MWater tank
N Head
0Brush
PHoseadapter
QHose
RExtension adapter
STextile pad
TCarpet glider (CP2000)
USmall textile pad
Windowsqueegee/Head for upholstery
(with a small textile pad)
W1Wire brush
W2Nozzle(45°)
W3Smallroundbrush
W4Large roundbrush
W5Scraper
W6Tile joint brush

OPERATING INSTRUCTIONS
Assembly
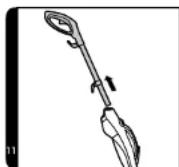
Remove all components from the packaging.
-
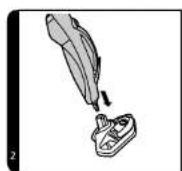
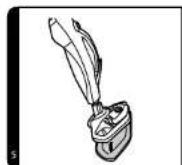
Insert the handle into the cleaner main body until it locks into position {1}.
-
Assemble the main body of the cleaner to the Floor Head (2).
Use
BEFORE THE FIRST USE
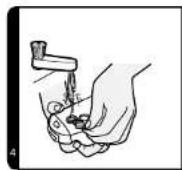
- Press the Water Tank Release Button and remove the tank (3).
NOTE: A tube feeding water from the water tank to the boiler is loaded with a brass ball. This design is intentional and serves to increase the efficiency of water use.
It is normal for this ball to create a rattling sound inside the Water Tank during operation.
2.Pull the Water Tank by the cap (4)
- Fill the tank with cold tap water. Secure the tank with the cap (4). Do not add any chemicals, detergents or perfumes to the Water Tank.
NOTE: We recommend using distilled or de-mineralized water in order to reduce building up mineral deposits and prolonging the life of the appliance.
-
Put the Water Tank back in its place and make sure the Water Filter is installed.
-
Attach the Textile Pad on the bottom of the Head (S).
IMPORTANT: Always disconnect the appliance from the mains prior to adding water or changing the Textile Pad.
NOTE: Wash the Textile Pad before putting on the appliance, it prevents a presence of any loose fibres.
FLOOR CLEANING
NOTE: Always vacuum or sweep the floor prior to use the steam cleaner.
IMPORTANT: Do not use the cleaner without the Textile Pad attached to the Head.
NOTE: Do not use the Carpet Glider for cleaning hard floor types.
concept
concept
- Connect the steam cleaner into the mains. Press the power on/off button, the indicator will light blue.
- After a few seconds half of the indicator will turn red, meaning the appliance is ready for use.
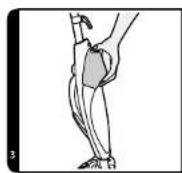
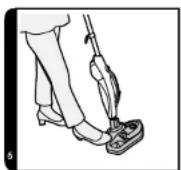
- Put your foot on the head and angle the body of the cleaner downwards (6).
- Press the trigger to release the vapour (7).
- Movethecleanersslowlybackwardsandforwardspayingparticular attention to frequently used areas.
CARPET CLEANING
NOTE: Always vacuum or sweep the floor prior to use the steam cleaner.
IMPORTANT: Do not use the cleaner without the Textile Pad attached to theHead.
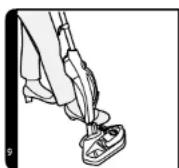
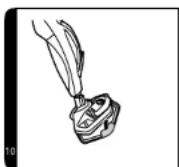
1. AttachtheCarpetGlidertotheHead(10).
2. Connect the steam cleaner into the mains. Press the power on/off button, the indicator will light blue.
3. After a few seconds half of the indicator will turn red, meaning the appliance is ready for use.
4. Put your foot on the head and angle the body of the cleaner downwards (6).
5. Press the trigger to release the vapour (7).
6. Movethecleanersslowlybackwardsandforwardspayingparticular attentiontofrequently used areas.
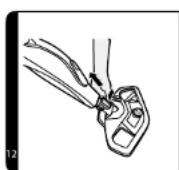
- Press the Manual Cleaner Release Button and remove the steel tube (11).
2.Remove the Head (12). - Press the Water Tank Release Button and remove the Water Tank (3).
NOTE: A tube feeding water from the water tank to the boiler is loaded with abrasive ball. This designisintentional and servestoincreasetheefficiency of wateruse. Itisnormalforthisballtotcreatearattlingsoundinsidethe WaterTankduringoperation.
4.Pull the Water Tank by the cap and open it (4). - Fill the tank with cold tap water. Secure the tank with the cap (4). Do not addanychemicals, detergentsorperfumestothewaterTank.
CAUTION! Use only distilled water to fill the water tank! - Always unplug the appliance when filling with distilled water, emptying or when the appliance is not in use.

REPLACING THE WATER FILTER
The water filter helps to filter minerals contained in water that reduce the efficiency of the steam cleaner. Depending on the frequency of use of the appliance, the filter should be replaced every 80-100 hours. Use only distilled water in the steam mop. If you live in an area with hard water, this water may cause deposits on the heater, which will reduce the performance of the cleaner. Use only distilled water. This will extend the service life of the water filter and heater.
- Put the Water Tank back on the main part of the cleaner and make sure the Water Filter is installed.
- Connect the steam cleaner into the mains. Press the power on/off button, the indicator will light blue.
- After a few seconds half of the indicator will turn red, meaning the appliance is ready for use.
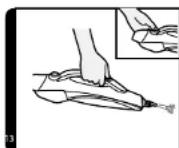
- Press the trigger to release the vapour (on the manual cleaner) (13).
IMPORTANT: Always disconnect the cleaner from the mains prior to removing the Head or handling the appliance. Always ensure the cleaner has fully cooled down before removing the Head.
SOLUTION TANK USE
- Rotate the Solution Tank cap counter-clockwise to open and fill the tank with a solution fluid (8).
-
Put back the Solution Tank cap and screw it clockwise.
-
Press the foot pedal to the ON position to engage the Solution Tank. Press the foot pedal to the OFF position to disengage.
IMPORTANT: To prevent solution from leaking ensure the foot pedal is in the OFF position when the product is not in use.
Empty the solution tank
- Connect the steam cleaner into the mains. Press the power on/off button, the indicator will light blue.
- Remove the Solution Tank (17)
- Rotate the Solution Tank cap counter-clockwise to open.
- Pour out the solution from the tank (17). Put back the Solution Tank cap, screw it clockwise, then put the tank back in its place.
EN
concept
concept
EN
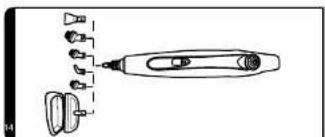
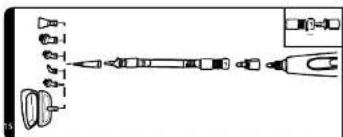
Accessories
Without a hose
- When the Head is removed, different accessories can be attached directly to the steam outlet of the appliance (14). Screw the accessories in clockwise until it is locked in position.
With a hose
- Fit the Hose Adapter to steam outlet of the appliance (15).
- Fit the Hose to the Hose Adapter. Align the orientation marks with the hole on Hose Adapter and rotate clockwise until hose is locked in position (15).
- Slide the Release Button on the bottom side of the hose away from the appliance, rotate the hose counterclockwise and gently pull out of the appliance.
- Fit the Extension Adapter to the hose nozzle and rotate it clockwise until it locks in its place securely.
- Fit other small accessories to the Extension Adapter, then rotate clockwise until it is locked in position (15).
Extension Adapter - Use it on heavily soiled areas such as showers, kitchens.
Window Squeegee - Use it on windows and mirrors for a smear free cleaning.
Upholstery Pad- Put the Upholstery Pad on the Window Squeegee and use it for sofa and chair upholstery cleaning.
Round Brush - Use it for stubborn grease and dirt deposits.
Wire Brush - Use it on oven grills and racks.
Angled Nozzle (45^) - Use it on hard to reach areas such as taps etc.
Scrapper - Ideal for dried residue in ovens or for defrosting freezers.
60
CP2000 CP2010
CLEANING AND MAINTENANCE
IMPORTANT: ALWAYS ENSURE THE CLEANER HAS FULLY COOLED DOWN BEFORE PERFORMING ANY MAINTENANCE TASKS.
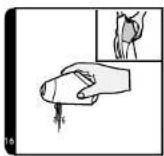
Emptythe Water Tank
- Disconnect the cleaner from the mains and ensure the appliance has cooled down.
- Release the Water Tank from the main body of the cleaner (3).
- Remove the Water Tank cap.
- Pour out any excess water from the tank [16]. Put the cap back and secure it.
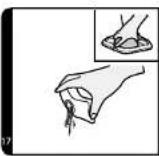
Changing and washing the Textile Pad
- Disconnect the cleaner from the mains and ensure the appliance has cooled down.
- Remove the Carpet Glider first if necessary and then remove the Textile Pad from the Head (18).
- Wash the Textile Pad in a washing machine with a mild detergent at maximum temperature of 40^
IMPORTANT: Do not use bleach or fabric softener when washing the Textile Pad.
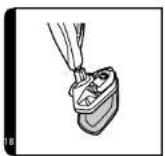
Changing the Water Filter
The cleaner is fitted with a water filter. If you live in an area with hard water the filter will discolour over time. Depending on the water hardness and frequency of use the filter should be changed every 6 months.
1. Disconnect the cleaner from the mains and ensure the appliance has cooled down.
2. Release the Water Tank from the main body of the cleaner (3).
3. Remove the Water Filter from the appliance (19). Replace the old filter with a new one.
4. Put the Water Tank back.
NOTE: The state of the filter will affect the cleaner performance.
TROUBLESHOOTING
If a problem occurs, look at this chart first. If that does not help, contact a service centre.
The steam trigger does not work.
Check the appliance is connected to the mains.
- Check the power cord.
No vapour comes out of the steam nozzle.
- Maybe there is no water in the water tank.
- Maybe the water tank is not properly installed in the appliance.
The textile pad does not clean.
The pad may be too saturated with dirt and needs to be washed. See the Maintenance section.
61
concept
concept
FAQ
How long does it take the device to be ready? Approximately 25 seconds.
Can I use the device on all floor surfaces? It can be used on all hard floor types such as marble, ceramic, stone, linoleum, sealed hardwood floors and parquet.
Does the device generate the steam automatically? No, to generate steam you should press the steam trigger under the handle.
Can I put detergents or other chemicals inside the water tank? No, it may damage the device.
What should I do if I live in an area where water is very hard? You can use filtered water or you will have to change the filter more often. If a weak steam flow comes out from the nozzle, check the opening of the steam nozzle whether it is clogged with a scale.
When is it time to change the water filter? How do I notice? It depends on the water hardness. Normally every 6 months. You may notice that the yellow colour inside of the filter has faded a bit.
How long will full water tank last before needing to be refilled? Approximately 12 minutes if the trigger id pressed continuously.
Is the mop washable? Yes, it can be washed by hand or in a washing machine with a mild detergent at max temperature of 40^ . Do not use bleach or fabric softener.
How often should I replace the mop? It depends on different factors above all how hard the floor is. The best way to identify when to change the mop with a new one is when the mop is still dirty after having been washed or if you notice that it doesn't perform like it used to.
SERVICE
Maintenance of a more extensive nature or repair, which requires interference with the internal parts of the product, mustbeperformedbyaprofessionalservice.
ENVIRONMENTAL PROTECTION
Recycle packaging materials and old appliances rather than throwing them away. The appliance box may be disposed of at a sorted waste collection point.
- Deliver polyethylene (PE) plastic bags to a waste collection facility for recycling.
Recycling the product at the end of its service life

A symbol on the product or its packaging indicates that this product should not be disposed of ashouseholdwaste.Itmustbetaketankocollectionpointauthorisedforrecyclingelectric and electronic equipment. By making sure this product is disposed of properly, you will helppreventnegativeeffectsontheenvironmentandhumanhealththatwouldotherwiseresultfrominappropriatedisposalthisproduct.Youcanlearnmoreaboutrecyclingthisproductfromyourlocalauthorities,ahouseholdwastedispasalservice,orinthestore whereyoupurchasedthisproduct.
This product meets all the basic EU regulation requirements that relate to it.
Changes to the text, design and technical specifications may occur without prior notice and we reserve the right to make these changes.
CP2000 | CP2010
DANKSAGUNG

m = 311 ;

m = 311 ;

m = 311
www.www.my-concept.com
Importer:
CONCEPT POLSKA sp. z o.o.
ul Ostrowskiego 30, 53-238 Wroclaw
tel:+48713390444,fax:713390414
www.www.my-concept.com
concept concept
LV GARANTIJAS TALONS
Pardevja pienakums ir iepazistin paterejau ar izstradajuma parametriun undarbibu, kari pinibuna un salasami azpildit garantijas talonu izstradajuma pardosanas diena.
Ja nav pareizi aizpildita vai neparelzi noradita nepieclesama informaci par izstradajumu, garantjas talons in ierndiges!
Razotaj (vai piegadatajs) garantijas laika perioda in atbdigis par izstradajuma tehniskajam ipaibam un ta darbub, ko paredz attieigas tehniskas normals un nosacijumi.
Garantijas laiks ilgst 24 meneus, sakot no pardosanas datuma, ja zatozats (vii piegadatats) na voteiests citadi.
Pateretajam garantijas iietvoros in tiesibas uz bezmaksas, savlacigiu a pinigiu izstradajuma bojajumov norestanu (skat. taliak) vai, ja tas nav neadekvati attiechia pret bojajuma raksturu, tiesibas uz izdradajuma bojato detalu mainju. Tiesibas uz izstradajuma mainju vai pirkanas liquma nosacijum neieverosanu var izmantor tikai tad, ja ir izpilditi visi likumigie nosacijumi, um tikai gadijura, ja izstradajums nav ticis parmerigi nolietens vai bojats.
Garantija ir spekā, ja ir izpilditi sadi nosacijumi:
- ieveroti iztradajuma apkalipes instrukcjjas noradiji
- uzadtri visi pirkumu aplicneinoske dokumenti un speka esosa garantijas apiclaea.
Ar pretenzijam par boajjumi pameterejam jagirezas tirdzniecibas vieta, kur izdradjiams tika legadiats. Bojajumu loabanu var pietelkit taja paşa tirdzniecibas vieta, kur tika tegadiats izdradjiams, vai ari kada no autorizjetami servisa centriemi, kur saraksrs Ir noradits iepakojumi sastlava, vai ari varat to alrast timeka vietne: www.my-concept.com.
Bridinajums pateretajam
Pateretaja pienakums ir saglabat garantjas talonu un pirkuma apiecinosu dokumenta (kases kecu, pavadzimui u.c.), sa kpiepina produktia agadi Sudzi budgijma izdradajums rupigi jizifira un jaiesaio ta, lai, to transportejot uz autorizeto servisa centru, tus netitku bojats.
Razotajam (vai piegadatajam) ir tiesibas neesget izdevumus, kis ia sirtiti ar nepamatotu sudzibu, un pierasit no sudzibas isjesedzja nepiecesalem atidizbu par izdevumiem, kas ir rudasies, noskaidrojt sudzibas pamatojumu.
Tiesibas uz iztradajuma bezmakaslas labosanu,
sektriftvi, iztradajuma atdostanu, na vjespjiams
jzimantol sados nadjiimos:
- ja nav tikiu ieveroti instalacijas, ekspulatacijas vai apkalpes nosacjumi, kas ir noraditi izstradajuma lietoanas instrukci:
- ja bolajums ir radies mehaniskas, termiskas vai kimiskas iedaribas, issavienojuma vai elektrotikla parsprtguma realutata;
- ja boajums irrads treies trespersonas profesionales rificbasresultata;
- ja bojajums ir radies dabas katastrofas rezultata;
ja boajumis ir radies nepieitkeosas vai nepimerotas apriques del, kas priruntan ar lietosianus instruktciu, tastarp boajumi, ka ir izrajsus adus vida visi nogulnss;
- ja izraddajuma vai tā dajas nolotujms ir radies parasitas losanidasresultata;
- ja apisides laukumu krasas maiju vai virsumkrajejumu ir izraisijus parastara lietošana;
- ja Izskata vail focjikas mainaju Irzaisilis saules starojums, siltums, edens vui das cugnolnes;
- ja atseviskam iztradajuma dadam, piem. akumulatoram, spuldzem ut, ir beidzes kalposanas laiks.
To, kada i attieciga boajjuma izelsme, ir lesigs noveriet vienigi razotajs, piegadatajs, autorzetais servisa centres vai tiesu eksperts nevis peardejevs jat pateretajs.
Paterejam nav tiesibu oz bojatjam reserves dalam, kas i prainmatis garantjas remonta gaita.
Ja pateretajns neievero pirksanas liguma nosacijumus, ta piienakums ir atodt izdradjumu visa piliniba,tostarp aprikojumu un Dokumentus, kas tikusi piegadati kopa ar izdradjumu.
Uz davanam, kuras var tikt pievionetas izstradajumam pardosanas laika un kuru cena no pateretaja nev ikeaksa, garantija neatticas.
The manufacturer (or importer) is responsible for ensuring the product complies with the requirements of applicable legal regulations as well as those of the relevant technical standards. Moreover, they are responsible for ensuring the product has the properties the manufacturer described in documents related to the goods or those reasonably expected by the customer with regard to the nature of the goods or based on advertising produced by the manufacturer, and further they are responsible for ensuring the product is fit for the purpose proposed by the manufacturer or that a product of the same type is normally used for.
The quality warranty term is 24 months from product takeover by the customer.
The warranty does not apply to wear and tear caused by regular use. The customer shall not be entitled to any warranty claims if, prior to taking the product over, they knew the product contained a defect or if the defect is attributable to the customer.
The warranty specifically does not apply:
- if the product installation, operation and service conditions stipulated in the product operating manual have not been adhered to.
- to malfunctions caused due to mechanical, heat or chemical damage, short circuit, over voltage or incorrect installation.
to malfunctions caused by an inexpert third-party intervention,
to malfunctions caused by natural disaster,
to malfunctions caused by insufficient or inappropriate maintenance in violation of the operating manual, including malfunctions caused by water and other sediments, - to changes in colour of the heating surface or to scratching of the surface caused as a result of using the products in an unusual manner,
to appearance and functional changes caused by exposure to sunlight, thermal radiation of water and other sediments, - if the service life of certain product parts expires, e.g. for accumulators, bulbs, etc.
The warranty does not apply to any products and services provided along with the product (gifts, promotional articles, etc.).
Filing a complaint
A complaint against a product defect must be filed as soon as identified, yet no later than before the end of the warranty term.
The customer must file a product complaint with the dealer from which they have purchased the product, or with any authorised service centre, a list of which is included in the product package, or available at www.my-concept.com.
While filing a product complaint, the product must be duly cleaned and securely packed so as to prevent any damage during its transport to an authorised service centre, where relevant, unless the product is delivered in person.
The customer must submit proof of having concluded a purchase contract for the product by producing the receipt.
While filing their complaint, the customer must indicate the noted defect and identify the preferred complaint application method.
Complaints processing
As long as the noted defect may be removed, the user has the right to have the defect duly removed free of charge on a timely basis.
Where such a procedure is not reasonable with regard to the nature of the defect, the user may require to be supplied a new defect-free product (replacement), or, where the defect applies to a part of the product only, replacement of the part concerned. However, if replacement of the product or any part thereof is not proportionate with regard to the nature of the defect, especially if the defect can be removed without undue delay, the customer has the right to have the defect removed free of charge.
If the noted defect is not removable, or if the customer becomes entitled to replacement of the product or a part thereof, yet the replacement is not possible, for example due to the product having been sold out, the customer has the right to return the product (withdrawal from the contract).
The customer shall have the right to a new product (replacement) or to replacement of a part of the product even if the defect can be removed, provided they cannot properly use the product due to repeated occurrence of the defect or due to a high number of such defects. In such a case, the customer also has the right to return the product (by withdrawing from the contract).
If the product is not returned the customer does not withdraw from the contract), or if the customer does not apply the right to a new defect-free product (replacement), to replacement of a part thereof or to repair of the product, they may request a reasonable discount. The customer also has a right to a reasonable discount if a new defect-free product cannot be supplied to them, or if a product part cannot be replaced or the product repaired unless the situation is remedied within a reasonable time limit, or if remedying the situation would create major discomfort on the part of the customer.
The seller, authorised service centre or a staff member authorised by them must decide about each complaint immediately or within three business days in complicated cases. This term does not include a reasonable period of time, depending on the type of product concerned,
required for the defect to be assessed by an expert. A complaint, including defect removal, must be dealt with without any undue delay, yet no later than within 30 calendar days of the complaint filing date, unless the seller and the customer agree on a later deadline.
On returning the product (withdrawing from the contract) the customer must return any accessories and documents supplied along with the product.
The customer does not have the right to keep the defective parts and components of the product replaced as part of a repair of the product.
This shall be without prejudice to any other rights the customer may have in relation to the purchase of the product.
Remark: Complaints against products damaged in transport are governed by the carrier's complaints procedure.
Manufacturer
Jindrich Valenta - Concept
Vysokomatska 1800, 565 01 Chocen Czech Republic
el. ^+ 420465471400 fax +420 465473034
Company ID No.13216660
http://www.servisymmy-concept.lz.com/ www.my-concept.com
Product data
| Model: | |
| Production number: | |
| Date of purchase: Seal and signature of vendor: | |
concept concept
DE GARANTIEBEDINGUNGEN
Garantie
www.www.my-concept.com
Produktdetails
CONDITIONS DE GARANTIE
Garantie
Jindrich Valenta - Concept Czech Republic
Vysokomytska 1800, 565 01 Chocen
Tel. +420 465 322 895, Fax: +420 465 473 304
www.my-concept.cz
SK
ELKO Valenta - Slovakia, s.r.o.
Hurbanova 1563/23, 911 01 Trenčin
Tel.: +421 326 583 465, Fax: +421 326 583 466
www.my-concept.sk
PL
CONCEPT POLSKA Sp. z o.o.
Ostrowskiego 30, 53-238 Wroclaw
Tel.: +48 71 339 04 44, Fax: 71 339 04 14
www.my-concept.pl
HU
ASPICO KFT
H-9027 Gyor,Hutohaz u.25.
Tel.: +36 96 511 291, Fax: +36 96 511 293
info@aspico.hu


- NAVOD NA OBSLUHU
- Zlozenie
- IMPORTANT SAFETY INSTRUCTIONS
- concept
- If you fail to follow the manufacturer's instructions, repairs cannot be recognized as a warranty.
- Household use only
- PRODUCT DESCRIPTION
- OPERATING INSTRUCTIONS
- Assembly
- Use
- BEFORE THE FIRST USE
- FLOOR CLEANING
- CARPET CLEANING
- REPLACING THE WATER FILTER
- SOLUTION TANK USE
- Empty the solution tank
- Accessories
- Without a hose
- With a hose
- CLEANING AND MAINTENANCE
- Emptythe Water Tank
- Changing and washing the Textile Pad
- Changing the Water Filter
- TROUBLESHOOTING
- FAQ
- SERVICE
- ENVIRONMENTAL PROTECTION
- Recycling the product at the end of its service life
- DANKSAGUNG
- Importer:
- concept concept
- LV GARANTIJAS TALONS
- Bridinajums pateretajam
- Filing a complaint
- Complaints processing
- Manufacturer
- DE GARANTIEBEDINGUNGEN
- Garantie
- CONDITIONS DE GARANTIE
Brand : Concept
Model : CP2010
Category : Steam cleaner