
Viaggio 22 Shuttle - Car seat PEG PEREGO - Free user manual and instructions
Find the device manual for free Viaggio 22 Shuttle PEG PEREGO in PDF.
| Product type | Child car seat group 2/3 |
| Brand | Peg Perego |
| Model | Viaggio 22 Shuttle |
| Approval category | Universal (belt) / Semi-Universal (with ISOFIX) |
| Approval standard | UN/ECE R44/04 |
| Child weight | 15 to 36 kg (approx. 3 to 12 years) |
| Installation | 3-point safety belt (static or retractor) or integrated ISOFIX connectors |
| Shoulder belt height adjustment | Yes, by button and adjustable strap |
| Armrests | Yes, integrated, not removable |
| Cup holder | Yes, removable, attaches to sides |
| Cover | Removable, hand washable (no bleach, no dryer) |
| Plastic parts cleaning | Damp cloth, no solvents |
| Safety - ISOFIX installation indicator | Green = correct, red = incorrect |
| Spare parts and repairs | Contact Peg Perego after-sales service |
| Manufacturer | PEG-PÉREGO S.p.A. |
| Dimensions (approx.) | Not provided in the manual |
Frequently Asked Questions - Viaggio 22 Shuttle PEG PEREGO
User questions about Viaggio 22 Shuttle PEG PEREGO
0 question about this device. Answer the ones you know or ask your own.
Ask a new question about this device
Download the instructions for your Car seat in PDF format for free! Find your manual Viaggio 22 Shuttle - PEG PEREGO and take your electronic device back in hand. On this page are published all the documents necessary for the use of your device. Viaggio 22 Shuttle by PEG PEREGO.
USER MANUAL Viaggio 22 Shuttle PEG PEREGO
EN Instructions for use
FR Notice d'emploi
natural_image
Illustration of a person wearing a car seatbelt and red belt, seated in a black seat (no text or symbols)EN•The child is secured by means of the safety belt of the car. The child seat simply leans against the car seat.
EN•The child is secured by means of the safety belt of the car. The child seat is fixed in place with the ISOFIX connectors of the car.
natural_image
Illustration of a portable shower pool with labeled parts (a, b), no text or symbols present.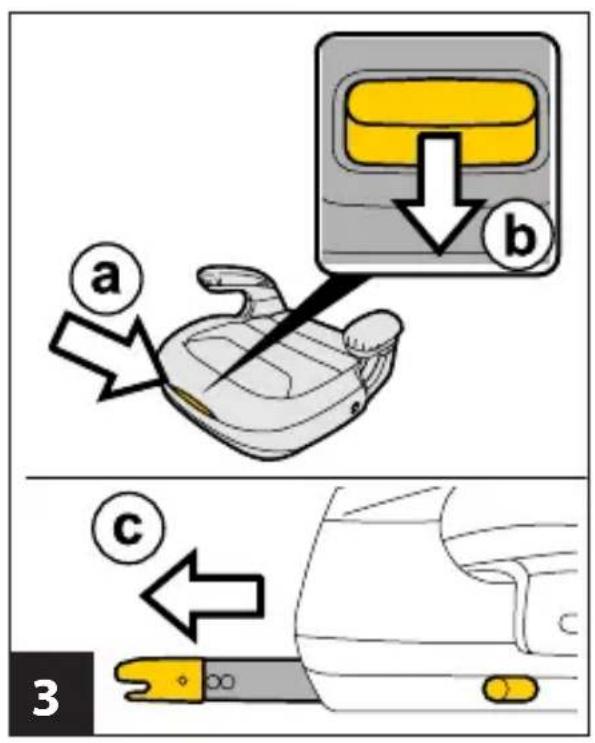


natural_image
Line drawing of a car seatbelt device with an arrow pointing to the seat area (no text or symbols)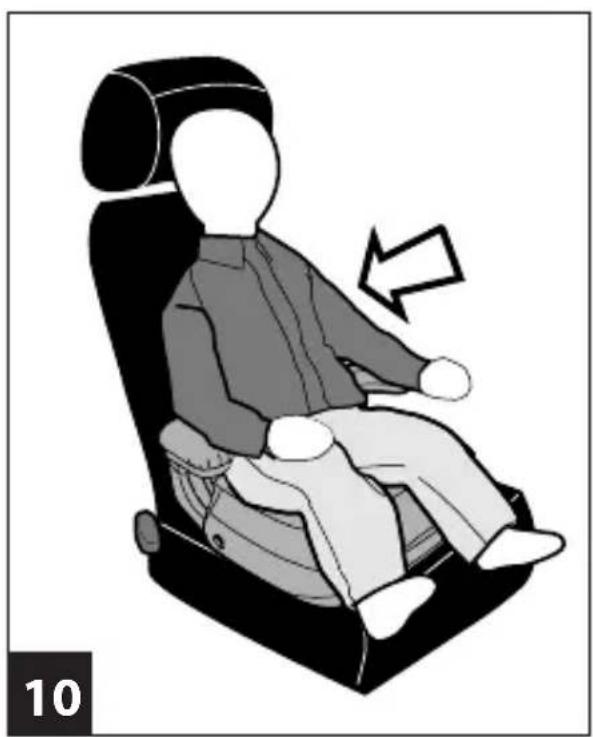
natural_image
Illustration of a person seated in a car seat with a directional arrow indicating movement (no text or symbols)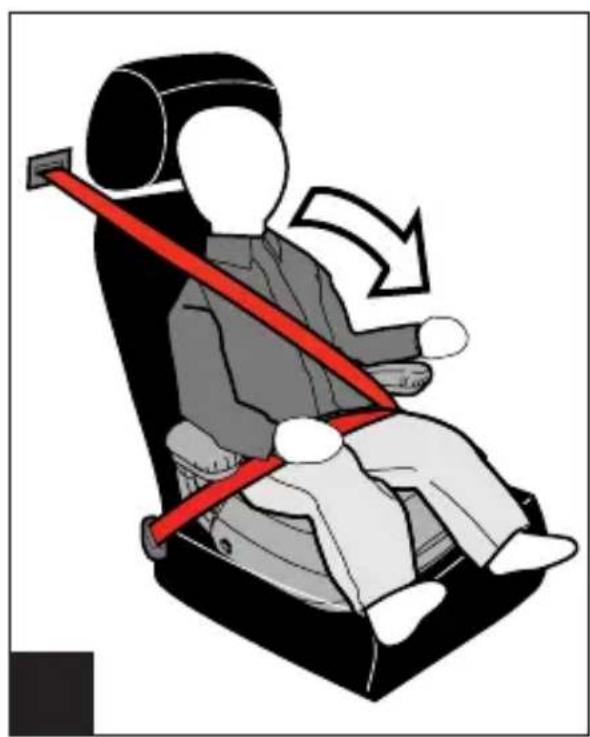
natural_image
Illustration of a person seated in a car seat using a red belt, with an arrow indicating motion (no text or symbols)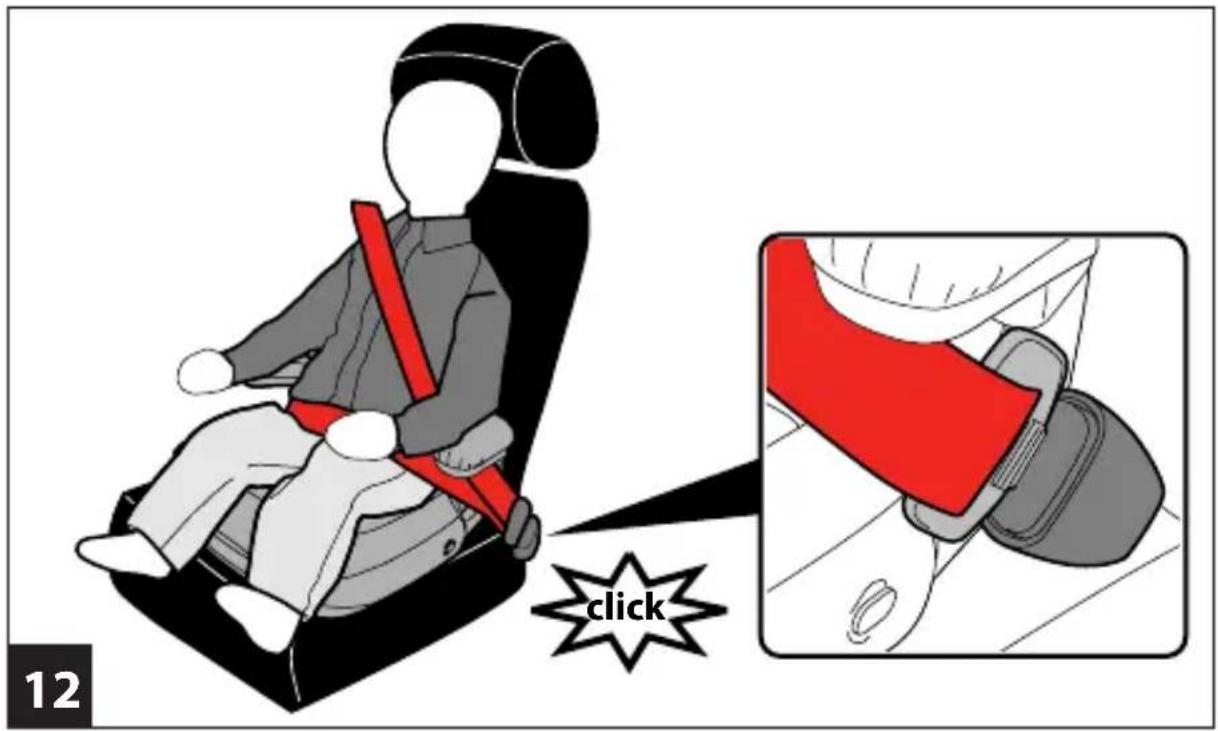
natural_image
Mechanical assembly diagram showing a lever mechanism inside a housing frame (no text or symbols)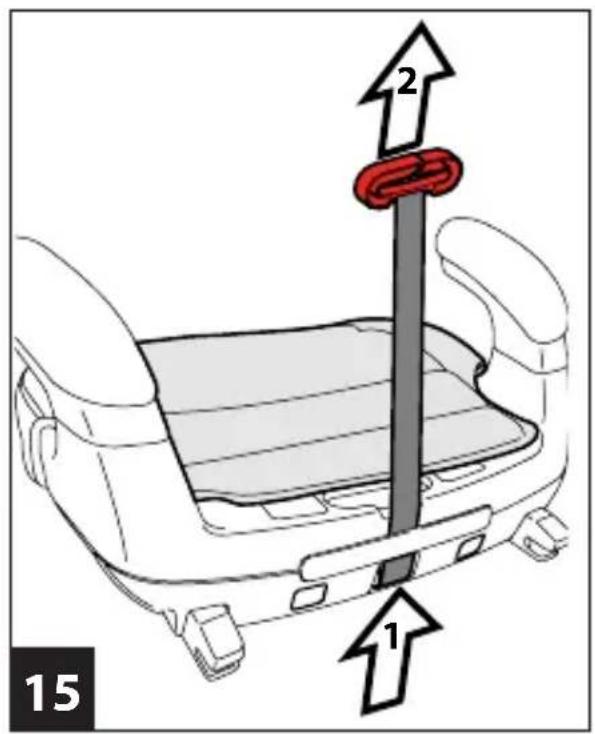
natural_image
Line drawing of a car seat with handle and seatbelt (no text or symbols)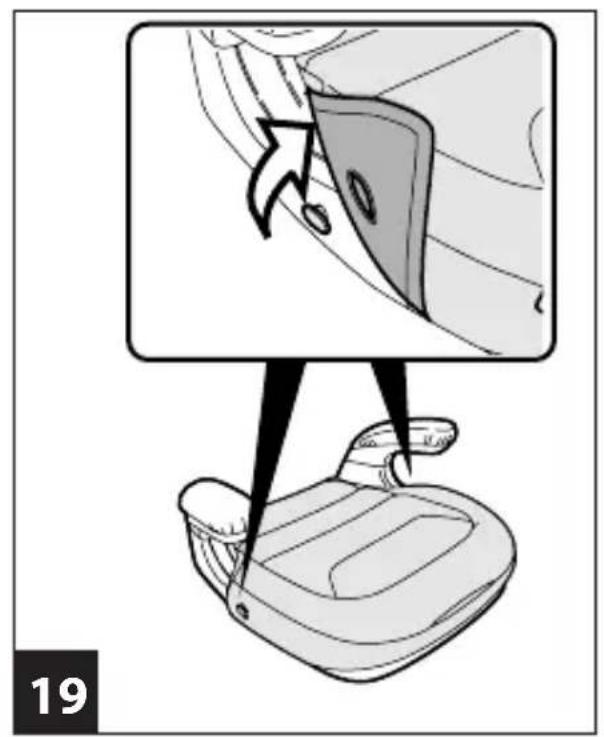
natural_image
Technical diagram of a car seat assembly showing front and side views (no text or labels)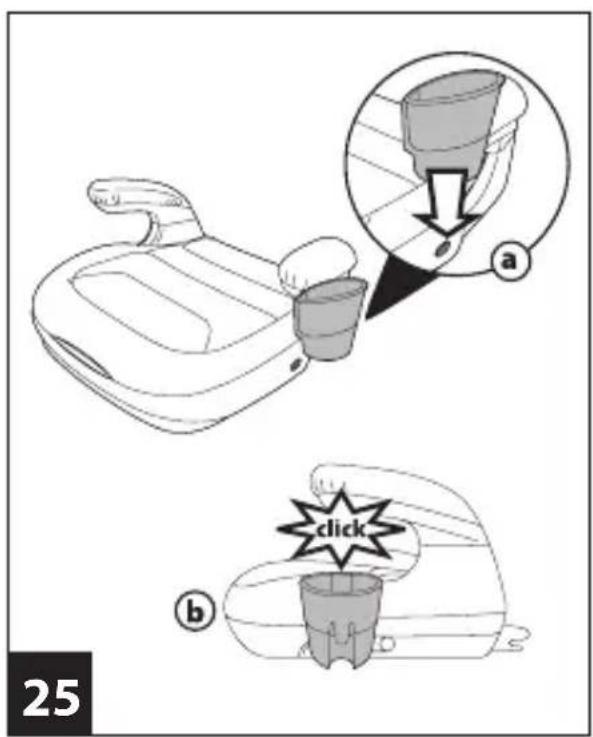
Viaggio 2-3 Shuttle
natural_image
Simple line drawing of a rectangular container with a slot, no text or symbols presentnatural_image
Line drawing of a flexible strap with two connectors and a loop (no text or symbols)
natural_image
Simple line drawing of a container and a lid, no text or symbols presentIT• Ricambi disponibili in più colori da specificare nella richiesta.
EN• Spare parts available in different colours to be specified when ordering.
FR• Pièces de rechange disponibles en plusieurs couleurs à spécifier dans la demande.
DE• Ersatzteile in mehr Farben vorhanden, die in der Anfrage spezifiziert werden müssen.
ES• Repuestos disponibles en otros colores que se especificarán en el pedido.
BR-PT• Peças de reposição disponíveis em cores alternativas a serem especificadas no pedido.
NL• Reserveonderdelen verkrijgbaar in meerdere kleuren, bij bestelling te specificeren.
DK• Reservedele kan leveres i flere farver som bør specificeres ved bestillingen.
Fl• Varaosia saatavana eri värisinä: ilmoita väri tilauksessa.
CZ• U náhradních dílů, které jsou k dispozici ve více barvách, je nutné na objednávce specifikovat příslušnou barvu.
SK• Pri náhradných dieloch, ktoré sú k dispozícii vo viacerých farbách, je potrebné pri objednávke špecifikovať želanú farbu.
HU• A tartalék alkatrészek különböző színekben elérhetők, melyeket rendeléskor kell kiválasztani.
SL• Rezervni deli so na voljo v več barvah, ki jih je treba navesti pri naročilu.
RU• Запчасти имеются различных цветов, необходимый указать в запросе.
TR• Siparişte belirtilen değişik renklerdeki yedek parçalari mevcuttur.
HR/SRB/MNE/BiH• Zamjenski dijelovi dostupni u više boja što je potrebno specificirati u narudžbi.
PL• Części zamienne fotelika są dostępne w różnej kolorystyce.
EL• Ανταλλακτικά διαθέσιμα σε διάψορα χρώματα. Προσδιορίστε όταν παραγγείλετε.
Thank you for choosing a Peg-Pérego product.
Car seat, Viaggio 2-3 Shuttle "Universal" category with straps
- Complies with the EU regulation UN/ECE R44/04, for children from 15 to 36 kg (around 3 to 12 years).
- Suitable for most car seats but not all.
- The car seat can be correctly installed if your vehicle's instruction and maintenance handbook reports that it is compatible with the "Universal" restraint systems.
- This car seat is classified "Universal" if it meets standards that are more demanding than those for previous models that did not report the type of approval label.
• The car seat can only be used in approved cars, fitted with a 3-point static seat belt or winder, approved in accordance with standard UN/ECE R16 or equivalent regulations. - IMPORTANT: the use of a 2-point seat belt or lap belt is forbidden.
Car seat, Viaggio 2-3 Shuttle "Semi Universal" category, with straps + ISOFIX
- Complies with the EU regulation UN/ECE R44/04, for children from 15 to 36 kg (around 3 to 12 years).
- This car seat is classified as "semi-
universal" and can be fitted on the seats of car models specified in the list attached to these instructions.
- The car seat can only be used in approved cars, fitted with a 3-point static seat belt or winder, approved in accordance with standard UN/ECE R16 or equivalent regulations.
- IMPORTANT: the use of a 2-point seat belt or lap belt is forbidden.
WARNING
- Carefully read the instructions before use and keep them in a safe place for future reference. Failure to closely follow the car seat installation instructions will put your child at risk.
• Viaggio 2-3 Shuttle must be assembled and installed by adults, keeping children away from the product.
- When travelling in the vehicle, never hold your child in your arms or allow him/her to sit outside of the car seat. In the event of sudden braking, even at low speeds, the child might easily be flung forward.
- Do not insert fingers into the mechanisms.
- Pay particular attention to luggage or other objects that could injure the child sitting in the car seat in case of an accident.
- Do not use installation methods other than those recommended because they could cause the seat to detach.
- Never leave your child unattended in the car seat: watch him even when he is sleeping.
- Never remove your child from the seat when the vehicle is moving.
- Check that the car seat is not blocked by a moving part of the seat or a door.
- Adjust the height and tension of the belts, checking that they adhere to the child's body without being too tight. Check that the seat belt is not twisted and the child cannot unfasten it.
- Do not use the car seat without the lining. This lining cannot be replaced by other lining that has not been specifically approved by the manufacturer because it is an integral part of the seat and is essential for safety purposes.
- Do not remove or replace the white part in polystyrene under the seat, as it is essential for safety purposes.
- If in doubt, contact the manufacturer or retailer of this car seat.
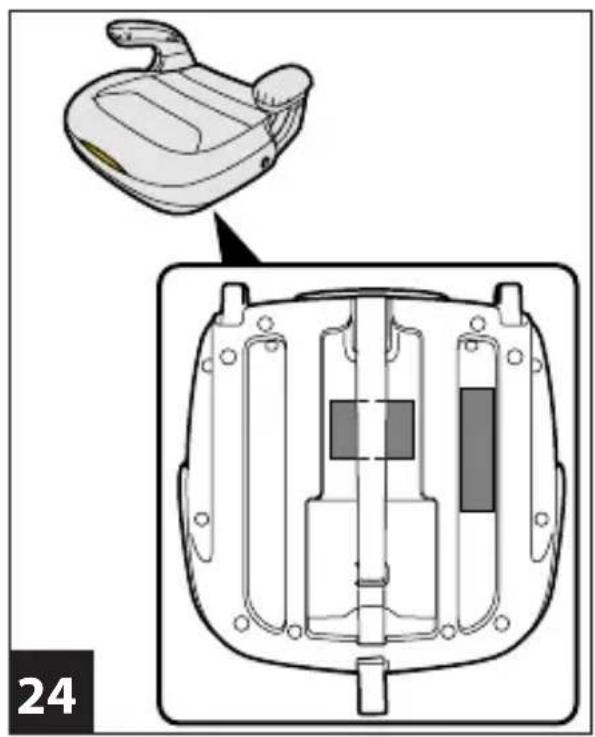
- This article is progressively numbered through its certification label, located on the bottom of the seat (fig. 24).
- Do not remove the adhesive and sewn labels. Removal of these labels could result in the product not complying with the law.
- Do not alter the product.
- Contact the post-sales service for repairs, the replacement of components and information on the product; contact information is provided on the last page of this manual.
- When not in use, the car seat can be left in the vehicle provided it is attached to the vehicle's Isofix attachments; otherwise, remove it from the vehicle: in the event of an accident it could be
dangerous for other passengers.
- Do not use accessories that have not been approved by the manufacturer or competent authorities.
- Never put hot drinks in cup holders (if any).
- Do not remove or replace the white polystyrene part under the seat, in the backrest and in the headrest, as it is essential for safety purposes.
- Do not use the child car seat if it is broken or if there are missing parts, or if it has been subjected to heavy impacts as a result of accidents, as it may have suffered structural damage which is not visible but is extremely hazardous.
- If using a second-hand product, make sure it is a recent model, comes with instructions, and is fully functional in all parts. An obsolete product may not conform to safety standards, due to natural ageing of materials and updating of regulations. If you have any doubts, contact the manufacturer's customer service centre.
1 IMPORTANT
- "Viaggio 2-3 Shuttle": this car seat, Group 2-3, must be installed in the direction of travel.
- Do not install "Viaggio 2-3 Shuttle" on seats that are not in the direction of travel or are transversal to the direction of travel.
- It is always advisable to fit the car seat on the rear vehicle seat and on the passenger's side.
- If the car seat is installed on the front seat, it is advisable to place it as far as possible from the dashboard.
Product components
- Inspect the content of the package and contact the post sale Customer Care if some items are missing.
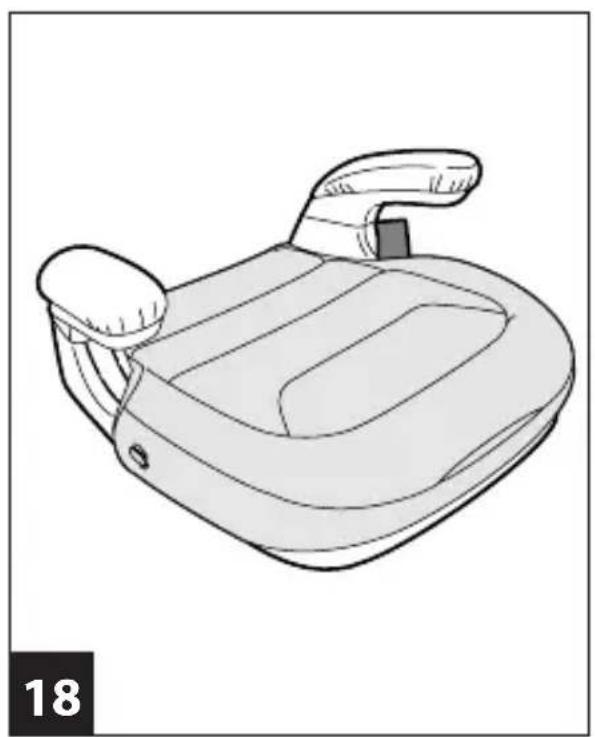
_The car seat includes: seat with armrests (a) and adjustable shoulder belt, located under the seat's packaging (b).
How to attach the car seat to the vehicle if you own a car with Isofix attachments
This type of attachment can be used if your car is fitted with Isofix hooks. Otherwise, go to the next section. For further information on the availability of these hooks and their location, refer to the vehicle's instruction manual.
Fastening the attachments guarantees greater stability and safety in the vehicle, but cannot replace the restraining function of the vehicle's seat belts.
-
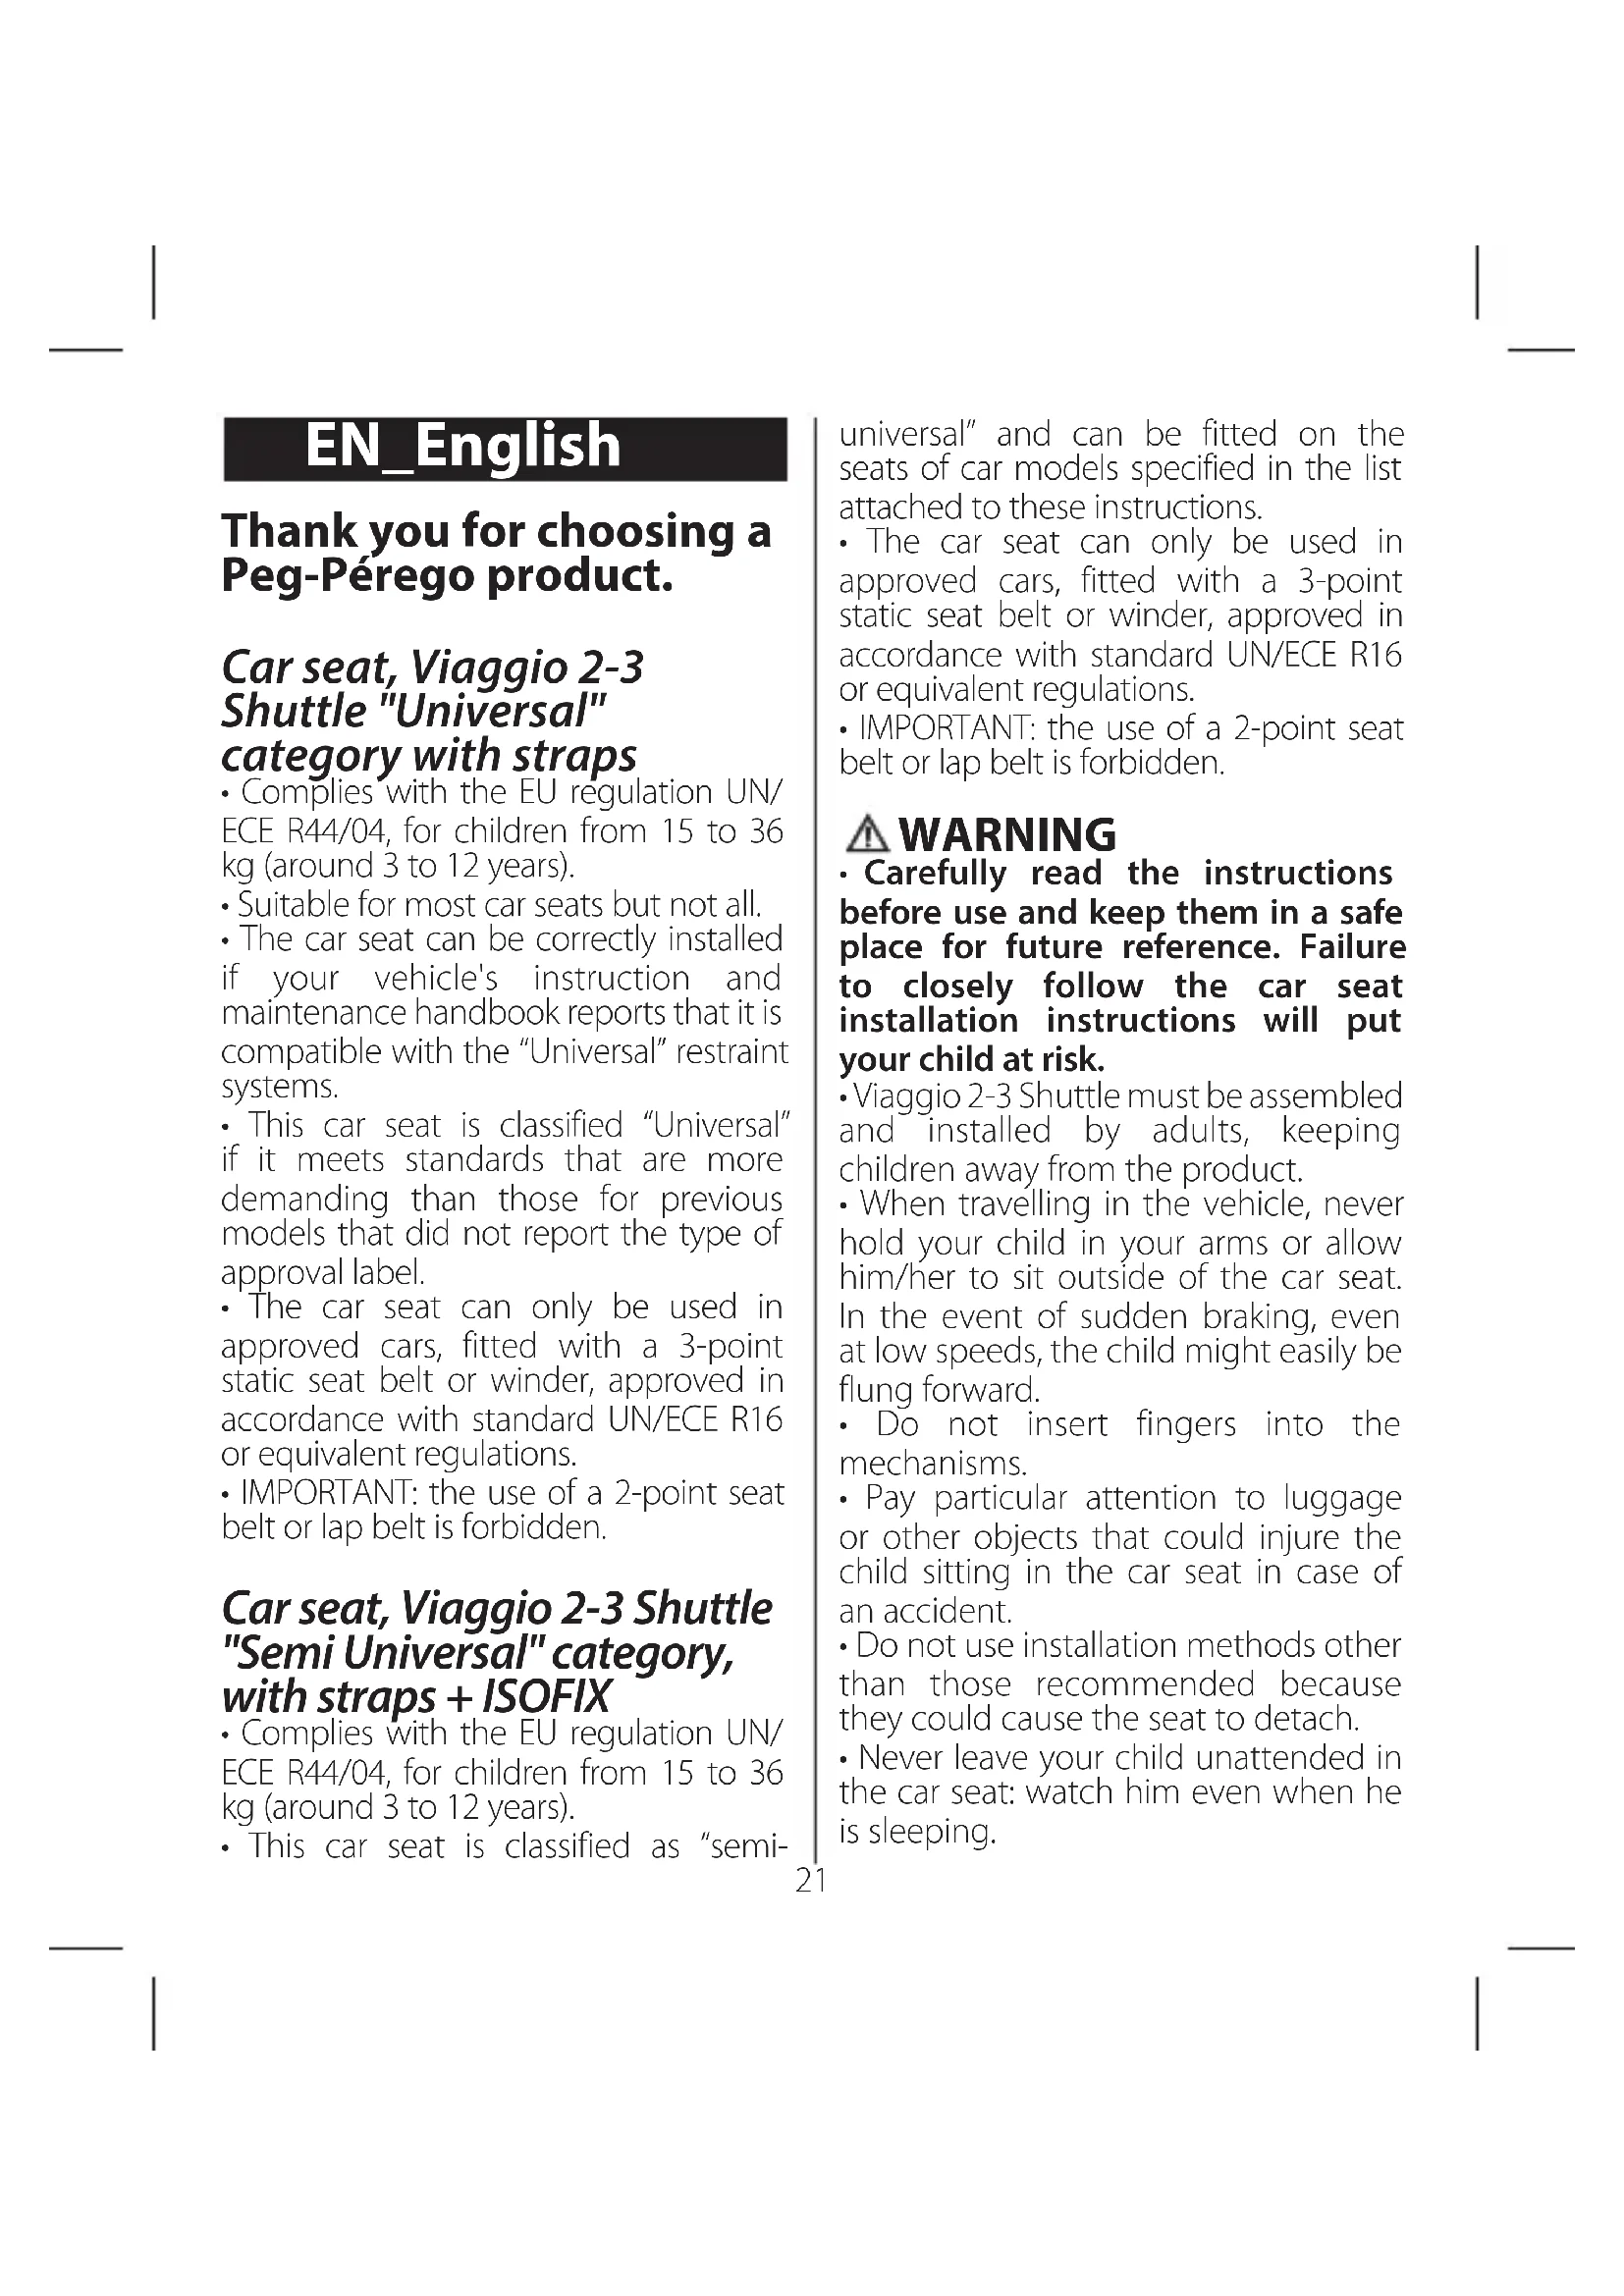
To lengthen the connectors inside of the seat, turn the handle on the front of the seat, placing your hand into the slot shown in yellow (fig_a) pulling it longitudinally towards you (fig_b). The connectors will automatically be expelled (fig_c). Repeat to ensure that the connectors have been expelled at the same time and are extended fully.
-
Fix the connectors of the car seat to the Isofix hooks in the car itself, verifying that they "click" into place.
- ⚠️ IMPORTANT: The vehicle's Isofix hooks and the seat are correct coupled when a green signal appears above the connectors (fig_a). A red signal indicates that the attachments have NOT been coupled correctly (fig_b).
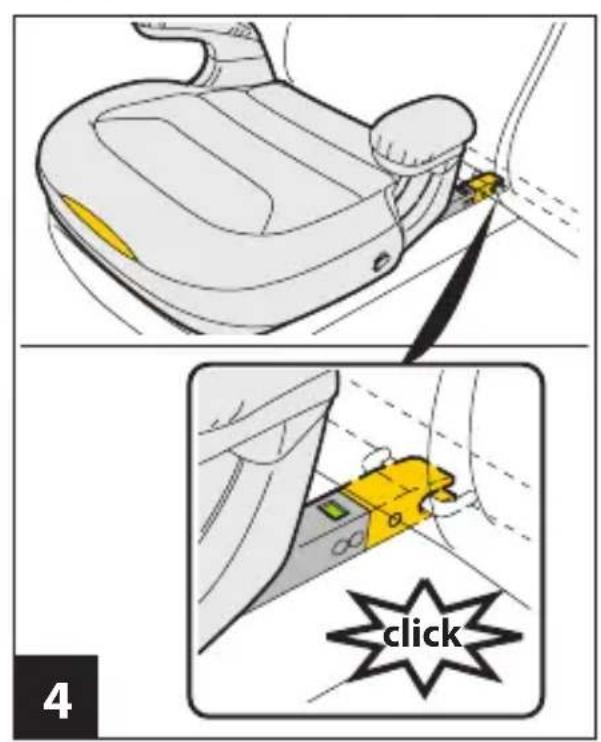
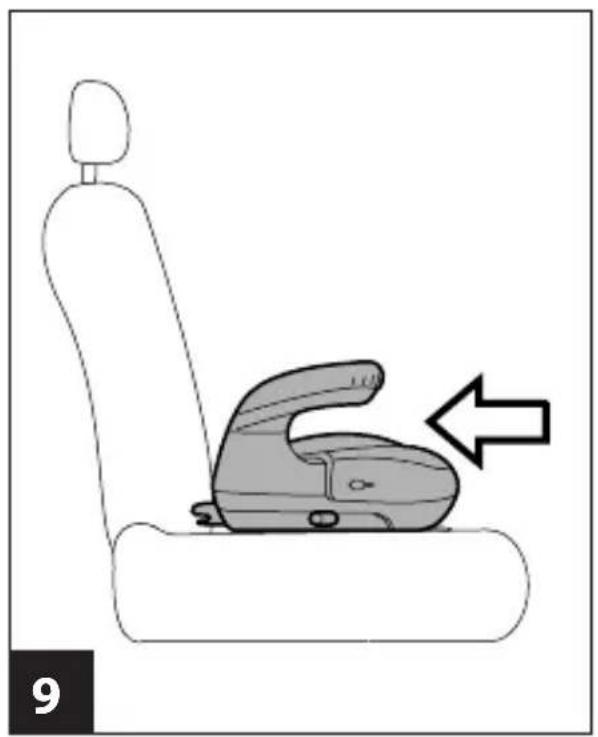
- Once the seat is correctly hooked, pull the central handle again (fig_a) and simultaneously push it against the seat (fig_b).
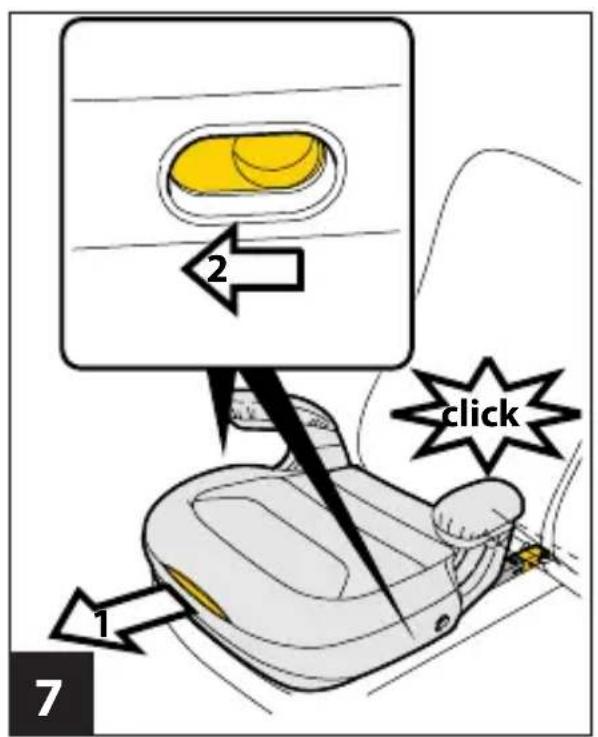
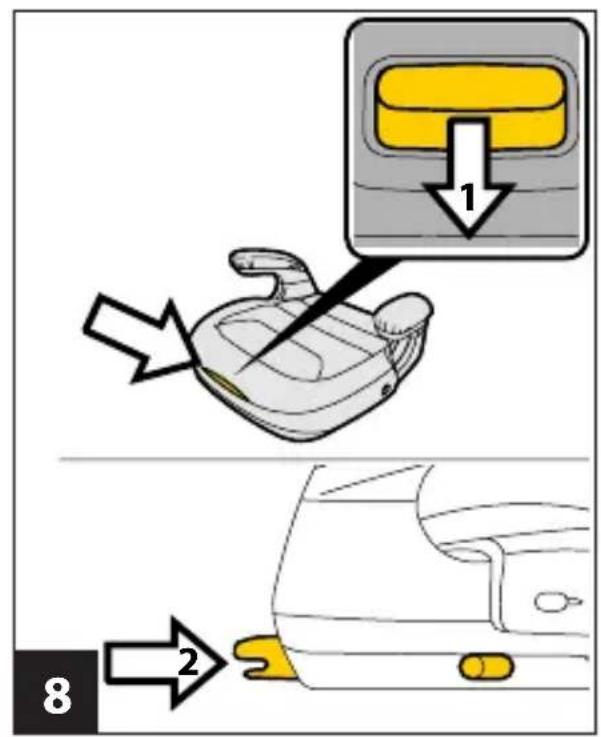
- To release Viaggio 2-3 Shuttle from the seat, pull the handle (1) until the connectors are completely exposed. By doing this, the yellow release buttons will be visible on the sides of the base; pull the two buttons (2) until you hear the click of the connectors opening. You can the proceed to remove the seat.
- To reposition the connectors within the seat, pull the lever (1) while pushing one of the two connectors (2) until they are barely visible.
How to attach the car seat to the vehicle if you own a car with no Isofix attachments
- Place the Viaggio 2-3 Shuttle on the vehicle seat in the direction of travel, leaving the connectors within the seat.
How to secure your child with Viaggio 2-3 Shuttle
- Strap the child in as in the figure,
ensuring that the seat does not move during this operation.
11• Secure your child with the vehicle seat belt as shown in the figure.
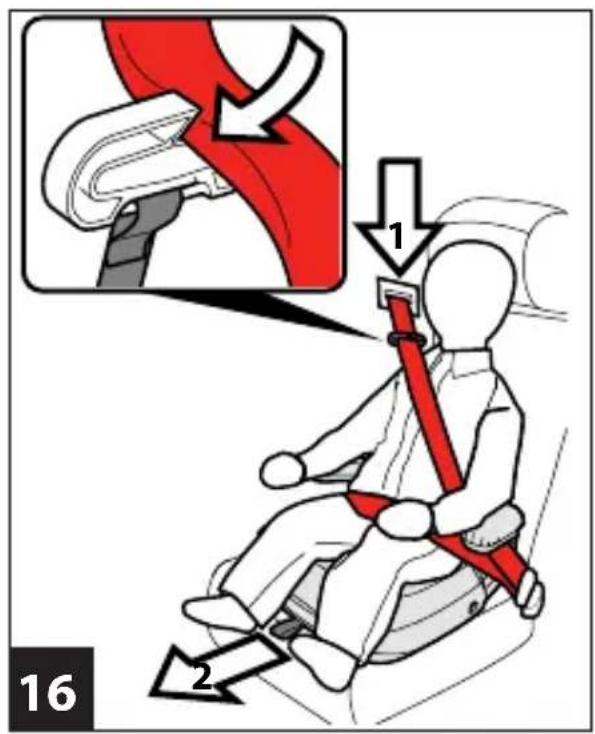
12. Fasten the seat belt, ensuring that it clicks into place. Position the two parts of the seat belt as shown in figure; both the waist and shoulder straps must pass under the armrest.
13. To complete the installation process into the car, the adjustable shoulder loop can be used. To remove the loop from its location under the fabric of the seat, follow the instructions below.
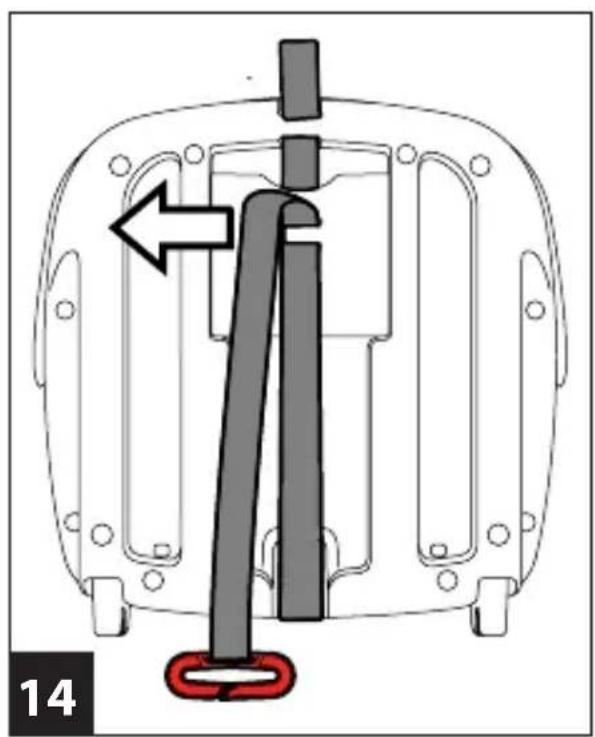
14. Remove the strap from the loop under the car seat.
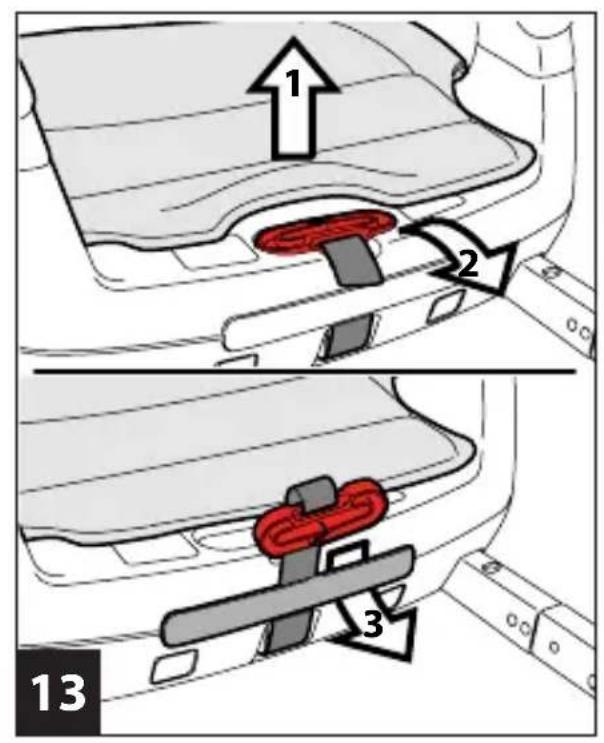
15· Extend the strap for the shoulder loop by pressing the button located behind the car seat (1) and pulling it upwards (2).
16. Insert the seat belt into the shoulder loop (as in the box), then lower the shoulder loop (1) by pulling the belt (2).
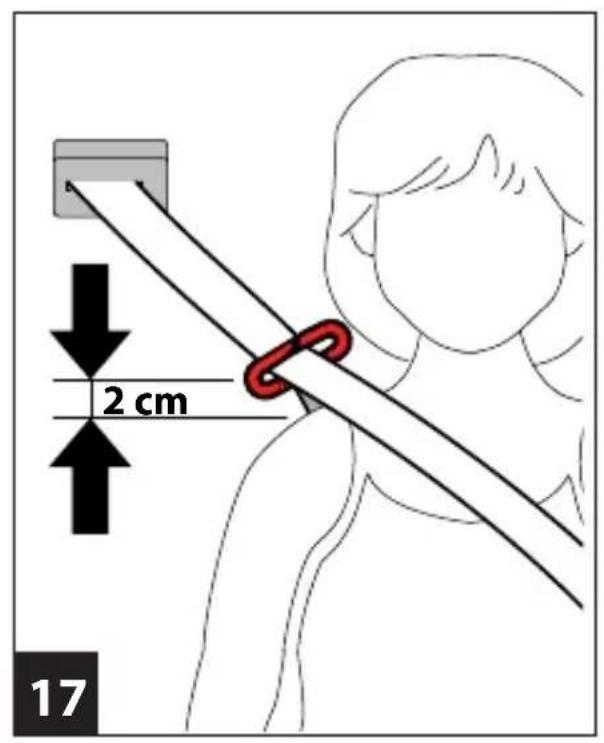
17. The correct height of the shoulder loop is just above the shoulder level.
How to remove the fabric lining
The fabric seat of the Viaggio 2-3 Shuttle can be removed for cleaning. The armrests are not removable.
18• Follow the washing instructions on the packaging label (shown in the figure).
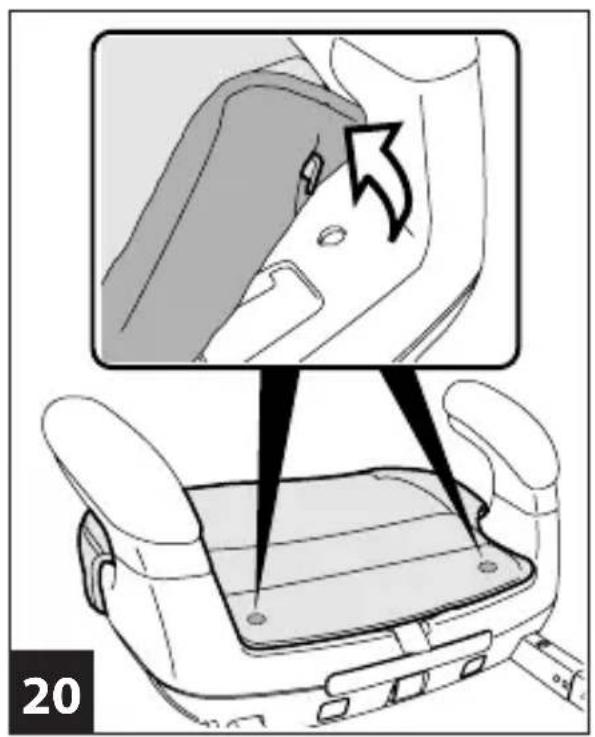
19. Unhook the two eyelets from the buttons on the sides of the car seat base.
20. Release the two hooks from the seat base.
Maintenance and cleaning of the fabric lining
Brush the fabric parts to remove dust.
- Follow the washing instructions on the label sewn onto the seat's lining (fig. 18).
- Do not use chlorine bleach.
- Do not iron.
- Do not dry clean.
- Do not remove stains with solvents.
- Do not tumble dry.
Repositioning the car seat cover:
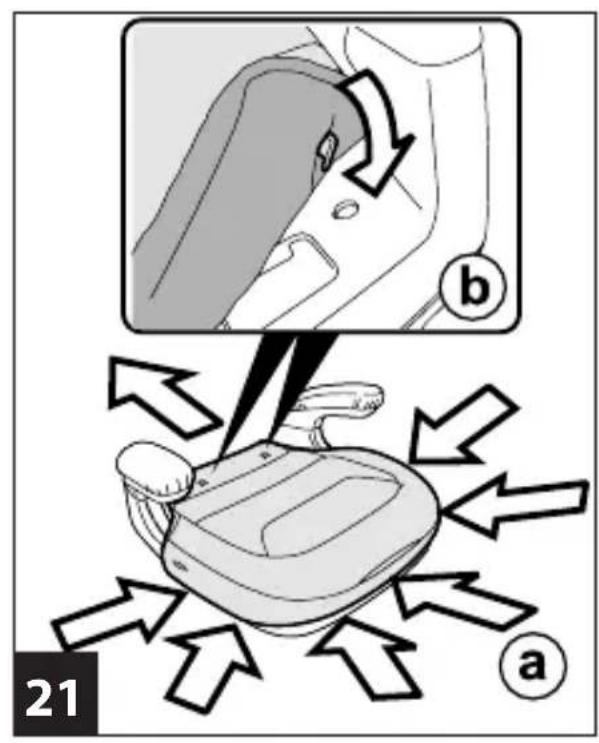
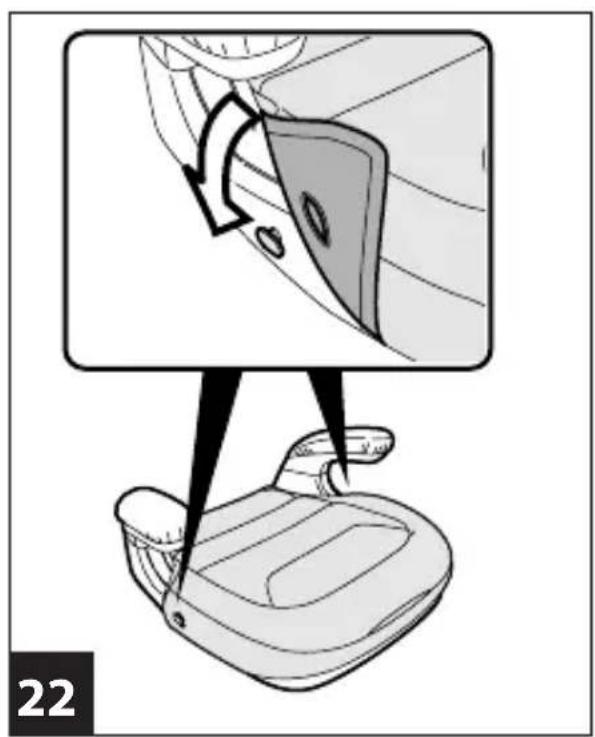
21· Fit the cover from the front of the car seat by inserting it into its housing (fig_a); insert the two hooks of the seat in the appropriate holes near the rear of the car seat (fig_b).
22• Hook the two side slots to the buttons on the sides.
Transport
- Viaggio 2-3 Shuttle is easily carried using a handy transport handle.
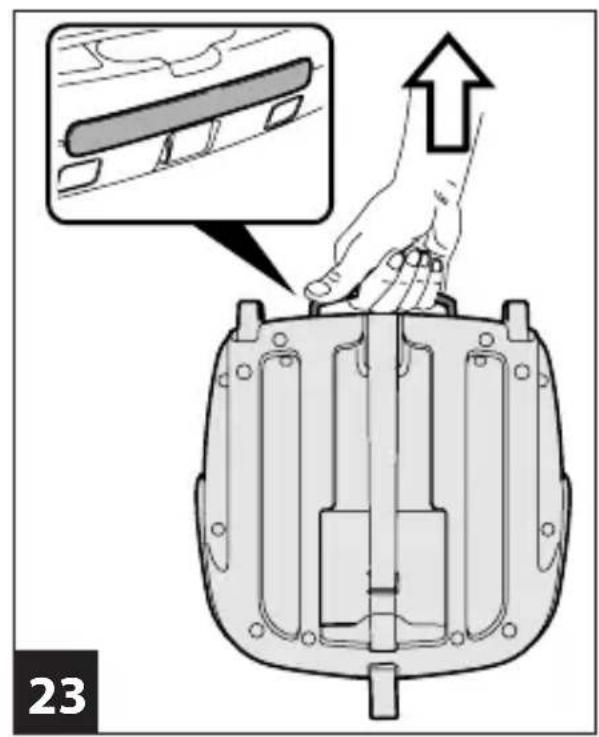
Serial numbers
- On its underside, Viaggio 2-3 Shuttle contains information about its product name, production date and serial number, along with its orange certification label.
Cup holders
25• The car seat comes with a cup holder. Place the cup holder on the mushroom button, present on either side of the seat (fig_a), and secure it in place (fig_b).
Product cleaning
This product requires minimal maintenance.
- Cleaning and maintenance must only be carried out by adults.
- It is advisable to keep all the moving parts clean.
- Clean the plastic parts periodically with a damp cloth. Do not use solvents or similar substances.
- Brush the fabric parts to remove dust or clean following the instructions provided in the dedicated section.
- Do not clean polystyrene parts with solvents or other similar products.
- Protect the product from atmospheric agents, such as humidity, rain or snow. Extended exposure to sunshine can cause colour changes in many materials.
- Store the product in a dry environment.
How to read the type approval labe
This paragraph explains how to interpret the type approval label (orange label).
- The label is double because this car seat is type approved for two types of installation in vehicles:
- Hooking system with three-point static or inertia-reel belt and connectors integrated into the car seat (the SEMI-UNIVERSAL marking indicates that the car seat is
compatible with the ISOFIX system).
- Fixing system with a 3-point static seat belt or winder (the UNIVERSAL marking indicates that the car seat is suitable for vehicles with this kind of seat belt).
• The top of the label displays the trademark of the manufacturing company and the name of the product.
• The letter E in a circle indicates the European type approval mark and the number indicates the country that issued the type approval (1: Germany, 2: France, 3: Italy, 4: Netherlands, 11: Great Britain, 24: Ireland). - Type approval number: if it starts with 04, this indicates the fourth amendment (the one currently in force) of Regulation R44.
• Reference standard: UN/ECE R44/04.
• Production serial number: on issue of type approval, each car seat is personalised with its own number.
PEG-PÉREGO S.p.A.
Peg-Pérego SpA adopts a quality management system certified by TÜV Italia Srl in accordance with the ISO 9001 standard. Peg Pérego can make changes at any time to the models described in this publication for technical or commercial reasons.
Peg-Pérego after-sales service
If any parts of the item get lost or
damaged, only use genuine Peg-Pérego spare parts. For any repairs, replacements, information on the products and sales of genuine spare parts and accessories, contact the Peg-Pérego Assistance Service and state the serial number of the product, if present.
tel. 0039/039/60.88.213
Toll free number 800/147.414
(contactable by landline)
fax 0039/039/33.09.992
All intellectual property rights on the contents of this manual are the property of PEG-PEREGO S.p.A. and are protected by the laws in force.
FR\_Français


- Viaggio 2-3 Shuttle
- Thank you for choosing a Peg-Pérego product.
- Car seat, Viaggio 2-3 Shuttle "Universal" category with straps
- Car seat, Viaggio 2-3 Shuttle "Semi Universal" category, with straps + ISOFIX
- WARNING
- IMPORTANT
- Product components
- How to attach the car seat to the vehicle if you own a car with Isofix attachments
- How to attach the car seat to the vehicle if you own a car with no Isofix attachments
- How to secure your child with Viaggio 2-3 Shuttle
- How to remove the fabric lining
- Maintenance and cleaning of the fabric lining
- Repositioning the car seat cover:
- Transport
- Serial numbers
- Cup holders
- Product cleaning
- How to read the type approval labe
- PEG-PÉREGO S.p.A.
- Peg-Pérego after-sales service
- FR\_Français
Brand : PEG PEREGO
Model : Viaggio 22 Shuttle
Category : Car seat