
RVC1530IPTG - Vacuum Cleaner RYOBI - Free user manual and instructions
Find the device manual for free RVC1530IPTG RYOBI in PDF.
| Product Type | Wet and dry vacuum cleaner |
| Brand | RYOBI |
| Model | RVC1530IPTG |
| Supply Voltage | 220-240 V ~ 50 Hz |
| Rated Power | 1500 W |
| Maximum Power Outlet | 2000 W |
| Tank Volume | 30 L |
| Hose Diameter | 35 mm |
| Hose Length | 3.5 m |
| Dust Filter | Washable cartridge filter |
| Liquid Filter | Foam filter |
| Protection Rating | IPX4 |
| Maximum Suction | 20 kPa |
| Maximum Airflow | 50.5 dm³/s |
| Maximum Pressure | 21.5 kPa |
| Power Cord Length | 4 m |
| Weight | 7.5 kg |
| Functions | Dust and liquid vacuuming, blowing, power tool connection |
| Safety | Float safety valve, automatic shut-off in case of overflow |
| Included Accessories | 2 extension tubes, floor nozzle, crevice tool, round brush, 3.5 m hose, casters, cloth pre-filter, cartridge filter, foam filter, dust bag |
Frequently Asked Questions - RVC1530IPTG RYOBI
User questions about RVC1530IPTG RYOBI
0 question about this device. Answer the ones you know or ask your own.
Ask a new question about this device
Download the instructions for your Vacuum Cleaner in PDF format for free! Find your manual RVC1530IPTG - RYOBI and take your electronic device back in hand. On this page are published all the documents necessary for the use of your device. RVC1530IPTG by RYOBI.
USER MANUAL RVC1530IPTG RYOBI
natural_image
Line drawing of a vacuum cleaner with handle and control panel (no text or symbols)
| Important! | It is essential that you read the instructions in this manual before assembling, maintaining and operating the product. |
| Attention! | Il est essentiel que vous lisiez les instructions contenues dans ce manuel avant d'assembler, d'entretenir et d'utiliser le produit. |
| Achtung! | Es ist wichtig, dass Sie vor Zusammenbau, Wartung und Benutzung des Produktes die Anweisungen in dieser Anleitung lesen. |
| ¡Atención! | Resulta fundamental que lea este manual de instrucciones antes de realizar el montaje, el mantenimiento y de utilizar este producto |
| Attenzione! | E' importante leggere le istruzioni contenute nel presente manuale prima di montare il prodotto, svolgere le operazioni di manutenzione sullo stesso e metterlo in funzione. |
| Let op! | Het is van essentieel belang dat u de instructies in deze gebruiksaanwijzing leest voor u het product monteert, onderhoudt en gebruikt. |
| Atenção! | É fundamental que leia as instruções deste manual antes da montagem, manutenção e operação do aparelho. |
| OBS! | Det er vigtigt, at man læser instrukserne i denne brugsanvisning, inden man samler, vedligeholder og betjener produktet. |
| Observera! | Det är viktigt att du läser instruktionerna i manualen före montering, användning och underhåll av produkten. |
| Huomio! | On tärkeää, että luet tämän käsikirjan ohjeet ennen tuotteen kokoamista, huoltoa ja käyttöä. |
| Advarsel! | Det er viktig at du leser instruksjonene i denne manualen før sammensetning, vedlikehold og bruk av produktet |
| Внимание! | Необходимо прочитать инструкции в данном руководстве перед сборкой, обслуживанием и эксплуатацией этого изделия. |
| Uwaga! | Koniecznie należy przeczytać instrukcje zawarte w tym podręczniku przed montażem, obsługą oraz konserwacją produktu. |
| Dûležité upozornění! | Neinstalujte, neprovádějte údržbu ani nepoužívejte tento výrobek dříve, než si přečtete pokyny uvedené v tomto návodu. |
| Figyelem! | Fontos, hogy a termék összeszerelése, karbantartása és használata előtt elolvassa a kézikönyvben található utasításokat. |
| Atenție! | Este esențial să citiți instrucțiunile din acest manual înainte de asamblare, efectuarea întreținerii și operarea produsului. |
| Uzmanību! | Ir svarīgi izlasīt šīs rokasgrāmatas instrukcijas pirms uzstādīšanas, apkopes un preces darbināšanas. |
| Dèmesio! | Prieš surenkant, prižiūrint ir naudojant gaminį, būtina perskaityti šiame vadove pateiktus nurodymus. |
| Tähtis! | Enne masina kokkupanekut, hooldamist ja kasutama hakkamist tuleb käesolevas juhendis esitatud juhised kindlasti läbi lugeda. |
| Upozorenje! | Vrlo je važno da ste prije sklapanja, održavanja i rada s ovim proizvodom pročitali upute u ovom priručniku. |
| Pomembno! | Pomembno je da pred montažo vzdrževanjem in uporabo tega izdelka preberete navodila v tem priročniku. |
| Upzornenie! | Je dôležité, aby ste si pred montázou, údržbou a obsluhou produktu prečitali pokyny v tomto návode. |
| Важно! | Изключително важно е да прочетете инструкциите в настоящото ръководство, преди да преминете към сглобяване, поддръжка или работа с продукта. |
| Важливо! | Дуже важливо, щоб ви прочитали інструкції в цьому керівництві перед складанням, обслуговуванням та експлуатацією цієї машини. |
| Dikkat! | Ürünün montajını, bakımını yapmadan ve ürünü çalıştırmadan önce bu kılavuzda yer alan talimatları okumanız önemlidir. |
| Просохн! | Еівали полú σημαντικό να διαβάσετε τις οδηγίες στο παρόν εγχειρίδιο πριν συναρμολογήσετε, συντηρήσετε ή λειτουργήσετε το προϊόν. |
Subject to technical modification | Sous réserve de modifications techniques | Technische Änderungen vorbehalten | Bajo reserva de modificaciones técnicas | Con riserva di eventuali modifiche tecniche | Technische wijzigingen voorbehouden | Com reserva de modificações técnicas | Med forbehold for tekniske ændringer | Med förbehåll för tekniska ändringar | Tekniset muutokset varataan | Med forbehold om tekniske endringer | могут быть внесены технические изменения | Z zastrzeżeniem modyfikacji technicznych | Změny technických údajů vyhrazeny | A můszaki módosítás jogát fenntartjuk | Sub rezerva modificațiilor tehnice | Paturam tiesības mainīt tehniskos raksturlielumus | Pasiliekant teisę daryti techninius pakeitimus | Tehnilised muudatused võimalikud | Podloæno tehniëkim promjenama | Tehnične spremembe dopuščene | Právo na technické zmeny je vyhradené | Подлежи на технически модификации | Є об'єктом для технічних змін | Teknik değişiklik hakkı saklıdır | Утю тнв єтифúлаξη τεχνικών троттопоїσεων


text_image
Technical diagram of a vacuum cleaner with numbered parts and labeled parts, including a model and component details.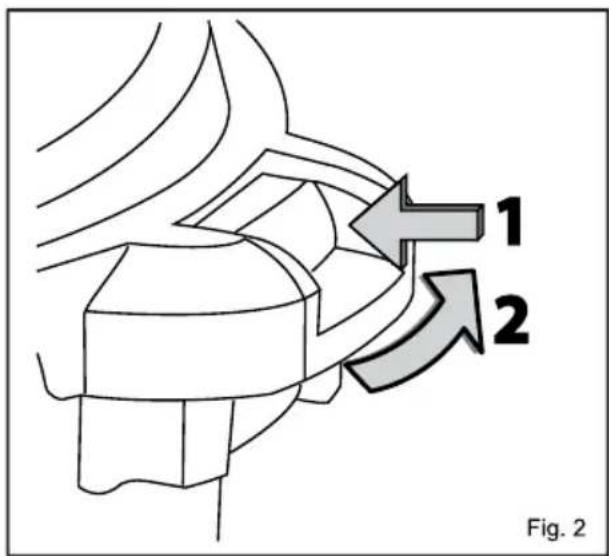
text_image
1 2 Fig. 2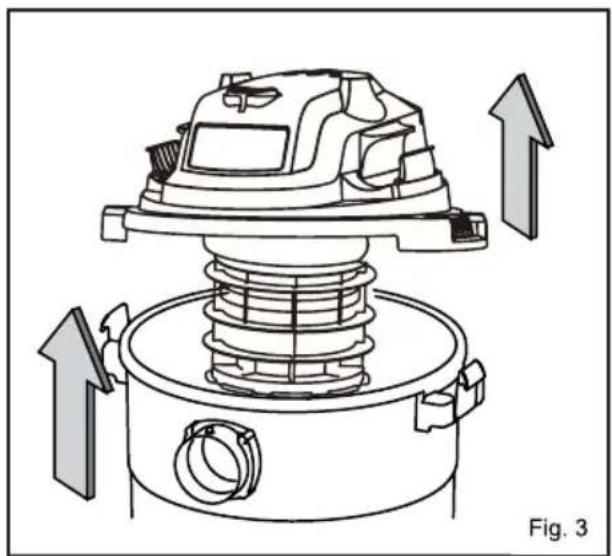
natural_image
Technical line drawing of a mechanical device with upward arrows indicating motion or force, labeled 'Fig. 3' (no text or symbols on the diagram itself)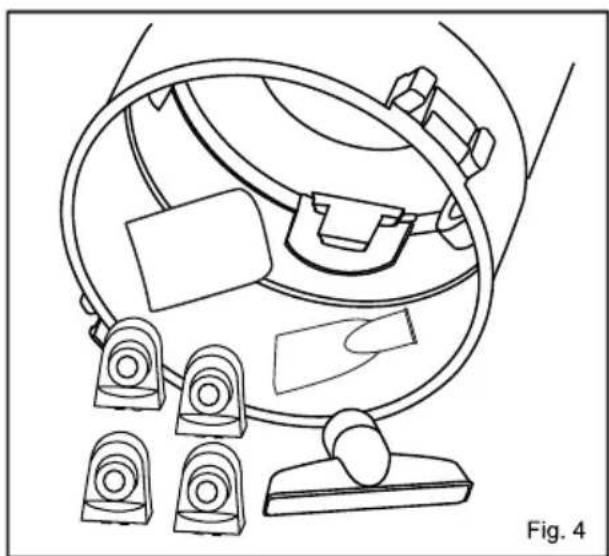
natural_image
Line drawing of a mechanical device with multiple mounting brackets and a central housing (no text or symbols)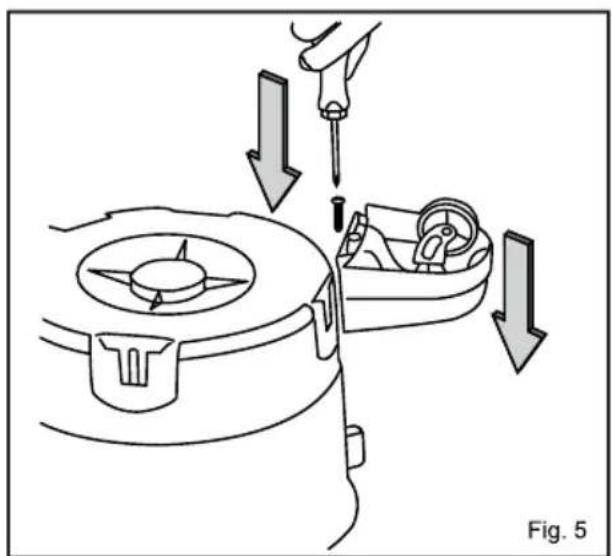
natural_image
Diagram showing a hand using a screwdriver to adjust a mechanical component, with arrows indicating downward motion (no text or symbols)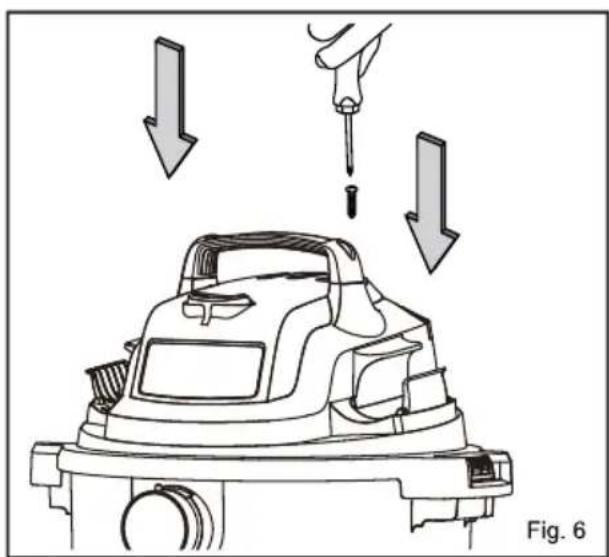
natural_image
Diagram of a mechanical device with downward arrows indicating force or movement, no text or symbols present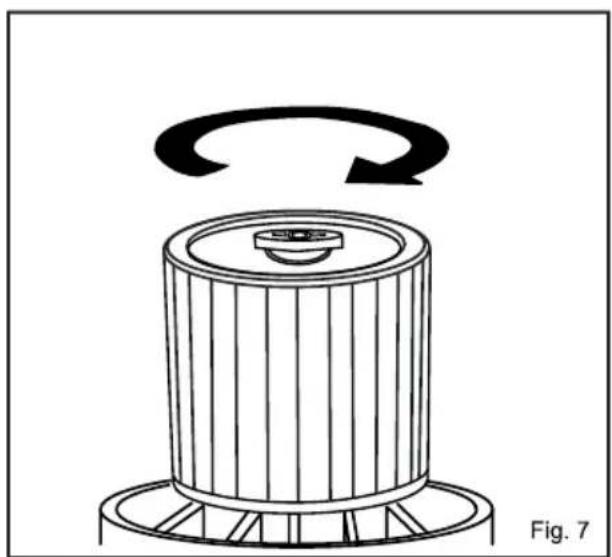
natural_image
Diagram of a mechanical component with a rotating arrow indicating rotational motion (no text or symbols)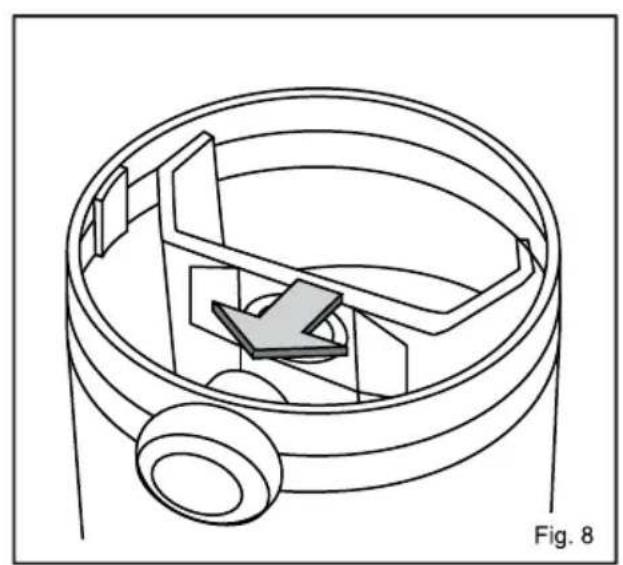
natural_image
Technical line drawing of a mechanical component with internal structure and labeled Fig. 8 (no text or symbols on the diagram itself)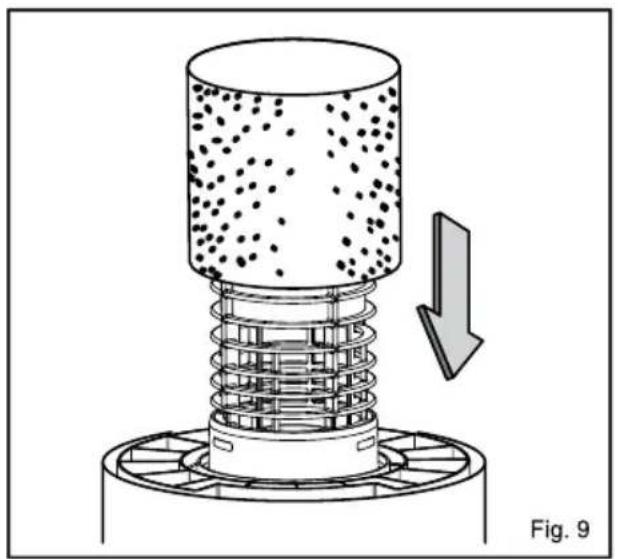
natural_image
Diagram of a mechanical press or spring assembly with a downward arrow indicating compression or disassembly (no text or symbols present)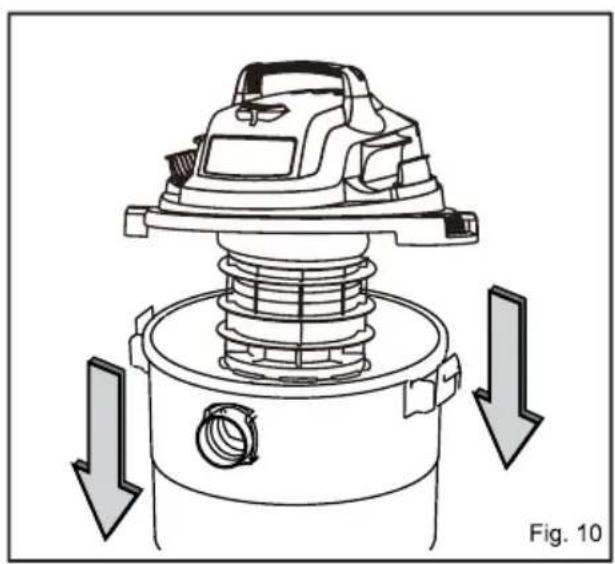
natural_image
Technical diagram of a vacuum cleaner assembly with downward arrows indicating motion (no text or symbols)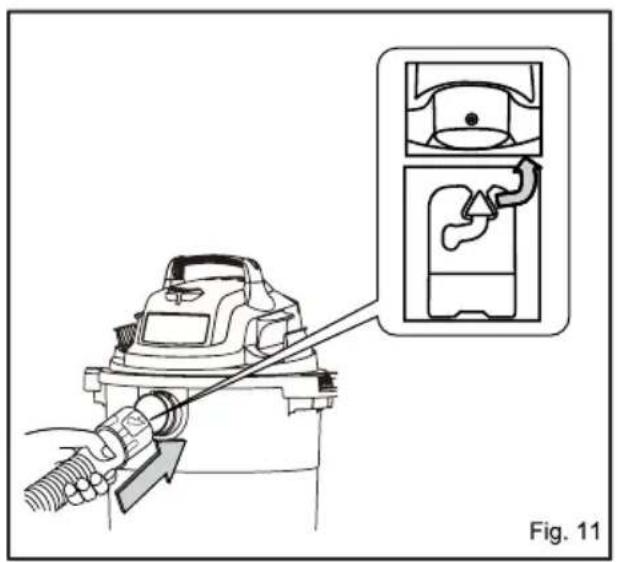
text_image
Fig. 11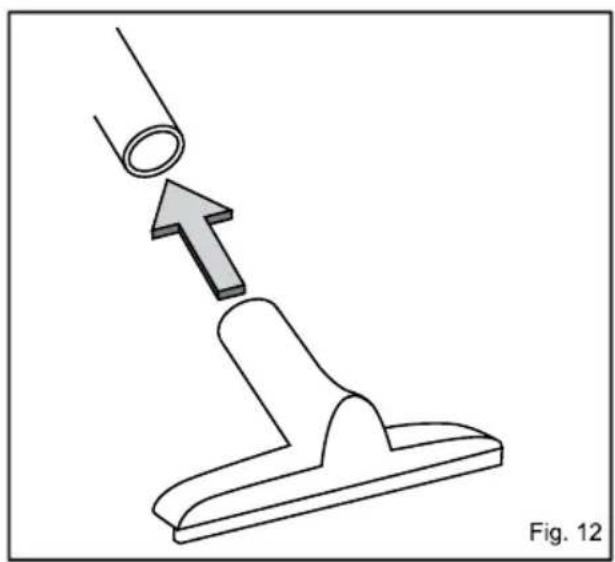
natural_image
Diagram of a mechanical component with an arrow indicating direction, labeled as Fig. 12 (no text or symbols on the diagram itself)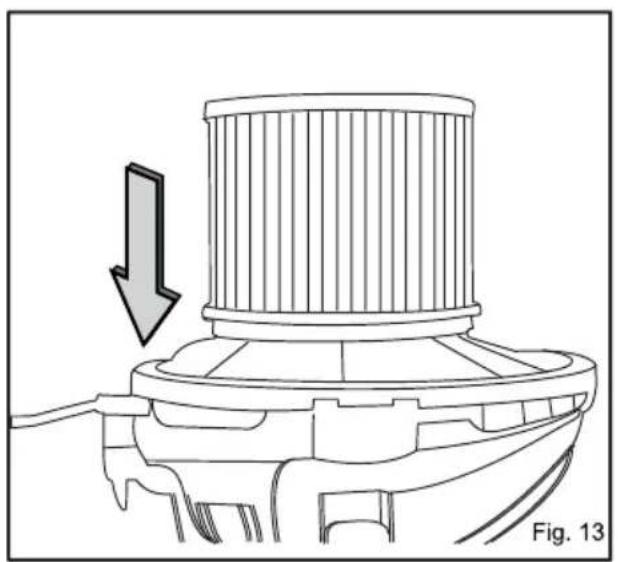
natural_image
Technical line drawing of a mechanical component with an arrow indicating downward motion (no text or symbols present)
text_image
I O II Fig. 14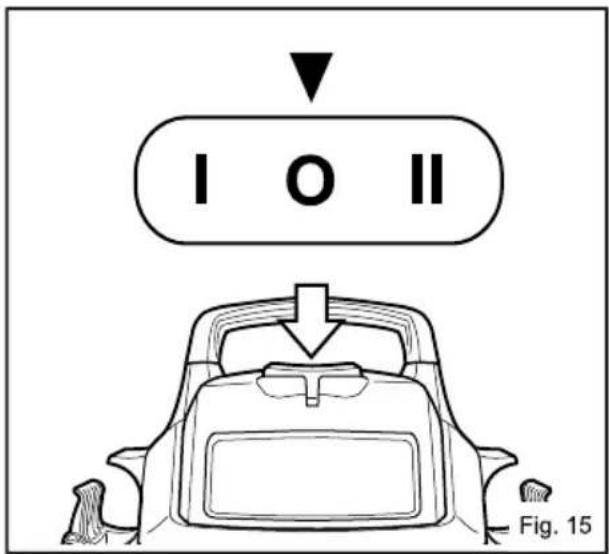
text_image
I O II Fig. 15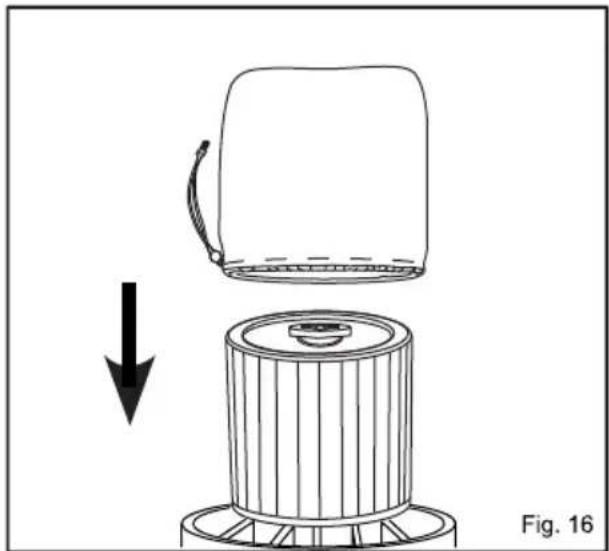
natural_image
Diagram showing a device with a lid and a base, labeled as Fig. 16 (no text or symbols on the diagram itself)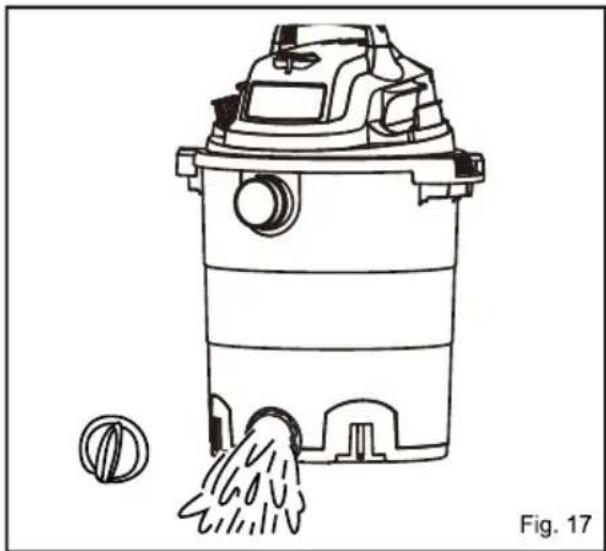
natural_image
Line drawing of a vacuum cleaner with a circular component nearby (no text or symbols)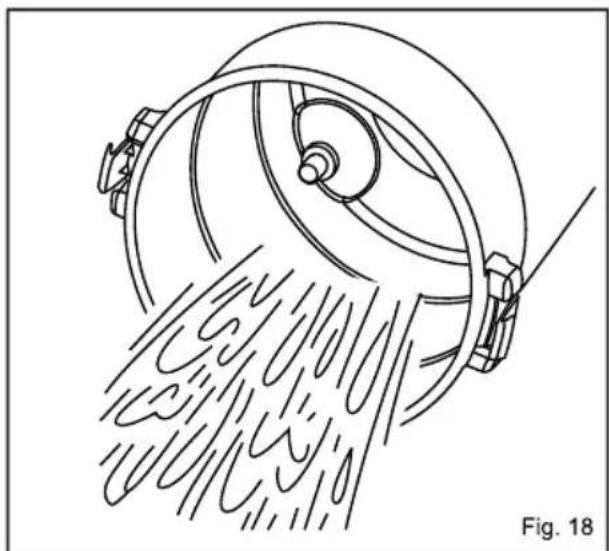
natural_image
Line drawing of a bucket pouring liquid into a container, labeled as Fig. 18 (no text or symbols on the diagram itself)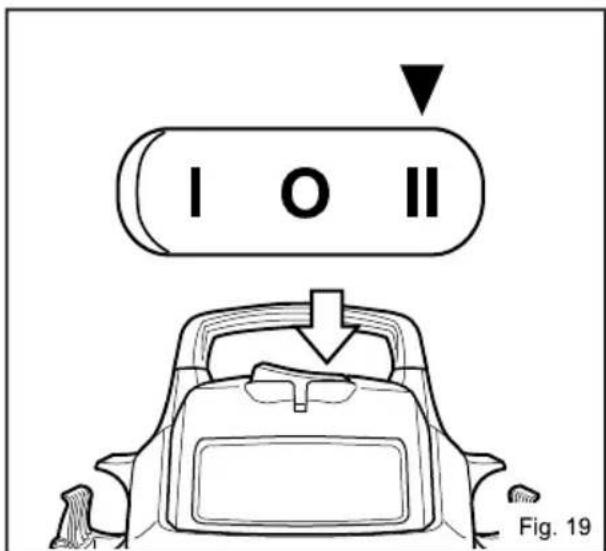
text_image
I O II Fig. 19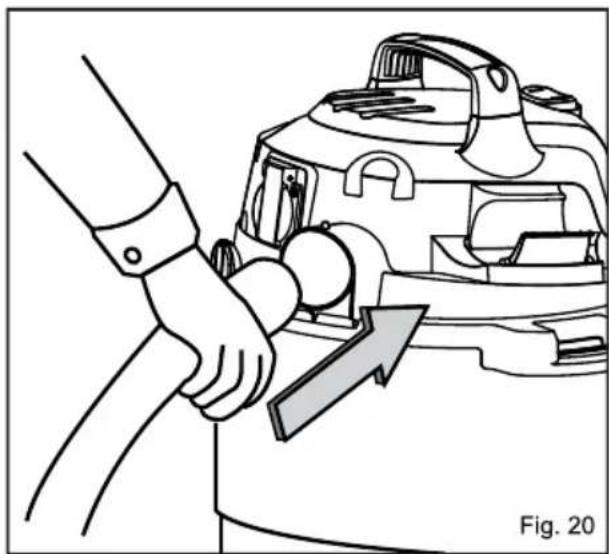
natural_image
Line drawing of a hand pressing down on a mechanical component with an arrow indicating motion (no text or symbols)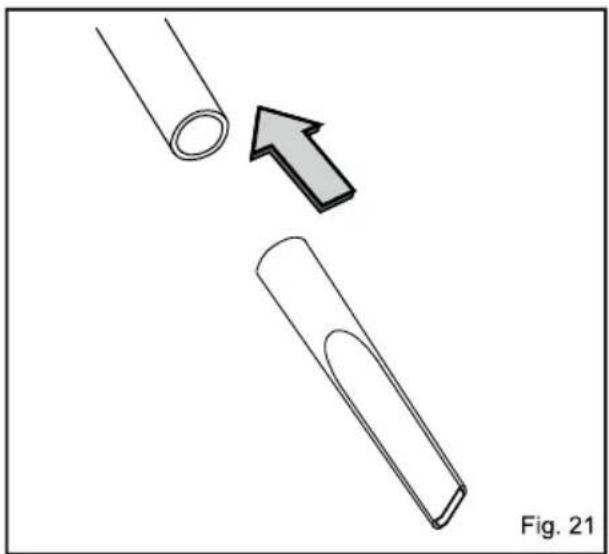
natural_image
Diagram showing two cylindrical objects with an arrow indicating a process or transformation, labeled 'Fig. 21' (no text or symbols on the objects themselves)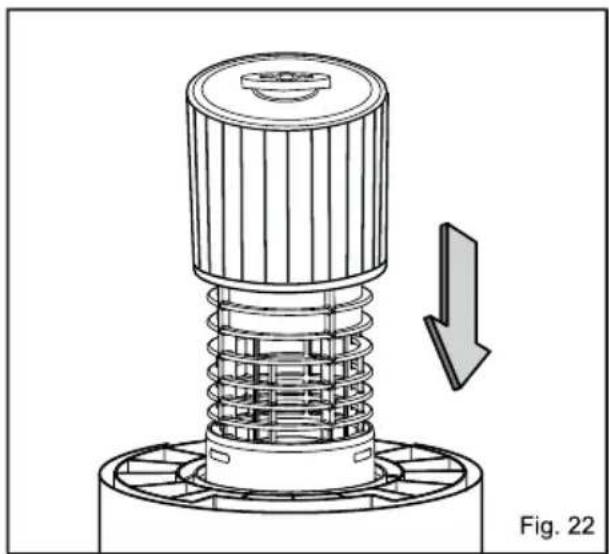
natural_image
Technical illustration of a mechanical assembly with a downward arrow indicating motion or force (no text or symbols present)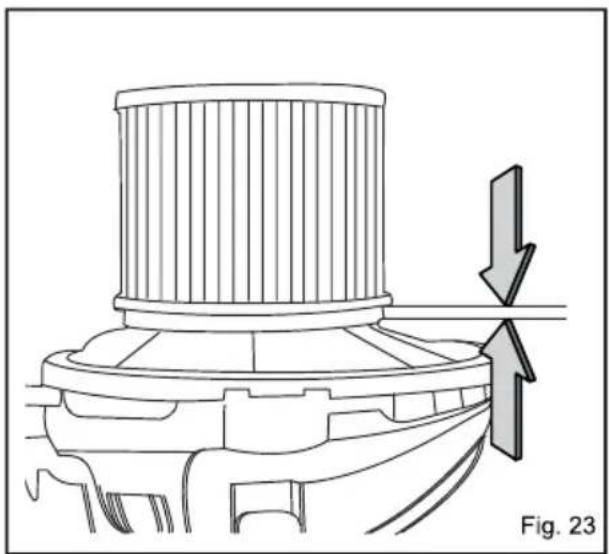
natural_image
Technical diagram of a mechanical component with directional arrows indicating movement or force (no text or symbols)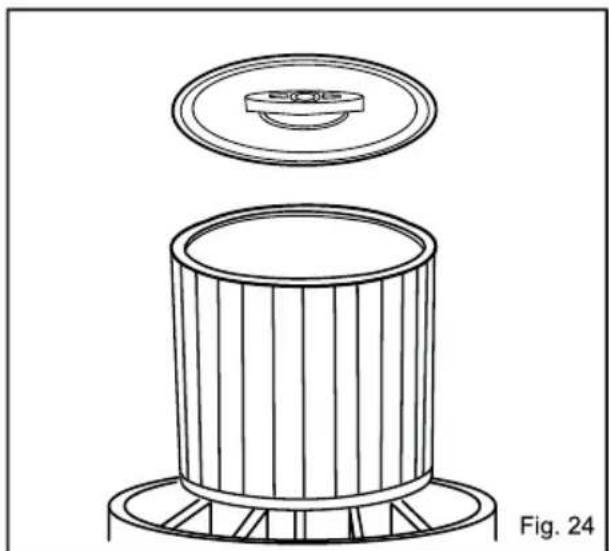
natural_image
Technical line drawing of a cylindrical mechanical component with a lid and base, labeled Fig. 24 (no text or symbols on the diagram itself)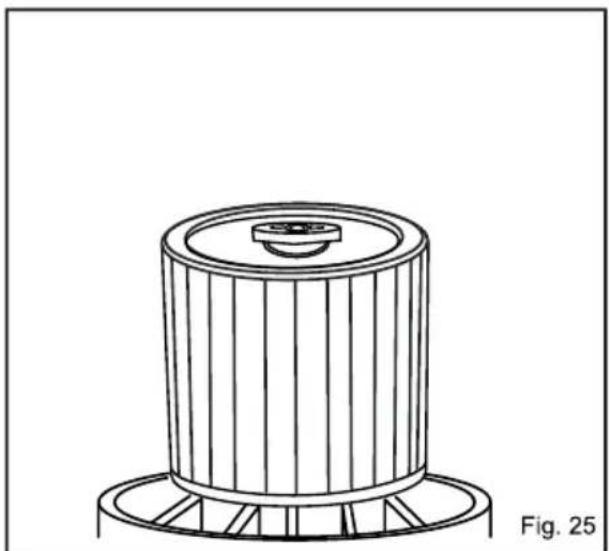
natural_image
Technical line drawing of a cylindrical mechanical component with a flanged base and central hub (no text or symbols)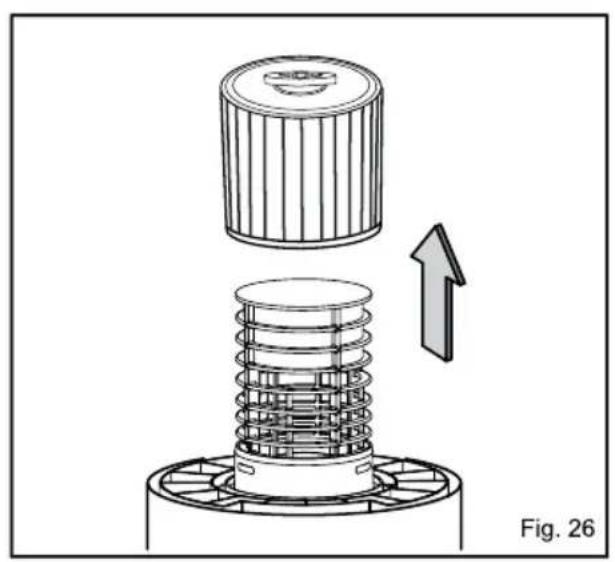
natural_image
Technical illustration of a mechanical assembly with a cylindrical component and a spring-like base, showing an upward arrow (no text or symbols)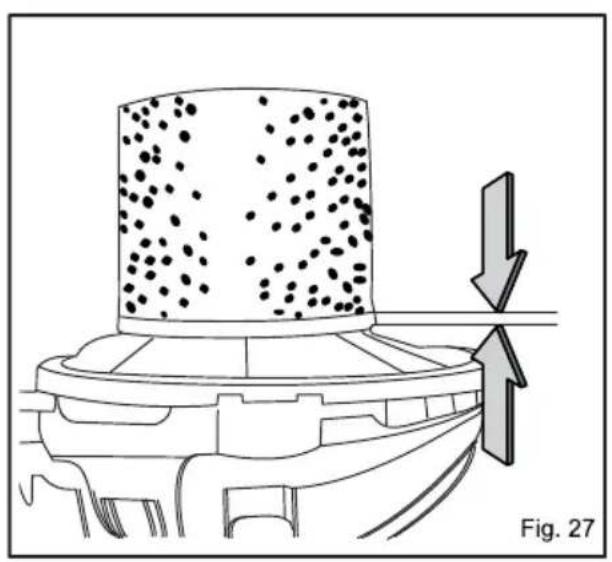
natural_image
Diagram of a mechanical component with particles and directional arrows, labeled Fig. 27 (no text or symbols on the diagram itself)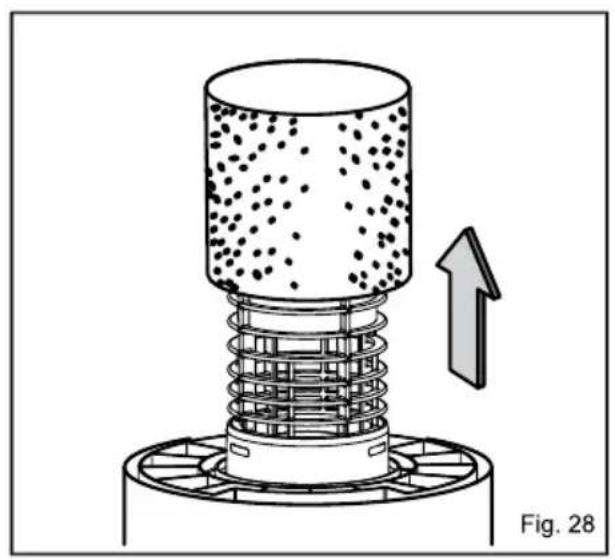
natural_image
Diagram of a mechanical press or spring assembly with a cylindrical component and upward arrow, labeled Fig. 28 (no text or symbols on the diagram itself)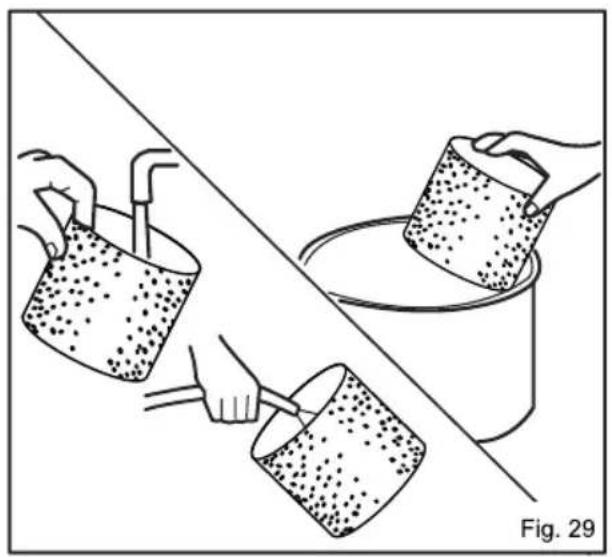
natural_image
Illustration of three hands pouring granular material from buckets into a container, with no text or symbols present.English
DESCRIPTIONS
Components list
- Extension Wand (x2)
- Floor tool
- Crevice tool
- Round brush
- Hose set
- Castor (x4)
- Cloth pre-fi Iter
- Handle
- Foam filter
- Screws
- Dust bag
- Outlet-socket for power take off
- Blower connection
- Filter basket
- Safety float valve
- Cartridge fi Iter cap
- Cartridge fi Iter (Washable)
- ON/OFF switch
- Connection for the vacuum hose
- Clamp (x2)
- Tank
- Drain outlet
- Power tool adaptor
SPECIFICATIONS
| Supply voltage 220-240V~50 Hz | |
| Rated power | 1500 W |
| Max power take off | 2000 W |
| Tank volume | 30 L |
| Hose system | ∅ 35 mm |
| Hose length | 3.5 m |
| Filter - dry | Cartridge fi liter |
| Filter - wet | Foam fi liter |
| IP rating | IPX4 |
| Suction | 20 kpa / 2.9 PSI |
| Max air flow l/sec motor | 50.5 dm ^3 /s |
| Max vac pressure l/sec motor | 21.5 Kpa |
| Cord length | 4 m |
| Weight according to EPTA-Procedure 01/2003 | 7.5 kg |
WARNING!
Read all safety warnings and all instructions. Failure to follow the warnings and instructions may result in electric shock, fi re and/or serious injury.
Save all warnings and instructions for future reference.
GENERAL POWER TOOL SAFETY WARNINGS
WARNING!
This appliance complies with the compulsory safety regulations for electric equipment. However, improper use can be harmful to people and property. Please read these operating instructions carefully and completely before switching the appliance on. Keep the operating instructions, the guarantee certifi cate, the receipt, as well as the packaging and packaging material if at all possible.
This appliance is designed solely for use in the private sector and for the designated purpose. The appliance is not suitable for commercial use. Don't use the appliance outdoors (unless it has been specifically designed for use outdoors). Don't subject the appliance to heat, direct sunshine or very high moisture (e.g., rain).
Never immerse the appliance in liquids and be aware of sharp edges that may damage it. Never use the appliance with wet or damp hands. Unplug it immediately if the appliance becomes wet or damp when it is running. Don't immerse the appliance in water.
This wet/dry vacuum cleaner may only be used and kept in a private home.
The appliance is designed to vacuum up materials that are not hazardous to your health and that are not fl ammable.
Never hold the connectors in front of your face (especially your eyes, ears, etc.). Never direct the nozzle towards persons or animals.
Only use the appliance for its designated purpose. Any other types of use are at your own risk and are possibly dangerous.
Other uses and unattended operation are not allowed. The manufacturer cannot be made responsible for damages that are caused by improper use or incorrect operation.
Wear protective clothing and gloves.
Connect the appliance only to a 240V alternating current receptacle.
Make sure that the correct dust bag has been inserted securely in its holder before using the appliance. The wrong dust bag or incorrectly installed dust bags can cause damage to the appliance and cause the guarantee to become void.
If the power cord is damaged, it must be completely
English
replaced along with the cable protector by an authorised service centre or other qualified service organisation.
Do not vacuum up ashes, hot coals and the like, large fragments of glass and sharp objects.
Don't vacuum up any toner dust, which is used in printers and copiers for example, because it is electrically conductive. In addition, it is possible that it will not be completely filtered out by the filter system of the wet/dry vacuum cleaner and can be released into the air via the exhaust fan.
Never vacuum fl ammable or poisonous liquids like petrol, oil, acids, or other volatile substances.
Don't vacuum up liquids that are hotter than 60°C or any poisonous or flammable dusts.
Never lay the appliance on its side. Pay particular attention to a horizontal position and adequate stability on stairs.
Always unplug the appliance after use and before cleaning or changing the fi Iters or accessories.
Only trained specialists may make repairs on electric equipment. Improper repairs could result in considerable danger to the user.
Do not store the appliance directly beside a hot oven or radiator.
Children, disabled persons, and the aged are often not aware of the dangers that can result from handling electric appliances. The above mentioned persons and untrained persons must never work with this electrical appliance.
When cleaning or removing the appliance, always switch it off. Pull the plug out of the receptacle, if you are not going to use the appliance for an extended period of time. Never pull on the cable to unplug the appliance, rather pull on the plug itself. Also, remove any special accessories from the appliance.
Always keep the appliance clean. Don't use any solvents or cleaners that may damage or be harmful to the appliance or user.
Never leave the appliance switched on unattended. If you leave the work area, switch the appliance off or unplug it from the receptacle (don't pull the cord, but use the plug).
In order to protect children from electric household appliances, make sure that the cable can't cause children to stumble and don't give children access to the appliance.
Never use the appliance when you are under the influence of medication, alcohol or drugs, if you are currently under medical care, or if you are tired.
Check the appliance and the power cord regularly for any possible damage. Don't use damaged appliances.
Don't try to repair the appliance yourself. Always use an authorised technician for repairs. Always have faulty power cords replaced immediately by the manufacturer or a qualified service organisation. Use the same type of
cable in order to prevent any danger of electric shock and injury.
Only use original spare parts and accessories. Non approved parts or third-party accessories may be a possible source of danger and cause the guarantee to become void.
Check the float often.
If you notice liquid leaking from your appliance, switch it off immediately and unplug it.
Do not submerge the appliance in water. Make sure that water is not spilled on the appliance.
When disposing of the wastewater, make sure that you observe any legal regulations.
Only store the appliance in a safe and dry location outside the reach of children.
Please also pay particular attention to the following "Special Safety Rules".
This appliance is not intended to be used or cleaned by persons with reduced physical, sensory or mental capabilities, or lack of experience or knowledge, unless they have been given instructions concerning the safe use of the appliance by a person legally responsible for their safety. They should be supervised whilst using the appliance.
Children shall not use, clean or play with this appliance, which when not in use should be secured out of their reach.
Children should be supervised to ensure that they do not play with the appliance.
If the supply cord is damaged, it must be replaced by the manufacturer, its service agent or similarly qualified persons in order to avoid a hazard.
Electrical power should be supplied via a residual current device (RCD) with a tripping current of not more than 30 mA.
Only use a weather proof extension cord. Check the extension cord before every use for damage. Always uncoil the extension cord during use because coiled cords can overheat. Damaged extension cords should not be repaired. They should be replaced with an equivalent type.
WHEN USING BLOWER FUNCTION:
Direct air discharge at work area only - never at people or animals.
Do not use blower as a sprayer in wet mode. Wear a dust mask and protective eye wear.
English
WARNING
Always switch off and unplug the machine from the electrical outlet before assembling, opening, emptying the dirt container, before connecting/disconnecting the attachments, or carrying out maintenance or troubleshooting checks.
IMPORTANT!
If the hose or tools are blocked, switch off the cleaner and remove the blockage(s) before re-starting your machine.
IMPORTANT!
Cleaning filters and replacing them regularly maintains vacuum performance. Vax recommends that your filters should be checked, cleaned and replaced periodically.
DAMAGE TO THE VACUUM CLEANER CAUSED AS A DIRECT RESULT OF NOT ADHERING TO THE GENERAL SAFETY INFORMATION AND THE INSTRUCTIONS IN THIS USER GUIDE INVALIDATES THE WARRANTY.
PLEASE KEEP THESE INSTRUCTIONS FOR FURTHER USE.
SPECIAL SAFETY RULES
Never vacuum up hot ashes, pointed or sharp objects.
Never use the appliance in damp rooms.
Don't use the appliance without a dust bag (an exception is wet vacuuming or with the cartridge filter). Make sure that the dust bag is inserted into the appliance correctly.
When using the appliance, make sure that no hair, clothing, or members are drawn in.
Keep the vacuum cleaner away from heat sources such as radiant heaters, ovens, and so on.
DISPOSAL INFORMATION
The appliance contains electric and electronic components and may not be disposed of as household garbage.
The local and currently applicable legislation must be observed unconditionally.
SPECIFIED CONDITIONS OF USE
The appliance is suitable for picking up dry, non-fl ammable dust and liquids.
This appliance is designed solely for use in the private sector and for the designated purpose. The appliance is not suitable for commercial use. Don't use the appliance outdoors (unless it has been specifically designed for use outdoors). Don't subject the appliance to heat, direct sunshine or very high moisture (e.g., rain).
Any other use is considered as improper use. The manufacturer accepts no liability for any damage resulting from such use. The risk for such use is borne solely by the user.
Proper use also includes proper operation, servicing and repairs as specified by the manufacturer.
EC-DECLARATION OF CONFORMITY
We declare under our sole responsibility that the product described under "Technical Data" fulfills all the relevant provisions of the directives 2011/65/EU (RoHs), 2014/35/EU, 2014/30/EU and the following harmonised standards have been used:
EN 60335-1:2012/A2:2019
EN 60335-2-2:2010/A1:2013
EN 62233:2008
EN 55014-1:2017
EN 55014-2:2015
EN 61000-3-2:2014
EN 61000-3-3:2013
EN IEC 63000:2018
Winnenden, 2020-05-25

Branko Lenger
Senior Vice President, Engineering and Quality - Asia, Engineering Commercial Product Development Authorized to compile the technical file.

Techtronic Industries GmbH
Max-Eyth-Straße 10
71364 Winnenden
Germany
PACKAGING CONTENT
See Fig. 2 - Fig. 4
Carefully unpack the contents of the box.
Hold the two clamps, which hold the upper section in its position and fold them upwards.
Loosen the clamps, remove the upper section, and remove the contents from the tank.
Please check the parts using the components list to make sure they are complete and that there has been no damage in transport.
If any parts are missing or damaged, then please contact your dealer immediately.
English
ASSEMBLY
- Ensure that the power cord is disconnected from the power outlet.
- Undo the clamps. (Fig. 2)
- Lift the top section off the tank. (Fig. 3)
- Remove the contents from inside the tank. (Fig. 4)
- Turn the tank upside down, and insert the casters on to the four feet of the tank.
- Ensure that they are mounted correctly. Do not over tighten. (Fig. 5)
- Insert the handle into the slots on the power head and pressure into place. (Fig. 6)
- For dry vacuum cleaning, install the supplied cartridge filter and dust bag. (Fig. 7, Fig. 8)
- For wet vacuum cleaning, install the supplied foam filter. (Fig. 9)
- Replace the top section on the tank. (Fig. 10)
- Align the top section with the clamps and snap into place by applying pressure until clamps click. (Fig. 10)
- Insert the large end of the hose into the front inlet of the tank and turn to lock. (Fig. 11)
- Fit the required accessory on to the suction tube. (Fig. 12)
OPERATION
DRY VACUUMING
WARNING
Ensure that you read, understand, and apply the safety instructions.
Reminder: DO NOT vacuum hazardous substances. The use of an incorrect dust bag will invalidate the warranty.
- Ensure that the power cord is disconnected from the power outlet.
- Ensure that the cartridge fi Iter is completely mounted.
- Ensure that the filter is inserted all the way. (Fig. 13) Verify that the dust bag is installed to the inside of the tank. (Fig. 8)
- Replace the top section on the tank, and secure it in place using the clamps. (Fig. 10)
- Insert the larger end of the hose into the front inlet on the tank and lock it in place. Push the required attachment on to the free end of the hose or extension. (Fig. 12)
- Plug the power cord in to the power outlet.
- Turn the motor on by flipping the switch to the 'I' (ON) position. (Fig. 14)
- Once you have finished vacuuming, flip the switch to the 'O' (OFF) position and unplug the power cord from the power outlet. (Fig. 15)
WARNING
DO NOT USE THE CARTRIDGE FILTER FOR WET OR SHARP MATERIALS.
DO NOT USE DUST BAG FOR LIQUID VACUUMING.
REINFORCE THE DUSTPROOF EFFECT
Covering the cartridge filter with the orange cloth pre-filter will reinforce the dustproof effect.
Place the pre-filter on the cartridge filter and tighten the string to lock it tightly to the filter basket. (Fig. 16)
The cloth pre-filter CAN'T be used singly.
WET VACUUMING
WARNING
- Ensure that you read, understand, and apply the safety instructions.
Reminder: DO NOT vacuum hazardous substances. - Ensure that the power cord is disconnected from the power outlet.
Ensure that the tank is clean and free of dust and dirt. - Remove the cartridge filter and dust bag, and install a foam filter over the filter basket and place the top section back on the tank. (Fig. 9)
DO NOT use the cartridge filter for wet or sharp materials. - Fit the desired nozzle to the vacuum hose. (Fig. 12)
- Ensure that the switch is in the 'O' (OFF) position before plugging the power cord into the power outlet.
- Turn the motor on by flipping the switch to the "I" (ON) position. (Fig. 14)
- After use, flip the switch to the "O" position (Fig. 15) and unplug the power cord, then empty and dry the tank. (Fig. 16, Fig. 17)
WARNING
The foam filter must be removed after wet vacuuming, and a cartridge filter must be installed before dry vacuuming again.
IMPORTANT!
When vacuuming large quantities of liquids, do not immerse the nozzle completely in the liquid; leave a gap at the tip of the nozzle opening to allow air inflow.
The machine is fitted with a float valve that stops the suction action when the container reaches its maximum capacity. You will notice an increase in motor speed.
When this happens, turn off the machine, disconnect from power supply, and drain the liquid into a suitable receptacle or drain. To continue vacuuming, refit the container with the drain cap. After wet vacuuming, turn the machine off and remove plug from power supply.
English
Empty the container, clean and dry the inside and outside before storage.
CONNECT ELECTRICAL APPLIANCES
Connect electrical appliance with Power Take Off on the Shopvac.
Switch on electrical appliance. Only connect electrical appliances with a maximum power rating of 900 W.
Flipping the switch to the "I" position (Fig. 19). Once the electrical appliance has been switched off, the vacuum cleaner switches off following a time lapse.
BLOWER OPERATION
This Wet/Dry Vac has blowing capabilities.
To use the blower feature follow the instructions listed.
WARNING
Always wear safety goggles before using blower.
Keep bystanders clear from blowing debris.
Wear a dust mask if blowing creates dust that might be inhaled.
- Insert the large end of the hose into the blower connection in the top of the motor housing. (Fig. 20)
- Fit the crevice tool to the vacuum hose. (Fig. 21)
- Ensure the power switch is turned off and plug in the power supply.
- Turn the motor on by flipping the switch to the "I" (ON) position. (Fig. 14)
- The unit will now blow through the vacuum hose and can be used to clear obstructions within the hose.
- Once you have finished operation, flip the switch to the 'O' (OFF) position and unplug the power cord from the power outlet. (Fig. 15)
WARNING
If after a few seconds the hose continues to be blocked, turn off the unit and clear the hose manually.
MAINTENANCE
INSTALLING AND CLEANING THE DRY FILTER
Note: Unplug machine from the power outlet before performing maintenance.
Installing Dry Filter
- Install the dry filter over the filter cage with the flat end of the filter towards the vacuum power head. Carefully push filter in until it stops against the power head. (Fig. 22 & 23)
- Place filter retainer on top of cartridge filter over the raise lip and tighten down by turning retainer
clockwise, do not overtighten. (Fig. 24 & 25)
Removing And Cleaning Dry Filter
- Unlock and remove the fi ller retainer by turning retainer handle anti clockwise.
- Carefully hold and pull the dry filter up for removal. (Fig. 26)
- Clean the cartridge fi ller by gently tapping or brushing dirt off. For optimal performance it is recommended to regularly change this fi ller depending on level of use (e.g., 3-6 months).
- Install cleaned or new filter into place as instructed above.
INSTALLING AND CLEANING THE FOAM FILTER
Note: Unplug machine from the power outlet before performing maintenance.
Installing Foam Filter
Follow instructions to remove dry dust filter first before changing to foam filler.
Carefully slide foam filter down over the filler cage making sure the whole cage is covered. (Fig. 9 & 27)
Cleaning Foam Filter
Carefully remove foam fi Iter. (Fig. 28)
Use a mild soap and water solution to wash foam fi Iter and rinse with clean water. (Fig. 29)
Allow filter to air dry before installing and using again.
SYMBOLS
 | CAUTION! WARNING! DANGER! |
| V | Volts |
| Hz | Hertz |
| ~ | Alternating Current |
| W | Watts |
 | Please read the instructions carefully before starting the machine. |
 | Recycle |
English

Do not dispose of electric tools together with household waste material.
Electric tools and electronic equipment that have reached the end of their life must be collected separately and returned to an environmentally compatible recycling facility. Check with your local authority or retailer for recycling advice and collection point.

European Conformity Mark
FREQUENTLY ASKED QUESTIONS
WARNING!
To reduce the risk of personal injury, unplug the cleaner before performing maintenance/troubleshooting checks.
Problem Cause Solution
| The appliance doesn't work. No power. | Check the power supply. | |
| Functional fault in the power cord, switch, or motor. | Have the damaged part checked by qualified personnel or replace it. | |
| Tank is full of liquid. | Empty the tank. | |
| Dust is escaping from the motor cover. | The dust bag is missing or damaged. | Put in a dust bag or replace it. |
| Low suction power and high motor speed / vibrations. | Dust bag is full. | Replace the dust bag. |
| Suction nozzle, hose, or tank inlet is blocked.. | Check the suction nozzle, hose, and tank inlet for obstructions. | |
Français
DESCRIPTIONS
DÉCLARATION DE CONFORMITÉ CE
Winnenden, 2020-05-25

Branko Lenger
Senior Vice President, Engineering and Quality - Asia,
Engineering Commercial Product Development
Français
Winnenden, 2020-05-25

Branko Lenger
Winnenden, 2020-05-25

Branko Lenger
Senior Vice President, Engineering and Quality - Asia, Engineering Commercial Product Development Autorizado para recopilar la ficha técnica.

Español
Techtronic Industries GmbH
Max-Eyth-Straße 10
71364 Winnenden
Germany
Winnenden, 2020-05-25

Branko Lenger
Senior Vice President, Engineering and Quality - Asia, Engineering Commercial Product Development
"I" (ON). (Figura 14)
INFORMATIE OVER AFVALVERWERKING
Winnenden, 2020-05-25

Branko Lenger
Senior Vice President, Engineering and Quality - Asia, Engineering Commercial Product Development Bevoegd om het technische dossier samen te stellen.

Techtronic Industries GmbH
Max-Eyth-Straße 10
Nederlands
71364 Winnenden
Germany
INHOUD VAN DE VERPAKKING
LET OP! WAARSCHUWING! GEVAAR!
Volt
Hz Hertz

Wisselstroom
W Watt

Winnenden, 2020-05-25

Branko Lenger
Senior Vice President, Engineering and Quality - Asia, Engineering Commercial Product Development Autorizado a compilar o ficheiro técnico.

Techtronic Industries GmbH Max-Eyth-Straße 10 71364 Winnenden Germany
CONTEÚDO DA EMBALAGEM
Ver figura 2 - 4.
Winnenden, 2020-05-25

Branko Lenger
Senior Vice President, Engineering and Quality - Asia, Engineering Commercial Product Development
OFTE STILLEDE SP∅RGSMÅL
ADVARSEL!
Winnenden, 2020-05-25

Branko Lenger
Senior Vice President, Engineering and Quality - Asia, Engineering Commercial Product Development Auktoriserad för att kompilera den tekniska filen.

Techtronic Industries GmbH
Max-Eyth-Straße 10
71364 Winnenden
Germany
FÖRPACKNINGENS INNEHÅLL
Se bild 2 - 4.
Winnenden, 2020-05-25

Branko Lenger
Senior Vice President, Engineering and Quality - Asia, Engineering Commercial Product Development
Winnenden, 2020-05-25

Branko Lenger
Senior Vice President, Engineering and Quality - Asia, Engineering Commercial Product Development
OFTE STILTE SP∅RSMÅL

ADVARSEL!
Winnenden, 2020-05-25
Branko Lenger
Senior Vice President, Engineering and Quality - Asia, Engineering Commercial Product Development
DEKLARACJA ZGODNOŚCI WE
Winnenden, 2020-05-25
Polski

Branko Lenger
Senior Vice President, Engineering and Quality - Asia, Engineering Commercial Product Development
Winnenden, 2020-05-25

Branko Lenger
Winnenden, 2020-05-25

Magyar
Branko Lenger
Senior Vice President, Engineering and Quality - Asia, Engineering Commercial Product Development
Winnenden, 2020-05-25

Branko Lenger
Senior Vice President, Engineering and Quality - Asia, Engineering Commercial Product Development
Winnenden, 2020-05-25

Branko Lenger
Senior Vice President, Engineering and Quality - Asia, Engineering Commercial Product Development Pilnvarots sastādīt tehnisko dokumentāciju.

Techtronic Industries GmbH
Max-Eyth-Straße 10
71364 Winnenden
Germany
IEPAKOJUMA SATURS
Winnenden, 2020-05-25

Branko Lenger
Senior Vice President, Engineering and Quality - Asia, Engineering Commercial Product Development Igaliotas sudaryti technine byla.

Techtronic Industries GmbH
Max-Eyth-Straße 10
71364 Winnenden
Germany
PAKUOTÈS TURINYS
Žr. 2 - 4 pav.
ÜLDISED OHUTUSREEGLID
HOIATUS!
Winnenden, 2020-05-25

Branko Lenger
Senior Vice President, Engineering and Quality - Asia, Engineering Commercial Product Development
POSEBNA SIGURNOSNA PRAVILA
Nikada ne usisavajte vrući pepeo, šiljaste ili oštre predmete.
Aparat nikada ne koristite u mokrim prostorijama.
Aparat ne koristite bez vrećice za prašinu (iznimka je mokro usisavanje ili usisavanje s uložnim filtrom). Provjerite je li vrećica za prašinu pravilno umetnuta u aparat.
Winnenden, 2020-05-25

Branko Lenger
Senior Vice President, Engineering and Quality - Asia, Engineering Commercial Product Development Ovlašten za ispunjavanje tehničke dokumentacije.

Techtronic Industries GmbH
Max-Eyth-Straße 10
71364 Winnenden
Germany
SADRŽAJ PAKIRANJA
Pogledajte sliku 2 - 4.
Winnenden, 2020-05-25

Branko Lenger
Senior Vice President, Engineering and Quality - Asia, Engineering Commercial Product Development Pooblaščen za pripravo tehnične dokumentacije.

Techtronic Industries GmbH
Max-Eyth-Straße 10
71364 Winnenden
Germany
VSEBINA EMBALAŽE
Glejte sliko 2 - 4.
Winnenden, 2020-05-25

Branko Lenger
Senior Vice President, Engineering and Quality - Asia, Engineering Commercial Product Development
Winnenden, 2020-05-25

Branko Lenger
Senior Vice President, Engineering and Quality - Asia, Engineering Commercial Product Development
Winnenden, 2020-05-25

Branko Lenger
Senior Vice President, Engineering and Quality - Asia,
Engineering Commercial Product Development
Winnenden, 2020-05-25

Branko Lenger
Senior Vice President, Engineering and Quality - Asia, Engineering Commercial Product Development Teknik dosyayı derleme yetkisine sahip.

Techtronic Industries GmbH
Max-Eyth-Straße 10
71364 Winnenden
Germany
AMBALAJ İÇERIĞI
Winnenden, 2020-05-25

Branko Lenger
Senior Vice President, Engineering and Quality - Asia,
Engineering Commercial Product Development
EN RYOBI WARRANTY APPLICATION CONDITIONS
In addition to any statutory rights resulting from the purchase, this product is covered by a warranty as stated below.
-
The warranty period is 24 months for consumers and commences on the date the product was purchased. This date has to be documented by an invoice or other proof of purchase. The product is designed and dedicated to consumer and private use only. So there is no warranty provided in case of professional or commercial use. This warranty applies only on new products.
-
There is a possibility to extend for a part of the range of power tools (AC/DC) the warranty period over the period described above using the registration on the www.ryobitools.eu website. The eligibility of products for extended warranty is clearly displayed in stores and / or on packaging and is contained within the product documentation. The end user is required to register his/her newly-acquired products online within 30 days from the date of purchase. The end user may register for the extended warranty in his/her country of residence if listed on the online registration form where this option is valid. Furthermore, end users must give their consent to the storage of their personal data that is required to be entered online. They must also accept the terms and conditions. The registration confirmation receipt, which is sent out by e-mail, and the original invoice showing the date of purchase will serve as proof of the extended warranty.
-
The warranty covers all defects of the product during the warranty period due to faults in workmanship or material at the purchase date. The warranty is limited to repair and/or replacement and does not include any other obligations including but not limited to incidental or consequential damages. The warranty is not valid if the product has been misused, used contrary to the instruction manual, or has been incorrectly connected to a power supply. This warranty does not apply to:
– any damage to the product that is the result of improper or lack of maintenance – any product that has been altered or modified
– any product where original identification (trade mark, serial number) markings have been defaced, altered or removed
– any damage caused by non-observance of the instruction manual
– any product not displaying the CE approval mark on the rating plate
– any product that has been attempted to be repaired by a non-authorised warranty service centre or without prior authorisation by Techtronic Industries
– any product connected to improper power supply (amps, voltage, frequency) – any damage caused by external influences (water, chemical, physical, shocks) or foreign substances
– normal wear and tear spare parts
– inappropriate use, overloading of the tool
– use of non-approved accessories or parts
- Power tool accessories provided with the tool or purchased separately, including but not limited to screw driver bits, drill bits, abrasive discs, sand paper and blades, lateral guide, etc.
- Components (parts and accessories) subject to natural wear and tear, including but not limited to service & maintenance kits, carbon brushes, bearings, chuck, SDS drill bit attachment or reception, power cord, auxiliary handle, transport carry case, sanding plate, dust bag, dust exhaust tube, felt washers, impact wrench pins & springs, etc.
-
For servicing, the product must be sent or presented to a RYOBI authorised service station listed for each country in the following list of service station addresses. In some countries your local RYOBI dealer undertakes to send the product to the RYOBI service organisation. When sending a product to a RYOBI service station, the product should be safely packed without any dangerous contents such as petrol, marked with sender's address and accompanied by a short description of the fault.
-
A repair / replacement under this warranty is free of charge. It does not constitute an extension or a new start of the warranty period. Exchanged parts or products become our property. In some countries delivery charges or postage will have to be paid by the sender. Your statutory rights arising from the purchase of the product remain unaffected
-
This warranty is valid in the European Community, Switzerland, Iceland, Norway, Liechtenstein, Turkey, Russia, and the United Kingdom. Outside these areas, please contact your authorised RYOBI dealer to determine if another warranty applies.
AUTHORISED SERVICE CENTRE
Any request or issue with the product can be addressed to your local authorised service centres (visit www.ryobitools.eu) or directly to: Techtronic Industries GmbH, Max Eyth Straße 10, 71364 Winnenden, Germany. Please state the serial number and product type printed on the label.
FR RYOBI CONDITIONS D'APPLICATION DE LA GARANTIE
EN RYOBI is a trade mark of Ryobi Limited, and is used under license.
71364 Winnenden, Germany
20211119v2