
MDRB380FGE01 - Fridge MIDEA - Free user manual and instructions
Find the device manual for free MDRB380FGE01 MIDEA in PDF.
| Product Type | Refrigerator |
| Brand | Midea |
| Model | MDRB380FGE01 |
| Fresh Food Compartment Volume | 199 L |
| Freezer Compartment Volume | 71 L |
| Total Volume | 270 L |
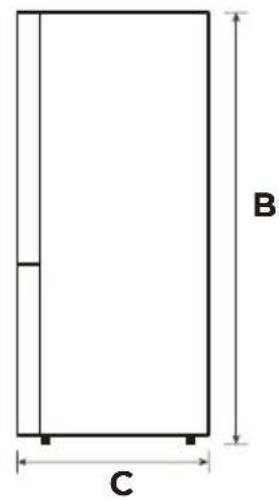
| Dimensions (W x H x D) | 545 x 1800 x 625 mm |
| Power Supply | 220-240 V~ |
| Defrost Type | Automatic |
| Freezing Capacity | 3.5 kg/24h |
| Temperature Rise Time | 7 h |
| Number of Fruit and Vegetable Bins | 3 |
| Water Dispenser | Optional |
| Interior Lighting | LED (Class F) |
| Climate Class | SN, N, ST, T (according to label) |
| Temperature Setting | 6 positions + quick cooling |
| Super Freeze Function | Yes (quick cooling) |
| Adjustable Feet | Yes |
| Reversible Door | Yes |
| Maintenance | Regular cleaning, automatic defrost |
| Available Spare Parts | Thermostat, sensors, boards, LED, handles, hinges, drawers, baskets, gaskets (7-10 years) |
Frequently Asked Questions - MDRB380FGE01 MIDEA
User questions about MDRB380FGE01 MIDEA
0 question about this device. Answer the ones you know or ask your own.
Ask a new question about this device
Download the instructions for your Fridge in PDF format for free! Find your manual MDRB380FGE01 - MIDEA and take your electronic device back in hand. On this page are published all the documents necessary for the use of your device. MDRB380FGE01 by MIDEA.
USER MANUAL MDRB380FGE01 MIDEA
Thank you for choosing Midea! Before using your new Midea product, please read this manual thoroughly to ensure that you know how to operate the features and functions that your new appliance offers in a safe way.
EN
CONTENTS
THANK YOU LETTER 01
SPECIFICATIONS 02
PRODUCT OVERVIEW 03
PRODUCT INSTALLATION 04
OPERATION INSTRUCTIONS 11
CLEANING AND MAINTENANCE 15
TROUBLESHOOTING 17
APPENDIX 19
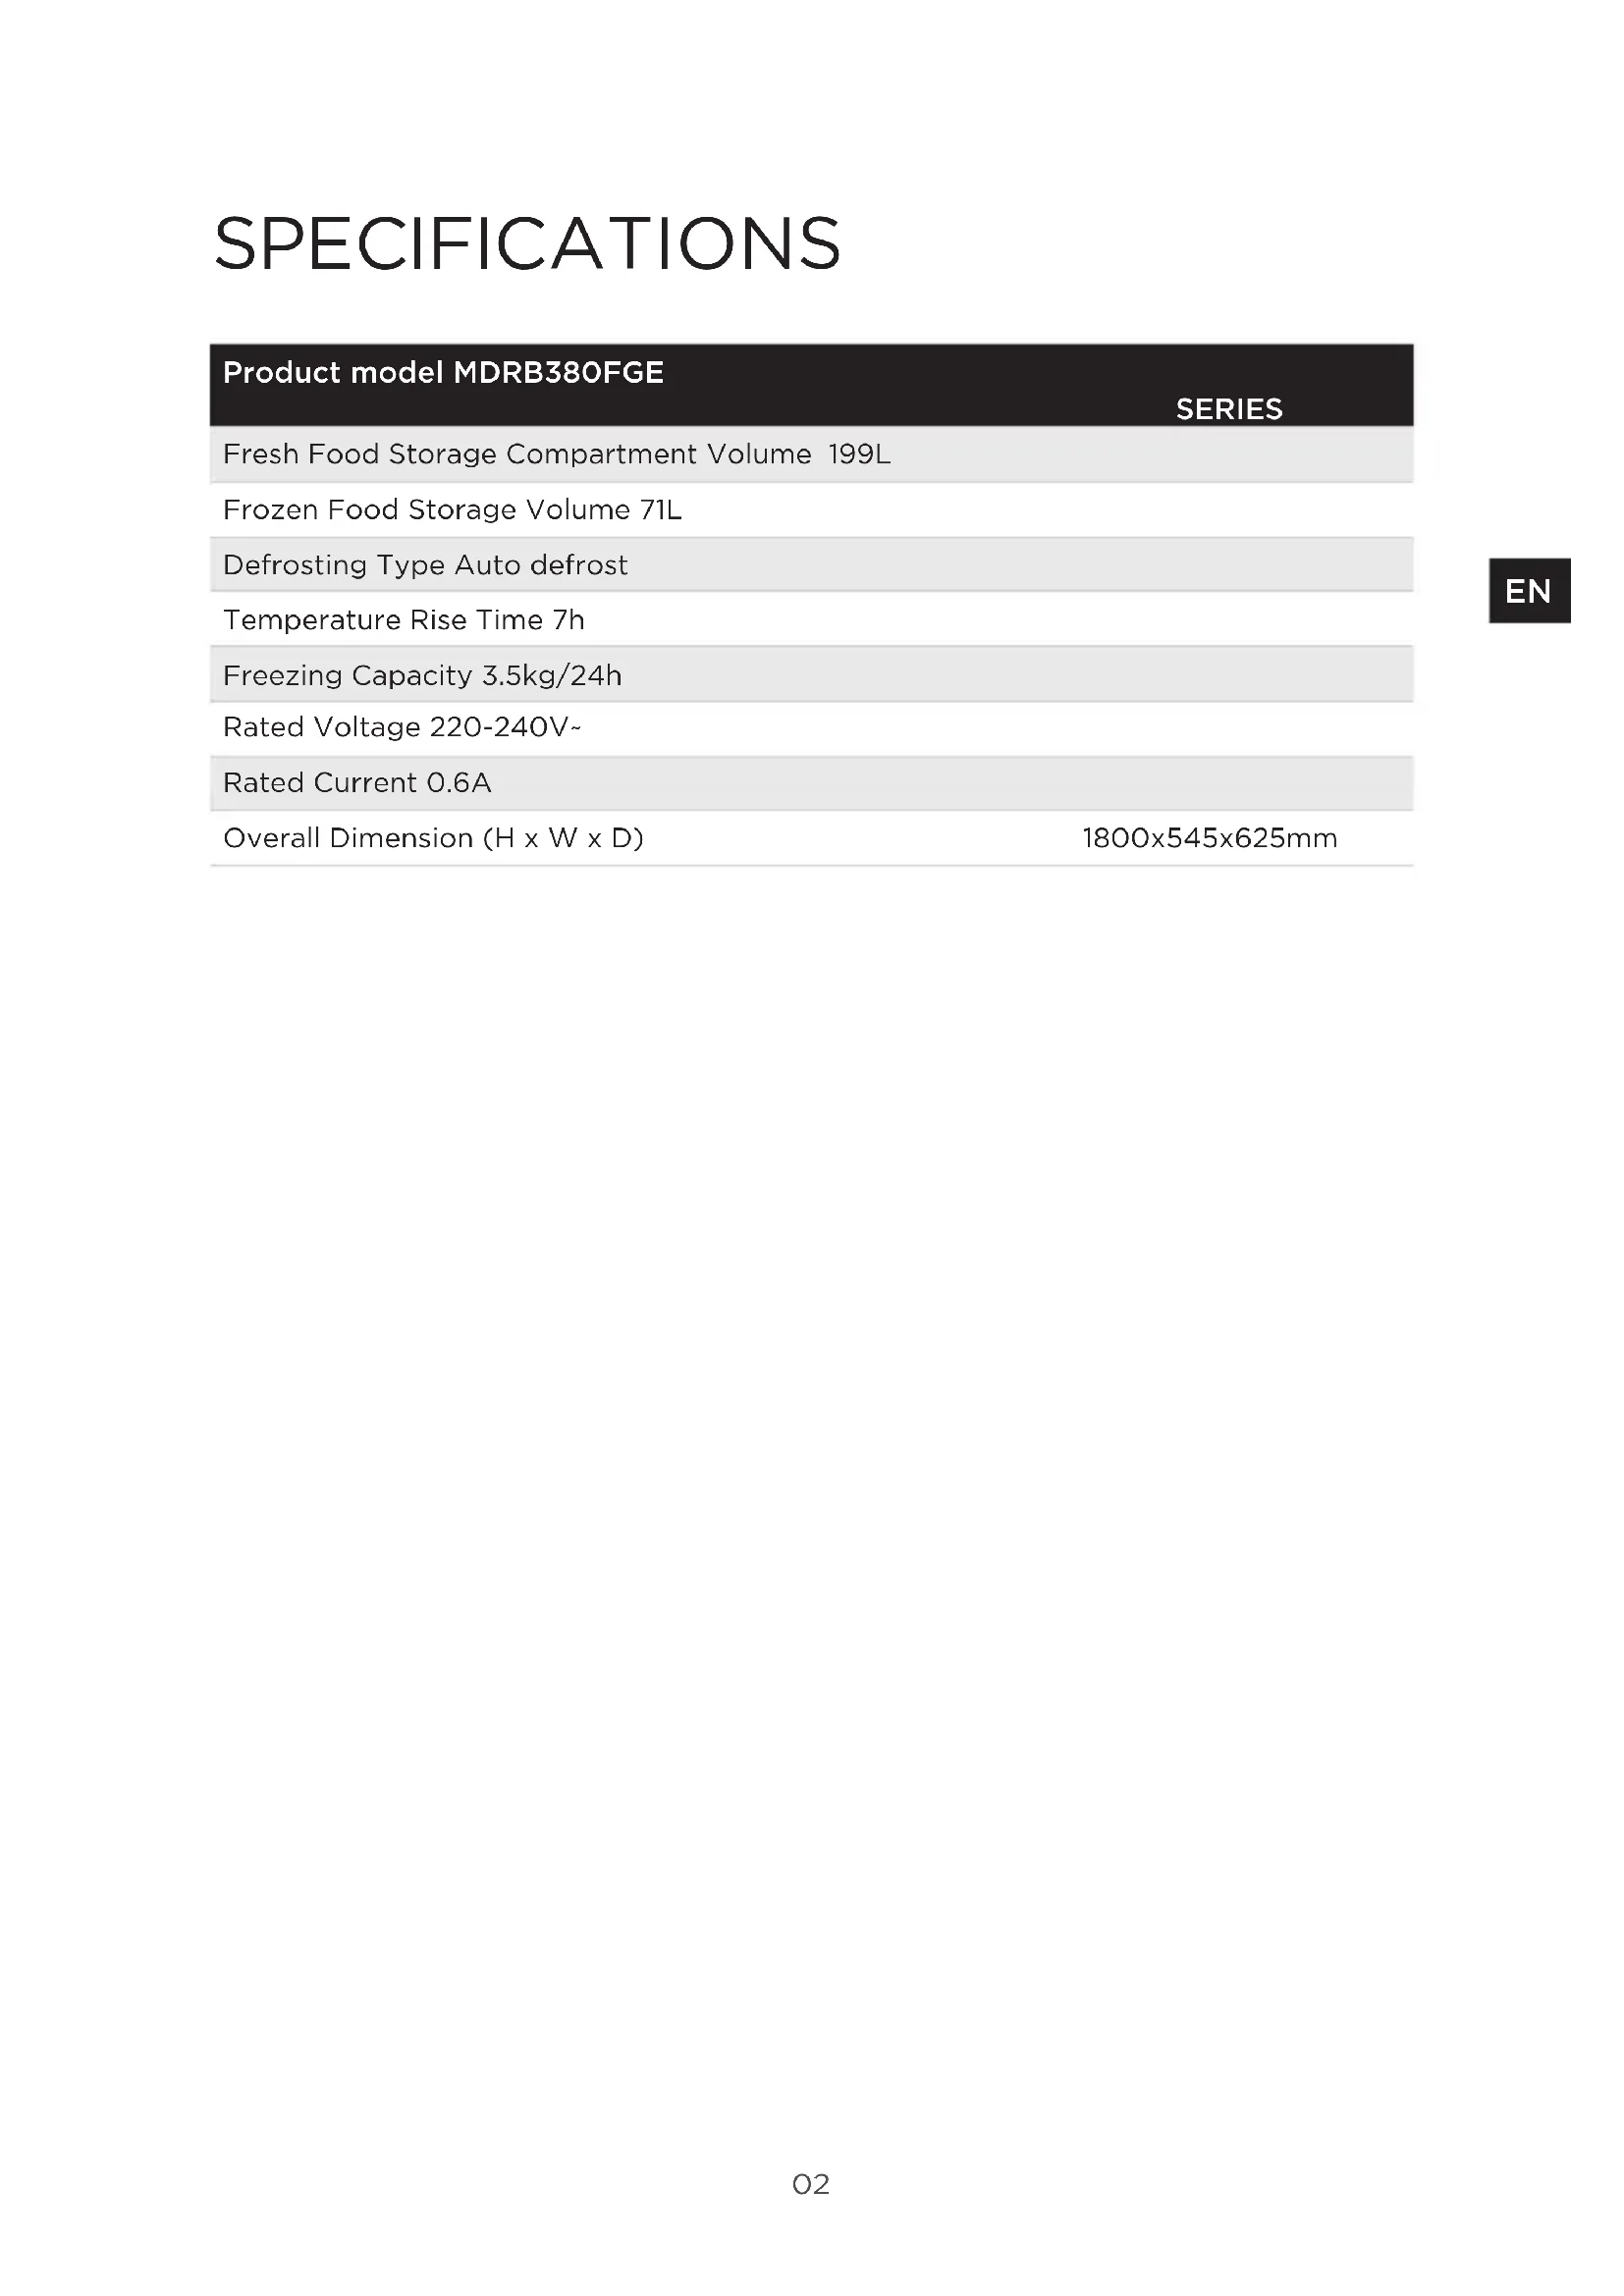
SPECIFICATIONS
| Product model MDRB380FGE SERIES | |
| Fresh Food Storage Compartment Volume 199L | |
| Frozen Food Storage Volume 71L | |
| Defrosting Type Auto defrost | |
| Temperature Rise Time 7h | |
| Freezing Capacity 3.5kg/24h | |
| Rated Voltage 220-240V~ | |
| Rated Current 0.6A | |
| Overall Dimension (H x W x D) | 1800x545x625mm |
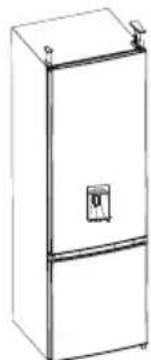
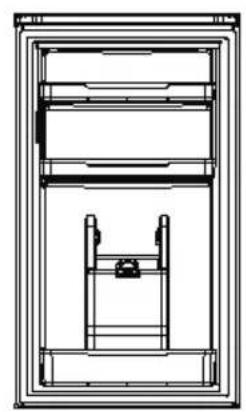
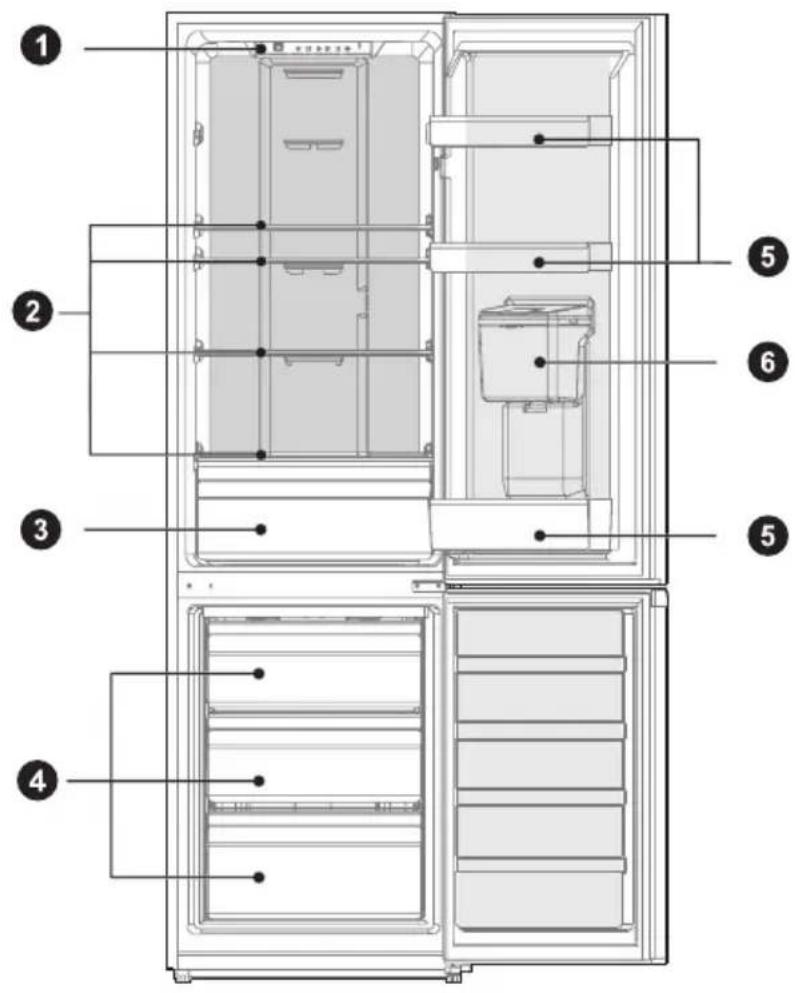
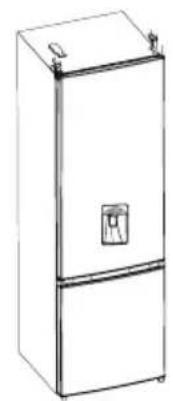
PRODUCT OVERVIEW
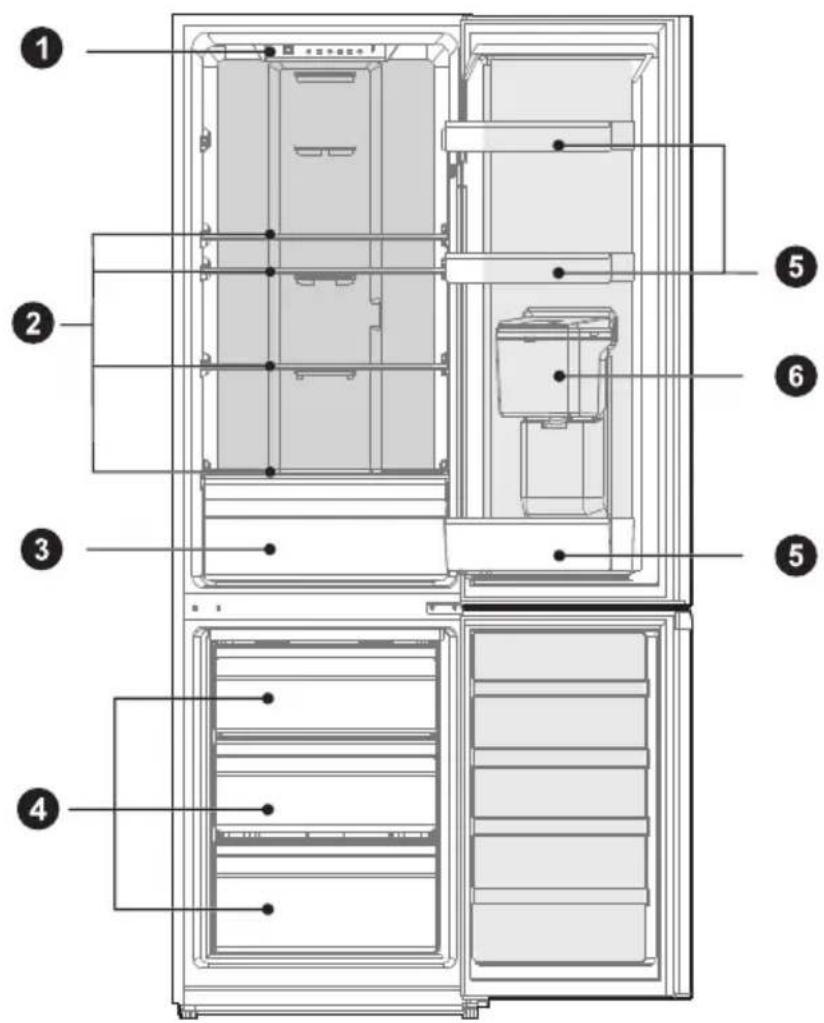
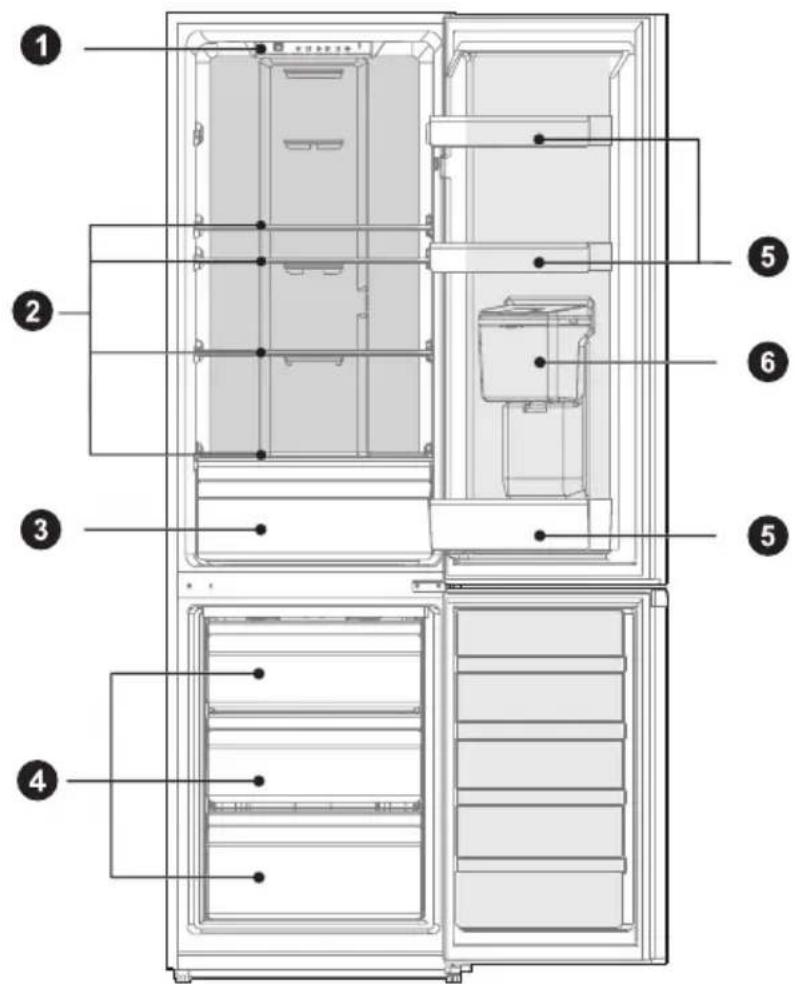
Names of components
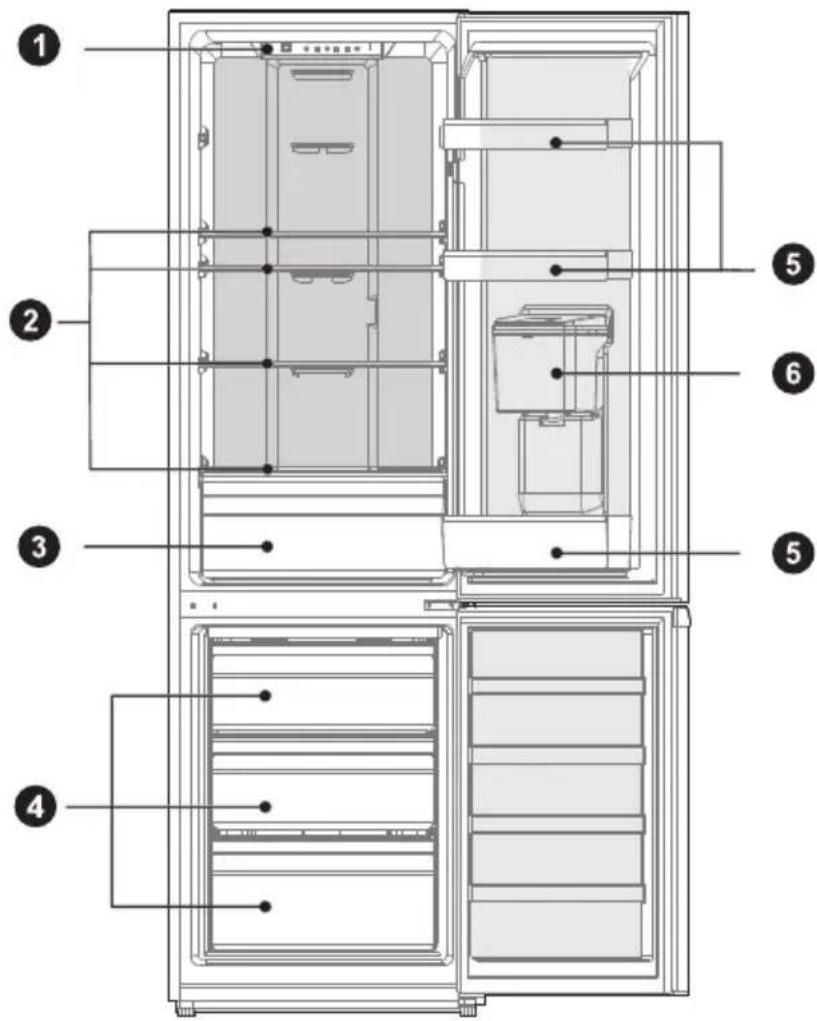
1 LED lighting
4 4
2 Shelf
5 Door Tray
3 Fruits and vegetables box
6 Water dispenser (optional)

ATTENTION
The picture above is only for reference. The actual configuration will depend on the physical product or statement by the distributor.
PRODUCT INSTALLATION
Install Instruction
For refrigerating appliances with climate class
- Depending on the climate class, This refrigerating appliance is intended to be used at ambient temperatures range as specified following table.
- The climate class can be found on the rating plate. The product may not operate properly at temperatures outside of the specific range.
- You can find the climate class on the product label.
Effective temperature range
- The product is designed to operate normally in the temperature range specified by its class rating.
| Class Symbol | Ambient temperature range °C | ||
| IEC 62552 (ISO 15502) ISO 8561 | |||
| Extended temperate SN + 10 to + 32 + 10 to + 32 | |||
| Temperate N + 16 to + 32 + 16 to + 32 | |||
| Subtropical ST + 16 to + 38 + 18 to + 38 | |||
| Tropical T + 16 to + 43 + 18 to + 43 | |||
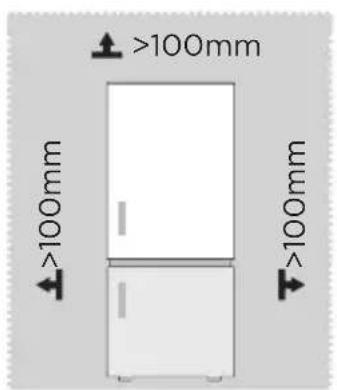
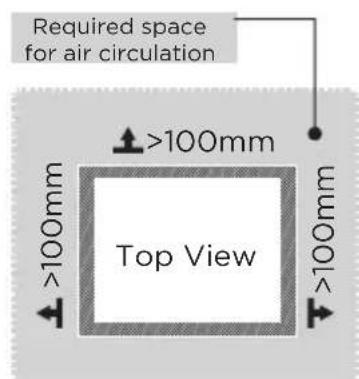
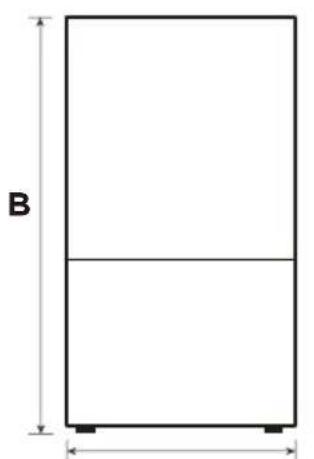
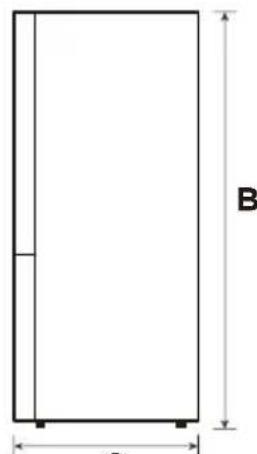
Dimensions and Clearances
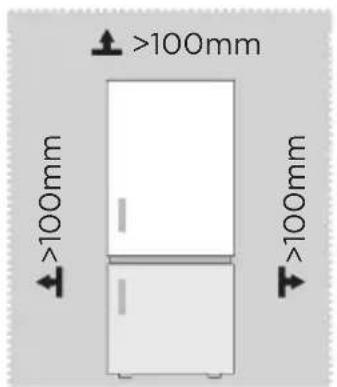
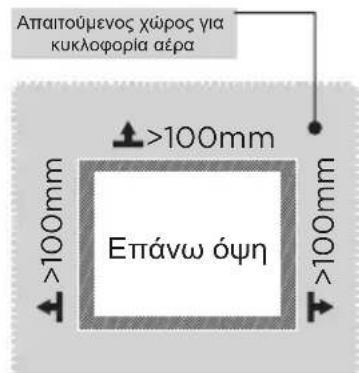
- Too small of a distance from adjacent items may result in the degradation of freezing capability and increased electricity costs. Allow over 100mm of clearance from each adjacent wall when installing the appliance.

ATTENTION
The picture above is only for reference. The actual configuration will depend on the physical product or statement by the distributor.
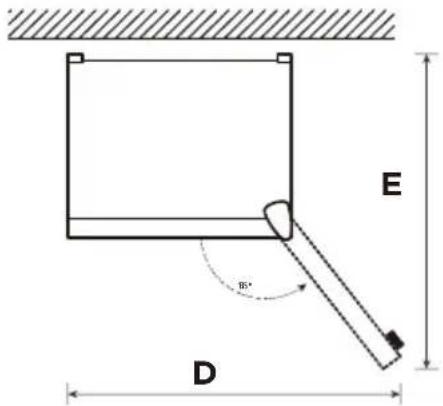
Space requirement diagram (when the door is open and when the door is closed)


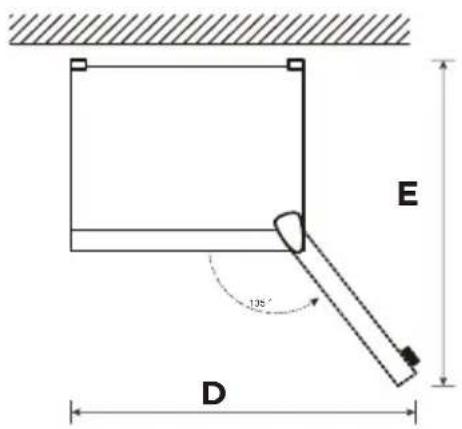
| Width Overall Height Depth | Width doors open 135° | Depth doors open 135° | ||
| A B C D E | ||||
| 545 1800 | 625 820 1070 | |||
Notice: All dimensions in mm
Leveling feet
To avoid vibration, the unit must be leveled.
If required, adjust the leveling screws to compensate for the uneven floor.
The front should be slightly higher than the rear to aid in door closing.
Leveling screws can be turned easily by tipping the cabinet slightly.
Turn the leveling screws counterclockwise to raise the unit, clockwise to lower it.
Moving the appliance
- Before the refrigerator is moved, take all objects inside out, pull the power plug out.
- Fix the glass partitions, vegetable holder, freezing chamber drawers and ect. with tape, and tighten the leveling feet; close the doors and seal them with tape.
- Move the appliance with more than two people carefully. During moving, the appliance shall not be excessively laid upside down or horizontally, or be vibrated; the inclination during movement shall be no more than 45^ .
- After installing the appliance, connect the power plug into a socket out to switch on the appliance.

ATTENTION
Precautions before operation:
Before making changes the refrigerator must be disconnected from power.
precautions should be taken to prevent any personal injury.
Placement
- Before use, remove all packing materials, including bottom cushions, foam pads and tapes inside of the refrigerator; tear off the protective film on the doors and the refrigerator body.
- Keep away from heat and avoid direct sunlight. Do not place the freezer in moist or watery places to prevent rust or reduction of insulating effect.
- Do not spray or wash the refrigerator; do not put the refrigerator in moist places easy to be splashed with water so as not to affect the electrical insulation properties of the refrigerator.
- The refrigerator is placed in a well-ventilated indoor place; the ground shall be flat, and sturdy (rotate left or right to adjust the wheel for leveling if unstable).

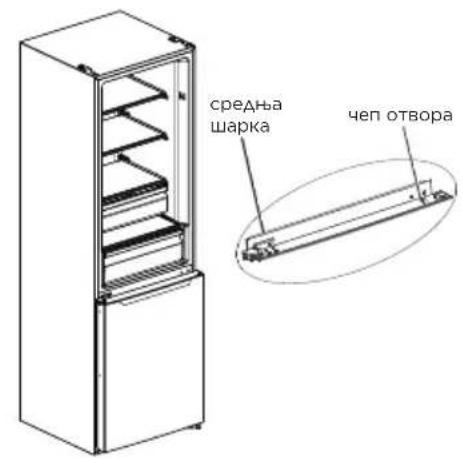
Door right-left change (optional)
Based on the location where you plan to use your refrigerator, you may find it more convenient to reverse the position of the door.

CAUTION
CAUTION: To avoid injury to yourself or your property, we recommend that someone assist you during the door reversal process.
Preparing to reverse the door position
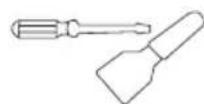
You will need: A standard screwdriver, a Phillips screwdriver, and the included Allen wrench.
- Make sure that your refrigerator is unplugged and empty.
- Have someone available to assist you in the process.
- Keep all of the parts you remove to reuse them later.
Tools needed for changing the door:
Cross screwdriver Putty knife
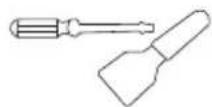
thin-blade screwdriver
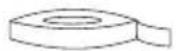
5/16" socket and ratchet Masking tape
Step
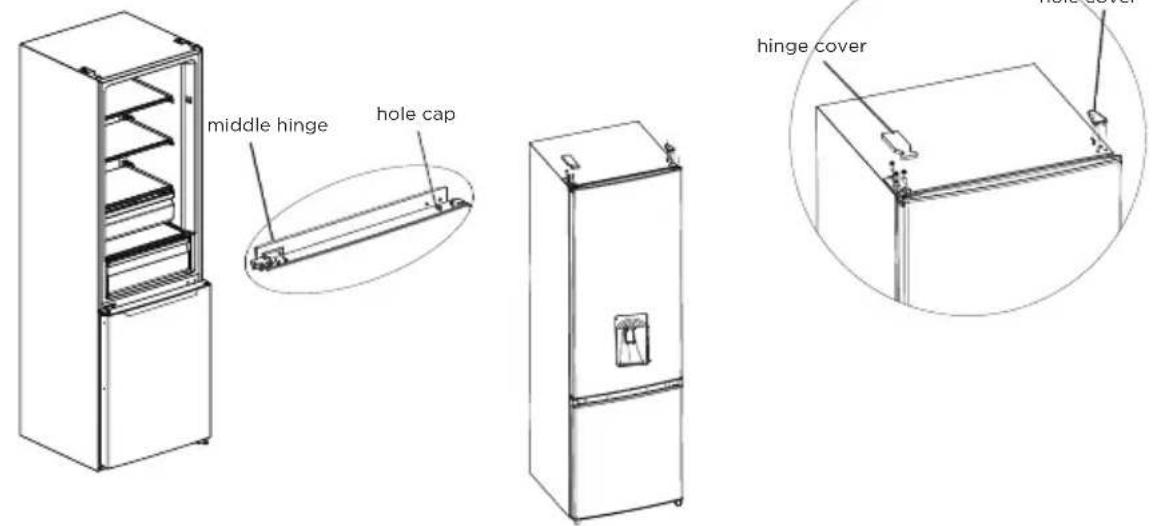
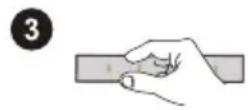
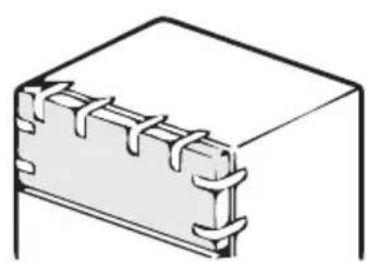
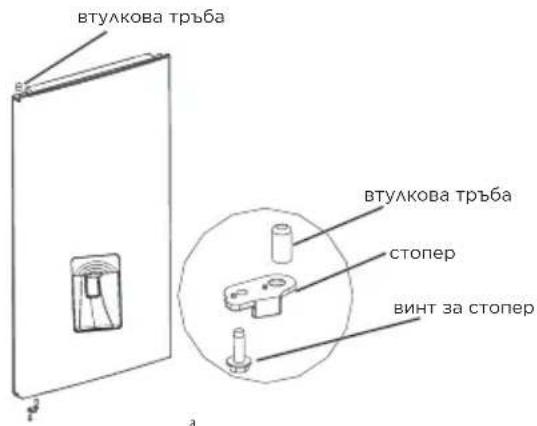
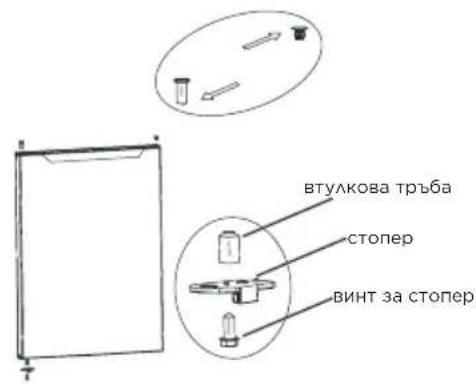
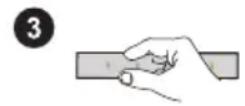
- Please power off this appliance, before conduct this operation. Remove all food from the inner door liner. Tape the door shut with tape.
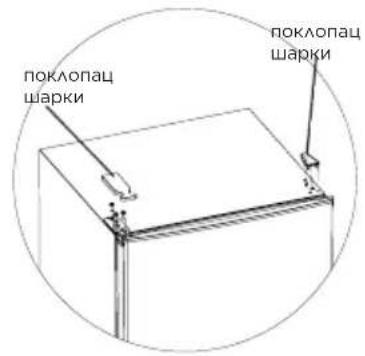
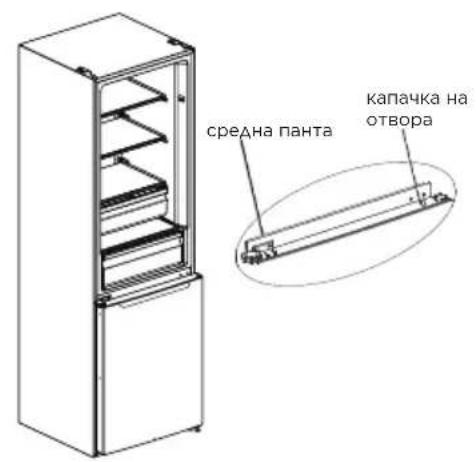
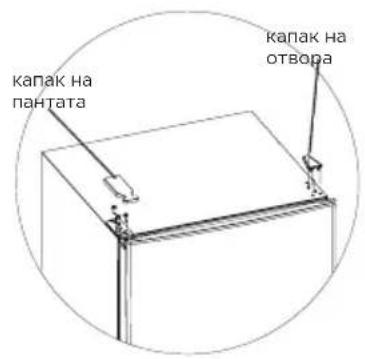
- Dismantle the hole cover,hinge cover and upper hinge.
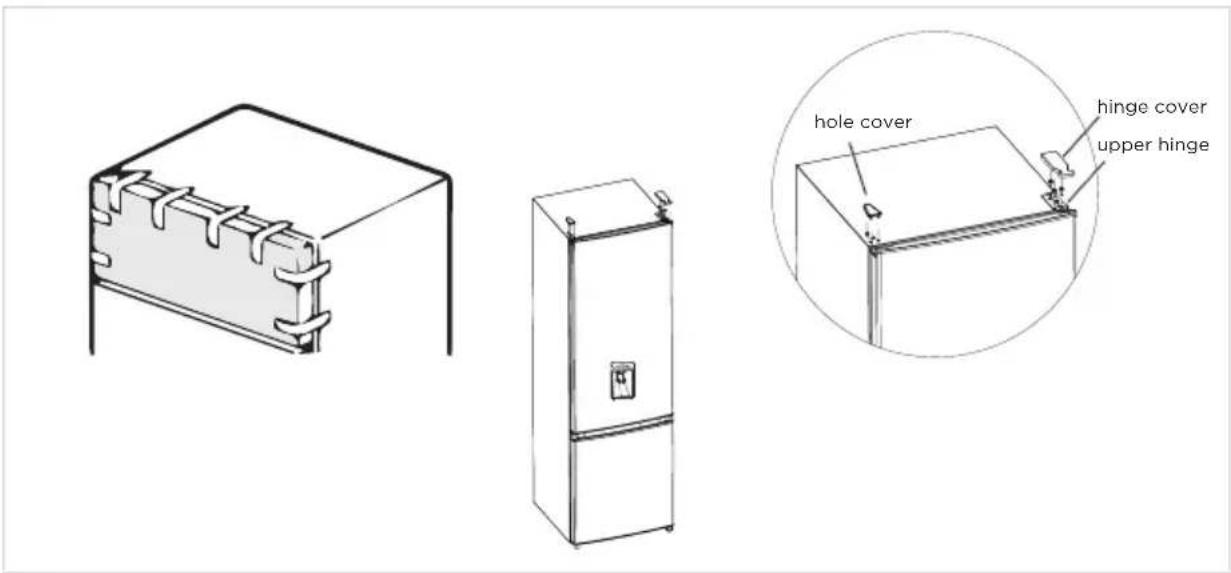
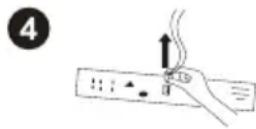
- Take off refrigerating chamber door, middle hinge (use a allen wrench to remove the middle hinge screw) and hole cap of other side.
- Take off freezing chamber door, dismantle bottom hinge, hole caps, levelling foot, install the bottom hinge on the other side.
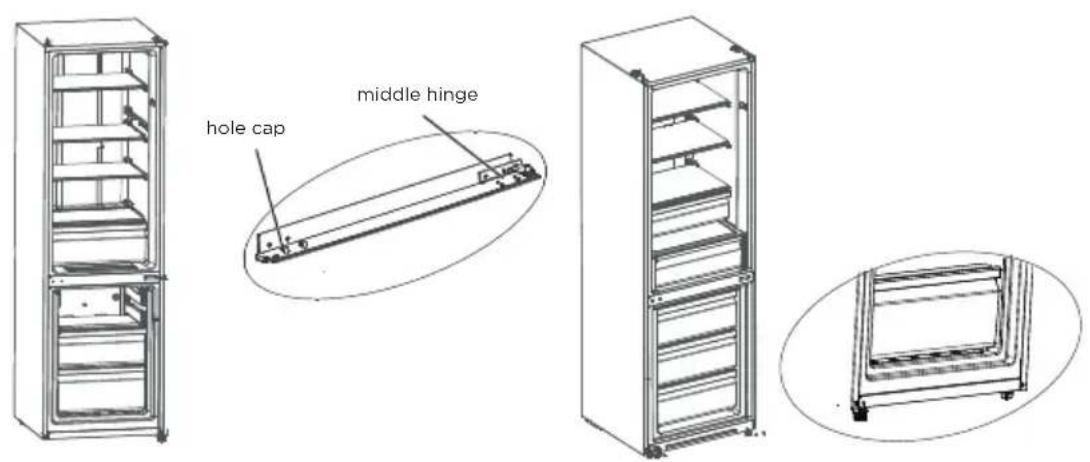
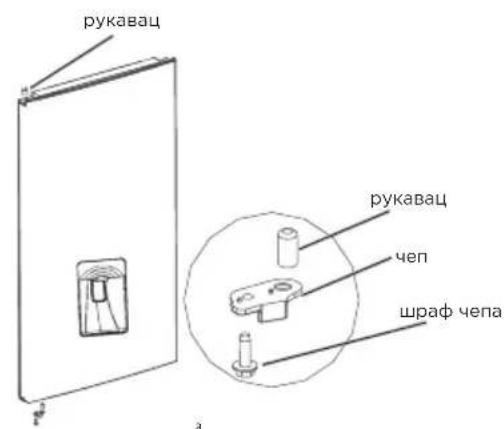
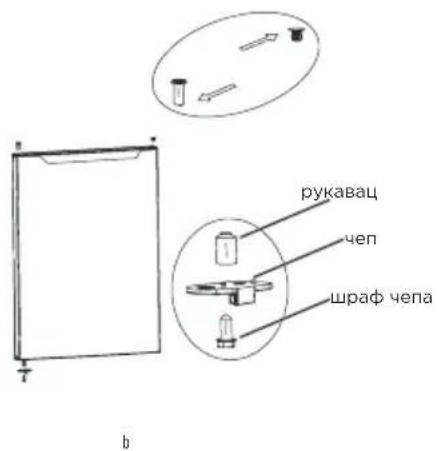
- a) Dismantle the stopper, sleeve pipe of refrigerating chamber door. assemble the sleeve pipe and stopper on bottom left of door with screw. b) Dismantle the stopper and sleeve pipe from right of freezing chamber door, assemble the sleeve pipe and stopper on bottom left of door by screw. Take off the sleeve pipe and hole caps on the freezing chamber door and mount it on the other side.
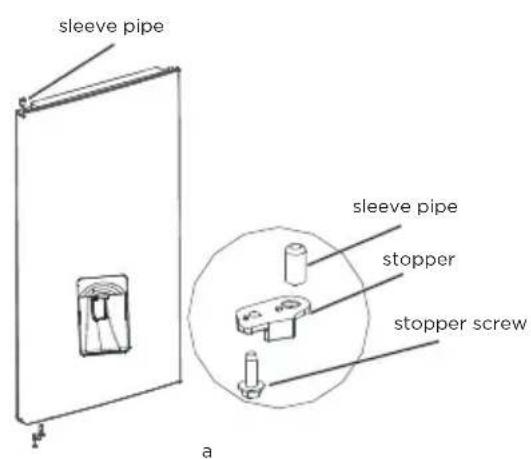
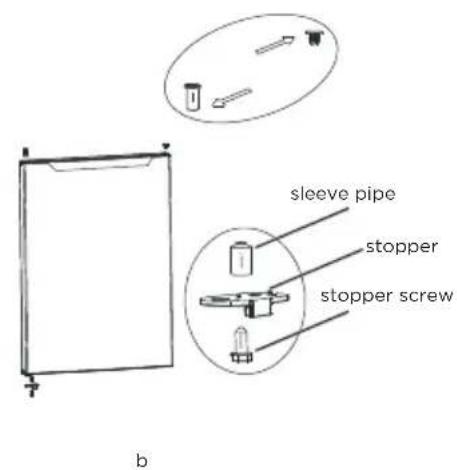
- Put freezing door on bottom hinge and install middle hinge, hole caps.
-
Put the refrigerating chamber door on middle hinge and install upper hinge, hinge cover.
-
Put the refrigerating chamber door on middle hinge and install upper hinge, hinge cover.
The following must be confirmed before installing the top hinge cover. The screws that hold th hinge should be tightly pressed against the hinge surface to ensure that the screw is not deflected, Afted the finge is installed, make sure there is no shaking.

ATTENTION
The picture above is only for reference. The actual configuration will depend on the physical product or statement by the distributor.
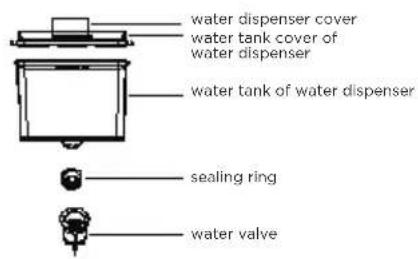
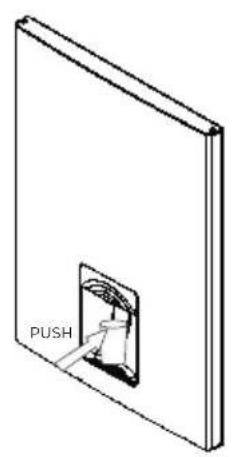
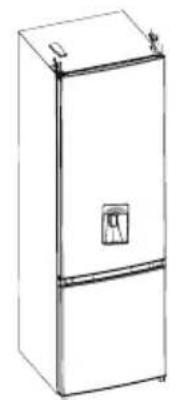
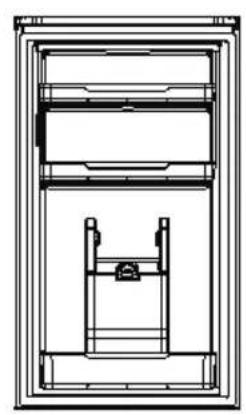
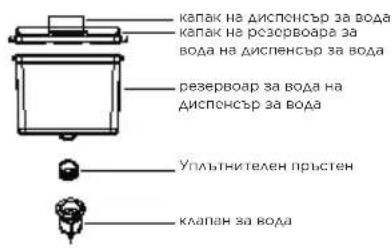
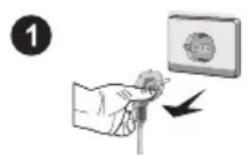
Usage of water dispenser (optional)
- First open Water inlet cover, fill with drinking water to "MAX" marked as the maximum amount of water.
- Use the cup to push the trigger to the inside, the water will flow out, when the trigger back tothe original position, the water stops.
- Water dispenser can only be used for pure water, not suitable for beverages or fruit juice.
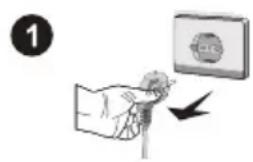
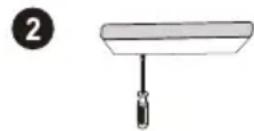
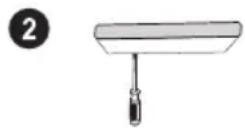
Changing the light
- Any replacement or maintenance of the LED lamps is intended to be made by the manufacturer, its service agent or similar qualified person. This product contains a light source of energy efficiency class < F> .
Step
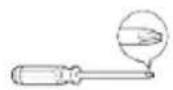
- Please take out the plug before removal.
- Remove the lampshade with a screwdriver.
- Take down the lamp panel.
- Remove the connection terminal.
Connecting the appliance
Before initial start, keep the refrigerator still for two hours before connecting it to power supply.

ATTENTION
Before putting any fresh or frozen foods, the refrigerator shall have run for 2-3 hours, or for above 4 hours in summer when the ambient temperature is high.
Tips for energy saving
- The appliance should be located in the coolest area of the room, away from heating and heating appliances or heating ducts, and out of the direct sunlight.
- Let hot foods cool to room temperature before placing in the appliance. Overloading the appliance forces the compressor to run longer. Foods that freeze too slowly may lose quality, or spoil.
- Be sure to wrap foods properly, and wipe containers dry before placing them in the appliance. This cuts down on frost build-up inside the appliance.
- Appliance storage bin should not be lined with aluminum foil, wax paper, or paper toweling. Liners interfere with cold air circulation, making the appliance less efficient.
- Organize and label food to reduce door openings and extended searches. Remove as many items as needed at one time, and close the door as soon as possible.
OPERATION INSTRUCTIONS
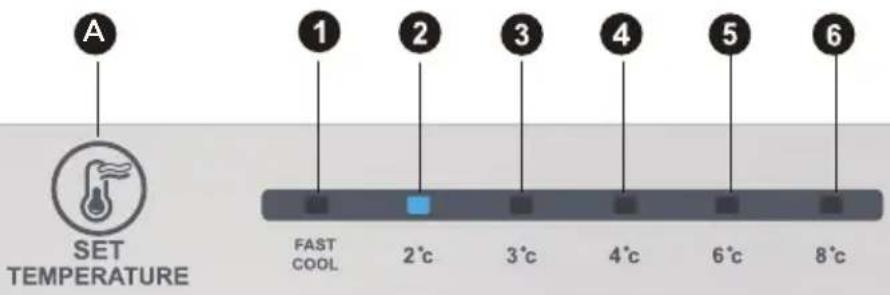
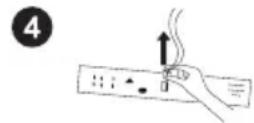
Control panel
ATTENTION
The picture above is only for reference. The actual configuration will depend on the physical product or statement by the distributor.
Key
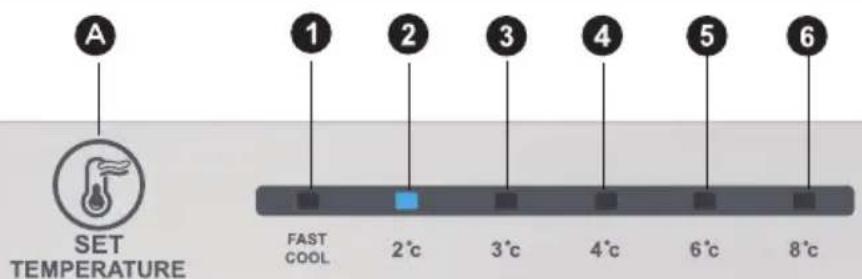
A Alarm/power off/power on button
| Display screen | |
| 1 | temperature setting 1 |
| 2 | temperature setting 2 |
| 3 | temperature setting 3 |
| 4 | temperature setting 4 |
| 5 | temperature setting 5 |
| 6 | temperature setting 6 |
Display
When power-on the refrigerator, the display screen (including the key light) will shine in full for 3s, then the refrigerator runs according to temperature setting 4.
Display of normal running
On the occurrence of a failure, the corresponding LED light will give a combined display of failure code (in recycling display);
Where there is no failure, the LED light will display the existing temperature setting.
ATTENTION
The actual control panel may differ from model to model.
Operating instructions
Gear setting
- The temperature setting will be changed once every time when you press the key SET. Then, the refrigerator will run under the new setting value after 15s. Setting1 - Setting 2 Setting 3 Setting 4 Setting 5 Setting 6 Setting 1
Fast cool mode:
- Enter: Circulating modulation rapid cooling mode.
- Operate: Indicator of rapid cooling lights up, and the refrigerator operates at 2^ .
- Fast cool mode automatically disabled for 24H.
- Fast cool function can be used as Super freezing function.
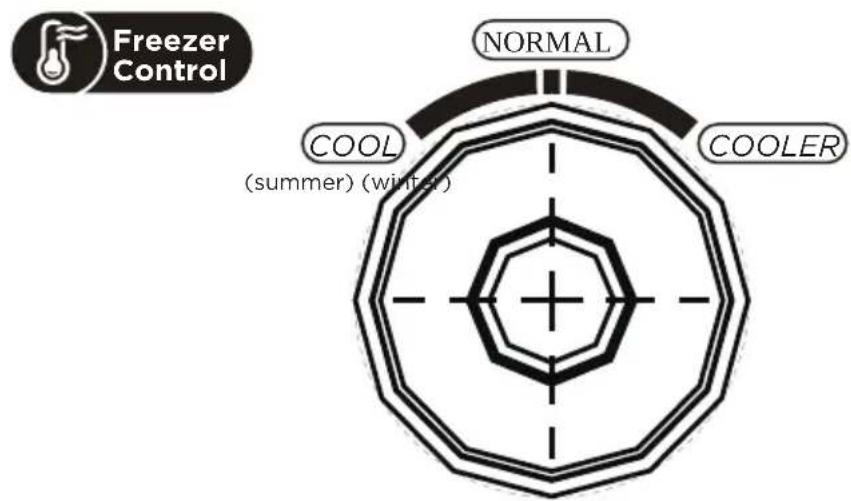
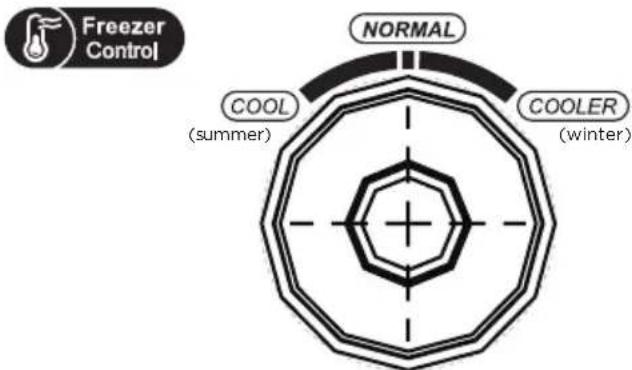
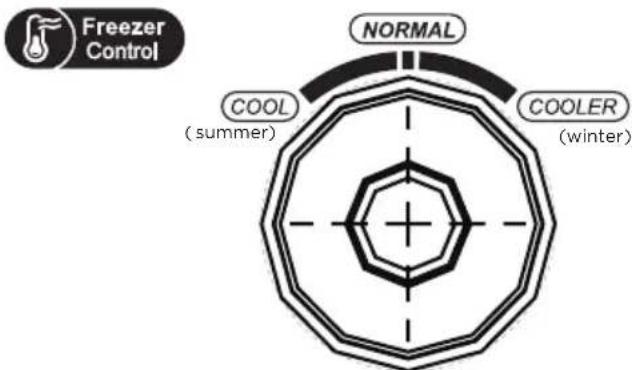
Temperature control of freezing chamber
- The freezing temperature is relatively low in "COOLER" position, while the freezing temperature is relatively high in "COOL" position, thus, "NORMAL" position is generally used.
- When ambient temperature is high in summer, the temperature shall be in the range from "NORMAL" to "COOL". If the ambient temperature is above 35^ , then "COOL" position shall prevail.
- When ambient temperature is low in winter, the temperature shall be in the range from "NORMAL" to "COOLER". If the ambient temperature is below 10^ , then "COOLER" position shall prevail.
Error code
- The following warnings appearing on the display indicate corresponding faults of the refrigerator.
- Though the refrigerator may still have cooling and freezing function with the following faults, the user shall contact a maintenance specialist for maintenance, so as to ensure normal use of the refrigerator.
Fault Code Fault Description
The LED 1 and LED 2 lit Refrigerator temperature sensor circuit
The LED 1 and LED 3 lit Freezer defrost sensor
The LED 1 and LED 4 lit Ambient temperature sensor
Refrigerating chamber
- The Refrigerating Chamber is suitable for storage of a variety of fruits, vegetables, beverages and other food consumed in the short term,suggested storage time 3days to 5days.
- Cooking foods shall not be put in the refrigerating chamber until cooled to room temperature.
- Foods are recommended to be sealed up before putting into the refrigerator.
- The glass shelves can be adjusted up or down for a reasonable amount of storage space and easy use.
Freezing chamber
- The low temperature freezing chamber may keep food fresh for a long time and it is mainly used to store frozen foods and making ice.
- The freezing chamber is suitable for storage of meat, fish, rice balls and other foods not to be consumed in short term.
- Chunks of meat are preferably to be divided into small pieces for quick freezing and easy access. Please be noted food shall be consumed within the shelf time.
| Order | Compartments TYPE | Target storage temp. [°C] | Appropriate food |
| 1 Fridge +2 ~ +8 | Eggs, cooked food, packaged food, fruits and vegetables, dairy products, cakes, drinks and other foods are not suitable for freezing. | ||
| 2 (**)*-Freezer | ≤-18 | Seafood (fish, shrimp, shellfish), freshwater aquatic products and meat products (recommended for 3 months, the longer the storage time, the worse the taste and nutrition), suitable for frozen fresh food. | |
| 3 ***-Freezer | ≤-18 | Seafood (fish, shrimp, shellfish), freshwater aquatic products and meat products (recommended for 3 months, the longer the storage time, the worse the taste and nutrition), suitable for frozen fresh food. | |
| 4 **-Freezer | ≤-12 | Seafood (fish, shrimp, shellfish), freshwater aquatic products and meat products (recommended for 3 months, the longer the storage time, the worse the taste and nutrition), suitable for frozen fresh food. | |
| 5 *-Freezer | ≤-6 | Seafood (fish, shrimp, shellfish), freshwater aquatic products and meat products (recommended for 3 months, the longer the storage time, the worse the taste and nutrition), suitable for frozen fresh food. | |
| 6 0-star -6 ~ 0 | Fresh pork, beef, fish, chicken, some packaged processed foods, etc. (Recommended to eat within the same day, preferably no more than 3 days). Partially encapsulated processed foods (non-freezable foods). | ||
| 7 Chill -2 ~ +3 | Fresh/ frozen pork, beef, chicken, freshwater aquatic products, etc. (7 days below 0°C and above 0°C is recommended for consumption within that day, preferably no more than 2 days). Seafood (less than 0 for 15 days, it is not recommended to store above 0°C. | ||
| 8 Fresh food 0 ~ | +4 | Fresh pork, beef, fish, chicken, cooked food, etc. (Recommended to eat within the same day, preferably no more than 3 days) | |
| 9 Wine +5 ~ +20 Red wine, white wine, sparkling wine, etc. | |||

ATTENTION
please store different foods according to the compartments or target storage temperature of your purchased.
CLEANING AND MAINTENANCE
Overall cleaning
- Dusts behind the refrigerator and on the ground shall be timely cleaned to improve the cooling effect and energy saving.
- Check the door gasket regularly to make sure there are no debris. Clean the door gasket with a soft cloth dampened with soapy water or diluted detergent.
- The interior of the refrigerator should be cleaned regularly to avoid odor.
- Please turn off the power before cleaning interior, remove all foods, drinks, shelves, drawers, etc.
- Use a soft cloth or sponge to clean the inside of the refrigerator, with two tablespoons of baking soda and a quart of warm water. Then rinse with water and wipe clean. After cleaning, open the door and let it dry naturally before turning on the power.
- For areas that are difficult to clean in the refrigerator (such as narrow sandwiches, gaps or corners), it is recommended to wipe them regularly with a soft rag, soft brush, etc. and when necessary, combined with some auxiliary tools (such as thin sticks) to ensure no contaminants or bacterials accumulation in these areas.
- Do not use soap, detergent, scrub powder, spray cleaner, etc., as these may cause odors in the interior of the refrigerator or contaminated food.
- Clean the bottle frame, shelves and drawers with a soft cloth dampened with soapy water or diluted detergent. Dry with a soft cloth or dry naturally.
- Wipe the outer surface of the refrigerator with a soft cloth dampened with soapy water, detergent, etc., and then wipe dry.
- Do not use hard brushes, clean steel balls, wire brushes, abrasives (such as toothpastes), organic solvents (such as alcohol, acetone, banana oil, etc.), boiling water, acid or alkaline items, which may damage the fridge surface and interior. Boiling water and organic solvents such as benzene may deform or damage plastic parts.
- Do not rinse directly with water or other liquids during cleaning to avoid short circuits or affect electrical insulation after immersion.

ATTENTION
Please unplug the refrigerator for defrost and cleaning.
Defrosting
- The refrigerator is made based on the air-cooling principle and thus has automatic defrosting function. Frost formed due to change of season or temperature may also be manually removed by disconnection of the appliance from power supply or by wiping with a dry towel.
Cleaning of door tray
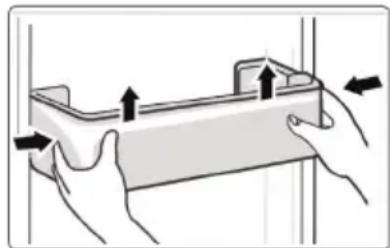
- According to the direction arrow in the figure below, use both hands to squeeze the tray, and push it upward, then you can take it out.
After washing the tray having been taken out, you can adjust its installing height in accordance with your requirement.
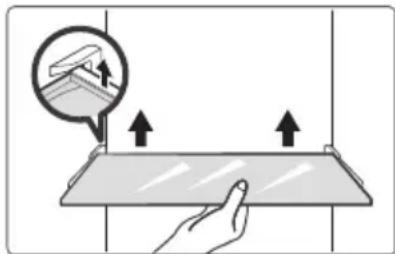
Cleaning of glass shelf
- As the innermost part of the refrigerator liner where contacting the shelves has a backstop, you shall raise the shelves upward, then you can be able to take it out.
- Adjust or clean the shelves according to your requirement.
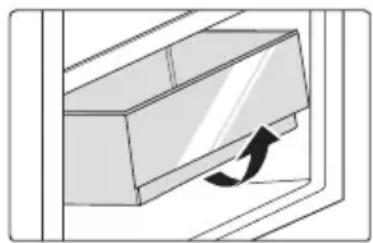
Cleaning the vegetable drawer
- Remove the contents of the drawer. Hold the handle of the vegetable drawer and pull it out completely until it stops.
- Lift the vegetable drawer up and remove it by pulling it out.
Out of operation
Power failure:
In case of power failure, even if it is in summer, foods inside the appliance can be kept for several hours; during the power failure, the times of door opening shall be reduced, and no more fresh food shall be put into the appliance.
Long-time nonuse:
The appliance shall be unplugged and then cleaned; then the doors are left open to prevent odor.
Moving:
Before the refrigerator is moved, take all objects inside out, fix the glass partitions, vegetable holder, freezing chamber drawers and etc. with tape, and tighten the leveling feet; close the doors and fix them with tape. During moving, the appliance shall not be laid upside down or horizontally, or be vibrated; the inclination during movement shall be no more than 45^ .

ATTENTION
The appliance shall run continuously once it is started. Generally, the operation of the appliance shall not be interrupted; otherwise the service life may be impaired.
TROUBLESHOOTING
The following simple issues can be handled by the user. Please call the after-sale service department if the issues are not solved.
| Problem Possible reason | |
| Failed operation | ·Check whether the appliance is connected to power or whether the plug is in well contact |
| ·Check whether the voltage is too low | |
| ·Check whether there is a power failure or partial circuits have tripped | |
| Odor | ·Odorous foods shall be tightly wrapped |
| ·Check whether there is any rotten food | |
| ·Clean the inside of the refrigerator | |
| Long-time operation of the compressor | ·Long operation of the refrigerator is normal in summer |
| ·when the ambient temperature is high It is not suggestible having too much food in the appliance at the same time | |
| ·Food shall get cool before being put into the appliance | |
| ·The doors are opened too frequently | |
| Light fails to get lit | ·Check whether the refrigerator is connected to power supply and whether the illuminating light is damaged |
| ·Have the light replaced by a specialist | |
| Door can not be properly closed | ·The door is stuck by food packages Too much food is placed |
| ·The refrigerator is tiltedr. | |
| Loud noises | ·Check whether the floor is level and whether the refrigerator is placed stably |
| ·Check whether accessories are placed at proper locations | |
| Door seal fails to be tight | ·Remove foreign matters on the door seal |
| ·Heat the door seal and then cool it for restoration (or blow it with an electrical drier or use a hot towel for heating) | |
| Water pan overflows | ·There is too much food in the chamber or food stored contains too much water, resulting in heavy defrosting |
| ·The doors are not closed properly, resulting in frosting due to entry of air and increased water due to defrosting | |
| Hot housing | ·Heat dissipation of the built-in condenser via the housing, which is normal When housing becomes hot due to high ambient temperature, storage of too much food or shutdown of the compressor is shut down, provide sound ventilation to facilitate heat dissipation |
| Surface condensation | ·Condensation on the exterior surface and door seals of the refrigerator is normal when the ambient humidity is too high. Just wipe the condensate with a clean towel. |
| Abnormal noise | ·Buzz: The compressor may produce buzzes during operation, and the buzzes are loud particularly upon start or stop. This is normal. |
| ·Creak: Refrigerant flowing inside of the appliance may produce creak, which is normal. | |
APPENDIX
Special for new European standard
The ordered parts in the following table can be acquired from Service provider channel
| Ordered part Provided by | Minimum time required for Provision | |
| Thermostats Professional maintenance personnel | At least 7 years after the last model is launched on the market | |
| Temperature sensors | Professional maintenance personnel | At least 7 years after the last model is launched on the market |
| Printed circuit boards | Professional maintenance personnel | At least 7 years after the last model is launched on the market |
| Light sources Professional maintenance personnel | At least 7 years after the last model is launched on the market | |
| Door handles Professional repairers and final users | At least 7 years after the last model is launched on the market | |
| Door hinges Professional repairers and final users | At least 7 years after the last model is launched on the market | |
| Trays Professional repairers and final users | At least 7 years after the last model is launched on the market | |
| Baskets Professional repairers and final users | At least 7 years after the last model is launched on the market | |
| Door gaskets Professional repairers and final users | At least 10 years after the last model is launched on the market | |
Dear customer
- If you want to return or replace the product, please contact the store where you buy.
(Remember to bring the purchase invoice)
- If your product breaks down which needs to repair, please contact after-sales service provider.
ATTENTION
The model information in the product database, as well as the model identifier, can be obtained through a weblink scanned by a QR code, if any, on the energy efficiency label of the product.
For more information about the energy efficiency of the appliance, visit https://ec.europa.eu and search using the model name.
The model name can be found on the rating label of the appliance.
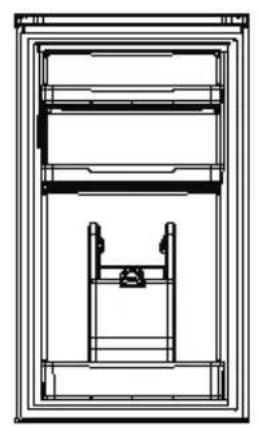
Coldest zone in the refrigerator
OPTIONAL: OK-temperature indicator
- The OK-temperature indicator can be used to determine temperatures below +4^ . Gradually reduce the temperature if the sign does not indicate "OK".
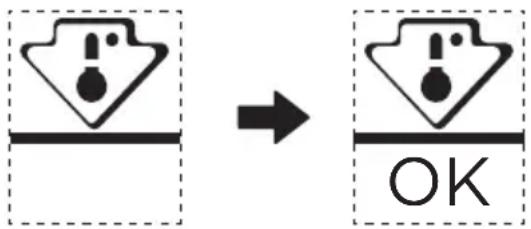
- To ensure the temperature in this area, do not change the positioning of the shelf. Inforced air refrigerators (equipped with a fan or No Frost models), the symbol of the coldest zone is not represented because the temperature inside is homogeneous.
Temperature indicator setting
- To help you set your refrigerator well, it is equipped with a temperature indicator that will monitor the average temperature in the coldest zone.
- WARNING: This indicator is intended to work only with your refrigerator, do not use it in another refrigerator (in fact, the coldest zone is not the same), or for any other use.
Checking the temperature in the coldest zone
- With the temperature indicator, you can check regularly that the temperature of the coldest zone is correct. Indeed, the internal temperature of the refrigerator depends on several factors such as the ambient temperature of the room, the amount of food stored and the frequency of door opening. Take these factors into consideration when setting the device.
- When the indicator shows " OK ", this means that your thermostat is well adjusted and the internal temperature correct.
- If the indicator of temperature turns WHITE, this means that the temperature is too high; in this case, increase the refrigerator temperature control setting and wait for 12 hours before performing a new visual inspection of the indicator. When fresh food has been introduced or the door has been left open, it is possible for the indicator of temperature to turn WHITE after a while.
LETTERA DI RINGRAZIAMENO
LIMPEZA E MANUTENÇÂO
Limpeza geral
Aiaotaoeic kai aTooTaeic
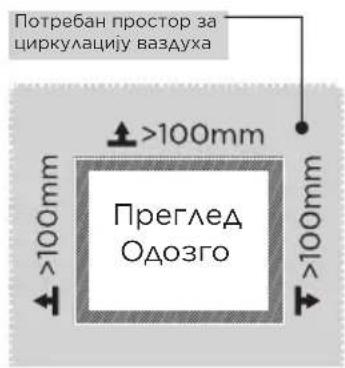
OUIIePBoIAkAikpEc aIOoTaoEic aIIO TAPaKeiEvva AVIKeIeVA EvExTeai va Oynnoov eUIOBAtn ts IKAVOTnTaC katauugns kai oE auNMeVn Katavalwon nAektpiKnc EvpeiaC. Kata tnv EYkataoTaon tnC oukeuNC, apnoTe aiooTaon Tavw ano 100 mm aTIO KAOE TAPaKeIevo ToIxO.

PPO2OXH
H npapavw eikova Tpoopiζeai mvo yia okoTouc avapopac. H diapoppwon Egaptatai aTTO EKAOTTE Poiov n Tn dnawon Tou diovua.
Courant nominal O .6 A
Dimension globale (H x L x P) 1800 x 545 x 625 mm
PRÉSENTATION DU PRODUIT
Noms des composants
1 Lumière LED
4 Tiroir
2 Etagere
5 Plateau de porte
RIESENIE PROBLEMOV 17
DODATOK 19
SPECIFIKÁCIE
Fast cool (Gyors huts) uzemmod:
PRODUKTA PÄRSKATS 03
PRODUKTA UZSTÄDISHANA 04
EKSPLUATACIJAS INSTRUKCIJAS 11
TIRISANA UN APKOPE 15
PROBLEMU NOVER'SANA 17
PIELIKUMS 19
SPECIFIKACIJAS
HHCTAALAUJA IPOIN3BODA 04
YIYTCTBO 3A PAA 11
CHWTHHe N OADPKABAHb 15
PEUABAHEPPOEEMA 17
OoataK 19
CNEUΦNKAUNJE
| Модал пОНЗВОДа | MDRB380FGE SERIES |
| Запremина одевka за склоадиштейbe сбже xранe 199L | |
| Запremина склоадиштейba смрзныхранe 71L | |
| Тип одmpзаваьа Camocстално одmpзаванje | |
| Вөрeme пораста TemпераType 7h | |
| Кашитет замрзаваьа 3,5kg/24h | |
| Наон | 220-240V~ |
| Номина на стуja 0,6A | |
| УкYPна димензija (В x Ш x Д) 1800x545x625mm |
SR
ПЕГАЕД ПОИЗВODА
Ha3nBn KOMnoHeHTN
1 LEDocBeTbeHe
4Φnoka
2 Poinua
5 OoP Tpa
3 Kytnja 3a Bohe n nobphe
6 AncneH3ep 3a BODy (onuHO)

TAKHbA
Cnka n3Haad cnyxncam0 3a pepepehcy. CTbapHa KOHfpyauja 3abucne oD fN3uKor npoun3BOda nn nn 3jaabe dncptpu6ytepa.
INHCTAANJAPON3BODA
YnyTCTBO 3a INHCTaInpaIbe
3a pacxAaHpehaje ca KAnMaTCKOM Kaacom
- Y 3aBnCHoCTN OD Kλace KλImMaTn3aζηje, OBaj ypehaj 3a xλaHeJe je HameHjeh Da ce KopnCTN y paCnoHy OKOAnHe TempepaType npnKa3aHe Ha CλeDeHoJ Ta6eAn.
- Kλacy kλιMaTn3aζηje moKæTe npOhaHn Ha Ta6λιζι ca nOdaζma. Προι3BODMOxDa HeHe nCπpaBnO paDHTn Ha TempeNaTypAm aN3BaH oDpeHεHor oncera.
- Kλacy kλιMaTn3aζηje moXeTe npOHaHn Ha etNkeTn npOu3BOda.
EΦeKTHBHN TeMnepaTyphN onCeR
- PpOu3BOD je An3ajHnpaH Da HopMaAHO paAn y TempepaTyphOM Oncery OaPeHemO y HBeROBoJ KAcN.
| Клaca Симбов | Опсер ТемпераType okолиne °C | |
| ИEC 62552 (ИСО 15502) | ИСО 8561 | |
| Проблема умeperна SN+ | 10do + 32 | + 10do + 32 |
| Умeperна H + 16 do + 32 + 16 do + 32 | ||
| Сymb�порская ST+ 16 do + 38 + 18 do + 38 | ||
| Тропская T + 16 do + 43 + 18 do + 43 | ||
AnMeH3nje npa3Maun
- Ppema yda/behoc Tc CyceHn X ppeMaTa MoKe DOBecTn DO CmaHeBa cnoc6HocTN 3aM3aBaHa N NOBeHaHa TpoWKoBa eEeKtpnue Heepnje. Octabnte Bnse Od 100 MM cAo6oHOr npocToPa Od CBAkor cycedHor 3nda npNkOM nOCTaBbHa Yapehaja.


NAKbA
Cnka n3Ha d cLyKc caMo 3a pepepeu. CTBapHa KOHfNpyauJa 3aBncHe oD fN3NkO npOn3BOda nn H3jaBe Anctp6yTepa.
Anjarpam notpe6a 3a npocTopom (kaa cy bpaTa OTbopeHa N Kaa cy BpTa 3aTbopeHa)
A
C
SR
| Ширinia | С党支部а Висиа | Дубiosa | Ширinia враза се отвара 135° | Адения враза сe отвара 135° |
| A BCDE | ||||
| 54518006 | 25 8201070 |
HanomeHa: CBe dImeH3nje cy y MM
Hore 3a HnBeAIncaHbe
△a 6n ce n36erIe Bn6paunje, jejHnua Mopa 6ntn HBeAncaHa.
Ako je noTpe6Ho, noDecuTe 3aBpTHe 3a HnBeIncaHe Da 6nCTe KOMneH3OBaHn HepaBHn NOd.
IpeHbN Deo Tpe6a Da 6yde HeuTo BnUn Oa 3aAHer Da 6n Ce AakSe 3aTBOpHbAe BpaTa.
Buiu 3a HnBeIncaHbe Mory ce Iako OKpeHyTu AaraHm HaunBaHem KyHnUta.
Okpene 3aBPTbe 3a HnBeAuncahe y cmepy cynpoTHOM oKa3a/bke Ha caty Da 6ncTe npAnI jeuHnUy, y cmepy Ka3a/bke Ha caty a 6ncTe je cnycTnAn.
Pomepahe ypehaja
- Ппс Hero Што се Фриждерnomepа, ИЗвуцпес СBE прдмete HaNoByИ NCKычпЕ Hanaja№.
2.ФИКСИРAJTe AENbHbOM TpaKOM CTaKHe NperpaDe,ApXaU NOBpHa,ФIOKe KOMOpe 3a 3aMP3aBaHbe NTd.NCTeHNTe Horape 3a HnBeAuncaHje,3aTBOpHTe Bpata N HbIX NcTO 3aueNITE - Пжьно nomepajte ypehaj ca Bnwe od ABe ocObe. Tokom nomepaHa, ypehaj He cme Da 6yde npeTepaHo NOAOKeH HaONaKO HAn XOpN3OHTaHNO, HNTu Da 6yDe Bn6pnpaH; Harn6 TOKOM KpeTaHa He cme 6ntn BeHn o4 45^
- HakoH nHcTaA npaHa ypehaja, npKbYuHTe yTuKaU y TuUnu Da 6nCTe yKbYuAnu ypehaj.

TAKHbA
Mepe onpe3a npe onepauzije:
Ipe 6nlokaBnx n3MeHa φpIXndep Mopa 6ntn NCKbUeyen n3 HanajaHa, noTpe6Ho je npey3eTn. IpeBeHTNBHe Mepe Da 6n Ce n36erA AnuHa Nobpeda.
NoctBa/baHe
- Пп Коришени, уклонт e MaTeprnjaA KoJIM je ynaKOBaHO, yKbvyjyHn DoHbe jactyuHHe oI neHe, n TpaKe yHyTap φpIXnDEpa, noцeJaTe 3aHTnTHy φOAnjY Ha BpATMa n O6Ody φpIXnDEpa.
- Apxatn Iopabe Oa TOIATE N AnpeKTHe cyHueBE CBETAOCTN. He nocTaBbaTn npkndep Ha BAAxHm nn MOKpM MeCTMa da 6n ce n36erla pha nn CmaHno ekekat n3oAunje.
He npckajte HNTn nepnte npkndep, He nocTabbATn npkndep Ha BAAKHIM MeCTMa Tde 6n Aako DOwAo DO npckaHb BAOM, KaKO He 6n yTucaAo Ha eAektpnuHy n3Oaunjy npkndepa.
-Фпиждер спocтавауdoбpo npobetpeho 3aTbopeHo MeCTO;noIaIra Tpe6a da 6yde paBHa n YBpCTa (poTnpajTe AeBO IAN DeCHO da NODecHTe ToaK 3a HINBeAICaHBe aKO je HeCTa6NtHO).
5/16" HacTaBak n noAγa
Umpaxla Upaqurep ca TaHKIM CeYBOM
CamoIeIbIbVa TpaKa
Kopak
- MoIIMO nCKbvyuTe ypehaj npe noeTka onepaunje.
YkloHnTe CBy XpaHy n3 noCTabe Ha BpaTIma. 3aAennte Bpata TpaKOM. - PacTabuTn NOKLOnauc OTBopa, NOKLOnauc WaPkn I RopHy WaPky.
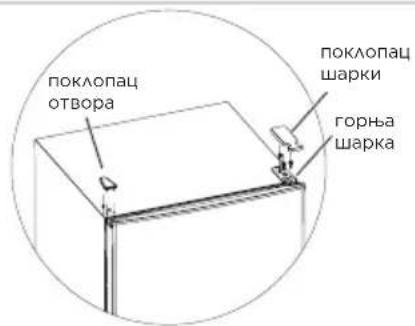
- YKLOHHTN Bpata KOMOpE pnnnepa, cpeBHy wapky (KOpNCHTN Nm6yc KByu 3a yKHaBaHe WpaΦa CpeBHe wapke) nOKoNaC OTbopa Ha dpyroj CTpaHI.
- YKLOHHTN BpTa KOMOpE 3aMp3nBaHa, pa3MOHTnpaTn DObY ShApKy, NOKLOnaC OTBOPa, Horape 3a HnBeAIncaHe, INoCTaBHTN DObY ShApKy Ha cynpoTHoj CTpaHn.
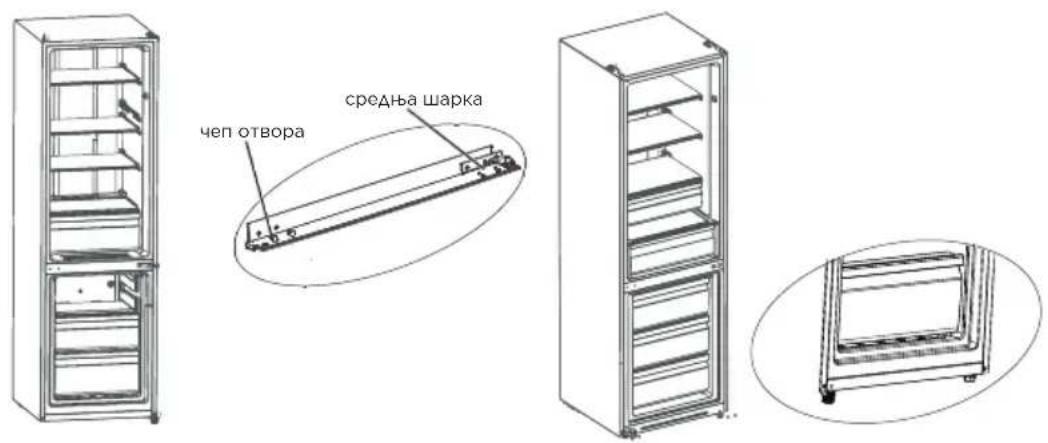
- a)Pa3MOHTnpaTn che, pyKaBaU BpaTa paCXHaDHe KOMope, nocTabNTn pyKaBaU n che y DOHbEM AEBOM DeAly BpTa nomohy wpa?a. b) Pa3MOHTnpaTn che, pyKaBaU BpaTa 3amp3nBau, nocTabNTn pyKaBaU n che y DOHbEM AEBOM DeAly BpTa nomohy wpa?a. CkHyTu pyKaBaU n PoklOncu OTbopa Ha BpTaUMa 3amp3nBaua n noCTabNTn nx Ha cynpoTHoJ cTpaHn.
- ПocТаВИТи ВраТа 3aMPЗИВача Ha DoHbу ШарКу, 3aTиM ПocТаВИТи CpeДышapКу И NOKАОпe OTВopa.
-
NocTabuTn 6paTa pacxHaHe KOMope Ha cpeHbOJ wapu, 3aTm NoCTaBtu TropBy wapky noklonnauc wapke.
-
NocTaBnTb 6paTa pacXaADHe KOMope Ha cpeAboj wapu, 3aTm NocTaBnTn rohBy wapky n oKlonauc wapke.
Caehe ce Mopa notBpntn ppe nocTbba hba nokoanca rophe wapke. ⅢpafoBN KOJN dpxke wapky mopajy 6nTn Tecno npnbjeH y3 nobpunHy wapke, da 6n ce ocngypaLo da wpaΦ Hnje NCKoUeH. HakoH noCTBaHa hza wapkn, npOBepNT Da An ce Tpece.

NAKHB
Cnka n3Haad cnykncam0 3a pepepehcy. CTbapHa KOHfpyaujia 3abucne oA fN3uKor npoun3BOda nn nn 3jaBe dncTp6ytepa.
Kopnshebe AncpeH3epa 3a BODy(OnuHO)
- Пьво OTВОРИТN NOKДОпа 3a улд BODE, HAnyHITN BODOM 3a пиHe Do "MAX", o6eJExKeHO kao HajBeHa KOnuHnHa BODe.
- Kopncnttu che 6n cTe npntncny An peknda, Bda he noeTu da Teue, KaDa ce npeknaay BpaTu y npBO6nTu No3uNjy, BOa npecTaje Da Teue.
- Anncnep 3a Body Moke da Ce Kopnctu NCKbUyBO 3a uNCTy BDOy, Hne noroAHO 3a nnHn BOHe COKOBe.


PnpomeHa cBeTla
KaDa He nocToJn Kbap, LED Aamnua he npka3nBaTu TpeHyTHo NoadeShaBaHe TemnepaType.

TAKHbA
CTbapHa KOHTPOLambda Ta6Lambda MoKe ce pa3ANKOBaTN Od MODeLambda DO MODeLambda.
YnycTBO 3a pyKoBaHbe
NoeShaBaHe 6p3nHe
- POneUaBaHbTe TemnepaType he ce npomeHHT jeAHOM CBAKN nyT KaDa npuTncHeTe Tactep SET. 3aTm, fpuKnAep he paAnTu NO BpeHocTn HOBOr POneUaBaHa HAKOH 15 ceKHydN.
e山 aBaBe1 NoeWaaBaBe 2 NoeWaaBaBe 3 NoeWaaBaBe 4 NoeWaaBaBe 5 NoeWaaBaBe 6 NoeWaaBaBe 1 ....
Pexkm Fast cool (6p30r xHaheba)
- Yλa3: Pēχιm rapid cooling (6p3or xλaḥeBa) ca Módyλaúnjom Σιρκyλaúŋe.
- Ynpabbahe: INHdkatop 6p30r xaaheBa ce ocBeTbaBa n φpnxnep paHn Ha 2^
- Pexim Fast cool (6p30r xhaheHa) je ayTomatckn nckbyueH ha 24 cata.
-Функида Fast cool (6p30r xhaheHa) moKe Da ce KOpncTn kao yHKuJa Super freezing (Cynepe 3amp3aBaHa).
KoHTpOa Tempeatype KOMope 3a 3aMpa3aBaHbe.
- Tempepatya 3a 3amp3abahe je 3HaTHO Hnka y no3ujiN "COOLER (XAAADHNIJE),doK Tempepatya 3a 3amp3abahe 3HaTHO BncoKa y no3ujiN "COOL (XAAADHO)36or 3ora ce no3uja "NORMAL (HOPMAAHO)" o6nuho KOpNCtN
KaJa je OKoHa TEmpepaTpa BnTa TOKOM Aeta, TempepaTpa 6n Tpe6aHa 6nTu paCnoHy n3Mehy "NORMAL (HOPMAHO)" do "COOL (XAAADHO)". Ako je OKoHa TempepaTpa BnTa oD 35^ , TaDa he npoe6aDatn no3uJa "COOL (XAAADHO)".
KaJa je OKoHa TeMnepaTpy Hxka TOKOM 3HMe,TeMnpaTpy 6n Tpe6aAa 6nTu y paCnoHy n3Mehy "NORMAL (HOPMAHO)"do "COOLER (XAAADHNJE)". Ako je OKoHa TeMnpaTpy Hxka oD 10^ ,TaDa he npeOBaDaTu no3uJa COOLER (XAAADHNJE").
KoA rpewke
Control temperatura in compartmentul congelator
HaHMeHOBaHHa KaKOMNoHEHTIte
1 LEDocBeTaeHne
4 YeKeMeAke
2 PaΦT
5 PaΦT Ha BpaTa
3 KyTna 3a nAoDoBe H 3eAnHuCn
- a) DeMoHTnpaIte TanaTa, BTyKOBaTa Tpb6a Ha BpaTaTa Ha XaAnHaTa KaMepa. CrIo6eTe BTyKOBaTa Tpb6a N TaNaTa B DOAnHaTa ABya YacT Ha BpaTaTa C BnHT. 6) DeMoHTnpaIte CTonepa I BTyKaTa OT AChHaTa CtpaHa Ha BpaTaTa Ha KaMepaTa 3a 3aMpa3BaHe, MOHTnpaIte BTyKaTa N CTonepa B DOAnHaTa ABya YacT Ha BpaTaTa C NOMoUta Ha BnHT. CbAeTe BTyKOBaTa Tpb6a N KaNaKInTe Ha OTBOpHt E Ha BpaTaTa Ha KaMepaTa 3a 3aMpa3BaHe I R MoHTnpaIte OT ApyraTa CtpaHa.
b
- NocTaBeTe BpaTata Ha 0pIn3epHaT a KaMepa Ha DOAHaTa NaHTa mOHTnpaTe CpeHaTa nAHTa u KanauKnTe Ha OTBOpNTe.
-
NocTaBeTe BpaTaTa Ha XaAnHaTa KaMepa Ha CpeHaTa NaHTa N MOHTnpaTe TropHata NaHTa N Kanaka Ha NaHTata.
-
NocTabete BpaTata Ha XaHaHaTa KaMepa Ha CpeHaTa NaHTa N MOHTnpaTe roPHaTa NaHTa N Kanaka Ha NaHTata.
IpeAn Da MOHTnpaTe KaNaka Ha TropHaTa NaHTa, Tp86Ba Da NOTBbPdNTe CaeHTo. BnHTOBete, KOnTO AByPkaT NaHTata, Tp86Ba Da 6bDaT NbTHo PnTnCHaTN KbM NOBbPxHOCTTa Ha NaHTata, 3a Da ce rapaHTnpa, Ye BnHTbT He e pa3MeCTeH, CKeD KaTo NaHTata e MOHTnpaHa, ce yBepete, Ye Hma pa3KlaUaHe.
BHIMAHNE
KaptnHkata rope e npimepHa. PeaHaTa KOHpypaun 3aBnCn O T Φn3nueckn npOdyKT nIIN3RAeHne ot dncptp6yTopa.
I3noaBaHe Ha AncpeHcbpa 3a BOa (He3aAbXKNTeHN)
- TbpBO OTBopTe BXOHNa KaNaka 3a BOda, HnBHeTe C nHTeHa BOda Do "MAX (MAKC), OT6eA3BaUo MAKCmAmHOTo KOAnueCTBO BOda.
2.ИЗпОАВайтЕЧАшАТа,3aДаHaTиСHTe CnYCbKa KbM BbTpEshOCTTa,BODaTa UeNoTeue,aKOraTO CnYCbKbT Ce BbpHcBПьрBOHaaHOTO NOLOXKeHHe,BODaTaUe cnpe. - AnncnecbpbT 3a B0da MoKe da ce n3no3Ba cAmo 3a uNCTa BOda, He e NOxOAnu 3a HAnNTKn NAn PAnOBOu COKObe.

Смяна на сбетанhaТа
BcKa IoAMHa HnpeMOHT Ha CBeTOAnOAHnte Aamn Tpr6Ba Da ce n3BbPwBa OT npON3BOaNTeA, HeROB cepBn3eH PpeCTaBNTeA nn CXoADHO KBaHnΦuNpaHo AnCe. To3n pOyKT cbDbpxkCBeTANHeH N3TOUHNK C KAc Ha eHeprHa eΦeKTHBHOCT
CTbNka
- Moλ, n3BaTe Te ΜεπCeλ πpeДn OτСтpaHЯВaHe.
- OtctpaHeTe kanaKa Ha oCBeTAnEHNeTO C OTBepTKa.
- CbaAte NaHeAa Ha aaMnaTa.
- OtctpaHeTe KlaMaTa 3a Cbbp3BaHe.
Cbbp3BaHe Ha ypeDa
IpeN nbpBOHaaHTo nyckaHe, OCTaBeTe XaAnHnKa HeNodBnKeH 3a 2 yaca
IpeN CBp3BaHe KbM 3axpaHbHeTo.

BHIMAHNE
Xaannnka Tp6Ba Da pa6oTn 2-3 Yaca npeAn da ce cLoxN npraChn nn 3ampa3eHa XpaHa B Heo nn Da pa6oTn Nohe 4 Yaca npe3 AANTO KOrATo OKoANHaTa TempePaTpa e N0-BnCoka.
CbBeTn 3a NecTeHe Ha eHeprna
- YpeDa TpЯБВа Да e B Hαн-СТУДeHаТаЧaT ha CтЯТа, Дaλeч OT OTОПАnteHnUpeDи ИДиpeKTHa CΛbHueВa CBetAnHa.
- Ппеба Да сLoжиTe xpaHa B XxAaHInHnKa, OCTaBeTe Da ce OxlaAn Do CTaHa
- TempePaTypa. ПпетоварВaIGNуpeDa BOAn Do YBeAnuHaBaHe Ha pa6OtaTa
- Н komпесopa. XpaHN, KOnTO 3aMpb3BaT TBbpDe 6aBHO MoKe Da 3aRy6N
- KaueCTBaTa CS NAn Da ce pa3BaAn.
He 3a6paBraIte Da onakOBaTe xpaHInTe npaBnAnHO n Da n36bpweTe KOHTeHepnte Da ca cyxN, ppeDn Da rN NOCTaBnTe B ypeDa. Toba HamaAraBa HaTpyuBaNHeTo Ha 3aMpb3BaHe BbB BbTpEShOcTTa Ha ypeDa. - ΑbhOTO Ha ypea He Tp6Ba Da nMa aAymHneBO fOAno, xapTna 3a neYeHe nn AOMaknHcKa XapTna. NocTabraHeto Ha Te3n He7a B ypea ige rHa npabN noMaAko eΦeKtNBen.
- OpraHn3npaIte n IocTaBeTe cTKePn Ha xpaHaTa 3a Da HamaNtPe pa3BaAHeTo Ha xpaHaTa. N3BaJdaIte XpaHa Bb3MOxHo Ha-6bp3O, 3a Da HamaNtPe BpeMeTO B KOEt BOpaTAt e OTBopeHa.
ИнструksязАЕКСПОАЦЯ
KoHTpOaH nAHeA

BHIMAHNE
KaptnHkata rope e npimepHa. PeaHaTa KOHpypaun 3aBnC n ot fH3nueckn npOyKT IIN3RAeHne oT dNCTp6yTopa.
KAIIO4
A Byton 3a Alarm/power off/power on (AanapMa/n3KAnOuBaHe/BkAnOuBaHe Ha 3axpaHbAheTo)
EkpaH Na AncPnae
1 NaCTPOIKA Ha TempepaTypaTa 1
2 HacToPoIka Ha TempepaTypaTa 2
3 Hactpoika Ha Tempepatypata 3
4 HactpoNka Ha TemnepaTypata 4
5 HacTpoiKa Ha TempepaTypaTa 5
6 HacTpoIka Ha TeMnepaTypaTa 6
Aucnn
Korato BKAUHTe XaAUNHnka, ekpaHbT Ha DNcPaei (BKAUHTeHNo CBeTnHaTa Ha KluOa) Ie CBETnI3zraLo B IpoAbXkeHne Ha 3 cekyHn, cJeD KOeTO XaADNHNkBT Ie pa6oTn CnopeA TeMnepaTpHa HacTpoNka 4.
HcπIe 3a HopMaHa pa6oTa
Пи ВьзнкВаHe Ha NOBpeДa, cBoTbeThaTa LED cBeTAnHa Ze DaIe KOM6HnHa HnCnIe Ha KoDa Ha NOBpeDaTa (B DnCnIeЯ 3a peuKnIpaHe);
Korato Hama Nobpea, LED nHdkaTOpbT noka3Ba Tekyuata HaCTpoKa Ha Tempepatypata.

BHIMAHNE
KoHTPOAHnIaHnB DaenCTBnTeAHOCT MoKe Da ce pa3AnuBa I npn pa3AnuHnTe MoeAn.
Pekm Ha Fast cool (BbP3O oxAaKdHe):
BbBeDeTe: Pekn Ha rapid cooling (6bp3o oxaKaAHe) c npKyaPaua MoayaaH.
Pa60Ta: HndnKaTOpbT 3a 6bp3o oxAkaHe cBeTba n XaaAnHnKbT pa6Otn npn Tempepatya 2^
- PexkmbT Ha Fast cool (Бьрзо oxaЖдаHe) e aBTOMaTHUHO DeakTNBupaH 3a 24 yaca.
- Φυκυητα 3a Fast cool (Бbvрзо oxλажданe) може да ce n3noλ3ba kaT0
- Фυнкуня 3a Super freezing (Супер зampаэяванe).
TemnepaTypeH KOHTPOHa KaMepaTa
- Tempepatpata Ha 3ampb3BaHe e oTHOCHTeHNO HnCKa B no3uia "COOLER (IO-TOTUHO),doKaTo Tempepatpata Ha 3ampb3BaHe e oTHOCHTeHNO BnCOKa B no3uia "COOL (TOTUHO), n 3aTOBa O6nKHOBeHo Ce n3noA3Ba no3uia "NORMAL (HOPMAALHO).
Korato TemnepaTypata Ha OKoHaTa Cpea e BnCoka npe3 AYTOTo, TemnepaTypata Tp86Ba Da 6bDe B rpaHnUte OT "NORMAL (HOPMAHO)" AO "COOL (TOTNOHO)". Ako TemnepaTypata Ha OKoHaTa Cpea e HAD 35^, TORABA NOOKeHneTO "COOL (CTYAEHO)" Ue NMa PpeAumCTBO.
Korato TemnepaTypaHa OkoHaTa Cpea e Hncka ppe3 3mata, TemnepaTypa Tp6Ba Da 6bDe B rpaHnTe ot "NORMAL (HOPMAHO)"do "COOLER (IO-FTNOHO)". Ako TemnepaTypaHa OkoHaTa Cpea e noA 10^, Toraba npeo6aadaBa no3ueta "COOLER (IO-FTNOHO").
KoA ha rpewka
- CλeHnTe npédynpejxEHnCe nOraBbAT Ha dncnAe, 3a da nHAnKnpaT npo6IeMn C XλaDnAhnka.
Bbnpekuye xAaHnHKbT BCE naK moKe da nMa yHKcIra 3a OxAAkDaHe n 3aMpa3BaHe Cbc CLeADHnTe HEn3PpABHocTn, NOTpe6nteAra Tp8Ba Da ce CbbpKe Cbc CneuaAnCT NO NoAaPbXka 3a N3BbPwBaHe Ha TexHnuecko O6cayXbaHe, 3a Da ce OcnIpyn HopMaANHO To N3NoA3BaHe Ha XAaAHNka.
KoA 3a TpeuKa Onncahne Ha TpeuKaTa
LED 1 n LED 2 cBeTbaT Cxema Ha ceH3opa 3a TeMnepaTpya Ha xHaAnHnKa
LED1nLED3cBeTBaT CeH3Op 3a pa3Mpa3BaHe Ha φpni3epa
LED4nLED4cBeTbAT CeH3Op 3a TeMnepaTypa Ha 3ao6nKaAaTa cpeaa
XaAnHa KaMepa
XaHnHaTa KaMepa e NOxOJa 3a CbXpaHeHne Ha pa3AnuHn PLoOBe, 3eAeHuU, HAnrKu N ApyrN XpaHn, KOnTO Ue 6bDaT KoHCympaHn CKopo. IpenopbUnTeAHOta BpeMe 3a CbXpaHeHne e ot 3 dHn Do 5 dHn.
- IOTBeHn XpaHn He 6bBa Da ce NoCTaBraT B XaAaHnHa Ka PpeAn Da ce OXaAraT Do CtaHa TempepaTypa.
- IpnopbunTeHo e da xepMeTn3npaTe xpaHaTa npeDn da y nOCTaBtE B XaAUNHnka.
- CtbkHeHnTe paΦToBe moKe Da ce HaIaCrt HaRope IAn HAdOy, 3a Da ce OcInrpyn NOxOaIIO pOcTpaHCTBO N AecHa yNoTpe6a.
Φpn3ep
- Hnckkata TemnepaTpya BbB φpni3epHaTa KaMepa MoKe Da 3ana3n XpaHaTa CBexKa 3a DbAByr NepnoD OT BpeMe n Ce NOA3Ba HaN-Beue 3a CkAaHpaHe Ha 3ampa3eHa XpaHa n Ha npabaTa Ha AeD.
- ΦизернаТа Камра e NOДхОДЯЗа 3a XpaHи KaTo MecO, рИба, opиЗOBи TOnКи N Дуги XpaHи, KОПTO He ca 3a ДИпeКТha KOHCyMaци.
- NapueTa MecO e npenopbUHTeAHO Da 6bDaT pa3deAeHn Ha MaAKn napYeTa 3a No-6bp3o 3aMpa3raBaHe n AecEH DoCTbN. MoA 3anomHeTe, ye xpaHInTe ce KOHCymnP aT cnpA moCpoka mHa rOdHocT.
| Поредноct | ТINРОДLENEСИ | UCELEBEATMNEPATypaHa CBxpanenHe [°C] | ПОДХОДЯSHAхан |
| 1XlaAnIaHnK +2 ~ +8 | Яица,rotвенихрана,пакетираныхрана,плобовии зеленчуши,м aleуни пюдукту,Tорту,нанитки и дугихрани - He ca похдяши 3aЗамразявае. | ||
| 2 | (**)*-Фризер | ≤-18 | Морски Дарове (ріба,с capиди, міди),сладковоани пюдукту и месни пюдукту(преторьчы се за 3meсяа, калто по-дылговь врет氧To 3a CBхрavenи,TOKOBа по-лоши саВКUCBТихрантЕАнота StOnHOCST),poДхODяшиЗа замразени песнихрани. |
| 3*** -Фризер | ≤-18 | Морски Дарове (ріба,с capиди, міди),сладковоани пюдукту и месни пюдукту(преторьчы се за 3meсяа, калто по-дылговь врет氧To 3a CBхрavenи,TOKOBa по-лоши саВКUCBТихрантЕАнота StOnHOCST),poДхODяшиЗа замразени песнихрани. | |
| 4**-Фriзер | ≤-12 | Морски Дарове (ріба,с capиди, міди),сладковоани пюдукту и месни пюдукту(преторьчы се за 3meсяа, калто по-дылговь врет氧To 3a CBхрavenи,TOKOBa по-лоши саВКUCBТихрантЕАнота StOnHOCST),poДхODяшиЗа замрazени песнихрани. | |
| 5*-Фriзер | ≤-6 | Морски Дарове (ріба,с capиди, міди),сладковоани пюдукту и месни пюдукту(преторьчы се за 3meсяа, калто по-дылговь врет氧To 3a CBхрavenи,TOKOBa по-лоshi саВКUCBТихрантЕАнота StOnHOCST),poДхODяшиЗа замрazени песнихрани. | |
| 6 O-star -6 ~ 0 | Прясно CBинско, roвекdo, ріба, піл,e,nякови пaketирани петрабOTehи xpaни nT.H.(ПреторьчытELno e da ce koncymparВразмкite Na на CBишя Deh, 3a п徳почитale Do He nopeye ot 3dNi).Частуну Kansasларни петрабOTehи xpaни (храни, коimitsNe He ce zamрazяваT). | ||
| 7OxlaЖданe -2 ~ +3 | Прясно/Замрazeно CBинско, teleшko, пілшko, сладковоани пюдукту и depr. (3a 7dni podA0°Cи наD0°Cce петрportьчы за консуразниВразмкite Na на CBишя Deh, 3a п徳почитale He nopeye ot 2dNi).Морски Дарove (пр по 0Зa 15dni, He ce петрportьчыда с CBхрavenВat naD0°C. | ||
| 8 | Пряснаханa | Прясно CBинско, teleшko, ріба, піл,e,trotberhaха xpaни T.N.(ПреторьчытELno e dace koncymрьВразмкite Na на CBишя Deh, 3a п徳почитaleNo | |
| 9Вино +5 ~ +20 | Червано Вино,бая lo Вино,пеньлво Вино и depr. |

BHIMAHNE
MÖλ, cbxpaHЯBaIte pa3AnuHnTe xpaHn cbo6pa3Ho OTdEaHnra Tnʌn ceaBeBaTa TempePaTpaHa cbxpaHene Ha 3aKynenr OTo Bac.
ПОЧECTBAHEИ ПОДAPьЖKA
O6uO nouHCTBaHe
- Ppax 3aA xAaHnHnka n Ha noDa Tpr6Ba peoBHO da ce nouNCtBa, 3a Da ce noo6pn OXaAnTeHnna eΦeKT n eHeproCneTBAHeTo.
- Поверете враза та уесTo, за доочисту оctа Тьц. Дочисту враза с MeK, ваджен napcaи canyHeHa BODa.
BbTpewHocTtHa XaAnHnKa Tp6Ba Da ce YnCTn YeCTo 3a Da ce n36erHe Mnpnc. - MoЯ n3KIAUOte Yepea npeAn NOuNCtBaHe, npeMaxHeTe xpaHa, HaNITKN, paΦTOBe n T.H.
- Изпολзваite Мек napcaа ИИ Гба 3a Да ИЗЧИСТИЕ ВБТРУSHOCCTTа нахлдИннka, сдев Альжицу СODA и Xладka BODa. Сдд TOВа ИЗПАКHETe C MaIko BOda И ИЗБьршete. Сдд NOчИСТВaHe, OTВОпЕ ТВаТа TИ ИСТавETe ДА ИЗСБХе DT CamOse6ecn ПpeД N DA BKЛQUHITe ypeDA.
3a MeCTaTAtpydHn 3a NOuchTaBHe B XAAADHnKa (KaTO TeCHn IpoceH), ce PpeOpbUBa Da Ce N3POn3Ba MeKa YeTKa n aKO e HuyKHN I apyRn IocO6n 3a NouchTaBHe 3a Da Ce NODcNpyrnppeMaxBaHe Ha 6akTeepnn n Cb6npaHe Ha MyXbA.
He n3no3BaIte canyH, 6eAnHa, npa, cnpen H. KaTo Te MoarTa oCTaBRT MInpN3Mn CLeA, NouICTBaHe.
-Изунлгото 3a HanNTkn Ha BpaTaHa XAnAInHnka C canyHeHa BOda n BlaJKe Hapua. YncTeTe C BlaJKeH napcaanmOCTaBeTe Da n3cbxHe caM. - N36bþpse Te BbHsHaTa YacT Ha XaAaHnHaKa C BλaKeH napcaa Hanoe H c canyHeHa BOda, npenapat 3a NOueCTBaHe n T.H n Cæd TOBa N36þpseTe.
He n3noa3BaIe TBbpAn YeTKn, YnCTn CTOMaHEn TOnKn, TeAeHn YeTKn, abpa3nBn (kaTo nactn 3a 3b6n), opraHnHn pa3TBopnteN (KaTo aAkoXoA, aTeOn, bHaHOBO MacAo np.). Bpaa Boa, KnceAHHn nn aAkaAHN ppeMeTn, KOto MoarT Da NobpeJr NOBpXHocTTa Ha XAaAHHaNkA u HInTeepnop. Bpaa Boa n opraHnHn P3TBopnteN MoKe Da AeOpMnpaT PAACTMaCobNTe qactn Ha ypeDa.
He n3nAkaBaiTe dIpeKTHo C B0da nn DpyrN TeuHOCTn DOkato YnCTnTe 3a da n36erHeTe KbCO cBeDnHeHne.

BHIMAHNE
Moi n3KauoTe XaAnHnKa 3a pa3Mpa3BaHe n nouCTBaHe.
Pa3mpa3raBaHe
XaHnHaKa e 6a3npaH Na npHcHNa Ha Bb3dUH OXaJdaHe n 3aTOBa HMa yHKuN 3a aBtOMaTnUHO pa3Mpa3raBaHe. Ckpex, oOpMnpaHa nopadn CMHaTa Ha Ce3OHa MoKe Da Tp86Ba Da 6bDe npemaxHaTa pbH0 KaTo N3KIOHTe ypeDa n 3a6bpWeTe ypeDa cbc cyxa Kbpna.
INSTALIMI I PRODUKTIT
Instruksionet e Instalimit
Pér pajisjet ftohëse me klase klimatike
make yourself at home

- CONTENTS
- SPECIFICATIONS
- PRODUCT OVERVIEW
- Names of components
- ATTENTION
- PRODUCT INSTALLATION
- Install Instruction
- For refrigerating appliances with climate class
- Effective temperature range
- Dimensions and Clearances
- Leveling feet
- Moving the appliance
- Placement
- Door right-left change (optional)
- CAUTION
- Tools needed for changing the door:
- Step
- Usage of water dispenser (optional)
- Changing the light
- Connecting the appliance
- Tips for energy saving
- OPERATION INSTRUCTIONS
- Key
- Display
- Operating instructions
- Gear setting
- Fast cool mode:
- Temperature control of freezing chamber
- Error code
- Fault Code Fault Description
- Refrigerating chamber
- Freezing chamber
- CLEANING AND MAINTENANCE
- Overall cleaning
- Defrosting
- Cleaning of door tray
- Cleaning of glass shelf
- Cleaning the vegetable drawer
- Out of operation
- Power failure:
- Long-time nonuse:
- Moving:
- TROUBLESHOOTING
- APPENDIX
- Special for new European standard
- Dear customer
- Coldest zone in the refrigerator
- OPTIONAL: OK-temperature indicator
- Temperature indicator setting
- Checking the temperature in the coldest zone
- LETTERA DI RINGRAZIAMENO
- LIMPEZA E MANUTENÇÂO
- Limpeza geral
- Aiaotaoeic kai aTooTaeic
- PPO2OXH
- PRÉSENTATION DU PRODUIT
- Noms des composants
- SPECIFIKÁCIE
- Fast cool (Gyors huts) uzemmod:
- SPECIFIKACIJAS
- CNEUΦNKAUNJE
- ПЕГАЕД ПОИЗВODА
- Ha3nBn KOMnoHeHTN
- TAKHbA
- INHCTAANJAPON3BODA
- YnyTCTBO 3a INHCTaInpaIbe
- 3a pacxAaHpehaje ca KAnMaTCKOM Kaacom
- EΦeKTHBHN TeMnepaTyphN onCeR
- AnMeH3nje npa3Maun
- NAKbA
- Hore 3a HnBeAIncaHbe
- Pomepahe ypehaja
- NoctBa/baHe
- Kopak
- NAKHB
- Kopnshebe AncpeH3epa 3a BODy(OnuHO)
- PnpomeHa cBeTla
- YnycTBO 3a pyKoBaHbe
- NoeShaBaHe 6p3nHe
- Pexkm Fast cool (6p30r xHaheba)
- KoHTpOa Tempeatype KOMope 3a 3aMpa3aBaHbe.
- KoA rpewke
- Control temperatura in compartmentul congelator
- HaHMeHOBaHHa KaKOMNoHEHTIte
- BHIMAHNE
- I3noaBaHe Ha AncpeHcbpa 3a BOa (He3aAbXKNTeHN)
- Смяна на сбетанhaТа
- CTbNka
- Cbbp3BaHe Ha ypeDa
- CbBeTn 3a NecTeHe Ha eHeprna
- ИнструksязАЕКСПОАЦЯ
- KAIIO4
- EkpaH Na AncPnae
- Aucnn
- Pekm Ha Fast cool (BbP3O oxAaKdHe):
- TemnepaTypeH KOHTPOHa KaMepaTa
- KoA ha rpewka
- KoA 3a TpeuKa Onncahne Ha TpeuKaTa
- XaAnHa KaMepa
- Φpn3ep
- ПОЧECTBAHEИ ПОДAPьЖKA
- O6uO nouHCTBaHe
- Pa3mpa3raBaHe
- INSTALIMI I PRODUKTIT
- Instruksionet e Instalimit
- Pér pajisjet ftohëse me klase klimatike
Brand : MIDEA
Model : MDRB380FGE01
Category : Fridge