
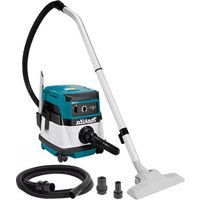
DVC150LZ - Cordless vacuum MAKITA - Free user manual and instructions
Find the device manual for free DVC150LZ MAKITA in PDF.
| Product type | Cordless vacuum cleaner |
| Brand | Makita |
| Model | DVC150LZ |
| Main use | Dry and wet dust (with cloth filter) |
| Power supply | 36 V DC battery or mains (single-phase current) |
| Compatible batteries | BL1815N, BL1820B, BL1830B, BL1840B, BL1850B, BL1860B |
| Compatible chargers | DC18RC, DC18RD, DC18RE, DC18SD, DC18SE, DC18SF, DC18SH, DC18WC |
| Max air volume (on battery) | 2.1 m³/min (with hose Ø38 mm x 2.5 m) |
| Max air volume (on mains) | 3.6 m³/min (with hose Ø38 mm x 2.5 m) |
| Max vacuum (on battery) | 9.0 kPa |
| Max vacuum (on mains) | 24.0 kPa |
| Tank capacity (dust) | 15 L |
| Tank capacity (water) | 12 L |
| Dimensions (L x W x H) | 366 mm x 334 mm x 421 mm |
| Net weight (with battery) | 8.2 - 9.6 kg |
| Sound level | 75 dB(A) (uncertainty 2.5 dB(A)) |
| Vibration | ≤ 2.5 m/s² (uncertainty 1.5 m/s²) |
| Protection rating | IPX4 |
| Safety category | Double insulation (Class II) |
| Standard filter type | Cloth filter (dry/wet) |
| Optional filter | HEPA powder filter (dry only) |
| Special functions | Automatic shut-off for wet suction (float), caster lock brake, variable suction power, integrated tool box |
| Cleaning and maintenance | Washable filters (water), optional paper or polyethylene bag |
| Warranty | Consult the manual or dealer |
| Country of manufacture | Not specified |
Frequently Asked Questions - DVC150LZ MAKITA
User questions about DVC150LZ MAKITA
0 question about this device. Answer the ones you know or ask your own.
Ask a new question about this device
Download the instructions for your Cordless vacuum in PDF format for free! Find your manual DVC150LZ - MAKITA and take your electronic device back in hand. On this page are published all the documents necessary for the use of your device. DVC150LZ by MAKITA.
USER MANUAL DVC150LZ MAKITA
- This machine is not intended for use by persons including children with reduced physical, sensory or mental capabilities, or lack of experience and knowledge.
- Children should be supervised to ensure that they do not play with the cleaner.
- If the supply cord is damaged, it must be replaced by the authorized service facility.
- See the chapter "SPECIFICATIONS" for the type reference of the battery.
- See the section "Installing or removing battery cartridge" for how to remove or install the battery.
- When disposing the battery cartridge, remove it from the tool and dispose of it in a safe place. Follow your local regulations relating to disposal of battery.
- If the tool is not used for a long period of time, the battery must be removed from the tool.
- Do not short the battery cartridge.
See the chapter "MAINTENANCE" for the appropriate details of precautions during user maintenance.
SPECIFICATIONS
| Model: DVC150L DVC151L | |||
| Standard filter type | Cloth filter (for dry and wet dust) | Powder filter (for dry dust) | |
| Maximum air volume at the end of hose | DC operation(with BL1850B,ø38 mm x 2.5 m hose) | 2.1 m³/min | |
| AC operation(withø38 mm x 2.5 m hose) | 3.6 m³/min | ||
| Maximum air volume at turbine DC | C operation(with BL1850B) | 2.9 m³/min | |
| AC operation 4.2 m | ³/min | ||
| Vacuum DC operation | (with BL1850B) | 9.0 kPa | |
| AC operation 24.0 kPa | |||
| Recoverable capacity Dust 15 L | |||
| Water 12 L - | |||
| Dimensions (L x W x H) 366 mm x 334 mm x 421 mm | |||
| Electric ratings with AC operation | Depends on the country. Refer to the nameplate. | ||
| Rated voltage with battery operation | D.C. 36 V | ||
| Net weight | 8.2 - 9.6 kg | 8.9 - 10.3 kg | |
| Protection degree | IPX4 | ||
| Safety class | ☐/II | ||
- Due to our continuing program of research and development, the specifications herein are subject to change without notice.
- Specifications and battery cartridge may differ from country to country.
- The weight does not include accessories but battery cartridge(s). The lightest and heaviest combination weight of the appliance and battery cartridge(s) are shown in the table.
- For wet dust, the float and the water filter or cloth filter are required.
Applicable battery cartridge and charger
| Battery cartridge | BL1815N / BL1820B / BL1830B / BL1840B / BL1850B / BL1860B |
| Charger | DC18RC / DC18RD / DC18RE / DC18SD / DC18SE / DC18SF / DC18SH / DC18WC |
Some of the battery cartridges and chargers listed above may not be available depending on your region of residence.
WARNING: Only use the battery cartridges and chargers listed above. Use of any other battery cartridges and chargers may cause injury and/or fire.
Symbols
The followings show the symbols which may be used for the equipment. Be sure that you understand their meaning before use.

Read instruction manual.

Take particular care and attention.

Warning! The cleaner may contain hazardous dust.

Never stand on the cleaner.

Dust class L (light). The cleaners are capable of picking up dust class L. Follow your country's regulations relating to dusts and to occupational health and safety.

DOUBLE INSULATION

Ni-MH Li-ion
Only for EU countries
Due to the presence of hazardous components in the equipment, waste electrical and electronic equipment, accumulators and batteries may have a negative impact on the environment and human health.
Do not dispose of electrical and electronic appliances or batteries with household waste!
In accordance with the European Directive on waste electrical and electronic equipment and on accumulators and batteries and waste accumulators and batteries, as well as their adaptation to national law, waste electrical equipment, batteries and accumulators should be stored separately and delivered to a separate collection point for municipal waste, operating in accordance with the regulations on environmental protection.
This is indicated by the symbol of the crossed-out wheeled bin placed on the equipment.
Intended use
The tool is suitable for commercial use, for example in hotels, schools, hospitals, factories, shops, offices and rental businesses.
DVC150L
The tool is intended for collecting both wet and dry dust.
DVC151L
The tool is intended for collecting dry dust only.
Power supply
The tool should be connected only to a power supply of the same voltage as indicated on the nameplate, and can only be operated on single-phase AC supply. They are double-insulated and can, therefore, also be used from sockets without earth wire.
Noise
The typical A-weighted noise level determined according to IEC60335-2-69:
Model DVC150L
Sound pressure level (L_pA):75dB (A)
Uncertainty (K) : 2.5 dB (A)
Model DVC151L
Sound pressure level (L_pA):75dB(A)
Uncertainty (K) : 2.5 dB(A)
The noise level under working may exceed 80 dB (A).
NOTE: The declared noise emission value(s) has been measured in accordance with a standard test method and may be used for comparing one tool with another.
NOTE: The declared noise emission value(s) may also be used in a preliminary assessment of exposure.

WARNING: Wear ear protection.
WARNING: The noise emission during actual use of the power tool can differ from the declared value(s) depending on the ways in which the tool is used especially what kind of workpiece is processed.
WARNING: Be sure to identify safety measures to protect the operator that are based on an estimation of exposure in the actual conditions of use (taking account of all parts of the operating cycle such as the times when the tool is switched off and when it is running idle in addition to the trigger time).
Vibration
The vibration total value (tri-axial vector sum) determined according to IEC60335-2-69:
NOTE: The declared vibration total value(s) has been measured in accordance with a standard test method and may be used for comparing one tool with another.
NOTE: The declared vibration total value(s) may also be used in a preliminary assessment of exposure.

WARNING: The vibration emission during actual use of the power tool can differ from the declared value(s) depending on the ways in which the tool is used especially what kind of workpiece is processed.

WARNING: Be sure to identify safety measures to protect the operator that are based on an estimation of exposure in the actual conditions of the cycle (taking account of all parts of the operating cycle such as the times when the tool is switched off and when it is running idle in addition to the trigger time).
EC Declaration of Conformity
For European countries only
The EC declaration of conformity is included as Annex A to this instruction manual.
SAFETYWARNINGS
Cored and cordless vacuum cleaner safety warnings
WARNING: IMPORTANT! READ CAREFULLY all safety warnings and all instructions BEFORE USE. Failure to follow the warnings and instructions may result in electric shock, fire and/or serious injury.
- Before use, make sure that this cleaner must be used by people who have been adequately instructed on the use of this cleaner.
- Before use, operators shall be provided with information, instruction and training for the use of the machine and the substances for which it is to be used, including the safe method of removal and disposal of the material collected.
- If foam/liquid comes out, switch off immediately.
- Clean the water level limiting device regularly and examine it for signs of damage.
- Do not use the cleaner without the filter. Replace a damaged filter immediately.
- USE OF EXTENSION CORD. When using an extension cord because of the great distance to your power source, try to employ a cord that is sufficiently thick but not too long, or cleaner performance will be adversely affected. For outdoor applications use an extension cord suitable for outdoor use.
- VOLTAGE WARNING: Before connecting the cleaner to a power source (receptacle, outlet, etc.) be sure the voltage supplied is the same as that specified on the nameplate of the cleaner. A power source with voltage greater than that specified for the cleaner can result in SERIOUS INJURY to the operator as well as damage to the cleaner. If in doubt, DO NOT PLUG IN THE CLEANER. Using a power source with voltage less than the nameplate rating is harmful to the motor.
- AVOID UNINTENTIONAL STARTING. Be sure switch is OFF when plugging in.
- Do not attempt to pick up flammable materials, fire works, lighted cigarettes, hot ashes, hot metal chips, sharp materials such as razors, needles, broken glass or the like.
- NEVER USE THE CLEANER IN THE VICINITY OF GASOLINE, GAS, PAINT, ADHESIVES OR OTHER HIGHLY EXPLOSIVE SUBSTANCES. The switch emits sparks when turned ON and OFF. And so does the motor commutator during operation. A dangerous explosion may result.
- Never vacuum up toxic, carcinogenic, combustible or other hazardous materials such as asbestos, arsenic, barium, beryllium, lead, pesticides, or other health endangering materials.
-
Always place the cleaner on a horizontal flat surface to prevent it from falling or moving unintentionally.
-
Never use the cleaner outdoors in the rain.
- For Finland, this machine is not to be used outdoors at low temperature.
- Do not use close to heat sources (stoves, etc.).
- If the exhaust air is returned to the room, it is necessary to provide for an adequate air change rate in the room. Reference to National regulations is necessary.
- GUARD AGAINST ELECTRIC SHOCK. Prevent body contact with grounded surfaces. For example; pipes, radiators, ranges, refrigerator enclosures.
- Do not block cooling vents. These vents permit cooling of the motor. Blockage should be carefully avoided otherwise the motor will burn out from lack of ventilation.
- Keep proper footing and balance at all times.
- DO NOT ABUSE CORD. Never carry the cleaner by cord or yank it to disconnect from receptacle. Keep cord away from heat, oil, and sharp edges. Inspect cleaner cords periodically and if damaged, have repaired by authorized service facility. Inspect extension cords periodically and replace if damaged.
- Do not fold, tug or step on the hose.
- Stop the cleaner immediately if you notice poor performance or anything abnormal during operation.
- DISCONNECT THE CLEANER. When not in use, before servicing, and when changing accessories.
- Clean and service the cleaner immediately after each use to keep it in tiptop operating condition.
- MAINTAIN THE CLEANER WITH CARE. Keep the cleaner clean for better and safer performance. Follow instructions for changing accessories. Keep handles dry, clean, and free from oil and grease.
- CHECK DAMAGED PARTS. Before further use of the cleaner, a guard or other part that is damaged should be carefully checked to determine that it will operate properly and perform its intended function. Check for alignment of moving parts, binding of moving parts, breakage of parts, mounting, and any other conditions that may affect its operation. A guard or other part that is damaged should be properly repaired or replaced by an authorized service center unless otherwise indicated elsewhere in this instruction manual. Have defective switches replaced by authorized service center. Don't use the cleaner if switch does not turn it on and off.
- For user servicing, the machine shall be dismantled, cleaned and serviced, as far as is reasonably practicable, without causing risk to the maintenance staff and others.
-
The machine should be technically inspected by the manufacturer, or an instructed person, at least annually, consisting of, for example, inspection of filters for damage, air tightness of the machine and proper function of the control mechanism.
-
When carrying out service or repair operations, all contaminated items which cannot be satisfactorily cleaned are to be disposed of; such items shall be disposed of in impervious bags in accordance with any current regulation for the disposal of such waste.
- REPLACEMENT PARTS. When servicing, use only identical replacement parts.
- When not in use, always store the cleaner indoors.
- Wet filters and the interior part of the liquid container shall be dried before storage.
- Be kind to your cleaner. Rough handling can cause breakage of even the most sturdily built cleaner.
- Do not attempt to clean the exterior or interior with benzine, thinner or cleaning chemicals. Cracks and discoloration may be caused.
- Do not use cleaner in an enclosed space where flammable, explosive or toxic vapors are given off by oil-base paint, paint-thinner, gasoline, some mothproofing substances, etc., or in areas where flammable dust is present.
- Do not leave the cleaner cord lying on the floor after you have finished a cleaning job. It can become a tripping hazard or may cause damage to the cleaner.
- Do not operate the cleaner or any tool while under the influence of drugs or alcohol.
- As a basic rule of safety, use safety goggles or safety glasses with side shields.
- Use a dust mask in dusty work conditions.
- This machine is not intended for use by persons including children with reduced physical, sensory or mental capabilities, or lack of experience and knowledge.
- Children should be supervised to ensure that they do not play with the cleaner.
- Never handle plug cord or cleaner with wet hands.
- Use extreme caution when cleaning on stairs.
- Do not use the cleaner as a stool or work bench. The machine may fall down and may result in personal injury.
Battery tool use and care
- Recharge only with the charger specified by the manufacturer. A charger that is suitable for one type of battery pack may create a risk of fire when used with another battery pack.
- Use power tools only with specifically designated battery packs. Use of any other battery packs may create a risk of injury and fire.
- When battery pack is not in use, keep it away from other metal objects, like paper clips, coins, keys, nails, screws or other small metal objects, that can make a connection from one terminal to another. Shorting the battery terminals together may cause burns or a fire.
-
Under abusive conditions, liquid may be ejected from the battery; avoid contact. If contact accidentally occurs, flush with water. If liquid contacts eyes, additionally seek medical help. Liquid ejected from the battery may cause irritation or burns.
-
Do not use a battery pack or tool that is damaged or modified. Damaged or modified batteries may exhibit unpredictable behaviour resulting in fire, explosion or risk of injury.
- Do not expose a battery pack or tool to fire or excessive temperature. Exposure to fire or temperature above 130^ may cause explosion.
- Follow all charging instructions and do not charge the battery pack or tool outside the temperature range specified in the instructions. Charging improperly or at temperatures outside the specified range may damage the battery and increase the risk of fire.
SAVE THESE INSTRUCTIONS.
WARNING: DO NOT let comfort or familiarity with product (gained from repeated use) replace strict adherence to safety rules for the subject product. MISUSE or failure to follow the safety rules stated in this instruction manual may cause serious personal injury.
Important safety instructions for battery cartridge
- Before using battery cartridge, read all instructions and cautionary markings on (1) battery charger, (2) battery, and (3) product using battery.
- Do not disassemble or tamper with the battery cartridge. It may result in a fire, excessive heat, or explosion.
- If operating time has become excessively shorter, stop operating immediately. It may result in a risk of overheating, possible burns and even an explosion.
- If electrolyte gets into your eyes, rinse them out with clear water and seek medical attention right away. It may result in loss of your eyesight.
- Do not short the battery cartridge:
(1) Do not touch the terminals with any conductive material.
(2) Avoid storing battery cartridge in a container with other metal objects such as nails, coins, etc.
(3) Do not expose battery cartridge to water or rain. A battery short can cause a large current flow, overheating, possible burns and even a breakdown.
- Do not store and use the tool and battery cartridge in locations where the temperature may reach or exceed 50^ (122°F).
- Do not incinerate the battery cartridge even if it is severely damaged or is completely worn out. The battery cartridge can explode in a fire.
- Do not nail, cut, crush, throw, drop the battery cartridge, or hit against a hard object to the battery cartridge. Such conduct may result in a fire, excessive heat, or explosion.
-
Do not use a damaged battery.
-
The contained lithium-ion batteries are subject to the Dangerous Goods Legislation requirements. For commercial transports e.g. by third parties, forwarding agents, special requirement on packaging and labeling must be observed. For preparation of the item being shipped, consulting an expert for hazardous material is required. Please also observe possibly more detailed national regulations. Tape or mask off open contacts and pack up the battery in such a manner that it cannot move around in the packaging.
- When disposing the battery cartridge, remove it from the tool and dispose of it in a safe place. Follow your local regulations relating to disposal of battery.
- Use the batteries only with the products specified by Makita. Installing the batteries to non-compliant products may result in a fire, excessive heat, explosion, or leak of electrolyte.
- If the tool is not used for a long period of time, the battery must be removed from the tool.
- During and after use, the battery cartridge may take on heat which can cause burns or low temperature burns. Pay attention to the handling of hot battery cartridges.
- Do not touch the terminal of the tool immediately after use as it may get hot enough to cause burns.
- Do not allow chips, dust, or soil stuck into the terminals, holes, and grooves of the battery cartridge. It may cause heating, catching fire, burst and malfunction of the tool or battery cartridge, resulting in burns or personal injury.
- Unless the tool supports the use near high-voltage electrical power lines, do not use the battery cartridge near high-voltage electrical power lines. It may result in a malfunction or breakdown of the tool or battery cartridge.
- Keep the battery away from children. SAVE THESE INSTRUCTIONS.
CAUTION: Only use genuine Makita batteries. Use of non-genuine Makita batteries, or batteries that have been altered, may result in the battery bursting causing fires, personal injury and damage. It will also void the Makita warranty for the Makita tool and charger.
Tips for maintaining maximum battery life
- Charge the battery cartridge before completely discharged. Always stop tool operation and charge the battery cartridge when you notice less tool power.
- Never recharge a fully charged battery cartridge. Overcharging shortens the battery service life.
- Charge the battery cartridge with room temperature at 10^ - 40^ (50°F - 104°F). Let a hot battery cartridge cool down before charging it.
- When not using the battery cartridge, remove it from the tool or the charger.
- Charge the battery cartridge if you do not use it for a long period (more than six months).
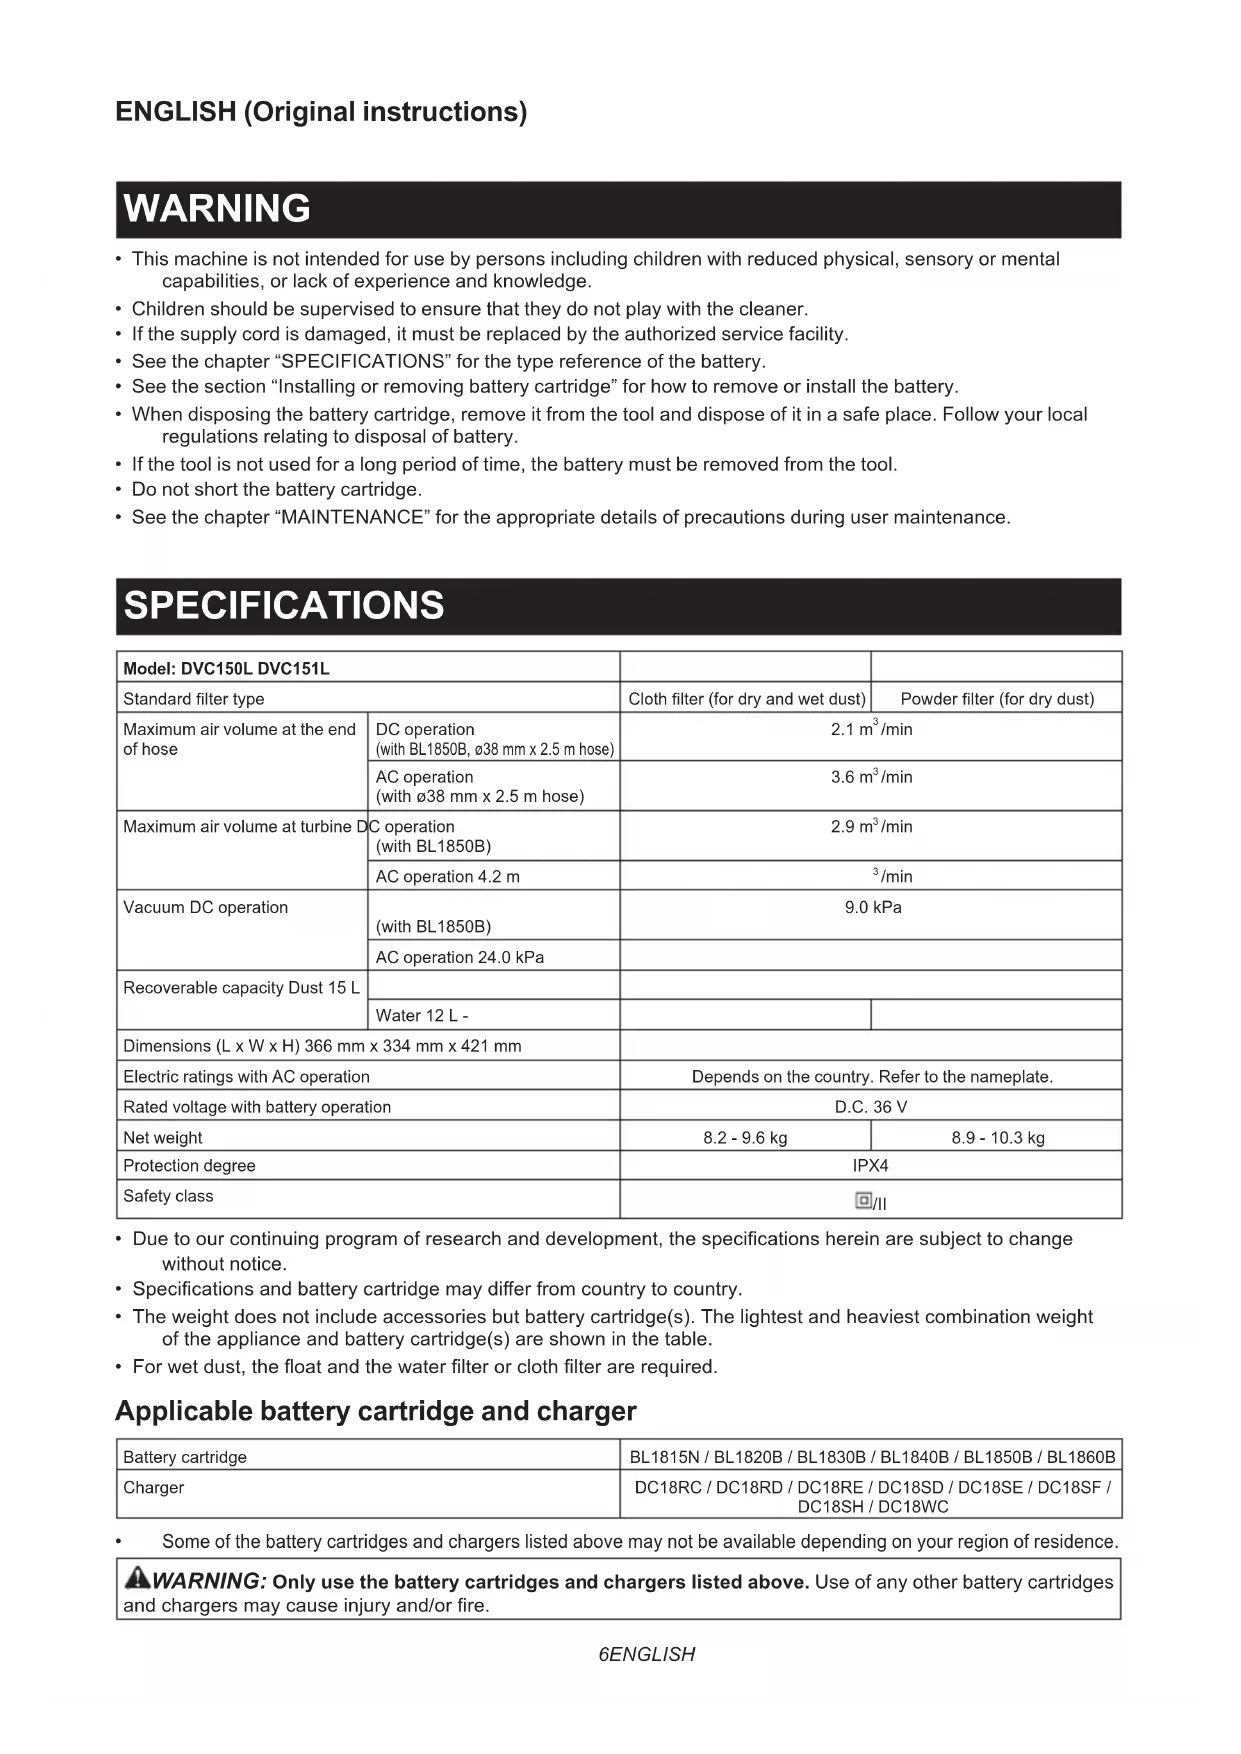
PARTS DESCRIPTION
Model DVC150L
(Cloth filter (for dry and wet dust) model)
Fig.1: 1. Tank cover 2. Float 3. Float cage 4. Cloth filter 5. Tank
Model DVC151L
(Powder filter (for dry dust) model)
Fig.2: 1. Tank cover 2. Powder filter (HEPA) 3. Damper 4. Prefilter 5. Tank
FUNCTIONAL DESCRIPTION
Use with AC power:
WARNING: Before plugging the cleaner, always make sure that the cleaner is switched off. Plugging the cleaner with the switch on may cause an unexpected start resulting in serious personal injury.
Connect the plug to a power supply.
Fig.3: 1. Plug (the shape and cord length may differ from country to country)
The AC power indicator lights up when setting the stand-by switch to "l" side.
Fig.4: 1.AC power indicator
NOTE: Even operating in DC power mode, the cleaner is automatically changed into AC power mode when plugged in.
NOTE: If the cleaner is unplugged during operation with the battery inserted, the cleaner gets into stand-by state.
Use with battery:
CAUTION: Always be sure that the cleaner is switched off, unplugged, and the battery cartridge is removed before adjusting or checking function on the cleaner.
Installing or removing battery cartridge
CAUTION: Always switch off the tool before installing or removing of the battery cartridge.
CAUTION: Hold the cleaner and the battery cartridge firmly when installing or removing battery cartridge. Failure to hold the cleaner and the battery cartridge firmly may cause them to slip off your hands and result in damage to the cleaner and battery cartridge and a personal injury.
CAUTION: Be careful not to pinch your fingers when opening or closing the battery cover. Failure to do so may cause personal injury.
To install the battery cartridge, release the lock first, and then open the battery cover. After that, insert the battery cartridge.
Fig.5: 1. Lock 2. Battery cover
Align the tongue on the battery cartridge with the groove in the housing and slip it into place. Insert it all the way until it locks in place with a little click. Then lock the battery cover.
Fig.6: 1. Battery cartridge
To remove the battery cartridge, slide it from the tool while sliding the button in front of the cartridge.
CAUTION: Always install the battery cartridge fully until the red indicator cannot be seen. If not, it may accidentally fall out of the cleaner, causing injury to you or someone around you.
CAUTION: Do not install the battery cartridge forcibly. If the cartridge does not slide in easily, it is not being inserted correctly.
NOTE: The cleaner does not work with only one battery cartridge.
NOTE: Remove the plug of the cleaner from the extension cord when using the cleaner with the batteries.
Indicating the remaining battery capacity
Only for battery cartridges with the indicator
Fig.7: 1. Indicator lamps 2. Check button
Press the check button on the battery cartridge to indicate the remaining battery capacity. The indicator lamps light up for a few seconds.
| Indicator lamps Remaining | capacity | ||
| Lighted Off | Blinking | ||
| 75% to 100% | |||
| 50% to 75% | |||
| 25% to 50% | |||
| 0% to 25% | |||
| Charge the battery. | |||
| The battery may have malfunctioned. | |||
NOTE: Depending on the conditions of use and the ambient temperature, the indication may differ slightly from the actual capacity.
NOTE: The first (far left) indicator lamp will blink when the battery protection system works.
Indicating the remaining battery capacity
▶ Fig.8: 1. Battery indicator 2. Check button
Fig.9
Press the check button to indicate the remaining battery capacities. The battery indicators correspond to each battery.
| Battery indicator status Remaining | battery capacity | ||
| On Off | Blinking | ||
| 50% to 100% | |||
| 20% to 50% | |||
| 0% to 20% | |||
| Charge the battery | |||
Tool / battery protection system
The tool is equipped with a tool/battery protection system. This system automatically cuts off power to the motor to extend tool and battery life. The tool will automatically stop during operation if the tool or battery is placed under one of the following conditions:
Overload protection
When the tool is operated in a manner that causes it to draw an abnormally high current, the tool automatically stops without any indication. In this situation, turn the tool off and stop the application that caused the tool to become overloaded. Then turn the tool on to restart.
Overheat protection

When the tool is overheated, the tool stops automatically, and the battery indicator blinks about 60 seconds. In this situation, let the tool cool down before turning the tool on again.
Overdischarge protection
When the battery capacity becomes low, the tool stops automatically. If the product does not operate even when the switches are operated, remove the batteries from the tool and charge the batteries.
Switch action
Fig.10: 1. Stand-by switch 2. Power button
3. Suction force adjusting knob
To start the cleaner:
- Set the stand-by switch to the "I" side. The cleaner gets into stand-by state.
- Press the power button.
To make the cleaner get into stand-by mode, press the power button again.
To turn off the cleaner, set the stand-by switch to the "O" side. The suction power can be adjusted according to your work need. Suction power can be increased by turning the suction force adjusting knob from the symbol to the symbol.
NOTICE: Always set the stand-by switch to the "O" side when not using the cleaner for long time. The cleaner consumes power during stand-by state.
Auto-suction stop during wet suction operation
Only for the cloth filter model
WARNING: Do not use for a long time while the float is at work. Using the cleaner with its float at work for a long time can cause overheat, resulting in the cleaner deformation.
WARNING: Do not pick up foam or soapy
liquid. Picking up foam or soapy liquid can cause foam to come out of air exit before the float works. Continuing to using in this condition may cause an electric shock and breakage of the cleaner.
Auto-suction stop works only when using with the float and float cage.
The cleaner has a float mechanism that prevents water from immersing into the motor when picking up more than a certain amount of water. When the tank is full and the cleaner no longer picks up water, switch off the cleaner and empty the tank.
Locking or unlocking the caster
▶ Fig.11: 1. Caster 2. Stopper lever 3. FREE position 4. LOCK position
Locking the caster is convenient when storing the cleaner, stopping the work on the way and keeping the cleaner still.
To operate the stopper, move it by hand.
To lock the caster with a stopper, lower the stopper lever and the caster no longer will rotate. To release the caster from the locked position, raise the stopper lever.
NOTE: When moving the cleaner, make sure that the caster is unlocked. Moving the cleaner with the caster in the locked position may cause damage to the caster.
Carriage handle
When carrying the cleaner, carry it by holding the handle on the head. The handle is retractable at the head when not in use.
Fig.12
ASSEMBLY
CAUTION: Always be sure that the cleaner is switched off, unplugged, and the battery cartridge is removed before carrying out any work on the cleaner.
CAUTION: Always wear dust mask during assembly or maintenance.
Installing the powder filter (HEPA) and prefilter (for dry dust)
Optional accessory for cloth filter model
CAUTION: Never pick up water or other liquids or wet dusts when using the powder filter. Picking up such things may cause the powder filter breakage.
To use powder filter:
- Remove the float cage and float by removing the bolts.
Fig.13: 1. Float 2. Float cage - Place the prefilter in the tank with aligning the mounting position markings.
- Mount the damper on the powder filter and then place them in the prefilter with aligning the mounting position markings.
- Finally, mount the tank cover and lock it.
Fig.14: 1. Tank cover 2. Powder filter (HEPA) 3. Damper 4. Prefilter 5. Tank 6. Mounting position marking
NOTICE: Before using the powder filter, make sure that prefilter and damper are always used together. It is not allowed to install powder filter solely.
Installing the water filter
Optional accessory for cloth filter model
CAUTION: Never pick up water or wet dust without the float and the cloth filter or the water filter.
CAUTION: For picking up wet dust, make sure that the float cage and the float are installed on the cleaner.
CAUTION: When installing the water filter on the tank, set it tight at the opening of the tank so that the hook of the water filter engages the tank opening firmly and there is no space between the water filter and the tank.
To pick up water or wet dust only, the water filter is more suitable than the cloth filter.
When installing the water filter, align its mounting position mark with the one on the tank.
Fig.15: 1. Water filter 2. Tank 3. Mounting position marking
NOTE: It is recommended using water filter when picking up large amount of water repeatedly.
Otherwise vacuum ability may be reduced in case of cloth filter.
Installing the paper pack
Optional accessory
WARNING: When using the paper pack, also use the cloth filter or prefilter together that is preinstalled on the cleaner. Failure to use the cloth filter / prefilter together may cause unusual noise and heat, resulting in a fire.
CAUTION: (For the cloth filter model)
- Never pick up water or other liquids or wet dusts when using the paper pack. Picking up such things may cause the paper pack breakage.
- Before using the paper pack, make sure that powder filter (optional accessory), damper (optional accessory) and prefilter are always used together.
CAUTION: (For the powder filter model)
-
Before using the paper pack, make sure that powder filter, damper and prefilter are always used together.
-
Remove the rubber holder.
Fig.16: 1. Rubber holder - Extend the paper pack.
- Align the paper pack opening with the dust suction opening of the cleaner.
- Insert the cardboard of the paper pack onto the holder so that it is positioned at the end beyond the detent protrusion.
▶ Fig.17: 1. Paper pack 2. Holder
Installing the polyethylene bag
Cleaner can also be used without polyethylene bag. However, using polyethylene bag is easier to empty the tank without letting your hands dirty.
Spread the polyethylene bag in the tank. Insert it between the holder plate and the tank, and pull it to the hose inlet.
Fig.18: 1. Holder plate 2. Polyethylene bag
Spread the bag around the top of the tank so that the cloth filter / prefilter edge can catch and hold the bag securely.
Fig.19: 1. Cloth filter / prefilter
NOTE: A polyethylene bag available on the market can be used. 0.04 mm or thicker one is recommended.
NOTE: Too much dust will tear the bag easily, so do not collect the dust more than the half of the bag capacity.
Emptying the polyethylene bag
WARNING: Always make sure that the cleaner is switched off, unplugged, and the battery cartridge is removed before emptying the polyethylene bag. Failure to do so may cause an electric shock and serious personal injury.
CAUTION: Do not apply a great impact on the float cage and tank. Applying a great impact may cause deformation and damage to the parts.
CAUTION: Empty the tank at least once a day although this depends on picked-up dust volume in the tank. Or, the suction force will weaken and the motor may be broken.
CAUTION: Do not grab the hook when emptying the tank. Grabbing the hook may cause the hook to break.
Unhook and lift up the tank cover.
Shake off the dust from the cloth filter / prefilter and then take the polyethylene bag out of the tank.
Fig.20
NOTE: Take the polyethylene bag carefully out of the tank so that the polyethylene bag cannot be caught and torn by the protrusion inside the tank when emptying it.
NOTE: Empty the polyethylene bag before it becomes full. Too much dust in the tank may cause the polyethylene bag to be torn.
Installing the tool box
- Release the lock of the battery cover, and open the battery cover.
- Set the rails on the tool box along the grooves on the housing.
- Close the battery cover and apply the lock.
Fig.21
The tool box is convenient for carrying batteries, extension code, pipe, or cuffs.
Fig.22
Connecting the hose
NOTICE: Never force the hose for bending or stamp it. Never move the cleaner by a hose. Forcing, stamping and pulling the hose may cause a breakage or deformation of the hose.
NOTICE: When picking up large wastes such as planer carvings, concrete dusts or similar other than small wastes, use the 38mm inner diameter hose (optional accessory). Using the 28mm inner diameter hose (optional accessory) may cause a hose stuffing and damage.
Insert the hose onto the mounting port of the tank and turn it clockwise until it locks.
Fig.23
MAINTENANCE
CAUTION: Always be sure that the cleaner is switched off, unplugged, and the battery cartridge is removed before attempting to perform inspection or maintenance.
NOTICE: Never use gasoline, benzine, thinner, alcohol or the like. Discoloration, deformation or cracks may result.
To maintain product SAFETY and RELIABILITY, repairs, any other maintenance or adjustment should be performed by Makita Authorized or Factory Service Centers, always using Makita replacement parts.
Storage of power supply cord
You can wind up the power supply cord around the tool box.
Fig.24
Storage of accessories
The pipes can be placed into the pipe holder when not using the cleaner for a short time.
Fig.25
Fig.26
The hose can be stored around the tool by connecting each ends.
Fig.27
Cleaning of cloth filter
Only for the cloth filter model
Clogged cloth filter causes poor suction performance. Clean out the cloth filter from time to time.
To remove dust or particles adhering to the cloth filter, shake the frame bottom quickly several times.
Fig.28: 1. Cloth filter
Cleaning of powder filter (HEPA) and prefilter
Only for the powder filter model
Clogged powder filter, prefilter and damper cause poor suction performance. Clean out the filters and dampers from time to time.
To remove dust or particles adhering to the filters, shake the frame bottom quickly several times.
Fig.29
Occasionally wash the powder filter in water, rinse and dry thoroughly in the shade before use. Never wash filters in a washing machine.
NOTE: Do not rub or scratch the powder filter, the prefilter or the damper with hard objects such as a brush and a paddle.
NOTE: The filters wear out in course of time. It is recommended to have some spares for them.
OPTIONAL ACCESSORIES
CAUTION: These accessories or attachments are recommended for use with your Makita tool specified in this manual. The use of any other accessories or attachments might present a risk of injury to persons. Only use accessory or attachment for its stated purpose.
If you need any assistance for more details regarding these accessories, ask your local Makita Service Center.
Hose
- Front cuff (22, 24, 38)
Straight pipe
- Corner nozzle
- Round brush
- Powder filter, HEPA (for dry dust)
Damper
- Prefilter
- Nozzle assembly
- Bent pipe
Polyethylene bag
- Paper pack
- Holder set
Water Filter (option for the cloth filter model)
- Makita genuine battery and charger
NOTE: Some items in the list may be included in the tool package as standard accessories. They may differ from country to country.
AVENTISSEMENT
ACCESSIONS EN OPTION
NOTA: Whenever you use this device, you will be able to use it in the following situations.
VEILIGHEIDSWAARSCHUWINGEN
▶ Fig.28: 1. Doekfilter
OPTIONELE ACCESSOIRES
To epyaaleio ppoopizetai yia tn oulloyn uypns kai 5npns oKovns.
DVC151L
To epyaieio pooipietai ia tn ouaoyn n npns okovnc mvo.
Hλεκτρική παροχή
To epyaaleio TpETeia va ouvdeetai mOvo E nAekptiKn npoxn tnc iia c taonc e autn nnou avaypaetai otnv tinavakda ovuaotikwv tiuvkai mtopei va aeitoupnoe i movo e evaalaaofoevo movopaoik oeu. YIAPxE IITANmovwn kai katouveTieia, mTpei va yivei ouvdeon 6 akpoedkTeC xwpic uupma yeiowng.
Oópuβoç
To tUTIko A EITTESO KAATAEETPNEVOU OOpUBOKaOpiZeTaI OUPWVA U TO IEC60335-2-69:
Movélo DVC150L
Móvo yia xwpe ts Eupwnns
H E K a
Papaptnma A oTo TAPOV EYXeipidio odnyiwv.
IPOEIAOIOIHSEIEA ΣΦΑΛΕΙΑΣ
IpoεiδoTROINOεiC aOφαλεiac γia Tny EvouμaTN KAI φopntn σkoUTa avappóΦnONs
A PPOEIADONOIH: SHMANTIKO! DIABAE
IPOSEKTIKA oAeT TIC TPOEIDOTIOINoEIG YIA TNV aOaAeia kai oAeT TIG OByIE CIPIN ANO TH XPHEH. H n Tnpon Tuv TPOEIDOTIOINoEw KAI oOnyiw mTpei va kataAnxi eN AektpoTTnGia, TUPKayia n/kai oBapo Tpaumatouo.
- Pniv aTTO xPOn, BepaiWteIe oTI autn n unXavn 0a xpnoiopoIntheta i anto atOa OToia exouv dotheta επapkeic obnyiec yia Tn xpnoi autnc ts unXavns.
- Piv Tn xpno, OTOUC xeiipotc 0a dooouv PAnpoopiecs, oynies kai ekTiaeduon yia Tn xpnoTou mnxavnupatos kai twov ouoiw u Tc OTIOEc 0x npnsioTOnEi, oupiapauavo- evnc ts aospalooC eO60ou apapeoNc kai dioeocns Tou ulikou Tou ouaExnke.
- Av aphioc/uypo, oBnoTe aueoWc.
- Na kaθapiετe taktiKa Tn diataaŋ πepiopioou tns σταθμης vερού και va tvv εξεταετε γι ενδείεις ημιας.
- Mn xpoiouoieTe Tn unxavn xwpiC To qIATPO. AvTKaOtnote aEeOwG eva qIATPO Tnou exei UTOOTei Znmuia.
-
XPHSH TOY KAANAOIY NPOEKTAE (MNAANTEZA).OTAV xpoaioioite Kaawio pnoektaoNG (muavtea) eTie n NaekpiKn npoxn antexei yeaan anooataon, PpOoataoTE va xpoaiouoioe EVA kaawioe apketaevao raXoc, aaaa oxi yeaol mKos, diaopoptikn atodooan oiaeWt. Ia evapoyes cEgWTepikoCxwpouc,va xpoaiuotoiite kawio pnoektaoNG (muavteca) katalnnlo ia eWtepiKn xpnon.
-
NPOEIOONIH TAN: NIV OUVDEOET TN OKOUTA OE NAEKPTIKI TAPOXI (PEUUMATOBOTN, TPICA, KTA.), BEBAIWOTIE OTN TAOIN TOU TAPEXTAI EIVAI N IDIA ME AUTN TOU KAOTOPICETE OTNV IVAKIDA OVUAGTIKWV TIPWVTNS OKOUTAC. HAEKPTIKI TAPOXI ME TAON MEVAUTEPN ANO AUTN TOU EXEIKAOTOTEYIA TN OKOUTA MTOPEVI AEXI WCS ANOTLEEAQSA ZOBAPO TPAYMATIEMO TOU XEPIOTN, KAOWC KAI ZNMIa OTN OKOUTA. AV EXETE AMPOBOLIES, MHN SYNDESETE TO PIETOY HAEKTPIKOY KAANOIOY THE SKOYNAZ STO PEYMA. AV XPNIOITIOEITE NAEKPTIKI TAPOXI ME TAON MIKpOTEPN ANTO TV OVOUAGTIKI TIPN OTNV TIVAKID, MTROPES VA TPOKANEOI ZNMIa OTO MOTEP.
-
NA ANOΦEYΓΕTE THN AOEΛHT ENEPΓΟΝΙΗΝ. Beβαιωθείτε οΤι ο διακόπης εῖαι KAEΙΣΤΟ Θόταν συνδέτετο φις του ηλε-KτριΚΟ καλωδιού σε ρεύμα.
- Mny ETIIXEIPNOETe va OUAALESE T EUFWKEKTA UIAKA, TUPOTEXVnmuata, avaumeva Toiyapa, KAUTEc OTAXTEG, ZEOTa MEtALIKA OpaOmuata, Aixunpa avTIkeiEvA oTTWg SUpapakia, BELoVEs, OTRauevo yuaI n nappoia avTKeiEvA.
- MH XPHESIMONIEITE NOTE TH MHXANH KONTA SE BENZINH, AEPIA, MNOTIA, KOANES H AANES YPHA EKPHKTIKEOYIEE. O dia-KoTTnC Tnpayei OTIVnpec otav EVepyoTOIEI TAI KAI ATNEVPOYOIEITAI. To iIO kai o metatpoTnac potepkata ndiapkeia ncs LEIToupyiac. Mtopei va Tpokuey ETRIKIVDuvn EkpnSg.
- Mny avappoate TOTe TOsika, kapkivoyova, kaouma n aaaa eTikivovua uikia, otwcaiavto, apoeviko, bapiio, npuAIO, oluBdo, Evtouokrova n aaaa uikia Tou aToteAoov Kivovvo yia tyn uyia.
- Na tonotheite navta tn okouna o opiovria eintedn eipaveia, ia va aTPOpeuxe i nTTwon n n metakivnon ts kat aaoos.
- Mn xpooiotoiie TOTe Tn unxavn oE EwTe- piko xwpo otn bpoxn.
- Tn avbia, auto to mxa vma 6ev npetie va xpoiouintheta i e Ewtepiokous wpuoc e Xaunneppokpaia.
- Mn xpoioiopoite Kovra oE Tnyec θepoIntaC (poupvoi, kTλ.).
- Av o aepac aywync IIOptpeei OTO tio, eivai aIapaiNTo va povtioeTe YIA TOV EIIAPKn puOu oAlambdaNc Tou aEpa OTo tio. Eivai aIapaiNTo va avatpeEeTe OTouc VIKOUC KAVOVIOUc.
- NA NPOSTATEYETE ANO THN NPOKAHEN HAEKTPONAHIAZ. ATOPEUYETe TNV ETTaPn TOU OwatoC ME YEIWUEVC EITIAPVEIEc. Ia TAPadeiyu, OwAnvEc, KaLOpIeP, FoOpVouc KAI yuyia.
- Mn aoe ta avoiyma ta yngs.Au ta avoiymata eTIPeTou nV uETo uotep. Oa TpeTEI VA aTOpeuxtheta POeKTIA TO pao, Diaopetikto oTepoA KaeI Aoyw EAAeiusn Cepioou.
-
Na οτέκεοτη πάντα σταθερά και οσόρροτημένα.
-
MHN KAKOMETAXEIPIZESTE TO KAANIO. Mny metaepete Tn OKouTTa KpatwVtac TnV ato To nAeKTPIOKO AALWIO KAI mV TpaBATE TO NAEKTPIKO AALWIO aTTOJA VIA VA TO aTTOAUVDcETe aTTO Tn V pIgna. Na diatnpite To nAeKTPIO KAHWIO paakia aTTO THepuOTNTa, Ta Adbia KAI aIXmuPpavTKIEi- meva. Na EAVXETe Tk AALWIO TNC OKOUTAC TAKTIA KAI, av exouv Zmua, OTEIATE TA YIA ETIOKEUN aTRO Eosioobotnevo Kevtpo oepic. Na eTIeewpeite Ta KAALWIO TTPOEKTAOnc (PTAAAVTEcEs) TEPIOIDKA KAI va Ta aVTIKaGTATE, AV TAPOUIAQUV Zmua.
- Mn διπλώνετ, μην τραβάτε και μην πατάτε τον εύκαμττο σωλήνα.
- AiaKoWTE aEosG Tn AEIToupyia Tns mXavis av npatnpnoTe AVtapKn ano0on n otioh- note aouvnOto katn aeitoupyia.
- ANOZYNEETH EKOYNA. Otav xpnoi- pnoieitai,piiv aTto oepic kai otav aaaladetaegeouap.
- Kaθαρίοτε και εκτέλεότε σέρβις Ση μήχανή αμέσως Μετά πτο καθε χρόη γιαν διαπηρεῖται σε αρίση λειούργική κατάσταση.
- DIATHPEITE TH MHXANH ME NPOOXH. Na δia-tnpeite tn unxavn kaapn yia tvn kalutepn kai aopaaetepn anoogn. Na akoloutheta tis oynieyia tnv alayn twv agoeouap. Na diatnpite TIs aβes steyevcs, kaapecs, xwpi λabi kai ypaso.
- NA EAEIXETE TA MEPH ME ZHMIA. niv aTn Tnv TEPaIePw xPON TnC mXavns, 0a TpeTcIva EEyxTe PPOeKTiKa Tuxov PPOoTateUTiKa EApntmuata n aaaa Eaptnma u eZnmuia yia va KaOpioTe av th a Leitoupyoouv oWotkaai av th a TpaYpatoIOauov Tnv TPOoPiOeVn LEIToupya Touc. EEyTe Tnv EUbuypamion Twv KIVouMeVW Uepwv,Tnv EeuBepn KIVOn Tuv KIVouMeVW Uepwv, to Tuxov OTaIoPo EAptnmuatWv, tn OtepeWon kAI OTIOEbnTne aAee Sc ouVhKec Toun pTopei va EINPeaoouv Tn LEIToupyia Tou epyaleoiu. 'Eva TPOoTateutiko n aAoo EAptnma u eZnmuia 0a TpeTcIva EIOKEuaotei n v avTKATAOtaBei 0wota c EsoouIOobtmevo Kevtpo eepic EKToc av Dnawetai diaopetikAcTO npov Exyeiipio 0bnyiw.OI EaattuATIKoi Biakottc TpeTcIva AVTKaOiTavTai OE EsoouIOobtmevo Kevtpo eepic Mn XpOIOtoie Te mXavn av Odiokottns EV Tnv EvpyoIOei Kai dTv nATEVEpyoIOei.
- Tia Tc epyaie c epic an to tv xpnoT, to
mxaunma nopei va aonouvapuooyn0ei,va
kaopaiTei kai va ouvtnpn0ei, ooo eivai EUloya
tpaktio, xwpi v npokn0e kivduvoC 0to
TPOOWTIKO uvtnpnOc kai e aaouc. - To n x v n u 0 a TpETTEI VA UTOKEITAI OE TEXVIK EITIEWpON aTc TOV KATAOKEUaOTn, n aTc EVTETALeVO aToO, TouAxiotov ETN- ciws, TepiAubavovtac, yia TapaEiyu, Tnv EITeWpON Twv piATpwv ia Znui, TNV aepo- OTeyavOTnta Tou unxavnatoC kAI Tn Owotn Aetoupyia Tou unxavioou EEvxou.
-
Otav dieyayyete epyaiec eepic n tkeun, 6a ta oluuveva stoixia Tou dev Tropouv va kaapioTuV oe IKavotnointiko a npTei va diatebouv. Auta ta stoixia TpeTeu vdiatoeuuv mea oleiatapea- OTEC oakouaes uqwva e otioovdntote Ioxovta kavovio yia tn diaeon teoiowv atroBantw.
-
ANTAAAKTIKA. Kata to oepbis, va xpnoiopoTIOIEITE mvo yvnoia avtaaaktikca.
- NA ANOOHKEYETEHMHXANH OTAN DEN TH XPHZIMONIOIEITE. Otav xpnoiopoitai, n unxavn 0a pnte i va aTNOkEUTAI e EOWTEPIKO xwpo.
- Ta uypa φiλtpa kai to εωτερικό μερος Tou δoxeiou uypou πρεπειν στεγνωσουν πριν ην αποθήκευση.
- Na pooexe Tn mXavn. O kAnpoc xepi- ITOpeiv a POKaEoeI TO tAOIO aKoJN KAI TNS TIO KAOKATAOKEuaOEvns mXavns.
- Mny ETIeipnoeTe va kaapioeTe to eWTEpiKO nTO eWTepiKOe BeVzivn, vepTn KaapiotiKcS xmuKcS ouieC. MTopei va TpokAnOuv pwyue Kai aTOxpwuaTIOuOc.
- Mn xpoiopoite Tn unxavn oKleio To wpo 0Tov onio aTeLEuOepwovvTai eUphiEKToi, EKPNTIKOI n ToGkoI aTmoI aTOyIEc ME BaoN to lao, vefTI, BeVzivn, epeikec ouiecs Kata Tns OKoupiac, kT.. n OE TEPIOXeC OTou UTRAPxE uΦAekTN oKovn.
- Mny aqnvete To nAekpiKO KAwdo TnC OKouTACoTo dATEBO apou exETeAEIWoeI ME TOV KaOapiOmo.MTOpei va aTOTEeoi KIVduvo yia Tapaatntma n TTOpei va TpOKaEeOI Znmuia OTN OKouTna.
- Mn xpoiopoioite auto to epyaieio n otoio- dntote aallo epyaiaio uno tvv einnpeia vapKwTikwovouiwnakooA.
- Ως βαοικός κανόνας ασφαλείας, να χρησιομο-TοΙΕΙTE γυαλία σφαλείας ἡ γυαλία με πλαῖνα προστATEUTIΚΑ.
- Na xpoioiopoitemuoka kata tnc oKovnC 0e ouvNkEc me TOnnn Kovn.
- To mnxavma auto dev npoopiceta iya xpnon aTTO ATA, OUMTEPIAumavouevwTwv TAIdeltaV, ME PEIWMEVCOWATIKES, aOHTnnpies n DIavontikcIKAVOTNTc, n aTO ATAPOa TOU dev exouv TEIPA KAI YWOSIEs.
- Ta naiia thpenei va eitnpouvtai va Ea eaoaaiotei oI dev naiouv me tn unxavn.
- Mn xεiipizote TO nλeKtpiko Kaωδio n Tn Okoúπa με βρεγμενα xépiα.
- Na προσέχετιδίατερα ὄταν καθαρίζετε σκαλοπίαι.
- Mn xpnoiopotoeite tn unxavn ia okautno n triyko epyaocac. H unxavn okuouta mtopei va Teoikai va Tpokaloei TpooTIKo Tpaumatouo.
Xpnoi ka oovia mataipow
- Na επαναφορτιζετε TIC μπαταρες Μόνο με Φορτισή που καθοριζεται από ον τκασκευαστή. Evac φορτισή που εἰναι καταλληλος γία μια συγκεριμένη μπαταρία μπορείν αδημιούργησει κίνδυνο πιρκαγίας ὄταν χρησιμοτοίειαι με μία αλλη μπαταρία.
-
Na xpoiiooieite nEeKtpia epyaia mOvo e ioka kaopiopeves mTataipes.Hxpnon kato aanns mTatapiaac mTopei va dnoupynaei kivduo Tpaumatou n TUPKayiac.
-
Otav xpnooioietai n kaetauatapivw, biatnpnoTe Tn maKpi aTTO aaMa eTaalAikacavtikeiEvaa,6TWC uovdtnpes,Kepuata, KLeia, kappia, Biocn aaAaMpaMaTAAkacavtikeiEvaa,Me ta OTIOA MTOpei va bmoOpvyNei suvdeon anTov evav akpoektn OToV alov.To paxukkawma Twv akpoektw Tc mTATapiac mTOpei va TpokaeeEykaumata n TUPKayia.
- YIIO OUVNKEC KATAXPONCS, MTOpEi VA EExaXeI UyPO ATO TNV MTApatia. Na ATOPAEUYET NVEA Pn. EAV OUMBEI ETTAPN KA TA ABOG, EKTLAUVETE ME VEPo. EAV TO UYPO EPGEI OE EITAPN ME TA MAtIA, AVACNTNOTE KAI IATPIK BOnHEIA.To UyPO TOU EAYETAI ANTO NV MTATAPIA MTOpEi VA TpOKA- LEOEPEOIOH EYKAUmaT.
- Mn xnpoiomoeiie pia kaoet a mtaapiw n epyaieio tou exei kataotpapei n tpontointhei. OI katostpaueves n tpontoinuecs mtatapiec mtopeiv a npouoiacov atpobAeTTn ountepopapouexei wc atotelaaupkayia, ekpnqn n kivduvo tpaumatou.
- Mny EkTeTc Tnv KaaTa mTataWv n To Epyaλeio e TnpKayia n UTEpBoIAk a uynn thepoKpaia. H ekEon stnv TnpKayia n otn Eepokpaia avw twv 130°C mTopeni va Tpokaeei ekpnξn.
- Akolouhote oles tis obnyiec opionkai mnv ooptiote nky kaetaa npataiwv n to epyaleio ektoC tou thepokpaiaakou eupous Tou kato pizetai otic onyies. H aaveaovn opionn n phopion ae thepokpaies EKTOG tou KAthetaoEvou eupocmuopei va Tpokaeei Znia OTNV MTApatia kai va auhoei tv Kivuvo TUPKayiac.
ΦYΛΑΕTE TΙΣ ΕΟΔΗΓΙΕΣ ΑΥΤΕΣ.
A PPOEI OIOIH: MHN EITIpeyete To
Bao avcns n eoikeiwns me to Tpoiov (loyw
ETAVeianmuevns xpns) va aVTIKATAOTnoei Tnv
auotnpn npon Tov kavovw vaaaleiac tou
TAPOVTOEpyaieiou. H ANOAEMENH XPHSH n
naeia va akolouthetaTE touc kavovec aa
aiaac Tou biutuvovtaoi oTo napov Evxepio
Oonyiw mtoei va pokalaeoi oobapo TpooW
TIKO Tpaumatoo.


- SPECIFICATIONS
- Applicable battery cartridge and charger
- Symbols
- Intended use
- DVC150L
- DVC151L
- Power supply
- Noise
- Model DVC150L
- Model DVC151L
- WARNING: Wear ear protection.
- Vibration
- EC Declaration of Conformity
- For European countries only
- SAFETYWARNINGS
- Cored and cordless vacuum cleaner safety warnings
- Battery tool use and care
- SAVE THESE INSTRUCTIONS.
- Important safety instructions for battery cartridge
- Tips for maintaining maximum battery life
- PARTS DESCRIPTION
- FUNCTIONAL DESCRIPTION
- Use with AC power:
- Use with battery:
- Installing or removing battery cartridge
- Indicating the remaining battery capacity
- Only for battery cartridges with the indicator
- Tool / battery protection system
- Overload protection
- Overheat protection
- Overdischarge protection
- Switch action
- Auto-suction stop during wet suction operation
- Only for the cloth filter model
- Locking or unlocking the caster
- Carriage handle
- ASSEMBLY
- Installing the powder filter (HEPA) and prefilter (for dry dust)
- Optional accessory for cloth filter model
- Installing the water filter
- Installing the paper pack
- Optional accessory
- CAUTION: (For the cloth filter model)
- Installing the polyethylene bag
- Emptying the polyethylene bag
- Installing the tool box
- Connecting the hose
- MAINTENANCE
- Storage of power supply cord
- Storage of accessories
- Cleaning of cloth filter
- Cleaning of powder filter (HEPA) and prefilter
- Only for the powder filter model
- OPTIONAL ACCESSORIES
- AVENTISSEMENT
- ACCESSIONS EN OPTION
- VEILIGHEIDSWAARSCHUWINGEN
- OPTIONELE ACCESSOIRES
- Hλεκτρική παροχή
- Oópuβoç
- Movélo DVC150L
- IPOEIAOIOIHSEIEA ΣΦΑΛΕΙΑΣ
- IpoεiδoTROINOεiC aOφαλεiac γia Tny EvouμaTN KAI φopntn σkoUTa avappóΦnONs
- Xpnoi ka oovia mataipow
- ΦYΛΑΕTE TΙΣ ΕΟΔΗΓΙΕΣ ΑΥΤΕΣ.
Brand : MAKITA
Model : DVC150LZ
Category : Cordless vacuum