XCV04 - Cordless vacuum MAKITA - Free user manual and instructions
Find the device manual for free XCV04 MAKITA in PDF.
| Product Type | Cordless Vacuum Cleaner |
| Brand | Makita |
| Model | XCV04 |
| Dimensions (L x W x H) | 366 mm x 334 mm x 368 mm |
| Net weight (with battery) | 8.6 kg to 9.9 kg depending on battery |
| Power supply | 36 V DC Li-ion battery or AC mains (with adapter) |
| Compatible battery types | BL1815N, BL1820, BL1820B, BL1830, BL1840, BL1840B, BL1850, BL1850B |
| Airflow (on battery) | 2.1 m³/min |
| Airflow (on mains) | 3.6 m³/min |
| Vacuum (on battery) | 90 hPa |
| Vacuum (on mains) | 240 hPa |
| Dust recovery capacity | 8 L |
| Water recovery capacity | 6 L |
| Standard filter type | Powder filter (for dry debris) |
| Main functions | Dry and wet vacuuming (with optional cloth filter), suction power adjustment, automatic shut-off for wet debris, battery protection system |
| Maintenance and cleaning | Regular filter cleaning; powder filter washable with water; do not use solvents |
| Safety | Double insulation, overload and overheating protection, automatic shut-off in wet mode |
| Spare parts and repairability | Use only Makita genuine spare parts; repairs by authorized service center |
| General information | Limited one-year warranty; commercial use allowed |
Frequently Asked Questions - XCV04 MAKITA
User questions about XCV04 MAKITA
0 question about this device. Answer the ones you know or ask your own.
Ask a new question about this device
Download the instructions for your Cordless vacuum in PDF format for free! Find your manual XCV04 - MAKITA and take your electronic device back in hand. On this page are published all the documents necessary for the use of your device. XCV04 by MAKITA.
USER MANUAL XCV04 MAKITA
MANUEL D'INSTRUCTION
Corded and Cordless Vacuum
Cleaner
IMPORTANT: Read Before Using.
IMPORTANT: Lire avant usage.
IMPORTANTE: Leer antes de usar.
ENGLISH (Original instructions)
SPECIFICATIONS
| Model | XCV03 | XCV04 | |
| Standard filter type | Cloth filter (for dry and wet dust) | Powder filter (for dry dust) | |
| Volume flow (air) | DC operation(with BL1830,ø38 mm (1-1/2") x 2.5 m (98-1/2") hose) | 2.1 m^3/min (74 cu.ft./min) | |
| AC operation(with ø38 mm (1-1/2") x 2.5 m (98-1/2") hose) | 3.6 m^3/min (127 cu.ft./min) | ||
| Vacuum | DC operation(with BL1830,ø38 mm (1-1/2") x 2.5 m (98-1/2") hose) | 90 hPa | |
| AC operation(with ø38 mm (1-1/2") x 2.5 m (98-1/2") hose) | 240 hPa | ||
| Recoverable capacity | Dust 8 L (2.1 gal) | ||
| Water 6 L (1.6 gal) - | |||
| Dimensions (L x W x H) 366 mm x 334 mm x | 368 mm (14-3/8" x 13-1/8" x 14-1/2") | ||
| Rated voltage (operation with batteries) DC 36 V | |||
| Standard battery cartridges | BL1815N, BL1820, BL1820B, BL1830, BL1840, BL1840B, BL1850, BL1850B | ||
| Net weight (with BL1815N / BL1820) 8.6 kg (19.0 lbs) | 9.3 kg (20.5 lbs) | ||
| Net weight (with BL1830 / BL1840 / BL1850) 9.2 kg (20 lbs) | 3 lbs) 9.9 kg (21.8 lbs) | ||
| Safety class /II | 回 | ||
- Due to our continuing program of research and development, the specifications herein are subject to change without notice.
- Specifications may differ from country to country.
• Weight according to EPTA-Procedure 01/2003 - For wet dust, the float and the water filter or cloth filter are required.
USA022-1
IMPORTANT SAFETY INSTRUCTIONS
When using an electrical appliance, basic precautions should always be followed, including the following:
READ ALL INSTRUCTIONS BEFORE USING THIS APPLIANCE. WARNING - To reduce t
risk of fire, electric shock or injury:
- Do not leave appliance when plugged in or battery fitted. Unplug from outlet and remove battery
from appliance when not in use and before servicing.
- Do not allow to be used as a toy. Close attention is necessary when used by or near children.
- Use only as described in this manual. Use only manufacturer's recommended attachments.
- Do not use with damaged cord, plug or battery. If appliance is not working as it should, has been dropped, damaged, left outdoors, or dropped into water, return it to a service center.
- Do not pull or carry by cord, use cord as a handle, close a door on cord, or pull cord around sharp edges or corners. Do not run appliance over cord. Keep cord away from heated surfaces.
- Do not unplug by pulling on cord. To unplug, grasp the plug, not the cord.
-
Do not handle plug or appliance with wet hands.
-
Do not put any object into openings. Do not use with any opening blocked; keep free of dust, lint, hair, and anything that may reduce air flow.
-
Keep hair, loose clothing, fingers, and all parts of body away from openings and moving parts.
-
Turn off all controls before unplugging or removing the battery cartridge.
-
Use extra care when cleaning on stairs.
-
Do not use to pick up flammable or combustible liquids, such as gasoline, or use in areas where they may be present.
-
Use only the charger supplied by the manufacturer to recharge.
-
Do not pick up anything that is burning or smoking, such as cigarettes, matches, or hot ashes.
-
This appliance is provided with double insulation. Use only identical replacement parts. See instructions for Servicing of Double-Insulated Appliances.
-
Do not use without filters in place.
-
Do not charge the battery outdoors.
-
Use power tools only with specifically designated battery packs. Use of any other battery packs may create a risk of injury and fire.
-
When battery pack is not in use, keep it away from other metal objects, like paper clips, coins, keys, nails, screws or other small metal objects, that can make a connection from one terminal to another. Shorting the battery terminals together may cause burns or a fire.
-
Under abusive conditions, liquid may be ejected from the battery; avoid contact. If contact accidentally occurs, flush with water. If liquid contacts eyes, additionally seek medical help. Liquid ejected from the battery may cause irritation or burns.
-
(For the powder filter models.) Do not use on wet surfaces. Do not expose to rain. Store indoors.
-
(For the cloth filter models.) Do not expose to rain. Store indoors.
-
Always install float before any wet pick-up operation.
Battery tool use and care
-
Recharge only with the charger specified by the manufacturer. A charger that is suitable for one type of battery pack may create a risk of fire when used with another battery pack.
-
Use power tools only with specifically designated battery packs. Use of any other battery packs may create a risk of injury and fire.
-
When battery pack is not in use, keep it away from other metal objects, like paper clips, coins, keys, nails, screws or other small metal objects, that can make a connection from one terminal to another. Shorting the battery terminals together may cause burns or a fire.
-
Under abusive conditions, liquid may be ejected from the battery; avoid contact. If contact accidentally occurs, flush with water. If liquid contacts eyes, additionally seek medical help. Liquid ejected from the battery may cause irritation or burns.
SERVICING OF DOUBLE-INSULATED APPLIANCES
A double-insulated appliance is marked with one or more of the following: The words "DOUBLE INSULATION" or "DOUBLE INSULATED" or the double insulation symbol (square within a square).

000006
In a double-insulated appliance, two systems of insulation are provided instead of grounding. No grounding means is provided on a double-insulated appliance, nor should a means for grounding be added to the appliance. Servicing a double-insulated appliance requires extreme care and knowledge of the system, and should be done only by qualified service personnel. Replacement parts for a double-insulated appliance must be identical to the parts they replace.
Polarization instructions
To reduce the risk of electric shock, this appliance has a polarized plug (one blade is wider than the other). This plug will fit in a polarized outlet only one way. If the plug does not fit fully in the outlet, reverse the plug. If it still does not fit, contact a qualified electrician to install the proper outlet. Do not change the plug in any way.
USE PROPER EXTENSION CORD. Make sure your extension cord is in good condition. When using an extension cord, be sure to use one heavy enough to carry the current your product will draw. An undersized cord will cause a drop in line voltage resulting in loss of power and overheating. Table 1 shows the correct size to use depending on cord length and nameplate ampere rating. If in doubt, use the next heavier gage. The smaller the gage number, the heavier the cord.
Table 1: Minimum gage for cord
| Ampere Rating | Volts | Total length of cord in feet | ||||
| 120V 25 ft. | 50 ft. 100 ft. | 150 ft. | ||||
| 220V - 240V | 50 ft. 100 ft. | 200 ft. 300 ft. | ||||
| More Than Not More Than | AWG | |||||
| 0 | 6 | 18 | 16 16 14 | |||
| 6 | 10 | 18 | 16 | 14 | 12 | |
| 10 | 12 | 16 | 16 | 14 | 12 | |
| 12 | 16 | 14 | 12 | Not Recommended | ||
000300
SAVE THESE INSTRUCTIONS.
This appliance is intended for commercial use.
ENC007-10
IMPORTANT SAFETY INSTRUCTIONS FOR BATTERY CARTRIDGE
- Before using battery cartridge, read all instructions and cautionary markings on (1) battery charger, (2) battery, and (3) product using battery.
- Do not disassemble battery cartridge.
- If operating time has become excessively shorter, stop operating
immediately. It may result in a risk of overheating, possible burns and even an explosion.
- If electrolyte gets into your eyes, rinse them out with clear water and seek medical attention right away. It may result in loss of your eyesight.
- Do not short the battery cartridge:
(1) Do not touch the terminals with any conductive material.
(2) Avoid storing battery cartridge in a container with other metal objects such as nails, coins, etc.
(3) Do not expose battery cartridge to water or rain.
A battery short can cause a large current flow, overheating, possible burns and even a breakdown.
- Do not store the tool and battery cartridge in locations where the temperature may reach or exceed 50^ C ( 122^ F).
-
Do not incinerate the battery cartridge even if it is severely damaged or is completely worn out. The battery cartridge can explode in a fire.
-
Be careful not to drop or strike battery.
- Do not use a damaged battery.
- Follow your local regulations relating to disposal of battery.
SAVE THESE INSTRUCTIONS.
⚠️ CAUTION: Only use genuine Makita batteries.
Use of non-genuine Makita batteries, or batteries that have been altered, may result in the battery bursting causing fires, personal injury and damage. It will also void the Makita warranty for the Makita tool and charger.
Tips for maintaining maximum battery life
- Charge the battery cartridge before completely discharged.
Always stop tool operation and charge the battery cartridge when you notice less tool power. - Never recharge a fully charged battery cartridge. Overcharging shortens the battery service life.
- Charge the battery cartridge with room temperature at 10^ C - 40^ C ( 50^ F - 104^ F). Let a hot battery cartridge cool down before charging it.
- Charge the battery cartridge if you do not use it for a long period (more than six months).
FUNCTIONAL DESCRIPTION
Use with AC power:
WARNING:
- Before plugging the cleaner, always make sure that the cleaner is switched off. Plugging the cleaner with the switch on may cause an unexpected start resulting in serious personal injury.

natural_image
Line drawing of a portable air purifier with labeled component (no text or symbols beyond label)- Plug (the shape and cord length may differ from country to country)
015533
Connect the plug to a power supply.
text_image
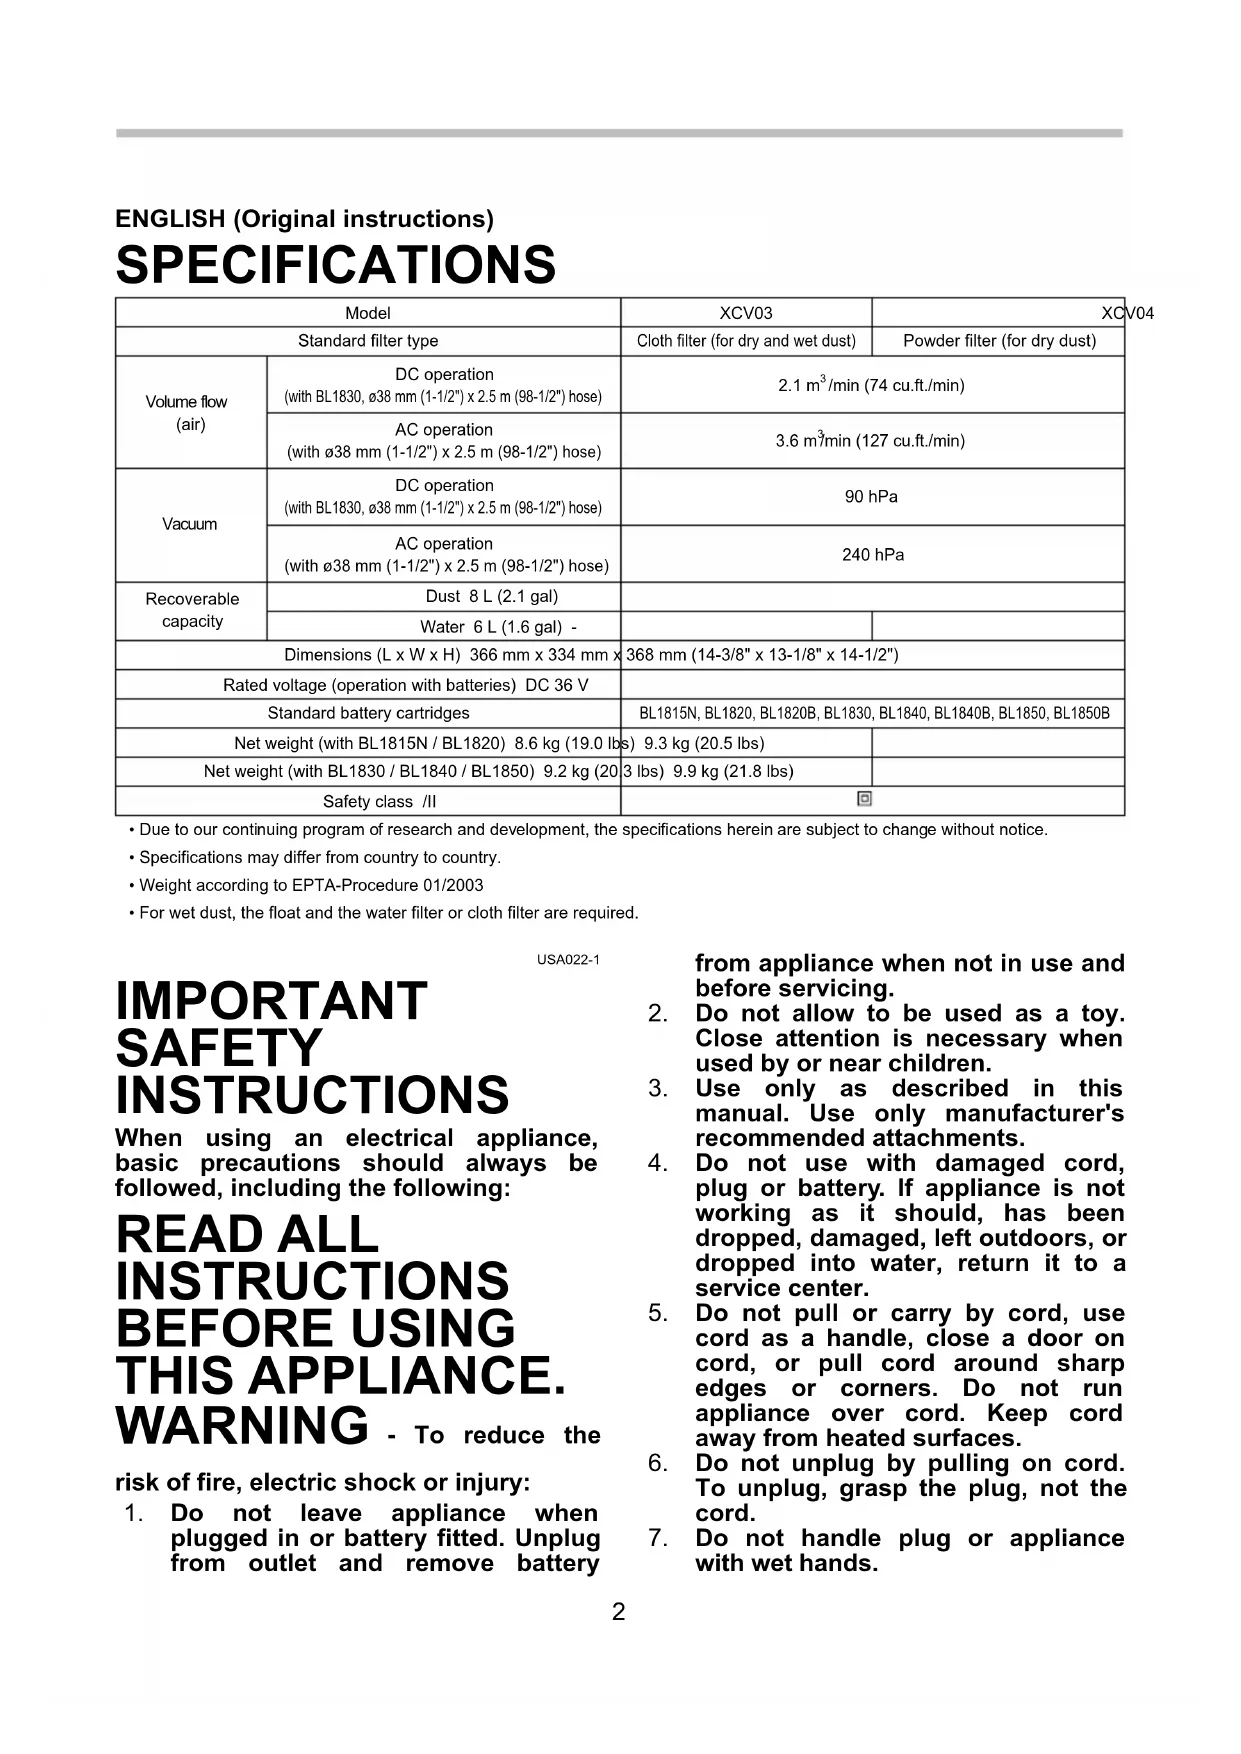
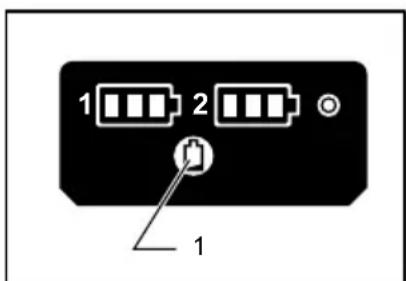
1 2 1- AC power indicator
015549
The AC power indicator lights up when setting the stand-by switch to "I" side.
NOTE:
- Even operating in DC power mode, the tool is automatically changed into AC power mode when plugged in.
- If the tool is unplugged during operation with the battery inserted, the cleaner gets into stand-by state.
Use with battery:
Installing or removing battery cartridge
CAUTION:
· Always be sure that the cleaner is switched off, unplugged, and the battery cartridge is removed before adjusting or checking function on the tool.
- Hold the cleaner and the battery cartridge firmly when installing or removing battery cartridge. Failure to hold the cleaner and the battery cartridge firmly may cause them to slip off your hands and result in damage to the cleaner and battery cartridge and a personal injury.
- Be careful not to pinch your fingers when opening or closing the battery cover. Failure to do so may cause personal injury.
text_image
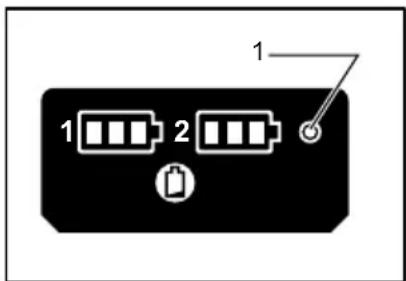
Diagram of a cleaning or cleaning device with labeled parts 1 and 2, showing internal components and directional arrows.- Lock
- Battery cover
015530 To install the battery cartridge, release the lock first, and open the battery cover. And then, insert the battery cartridge.

text_image
Diagram of a device component with labeled parts and directional arrows indicating assembly or movement- Battery cartridge
015531
Align the tongue on the battery cartridge with the groove in the housing and slip it into place. Insert it all the way until it locks in place with a little click. Then lock the battery cover.
To remove the battery cartridge, slide it from the tool while sliding the button on the front of the cartridge.
NOTICE:
- Remove the plug of the cleaner from the extension cord when using the cleaner with the batteries.
CAUTION:
· Always install the battery cartridge fully in place. If not, it may accidentally fall out of the tool, causing injury to you or someone around you.
- Do not install the battery cartridge forcibly. If the cartridge does not slide in easily, it is not being inserted correctly.
NOTE:
- The cleaner does not work with only one battery cartridge.
Tool / battery protection system
The tool is equipped with a tool/battery protection system. This system automatically cuts off power to the motor to extend tool and battery life.
The tool will automatically stop during operation if the tool or battery is placed under one of the following conditions. In some conditions, the indicators light up.
Overload protection
If the tool is overloaded, the tool stops automatically. In this situation, turn the tool off and stop the application that caused the tool to become overloaded. Then turn the tool on to restart.
Overheat protection for tool

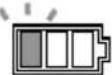
text_image
■:OnBlinking ■:015485
When the tool is overheated, the tool stops automatically, and the battery indicator blink about 60 seconds. In this situation, let the tool cool down before turning the tool on again.
Overdischarge protection
When the battery capacity becomes low, the tool stops automatically. If the product does not operate even when the switches are operated, remove the batteries from the tool and charge the batteries.
Remaining battery capacity indication
text_image
1 2 1- Check button
015550

text_image
Diagram showing a device with labeled ports and warning symbols, likely for safety or diagnostic instructions.015674 Press the check button to make the battery indicators show the remaining battery capacities. The battery indicators correspond to each battery.
Remaining battery capacity indication
| Battery indicator status | Remaining battery capacity |
| ☐:OnOff: ☐:Blinking | |
 | 50% - 100% |
 | 20% - 50% |
 | 0% - 20% |
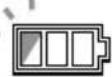 | Charge the battery |
015527
Indicating the remaining battery capacity
(Only for battery cartridges with "B" at the end of the model number.)
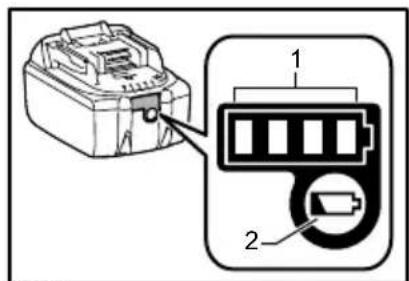
text_image
Diagram showing a device with labeled components, including a battery icon and a close-up of its internal structure.- Indicator lamps
- Check button
015676
Press the check button on the battery cartridge to indicate the remaining battery capacity. The indicator lamps light up for few seconds.
| Indicator lamps | Remaining capacity | ||
| Lighted | Off | Blinking | |
 | 75% to 100% | ||
 | 50% to 75% | ||
 | 25% to 50% | ||
 | 0% to 25% | ||
 | Charge the battery. | ||
  | The battery may have malfunctioned. | ||
015658
NOTE:
. Depending on the conditions of use and the ambient temperature, the indication may differ slightly from the actual capacity.
Switch action
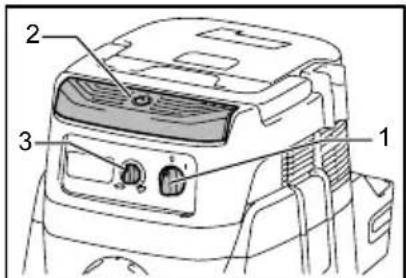
text_image
Technical diagram of a portable air conditioner unit with labeled parts 1, 2, and 3015529
To start the cleaner:
-
Set the stand-by switch to the "I" side. The cleaner gets into stand-by state.
-
Press the power button.
To make the cleaner get into stand-by mode, press the power button again.
To turn off the cleaner, set the stand-by switch to the "O" side.
The suction power can be adjusted according to your work need.
Suction power can be increased by turning the suction force adjusting knob from the symbol to the symbol.
NOTICE:
· Always set the stand-by switch to the "O" side when not using the cleaner for long time. The cleaner consumes power during stand-by state.
Auto-suction stop during wet suction operation (for the cloth filter model)
⚠ WARNING:
- Do not use for a long time while the float is at work. Using the cleaner with its float at work for a long time can cause overheat, resulting in the cleaner deformation.
· Do not pick up foam or soapy liquid.
Picking up foam or soapy liquid can cause foam to come out of air exit before the float works. Continuing to using in this condition may cause an electric shock and breakage of the cleaner.
Auto-suction stop works only when using with the float and float cage.
The cleaner has a float mechanism that prevents water from immersing into the motor when picking up more than a certain amount of water.
When the tank is full and the cleaner no longer picks up water, switch off the cleaner and empty the tank.
Locking or unlocking the caster
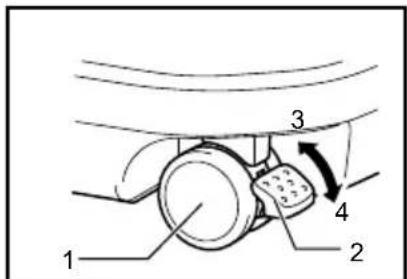
text_image
1 2 3 4- Caster
- Stopper lever
- FREE position
- LOCK position
011611
To lock the caster with a stopper, lower the stopper lever and the caster no longer will rotate. To release the caster from the locked position, raise the stopper lever.
Locking the caster is convenient when storing the cleaner, stopping the work on the way and keeping the cleaner still.
To operate the stopper, move it by hand.
NOTE:
- When moving the cleaner, make sure that the caster is unlocked. Moving the cleaner with the caster in the locked position may cause damage to the caster.
Carriage handle
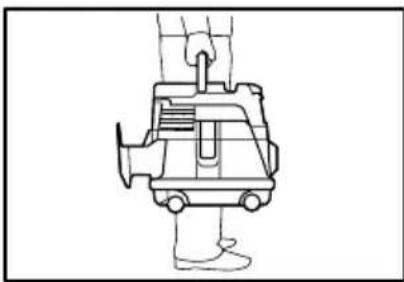
natural_image
Line drawing of a mechanical device with a foot and lever mechanism (no text or symbols)When carrying the cleaner, carry it by holding the handle on the head. The handle is retractable at the head when not in use.
PARTS DESCRIPTION
Model XCV03
(Cloth filter (for dry and wet dust) model)
text_image
Technical diagram of a mechanical device with labeled parts including a pump, rotor, bucket, and housing.- Tank cover
- Float
- Float cage
- Cloth filter
- Tank
015616
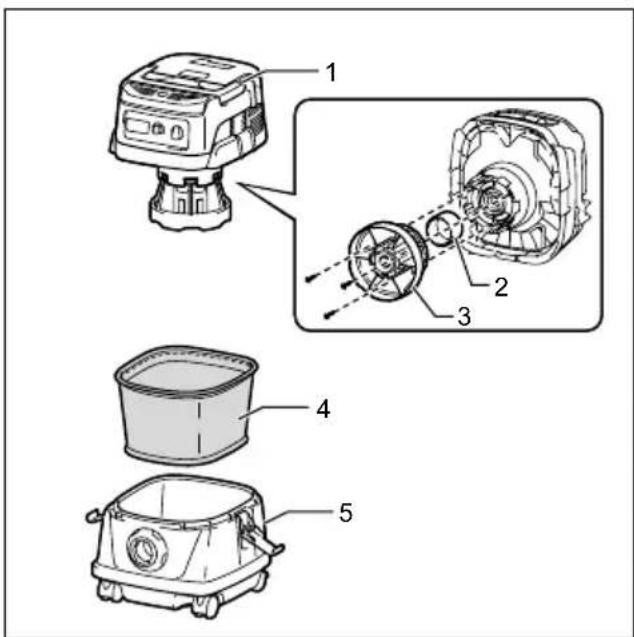
Model XCV04
(Powder filter (for dry dust) model)

text_image
Exploded view diagram of a kitchen appliance with labeled parts from top to bottom- Tank cover
- Powder filter
- Damper
- Prefilter
- Tank
015617
ASSEMBLY
CAUTION:
· Always be sure that the cleaner is switched off, unplugged, and the battery cartridge is removed before carrying out any work on the cleaner.
· Always wear dust mask during assembly or maintenance.
Installing the powder filter and prefilter (for dry dust) (optional accessory for cloth filter model)
CAUTION:
- Never pick up water or other liquids or wet dusts when using the powder filter. Picking up such things may cause the powder filter breakage.
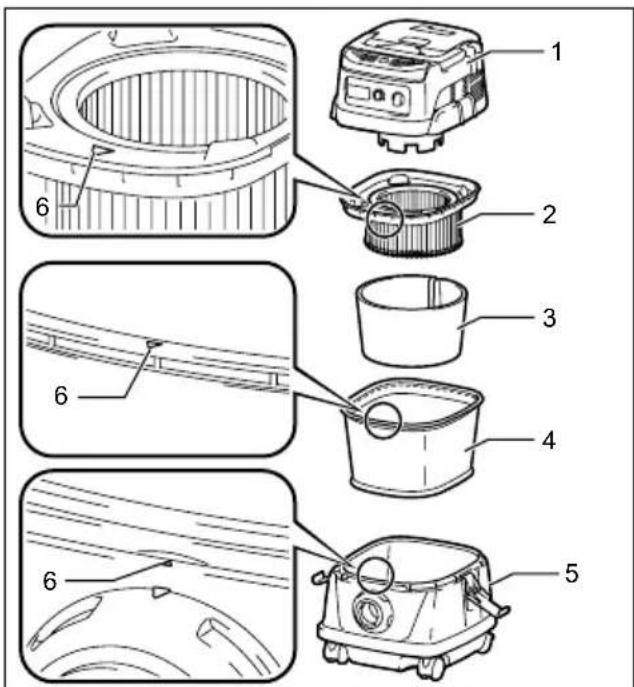
text_image
Technical diagram showing exploded view of a cleaning or dust removal device with numbered parts for each stage.- Tank cover
- Powder filter
- Damper
- Prefilter
- Tank
- Mounting position marking
015534

text_image
Technical diagram of a mechanical assembly with labeled components and directional arrows indicating motion or flow.- Float
- Float cage
015551
To use powder filter, remove the float cage and float by removing the bolts.
Place the prefilter in the tank.
Next, mount the damper on the powder filter and then place them in the prefilter.
When installing powder filter and prefilter, align the mounting position marking on each of them with that one at the top of the tank.
Finally, mount the tank cover and lock it.
NOTE:
- Before using the powder filter, make sure that prefilter and damper are always used together. It is not allowed to install powder filter solely.
Installing the water filter (for cloth filter model) (optional accessory)
CAUTION:
- Never pick up water or wet dust without the float and the cloth filter or the water filter.
- For picking up wet dust, make sure that the float cage and the float are installed on the cleaner.
- When installing the water filter on the tank, set it tight at the opening of the tank so that the hook of the water filter engages the tank opening firmly and there is no space between the water filter and the tank.
NOTICE:
- It is recommended using water filter when picking up large amount of water repeatedly. Otherwise vacuum ability may be reduced in case of cloth filter.
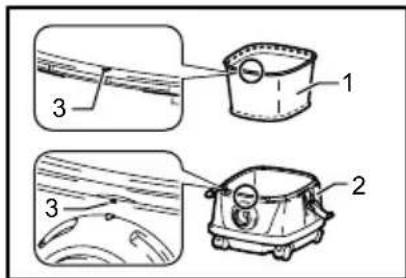
text_image
Technical diagram showing three labeled components of a mechanical device, with numbered parts and directional arrows indicating assembly or assembly.- Water filter
- Tank
- Mounting position marking
015532
To pick up water or wet dust only, the water filter is more suitable than the cloth filter.
When installing the water filter, align its mounting position mark with the one on the tank.
Installing the paper pack (optional accessory)
WARNING:
- When using the paper pack, also use the cloth filter or prefilter together that is preinstalled on the tool. Failure to use the cloth filter / prefilter together may cause unusual noise and heat, resulting in a fire.
CAUTION:
(For the cloth filter model)
- Never pick up water or other liquids or wet dusts when using the paper pack. Picking up such things may cause the paper pack breakage.
- Before using the paper pack, make sure that powder filter (optional accessory), damper (optional accessory) and prefilter are always used together.
(For the powder filter model)
- Before using the paper pack, make sure that powder filter, damper and prefilter are always used together.
- Remove the rubber holder.
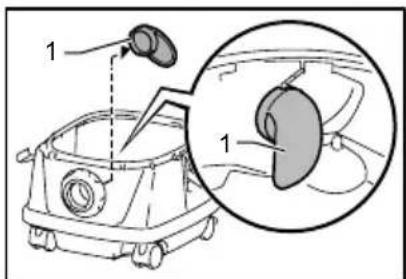
text_image
Diagram showing a device with labeled parts and an inset close-up of the component, likely illustrating a mechanical or electrical assembly.- Rubber holder
015535
- Extend the paper pack.
- Align the paper pack opening with the dust suction opening of the cleaner.
- Insert the cardboard of the paper pack onto the holder so that it is positioned at the end beyond the detent protrusion.

text_image
Technical diagram of a vehicle interior with labeled parts and a magnified inset showing hand positioning and adjustment.- Paper pack
- Holder
015536
Installing the polyethylene bag
Cleaner can also be used without polyethylene bag. However, using polyethylene bag is easier to empty the tank without letting your hands dirty.
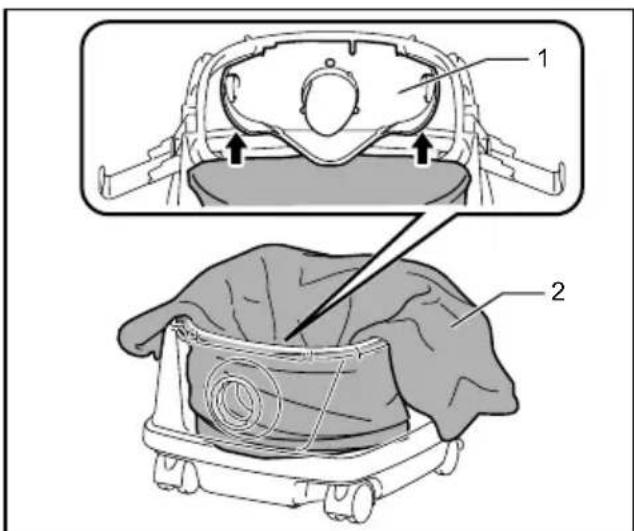
text_image
Medical diagram showing anatomical views of a patient's head and torso with labeled parts 1 and 2-
Holder plate
-
Polyethylene bag
015542
Spread the polyethylene bag in the tank. Insert it between the holder plate and the tank, and pull it to the hose inlet.
Spread the bag around the top of the tank so that the prefilter edge can catch and hold the bag securely.
NOTE:
· A polyethylene bag available on the market can be used. 0.04 mm or thicker one is recommended.
- Too much dust will tear the bag easily, so do not collect the dust more than the half of the bag capacity.
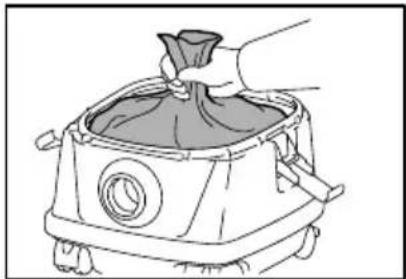
Emptying the polyethylene bag
WARNING:
· Always make sure that the cleaner is switched off and unplugged before emptying the polyethylene bag. Failure to do so may cause an electric shock and serious personal injury.
CAUTION:
- Do not apply a great impact on the float cage and tank. Applying a great impact may cause deformation and damage to the parts.
- Empty the tank at least once a day although this depends on picked-up dust volume in the tank. Or, the suction force will weaken and the motor may be broken.
- Do not grab the hook when emptying the tank. Grabbing the hook may cause the hook to break.
Unhook and lift up the tank cover.
natural_image
Line drawing of a hand pouring liquid into a portable stove (no text or symbols)015544
Shake off the dust from the cloth filter / powder filter and then take the polyethylene bag out of the tank.
NOTE:
• Take the polyethylene bag carefully out of the tank so that the polyethylene bag cannot be caught and torn by the protrusion inside the tank when emptying it.
· Empty the polyethylene bag before it becomes full. Too much dust in the tank may cause the polyethylene bag to be torn.
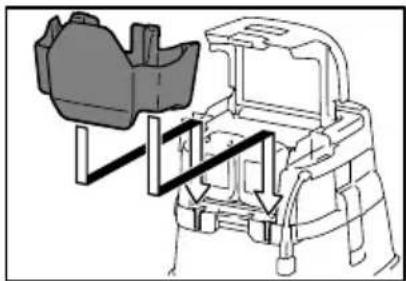
Installing the tool box
natural_image
Technical line drawing of a mechanical assembly with no visible text or symbols015537
-
Release the lock of the battery cover, and open the battery cover.
-
Set the rails on the tool box along the grooves on the housing.
-
Close the battery cover and apply the lock.

natural_image
Line drawing of a cleaning or dust removal machine (no text or symbols)015538
The tool box is convenient for carrying batteries, extension code, pipe, or cuffs.
Connecting the hose
CAUTION:
- Never force the hose for bending or stamp it. Never move the cleaner by a hose. Forcing, stamping and pulling the hose may cause a breakage or deformation of the hose.
- When picking up large wastes such as planer carvings, concrete dusts or similar other than small wastes, use the 38 mm inner diameter hose (optional accessory). Using the 28 mm inner diameter hose (optional accessory) may cause a hose stuffing and damage.
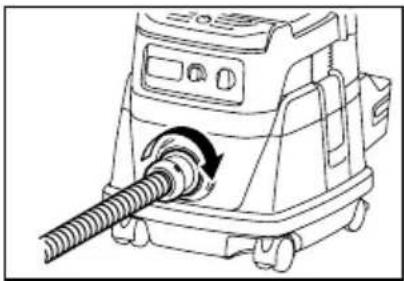
natural_image
Line drawing of a vacuum cleaner with a hose inserted, showing mechanical components and airflow direction (no text or symbols)Insert the hose onto the mounting port of the tank and turn it clockwise until it locks.
MAINTENANCE
⚠️CAUTION:
· Always be sure that the tool is switched off, unplugged, and the battery cartridge is removed before attempting to perform inspection or maintenance.
Storage of power supply cord
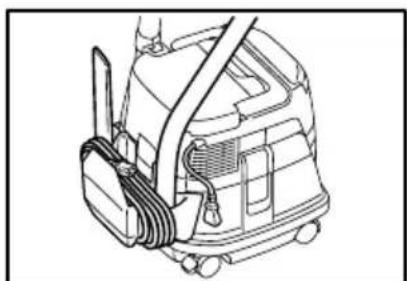
natural_image
Line drawing of a cleaning or cleaning machine with hoses and control panel (no text or symbols)015724
You can wind up the power supply cord around the tool box.
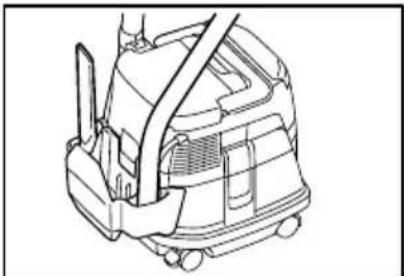
Storage of accessories
natural_image
Line drawing of a mechanical device with no visible text or symbols015539

natural_image
Line drawing of a vacuum cleaner with coiled tubing (no text or symbols)015618
The pipes can be placed into the pipe holder when not using the cleaner for a short time.
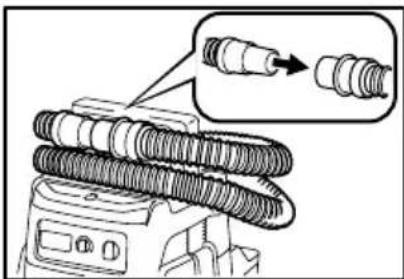
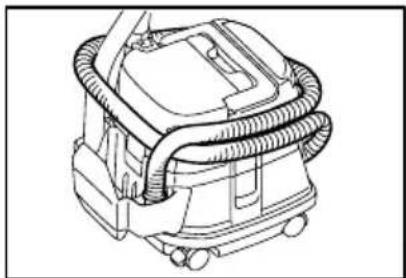
natural_image
Illustration of a coiled medical device with an arrow pointing to a connector (no text or symbols present)015548
The hose can be stored around the tool by connecting each ends.
Cleaning
CAUTION:
- Never use gasoline, benzine, thinner, alcohol or the like. Discoloration, deformation or cracks may result.
Cleaning of cloth filter (for the cloth filter model)

natural_image
Line drawing of a hand pressing down on a square-shaped device (no text or symbols)015543
Clogged cloth filter causes poor suction performance.
Clean out the cloth filter from time to time.
To remove dust or particles adhering to the cloth filter, shake the frame bottom quickly several times.
Cleaning of powder filter and prefilter (for the powder filter model)
Clogged powder filter, prefilter and damper cause poor suction performance.
Clean out the filters and dampers from time to time.
To remove dust or particles adhering to the filters, shake the frame bottom quickly several times.

natural_image
Illustration of hands using a tool to lift or spread a mechanical component, no text or symbols present015547
Occasionally wash the powder filter in water, rinse and dry thoroughly in the shade before use. Never wash filters in a washing machine.
NOTE:
- Do not rub and scratch the powder filter, the prefilter or the damper with hard objects such as a brush and a paddle.
- The filters wear out in course of time. It is recommended to have some spares for them.
To maintain product SAFETY and RELIABILITY, repairs, any other maintenance or adjustment should be performed by Makita Authorized Service Centers, always using Makita replacement parts.
OPTIONAL ACCESSORIES
CAUTION:
• These accessories or attachments are recommended for use with your Makita tool specified in this manual. The use of any other accessories or attachments might present a risk of injury to persons. Only use accessory or attachment for its stated purpose.
If you need any assistance for more details regarding these accessories, ask your local Makita Service Center.
- Makita genuine battery and charger
• Hose - Front cuffs (22, 24, 38)
. Straight pipe
· Corner nozzle - Round brush
• Powder filter (for dry dust)
. Damper
. Prefilter - Nozzle assembly
- Bent pipe
. Polyethylene bag - Water Filter (option for the cloth filter model)
. Paper pack - Holder set
NOTE:
- Some items in the list may be included in the tool package as standard accessories. They may differ from country to country.
MAKITA LIMITED ONE YEAR WARRANTY
Warranty Policy
Every Makita tool is thoroughly inspected and tested before leaving the factory. It is warranted to be free of defects from workmanship and materials for the period of ONE YEAR from the date of original purchase. Should any trouble develop during this one year period, return the COMPLETE tool, freight prepaid, to one of Makita's Factory or Authorized Service Centers. If inspection shows the trouble is caused by defective workmanship or material, Makita will repair (or at our option, replace) without charge.
This Warranty does not apply where:
• repairs have been made or attempted by others:
• repairs are required because of normal wear and tear:
• the tool has been abused, misused or improperly maintained:
• alterations have been made to the tool.
IN NO EVENT SHALL MAKITA BE LIABLE FOR ANY INDIRECT, INCIDENTAL OR CONSEQUENTIAL DAMAGES FROM THE SALE OR USE OF THE PRODUCT. THIS DISCLAIMER APPLIES BOTH DURING AND AFTER THE TERM OF THIS WARRANTY.
MAKITA DISCLAIMS LIABILITY FOR ANY IMPLIED WARRANTIES, INCLUDING IMPLIED WARRANTIES OF "MERCHANTABILITY" AND "FITNESS FOR A SPECIFIC PURPOSE," AFTER THE ONE YEAR TERM OF THIS WARRANTY.
This Warranty gives you specific legal rights, and you may also have other rights which vary from state to state. Some states do not allow the exclusion or limitation of incidental or consequential damages, so the above limitation or exclusion may not apply to you. Some states do not allow limitation on how long an implied warranty lasts, so the above limitation may not apply to you.
EN0006-1
natural_image
Technical line drawing of a mechanical device with labeled component (1), no visible text or symbols beyond the label.text_image
Diagram of a cleaning or cleaning device with labeled parts 1 and 2, showing internal components and directional arrows.text_image
:MARCHE Clignotement:015485
text_image
Diagram showing a mechanical assembly with labeled components and directional arrows indicating motion or flow.015674
text_image
Diagram showing a device with labeled components, including a connector and battery symbol- Témoins
- Bouton CHECK
015676
text_image
Technical diagram of a device rear panel with labeled parts 1, 2, and 3natural_image
Line drawing of a mechanical device with foot and legs, no text or symbols present015545
text_image
Technical diagram of a cleaning or cleaning device with labeled parts including a pump, bucket, and fan assembly.text_image
Exploded view diagram of a kitchen appliance with labeled parts from top to bottomtext_image
Technical diagram showing exploded view of a cleaning or dust removal device with numbered parts for each stage.text_image
Technical diagram of a mechanical assembly with labeled components and directional arrows indicating motion or flow.text_image
Technical diagram showing three labeled components of a mechanical device, with numbered parts and directional arrows indicating assembly or assembly.text_image
Diagram showing a device with labeled parts and an inset close-up of the component, likely illustrating a mechanical or electrical assembly.text_image
Technical diagram of a car interior with labeled parts and a magnified inset showing hand positioning and adjustment.- Sac papier
- Support
015536
text_image
Medical diagram showing anatomical views of a patient's head and torso with labeled parts 1 and 2natural_image
Line drawing of a kitchen appliance with a funnel and lid (no text or symbols)015544
natural_image
Technical line drawing of a mechanical assembly with no visible text or symbols015537
natural_image
Line drawing of a cleaning or dust removal machine (no text or symbols)015538
natural_image
Line drawing of a cleaning or dust removal machine with a coiled hose and directional arrow (no text or symbols)015541
natural_image
Line drawing of a cleaning or cleaning machine with hoses and components (no text or symbols)015724
natural_image
Technical line drawing of a mechanical device with no visible text or symbols015539
natural_image
Line drawing of a mechanical device with coiled tubing and housing (no text or symbols)015618
natural_image
Diagram of a coiled mechanical component with an inset showing a connector (no text or symbols present)015548
natural_image
Line drawing of a kitchen appliance with a handle and lid (no text or symbols)015543
natural_image
Illustration of hands using a tool to lift or spread a mechanical component, no text or symbols present015547
natural_image
Technical line drawing of a mechanical device with labeled component (1), no readable text or symbols present.text_image
Diagram of a cleaning or cleaning device with labeled parts 1 and 2, showing internal components and directional arrows.text_image
Diagram showing a mechanical assembly with labeled components and directional arrows indicating connection or movement.015674
text_image
Diagram showing a device with labeled components, including a battery symbol and a close-up of its internal structure.text_image
Technical diagram of a vehicle front panel with numbered components labeled 1, 2, and 3natural_image
Technical line drawing of a mechanical device with no visible text or symbols015545
text_image
Technical diagram of a cleaning or cleaning device with labeled parts including a pump, bucket, and motor assembly.text_image
Exploded view diagram of a kitchen appliance with labeled parts from top to bottomtext_image
Technical diagram showing exploded view of a cleaning or cleaning device with numbered parts for identification.text_image
Technical diagram of a mechanical assembly with labeled components and directional arrows indicating motion or flow.- Flote
- Flotador
015551
text_image
Technical diagram showing two views of a mechanical device with labeled parts 1 and 2, and parts 3 for detail.text_image
Diagram showing a device with labeled parts and an inset close-up of the component, likely illustrating a mechanical or electrical assembly.text_image
Technical diagram of a car interior with labeled parts and an inset showing hand positioning on a panel.text_image
Medical diagram showing anatomical views of a patient's head and torso with labeled parts 1 and 2natural_image
Line drawing of a hand pouring liquid into a cooking pot (no text or symbols)015544
natural_image
Technical line drawing of a vehicle chassis with structural components and mounting brackets (no text or symbols)015537
natural_image
Line drawing of a cleaning or cleaning machine component (no text or symbols)015538
natural_image
Line drawing of a portable vacuum cleaner with a hose inserted, showing mechanical components and airflow direction (no text or symbols)015541
natural_image
Line drawing of a cleaning or cleaning machine with hoses and control panel (no text or symbols)015724
natural_image
Technical line drawing of a mechanical device with no visible text or symbols015539

natural_image
Line drawing of a mechanical device with coiled tubing and wheels (no text or symbols)015618
natural_image
Diagram of a coiled industrial device with a magnified inset showing internal components (no text or symbols)015548
natural_image
Line drawing of a hand pressing down on a square-shaped device with a circular vent (no text or symbols)015543
natural_image
Illustration of hands using a tool to clean or store items around a mechanical gear (no text or symbols visible)015547
Some dust created by power sanding, sawing, grinding, drilling, and other construction activities contains chemicals known to the State of California to cause cancer, birth defects or other reproductive harm. Some examples of these chemicals are:
- lead from lead-based paints,
• crystalline silica from bricks and cement and other masonry products, and
• arsenic and chromium from chemically-treated lumber.
Your risk from these exposures varies, depending on how often you do this type of work. To reduce your exposure to these chemicals: work in a well ventilated area, and work with approved safety equipment, such as those dust masks that are specially designed to filter out microscopic particles.
3-11-8, Sumiyoshi-cho,
Anjo, Aichi 446-8502 Japan