
Sikanda 21726 - Mouse TRUST - Free user manual and instructions
Find the device manual for free Sikanda 21726 TRUST in PDF.



User questions about Sikanda 21726 TRUST
0 question about this device. Answer the ones you know or ask your own.
Ask a new question about this device
Download the instructions for your Mouse in PDF format for free! Find your manual Sikanda 21726 - TRUST and take your electronic device back in hand. On this page are published all the documents necessary for the use of your device. Sikanda 21726 by TRUST.
USER MANUAL Sikanda 21726 TRUST
Frequently asked questions: www.trust.com/21726/FAQ

Trust
SIKANDA PC LAPTOP
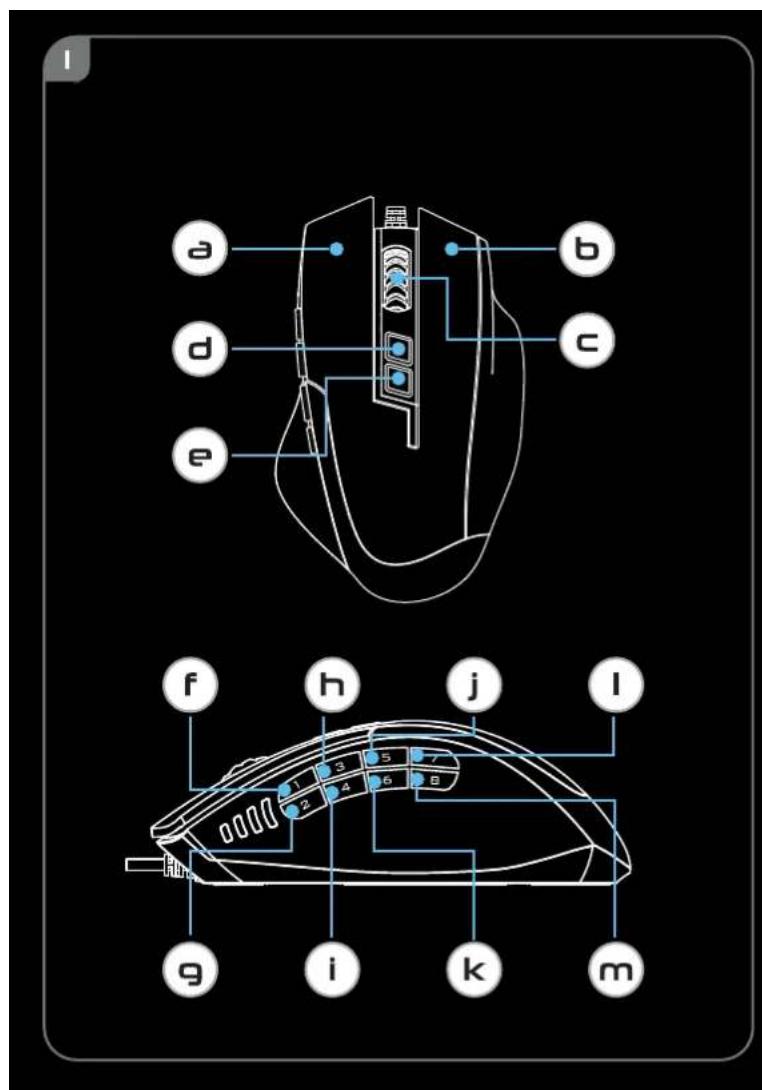
- Button layout
| a | - Button 1 (Default = Left mouse button) |
| b | - Button 2 (Default = Right mouse button) |
| c | - Button 3 (Default = Mid click) |
| d | - Button 4 (Default = DPI +) |
| e | - Button 5 (Default = DPI -) |
| f | - Button 6 (Default = 1) |
| g | - Button 7 (Default = 2) |
| h | - Button 8 (Default = 3) |
| i | - Button 9 (Default = 4) |
| j | - Button 10 (Default = 5) |
| k | - Button 11 (Default = 6) |
| l | - Button 12 (Default = 7) |
| m | - Button 13 (Default = 8) |
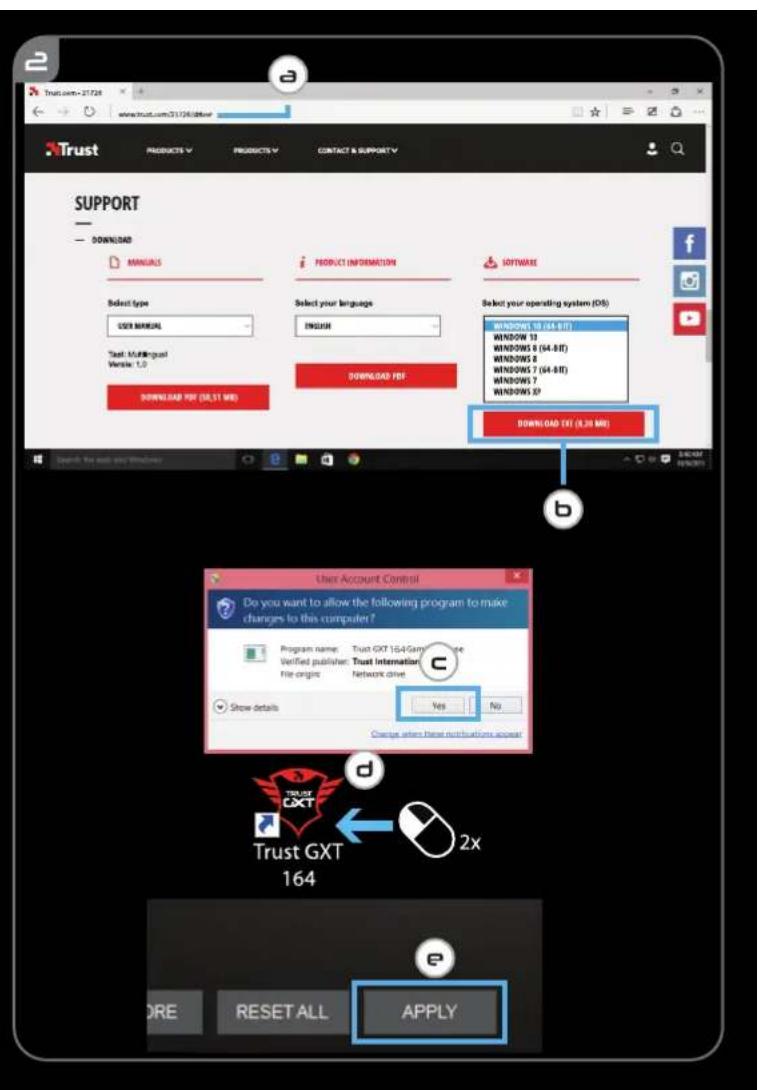
2. Installation
a - Open the internet browser and go to wwwtrust.com/21726/driver.
b - Click the "Download EXE" button to download the software.
c - Click on the "21726-02_05.exe" and follow the installation wizard.
d - Click on the "GXT 164 Gaming Mouse" shortcut to start the software.
- You can now start to configure the mouse. In the manual will be referred to 'Apply' to update the mouse.
Updating the mouse can take up to 20 seconds depending on your system.
Button Programming
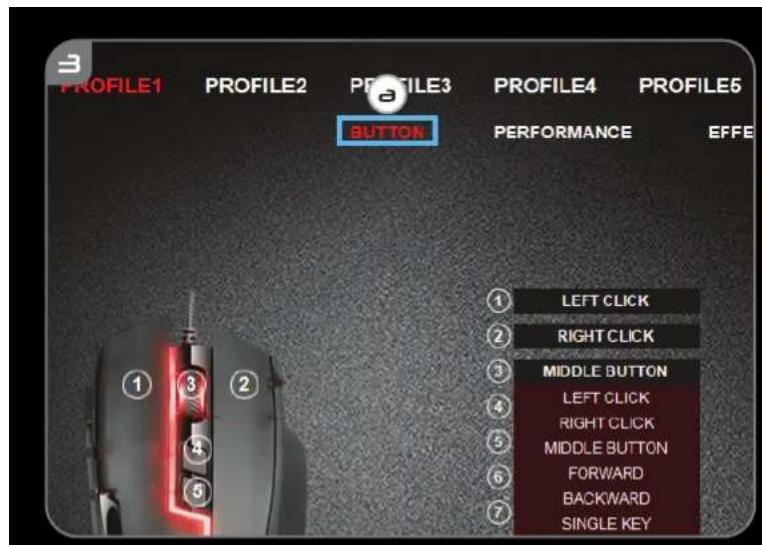
3. Assign a function
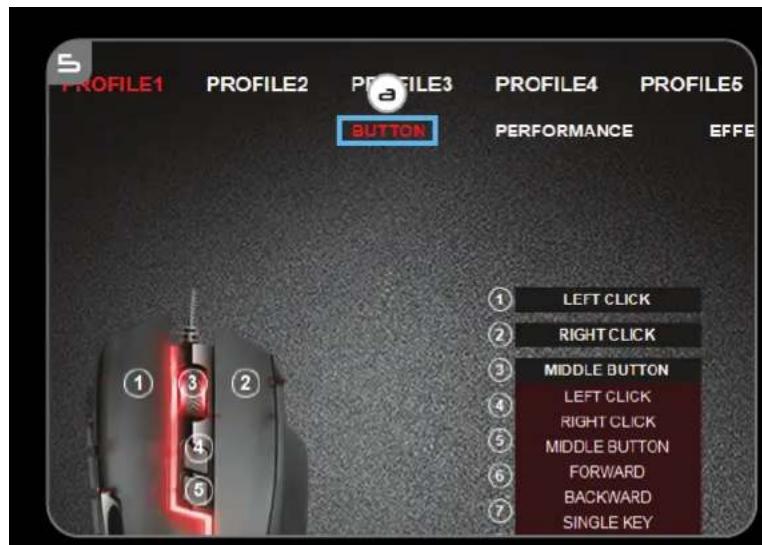
a - Click on the 'BUTTON' tab.
b - Click on the button you want to re-assign
c - Click on the function you want to assign.
- Click on 'Apply', the mouse is being updated.
At least one button has to be assigned as "Left Click".
Report rate & DPI settings
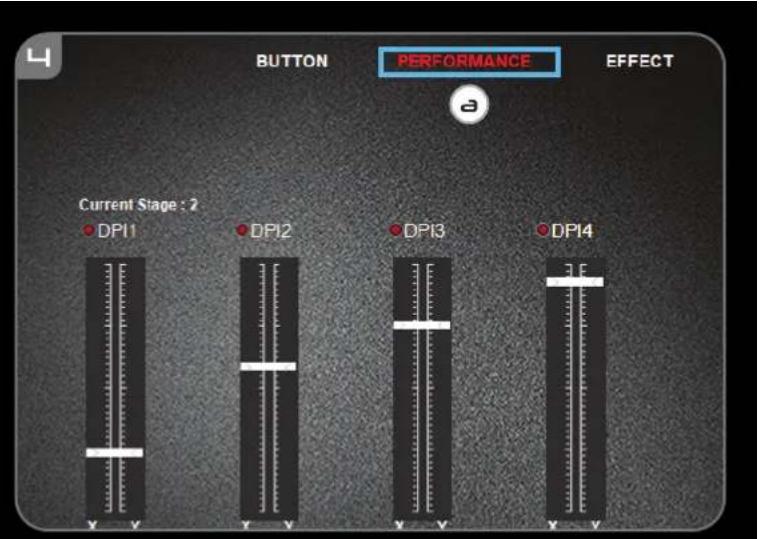
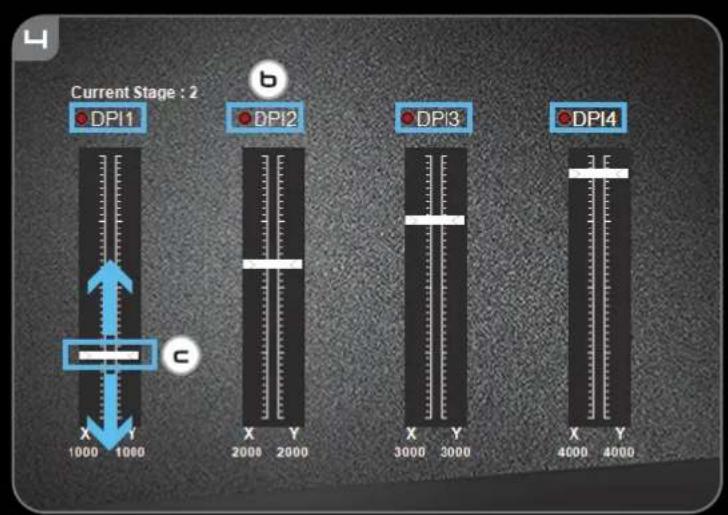
4. DPI setting
a - Click on the 'PERFORMANCE' tab.
b - Click on the checkbox next to the DPI number to enable or disable this DPI level.
c - Change the DPI level by dragging the respective bar.
- Click on 'Apply', the mouse is being updated.
5. Other Settings
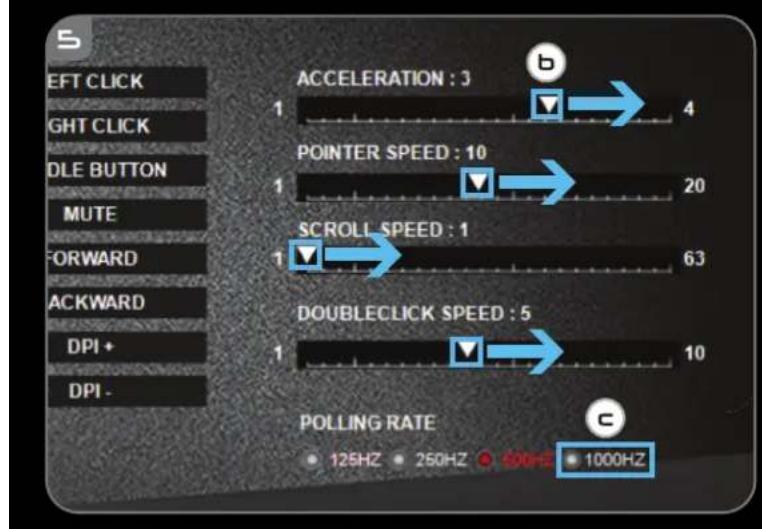
a - Click on the 'BUTTON' tab.
b - Change the Acceleration, Windows pointer speed, Windows scroll speed or Windows doubleclick speed by dragging the respective cursor.
c - Change the Polling rate by clicking on the respective frequency.
- Click on 'Apply', the mouse is being updated.
Light Settings
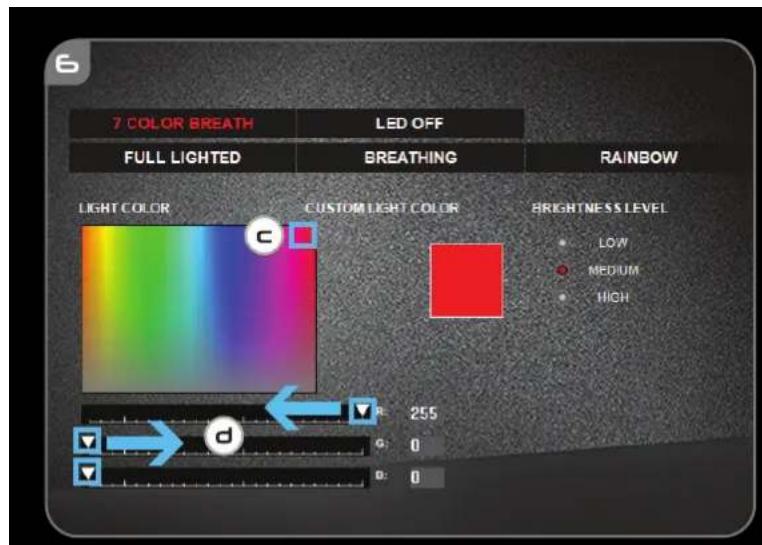
- Change the Light Effect
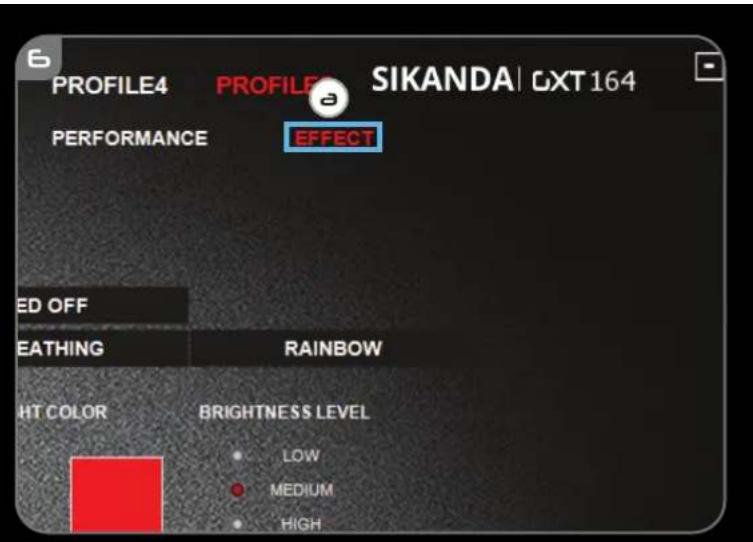
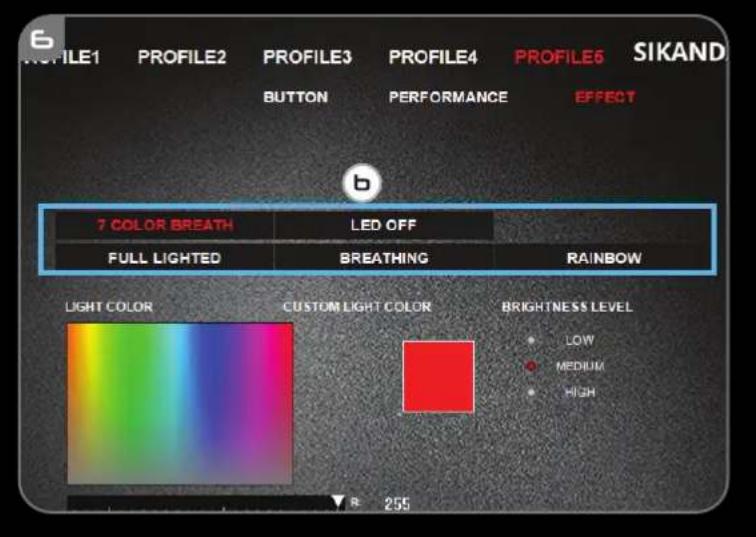
a - Click on the 'EFFECT' tab.
b - Change the light mode.
c - Change the colour by clicking the color box or;
d - Change the colour by dragging the Red, Green or Blue cursor.
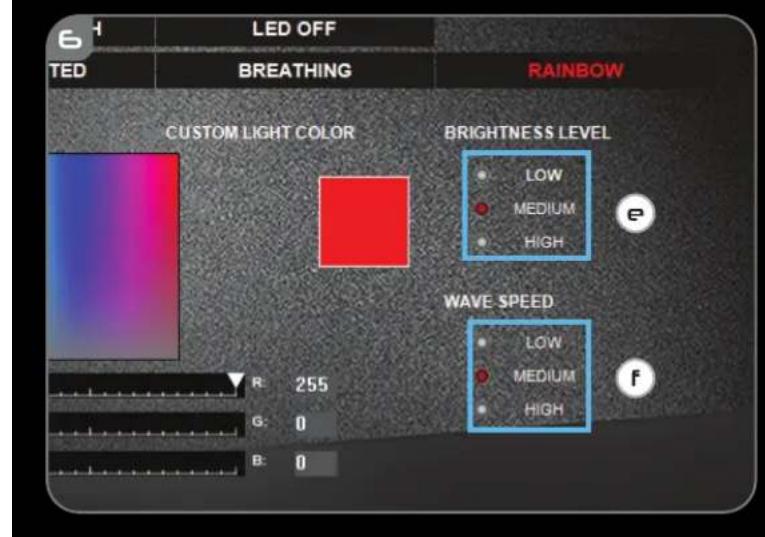
e - Change the LED brightness level.
f - Change the animation speed.
- Click on 'Apply', the mouse is being updated.
Light modes;
7 Color Breath = multiple colours breathing
Full lighted = one solid colour
LEDOff = disableLED
Breathing = one breathing colour
Rainbow = Rainbow wave effects
Macro Settings
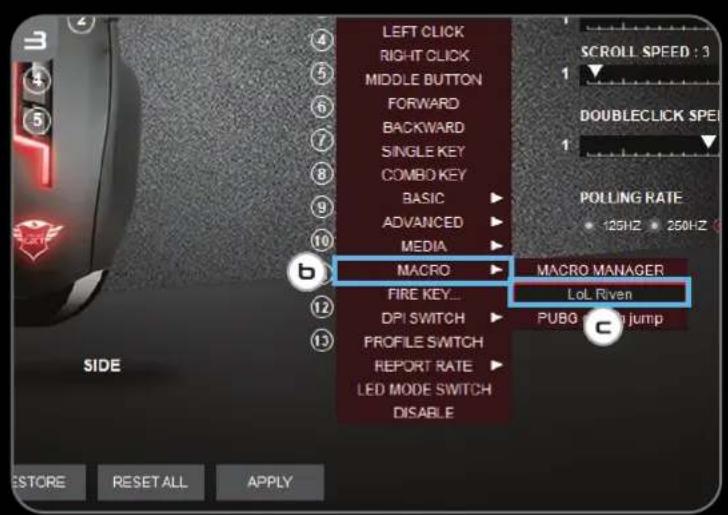
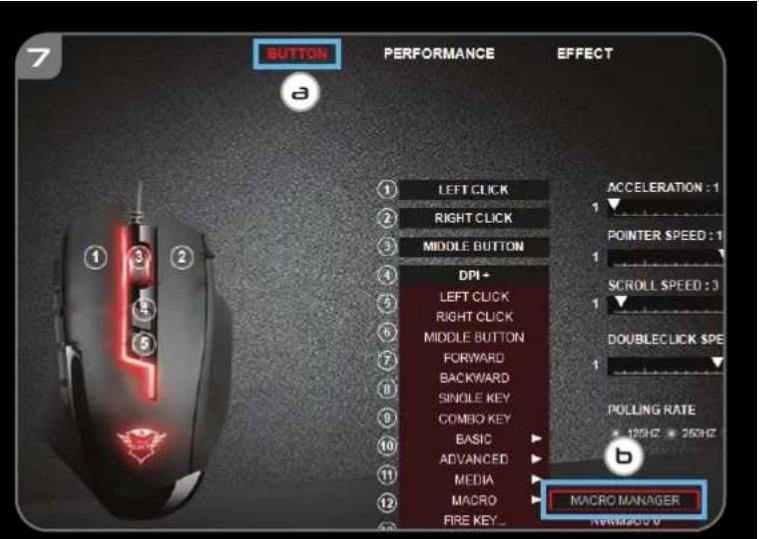
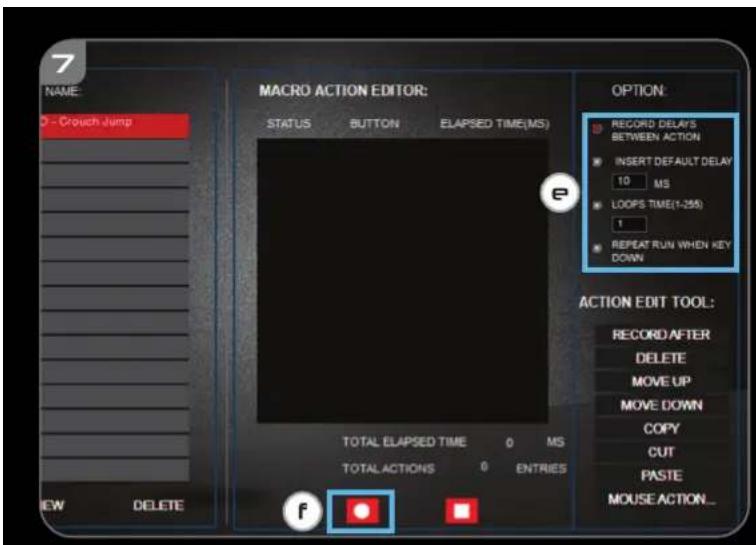
- Create a Macro (Store a sequence of keys in the software)
- Go to the 'BUTTON' tab.
- Click on a button and then on 'MACRO MANAGER'.
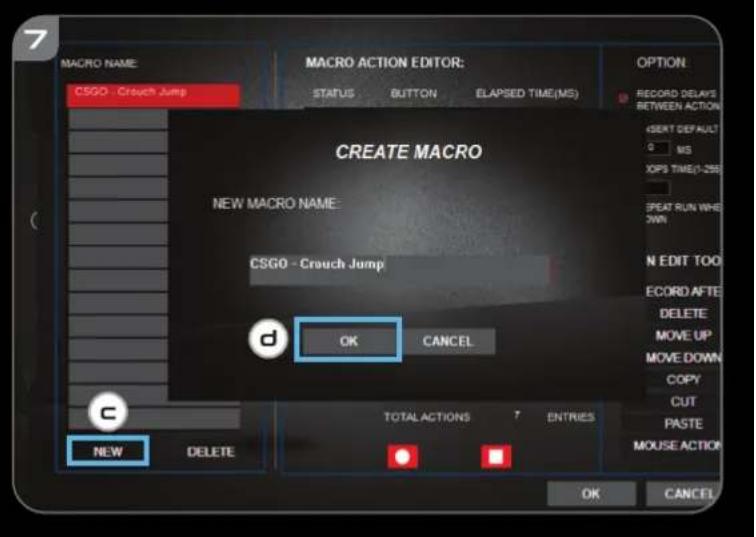
- Click on 'NEW' to create a new macro.
- Fill in the name of the macro and click on 'OK'.
e - Set the delay time between each action and/or the loop/repeat setting.
f - Click to start recording the macro. Now enter your preferred macro sequence.
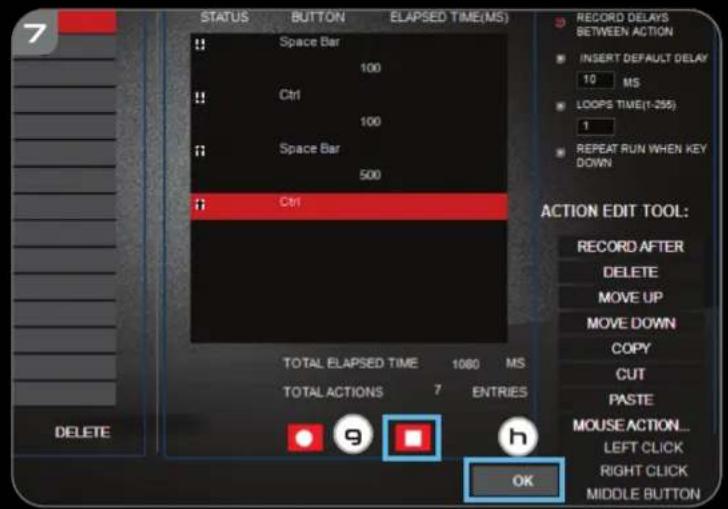
g - Click to stop recording the macro. (max. 60 actions)
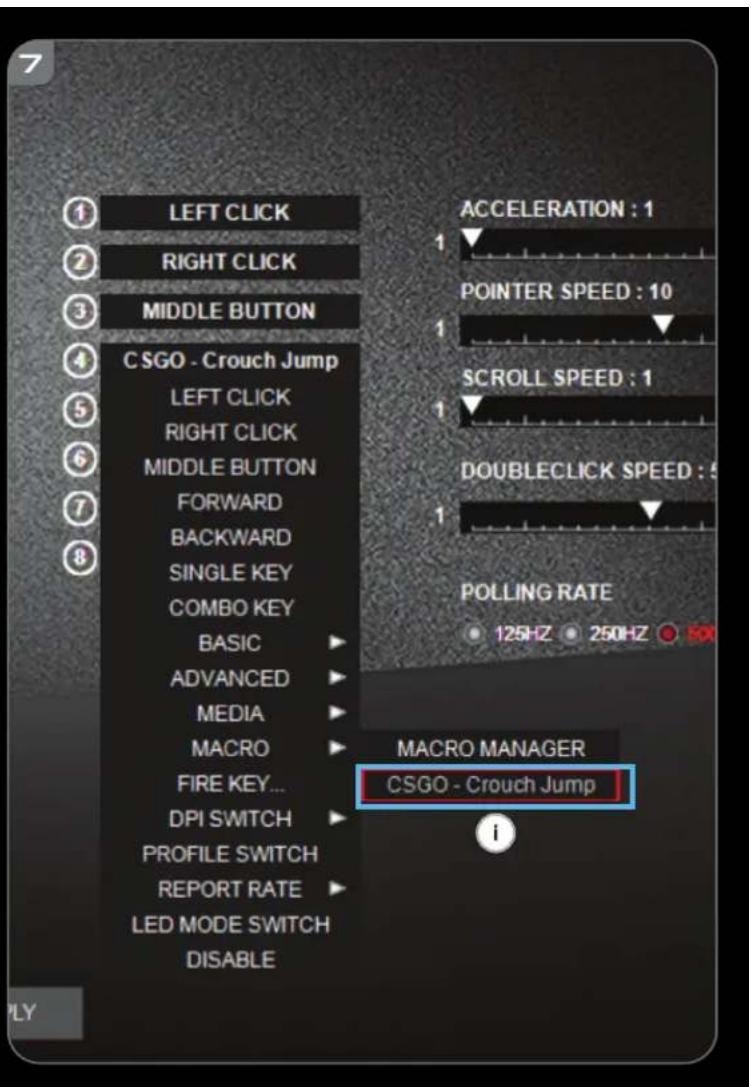
h - Click OK to return to the BUTTON' tab. - The created macro is now available under the 'MACRO' function.
To assign a macro follow step 3 of this manual.
Profile Settings
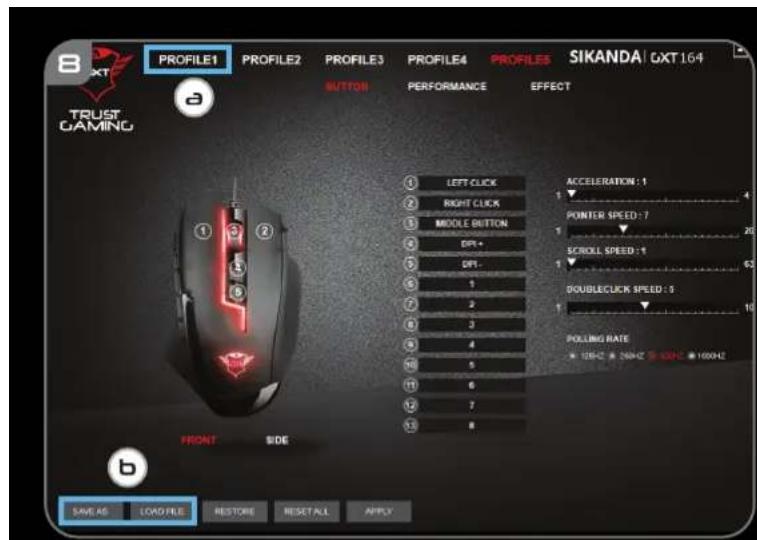
- Select, Save or Load a profile
a - Select one of the 5 profiles by clicking on the preferred profile.
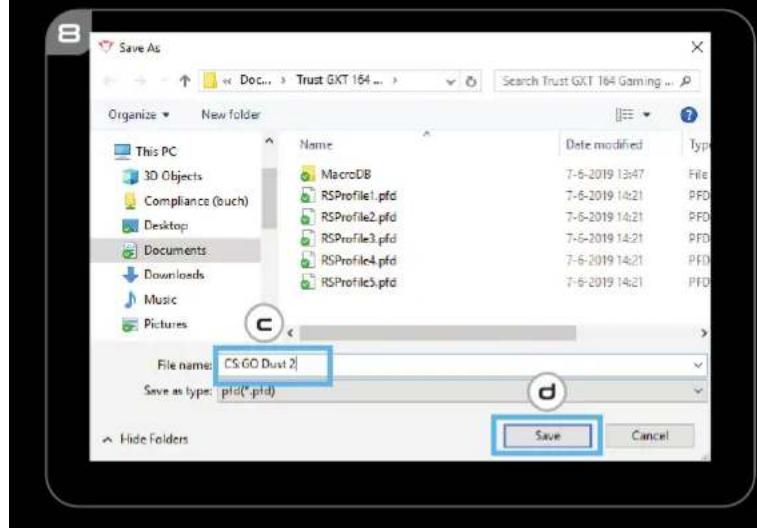
b - Click on 'SAVE AS' to save a setup, Click on 'LOAD FILE' to load a setup.
c - Enter a name for the mouse setup you want to save, or choose the preferred profile to load.
d - Click on 'Save' to save the setup, click on 'Open' to load the setup.
- Click on 'Apply' Your mouse setup is now saved or updated to your mouse.
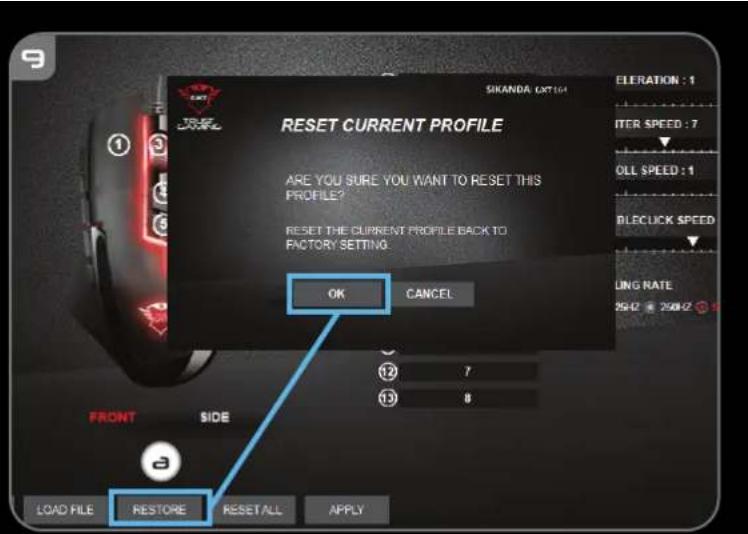
a - Click on 'RESTORE' to reset the current profile to factory default.
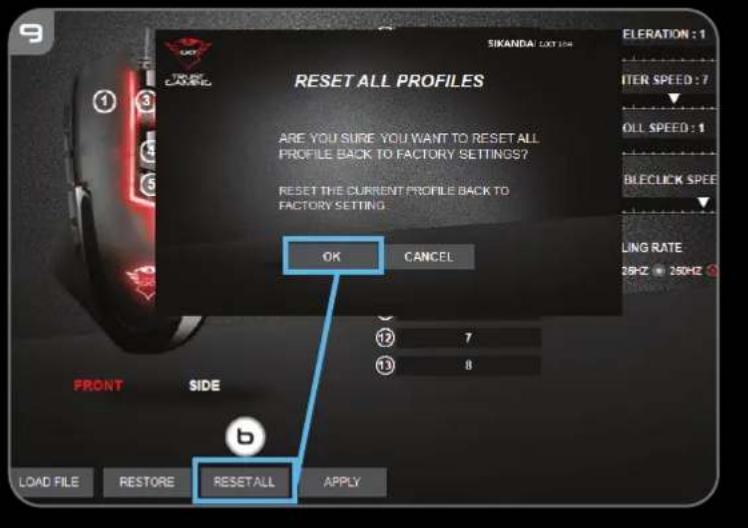
b - Click on 'RESET ALL' to reset all profiles to factory default.
Report rate & DPI settings
4. DPI-innstilling
| a | - Knapp 1 (standard = vänster musknapp) |
| b | - Knapp 2 (standard = höger musknapp) |
| c | - Knapp 3 (standard = mittenblick) |
| d | - Knapp 4 (Standard = DPI +) |
| e | - Knapp 5 (Standard = DPI -) |
| f | - Knapp 6 (Standard = 1) |
| g | - Knapp 7 (Standard = 2) |
| h | - Knapp 8 (Standard = 3) |
| i | - Knapp 9 (Standard = 4) |
| j | - Knapp 10 (Standard = 5) |
| k | - Knapp 11 (Standard = 6) |
| l | - Knapp 12 (Standard = 7) |
| m | - Knapp 13 (Standard = 8) |
2. Installation
Setári report rate.si DPI
Setarea DPI
-
- Dati clipe fila PERFORMANCE".
- Dati ciic pe caseta de selectra de lnga numarul DPI penta umino sau deactiva acest nivel
D DPI.
c -- Modificati nivelul DPI tragand bara uminous e. - Datic pe,Apply", mouse-ul esteactualizat.
5. Alte setári
a - Dati clipe fila "BUTTON".
b - Modificati accelerarea, viteza cursorului Windows, viteza de defilare sau viteza de dublu cliC Windows tragand cursorul uminous e.
c - Modificati setarile de interogare ciclica dand clipe freventa uminous e.
-Datclicpe"Apply",mouse-ulesteactualizat.
Setárideluminá
- CmHa Ha CBeTJHHn eΦeKT
a -LpaKHeTe Bbpxy pa3en "EFFECT".
b -CmeheTe pexima Ha CBETINHaTa.
c -CmHa Ha zBeta Upe3 upaKaBaHe Ha ZBeTOBOTo NOJe INI;
d -CmHa Ha Zbeta Ype3 n3TeerIHe Ha YepBeHn, 3eJIeHn nn CInHn Kycpcop.
e -CmraHnBToHa npKoCT Ha CBeToNoJa.
f -CmHa Ha ckopoCTTa Ha aHIMaIyraTa.
- Lpakhe TBpyx, Apply", MmkaTa ce aKtyaIIN3npa.
PekmHa CBeTInHa;
7 Color Breath = nyIcaun Ha MHOrO CBeTOBe
Fulllighted =eINHnoCToHEnuB
LED Off =deakTNBpuH CBeToDIO
Breathing = eHn npncpau zB
Rainbow = EΦeKTHa BbHa Dba
MaKpo NaCTpoNk
Cb3daBaHe Ha MaKpoc (3anaMetere nocneobatennHcT Ha KnaBnB B coFpyepa)
- -PpemHeTe KbMa3dEn "BUTTON".
a -LpaKHeTe 6yToH,a CneI TOBa Ha ,MACRO MANAGER".
b -LpaKHeTe Bbpxy ,NEW"3a da cb3daTe HOB MaKpoc.
c -PonbHete HmTo Ha MaKpOca N uPakHete,OK'.
d -3aadaTe BpeMe 3a 3abABye MeKdy BCaKo DeIcTBne H/wnHn HacTpoKa Ha Unkbl/NoBTopeHne.
e - ⅢpaKHeTe , 3aДа CTAPTnPaTe 3aHnCa Ha MaKpoc. Cera BbBeTe NcKaHaTa OT Bac
1 NocneIOBATEJIHOCT Ha MaKpOc. - -LpakheTe 3a da cnpTe 3anica Ha MaKPOc. (MaKc. 60 deiCTBna)
- lupaKHeTe,OK,3a da ce BbpeTe KbM pa3deJn, BUTTON.
- Cb3daeneHnT MaKpOe HAnuEh BbB FyHKnIa,MACRO"
3a da Ha3HaHTe MaKPOC, CLEDaBnTE CTbNka 3 Ha To3n HApbYnK.
HaetpoKn Ha npoФn
I36epete, 3ana3n nn 3apeyn npoqnn
-
36epeTe eDnH ot 5 Te npoФиla KaTo UpaKHe T Bbpxy npednoHTaHna.
-
-UpaKHeTe "SAVE AS", 3a da 3ana3nte Hacrpoikata. UpaKHeTe Bbpxy ,LOAD FILE", 3a da 3apeiTe
a HacTpoNka.
b -BbBeTe Me 3a NaCTPOKaTa Ha MNsKaTa, KOrTo NcKte Da 3aNa3nTe nn n36peTe 3a 3apeKdaHe c npednouHTanpofnn.
d -LpaKHeTe"Save",3a da 3ana3nte HacTpoiKaTa.LpaKHeTe Bbpxy "Open",3a da 3apeiTe HacTpoiKa. -
LpakheBbpxy,Apply"→ Cera hactpoKaTa Ha MmKkata Bn e 3ana3eHa nIi akTuJin3npaHa B MmKkata.
-
Bb3ctaHOBBAHe Ha HAcTpoKn no nopda36npaHe
a -LpakheTe Bbpxy ,RESTORE", 3a da hynpaTe Tekyu npoФm KbM fa6pnHnTe HacTpoKn.
b -LpaKHeTe,RESETALL"3a Da HynipaTe BCnKn npoHn KbM fa6pnHnTe HaCtpoKn.
1.Cxema KhoNOK