
Crusher DZ1893 - Watch Diesel - Free user manual and instructions
Find the device manual for free Crusher DZ1893 Diesel in PDF.
User questions about Crusher DZ1893 Diesel
0 question about this device. Answer the ones you know or ask your own.
Ask a new question about this device
Download the instructions for your Watch in PDF format for free! Find your manual Crusher DZ1893 - Diesel and take your electronic device back in hand. On this page are published all the documents necessary for the use of your device. Crusher DZ1893 by Diesel.
USER MANUAL Crusher DZ1893 Diesel
Certificate of Warranty 222
Notices 224
ENGLISH
IMPORTANT TO KNOW!
- When the watch is underwater or wet, never use the pushers/bezels, or set the time. Watch cases and metal brackets should be rinsed thoroughly in fresh water after being in salt water.
- No hot tub/sauna. Please do not take your DIESEL watch into the hot tub/sauna. The combination of extreme heat and water may cause your watch to lose some of its water-resistance.
- No backward hand, or date, adjustments should be made when the analog hands read between 8pm and 3am. At these times, the gears are too close together and such a change could cause damage.
Water Resistance
See caseback for water resistance rating.
The water resistance rating provides guidelines for appropriate water-related exposure to avoid damage to internal watch components. Please see chart for recommended usage guidelines.
In order to ensure water does not enter the watch and cause damage to it, please follow the instructions listed below:
-
Do not adjust the crown while the timepiece is in contact with water.
-
Ensure the crown is in the closed position before contact with water. For timepieces with screw-down crowns, ensure the crown is completely tightened before contact with water.
- For timepieces with pusher-enabled functionality, do not engage the function underwater.
- Exposure to extreme atmospheres is not recommended (i.e. hot water, saunas or steam rooms).
- Avoid exposure to water moving with force (i.e. water running from a faucet, ocean waves or waterfalls).
- Avoid long exposure to salt water. After contact with salt water, rinse watch under tap water if rated SATM or higher and wipe dry with a soft cloth.
RECOMMENDATIONS FOR WATER-RELATED USE
SPLASH RESISTANT SUBMERSIBLE SHALLOW DIVING SCUBA DIVING
INDICATION
0
3 ATM·3 BAR·30 Meters
5ATM·5BAR·50Meters
10.ATM、10.PAD-100Mater
20 ATM·20 BAR·200 Meters
Hand Washing) (Swimming) (Snorkeling) (Not Deep Sea)
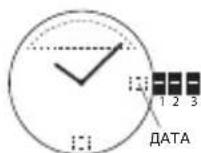
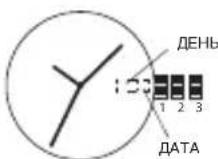
Date Watch 515.2-3, 2117, 2317, VX42EZ-D
DATE SETTING
- Pull crown out to position 2.
- Rotate counter-clockwise to set date.
- Return crown back to position 1.
TIME SETTING 123
1.Pull crown out to position 3. DATE
2. Rotate counter-clockwise to set time.
3. Return crown to position 1
Day/Date Watch 2305
DATE SETTING
- Pull crown out to position 2.
- Rotate clockwise to set date.
- Return crown back to position 1. DATE
DAY SETTING
With crown still in position 2, turn counter-clockwise and set day for previous day.
TIME SETTING
- Pull crown out to position 3.
- Rotate counter-clockwise to set time.
- Return crown to position 1.
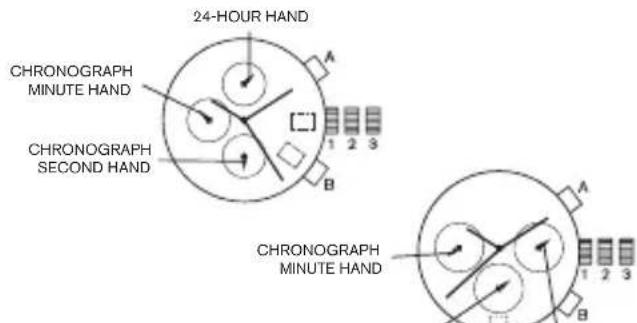
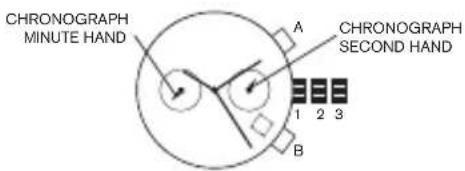
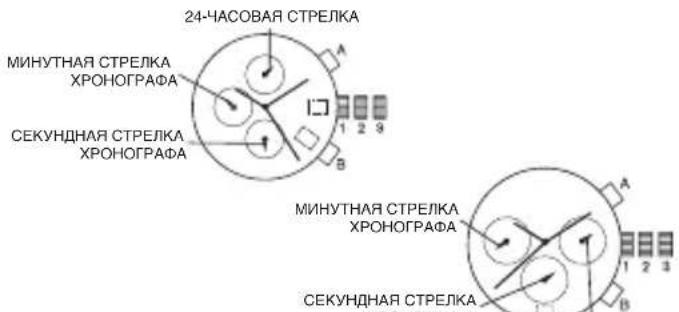
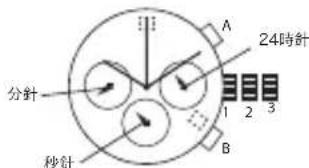
Chronograph JS15,JS16,JS26,JS10
DATE SETTING
- Pull crown out to position 2.
- Rotate clockwise to set date.
- Return crown back to position 1.
TIME SETTING
- Pull crown out to position 3.
- Rotate clockwise to set time.
- Return crown to position 1.
CHRONOGRAPH
- Press A to start/stop the chronograph.
- Press B to reset to zero.
CHRONOGRAPH ZERO RESET
- If either of the chronograph hands is not at the zero (12:00) position, pull crown out to position 3.
- Press A to rotate hands clockwise; press B to rotate hands counter-clockwise.
- Each press of A or B will move the chronograph hands by one increment/ decrement. Press and hold A or B for fast increment/decrement.
- When both hands are in the zero position, reset time and return crown to position 1. NOTE: Chronograph minute hand will synchronize with chronograph second hand during chronograph zero reset.
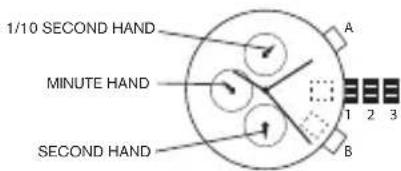
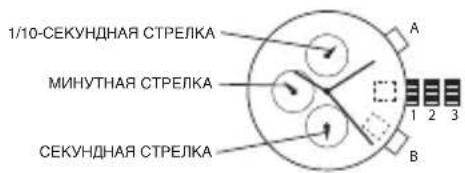
Chronograph Stopwatch VD57B
DATE SETTING (on some models only)
- Pull crown out to position 2.
- Rotate clockwise to set date.
- Push crown back to position 1.
TIME SETTING
- Pull crown out to position 3.
- Rotate clockwise to set time.
- Return crown to position 1.
USING THE STOPWATCH
- Press A to start/stop the stopwatch.
- Press B to control the split time and reset.
STOPWATCH HAND ADJUSTMENT
-
Pull crown out to position 3.
-
Press A to reset the stopwatch 1/10 second hand to the "0" position.
- Press B to reset the second and minute hands.
- Each press of A or B will move the chronograph hands by one increment/ decrement.
Press and hold A or B for fast increment/decrement.
NOTE: If the stopwatch hands function improperly, pull out crown and press A and B at the same time for over 2 seconds. When the pushers are released, the stopwatch second and 1/10 second hands will spin around and return to "O." This will indicate that the internal circuit has been reset.
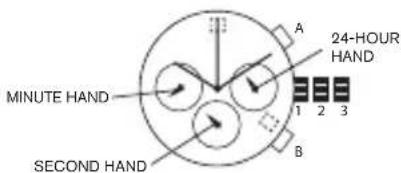
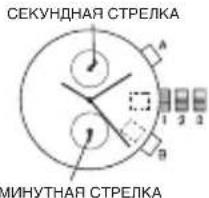
Chronograph VD51B
DATE SETTING
- Pull crown out to position 2.
- Rotate the crown clockwise until the preview day's date appears.
- Return crown to position 1.
TIME SETTING
- Pull crown out to position 2 when the second hand is at the 12 o'clock position.
- Rotate crown to set time.
- Return crown to position 1.
USING THE STOPWATCH
- Press A to start/stop the stopwatch.
- Press B to control split time and reset.
NOTE: The measurement time is indicated by the stopwatch hands that move independently of the center hands (and 24-hour hand where applicable).
NOTE: The stopwatch can measure up to 60 minutes.
STOPWATCH HAND ADJUSTMENT
- Pull crown out to position 3.
- Press A or B to reset all stopwatch hands to "0" position.
- Each press of A or B will rotate hands clockwise; press B to rotate hands counter-clockwise. Press and hold A or B for fast increment/decrement.
- Return crown to position 1.
NOTE: Before setting the time, check if all the chronograph hands - 1/10 second (where applicable), second, minute - are at the "0"(12 o'clock) position.
NOTE: If the stopwatch is in use, press the buttons in the following order to reset it, and then check if the hands return to the "0" position.
If the chronograph is counting: A B
If the stopwatch is stopped: B
*If the split time is displayed: B = A B
Chronograph VD53, VD53B, VR32A25
DATE SETTING
- Pull crown out to position 2.
- Rotate clockwise to set date.
- Return crown back to position 1.
TIME SETTING
- Before setting the time, make sure the chronograph is stopped and set to zero (12:00) position.
- Pull crown out to position 3.
- Rotate crown clockwise to set time.
- Return crown to position 1.
CHRONOGRAPH
- Press A to start/stop the chronograph.
- Press B to reset to zero.
SPLIT TIME
- Press B while the chronograph is running.
- Press B again to return to the chronograph.
- Press A to finalize timing.
- Press B to reset.
CHRONOGRAPH ZERO RESET
- If either of the chronograph hands is not at the zero (12:00) position, pull crown out to position 3.
- Press A to rotate hands clockwise; press B to rotate hands counter-clockwise.
- Each press of A or B will move the chronograph hands by one increment/ decrement. Press and hold A or B for fast increment/decrement.
- When both hands are in the zero position, reset time and return crown to position 1.
Chronograph 6S21
DATE SETTING
- Pull crown out to position 2.
- Rotate clockwise to set date.
- Return crown back to position 1.
If the date is set between the hours of 9:00 PM and 1:00 AM, the date may not change on the following day.
TIME SETTING
- Pull crown out to position 3.
- Rotate clockwise to set time.
- Return crown back to position 1.
CHRONOGRAPH
This chronograph is able to measure and display time in 1/4 second up to 59 minute 59 seconds
- Press A to start/stop the chronograph
- Press B to reset to zero
CHRONOGRAPH ZERO RESET
- Pull crown out to position 3.
- Press A once to set the chronograph second hand to zero.
The chronograph hands can be advanced rapidly by continuously pressing A.
3. Return crown back to position 1.
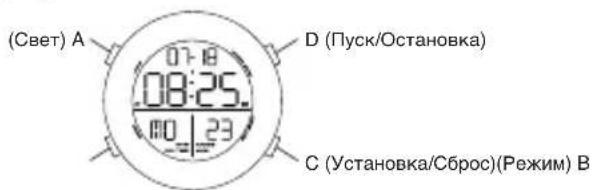
Digital QFO-AA-23
OVERVIEW
Features includeCALENDAR, ALARM, 12/24H FORMAT, CHRONO, TIMER, DUAL TIME, EL BACKLIGHT.
TIME SETTING
- Press and hold C for 2
seconds to enter time setting mode; "seconds" will begin flashing. - Press B to set and advance to next setting value.
- Setting sequence is seconds, minutes, hour (12/24H format), month, day, week.
- Press D to advance the flashing digit.
- Press C to exit setting mode.
NOTE: Pressing D while the seconds are in the range of 30 to 59 resets them to 00 and adds 1 to the "minutes". In the range of 00 to 29, the minutes are unchanged. NOTE: Press A for 3 seconds to activate EL backlight.
ALARM SETTING
- Press D to turn on/off the alarm or chime.
- To set the alarm, press and hold C for 2 seconds to select "hour" setting; Press B to select "minute" setting; Press D to advance the flashing digit.
- When the alarm reaches the scheduled time, the alarm icon will flash and the chime will sound for 20 seconds then automatically stop.
CHRONOGRAPH
- Press D to start/stop chronograph.
- When stopped, press C to return to zero.
- When running, press C to split count, then press D to exit split count
- Press C to return to zero.
- Press B to return to time setting.
TIMER MODE
- The display range of the timer is 23 hours, 59 minutes, and 59 seconds.
- Press D to start/stop the timer. Press C to return to starting value.
- Timer sounds for 10 seconds when counting down to 00:00:00. The timer will automatically reset to its starting value after the alarm stops.
- To set time to a specific time press C for 2 seconds, "hours" will begin flashing.
-
Press B to select hours or minutes setting, Press D to adjust the flashing item, Press C
-
to complete setting
-
Press D to start/stop timer
-
Press C to reset
DUAL TIME
In the "Dual Time" mode, press and hold C for 2 seconds to select "minutes" setting; Press B to select "hours" setting, Press D to adjust the flashing item; Press C to finish setting and to exit setting mode.
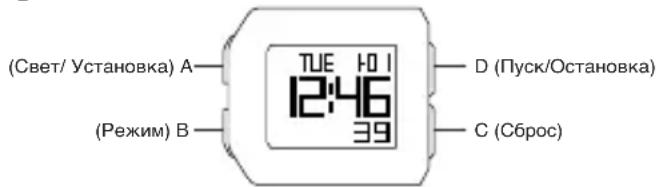
Digital QBJF327
OVERVIEW
Features include CALENDAR, ALARM, 12/24H FORMAT, CHRONO, TIMER, DUAL TIME, EL BACKLIGHT.
TIME SETTING
- Press and hold A for 2 seconds to enter time setting mode. Press B to cycle through the settings. In any setting mode, if you do not press any button within 30 seconds, the watch will automatically exit from that setting mode and return to the 'TIME' screen.
- LIGHT - In this mode you can turn the EL backlight on/off by pressing C or D. If you have it set to 'LIGHT ON' the icon 'AEL' will display on the screen. If you have it set to 'LIGHT OFF' press A to activate EL backlight as needed. Press B to set and advance to next setting value.
- CHIME - In this mode you can turn the chime on/off by pressing C or D. If you have it set to 'CHIME ON' the icon 'CHM' will display on the screen and the chime will sound every hour. Press B to set and advance to next setting value.
- TIME - Press C or D to select 24-hour or 12-hour clock. Press B to set and advance to next setting value.
- Press C to decrease and D to increase the hours. Press B to set and advance to next setting value. Repeat for minutes, seconds, year, and day/date format.
- Press A to exit from setting mode. Once you have exited from setting mode you can press C to turn on/off 'KET' which is the button tone.
CHRONOGRAPH
- Press B until 'CHRONO' appears.
- Press D to start/stop the chronograph.
- When running, press C to enter 'LAP' mode. 'LAP' time will display on the screen for 8 seconds. When stopped, press A to enter the memory mode then press A again to view LAP record data. Press C key to exit the memory mode.
- To clear all previous records stop chronograph'. Press and hold C for 2 seconds.
TIMER MODE
- The display range of the timer is 23 hours, 59 minutes, and 59 seconds.
- Press B until 'TIMER' appears.
-
There are three timer modes:
-
CD-STP - When the countdown time is over the chime will sound for 30 seconds and then return to time setting.
- CD-REP - The timer will repeat up to 100 times. The chime will sound after every repetition. When the number of repetitions is completed the chime will sound for 30 seconds and then return to time setting.
-
CD-UP - When the countdown time is over the chime will sound for 30 seconds and then switch to begin counting up.
-
Press and hold A for 2 seconds to enter the timer setting screen. Press C or D to select the countdown type. Press B to set and advance to next setting value
- Press C to decrease and D to increase the hours. Press B to set and advance to next setting value. Repeat for minutes and seconds.
- Press A to exit from the setting screen.
- Press D to start/stop timer.
- Press C to reset.
ALARM
- Press B until 'Alarm' appears.
- Press D to display 4 sets of alarm clocks.
- Press and hold A for 2 seconds to set the alarm.
- Press C to decrease and D to increase the hours. Press B to set and advance to next setting value. Repeat for minutes.
- Press A to exit from the setting screen.
- Press C to turn alarm on/off.
- When the alarm is on, chime will sound for 30 seconds. Press any button to stop.
DUAL TIME
Press and hold D for 2 seconds to enter the 'Dual Time Mode'. 'T2' will appear on your screen. Press and hold A for 2 seconds to enter the dual time setting screen. Press C to decrease and D to increase the time zone setting range. Press A to exit from the setting screen.
ITALIANO
AVVERTENZE IMPORTANT!
DOUBLE FUSEAU HORAIRE
ANVANDNING AV STOPPURET
YacbI c HndkaTopom DaTbI 515.2-3, 2117, 2317, VX42EZ-D
YCTAHOBKA DATbl
- BbTAHNTe 3aOBDHYo rONOBKYdo NOJIOXeHN2.
- NObepHnTe npOTnB YacOBoi CTpeKNu yCTaHOBnTe DaTy.
- BepHnTe 3aOBDHyIO rONOBky B nONOXHe1.
YCTAHOBKA BPEMEHN
- BbITAHHTe 3aBOdHyO rONOBky Do nOJoxKeHn 3.
- NOBEPHNTe npOTNB acBOBc CTpeKNu yCTaHOBnTE BpEMA
- BepHnTe 3aBODHyIO rONOBky B noJNOXeHne 1.
HacblnHKaTopOM Hn HeJeN n DaTbI 2305
YCTAHOBKA DATbl
- BbITAHHTe 3aBOdHyO rONOBky Do nOJIOXKeHn2.
- NOBEPHNTe no yacoboi CTpeNke n yctaHOBNTe DaTy.
- BepHnTe 3aBoNDHyI rONOBky B nONKeHne 1.
YCTAHOBKA HRA HEDEJIN
OCTABIN 3aBOHyTOJNOBky B NOJoxeHm2, BpaauTe ee HnapabNeHH npOTIB YACOBI CTpeKN N yCTaHOBNTe DeH HeDeHN DnN PpeBldyero DNH.
YCTAHOBKA BPEMEHN
- BbITAHHTe 3aBODHYO rONOBKY DO NOJOXeHn3.
- NObepHnTe npotnb HacOBOn CTpeKNu yCTaHOBnTE BpEMr.
- BepHnTe 3aOBDHyIO rONOBky B noJOnKeHne 1.
XpoHorpaΦ JS15,JS16,JS26,JS10
YCTAHOBKA DATbl
- BbITAHHTe 3aBOdHyIO rOIOBky IO NOIOXKeHHN2.
- NobeHnTe no yacobOn CTpeKe n ycTaHOBnTe DaTy.
- BepHnTe 3aObHyIO rONOBky B nONoXeHne 1.
YCTAHOBKA BPEMEHN
- BbITaHHTe 3aBOdHyIO rOIOBky Do NOnOKeHN3.
- NObepHnTe no yacOBoCtpeKe uYcTaHOBnTe Bpema
- BepHnTe 3aObHyIO rONOBky B noJoxKeHne 1.
XPOHOTPAΦ
- Haxmte KhoKy A, yTo6b3 anyCTnTb nnOCTaHOBnTb xpoHorpa
- HaxmTe KONky B, yTo6bI c6pocTb pe3yNbTaTbI.
C6POC PE3YbTATOB XPOHOMETPA
- Ecn KaKaH-Jin6o 3cTpeNoK xpoHometpa HaxOOnTCB N0sNIM,OTnHHOIOT HyeBOI (T.e. He Ha 12:00), npBeDInTe 3aBoNDHyro rONOBky B nOJKeHHe 3.
- HaxMMte A, T06bI nepeBdHHyt cbTpeKN no YacBOB cTpeKne; HAXMMte B, T06bI nepeBdHHyt cbTpeKN npOTBAAcBOB cTpeKN.
3.BpeyntateKaqdoRaHaxatnAnnB,ctpenkxApoHometpa6ydet nepeDnurbaHaOHynoNtioBnepe(Ha3aJ).HaxmTeuNyepKBAeT A nnB DnBbCTpOrnepeDnBxekHeN CTpeKn Bnepe(Ha3aJ). - Ecnn 06e cTpeKn HaxoJATcB HnyeBoN No3uM, C6pocbTe Bpemr N BepHmTe 3aBOHyO rONOBKY B NOJoxEHe 1.
IPTMEAHIME. MInyTHa STpeKxPOHOMeTpa CmHxPOHN3pYETcCo BTOPO CTpeKNXPOHOMeTpaB XOe C6pOca pe3yJIbTa0B xPOHOMeTpa HONb.
104 105
CekyHdomep-xpoHorpaΦ VD57B
YCTAHOBKA DATbI (TolboKo DnH HeKOTopbIX MoDenei)
- BbITAHHTe 3aBOHyO rONOBky Do nONOXeHNr 2.
- NobePHTe no yacOBoCtpeNke uYCTaHOBnTe DaTy.
- HaxaTMEM BepHnTe 3aBODHyrONoBky B noNoXeHne 1.
YCTAHOBKA BPEMEHN
- BbITAHHTe 3aBODHyIO rONOBky Do noNOLKeHNr 3.
- NObepHnTe no yacOBOn CTpeNke n ycTaHOBnTe BpMa
- BepnTe 3aBODHyIO rOJbKBy b noJoxKeHne 1
NCIOJIb3OBAHNECEKYHDOMEPA
1.ДЯЗANyCKa(OCTaHOBKn)CEkyHdOMepaHaKMnTeA
2.ДИА KOHTPONI npOMExyTOHOrO BpEmeHn c6pOca HaxMnte B.
PERYIINPOBKACTPEJIKNCEKYHIOMEPA
- BbITAHHTe 3aBOdHyIO rONOBky Do noJNOXKeHNr 3.
2.ДЯсбрca 1/10-cekyндои ctpeKN cekyHdomepa K nonoxhenIO «O» Haxmte A.
3.ДЯсбрcacekyнHOnmHyTHOCHTpeJOKHaKMnTeB
4.Bpe3yIbTaTe KaJdoRo HaxKaTHA ANB,CTpeJIa xpoHOMetpa 6byET nepeDbIRatbCn Ha ONDHy No3NIO Bnepei (Ha3a).HaxMNTe u ydepKnBaIte A nB IaIb6bIcTporo nepeDbIXeHNr CTpeIKn Bnepei (Ha3a,d).
PIMMEUAHHE: Ecnn cTepeKn CekyHdomepe Ha pabotaiOT HopmaIbHo, Bbytaunte 3aBodHyIO rONoBky iOnHOBpeMeHHo HaxmMaIte Ha A n B TeueHHe Me Hee 2 CekyHd. Pn OTnyckAHH KhoNOK CekyHdHa CTepeKa n CTepeKa ChetuHa 1/10 cek. CekyHdomepa CdeNaOT Kpyr N BePhYTCB N ONoXeHHe «O». 3To 6dyet O3Haayb, YTO BHTpeHHN KOHTyp 6blc6poWeH.
XpoHorpa VD51B
YCTAHOBKAДATbl
- BbITAHHTe 3aBOdHyIO rOIOBky DO nOIOXKeHH2.
- NOBEPHNTe 3aBOHyIO rONoBky no YacobOn CTpeKe n yCTaHOBnTe DaTy npdeIduyero DHA
- BepHTe 3aObHyIO rONOBky B nONOXHeHne 1.
YCTAHOBKA BPEMEHM
- 13BnEKeIte 3aOBDHyro rONOBky uYcTaHOBInTe ee B nOnOKeHne 2, KOrdaCeKynDHaA CTrpeJa 6yDet HaxoDHTbC B nOnOKeHnn 12:00.
- NOBepHnTe 3aBOHyIO rONOBky u yCTaHOBnTe Bpema.
- BepHnTe 3aBODHyIO rONOBKY B nONOKeHne 1.
NCIOJIb3OBAHNECEKUYDOMEPA
1.Диэлса(OCTAHOBKn)CEkyHdomepaHaxMnTeA
2.ДИЕKHTPONI pnpomexyTOHORO BpeMeHH n6bOpa HaxMnTe B.PNIMEHAHIE.Pe3yIbTn3MEpEHINnOKa3bIAoTcPTeKNCEkyHDoMa, KOTOpBIE BPAuAoiTCHe3ABNCMOOn OteHTPaJIbHbIXCTPENK (n 24-aacOBOW cPTeKN, rne pImeHMo).
PIMMEAHHE. CekyHdomep moKet n3mepeT bpeMa 60 MNHT.
PEYJINPOBKACTPEJIKNCEKYHDOMEPA
- BbITAHHTe 3aBODHyO rONOBky Do noNIOXKeHn3.
- Haxmte A nn B, yTo6bI c6pocntb BCE cTpeKn ceKyHdomepaB nnoXKeHne «0»
- Pn KaKdAm HaxaTmN A nnB CTpeKn 6dyT BpaauatbCn no YacBOoB CTpeKe; HaxMnte B, TTObI NobepHyTB CTpeKN npOTNB YacBOoB CTpeKN.HaxMnte N ydepXbaIte A nnB D nB 6bIcTpOre nepeDbKHeHn CTpeKN BnePd (Haa3d).
- BepHnTE 3aOduHyIO rONOBky B nOnoXeHne 1. IPNMEUAHNE.Ipepe yCTaHOBkoB BpOeHH, npOBepbTe, TTO BCE CTpeKn xpoHOrpaΦa -ceKYHnAra 1/10 (rIe npIMEHMO), cKeYHnAra, MNHTHAR - HaxoJITcB NNoOKeHnN "0" (12 YacOB). IPNMEAHNE.Ecn CEkyHdOpem NCNOB3yETC, HAXMITE KHNB COOTBeTCTByuOeM nopRke, TTObblBnONHnTb C6Poc, INpOBepbTe, TTO CTpeKN BEPHyNCB B NONoXeHne "0".
*Ecn xpohorpaocyueCTBnREOTcET:A°BEcn cekynoep octahOBen:B Ecn nok3aHno pomexytoHoe Bpem:B A°B
106 107
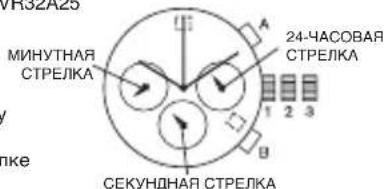
XpoHorpaΦ VD53, VD53B, VR32A25
YCTAHOBKA DATbl
- BbTTAHHTe 3aBOdHyIO rONOBky DO NOJoxEHn2.
- ПовернITE NO.YacOBО CTpeNKe n yCTaHOBnTe DaTy.
- BepHnTe 3aBODHyIO rOIOBky B noIOnKeHne 1.
YCTAHOBKA BPEMEHN
- Npei TEM KAK yCTaHaBnBaTb BpEMA, yBeIntecb, yTO xPOHOrpaO ocTaHOBJIeH uCTaHOBJIeH B HnyeBOe NOIOXKeHne (HaOTMeTKy 12:00).
- BbITAHHTe 3aBOHyO rONOBky Do noJIOXKeHn3.
- NOBEPHNTe 3aOBDHyIO rONOBky NO YACOBOI CTpeJIke N yCTAHOBITe BpEMH
- BepHnTe 3aOBDHyIO rONOBky B noJoxKeHne 1.
XPOHOPTAΦ
- HaxmTe KhONky A, yTo6bI 3anyCTnTb nN oCTaHOBnTb xpoHOrpaΦ.
- Haxmte KhoNky B, 4to6bI c6pocnTb pe3ynbTaTbI.
ФУHKUЯ ПОМЕЖYOTOHOrOФИИWA
- HaxmTe KhoNky B Bo BpeMa pa6OtbI xpOHorpa.
- HaxmTe KhoNky B eue pa3, YTo6bI BepyTbcra K xpoHorpa4y.
- Haxmnte KhONky A, yTo6bl 3aФuKcnpoBaTb OKOHaTeNbHOe 3HaueHne BpemEni.
- HaxmTe KhONky B nra 06HyneHn noKa3aHn.
CEPOC PE3yJIbTATOB XPOHOMETPA
- EcnK kakaHn6o n3 cTpeNoK xPOHOMeTp aHXoDITcB No3uIN, OTHNHOOT HyeBOI (T.e.He Ha 12:00), pInBeNTe 3aBOHy IONOKy B NOJoxKeHne 3.
- Haxmte A, TTo6bI nepeBnHyb CTpeKN no YacOBo CTePKe; Haxmte B, TTo6bI nepeBnHyb CTpeKN npOTNB YacOBo CTpeKN.
- B pe3ynbTaTe kaxdoTo haxaTnA nnB, cTpEknA xpoHometpa 6dyet nepeDbrAtbCn Ha Ondy No3uNIO bpeD (Ha3a). HaxMNTe n yepKbaTe A nnB dnn B 5bIcTporo nepeDbNxKeHn C TpeKn BpeD (Ha3a).
- Ecnn o6e cTpeKn HaxoJrTcB HynEBoN PO3uN, C6pOcTe BpEmn IN BepHnte 3a0bHyIO rONOBky B noJoxHeNe 1.
XpoHorpa6S21
YCTAHOBKA DATbl
- BbITAHHTe 3aOBDHyo rONOBky Do nONoxEHN2.
- NobePHnte no yacoboi CTpeNke u yCTaHOBNTe daTy.
3.BepHHTe 3aOBDHyIO rOIOBky B noJoxKeHne 1.
Ecn nata 6bina yctaHOBnHa B npomexyTke Mekjdy 9:00 Beepa n 1:00
yTpa, OHa MOKeT He I3MeHHTbcra Ha CNeDyIOUm DeHb.
YCTAHOBKA BPEMEHN
- BbITAHHTe 3aOBDHyIO rONOBky Do noIOnoxKeHH 3.
2.Повернite no yacobov CTpeNke n yctahOBnTe Bpema.
3.BepHnTe 3aOBDHyIO rONOBky B noJNOXeHne1.
XPOHOPTPAΦ
TOxPOHOrpaMOXeT H3MePbN BbIOHTb Ha 3KpaH BpMaB DEKIMe
1/4ceKyHbIdo59MNHyT59ceKyHd.
- Haxmte KhoNky A, yTo6b3aNoCTb/OctaHOBnTB xpoHorpa
- HaxmTe KhoNky B dny 6hynn noka3aHn
CBPOC PE3YJbTATOB XPOHOMETPA
- BbITAHHTe 3aBODHyO rONOBky Do noNIOXKeHn3.
2.HaxMMTE KONky A OINH paa, YTObI yCTAHOBHT cekyHNHyIO CTpeNky xPOHOraPafB HynEByIO no3nHiIO. Pp yDEpKBAHN KONKn «A» CTpeKN XPOHOraPap6dyT 6bIcTPO nepeMeaTbSsC
3.BepHHe 3aOBDHyIO rOIOBky B noJIOXeHne 1.
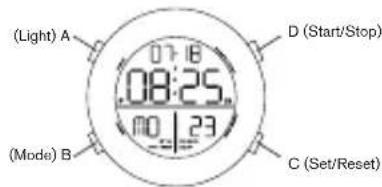
3NeKtpoHHbIe Yacblc c uHΦpOBoN HdNkauNei QFO-AA-23
OBUHE CBEDEHNA
Фуншим:KALEHДAPь,БДИЛьнИK,ФОМAT 12/24ч,CEKTHOMEP,TAIMME,NИДКATOP BTOPOTO YACOBOTO IORCA,3JKETPOLIOMHECLHTHA(JI) NOCDBETA.
YCTAHOBKA BPEMEHN
1.YTO6bI nepeTn B pexm yctahOBKn BpemHn, HaxMnte u yedeXbaTe CBTeHeHne 2ceyH;Pn3OTm HAHyT MrraTb“CEkyHbI”.
2. HaximmaTe B, YtObIy yCtaHOBuNT h nepeHTN K cIeDyIOUeMy ycTaHaBnBaEMOMy npaMeTpY.
3. NocneIOBATEbHOCTB yCTAHOBKN: CekyHDb, MmHyTb, Yacbl (12/24-YacBOBΦOpMaT), MEcH, DeHb, HeJeIa.
4. TTo6bI NOBBeCTM MRAIOUyU cHpPy, HaxmaiTe D.
5. YTo6bI BbInTu n3 peXmua yCTaHOBKn, HaxMnTe C.
PIMMEAHHE:HaKaTHDE, KOrDa CekyHbI HaxoJrTaC BnAna3OHe 30-59,pnBouDHTK INx O6HyEnHIO (00)N Do6BnHIO1 K «MnHYaTm»,Ptn 3OTM B DnAHA3OHe 00-29 MnHYbI OCTaOTc HEN3MeHHbIM.
PIMMEYAHNE: Yo6bl aKTHBnPoBaTb 3JI noDCBETKy, HAXMNTe A Ha 3 CEkyHbl.
YCTAHOBKA BydNJIbHnKA
1.ДЯВКЛIOHENBbIKNIOUeHnCnHaJnMEnOmHaxMnteD
2.Ду cTahOBKn 6duMbHnka HaxMNTe N ydepXbaaTe C B TeueHeN2 CEkyH, YTObblBbpaTb "Yac";Ду cTahOBKn "MnHYT" HaxMNTe B; YTObI NOBBeCTn MraOIoU Ou nppy, HaxMnAte D.
3.BaadaHHOeBpEMHcMMBOIbDyUINbHnKaHaUNHTMnTaBnIBTceHMe 20 cekHyd6 dyet 3ByuTaB MeOnDA, NOCNE Yero OH aBTOMATueckn OTKJIOUHTCR.
CEKYNOMEP
1.ДЯпусяк/ocTaHOBKcEkyHdOmepaHaxmMaTeD.
2. Nocne OCTaHOBKn HAXMITE C DnBa BO3BpaTa B INCXOHDHe NOIOXeHHe.
3. YTO6bI cENaTb Na3y B pa6Ote cekHyDoomepa, HaxMMTe C, a YTO6bI BblTNn3 Hee -HaxMMTe D.
4. Haxmte C dna BO3Bpata B INCXOHOe NOLOXeHne.
5.HaXMMTe B,TO6bI BEPHYtbcK YcTaHOBKe BpeMeHn.
PEKIM TAIIMEPA
- TaHMeP mHeT dHaNa3oH 23 yaca, 59 MmHyT n 59 cekyHd.
- HaxMMTE D, YTO6bI 3aNyCTnTB/OCTaHOBnTB TaMep. JInBa Bo3BpTa K XCXODHOMY 3HaueHnIO HAXMMTE C.
- Korda 6oRaTbHc ChET DoCTHRaE T3HaeHnH 00:00:00, TaIMep Ndoaet CnHAn B TeueHHe 10 cekyHd. No OKOHaHnCnRHaHnIsaun Taimep ABOTMaTHUeCKN NEPEXOJNT K I XCOXHOHMY 3HaeHnIO.
- Tóbby yctaHOBHT onpeJedEnHoe BpEM, HaxMNTe C Ha 2 cekyHdbi, NocJe Yero HauHYT MIRAtb «Acbl
5.HaKMnTe B, YTO6bI yCTaHOBnTb Yacbl NIN MNHyTb; HAKIMaIte D, YTO6bI NODBeCTN MIRAOUne UObbbl; HAKMnTe C, YTO6bI 3aKOHHTb yCTaHOBky. - 4TO6b3aNyCTnTb/OCTaHOBnTb TaIMep, HaxkMaIte D.
7.ДЯсбрcaHactpoKnHaKmTeC
BTOPOYACOBONORC
B pexnme «HdkaTOp BTOPO OacBOrO norca» DnA yCTaHOBKn «MHyT» HaxmTe NydpxNbaTe C Te TceHeN 2 cekH; DnA yCTaHOBKn «AcOB» HaxmTe B; nAn NObdeEHH MraIOUnx UcHp HaxmMaTe D; nAn 3abepeuHn YcTAHOBKn N BbXoDa n3 pexnma YcTAHOBKn HaxmTe C.
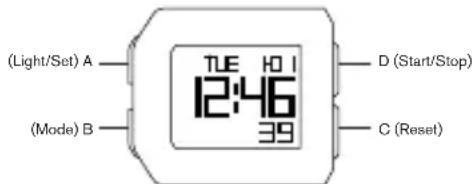
Digital QBJF327
053OP
Функшн Влочат可 KALEHДAPb,БУДИЛьНИK,12/24-ЧАСОВОй ФОМРА, XPOHOPTФ, TAIMEP, ИДИКATOP BTOPOTO YACOBOTO ПОRAС, ПОДCBETKY.
YCTAHOBKA BPEMEHN
1.Haxmte u ydepKbai Te KhoNky A B TeHne 2 ckyH d nBxOda B pexM UCTAHOBKN BPEMEHn. Haxmte KhoNky B DnI npokpyTKn HAcTPOeK. B IIO6OM PEXMHe HAcTPOKn: npn OTCyTcBn HaxaTn KaKo-NiNo 30 ckyH aCbs ABOTAMInHeck N bdyt n3 3TOrO pexMHa CAcTPOkNn BepHTcH hKpaH TIME (BPEM).
2. LIGHT (ПОДСВЕТКA) - 3ТО ржим поьлел ВКИОЧТБ/вькИОЧТБ
ноDCBETКУ нахаимен КОНКИ C ИИ D.Еси ду NOДСВЕТКИ установно
Зчени NIGHT ON (ПОДСВЕТКА BKЛIOЧЕHA), Ha Крапе NOВМСТЗАСК
AEL.Еси ду NOДСВЕТКИ установно 3HA OLIGHT OFF (ПОДСВЕТКА
ВькЛIOЧЕHA), hab KMOTе кONКИ A ДУ B KIOCHENI NOДСВЕТКИ.
HaxмITE
KONKу B ДУ установи и nepeхда К сду IOUOMу napametу HabTPOIMK.
3. CHIME (3BYKOBOINCHHJI) - 3OT pEXKM N03BOJNET BKJIOHTb/ BblkIOHTb 3BYKOBO CnHJI, HAKAB HA KHONKY C IND D. ECIN dIN HACTPOKN YCTaHOBNEO 3HaueHne CHIME ON (3BYKOBO CNHAI BKJIOUeyE). HA 3KpaHe 6yDet OTObpaKaTbCBA 3NaQOK CHM, n 3BYKOBO CnHAI 6yDet npOnrpBbATCBa KKaDb JAc. HAKMeTe KNKBy B dYcTAHOBKn INpeXoDa K cIeDuOeMy napAMETpy HAcTPOKN.
4. TIME (BPEMR) — Haxmnte Ha KHONK C JIN D IIN NEpekIOUeHNI MEJdy 24-ycacoBbIM n 12-acycoBbM ophiMaI. Haxmnte KONKy B IIN yCTAHOBKN IN nepexoJa K cndyoUeMo npametpy hactpoKn.
5. Haxmte KhoNky C nIy yMeHbWeHn I KhoNkdyBeyJIeHn 3HaYeHn YcOb. Haxmte KhoNky B dny yCTaHOBKn I nepeXoJa K cNeMy npaMtpy HactpOKn. NobTopHe dny yCTaHOBKn MHyT, ceKyHd, rOda n foPMAt py DeHb/daTa.
6. Haxmte KhoNkY A dHbBxOa n3 pexnma hactpoKn. Nocne BbXoDa n3 pexnma hactpoKn MochHO hKata bKnoKy C, Tc06bl BKIOHTb/BbIKIOHTb ToHaBbHm CnHAI KhoNk - INHikAtopket KET.
XPOHOPTPAΦ
- Haxmte u ydepKnBaTe KhONky B, noka He noBntcHaDnncb CHRONO.
- Haxmte KhoNky D, TTO6bI 3aNyCTnTb NIN OCTaHOBnTB xPOHorpaF
- Pm 3anyuHOM xpoHOrpape HaxMMte KhoNky C, T06bl BOITN B pexMM LAP (LUKI).BpeMa hKNa LAP 6ydt OTo6paKaTbCnHa nDCnPee B TeueHne 8 cekynd. Nocce octaHOBKn HaxMMte KhoNky A, T06bl BOITN B pexMM nAMrN, a 3aTeM hXMMte A eue pa3, T06bl npOCMToPeTB 3aanCeuKNa LAP.HaxMMte KhoNky C nDa BBxOda n3 pexMMa nAMrN.
4.ДЯ OчNTKn BCexnpdeIyuxN 3aIncen octaHOBnTe xpoHOrpaH. HaxMITE n ydepXkBaTe KhoNky CB TeYeHne 2 ckyHd.
PEKIM TANMEPA
- Duaanaoh OTO6paKeHH TaIMepa: 23 yaca, 59 MmHyT n 59 ckyHd.
- Haxmte u yepkmba Te KhoNky B, noka He noBntcHaanncb TIMER (TAIMEP).
-
CyuueCTBye Tpu peKMa TaIMepa:
-
CD-STP - noCTeHbHM BpeMeHN TaimepaB TeUeHne 30 cekyHd 6byet npOnrpBaTcBkyoBoN CnHn, NoCJe Yero CHOBA OTObpa3nTcRkKpAH NahtpoKn Taimepa.
-CD-REP 3aHaHoe Bpem TaImepa 6yDet NOBTOPTbC8do 100 pa3. 3ByKOBo CnHAn 6yDet 3ByuTaB NOCTe KaJDO NOBTOpeHn. KOrDa KOINHeCTBO NOBTOpeHn 6yDet 3aBePeHNo, 3ByKOBo CnHAn 6yDet 3ByuTaB B TeueHne 3OceHyd, a 3aTeM Ha dncnnee OTo6pa3rTc HactpoKn BpemEHn. -
CD-UP - KORDA OTCHET BPEMENH 3AKOHHTCN, 3BKYOBON CIRNHAN 6UYETB 3BYUHTE B TEEHEWIE 30CEKHYD, 3ATEM HAYHETC HOBJN OTCHET.
-
HaxMMTE u yedpKbMaBte KhoNkY A B TeChHne 2 cekyHd dIra B xOda B pexIM yCTaHOBKn Taimepa. HaxMMTe KhoNkY C nIu D, qTObbl b6paTb TIN o6paTHoro OTCeTa. HaxMMte KhoNkY B dIra yctaHOBKn N nepeXoDa K cneDyHoEmy npamETpy NaCTpoKn
- Haxmte Khony C nny yEmbshnna n KhoNY D nny beyenueHn 3aHneHn naoc.Haxmte KhoNY B dny taHOBKn n npexoDa n cndyouemy napamety hactpOkn. Nobtoprnt dny hactpOnk mNHT n cekyHd.
- ⅡIaBixOda n3peXIMHaCTpOKn HAXMnTe KHOkY A.
- Haxmte KhoNky D, 4TO6bl 3aNyctntb/oCTaHOBt TaMep.
- HaxmTe KhoNky C npia oBHyneHn nokaahn.
BvHbHK
- Haxmnte u ydepkunbae KhoNky B do noBHeHn Hdkatopa Alarm (ByuNbHK).
- Haxmte KhoNky D nIa oTo6paXeHn4 Ha6opob 6yduNbHKOB.
112 113
- Haxmte n ydepknBaTe KhoNky A B TeueHme 2 ckyHd dna BXoDa B peKum yCTaHOBKn 6yDnblbHnka.
- Haxmnte KONky C dny yMeHbWeHn KONky D nya YBeMnEHn 3aHaehn Yaob. Haxmnte KONky B dny ycTaHOBn n nepexoKa cneDyoueMy napameTy hAcTPOKn. NobToPnE n daHctPoKn MnHyT.
5.ДЯ BbIXOda n3 peXIMa HAcTpoiKn HaxMnte KhONky A.
6.ДЯВКIOUChENI INN BbIKIOUChENI INHdNKaTopa 6yINNbHnKa HaKMITe KhoNky C. - KOrda 6yDnblbHn BKIOUChE, 3BYKOBoCnHAn 6yDeT 3ByuTaB B TceHHe 30 ckyHd. HaxMnTe IIO6yIO KNOpKy, yTO6bI BbIKIOuHTb 3BYKOBo CnHAn.
HINKATOP BTOPOQ YACOBOIO NORCA
Дявхда В ржимВТороуЧавого NOЯcaнжмteи удрхьaite Khonky DВ.TeueHme2cekyHd.HaЗрaineOTOBpa3NTC T2.Hakmteи yedpcknBaTe KhONkyAВ.TeueHme2cekyHdДЯвхда В ржимHactpoKnВТороучавого NOЯca.HakmaiteKhONkyCДЯуMeHsWeHЯИD Дявспеспддлana3OHaHacTpoKnHacoborgoNOcA.DЯБbIXODaN3 pexmaHacTpoKnHakmteKhONkyA.
BAHASA INDONESIA
PENTING UNTUK DIKETAHUI!
KoNGLVFV53,VD53B,VR32A25
日付設定
- CHRONO'加五日日日日日日日日日日日日日日日日日日日
2.D请默龙K元上无G庄F言T自/
3.本音中曾以C都LAP'MO上或者KnA。LAP'S18K3K3K3K3K3K3K3K3K3K3K3K3K3K3K3K3K3K3K3K3K3K3K3K3K3K3K3K3K3K3K3K3K3K3K3K3K3K3K3K3K3K3K3K3K3K3K3K3K3K3K
4.1
T
1.taiMo的F5iVWn235595930
2.TIMER'加菲日如贝B
172 173
3.TAHIMOMOINDENSA
4.CD-STP-卡运德卡的山阿在日30头在上
5.CD-REP-Ta0I[M]查100mmzJiBnBoknLi.如mRnBnBnEiGnHnHnHnHnHnHnHnHnHnHnHnHnHnHnHnHnHnHnHnHnHnHnHnHnHnHnHnHnHnHnHnHnHnHnHnHnHnHnHnHnHnHnHnHnHnHnHnHnHnHn
6.CD-UP-KaOnBtDaRnSINJHcIeKJIaJI30JcKJU13aTcKAnBtBcEeU
7.A将2主关全到能龙托T目云明实定海用口为安。C无D将龙拉卡武道之用
8.C将不用连词,时加在已如长和D将不用连词,中长如长。B将不能列,或定的。
9.AA
10.D将默拉托贝司
11. C将能
晋朝
901 S. Central Expressway
Richardson, Texas 75080
United States of America
www.fossilgroup.com
SWISS DISTRIBUTOR:
Fossil Switzerland GmbH
Riehenring 182
4058 Basel
Switzerland
EUROPEAN AUTHORIZATION REPRESENTATIVE:
Fossil Europe B.V.
Terborgseweg 138
7005 BD Doetinchem
The Netherlands
STANDARD LIMITED WARRANTY
The Diesel Two (2) Year Limited Warranty is a voluntary manufacturer's warranty. It provides rights separate to rights provided by consumer law, including but not limited to those relating to non-conforming goods. Diesel's limited warranty benefits are in addition to, and not instead of, rights provided by consumer law.
Your Diesel watch is warranted by Fossil Group, Inc* ("Fossil") for a period two (2) years from the original date of purchase under the terms and conditions of this warranty. The Diesel warranty covers materials and manufacturing defects. A copy of the receipt or dealer stamp in the warranty booklet is required for proof of purchase.
During the warranty period the watch movement, hands and dial are the only components covered under this warranty. A covered component will be repaired or the watch will be replaced free of component and labor charges, if it proves to be defective in material or workmanship under normal use.
In case of replacement, Fossil cannot guarantee that you will receive the same model watch. If your model is not available, a watch of equal value and similar style will be provided. The warranty for the replacement watch ends two (2) years from the date the replacement watch is received.
THIS WARRANTY DOES NOT COVER:
- Any defects in materials and workmanship of battery, case, crystal, strap or bracelet; including plating on the case and/or bracelet.
- Damage resulting from improper handling, lack of care, accidents, normal wear and tear or aging.
Water damage if care instructions for the product's water resistance level (as marked on the product) were not followed. - Products that are not purchased from an authorized Diesel retailer.
This warranty is void if the watch has been damaged by accident, negligence of persons other than authorized Fossil sales or services agents, unauthorized service, or other factors not due to defects in materials or workmanship. The warranty is void if the serial numbers or product date codes or other tracking marks have been removed, altered or obliterated.
If not stated otherwise, the foregoing warranties and remedies are exclusive and in lieu of all other warranties, terms or conditions, express, implied or statutory, as to any matter whatsoever, including, without limitation, warranties of merchantability, fitness for a particular purpose, accuracy, satisfactory quality, title, and non-infringement, all of which are expressly disclaimed by Fossil. Fossil shall not be liable for incidental, consequential, indirect, special or punitive damages or liabilities of any kind arising out of or in connection with the sale or use of this product, whether based in contract, tort (including negligence), strict product liability or any other theory, even if Fossil has been advised of the possibility of such damages and even if any limited remedy specified herein is deemed to have failed of its essential purpose. Fossil's entire liability shall be limited to replacement or repair of the purchase price paid, at Fossil's sole option.
Some countries, states, or provinces do not allow the exclusion or limitation of implied warranties or the limitation of incidental or consequential damages so the above limitations and exclusions may be limited in their application to you. When implied warranties may not be excluded in their entirety, they will be limited to the duration of the applicable written warranty. This warranty gives you specific legal rights; you may have other rights that may vary depending on local law. Your statutory rights are not affected.
FOR AUSTRALIAN CUSTOMERS: Our goods come with guarantees that cannot be excluded under the Australian Consumer Law. You are entitled to a replacement or refund for a major failure and for compensation for any other reasonable foreseeable loss or damage. You are also entitled to have the goods repaired or replaced if the goods fail to be of acceptable quality and the failure does not amount to a major failure.
REQUESTING WARRANTY AND OTHER WATCH REPAIR:
Should you require work under warranty, please send in your watch, a copy of your sales receipt and/or the warranty booklet with dealer stamp and a description of the problem to the authorized international watch service center closest to you. Visit https://diesel.fgservices.com/hc/en-us.
For service work that is not covered under this warranty, the service center may perform the services you request for a charge dependent on watch style and type of work requested. These charges are subject to change.
Do not send original packaging, as it will not be returned. Fossil highly recommends you insure your parcel and adequately protect the watch during shipment. Fossil is not responsible for product lost or damaged during shipment. *901 South Central Expressway, Richardson, Texas 75080 USA
ITALIANO
PRODUTTORE:
Fossil Group, Inc.
Sedi centrali:
901 S. Central Expressway
Richardson, Texas 75080
Fossil Switzerland GmbH
Riehenring 182
4058 Basilea
Svizzera
RAPPPRESENTANTE EUROPEO AUTORIZZATO:
Fossil Europe B.V
Terborgseweg 138
7005BDDoetinchem
Paesi Bassi
*901 South Central Expressway, Richardson, Texas 75080 USA
DEUTSCH
HERSTELLER:
Fossil Group, Inc.
Hauptsis:
901 S. Central Expressway
Richardson, Texas 75080
Fossil Switzerland GmbH
Riehenring 182
4058 Basel
Schweiz
EUROPAVERTRETUNG:
Fossil Europe B.V.
Terborgseweg 138
7005BDDoetinchem
Niederlande
BESCHRANKTE STANDARDSGARANTIE
*901 South Central Expressway, Richardson, Texas 75080 USA
FRANÇAIS
FABRICANT :
Fossil Group Inc.
Siege social
901 S. Central Expressway
Richardson, Texas 75080
Fossil Switzerland GmbH
Riehenring 182
4058 Basel
Suisse
GARANTIE LIMITÉE STANDARD
CETTE GARANTIE NE COUVRE PAS:
*901 South Central Expressway, Richardson, Texas 75080 USA
MODALITÉS DE GARANTIE SUPPLEMENTAIRES À LA FRANCE
901 S. Central Expressway
Richardson, Texas 75080
Col. Pio XII, Santa Catarina N.L. C.P. 66362 Mexico
Tel: (0181) 88 88 70 00 Fax Ext 102
R.F.C. FME0508241S3
186 187
DISTRIBUIDOR SUIZO:
Fossil Switzerland GmbH
Riehenring 182
4058 Basilea
Suiza
901 S. Central Expressway
Richardson, Texas 75080
Estados Unidos da América
Fossil Switzerland GmbH
Riehenring 182
4058 Basel
Suica
REPRESENTANTE EUROPEU AUTORIZADO:
Fossil Europe B.V
Terborgseweg 138
7005BDDoetinchem
Holanda
GARANTIA VÁLIDA APENAS PARA PORTUGAL
*901 South Central Expressway, Richardson, Texas 75080 EUA
SVENSKA
TILLVERKARE:
Fossil Group, Inc.
Huvudkontor:
901 S. Central Expressway
Richardson, Texas 75080
USA
Hemsida:
www.fossilgroup.com
Fossil Switzerland GmbH
Riehenring 182
4058 Basel
Schweiz
EUROPEISK AUKTORISERAD
REPRESENTANT:
Fossil Europe B.V.
Terborgseweg 138
7005 BD Doetinchem
Nederländerna
BEGRANSAD STANDARDSGARANTI
*901 South Central Expressway, Richardson, Texas 75080 USA
POLSKI
PRODUCENT:
Fossil Group, Inc.
Siedziba:
901 S. Central Expressway
Richardson, Texas 75080
Holandia (The Netherlands)
STANDARDOWA OGRANICZONA GWARANCJA
Fossil Switzerland GmbH
Riehenring 182
4058 Basel
*901 South Central Expressway, Richardson, Texas 75080 USA
PYCCKN
ПОНЗВОДЛТЕЛБ:
Fossil Group, Inc.
llra6-kaertnape:
901 S. Central Expressway
Richardson, Texas 75080
United States of America
www.fossilgroup.com
DNTCPBbKOTOP B WIBEUPAPIN:
Fossil Switzerland GmbH
Riehenning 182
4058 Basel
Switzerland
YIIOJIHOMOUEHHbI IPEIDCTABNTIEL B EBPONE:
Fossil Europe B.V. Terborgseweg 138 7005 BD Doetinchem The Netherlands
CTAHAPTHAR OPGAHUEHHAR TAPAHTR
OrpaHnueHHa rapaHTnaDiesel Ha da 2) roda ABnIeTcdo6pOBohno IraPahNTne H3r0ToBInTeN. OHa npDeocTabnIeTOnElbHe Ipaba, NOMMIO npab, npDycmOTpeHHbx 3akoHOM o npabax Notpe6tEnTeN, BKIOUaH, 6e3 orpaHnueHni, npBaA, KOToPiE kacoTOCTc HecooTBeCTByuOero Tpe6oBaHm ToBaPa. PpeMyueCTBa ORpaHnueHHo IepaHn7C HpeOocTBA D DonOIJIHeK Npabam, npDeycMOteHHbIM 3akoHOM o npabax NoTpe6tEnTa, a He BMeCTO HIX.
Fossil Group, Inc* ("Fossil") npedocabniet Ha Baaun cabsi Diesel rapaHTno Ha 2a (2) rda c dablnebpohauhboH NOKYNB C COOTBTCTBM C NIOKEHNNM N yCNOBAMN daHNOI RAPAHNTN. IapAHTN diesel pacnpoctpanreTcHa depekTB MaTePnaNoB n 3rTOBENHE.N Dn okaataenbctba NOKYNN Tpe6yETc KONN YeKa Nn NeeTaDb nHepe B rapaHTNHOM TanoHE.
B TeHHe rapaHTnHOro nepHOa MexaHm3, cTePLKn u nΦepe6NaT qacob -3To eHNCTBeHHbIe KOMNoHEtbl, Ha KOTOpbe paCnpocptpaHreTcra papaTHn. NOKpbBaembe rapaHTnKOMNoHET 6yDet OTPEMOHTpOBOAH mN acbI 6yDyT 3aMeHEbI b6ecnA H06e3 BImAHn IINaTb 3a 3aNaChbIe qactn N Tpyd, ecnn 6yDet DokaHaO, YTO npn HOPMaJIbHM NcNOJIb3OBAHn B HIN pncytCTbyOT DeEeKbTI MaTePnaIOB INI N3ROTOBHHe.
Bcnyae 3aemhe Fossi He moKet rapaHTnpoBaTb, TTO BbI NOnyHte Yacbl ToJKe Moenn. Ecn Baasa Moen He Doctynna, bdyT npedocTabne Hycbl paBHOI eHHOCTn I NOXOXNE PO CTNIIO. TaapHTNHa 3aMeHraOUIue Yacbl 3akAHMaEeTCape3 Dba (2) rOda c DaTb, KOrJa NoJIyHeHb 3aMeHraOUIue Yacbl.
TAPAHTRHEPACNPOCTPAHRETCAHA:
JIO6bIe DeEeKbI MaTePmAnOB N3rTOBnEHMa BAtapEn, KopnyCa, CTekNa YacOB, PemEska Hnn 6paCneta, BKIOHApA NOkpyTne Kopnyca Hnn 6paCneta.
Uyep6BpeyntateHnpabnIbHoroO6paueHna,HeocTaTOHoro yxoJa,Heycacthix CJyuaEB,HOPMaIbHOrO H3HOcAINCTapeHnA.
PobepkdeHn BOIO, eCN He 6bIIN CO6KIOeHb HmCTpyKcHn POxOy dno COOTBeTCTByUcero ypoBn BOOCToKocTH N3DeNIA (KOtpbY kya3aHa H3DeJIIM)
- I3dieny, KOtOpBle 6bln npnopeTeHbI He y ynoHOMOeHHoro po3HnHoro npoDaBuA. Diesel.
Hactoaa rapaHTnA anHympyTeC,ecn Yacb bIIN nobpeXeHbI B pe3ytate He cactHO Cnya Hn HbepeXhoCTn Iu,He JIAIOUxxC yIONHOmeHHbIMn areHTAMn no npdaXe Hn o6cnykBaHNO Fossil,HceAHKMOHNPOBAHORo TexHueckoro 06cnykBaHn Hn BO3DeNCTBn DpyTnx fakTOB, He oycNoBneHHbIX DeEeKTAM mATEpnaOB nnn N3rOToBNeHn. RapaHTnAnHYnpyTeC,ecn cepHbIe Homepa, Kobdi dAT n3dEInn Hn dpYtne 3aKn OTCnxKBaHnBbNb6bln ydaenbl, n3MeHehbl nI n CTepTbI.
EcnHn E yka3aHO HNOE, BblueyNOMMyTbIe rapaHTmN CpeDCTBa npabOBo 3aunTbI ABNIOCTc NCKIOHTeBbIMN IzAmeHrO Tco60B BCE pOHe rapaHTmN, YCNOBn I NOIOXeHn, 6bYbTO RaBO bVipaeKHeHbIe, NpOpa3yMeBaEMbIe IINI PneDyCMOTpeHHbIe 3aKOHOaTeBCTBOM, NO IObOMy BONPOcy, BkIOuHb, Be3 OprAHuHEn, rapaHTmIO PPINOHOCTn DnpOdaxN, PPINOHOCTb DnI NCNoLb3OBAHn NO HA3NaHEnIO, TOCHOCb, YOBDNETBOPINTEbHOe KaucECTBO, PPABo BIAJAEHn OTCYCTBNE HApUeHN, B OTHOWeHN KOTobix KOMnAHn Fossil He daET kAKHX-Nb6O ob3aTeBCTB, KOMnAHn Fossil He hecet OTBeTcBEHNOCTn 3a CnyaHbIe, No6OHyIe, KOcBEHhIe, fakTNecKe IINI WTPaPbHbye b6bTKM, a TaKke He IMeET KaKHX-Nb6O ob3aTeBCTB, BO3HKnAIOxN BCNECTBNe IIN B CB8N C PPOdAXe IIN NcNOIb3OBAHnEM DaHHOr O3dJIeN, B CNpy DOBOBAPi INI DenIeKTA (BKIOHaN He6pExHoc7b), CTPORl OTBeTcBEHNOCTn 3a KaucECTBO I Be3OaNACHOCTb TOBAPA INI NIObIX NbIX bnPnIHnOB, DaKe eCNl KOMnAHn Fossil 6bIIa YbeDomnHeN O Bo3MOXHOCTN TAKNX y6bIKOB INEB3upar Ha TOT fAkt, YTO NIO6oe ORpAHuHEHoe cpeTBO nPpAOBOB 3aUNITbI, IN3IOXeHHOe B HactoIe rapaHTmN, He DOCTINO CBOeO OCHOBHO CEIN. OTBeTcBEHHOCTb KOMnAHn Fossil OrpAHuNVBaETC 3aMeHOJ, PemOHToM INI BO3MeUeHEm CTOnMOCTn H3dJIen Ha CObCTBEHHOe yCMOTpeHne KOMnAHn Fossil.
HeKOTOpbIeCTpaHbI,StaTbI ININPpOHNHnHEpaPeSauOTNCKIOUeHne INmOrpAHueHme DeiCTBnI NOpa3yMeBaemBXrapaHTN ININOrpaHueHne OTBeCTBeHHoCTNaCnyaHbIe ININKOCBEHHbIyeYbItKN,TAKTOBbIeYka3aHbIe
200 201
OrpaHHeHH NckHHeHH Moryr npMHeTcK BAMB OpaHHeHHOM obEMe. KOrda
noDpa3yMeBaembIe rapaHTn He Moryr 6bItb NOHCTbIO NCKHOeHbI, IN cPcK bDeT
OrpaHHeN npOdoNkTeBHOCTbIO npMHeIMm NcBmEHHO rapaHTn. Hactoiaa
raPaTHn HaJeTaeBac OnpeJeHHIMIpOJIuHEeCKHMn PpaBAmn, IN Bbl Takke MoKeTe
HMeTb Dpyme IpaBA, KOtOpBe Moryr 5bItb pAHHbIMn B 3ABNCMOCTn OT MeCTHO
3aKaHOdTaJIbCTBa. BaAMn 3aKaOHHeIpeBa He 3aTpAImBaOTcN.
3AIIPOC TAPAHIOHOTMOHOPEMOHTA YACOB:
EcnBAM Tpebyetc BbINONHeHne paobT no rapaHTn,OTnpabBe CBOW cAbcI,KONIO BAwero YeKa mNnra papaHTmHO rTaNoA CO UTAMNOm DInepa N OINCAHE npo6IeMb I B6nKAAuM K BAM yNpOHAMOeHHb MEkDyHapOHy cepBnCHy ceHTp NO peMOHTy cachOB,Dnra erOncka nocTe diesel.fgservices.com/hc/en-us
Ecnnpa60tbo no 6cbnykmbauHHe noKpbBbAotcnaactoae npaHTne,cebpncbmyeHTp MoKET BInOINHtB 3anpoeHHbE BamN yCnTy 3a nTaty,pa3Mep KOTopo3aBNCIT OT BnDa YacOB INa TnA 3anpaunBaEMo pa60tbo. Pa3Mep daHHO nnAatbl MoKET MeHrbcn.
He OtnpabnIte Yacb B opinHahlbHOYnakOBKe, nockoNkOy OH He 6yTe Bo3BpaUeHa. Fossil HactoTaeNbHO peKOMeHdyET Bam 3aCtpaXOBaTB NOcblIKy I COOTBETCTBYIOIM o6p30m 3aunTb Yacb Ha BPem TpaHCNOPTnOBKn. Fossil He heceT OTBeTCTBEHOCTM 3a NotepIO INN NOBpeKdHMe H3DeMBO BPem TpaHCNOPTnOBKn.
*901 South Central Expressway, Richardson, Texas 75080 USA
BAHASA INDONESIA
GARANSI TERBATAS STANDAR
*901 South Central Expressway, Richardson, Texas 75080 USA
日本語
標準的下限定保證
*901 South Central Expressway, Richardson, Texas 75080 USA
中文
标准有限保修
*901 South Central Expressway, Richardson, Texas 75080 USA
繁體中文
標準的有限質量保證
*901 South Central Expressway, Richardson, Texas 75080 USA
中国
五
*901 South Central Expressway, Richardson, Texas 75080 USA
AUTHORIZED DIESEL SERVICE CENTERS
ALGERIA
NexTimes Distributon LLC
Promotion immobiliere 21eme siecle
Bt 5 P16
Ain Allah
Algiers
T: +213560927331
E: service.client@nextimes.dz
ANDORRA
LESCAIRE
Avda. del Pesebre, 1 LOC.2
AD700 Escaldes-Engordany
Andorra
T: +376869400
E: escaire@andornet.ad
ARMENIA
Timeless LLC
5/171 Northern Avenue
0001 Yereyan
Armenia
T: +374 11 500 401
E:info@time.am
AUSTRALIA
Metro Service Centre
P.O.Box 6277
Frenchs Forest 2086
Australia
T:0289778086
E: customercare.au@fossil.com
AUSTRIA
DHL Express (Austria) GmbH
Fossil Repairs Service
Gewerbestasse 9
A-5102 Anthering
T: (+43) 720 228 316
E: service@fossil.de
AZERBAIJAN
Baygroup
Nizami 77
1100 Baku
Azerbaijan
T:491778933278
E: fikrat@baygroup.az
212 213
BAHRAIN
Yousif a Wahab al Hawaj & sons
P.O.Box 891
305 Manama
Bahrain
T: (973) 17 230-088
E: aswathy.prasad@alhawaj.com
BANGLADESH
Watches World Ltd.
Union Center
68/1 Gulshan Ave.
Gulshan, Dhaka - 1212
T: +88 02 988-5771
BANGLADESH
Watches World Ltd.
Level-04, Block - A
Bashundora city shopping mall
Panthopath, Dhaka
T: +88 02 988-5771
BANGLADESH
Watches World Ltd.
Jamuna Future Park, GD-29 & 30
Ka-244, Kuril
Progoti Sarani, Dhaka - 1229
T: +88 01713199266
BELARUS
Timegroup International LLC
Pobediteley Avenue 84, office 108
220030 Minsk
Belarus
T: +374 11 500 422
E: sona.shirinyan@time.am
BELARUS
ZIKO LLC
PROMZONA SHABANY
NOVODVORSKY S/S, 71/1
223016 Minsk
Belarus
T: +375 17 364-11-63
E: zikoservice@ziko.by
BELGIUM/LUXEMBOURG
DHC
Attn. Warranty & Repairs
Woluwelaan 151
1831 Diegen
T: (+32) 28086242
E: customerservice@fossil.nl
BOLIVIA
S&K CASA TOKYO
Calle Ayacucho 229
Santa Cruz
Bolivia
T: +591 3 3332960
E: gerencia@casatokyo.com.bo
BOSNIA / HERZEGOVINA
Watch Line D.O.O.
Muhameda ef. Pandze 4D
71000 Sarajevo
Bosnia / Herzegovina
T: +387 33 273 950
E:watchlin@bih.net.ba
BRAZIL
Grupo Technos
Rua Julio Gonzalez, number 132
27th floor
Barra Funda
São Paulo 01156-060
T: +55 (11) 3003-1070
4th Floor, Unit 01, No.25
Mao Tse Tung Blvd, Boeung Keng Kang I,
Chamkar Morn,
12302 Phnom Penh, Cambodia
T: (855) 061 703 886
E: watches@ione2u.com
CANADA
FG Services - Attn: Repairs
C/O NFI
25 Cottrelle Boulevard, Unit 3
Brampton, Ontario, L6S0C3, Canada
T:1-800-699-0556
E:info.ca@fgservices.com
CHILE
Attn: Carlos Rosales (manager) and
Maria Estelia Nunez
Xu Hui District, Shanghai 200030, China
T: (86)400-820-3126
E: shanghaicustomerservicegroup2@
fossil.com
CHINA
Hong Kong SAR, China
17/F, CDW Building
388 Castle Peak Road
Tsuen Wan, New Territories
Hong Kong SAR, China
T: (852) 3008 2157
E: FossilAsia-AfterSales@fossil.com
CHINA
Macau SAR, China
17/F, CDW Building
388Castle Peak Road
Tsuen Wan, New Territories
Hong Kong SAR, China
T: (852) 3008 2157
E: FossilAsia-AfterSales@fossil.com
CHINA
Taiwan, China
Dragonfly Asia-Pacific Limited
Taiwan Branch
4F, No. 2, Fixing North Road
Zhongshan District
Taipei, Taiwan, China
T: (886) 2 8773 9911
E: service@dragonflyapac.com.tw
COLOMBIA
TSQ S.A - Servicio Tecnico
Centro Comercial Hacienda
Contact Person: Adriana Sanchez
- (TSQ)
Calle 114# 6A - 92 local C-235.
Santa Barbara
T:2132688,6121837
E: serviciotecnicohsb@tsqsa.com
E: asanchez@tsqsa.com
COSTA RICA
Gujalsa S.A.
Attn: Juan Carlos
200 Metros Norte del INA en Paseo
Colon
San Jose, Costa Rica
T:222-0804
T:2256-5716
T:2257-2349
E:quialsa@polarcr.com
CROATIA
Hora Plus D.O.O.
Vlaska 55
10000 Zagreb
Croatia
T: +385 1 4697 787
E: Ivana@horaplus.hr
CZECH REPUBLIC
Look Plzen s.r.o.
Hodinarsky, zlatnicky dum
Na Roudne 47
301 00 Plzen
T: +420 723 655 889
E: hodinarskydum@foxstore.cz
DENMARK
FairTrans
C/O FAST EUROPE
Kliplev Erhervspark 20, Kliplev
Vigtig: Indlevering på kontor - 1 sal.
DK-6200 AABENRAA
T: +45 45 88 34 60
E:salesdenmark@fossil.com
ECUADOR
Distribuidora Yabimodas
Av. Shyris N36-188 y Naciones Unidas
Edf. Shyris Park, Ofc 409
Quito, Ecuador
T: (593) 2 292 6119
E: gerenciacomercial.ec@yabimodas.com
EGYPT
Link Watches
17 El Shaheed Mahmoud El Ashry St.
Triumph Sq - Helipolis, Cairo
Egypt
T: (20) 2 2690 0001 / 2
E: linkwatches@linkwatches.com
ESTONIA
Ou Megafort
Parnu mnt 141
11314 Tallinn
Estonia
T: +372 7 337030
E: megafort@megafort.ee
FINLAND
UAB Norkada
Ukmerges G. 369A
12142 Vilnius
Lithuania
T: +370 659 21442
E: service@norkada.eu
FRANCE
SAV Fossil France
RueduMartelberg
BP 80023 Monswiller
67701 Saverne Cedex
T: (+33) 184889308
E: contact@fossil.fr
GEORGIA
Timeless Ltd.
46 Rustaveli Str.
0108 Tbilisi
Georgia
T: +374 11 500 401
E:info@time.am
GERMANY
FESCO GmbH
Service DHL Logistiklager/ LDB
Werkstrasse 17
D-77815 Buh
T: (+49) 322 2109 2328
E: service@fossil.de
GREECE
Diesel Hellas S.A.
Syngrou Ave. 6
11742 Athens
Greece
T: +30 210 6021900
GUATEMALA
Watch it!
Diagonal 6, 13-01 zona 10 Oakland Mall
Tercer nivel
Guatemala
T: +502 4220 5778
E: serviciotecnico@victorino.gt
GUYANA
c/o King's Jewelry World
King's Plaza 141 Quamina St.
South Cummingsburg
Georgetown
T:592 226 0704
HONDURAS
Fossil India Pvt. Ltd.
Shop G18, Orion Mall
Dr. Raj Kumar Road, Rajaji Nagar
Bangalore 560 055
Karnataka
India
T:080-22682245
E:serviceorion@fossil.com
INDIA
Fossil India Pvt. Ltd.
Shop No. 116, DLF Promenade Mall
Nelson Mandela Marg, Vasant Kunj
New Delhi 110 070
India
T:011-41664015
T:011-41664016
E:service_3874@fossil.com
INDIA
Fossil India Pvt. Ltd
Shop No. S010, Ground Floor
Express Avenue Mall, Plot No.213
Whites Road
Royapettah
Chenai 600 014
Tamil Nadu
India
T:044-28464288
E: service_3831@fossil.com
INDIA
Fossil India Pvt. Ltd
Shop No. G10, Ambience Mall
Delhi - Jaipur Expy, Ambience Island
DLF Phase 3, Sector 24
Gurgaon 122 010
Haryana
India
T:0124-4665529
E:service 3834@fossil.com
GRAND INDONESIA
Watch Care Centre
JI, MH. Thamrin no
East Mall, Level 5 #GD2-16,17
Jakarta 10310
T: (62 21) 2358 1344
WA:0812 191 191 52
E:watchcare@time.co.id
IRAQ
Al Azyaa Al Alamiah
Ontime Service Center
Majidi Mall
Erbil, Iraq
T: +066-2648404
IRELAND
Transalliance TS
FAST (Fossil After Sales Team) -
Suite 8-9
Faraday Court - Centrum 100 - Burton
Upon Trent
DE14 2WX Staffordshire
T: (+44) 2038 685 984
E: ukenquiries@fossil.com
ISRAEL
Planet Style
4 Habitachon St.
Kiryat Matalon
4951248 Petach Tikva
T: +972 (0)3 924 6828
E: service@planetgroup.co.il
ITALY
FAST Europe
C/O DHL Supply Chain
Corso Lombardia N.61
10099 San Mauro Torinese (TO)
T: (+39) 0694 802649
E: online@fossil.it
JAPAN
Fossil Japan Repair Center
Yasuda A building 2F, 3-9
Moriya-cho Kanagawa-ku
Yokohama, 221-0022
T:(81)0345790368
E:(81)454506243
E:shop.ip@fossil.com
JORDAN
Abu Shakra Trading Agency
PO Box 6971
11118 Amman
Jordan
T: +962-6-581-7173
E: gm.off@abushakra.com
KAZAKHSTAN
Chronos Ltd.
125 Ablay Khan str.
050000 Almaty
Kazakhstan
T:+77272727441
SOUTH KOREA
Fossil (Korea) Limited
12F, Hanssem Sangam, #179
SeongAm-ro, Mapo-gu
Seoul, Korea
T:02-2156-0600
E:korcs@fossil.com
KOSOVO
IAS Group
Bulevardi I Pavaresise
60000Gjilan
Kosovo
T: +377 44 870 590
KUWAIT
Al Yasra Fashion Ontime Service Center
Marina Mall
Salmiya
Kuwait
T: +965-2-2244515
E: a.mullachery@alyasra.com
LATVIA
Estonia
Oü Megafort
Parnu mnt 141
11314 Tallinn
T: +372 7 337030
E: megafort@megafort.ee
LEBANON
Romance
P.O.Box 773
Fattal building, JISR el-Wati (Sin el-Fil)
Lebanon / Beirut
T: +961 1512002 ext 337-340
E: nadine.sfeir@fattal.com.lb
LITHUANIA
UAB Laiko Zvaigzde
Draugystes G. 19
51230 Kaunas
Lithuania
T: +370 631 63287
Fossil Time Malaysia - Service Centre
Unit L2-2-7, 2nd Floor
Wisma Kemajuan
No.2 Jalan 19/1B
46300 Petaling Jaya, Selangor
T:03-79691900
E:fmycs@fossil.com
MALTA
Watch Clinic Repair Centre
Trio B.Bontadini
Birkirkara
N
T: +356 2147 2980
E: info@aftersalesrepairs.com
MEXICO
Metro Service Center Mexico
Carretera Monterrey - Saltillo 1249 - A
Col. Pio XII
Santa Catarina, N.L. Mexico C.P. 66362
T:018002367745
E: reparaciones@fossil.com
MOLDOVA
Cronograf
23 Decebal Str., Jumbo, of. 204
2002 Chisinau
Moldova
T:37322505604
MOROCCO
Tempus
Cherry Oo Sevice Center, No.408
First Floor
Conner of Thein Phyu Road &
Bominyaung Street
Mingalar Taung Nyunt Township
Yangon, Myanmar
T: (+95-1) 200290
E:choservice@naingfamilymyanmar.com
9:00 AM - 5:00 PM (Monday to
Saturday)
NEPAL
Swiss Watch Service
Jamal, Dubarmarg
Besides Mayalu Centre
Kathmandu
T: +977-1-4222909
10:00 AM - 7:00 PM (Sunday to Friday)
NETHERLANDS
Team for Logistics
Attn. Warranty & Repairs
Lireweg 114
E: customerservice@fossil.nl
NEW ZEALAND
Watch World Ltd
45a Arrenway Drive
Albany
Auckland
T:094756103
NORWAY
Heier Urmakerverksted
Postboks 64
NO-1914 Ytre Enebakk
Norway
T: +47 64 92 61 53
E:servicenorway@online.no
PAKISTAN
Brand Merchants Co.
AbouTime Emporium Mall - 1st Floor.
Shop# F-25
Abdul Haque Road, Johar Town, Lahore
Pakistan
T: +92 42 32592370
PAKISTAN
Brand Merchants Co.
AbouTime Packages Mall - 2nd Floor.
Shop# 2020
Walton Road, Lahore
Pakistan
T: +92 42 38915848
PAKISTAN
Brand Merchants Co.
Office # 14, Mezzanine Floor
Progressive Plaza, PIDC
Karachi
T: +92 21 35632023/4
PANAMA
Z Relojero
C/Samuel Lewis
Panama
T:00507-3006666
E: servicoacliente@relojin.com
E: gerente@relojin.com
PARAGUAY
Tiempo de Relojes
Attn: Vicente Acosta
LillocasyBulnes
Asuncion, Paraguay
T: (+595) 21 - 660 109
E: tdr@tiempoderelojes.com.py
PERU
Le Grand Montres & Bijoux
Av Risso # 243
Oficina 202, Lince - Tecnico, Jose Munoz
Lima, Peru
T: (+51) 935 508 416
E: peru.legrand@gmail.com
PHILIPPINES
Time Check Service Center
G/F 6750 Retail Arcade, Ayala Center
Ayala Avenue, Makati City
Philippines
T: (632) 478-6167
E:timecheck.6750@gmail.com
POLAND
FAST
C/O Expeditors Polska
Dw. Tomasza 4D
05-808 Parzniew
T: (+48) 223 079 426
E: fqservicespl@fossil.com
PORTUGAL
Expeditors Portugal C/O Espacotrans
Att Reparacoes Fossil (FAST)
Parque Logistico Marinas de D. Ana
Quebradas de Cima, Armazem 6, 2625-
090 Póvoa de Santa Iria
T: (+351) 308 813 062
E: customerservice.pt@fossil.com
QATAR
Blue Salon
P.O.Box 6255
Suhaim Bin Hamad Street
Doha
T: +974 44 66 111
Unirea Shopping Center
P-ta. Unirii Nr.1, Sector 3
Parter, aripa Splai
Bucharest, Romania
T: +40.21.303.03.65
E: service@bbcollection.ro
RUSSIA
Fortuna-Time Ltd.
Garibaldi str., bld 7
119313 Moscow
Russia
T: +7(499) 553-49-92
service@fortuna-time.ru
SAUDI ARABIA
Al Yasra Fashion (OnTime)
Prince Naser Bin Abdul Aziz Street
Behind Guthmi Furniture
Khurais Road, Rawda Dist.
Riyadh, KSA
T: +966 1 2572095
E: anwarul@alyasra.com
SERBIA/MONTENEGRO
BPM Export - Import
Kneza Milosa 16
11000 Belgrade 6
Serbia
T: +381 11 362 0427
E: bpmservis@bpmsatovi.rs
SINGAPORE
Fossil Singapore Pte Ltd
51 Bras Basah Road
08-07 Manulife Centre
Singapore 189554
T: (65) 3165 4961
E: customerservice.sg@fossil.com
SLOVAKIA
Halo Bratislava s.r.o
Pribinova 8
811 09 Bratislava
Slovakia
T: +421 917 706 575
E: hodinar.eurovea@gmail.com
SLOVENIA
Slowwatch D.O.O
Gosposvetska cesta 5
1000 Ljubljana
Slovenia
T: +386 1 200 3100
E:slowwatch@slowwatch.si
SOUTH AFRICA
Fossil Accessories South Africa (Pty) Ltd
Unit 1, 48 Neptune Street
Paarden Eiland, 7405
Cape Town
South Africa
T: +27 21 4180045
E: contact@keren.co.za
SPAIN - CANARIAS
c/o FAST EUROPE (REPAIRS)
C/ Los Angeles n° 15, Nave 10
Poligono Industrial Centrovia
Timeless Jewelry, N.V
Attn: Ms. Inisrah Ashruf
Fossil Switzerland GmbH
RuedesPlaces13
2855 Glovelier
Switzerland
T: (+41) 315 281 633
E: customerservice-ch@fossil.com
THAILAND
Central Trading Co., Ltd.
3388/25-37 Sirinrat Building, Rama
4 Road
Klong-ton, Klong-toey
Bangkok 10110, Thailand
T: +66 (0) 2-229-7000
E: service@cmg.co.th
TUNISIA
ABCO Distribution
Bis Avenue de L'uma 62
Al Futtaim Watches & Jewelry Co. LLC
Al Futtaim Tower / 1st Floor, Office
102
Baniyas Square, Al Maktoum Street
Deira, Dubai
T: +971 4701 6900
E: joshy.narayanan@alfuttaim.ae
UNITED ARAB EMIRATES
Al Yasra Fashion Ontime Service Center
Ontime Dubai Festival City
First Floor, Shop No. SC227
Dubai
T: +971 4285 5455
E:info-watches@alyasra.com
UNITED ARAB EMIRATES
Al Yasra Fashion Ontime Service Center
Ontime Marina Mall
Ground Floor, Unit No 21, Marina Mall
Abu Dhabi
T: +971 2681 8134
E:info-watches@alyasra.com
UNITED ARAB EMIRATES
Time Bridge fzcc
Dubai Airport Free Zone, Unit G21
PO 293706
Dubai
T: +971 4 299 33 00
E:info@timebridge.ae
UNITED KINGDOM
Transalliance TS
FAST (Fossil After Sales Team) -
Suite 8-9
Faraday Court - Centrum 100 - Burton
Upon Trent
DE14 2WX Staffordshire
T: (+44) 2038 685 984
E: ukenquiries@fossil.com
UNITED STATES OF AMERICA
FG Services - Attn: Repairs
10615 Sanden Drive
Dallas, Texas 75238-1720
USA
T:800-842-8621
E: info@fgservices.com
URUGUAY
Lucia Achdjian
Dr. Enrique Muñoz 883
Montevideo, Uruguay
T: +598 27113757
E: service.lucia@gmail.com
VENEZUELA
Distribuidora Yabimodas
Edf. Shyris Park, Ofc 409
Quito, Ecuador
T: (593) 2 292 6119
E: gerenciacomercial.ec@yabimodas.com
CERTIFICATE OF WARRANTY
The CERTIFICATE OF WARRANTY which follows below is to be completed at time of purchase by the retail store where you purchased your watch.
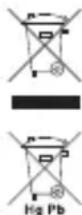
The symbol indicates that this product shall not be mixed with unsorted municipal waste when disposed of. There is a separate collection system for waste electrical and electronic equipment. Usually old electrical and electronic equipment can be returned free of charge. For further information please contact the competent municipal authorities or the shop where you purchased the product. Correct disposal ensures that waste electrical and electronic equipment is recycled and reused appropriately. It helps avoid potential damage for the environment and human health and to preserve natural resources.
NOTE: Certain watch styles are fitted with lithium batteries which may contain perchlorate material - special handling may apply, see www.dtsc.ca.gov/hazardouswaste/perchlorate for more information.
