
Predator XB252Q - Monitor ACER - Free user manual and instructions
Find the device manual for free Predator XB252Q ACER in PDF.

| Product Type | LCD Monitor |
| Brand | Acer |
| Model | Predator XB252Q |
| Screen Size | 24.5 inches (62 cm) |
| Maximum Resolution | 1920 x 1080 at 240 Hz |
| Response Time | 1 ms (gray to gray) |
| Panel Technology | TN |
| Brightness | 400 cd/m² (typical) |
| Contrast Ratio | 1000:1 |
| Viewing Angle (Horizontal/Vertical) | 170° / 160° (CR=10) |
| Refresh Rate (DisplayPort) | 30 to 240 Hz |
| Input Connectors | HDMI, DisplayPort |
| Power Supply | 100-240 V, 50/60 Hz |
| Power Consumption (Standby) | 0.46 W (typical) |
| Dimensions (W x H x D) | 557.89 x 390.87-505.87 x 268.31 mm |
| Net Weight | 6.2 kg |
| Ergonomic Adjustments | Tilt (-5° to +21°), Height (0-115 mm), Pivot (-90° to +90°), Swivel (-45° to +45°) |
| Special Features | ULMB (Ultra Low Motion Blur), Nvidia 3D Light Boost, Dark Boost, crosshair |
| Compatibility | VESA DDC-CI/DDC2B, Plug-and-Play |
| Maintenance and Cleaning | Clean with a soft cloth and a solvent-free solution; do not use ammonia or alcohol |
| Safety | Do not expose to water or moisture; do not open the casing |
| Repairability | Call an authorized technician; do not attempt repairs yourself |
Frequently Asked Questions - Predator XB252Q ACER
User questions about Predator XB252Q ACER
0 question about this device. Answer the ones you know or ask your own.
Ask a new question about this device
Download the instructions for your Monitor in PDF format for free! Find your manual Predator XB252Q - ACER and take your electronic device back in hand. On this page are published all the documents necessary for the use of your device. Predator XB252Q by ACER.
USER MANUAL Predator XB252Q ACER
Acer LCD Monitor Quick Start Guide (QSG)
Important safety instructions
Please read the following instructions carefully.
-
To clean the LCD monitor screen: Be sure that your monitor is electrically rated to operate with the AC power available in your location.
-
Turn off the LCD monitor and unplug the power cord.
- Spray a non-solvent cleaning solution onto a rag and clean the screen gently.
- NEVER SPRAY OR POUR ANY LIQUID DIRECTLY ONTO THE SCREEN OR CASE.
- PLEASE DO NOT USE ANY AMMONIA OR ALCOHOL-BASED CLEANERS ON THE LCD DISPLAY SCREEN OR CASE.
-
Acer will not be liable for damage resulting from use of any ammonia or alcohol-based cleaners.
-
Do not place the LCD monitor near a window. Exposing the monitor to rain, moisture or sunlight can severely damage it.
- Do not apply pressure to the LCD screen. Excessive pressure may cause permanent damage to the display.
- Do not remove the cover or attempt to service this unit yourself. An authorized technician should perform servicing of any nature.
- Store the LCD monitor in a room with a temperature of -20^ to 60^ C ( -4^ to 140^ F). Storing the LCD monitor outside this range may result in permanent damage.
- Immediately unplug your monitor and call an authorized technician if any of the following circumstances occur:
- Monitor-to-PC signal cable is frayed or damaged.
- Liquid spills onto the LCD monitor or the monitor is exposed to rain.
• The LCD monitor or case is damaged.
Attaching the monitor to the base
- Remove the monitor base from the packaging and place it on a stable and level workspace.
- Remove the monitor from the packaging.
- Attach the monitor stand arm to the base.
- Ensure that the base is locked onto the monitor stand arm. (for selected models)
- Secure the base to the monitor stand arm by turning the screw using the integrated tab or a suitable coin. (for selected models)
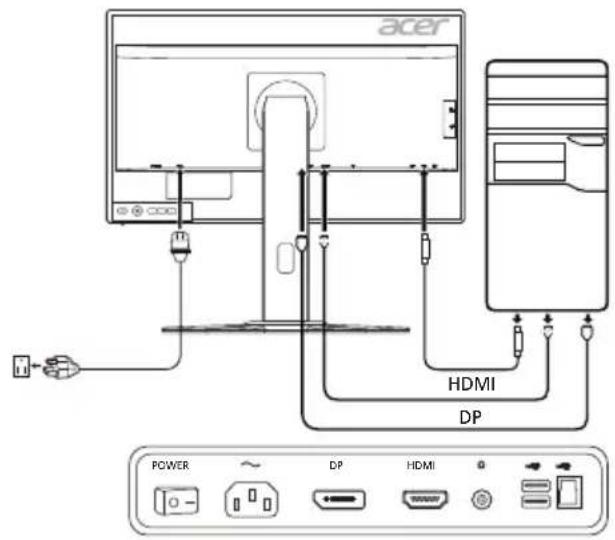
Connecting Your Monitor to a Computer
- Turn off your monitor and unplug your computer's power cord.
- 2-1 Connect HDMI Cable
a. Make sure both the monitor and computer are powered-OFF.
b. Connect the HDMI cable to the computer.
2-2 Connect DP Cable (Default input)
a. Make sure both the monitor and computer are powered-OFF.
b. Connect the DP cable to the computer.
- Connect the Audio Cable. (Optional)
- Insert the monitor power cable into the power port at the back of the monitor.
- Plug the power cords of your computer and your monitor into a nearby electrical outlet.
- Select Power-off USB charge ON/OFF to enable/disable Power-off USB charge function.
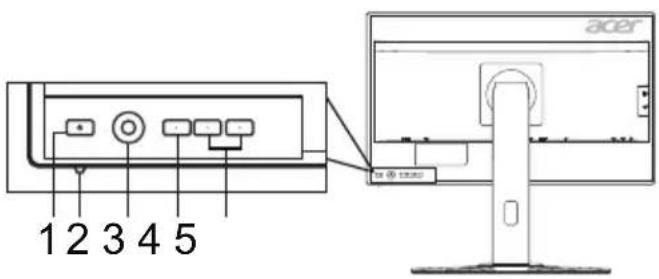
External Controls
| No. Item Description | ||
| 1, 2 | Power button/indicator | Turns the monitor on/off. Blue indicates power on. Amber indicates standby/power saving mode. |
| 3 Navi/OK button | Press to activate the OSD menu, then use it as a directional key to highlight the desired function. Press it again to enter a selection. | |
| 4 Input button Press to toggle input sources. | ||
| 5 | Hotkey 1, 2 buttons | Press to activate user defined hotkey function. |
Adjusting the OSD settings

NOTE: The following content is for general reference only. Actual product specifications may vary.
The OSD (on-screen display) can be used to adjust the settings of your LCD monitor. Press the MENU key to open the OSD. You can use the OSD to adjust the picture quality, OSD position and general settings. For advanced settings, please refer to the following pages:
Main page
The default function for buttons 1 and 2 are Modes and Volume. You can use the Hot Key Assignment function to set these buttons to your preferred functions.
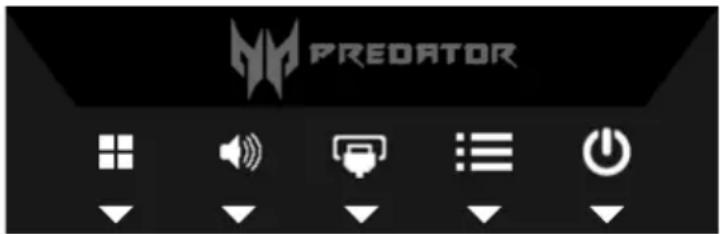
- Modes
- Volume
- Input
- Menu
- Power
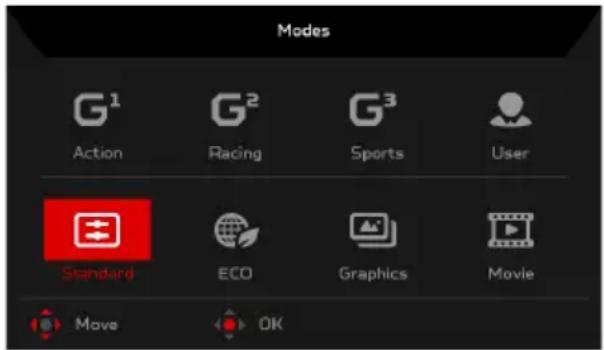
Turning Modes on or off
From any function page, press section for more information. to open the Modes control and select which user-defined profile to use (please see the OSD
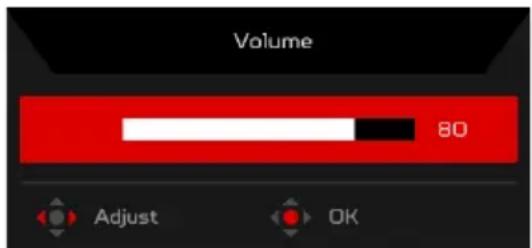
Adjusting the Volume
Open the Volume control and select the volume setting using the Navi/OK button. When you are done, press the Navi/OK button to go back one level.
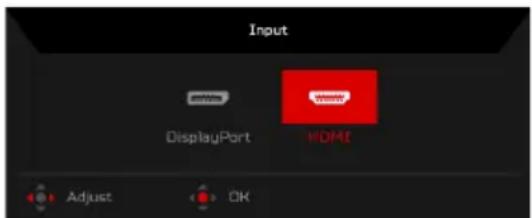
Selecting the input
Open the Input control and select the desired input. When you are done, press the Navi/OK button to go back one level.
The Function page
Open the Function page to select the Picture, Color, Audio, Gaming, OSD, or System functions, and adjust the settings which you want using the Navi/OK button. When you are done, press the Navi/OK button or go back one level.
Picture
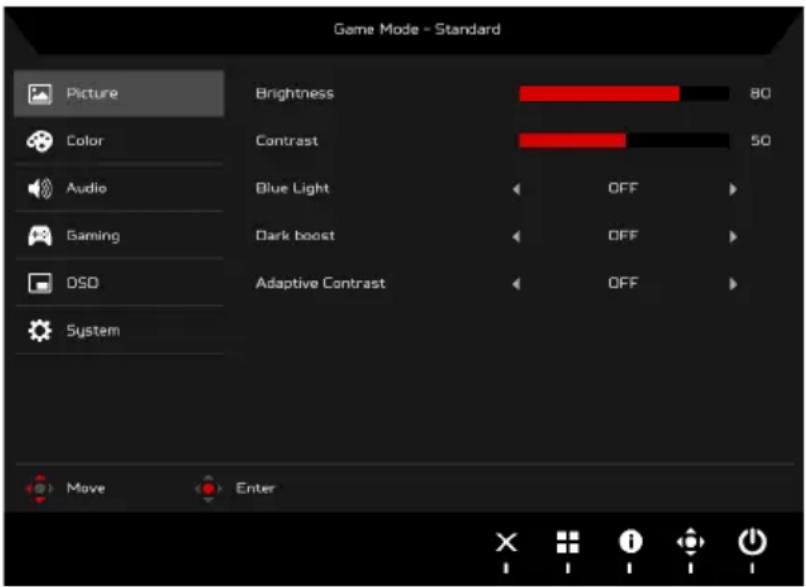
- Press the MENU key to open the OSD.
- Using the Navi/OK button, select Picture from the OSD. Then navigate to the picture element you wish to adjust.
- Use the Navi/OK button to adjust the sliding scales.
- The Picture menu can be used to adjust the Brightness, Contrast, Blue Light, Dark boost, and Adaptive Contrast.
- Brightness: Adjust the brightness from 0 to 100.

NOTE: Adjusts the balance between light and dark shades.
- Contrast: Adjust the contrast from 0 to 100.

NOTE: Sets the degree of difference between light and dark areas.
- Blue Light: Filters out blue light to protect your eyes by adjusting how much blue light is shown -- 80%, 70%, 60%, or 50%.

NOTE: Higher values allow more blue light through. For the best protection select a lower value.
- Dark boost: This boosts the amplitude of the dark color levels of the display—blacks will be less black. The higher the level, the higher the boost.
- Adaptive Contrast: This method usually increases the global contrast of many images, especially when the usable data of the image is represented by close contrast values. This allows for areas of lower local contrast to gain a higher contrast. The method is useful in images with backgrounds and foregrounds that are both bright or both dark. In particular, the method can lead to better views of bone structure in x-ray images, and to better detail in photographs that are over or under-exposed.
Color
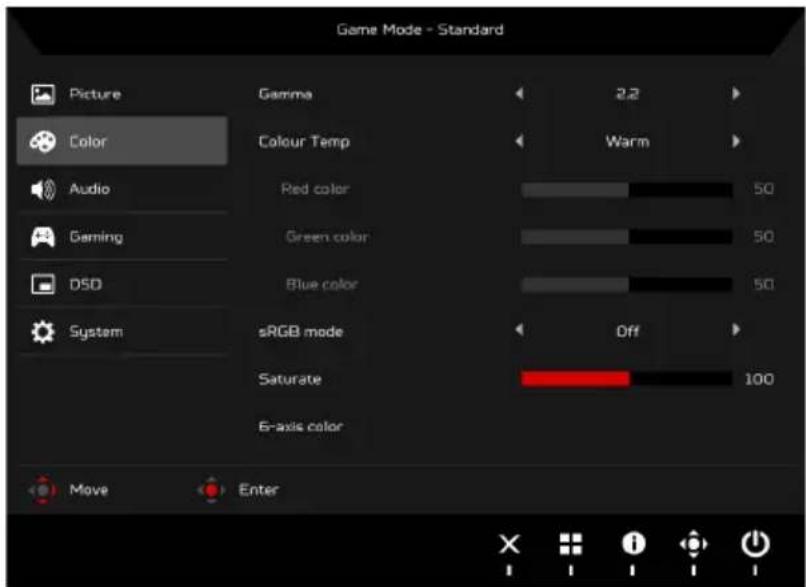
- Press the MENU key to open the OSD.
- Using the Navi/OK button, select Color from the OSD. Then navigate to the picture element you wish to adjust.
- Use the Navi/OK button to select the setting.
- Gamma mode allows you to adjust the luminance tone. The default value is 2.2 (standard value for Windows).
- Color Temperature: Default is warm. You can choose Cool, Warm, Normal, Bluelight or User.
- sRGB mode is for getting better color matching representation with the peripheral device, such as DSCs or printers.
- Saturate: Color brightness can be changed by 0\~200 adjustment.
- 6-axis color: Chroma of red, green, blue, cyan, yellow and magenta can be independently adjusted from 0\~100, changing the color quality of the image.
Audio
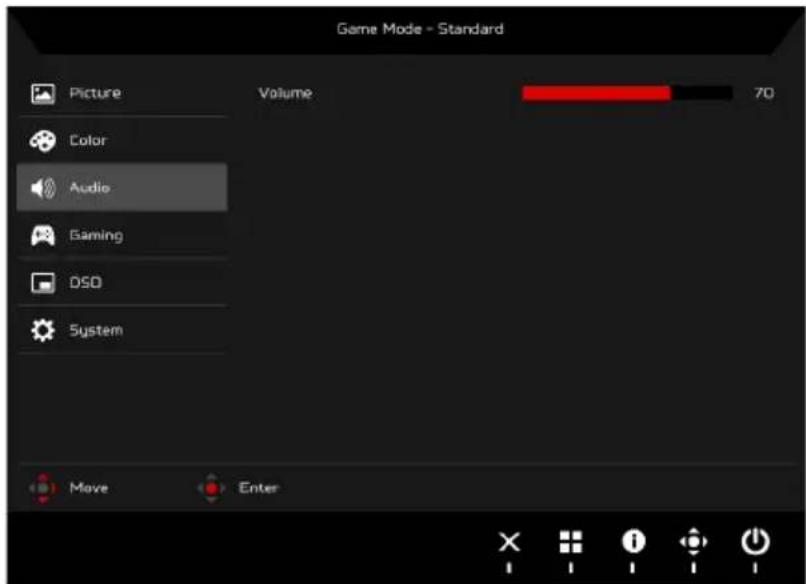
- Press the MENU key to open the OSD.
- Using the Navi/OK button, select Audio from the OSD. Then navigate to the setting you wish to change.
- Use the Navi/OK button to adjust any sliding scales.
- Volume: Adjust the volume.
Gaming
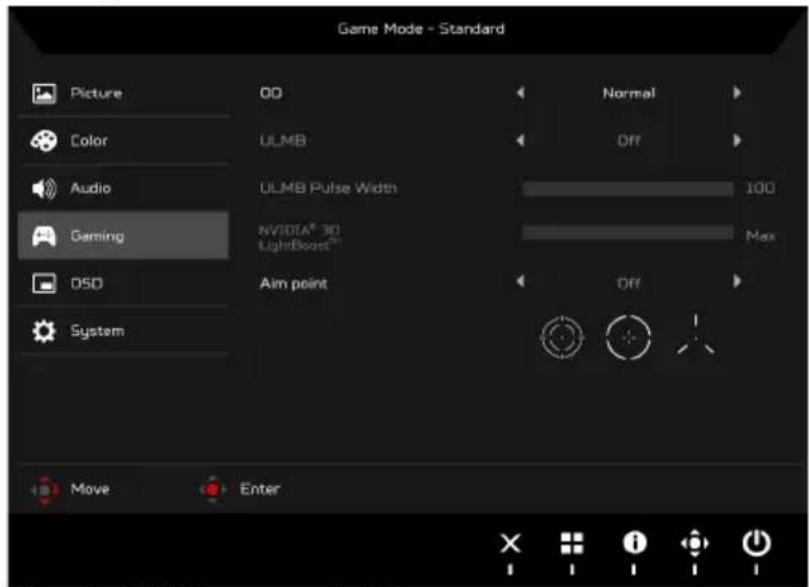
- Press the MENU key to open the OSD.
- Using the Navi/OK button, select Gaming from the OSD. Then navigate to the setting you wish to change.
- Use the Navi/OK button to adjust any sliding scales.
- OD: Select Off, Normal, or Extreme.
- ULMB (Ultra Low Motion Blur): Turn ULMB function On or Off.
- ULMB Pulse Width: Adjust the slider to reduce motion blur effect while you are watching fast-moving images. Please visit the NVIDIA website for more information.
- Aim point: Show an Aim point on the screen for shooting games.
OSD
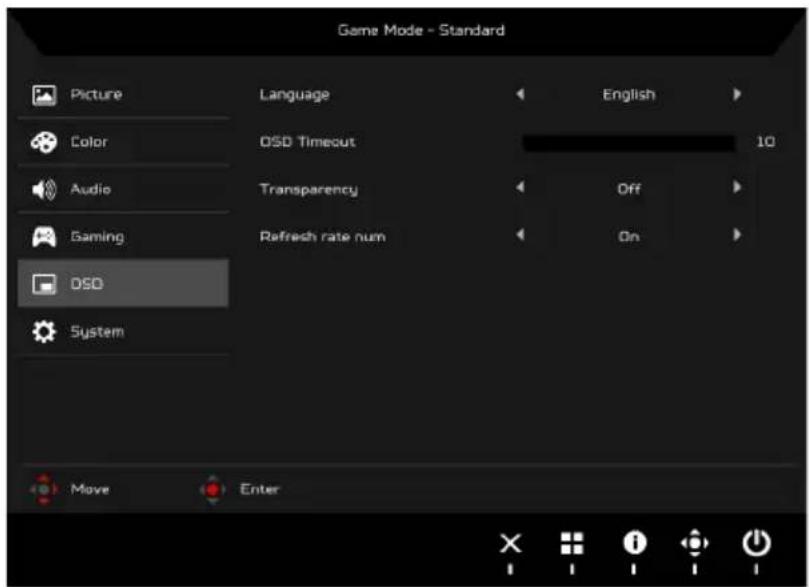
- Press the MENU key to open the OSD.
- Using the Navi/OK button, select OSD from the OSD. Then navigate to the setting you wish to change.
- Use the Navi/OK button to adjust any sliding scales.
- Language: Set the OSD menu language.
- OSD timeout: Adjust the delay before turning off the OSD menu.
- Transparency: Select the transparency when using gaming mode. The transparency can be 0% (OFF), 20%, 40%, 60%, or 80%.
- Refresh rate num: Display the panel's current refresh rate on the screen.
System
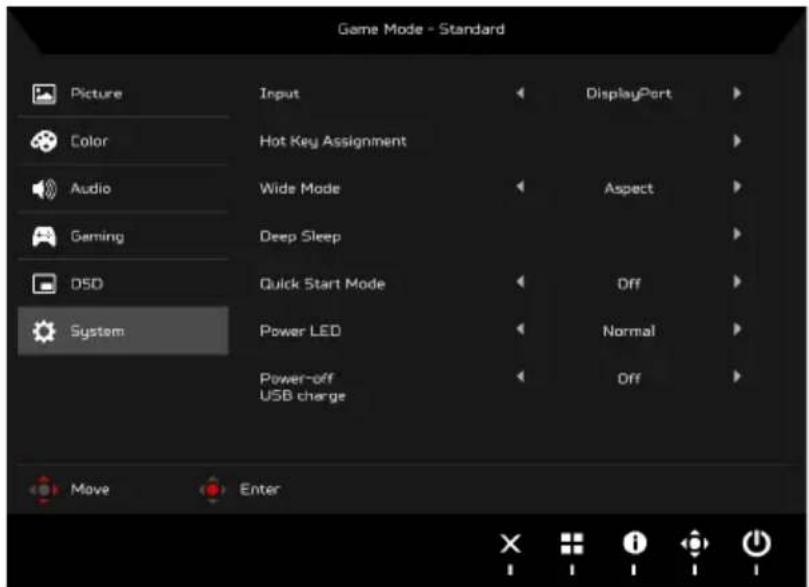
- This menu can be used to select the screen menu language and other important settings.
- Press the MENU key to open the OSD.
- Using the Navi/OK button, select System from the OSD. Then navigate to the setting you wish to adjust.
- Use the Navi/OK button to select the setting.
- Input: Select the source from DisplayPort or HDMI.
- Hot Key Assignment: Select the function of Hot Key 1 or Hot Key 2.
- Wide mode: You can select which screen aspect you are using. The options are Aspect and 1:1.
- Deep Sleep: When Deep Sleep function is On, the monitor shuts down its core functions and goes into energy saving mode if the monitor is idle for a certain period of time, or if the user turns off the monitor DC power.

NOTE: Pressing any button (except the Power button) on the monitor may also wake up the monitor after it goes into deep sleep.
- Quick Start Mode: Enable monitor rapidly.
- Power LED: You can set the power LED indicator to glow, go dimmer, or go off.
- Power-off USB charge: Turn On or Off.
Save Settings to... (User Mode only)
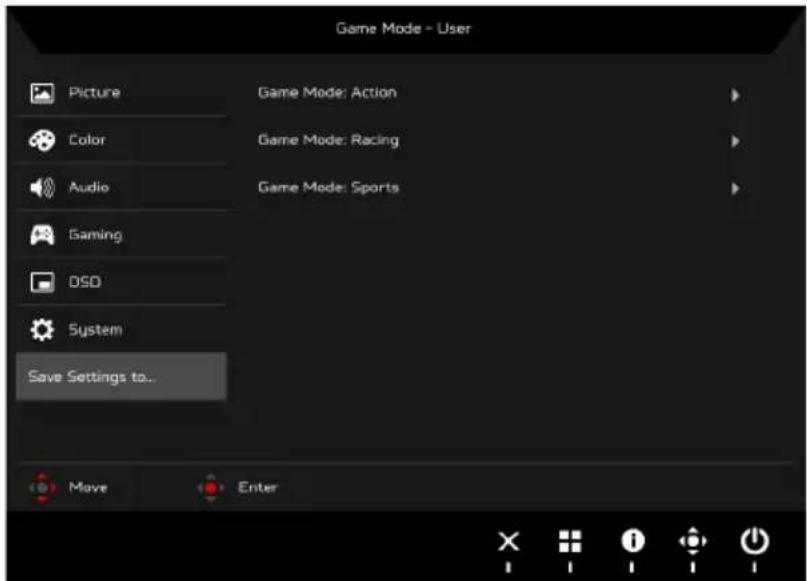
- Press the MENU key to open the OSD.
- Using the Navi/OK button, select Save Settings to... from the OSD. Then navigate to the element you wish to adjust and press the Navi/OK button to enter it.
- Save Settings to Game Mode: There are three user-defined game mode profiles available. Choose your desired settings and save them as one of the modes. The system will recall the settings in the future when you switch to Game Mode.
Product information
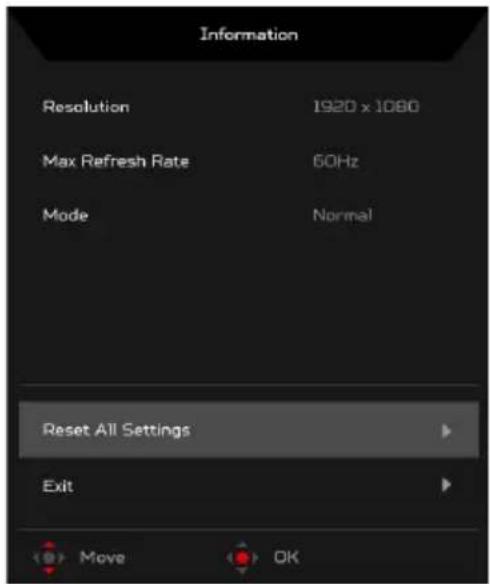
- From any function page, press the key to open the OSD.
- Reset All Settings: Reset all settings to the factory defaults.
Standard timing table
HDMI
| Mode Resolution Remark | ||||
| 1 VGA 6 | 40 x 480 60 Hz | |||
| 2 VGA 6 | 40 x 480P 59.94 Hz | 4:3 | ||
| 3 VGA 6 | 40 x 480P 60 Hz 4:3 | |||
| 4 SDTV 7 | 20 x 576P 50 Hz | 16:9 | ||
| 5 SDTV 7 | 20 x 480P 59.94 Hz | 16:9 | ||
| 6 SDTV 7 | 20 x 480P 60 Hz | 16:9 | ||
| 7 SVGA 8 | 800 x 600 60 Hz | |||
| 8 XGA 10 | 24 x 768 60 Hz | 16:9 | ||
| 9 HD 12 | 80 x 720P 50 Hz | 16:9 | ||
| 10 HD 12 | 80 x 720P 59.94 Hz | 16:9 | ||
| 11 HD 12 | 80 x 720P 60 Hz | 16:9 | ||
| 12 FHD 19 | 20 x 1080P 50 Hz | 16:9 | ||
| 13 FHD 19 | 20 x 1080P | 59.94 Hz | 16:9 | |
| 14 FHD 19 | 20 x 1080P 60 Hz | 16:9 | ||
| 15 FHD 19 | 20 x 1080 60 Hz | 21:9 | ||
DP
| Mode Resolution | Remark | |||
| 1 | VGA | 640 x 480 | 60 Hz | |
| 2 SVGA | 800 x | 600 | 60 Hz | |
| 3 | XGA 1024 x | 768 60 Hz | ||
| 4 FHD 1920 x 1080 60 Hz | ||||
| 5 FHD 1920 x 1080 100 Hz | ||||
| 6 FHD 1920 x 1080 120 Hz | ||||
| 7 FHD 1920 x 1080 144 Hz | ||||
| 8 FHD 1920 x 1080 200 Hz | ||||
| 9 FHD 1920 x 1080 240 Hz | ||||
G-SYNC Experience
For the following resolution:
1920 x 1080@60 Hz
1920 x 1080@100 Hz (DP only)
1920 x 1080@120 Hz (DP only)
1920 x 1080@144 Hz (DP only)
1920 x 1080@200 Hz (DP only)
1920 x 1080@240 Hz (DP only)
G-SYNC requires an NVIDIA GeForce GTX650Ti BOOST or higher GeForce GTX graphics card with a DisplayPort output. For more information, visit the NVIDIA® Website: http://www.nvidia.com/
Regulations and safety notices
FCC notice
This device has been tested and found to comply with the limits for a Class B digital device pursuant to Part 15 of the FCC rules. These limits are designed to provide reasonable protection against harmful interference in a residential installation. This device generates, uses, and can radiate radio frequency energy and, if not installed and used in accordance with the instructions, may cause harmful interference to radio communications.
However, there is no guarantee that interference will not occur in a particular installation. If this device does cause harmful interference to radio or television reception, which can be determined by turning the device off and on, the user is encouraged to try to correct the interference by one or more of the following measures:
● Reorient or relocate the receiving antenna.
- Increase the separation between the device and receiver.
- Connect the device into an outlet on a circuit different from that to which the receiver is connected.
- Consult the dealer or an experienced radio/television technician for help.
CE declaration of Conformity
Hereby, Acer Inc., declares that this LCD monitor is in compliance with the essential requirements and other relevant provisions of EMC Directive 2014/30/EU, Low Voltage Directive 2014/35/EU, and RoHS Directive 2011/65/EU and Directive 2009/125/EC with regard to establishing a framework for the setting of ecodesign requirements for energy-related product.
Notice:
In order to prevent damage to the monitor, do not lift the monitor by its base.
Notice: Shielded cables
All connections to other computing devices must be made using shielded cables to maintain compliance with EMC regulations.
Notice: Peripheral devices
Only peripherals (input/output devices, terminals, printers, etc.) certified to comply with the Class B limits may be attached to this equipment. Operation with non-certified peripherals is likely to result in interference to radio and TV reception.
Caution
Changes or modifications not expressly approved by the manufacturer could void the user authority, which is granted by the Federal Communications Commission, to operate this product.
Operation conditions
This device complies with Part 15 of the FCC Rules. Operation is subject to the following two conditions: (1) this device may not cause harmful interference, and (2) this device must accept any interference received, including interference that may cause undesired operation.
Notice: Canadian users
This Class B digital apparatus complies with Canadian ICES-003.
Disposal of Waste Equipment by Users in Private Household in the European Union

This symbol on the product or on its packaging indicates that this product must not be disposed of with your other household waste. Instead, it is your responsibility to dispose of your waste equipment by handing it over to a designated collection point for the recycling of waste electrical and electronic equipment. The separate collection and recycling of your waste equipment at the time of disposal will help to conserve natural resources and ensure that it is recycled in a manner that protects human health and the environment. For more information about where you can drop off your waste equipment for recycling, please contact your local city office, your household waste disposal service or the shop where you purchased the product.
SPECIFICATION
| LCD Panel | Driving System TFT Color LCD | |
| Size 24.5"W (62 cm) | ||
| Pixel Pitch 0.283 mm (H) x 0.280 mm (V) | ||
| Brightness | 400 cd/m2(Typical) | |
| Contrast 1000:1 | ||
| Viewable Angle 170° (H) 160° (V) (CR=10) | ||
| Response Time 1 ms (G to G) | ||
| Panel Type TN | ||
| H-Frequency | HDMI: 30-90 KHzDP: 67-255 KHz | |
| V-Frequency | HDMI: 24-60 HzDP: 30-240 Hz | |
| Display Colors 16.7 Million | ||
| Dot Clock HDMI: 148.5 MHz, DP: 556.8 MHz | ||
| Maximum Resolution 1920 x 1080 @ 240 Hz | ||
| Plug & Play VESA DDCCI/DDC2B | ||
| Energy Efficiency Class B | ||
| *Annual Energy Consumption 38 (kWh) (for HDMI-input Model) | ||
| Power Consumption (at 200 nits) | On Mode 23 W (Typical) | |
| Sleep Mode 0.46 W (Typical) | ||
| Off Mode | 0.43 W (Typical) | |
| Input Connector | HDMI 19 pinDP 20 pin | |
| Input Video Signal | HDMIDP | |
| Maximum Screen Size | Horizontal: 543.744 mmVertical: 302.616 mm | |
| Power Source | 100-240 V, 50/60 Hz | |
| Environmental Considerations | Operating Temp: 0° to 40°CStorage Temp: -20° to 60°COperating Humidity: 20% to 85% | |
| Dimensions | 557.89 (W) x 390.87 ~ 505.87 (H) x 268.31 (D) mm | |
| Weight (N. W.) | 6.2 kg (net) | |
| Mechanism Specifications | Tilt: -5° to +21° (Only at the highest point can 21 degrees of recline be offered for the angle of elevation)Swivel: -45° to +45°Height adjustment: 0 mm to 115 mmPivot: -90° to +90°Detachable foot stand: No | |
| External Controls | Switch/Buttons | Power Button InputHotkey 1 5 Navi KeyHotkey 2 |
| Functions | Contrast OD Brightness Hot Key Assignment6-Axis color Wide Mode (Full/Aspect)Color Temperature Power LEDBlue Light Deep SleepQuick Start Mode ULMB (DP only)Gamma nVidia 3D Light BoostAdaptive contrast Power-off USB chargeDark boost LanguagesRGB OSD TimeoutSaturate Input Signal SelectionRefresh rate number Display InformationTransparency ResetAim point Exit | |
| All specifications are subject to change without notice. | ||
Find manuals and other documents for your Acer product on the official Acer support website.
*Annual energy consumption is calculated using the typical power consumption 4 hours per day, 365 days per year.
Panduan Praktis Monitor LCD Acer (QSG)
規制と安全に関する注意
FCC に関する注意
Olulised ohutusalased juhised
Declaration of Conformity
We,
Acer Incorporated
8F, 88, Sec. 1, Xintai 5th Rd., Xizhi, New Taipei City 221, Taiwan
And,
Acer Italy s.r.l.
Via Lepetit, 40, 20020 Lainate (MI) Italy
Tel: +39-02-939-921, Fax: +39-02 9399-2913
www.acer.it
Product:
LCD Monitor
Trade Name:
Acer
Model Number:
XB252Q
SKU Number:
XB252Q xxxxxx
("x" = 0\~9, a \~ z, A \~ Z, or blank)
We, Acer Incorporated, hereby declare under our sole responsibility that the product described above is in conformity with the relevant Union harmonization legislations as below Directive and following harmonized standards and/or other relevant standards have been applied:
EMC Directive: 2014/30/EU
EN 55022:2010+AC:2011 Class B
EN 55024:2010
EN 61000-3-2:2006+A2:2009 Class D
EN 61000-3-3:2013
LVD Directive: 2014/35/EU
EN 60950-1:2006/A11:2009/A1:2010/A12:2011/A2:2013
RoHS Directive: 2011/65/EU
EN 50581:2012
☒ ErP Directive: 2009/125/EC
☒ Regulation (EC) No. 1275/2008; EN 50564:2011
Year to begin affixing CE marking: 2016.
NuJaw
RU Jan / Sr. Manager
Acer Incorporated (Taipei, Taiwan)
Dec. 15, 2016
Date
8F, 88, Sec. 1, Xintai 5th Rd., Xizhi, New Taipei City 221, Taiwan
Und
Acer Italy s.r.l.
Via Lepetit, 40, 20020 Lainate (MI) Italy
Tel: +39-02-939-921, Fax: +39-02 9399-2913
www.acer.it
Produkt:
LCD-Monitor
Handelsbezeichnung:
Acer
Modellnummer:
XB252Q
Artikelnummer:
XB252Q xxxxxx;
RU Jan / leitender Manager Acer Incorporated (Taipeh, Taiwan)
Dec. 15, 2016
Datum
8F, 88, Sec. 1, Xintai 5th Rd., Xizhi, New Taipei City 221, Taiwán
Y,
Acer Italy s.r.l.
Via Lepetit, 40, 20020 Lainate (MI) Italy
Tel: +39-02-939-921, fax: +39-02 9399-2913
www.acer.it
8F, 88, Sec. 1, Xintai 5th Rd., Xizhi, New Taipei City 221, Taiwan
Et,
Acer Italy s.r.l.
Via Lepetit, 40, 20020 Lainate (MI) Italie
Tél : +39-02-939-921, Fax : +39-02 9399-2913
www.acer.it
Produit :
Moniteur LCD
Nom commercial :
Acer
Numéro de modèle :
XB252Q
Numéro SKU :
XB252Q xxxxxx;
("x" = 0\~9, a \~ z, A \~ Z, ou blanc)
RU Jan / Sr. Manager
Acer Incorporated (Taipei, Taiwan)
8F, 88, Sec. 1, Xintai 5th Rd., Xizhi, New Taipei City 221, Taiwan
E,
Acer Italy s.r.l.
Via Lepetit, 40, 20020 Lainate (MI) Italy
Tel: +39-02-939-921, Fax: +39-02 9399-2913
www.acer.it
RU Jan / Senior Manager
Acer Incorporated (Taipei, Taiwan)
Dec. 15, 2016
Data
8F, 88, Sec. 1, Xintai 5th Rd., Xizhi, New Taipei City 221, Taiwan
En,
Acer Italy s.r.l.
Via Lepetit, 40, 20020 Lainate (MI) Italy
Tel: +39-02-939-921, fax: +39-02 9399-2913
www.acer.it
Product:
LCD-monitor
Handelsnaam:
Acer
Modelnummer:
XB252Q
SKU-nummer:
XB252Q xxxxxx
("x" = 0\~9, a \~ z, A \~ Z, of leeg)
RU Jan / Sr. Manager
Acer Incorporated (Taipei, Taiwan)
Dec. 15, 2016
Date
8F, 88, Sec. 1, Xintai 5th Rd., Xizhi, New Taipei City 221, Taiwan
E,
Acer Italy s.r.l.
Via Lepetit, 40, 20020 Lainate (MI) Italy
Tel: +39-02-939-921, Fax: +39-02 9399-2913
www.acer.it
Produto:
Monitor LCD
Regulatory Compliance


R43002 RoHS

