MTTS7 - Electric saw BLACK & DECKER - Free user manual and instructions
Find the device manual for free MTTS7 BLACK & DECKER in PDF.
| Product type | Power saw (attachment for multi-purpose tool) |
| Brand | Black & Decker |
| Model | MTTS7 |
| Power source | Battery 14.4 V or Max |
| No-load speed | 0 - 3400 min⁻¹ |
| Weight | 1.3 kg (14.4 V) / 1.5 kg (Max) |
| Max cutting depth | 21 mm |
| Blade diameter | 86 mm |
| Blade bore | 15 mm |
| Blade width | 1.1 mm |
| Sound pressure level (LpA) | 76.4 dB(A) ± 3 dB(A) |
| Sound power level (LWA) | 87.4 dB(A) ± 3 dB(A) |
| Vibration (wood cutting) | < 2.5 m/s² (uncertainty K=1.5 m/s²) |
| Usage | Domestic |
| Main functions | Cutting wood and plastic |
| Dust evacuation | Dust outlet for vacuum cleaner |
| Safety | Lower and upper blade guard, spindle lock |
| Warranty | 2 years |
| Maintenance | Regular cleaning, checking blades and blade guard |
| Repairability | Repair by a Black & Decker authorized technician |
| Included accessories | Hex key |
Frequently Asked Questions - MTTS7 BLACK & DECKER
User questions about MTTS7 BLACK & DECKER
0 question about this device. Answer the ones you know or ask your own.
Ask a new question about this device
Download the instructions for your Electric saw in PDF format for free! Find your manual MTTS7 - BLACK & DECKER and take your electronic device back in hand. On this page are published all the documents necessary for the use of your device. MTTS7 by BLACK & DECKER.
USER MANUAL MTTS7 BLACK & DECKER
natural_image
Illustration of a cutaway view of a mechanical assembly with no visible text or symbols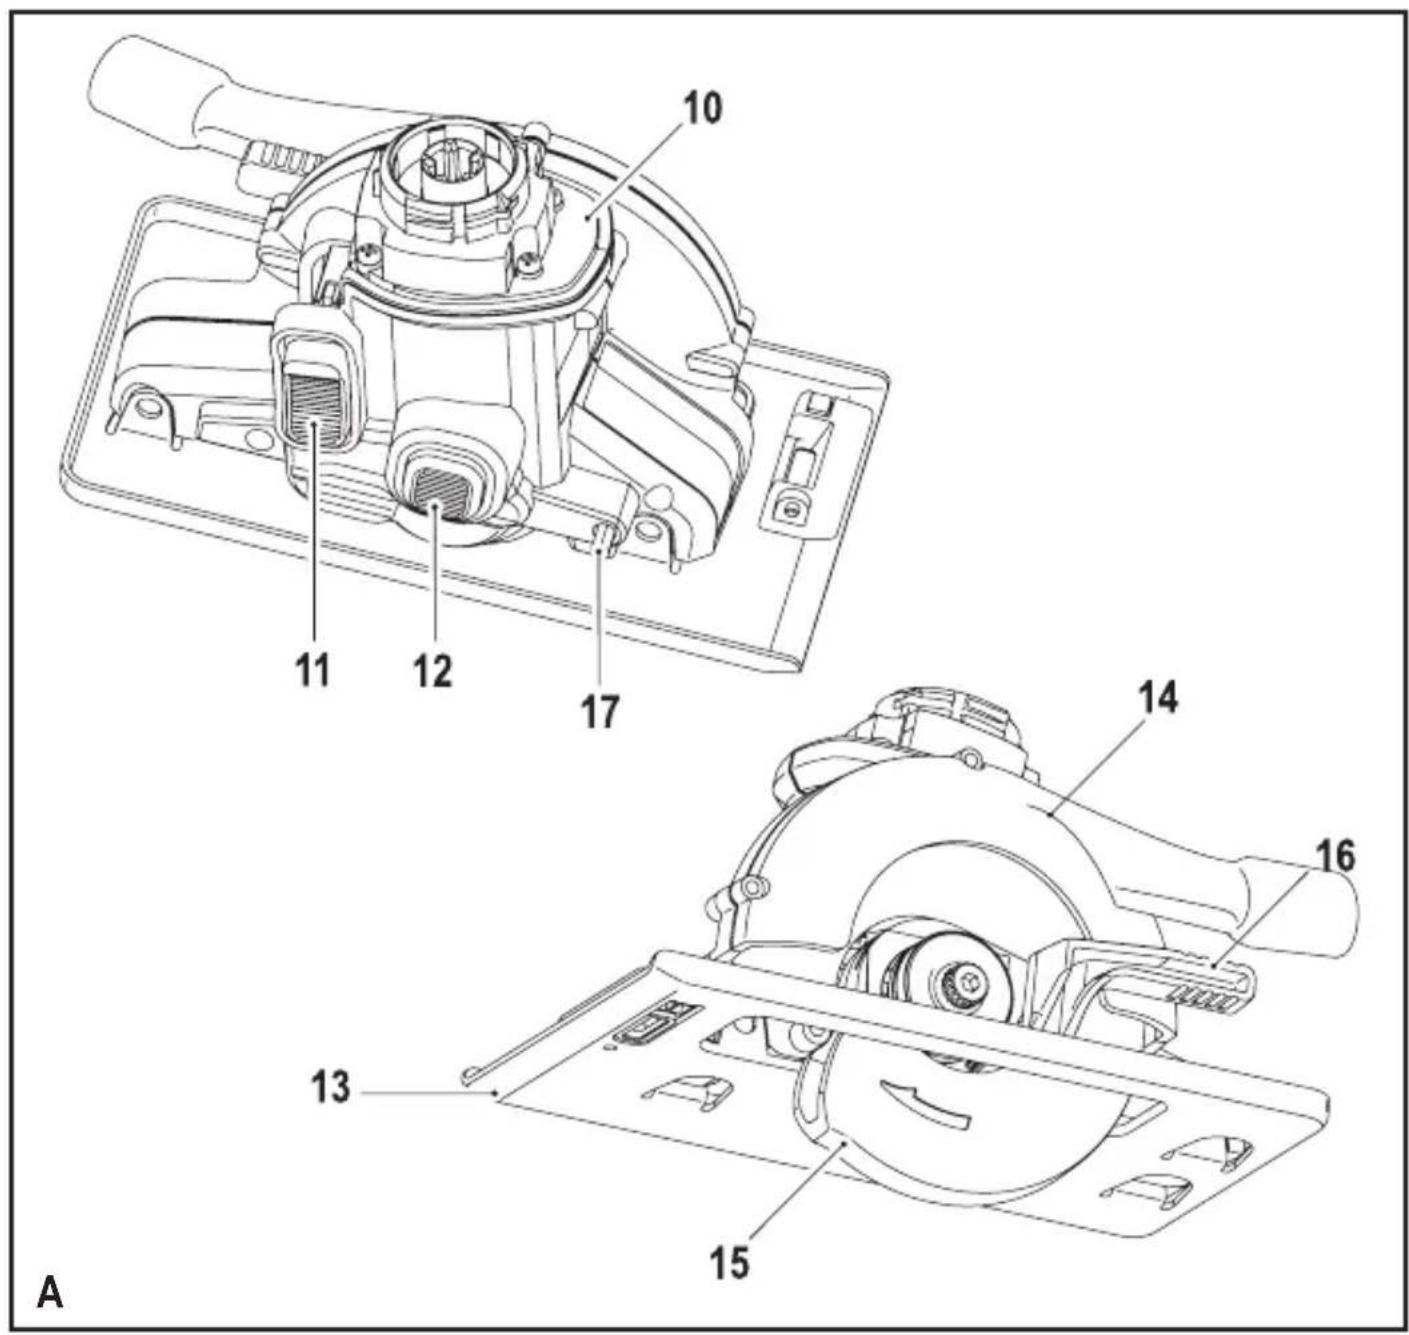

B
ENGLISH
(Original instructions)
Intended use
Your BLACK+DECKER multi-purpose tool has been designed for a wide range of DIY applications. Using the saw head (MTTS7), this tool is intended for sawing wood and plastics. This tool is intended for consumer use only.
Safety instructions
General power tool safety warnings

Warning! Read all safety warnings and all instructions. Failure to follow the warnings and instructions listed below may result in electric shock, fire and/or serious injury.

Warning! Read all safety warnings and all instructions provide with your power tool (MT143, MT350, MT108 or MT18) before using this accessory. Failure to follow the warnings and instructions may result in electric shock, fire and/or serious injury.
Save all warnings and instructions for future reference. The term "power tool" in the warnings refers to your mains operated (corded) power tool or battery operated (cordless) power tool.

Warning! Safety instructions for all saws
Cutting procedures
a.

Danger: Keep hands away from cutting area and the blade. Keep your second hand on auxiliary handle, or motor housing. If both hands are holding the saw, they cannot be cut by the blade.
b. Do not reach underneath the workpiece.
The guard cannot protect you from the blade below the workpiece.
c. Adjust the cutting depth to the thickness of the workpiece. Less than a full tooth of the blade teeth should be visible below the workpiece.
d. Never hold piece being cut in your hands or across your leg. Secure the workpiece to a stable platform. It is important to support the work properly to minimize body exposure, blade binding, or loss of control.
e. Hold the power tool by insulated gripping surfaces only, when performing an operation where the cutting tool may contact hidden wiring or its own cord. Contact with a "live" wire will also make exposed metal parts of the power tool "live" and could give the operator an electric shock.
f. When ripping, always use a rip fence or straight edge guide. This improves the accuracy of cut and reduces the chance of blade binding.
g. Always use blades with correct size and shape (diamond versus round) of arbour holes. Blades that do not match the mounting hardware of the saw will run eccentrically, causing loss of control.
h. Never use damaged or incorrect blade washers or bolt. The blade washers and bolt were specially designed for your saw, for optimum performance and safety of operation.
- When cutting pipe or conduit, make sure that they are free from water, electrical wiring, etc.
(Original instructions)
ENGLISH
- Do not touch the workpiece or the blade immediately after operating the tool. They can become very hot.
- Be aware of hidden hazards, before cutting into walls, floors or ceilings, check for the location of wiring and pipes.
- The blade will continue to move after releasing the switch. Always switch the tool off and wait for the saw blade to come to a complete standstill before putting the tool down.

Warning! Contact with, or inhalation of dusts arising from cutting applications may endanger the health of the operator and possible bystanders. Wear a dust mask specifically designed for protection against dust and fumes and ensure that persons within or entering the work area are also protected.
◆ Always wear hearing protection when working with powered saws
ENGLISH
(Original instructions)
Further safety instructions for all saws
Kickback causes and related warnings
- kickback is a sudden reaction to a pinched, bound or misaligned saw blade, causing an uncontrolled saw to lift up and out of the workpiece toward the operator;
- when the blade is pinched or bound tightly by the kerf closing down, the blade stalls and the motor reaction drives the unit rapidly back toward the operator;
- if the blade becomes twisted or misaligned in the cut, the teeth at the back edge of the blade can dig into the top surface of the wood causing the blade to climb out of the kerf and jump back toward the operator.
Kickback is the result of saw misuse and/or incorrect operating procedures or conditions and can be avoided by taking proper precautions as given below.
a. Maintain a firm grip with both hands on the saw and position your arms to resist kickback forces. Position your body to either side of the blade, but not in line with the blade. Kickback could cause the saw to jump backwards, but kickback forces can be controlled by the operator, if proper precautions are taken.
b. When blade is binding, or when interrupting a cut for any reason, release the trigger and hold the saw motionless in the material until the blade comes to a complete stop. Never attempt to remove the saw from the work or pull the saw backward while the blade is in motion or kickback may occur. Investigate and take corrective actions to eliminate the cause of blade binding.
c. When restarting a saw in the workpiece, centre the saw blade in the kerf and check that saw teeth are not engaged into the material. If saw blade is binding, it may walk up or kickback from the workpiece as the saw is restarted.
d. Support large panels to minimise the risk of blade pinching and kickback. Large panels tend to sag under their own weight. Supports must be placed under the panel on both sides, near the line of cut and near the edge of the panel.
e. Do not use dull or damaged blades. Unsharpened or improperly set blades produce narrow kerf causing excessive friction, blade binding and kickback.
f. Blade depth and bevel adjusting locking levers must be tight and secure before making cut. If blade adjustment shifts while cutting, it may cause binding and kickback.
g. Use extra caution when sawing into existing walls or other blind areas. The protruding blade may cut objects that can cause kickback.
Safety instructions for circular saws with outer or inner pendulum guards and with tow guard
Guard function
a. Check guard for proper closing before each use. Do not operate the saw if guarddoes not move freely and enclose the blade instantly. Never clamp or tie the guard so that the blade is exposed. If saw is accidentally dropped, guard may be bent. Check to make sure that guard moves freely and does not touch the blade or any other part, in all angles and depths of cut.
b. Check the operation and condition of the guard return spring. If the guard and the spring are not operating properly, they must be serviced before use. Guard may operate sluggishly due to damaged parts, gummy deposits, or a build-up of debris.
(Original instructions)
ENGLISH
c. Assure that the base plate of the saw will not shift while performing the "plunge cut" when the blade bevel setting is not at 90^ . Blade shifting sideways will cause binding and likely kick back.
d. Always observe that the guard is covering the blade before placing saw down on bench or floor. An unprotected, coasting blade will cause the saw to walk backwards, cutting whatever is in its path. Be aware of the time it takes for the blade to stop after switch is released.
Saw blades
Do not use blades of larger or smaller diameter than recommended. For the proper blade rating refer to the technical data. Use only the blades specified in this manual, complying with EN 847-1.
◆ Never use abrasive wheels.
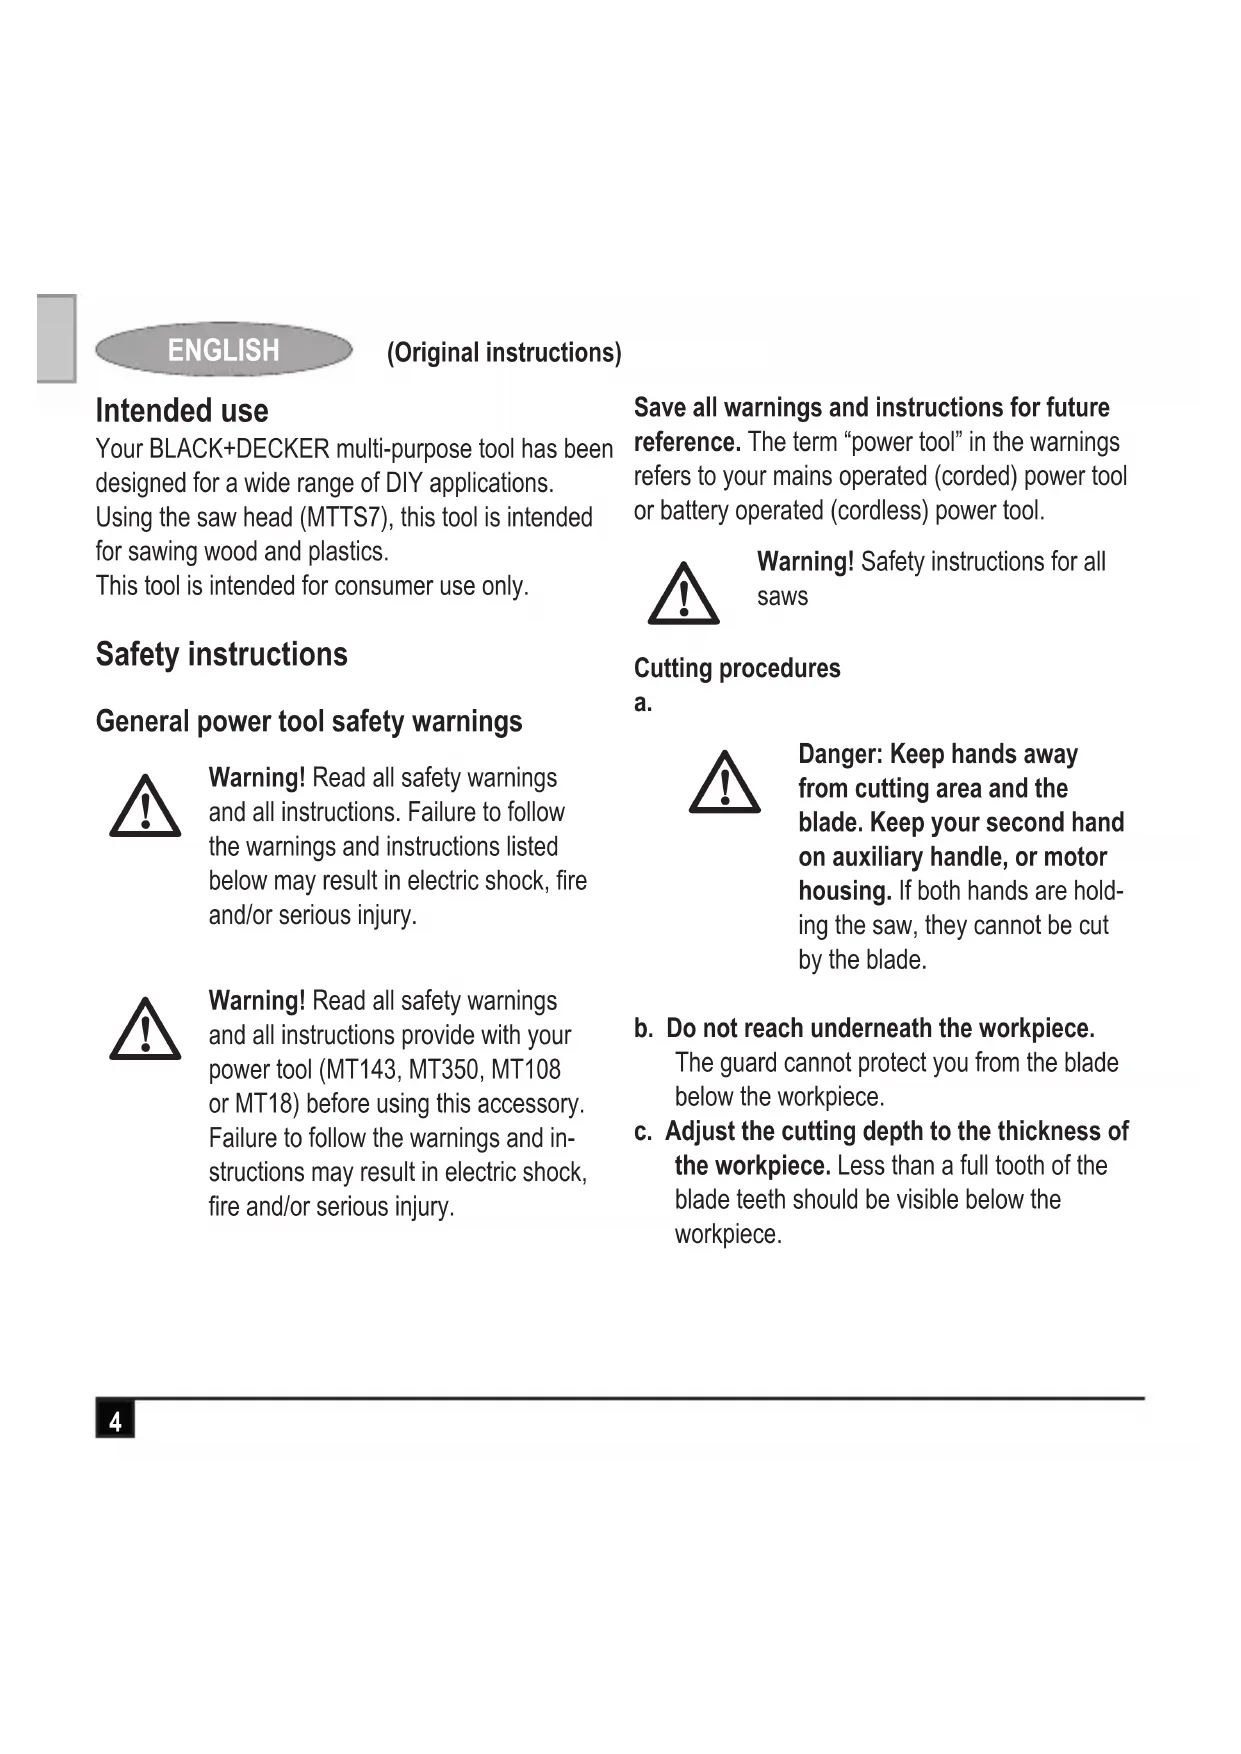
Features (fig. A)
Tool shown is MT143. Other tools are available for use with this tool head.
This tool includes some or all of the following features.
- Trimsaw head
- Lock off button
- Spindle lock
ENGLISH
(Original instructions)
-
Shoe
-
Upper guard
-
Lower guard
-
Guard retracting lever
-
Dust extraction outlet
-
Hex wrench
Assembly
Warning! Before assembly, remove the battery from the tool.
Fitting and removing a saw blade (fig. A & B)
◆ Lock the tool by setting the forward/reverse slider (2) to the centre position.
◆ Press and hold the spindle lock (12). Using the hex wrench (17) provided, remove the blade bolt (18) by turning it clockwise.
◆ Remove the outer clamping washer (19), ensure that the inner clamping washer (20) remains in place on the spindle (21).
- Retract the lower guard (15) using the guard retracting lever (16) and place the saw blade (22) onto the inner clamping washer (20), making sure that the arrow on the blade points in the same direction as the arrow on the lower guard.
◆ Fit the outer clamping washer (19) onto the spindle (21).
◆ Fit the blade bolt (18) into the spindle(21) by turning it anti-clockwise.
◆ Press and hold the spindle lock (12). Using the hex wrench (17) provided, tighten the blade bolt (18) by turning it anti-clockwise.
Warning! Never engage the spindle lock while the saw is running, or engage in an effort to stop the tool. Never turn the tool on while the spindle lock is engaged. Serious damage to your saw will result..
Warning! Ensure that you blade is correctly fitted. Using the hex wrench (17) provided turn the spindle anti-clockwise and ensure that the blade does not make contact with the guard before starting the tool.
Use
Warning! Let the tool work at its own pace. Do not overload.
Sawing
Note: Ensure the forward reverse slider (2) is not in the locked position.
◆ To switch the tool on, lift the lock off button (11) then press the variable speed switch (1). The tool speed depends on how far you press the switch.
◆ Release the lock off button.
◆ To switch the tool off, release the variable speed switch.
Note: Take care not to allow the blade tips to overheat.
Warning! When cutting plastic, it is very important not to let the blade tips to become hot. Hot blade tips can cause the plastic to melt.
Dust extraction
The dust extraction outlet is used to connect a vacuum cleaner or dust extractor to the tool. Dust extraction must be used when cutting wood
- Connect a vacuum cleaner hose by sliding it into the dust extraction outlet.
Hints for optimum use
Sawing
◆ Always use the appropriate type of saw blade for the workpiece material and type of cut.
◆ Always hold the tool with both hands.
◆ Let the blade run freely for a few seconds before starting the cut.
- Apply only a gentle pressure to the tool while performing the cut.
◆ Work with the shoe pressed against the work-piece.
- As some splintering along the line of cut on the top side of the workpiece cannot be avoided, cut on the side where splintering is acceptable.
(Original instructions)
ENGLISH
- Where splintering is to be minimised, e.g. when cutting laminates, clamp a piece of plywood onto the top of the workpiece.
◆ Support large panels to minimize the risk of blade pinching and kickback. Large panels tend to sag under their own weight.
◆ Supports must be placed under the panel on both sides, near the line of cut and near the edge of the panel being cut. - Never hold piece being cut in your hands or across your leg.
- Secure the workpiece to a stable platform using clamps. It is important to support the work properly to minimize body exposure, blade binding, or loss of control.
Accessories
The performance of your tool depends on the accessory used. BLACK+DECKER and Piranha accessories are engineered to high quality standards and designed to enhance the performance of your tool. By using these accessories you will get the very best from your tool.
Technical data
| MTTS7(14.4V) (H1) | MTTS7(Max) (H1) | ||
| No-load speed min | -1 | 0-3400 0-3400 | |
| Weight | kg 1.3 | 1.5 | |
| Max. depth of cutNot Adjustable | mm | 21 21 | |
| Blade diameter mm | 86 86 | ||
| Blade bore mm | 15 15 | ||
| Blade width mm | 1.1 1.1 |
| Level of sound pressure according to EN 60745: |
| Sound pressure (LpA) 76.4 dB(A), uncertainty (K) 3 dB(A) |
| Sound power (LWA) 87.4 dB(A), uncertainty (K) 3 dB(A) |
| Vibration total values (triax vector sum) according to EN 60745: |
| Cutting wood ( a_h,CW ) < 2.5 m/s ^2 , uncertainty (K) 1.5 m/s ^2 |
Guarantee
Black & Decker is confident of the quality of its products and offers an outstanding guarantee. This guarantee statement is in addition to and in no way prejudices your statutory rights. The guarantee is valid within the territories of the Member States of the European Union and the European Free Trade Area.
If a Black & Decker product becomes defective due to faulty materials, workmanship or lack of conformity, within 24 months from the date of purchase, Black & Decker guarantees to replace defective parts, repair products subjected to fair wear and tear or replace such products to ensure minimum inconvenience to the customer unless:
- The product has been used for trade, professional or hire purposes;
◆ The product has been subjected to misuse or neglect; - The product has sustained damage through foreign objects, substances or accidents;
◆ Repairs have been attempted by persons other than authorised repair agents or Black & Decker service staff.
To claim on the guarantee, you will need to submit proof of purchase to the seller or an authorised repair agent. You can check the location of your nearest authorised repair agent by contacting your local Black & Decker office at the address indicated in this manual. Alternatively, a list of authorised Black & Decker repair agents and full details of our after-sales service and contacts are available on the Internet at: www.2helpU.com
Please visit our website www.blackanddecker.co.uk to register your new BLACK+DECKER product and to be kept up to date on new products and special offers. Further information on the BLACK+DECKER brand and our range of products is available at www.blackanddecker.co.uk
EC declaration of conformity MACHINERY DIRECTIVE

MTTS7
Black & Decker declares that these products described under "technical data" are in compliance with:
2006/42/EC, EN60745-1, EN60745-2-5
These products also comply with Directive 2014/30/EU and 2011/65/EU. For more information, please contact Black & Decker at the following address or refer to the back of the manual. The undersigned is responsible for compilation of the technical file and makes this declaration on behalf of Black & Decker.

R. Laverick
Engineering Manager
Black & Decker Europe, 210 Bath Road, Slough,
Berkshire, SL1 3YD
United Kingdom
17/09/2014
DEUTSCH
Black & Decker Europe, 210 Bath Road, Slough,
Berkshire, SL1 3YD
Großbritannien
17/09/2014
FRANÇAIS
Responsible technique
Black & Decker Europe, 210 Bath Road, Slough,
Berkshire, SL1 3YD
Royaume-Uni
17/09/2014
ITALIANO
Black & Decker Europe, 210 Bath Road, Slough,
Berkshire, SL1 3YD
Regno Unito
17/09/2014
Beoogd gebruik
Black & Decker Europe, 210 Bath Road, Slough,
Berkshire, SL1 3YD
Verenigd Koninkrijk
17/09/2014
Uso específico
Black & Decker Europe, 210 Bath Road, Slough,
Berkshire, SL1 3YD
Reino Unido
17/09/2014
Utilização prevista
Black & Decker Europe, 210 Bath Road, Slough,
Berkshire, SL1 3YD
Reino Unido
17/09/2014
Användningsområde
Black & Decker Europe, 210 Bath Road, Slough,
Berkshire, SL1 3YD
Storbritannien
17/09/2014
Bruksområde
Black & Decker Europe, 210 Bath Road, Slough,
Berkshire, SL1 3YD
Storbritannia
17/09/2014
DANSK
Black & Decker Europe, 210 Bath Road, Slough,
Berkshire, SL1 3YD
Black & Decker Europe, 210 Bath Road, Slough,
Berkshire, SL1 3YD
Ηνωμένο Βασίλειο
17/09/2014
België/Belgique/Luxembourg Stanley Black & Decker Belgium BVBA Tel. NL +32 15 47 37 65
www.blackanddecker.be Egide Walschaertsstraat 16 Tel. FR +32 15 47 37 66
enduser.be@sbdinc.com 2800 Mechelen Fax. +32 15 47 37 99
Danmark Black & Decker kundeservice.dk@sbdinc.com