
PP610 - Electric saw BLACK & DECKER - Free user manual and instructions
Find the device manual for free PP610 BLACK & DECKER in PDF.

| Product Type | Long-reach electric saw |
| Brand | Black & Decker |
| Model | PP610 |
| Power Supply | 120 V ~ 60 Hz, double insulated |
| Chain Type | Anti-kickback cutting chain (RC1000) |
| Guide Bar | Anti-kickback with small radius tip |
| Lubrication System | Automatic, integrated oil reservoir |
| Chain Brake | Automatic, stops chain as soon as trigger is released |
| Safety Device | Lock-off button, anti-kickback device, double insulation |
| Shaft Length | Adjustable telescopic (extension shaft) |
| Usage | Tree pruning and limbing, wood cutting |
| Maintenance | Chain sharpening and replacement, regular cleaning, lubrication every 10 minutes |
| Replacement Parts | RC1000 chain, compatible guide bars |
| Warranty | 2 years, domestic use |
Frequently Asked Questions - PP610 BLACK & DECKER
User questions about PP610 BLACK & DECKER
0 question about this device. Answer the ones you know or ask your own.
Ask a new question about this device
Download the instructions for your Electric saw in PDF format for free! Find your manual PP610 - BLACK & DECKER and take your electronic device back in hand. On this page are published all the documents necessary for the use of your device. PP610 by BLACK & DECKER.
USER MANUAL PP610 BLACK & DECKER
- DO NOT OVER-TENSION CHAIN. Refer to "Adjusting Chain Tension" for proper method of tensioning chain.
Retighten chain frequently during first two hours of use.
Thank you for choosing BLACK+DECKER!
PLEASE READ BEFORE RETURNING THIS PRODUCT FOR ANY REASON.
If you have a question or experience a problem with your BLACK+DECKER purchase, go to http://www.blackanddecker.com/instantanswers If you can't find the answer or do not have access to the Internet, call 1-800-544-6986 from 8 a.m. to 5 p.m. EST Mon. - Fri. to speak with an agent. Please have the catalog number available when you call.
SAVE THIS MANUAL FOR FUTURE REFERENCE.
VEA EL ESPANOL EN LA CONTRAPORTADA. INSTRUCTIVO DE OPERATION, CENTROS DE SERVICIO Y POLIZA DE GARANTIA. ADVERTENCIA: LÉASE ESTE INSTRUCTIVO ANTESE DES USAR EL PRODUCTO.
To register your new product, call 1-800-544-6986 or visit www.BlackandDecker.com/NewOwner
SAFETY GUIDELINES - DEFINITIONS
It is important for you to read and understand this manual. The information it contains relates to protecting YOUR SAFETY and PREVENTING PROBLEMS. The symbols below are used to help you recognize this information.
ADANGER: Indicates an imminently hazardous situation which, if not avoided, will result in death or serious injury.
WARNING: Indicates a potentially hazardous situation which, if not avoided, could result in death or serious injury.
CAUTION: Indicates a potentially hazardous situation which, if not avoided, may result in minor or moderate injury.
CAUTION: Used without the safety alert symbol indicates a potentially hazardous situation which, if not avoided, may result in property damage.
IMPORTANT SAFETY RULES
SAVE THESE INSTRUCTIONS
READ AND UNDERSTAND ALL INSTRUCTIONS.
WARNING: When using electric gardening appliances, basic safety precautions should always be followed to reduce the risk of fire, electric shock, and personal injury, including the following:
WARNING: For safe operation read and understand owner's manual.
- Avoid Dangerous Environment. Don't use pole saw in damp or wet locations.
- Don't Use In Rain.
- Keep Children Away. All visitors should be kept at a distance from work area.
- Dress Properly. Do not wear loose clothing or jewelry. They can be caught in moving parts. Use of rubber gloves and substantial footwear is recommended when working outdoors. Wear protective hair covering to contain long hair.
- Use Safety Glasses. Always use face or dust mask if operation is dusty.
- Use Right Appliance. Do not use pole saw for any job except that for which it is intended.
Ground Fault Circuit Interruption (GFCI) protection should be
provided on the circuit(s) or outlet(s) to be used for the pole saw. Receptacles are available having built-in GFCI protection and may be used for this measure of safety.
- WARNING: To reduce the risk of electric shock, use only with an extension cord intended for outdoor use, such as an extension cord of cord type SW-A, SOW-A, STW-A, STOW-A, SJW-A, SJOW-A, SJTW-A, or SJTOW-A.
- Extension Cord. Make sure your extension cord is in good condition. When using an extension cord, be sure to use one heavy enough to carry the current your product will draw. An undersized extension cord will cause a drop in line voltage resulting in loss of power and overheating. The following table, shows the correct size to use depending on cord length and nameplate ampere rating. If in doubt, use the next heavier gage. The smaller the gage number, the heavier the cord.
| Minimum Gauge for Cord Sets Volts Total Length of Cord in Feet 120V 0-25 26-50 51-100 101-150 240V 0-50 51-100 101-200 201-300 |
| Ampere Rating More Not more American Wire Gauge Than Than |
| 0 - 6 18 16 16 14 6 - 10 18 16 14 12 10 - 12 16 16 14 12 12 - 16 14 12 Not Recommended |
- To reduce the risk of disconnection of pole saw cord from the extension cord during operating make a knot as shown in Figure below.
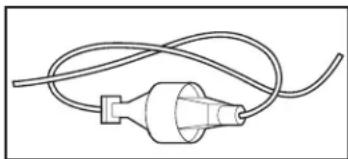
- Use the extension cord retainer (15) described in this manual.
- Avoid Unintentional Starting. Do not carry plugged-in pole saw with finger on switch. Be sure switch is off when plugging in.
- Do not Abuse Cord. Never carry pole saw by cord or yank it to disconnect from receptacle. Keep cord from heat, oil, and sharp edges.
- Do not grasp the exposed cutting blades or cutting edges when picking up or holding the pole saw.
- Do Not Force Pole Saw. It will do the job better and with less likelihood of a risk of injury at the rate for which it was designed.
- Do Not Overreach. Keep proper footing and balance at all times.
- Stay Alert. Watch what you are doing. Use common sense. Do not operate pole saw when you are tired.
- Disconnect Pole saw. Disconnect the pole saw from the power supply when not in use, before servicing, when changing accessories such as chains, and the like.
- Store Idle Pole saws Indoors. When not in use, pole saw should be stored indoors in dry, and high or locked-up place out of reach of children.
- Maintain Pole saw With Care. Keep cutting edge sharp and clean for best performance and to reduce the risk of injury. Follow instructions for lubricating and changing accessories. Inspect pole saw cord periodically, and if damaged, have it repaired by an authorized service facility. Inspect extension cords periodically and replace if damaged. Keep handles dry, clean, and free from oil and grease.
- Check Damaged Parts. Before further use of the pole saw, a guard or other part that is damaged should be carefully checked to determine that it will operate properly and perform its intended function. Check for alignment of moving parts, binding of moving parts, breakage of parts, mounting, and any other condition that may affect its operation. A guard or other part that is damaged should be properly repaired or replaced by an authorized service center unless indicated elsewhere in this manual.
SAVE THESE INSTRUCTIONS
SPECIFIC SAFETY RULES
Electrical safety
This tool is double insulated; therefore no grounding wire is required. Always check that the power supply corresponds to the voltage on the rating plate.
- Ground Fault Circuit Interrupter (GFCI) protection should be provided on the circuit(s) or outlet(s) to be used for the gardening appliance.
Receptacles are available having built-in GFCI protection and may be used for this measure of safety.
WARNING: Some dust created by power sanding, sawing, grinding, drilling, and other construction activities contains chemicals known to cause cancer, birth defects or other reproductive harm. Some examples of these chemicals are:
- lead from lead-based paints,
crystalline silica from bricks and cement and other masonry products, and arsenic and chromium from chemically-treated lumber. (CCA)
Your risk from these exposures varies, depending on how often you do this type of work. To reduce your exposure to these chemicals: work in a well ventilated area, and work with approved safety equipment, such as those dust masks that are specially designed to filter out microscopic particles.
Avoid prolonged contact with dust from power sanding, sawing, grinding, drilling, and other construction activities. Wear protective clothing and wash exposed areas with soap and water. Allowing dust to get into your mouth, eyes, or lay on the skin may promote absorption of harmful chemicals.
WARNING: Use of this tool can generate and/or disburse dust, which may cause serious and permanent respiratory or other injury. Always use NIOSH/OSHA approved respiratory protection appropriate for the dust exposure. Direct particles away from face and body.
CAUTION: Wear appropriate personal hearing protection during use. Under some conditions and duration of use, noise from this product may contribute to hearing loss.
Double Insulation
Double insulated tools are constructed throughout with two separate layers of electrical insulation or one double thickness of insulation between you and the tools electrical system. Tools built with this insulation system are not intended to be grounded. As a result, your tool is equipped with a two prong plug which permits you to use extension cords without concern for maintaining a ground connection. NOTE: Double insulation does not take the place of normal safety precautions when operating this tool. The insulation system is for added protection against injury resulting from a possible electrical insulation failure within the tool.
REPLACEMENT PARTS: When servicing all tools, USE IDENTICAL REPLACEMENT PARTS. Repair or replace damaged cords.
Polarized Plugs
To reduce the risk of electric shock, this appliance has a polarized plug (one blade is wider than the other) and will require the use of a polarized extension cord. The pole saw plug will fit into a polarized extension cord only one way. If the plug does not fit fully into the extension cord, reverse the plug. If the plug still does not fit, obtain a correct polarized extension cord. A polarized extension cord will require the use of a polarized wall outlet. This plug will fit into the polarized wall outlet only one way. If the plug does not fit fully into the wall outlet, reverse the plug. If the plug still does not fit, contact a qualified electrician to install the proper wall outlet. Do not change the equipment plug, extension cord receptacle, or extension cord plug in any way.
Before Operating Pole Saw
- For safe operation, read and understand all instructions before using the Pole Saw. Follow all safety instructions. Failure to follow all safety instructions listed below, can result in serious personal injury.
- Watch what you are doing. Use common sense. Do not operate Pole Saw when you are tired.
- Use Pole Saw for cutting tree branches only. Do not use Pole Saw for purposes not intended. Do not use for cutting other items.
- Only well-instructed adults should operate Pole Saw. Never allow children to operate.
- Do not allow children or untrained individuals to use this unit.
- Wear the following safety gear when operating Pole Saw:
- heavy-duty gloves
- steel-toed safety footwear with non-skid soles
- safety glasses, goggles or face screen that are marked to comply with ANSI Z87
- safety hard hat
-ear mufflers or ear plug - face or dust mask (if working in dusty areas)
- Wear heavy long pants and boots. Do not wear loose fitting clothing, short pants, jewelry of any kind, or go barefoot.
- Secure long hair so it is above shoulder level to prevent entanglement in any moving parts.
Before cutting, always provide the following: -
clear work area
-
secure footing
- planned retreat path from falling limbs
- 'Inspect tree before trimming. Make allowance for branches to fall freely to the ground.
Do not use your Pole Saw to fell saplings.
While Operating Pole Saw
DANGER: To reduce the risk of electric shock do no use on wet surfaces. Do not expose to rain. Store indoors.
DANGER: Avoid Unintentional Starting - Don't carry plugged-in appliance with finger on switch. Be sure switch is off when plugging in.
- Stay alert. Use common sense while operating the unit.
- Keep work area clean. Cluttered areas invite injuries
Always unplug pole saw when finished cutting or when left unattended.
- Keep children, animals and bystanders at least 50 ft. (15 m) away
from Pole Saw. Only Pole Saw user should be in work area.
- Do not use the Pole Saw to cut down trees.
- Do not grasp the exposed saw chain when picking up or holding the pole saw.
- Grip Pole Saw securely - one hand on the pole, the other on the handle.
- Keep finger off trigger until ready to make cut.
Before starting Pole Saw, make sure chain is not touching anything.
- Keep all parts of body away from chain when Pole Saw is running.
- Do not force Pole Saw while cutting. Apply light pressure. It will do the job better and safer at the rate for which it was intended.
- Carry Pole Saw from one place to another
with cord removed
- fingers off/away from trigger
- by holding pole at balance point
- with guide bar and chain to rear and with scabbard attached
- Do not cut small brush and saplings with the Pole Saw. Slender matter may catch in the chain and be whipped toward you. This could also pull you off balance.
Do not operate in poor lighting.
- Keep firm footing and balance. Do not overreach. Overreaching can result in loss of balance or exposure to hot surfaces.
- Keep all parts of your body away from any moving part.
- Do not, under any circumstance, use any attachment or accessory on this product, which was not provided with the product, or identified as appropriate for use with this product in this Instruction Manual.
- Inspect Pole Saw before each use and after dropping or other impacts. Ensure there are no significant defects or damage.
Do not operate Pole Saw
- while under the influence of alcohol, medication, or drugs.
- in rain or in damp or wet areas.
- where highly flammable liquids or gases are present
- if Pole Saw is damaged, adjusted incorrectly, or not fully and securely assembled.
- if trigger does not turn Pole Saw on and off. Chain must stop moving when you release trigger. Have faulty switch replaced by authorized service center. See "Service Information".
- while in a hurry.
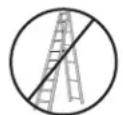
- while in tree or on a ladder.
- while on aerial booms, buckets or platforms.
- during high wind or storming weather.
GENERAL SAFETY RULES
DANGER: Shock Hazard. Serious Injury Or Death From
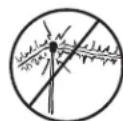
Electrocution If Power Lines Are Contacted. Never Use Near Any Electrical Source, Wires, Or Power Lines.
WARNING: For Safe Operation Read And Understand Owner's Manual. Wear Face Shield (And/Or Safety Glasses) And Hard Hat To Protect Against Falling Debris. Always Have A Clear Work Area, Retreat Path, And Be Aware Of Limb/Branch Location To Avoid Falling Limbs And Debris. Keep Bystanders 50 Ft (15 m) Away When Operating Saw. To Reduce The Risk Of Electric Shock Do No Use On Wet Surfaces. Do No Expose To Rain. Store Indoors.
- To protect yourself from falling branches do not stand directly under the branch or limb being cut. This unit should not be held at an angle over 60 degrees from ground level.
- Keep the handles dry, clean, and free of oil.
Before you start the unit, make sure the chain is not contacting any object
Make sure the cutting chain has stopped before setting the unit down.
Service
- Tool service must be performed only by qualified repair personnel. Service or maintenance performed by unqualified personnel could result in a risk of injury. See "Service Information".
- When servicing a tool, use only identical replacement parts.
Follow instructions in the Maintenance section of this manual. Use of unauthorized parts or failure to follow Maintenance Instructions may create a risk of electric shock or injury.
Guard Against Kickback
WARNING: KICKBACK may occur when the nose or tip of the guide bar touches an object, or when the wood closes in and pinches the saw chain in the cut. Tip contact in some cases may cause a lightning fast reverse reaction, kicking the guide bar up and back towards the operator. Pinching the saw chain along the top of the guide bar may push the guide bar rapidly back towards the operator. Either of these reactions may cause you to lose control of the saw which could result in serious injury to user.
The following precautions should be followed to minimize kickback:
- Grip Pole Saw firmly. Hold the saw firmly with both hands when the unit is running. Use a firm grip with thumbs and fingers encircling the saw handle and pole.
Do not over reach. - Keep proper footing and balance at all times.
- Don't let the nose of the guide bar contact a log, branch, ground or other obstruction.
- Do not extend Pole Saw handle above shoulder height.
- Use devices such as low kickback chain, chain braking system and special guide bars that reduce the risks associated with kickback.
Only use replacement bars and chains specified by the manufacturer or the equivalent. - Never let the moving chain contact any object at the tip of the guide bar.
- Keep the working area free from obstructions such as other trees, branches, rocks, fences, stumps, etc. Eliminate or avoid any obstruction that your saw chain could hit while you are cutting through a particular log or branch.
- Keep your saw chain sharp and properly tensioned. A loose or dull chain can increase the chance of kickback. Check tension at regular intervals with the motor stopped and extension cord unplugged.
- Begin and continue cutting only with the chain moving at full speed. If the chain is moving at a slower speed, there is a greater chance for kickback to occur.
Cut one branch at a time. -
Use extreme caution when re-entering a previous cut. Engage spiked bumpers into wood and allow chain to reach full speed before proceeding with cut.
-
Do not attempt plunge cuts or bore cuts.
- Watch for shifting branches or other forces that could close a cut and pinch or fall into chain.
KICKBACK SAFETY FEATURES
WARNING: The following features are included on your Pole Saw to help reduce the hazard of kickback; however such features will not totally eliminate this dangerous reaction. As a pole saw user do not rely only on safety devices. You must follow all safety precautions, instructions, and maintenance in this manual to help avoid kickback and other forces which can result in serious injury.
- Reduced-Kickback Guide Bar, designed with a small radius tip which reduces the size of the kickback danger zone on bar tip. A reduced-kickback guide bar is one which has been demonstrated to significantly reduce the number and seriousness of kickbacks when tested in accordance with safety requirements for electric chain saws.
- Low-Kickback Chain, designed with a contoured depth gauge and guard link which deflect kickback force and allow wood to gradually ride into the cutter. A low-kickback chain is a chain which has met kickback performance requirements of ANSI B175.1 when tested on the representative sample of chain saws.
Symbols
The label on your tool may include the following symbols. The symbols and their definitions are as follows:
V..... volts
A.....amperes
Hz.....hertz
W.....watts
min.....minutes
or AC alternating current
=or DC.direct current
no ......... no load speed
① Class I Construction (grounded)
earthing terminal
Class II Construction (double insulated)
.../min or rpm...revolutions or
reciprocation per minute
…
Read instruction manual before use.
Use proper respiratory protection
. Use proper eye protection
O .Use proper hearing protection
FUNCTIONAL DESCRIPTION
WARNING: Before using your Pole Saw familiarize yourself with all operating and safety features.
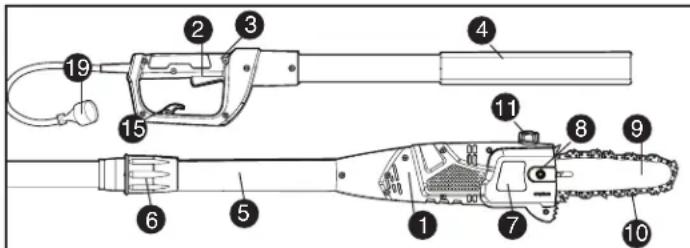

- Saw Head
- Trigger Switch
3.Lock Off Button - Foam Gripper
- Extension Pole
- Extension Coupling
- Sprocket Cover
- Allen Head Screw
- Guide Bar
-
Saw Chain
-
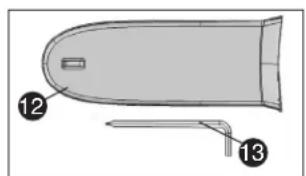
Oil Reservoir Cap
- Scabbard
- Allen Wrench
- Chain Tension Adjustment Screw Front Chain Tensioner
- Extension Cord Retainer
- Bumper Spikes
- Bottom Bump Spike
- Power Cord
POLE SAW NAMES AND TERMS
- Drive Sprocket or Sprocket - The toothed part that drives the saw chain.
- Guide Bar - A solid railed structure that supports and guides the saw chain.
- Guide Bar Scabbard - Enclosure fitted over guide bar to prevent tooth contact when saw is not in use.
- Kickback - The backward or upward motion, or both of the guide bar occurring when the saw chain near the nose of the top area of the guide bar contacts any object such as a log or branch, or when the wood closes in and pinches the saw chain in the cut.
- Low-Kickback Chain - A chain that complies with the kickback performance requirements of ANSI B175.1-1991 (when tested on a representative sample of chain saws.
- Reduced Kickback Guide Bar - A guide bar which has been demonstrated to reduce kickback significantly.
- Replacement Saw Chain - A chain that complies with kickback performance requirements of ANSI B175.1-1991 when tested with specific chain saws. It may not meet the ANSI performance requirements when used with other saws.
- Saw Chain A loop of chain having cutting teeth, that cut the wood, and that is driven by the motor and is supported by the guide bar.
- Spiked Bumper (Spike) - The pointed tooth or teeth for use when pruning to pivot the saw and maintain position while sawing.
- Switch - A device that when operated will complete or interrupt an electrical power circuit to the motor of the chain saw.
- Switch Lockout - A movable stop that prevents the unintentional operation of the switch until manually actuated.
- Trimming (Pruning) - Process of cutting limbs from a tree.
- Undercut - An upward cut from underside of a log or limb. This is done while in normal cutting position and cutting with top of guide bar.
STORAGE RECOMMENDATIONS
- Store indoors. The best storage place is one that is cool and dry away from direct sunlight, excess heat or cold and out of the reach of children. 2. Always reduce the tension off the chain again after finishing work. The chain contracts as it cools down. If tension is not reduced, it can damage the saw.
Transporting Pole Saw
- Always unplug the extension cord from the Pole Saw and cover the chain with the scabbard when transporting the Pole Saw.
PREPARED YOUR POLE TRIMMER FOR USE
WARNING: Read and understand all instructions. Failure to follow all instructions listed below may result in electric shock, fire and/or serious personal injury.
INSTALLING AND REMOVING BAR AND SAW CHAIN
The saw chain (10) and guide bar (9) are packed separately in the carton. The chain has to be attached to the bar, and both must be attached to the body of the tool.
To Install:
WARNING: Sharp moving chain. To prevent accidental operation, ensure that tool is unplugged before performing the following operations. Failure to do this could result in serious personal injury.
CAUTION: Sharp chain. Always wear protective gloves when installing or removing the chain. The chain is sharp and can cut you when it is not running.
CAUTION: A new saw chain must be re-tensioned more
frequently than one that has been in use already for an extended period.
- Place the saw on a firm surface.
- Rotate the allen head screw (8) of the sprocket cover (7) counterclockwise with the wrench provided as shown in figure A
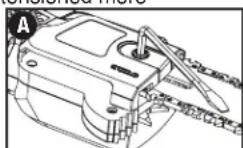
- Remove sprocket cover, and allen head screw.
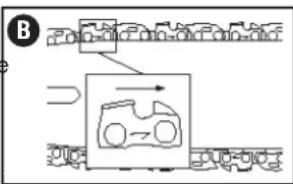
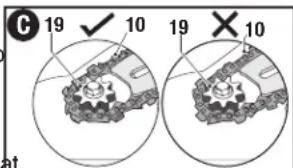
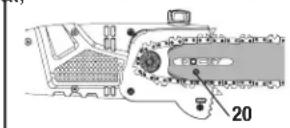
Wearing protective gloves, grasp the saw chain (10) and wrap it around the guide bar (9), ensuring the cutting teeth are facing in the correct direction by matching the arrow on the chain with the graphic on the sprocket cover (7) (see figure B) - Place the saw chain (10) around the sprocket (19) on the saw while lining up the hole on the guide bar with the chain tension adjustment t pin (20) on the base of the tool as shown in figure C.
While holding the bar in place and flat, replace sprocket cover (7). - Insert the allen head screw into the sprocket cover. Tighten the screw by rotating it clockwise with the wrench. Do not fully tighten the allen head screw into the sprocket cover until the chain has proper tension.
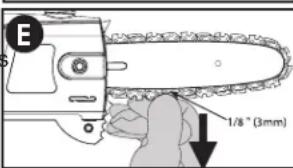
- Rotate the front chain tensioner (14) in the front of the housing using the flat screwdriver end of the wrench as shown in figure D. Turning the screw clockwise increases the tension on the chain. The tension is correct when the chain snaps back after being pulled 1/8 in. (3mm) away from the chain bar with light force from the index finger and thumb as shown in figure E.
- Do not over-tension the chain as this will lead to excessive wear and will reduce the life of the bar and chain.
- Once chain tension is correct, securely tighten allen head screw to
sprocket cover.
NOTE: If the chain is new, check the tension frequently (after unplugging extension cord) during the first 2 hours of use as a new chain stretches slightly.
To Remove:
WARNING: Sharp moving chain. To prevent accidental operation, ensure that tool is unplugged before performing the following operations. Failure to do this could result in serious personal injury.
CAUTION: Sharp chain. Always wear protective gloves when installing or removing the chain. The chain is sharp and can cut you when it is not running.
- Place the saw on a firm surface.
- Rotate the front chain tensioner (14) in the front of the housing using the flat screwdriver end of the wrench as shown in figure D. Turning the screw counterclockwise allows the guide bar to recede and reduces the tension on the chain so that it may be removed.
- Remove the allen head screw of the sprocket cover (5) by rotating it counterclockwise with the wrench provided as shown in figure A
- Remove sprocket cover, and allen head screw.
Guide bar and chain are now accessible. - Wearing protective gloves, grasp the saw chain and lift the worn chain out of the groove in the guide bar.
- Flip guide bar over.
- Clean any debris or saw dust from around auto oiling system ports and sprocket using a soft brush.
- Follow previous instructions on installing bar and chain.
ADJUSTING CHAIN TENSION
CAUTION: Always reduce the tension off the chain again after finishing work. The chain contracts as it cools down. If it is not slackened off, it can damage the saw.
CAUTION: A new saw chain must be re-tensioned more frequently than one that has been in use already for an extended period.
- With the saw still on a firm surface check the chain tension. The tension is correct when the chain snaps back after being pulled 1/8 in. (3mm) away from the chain bar with light force from the index finger and thumb as shown in figure E. There should be no "sag"
between the guide bar and the chain on the underside as shown in figure F.
To adjust saw chain tension, loosen allen head screw on sprocket cover.
- Rotate the front chain tensioner (14) in the front of the housing using the flat screwdriver end of the wrench as shown in figure D.
- Do not over-tension the chain as this will lead to excessive wear and will reduce the life of the bar and chain.
Once chain tension is correct, tighten allen head screw to clamp bar.
- When the chain is new check the tension frequently (after unplugging extension cord) during the first 2 hours of use as a new chain stretches slightly.
Auto oiling system
This pole saw is equipped with an auto oiling system that keeps the saw chain and guide bar constantly lubricated.
NOTE: Use a high quality bar and chain oil for proper chain and bar lubrication. As a temporary substitute, a non-detergent SAE30 weight motor oil can be used. The use of a vegetable based bar and chain oil is recommended when pruning trees. Mineral oil is not recommended because it may harm trees. Never use waste oil or very thick oil. These may damage your pole saw.
Filling the oil reservoir
- Remove the oil reservoir cap (11) and fill the reservoir with the recommended bar and chain oil until the oil level has reached the top of the oil fill reservoir opening. Using a funnel will prevent spills.
- Refit the oil reservoir cap.
- Periodically switch the pole saw off, unplug the extension cord and check the oil level. Fill as needed. Also check the bar and chain to ensure they are being properly oilled.
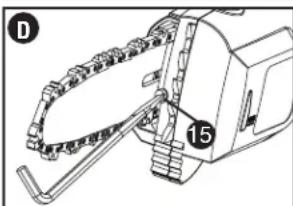
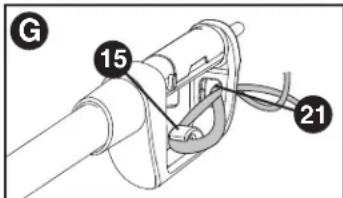
Attaching extension cord An extension cord retainer (15) is built into the switch handle. It prevents the extension cord from coming unplugged.
- Double the extension cord and insert it into the slot (21) in the end of the handle area as shown in figure G. Hook the loop formed by doubling the cord over the cord retainer (16). That it is firmly retained in the hand extension cord into the power coil
ASSEMBLY
NOTE: Always keep the cord away from the cutting area and position the cord so that it will not be caught on branches, and other material, during cutting.
Extending extension pole
WARNING: Always check to make sure that the extension coupling is completely tightened and that the extension pole does not retract. Not tightening the coupling completely could result in the saw head unexpectedly moving, creating a hazardous condition. Periodically check the connection to ensure that the coupling is fully tightened.
Always be sure of your footing and grip the Pole Saw firmly with both hands with the thumb and fingers encircling the pole.
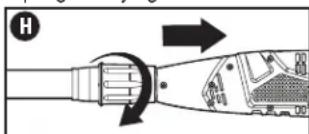
- Rotate the extension coupling (6) counterclockwise until it stops as shown in figure H.
- While holding the foam gripper (4) with one hand, slide the saw head (1) away from the extension coupling. This will reveal the extension pole (5) as shown in figure I. The pole saw can be
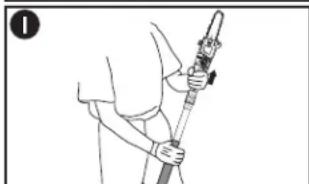
operated at any length of the extension pole.
- Once desired extension length is acquired, rotate the extension coupling (6) clockwise until it stops and fully secures the extension pole in place.
WARNING: Read and understand all instructions. Failure to follow all instructions listed below may result in electric shock, fire and/or serious personal injury.
CAUTION: Always reduce the tension off the chain again after finishing work. The chain contracts as it cools down. If it is not slackened off, it can damage the Pole Saw.
IMPORTANT: Never operate a Pole Saw that is damaged or improperly adjusted or that is not completely and securely assembled. Be sure that the saw chain stops moving when the trigger switch is released. Never adjust the guide bar or saw chain when the motor is operating.
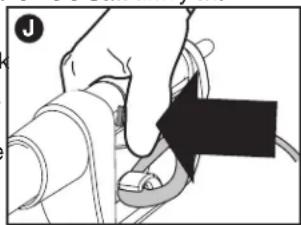
On/Off Switch
Always be sure of your footing and grip the Pole Saw firmly with both hands with the thumb and fingers encircling the handle.
To turn the tool ON squeeze the lock off button (3) in with your thumb and then squeeze the trigger (2) with your fingers as shown in figure J. (Once the tool is running you can release the lock off button.)
To turn the tool OFF, release the trigger.
Auto-Stop chain braking system
Your pole saw is fitted with an auto-stop chain braking system which will stop the chain quickly each time you release the trigger switch. This system should be tested before every use.
POLE SAW TRIMMING/PRUNING
WARNING:
- Never stand directly under the limb you are cutting. Always position yourself out of the path of falling debris.
Always wear head, eye, foot and body protection. Wearing body protection helps reduce the risk of injury when operating this unit. - Never stand on a ladder or other unstable support while using the Pole Saw. Always avoid any position which can cause you to lose your balance and cause severe injury.
- Keep other persons at least 50 feet (15m) from the work area. Distractions can cause you to lose control.
- Electrocution Hazard. To prevent shock, do not operate within 50 feet (15m) of overhead electrical lines. Always check surrounding area for hidden electrical lines.
- Do not extend Pole Saw switch handle above shoulder height.
Operating Position
Always Wear:
Head Protection
Eye Protection
Work Gloves
-Long Pants
Steel Toed Shoes
WARNING: Let the tool work at its own pace. Do not overload.
WARNING: When pruning trees:
- Guard Against Kickback which can result in severe injury or death. See "KICKBACK", section to avoid the risk of kickback.
- Do not overreach. Make sure your footing is firm. Keep feet apart. Divide your weight evenly on both feet.
- Use both hands to grip Pole Saw as shown in figure K. Use a firm grip. Thumbs and fingers must wrap around Pole Saw handle and pole.
- Never operate while in a tree, in any awkward position, on a ladder or any other unstable surface. You may lose control of the Pole Saw causing severe injury.
Follow directions below to trim a tree.
- Make sure Pole Saw is running at full speed before making a cut. When starting a cut, place moving chain against limb. Hold Pole Saw firmly in place to avoid possible bouncing or skating (sideways movement) of the Pole Saw.
- Make the first cut six inches away from tree trunk on underside of a
limb or branch. Use the top of the guide bar to make this cut. Guide the Pole Saw using light pressure to make a cut that is 1/3 of the diameter of limb. Then make the finishing cut from the top as shown in figure L. Do not force Pole Saw. The motor will overload and can burn out. It will do the job better and safer at the rate for which it was intended.
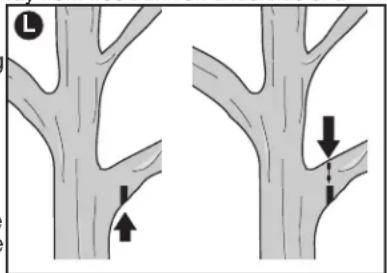
NOTE: If you try to cut off thick branches from the bottom, the branch will close in and pinch the saw chain in the cut. If you try to cut off thick branches from the top, without a shallow undercut, the branch will splinter and pull bark from the tree.
- Remove Pole Saw from cut while it is running at full speed. Stop Pole Saw by releasing trigger. Make sure chain has stopped before setting Pole Saw down.
Saw chain sharpness
CAUTION: Sharp chain. Always wear protective gloves when handling the chain. The chain is sharp and can cut you when it is not running.
IMPORTANT: The chain cutters will dull immediately if they touch the ground, stones, masonry or a nail while cutting.
To get the best possible performance from your chain saw it is important to keep the teeth of the chain sharp. Chain sharpening services are available from your nearest Black+Decker service center.
NOTE: Each time the chain is sharpened, it loses some of the low kickback qualities and extra caution should be used. It is recommended that a chain be sharpened no more than four times.
Saw chain tension
This should be checked regularly. Refer to "Adjusting Chain Tension".
ACCESSORIES
Replacement chain and bar are available from your nearest Black+Decker service center. Replacement chain # RC1000. The use of accessories not recommended in this manual may be hazardous.
POLE SAW MAINTENANCE SECTION
Regular maintenance ensures a long effective life for the tool.
After every 10 minutes of use be sure to unplug the extension cord and (be aware the chain and bar can be hot!) check the bar and chain for correct tension and lubricate per pole saw instruction manual.
- Turn the bar over every time you sharpen the chain and every time you replace the chain this helps avoid one-sided wear, especially at the nose and underside of the bar.
-
Keep cutting edge sharp and clean for best performance and to reduce the risk of injury.
-
Follow instructions for lubricating and changing accessories.
- Inspect appliance cord periodically, and if damaged, have it repaired by an authorized service facility.
- Inspect extension cords periodically and replace if damaged.
- Keep handles dry, clean, and free from oil and grease. Use only mild soap and damp cloth to clean the tool. Never let any liquid get inside the tool; never immerse any part of the tool into a liquid.
- IMPORTANT: To assure product SAFETY and RELIABILITY, repairs, maintenance and adjustment should be performed by authorized service centers or other qualified service organizations, always using identical replacement parts.
SERVICE INFORMATION
All Black+Decker Service Centers are staffed with trained personnel to provide customers with efficient and reliable power tool service. Whether you need technical advice, repair, or genuine factory replacement parts, contact the Black+Decker location nearest you. To find your local service location, refer to the yellow page directory under "Tools-Electric" or call: 1-800-544-6986 or visit www.blackanddecker.com.
This Class B digital apparatus complies with Canadian ICES-003. This device complies with part 15 of the FCC rules. Operation is subject to the following two conditions: (1) This device may not cause harmful interference, and (2) this device must accept any interference received, including interference that may cause undesired operation.
NOTE: This equipment has been tested and found to comply with the limits for a Class B digital device, pursuant to Part 15 of the FCC Rules. These limits are designed to provide reasonable protection against harmful interference in a residential installation. This equipment generates, uses and can radiate radio frequency energy and, if not installed and used in accordance with the instructions, may cause harmful interference to radio communications. However, there is no guarantee that interference will not occur in a particular installation.
If this equipment does cause harmful interference to radio or
TROUBLESHOOTING
| If your Pole Saw does not operate correctly check the following: Problem | Possible Cause | Possible Solution |
| ·Tool will not start. | ·Fuse blown or breaker tripped. ·Extension cord not plugged in. | ·Check fuse or breaker. ·Check to make sure extension cord is plugged into a working outlet. |
| ·Bar / chain overheated. | ·Chain too tight. ·Lubrication needed. | ·Refer to section on adjusting chain tension. ·Refer to sections for chain oiling application. |
| ·Chain is loose. | ·Chain tension set incorrectly. | ·Refer to section for chain tensioning. |
| ·Poor cut quality | ·Chain tension set incorrectly. ·Chain needs replacement. | ·Refer to section on adjusting chain tension. Note: Excessive tension leads to excessive wear and reduction in life of bar & chain. ·Refer to section for installation of chain. |
| ·Unit runs but does not cut. | ·Chain installed backwards. See illustration B. ·Chain installed? | ·Refer to sections for installing and removing chain. |
For assistance with your product, visit our website
www.blackanddecker.com for the location of the service center nearest you or call the BLACK+DECKER help line at 1-800-544-6986.
television reception, which can be determined by turning the equipment off and on, the user is encouraged to try to correct the interference by one or more of the following measures:
- Reorient or relocate the receiving antenna.
- Increase the separation between the equipment and receiver.
- Connect the equipment into an outlet on a circuit different from that to which the receiver is connected.
- Consult the dealer or an experienced radio/TV technician for help. Changes or modifications to this unit not expressly approved by the party responsible for compliance could void the user's authority to operate the equipment. This Class B digital apparatus complies with Canadian ICES-003.
TWO-YEAR LIMITED WARRANTY
Black+Decker (U.S.) Inc. warranties this product to be free from defects in material or workmanship for a period of two (2) years following the date of purchase, provided that the product is used in a home environment. This limited warranty does not cover failures due to abuse, accidental damage or when repairs have been made or attempted by anyone other than Black+Decker and its Authorized Service Centers. A defective product meeting the warranty conditions set forth herein will be replaced or repaired at no charge in either of two ways:
The first, which will result in exchanges only, is to return the product to the retailer from whom it was purchased (provided that the store is a participating retailer). Returns should be made within the time period of the retailer's policy for exchanges. Proof of purchase may be required. Please check with the retailer for its specific return policy regarding time limits for returns or exchanges. The second option is to take or send the product (prepaid) to a Black+Decker owned or authorized Service Center for repair or replacement at Black+Decker's option. Proof of purchase may be required. Black+Decker owned and authorized service centers are listed under "Tools-Electric" in the yellow pages of the phone directory or online at www.blackanddecker.com.
This warranty does not apply to accessories. This warranty gives you specific legal rights and you may have other rights which vary from state to state. Should you have any questions, contact the manager of your nearest Black+Decker Service Center. This product is not intended for commercial use, and accordingly, such commercial use of this product will void this warranty. All other guarantees, express or implied, are hereby disclaimed.
LATIN AMERICA: This warranty does not apply to products sold in Latin America. For products sold in Latin America, check country specific warranty information contained in the packaging, call the local company or see the website for such information.
Imported by
Black+Decker (U.S.) Inc.,
701 E. Joppa Rd.
Towson, MD 21286 U.S.A.

BlackandDecker.com
1-800-544-6986
BLACK+ DECKER TM
MANUEL D'INSTRUCTIONS
NUMERO DE MODELE
PP610
LA SCIE À LONG MANCHE

MERCI D'AVOIR CHOISI BLACK + DECKER!
À LIRE AVANT DE RETOURNER CE PRODUIT POUR QUELQUE RAISON QUE CE SOIT:
Col. Americana, S. Juarez
Guadalajara, Jalisco
Tel. 01 33 38 25 69 78
Col. Fracc. Universidad
Chihuahua, Chihuahua
Tel. 01 614 413 64 04
Fernando González Armenta
Bolivia No. 605
Col. Felipe Carrillo Puerto
Cd, Madero, Tam
Tel. 01 833 221 34 50
BOSQUES DE CIDROS ACCESO RADIATAS NO.42
COL. BOSQUES DE LAS LOMAS.
05120 MEXICO, D.F.
TEL. (01 55) 5326 7100
018008472309/018008472312
Cat No. PP610
Form No. 90611257
May 2014
Copyright © 2014 Black+Decker
Printed in China


- Thank you for choosing BLACK+DECKER!
- PLEASE READ BEFORE RETURNING THIS PRODUCT FOR ANY REASON.
- SAVE THIS MANUAL FOR FUTURE REFERENCE.
- SAFETY GUIDELINES - DEFINITIONS
- IMPORTANT SAFETY RULES
- SAVE THESE INSTRUCTIONS
- READ AND UNDERSTAND ALL INSTRUCTIONS.
- SPECIFIC SAFETY RULES
- Electrical safety
- Double Insulation
- Polarized Plugs
- Before Operating Pole Saw
- While Operating Pole Saw
- Do not operate Pole Saw
- GENERAL SAFETY RULES
- Service
- Guard Against Kickback
- The following precautions should be followed to minimize kickback:
- KICKBACK SAFETY FEATURES
- Symbols
- FUNCTIONAL DESCRIPTION
- POLE SAW NAMES AND TERMS
- STORAGE RECOMMENDATIONS
- Transporting Pole Saw
- PREPARED YOUR POLE TRIMMER FOR USE
- INSTALLING AND REMOVING BAR AND SAW CHAIN
- To Install:
- sprocket cover.
- To Remove:
- ADJUSTING CHAIN TENSION
- Auto oiling system
- Filling the oil reservoir
- Extending extension pole
- On/Off Switch
- Auto-Stop chain braking system
- POLE SAW TRIMMING/PRUNING
- WARNING:
- Operating Position
- Follow directions below to trim a tree.
- Saw chain sharpness
- Saw chain tension
- ACCESSORIES
- POLE SAW MAINTENANCE SECTION
- SERVICE INFORMATION
- TROUBLESHOOTING
- TWO-YEAR LIMITED WARRANTY
- BLACK+ DECKER TM
- MERCI D'AVOIR CHOISI BLACK + DECKER!
- À LIRE AVANT DE RETOURNER CE PRODUIT POUR QUELQUE RAISON QUE CE SOIT:
Brand : BLACK & DECKER
Model : PP610
Category : Electric saw