
Pixma MP460 - Printer CANON - Free user manual and instructions
Find the device manual for free Pixma MP460 CANON in PDF.
| Brand | Canon |
| Model | Pixma MP460 |
| Product type | Inkjet multifunction printer (print, copy, scan) |
| Main functions | PC printing, color and B&W copying, scanning, direct printing from memory card, PictBridge printing, infrared printing, optional Bluetooth |
| Connectivity | USB 2.0, PictBridge, IrDA, Bluetooth (with optional BU-20 unit) |
| Display | LCD screen |
| Power supply | 100-240 V AC, 50/60 Hz |
| Ink cartridges | 2 FINE cartridges: black (PG-50) and color (CL-51), high yield versions available |
| Supported paper sizes | A4, Letter, and other standard sizes |
| Copy functions | Zoom from 25 to 400%, borderless copy, image repeat, copy on stickers |
| Direct printing | From memory card (CompactFlash, Microdrive, SmartMedia, Memory Stick, SD, xD-Picture, etc.) and PictBridge camera |
| Scanning | Via MP Navigator, save to PC, PDF, email, or open in an application |
| Operating systems | Windows, Mac OS X (not compatible with Mac OS 9 or Classic) |
| Box contents | Printer, FINE cartridges (black and color), quick start guide, installation CD-ROM, power cable |
| Consumables | FINE PG-50 (black) and CL-51 (color) cartridges, available for 5 years after end of production |
| Safety instructions | Do not place near flammable solvents, do not use aerosol, do not disassemble, unplug before cleaning |
| Maintenance | Print head cleaning via menu, replace FINE cartridges |
| Environment | Energy Star compliant, recycling according to WEEE directive (2002/96/EC) |
| Support | Canon service centers, website www.canon-europe.com |
| Warranty | Refer to the European Warranty System (EWS) brochure |
Frequently Asked Questions - Pixma MP460 CANON
User questions about Pixma MP460 CANON
0 question about this device. Answer the ones you know or ask your own.
Ask a new question about this device
Download the instructions for your Printer in PDF format for free! Find your manual Pixma MP460 - CANON and take your electronic device back in hand. On this page are published all the documents necessary for the use of your device. Pixma MP460 by CANON.
USER MANUAL Pixma MP460 CANON
| Introduction 12 |
| Copying 17 |
| Printing From A Memory Card 20 |
| Printing From Your Computer 24 |
| Scanning 25 |
| Printing Photographs Directly From A Digital Camera 27 |
| Printing Photos From A Wireless Communication Device 28 |
| Maintenance 31 |
| Troubleshooting 34 |
▶ Preparing the machine
Unpack the machine
Please confirm bundled thing by the illustration printed on the flapped lid of the packing box.
IMPORTANT
- Do not connect the USB cable until after the software is installed.
- A printer cable is not included. You must purchase a USB cable (less than 10 ft. / 3 m) to connect your machine to a computer.
1 Turn ON the machine.
- The language setting is only available for some countries.
- If you have an undesired language selection, refer to the User's Guide.
2 Prepare the FINE Cartridges (ink cartridges).
- If the Scanning Unit (Printer Cover) is left open for more than 10 minutes, the FINE Cartridge Holder moves to the right. Close and reopen the Scanning Unit (Printer Cover) to return the Holder to the center.
- Do not reattach the Protective Tape once you have removed it.
3 Install the FINE Cartridge.
- Ensure that all the FINE Cartridges are installed in the order directed by the label. The machine cannot be used unless all the FINE Cartridges are installed.
- For safety reasons, store FINE Cartridges out of the reach of small children.
- Do not drop or shake FINE Cartridges as this may cause the ink to leak out and stain your clothes and hands.
- The Alarm Lamp still lights orange if a FINE Cartridge is not installed properly. Open the Scanning Unit (Printer Cover) and make sure that all the FINE Cartridges are installed in the correct order directed on the label.
▶ European Union (and EEA) only.

natural_image
Symbol of a trash bin crossed out by two diagonal lines (no text or labels)
This symbol indicates that this product is not to be disposed of with your household waste, according to the WEEE Directive (2002/96/EC) and your national law. This product should be handed over to a designated collection point, e.g., on an authorized one-for-one basis when you buy a new similar product or to an authorized collection site for recycling waste electrical and electronic equipment (EEE). Improper handling of this type of waste could have a possible negative impact on the environment and human health due to potentially hazardous substances that are generally associated with EEE. At the same time, your cooperation in the correct disposal of this product will contribute to the effective usage of natural resources. For more information about where you can drop off your waste equipment for recycling, please contact your local city office, waste authority, approved WEEE scheme or your household waste disposal service. For more information regarding return and recycling of WEEE products, please visit www.canon-europe.com/environment.
(EEA: Norway, Iceland and Liechtenstein)
For Customers in Europe, Middle-East, Africa and Russia only
For Canon Customer Support contacts, please see the back cover of the European Warranty System (EWS) Booklet or visit www.canon-europe.com.
Printer Model: K10283 (MP460)
Bluetooth ID: B02954
▶ Install the software
Select Easy Install in order to install the application software, On-screen Manual and MP drivers. Select Custom Install in order to choose the options you would like to install. When the User Registration screen appears, if you click Register and computer is connected to the internet, the on-screen instructions to register your product will appear. Registration can also be performed from the icon on the desktop after installation is completed.
IMPORTANT
- Temporarily disable any firewall software and close any open applications, including anti-virus software. Computer security programs can be re-started after software installation.
Installing the Printer Driver - Windows
- You must log on as an administrator or have administrative privileges in order to install the software in Windows XP or Windows 2000.
-
If the following screen appears, the USB cable is connected. Perform the following steps.
-
Disconnect the USB cable.
- Click [Cancel].
- Do not switch users during the installation process.
![Found New Hardware Wizard Welcome to the Found New Hardware Wizard This used help your own software to: MP301 If your hardware name with an installation CD in Memory disk, need it save. What to you want the installed CD? [Install the software automatically (Recommended)] [Install the list on specific location (Advanced)] Disk Next Incontinue. Next Next Cancel](/content/2026/03/528151/images/0b068f81d5344c83d3836e3d7f64d8528948ecfdb913435d372a3d773e0a1421.jpg)
Installing the Printer Driver - Macintosh
- Do not connect the machine to Mac OS 9 or Mac OS X Classic environments since they are not supported.
- Enter the name and password for an Administrator Account.
Perform the following to make sure the driver has been installed correctly:
- Select [Utilities] from the [Go] menu.
- Double-click the [Printer Setup Utility] ([Print Center] when using Mac OS X v.10.2.8) icon.
If the printer is displayed in the [Printer List], the printer driver is installed.
If the printer is not displayed in the [Printer List], click [Add] in the [Printer List] and select [USB] from the pop-up menu. Select [MP460] from the [Product] list and click [Add].
When connecting from Mac OS X v.10.3.3 or earlier:
Restarting the computer while connected to the machine may cause the machine not to be detected. To resolve this, either unplug the USB cable then plug it back in again, or turn the machine OFF then back ON again.
Disclaimer
Canon Inc. has reviewed this manual thoroughly in order that it will be an easy-to-use guide to your Canon MP460 Series. All statements, technical information and recommendations in this manual and in any guides or related documents are believed reliable, but the accuracy and completeness thereof are not guaranteed or warranted, and they are not intended to be, nor should they be understood to be, representations or warranties concerning the products described. Specifications are subject to change without notice.

As an ENERGY STAR® partner, Canon Inc. has determined that this product meets the ENERGY STAR® guidelines for energy efficiency.

This machine supports Exif 2.21 (also called “Exif Print”). Exif Print is a standard for enhancing the communication between digital cameras and printers. By connecting to an Exif Print-compliant digital camera, the camera’s image data at the time of shooting is used and optimized, yielding extremely high quality prints.
About Consumables
Consumables (ink tanks / FINE Cartridges) are available for 5 years after production has stopped.
Trademark Notices
- Windows is a registered trademark of Microsoft Corporation in the United States and other countries.
• Macintosh and Mac are trademarks of Apple Computer, Inc., registered in the United States and other countries. - CompactFlash is a registered trademark of SanDisk Corporation.
- MEMORY STICK and Memory Stick DUO are registered trademarks of Sony Corporation.
- SmartMedia is a registered trademark of Toshiba Corporation.
- Microdrive is a registered trademark of International Business Machines Corporation.
- MultiMediaCard is a trademark of the MultiMediaCard Association.
- xD-Picture Card is a trademark of Fuji Photo Film Corporation.
- SD, miniSD and SD Secure Digital are trademarks of SD Association.
- IrDA Feature Trademark is owned by the Infrared Data Association and used under license therefrom.
- Bluetooth is a trademark of Bluetooth SIG, Inc., U.S.A. and are licensed to Canon Inc.
- All the other product names and marks are trademarks or registered trademarks by their owners.
Copyright ©2006 CANON INC.
All rights reserved. No part of this publication may be transmitted or copied in any form whatsoever without expressed written permission from Canon Inc.
▶ How To Use The Documentation Provided
Easy Setup Instructions (Printed documentation):
Be sure to read this sheet first.
This sheet includes instructions for setting up your machine and getting it ready for use. Follow all steps in this sheet before using your machine.
Quick Start Guide (This guide):
Read this guide when starting to use the machine.
After following the instructions in the Easy Setup Instructions, we recommend that you read this guide to familiarize yourself with the basic operation of all functions that can be performed by your machine.
User's Guide (On-screen manual):
This guide is available on the Setup CD-ROM.
This guide includes instructions on printing from your computer, direct photo printing from a digital camera, and copying. Refer to this guide for in-depth instructions not included in the Quick Start Guide, or if you want to learn more about advanced features.
Printer Driver Guide/Scanning Guide (On-screen manual):
These guides are available on the Setup CD-ROM.
Refer to these guides for full instructions on printing and scanning from your computer. These guides describe the details of each function, as well as how to use the MP Drivers and MP Navigator.
Photo Application Guide (On-screen manual):
This guide is available on the Setup CD-ROM.
This guide describes the utility software on the Setup CD-ROM, such as Easy-PhotoPrint and Easy-WebPrint, including instructions on how to scan data, various printing methods, and details of functions.
Users in Asia Only
The on-screen manuals may not be installed depending on the country of purchase. If not, the on-screen manuals may be copied from the “Manual” folder in the Setup CD-ROM to your computer's hard disk.
▶ PC Displaying On-screen Manual Stored On The Setup CD-ROM
You can install the on-screen manuals using the Setup CD-ROM by either of the following.
- Select “Easy Install” to install the on-screen manuals along with the printer driver and applications.
- Select “On-screen Manual” from “Custom Install” to install the on-screen manuals. If you have not installed or have deleted the on-screen manuals, use either method above to install them.
- A start-up icon for the On-screen manual will be placed on the desktop after installing the software with Easy Install.
- Double-click the icon, then from the pop-up menu, click the title of each manual you want to open.
Various Web browsers are available for viewing HTML content, and therefore the same text or image may appear different depending on which browser you use. The on-screen manuals have been prepared on the assumption that they are displayed and read under the following conditions:
For Windows:
- Browser: Windows HTML Help Viewer
- Note: Microsoft Internet Explorer 5.0 or later must be installed.
- The on-screen manuals may not be displayed properly depending on your operating system or Internet Explorer version. We recommend that you keep your system up to date with Windows Update.
For Macintosh:
- Browser: Help Viewer
- Note: The on-screen manuals may not be displayed properly depending on your operating system. We recommend that you keep your system up to date.
▶ Reading The Document
Symbols Used In This Guide
| CAUTION | Indicates a caution concerning operations that may lead to injury or damage to property if not performed correctly. In order to use the machine safely, always pay attention to these cautions. |
| IMPORTANT | Indicates operational warnings and restrictions. Be certain to read these items to operate the machine correctly, and to avoid damage to the machine. |
| Indicates notes for operation or additional explanations. Reading these is highly recommended. | |
| PC | Indicates the description of the machine when connected to a computer. |
| Windows | Read this when the machine is connected to a Windows system. |
| Macintosh | Read this when the machine is connected to a Macintosh system. |
●(Operation branch title) Used for an operation that can be performed in branch procedures.
- (Operation branch-step) Used to explain each operation of a branch procedure.
Buttons Used In This Guide
[button name] Text enclosed in these brackets indicates a button on the Operation Panel of the machine or an item on the computer to be manipulated.
Example: [Color]
Example:
Terms Used In This Guide
machine General term used to represent the MP460.
default A setting that remains in effect unless you change it.
document The original sheets of paper, pages of a book, or photographs that you copy or scan with the machine.
paper Paper on which you can print with the machine.
▶ Safety Precautions
Please read the safety warnings and cautions provided in this guide to ensure that you use your machine safely. Do not attempt to use the machine in any way not described in this guide. For detailed safety information, refer to the User's Guide.
WARNING
You may cause an electric shock/fire or damage the machine if you ignore any of these safety precautions.
- Location
- Do not place the machine close to flammable solvents such as alcohol or thinners.
- Power supply
- Never attempt to plug or unplug the machine from the power supply when your hands are wet.
• Always push the plug all the way into the power outlet. - Never damage, modify, stretch or excessively bend or twist the power cord. Do not place heavy objects on the power cord.
- Never plug the machine into a power socket that is shared with other equipment (extension lead/cord, 2- or 3-way adapter, etc.).
- Never use the machine if the power cord is bundled or knotted.
- If you detect smoke, unusual smells or strange noises around the machine, immediately unplug the machine at the power supply and contact your local authorized Canon dealer or the Canon help line.
Using the machine in such conditions may result in fire or electrical shock.
- Periodically, unplug the machine and use a dry cloth to wipe off any dust or dirt collected on the plug and the power outlet.
If the machine is placed at a location exposed to a lot of dust, smoke, or high humidity, the dust collected on the plug absorbs moisture and may cause insulation failure and fire.
- Maintenance
- Use a damp cloth to clean the machine. Never use flammable solvents such as alcohol, benzene or thinners. If flammable solvents come in contact with electrical components inside the machine, it could cause a fire or electrical shock.
- Always turn OFF the power and unplug the machine from the power outlet before cleaning the machine. If you leave ON or accidentally switch the machine ON while cleaning it, it may result in injury or damage the machine.
- Handling
- Do not attempt to disassemble or modify the machine. There are no user serviceable parts inside the machine.
The machine contains high-voltage components. Never attempt any maintenance procedure not described in this guide. Incorrect maintenance procedures may damage the machine, or cause a fire or electrical shock.
- Do not use flammable sprays near the machine.
This could cause a fire or electrical shock if the spray comes into contact with electrical components inside the machine.
- Others
- When setting the machine near electric products with fluorescent lighting, separate the machine at least 5.9 inches (15 cm) from electric products equipped with fluorescent lighting. If you place it near to them, the machine may malfunction as a result of the noise emitted by the fluorescent lighting.
- When turning OFF the power, be sure to press [ON/OFF] and confirm that the Alarm Lamp has shut off. If you pull the power plug out of the wall outlet while the Alarm Lamp is on, the FINE Cartridge is not protected, and you may not be able to print later.
CAUTION
You may cause injury or damage the machine if you ignore any of these safety precautions.
- Location
- Place the machine on a flat, stable, vibration-free surface that is strong enough to support its weight.
- Do not install the machine in a location that is very humid or dusty, in direct sunlight, outdoors, or close to a heating source. Installing in such a location may result in fire or electrical shock. To avoid the risk of fire or electrical shocks, install the machine in a location with an ambient temperature range of 41^ to 95^ ( 5^ to 35^ ) and humidity of 10% to 90% (condensation free).
- Do not place the machine on a thick rug or carpet. If fibers or dust come inside the machine, it could cause a fire.
- Power supply
- Never remove the plug by pulling on the cord.
Pulling on the power cord may damage the cord and cause a fire or electrical shock. - Do not use an extension cord as this may result in fire or electrical shock.
- Ensure that the area around the power outlet is kept clear at all times so you can easily unplug the power cord if necessary. Otherwise you will be unable to disconnect the power plug in case of an emergency.
- Never use a power supply source other than the one rated for the machine in the country where you purchased the machine as it may result in fire or electrical shock.
The operating requirement of this machine is as follows:
100-240 V AC, 50/60 Hz (depending on local electrical requirements) - The socket-outlet shall be installed near the equipment and shall be easily accessible.
- Handling
- Close the Document Cover gently to avoid catching your hand. Failing to do so may result in personal injury.
- Do not press down hard on the Document Cover when using the Platen Glass to scan thick books. This may damage the Platen Glass and Document Cover, and/or result in personal injury.
- When moving the machine, carry the machine at both ends.
- Do not insert your hands into the machine while it is printing. Parts inside the machine are moving and this may result in injury.
- Do not turn the machine upside down. Ink may leak out and stain clothing or the surrounding area.
● FINE Cartridges (Ink Cartridges)
- For safety reasons, store FINE Cartridges (Ink Cartridges) out of the reach of small children. If a child ingests any ink, consult a doctor immediately.
- Do not shake FINE Cartridges (Ink Cartridges). Ink may leak out and stain clothing or the surrounding area.
- Never touch the nozzle and the gold terminal.
▶ Legal Limitations On Use Of Your Product And Use Of Images
It may be unlawful to make copies of, scan, print or use reproductions of the following documents. The list provided is non-exhaustive. When in doubt, check with a legal representative in your jurisdiction.
- Paper money
- Money orders
• Certificates of deposit - Postage stamps (canceled or uncanceled)
• Identifying badges or insignias - Selective service or draft papers
- Checks or drafts issued by governmental agencies
-
Motor vehicle licenses and certificates of title
-
Traveler's checks
- Food stamps
- Passports
- Immigration papers
- Internal revenue stamps (canceled or uncanceled)
- Bonds or other certificates of indebtedness
- Stock certificates
• Copyrighted works/works of art without permission of copyright owner
▶ Features Of Your Machine
Thank you for purchasing the Canon MP460. Your machine incorporates the following functions in one simple-to-operate device:
Desktop photo printer Prints photo-quality images from a digital camera or a memory card, without using a computer.
Copier Makes color or black & white copies. Also, applies advanced copy features to your copies.
PC Printer Prints photographs, vivid color and crisp black and white documents from your computer.
PC Scanner Scans high-resolution images to your computer and processes them easily using the utility software supplied.
You may select to use your machine as a stand-alone device for copying, and photo printing. Alternatively, connect your machine to a computer and you will have a fully integrated desktop printer/copier/scanner. The utility software supplied with your machine enables you to perform a variety of tasks from your computer effortlessly and efficiently.
▶ Machine Parts And Their Functions
Machine
- Exterior
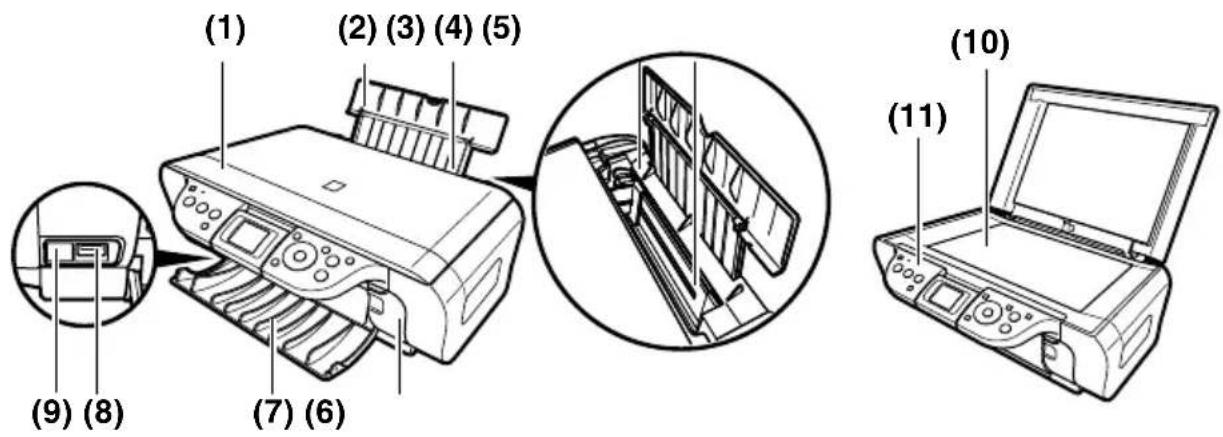
Covers the Platen Glass. Open this cover when loading a document on the Platen Glass.
(2) Paper Support
Supports paper loaded in the Auto Sheet Feeder. Open it before loading paper.
(3) Paper Support Extension
Supports paper loaded in the Auto Sheet Feeder. Pull it out before loading paper.
(4) Paper Guide
When loading paper, ensure the left edge of the paper just touches this guide.
(5) Auto Sheet Feeder
Load paper here. Paper feeds automatically, one sheet at a time.
(6) Card Slot Cover
Covers the Card Slots. Open this cover when inserting a memory card into the Card Slots.
(7) Paper Output Tray
Printouts are output to this tray. Open the tray before you start copying or printing. When not being used, keep it closed in the machine.
(8) Direct Print Port
Used to connect a PictBridge-compliant device or the optional Bluetooth unit to the machine when printing images directly from the camera.
(9) IrDA Port
Receives photo data sent from the mobile phone through infrared communication.
(10) Platen Glass
Used to load a document to be processed.
(11) Operation Panel
Displays the operational status of the machine. It is also used to change or check the settings of each function. For details, see page 15.
● Rear view and interior
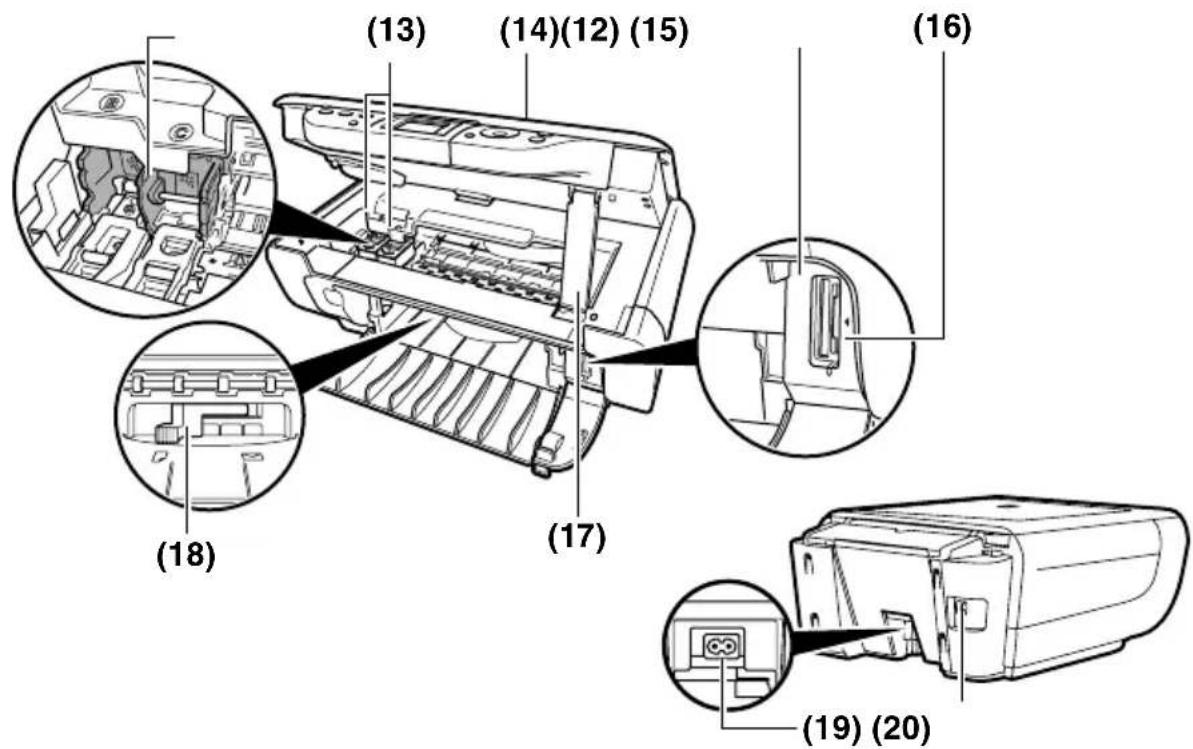
(12) FINE Cartridge Holder
Install the FINE Cartridges here.
(13) FINE Cartridges (Ink Cartridges)
Replaceable cartridges that comprise an integrated Print Head and ink tank.
(14) Scanning Unit
Used to scan a document.
(15) Card Slots
Insert a memory card or card adapter containing a memory card into these slots for photo printing. The machine is equipped with two kinds of Card Slot.
(16) Access Lamp
Lights when a memory card is inserted into the Card Slots. This lamp flashes while the machine is reading data from the memory card.
(17) Scanning Unit Support
Used to hold the Scanning Unit being opened.
(18) Paper Thickness Lever
Used to adjust the gap between the FINE Cartridge and surface of the printing paper.
(19) Power Connector
Used to connect the power cord to the machine.
(20) USB Port
Used to connect a computer to the machine when printing from or scanning to the computer.
IMPORTANT
- While the machine is printing from or scanning images to the computer, or the computer is in the sleep mode or standby mode, do not disconnect and connect the USB cable.
Operation Panel
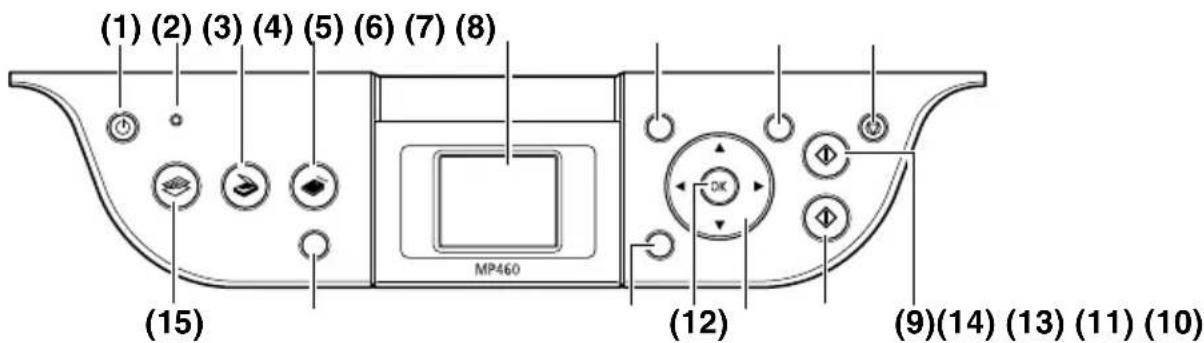
Turns the machine ON and OFF. Before turning ON the machine, make sure the Document Cover is closed.
(2) Alarm Lamp
Lights when the paper or ink runs out.
(3) [SCAN] Button
Switches the machine to scan mode. In scan mode, the machine scans a document to your computer according to the operations selected. To use this button, the machine must be connected to a computer.
(4) [MEMORY CARD] Button
Switches the machine to Memory Card mode.
(5) LCD (Liquid Crystal Display)
Displays messages, menu selections, and the operational status.
(6) [Menu] Button
Accesses the settings to customize operation of your machine.
(7) [Settings] Button
Use to configure the page size, media type and image correction settings.
(8) [Stop/Reset] Button
Cancels operations and returns the machine to standby mode.
(9) [Black] Button
Starts black & white copying.
(10) [Color] Button
Starts color copying or color photo printing.
(11) [◀][▶][▲][▼] Buttons
Scroll through menu selections, and increase or decrease the number of copies or the image file number. You can use these buttons when they are displayed on the LCD.
(12) [OK] Button
Selects item in menus, and confirms selections. Restores the machine to normal operation if there is an error while printing or if paper jams. Also, use this button to accept a displayed message.
(13) [Back] Button
Returns to the previous screen.
(14) [Photo Index Sheet] Button
Switches the machine to Photo Index Sheet mode.
(15) [COPY] Button
Switches the machine to copy mode.
▶ Loading Paper
1 Open the Paper Support (1), then pull out the Paper Support Extension (2).
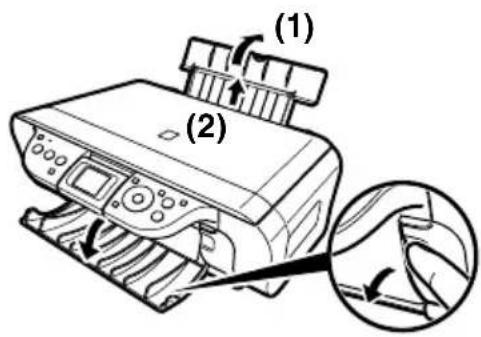
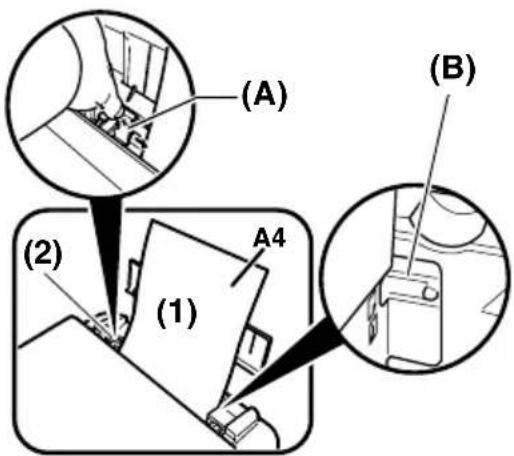
2 Place a stack of paper (print side up) in the Auto Sheet Feeder (1), pinch the Paper Guide (A) and adjust it to the left side of the stack (2).
- Make sure the stack does not exceed the Load Limit Mark (B).
- For details on loading paper, see the User's Guide.
▶ Recommended Paper
- Plain paper
- Super White Paper*
- Glossy Photo Paper*
- Matte Photo Paper*
- Photo Paper Pro*
• Photo Paper Plus Glossy*
• Photo Paper Plus Semi-Gloss*
* Indicates Canon genuine media.
For details on the general paper guidelines, see the User's Guide.
▶ Loading Documents
1 Lift the Document Cover.
2 Load your document.
- Place your document face down on the Platen Glass.
- Align the upper left corner of your document with the alignment mark on the lower right corner of the Platen Glass.
3 Gently close the Document Cover.

Making Copies
1 Press [COPY].
2 Use [▲] or [▼] to select the number of copies (max. 99 copies).
3 Adjust the settings for your document as necessary. (See below)
4 Press [Color] for color copying, or [Black] for black & white copying.
▶ Changing Copy Settings
1 Press [COPY].
2 Press [Settings].
3 Use [◀] or [▶] to select
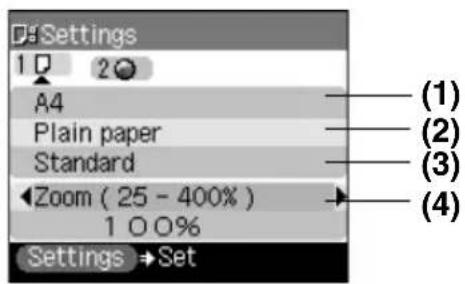
(1) You can specify the page size.
(2) You can specify the media type.
(3) You can adjust the image quality for the document to be copied.
(4) You can specify the reduction/enlargement method.
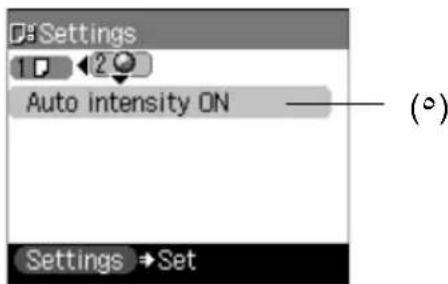
(5) You can specify if Auto intensity is performed.
4 Use [▲] or [▼] to select the item to set and then use [◀] or [▶] to change the setting.
5 Press [OK] after finishing all settings you need.
For details on changing the copy settings and setting items, see the User's Guide.
▶ Advanced Copy Features
Sticker copying Copies photos or graphics onto stickers.
Borderless copying Copies the images so that they fill the entire page without borders.
Image repeat Copies an image multiple times onto a single page.
For details on advanced copy features, see the User's Guide.
3 Printing From A Memory Card
There are several ways you can print photos directly from a memory card, without using a computer.
1 Make sure the machine is turned ON.
2 Load paper in the Auto Sheet Feeder. (See page 17)
3 Insert a memory card. (See page 21)
4 Select the printing method.
- Printing By Using The Photo Index Sheet (See page 22)
- Printing According To The Selected Photo Print Mode (See page 23)
• Other Printing Methods (See page 23)
▶ Compatible Memory Cards
| Left Card Slot Right Card Slot | ||
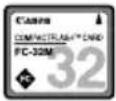 |  |  |
| CompactFlash Type I/II MEMORY STICK MultiMedia Card (ver3.31) | ||
 |  |  |
| Microdrive Memory Card SmartMedia SD Secure Digital Memory Card | ||
| Must be inserted into a card adapter | ||
 |  |  |
| xD-Picture Card Memory Stick DUO miniSD | ||
CAUTION
- When using a Memory Stick DUO, miniSD Card, or an xD-Picture Card, make sure to insert these cards into a card adapter (must be purchased separately) before inserting it into the Card Slots of the machine.
▶ Inserting/Removing A Memory Card
Inserting A Memory Card
1 Make sure the machine is turned ON.
2 Open the Card Slot Cover.
3 Insert the memory card or the card adapter containing the memory card into the appropriate Card Slot.
natural_image
Line drawing of a printer with paper feed and control panel (no text or symbols)| Type of card How to install | |
| CompactFlash (CF) CardMicrodrivexD-Picture Card*Install these cards into the left card slot. | 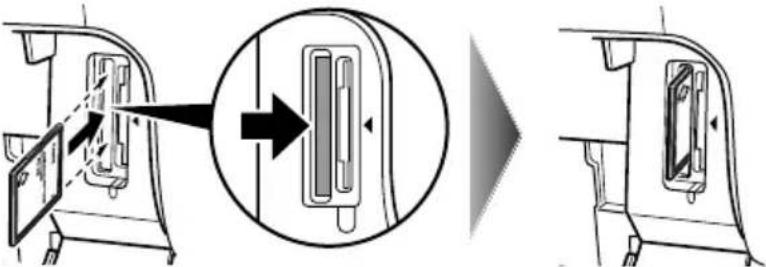 |
| Smart Media CInstall this card into the right card slot. | 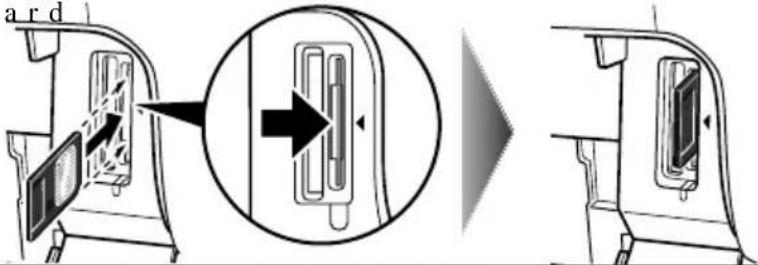 |
| Memory StickMemory Stick PROMemory Stick Duo*Memory Stick PRO Duo*SD Cardmini SDCard*MultiMedia Card (ver3.31)Install these cards into the right card slot. | 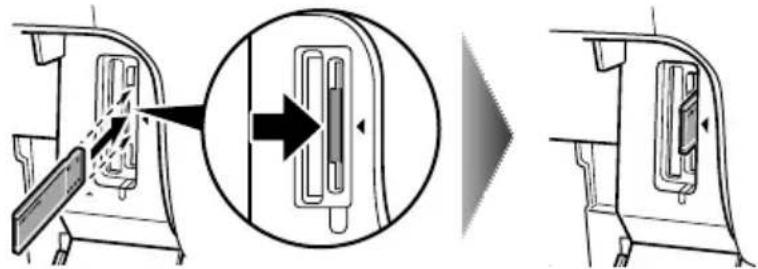 |
* Install the memory card with the appropriate adapter attached.

- Do not try to insert the memory card into the Card Slot furthermore than as it stops; otherwise the machine and/or the memory card will be damaged.
Removing A Memory Card
CAUTION
- If an error occurs during printing from the memory card (e.g. paper runs out), do not remove the memory card or card adapter containing a memory card as this may damage the data on the memory card.
- While the Access Lamp is flashing, do not remove the memory card or a card adapter containing the memory card as this may damage the data on the memory card.
1 Hold the exposed portion of the memory card with your fingers and remove the memory card from the Card Slot.
2 Close the Card Slot Cover.
▶ Printing By Using The Photo Index Sheet
With this machine, you can easily print photographs using a Photo Index Sheet, by filling in the appropriate circles to select print options and photographs you want to print. Simply scanning a Photo Index Sheet prints the selected photographs according to the selections you have made.
1 Turn ON the machine, and load A4-sized paper in the Auto Sheet Feeder.
2 Insert a memory card into the Card Slot. (See page 21)
3 Press [Photo Index Sheet].
4 Use [◀] or [▶] to select
5 Use [◀] or [▶] to select the range of photographs to print on the Photo Index Sheet.
- If you select
- Go to step 6.
- If you select
-
Press [OK].
-
Use [▲] or [▼] to select how many recent photographs to print, and then press [OK].
-
Go to step 6.
- If you select
-
Press [OK].
-
Use [◀] or [▶] to select the first recorded date of photographs you want to print, and then press [OK].
-
Use [◀] or [▶] to select the last recorded date of photographs you want to print, and then press [OK].
-
Go to step 6.
6 Press [Color].
• The machine prints the Photo Index Sheet.
7 Fill in the appropriate circles ( ) with a dark pencil to select the photographs to be printed and the print settings.
8 Load the paper selected on the Photo Index Sheet into the Auto Sheet Feeder.
9 Load the Photo Index Sheet on the Platen Glass.
CAUTION
- Be sure to load the Photo Index Sheet in the correct orientation on the Platen Glass.
10Press [Photo Index Sheet].
11 Use [◀] or [▶] to select
12Press [OK].
▶ Printing According To The Selected Photo Print Mode
1 Press [MEMORY CARD].
2 Use [◀] or [▶] to select
3 Use [◀] or [▶] to select the photo to print.
- If you selected
- Press [Color] to confirm the selection.
- Use [▲] or [▼] to specify the number of copies to print.
- If you selected
- Use [▲] or [▼] to specify the number of copies to print.
- Repeat step 3 and specify the number of copies for each photo you wish to print.
4 Adjust the print settings as necessary. (See the User's Guide)
5 Press [Color].
▶ Other Printing Methods
Layout print Prints several photos on a single sheet of paper.
Sticker print Prints photos onto stickers.
Photo Index print Prints an index of all photos saved in the memory card.
Print all photos Prints all photos saved in the memory cards.
DPOF print Prints photos according to the DPOF (Digital Print Order Format) settings.
For details on other printing methods, see the User's Guide.
▶ Printing Documents
The print procedure varies slightly depending on the application software. The basic print procedure is explained here.
Windows
1 Load paper in the Auto Sheet Feeder. (See page 17)
2 Create a document or open a file to print.
3 Select [Print] from the application software's [File] menu.
- Make sure that your machine is selected as a printer.
4 Adjust the settings for your document as necessary, then click [OK].
5 Click [Print] or [OK].
Macintosh
1 Load paper in the Auto Sheet Feeder. (See page 17)
2 Create a document or open a file to print.
3 Select [Page Setup] from the application software's [File] menu.
- Make sure that your machine is selected as a printer.
4 Select the desired paper size from [Paper Size], then click [OK].
5 Select [Print] from the application software's [File] menu.
6 Adjust the settings for your document as necessary, then click [OK].
7 Click [Print].
▶ Scanning Methods
Scanning Using The MP Navigator
Using the MP Navigator, you can scan, process and save documents to your computer. For details on using the MP Navigator, see the Scanning Guide.

On the Windows desktop, double-click [MP Navigator 3.0] icon to open the MP Navigator.

On the [Go] menu, select [Applications], [Canon Utilities], then double-click the [MP Navigator 3.0] icon to open the MP Navigator.
You can launch the following application software from the MP Navigator.
- Easy-PhotoPrint (Photo Printing)
- ArcSoft PhotoStudio (Photo image editing)
- ScanSoft OmniPage SE* (Converting scanned document to text)
* ScanSoft OmniPage SE does not support Windows 98 first edition.

If you performed the [Custom Install] and only installed the MP Driver and MP Navigator, these application software were not installed and thus cannot be launched. To launch any of the above application software from MP Navigator, perform the [Custom Install] once again to install them.
Scanning With The Operation Panel Of The Machine
1 Load the document on the Platen Glass. (See page 18.)
2 Press [SCAN].
The machine switches to scan mode.
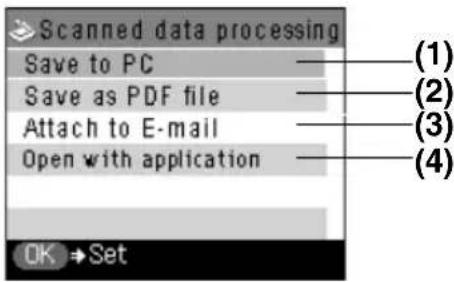
(1) The document is scanned and saved to the computer.
(2) The document is scanned and stored as a PDF file.
(3) The document is scanned, and the image is attached to an e-mail using the e-mail application software.
(4) The document is scanned and displayed on the registered application software.
3 Use [▲] or [▼] to select the scan operation, then press [OK].
4 Press [Color] or [Black].
The document is scanned. The settings configured from MP Navigator apply when scanning.
IMPORTANT
- If with some types of original the position and size of the image is not scanned in correctly, please refer to “Selecting the Behavior of the Operation Panel with MP Navigator” in the Scanning Guide (On-screen Manual) and change the MP Navigator [Document Type] and [Document Size] to match those of the original being scanned.

- The subsequent procedure varies depending on your settings. For details, see the Scanning Guide.
Scanning From An Application Software
You can scan an image from a TWAIN- or WIA- (Windows XP only) compliant application software and use the image in that application software. This procedure varies depending on the application software.
For the detailed procedure, refer to the manual of the application software you are using.
6 Printing Photographs Directly From A Digital Camera
Connecting To A PictBridge-Compliant Device
Connecting a PictBridge-compliant device such as digital camera, camcorder or mobile phone to the machine allows you to print recorded images directly without using a computer.
1 Turn ON the machine.
2 Load paper in the Auto Sheet Feeder. (See page 17)
3 Connect the PictBridge-compliant device to the machine.
- Ensure that the device is turned off.
- Connect the device to the machine using the USB cable (for connection to a computer) supplied with the device.
4 Turn ON and set up the device for direct printing.
Some types of PictBridge-compliant devices turn on automatically when connected to the machine. For devices that do not turn on automatically, do so manually.
5 You are now ready to print images from the camera.
7 Printing Photos From A Wireless Communication Device
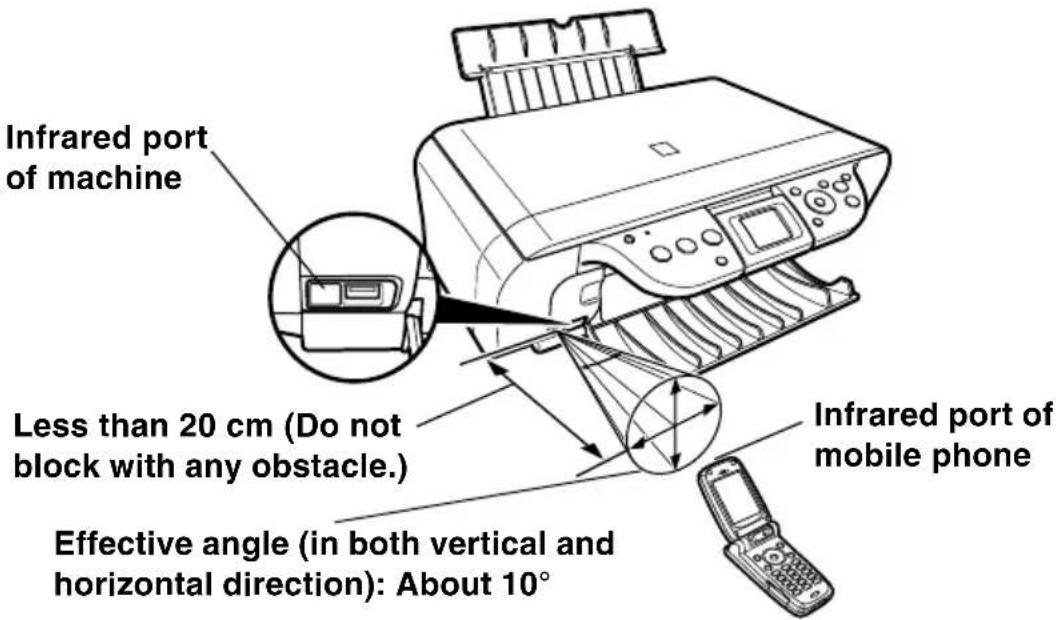
If you have a mobile phone with an infrared port for wireless data transmission, you can print photos through a cordless connection with the machine. You can also print photos received from Bluetooth-compatible mobile phones using the optional Bluetooth unit BU-20. (See the Bluetooth User's Guide)
▶ Performing Infrared Communication
When performing infrared communication, also refer to your mobile phone manual.
1 Turn ON the machine and load the paper in the Auto Sheet Feeder. (See page 17)
2 Adjust the print settings as necessary.
- You can select the page size, media type, smoothing and layout. (See the User's Guide)
- Press [Menu].
- Use [◀] or [▶] to select
, then press [OK]. - Use [◀] or [▶] to select
, then press [OK]. - Use [▲] or [▼] to select
, then press [OK]. - Use [▲] or [▼] to select the item to set, then use [◀] or [▶] to change the setting.
- Press [OK] after finishing all settings you need.
3 Oppose the infrared port of the mobile phone to that of the machine at a distance of less than 20 cm.
[Non-Text]
- The effective angle of the infrared port of the machine is about 10^ from the central axis in both vertical and horizontal directions.
- The allowable distance of communication with the machine depends on the mobile phone you use. For this distance, refer to your mobile phone manual.
4 Select the photo to print and send the data to the machine using the infrared communication function of the mobile phone.
- The ON/OFF lamp on the machine flashes in green when received the data properly.
- Printing will start after receiving all data.
For details on performing Infrared communication, see the User's Guide.
▶ Performing Bluetooth Communication (Optional)
For performing Bluetooth communication, also refer to your mobile phone or PC manual.
1 Turn ON the machine and load the paper in the Auto Sheet Feeder. (See page 17)
2 Adjust the print settings as necessary. (See page 28)
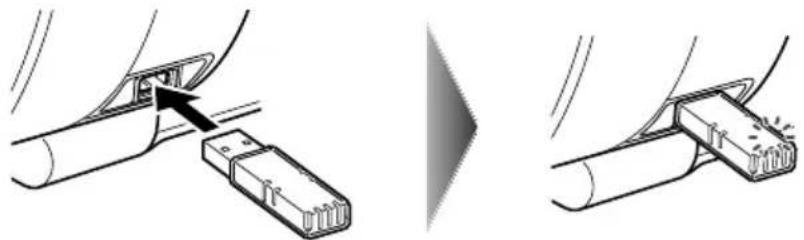
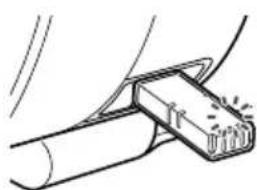
3 Connect the optional Bluetooth unit BU-20 to the Direct Print Port.
natural_image
Diagram showing two mechanical assembly steps: one with a connector and arrow, the other with a clamped component (no text or symbols)
- The blue lamp on the Bluetooth unit BU-20 lights if it is properly installed.
4 Specify the Bluetooth settings as necessary.
- You can set the device name, access refusal, security and passkey. (See the Bluetooth User's Guide)
- Press [Menu].
- Use [◀] or [▶] to select
, then press [OK]. - Use [◀] or [▶] to select
, then press [OK]. - Use [▲] or [▼] to select
, then press [OK]. - Use [▲] or [▼] to select the item to set, then use [◀] or [▶] to change the setting.
- Press [OK] after finishing all settings you need.
5 Start Bluetooth communication.
For details on performing Bluetooth communication, see the Bluetooth User's Guide.
▶ Replacing A FINE Cartridge
When replacing a FINE Cartridge, check the model number very carefully.
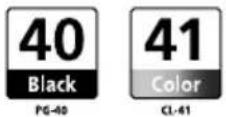
The FINE Cartridge PG-50 Black (High Yield) and CL-51 Color (High Yield) are also compatible with this machine.
1 Make sure the power is turned ON.
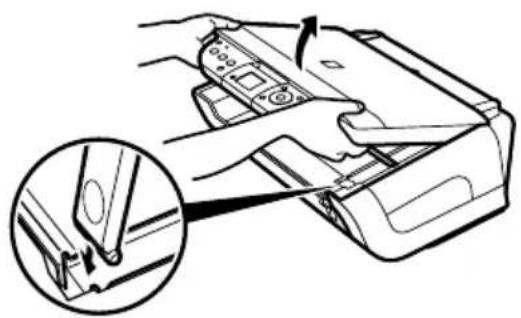
2 Lift the Scanning Unit and pull the Scanning Unit Support down into place.
CAUTION
- Do not try to manually move or stop the FINE Cartridge Holder.
- Do not touch any metal parts.
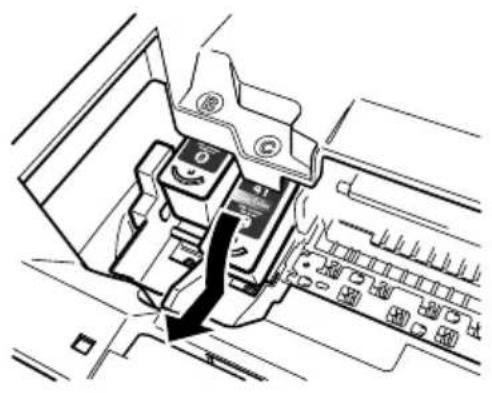
3 Push down the empty FINE Cartridge on the tab to release it, then pull out the FINE Cartridge.
natural_image
Diagram of a car seatbelt mechanism with a magnified inset showing the tool interacting with the seat (no text or symbols present)
natural_image
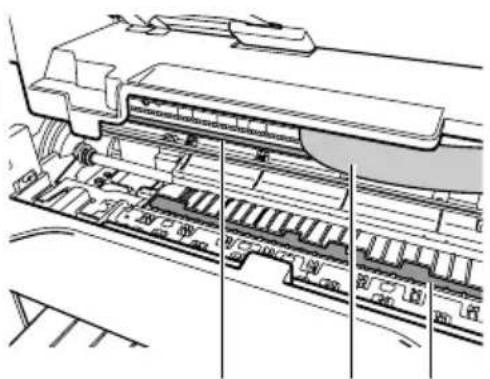
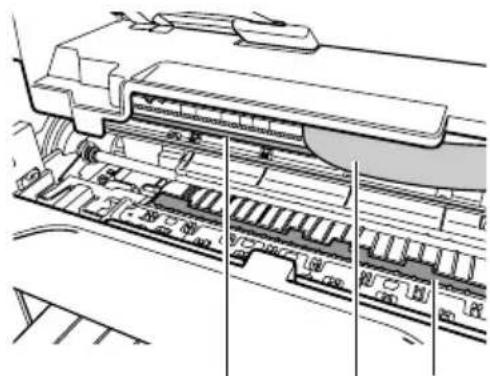
Technical line drawing of a mechanical assembly with no visible text or symbolsCAUTION
- Do not touch the transparent film (A), film cable (B), ink absorber (sponge part) (C), or any metal parts.
natural_image
Technical line drawing of a mechanical assembly or assembly with no visible text or symbols(B)(A) (C)
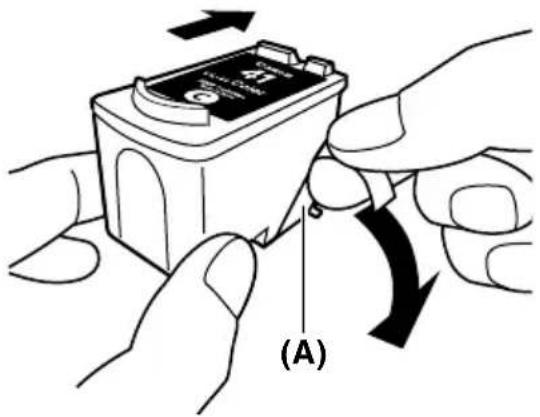
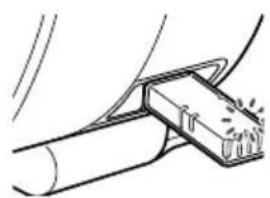
4 Remove a new FINE Cartridge from its packaging. Then hold the FINE Cartridge as shown and remove the Protective Tape (A).
CAUTION
- Do not touch the gold terminals (B) or nozzles (C).
- Do not shake or drop the FINE Cartridge as the ink may leak and stain your clothes or hands.
- Do not attempt to reattach the Protective Tape once you remove it.
- Do not place the nozzles in contact with any other surface.
(B)
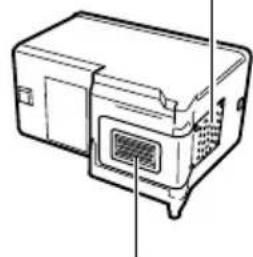
natural_image
Line drawing of a device casing with internal components and ventilation slots (no text or symbols)(C)
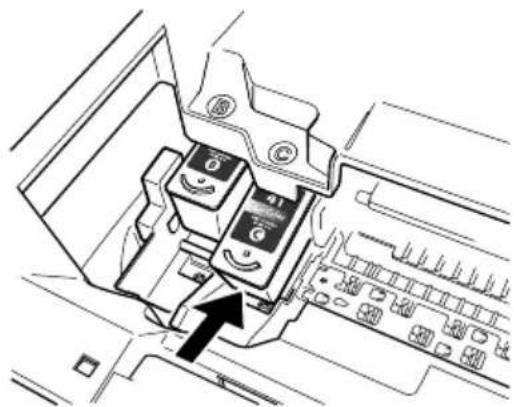
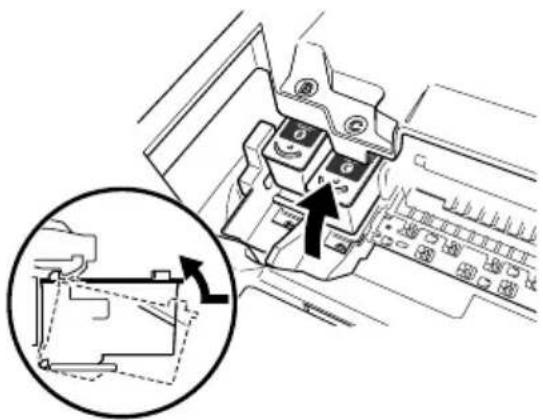
5 Insert the FINE Cartridge at a slight angle into the empty slot.
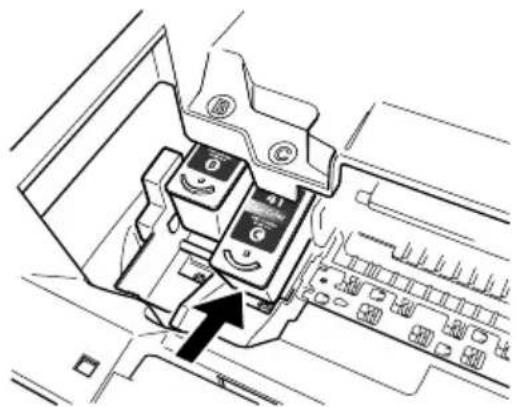
natural_image
Technical diagram of a mechanical component with an arrow pointing to a button (no text or symbols present)6 Push up the FINE Cartridge until it clicks into place.

natural_image
Technical diagram of a mechanical assembly with an inset showing a hand operating a component (no text or symbols present)7 If you need to replace another FINE Cartridge, repeat steps 3 to 6.
8 Lift the Scanning Unit and put the Scanning Unit Support and Scanning Unit back to its original position.
▶ Cleaning The FINE Cartridge
If the printed nozzle check pattern is incomplete, omitted, or a specific color is not printed, clean the FINE Cartridge.
1 Press [Menu].
2 Use [◀] or [▶] to select
3 Use [◀] or [▶] to select
4 Use [▲] or [▼] to select
Cleaning Performs normal FINE Cartridge cleaning.
Deep cleaning Performs deep FINE Cartridge cleaning.
5 Use [▲] or [▼] to select
Removing Jammed Paper
If
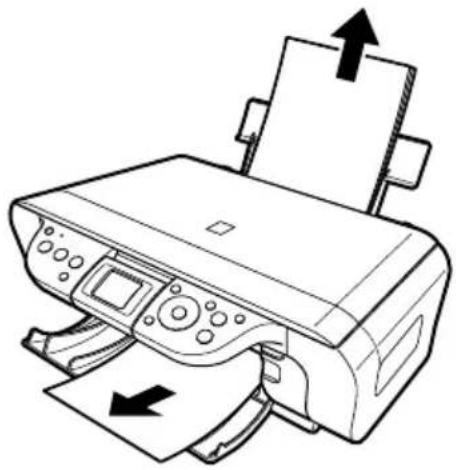
Clearing Jams In The Paper Output Tray
1 Gently pull any jammed paper out of the Paper Output Tray.
2 Press [OK].
Clearing Jams From The Auto Sheet Feeder
1 Gently pull out any jammed paper from the Auto Sheet Feeder.
2 Press [OK].
natural_image
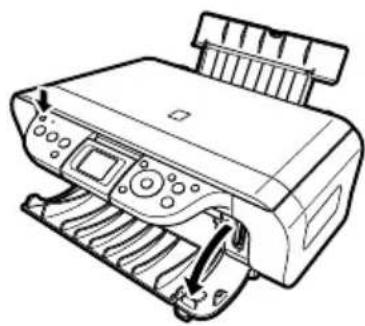
Line drawing of a printer with paper sheets being inserted, showing paper movement arrows (no text or symbols)Clearing Jams From Inside The Machine
1 Open the Scanning Unit.
2 Gently pull out any jammed paper from the rollers.
CAUTION
- Be careful not to touch the components inside the machine at this time, otherwise, print quality may be reduced.
3 Close the Scanning Unit.
4 Press [OK].

natural_image
Line drawing of a printer's internal structure showing paper feed, paper holder, and printer tray (no text or symbols)▶ More Information
For details on other troubleshooting, see the User's Guide.
This product uses the following copyrighted software:
exit.c Copyright © 1990 The Regents of the University of California. All rights reserved.
Redistribution and use in source and binary forms are permitted provided that the above copyright notice and this paragraph are duplicated in all such forms and that any documentation, advertising materials, and other materials related to such distribution and use acknowledge that the software was developed by the University of California, Berkeley. The name of the University may not be used to endorse or promote products derived from this software without specific prior written permission.
THIS SOFTWARE IS PROVIDED "AS IS" AND WITHOUT ANY EXPRESS OR IMPLIED WARRANTIES, INCLUDING, WITHOUT LIMITATION, THE IMPLIED WARRANTIES OF MERCHANTABILITY AND FITNESS FOR A PARTICULAR PURPOSE.
environ.c Copyright © 1995, 1996 Cygnus Support. All rights reserved.
Redistribution and use in source and binary forms are permitted provided that the above copyright notice and this paragraph are duplicated in all such forms and that any documentation, advertising materials, and other materials related to such distribution and use acknowledge that the software was developed at Cygnus Support, Inc. Cygnus Support, Inc. may not be used to endorse or promote products derived from this software without specific prior written permission.
THIS SOFTWARE IS PROVIDED "AS IS" AND WITHOUT ANY EXPRESS OR IMPLIED WARRANTIES, INCLUDING, WITHOUT LIMITATION, THE IMPLIED WARRANTIES OF MERCHANTABILITY AND FITNESS FOR A PARTICULAR PURPOSE.
impure.c Copyright © 1994, 1997 Cygnus Solutions. string.h All rights reserved.
Redistribution and use in source and binary forms are permitted provided that the above copyright notice and this paragraph are duplicated in all such forms and that any documentation, advertising materials, and other materials related to such distribution and use acknowledge that the software was developed at Cygnus Solutions. Cygnus Solutions may not be used to endorse or promote products derived from this software without specific prior written permission. THIS SOFTWARE IS PROVIDED "AS IS" AND WITHOUT ANY EXPRESS OR IMPLIED WARRANTIES, INCLUDING, WITHOUT LIMITATION, THE IMPLIED WARRANTIES OF MERCHANTABILITY AND FITNESS FOR A PARTICULAR PURPOSE.
PIXMA MP460
natural_image
Abstract grayscale pattern with horizontal stripes and curved lines, no text or symbols present▶ Préparation de la machine
Déballez la machine
natural_image
Simple line drawing of a trash bin with two crossed lines indicating no waste or restriction (no text or symbols)
Copyright ©2006 CANON INC.
(1) Touche [ON/OFF] (MARCHE/ARRÊT)
(8) Touche [Stop/Reset] (Stop/Restauration)
▶ Papier recommandé
- Papier Ordinaire
- Papier blanc Extra*
• Photo Papier Glacé* - Papier Photo Mat*
- Papier Photo Pro*
• Papier Photo Glacé Extra*
• Papier Photo Satiné Extra*
▶ Copie de documents
▶ Cartes mémoire compatibles
natural_image
Line drawing of a printer with paper feed and control panel (no text or symbols)natural_image
Diagram showing two-step assembly of a device with a handle, no text or symbols present
natural_image
Diagram of a hand using a tool to adjust or install a device, showing a magnified inset of the component (no text or symbols present)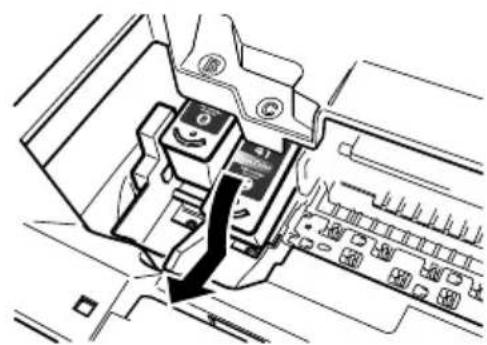
natural_image
Technical diagram of a mechanical assembly with no visible text or symbolsATTENTION
natural_image
Technical line drawing of a mechanical assembly with no visible text or symbols(B)(A) (C)
natural_image
Line drawing of a device casing with internal components and ventilation slots (no text or symbols)(C)
natural_image
Technical diagram of a mechanical component with an arrow pointing to a button labeled '41' (no readable text or symbols beyond basic labels)
natural_image
Technical diagram of a mechanical assembly with an inset showing a close-up of a component detail (no text or symbols present)natural_image
Line drawing of a printer with paper sheets and arrows indicating printing process (no text or symbols)natural_image
Line drawing of a printer's internal structure showing paper feeding into a tray (no text or symbols)Plus d'informations
natural_image
Simple line drawing of a trash bin with two crossed lines indicating no waste or prohibition (no text or symbols)
▶ Instalace softwaru
Copyright ©2006 CANON INC.
(8) Direct Print Port
▶ Doporučený papír
natural_image
Line drawing of a printer with paper feed and control panel (no text or symbols)natural_image
Diagram showing two mechanical components with a highlighted section, no text or symbols present
natural_image
Diagram of a device being inserted into a device, showing a magnified view of the internal structure (no text or symbols present)natural_image
Technical line drawing of a mechanical component with no visible text or symbolsA UPOZORNĚNÍ
natural_image
Technical line drawing of a mechanical assembly or assembly with no visible text or symbols(B)(A) (C)
natural_image
Line drawing of a device casing with internal components and ventilation slots (no text or symbols)(C)
natural_image
Technical diagram of a mechanical component with an arrow pointing to a button (no text or symbols present)natural_image
Technical diagram of a mechanical assembly with an inset showing a hand operating a component (no text or symbols present)natural_image
Line drawing of a printer with paper sheets and arrows indicating print direction (no text or symbols)natural_image
Line drawing of a printer's internal structure showing paper feeding into a tray (no text or symbols)▶ Další informace
natural_image
Simple line drawing of a trash bin with two crossed lines indicating no waste or prohibition (no text or symbols)![Found New Hardware Wizard Welcome to the Found New Hardware Wizard This view includes your main software for: MP30 If your hardware came with an installation 12 or Happy disk, saved it save. What is you created the software? □ (local software submittals [Recommended]) □ (local file in a specific location Advanced) Data found to continue. Next Next Cancel](/content/2026/03/528151/images/5866f42a59de98fee3999a35c2e05b61f0ec0217c13c4c74fabc82ee25ed2fce.jpg)
Printeri draiveri installeerimine - Macintosh
▶ Soovitatav paber
- Tavaline paber
- Ülivalge paber*
• Läikiv fotopaber* - Matt fotopaber*
- Erialane fotopaber*
- Eriti läikiv fotopaber*
- Poolläikiv fotopaber*
Kopeerimine
natural_image
Line drawing of a printer with control panel and paper feed (no text or symbols)| Kaardi liik Kuidas paigaldada | |
| • CompactFlash (CF) -kaart• Microdrive• xD-Picture Card*Paigaldage need kaardid vasakpoolsesse kaardipilusse. | 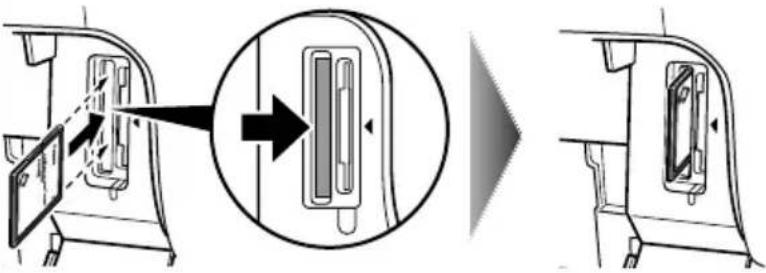 |
| • SmartMedia -kaartSisestage see kaart paremasse kaardipilusse. | 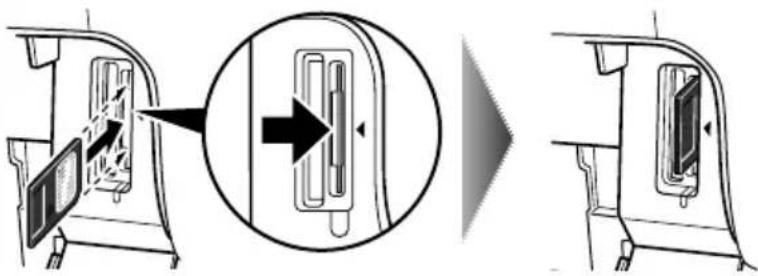 |
| • Memory Stick• Memory Stick PRO• Memory Stick Duo*• Memory Stick PRO Duo*• SD -kaart• miniSD -kaart*• MultiMedia Card (ver3.31)Paigaldage need kaardid parempoolsesse kaardipilusse. |  |
natural_image
Diagram showing two mechanical components with arrows indicating movement, no text or symbols present
natural_image
Diagram of a device being inserted into a cable, showing hand positioning and tool insertion (no text or symbols)natural_image
Technical line drawing of a mechanical assembly with no visible text or symbolsETTEVAATUST
- Ärge puudutage läbipaistvat kilet (A), kilejuhet (B), tindiimajat (käsnyas osa) (C) ega metallosi.
natural_image
Technical line drawing of a mechanical assembly with no visible text or symbols(B)(A) (C)
natural_image
Line drawing of a device casing with internal components and ventilation slots (no text or symbols)(C)
natural_image
Technical diagram of a mechanical component with an arrow pointing to a button or connector (no text or symbols present)
natural_image
Technical diagram of a mechanical component with an inset showing a close-up view of a tool path (no text or symbols present)natural_image
Line drawing of a printer with paper sheets and arrows indicating printing process (no text or symbols)natural_image
Line drawing of a printer's internal structure showing paper feeding into a printer (no text or symbols)Lisateave
natural_image
Simple line drawing of a trash bin with two crossed lines indicating no waste or prohibition (no text or symbols)
Printera draivera instalâcija - Macintosh
▶ Kopēšana
natural_image
Line drawing of a printer with control panel and paper feed (no text or symbols)natural_image
Diagram showing two-step assembly of a device with a connector and cable, no text or symbols present
natural_image
Diagram of a hand using a device to adjust or install a component, with an inset showing the tool interacting with the handle (no text or symbols present)3 Spiediet tukšas FINE kasetnes skavu uz leju un izvelciet FINE kasetni.
natural_image
Technical line drawing of a mechanical assembly with no visible text or symbolsUZMANIBU
natural_image
Technical line drawing of a mechanical assembly or housing with no visible text or symbols(B)(A)(C)
natural_image
Line drawing of a device casing with internal components and ventilation slots (no text or symbols)(C)
natural_image
Technical diagram of a mechanical component with an arrow pointing to a button labeled '41' (no readable text or symbols beyond basic labels)
natural_image
Technical diagram of a mechanical component with an inset showing a close-up view of a tool or assembly (no text or symbols present)natural_image
Line drawing of a printer with paper sheets and arrows indicating printing process (no text or symbols)natural_image
Line drawing of a printer's internal structure showing paper feed, paper holder, and printer tray (no text or symbols)natural_image
Symbol of a trash bin crossed with a diagonal line, no text or numbers present▶ Kopijų darymas
natural_image
Line drawing of a printer with paper feed and control panel (no text or symbols)natural_image
Diagram showing two mechanical assembly steps: one with a USB plug inserted into a cable, the other with a pin inserted into a connector (no text or symbols present)
natural_image
Diagram of a device's internal components with an inset showing a tool interacting with a clip (no text or symbols present)natural_image
Technical line drawing of a mechanical component with no visible text or symbolsDÉMESIO
natural_image
Technical line drawing of a mechanical assembly with no visible text or symbols(B)(A)(C)
natural_image
Line drawing of a device casing with internal components and ventilation slots (no text or symbols)(C)

natural_image
Technical diagram of a mechanical component with an arrow pointing to a button labeled '41' (no readable text or symbols beyond basic labels)
natural_image
Technical diagram of a mechanical component with an inset showing a close-up view of a mechanical assembly (no text or symbols present)natural_image
Line drawing of a printer with paper sheets and arrows indicating printing process (no text or symbols)natural_image
Line drawing of a printer's internal structure showing hand operating the lid (no text or symbols)▶ Papildoma informacija
natural_image
Symbol of a trash bin crossed with no text or numbers, representing environmental restriction (no text present)Copyright ©2006 CANON INC.
Ajánlott papír
natural_image
Line drawing of a printer with paper feed and control panel (no text or symbols)natural_image
Diagram showing two mechanical assembly steps: one with a cable being inserted into a component, the other with a tool emitting sparks (no text or symbols present)
natural_image
Diagram of a device being inserted into a slot, showing tool insertion and assembly (no text or symbols)natural_image
Technical line drawing of a mechanical assembly with no visible text or symbolsFIGYELEM!
natural_image
Technical line drawing of a mechanical assembly or component (no visible text or symbols)(B)(A) (C)
natural_image
Line drawing of a device casing with ventilation slots and a ventilation grille (no text or symbols)(C)
natural_image
Technical diagram of a mechanical component with an arrow pointing to a button (no text or symbols present)natural_image
Technical diagram of a mechanical assembly with an inset showing a hand operating a component (no text or symbols present)natural_image
Line drawing of a printer with paper being inserted, showing paper and printer pages (no text or symbols)natural_image
Line drawing of a printer's internal structure showing paper feed and paper tray (no text or symbols)Bővebb információ
natural_image
Symbol of a trash bin crossed with a diagonal line, no text or numbers presentCopyright ©2006 CANON INC.
natural_image
Line drawing of a printer with paper feed and control panel (no text or symbols)natural_image
Diagram showing two mechanical components with a highlighted section, no text or symbols present
natural_image
Diagram of a device's internal components with an inset showing a tool interacting with a clip (no text or symbols present)natural_image
Technical line drawing of a mechanical component with no visible text or symbolsPRZESTROGA
natural_image
Technical line drawing of a mechanical assembly with no visible text or symbols(B)(A)(C)
natural_image
Line drawing of a device casing with internal components and ventilation slots (no text or symbols)(C)
natural_image
Technical diagram of a mechanical component with an arrow pointing to a button (no text or symbols present)natural_image
Technical diagram of a mechanical assembly with an inset showing a hand operating a component (no text or symbols present)natural_image
Line drawing of a printer with paper and paper roll, showing paper being inserted (no text or symbols)natural_image
Line drawing of a printer's internal structure with a hand operating the lid (no text or symbols)natural_image
Simple line drawing of a trash bin with two crossed lines indicating no waste or prohibition (no text or symbols)
Создание копий
natural_image
Line drawing of a printer with control panel and paper feed (no text or symbols)natural_image
Diagram showing two mechanical components with a close-up view of a connector (no text or symbols present)
natural_image
Diagram of a device being processed with a tool, showing a magnified view of the process (no text or symbols present)natural_image
Technical line drawing of a mechanical assembly with no visible text or symbolsПРЕДУПРЕЖДЕНИЕ
natural_image
Line drawing of a device casing with internal components and a ventilation grille (no text or symbols)(C)
natural_image
Technical diagram of a mechanical or electrical component with no visible text or symbols
natural_image
Technical diagram of a mechanical assembly with an inset showing a close-up of a component (no text or symbols visible)natural_image
Line drawing of a printer with paper sheets and arrows indicating printing process (no text or symbols)natural_image
Line drawing of a printer's internal structure showing paper feeding into a printer (no text or symbols)natural_image
Simple line drawing of a trash bin with two crossed lines indicating no waste or prohibition (no text or symbols)![Found New Hardware Wizard Welcome to the Found New Hardware Wizard This would help you install software to: MP345 If your hardware name with an installation (C) in a type of disk, need it save. What to you want the installed tool? [Install the software automatically (Recommended)] [Install has a bit on specific location (Advanced)] Data Real Incontinu: Next Next Cancel](/content/2026/03/528151/images/126d2b411fb5436290c4d73be494b51fc2ba4de9df2620b8b268aaf8bd1182e1.jpg)
- Ne zamenjujte uporabnikov med postopkom namestitve.
Namestitev gonilnika tiskalnika - Macintosh
Copyright ©2006 CANON INC.
Vse pravice pridržane. Te publikacije ni dovoljeno, ne v delih ne v celoti, prenašati ali kopirati, in sicer v nobeni obliki in brez pisnega dovoljenja podjetja Canon Inc.
Primer:
Izrazi, uporabljeni v priročniku
▶ Priporočen papir
- Navaden papir
- Super beli papir*
• S v e t l e či fotografski papir* - Matte fotografski papir*
• Fotografski papir Pro*
• S v e t l e či fotografski papir Plus* - P o l s v e t l e či fotografski papir Plus*
* O z n a čuje Canonov originalen medij.
▶ Kopiranje
1 Pritisnite [KOPIRANJE].
4 Z [▲] ali [▼] izberite predmet, ki ga boste nastavili in z [◀] ali [▶] spremenite nastavitev.
5 Po dokončanju vseh potrebnih nastavitev pritisnite [OK].
natural_image
Line drawing of a printer with paper feed and control panel (no text or symbols)| Vrsta kartice Kako namestiti | |
| KarticaCompactFlash (CF)MicrodrivexD-Picture Card*Te kartice se vstavijov levo kartično režo. | 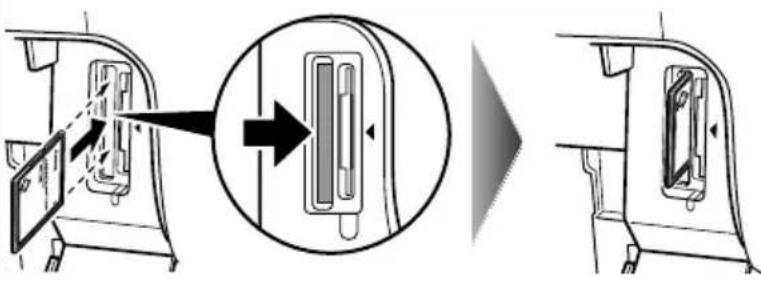 |
| Kartica SmartMediaTa kartica se vstavi vdesno kartično režo. | 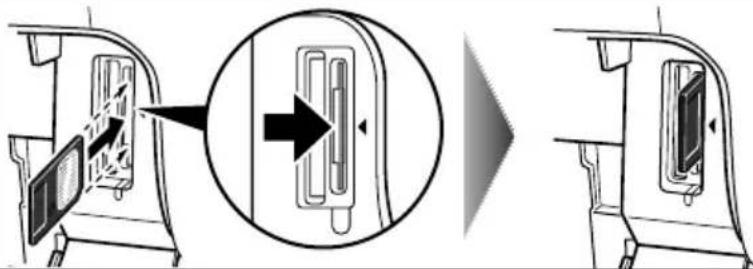 |
| Memory StickMemory Stick PROMemory Stick Duo*Memory Stick PRO Duo*Kartica SDKartica miniSD*MultiMedia Card (ver3.31)Te kartice se vstavijov d es no k a r ti čno rožo. | 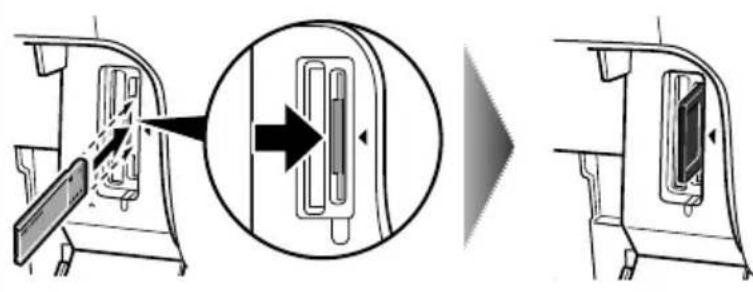 |
* Vstavite spominsko kartico skupaj z ustreznim vmesnikom.

(1) Dokument se skenira in shrani v računalnik.
(2) Dokument se skenira in shrani kot datoteka PDF.
(3) Dokument se skenira in z aplikacijsko programsko opremo za e-pošto se slika vstavi v e-sporočilo.
(4) Dokument se skenira in prikaže v registrirani aplikacijski programski opremi.
3 Z [▲] ali [▼] izberite operacijo skeniranja, nato pritisnite [OK].
4 Pritisnite [Barvno] ali [Črno].
natural_image
Diagram showing two steps of inserting a component into a cable, with no visible text or symbols.![CANON Pixma MP460 - Pritisnite [Barvno] ali [Črno]. - 1](/content/2026/03/528151/images/cad96d69387006e0df43ce4f42b7ab694d40cbc487e8b2ac21b2773cd5c1cb23.jpg)
natural_image
Diagram of a printer's internal structure with a magnified inset showing the blade being cut (no text or symbols present)![CANON Pixma MP460 - Pritisnite [Barvno] ali [Črno]. - 2](/content/2026/03/528151/images/989cfa3c3324124eb8d8ec881876f2166152c6c34f81853b5982bc8dcf5487d9.jpg)
natural_image
Technical line drawing of a mechanical assembly with no visible text or symbolsPOZOR
natural_image
Technical line drawing of a mechanical assembly or structural component (no visible text or symbols)(B)(A) (C)
natural_image
Line drawing of a device casing with ventilation slots and a ventilation grille (no text or symbols)(C)
natural_image
Technical diagram of a mechanical component with no visible text or symbols6Kartušo FINE potisnite gor, tako da se zaskoči na mesto.

natural_image
Technical diagram of a mechanical assembly with an inset showing a close-up of a component detail (no text or symbols present)natural_image
Line drawing of a printer with paper sheets and arrows indicating printing process (no text or symbols)natural_image
Line drawing of a printer's internal structure showing paper feeding into a tray (no text or symbols)natural_image
Symbol of a trash bin crossed with no text or numbers, representing environmental restriction (no text present)Copyright ©2006 CANON INC.
▶ Odporúčaný papier
▶ Vytváranie kópií
natural_image
Line drawing of a printer with control panel and paper feed (no text or symbols)| Typ karty Postup | pri inštalácii |
| Karta CompactFlash (CF)MicrodrivexD-Picture Card*Tieto karty vkladajte do l'avej zásuvky na karty. | 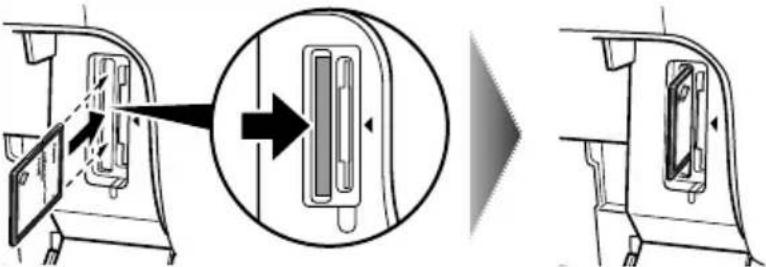 |
| Karta SmartMediaTúto kartu vkladajte do pravej zásuvky na karty. |  |
| Memory StickMemory Stick PROMemory Stick Duo*Memory Stick PRO Duo*SD Cardmini SDCard*Karta MultiMediaCard (ver3.31)Tieto karty vkladajte do pravej zásuvky na karty. | 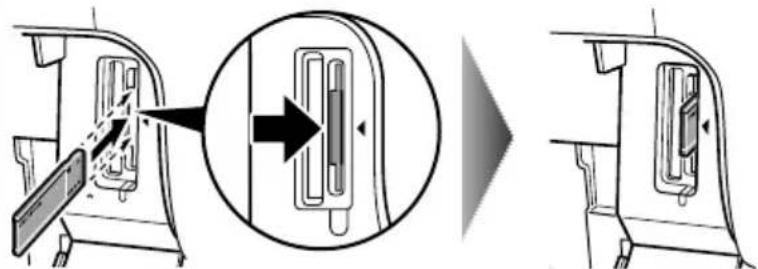 |
natural_image
Diagram showing a cable connector being inserted into a USB flash drive (no text or symbols present)
natural_image
Simple line drawing of a tool interacting with a cylindrical object (no text or symbols)
natural_image
Diagram of a car seatbelt mechanism with an inset showing a tool interacting with the handle (no text or symbols present)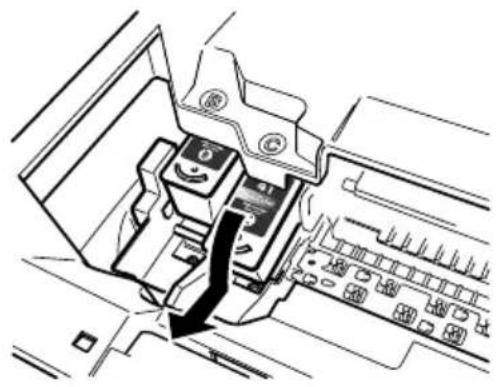
natural_image
Technical line drawing of a mechanical assembly with no visible text or symbolsVÝSTRAHA
natural_image
Technical line drawing of a mechanical assembly or device with no visible text or symbols(B)(A) (C)
natural_image
Line drawing of a device casing with internal components and ventilation slots (no text or symbols)(C)
natural_image
Technical diagram of a mechanical component with an arrow pointing to a button labeled '41' (no readable text or symbols beyond basic labels)6 Kazetu FINE (FINE Cartridge) zatlačte, aby s kliknutím zapadla na miesto.
natural_image
Technical diagram of a mechanical component with an inset showing a close-up view of a mechanical assembly (no text or symbols present)natural_image
Line drawing of a printer with paper sheets and arrows indicating printing process (no text or symbols)natural_image
Line drawing of a printer's internal structure showing paper feeding into a tray (no text or symbols)▶ Ďalšie informácie
natural_image
Simple line drawing of a trash bin with no text or symbols![Found New Hardware Wizard Welcome to the Found New Hardware Wizard This was used to provide details for Microsoft If your hardware name with an installation CD in Raspberry disk, need it save. What do you want the installed-up? [ ] Install the software automatically (Recommended) [ ] Install less than a list of generic versions (Recommended) Click Real in continue Next Next Cancel](/content/2026/03/528151/images/99e96eb0c1aec3c4596ff1b473c73705cc09fd19d199111f0e2f2e18d374690c.jpg)
Telif Hakkı ©2006 CANON INC.
▶ Önerilen Kağıt
natural_image
Line drawing of a printer with paper feed and control panel (no text or symbols)natural_image
Diagram showing two-step assembly of a USB device with a connector, no text or symbols present
natural_image
Technical line drawing of a mechanical assembly with no visible text or symbols⚠ DİKKAT
natural_image
Technical line drawing of a mechanical assembly with no visible text or symbols(B)(A)(C)
natural_image
Line drawing of a device casing with ventilation slots and a ventilation grille (no text or symbols)(C)
natural_image
Technical diagram of a mechanical component with no visible text or symbolsnatural_image
Technical diagram of a mechanical assembly with an inset showing a close-up of a component (no text or symbols visible)natural_image
Line drawing of a printer with paper and paper sheets being inserted (no text or symbols)natural_image
Line drawing of a printer's internal structure showing paper feed, paper holder, and printer tray (no text or symbols)X Ayrıntılı Bilgi
natural_image
Simple line drawing of a trash bin with two crossed lines indicating no waste or prohibition (no text or symbols)
▶ Вироблення копій
natural_image
Line drawing of a printer with control panel and paper feed (no text or symbols)natural_image
Diagram showing two-step installation of a USB device into a cable, with no visible text or symbols.[Non-Text]
natural_image
Diagram of a device being processed with a tool, showing a magnified view of the process (no text or symbols present)natural_image
Technical line drawing of a mechanical assembly with no visible text or symbols⚠ YBAΓA!
natural_image
Technical line drawing of a mechanical assembly with no visible text or symbols(B)(A) (C)
natural_image
Line drawing of a device housing with internal components and a ventilation grille (no text or symbols)(C)
natural_image
Technical diagram of a mechanical component with no visible text or symbols
natural_image
Technical diagram of a mechanical assembly with an inset showing a close-up of a component (no text or symbols present)natural_image
Line drawing of a printer with paper sheets being inserted, showing paper movement arrows (no text or symbols)natural_image
Line drawing of a printer's internal structure showing paper feed, paper tray, and printer casing (no text or symbols)▶ Більше інформації
natural_image
Line drawing of a printer with paper and paper sheets being inserted (no text or symbols)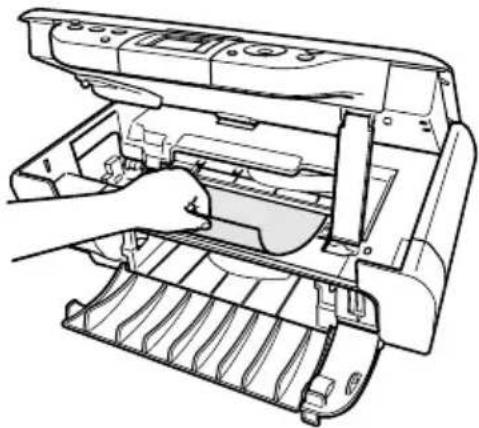
natural_image
Line drawing of a printer's internal structure showing paper feeding into a tray (no text or symbols)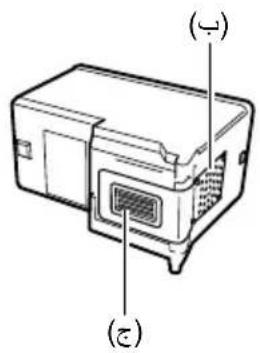

natural_image
Technical diagram of a mechanical component with an arrow pointing to a button (no text or symbols present)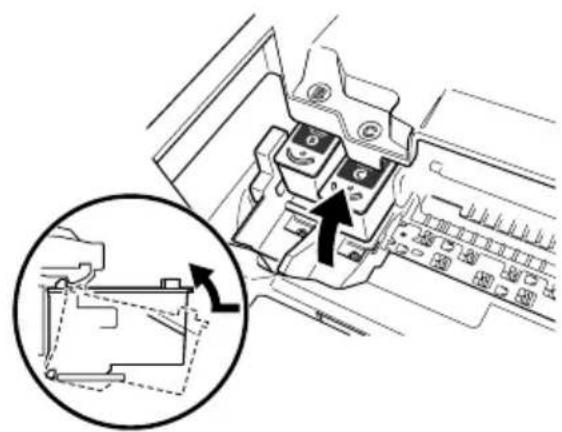
natural_image
Technical diagram of a mechanical assembly with an inset showing a close-up of a component detail (no text or symbols present)natural_image
Diagram of a device being inserted into a slot, showing hand placement and tool insertion (no text or symbols)
natural_image
Technical line drawing of a mechanical assembly with no visible text or symbols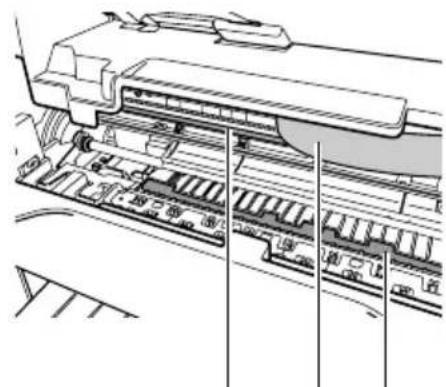
natural_image
Technical line drawing of a mechanical assembly or device with no visible text or symbols(أ) (ب) (ج)

natural_image
Diagram showing a connector being inserted into a cable, with no visible text or symbols
natural_image
Diagram of a mechanical joint or bracket with no visible text or symbols
natural_image
Line drawing of a printer with paper feed and scroll wheel (no text or symbols)[Borderless copying]
(نسخ بدون حدود)
تحميل المستندات

:Windows analyst staying
natural_image
Simple line drawing of a trash bin with no text or symbols.www.canon-europe.com/environment
The following FINE Cartridges are compatible with this machine.
The following FINE Cartridges (High Yield) are also compatible with this machine.
For details on FINE Cartridge replacement, refer to "Replacing A FINE Cartridge" in this guide.