
AMG300 - Food Processor BESTRON - Free user manual and instructions
Find the device manual for free AMG300 BESTRON in PDF.
| Product type | Food processor |
| Brand | Bestron |
| Model | AMG300 |
| Dimensions (L x H x D) | 32 x 14 x 30 cm |
| Supply voltage | 220-240 V |
| Frequency | 50-60 Hz |
| Power | 300 W |
| Cord length | 78 cm |
| Protection class | II |
| Main functions | Meat grinding, sausage making, kibbeh preparation |
| Included accessories | Food pusher, feeding tray, grinding head, grinding cylinder, rotating blades, medium grinding disc, coarse grinding disc, locking ring, sausage attachment, Kibbeh attachment |
| Housing material | Plastic |
| Use | Household only, non-professional use |
| Care and cleaning | Clean removable parts with warm soapy water; do not put in dishwasher; wipe housing with a damp cloth |
| Safety | Do not use hard foods (nuts, bones, ginger); do not run more than 5 minutes without a break; reverse function for unblocking |
| Spare parts and repairability | Repairs by qualified professional only; contact Bestron customer service |
| Warranty | Consult Bestron customer service |
Frequently Asked Questions - AMG300 BESTRON
User questions about AMG300 BESTRON
0 question about this device. Answer the ones you know or ask your own.
Ask a new question about this device
Download the instructions for your Food Processor in PDF format for free! Find your manual AMG300 - BESTRON and take your electronic device back in hand. On this page are published all the documents necessary for the use of your device. AMG300 by BESTRON.
USER MANUAL AMG300 BESTRON
natural_image
Exterior view of a stainless steel meat grater with a fork and handle (no text or symbols visible)INSTRUCTION MANUALMEAT
DE
EN
PL H
SK
G
The image is too blurry to recognize any text content.
The image is too blurry to recognize any text content.
The image is too blurry to recognize any text content.
The image is too blurry to recognize any text content.
The image is too blurry to recognize any text content.
The image is too blurry to recognize any text content.
The image is too blurry to recognize any text content.
flowchart
graph TD
    A["Raw Material: Round cutter, Potato Slice"] --> B["Add Potato Slice"]
    B --> C["Add Potato Slice with Radial Strip"]
    C --> D["Add Radial Strip with Stover"]
    D --> E["Add Stover with Stover"]
    E --> F["Output: Final Product with Stover"]
SICHERHEITSHINWEISE
| Technical Specifications | |
| Model AMG300 | |
| Mains 220-240V | |
| Frequency (Hz) 50-60 | |
| Safety Class II | |
| Power (Watt) 300 | |
| Noise (dB(A)) - | |
| Max. Capacity | - |
| Maximum continuous operating time (KB) | - |
| Dimensions (L x W x H) (cm) | 32x14x30 |
| Cable length (cm) | 78 |
SAFETY INSTRUCTIONS
- This appliance is not intended for professional use, but is intended for domestic and similar use, such as in staff kitchens, in shops, offices and other working environments, by guests in hotels, motels and other residential environments, in Bed & Breakfast type environments and farms.
- Make sure that the mains voltage matches with the voltage shown on the rating plate.
• Always install the appliance on a stable and level surface where it cannot fall over.
- Parts of this appliance may become warm or hot. Avoid burning yourself. Do not touch.
- Your hands must be dry when you touch this appliance, it's cord and plug.
- This appliance must lose it's heat so give it sufficient clearance around it. Also do not cover it.
- This appliance, it's cord and plug may not come into contact with water.
- Do not touch this appliance if it have been in contact with water. Immediately unplug it.
- This appliance, it's cord and plug may not come into contact with heat sources or open fire.
- Never let the cord hang over the edge of the sink, a worktop or a table.
- Always remove the plug from the socket when you are not using the electrical appliance.
- Remove the plug from the socket by pulling the plug itself and not the cord.
- Do not use the electrical appliance if the cord is damaged.
- Do not switch on this appliance with an external timer or a separate remote controlled system.
- If the appliance is defective or the cord is damaged, do not try to repair it yourself. Always have a qualified mechanic carry out any repairs. It must be replaced by the manufacturer, a technical service provider or a person with an equivalent qualification, to avoid any danger.
- This appliance is not intended for use by children or persons with reduced physical, sensory or mental capabilities or lack of experience and knowledge.
• Children are not allowed to play with the device.
- Cleaning and user maintenance should not be performed by children.
- Keep the appliance, it's cable and plug out of reach of children under the age of 8 years old.
- Keep your fingers clear of all moving parts whilst the appliance is in operation.
- Do not switch on the appliance unless the accessories and the bowl are fitted properly.
- Always switch off the appliance before cleaning the appliance or when changing or removing the accessories.
• Always lift the device with both hands. Lift it by holding on to the housing, never hold on to the head or tray.
- Do not grind hard food like nuts, bones, ginger roots, etc.
- To avoid jamming, do not use excessive force when pushing food through the device
- Thoroughly clean the appliance after use (see Cleaning and Maintenance).
ENVIRONMENT
Dispose of packaging material such as plastic and cardboard boxes in the designated containers.
- Do not dispose of this product as normal domestic waste at the end of its life, but hand it in at a collection point for the reuse of electric and electronic equipment. Look for the symbol on the product, the user instructions or the packaging showing the type of waste.
- The materials can be used as indicated. By helping us reuse and process the materials or otherwise recycle the old equipment, you will be making an important contribution towards the protection of the environment.
- Your municipality can tell you where to find the designated waste collection point in your neighbourhood.
SERVICE
In the unlikely event of a malfunction, please contact Bestron customer service: www.bestron.com/service
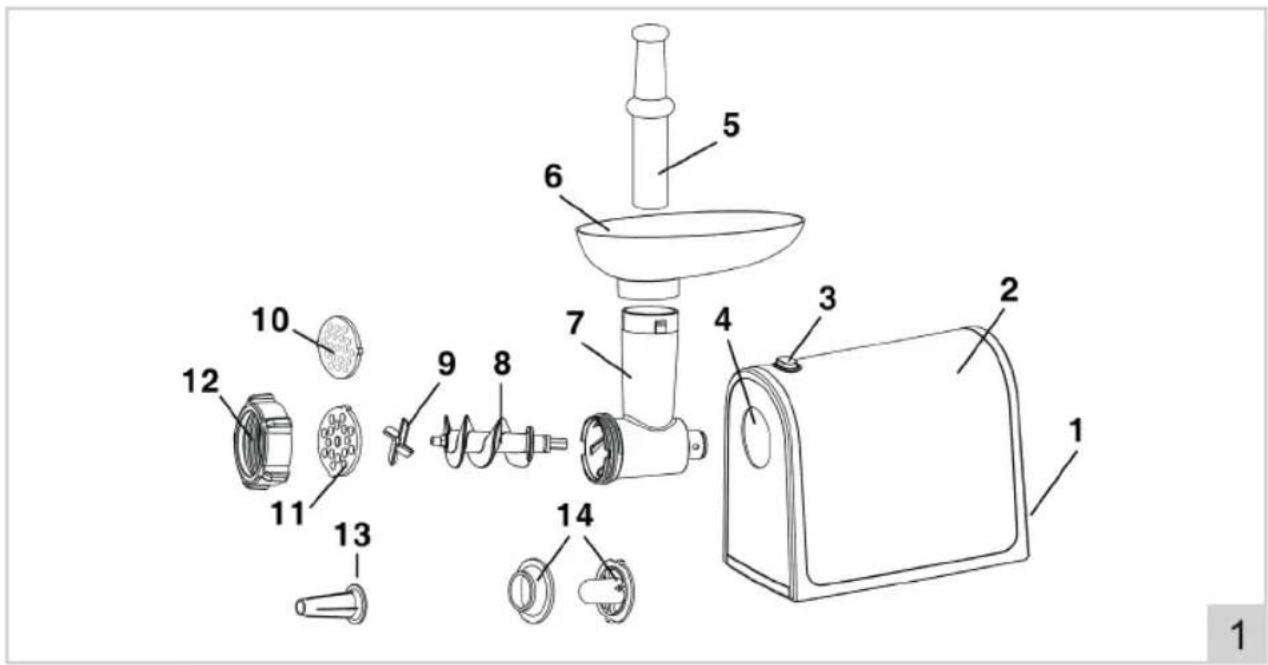
OPERATION - General information
The below description goes with the image on page 2.
- "ON/0/R" switch
- Motor housing
- Locking knob
- Crevice
- Food presser
- Feeding tray
-
Grinding head
-
Grinding cylinder
- Spinning blades
- Grinding disc (medium)
- Grinding disc (coarse)
- Locking ring
- Sausage attachment
- Kibbeh attachment
FUNCTION - Using for the first time
- Remove the packaging.
- Clean the device to remove any manufacturing residues (see "Cleaning and maintenance").
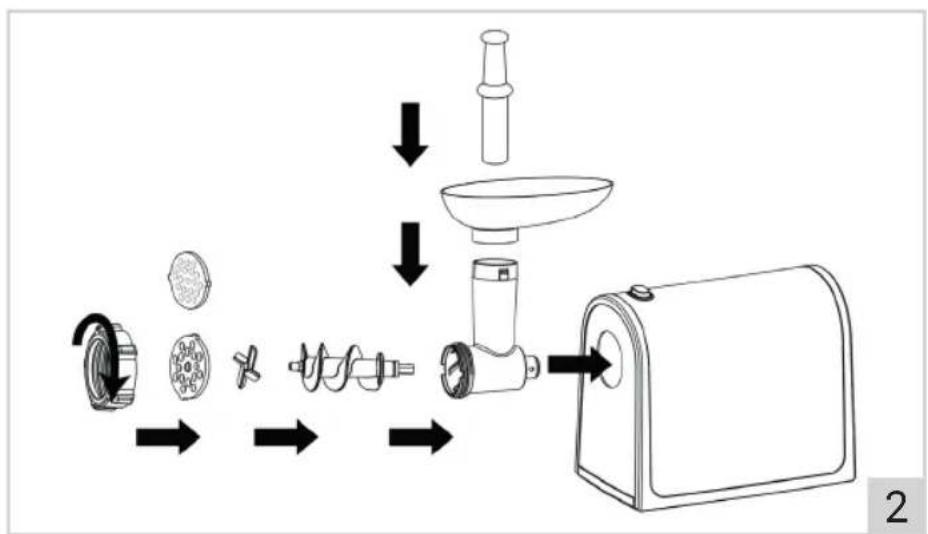
FUNCTION - Assembling (see illustration 2 & 3 on page 2)
WARNING:
• Make sure the device is placed on a stable, flat surface.
• The air vents at the side and bottom of the device should not be blocked.
- During assembling the device should not be plugged into a socket.
- Press down the locking knob, then grab the grinding head with one hand and position it into the crevice in the device. Turn it until it locks into place.
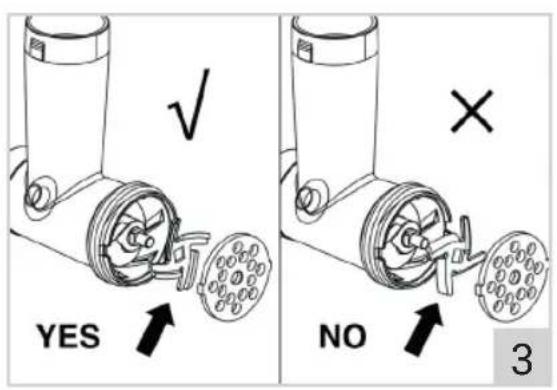
- Fit the grinding cylinder and the spinning blades inside the shaft of the grinding head. Make sure that the spinning blades face you (see illustration 3).
- Then attach the medium or coarse grinding disc and press it in place. If the grinding cylinder, spinning blade or grinding disc are not fitting correctly, the device will not grind meat.
- Attach and secure the locking ring by turning it clockwise. Do not turn the locking ring any further than is required.
- Place the feeding tray on top of the grinding head and place a bowl under the grinder to catch food.
FUNCTION - Grinding meat
WARNING:
- Only use the food presser supplied with the device to push food into the device
- Cut all the food into pieces that'll easily fit into the opening. Sinewless, boneless and fatless meat is recommended. Do not use frozen meat!
- Never use the appliance for longer than 5 minutes to prevent overheating. Switch it off and wait a few minutes to allow it to cool before continuing use.
- Pushing in food too quickly may cause the device to stop working.
- If the device starts shaking during use, the accessories are not installed properly.
NOTE: for a smoother grinding process, go through the machine with fatty meat.
- Put the plug into the wall socket. Switch the "ON/0/R" switch in the "ON" position to turn on the appliance.
- Put the meat on the feeding tray and use the food presser to push food from the feeding tray into the opening. Don't apply too much force on the food presser.
- When finished, shut down the device by switching the "ON/0/R" switch in the "0" position and remove the plug from the wall socket.
If your appliance suddenly stops working:
- Turn off the appliance by switching the "ON/0/R" switch in the "0" position, then remove the plug from the wall socket.
- Let the appliance cool down to room temperature.
- Put the plug back into the wall socket.
- Switch on the appliance by switching the "ON/0/R" switch in the "ON" position.
FUNCTION - "Reverse" function
When the device jams, set the "ON/0/R" switch into the "R" (Reverse) position for 3-5 seconds (this is the position where you need to keep pressing down the switch). The grinding cylinder will run in the opposite direction, allowing you to dislodge the blocking element,
NOTE:
- If you cannot manage to remove the blocking element by utilizing the "Reverse" function you need to shut down the device, disassemble the grinding head and clean it.
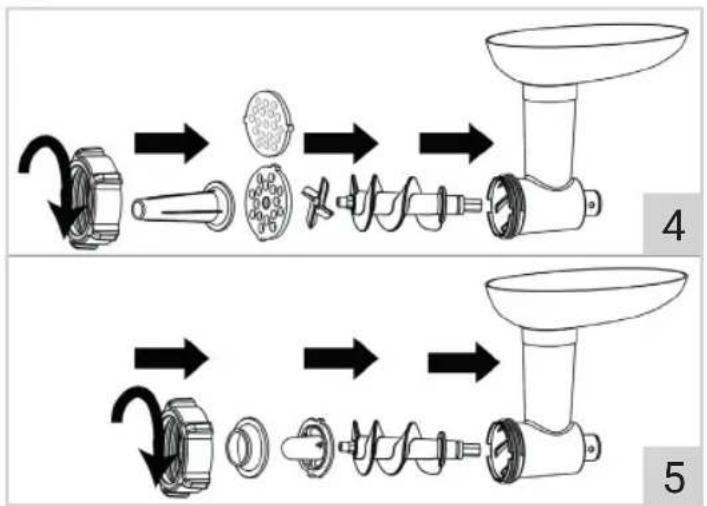
FUNCTION - Making sausages
To make sausages the accessories need to be changed. Disassemble the device by following the steps described in the chapter "Assembling" in the opposite direction. Whenever you wish to make sausage, follow the steps as described in the chapter 'Assembling'. Before placing the locking ring however, place the sausage attachment as shown in illustration 4.
NOTE:
- Meat must be prepped beforehand, you cannot grind unprocessed meat directly into sausage casings.
- You can use natural or dry casings. If you have bought dry casings, they first must be soaked in cold water until they are soft and pliable. Then rinse them under lukewarm water and let the water run through the casings.
• To make sausages to the desired length, twist the casing at intervals.
-
Attach the casing to the end of the sausage attachment. Clamp the casing (with the closing strip of a sandwich bag, for instance) and tie it shut at the desired length.
-
Turn on the appliance by switching the "ON/0/R" switch in the "ON" position.
-
Put meat on the feeding tray and use the food presser to push food from the feeding tray into the opening until the meat completely fills the casing.
-
Turn off the appliance and remove the end of the casing from the sausage attachment and tie a knot in the open end of the casing.
-
Use a knife or needle to poke holes in the length of the sausage to remove any air bubbles.
-
Repeat the process until you're finished making sausages.
-
When finished, shut down the device by switching the "ON/0/R" switch in the "0" position and remove the plug from the wall socket.
FUNCTION - Making Kibbeh
For the stuffing of Kibbeh, an oriental meat dish, sheep meat is recommended. For every 100 grams of meat add a tablespoon of olive oil, a table spoon of finely cut onion and a tablespoon of flour. Season the meat according to taste.
-
Grind the meat once or twice.
-
Fry the onion until it's brown and add the rest of the ingredients.
For the casing of Kibbeh you should use 450 grams of lean meat, 150 to 200 grams of flour and one finely cut or ground piece of nutmeg. Season according to taste.
-
Grind the meat three times and add all the ingredients together in a bowl.
-
Grind the mixture three additional times.
-
To make Kibbeh, the accessoires need to be changed. Disassemble the device by following the steps described in the chapter "Assembling" in the opposite direction. Then follow the steps as described in the chapter 'Assembling', but without the spinning blade and grinding disc from the grinding head. Before placing the locking ring, place the Kibbeh attachments (see illustration 5) and place the locking ring. Do not turn the ring any further than necessary.
-
Use the food presser to push the mixture through the opening in the feeding tray. The device will create the Kibbeh-casing.
-
Cut or pinch the Kibbeh off at the desired length to finish the outer shell of the Kibbeh.
-
Fill the casing with the stuffing you made earlier and seal the open end.
CLEANING AND MAINTENANCE
-
Turn off the appliance and remove the plug from the wall socket.
-
Disassemble the device by following the steps described in the chapter "Assembling" in the opposite direction.
-
Clean the parts in warm water with soap. The device is not dishwasher-proof.
-
Clean the housing with a clean cloth moistened with a disinfectant cleaner, and dry thoroughly.
WARNING:
- Clean the device after each use.
- If you are experiencing difficulty in removing the grinding disc, place the flat edge of a spoon at the edge between the grinding disc and the grinding head. This way, you can tilt the grinding disc out of the grinding head.
- Never use corrosive or scouring cleaning agents or sharp objects (such as knives or hard brushes) to clean the device.
- Do not immerse the motor unit in water, or in other liquids.
• The device is not dishwasher-proof.
- To prevent discoloration or rusting, wipe the grinding plates with vegetable oil and wrap each plate with greaseproof paper.
ALL YOU WANT TO KNOW ABOUT YOUR UNIQUE 5 YEAR WARRANTY
ALLES, WAS SIE ÜBER IHRE EINZIGARTIGE 5-JAHRES-GARANTIE WISSEN MÖCHTEN TOUT CE QUE VOUS VOULEZ SAVOIR SUR VOTRE GARANTIE UNIQUE DE 5 ANS ALLES WAT U WILT WETEN OVER UW UNIEKE GARANTIE VAN 5 JAAR TUTTO QUE LLO CHE VUOI SAPERE SULLA TUA GARANZIA UNICA DI 5 ANNI TODO LO QUE QUIERES SABER SOBRE TU ÚNICA GARANTÍA DE 5 AÑOS
BESTRON.COM/GUARANTEE

NEED HELP?
CHECK OUT OUR SERVICE PAGE
BRAUCHEN SIE HILFE? SCHAUEN SIE SICH UNSERE SERVICESEITE AN BESOIN D'AIDE? DISCUTE AVEC NOUS! CONSULTEZ NOTRE PAGE DE SERVICE HULP NODIG? CHAT MET ONS! BEKIIK ONZE SERVICEPAGINA HO BISOGNO DI AIUTO? CHATTA CON NOI! GUARDA LA NOSTRA PAGINA SERVIZI ¿NECESITAS AYUDA? CONSULTE NUESTRA PÁGINA DE SERVICIO
BESTRON.COM/SERVICE

natural_image
Generic user avatar icon showing a person wearing a headset and holding a microphone (no text or symbols)EASTERN EUROPE CUSTOMER SERVICE
POLSKA bestron.service.pl@sertronics.de HRVATSKA bestron.service.hr@sertronics.de CZECHIA bestron.service.cz@sertronics.de SLOVENSKO bestron.service.sk@sertronics.de ROMÂNIA bestron.service.ro@sertronics.de BULGARIA bestron.service.bg@sertronics.de
SERVICE HOTLINE: 00800 954 39 543


240910-01
| Hersteller / Fournisseur/ Výrobce / Proizvođač / Produčator / Výrobca / ПроизводителBestron Nederland BV, Moeskampweg 20, 5222 AW, 's-HertogenboschNiederlande, Pays-Bas, Nizozemí, Hollandia, Holandia, Olanda, Holandsko, Холандия | |||||||
| DCZHRPLRO/MIDSKBG | |||||||
| Ursprungs-landChina | Pays d'origineChine Čína | Země původuKina Chiny | Zemlja podrijetlaChina Čína Kirtaj | Wyprodu kowano w | Tara de origine | Krajina pôvodu | Страна на производ |


- SICHERHEITSHINWEISE
- SAFETY INSTRUCTIONS
- ENVIRONMENT
- SERVICE
- OPERATION - General information
- FUNCTION - Using for the first time
- FUNCTION - Assembling (see illustration 2 & 3 on page 2)
- WARNING:
- FUNCTION - Grinding meat
- FUNCTION - "Reverse" function
- NOTE:
- FUNCTION - Making sausages
- FUNCTION - Making Kibbeh
- CLEANING AND MAINTENANCE
- ALL YOU WANT TO KNOW ABOUT YOUR UNIQUE 5 YEAR WARRANTY
- CHECK OUT OUR SERVICE PAGE
- EASTERN EUROPE CUSTOMER SERVICE
Brand : BESTRON
Model : AMG300
Category : Food Processor