90106 - Heating NEO tools - Free user manual and instructions
Find the device manual for free 90106 NEO tools in PDF.
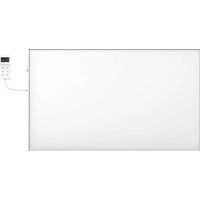
| Product type | Infrared heater |
| Compatible models | 90-105 (450 W), 90-106 (600 W), 90-107 (720 W) |
| Rated power | 600 W (model 90-106) |
| Rated voltage | 230 V ~ 50 Hz |
| Power supply | Mains with plug |
| Main functions | Adjustable thermostat, timer, control via remote control and WiFi app (TuyaSmart/Smart Life) |
| Mounting type | Wall or ceiling (kit included) or on feet (accessory 90-109) |
| Included accessories | 2 feet, remote control, wall mounting kit (4 plastic rails, 4 metal screws), ceiling mounting kit (4 plastic rails, 4 metal screws, 4 O-rings, 1 H-type metal bracket) |
| Maintenance and cleaning | Clean with a soft damp cloth after cooling and unplugging. Do not use abrasive products. |
| Safety | Protected against overheating (do not cover), automatic shutdown in case of overheating, safety distance of 1 m from flammable objects |
| Spare parts and repairability | Feet (90-109), ceiling brackets (90-108, 90-108-1), remote control. Repairs only by authorized center. |
| Minimum distance from ceiling | 4 cm |
| Minimum distance from floor | 20 cm for wall mounting, 185 cm for ceiling mounting |
| Protection rating | Not specified |
Frequently Asked Questions - 90106 NEO tools
User questions about 90106 NEO tools
0 question about this device. Answer the ones you know or ask your own.
Ask a new question about this device
Download the instructions for your Heating in PDF format for free! Find your manual 90106 - NEO tools and take your electronic device back in hand. On this page are published all the documents necessary for the use of your device. 90106 by NEO tools.
USER MANUAL 90106 NEO tools
This product is only suitable for occasional use or for use in well-insulated areas
DE
natural_image
Hand-drawn sketch of a tool with a pointed tip, no text or symbols present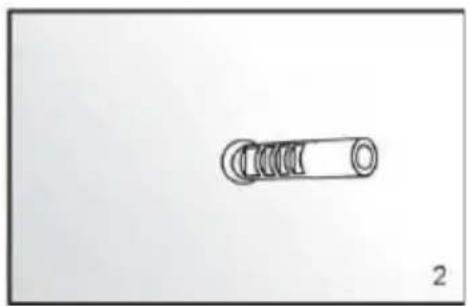
natural_image
Simple line drawing of a mechanical spring or coil component (no text or symbols)
natural_image
Simple circular object with a cross symbol, no text or labels present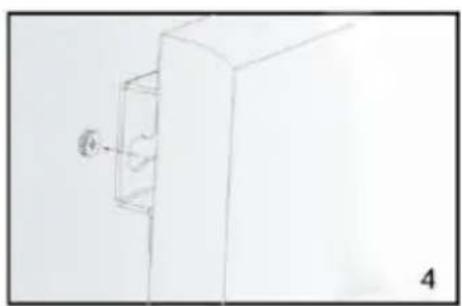
natural_image
Simple line drawing of a cabinet with a wall-mounted door and a numbered label '4' (no text or symbols on the diagram itself)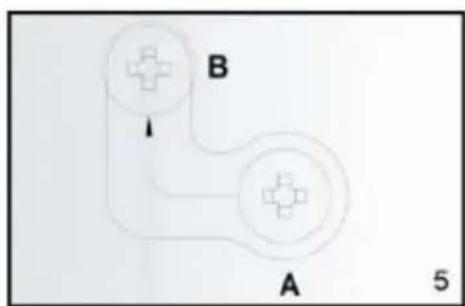
INSTRUKCJA MONTAŻU NA SUFICIE
INSTRUKCJA UŻYTKOWANIA
6.
Obstuga:
SYSTEMY KONTROLI
Panel sterowania:
KONSERWACJA I PRZECHOWYWANIE
NOTE: BEFORE THE EQUIPMENT IS USED FOR THE FIRST TIME, READ THIS INSTRUCTION MANUAL AND KEEP IT FOR FUTURE REFERENCE. PEOPLE WHO HAVE NOT READ THIS INSTRUCTION SHOULD NOT ASSEMBLE, LIGHT, ADJUST OR OPERATE THE UNIT
DETAILED SAFETY REGULATIONS
ATTENTION!

Read carefully-The infrared heater is designed for safe operation. Nevertheless, installation, maintenance and operation of the heater can be dangerous. Observing the following procedures will reduce the risk of fire, electric shock, injury to person and keep installation time to a minimums.
a) This appliance can be used by children aged from 8 years and above and persons with reduced physical, sensory or mental capabilities or lack of experience and knowledge if they have been given supervision or instruction concerning use of the appliance in a safe way and understand the hazards involved. Children shall not play with the appliance. Cleaning and user maintenance shall not be made by children without supervision.
b) Never place hands under the heating elements!
WARNING!
- In order to avoid overheating, do not cover the heater.
- Children of less than 3 years should be kept away unless continuously supervised.
- Children aged from 3 years and less than 8 years shall only switch on/off the appliance provided that it has been placed or installed in its intended normal operating position and they have been given supervision or instruction concerning use of the appliance in a safe way and understand the hazards involved. Children aged from 3 years and less than 8 years shall not plug in, regulate and clean the appliance or perform user maintenance.
- Caution – some parts of this product can become very hot and cause burns. Particular attention has to be given where children and vulnerable people are present.
When using electrical appliance basic precautions should always be followed including below:
-
Use this heater only as described in this manual. Any other use not recommended by the manufacturer may cause fire, electric shock, or injury to persons.
-
Read all instruction before using this heater.
- Remove the unit form it's packaging and check to make sure it is in good condition before using.
- Do not let children play with parts of package (such as plastic bags)
- Check the household voltage to ensure it matches the heater's rated specification.
- Check the power cord and plug carefully before used, to make sure that they are not damaged
- Do not run cord under carpeting. Do not cover cord with throw rugs, runners, or similar coverings. Do not route cord under furniture or appliances. Arrange cord away from traffic area and where it will not be tripped over.
- The unit must not be used outdoors during precipitation, or in very wet or humid environments. The caveat does not apply to bathrooms.
-
Please note that the heater can become very hot and should, therefore, be placed at a safe distance (1 m) from flammable objects such as furniture, curtains and similar.
-
Do not cover the heater.
-
Do not put fingers or foreign objects into the grill while in operation.
-
Do not insert or allow foreign objects to enter any ventilation or exhaust opening, as this may cause an electric shock, fire or damage to the heater.
-
The heater must not be located immediately below a wall socket.
-
Do not connect the fan heater using an on/off timer or other equipment which can automatically switch the device on.
-
The heater must not be placed in rooms where flammable liquids or gases are used or stored.
-
If an extension cord is used, it must be as short as possible and always be fully extended.
-
Do not use this heater in the immediate surroundings of a bath, a shower or a swimming pool.
-
If the supply cord is damaged, it must be replaced by the manufacturer, its service agent or similarly qualified persons in order to avoid a hazard.
-
You must not connect other appliances to the same mains socket as the fan heater.
-
Make sure heater is always under surveillance and keep children and animals away from it;
-
When you don't use the appliance for a long time, unplug the appliance. Don't leave the heater for a considerable amount of time when in use. Pull the plug straight out, never remove the plug by pulling on the cord.
-
Keep the heater far from curtain or places where the air inlet can easily be blocked.
-
Always allow heating element to cool at least 10 minutes before touching the heating tube or adjacent part
-
In order to prevent possible electric shock or leakage current, never use the appliance with wet hand or operate the appliance when there is water on the power cord.
-
Do not dispose of electrical appliances as unsorted municipal waste, use separate collection facilities. Contact your local government for information regarding the collection systems available. If electrical appliance are disposed of in landfills or dumps, hazardous substances can leak into the groundwater and get into the food chain, damaging your health and well-being.
-
This appliance is not intended for use by persons (including children) with reduces physical, sensory or mental capabilities or lack of experience and knowledge unless they have been given supervision or instruction concerning the use of the appliance by a person responsible for their safety.
-
Children should be supervised to ensure that they do not play with the appliance.
-
The ceiling-mounted device must be mounted at a minimum distance of 25 cm from the ceiling. The device must not completely adhere to the ceiling. It may cause overheating and burning of the device.
-
If the heater has been dropped or damaged in any manner. Return it to authorized service facility for examination, electrical or mechanical adjustment, or repair.
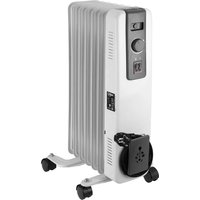
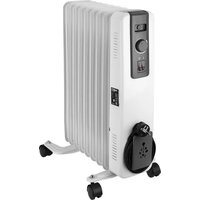
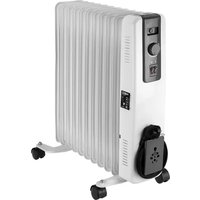
TECHNICAL SPECIFICATIONS
| Model | 90-105 | 90-106 | 90-107 |
| Rated power | 450W | 600W | 720W |
| Rated voltage | 230V~50Hz | ||
PACKING LIST
- Heater
- Instruction manual
- Remote control
-
2x feet
• Accessories for wall mounting: -
4x plastic rail
- 4x metal screw
• Accessories for ceiling mounting:
- 4x plastic rail
- 4x metal screw
- 4x O-rings
- 1x H-type metal bracket
ADDITIONAL ELEMENTS FACILITATING ASSEMBLY - NOT INCLUDED IN THE SET:
- 90-108 Ceiling bracket - suitable for 90-105 / 90-106 panels
- 90-108-1 Ceiling bracket - fits panels 90-107
- 90-109 Legs 2 pcs - fits panels 90-105 / 90-106 / 90-107
WALL MOUNTING INSTRUCTION
Unpack your package and find the heater together with the wall mounting accessories pack.
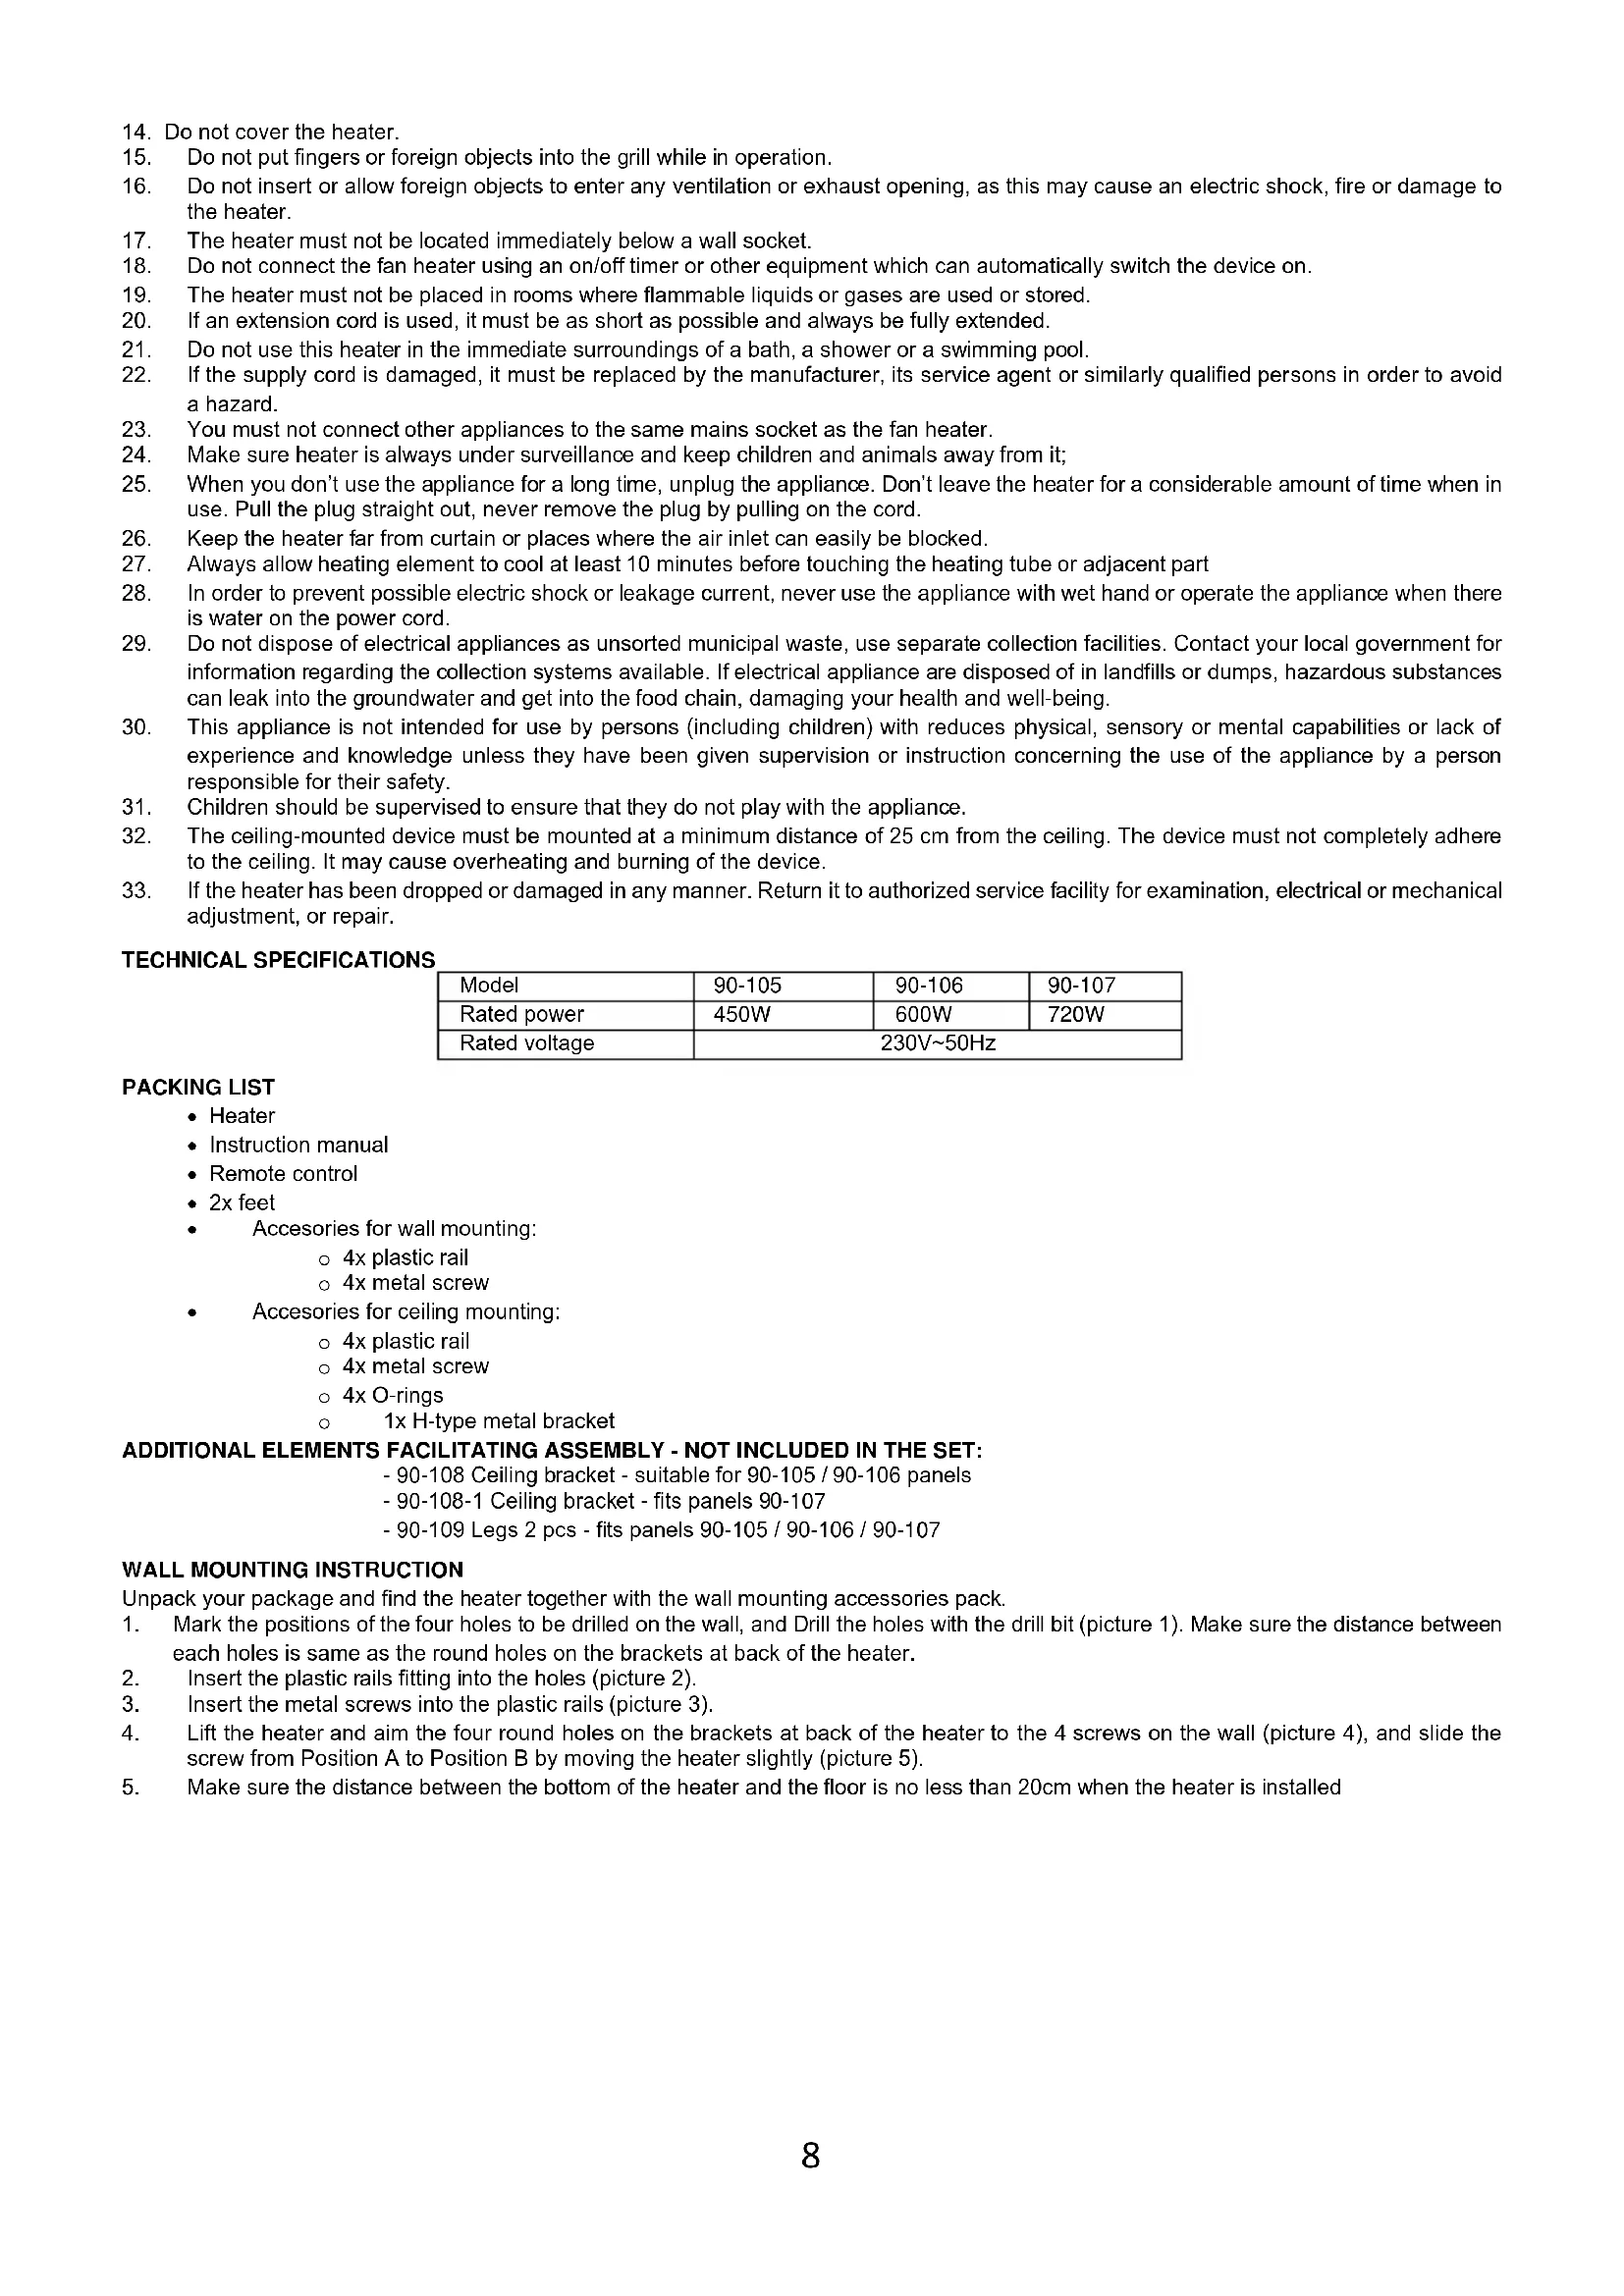
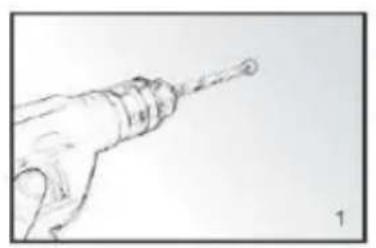
- Mark the positions of the four holes to be drilled on the wall, and Drill the holes with the drill bit (picture 1). Make sure the distance between each holes is same as the round holes on the brackets at back of the heater.
- Insert the plastic rails fitting into the holes (picture 2).
- Insert the metal screws into the plastic rails (picture 3).
- Lift the heater and aim the four round holes on the brackets at back of the heater to the 4 screws on the wall (picture 4), and slide the screw from Position A to Position B by moving the heater slightly (picture 5).
- Make sure the distance between the bottom of the heater and the floor is no less than 20cm when the heater is installed
natural_image
Sketch of a hand holding a tool, no text or symbols present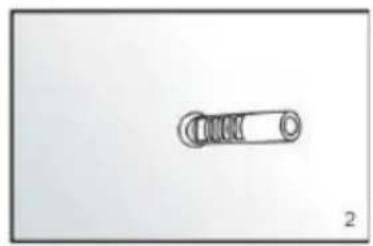
natural_image
Simple line drawing of a mechanical component with no text or symbols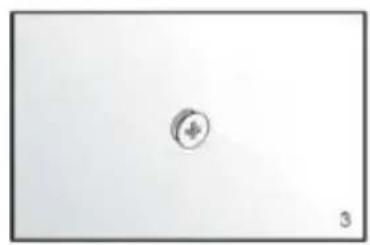
natural_image
Simple circular symbol with a plus sign inside, placed on a plain white background (no text or labels)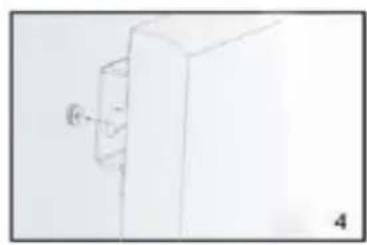
natural_image
Simple line drawing of a white cabinet or enclosure with a small protrusion and label '4' (no text or symbols on the diagram itself)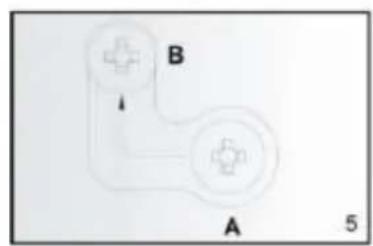
natural_image
Simple diagram of two labeled components A and B with directional arrows, no text or symbols present.CEILING MOUNTING INSTRUCTION
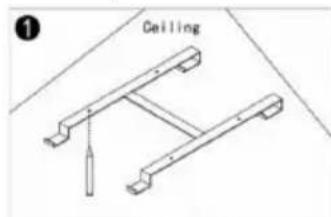
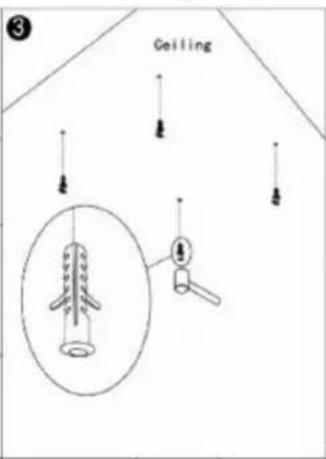
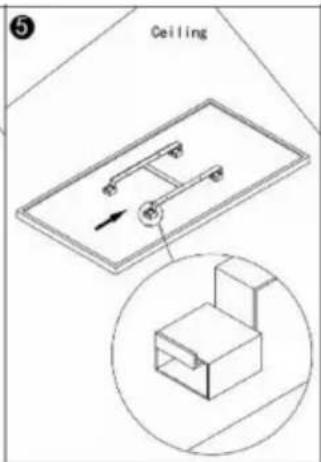
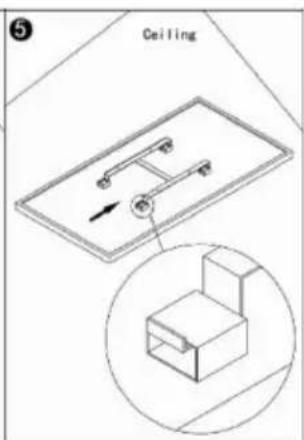
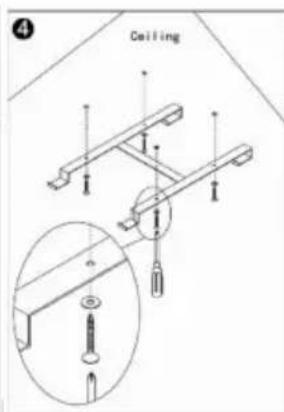
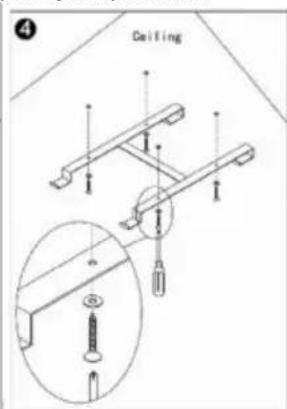
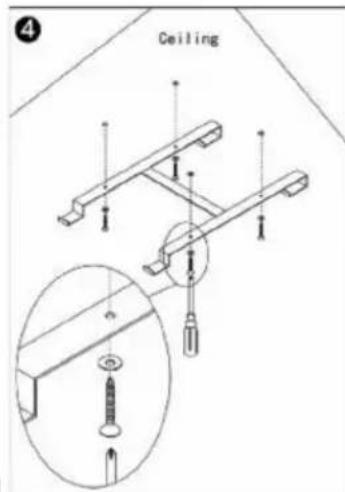
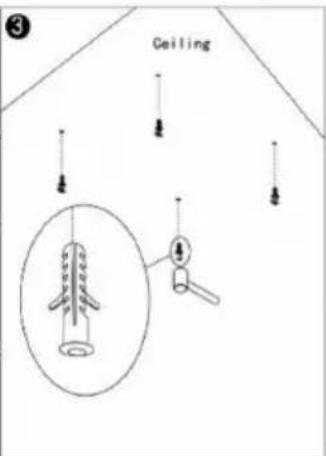
The heating panel must be at least 20 cm from all objects, walls and so on. The minimum distance from the ceiling is 4 cm as this allows an airflow which will prevent the heating panel from overheating. The minimum distance from the bottom of the heating panel to the floor must be 185 cm. Choose a sturdy, even ceiling made of heat-proof material for hanging the heating panel.
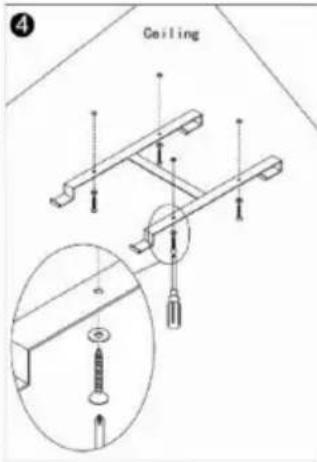
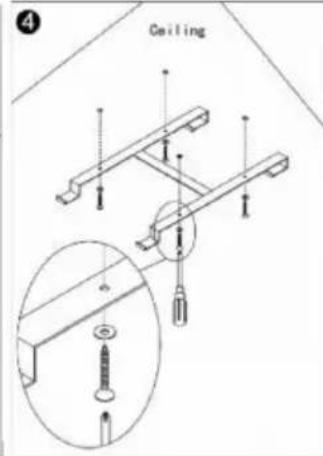
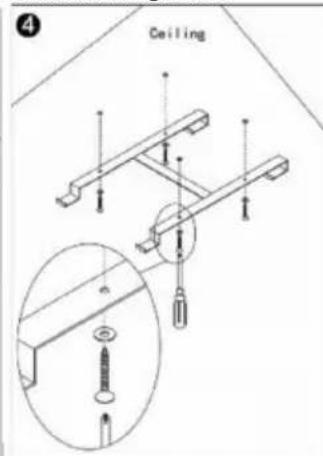
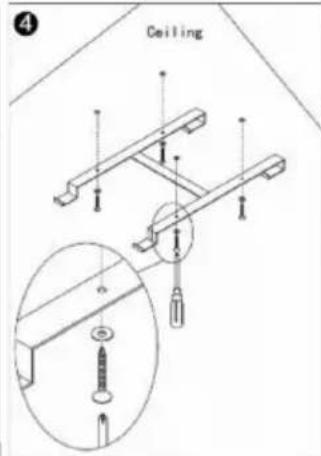
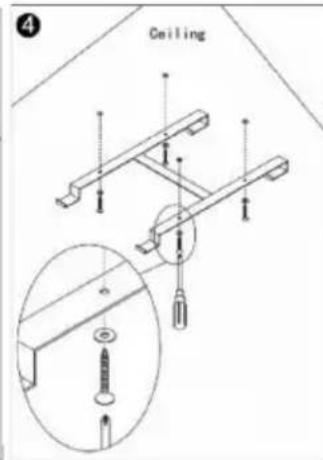
- Use the H-bracket to mark the holes in the ceiling Position the H-bracket such that, when the heating panel is installed, the minimum distances above are guaranteed. Make sure that the hanging frame is installed with the correct side to the top. (see diagram) Check and make sure that there are no cables in the ceiling before drilling at the marked points.
- Drill holes with drill bit
- Push the plugs into the holes
- Secure the screws with the O-rings in the plugs through the holes in the H-bracket
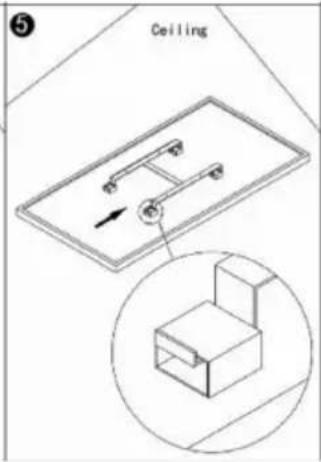
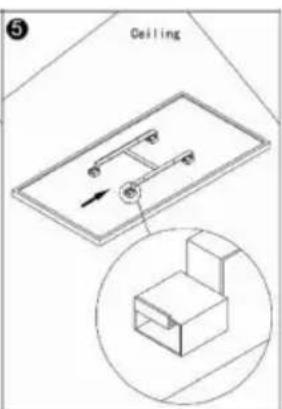
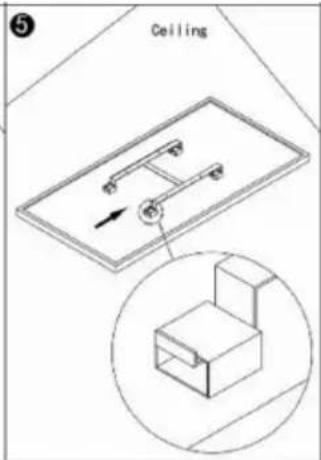
- Mount the panel on the bracket and ensure that the panel is secured as shown in image 5.


USING INSTRUCTIONS
Use and Working:
- Check the heater to be sure it is not damaged.
- Insert the plug in the socket.
- Now press the ⏻ button: the heater will start working. The display will show the room temperature.
- After use, press the ⏻ button first in ordered to switch the device off. Finally remove the plug from the socket.
Thermostat:
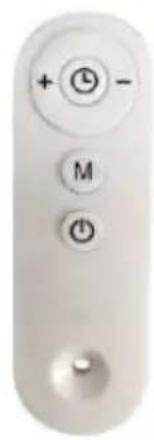
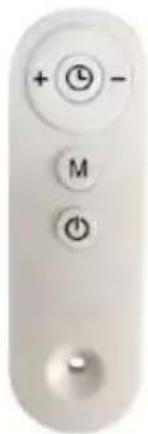
- Pressing the + or - button on the remote control will cause the temperature setting to flash five times.
- You can adjust the temperature setting by pressing the + or - key while it is flashing. With each key press, the temperature will be increased (+) or decreased (-) by one degree.
- The device will retain the temperature setting by switching itself on and off automatically.
Timer:
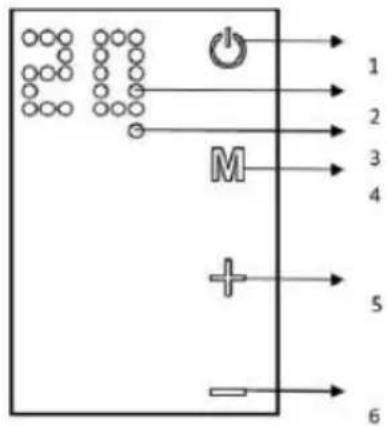
Briefly pressing the M button located on the heating panel in the upper right corner, activates the Timer setting. You can set the time after which the unit should turn off by pressing + or -. Each press will change the number of hours. After setting the Timer, wait for 5 blinks of the display,
the settings you have made will be remembered. The display will alternate between the room temperature and the set number of hours. The unit will turn off after the specified number of hours. The display will turn off if nothing is changed in the settings within 10 seconds. You can reactivate it by pressing any button once.
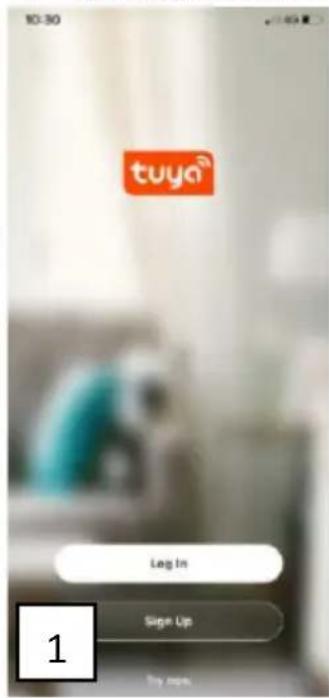
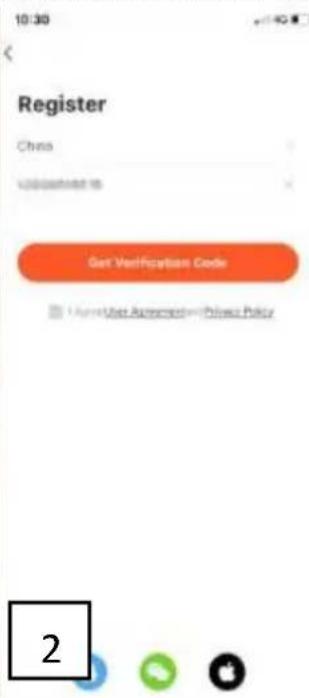
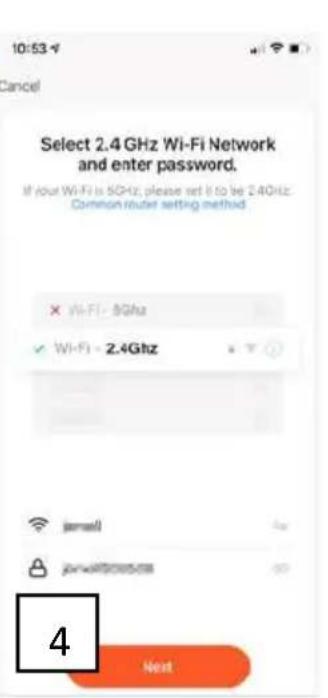
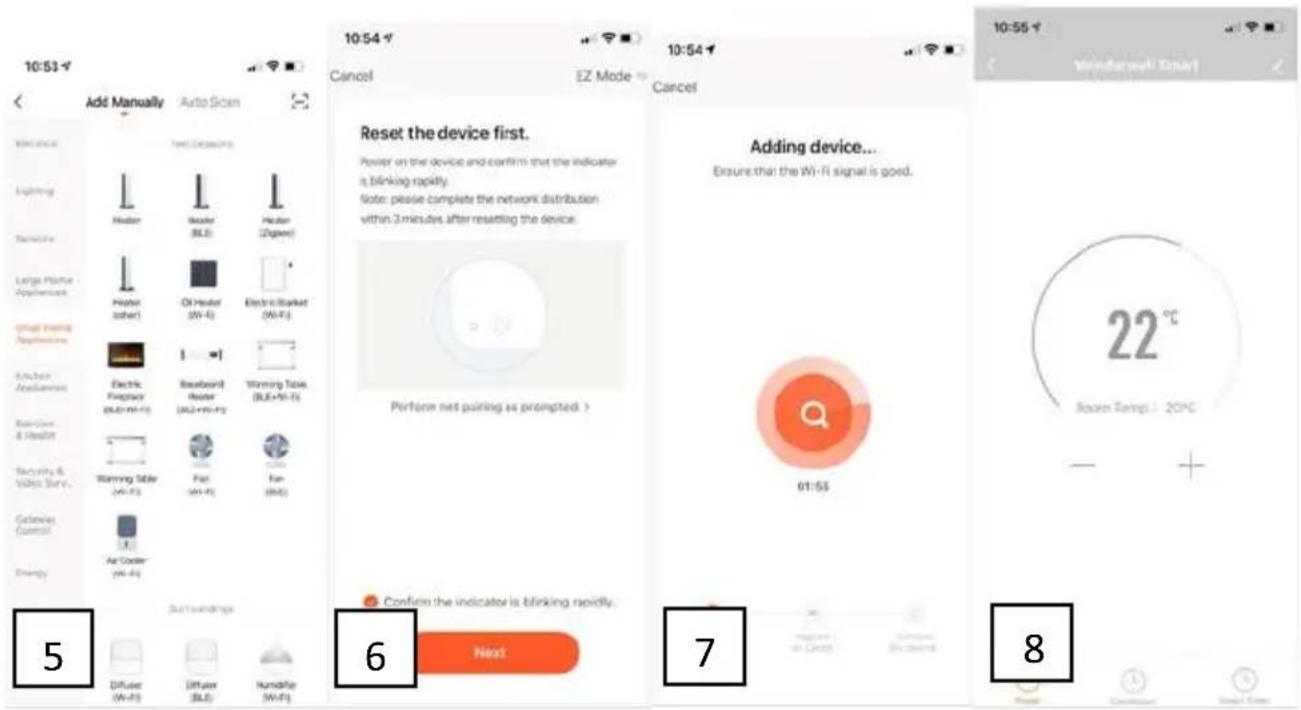
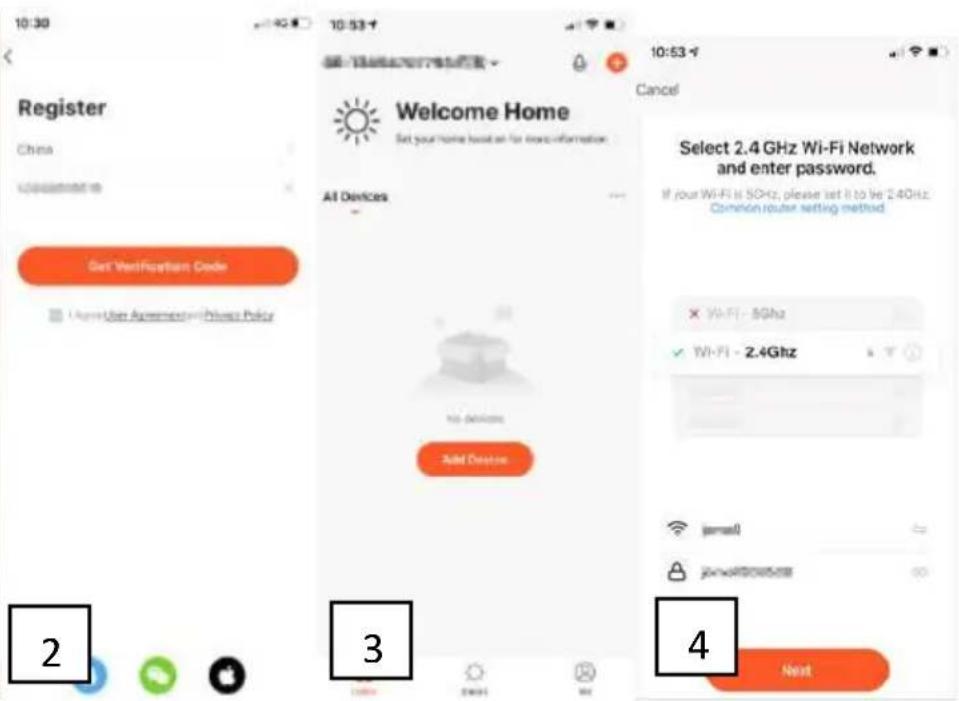
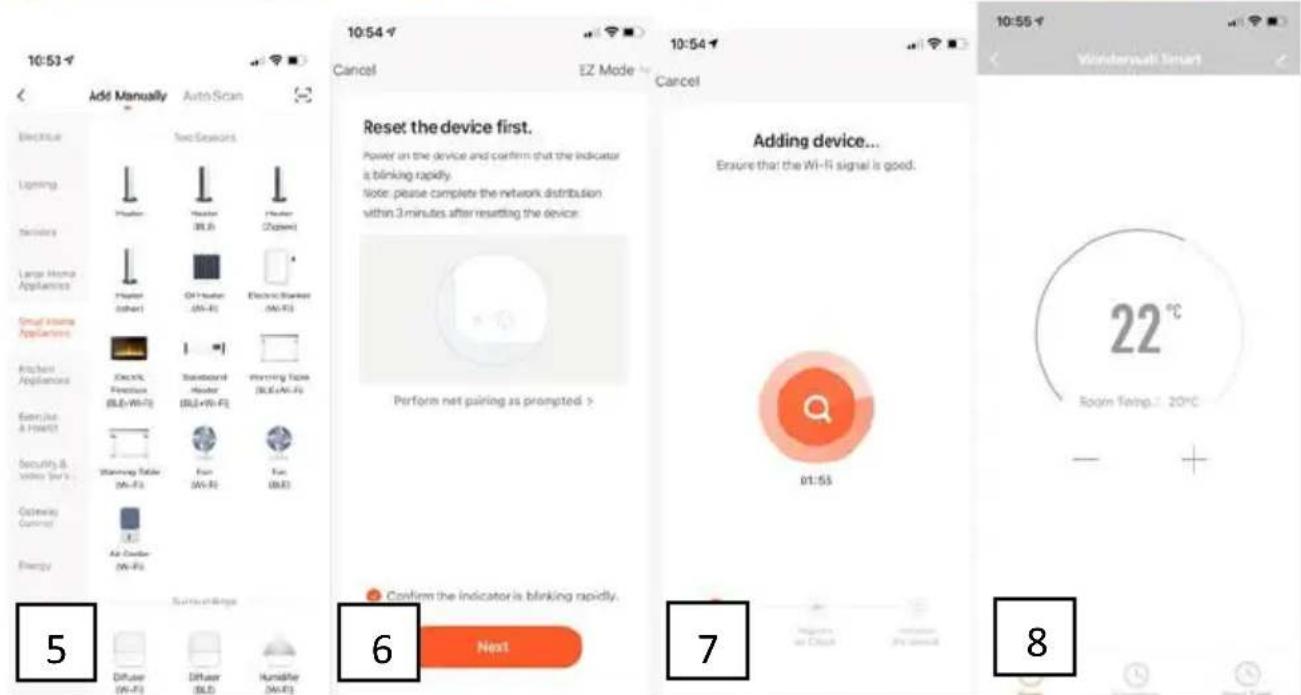
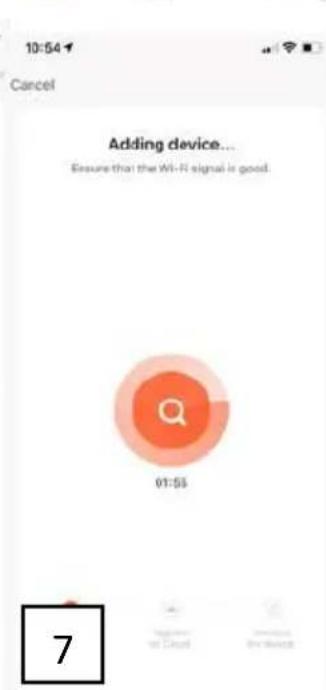
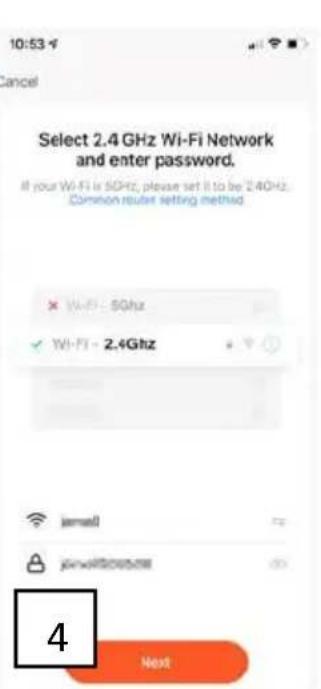
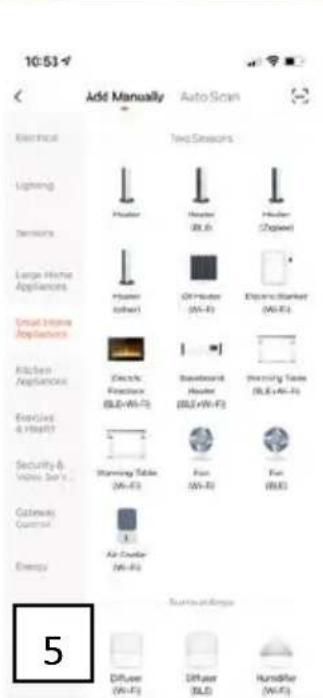
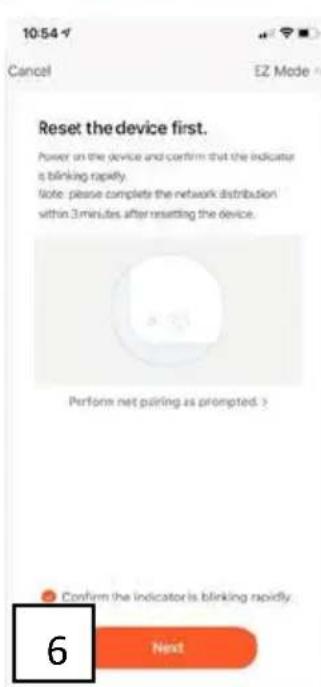
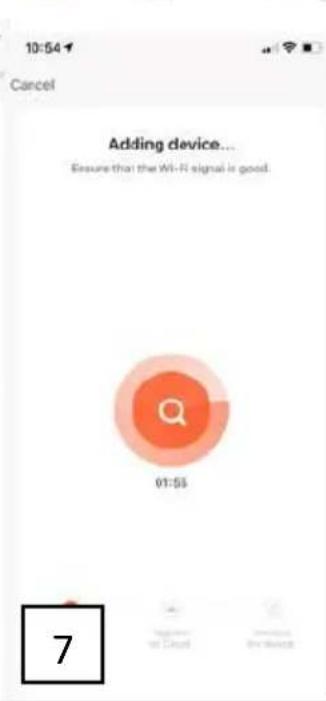
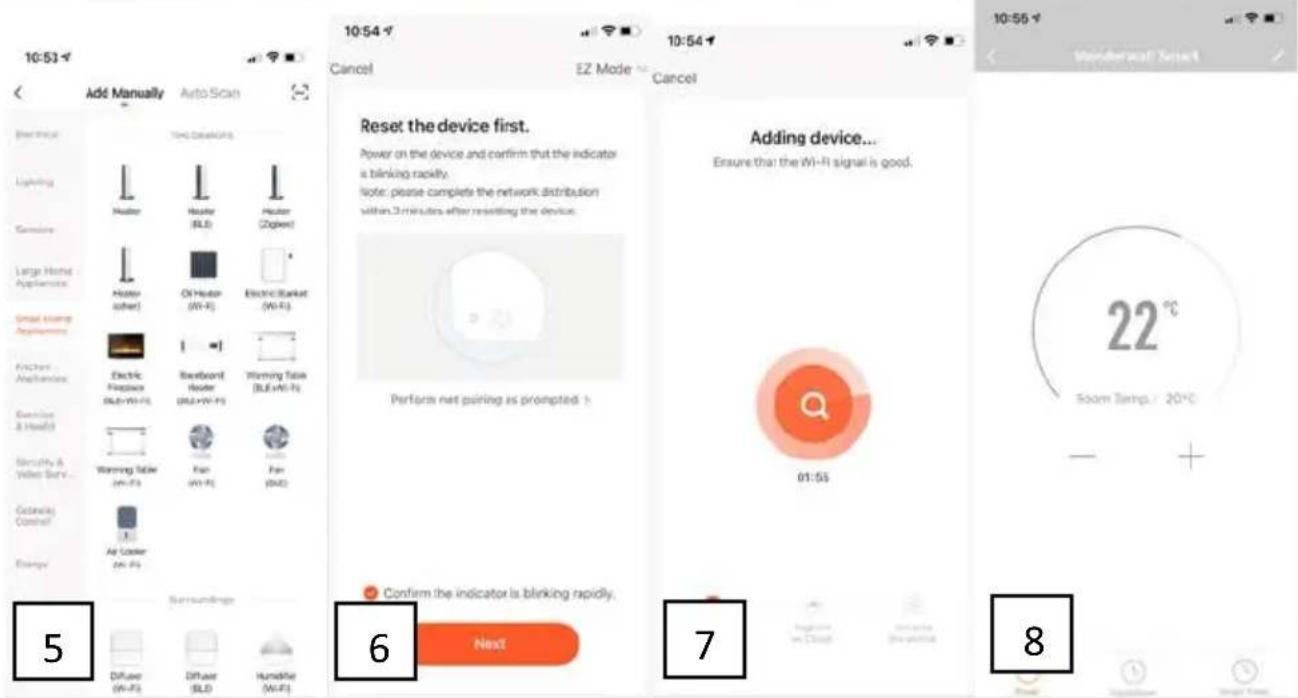
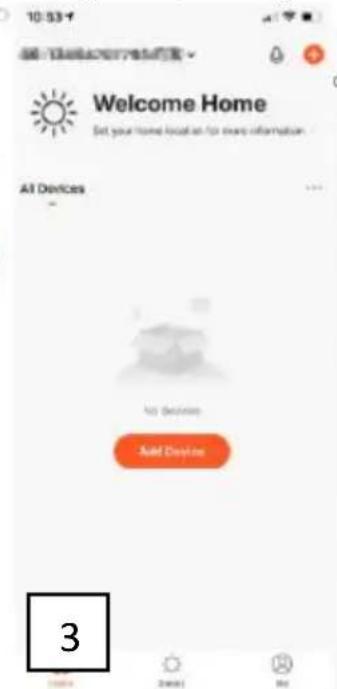
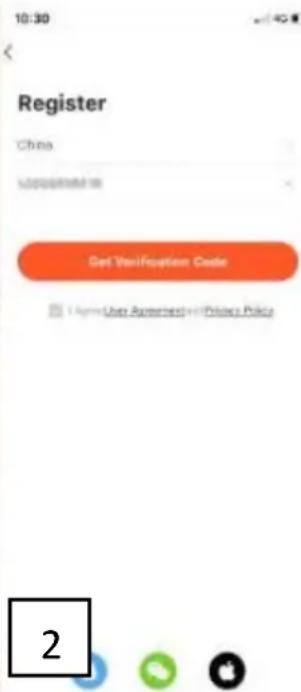
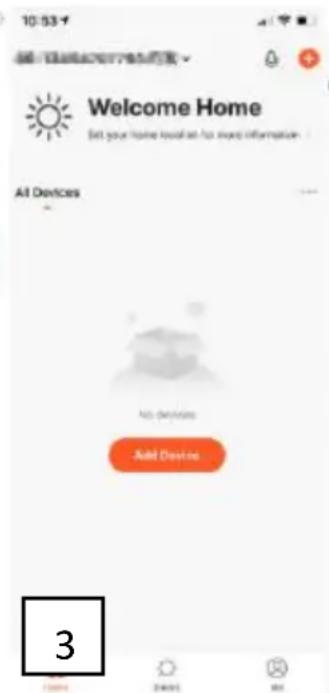
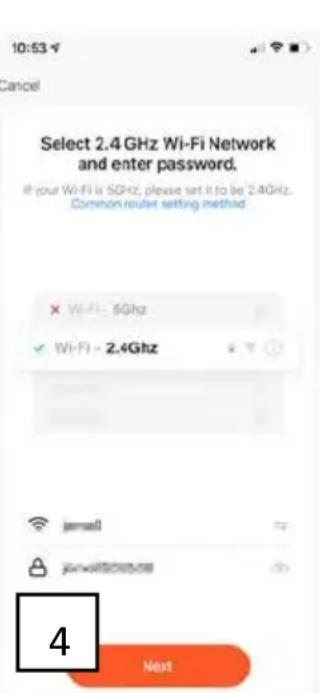
Wi-Fi and app operation:
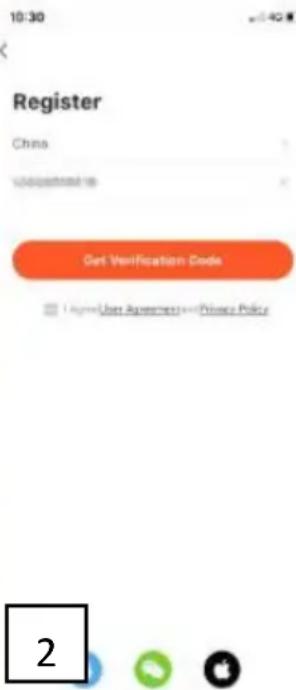
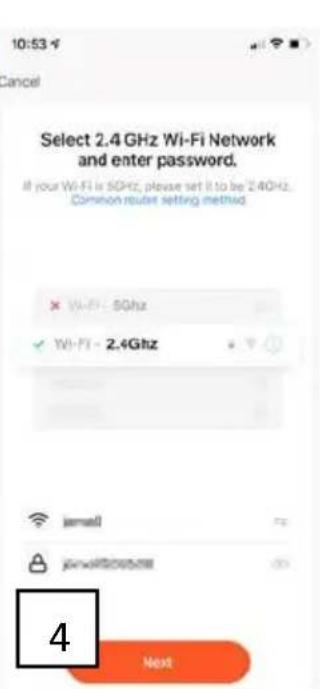
The heater can also be controlled with an app on your smartphone. To do this, the heater must be connected to a Wi-Fi modem.
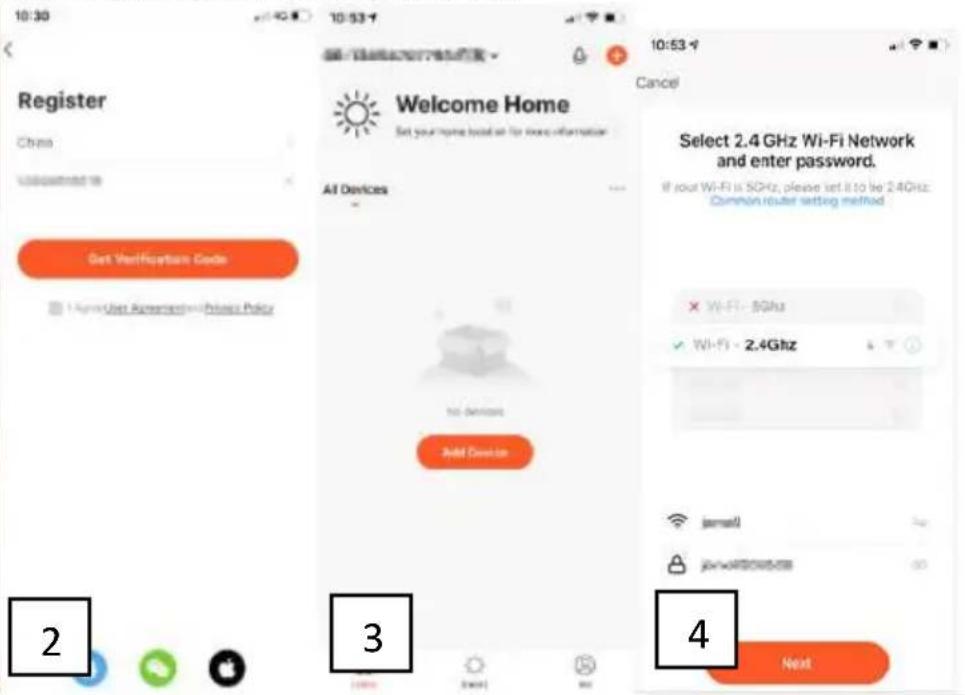
- Download the control App ('tuyasmart' or 'smart life') from App store or Android market.
- Open the app and select Sign Up (picture 1)
- Enter your mobile phone number, the country code has already been filled in for you (picture 2)
- You will receive an SMS with a verification code. Within 60 seconds, enter this verification code and your chosen password and select confirm to confirm the registration.
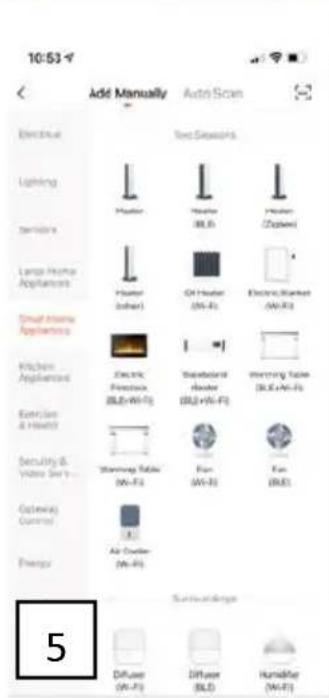
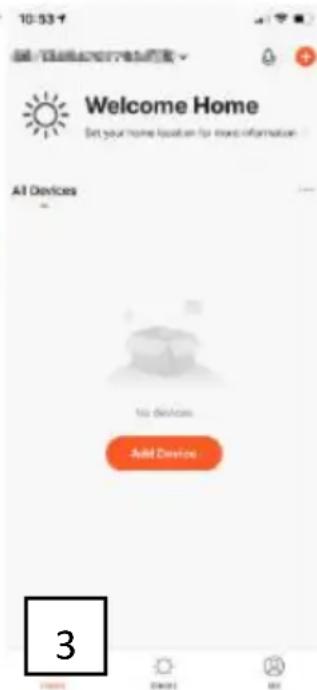
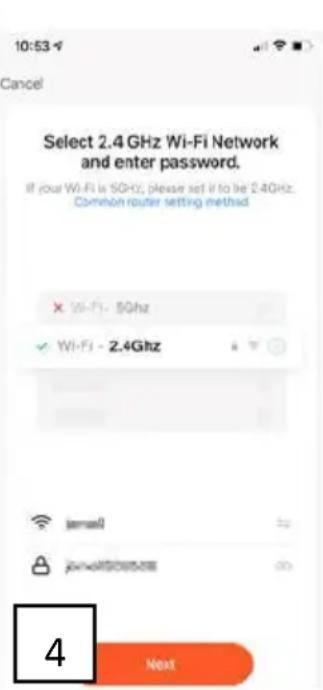
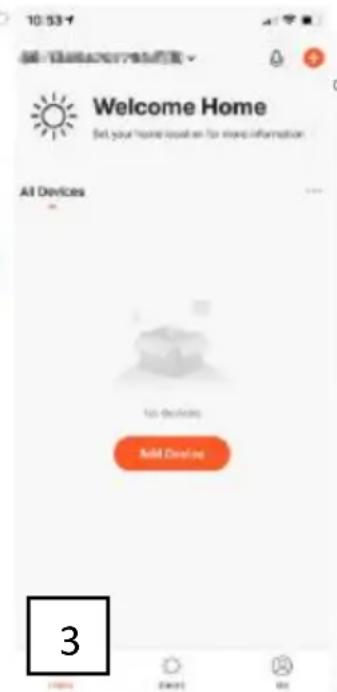
- In order to use the App, your heater must be added to the App. Select Add Device (picture 3)
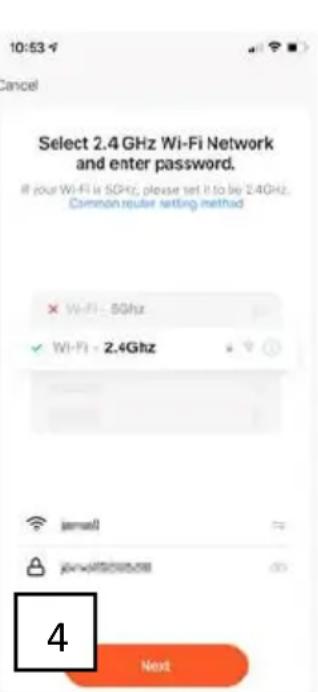
- Enter the correct Wi-Fi password (picture 4)
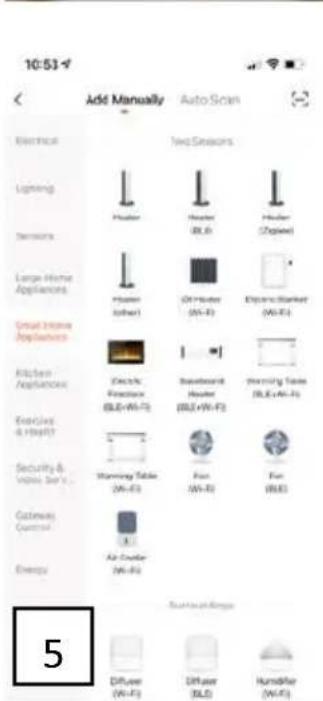
- Choose the "Small Home Appliance", then choose "heater" (picture 5)
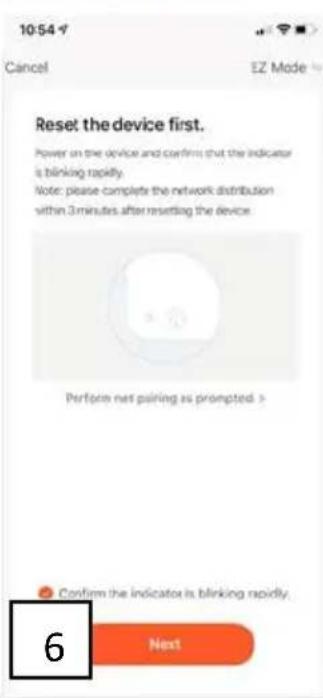
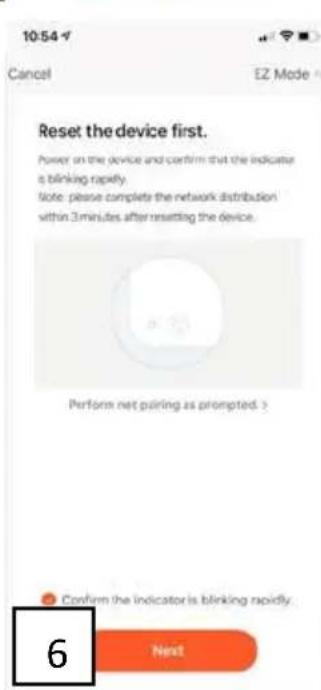
- On the heater, the WiFi indicator light (located in the right bottom corner of the screen) will blink rapidly
- When the indicate light on the heater is blinking rapidly, select in the App: "confirm the indicator is blinking rapidly" (picture 6)
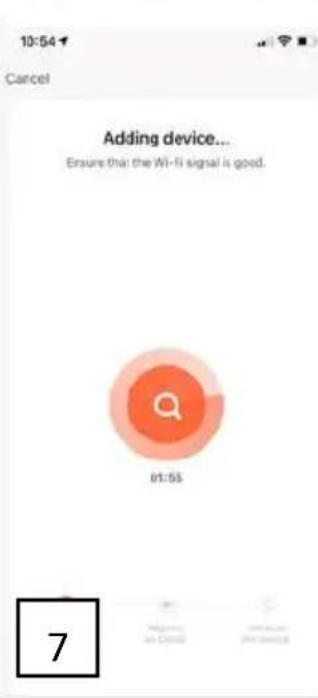
- A connection will now be made between the App and the heater (picture 7)
- Select 'Done' once the connection has been successfully established
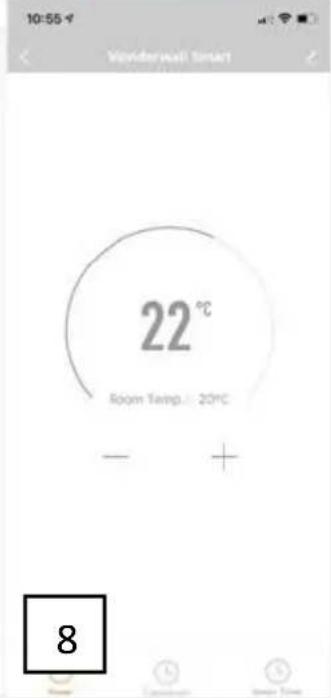
- The screen for operating the heater will now appear
- Select ... at top right in the control screen, then select Modify Device Name to give your heater a logical name so that it is clear to you which heater it is.
- Your heater now can be controlled by the App, you can set the temperature and one week timer in the App (picture 8).
- After connected, the WiFi indicator light on the heater will stop blink and keep on.

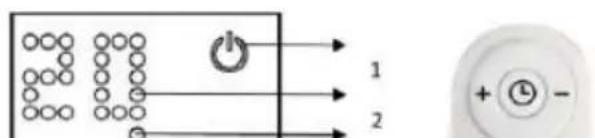
CONTROL SYSTEM DESCRIPTION
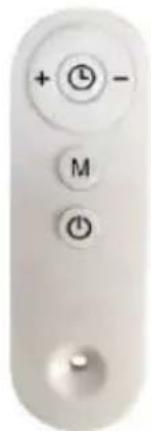
Control Panel:
- Power on/off switch
- Display
- Wi-Fi indicator light
- Timer button
- Temperature / timer UP key
- Temperature timer DOWN key
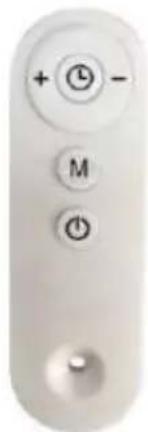
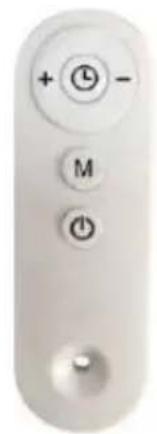
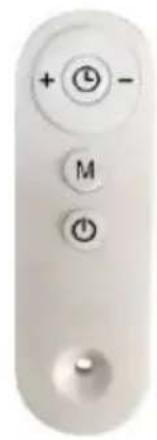
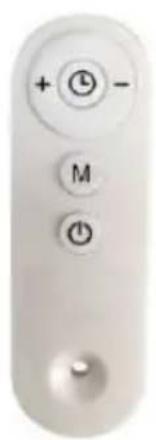
Remote controller buttons:
+: Up key
-: Down key
M: Temperature setting button

Timer setting button

: Power button
natural_image
Close-up of a white remote control with three buttons (clock, plus, minus) and a knob at the bottom (no text or symbols beyond basic icons)CLEANING AND STORAGE
Before cleaning your heater, switch off the heater and allow it to cool. Disconnect the electricity supply to the appliance. The outside can be cleaned by wiping it over with a soft damp cloth and then dried. Do not use abrasive cleaning powders or furniture polish, as this can damage the surface finish. To release the heater from the wall, for cleaning or redecoration, just open the screw bolt cap and unscrew the bolts to take off from the wall. For short term storage, just plug off the heater and leave it away; for long term storage, you can dismantle from the wall or cover it with some material.
TROUBLESHOOTING
If your heater fails to operate, please follow these instructions:
- Ensure that your circuit breaker or fuse is working properly.
- Be sure the heater is plugged in and that the electrical outlet is working properly.
• If the ON/OFF switch is not illuminated at ON position, send it to service center for reparation directly.
NOTE: IF YOU EXPERIENCE A PROBLEM WITH YOUR HEATER, PLEASE SEE THE WARRANTY INFORMATION FOR INSTRUCTIONS. PLEASE DO NOT ATTEMPT TO OPEN OR REPAIR THE HEATER YOURSELF. DOING SO MAY VOID THE WARRANTY AND COULD CAUSE DAMAGE OR PERSONAL INJURY. IF THE PROBLEM STILL PERSISTS, PLEASE CONTACT THE DISTRIBUTOR.
RECYCLING
Electrical equipment must not be disposed of household waste and, instead, should be utilized at appropriate facilities. Information on utilization can be provided by the product vendor or the local authorities. Waste electrical and electronic equipment contains substances that are not neutral to the natural environment. Equipment that is not recycled constitutes a potential hazard to the environment and to human health.
Hereby, Grupa Topex Sp. z o.o. Sp.k. declares that the radio equipment type 90-105 / 90-106 / 90-107 is in compliance with Directive 2014/53/EU. The full text of the EU declaration of conformity is available at the following internet address:
https://tiny.pl/r5kz9
DE
natural_image
Line drawing of a hand holding a drill bit with a pointed tip (no text or symbols)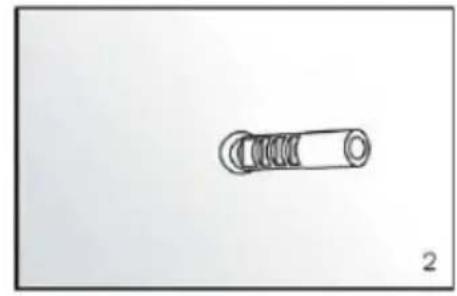
natural_image
Simple line drawing of a cylindrical mechanical component with threaded ends (no text or symbols)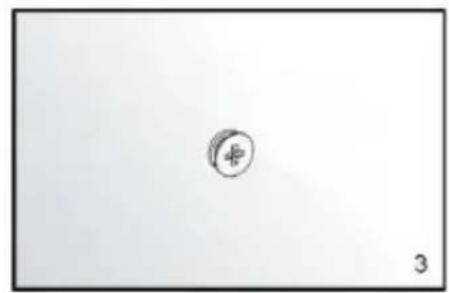
natural_image
Simple line drawing of a circle with a plus sign and the number 3 below it (no text or symbols on the circle itself)
natural_image
Simple line drawing of a rectangular box with a small protrusion and label '4' (no text or symbols on the object itself)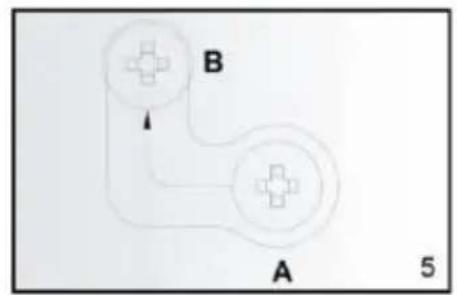
flowchart
graph TD
    A["Circle Node 1"] --> B["Circle Node 2"]
    B --> C["Arrow pointing to B"]
    style A fill:#f9f,stroke:#333
    style B fill:#ccf,stroke:#333
    note right of B: 5
natural_image
Line drawing of a hand holding a drill bit with a pointed tip (no text or symbols)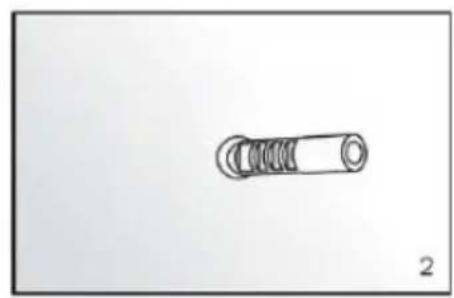
natural_image
Simple line drawing of a cylindrical mechanical component with threaded ends (no text or symbols)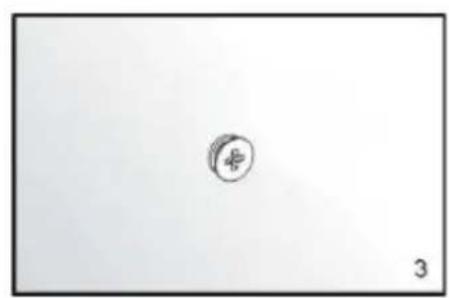
natural_image
Simple sketch of a small circular symbol with the number 3, no text or labels present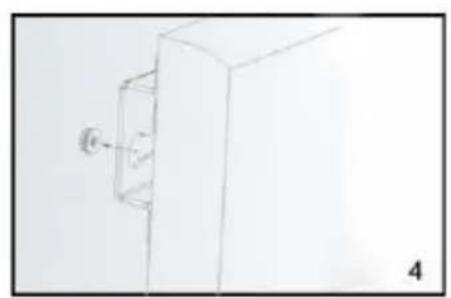
natural_image
Simple line drawing of a rectangular box with a small circular object attached to its side (no text or symbols)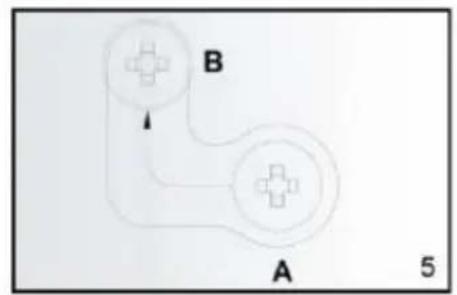
flowchart
graph TD
    A["Node A"] --> B["Node B"]
    B --> A
    style A fill:#f9f,stroke:#333
    style B fill:#ccf,stroke:#333
    note right of A 5


ЧИСТКА И ХРАНЕНИЕ
natural_image
Hand-drawn sketch of a tool with a pointed tip, no text or symbols present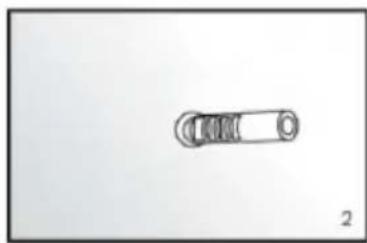
natural_image
Simple line drawing of a mechanical component with a cylindrical shaft and circular end (no text or symbols)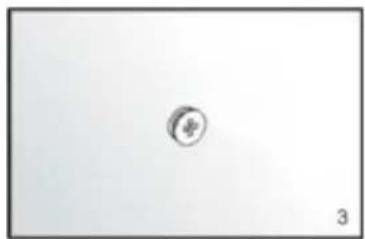
natural_image
Simple circular icon with a plus sign inside, no text or symbols present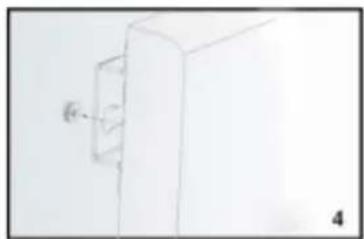
natural_image
Simple line drawing of a cabinet or enclosure with a wall-mounted cable (no text or symbols)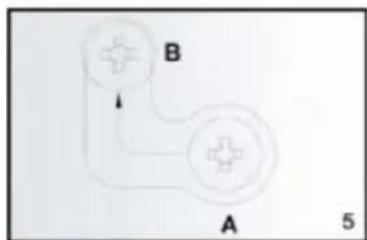

natural_image
Sketch of a hand holding a tool, possibly a drill bit or drill pen, with no visible text or symbols.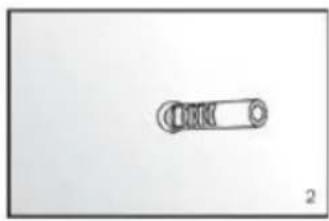
natural_image
Simple line drawing of a mechanical component with a circular end and internal grooves (no text or symbols)
natural_image
Simple circular symbol with number 3, no text or labels present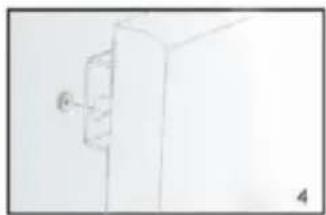
natural_image
Simple line drawing of a cabinet or cabinet with a wall-mounted door, no text or symbols present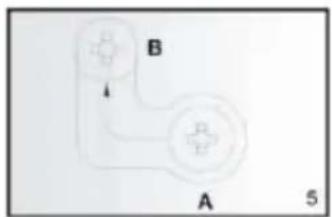
flowchart
graph TD
    A["Node A"] --> B["Node B"]
    B --> C["Step 5"]
    style A fill:#f9f,stroke:#333
    style B fill:#ccf,stroke:#333

VEZÉRLÖRENDSZER LEÍRÁSA
Vezérlöpult:
natural_image
Hand-drawn sketch of a handheld tool with a pointed tip (no text or symbols)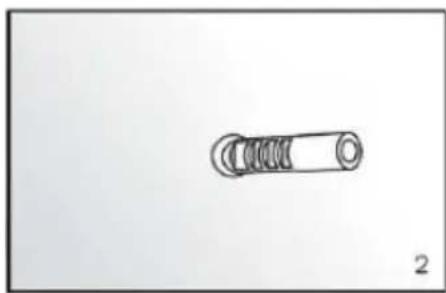
natural_image
Simple line drawing of a cylindrical mechanical component with threaded ends (no text or symbols)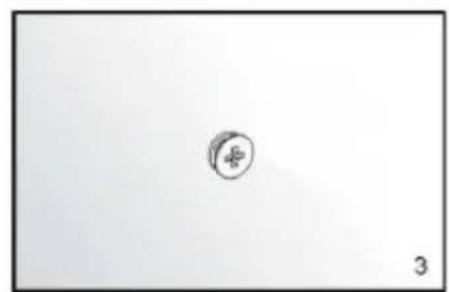
natural_image
Simple line drawing of a circle with a plus sign and the number 3 below it (no text or symbols on the circle itself)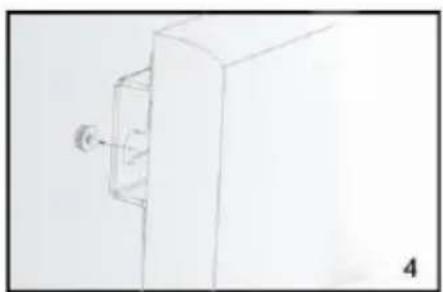
natural_image
Simple line drawing of a cabinet or enclosure with a wall-mounted fixture (no text or symbols)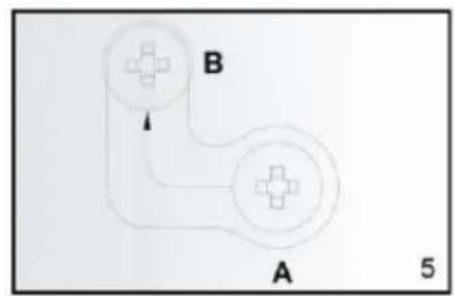
flowchart
graph TD
    A["Component A"] --> B["Component B"]
    B --> C["Scale: 5"]
    style A fill:#f9f,stroke:#333
    style B fill:#ccf,stroke:#333
INSTRUCTIUNI DE MONTARE A PLAFONULUI

Utilizare și lucru:

DESCRIEREA SISTEMULUI DE CONTROL
Panou de control:
CURĂTARE ȘI DEPOZITARE
DALŠÍ PRVKY USNADŇUJÍCÍ MONTÁŽ - NEJSOU SOUČÁSTÍ SADY:
natural_image
Hand-drawn sketch of a handheld electric drill bit (no text or symbols)
natural_image
Simple line drawing of a mechanical component with no text or symbols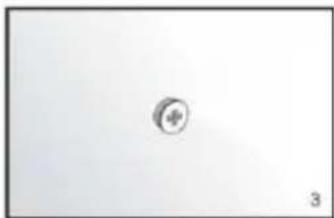
natural_image
Simple circular icon with a plus sign inside, no text or symbols present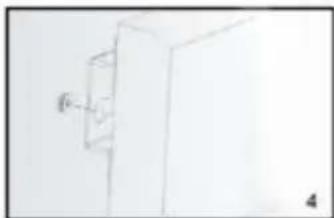
natural_image
Simple line drawing of a cabinet or cabinet with a wall-mounted fixture (no text or symbols)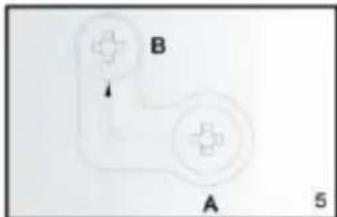
NÁVOD K MONTÁŽI STROPU
POPIS RÍDICÍHO SYSTÉMU
Kontrolní panel:
ČIŠTĚNÍ A SKLADOVÁNÍ
natural_image
Sketch of a hand holding a drill bit with a pointed tip (no text or symbols)
natural_image
Simple line drawing of a cylindrical object with internal spiral grooves, labeled '2' at bottom right (no text or symbols on the object itself)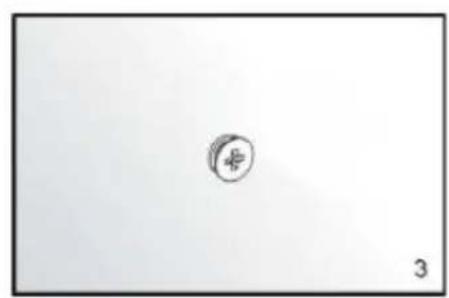
natural_image
Simple line drawing of a circle with a number 3, no text or symbols present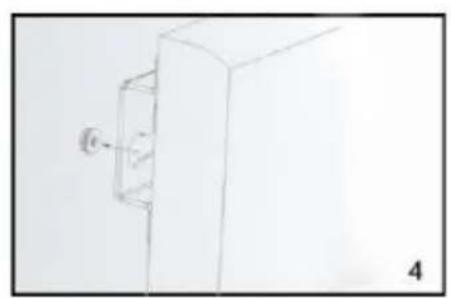
natural_image
Simple line drawing of a cabinet or enclosure with a wall-mounted fixture (no text or symbols)
POKYNY NA MONTÁŽ STROPU

POUŽITIE POKYNOV
Použitie a práca:


POPIS RIADIACEHO SYSTÉMU
Ovládací panel:
ČISTENIE A ÚDRŽBA
natural_image
Sketch of a hand holding a drill bit with a pointed tip (no text or symbols)
natural_image
Simple line drawing of a cylindrical mechanical component with threaded ends (no text or symbols)
natural_image
Simple sketch of a circular symbol with the number 3, no text or labels present
natural_image
Simple line drawing of a 3D rectangular box with a small circular element attached to its side, labeled '4' (no text or symbols on the diagram itself)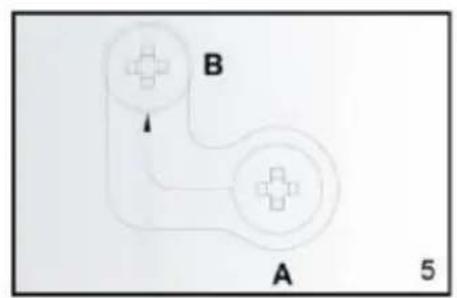
NAVODILO ZA MONTAŽO STROPOV

UPORABA NAVODIL
Uporaba in delo:


OPIS NADZORNEGA SISTEMA
Nadzorna plošča:
natural_image
Close-up of a white remote control with three buttons (clock, megaphone, and power) and a plus/minus sign, no readable text or symbols beyond basic function labels.ČIŠČENJE IN SKLADIŠČENJE
natural_image
Hand-drawn sketch of a handheld tool or drill bit with a pointed tip (no text or symbols)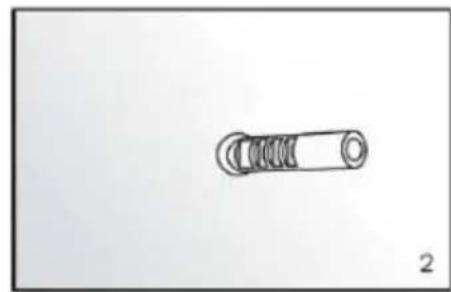
natural_image
Simple line drawing of a cylindrical mechanical component with threaded ends (no text or symbols)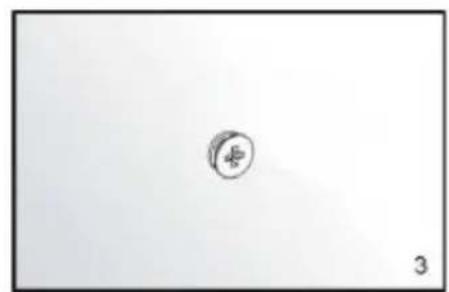
natural_image
Simple sketch of a circle with a plus sign inside, no text or symbols present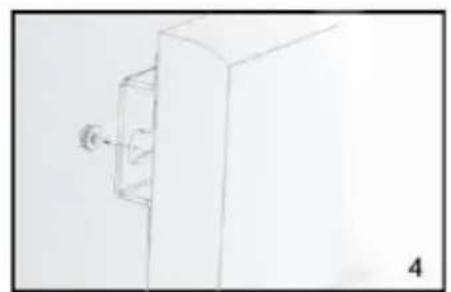
natural_image
Simple line drawing of a rectangular box with a small protrusion and label '4' (no text or symbols on the object itself)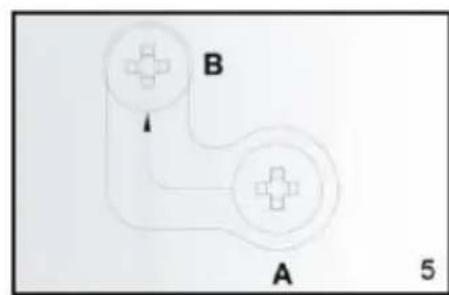
LUBU MONTAVIMO INSTRUKCIJA
NAUDOJIMAS INSTRUKCIJOS
KONTROLĖS SISTEMOS APRAŠYMAS
Kontrolés skydelis:
VALYMAS IR LAIKYMAS
natural_image
Sketch of a hand holding a drill bit with a pointed tip (no text or symbols)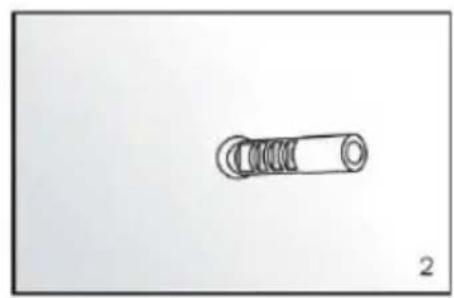
natural_image
Simple line drawing of a cylindrical mechanical component with threaded ends (no text or symbols)
natural_image
Simple sketch of a small circular symbol with a cross inside, on a plain background (no text or labels)
natural_image
Simple line drawing of a cabinet or enclosure with a wall-mounted fixture (no text or symbols)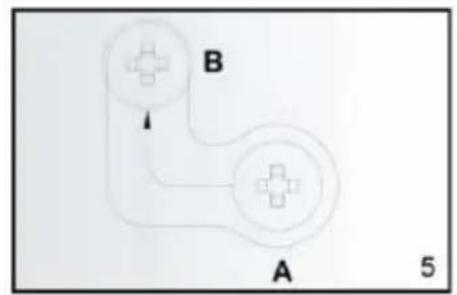
GRIEŠU MONTĀŽAS INSTRUKCIJA
LIETOŠANAS INSTRUKCIJAS


KONTROLES SISTÉMAS APRAKSTS
Vadības panelis:
TİRİŞANA UN UZGLABÄŞANA
DETALJNI PROPISI O SIGURNOSTI
PAŽNJA!


UPOTREBA UPUTE
Upotreba i rad:

OPIS SUSTAVA UPRAVLJANJA
Upravljačka ploča:
- Prekidač za uključivanje / isključivanje napajanja
- Zaslon
- Wi-Fi indikatorska lampica
- Gumb za odbrojavanje
- Tipka GORE za temperaturu / timer
- Tipka za odbrojavanje temperature DOLJE
ČIŠĆENJE I SKLADIŠTENJE
natural_image
Hand holding a drill bit with a pointed tip, no text or symbols visible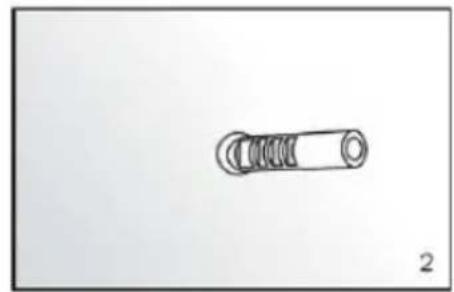
natural_image
Simple line drawing of a mechanical component with no text or symbols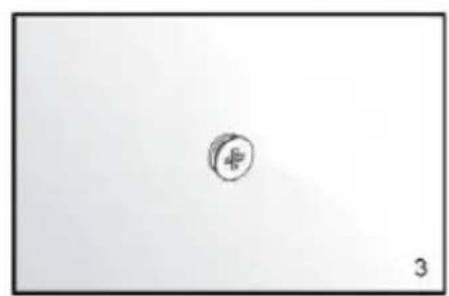
natural_image
Simple line drawing of a circular symbol with number 3, no text or labels present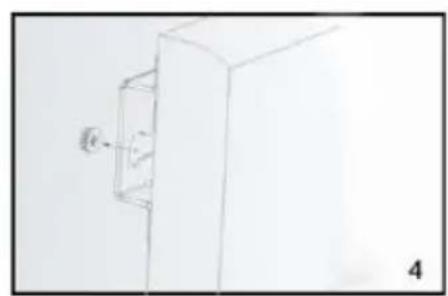
natural_image
Simple line drawing of a 3D box with a small protrusion and label '4' (no text or symbols on the diagram itself)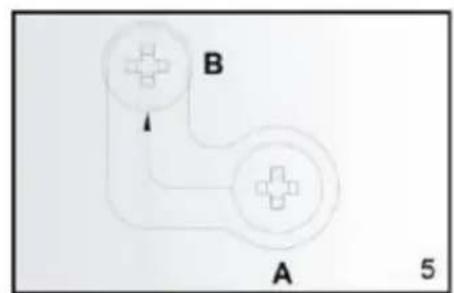
flowchart
graph TD
    A["Start"] --> B["Node B"]
    B --> A
    style A fill:#f9f,stroke:#333
    style B fill:#ccf,stroke:#333
natural_image
Close-up of a white remote control with three buttons (clock, M, power) and a plus/minus sign, no readable text or symbols beyond basic design.Контролна табла:
natural_image
Hand-drawn sketch of a handheld tool with a pointed tip, no text or symbols present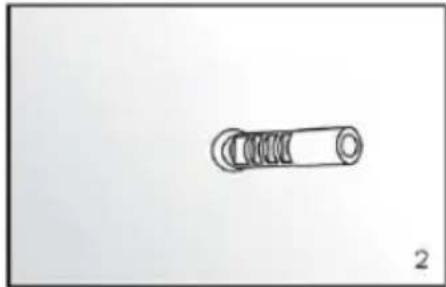
natural_image
Simple line drawing of a mechanical component with no text or symbols
natural_image
Simple sketch of a circular symbol with a plus sign, no text or labels present
natural_image
Simple line drawing of a cabinet with a wall-mounted door and a label '4' (no text or symbols on the cabinet itself)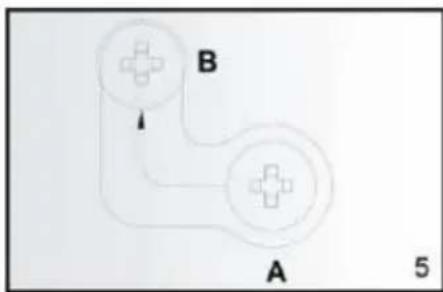
flowchart
graph TD
    A["Circle A"] --> B["Circle B"]
    B --> A
    style A fill:#f9f,stroke:#333
    style B fill:#ccf,stroke:#333
    note right of A "5"
natural_image
Close-up of a white remote control with three buttons (circled, M, and power) and a plus/minus sign on the left (no readable text or symbols beyond basic icons)natural_image
Sketch of a hand holding a tool, possibly a drill bit or screwdriver, with no visible text or symbols.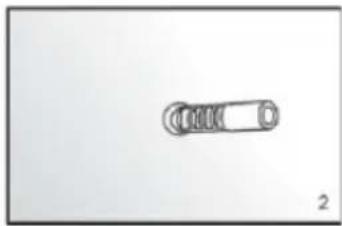
natural_image
Simple line drawing of a mechanical component with no text or symbols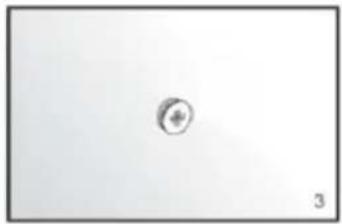
natural_image
Simple circular symbol with a plus sign inside, no text or labels present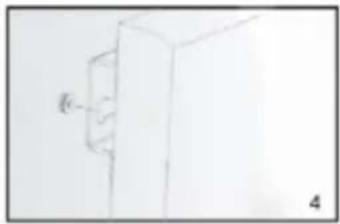
natural_image
Simple line drawing of a 3D rectangular block with an arrow pointing to its side (no text or symbols)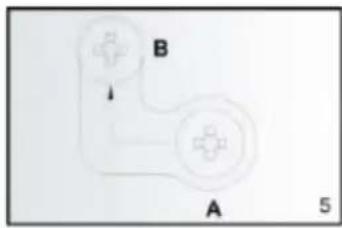
ISTRUZIONI PER IL MONTAGGIO A SOFFITTO
ISTRUZIONI PER L'USO

5


natural_image
Close-up of a white remote control with three buttons (clock, magnifying glass, and power button) and a handle (no text or symbols visible)RACCOLTA DIFFERENZIATA

natural_image
Hand holding a tool with a pointed tip, no visible text or symbols
natural_image
Simple line drawing of a mechanical component with threaded end and circular base (no text or symbols)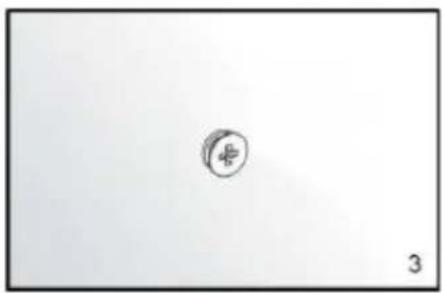
natural_image
Simple line drawing of a small circular object with a cross symbol, no text or labels present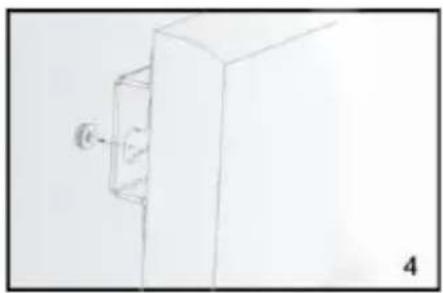
natural_image
Simple line drawing of a cabinet with a wall-mounted door (no text or symbols)
flowchart
graph TD
    A["Node A"] --> B["Node B"]
    B --> A
    style A fill:#f9f,stroke:#333
    style B fill:#ccf,stroke:#333
    note right of A: 5
PLAFOND MONTAGE INSTRUCTIE

GEBRUIKSAANWIJZING
Gebruik en werking:


BESCHRIJVING BESTURINGSSYSTEEM
Controlepaneel:
REINIGING EN OPSLAG
natural_image
Hand-drawn sketch of a hand holding a tool, no text or symbols present
natural_image
Simple line drawing of a mechanical component with a cylindrical shaft and threaded end (no text or symbols)
natural_image
Simple line drawing of a circular object with a cross symbol, no text or labels present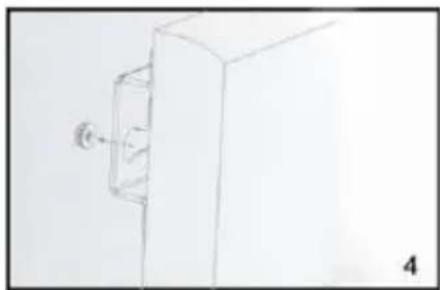
natural_image
Simple line drawing of a cabinet with a wall-mounted door (no text or symbols)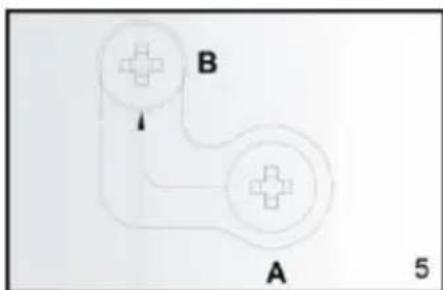
flowchart
graph TD
    A["Node A"] --> B["Node B"]
    B --> A
    style A fill:#fff,stroke:#000
    style B fill:#fff,stroke:#000
    note right of A: 5
INSTRUCTION DE MONTAGE AU PLAFOND
INSTRUCTIONS D'UTILISATION
DESCRIPTION DU SYSTÈME DE CONTRÔLE
natural_image
Close-up of a white remote control with three buttons (clock, plus, minus) and one button labeled 'M' (no additional text or symbols)NETTOYAGE ET ENTRETIEN