USER MANUAL PPWD 30 B2 PARKSIDE
Workshop Vacuum Cleaner
Translation of the original instructions
NL BE
Before reading, unfold the page containing the illustrations and familiarise yourself with all functions of the device.
FR BE
Scope of delivery/accessories. 29
Overview. 29
Description of functions. 30
Technical data. 30
Meaning of the safety information. 31
Pictograms and symbols. 31
Safe initial start-up of the workshop vacuum cleaner. 32
Safety information for batteries. 35
Preparation. 36
Control elements. 36
Handheld transmitter. 36
Attaching and removing the motor head. 36
Assembly. 37
Fitting and removing a bag. 37
Attaching and removing the suction hose. 38
Setting up the floor nozzle. 39
Fitting the suction accessories. 39
Fitting the Parkside System Box. 39
Operation. 39
Before operation. 39
Dry vacuuming. 40
Suction tool. 40
Wet vacuuming. 41
Transport 41
Cleaning, maintenance and
storage. 42
Cleaning 42
Filter cleaning button. 42
Replacing a flat pleated filter.....42
Cleaning and replacing the outlet filter. 43
Maintenance and repair. 43
Storage. 43
Parkside app. 44
Parkside app. 44
Removed the device from the app. 44
Privacy policy. 44
Disposal/environmental protection. 44
Troubleshooting. 45
Service. 46
Guarantee. 46
Repair service. 47
Service Centre. 48
Importer. 48
Spare parts and accessories......48
Exploded view. 262
Introduction
Congratulations on purchasing your new workshop vacuum cleaner (hereafter referred to as device or power tool).
You have chosen a high-quality device. This device was quality-tested and subjected to a final inspection during production, therefore ensuring proper functioning of your device.
In some cases, residual amounts of water may be present on or in the device or in hose lines. This is not a flaw or a defect and is no cause for concern.
#
The instruction manual forms part of this device. It contains important information on safety, use and disposal. Read the instruction manual carefully. Familiarise yourself with the controls and how to use the device
correctly. Use the device only as described and for the stated fields of application. Store the instruction manual carefully and ensure that all documents are handed over in the event that the device is passed on to another user.
Proper use
This device is only intended for the following uses:
- Suction and extraction of hazardous dry dusts according to dust class H according to EN 60335-2-69, e.g. dusts from wood and varnish
- Extraction of an air-water mixture
- Connecting mains-operated power tools in a dry environment
The vacuuming of asbestos and flammable or explosive substances is prohibited.
The vacuum cleaner has been dust-tested and complies with dust class H for dry dusts according to IEC/EN 60335-2-69. It is a workshop vacuum cleaner and is not suitable for household use.
Any other use that is not expressly permitted in this instruction manual may pose a serious hazard to the user and result in damage to the device. The operator or user of the machine is responsible for any accidents or personal injury and/or material damage to third parties or their property. The machine is intended to be used by do-it-yourselfers. It was not designed for heavy commercial use. The warranty is void in the case of commercial use. The manufacturer is not liable for damage caused by improper use or incorrect operation.
Scope of delivery/accessories
Unpack the device and check that everything is present.
Dispose of the packaging material properly.
The following parts are in the dirt container on delivery. Attaching and removing the motor head, p. 36
Overview
The illustrations for the device can be found on the front and back fold-out page.
1 Appliance socket
2 Volume flow controller
3 On/Off switch
4 Bluetooth module
5 USB type C connection
6 Receptacle (Parkside System Box)
7 Suction hose (fabric; 3.5m )
8 Carrying handle
9 Receptacle hole
10 Power cord
11 Filter cleaning button
12 Motor head
13 2 × Snap lock
14 Wheel
15 Dirt container
16 Exhaust air outlet
17 Castor
18 Parking brake
19 Suction connector
20 Cover
21 Fleece filter bag
22 Sealing ring
23 Closing tab
24 Foil bag
25 Warning label
26 Floor nozzle
27 Holder (Power cord)
28 Holder (Suction tube)
29 Retaining lug
30 2 × Accessories holder (Motor head)
31 Metal suction tube (two-part)
32 Handheld transmitter
33 Air control
34 Handle
35 Suction adapter
Fig. B
36 Connector
Fig. C
37 Lock (Suction hose)
Fig. D
38 Notch
39 Brush
40 Rubber lip
Fig. E
41 LED (Handheld transmitter)
42 Button (Handheld transmitter)
43 Cover (Battery compartment)
44 Battery (CR2032)
Fig. F
45 Flat pleated filter
46 Holder (Flat pleated filter)
47 Lever
48 Safety screw
Fig. G
49 Outlet filter
Description of functions
The appliance is equipped with a dust-tight dirt container. 2 swivel castors with brake and 2 large, rubberised wheels ensure high mobility and a stable stand. When wet vacuuming, a sensor interrupts the drive when the dirt container is full.
Please refer to the descriptions below for information on how the operating elements work.
Technical data
Workshop Vacuum Cleaner PPWD 30 B2
Rated voltage U 220-240 V\~;50/60 Hz
Rated output P 1300 W
Power (Appliance socket) .... ≤2150 W
Length Power cord 7.5 m
Protection class
Protection type . IPX4
Weight (Including accessories) 13,4 kg
Volume flow 137 m³/h (38 l/s)
Maximum negative pressure 200 hPa (20 kPa)
Container volume 301
Sound pressure level (L_pA) 73 dB(A); K_WA = 3 dB
Vibration (a_h) .. ≤ 2.50~m / s^2 USB type C connection . 5V;2 A frequency band .... 2400-2483.5 MHz transmitted power .. ≤ 20 dBm
Handheld transmitter Rated voltage U. 3 V Battery . CR2032 (Li-Mn) Range (without obstructions) ....10 m frequency band .... 2400-2483.5 MHz transmitted power .. 2 dBm

CAUTION! The following basic safety precautions must be observed while using electrical devices to protect against electric shock, injury and risk of fire.
DANGER! If you do not observe this safety instruction, an accident will occur. The result of which is severe bodily injury or death.
WARNING! If you do not observe this safety instruction, an accident may occur. The result of which is likely severe bodily injury or death.
CAUTION! If you do not observe this safety instruction, an accident will occur. The result of which is likely minor or moderate bodily injury.
NOTICE! If you do not observe this safety instruction, an accident will occur. The result of which is possible damage to property.
Pictograms and symbols Symbols on the device

Read the instruction manual carefully. Familiarise yourself with the controls and how to use the device correctly.

For cold ash only! There is a risk of fire if the suction material exceeds a temperature of 40^
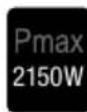
Power (Appliance socket): ≤2150 W

Appliance socket
IP44 Protection type (Appliance socket): IP44 Protected against solid foreign bodies with diameter ≥ 1.0 mm; Protection against splash water on all sides

Bluetooth module: Status LED and button
Filter cleaning button, p. 42
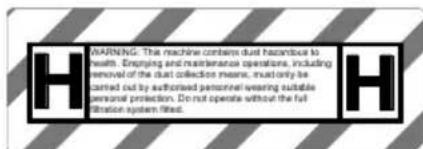
WARNING! This appliance contains dust that is harmful to health. Emptying and maintenance operations, including the removal of dust collection containers, must only be carried out by professionals wearing appropriate protective equipment. Do not operate without the complete filtration system.
Waste electrical and electronic equipment (WEEE) must not be disposed of with domestic waste.
- "Cold ash" is ash that has cooled down for a sufficient amount of time and no longer contains any embers. This can be determined by combing the ashes with a metal tool before using the device. There will no longer be noticeable heat radiating from the cold ash.
Safe initial start-up of the workshop vacuum cleaner
WARNING! Only use the vacuum cleaner if you have received sufficient information for the use of the vacuum cleaner, the substances to be vacu-umed and for their safe disposal. Careful instruc-tion reduces operating errors and injuries.
WARNING! Never vacuum materials containing asbestos. Asbestos is considered carcinogenic.
- CAUTION! This appliance is for indoor use only.
WARNING! The vacuum cleaner contains dust that is hazardous to health. Have emptying and maintenance operations, including the removal of dust collection containers, carried
out only by professionals. Appropriate protective equipment is required. Do not operate the vacuum cleaner without the filter system complete and carefully in place. Otherwise you are endangering your health.
WARNING! The vacuum cleaner is suitable for vacuuming dry materials and, by taking appropriate measures, also for vacuuming liquids. The ingress of liquids increases the risk of electric shock.
WARNING! Only use the outlet on the machine for the purposes specified in the instructions. WARNING! Clean the water level limiting device regularly and inspect it for signs of damage.
- Read the instruction manual carefully. Familiarise yourself with the controls and how to use the device correctly.
- This appliance must not be used by persons (in
cluding children) with reduced physical, sensory or mental capabilities, or lack of experience and knowledge. Children must be supervised to ensure that they do not play with the appliance.
Note that the user is responsible for any accidents or risks to others and their property.
- Observe noise protection rules and other local regulations.
Preparation
-
Prior to use, always check the power cord and extension cord for signs of damage or wear and tear. If the cord is damaged during use, it must be disconnected from the supply network immediately. DO NOT TOUCH THE CABLE BEFORE IT HAS BEEN DISCONNECTED FROM THE POWER SUPPLY. Do not use the device if the cord is damaged or worn.
-
Make sure that the mains voltage matches the details on the type plate.
-
Connect the device only to a power outlet with a residual current circuit breaker (FI switch) of rated residual current no more than 30mA .
- Connect the appliance to a power outlet with a fuse of at least 16 A.
- If the power cord of this device is damaged, it must be replaced by the manufacturer, their customer service or by a similarly qualified person in order to avoid hazards. contact the service centre.
- Never use the device if there are children or animals nearby. People nearby must wear protective clothing.
Operation
- Pay attention, be aware of what you are doing and take the utmost care when working with the device. Do not use the device if you are tired or you are under the influence of drugs, alcohol or medication.
GB MT
- The machine must not be used at altitudes over 2000m .
- Do not allow the vacuum to come into contact with people or animals.
While in operation, never aim the suction hose and nozzles at yourself or other people; particularly not eyes or ears. There is a risk of injury.
- The nozzles and suction hose must not be at the same height as your head while working. There is a risk of injury.
- Do not vacuum hot, glowing, flammable or explosive substances. These include hot ashes, petrol, solvents, acids or alkalis amongst others. Risk of fire and injury.
- Switch off the appliance immediately if foam or liquid escapes.
- Make sure not to damage the power cord by pulling it over sharp edges, getting it trapped or by pulling on the cable.
- Never use the power cord to pull the plug out of the outlet or to pull the
device. Protect the power cord from heat, oil and sharp edges.
- Never transport the device while the drive is running.
-
Switch off the device and disconnect the plug from the power outlet. Make sure that all moving parts have come to a complete stop
-
when leaving the device,
- before changing the accessories,
- before removing obstructions or loosening blockages,
-
before checking the device, cleaning it or performing maintenance work on it.
-
If the device starts to vibrate abnormally, an immediate check is required, :
-
Examine for loose parts and tighten these,
- search for signs of damage,
- replace damaged accessories. For repairs,
contact the service centre.
Cleaning, maintenance and storage
-
CAUTION! This appliance may only be stored indoors.
-
Allow the motor to cool down before storing the device for a longer period.
-
Remove the battery from the appliance before storing it.
-
Replace worn or damaged parts in the interests of safety. Use only original spare parts and accessories. Using externally produced parts results in the immediate loss of any warranty claim.
-
The device may only be opened by an authorised electrician. Always contact our service centre for repairs.
-
Switch the drive off, disconnect the device from the power supply and allow the device to cool off if you want to clean, adjust, store the device or
to exchange an accessory part.
- Handle the device with care and keep it clean.
- Store the device out of reach of children.
Under normal operating conditions, a hermetically sealed battery does not present any hazards. A battery can present a hazard in the following cases:
DANGER! Danger to life due if swallowed! Keep children away from batteries.
CAUTION! Risk of explosion and burns! When handling batteries, observe the following:
- Never open or damage batteries.
- Never try to charge disposable batteries.
- Never expose batteries to a source of heat, fire or direct sunlight.
- Never short-circuit batteries.
- Never mix used and new batteries in a device.
- Pay attention to the correct polarity when inserting the batteries.
Take leaking batteries out of the battery compartment immediately.
WARNING! Risk of chemical burns and poisoning from battery acid! If toxic and caustic battery acid leaks:
After eye contact: Flush the eyes with a large amount of running water for 30 minutes. Call a doctor right away.
After skin contact: Take off soiled clothing and rinse the skin with a large amount of running water for
at least 15 minutes. Call a doctor if irritation, injury or pain persists.
- After breathing it in: Get some fresh air if you notice your respiratory tract is irritated. Call a doctor if irritation persists.
- After swallowing: Do not force vomiting. If the affected person is conscious, make sure that they rinse their mouth and the surrounding areas of skin with water for at least 15 minutes. Consult a doctor right away. Call a doctor right away.
Preparation
WARNING! Risk of injury due to unintentional start-up. Do not insert the plug into the outlet until the device is fully prepared for use.
Control elements
Familiarise yourself with the operating elements before using the device for the first time.

On/Off switch (3)
The appliance has two operating modes.
- OFF: Appliance is switched off.
ON: Appliance is switched on.
- AUTO: Appliance starts automatically when a connected power tool is switched on.
Volume flow controller (2)

MIN: Minimum volume flow
MAX: Maximum volume flow
Handheld transmitter
- Switches the vacuum cleaner on and off (On/Off switch (3): AUTO).
LED (41)
- Lights up green when the button is pressed.
Replacing the battery
(Fig. E) Replace the battery (CR2032) if the LED no longer lights up when the button is pressed.
- Turn the cover (43) of the battery compartment with a suitable coin
- Remove the cover (43) of the battery compartment.
- Remove the battery (44). Take the battery to a collection point.
- Insert a new battery (44). The + pole points upwards.
- Close the battery compartment with the cover (43).
Attaching and removing the motor head
Disassembling the motor head
- Unlock the snap locks (13) on the dirt container (15).
- Take the motor head (12) off.
Assembling the motor head
-
Place the motor head (12) on the direct container (15). The control panel points to the suction connection (19).
-
Lock the snap locks (13) on the dirt container (15).
Assembly
Sticking on a warning label
The appliance must be provided with a warning label.
- Peel off the warning label (25) in your national language from the enclosed sticker sheet and stick the warning label on the marked area.
State on delivery
- Motor head (pre-assembled)
- Flat pleated filter (pre-assembled)
- Holder (Power cord) (not assembled).
Phillips screwdriver PH2
Holder (Power cord) assembly (Fig. A)
- Insert the holder (27) for the power cord into the receptacle on the back of the motor head (12).
- Fasten the holder (27) for the power cord with the screws. The screws are pre-assembled in the holes of the holder.
Fitting and removing a bag
WARNING! This appliance contains dust that is harmful to health. Emptying and maintenance operations, including the removal of dust collection containers, must only be carried out by professionals wearing appropriate protective equipment. Do not operate without the complete filtration system.
Overview
The appliance has the following bags:
Fleece filter bag (21)
Dry vacuuming
- Suction of harmful substances together with the foil bag.
- Foil bag (24)
Dry vacuuming
- Suction of harmful substances together with the fleece filter bag.
- When vacuuming dust class H fabrics, use the fleece filter bag and the foil bag.
Fitting a foil bag
(Fig. B)
WARNING! This bag is not a toy. To avoid danger of suffocation, keep this plastic bag away from babies and children. The bag could adhere to the mouth and nose and obstruct breathing. Do not use this bag in cribs, beds, prams or play pens.
- Remove the motor head (12).
- Remove any bags present in the dirt container (15).
- Place the foil bag (24) in the dirt container (15) with the opening facing forwards.
- Pull the opening of the foil bag (24) inside the dirt container (15) over the suction connection (19). The sealing ring (22) at the opening of the foil bag must lie between the webs (36) on the suction connection.
- Make sure that the foil bag (24) is completely against the inner walls of the dirt container (15).
- Fold the rest of the foil bag (24) over the edge of the dirt container (15).
- Perform one of the following activities:
see Installing the fleece filter bag
Assembling the motor head, p. 36
Installing the fleece filter bag
(Fig.B)
- Remove the motor head (12).
-
Perform one of the following activities:
-
Remove any bags present in the dirt container (15).
If you wish to vacuum hazardous substances: see Fitting a foil bag
-
Place the fleece filter bag (21) in the dirt container (15) with the opening facing forwards.
- Pull the opening of the fleece filter bag (21) inside the dirt container (15) over the suction connection (19). The sealing ring (22) on the fleece filter bag opening must fully surround the connector (36) on the suction connection.
- Make sure that the filter bag is not pinched.
Assembling the motor head, p. 36
Removing the fleece filter bag
If the foil bag is also used: see Removing the foil bag
- Remove the motor head (12).
- Pull the opening of the fleece filter bag (21) from the suction connection (19).
- Close the fleece filter bag: Pull the tab.
- Remove the fleece filter bag (21) from the dirt container (15). Dispose of the fleece filter bag in an environmentally friendly way.
- Perform one of the following activities:
Fitting a foil bag, p. 37
- Installing the fleece filter bag, p. 38
Assembling the motor head, p. 36
Removing the foil bag
- Removing the suction hose Make sure that the suction connection is closed by the closing flap.
- Remove the motor head (12).
- Flip the foil bag upwards.
- Close the foil bag with a cable tie.
- Pull the opening of the foil bag (24) and, if applicable, the fleece filter bag (21) from the suction connection (19).
- Close the foil bag: Pull the closing tab (23).
- Carefully remove the closed foil bag from the dirt container without damaging it (15).
- Dispose of the used foil bag in accordance with the legal requirements.
- Perform one of the following activities:
Fitting a foil bag, p. 37
- Installing the fleece filter bag, p. 38
Assembling the motor head, p. 36
Attaching and removing the suction hose
Attaching the suction hose (Fig. C)
- Open the cover (20).
- Insert the thick end of the suction hose (7) with the lock (37) into the suction connection (19).
You will hear the lock click into place.
Removing the suction hose (Fig. C)
- Press and hold the lock (37) on the suction hose (7).
- Pull the suction hose (7) out of the connector.
- Make sure that the cover (20) securely closes the suction connection (19).
Setting up the floor nozzle
The floor nozzle can be set up for the following floors:
- Wet vacuuming, carpet: Floor nozzle with rubber lip
- Dry vacuuming (smooth floors): Floor nozzle with brushes
Notes
- The rubber lips are fitted with the smooth side facing inwards.
- Please note that there is a short and a long part of each insert. Fit the short part between the wheels.
Removing attachments (Fig. D)
- Press and hold the edge of the floor nozzle (26) outwards near a notch (38).
You can use a slotted screwdriver as an aid.
- Pull the rubber lip (40)/brush (39) over the notch (38).
- Pull the rubber lip (40/brush (39) to the side out of the floor nozzle 26.
Fitting attachments (Fig. D)
- Insert the rubber lip (40)/brush (39) from the side behind a notch (38) into the floor nozzle (26) as far as it will go.
- Press the rubber lip (40)/brush (39) behind the other notch (38)
Fitting the suction accessories
The following accessories can be plugged onto the fabric suction hose (7) or onto each other:
If the air velocity falls below 20m/ s, secondary air can be added to the air flow with the air control (33).
- 2 × metal suction tube (31)
If you use both suction tubes, attach the suction tube with retaining lug (29) second. This allows you
to hook the suction tube onto the holder (28) during short breaks.
Fitting the Parkside System Box
Notes
- Do not attach more than one Parkside System Box to the appliance.
The weight of the Parkside System Box with contents must not exceed 15kg
Operation
Before operation
- The vacuum cleaner is equipped with volume flow monitoring. The volume flow monitoring is fixed at a value of 20m / s , regardless of the position of the volume flow controller (2). If this value is undershot, e.g. due to accumulated dirt in the suction hose, a full safety filter bag or a clogged resp. missing flat pleated filter, an acoustic warning signal sounds.
Remedy
- Increase the volume flow with the volume flow controller (2).
- Add secondary air with the air control (33).
-
Remove blockages in the suction hose and accessories.
-
When operating the vacuum cleaner, make sure that the castors (17) on the vacuum cleaner are locked with the parking brakes (18). This protects the vacuum cleaner from rolling away unintentionally. Test the castors for function before using them on the relevant surface.
Inform yourself about the valid regulations/laws regarding the hand
ling of hazardous dusts in your country.
- The vacuum cleaner may be used for vacuuming and extracting the following materials: Dusts with an exposure limit value < 0.1 mg/m^3
- The vacuum cleaner must not be used in rooms where there is a risk of explosion.
- Only use the appliance socket for the following purpose: Connecting mains-operated power tools in a dry environment.
Dry vacuuming
Notes
- The pleated filter can become clogged when large quantities of fine dust are vacuumed up. In this case, we recommend that you use a filter bag.
Switching on
- Set a volume flow with the volume flow controller (2).
- Set the on/off switch to ON.
Switching off
- Set the on/off switch to OFF.
- Decontaminate the appliance if necessary.
Notes
If possible, use the handle (34). You can then add secondary air with the air control (33), if required
- If the exhaust air is returned to the room, there must be a sufficient air exchange rate L in the room. In order to comply with the required limit values, the recirculated volume flow must not exceed 50% of the fresh air volume flow (room volume V_R × air change rate L_W ). Also observe national and regional regulations.
- The pleated filter can become clogged when large quantities of fine dust are vacuumed up. In this case, we recommend that you use a filter bag.
Preparation
- Connect the suction adapter (35) to the handle (34).
- Connect the suction opening of the power tool to the suction adapter (35).
-
Connect the power tool to the appliance. Note one of the following descriptions:
-
Power tool with mains plug: Insert the mains plug of the power tool into the appliance socket (1).
- Battery-operated power tool with smart battery: Set up Automatic with battery tool, p. 41
- Handheld transmitter: Fit the handheld transmitter (32) to the power tool or suction hose (7).
Switching on
- Set a volume flow with the volume flow controller (2).
-
Set the on/off switch to AUTO.
-
Mains connection, smart battery: The vacuum cleaner starts automatically when you switch on the power tool. The vacuum cleaner stops shortly after you switch off the power tool. You can set this time in PARKSIDE app.
- Handheld transmitter: Press the button (32). The vacuum cleaner switches on or off.
Switching off
- Set the on/off switch to OFF.
-
Remove the handle (34) and suction adapter (35) from the power tool.
-
Power tool with mains plug: Remove the mains plug of the power tool from the appliance socket (1). Handheld transmitter: Remove the handheld transmitter (32).
- Decontaminate the appliance if necessary.
Notes
- The vacuum cleaner only switches on automatically when the PARKSIDE app is running in the foreground and the screen is activated.
Requirements
- A smart battery is inserted in the cordless tool, which is connected to the PARKSIDE app.
- The device is connected to the PARKSIDE app.
Procedure
- Set the on/off switch (3) to AUTO Mode: AUTO
- Set the following: Auto Turn On > Automatic
- Test the connection before you start: Switch on the cordless tool. The device switches on with a short delay.
- Leave the PARKSIDE app running in the foreground and the smartphone screen on.
Wet vacuuming
DANGER! Danger of electric shock. Never reach into the water to be suctioned up.
Notes
- Do not use the vacuum cleaner to suck up flammable or explosive liquids such as petrol, oil, alcohol or solvents. Do not vacuum hot, burning or explosive dusts. Do not operate the vacuum cleaner in rooms
where there is a risk of explosion. The dusts, vapours or liquids may ignite or explode.
- Switch off the appliance immediately if foam or liquid leaks out.
- During wet vacuuming, a contact interrupts the motor when the dirt container is full. Empty the dirt container.
- Make sure that the suction nozzle is not completely in the water so that some air is always sucked in.
- When wet vacuuming, make sure that the vacuum cleaner is always higher than the water surface to be vacuumed. Otherwise, a siphon effect could occur.
Switching on
- Set a volume flow with the volume flow controller (2).
- Set the on/off switch to ON.
Switching off
- Set the on/off switch to OFF.
-
Empty the dirt container (15) immediately after vacuuming because it is not designed to store liquids.
-
Remove the suction hose.
-
Empty the dirt container through the suction connection.
After work: Wipe the inside of the dirt container dry.
-
Decontaminate the appliance if necessary.
Transport
Information on transporting the tool:
- Switch off the device and disconnect the plug from the power outlet. Make sure that all moving parts have come to a complete stop.
- Clean the appliance thoroughly before removing it from the contaminated area.
GB MT
- Parts that cannot be completely cleaned must be sealed airtight in a plastic bag for transport.
Make sure that the cover (20) closes the suction connection (19) dust-tight.
- Carry the appliance by the carrying handle (8).
- When the dirt container is clean and no bags are inserted, you can store the suction tube (31), the handle (34) and the floor nozzle (26) in it.
Cleaning, maintenance and storage
WARNING! Electric shock! Risk of injury due to unintentional startup. Protect yourself when performing maintenance or cleaning work. Switch off the device and disconnect the mains plug from the socket. You should have any repair and maintenance work that is not described in these instructions carried out by our Service Centre. Only use original replacement parts.
Cleaning
NOTICE! Risk of damage! Improper cleaning can damage the machine. Never spray down the appliance with water. Do not use any abrasive cleaning agents or solvents.
Notes
- Before removing the appliance from a hazardous area, the appliance housing should be decontaminated by dust extraction procedures and wiped clean or treated with sealant. All equipment parts must be considered contaminated when removed from the hazard
ous area and appropriate measures must be taken to prevent dust dispersal.
General cleaning
- Empty the dirt container (15).
- Clean the dirt container (15) with a damp cloth.
- Replace a full bag (for reordering see).
If the suction power decreases, you can improve it by pressing the filter cleaning button.
- Close the suction connection (19) with the cover (20).
- Set the volume flow controller (2) to MAX. Switch on the device (ON).
- Press the filter cleaning button (11) three times for three seconds.
- Air is blown through the flat pleated filter (45) to remove debris and dirt.
Replacing a flat pleated filter
The appliance has the following filters and bags:
Procedure (Fig. F)
- Remove the motor head (12). Place the motor head (12) with the top facing downward.
- Loosen the safety screws (48).
-
Flip the lever (47) upwards and pull the filter holder (46) upwards out of the motor head.
-
Push the flat pleated filter (45) down out of the filter holder (46) into a dust-tight bag.
- Clean the filter holder (46).
- Place a new flat pleated filter (45) in the filter holder (46).
- Place the filter holder (46) in the motor head (12) and fold the lever (47) down.
- Secure the filter holder (46) with the safety screws (48).
- Mount the motor head.
Cleaning and replacing the outlet filter
Notes
- If the flat pleated filter is intact and no harmful substances are sucked up, it should not be necessary to clean or replace the outlet filters.
- The appliance has an outlet filter on each side. Only replace an outlet filter with an identical outlet filter.
Replacing the outlet filter (Fig. G)
- Press down the lug on the exhaust air outlet (16).
- Remove the exhaust air outlet (16).
- Replace the outlet filter (49).
- Insert the exhaust air outlet (16) with outlet filter.
Maintenance and repair
Notes
- For user maintenance, the appliance must be disassembled, cleaned and serviced as far as is practicable without causing danger to maintenance personnel and other persons. Appropriate precautions include decontamination before disassembly, provision for local filtered forced ventilation where the machine is being disassembled, cleaning of the service
area and appropriate personal protective equipment.
- When carrying out maintenance or repair work, any contaminated items that cannot be satisfactorily cleaned must be disposed of. Such items must be disposed of in impermeable bags in accordance with the applicable regulations for the disposal of such waste.
Annual inspections
- The manufacturer or a trained person must carry out a technical inspection at least once a year, consisting of, for example, checking the filters for damage, the air tightness of the appliance and the correct functioning of the control device.
- In addition, the filter efficiency of the appliance should be tested at least annually in accordance with EN 60335-2-69 22.AA.201.2. National requirements may stipulate more frequent testing. If the test is not passed, it shall be repeated with a new main filter.
Storage
Always store the device and accessories:
clean
dry
- protected against dust
out of the reach of children
Notes
- The dirt container is not suitable for storing liquids. Empty the dirt container after wet vacuuming.
- When the dirt container is clean and no bags are inserted, you can store the suction tube (31), the handle (34) and the floor nozzle (26) in it.
Preparing the appliance for storage (Fig. H)
- Wind up the power cord (10) on the holder (27).
-
Suction tube (31):
-
Hang the lower part with the retaining lug (29) on the holder (28).
-
Insert the upper part into an accessory holder (30).
-
Stow the suction hose (7) in the storage compartment on the motor head (12).
- Insert the other accessories into the accessory holders (30) or onto a suction tube (31).
PARKSIDE app
PARKSIDE app
The PARKSIDE app lets you monitor the device and control certain functions. The functions may change with updates to the app and firmware.
Requirements
To find the device in the PARKSIDE app, the following requirements must be met:
- The PARKSIDE app is installed on your smartphone and Bluetooth® is activated.
- The smartphone is connected to a 2.4 GHz WLAN. You know the access data for this WLAN.
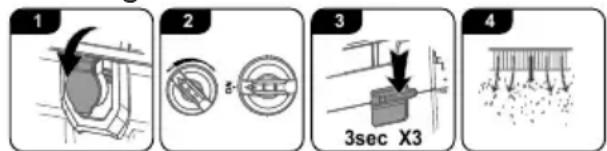
Connecting the device to the PARKSIDE app
- Switch on the appliance. The blue LED flashes.
- Open the PARKSIDE app.
- Your tools.
-
Press the button on the Bluetooth module (Bluetooth module) until the blue LED flashes quickly.
-
Add the device with +.
- Select the device on the following screen.
- Follow the instructions on the screen.
The device is automatically recognised in the PARKSIDE app during the next connections.
Monitoring and controlling the device
- Your tools.
- Select the device from the list. The device overview page is displayed.
- Select the desired setting on the overview page.
Removed the device from the app
When a device is removed from the app, the associated data is also deleted.
- Your tools.
- Swipe the device's card from right to left.

- Confirm the dialog box.
Privacy policy
see Page More; Section Legal, Privacy policy
Disposal/ environmental protection
The device, accessories and packaging should be properly recycled.
Waste electrical and electronic equipment (WEEE) must not be disposed of with domestic waste.
The symbol of the crossed-out wheeled bin means that this product must not be disposed of as unsorted municipal waste at the end of its useful life.
Directive 2012/19/EU on waste electrical and electronic equipment:
Consumers are legally obliged to recycle electrical and electronic equipment in an environmentally sound manner at the end of its life. In this way, environmentally friendly and resource-saving recycling is ensured. Depending on the implementation in national law, you may have the following options:
This does not affect accessories enclosed with the old devices or tools without any electrical components.

Dispose of the batteries according to local regulations. Hand in the batteries at a used battery collection point where they are recycled in an environmentally friendly manner. For more information, please contact your local waste management provider or the service centre.
Troubleshooting
The following table will assist you in fixing faults:
| Problem Possible cause | Error correction | |
| Device does not start | On/Off switch (3) turned off | Check the position of the On/Off switch |
| No mains power supply Check | Check the socket, mains connection cable, plug and fuse and have them repaired by a qualified electrician if necessary. |
| On/Off switch (3) is broken | Contact the service centre. |
| Defective motor |
| Weak or no suction power/throughput | Suction hose (7) or nozzles blocked | Removing obstructions and blockages |
| Suction pipe (31) not correctly assembled | Assemble the suction pipe properly |
| Dirt container (15) open Attaching and removing the motor head, p. 36 |
| Dirt container (15) full Emptying the dirt container | Empty, clean or replace the filter |
| Filter (45/49) full or clogged |
| Dust or dirt is blown out of the device | Filter (45/49) not assembled or incorrectly as-sembled | Replacing a flat pleated filter, p. 42
Cleaning and replacing the outlet filter, p. 43 |
Service
Guarantee
Dear Customer,
This product is provided with a 5 year guarantee from the date of purchase. In case of defects, you have statutory rights against the seller of the product. These statutory rights are not restricted by our guarantee presented below.
Terms of Guarantee
The guarantee period begins on the date of purchase. Please retain the original receipt. This document is required as proof of purchase. If a material or manufacturing defect occurs within five years of the date of purchase of this product, we will repair or replace - at our choice - the product for you free of charge. This guarantee requires the defective product and proof of purchase to be presented within the five-year period with a brief written description of what constitutes the defect and when it occurred.
If the defect is covered by our guarantee, you will receive either the repaired product or a new product. No new guarantee period begins on repair or replacement of the product.
Guarantee Period and Statutory Claims for Defects
The guarantee period is not extended by the guarantee service. This also applies for replaced or repaired parts. Any damages and defects already present at the time of purchase must be reported immediately after unpacking. Repairs arising after expiry of the guarantee period are chargeable.
Guarantee Cover
The product has been carefully produced in accordance with strict quality guidelines and conscientiously checked prior to delivery.
The guarantee applies for all material and manufacturing defects. This guarantee does not extend to cover product parts that are subject to normal wear and may therefore be considered as wearing parts (e.g. Fil
ter) or to cover damage to breakable parts.
This guarantee shall be invalid if the product has been damaged, used incorrectly or not maintained. Precise adherence to all of the instructions specified in the operating manual is required for proper use of the product. Intended uses and actions against which the operating manual advises or warns must be categorically avoided.
The product is designed only for private and not commercial use.
The guarantee will be invalidated in case of misuse or improper handling, use of force, or interventions not undertaken by our authorised service branch.
Processing in Case of Guarantee
To ensure efficient handling of your query, please follow the directions below:
- Please have the receipt and product number (IAN 465676_2404) ready as proof of purchase for all enquiries.
- Please refer for the product number to the type plate on the product, an engraving on the product, the title page of the operating instructions (bottom left) or the sticker on the back or underside of the product.
- Should functional errors or other defects occur, please initially contact the service centre specified below by telephone or use the contact form available on parkside-diy.com in the category Service.
After consultation with our customer service, a product recorded as defective can be sent postage paid to the service address communicated to you, with the proof of pur
chase (receipt) and specification of what constitutes the defect and when it occurred. In order to avoid acceptance problems and additional costs, please be sure to use only the address communicated to you. Ensure that the consignment is not sent carriage forward or by bulky goods, express or other special freight. Please send the appliance inc. all accessories supplied at the time of purchase and ensure adequate, safe transport packaging.

You can view and download these and many other manuals on parkside-diy.com. This QR code will take you directly to parkside-diy.com. Select your country and search for the operating instructions via the search mask. You can open your operating instructions by entering the article number (IAN) 465676_2404.
Repair service
For repairs that are not covered by warranty, contact the service centre. They will gladly create a cost estimate for you.
- We can only work on devices which are sent in properly packed and with postage paid.
Note: Please send your device cleaned and with an indication of
the defect to the address named for the service centre.
- The following are not accepted: devices sent in without prepaid postage, sent as bulky goods, sent as an Express shipment, or devices sent as any other form of special freight.
We will dispose of defective devices you ship to us free of charge.
Service Centre

Service Great Britain
Tel.: 0800 051 8970
Contact form on
parkside-diy.com
IAN 465676_2404

Service Malta
Tel.: 800 65168
Contact form on
parkside-diy.com
IAN 465676_2404
Importer
Please note that the address below is not a service address. Contact the service centre named above first.
Spare parts and accessories
You can get spare parts and accessories from www.grizzlytools.shop. If you have any problems with your order, contact us via our online shop. If you have any other questions, contact: Service Centre, p. 48
| Pos. nr. | 1 | Name Order No. | |
| 7 39 Suction hose (fabric; 3.5 m) 91110483 |
| 12 57 Motor head 91110478 |
| 14, 17 47 Wheel set (2 × Wheel, 2 × Castor) 91110482 |
| 15 35 Dirt container 91110481 |
| 21 44 Fleece filter bag 91110487 |
| 24 56 Foil bag 91110686 |
| 26, 39, 40 | 55 Floor nozzle, 2× Brush, 2× Rubber lip | 91110685 |
| 31 48 2 × Metal suction tube | 91110484 |
| 32 59 Handheld transmitter | 91110688 |
| 34 43 Handle | 91110486 |
| 35 58 Suction adapter 91110687 |
| 45 23 Flat pleated filter | 91110480 |
| 46 22 Holder (Flat pleated filter) | 91110479 |
1 Exploded view, p. 262
Product: Workshop Vacuum Cleaner
Model:PPWD 30 B2
Serial number: 000001-041800
The object of the declaration described above is in conformity with the relevant Union harmonisation legislation:
2006/42/EC • 2014/30/EU • 2011/65/EU & (EU) 2015/863 • 2014/53/EU
The object of the declaration described above is in conformity with Directive 2011/65/EU of the European Parliament and of the Council of 8 June 2011 on the restriction of the use of certain hazardous substances in electrical and electronic equipment.
To ensure conformity, the following harmonised standards and national standards and regulations have been applied:
EN 60335-1:2012/A15:2021 • EN 60335-2-69:2012
EN 62233:2008 • EN IEC 55014-1:2021 • EN IEC 55014-2:2021
EN IEC 61000-3-2:2019/A1:2021 • EN 61000-3-3:2013/A2:2021
EN IEC 63000:2018 • EN 301 489-1 V2.2.3 (2019-11)
EN 301 489-3 V2.3.2 (2023-01) • Draft EN 301 489-17 V3.2.6 (2023-06)
EN 300 328 V2.2.2 (2019-07) • EN 300 440 V2.1.1 (2017-03)
EN 300 440 V2.2.1 (2018-07)
EN 50663:2017 • EN 62311:2008
This declaration of conformity is issued under the sole responsibility of the manufacturer:

Authorised representative of documentation
Sommaire
Introduction. 50
Chere cliente, cher client,
Reparatie-service. 97
Service-Center 97
Importeur. 97
Reparationservice. 259
Service-Center 259
Importor. 259
Montering at Parkside System Box
Bemerk

