KAC929.1 - Washing machine KRESS - Free user manual and instructions
Find the device manual for free KAC929.1 KRESS in PDF.
User questions about KAC929.1 KRESS
0 question about this device. Answer the ones you know or ask your own.
Ask a new question about this device
Download the instructions for your Washing machine in PDF format for free! Find your manual KAC929.1 - KRESS and take your electronic device back in hand. On this page are published all the documents necessary for the use of your device. KAC929.1 by KRESS.
USER MANUAL KAC929.1 KRESS
text_image
Kress Commercial| CyberCabinet | EN | P02 |
| CyberCabinet | D | P17 |
| CyberCabinet | F | P32 |
| CyberCabinet | I | P47 |
| CyberCabinet | ES | P62 |
| CyberCabinet | PT | P77 |
| CyberCabinet | NL | P92 |
| CyberCabinet | HU | P107 |
| CyberCabinet | RO | P122 |
| CyberCabinet | PL | P137 |
| CyberCabinet | CZ | P152 |
| CyberCabinet | SK | P167 |
| CyberCabinet | SL | P182 |
| CyberCabinet | HR | P197 |
| CyberCabinet | DK | P212 |
| CyberCabinet | FIN | P227 |
| CyberCabinet | NOR | P242 |
| CyberCabinet | SV | P257 |
| KAC929 KAC929.X | ||
TABLE OF CONTENTS
Introduction....2
Component List....3
Assembly & Operation....5
General layout inside the CyberCabinet....15
Technical Data....16
INTRODUCTION
Dear Customer,
Thank you for buying this Kress Commercial product. We are dedicated to developing high quality products to meet your commercial landscaping requirements.
The Kress brand is synonymous with premium quality service. Over the years of your product's life, if you have any questions or concerns about your product, please contact your dealer or our Customer Service Team for assistance.
We are confident you will enjoy working with your Kress product for years to come.
INTENDED USE
The product is intended for protecting the CyberTank and related products from inclement weather, accidental contact and theft
text_image
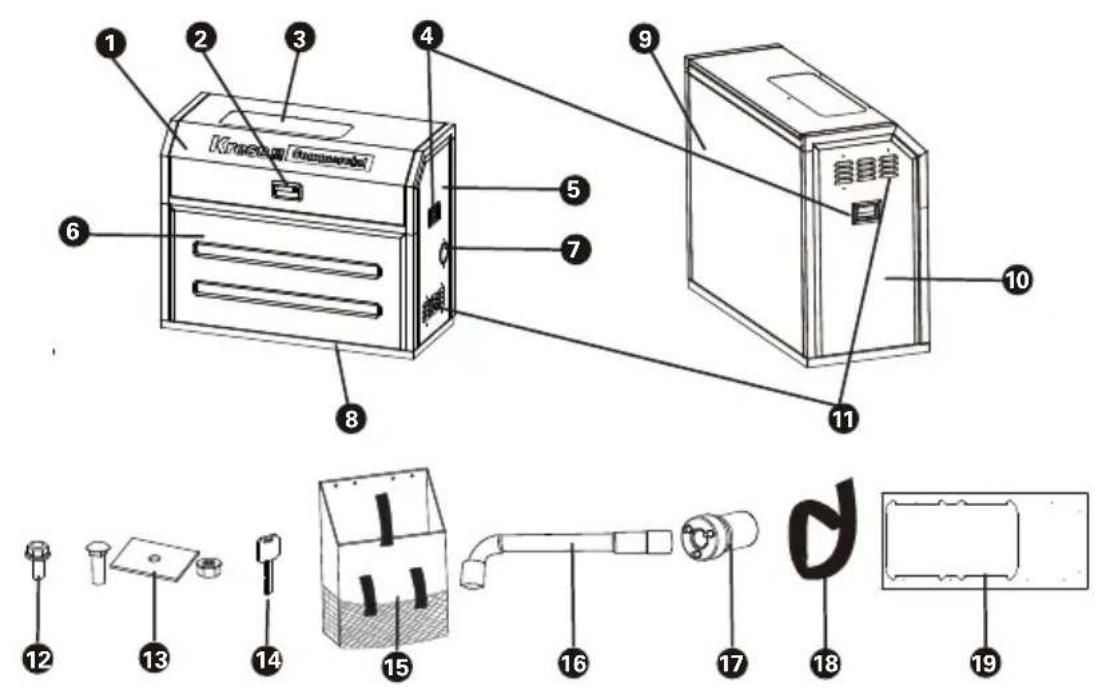
Technical diagram of a refrigerator with numbered parts and exploded view, including labeled components and parts numbered 12 to 19.COMPONENT LIST
| 1. | TOP FRAME & DOOR |
| 2. | PANEL LOCK |
| 3. | OBSERVATION WINDOW |
| 4. | SIDE HANDLES |
| 5. | RIGHT PANEL |
| 6. | FRONT PANEL |
| 7. | CABLE OUTLET |
| 8. | BASE FRAME |
| 9. | BACK PANEL |
| 10. | LEFT PANEL |
| 11. | ADJUSTABLE AIR VENT |
ACCESSORY LIST
* Not all the accessories illustrated or described are included in standard delivery.
| Description Quantity | ||
| 12. | Hex Flange Bolt (M5x12)(For securing the panels and the top frame & door) | 23 |
| 13. | Carriage Bolt (3/8-16 x 4'')+Spacer+Nut(For securing the base frame) | 6 |
| 14. | Key 2 | |
| 15. | Bag 1 | |
| 16. | Socket Wrench(For assembling or removing the hex flange bolts) | 1 |
| 17. | Customized socket(For assembling or removing the nuts) | 1 |
| 18. | Cable Tie 7 | |
| 19. | Base Outline 1 | |
| 20. | CyberTank Warming kit* 1 |
SAFETY WARNINGS
- Look for a flat and solid surface free from potholes or debris, and place the product on it securely.
- During rainy or snowy weather, make sure to keep the door closed at all times.
- In excessively hot and sunny conditions, open both the air vent and the door for better heat dissipation.
- Do not use the product after consuming alcohol or if you feel unwell.
- Avoid using this product during thunderstorms or lightning.
- Do not use the product for purposes other than its intended use.
- It is recommended to wear gloves and non-slip shoes when operating this product.
- Remember to wash your hands once all work is completed.
SYMBOLS
 | To reduce the risk of injury, user must read instruction manual | |
| EN |  | Mind your head |
 | Be careful not to pinch your hands |
ASSEMBLY AND OPERATION
• INSTALLING YOUR CYBERCABINET
STEP 1
If your CyberTank has already been installed in the preferred location.
- Remove the protective guards of CyberTank. If the rain protection cover is installed, remove it first.
- Determine the CyberCabinet's installation position based on the location of your CyberTank either in your truck bed or trailer.
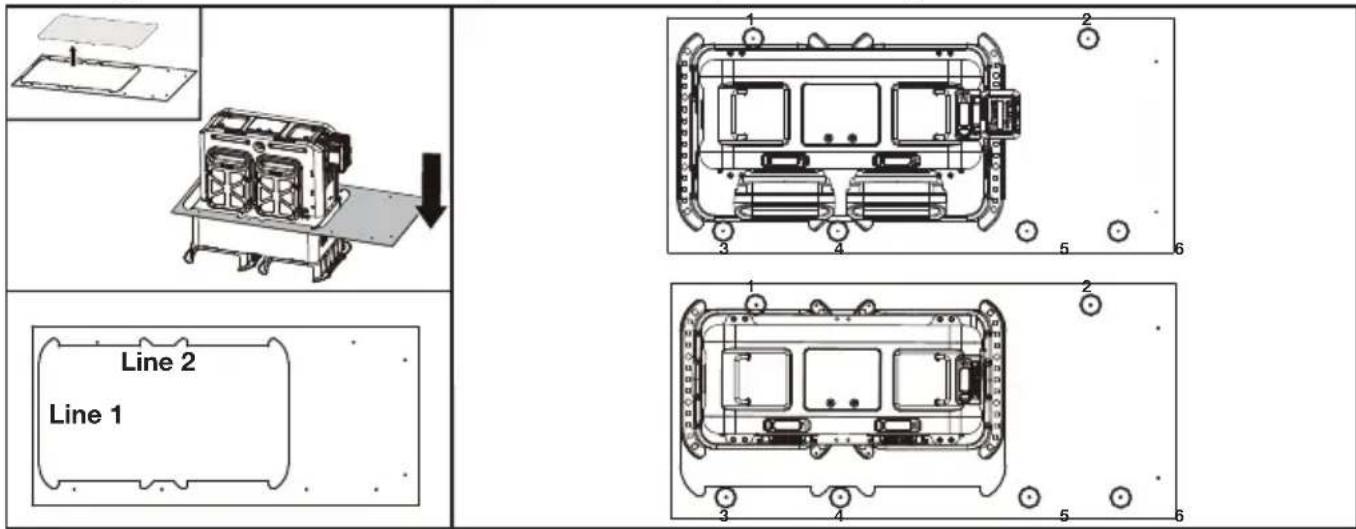
- Place the cabinet base outline on the outside of your CyberTank.
NOTE: The line 1 and line 2 of the base outline should fit closely with the CyberTank mounting brackets.
NOTE: Please place the base outline in the correct direction. Do not confuse the front and back of the base outline. Please pay attention to the printing on the base outline.
- Drill the mounting holes (13 mm) into the truck or trailer as it shows on the base outline.
NOTE: See the following figure for the recommended drilling position of mounting holes. The recommended drilling position is for reference only which can be adjusted according to the actual situation.
text_image
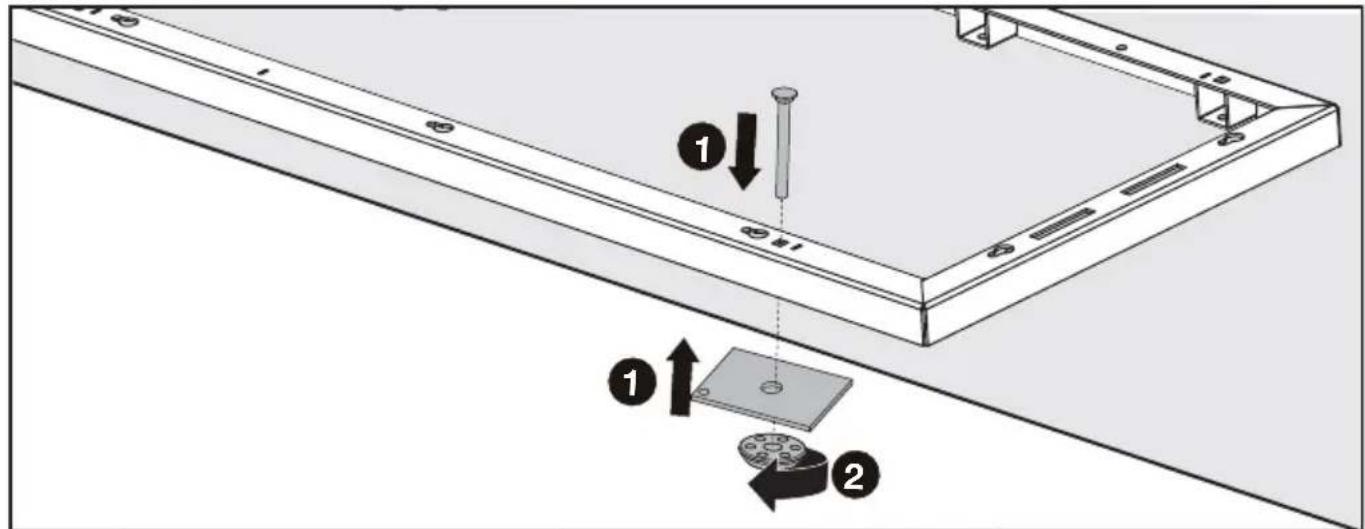
Line 2 Line 1- Place the base frame according to the position of the mounting holes. Fix the base frame with carriage bolts and nuts.
text_image
Technical diagram showing a mechanical assembly with numbered components and directional arrows indicating assembly steps.NOTE: The frame 1 and frame 2 should fit closely with the CyberTank mounting bracket. (The base frame needs to be overlapped with the CyberTank mounting bracket) There must be a certain gap between frame 3 and CyberTank.
text_image
Frame 2 Frame 1 Frame 3EN

natural_image
Technical line drawing of a device chassis with an inset close-up view showing internal components (no text or symbols)If your CyberTank has NOT been installed
- Read CyberTank installation guide
- Install the CyberTank
NOTE: Do not assemble the protective guards of CyberTank. For detailed information of CyberTank installation, please refer to CyberTank installation guide.
- Determine the CyberCabinet's installation position based on the location of your CyberTank either in your truck bed or trailer.
- Place the cabinet base outline on the outside of your CyberTank.
NOTE: The line 1 and line 2 of the base outline should fit closely with the CyberTank mounting brackets.
NOTE: Please place the base in the correct direction. Do not confuse the front and back of the base outline.
- Drill the mounting holes (13 mm) into the truck or trailer as it shows on the base outline.
NOTE: See the above figures for the recommended drilling position of mounting holes.
- Place the base frame in the position shown in the figure above. Fix the base frame with carriage bolts and nuts.
STEP 2
Assemble the warming kit with the CyberTank (if required).
When CyberTank is connected with AC cable and it is too cold for Cybertank to charge, the warming kit will start to warm it up until CyberTank returns to normal status. The LED display of CyberTank will show the status of warming up.
For detailed information of CyberTank warming kit, please refer to CyberTank warming kit instruction manual.
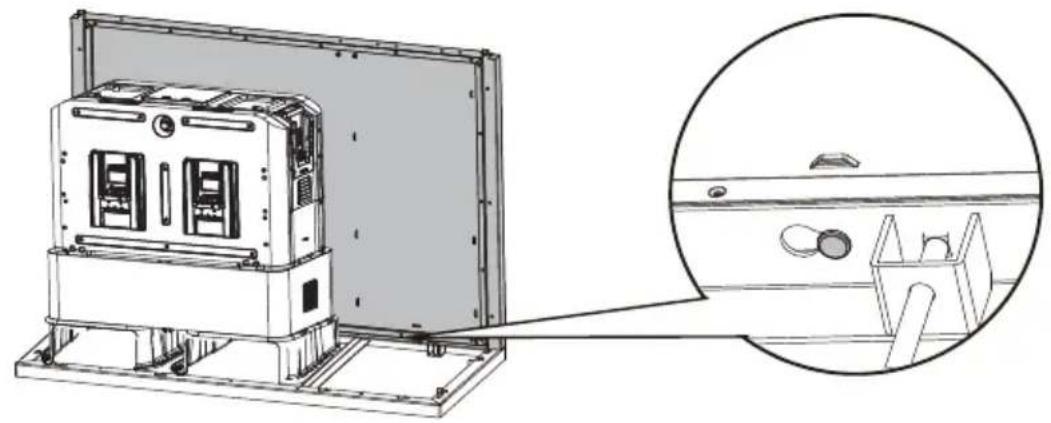
STEP 3
Assemble the back panel with the base frame
text_image
Technical diagram illustrating a mechanical assembly process with labeled components and directional arrows indicating motion or assembly.
natural_image
Technical line drawing of a mechanical device with an inset close-up showing internal components (no text or symbols)STEP 4
Assemble the right panel.
STEP 5
Assemble the left panel in the same way as the right panel.
STEP 6
Assemble the front panel.

text_image
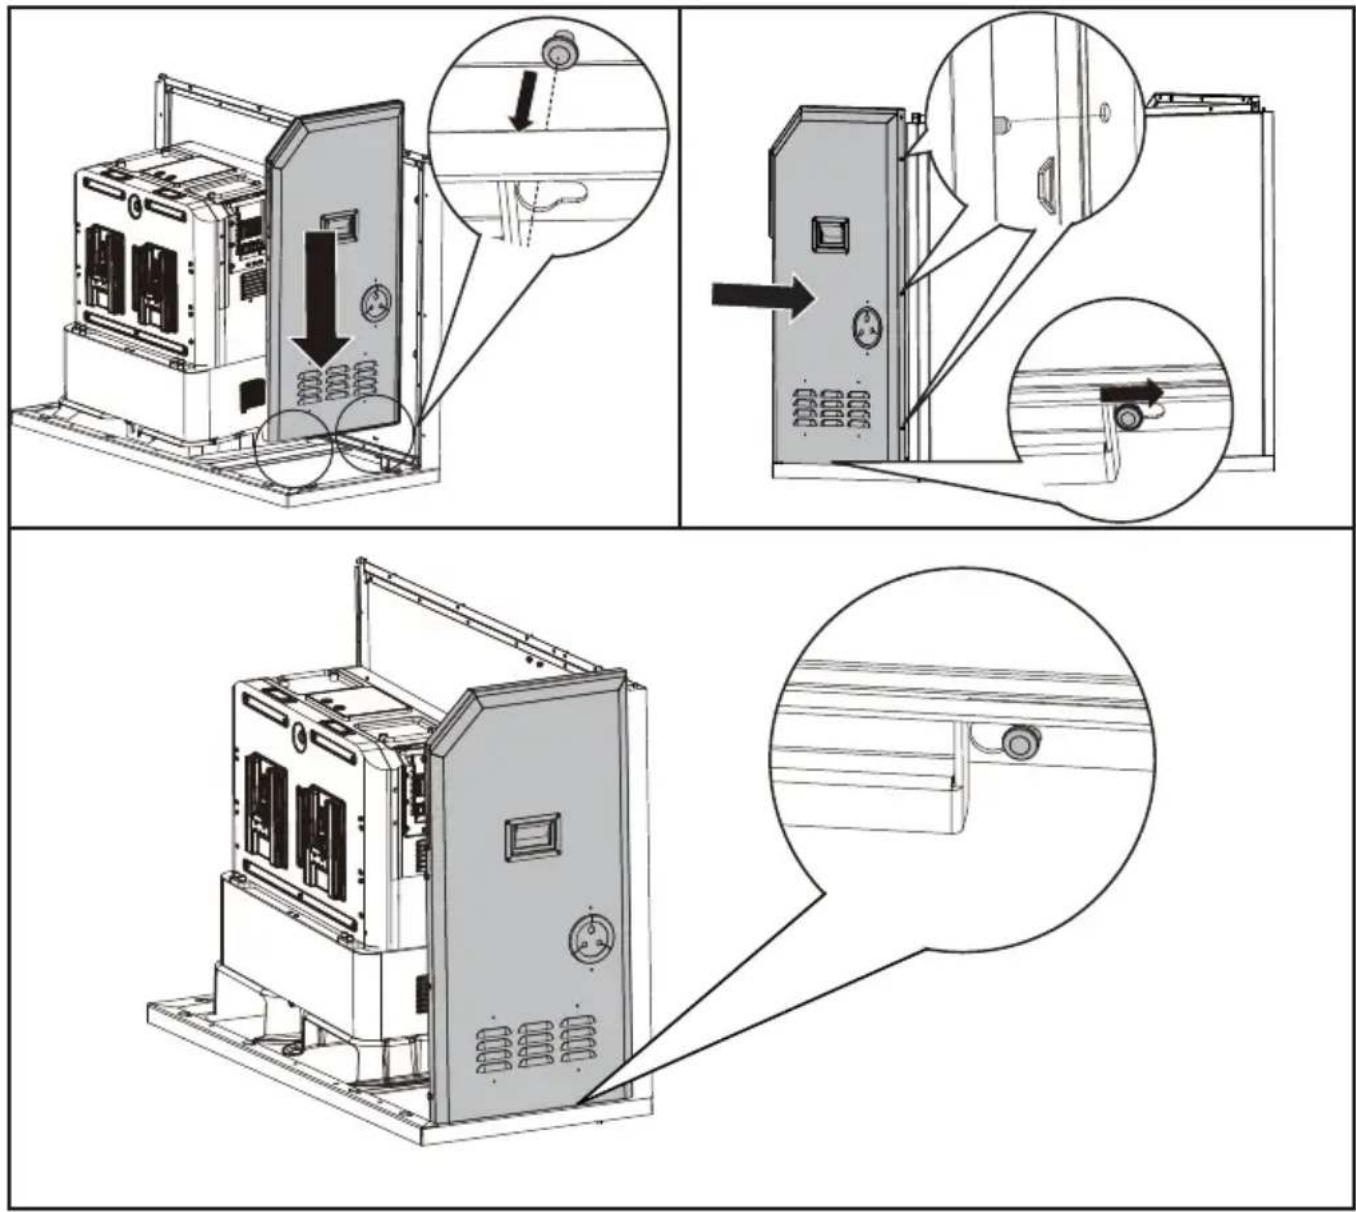
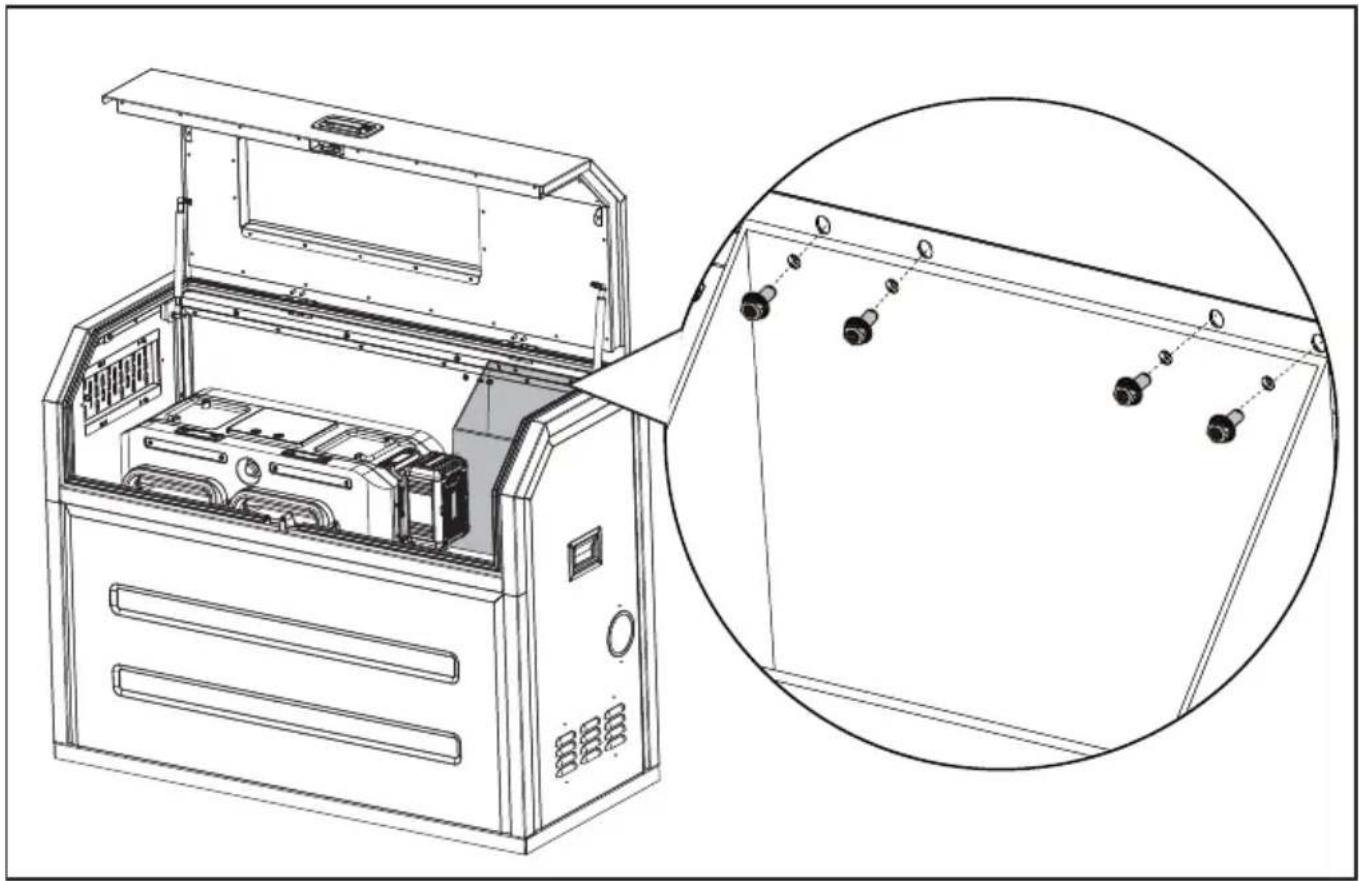
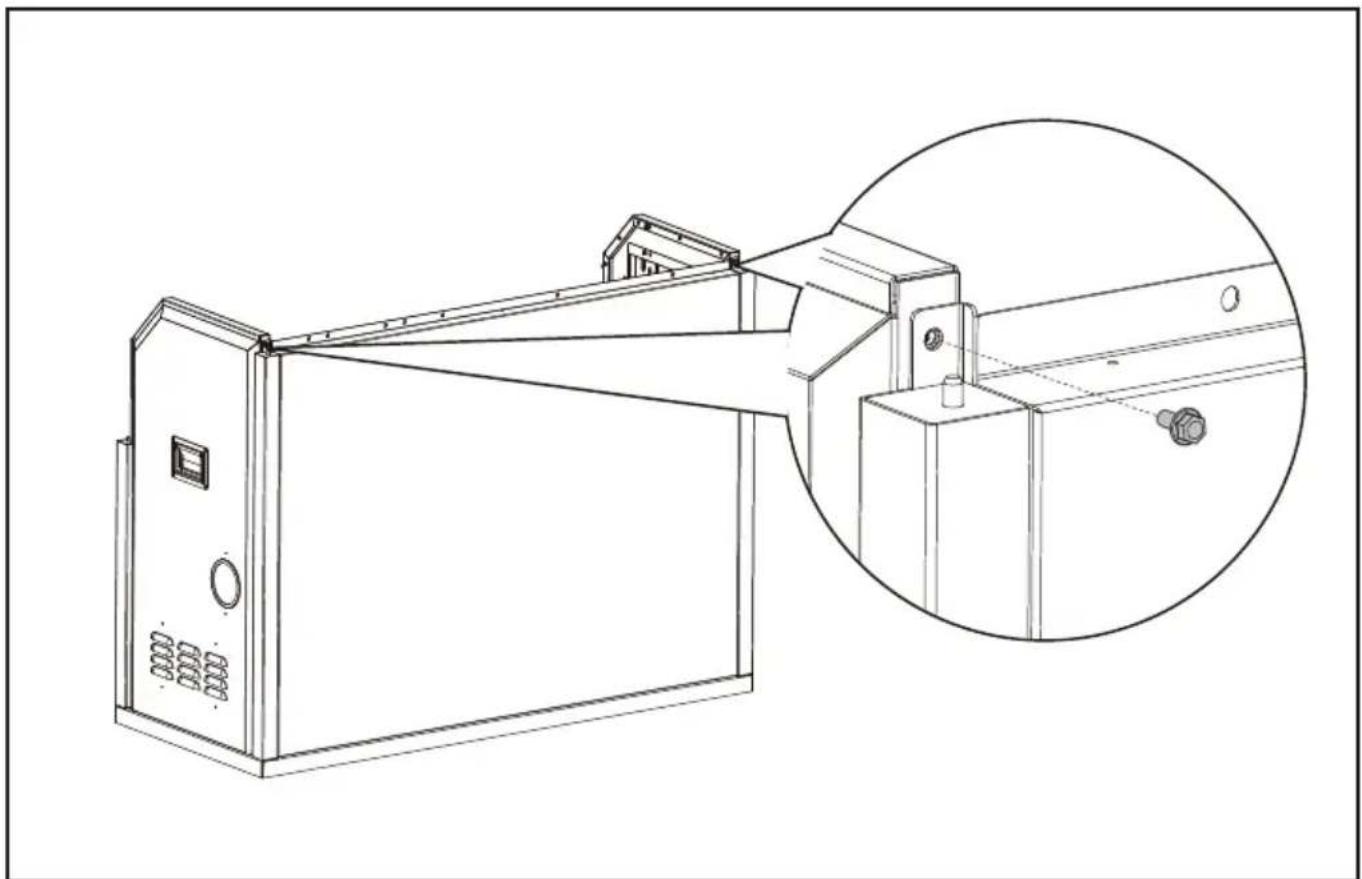
Technical diagram of a device with labeled components and zoomed-in views showing internal structure and assembly.STEP 7
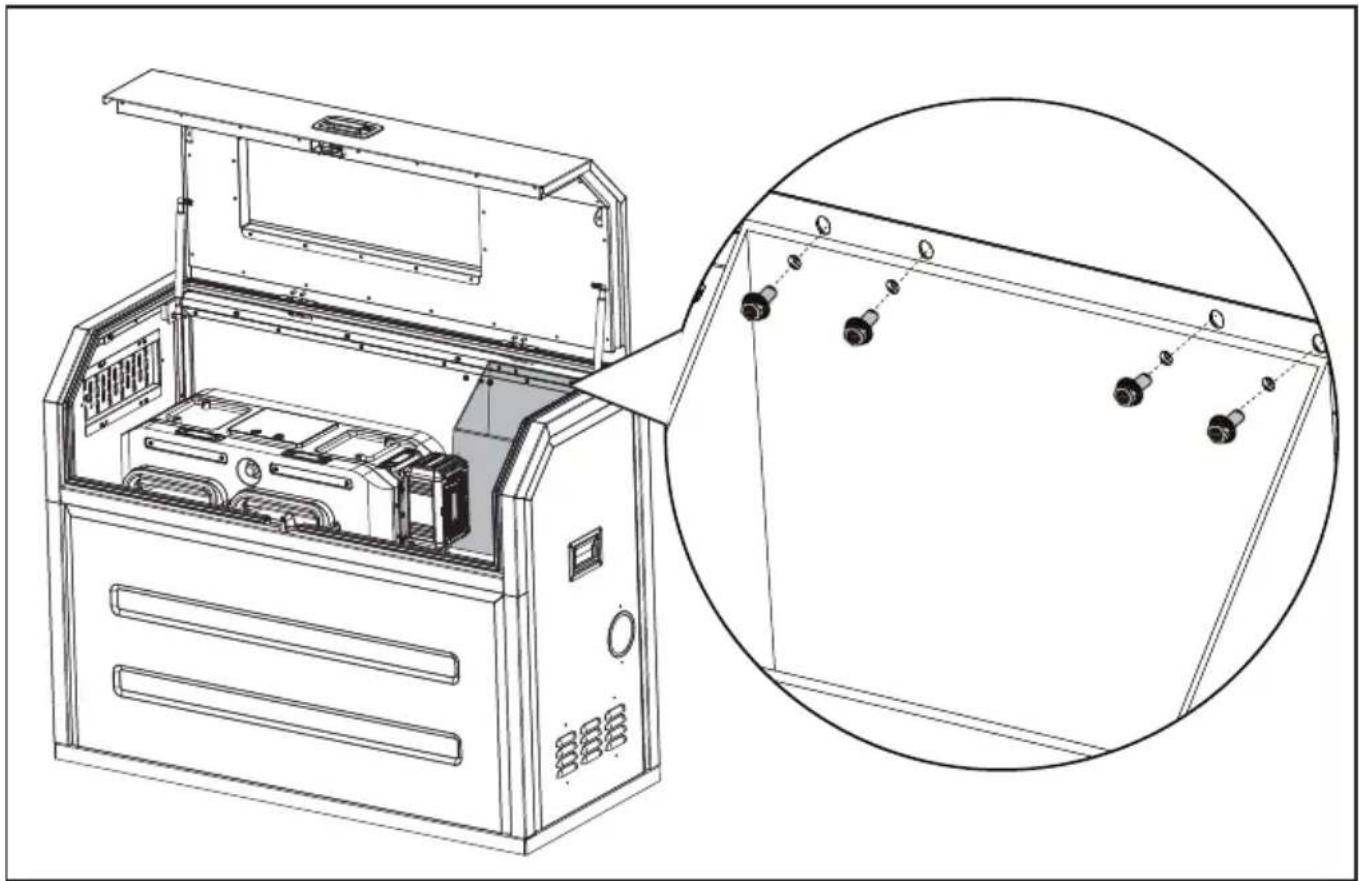
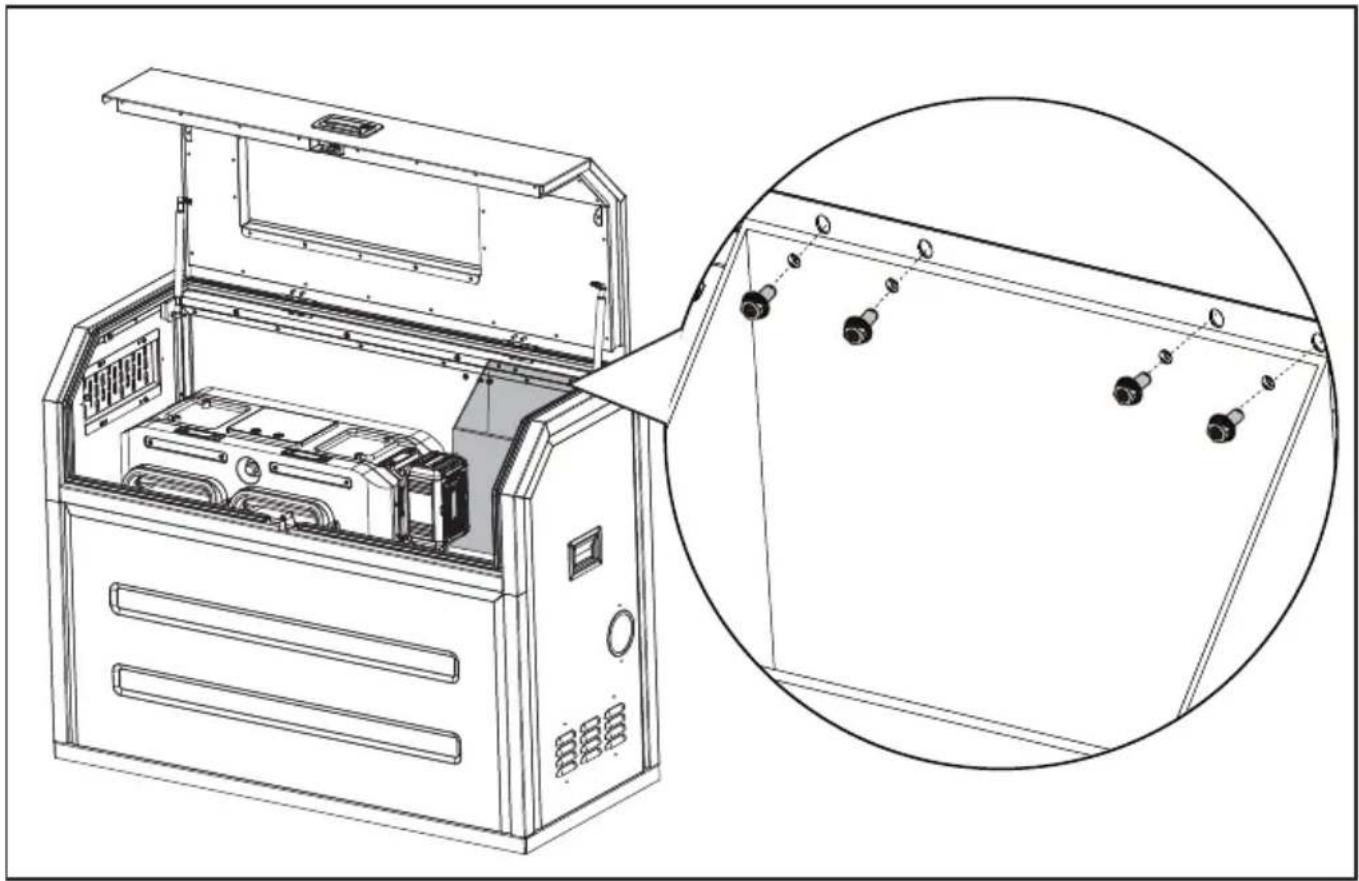
Secure the right panel and the left panel with hex flange bolts.

natural_image
Technical line drawing of a mechanical device with an inset close-up showing internal components (no text or symbols)Secure the front panel with hex flange bolts.
natural_image
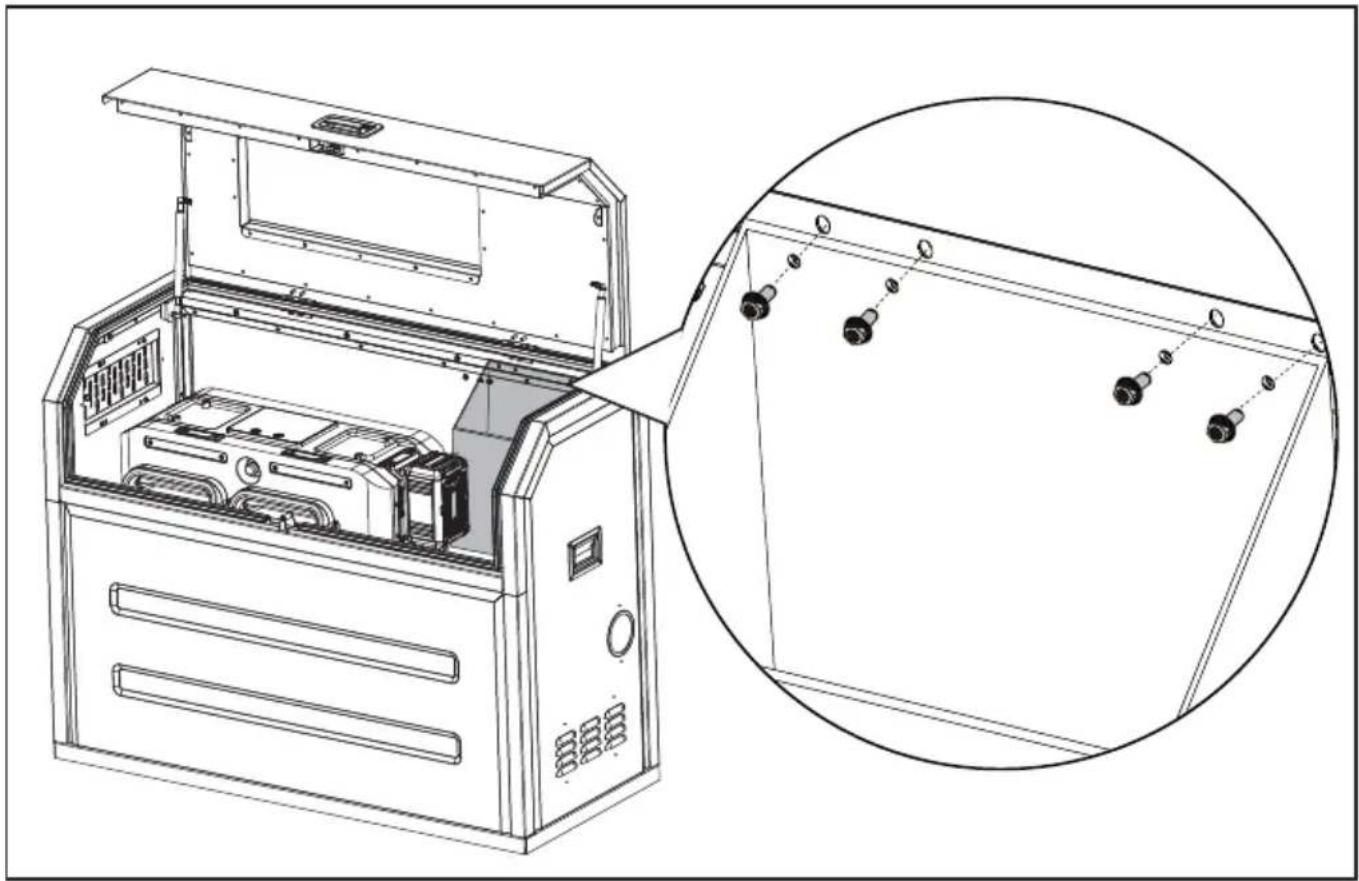
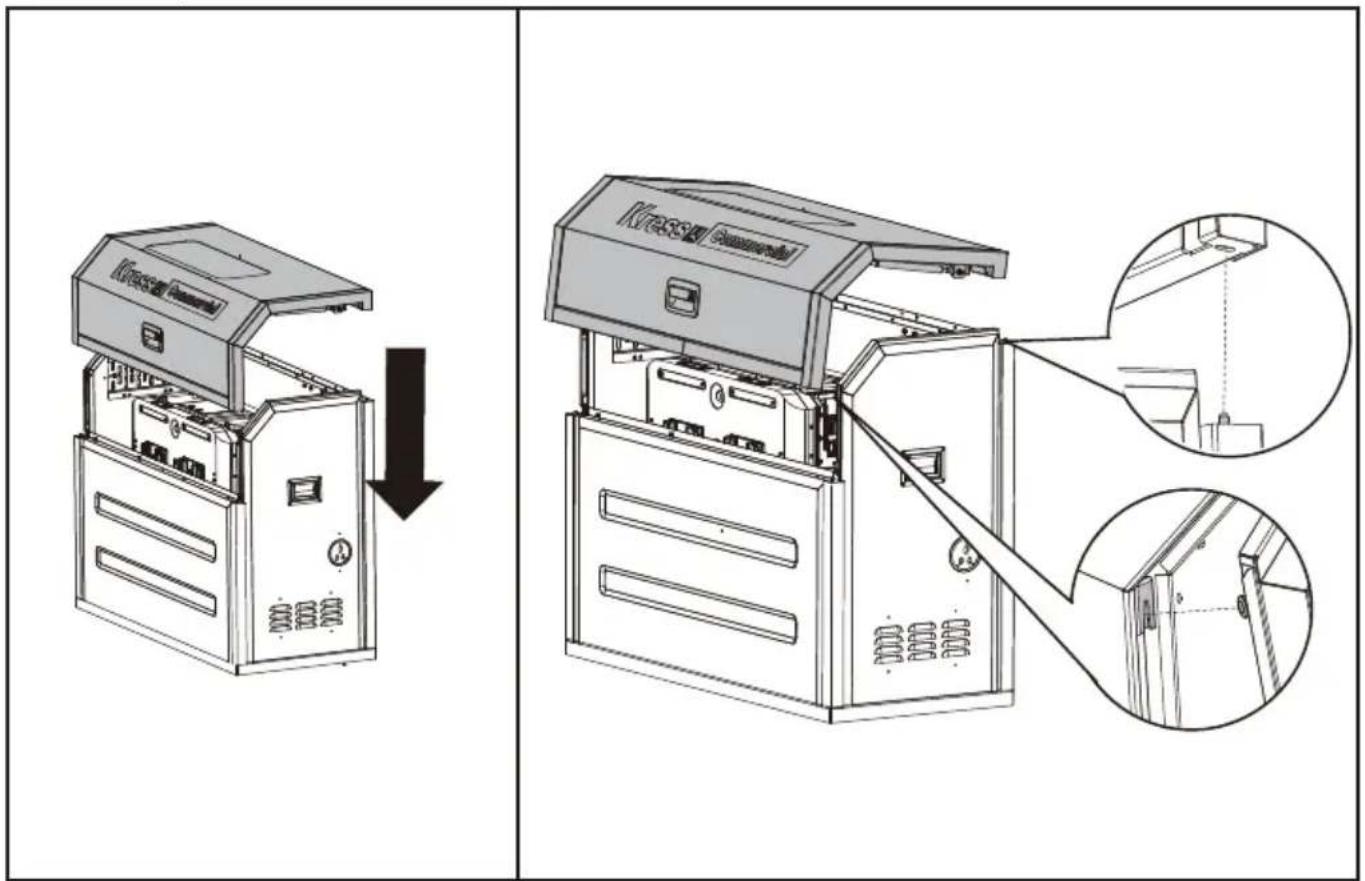
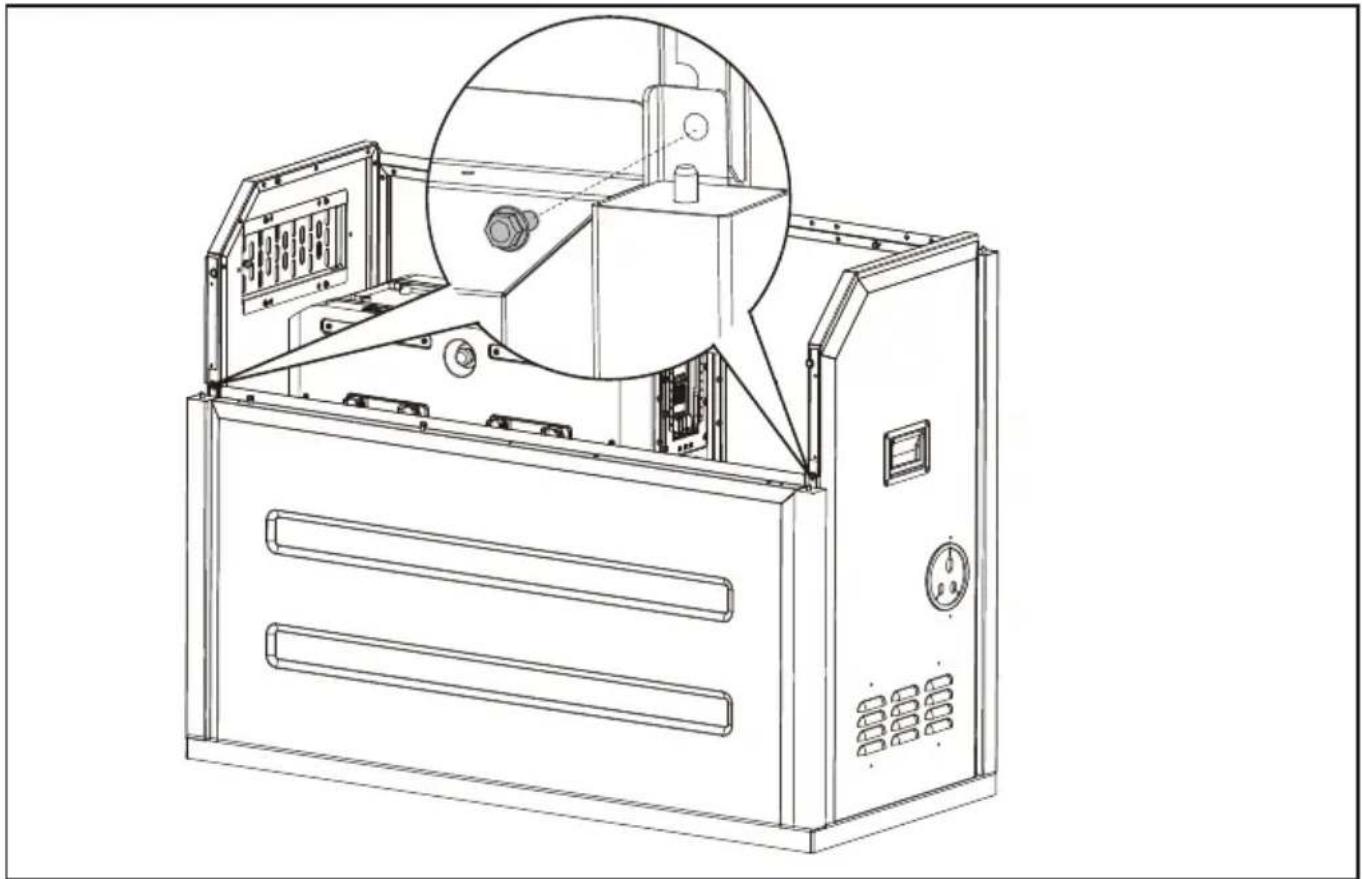
Technical line drawing of an industrial machine with internal components and a magnified inset showing internal structure (no text or symbols)STEP 8
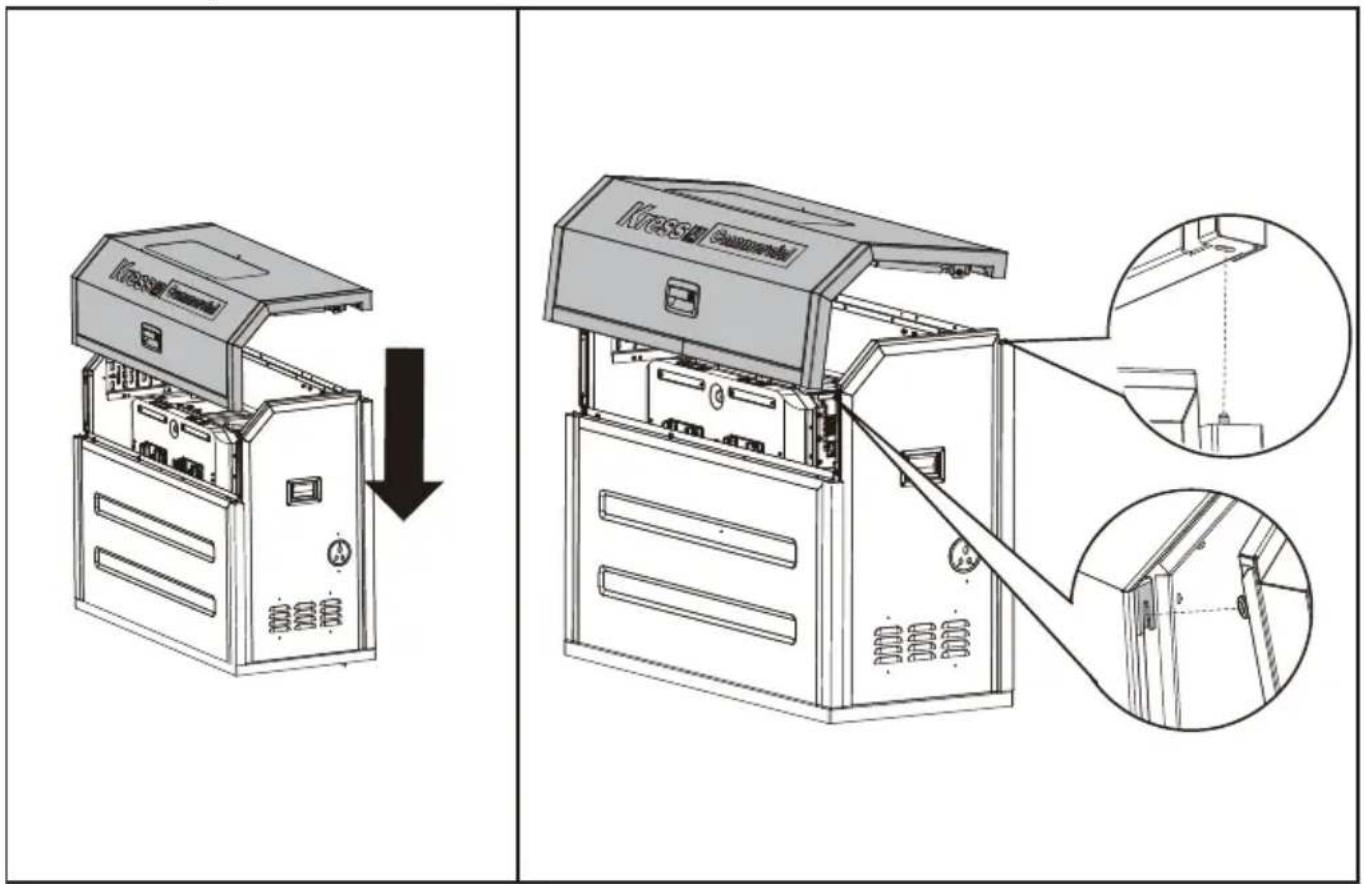
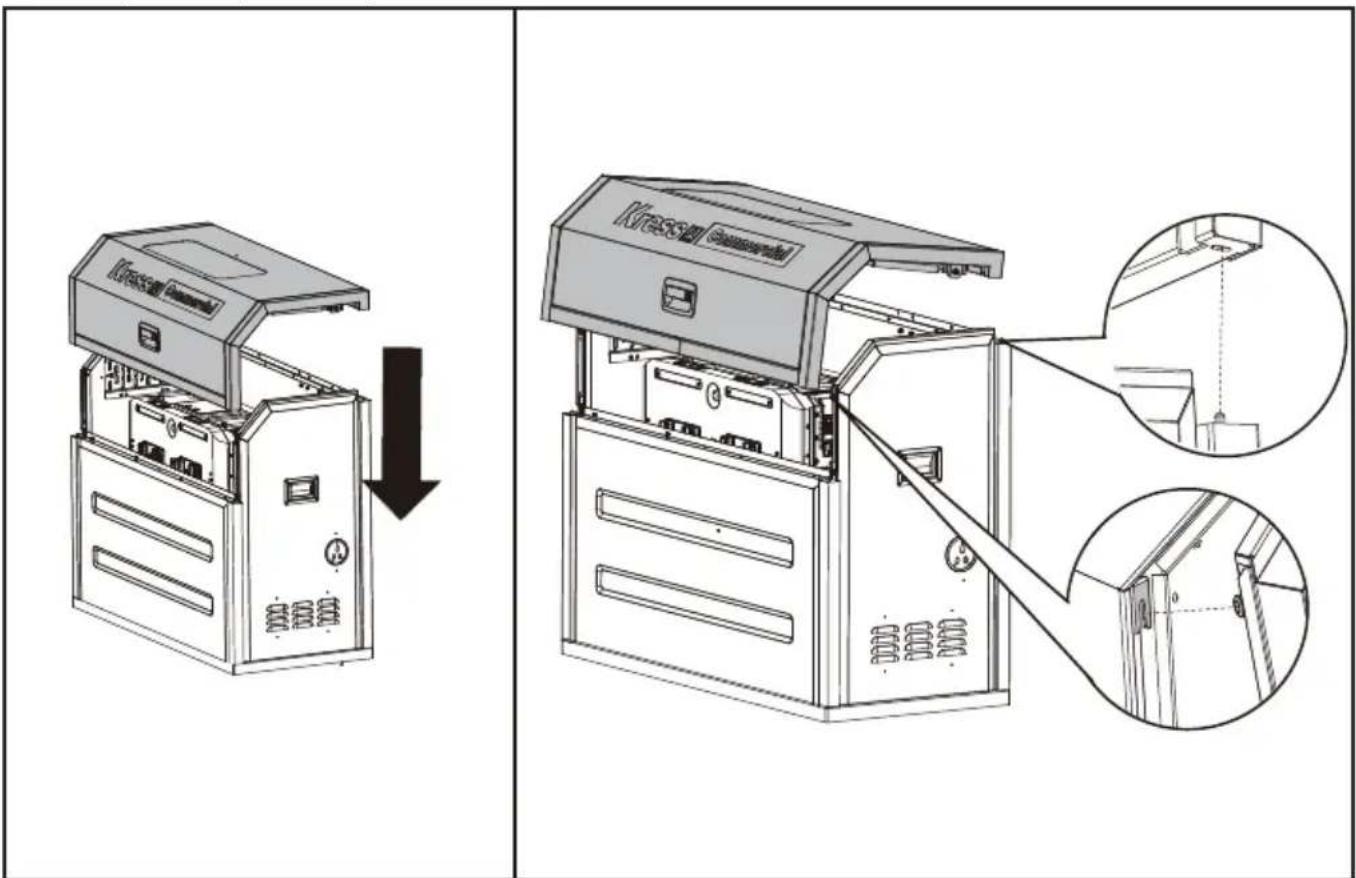
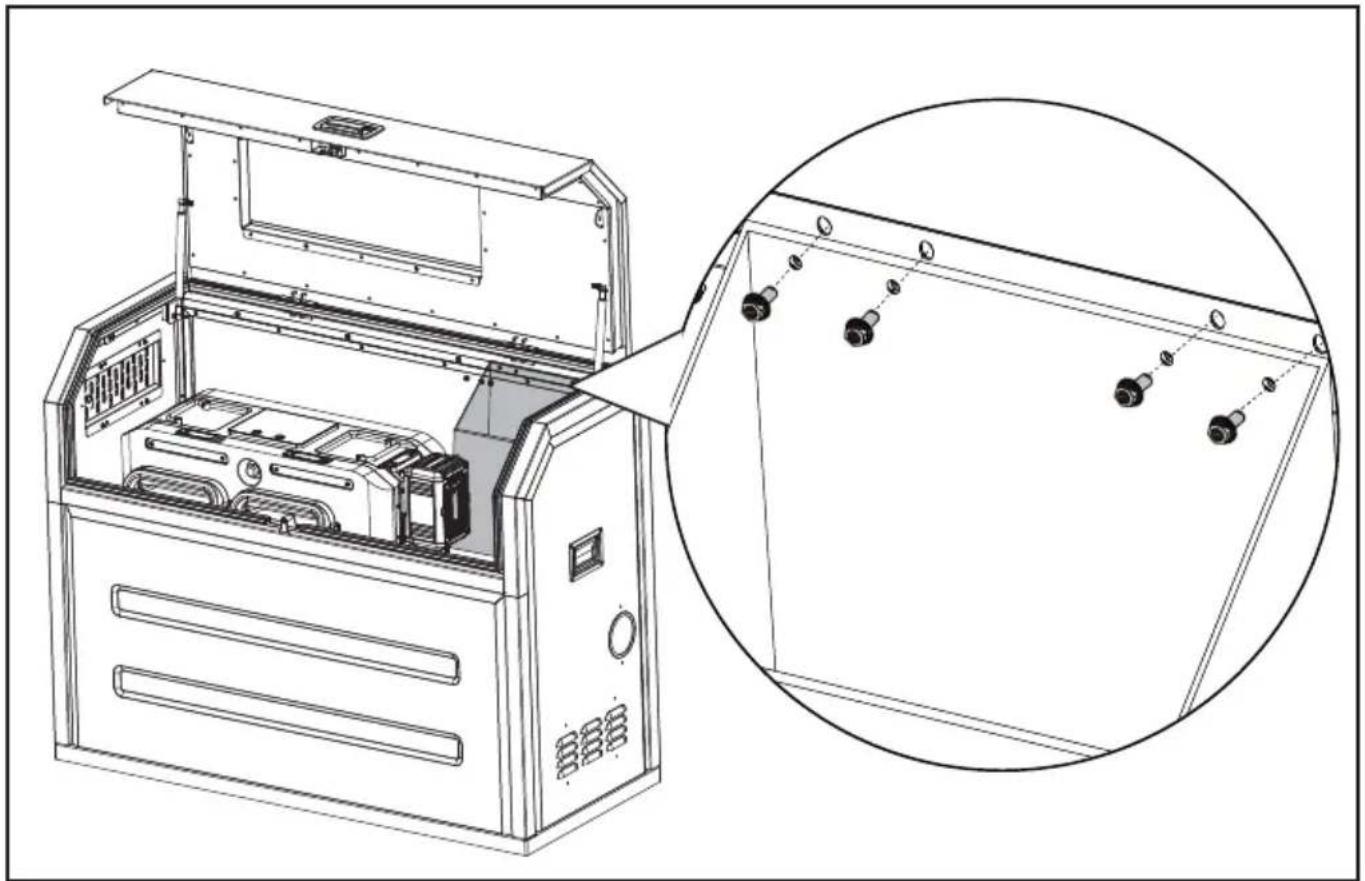
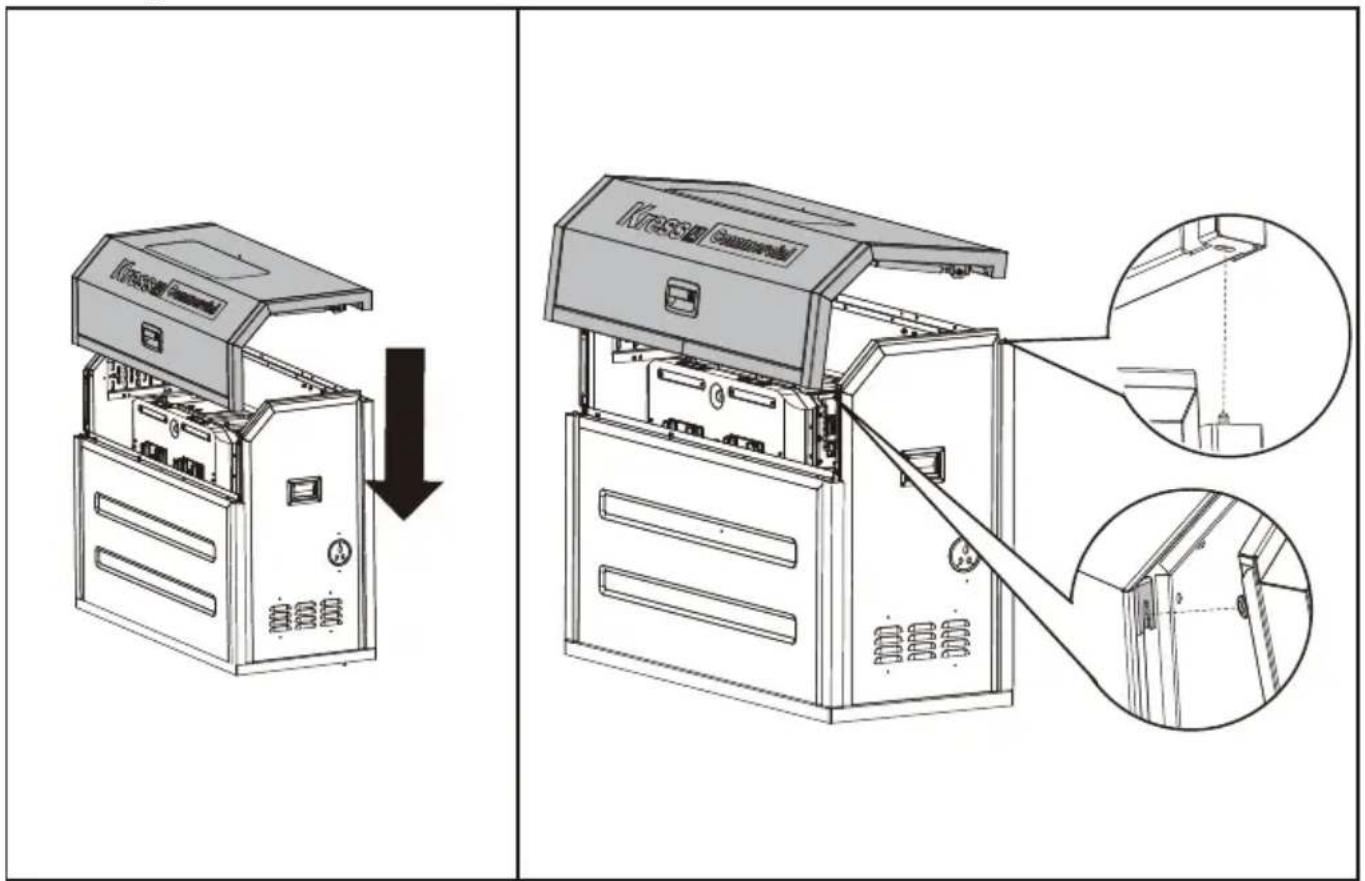
Assemble the top frame & door.
text_image
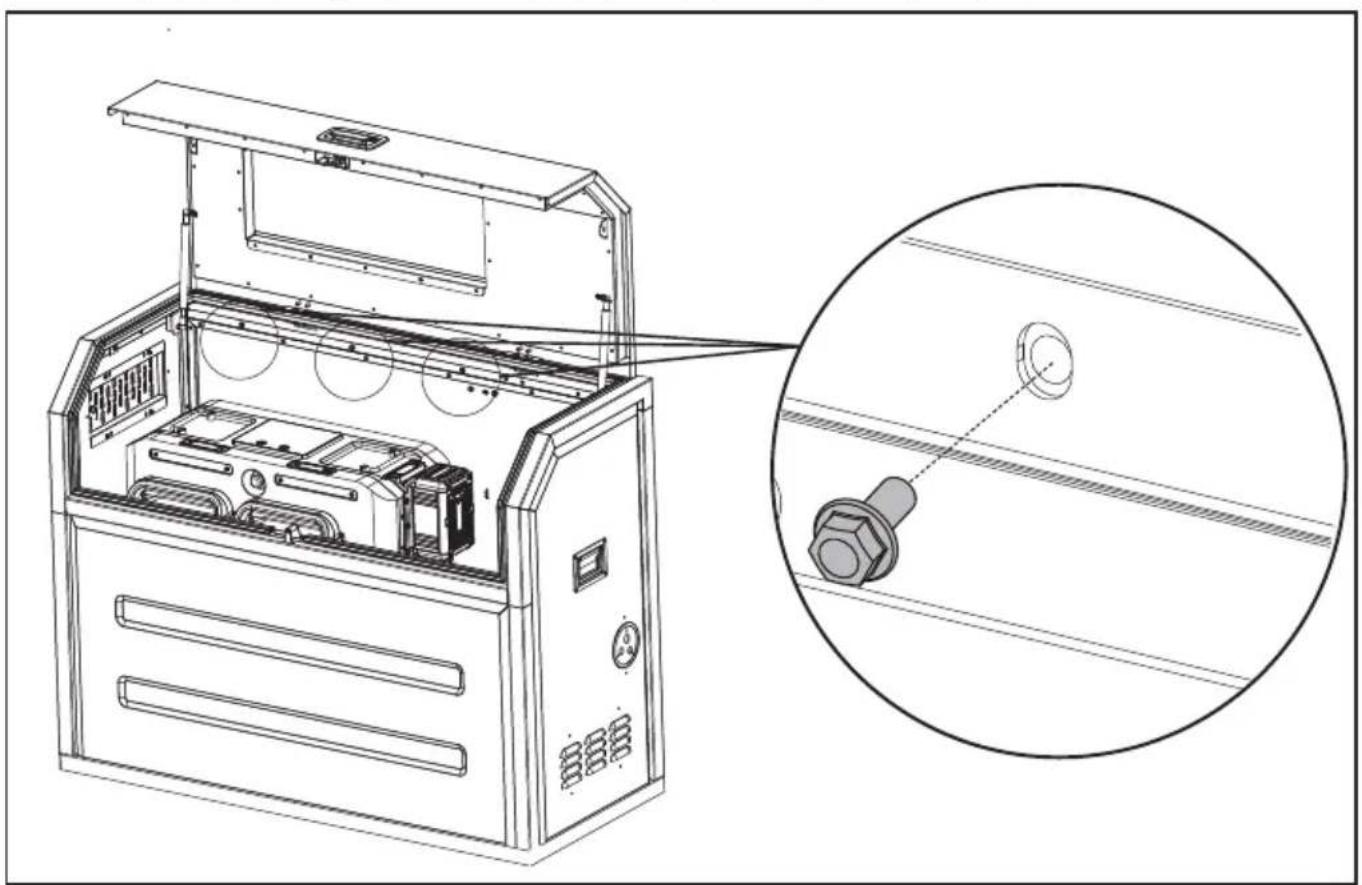
Technical diagram showing a device with open lid and internal components, before and after assembly, with close-ups of internal components.EN
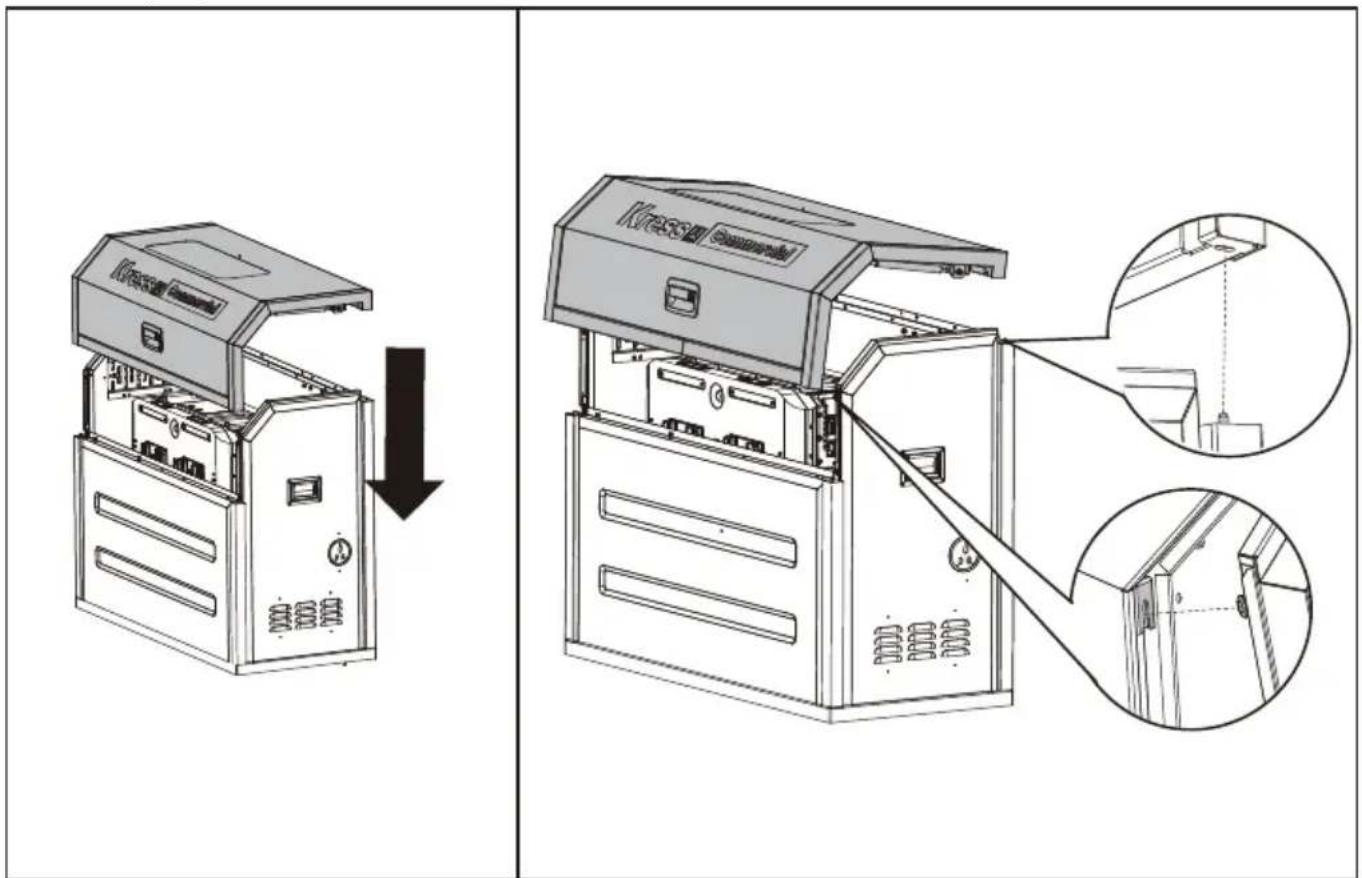
Open the door and secure the top frame & door with hex flange bolts.
natural_image
Technical line drawing of an open industrial machine with internal components and a magnified inset showing a bolt detail (no text or symbols)
natural_image
Technical line drawing of an electronic device with internal components and a close-up inset showing a connector (no text or symbols present)EN
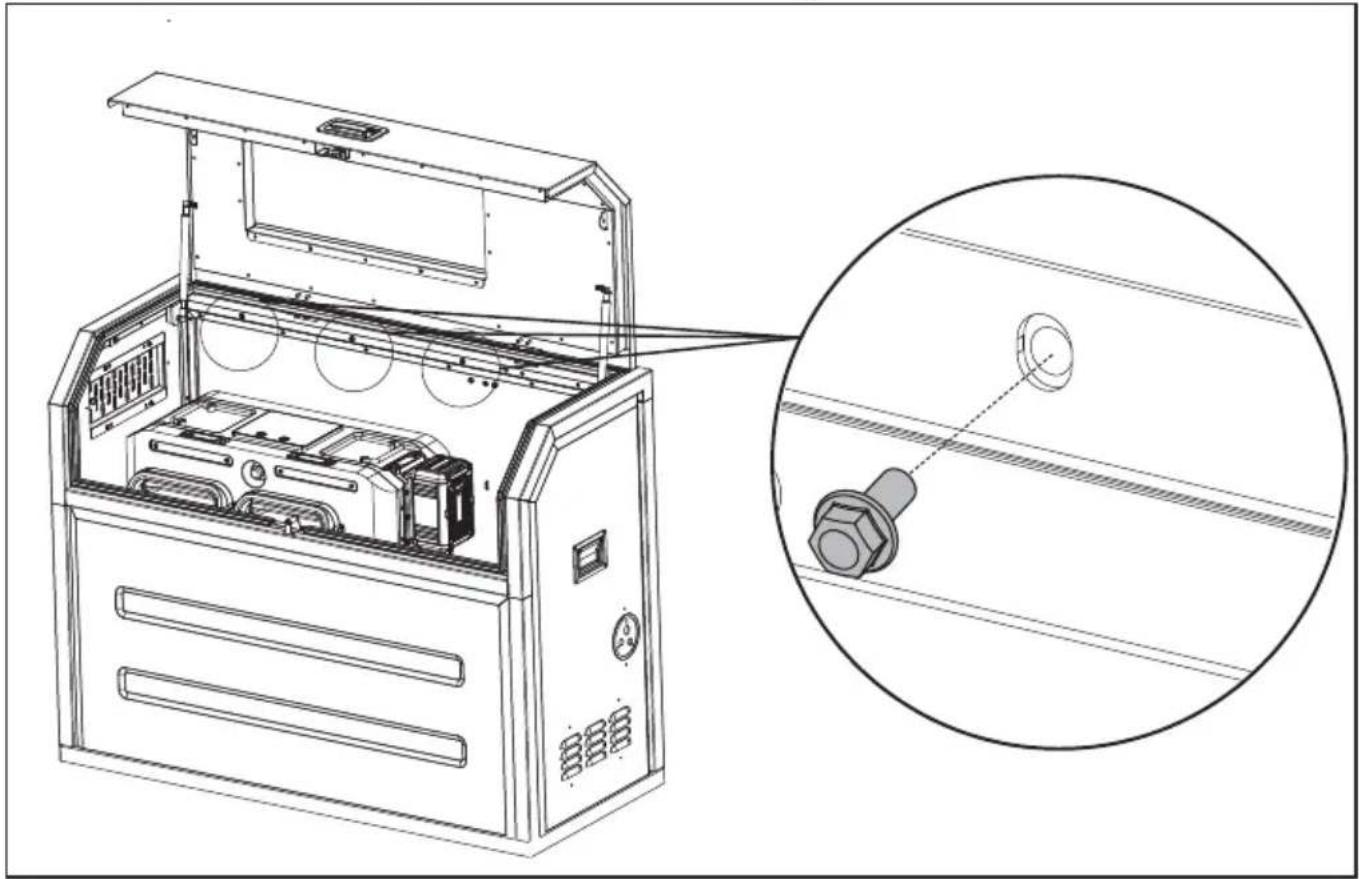
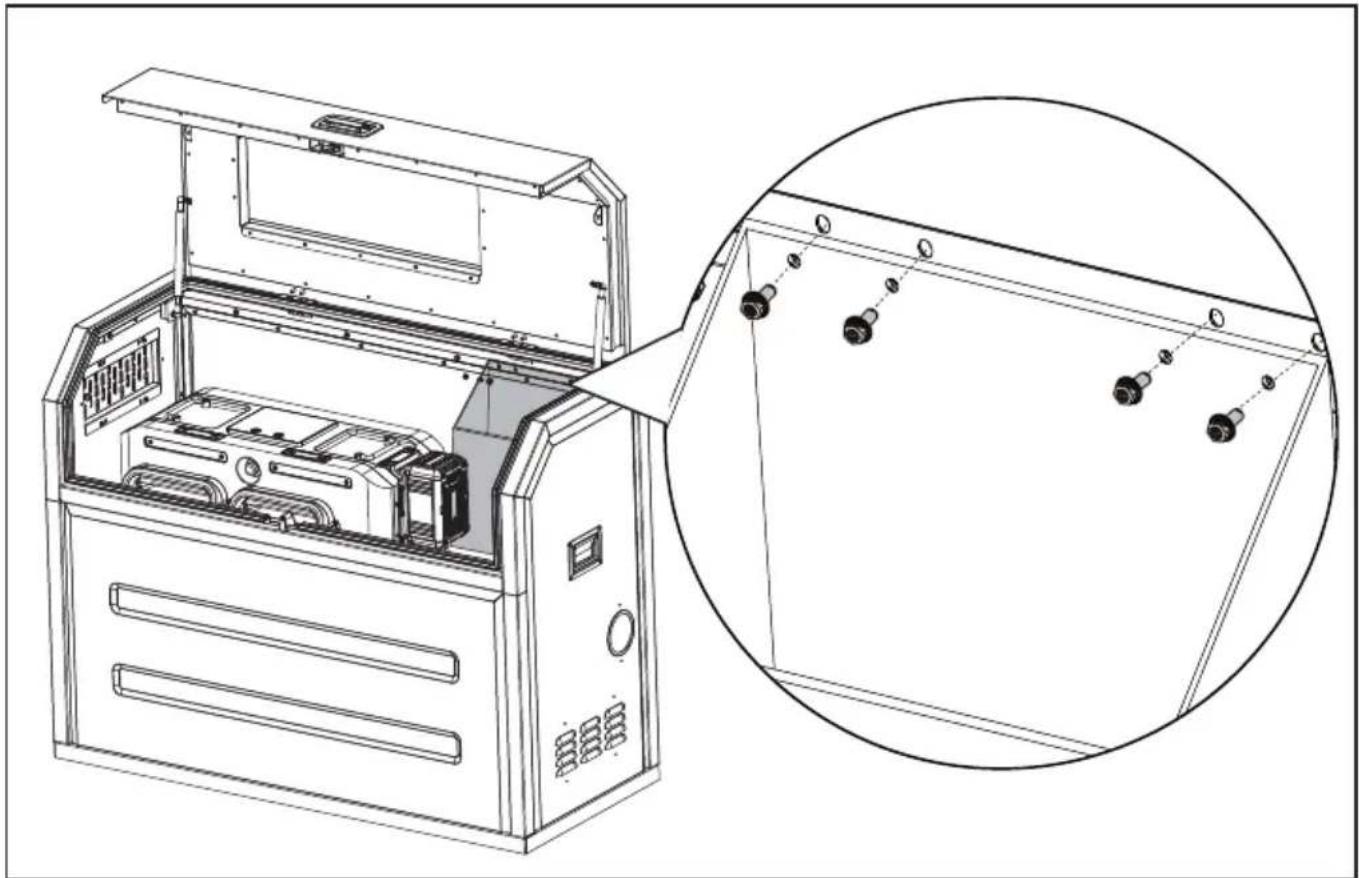
STEP 9
Assemble the bag
natural_image
Technical line drawing of an open industrial machine with internal components and a magnified inset showing internal wiring (no text or symbols)OPEN/CLOSE THE AIR VENT
Open the air vent when the temperature is too high.
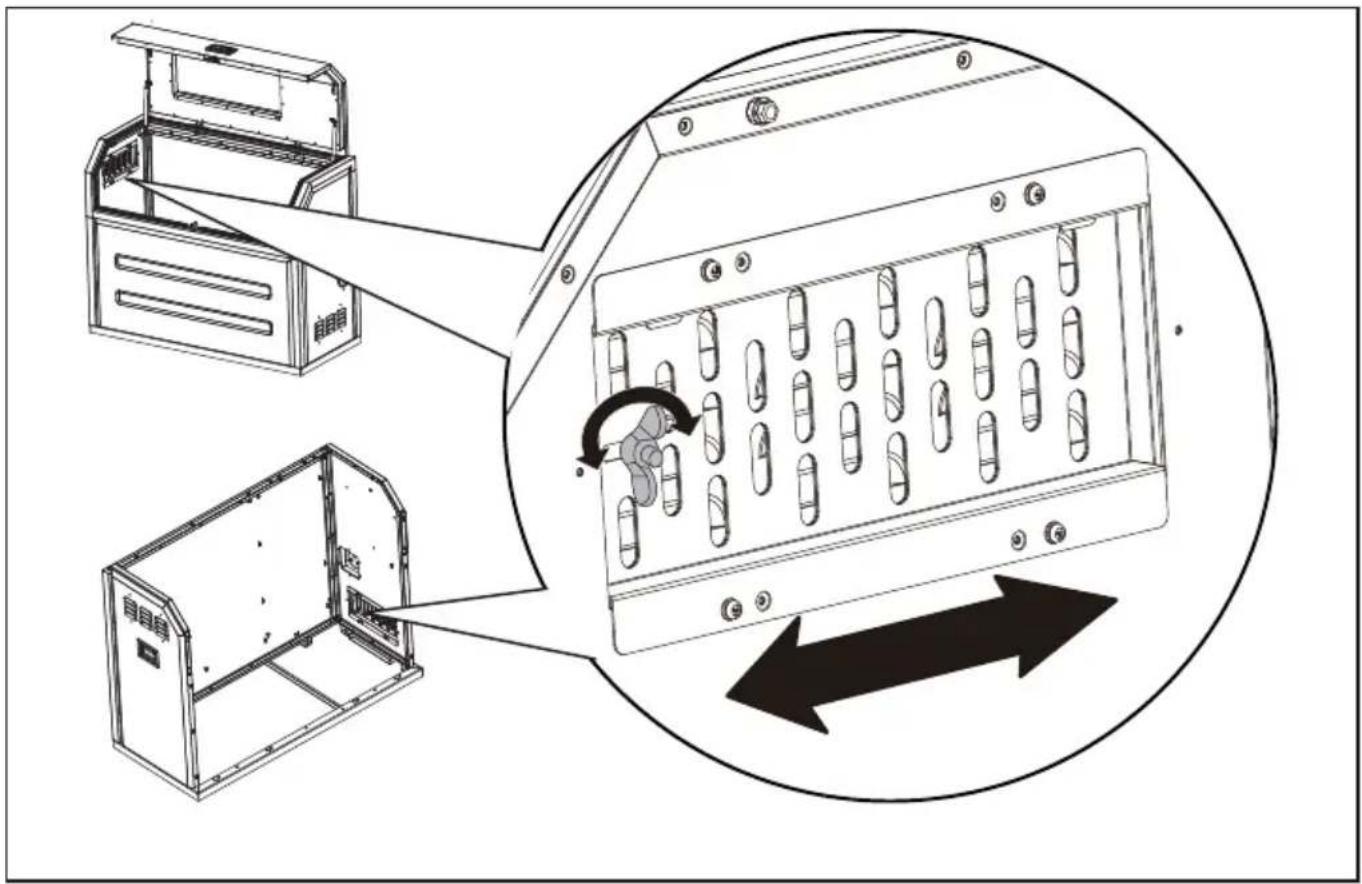
text_image
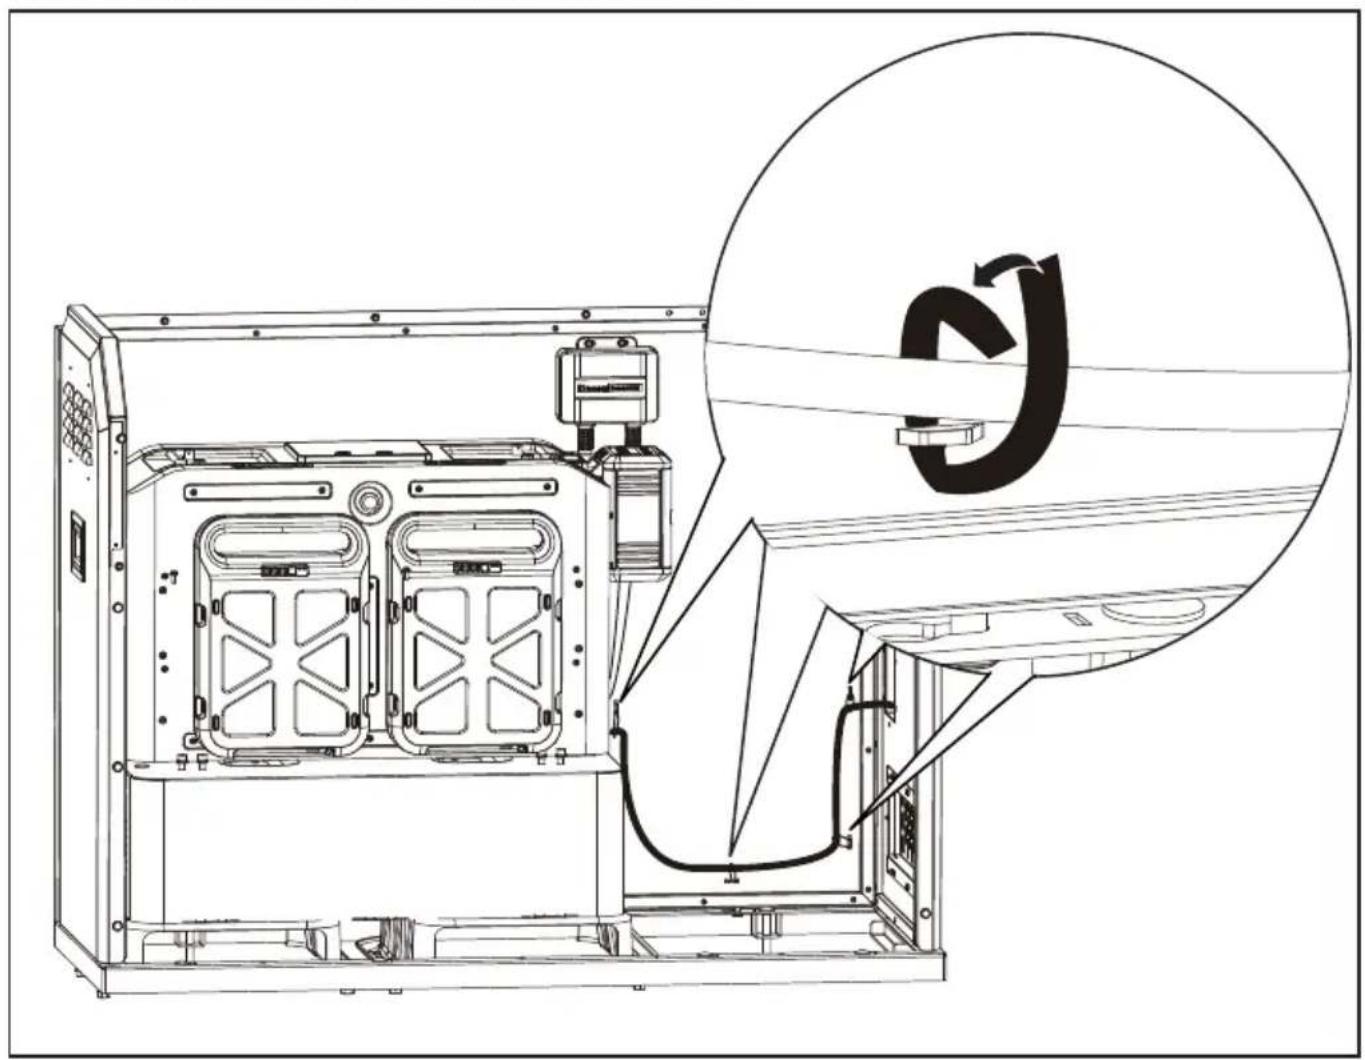
Technical diagram showing internal components of a device with labeled parts and directional arrows indicating assembly or movement.Secure the cables with cable ties

natural_image
Technical line drawing of an internal device with a magnified inset showing a circular component labeled 'S' (no text or symbols on the diagram itself)Take the cables out of the cabinet through cable outlet
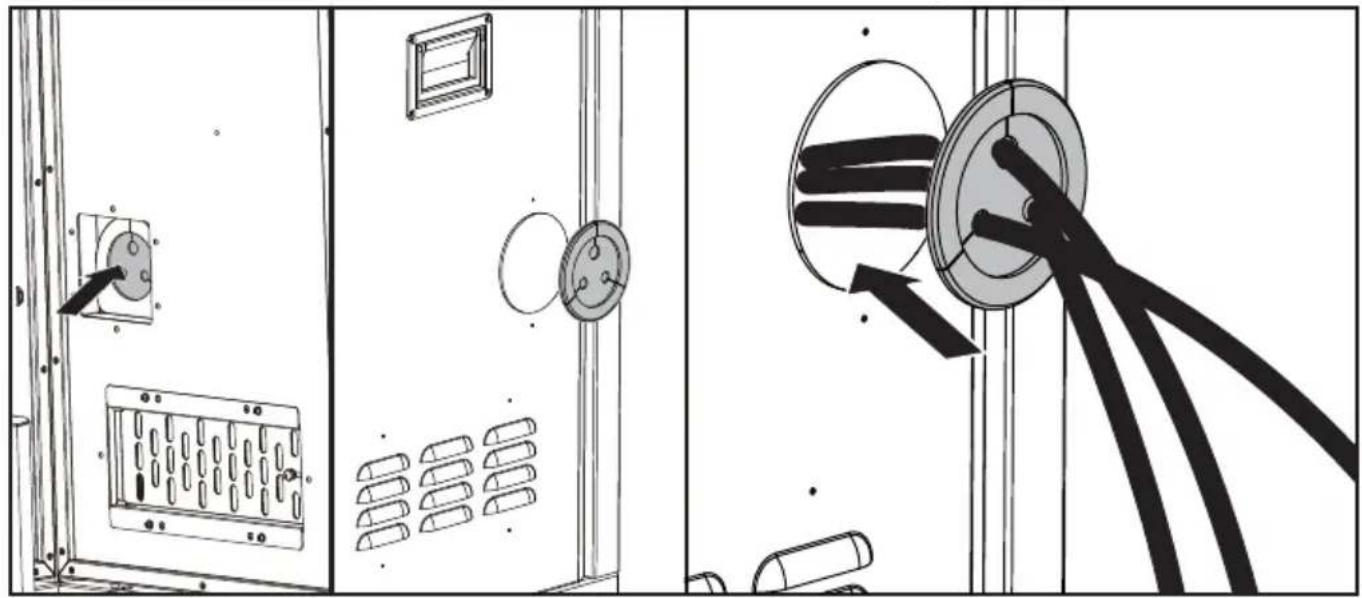
natural_image
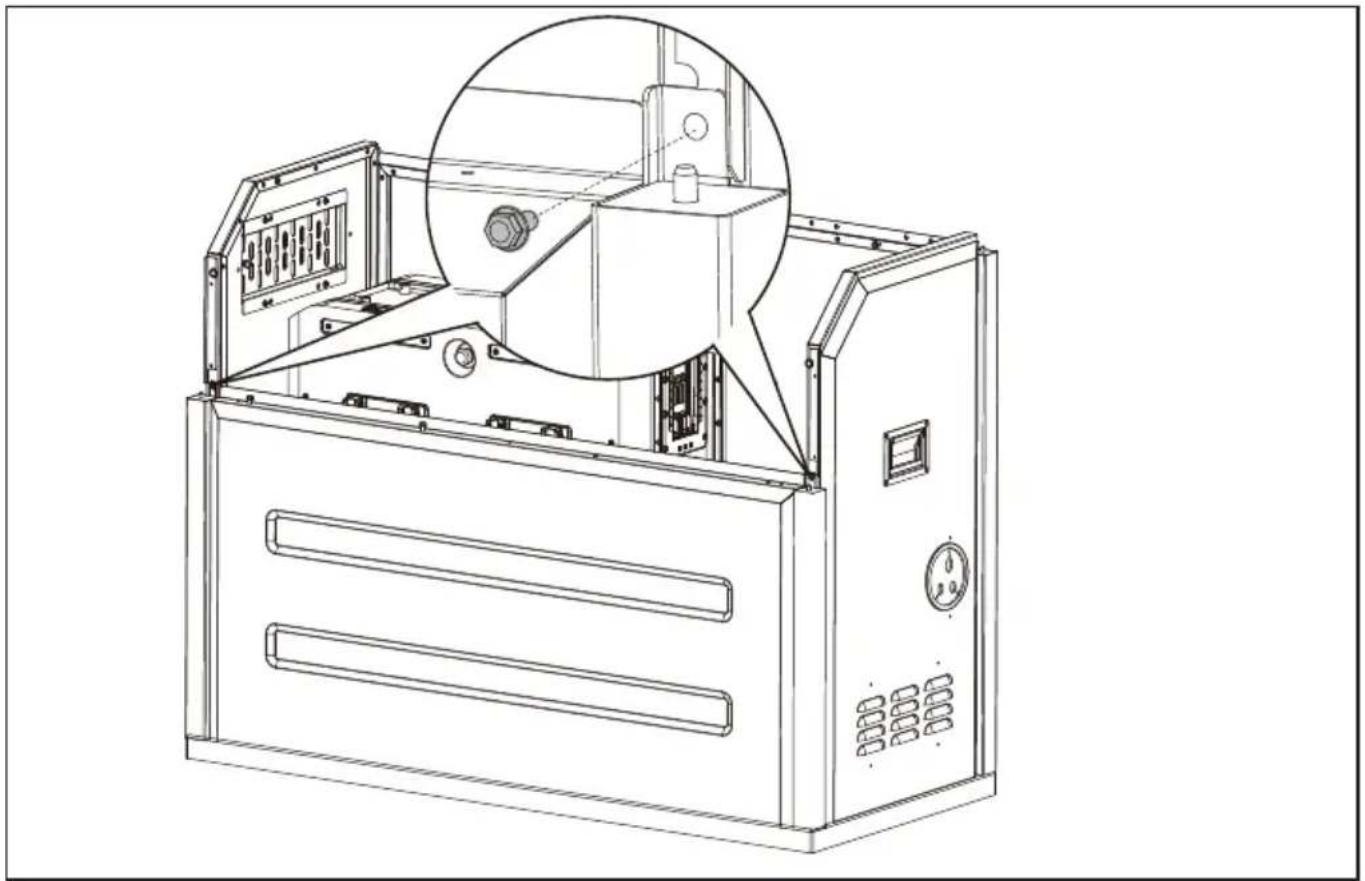
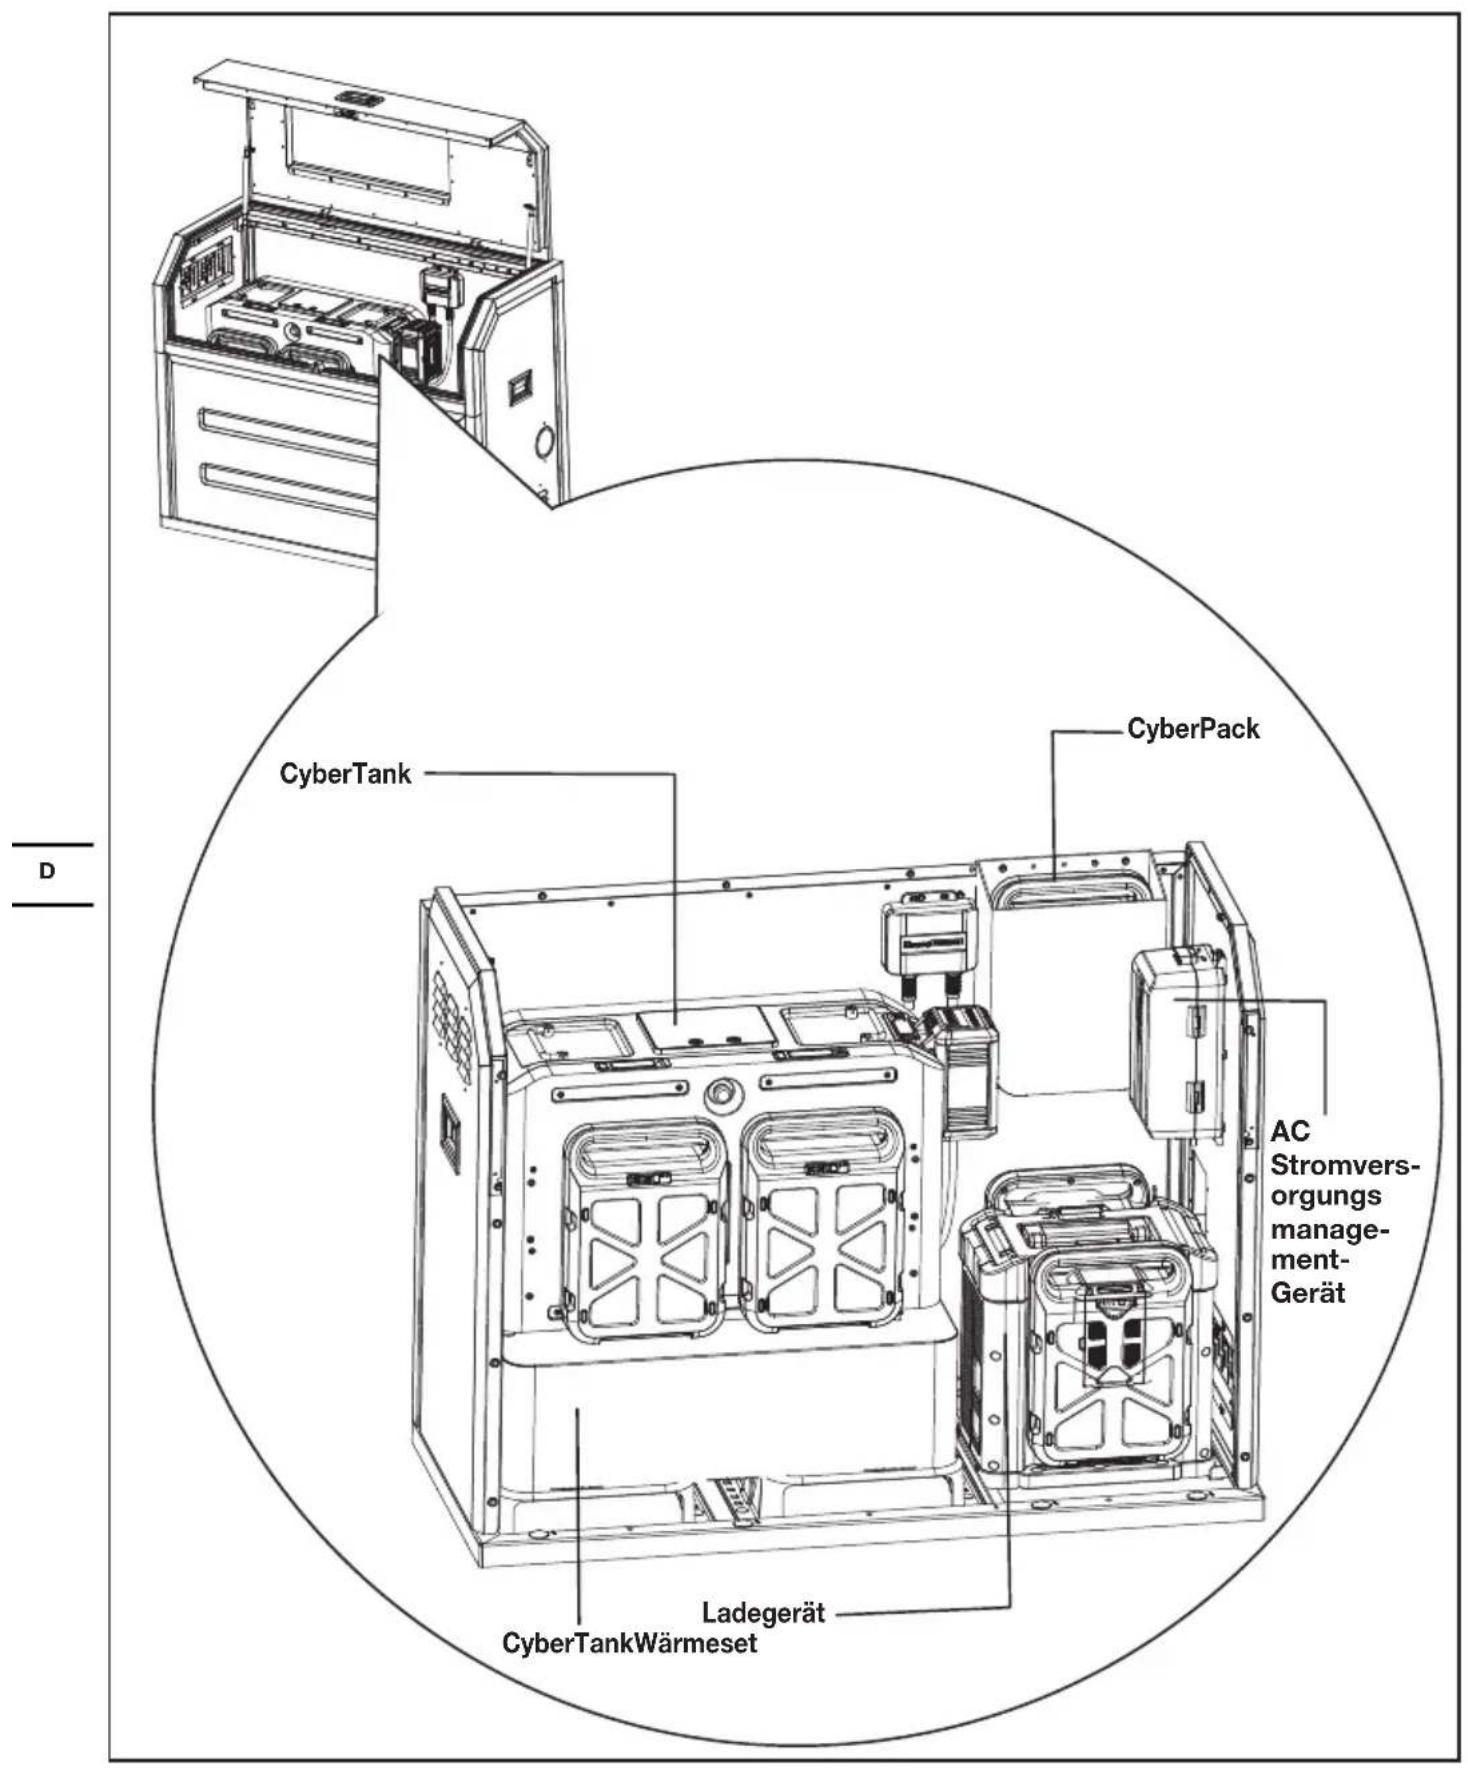
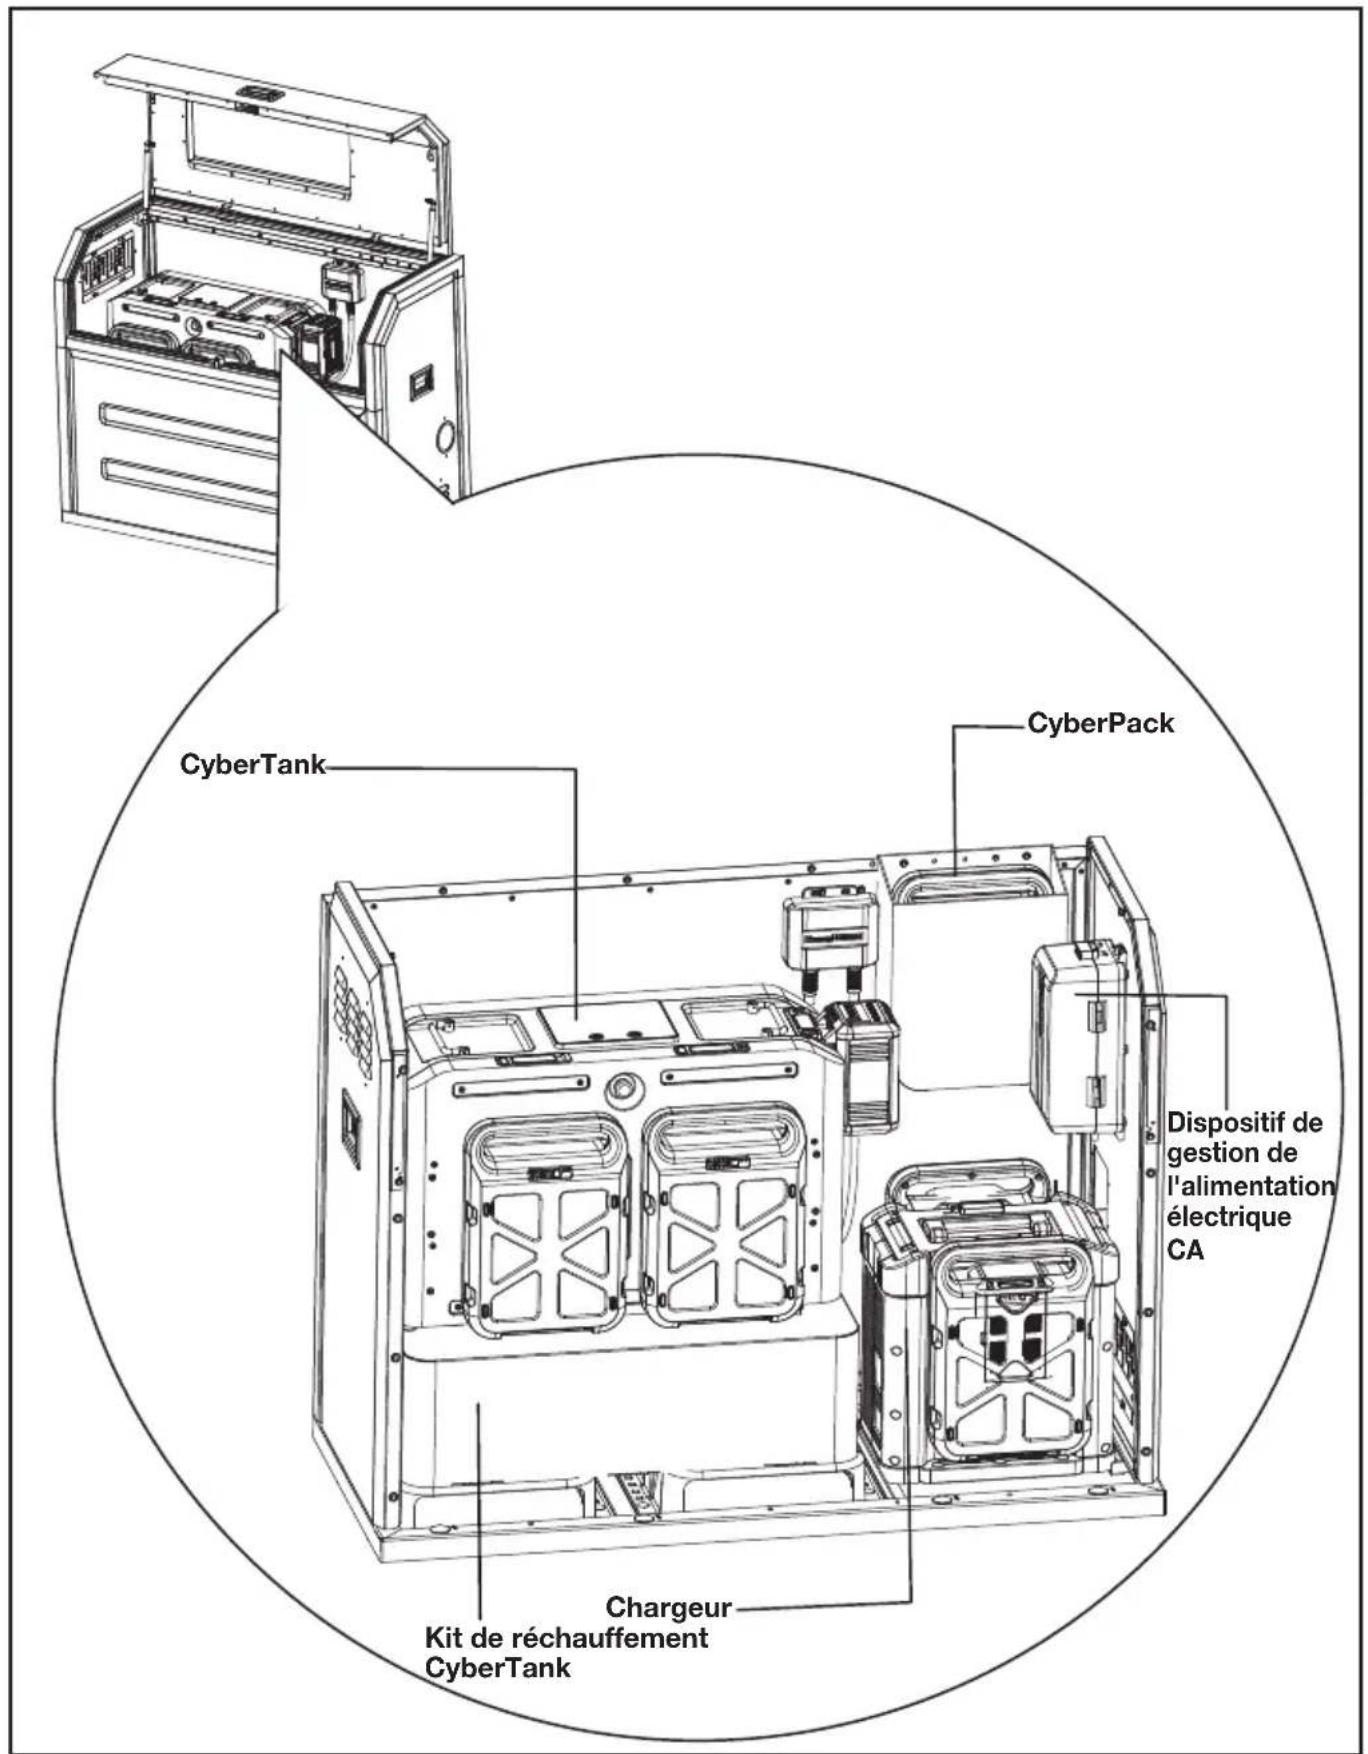
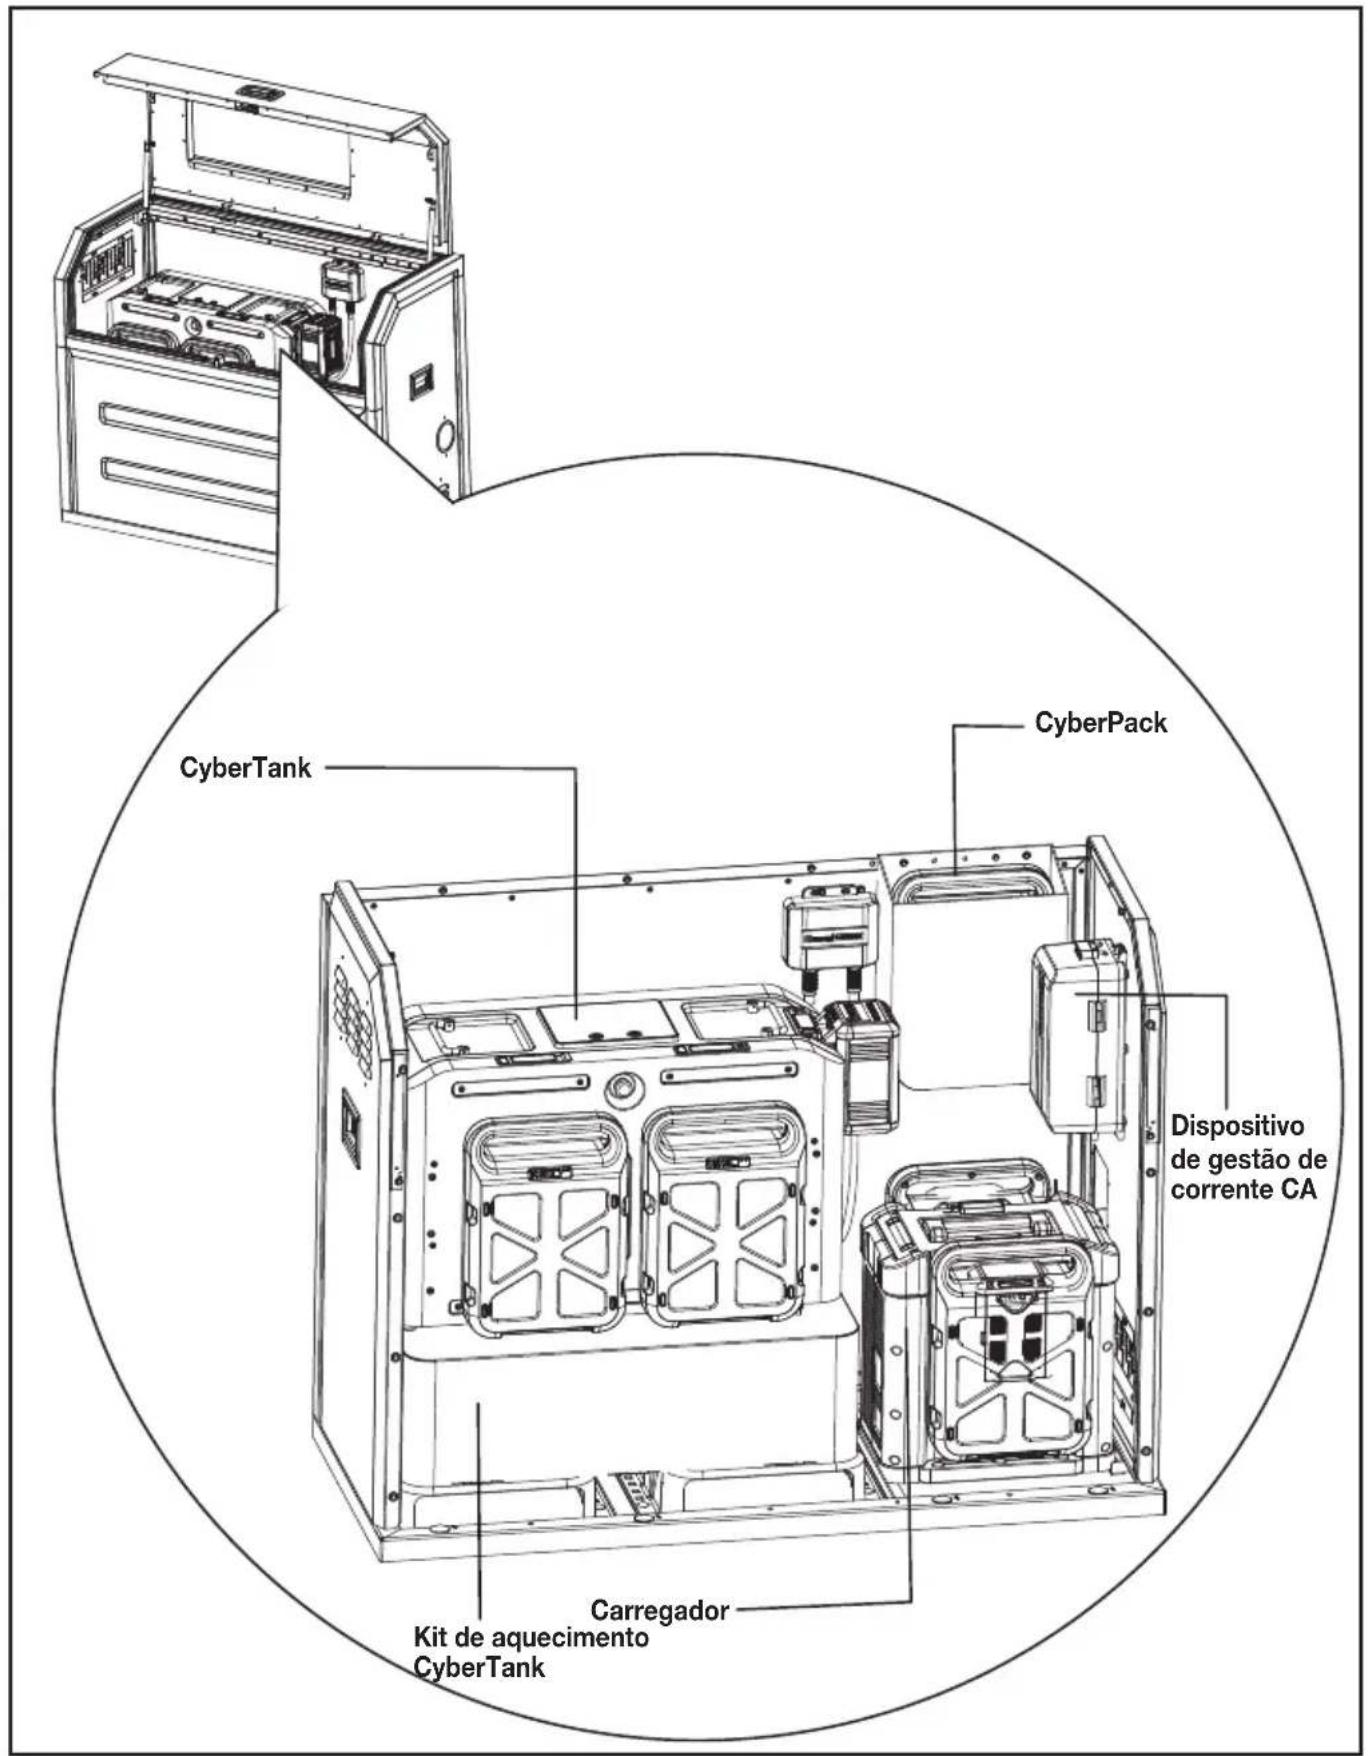
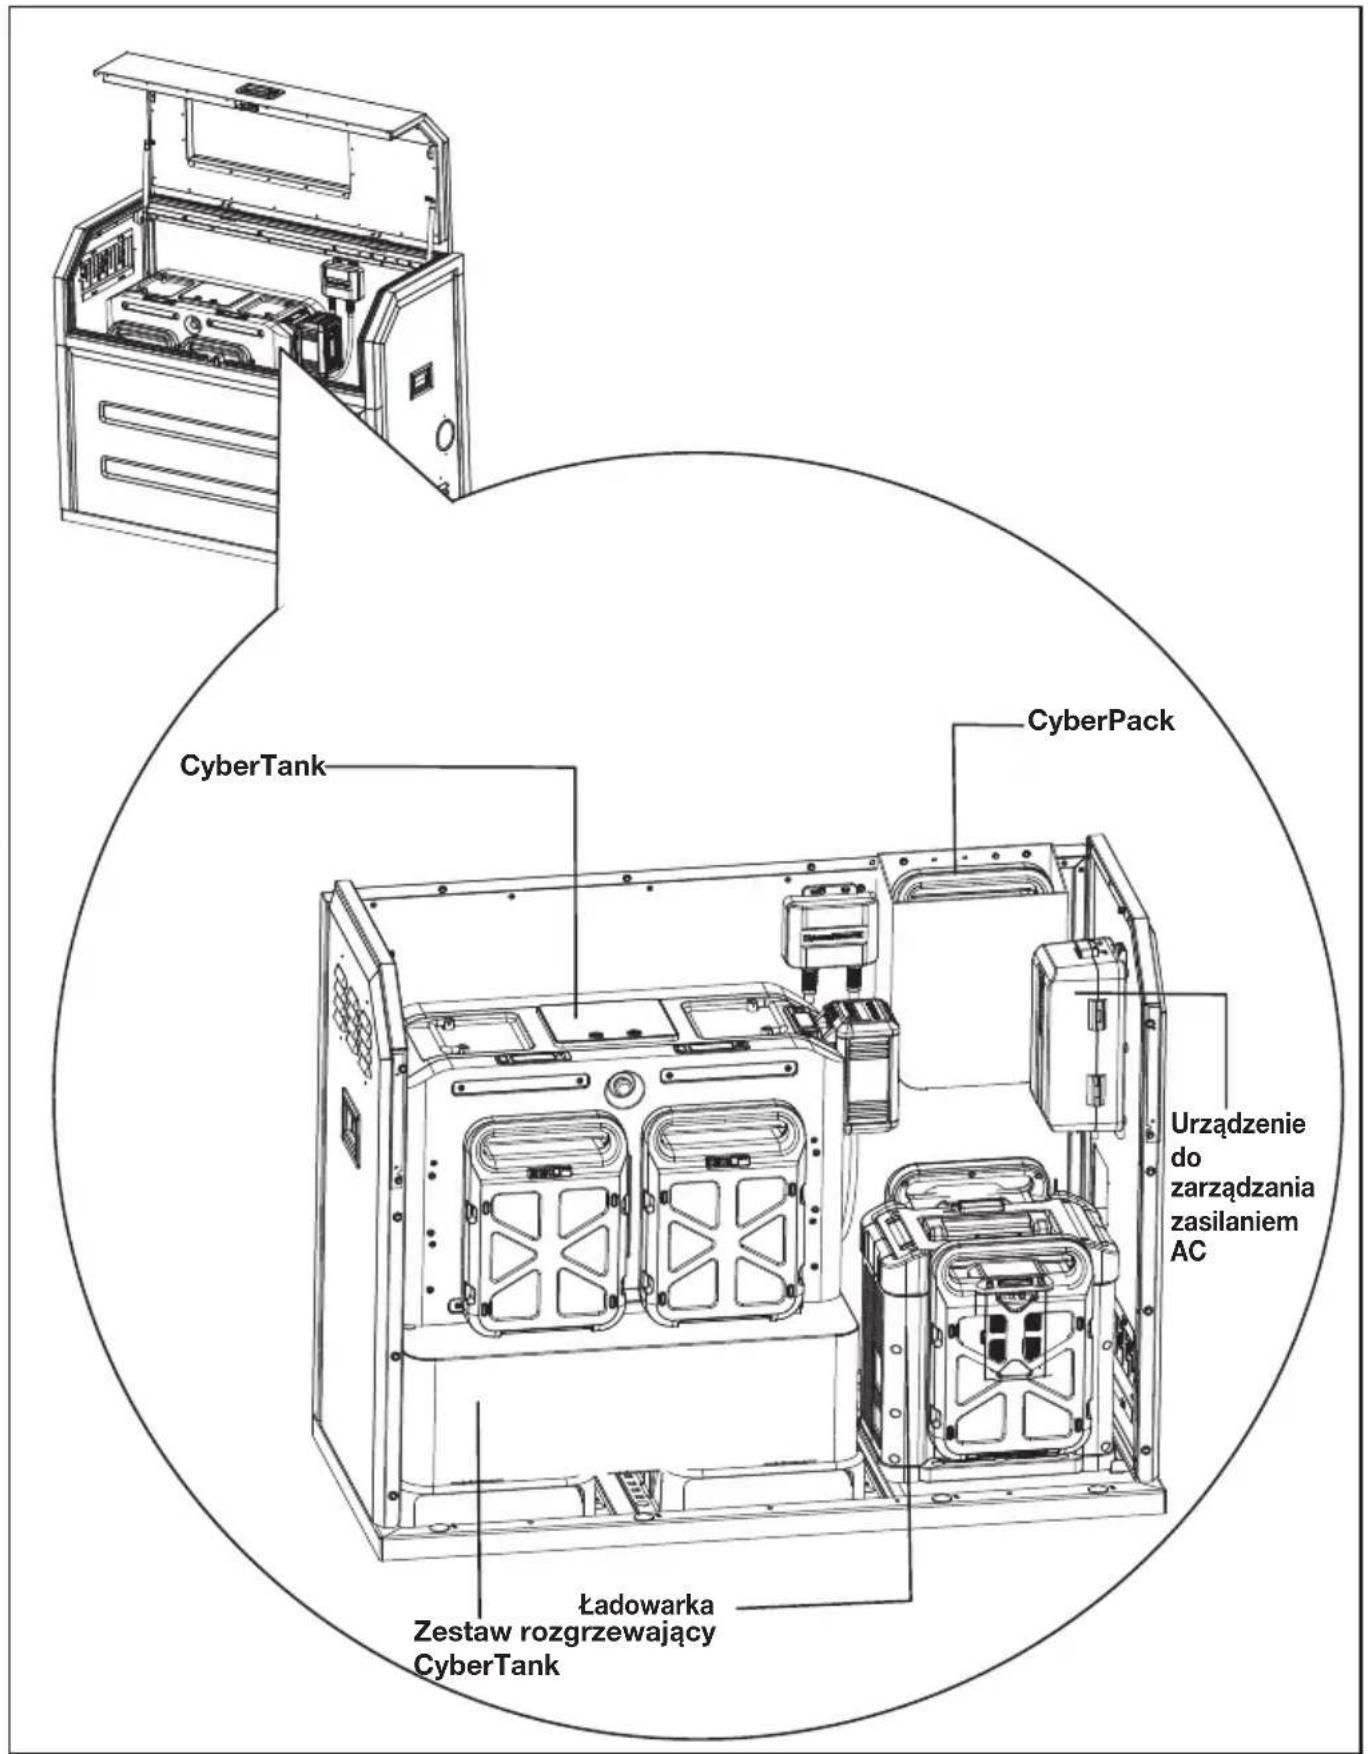
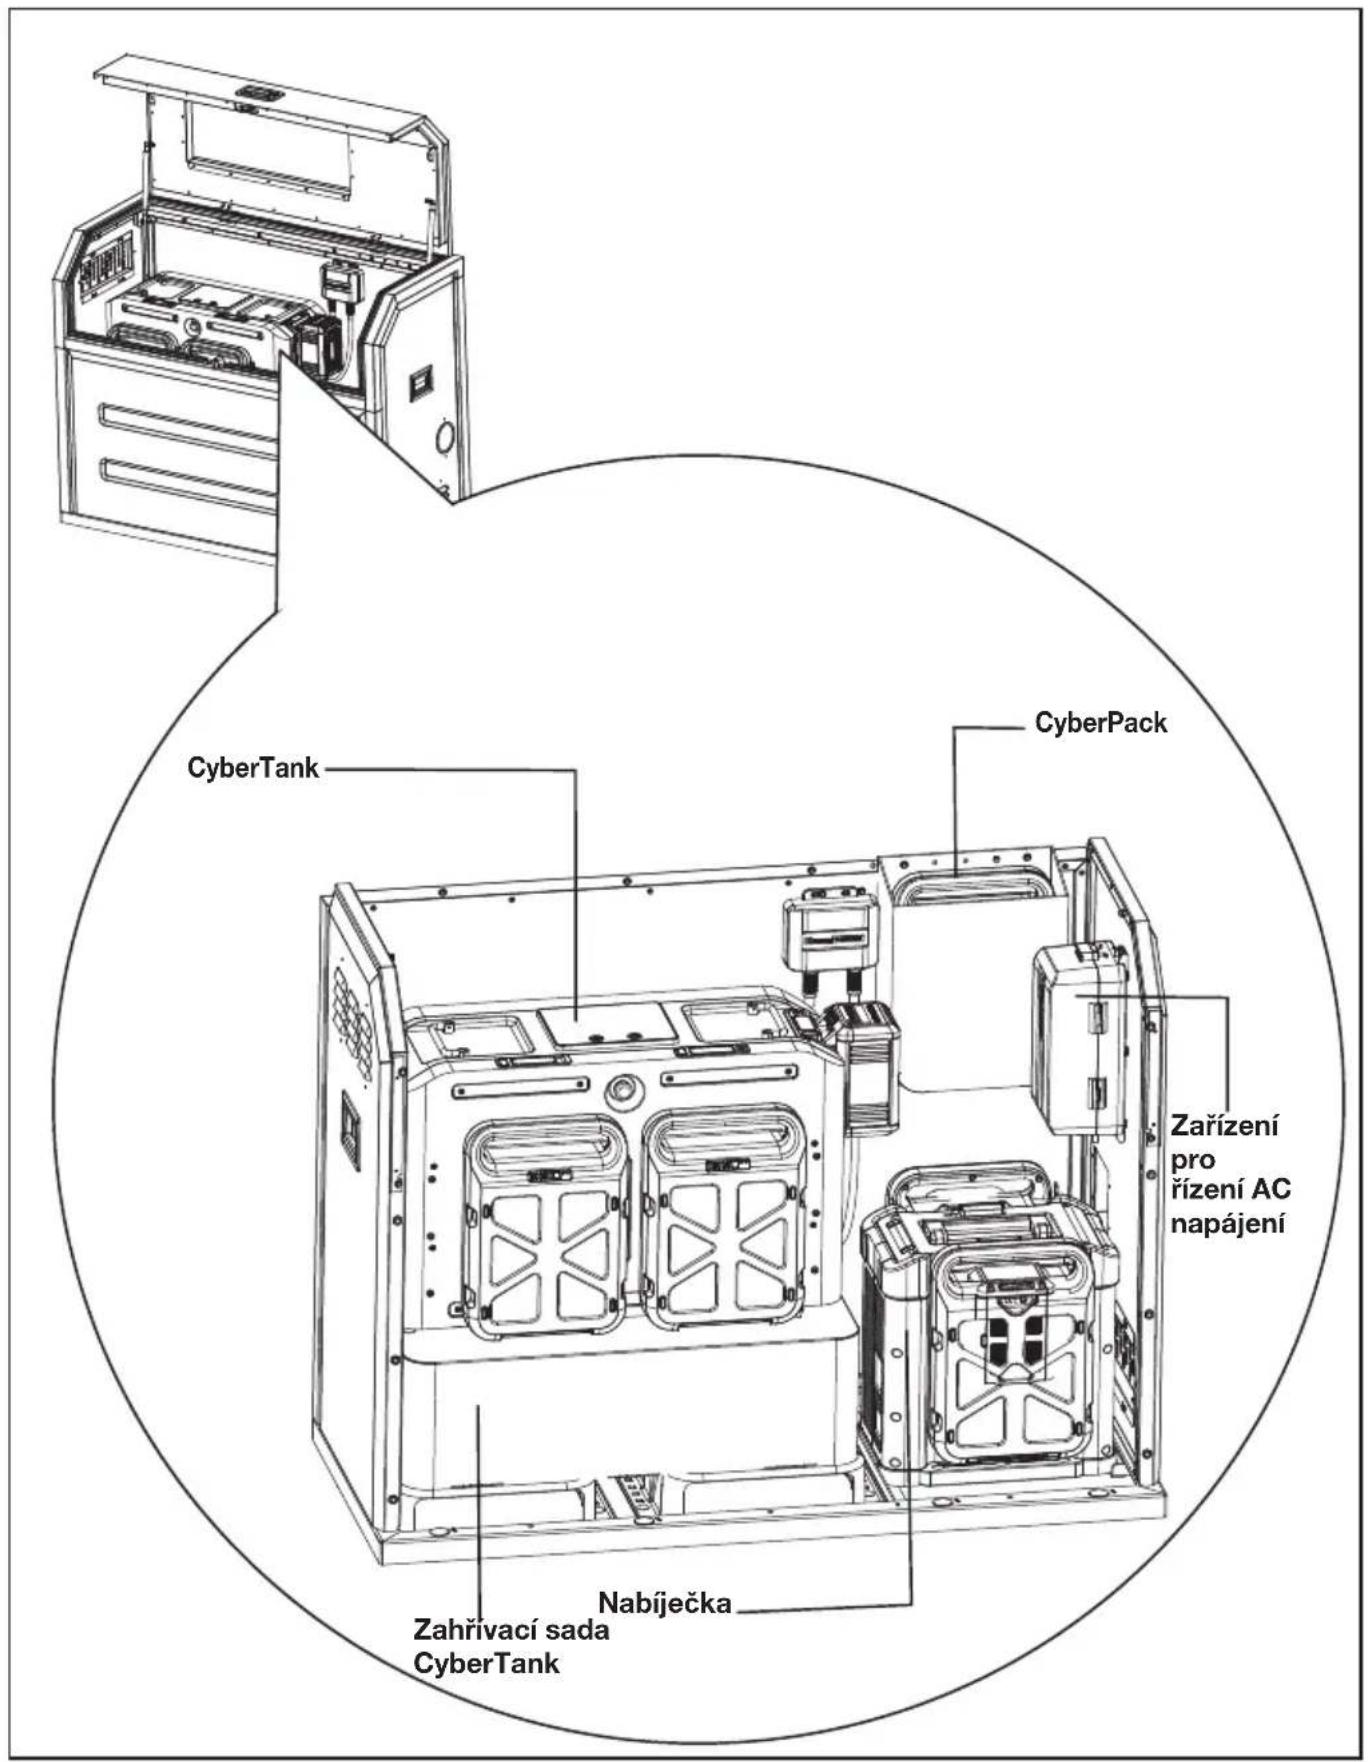
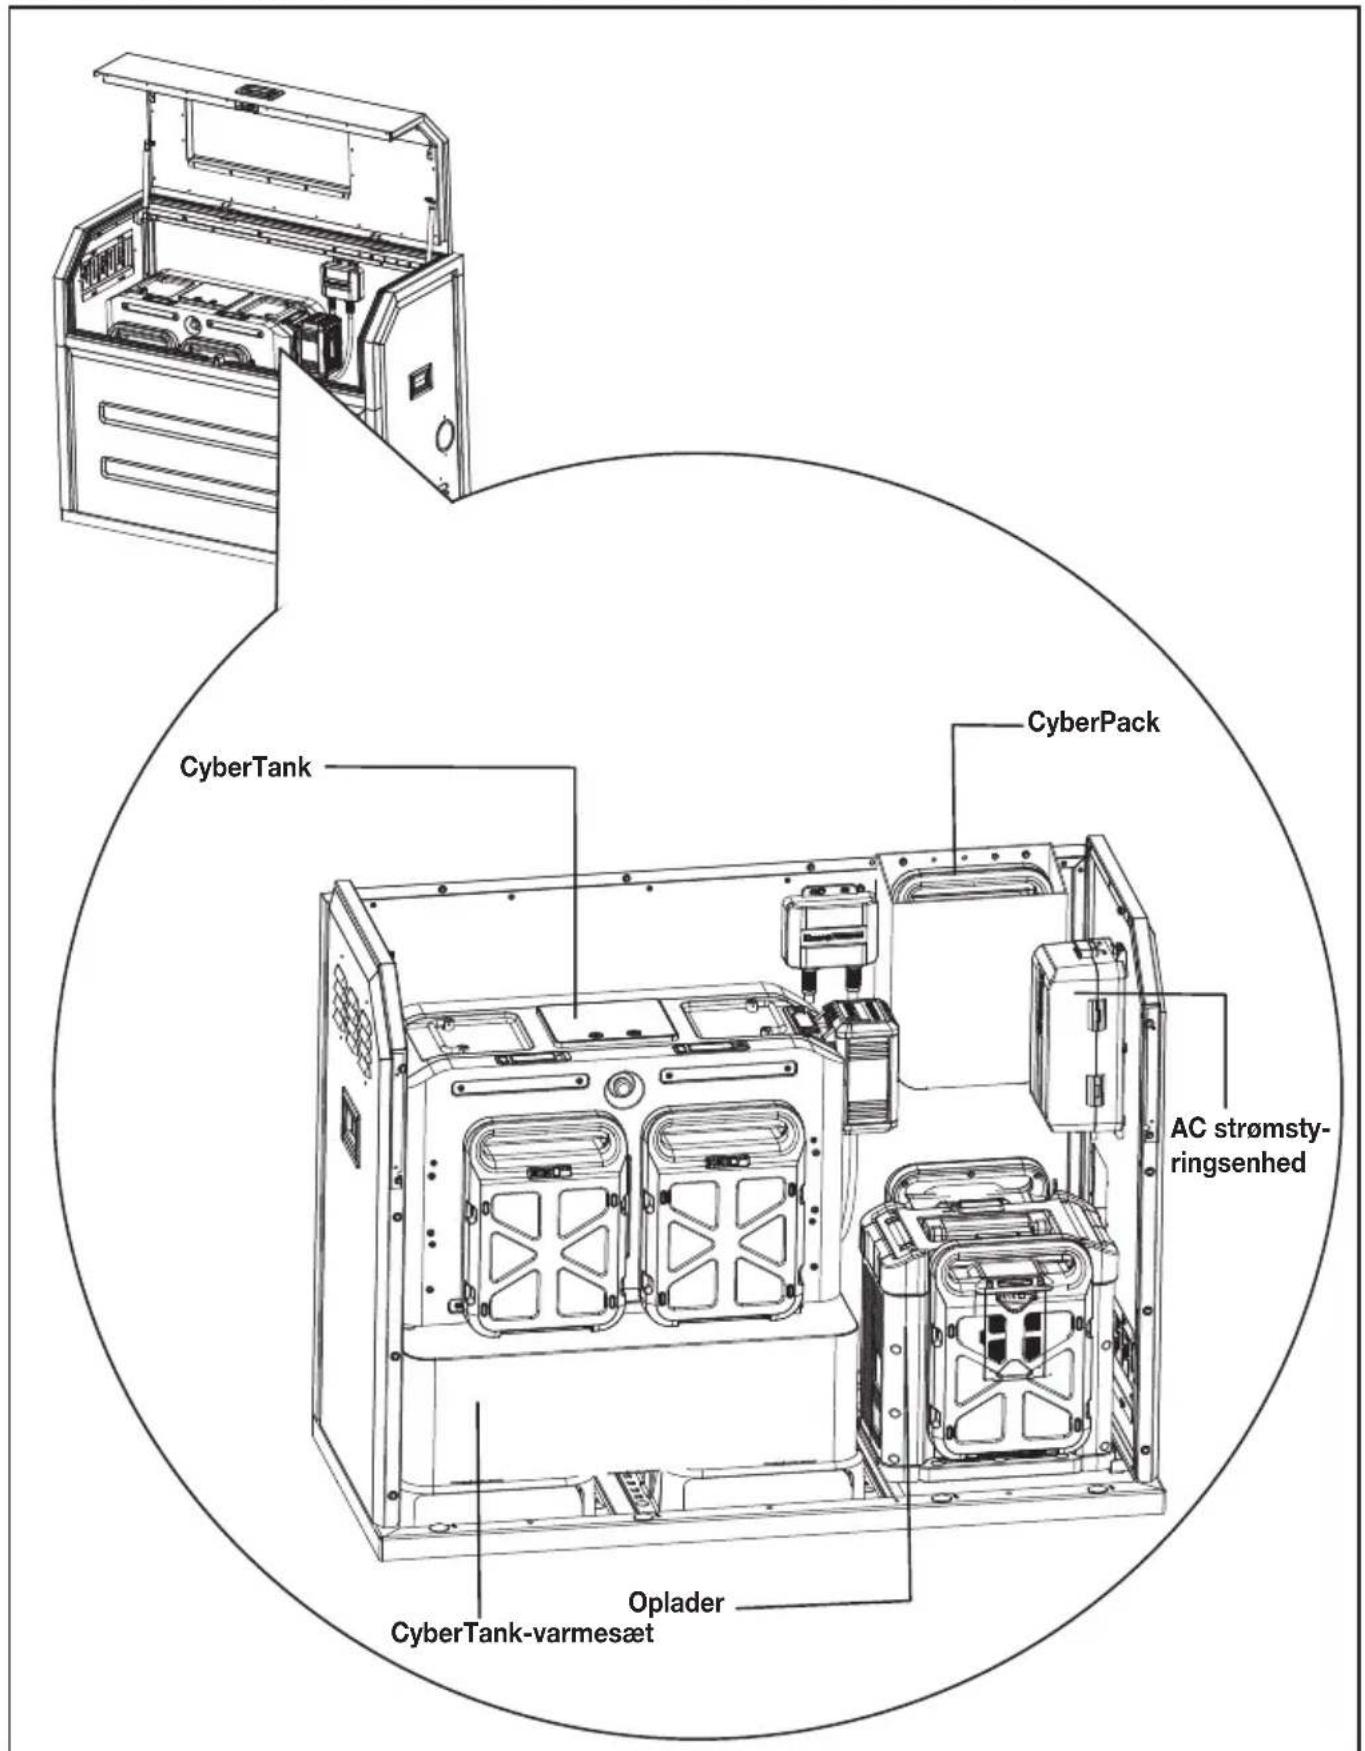
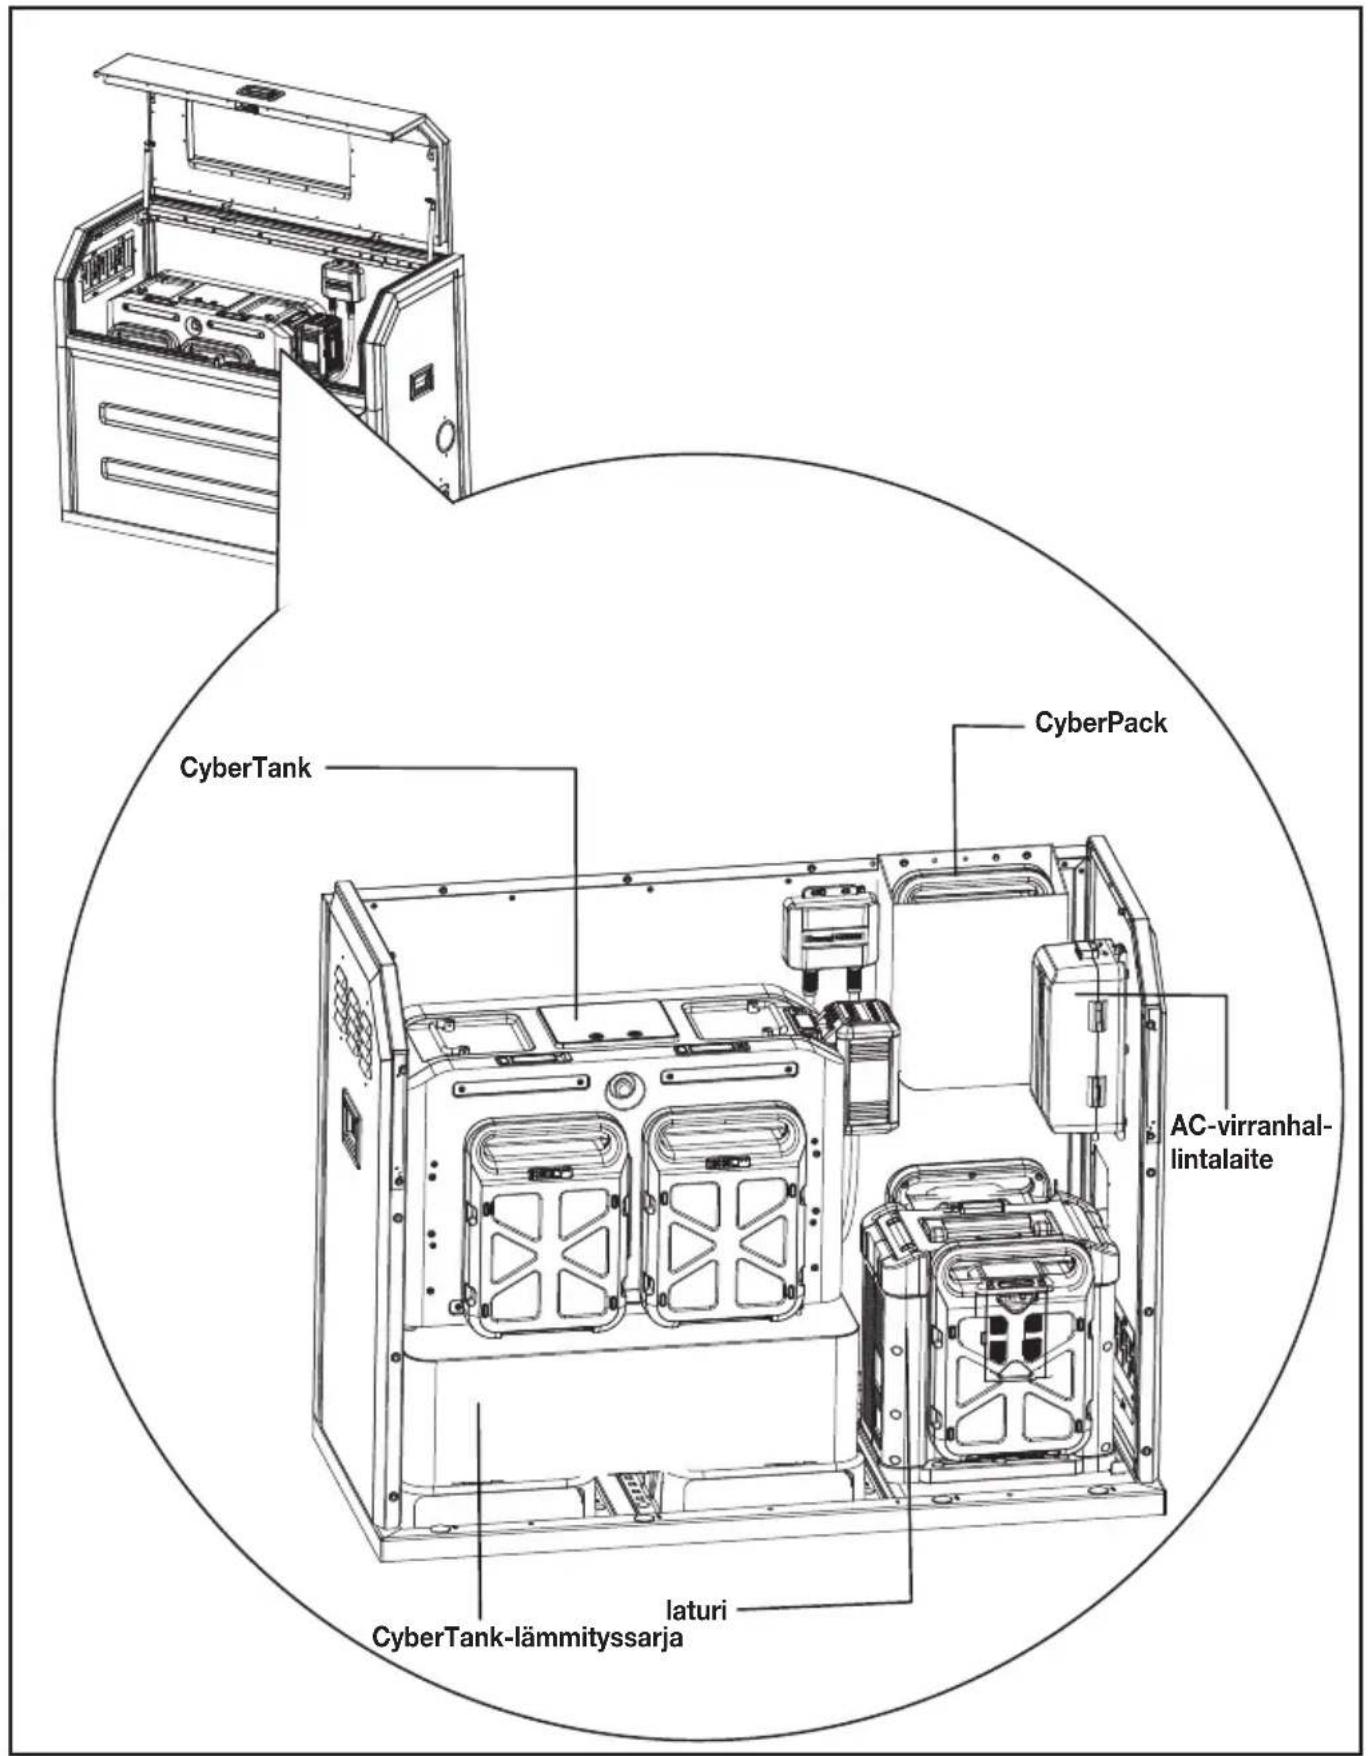
Diagram showing electrical panel installation with a spool and cable, no text or symbols presentGENERAL LAYOUT INSIDE THE CYBERCABINET

text_image
CyberTank CyberPack AC power management device Charger CyberTank warming kitTECHNICAL DATA
| KAC929 KAC929.X** | |
| Size 1270 mm (Length) x 550 mm (Width) x 1000 mm (Height) | |
| Weight 96 kg | |
| Recommended CyberTank KAC875E/KAC877E/KAC880E | |
**X=1-999,A-Z,M1-M9 they are only used for different customers, there are no safety relevant changes between these models.
INHALTSVERZEICHNIS
Einführung....17
Komponenten....18
text_image
Technical diagram of a portable air conditioner unit with numbered parts and exploded view detailsKOMPONENTEN
natural_image
Technical illustration of a mechanical assembly with a downward arrow indicating motion (no text or symbols present)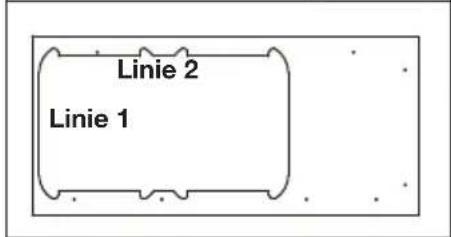
text_image
Technical diagram of a 3D robotic device with numbered components and labeled parts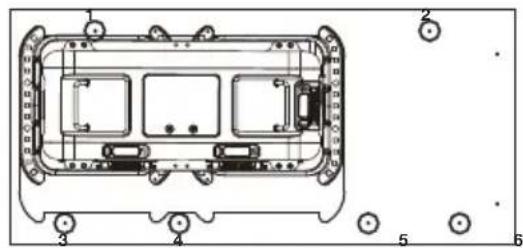
text_image
Technical diagram of an electronic device casing with numbered components and mounting pointstext_image
Technical diagram showing a mechanical assembly with numbered components and directional arrows indicating assembly steps.text_image
Rahmen 2 Rah- men 1 Rah- men 3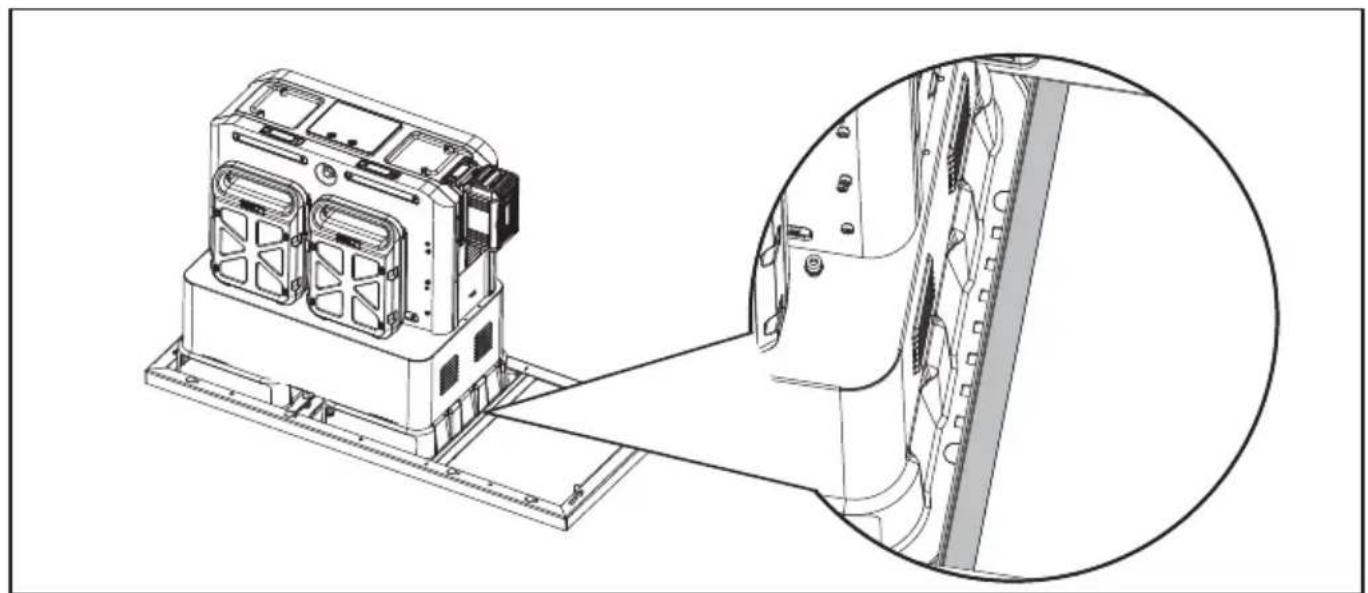
natural_image
Technical line drawing of a mechanical device with an inset close-up view showing internal components (no text or symbols)text_image
Technical diagram illustrating a mechanical assembly process with labeled components and directional arrows indicating motion or assembly.D
natural_image
Technical line drawing of an industrial machine with a magnified inset showing internal components (no text or symbols)SCHRITT 4
text_image
Technical diagram of a device with labeled components and assembly steps, showing internal structure and detail views.SCHRITT 7
natural_image
Technical line drawing of a mechanical device with an inset close-up showing internal components (no text or symbols)D
natural_image
Technical line drawing of an industrial machine with internal components and a magnified inset showing internal structure (no text or symbols)SCHRITT 8
text_image
Technical diagram showing a device with open lid and internal components, alongside its exploded view with close-ups of internal components.natural_image
Technical line drawing of an open industrial machine with a close-up inset showing internal components (no text or symbols)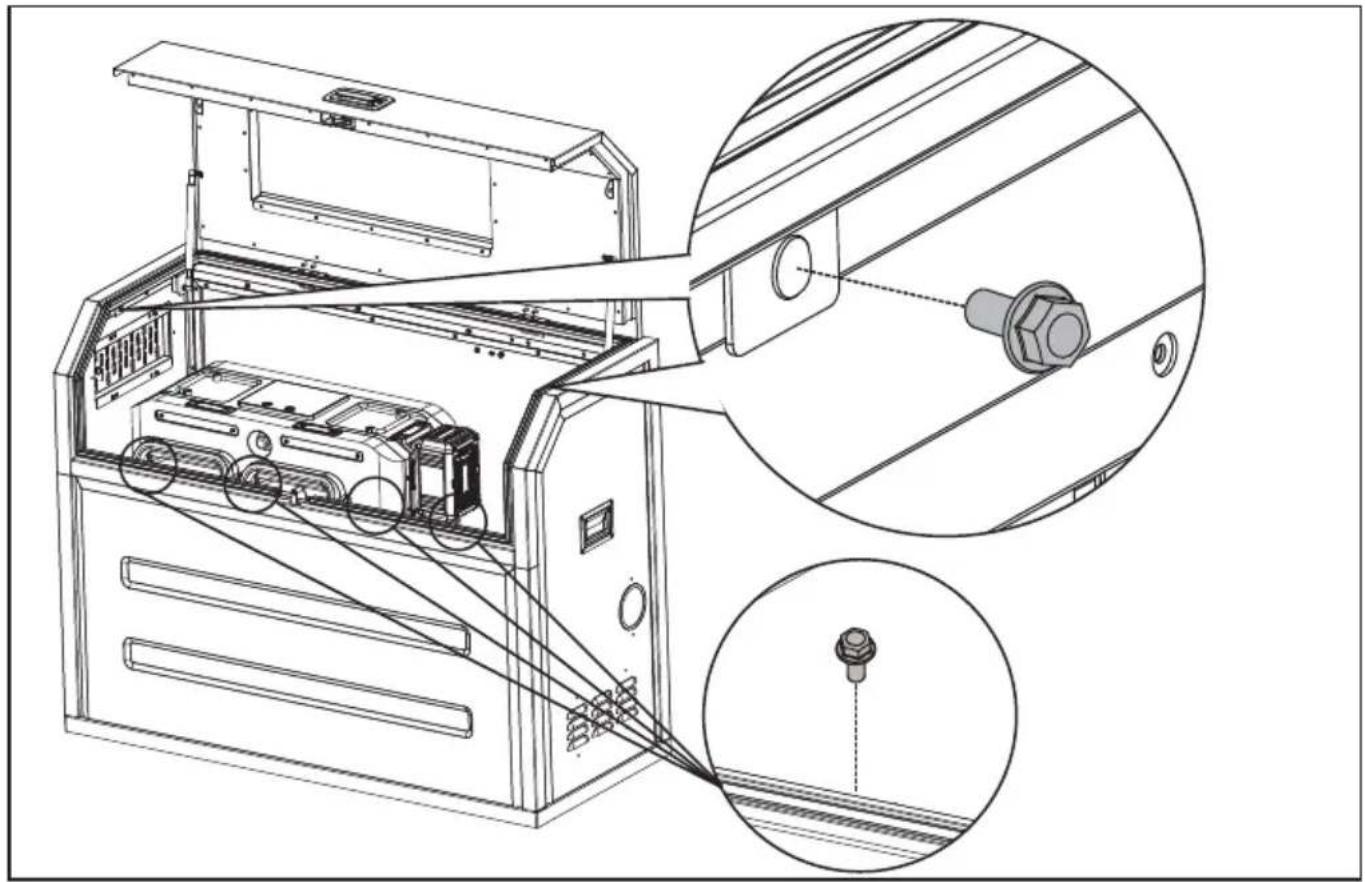
natural_image
Technical line drawing of an electronic device with internal components and a close-up inset showing a connector (no text or symbols present)SCHRITT 9
natural_image
Technical line drawing of an open industrial machine with internal components and a magnified inset showing internal wiring (no text or symbols)D
text_image
Technical diagram showing assembly of a device into a housing, with an inset illustrating the internal mechanism and directional arrows.natural_image
Technical line drawing of an industrial machine with internal components and a magnified inset showing a circular component (no text or symbols)D
natural_image
Diagram showing electrical panel installation and cable spooling process (no text or symbols)ALLGEMEINER AUFBAU IM CYBERCABINET
text_image
CyberTank CyberPack AC Stromvers- orgungs manage- ment- Gerät Ladegerät CyberTankWärmeset DTECHNISCHE DATEN
text_image
Technical diagram of a device with numbered parts and exploded view, including front panel, internal components, and labeled parts.LISTE DES COMPOSANTS
| 1. | CADRE SUPÉRIEUR ET PORTE |
| 2. | VERROU DE PANNEAU |
| 3. | FENÊTRE D'OBSERVATION |
| 4. | POIGNÉES LATÉRALES |
| 5. | PANNEAU DROIT |
| 6. | PANNEAU AVANT |
| 7. | SORTIE DE CÂBLE |
| 8. | CADRE DE BASE |
| 9. | PANNEAU ARRIÈRE |
| 10. | PANNEAU GAUCHE |
| 11. | VENTILATION RÉGLABLE |
LISTE D'ACCESSOIRES
- Place the base frame according to the position of the mounting holes. Fix the base frame with carriage bolts and nuts.
text_image
Technical diagram showing a mechanical assembly with labeled parts and directional arrows indicating motion or assembly.natural_image
Technical line drawing of a device chassis with an inset close-up view showing internal components (no text or symbols)text_image
Technical diagram of a server rack with labeled components and structural details, including zoomed-in views and numbered annotations.ÉTAPE 7
natural_image
Technical line drawing of a mechanical device with an inset close-up showing internal components (no text or symbols)natural_image
Technical line drawing of an industrial machine with internal components and a magnified inset showing internal structure (no text or symbols)ÉTAPE 8
text_image
Technical diagram showing a device with a downward arrow and its close-up view of the internal structure, including magnified detail views.natural_image
Technical line drawing of an open industrial machine with internal components and a magnified inset showing a bolt detail (no text or symbols)
natural_image
Technical line drawing of an electronic device with internal components and a close-up inset showing a connector (no text or symbols present)F
ÉTAPE 9
ASSEMBLEZ LE SAC.
natural_image
Technical line drawing of an open industrial machine with internal components and a magnified inset showing internal wiring (no text or symbols)OUVRIR/FERMER LA GRILLE D'AÉRATION
text_image
Technical diagram showing assembly of a device into a housing, with directional arrows indicating movement or assembly.natural_image
Technical line drawing of an internal device with a magnified inset showing a circular component labeled 'S' (no text or symbols on the diagram itself)natural_image
Diagram showing electrical panel installation with a spool and cable, no text or symbols presentDISPOSITION GÉNÉRALE À L'INTÉRIEUR DU CYBERCABINET
text_image
Technical diagram of a portable air conditioner unit with numbered parts and exploded view detailsELENCO COMPONENTI
| 1. | TELAIO SUPERIORE E PORTA | |
| I | 2. | BLOCCO DEL PANNELLO |
| 3. | FINESTRA DI OSSERVAZIONE | |
| 4. | MANIGLIE LATERALI | |
| 5. | PANNELLO DESTRO | |
| 6. | PANNELLO ANTERIORE | |
| 7. | USCITA CAVO | |
| 8. | TELAIO BASE | |
| 9. | PANNELLO POSTERIORE | |
| 10. | PANNELLO SINISTRO | |
| 11. | BOCCHETTA D'ARIA REGOLABILE |
ELENCO DEGLI ACCESSORI
text_image
Technical diagram showing a device with labeled components and directional arrows indicating assembly or movement.natural_image
Technical line drawing of a mechanical device with an inset close-up view showing internal components (no text or symbols)text_image
Technical diagram of a device with labeled components and internal structure, showing assembly steps and component details.PASSO 7
natural_image
Technical line drawing of a mechanical device with an inset close-up showing internal components (no text or symbols)natural_image
Technical line drawing of an industrial machine with internal components and a magnified inset showing internal structure (no text or symbols)1
PASSO 8
text_image
Technical diagram showing a device with a downward arrow and close-up of its internal structure, labeled in Chinese.natural_image
Technical line drawing of an open industrial machine with internal components and a magnified inset showing a bolt detail (no text or symbols)
natural_image
Technical line drawing of an electronic device with internal components and a close-up inset showing a connector detail (no text or symbols present)PASSO 9
Assemblare la borsa
natural_image
Technical line drawing of an open industrial machine with internal components and a magnified inset showing internal wiring (no text or symbols)APRIRE/CHIUDERE LA PRESA D'ARIA
text_image
Technical diagram showing assembly of a computer case with internal components and directional arrows indicating process flow.Fissare i cavi con le fascette
natural_image
Technical line drawing of an internal air conditioner unit with a magnified inset showing a circular component (no text or symbols)1
natural_image
Diagram showing electrical panel installation with a spool and cable, no text or symbols presenttext_image
Technical diagram of a refrigerator with numbered parts and exploded view, including labeled components and parts numbered 12 to 19.text_image
Technical diagram showing a mechanical assembly with numbered components and directional arrows indicating assembly steps.natural_image
Technical line drawing of a device chassis with an inset close-up view showing internal components (no text or symbols)text_image
Technical diagram illustrating the assembly of a device with labeled components and directional arrows indicating process steps.
natural_image
Technical line drawing of an electronic device with a magnified inset showing internal components (no text or symbols)PASO 4
text_image
Technical diagram of a device with labeled components and structural views, showing internal structure and assembly details.PASO 7
natural_image
Technical line drawing of a mechanical device with an inset close-up showing internal components (no text or symbols)natural_image
Technical line drawing of an industrial machine with internal components and a magnified inset showing internal structure (no text or symbols)PASO 8
text_image
Technical diagram showing a device with a downward arrow and its close-up view of the internal structure, including a magnified inset of the device's internal components.ES
natural_image
Technical line drawing of an open industrial machine with internal components and a magnified inset showing a bolt detail (no text or symbols)
natural_image
Technical line drawing of an electronic device with internal components and a close-up inset showing a connector (no text or symbols present)ES
PASO 9
Ensamble la bolsa.

natural_image
Technical line drawing of an open industrial machine with internal components and a magnified inset showing internal wiring (no text or symbols)ABRIR/CERRAR EL RESPIRADERO DE AIRE.
text_image
Technical diagram showing assembly of a device into a housing, with an inset illustrating the internal structure and directional arrows indicating movement.natural_image
Technical line drawing of an internal air conditioner unit with a magnified inset showing a circular component (no text or symbols)natural_image
Technical illustration of electrical panel installation with a spool and cable, showing no text or symbolstext_image
Technical diagram of a portable air conditioner unit with numbered parts and exploded view detailstext_image
Technical diagram showing a mechanical assembly with labeled parts and directional arrows indicating assembly steps.natural_image
Technical line drawing of an electronic device with a magnified inset showing internal components (no text or symbols)text_image
Technical diagram illustrating a mechanical assembly process with labeled components and directional arrows indicating motion or assembly.PT
natural_image
Technical line drawing of an electronic device with a magnified inset showing internal components (no text or symbols)PASSO 4
text_image
Technical diagram of a device with labeled components and assembly steps, showing internal structure and detail views.PASSO 7
natural_image
Technical line drawing of a mechanical device with an inset close-up showing internal components (no text or symbols)natural_image
Technical line drawing of an industrial machine with internal components and a magnified inset showing internal structure (no text or symbols)PT
PASSO 8
Monte o quadro superior e a porta.
text_image
Technical diagram showing a device with a downward arrow and its close-up view of the internal structure, including magnified detail views.natural_image
Technical line drawing of an open industrial machine with a close-up inset showing internal components (no text or symbols)
natural_image
Technical line drawing of an electronic device with internal components and a close-up inset showing a connector (no text or symbols present)PASSO 9
Monte a bolsa.
natural_image
Technical line drawing of an open industrial machine with internal components and a magnified inset showing internal wiring (no text or symbols)ABRIR/FECHAR A SAÍDA DE AR
text_image
Technical diagram showing assembly of a computer case with internal components and directional arrows indicating process flow.natural_image
Technical line drawing of an internal air conditioner unit with a magnified inset showing a circular component (no text or symbols)PT
natural_image
Diagram showing electrical panel installation with a spool and cable, no text or symbols presentESQUEMA GERAL DO INTERIOR DO CYBERCABINET
text_image
Technical diagram of a refrigerator with numbered parts and exploded view, including labeled components and parts numbered 12 to 19.ONDERDELENLIJST
| 1. | TOP FRAME & DEUR |
| 2. | PANEELSLOT |
| 3. | OBSERVATIEVENSTER |
| 4. | ZIJHANDVATTEN |
| 5. | RECHTERPANEEL |
| 6. | VOORPANEEL |
| 7. | KABELUITGANG |
| 8. | BASISFRAME |
| 9. | ACHTERPANEEL |
| 10. | LINKERPANEEL |
| 11. | VERSTELBARE LUCHTROOSTER |
ACCESSOIRELIJST
VEILIGHEIDSWAARSCHUWINGEN
text_image
Technical diagram showing assembly steps of a device with labeled components and component numbers- Place the base frame according to the position of the mounting holes. Fix the base frame with carriage bolts and nuts.
text_image
Technical diagram showing a mechanical assembly with numbered components and directional arrows indicating assembly steps.natural_image
Technical line drawing of a device chassis with an inset close-up view showing internal components (no text or symbols)text_image
Technical diagram of a device with labeled components and directional arrows indicating assembly or assembly stepsSTAP 7
natural_image
Technical line drawing of a mechanical device with an inset close-up showing internal components (no text or symbols)natural_image
Technical line drawing of an industrial machine with internal components and a magnified inset showing internal structure (no text or symbols)STAP 8
text_image
Kressi Commercial Kressi CommercialNL
natural_image
Technical line drawing of an air conditioner unit with a magnified inset showing internal components (no text or symbols)
natural_image
Technical line drawing of an electronic device with internal components and a close-up inset showing a connector (no text or symbols present)NL
STAP 9
Monteer de tas
natural_image
Technical line drawing of an open industrial machine with internal components and a magnified inset showing internal wiring (no text or symbols)OPEN/SLUIT HET LUCHTVENTIEL.
text_image
Technical diagram showing assembly of a computer case with internal components and directional arrows indicating process flow.NL
natural_image
Technical line drawing of an internal device with a magnified inset showing a circular component labeled '2' (no text or symbols on the diagram itself)natural_image
Technical illustration of electrical panel installation with a spool and cable, showing no text or symbolsALGEMENE INDELING BINNENIN DE CYBERCABINET

text_image
CyberTank CyberPack AC-stroombe-heerlader Oplader CyberTank-VerwarmingskitTECHNISCHE GEGEVENS
| KAC929 KAC929.X** | |
| Maat 1270 mm (Lengte) x 550 mm | (Breedte) x 1000 mm (Hoogte) |
| Gewicht 96 kg | |
| Aanbevolen CyberTank KAC875E/KAC877E/KAC880E | |
text_image
Technical diagram of a portable air conditioner unit with numbered parts and exploded view detailstext_image
Technical diagram showing a mechanical assembly with numbered components and directional arrows indicating assembly steps.natural_image
Technical line drawing of a mechanical device with an inset close-up view showing internal components (no text or symbols)text_image
Technical diagram of a device with labeled components and zoomed-in views showing internal structure and assembly.7. LÉPÉS
natural_image
Technical line drawing of a mechanical device with an inset close-up showing internal components (no text or symbols)HU
natural_image
Technical line drawing of an industrial machine with internal components and a magnified inset showing internal structure (no text or symbols)8. LÉPÉS
text_image
Technical diagram showing a device with a downward arrow and its close-up view of the internal structure, labeled in Chinese.natural_image
Technical line drawing of an open industrial machine with a close-up inset showing internal components (no text or symbols)
natural_image
Technical line drawing of an electronic device with internal components and a close-up inset showing a connector (no text or symbols present)9. LÉPÉS
natural_image
Technical line drawing of an open industrial machine with internal components and a magnified inset showing internal wiring (no text or symbols)HU
NYISSA/ZÁRJA AZ ÁRNYÉKOLÓ LÉGBEÖMLŐT.
text_image
Technical diagram showing assembly of a device into a housing, with directional arrows indicating movement or assembly.natural_image
Technical line drawing of an internal device with a magnified inset showing a circular component labeled 'J' (no text or symbols on the diagram itself)HU
natural_image
Diagram showing electrical panel installation and cable routing (no text or symbols)A CYBERCABINET BELSŐ ELRENDEZÉSE ÁLTALÁBAN A KÖVETKEZŐKÉPPEN NÉZ KI
HU

text_image
Technical diagram of a refrigerator with numbered parts and exploded view, including labeled components and parts numbered 12 to 19.text_image
Technical diagram showing a mechanical assembly with numbered components and directional arrows indicating assembly steps.natural_image
Technical line drawing of a device chassis with an inset close-up view showing internal components (no text or symbols)text_image
Technical diagram illustrating a mechanical assembly process with labeled components and directional arrows indicating motion or assembly.
natural_image
Technical line drawing of a server rack unit with an inset close-up showing internal components (no text or symbols)PASUL 4
Asamblati panoul drept.
PASUL 5
text_image
Technical diagram of a device with labeled components and directional arrows indicating assembly or assembly stepsRO
PASUL 7
natural_image
Technical line drawing of a mechanical device with an inset close-up showing internal components (no text or symbols)natural_image
Technical line drawing of an industrial machine with internal components and a magnified inset showing internal structure (no text or symbols)PASUL 8
text_image
Technical diagram showing a device with internal components before and after assembly, including close-ups of the internal structure.RO
natural_image
Technical line drawing of an open industrial machine with internal components and a magnified inset showing a bolt detail (no text or symbols)
natural_image
Technical line drawing of an electronic device with internal components and a close-up inset showing a connector (no text or symbols present)RO
PASUL 9
Asamblarea sacului

natural_image
Technical line drawing of an open industrial machine with internal components and a magnified inset showing internal wiring (no text or symbols)DESCHIDETI/ÎNCHIDETI ORIFICIUL DE AERISIRE
text_image
Technical diagram showing assembly of a device into a housing, with directional arrows indicating movement or assembly.natural_image
Technical line drawing of an internal air conditioner unit with a magnified inset showing internal components (no text or symbols)natural_image
Technical illustration of electrical panel installation with a spool and cable, showing internal components and wiring (no text or symbols)ARANJAMENTUL GENERAL DIN INTERIORUL CYBER-CABINET-ULUI
text_image
Technical diagram of a portable air conditioner unit with numbered parts and exploded view detailsLISTA KOMPONENTÓW
- RAMA GÓRNA I DRZWI
- BLOKADA PANELU
- WZIERNIK
- UCHWYTY BOCZNE
- PANEL PRAWY
- PANEL PRZEDNI
- GNIAZDO KABLOWE
- RAMA PODSTAWY
- PANEL TYLNY
- PANEL LEWY
- REGULOWANY WYWIETRZNIK
LISTA AKCESORIÓW
- Place the base frame according to the position of the mounting holes. Fix the base frame with carriage bolts and nuts.
text_image
Technical diagram showing a mechanical assembly with numbered components and directional arrows indicating assembly steps.natural_image
Technical line drawing of a mechanical device with an inset close-up view showing internal components (no text or symbols)text_image
Technical diagram of a device with labeled components and directional arrows indicating assembly or assembly stepsKROK 7
natural_image
Technical line drawing of a mechanical device with an inset close-up showing internal components (no text or symbols)PL
natural_image
Technical line drawing of an industrial machine with internal components and a magnified inset showing internal structure (no text or symbols)KROK 8
text_image
Technical diagram showing a device with a downward arrow and close-up of its internal structure, likely illustrating a mechanical or electrical assembly.natural_image
Technical line drawing of an air conditioner unit with internal components and a magnified inset showing a bolt detail (no text or symbols)
natural_image
Technical line drawing of an electronic device with internal components and a close-up inset showing a connector (no text or symbols present)KROK 9
Zamontuj torbę
natural_image
Technical line drawing of an open industrial machine with internal components and a magnified inset showing internal wiring (no text or symbols)PL
text_image
Technical diagram showing assembly of a device into a housing, with directional arrows indicating process flow.natural_image
Technical line drawing of an internal appliance unit with a magnified inset showing a circular component labeled 'e' (no text or symbols on the device itself)PL
natural_image
Diagram showing electrical panel installation and cable routing (no text or symbols)OGÓLNY UKŁAD WNETRZA CYBERCABINETU
PL
text_image
Technical diagram of a refrigerator with numbered parts and exploded view, including labeled components and parts numbered 12 to 19.SEZNAM KOMPONENTÜ
| 1. | HORNÍ RÁM A DVÍŘKA |
| 2. | ZÁMEK NA PANEL |
| 3. | POZOROVACÍ OKNO |
| 4. | BOČNÍ RUKOJETI |
| 5. | PRAVÝ PANEL |
| 6. | PŘEDNÍ PANEL |
| 7. | KABELOVÝ VÝSTUP |
| 8. | ZÁKLADNÍ RÁM |
| 9. | ZADNÍ PANEL |
| 10. | LEVÝ PANEL |
| 11. | NASTAVITELNÁ VĚTRACÍ MŘÍŽKA |
SEZNAM PŘÍSLUŠENSTVÍ
- INSTALACE VAŠÍ CYBERCABINET KROK 1
text_image
Technical diagram showing a mechanical assembly with numbered components and directional arrows indicating assembly steps.natural_image
Technical line drawing of a device chassis with an inset close-up view showing internal components (no text or symbols)text_image
Technical diagram of a device with labeled components and directional arrows indicating assembly or assembly stepsKROK 7
natural_image
Technical line drawing of a mechanical device with an inset close-up showing internal components (no text or symbols)natural_image
Technical line drawing of an industrial machine with internal components and a magnified inset showing internal structure (no text or symbols)KROK 8
text_image
Technical diagram showing a device with internal components before and after assembly, including close-ups of the internal structure.CZ
natural_image
Technical line drawing of an open industrial machine with internal components and a magnified inset showing a bolt detail (no text or symbols)
natural_image
Technical line drawing of an electronic device with internal components and a close-up inset showing a connector detail (no text or symbols present)CZ
KROK 9
Sestavte tašku.
natural_image
Technical line drawing of an open industrial machine with internal components and a magnified inset showing internal wiring (no text or symbols)OTEVŘETE/ZAVŘETE VZDUCHOVOU VENTILACI
text_image
Technical diagram showing assembly of a device into a housing, with directional arrows indicating process flow.natural_image
Technical line drawing of an internal air conditioner unit with a magnified inset showing internal components (no text or symbols)natural_image
Diagram showing electrical panel installation and cable routing (no text or symbols)OBECNÁ ROZVRŽENÍ UVNITŘ CYBERCABINET
text_image
Technical diagram of a portable air conditioner unit with numbered parts and exploded view detailsZOZNAM SÚČASTÍ
| 1. | HORNÝ RÁM A DVERE | |
| SK | 2. | ZÁMOK PANELU |
| 3. | OKENNÝ OTVOR | |
| 4. | BOČNÁ RUKOVÄŤ | |
| 5. | PRAVÝ PANEL | |
| 6. | PREDNÝ PANEL | |
| 7. | VÝVOD PRE KÁBLE | |
| 8. | ZÁKLADNÝ RÁM | |
| 9. | ZADNÝ PANEL | |
| 10. | L’AVÝ PANEL | |
| 11. | NASTAVITEL’NÉ VETRANIE |
ZOZNAM PRÍSLUŠENSTVA
text_image
Technical diagram showing a mechanical assembly with labeled components and directional arrows indicating assembly steps.natural_image
Technical line drawing of a mechanical device with an inset close-up view showing internal components (no text or symbols)text_image
Technical diagram illustrating a mechanical assembly process with labeled components and directional arrows indicating motion or assembly.
natural_image
Technical line drawing of an industrial machine with a magnified inset showing internal components (no text or symbols)KROK 4
text_image
Technical diagram of a device with labeled components and directional arrows indicating assembly or assembly stepsKROK 7
natural_image
Technical line drawing of a mechanical device with an inset close-up showing internal components (no text or symbols)SK
natural_image
Technical line drawing of an industrial machine with internal components and a magnified inset showing internal structure (no text or symbols)KROK 8
Zostavte horný rám a dvere.
text_image
Technical diagram comparing internal components of a KESSA device, showing external and internal assembly with close-ups.natural_image
Technical line drawing of an air conditioner unit with internal components and a magnified inset showing a bolt detail (no text or symbols)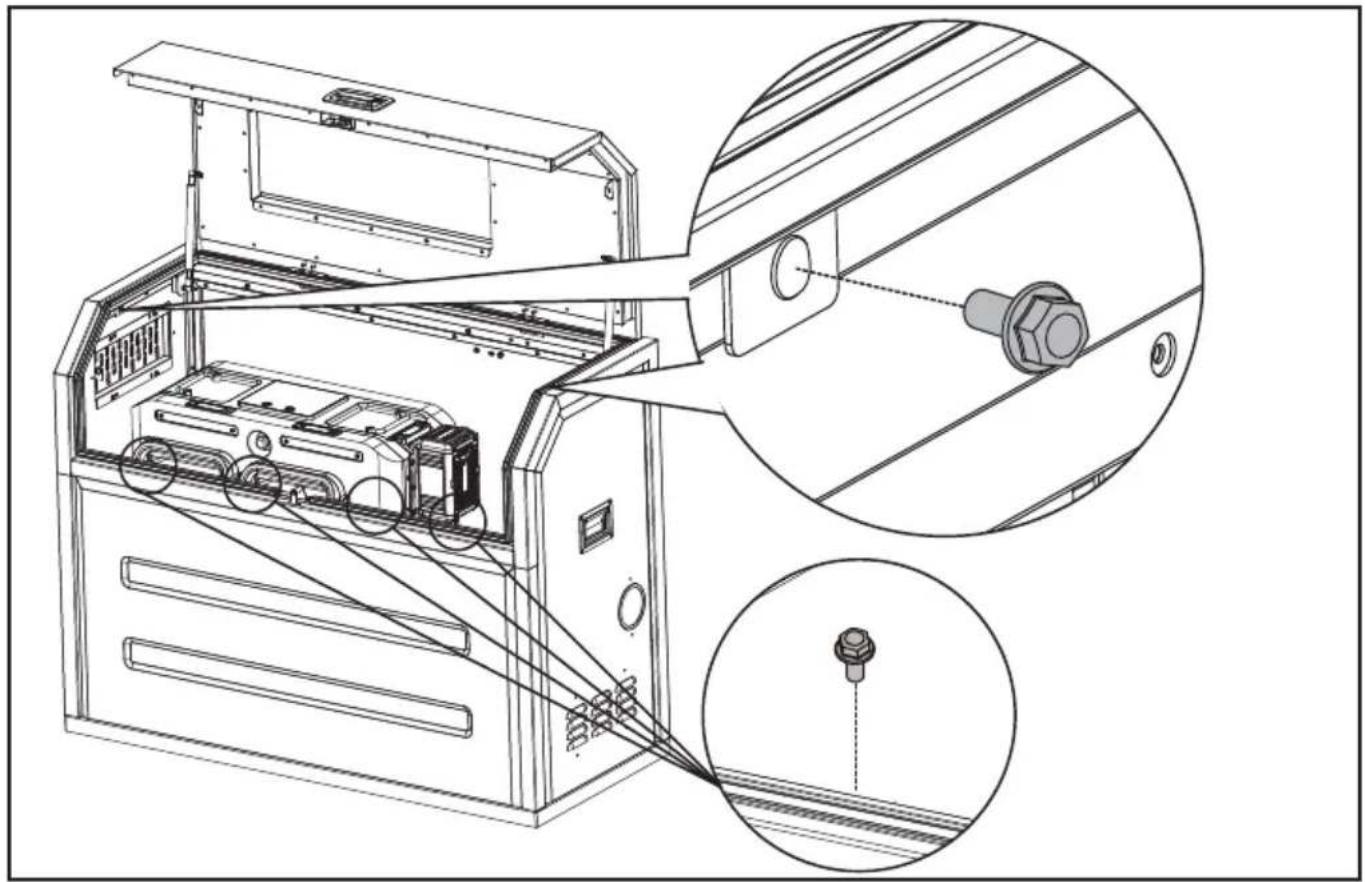
natural_image
Technical line drawing of an electronic device with internal components and a close-up inset showing a connector (no text or symbols present)KROK 9
Zostavte tašku.
natural_image
Technical line drawing of an open industrial machine with internal components and a magnified inset showing internal wiring (no text or symbols)SK
OTVORTE/ZATVORTE VENTIL NA PRÍVODE VZDUCHU.
text_image
Technical diagram showing internal components of a device with labeled parts and directional arrows indicating assembly or movement.natural_image
Technical line drawing of an internal air conditioner unit with a magnified inset showing a circular component (no text or symbols)SK
natural_image
Illustration of electrical panel installation with a spool and cable, showing no text or symbolsVŠEOBECNÉ USPORIADANIE VNÚTRI CYBERCABINETU
SK
text_image
CyberTank CyberPack Zariadenie na riadenie AC napájania Nabíjačka Kúrenie kit CyberTankTECHNICKÉ ÚDAJE
text_image
Technical diagram of a refrigerator with numbered parts and exploded view, including labeled components and parts numbered 12 to 19.SESTAVNI DELI
| 1. | ZGORNJI OKVIR IN VRATA |
| 2. | KLJUČAVNICA PLOŠČE |
| 3. | OPAZOVALNO OKNO |
| 4. | STRANSKI ROČAJI |
| 5. | DESNA PLOŠČA |
| 6. | SPREDNJA PLOŠČA |
| 7. | IZHOD ZA KABEL |
| 8. | OSNOVNI OKVIR |
| 9. | ZADNJA PLOŠČA |
| 10. | LEVA PLOŠČA |
| 11. | NASTAVLJIV ZRAČNIK |
SEZNAM DODATKOV
text_image
Technical diagram showing a mechanical assembly with numbered components and directional arrows indicating assembly steps.OPOMBA: Okvir 1 in okvir 2 naj bosta tesno prilegajoča se CyberTank nosilca. (Osnovni okvir mora prekrivati nosilec CyberTank-a)
natural_image
Technical line drawing of a device chassis with an inset close-up view showing internal components (no text or symbols)text_image
Technical diagram illustrating a mechanical assembly process with labeled components and directional arrows indicating motion or assembly.
natural_image
Technical line drawing of a server rack unit with an inset close-up view showing internal components (no text or symbols)KORAK 4
text_image
Technical diagram of a device with labeled components and directional arrows indicating assembly or assembly stepsKORAK 7
natural_image
Technical line drawing of a mechanical device with an inset close-up showing internal components (no text or symbols)natural_image
Technical line drawing of an industrial machine with internal components and a magnified inset showing internal structure (no text or symbols)KORAK 8
Sestavite zgornji okvir in vrata.
text_image
Technical diagram showing a device with open lid and internal components, alongside its close-up view of the internal structure with detail insets.SL
natural_image
Technical line drawing of an open industrial machine with internal components and a magnified inset showing a bolt detail (no text or symbols)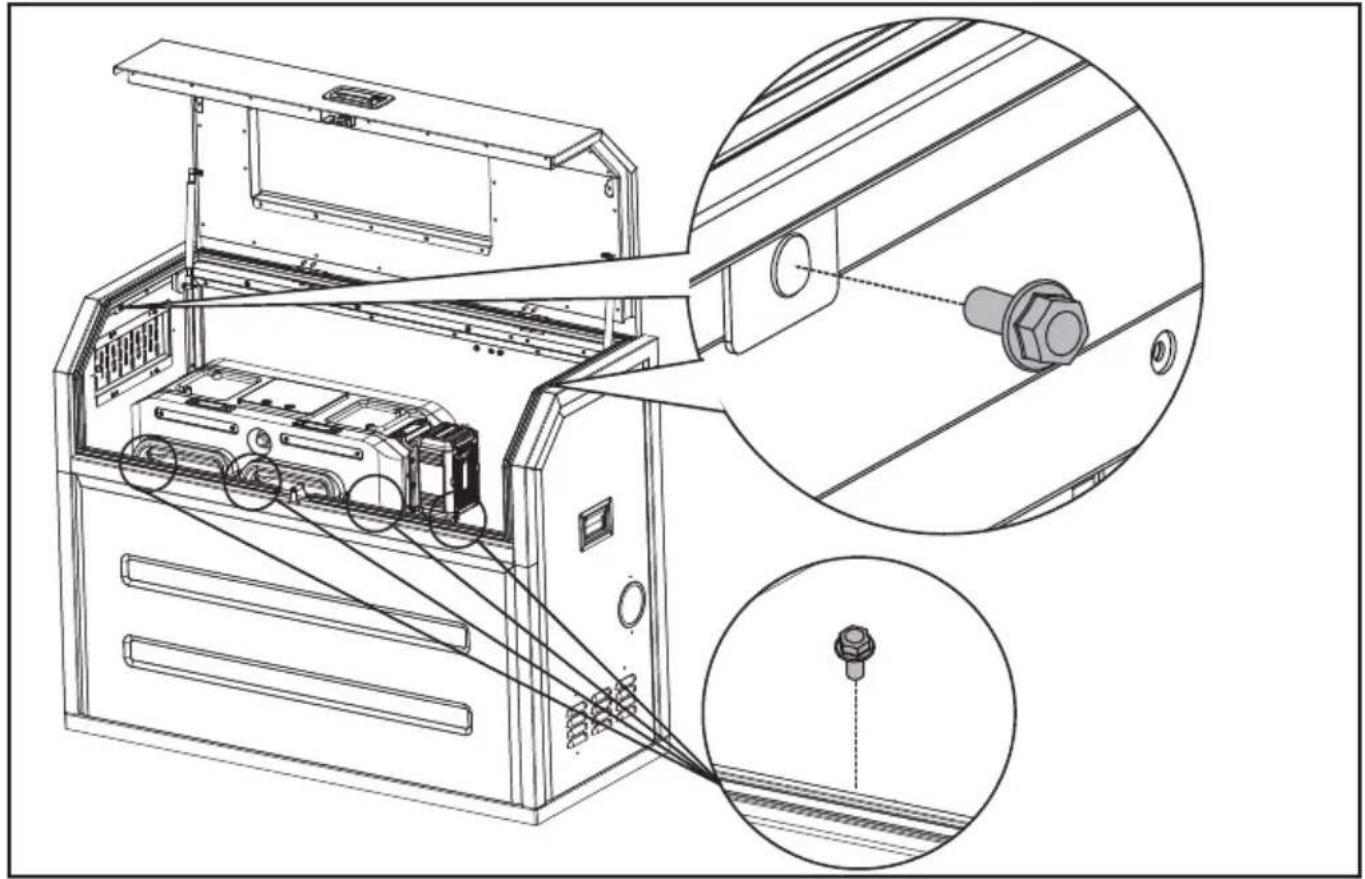
natural_image
Technical line drawing of an electronic device with internal components and a close-up inset showing a connector (no text or symbols present)SL
KORAK 9
Sestavite torbo.
natural_image
Technical line drawing of an open industrial machine with internal components and a magnified inset showing internal wiring (no text or symbols)ODPRITE/ZAPRITE ZRAČNI ODPRTINO.
text_image
Technical diagram showing assembly of a device into a housing, with directional arrows indicating process flow.natural_image
Technical line drawing of an internal appliance unit with a magnified inset showing a circular component labeled 'S' (no text or symbols on the device itself)natural_image
Technical illustration of electrical panel installation with a spool and cable, showing no text or symbolsSPLOŠNA POSTAVITEV ZNOTRAJ CYBERCABINETA
text_image
CyberTank CyberPack Naprava za upravljanje z AC napajanjem Ogrevni komplet CyberTank PolnilecTEHNIČNI PODATKI
text_image
Technical diagram of a portable air conditioner unit with numbered parts and exploded view detailsPOPIS KOMPONENTI
| HR | 1. | GORNJI OKVIR I VRATA |
| 2. | BRAVA PLOČE | |
| 3. | PROZORČIĆ ZA PROMATRANJE | |
| 4. | BOČNE RUČKE | |
| 5. | DESNA PLOČA | |
| 6. | PREDNJA PLOČA | |
| 7. | IZLAZ ZA KABEL | |
| 8. | OKVIR POSTOLJA | |
| 9. | STRAŽNJA PLOČA | |
| 10. | LIJEVA PLOČA | |
| 11. | PODESIVI OTVOR ZA ZRAK |
KELLÉKLISTA
* Standardna isporuka ne obuhvaća sav ilustriran ili opisan pribor.
| Opis | Količina | |
| 12. | Šesterokutni vijak prirubnice (M5x12) (Za pričvršćivanje ploča i gornjeg okvira i vrata) | 23 |
| 13. | Vijci za nosače(3/8-16 x 4'')+odstojnik+matica (Za pričvršćivanje okvira posolja) | 6 |
| 14. | Ključ | 2 |
| 15. | Torbica 1 | |
| 16. | Nasadni ključ (Za sastavljanje ili uklanjanje šesterokutnih vijaka prirubnice) | 1 |
| 17. | Prilagođena utičnica(Za sastavljanje ili uklanjanje matica) | 1 |
| 18. | Vezica za kabel 7 | |
| 19. | Kontura osnove 1 | |
| 20. | CyberTank komplet za zagrijavanje* 1 |
UPUTE ZA SIGURNOST
text_image
Technical diagram showing a mechanical assembly with numbered components and directional arrows indicating assembly steps.NAPOMENA: Okvir 1 i okvir 2 trebaju dobro pristajati uz bosač CyberTanka. (Okvir postolja mora biti preklopljen s montažnim nosačem CyberTanka) Mora biti određeni razmak između okvira 3 i CyberTanka.
text_image
Okvira 2 Okvira 1 Okvira 3
natural_image
Technical line drawing of a mechanical device with an inset close-up view showing internal components (no text or symbols)Ako vaš CyberTank NIJE postavljen
- Pročitajte CyberTank vodič za postavljanje
- Postavite CyberTank.
NAPOMENA: Ne sastavljajte zaštitne štitnike CyberTanka. Za detaljne informacije o postavljanju CyberTanka, pogledajte vodič za postavljanje CyberTanka.
- Odredite položaj CyberCabineta za ugradnju na temelju lokacije vašeg CyberTanka, bilo u krevetu vašeg kamiona ili prikolice.
text_image
Technical diagram illustrating the assembly of a device with labeled components and directional arrows indicating process steps.HR

natural_image
Technical line drawing of an electronic device with a magnified inset showing internal components (no text or symbols)4. KORAK
Sastavite desnu ploču.
5. KORAK
text_image
Technical diagram of a device with labeled components and assembly steps, showing internal structure and detail views.7. KORAK
Pričvrstite desnu ploču i lijevu ploču vijcima sa šesterokutnom prirubnicom.
natural_image
Technical line drawing of a mechanical device with an inset close-up showing internal components (no text or symbols)HR
Pričvrstite prednju ploču vijcima sa šesterokutnom prirubnicom.
natural_image
Technical line drawing of a mechanical device with internal components and a magnified inset showing a close-up view (no text or symbols)8. KORAK
text_image
Technical diagram showing a device with open lid and internal components, alongside its close-up view of the internal structure with detail insets.Otvorite vrata i pričvrstite gornji okvir i vrata sa šesterokutnim vijcima za prirubnicu.
natural_image
Technical line drawing of an air conditioner unit with internal components and a magnified inset showing a bolt detail (no text or symbols)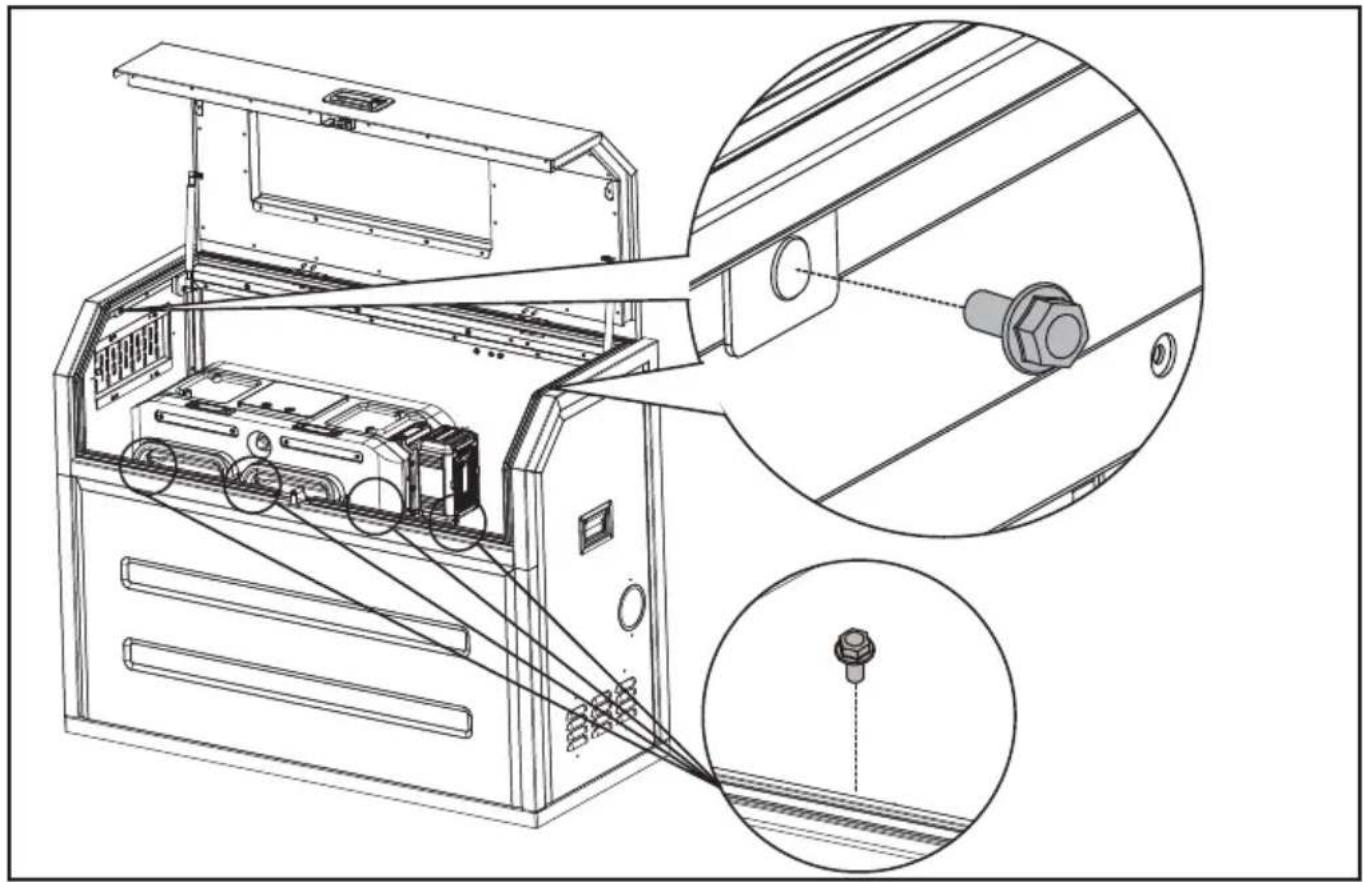
natural_image
Technical line drawing of an electronic device with internal components and a close-up inset showing a connector (no text or symbols present)9. KORAK
Sastavite torbicu

natural_image
Technical line drawing of an open industrial machine with internal components and a magnified inset showing internal wiring (no text or symbols)HR
OTVORI/ZATVORITE OTVOR ZA ZRAK
Otvorite otvor za zrak kada je temperatura previsoka.

text_image
Technical diagram showing assembly of a computer case with internal components and directional arrows indicating assembly steps.Učvrstite kabele vezicama za kabele

natural_image
Technical line drawing of an air conditioner unit with internal components and a magnified inset showing a circular detail (no text or symbols)HR
natural_image
Diagram showing electrical panel installation with a spool and cable, no text or symbols presentOPĆI RASPORED UNUTAR CYBERCABINETA
HR
text_image
CyberTank CyberPack Uređaj za upravljanje izmjeničnom strujom CyberTank komplet za zagrijavanje PunjačTEHNIČKI PODACI
| KAC929 KAC929.X** | |
| Veličina | 1270 mm (duljina) x 550 mm (širina) x 1000 mm (visina) |
| Težina 96 kg | |
| Preporučeni CyberTank | KAC875E/KAC877E/KAC880E |
** X=1-999,A-Z,M1-M9 upotrebljavaju se samo za različite korisnike, između ovih modela nema bitnih promjena koje se odnose na sigurnost.
HR
INDHOLDSFORTEGNELSE
Introduktion....212
komponentliste....213
text_image
Technical diagram of a refrigerator with numbered parts and exploded view, including labeled components and parts numbered 12 to 19.KOMPONENTLISTE
| 1. | TOPRAMME OG D∅R |
| 2. | PANELLÅS |
| 3. | OBSERVATIONSVINDUE |
| 4. | SIDEHÅNDTAG |
| 5. | H∅JRE PANEL |
| 6. | FRONTPANEL |
| 7. | KABELGENNEMF∅RING |
| 8. | BUNDRAMME |
| 9. | BAGPANEL |
| 10. | VENSTRE PANEL |
| 11. | JUSTERBAR LUFTVENTIL |
TILBEH∅RSLISTE
text_image
Technical diagram showing a mechanical assembly with numbered components and directional arrows indicating assembly steps.natural_image
Technical line drawing of a device chassis with an inset close-up view showing internal components (no text or symbols)Hvis din CyberTank IKKE er installeret
Monter frontpanelet.
text_image
Technical diagram of a device with labeled components and directional arrows indicating assembly or assembly stepsDK
TRIN 7
natural_image
Technical line drawing of a mechanical device with an inset close-up showing internal components (no text or symbols)natural_image
Technical line drawing of an industrial machine with internal components and a magnified inset showing internal structure (no text or symbols)TRIN 8
text_image
Technical diagram showing a device with a downward arrow and close-up of its internal structure, labeled in Chinese.DK
natural_image
Technical line drawing of an air conditioner unit with internal components and a magnified inset showing a bolt detail (no text or symbols)
natural_image
Technical line drawing of an electronic device with internal components and a close-up inset showing a connector (no text or symbols present)DK
TRIN 9
Monter tasken
natural_image
Technical line drawing of an open industrial machine with internal components and a magnified inset showing internal wiring (no text or symbols)ÅBN/LUK VENTILATIONSÅBNINGEN
text_image
Technical diagram showing assembly of a device into a housing, with directional arrows indicating process flow.DK
natural_image
Technical line drawing of an internal device with a magnified inset showing a circular component labeled '2' (no text or symbols on the diagram itself)natural_image
Technical illustration of electrical panel installation with a spool and cable, showing no text or symbolsGENEREL OPSTILLING INDEN I CYBERCABINET
text_image
Technical diagram of a portable air conditioner unit with numbered parts and exploded view detailsKOMPONENTTILUETTELO
| 1. | YLÄRUNKO JA OVI | |
| FIN | 2. | PANEELILUKKO |
| 3. | TARKASTUSIKKUNA | |
| 4. | SIVUKAHVAT | |
| 5. | OIKEA PANEELI | |
| 6. | ETUPANEELI | |
| 7. | KAAPELIN LÄPIVIENTI | |
| 8. | POHJARUNKO | |
| 9. | TAKAPANEELI | |
| 10. | VASEN PANEELI | |
| 11. | SÄÄDETTÄVÄ ILMANOTTOAUKKO |
TARVIKELUETTELO
text_image
Technical diagram showing a mechanical assembly with numbered components and directional arrows indicating assembly steps.natural_image
Technical line drawing of a mechanical device with an inset close-up view showing internal components (no text or symbols)text_image
Technical diagram of a device with labeled components and zoomed-in views showing internal structure and assembly.VAIHE 7
natural_image
Technical line drawing of a mechanical device with an inset close-up showing internal components (no text or symbols)FIN
natural_image
Technical line drawing of an industrial machine with internal components and a magnified inset showing internal structure (no text or symbols)VAIHE 8
text_image
Technical diagram showing a device with open lid and internal components, alongside its exploded view with close-ups of internal structure.natural_image
Technical line drawing of an air conditioner unit with a magnified inset showing internal components (no text or symbols)
natural_image
Technical line drawing of an electronic device with internal components and a close-up inset showing a connector detail (no text or symbols present)natural_image
Technical line drawing of an open industrial machine with internal components and a magnified inset showing internal wiring (no text or symbols)FIN
AVAA/SULJE ILMANVAIHTOVENTTIILI.
text_image
Technical diagram showing assembly of a computer case with internal components and directional arrows indicating assembly steps.natural_image
Technical line drawing of an air conditioner unit with internal components and a magnified inset showing a circular component (no text or symbols)FIN
natural_image
Diagram showing electrical panel installation with a spool and cable, no text or symbols presentYLEINEN ASETTELU CYBERCABINETIN SISÄLLÄ
FIN
text_image
CyberTank CyberPack AC-virranhal- lintalaite CyberTank-lämmityssarja laturiTEKNISET TIEDOT
| KAC929 KAC929.X** | |
| Koko 1,270 mm (Pituus) x 550 mm | (Leveys) x 1,000 mm (Korkeus) |
| Paino 96 kg | |
| Suositeltu CyberTank KAC875E/KAC877E/KAC880E | |
text_image
Technical diagram of a refrigerator with numbered parts and exploded view, including labeled components and parts numbered 12 to 19.KOMPONENTLISTE
| 1. | TOPPRAMME OG D∅R |
| 2. | PANELLÅS |
| 3. | OBSERVASJONSVINDU |
| 4. | SIDEHÅNDTAK |
| 5. | H∅YRE PANEL |
| 6. | FREMRE PANEL |
| 7. | KABELUTGANG |
| 8. | BUNNRAMME |
| 9. | BAKRE PANEL |
| 10. | VENSTRE PANEL |
| 11. | JUSTERBAR LUFTVENTIL |
TILBEH∅RSLISTE
text_image
Technical diagram showing a mechanical assembly with numbered components and directional arrows indicating assembly steps.MERKNAD: Ramme 1 og ramme 2 skal passe tett med monteringsbraketten til CyberTanken. (bunnrammen må overlappe monteringsbraketten til CyberTanken.) Det må være en viss avstand mellom ramme 3 og CyberTanken.

text_image
Ramme 2 Ramme 1 Ramme 3NOR
natural_image
Technical line drawing of a device chassis with an inset close-up view showing internal components (no text or symbols)Hvis CyberTanken din IKKE er installert
Monter frontpanelet.

text_image
Technical diagram of a device with labeled components and structural views, showing internal structure and assembly details.NOR
STEG 7
natural_image
Technical line drawing of a mechanical device with an inset close-up showing internal components (no text or symbols)Sikre frontpanelet med sekskantflensbolter.
natural_image
Technical line drawing of an industrial machine with internal components and a magnified inset showing internal structure (no text or symbols)STEG 8
text_image
Technical diagram showing a device with internal components before and after disassembly, alongside its close-up view of the internal structure.NOR
natural_image
Technical line drawing of an open industrial machine with internal components and a magnified inset showing a bolt detail (no text or symbols)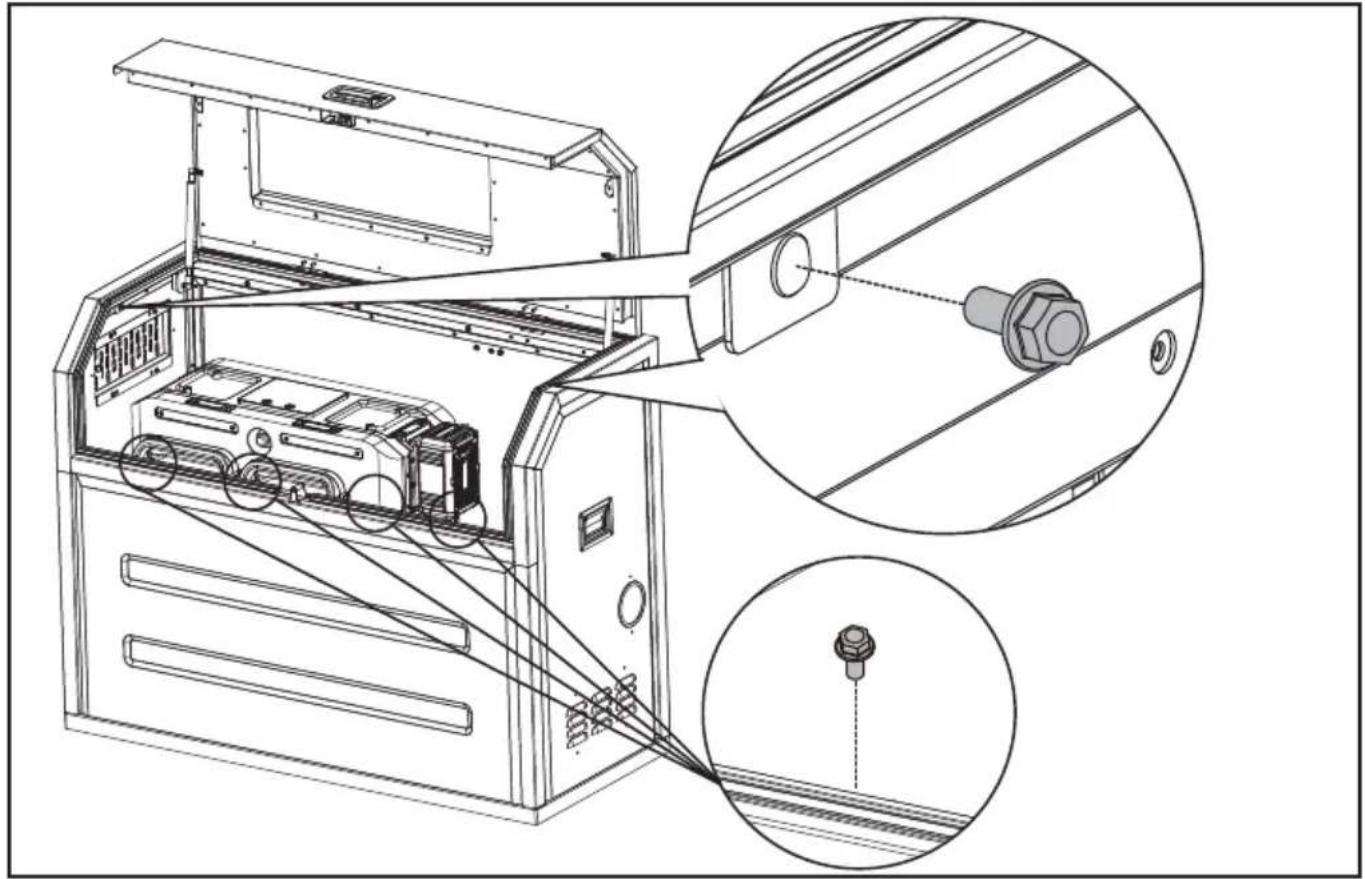
natural_image
Technical line drawing of an electronic device with internal components and a close-up inset showing a connector (no text or symbols present)NOR
STEG 9
Monter posen.

natural_image
Technical line drawing of an open industrial machine with internal components and a magnified inset showing internal wiring (no text or symbols)ÅPNE/LUKK LUFTVENTILEN
text_image
Technical diagram showing assembly of a computer case with internal components and directional arrows indicating assembly steps.NOR
Sikre kablene med kabelbindere
natural_image
Technical line drawing of an internal device with a magnified inset showing a circular component labeled 'S' (no text or symbols on the diagram itself)natural_image
Technical illustration of electrical panel installation with a spool and cable, showing no text or symbolsGENERELL UTFORMING INNE I CYBERCABINET

text_image
CyberTank CyberPack AC-strømstyringsenhet Lader CyberTank varmesettNOR
TEKNISKE DATA
INNEHÅLLSFÖRTECKNING
Introduktion....257
Komponenter....258
text_image
Technical diagram of a portable air conditioner unit with numbered parts and exploded view detailsKOMPONENTER.
| 1. | TOPPRAM OCH DÖRR | |
| sv | 2. | PANELLÅS |
| 3. | OBSERVATIONSFÖNSTER | |
| 4. | SIDOHANDTAG | |
| 5. | HÖGER PANEL | |
| 6. | FRONTPANEL | |
| 7. | KABELUTTAG | |
| 8. | BOTTENRAM | |
| 9. | BAKPANEL | |
| 10. | VÄNSTER PANEL | |
| 11. | JUSTERBART LUFTUTLOPP |
TILLBEHÖRSLISTA
text_image
Technical diagram showing a mechanical assembly with numbered components and directional arrows indicating assembly steps.text_image
Ram 2 Ram 1 Ram 3
natural_image
Technical line drawing of a mechanical device with an inset close-up view showing internal components (no text or symbols)text_image
Technical diagram of a device with labeled components and zoomed-in views showing internal structure and assembly.STEG 7
natural_image
Technical line drawing of a mechanical device with an inset close-up showing internal components (no text or symbols)SV
natural_image
Technical line drawing of an industrial machine with internal components and a magnified inset showing internal structure (no text or symbols)STEG 8
Montera toppram & dörr.
text_image
Technical diagram showing a device with internal components before and after disassembly, alongside its close-up of the internal structure.natural_image
Technical line drawing of an air conditioner unit with internal components and a magnified inset showing a bolt detail (no text or symbols)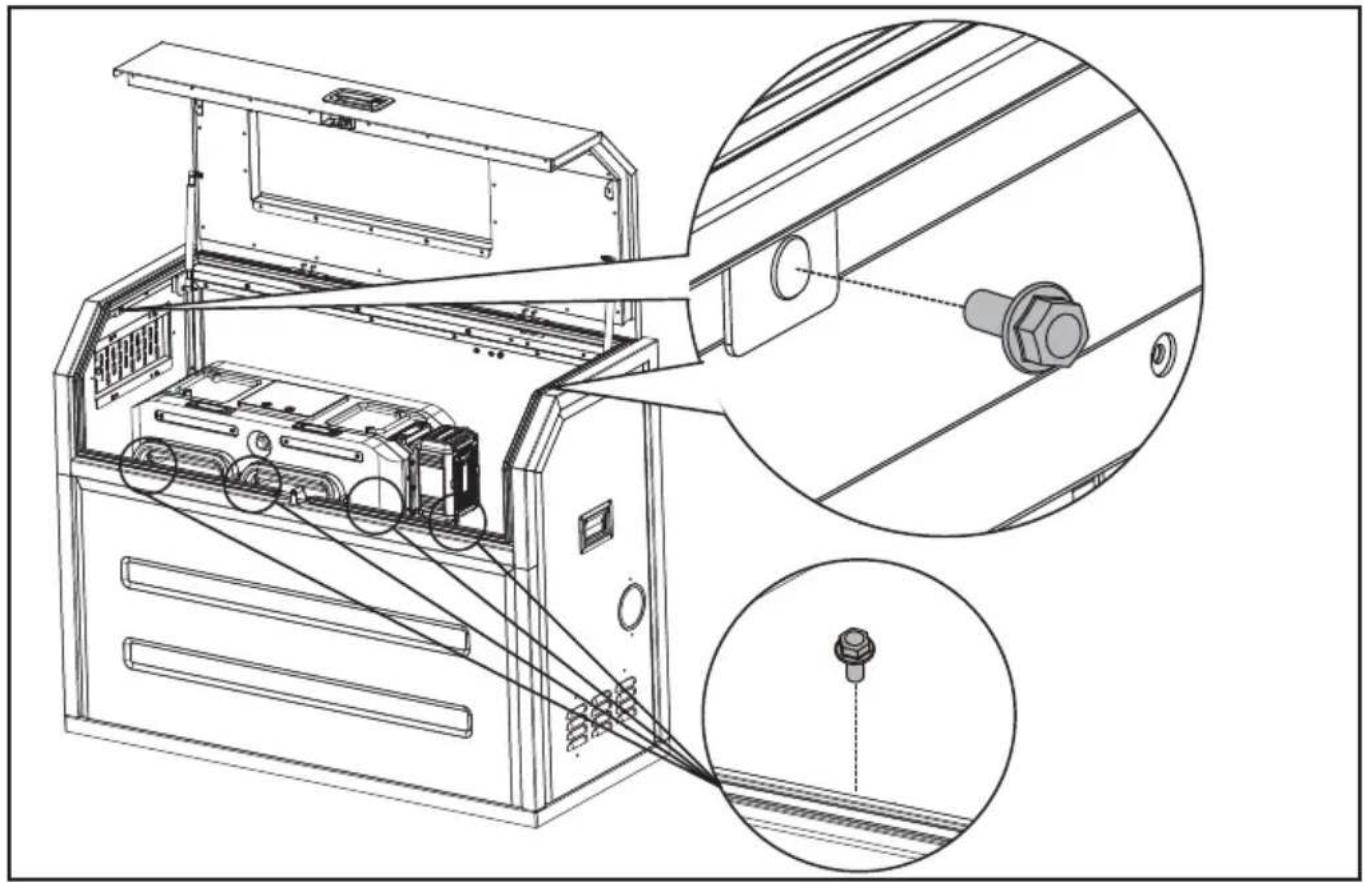
natural_image
Technical line drawing of an electronic device with internal components and a close-up inset showing a connector (no text or symbols present)STEG 9
Montera väskan.
natural_image
Technical line drawing of an open industrial machine with internal components and a magnified inset showing internal wiring (no text or symbols)ÖPPNA/STÄNG LUFTVENTILEN.
text_image
Technical diagram showing assembly of a computer case with internal components and directional arrows indicating assembly steps.Säkra kablarna med kabelbindare.
natural_image
Technical line drawing of an internal device with a magnified inset showing a circular component labeled 'J' (no text or symbols on the diagram itself)SV
natural_image
Diagram showing electrical panel installation and cable routing (no text or symbols)ALLMÄNT UTSEENDE INUTI CYBERSKÅPET
text_image
Kress CommercialCopyright © 2023, Positec. All Rights Reserved.
V1-18L-KAC929 KAC929.X-M-20230506