
WHI649X21P - Range hood GORENJE - Free user manual and instructions
Find the device manual for free WHI649X21P GORENJE in PDF.
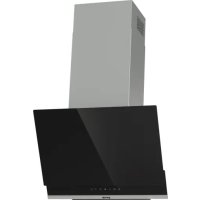



| Product type | Hood |
| Brand | Gorenje |
| Model | WHI649X21P |
| Power supply | 220-240 V ~ 50 Hz |
| Control type | Electronic buttons |
| Number of speeds | 3 speeds + Power Boost |
| Extraction mode | External extraction or recirculation |
| Lighting | LED |
| Grease filter | Washable (monthly) |
| Activated carbon filter | Replacement every 4 months (recirculation) |
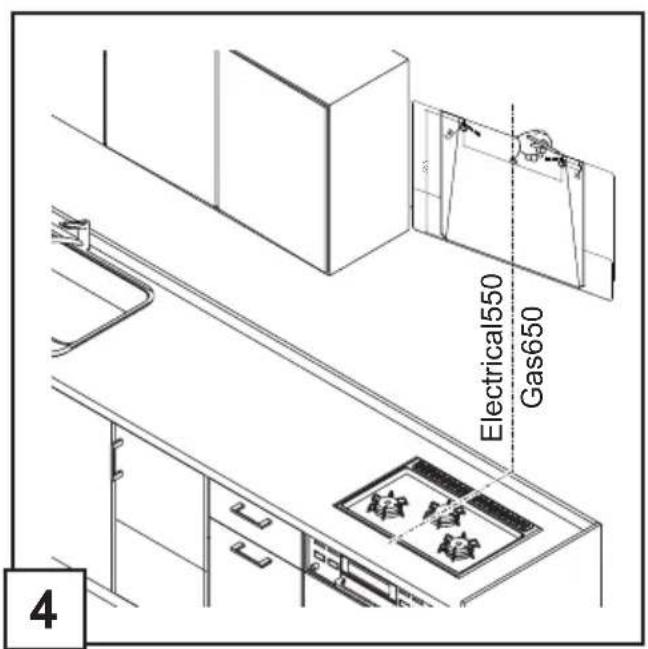
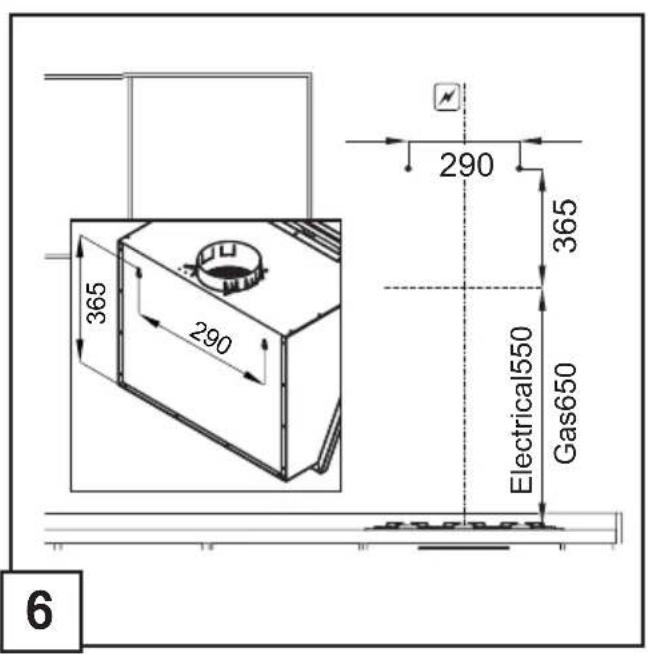
| Minimum installation distance (electric) | ≥ 50 cm |
| Minimum installation distance (gas/mixed) | ≥ 65 cm |
| Installation type | Wall mounting |
| Timer function | Delayed shut-off 15 minutes |
| Power Boost function | 5 minutes at maximum power |
| External cleaning | Soft sponge and neutral detergent |
| Safety instructions | Disconnect before maintenance, do not flambé under the hood |
| Lamp replacement | Contact technical service |
| Optional accessories | Activated carbon filter (if not supplied) |
| Standards complied with | EN/IEC 60335, EN/IEC 61591, EN 55014 |
Frequently Asked Questions - WHI649X21P GORENJE
User questions about WHI649X21P GORENJE
0 question about this device. Answer the ones you know or ask your own.
Ask a new question about this device
Download the instructions for your Range hood in PDF format for free! Find your manual WHI649X21P - GORENJE and take your electronic device back in hand. On this page are published all the documents necessary for the use of your device. WHI649X21P by GORENJE.
USER MANUAL WHI649X21P GORENJE
7 EN COOKER HOOD 11 BG ACINPATOP B ACINPUPAUBA BEPCNA 15 CS ODSAVAc PAR 19 DA EMH/ETTE 23 DE DUNSTABZUGSHAUBE 27 EL ANOPPOΦHTHPA Σ KOYZINA 31 ES CAMPANA EXTRACTORA 35 ET OHUPUHASTI 39 FI LIESITUULETIN 43 FR HOTTE 47 HR, BIH KUHINJSKANA PAPA 51 HU ELSZIVO 55 IT CAPPA ASPIRANTE 59 KZ CYbIPY KAJIINAFbl 63 LT GARU SURINKTUVAS 67 LV GAISA NOSUCEJS 71 MK ACINHPATOP 75 NO VENTILATOR 79 PL OKAP WYCIAGOWY 83 PT EXAUSTOR 87 RO HOTA ASPIRANTA 91 RU KYXOHHABBbITXKA 95 SK ODSAVAC PARY 99 SL KUHINJSKA NAPA 03 SR, BIH, MNE KUHINJSKI ASPIRATOR 07 SV KÖKSFLÄKT 11 UK KYXOHHA BNTJXAKA 15 AR wIb IJboS

EN COOKER HOOD
Closely follow the instructions set out in this manual. All responsibility, for any eventual inconveniences, damages or fires caused by not complying with the instructions in this manual, is declined. The hood is conceived for the suction of cooking fumes and steam and is destined only for domestic use.
The hood can look different to that illustrated in the drawings in this booklet. The instructions for use, maintenance and installation, however, remain the same.
It is important to conserve this booklet for consultation at any moment. In the case of sale, cession or move, make sure it is together with the product. ! Read the instructions carefully: there is important information about installation, use and safety. Do not carry out electrical or mechanical variations on the product or on the discharge conduits. Before proceeding with the installation of the appliance verify that there are no damaged all components. Otherwise contact your dealer and do not proceed with the installation.
Note: the elements marked with the symbol (*) are optional accessories supplied only with some models or elements to purchase, not supplied.

CAUTIONWARNING!
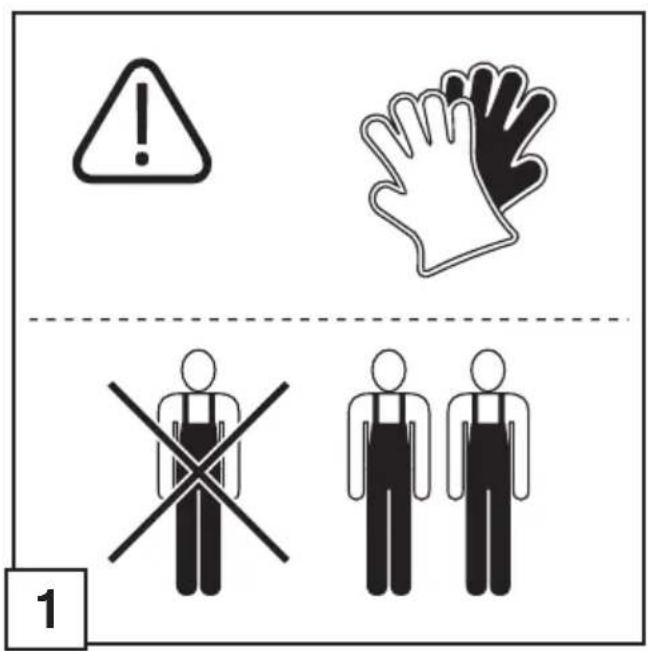
! Do not connect the appliance to the mains until the installation is fully complete. Before any cleaning or maintenance operation, disconnect hood from the mains by removing the plug or disconnecting the mains electrical supply. ! Always wear work gloves for all installation and maintenance operations. The appliance is not intended for use by children or persons with impaired physical, sensorial or mental faculties, or if lacking in experience or knowledge, unless they are under supervision or have been trained in the use of the appliance by a person responsible for their safety. This appliance is designed to be operated by adults, children should be monitored to ensure that they do not play with the appliance.
This appliance is designed to be operated by adults. Children should not be allowed to tamper with the controls or play with the appliance. Never use the hood without effectively mounted grating! The hood must NEVER be used as a support surface unless specifically indicated. The premises where the appliance is installed must be sufficiently ventilated, when the kitchen hood is used together with other gas combustion devices or other fuels. The ducting system for this appliance must not be connected to any existing ventilation system which is being used for any other purpose such as discharging exhaust fumes from appliances burning gas or other fuels. The flaming of foods beneath the hood itself is severely prohibited. The use of exposed flames is detrimental to the filters and may cause a fire risk, and must therefore be avoided in all circumstances. Any frying must be done with care in order to make sure that the oil does not overheat and ignite. Accessible parts of the hood may become hot when used with cooking appliance. With regards to the technical and safety measures to be adopted for fume discharging it is important to closely follow the regulations provided by the local authorities. The hood must be regularly cleaned on both the inside and outside (AT LEAST ONCE A MONTH). This must be completed in accordance with the maintenance instructions provided in this manual. Failure to follow the instructions provided in this user guide regarding the cleaning of the hood and filters will lead to the risk of fires. Do not use or leave the hood without the lamp correctly mounted due to the possible risk of electric shocks. We will not accept any responsibility for any faults, damage or fires caused to the appliance as a result of the nonobservance of the instructions included in this manual. This appliance is marked according to the European directive 2002/96/EC on Waste Electrical and Electronic Equipment (WEEE). By ensuring this product is disposed of correctly, you will help prevent potential negative consequences for the environment and human health, which could otherwise be caused by inappropriate waste handling of this product.

The symbol on the product, or on the documents accompanying the product, indicates that this appliance may not be treated as household waste. Instead it should be taken to the appropriate collection point for the recycling of electrical and electronic equipment. Disposal must be carried out in accordance with local environmental regulations for waste disposal.
For further detailed information regarding the process, collection and recycling of this product, please contact the appropriate department of your local authorities or the local department for household waste or the shop where you purchased this product.
Appliance designed, tested and manufactured according to:
Safety: EN/IEC 60335-1; EN/IEC 60335-2-31, EN/IEC 62233. Performance: EN/IEC 61591; ISO 5167-1; ISO 5167-3; ISO 5168; EN/IEC 60704-1; EN/IEC 60704-2-13; ISO 3741; EN 50564; IEC 62301. EMC: EN 55014-1; CISPR 14-1; EN 55014-2; CISPR 14-2; EN/IEC 61000-3-2; EN/IEC 61000-3-3.
Suggestions for a correct use in order to reduce the environmental impact: Switch ON the hood at minimum speed when you start cooking and keep it running for a few minutes after cooking is finished. Increase the speed only in case of large amount of smoke and vapour and use boost speed(s) only in extreme situations. Replace the charcoal filter(s) when necessary to maintain a good odour reduction efficiency. Clean the grease filter(s) when necessary to maintain a good grease filter efficiency. Use the maximum diameter of the ducting system indicated in this manual to optimize efficiency and minimize noise.
Additional Installation Specifications:
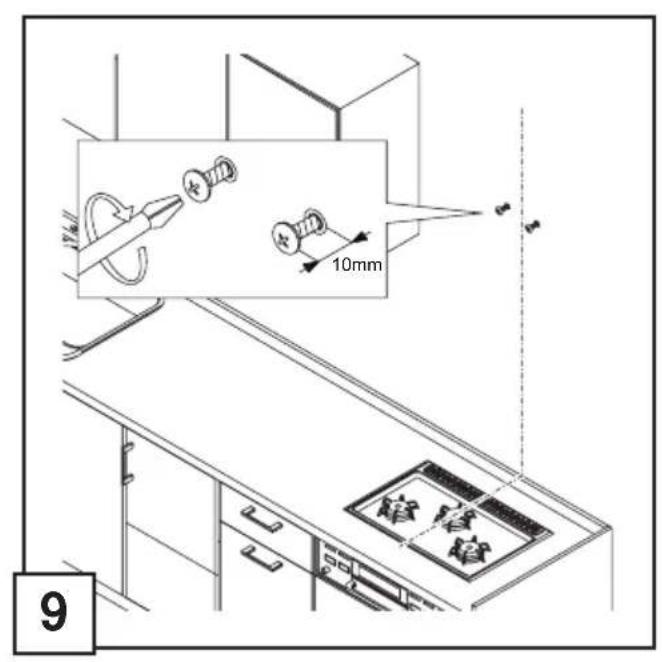
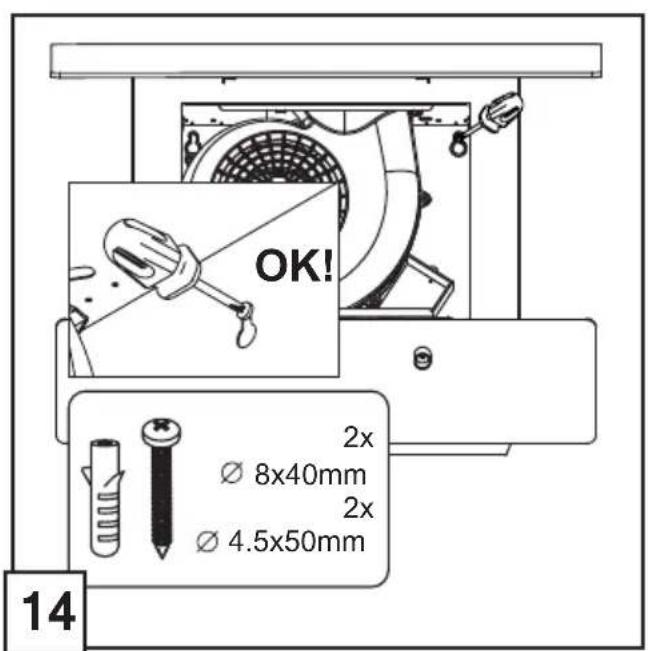
Use only the fixing screws supplied with the product for installation or, if not supplied, purchase the correct screws type.
Use the correct length for the screws which are identified in the Installation Guide.
In case of doubt, consult an authorised service assistance centre or similar qualified person.
WARNING! Failure to install the screws or fixing device in accordance with these instructions may result in electrical hazards.
USE
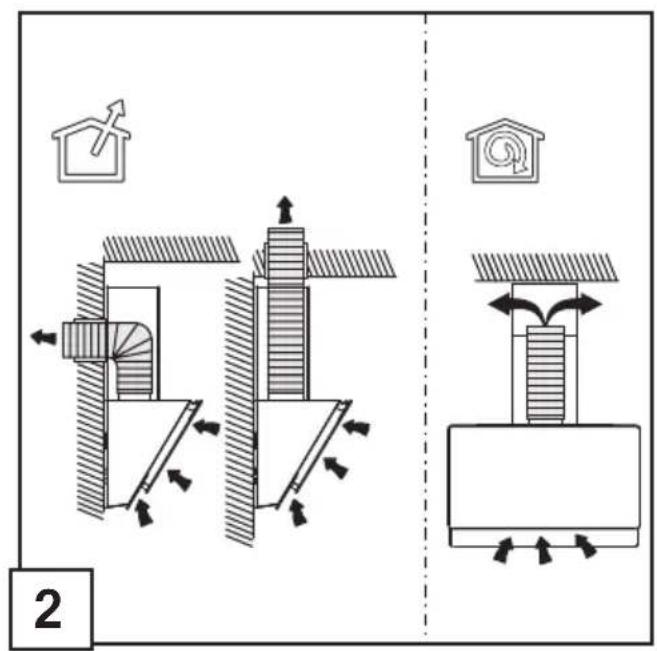
The hood is designed to be used either for exhausting or filter version.

Ducting version
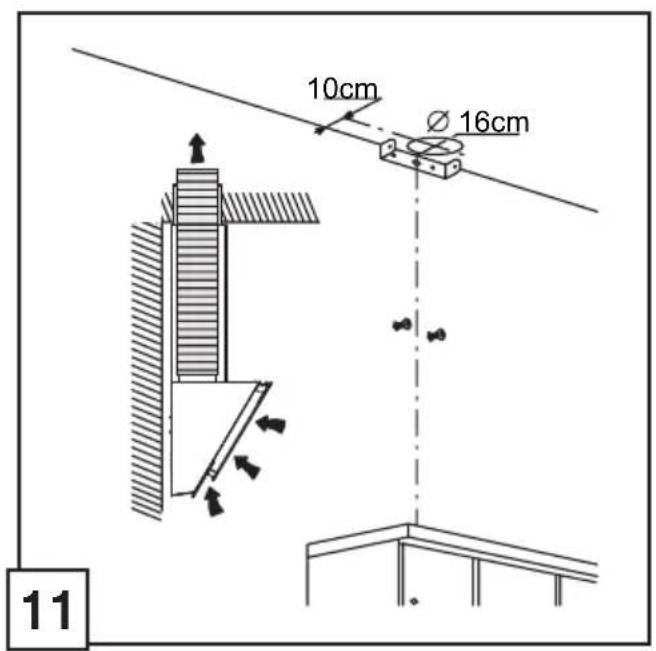
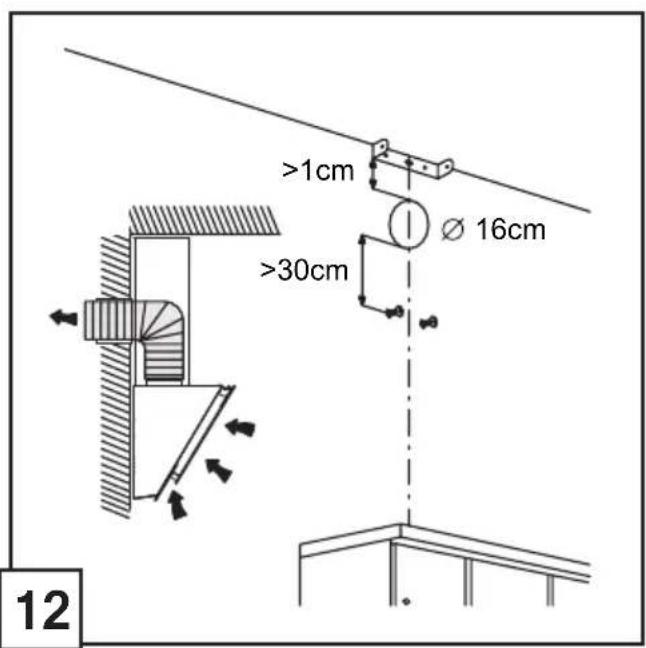
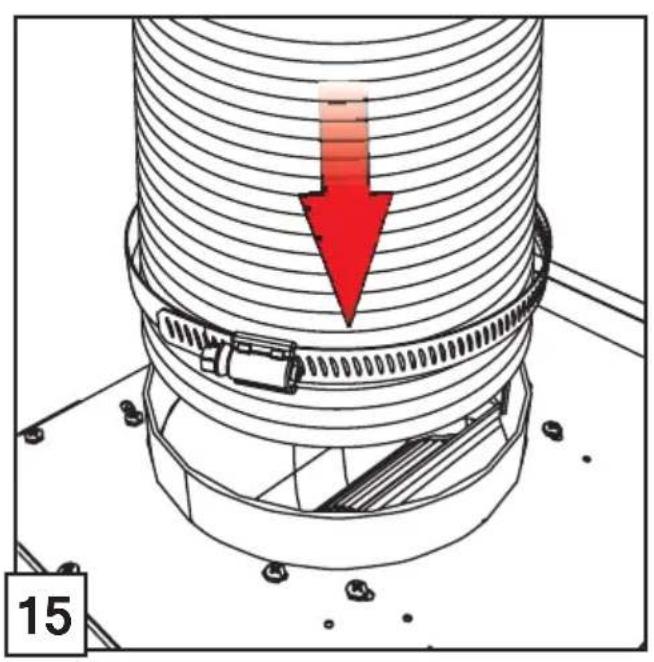
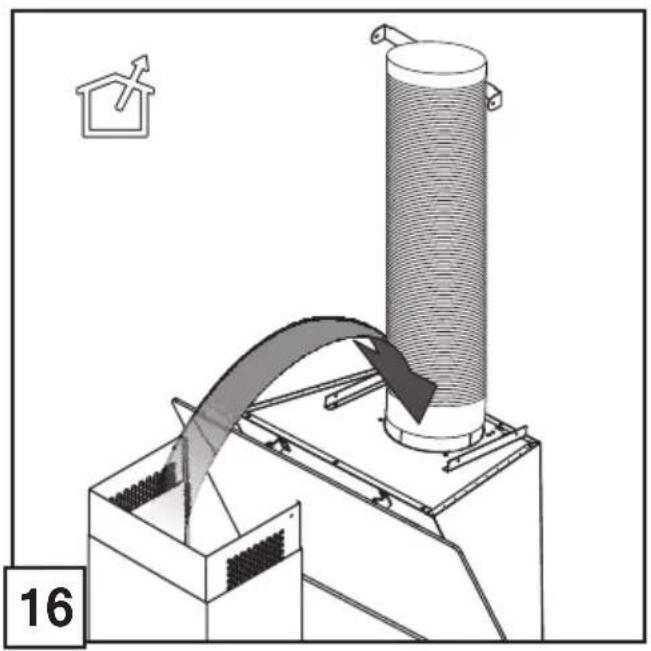
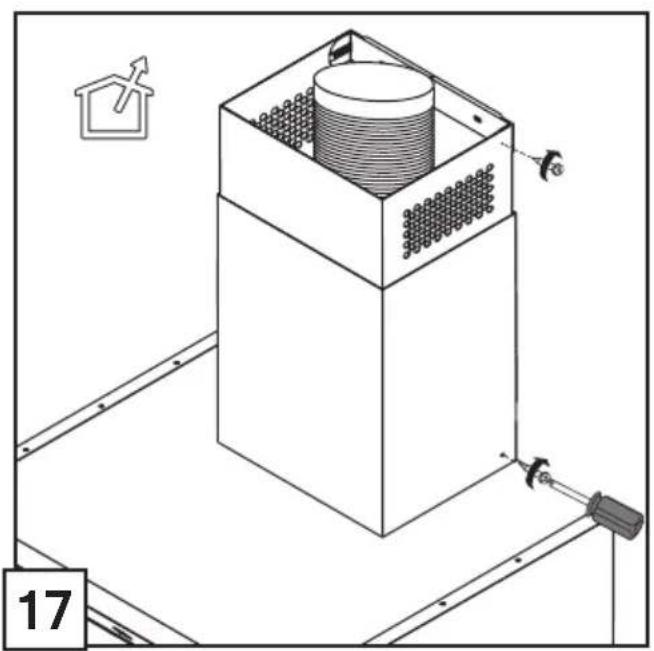
In this case the fumes are conveyed outside of the building by means of a special pipe connected with the connection ring located on top of the hood.
Attention! The exhausting pipe is not supplied and must be purchased apart.
Diameter of the exhausting pipe must be equal to that of the connection ring.
In the horizontal runs the exhausting pipe must be slightly slanted (about 10 degrees) and directed upwards to vent the air easily from the room to the outside.
Attention! If the hood is supplied with active charcoal filter, then it must be removed.
Connect the hood and discharge holes on the walls with a diameter equivalent to the air outlet (connection flange).
Using tubes and discharge holes on walls with smaller dimensions will cause a diminution of the suction performance and a drastic increase in noise.
Any responsibility in the matter is therefore declined.
! Use a duct of the minimum indispensable length.
Use a duct with as few elbows as possible (maximum elbow angle: 90°
! Avoid drastic changes in the duct cross-section.
! Use a duct as smooth as possible inside.
The duct must be made of certified material.

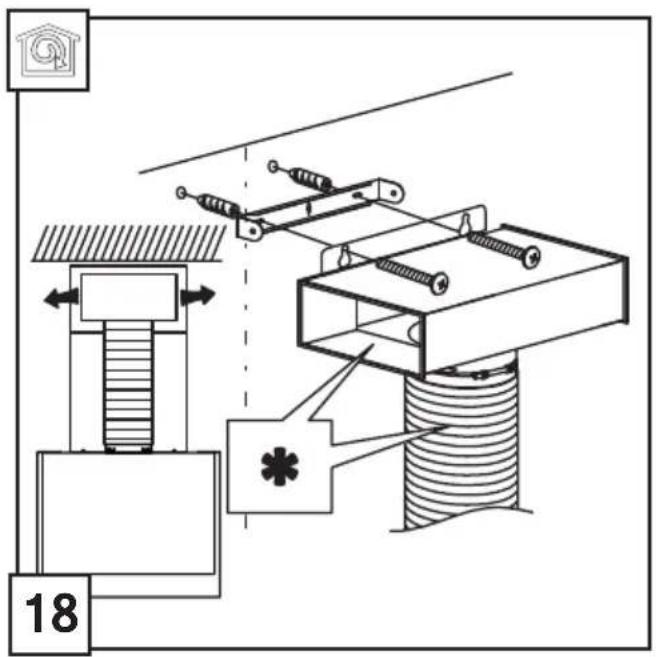
Filter version
One active charcoal filter is needed for this and can be obtained from your usual retailer.
The filter removes the grease and smells from the extracted air before sending it back into the room through the upper outlet grid.
INSTALLATION
The minimum distance between the supporting surface for the cooking equipment on the hob and the lowest part of the range hood must be not less than 55cm from electric cookers and 65cm from gas or mixed cookers.
If the instructions for installation for the gas hob specify a greater distance, this must be adhered to.

Electrical connection
The mains power supply must correspond to the rating indicated on the plate situated inside the hood. If provided with a plug, connect the hood to a socket in compliance with current regulations and positioned in an accessible area, after installation. If it is not fitted with a plug (direct mains connection) or if the plug is not located in an accessible area, after installation, apply a double pole switch in accordance with standards which assures the complete disconnection of the mains under conditions relating to over-current category III, in accordance with installation instructions.
Warning! Before re-connecting the hood circuit to the mains supply and checking the efficient function, always check that the mains cable is correctly assembled.
Mounting
Very heavy product; hood handling and installation must be carried out by at least two persons.
Before beginning installation:
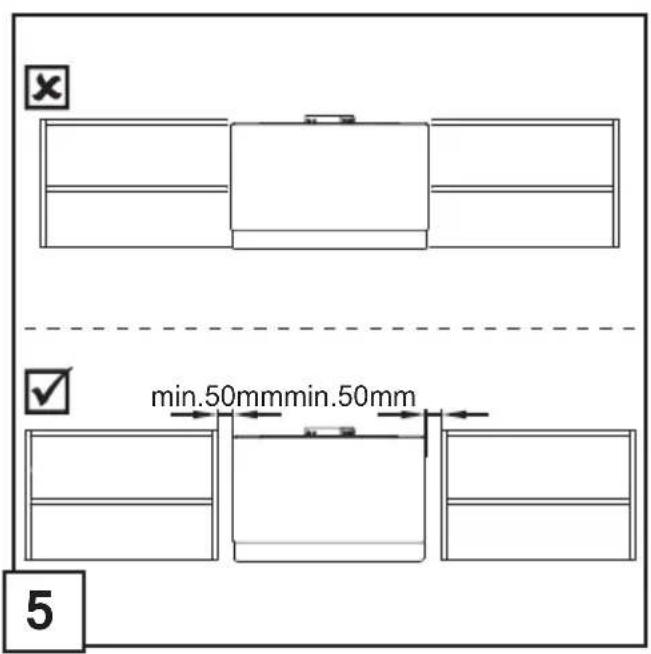
- Check that the product purchased is of a suitable size for the chosen installation area.
- Remove the charcoal (*) filter(s) if supplied (see also relative paragraph). This/these is/are to be mounted only if you want to use the hood in the filtering version. Check (for transport reasons) that there is no other supplied material inside the hood (e.g. packets with screws, guarantees, etc.), eventually removing them and keeping them. If possible, disconnect and move freestanding or slide-in range from cabinet opening to provide easier access to rear wall/ceiling. Otherwise put a thick, protective covering over countertop, cooktop or range to protect from damage and debris. Select a flat surface for assembling the unit. Cover that surface with a protective covering and place all canopy hood parts and hardware in it.
- In addition check whether near the installation area of the hood (in the area accessible also with the hood mounted) an electric socket is available and it is possible to connect a fumes discharge device to the outside (only suction version).
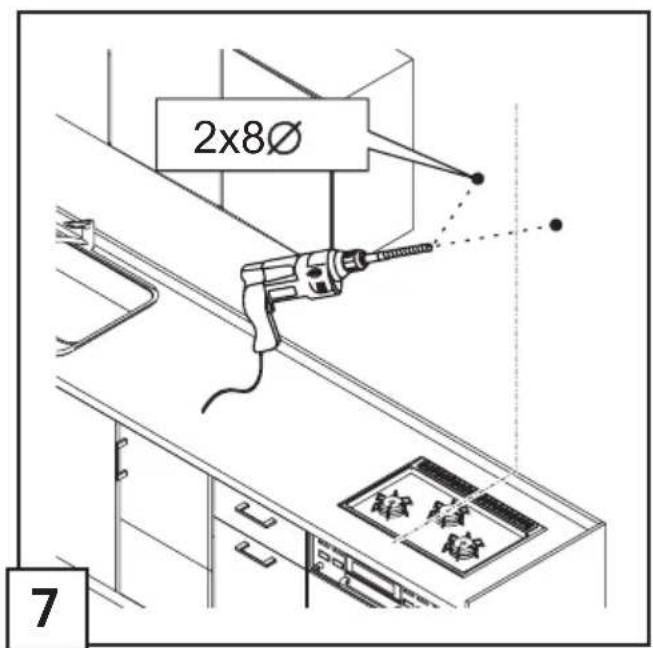
- Carry out all the masonry work necessary (e.g. installation of an electric socket and/or a hole for the passage of the discharge tube).
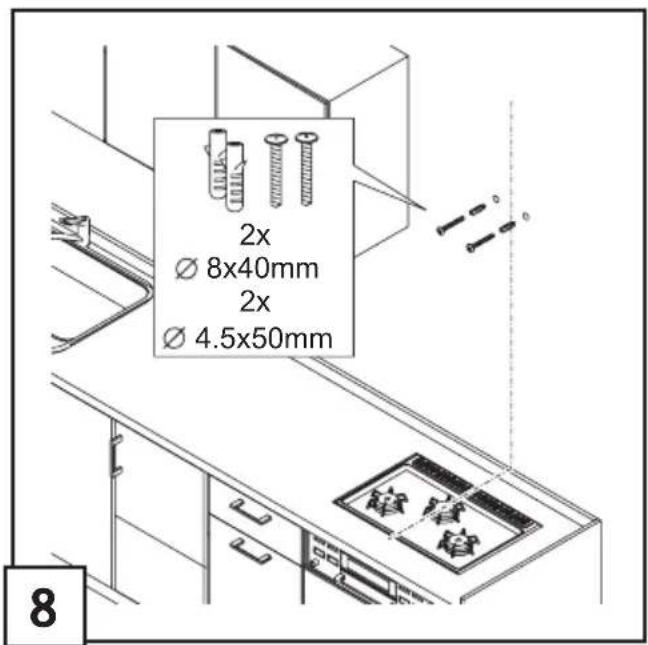
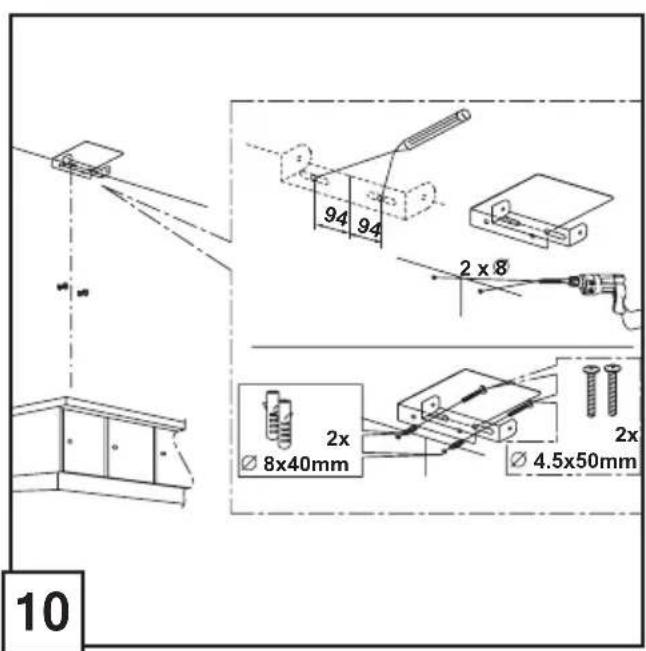
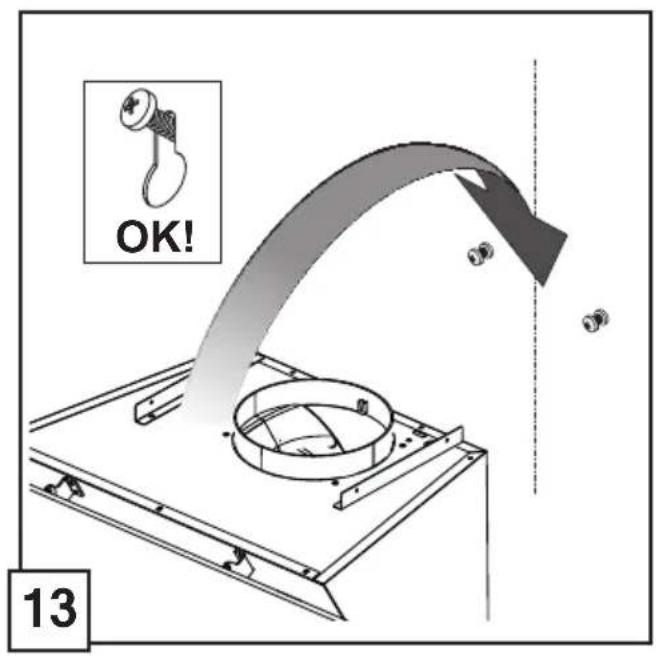
Expansion wall plugs are provided to secure the hood to most types of walls/ceilings. However, a qualified technician must verify suitability of the materials in accordance with the type of wall/ceiling. The wall/ceiling must be strong enough to take the weight of the hood. Do not tile, grout or silicone this appliance to the wall. Surface mounting only.
OPERATION
Use the high suction speed in cases of concentrated kitchen vapors. It is recommended that the cooker hood suction is switched on for 5 minutes prior to cooking and to leave in operation during cooking and for another 15 minutes approximately after terminating cooking.
Touch controls

- Press the Light button to switch the light ON. Press again to switch the light OFF.
- Press the On/Off button to start selecting the motor speeds. When On/Off button is selected, Speed 1-3, Power Boost and Timer are semi illuminated.
- Press the Speed 1 button to start the motor with speed 1.
- Press the Speed 1 button to start the motor with speed 2.
- Press the Speed 1 button to start the motor with speed 3.
- Press the Power boost button to operate the hood in boost mode. The appliance works in boost mode for 5 minutes, then reverts to the Speed 3 level of operation.
- ON/OFF Timer of the suction speed (power).
Note: this function is available for the speeds that can be selected with buttons for speed selection (1-3 and Power boost mode).
Press once to choose the delayed switch off time (15 min). When operating in boost mode, the appliance will work in boost mode for 5 minutes, then reverts to the Speed 3 level of operation for 10 minutes.
MAINTENANCE
ATTENTION! Before performing any maintenance operation, isolate the hood from the electrical supply by switching off at the connector and removing the connector fuse.
Or if the appliance has been connected through a plug and socket, then the plug must be removed from the socket.
Cleaning
The cook hood should be cleaned regularly (at least with the same frequency with which you carry out maintenance of the fat filters) internally and externally. Clean using the cloth dampened with neutral liquid detergent. Do not use abrasive products. DO NOT USE ALCOHOL! WARNING: Failure to carry out the basic cleaning recommendations of the cooker hood and replacement of the filters may cause fire risks. Therefore, we recommend observing these instructions.
The manufacturer declines all responsibility for any damage to the motor or any fire damage linked to inappropriate maintenance or failure to observe the above safety recommendations.
Grease filter
Traps cooking grease particles.
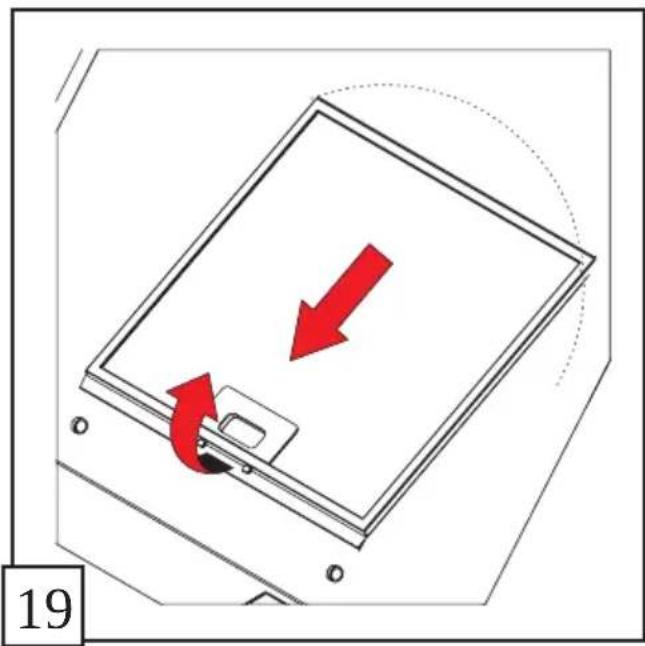
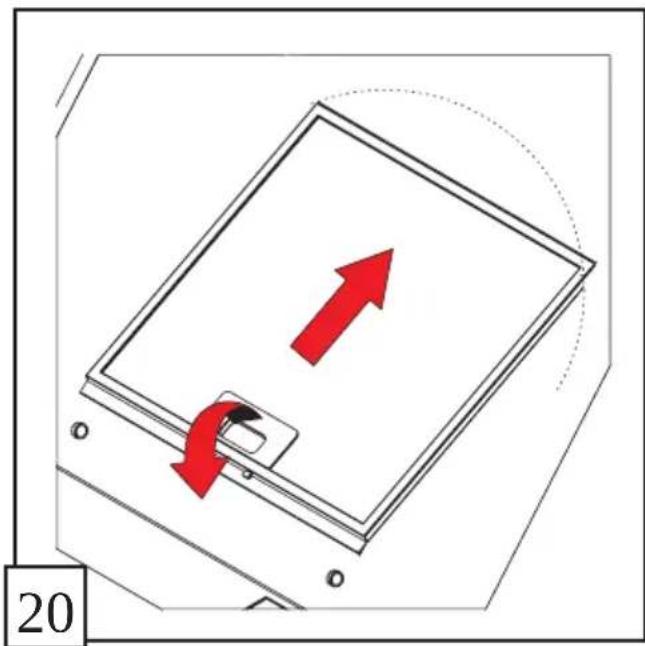
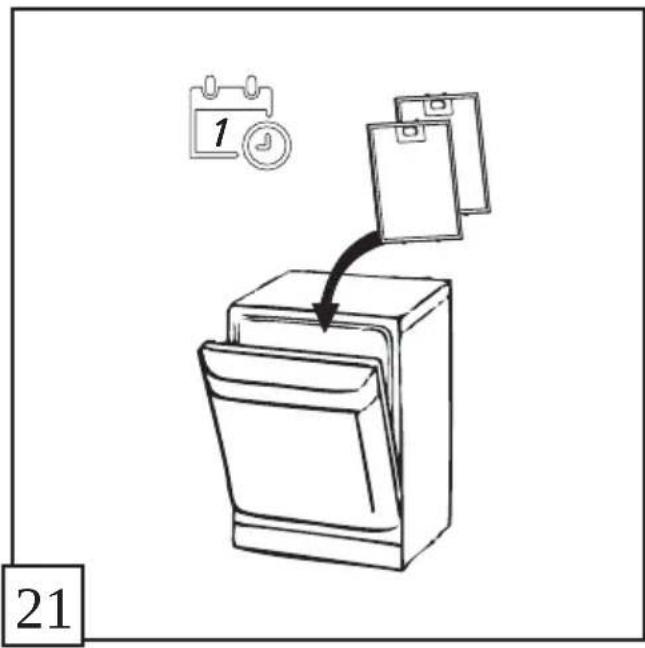
The grease filter must be cleaned once a month using non aggressive detergents, either by hand or in the dishwasher, which must be set to a low temperature and a short cycle. When washed in a dishwasher, the grease filter may discolour slightly, but this does not affect its filtering capacity.
To remove the grease filter, pull the spring release handle.
Charcoal filter(siflberonly)
It absorbs unpleasant odours caused by cooking.
The saturation of the charcoal filter occurs after more or less prolonged use, depending on the type of cooking and the regularity of cleaning of the grease filter.
In any case it is necessary to replace the cartridge at least every four months.
The charcoal filter may NOT be washed or regenerated.
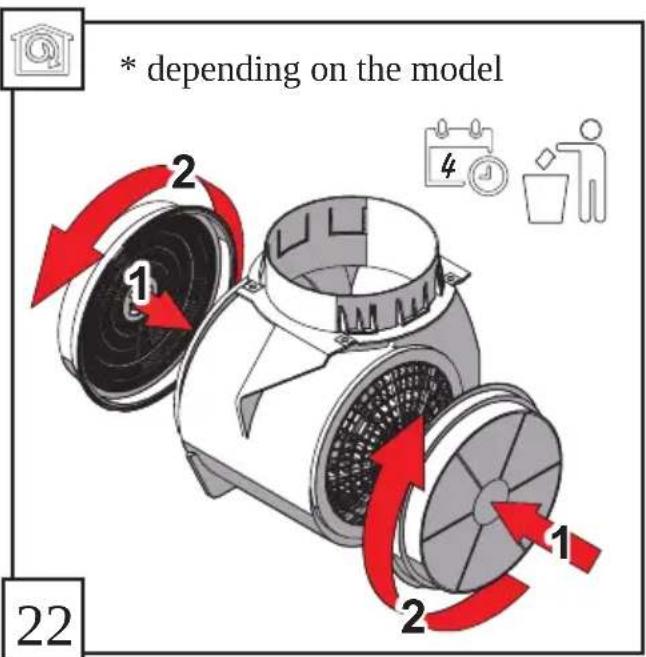
Circular carbon filter
Apply one on each side as cover to both the shield grids of the motor impeller, then turn clockwise.
For the disassembly, turn counter-clockwise.
Replacing lamps
The hood is equipped with a lighting system based on LED technology.
The LEDs guarantee an optimum lighting, a duration up to 10 times as long as the traditional lamps and allow to save 90% electrical energy. In case of malfunction of the illumination system contact the technical service.
Follow strictly the instructions in this manual. We are not responsible for any inconvenience, damage or injury caused by failure to follow the instructions in this manual. The appliance is intended for household use only.
The appliance can be used for various purposes as described in this manual. The instructions for use, maintenance and installation remain in force.
It is important to keep this book for consultation at all times. In case of sale, transfer or donation, make sure that the product is accompanied by this manual. Read the instructions carefully: they contain important information regarding installation, use and safety. Do not carry out any electrical or mechanical modifications on the product or its accessories. Before starting the installation of the device, make sure that there are no damaged components. In case of damage, contact your dealer and do not proceed with the installation.
Note: The elements marked with the symbol (*) are optional accessories, available separately, or elements that are not supplied and must be purchased.

WARNING
PRECAUTIONS
Do not connect the device to the mains electricity until the installation is fully completed. Before carrying out any maintenance or repair, disconnect the appliance from the mains electricity, remove the fuse or switch off the circuit breaker. Be careful when working with the device during installation or repair. The device is not intended for use by persons (including children) with reduced physical, sensory or mental capabilities, or lack of experience and knowledge, unless they have been given supervision or instruction concerning use of the appliance by a person responsible for their safety. This device is intended for use by adults. Children should be supervised to ensure that they do not play with the appliance. This device is intended for use by adults. Do not allow children to play with the controls or to play with the appliance. Never use the appliance without a properly installed filter! The appliance must never be used as a support surface, unless explicitly indicated. The rooms in which the appliance is installed must have adequate ventilation when the appliance is used together with other gas or other fuel-burning appliances. The ducting system of this appliance must not be connected to another existing ventilation system, when it is used for exhausting fumes from appliances burning gas or other fuels. Flambéing under the appliance is strictly forbidden. Open flames can be dangerous during frying and may cause a fire, so they must be avoided under all circumstances. Any frying must be done carefully, to ensure that the oil does not overheat and catch fire. The accessible parts of the appliance may become hot when used with a gas appliance. With regard to the technical and safety measures to be applied for the exhausting of fumes, it is important to strictly follow the regulations of the local authorities. The appliance must be cleaned regularly, both internally and externally (at least every two months). This must be carried out in accordance with the maintenance instructions provided in this manual. Failure to follow the instructions provided in this manual regarding the cleaning of the appliance and the filters may lead to a risk of fire. Do not use or leave the appliance without a properly installed lamp or with a possible risk of electric shock. We are not responsible for any damage, injury or fire caused to the appliance as a result of failure to follow the instructions included in this manual. This appliance is marked according to the European Directive 2002/96/EC on waste electrical and electronic equipment (WEEE). By ensuring that this product is disposed of correctly, you will help prevent potential negative consequences for the environment and human health, which could otherwise be caused by inappropriate waste handling of this product.

This product is marked with the selective sorting symbol. It must be disposed of separately as waste. It must be handed over to the appropriate collection point for recycling of electrical and electronic equipment. Waste must be disposed of in accordance with local environmental regulations for waste disposal.
For more information regarding the treatment, recovery, and recycling of this product, please contact your local authorities, the local waste disposal service, or the store where you purchased this product.
Designed, tested, and manufactured in accordance with:
Safety: EN/IEC 60335-1; EN/IEC 60335-2-31, EN/IEC 62233. - Performance: EN/IEC 61591; ISO 5167-1; ISO 5167-3; ISO 5168; EN/IEC 60704-1; EN/IEC 60704-2-13; ISO 3741; EN 50564; IEC 62301.
- Electromagnetic compatibility: EN 55014-1; CISPR 14-1; EN 55014-2; CISPR 14-2; EN/IEC 61000-3-2; EN/IEC 61000-3-3.
Recommendations for correct use to reduce environmental impact: Switch on the extractor at minimum speed when you start cooking and leave it running for a few minutes after cooking is finished. Increase the speed only in case of large amounts of fumes and use the high speed(s) only in extreme situations. Replace the charcoal filter(s) when necessary to maintain effective odor reduction. Clean the grease filter(s) when necessary to maintain effective grease removal. Use the maximum diameter of the exhaust duct system indicated in this manual to optimize efficiency and minimize noise.
Additional installation specifications:
Use only the screws provided with the product for installation or, if provided, purchase the correct screws. Use screws of the correct length as indicated in the installation manual. In case of doubt, consult an approved service center or qualified personnel.
WARNING! If you do not install the screws or fixing elements in accordance with these instructions, there is a risk of electric shock.
USE
The extractor is intended to be used for exhaust or filtration.

Exhaust duct
In this case, the air is exhausted outside through a special pipe connected to the flange located in the upper part of the extractor.
Attention! The exhaust pipe is not supplied and must be purchased separately. The diameter of the exhaust pipe must be equal to that of the connection ring.
The horizontal sections of the exhaust pipe must have a slight slope (about 10°) and be directed upwards, so that the air is exhausted easily from the room.
Warning! If the appliance is not installed correctly, it must be removed.
Connect the extractor and the wall openings with a diameter equal to the air outlet opening (using a flange).
Use pipes for the wall openings with a smaller diameter only if the extraction efficiency is reduced and the noise is increased.
Do not assume responsibility for problems related to non-compliance with the above extraction.
Use the pipe with the minimum possible number of bends (maximum number of bends: 90°). Insert the pipe carefully into the opening of the pipe. Use the pipe with the maximum possible smoothness from the inside. The pipe must be made of non-flammable material.

Version
For this, an inlet with active air intake is necessary, and with it you can get rid of the odors from the cooking. The inlet removes the grease and impurities from the extracted air before it is returned to the room through the grille of the upper opening.
Installation
The minimum distance between the supporting surface for the cooking appliances on the hob and the lower part of the extractor must be not less than 55 cm for electric cookers and not less than 65 cm for gas or combined cookers.
If the installation instructions for the gas hob specify a greater distance, this must be respected.

Electrical connection
The electrical connection must correspond to the source indicated on the plate with the production data, located on the inner side of the extractor. If a plug is provided, connect the extractor to a contact corresponding to the current regulations and located in an accessible place. If a plug is not provided (direct connection to the electrical network) or if the contact is not located in an accessible place, you must install a bipolar switch in the standard, which ensures disconnection from the network under the conditions related to category III overvoltage protection, according to the installation instructions.
Warnings
Before connecting the extractor to the electrical network and checking its correct operation, verify that the supply cable is correctly connected.
Installation
This product is intended to be used with the aspirator only when it is switched on.
Installation:
Check that the product is suitable for the chosen installation location. - Remove the protective film(s) from the product, if provided (see corresponding paragraph). It should only be installed if you intend to use the aspirator in the version with a filter. - Check (e.g., during transport) that there is no other provided material inside the aspirator (e.g., bags with screws, washers, etc.), remove it and store it. If possible, connect and test the free movement of the control before installation, to ensure easier installation.
In the second case, place the protective cover on the worktop or hob to protect it from damage or scratches. Choose a flat surface for placing the device. Cover the surface with the protective cover and place the individual parts of the aspirator on it.
- Additionally, check that the electrical contact is close to the installation location (after the aspirator has been installed) and that it is possible to connect the device for air extraction (only for versions with extraction).
- Select the necessary working position (e.g., installation of the electrical contact and/or opening for the passage of the exhaust pipe).
The provided bracket is for fixing the aspirator to the ceiling or wall. Despite this, the installer must check the suitability of the materials in accordance with the type of ceiling/wall. The ceiling/wall must be sufficiently strong to bear the weight of the aspirator. Do not delay, do not cement, and do not fix with silicone adhesive to the ceiling. Installation is only allowed on the surface.
OPERATION OF THE DEVICE
Use the high extraction rate only in case of high concentration of vapors. It is recommended to turn on the extraction 5 minutes before cooking and to leave the aspirator running for about 15 minutes after cooking.
Sensor buttons


Press the light button to turn on the lighting. To turn off the lighting, press it again. Press the on/off button to select the motor speed. When the on/off button is selected, the speed buttons 1-3, Power boost, and timer are illuminated. Press the speed 1 button to turn on the motor at the first speed. Press the speed 2 button to turn on the motor at the second speed. Press the speed 3 button to turn on the motor at the third speed.
Press the Power boost button to operate the aspirator in the intensive power mode. The device operates in this mode for 5 minutes, after which it returns to level 3.
- Turn on/off the timer for the suction speed (power).
Note: This function is available for the speeds that can be selected with the speed selection buttons (from 1 to 3 and Power boost).
Press the timer button to select the delayed shut-off time (15 min). When operating in the intensive power mode, the device operates for 5 minutes, after which it returns to level 3 for 10 minutes.
WARNING! Before cleaning or performing maintenance on the vacuum cleaner, disconnect it from the electrical mains by unplugging the connector from the wall socket.
If the vacuum cleaner is connected without a plug in the contacts, remove the plug from the contacts.
Maintenance
The vacuum cleaner should be cleaned regularly (at least the frequency indicated by the filter manufacturer) from the inside and outside. Use a cloth, dampened with neutral detergent. Do not use abrasive products. Do not use alcohol!
WARNING: Failure to follow the basic rules for cleaning the vacuum cleaner and replacing the filter may create a fire hazard.
Therefore, follow these instructions carefully.
The manufacturer accepts no responsibility for damage to the motor or damage from fire caused by incorrect cleaning or failure to follow the safety instructions.
Grease filter
Remove the greasy parts carefully.
The grease filter should be cleaned every few months with non-abrasive detergent, either by hand or in the dishwasher, which should be set to a low temperature and short cycles. When cleaned in the dishwasher, the grease filter may discolor, but this does not affect its filtering capacity.
To remove the grease filter, pull the handle to release the spring.
Activated carbon filter (only for versions with filter)
It absorbs odors caused by cooking.
The saturation of the activated carbon filter depends on the type of cooking and the frequency of cleaning of the grease filter.
The filter must be cleaned at least every four months.
The activated carbon filter does not need to be replaced.
Replacing the filter
Place one on each side as a cover over the two front grilles of the motor housing, then tighten the screws following the direction of the hour hand. To loosen the screws, turn them in the opposite direction of the hour hand.
Replacing the bulb
The hood is equipped with a lighting system based on LED technology.
The LEDs guarantee optimal lighting with a lifespan of 10 years and consume 90% less electrical energy than traditional bulbs. In case of damage to the lighting system, contact the authorized service.
Grease filter (only for filter version)
The grease filter must be cleaned at least every four months.
The activated carbon filter must be replaced.
! Do not use the grease filter without the mesh. ! Do not operate the hood without the grease filter. The maximum rotation speed is 90°; do not exceed this limit. ! The grease filter must be cleaned at least every two months. The grease filter is made of flammable materials.

Cleaning the grease filter
The grease filter can be cleaned in the dishwasher or by hand.
If the filter is very dirty, soak it in hot water with detergent before cleaning.
The device must be installed at a minimum distance of 55 centimeters from electrical devices and 65 centimeters from gas or water pipes. If the distance to the device is less than the specified minimum, it must be increased.

Electrical connection
Before connecting the device to the mains, check that the electrical data match the mains supply. If the power cord or plug is damaged, it must be replaced by the manufacturer, its service agent, or similarly qualified persons to avoid hazard. If the power cord or plug is not damaged, but the device does not work, check the fuse and replace it if necessary. Do not attempt to repair the device yourself.
Warning! The device must be connected to the mains only after all other connections have been made.
Installation
The device must be installed and connected only by qualified personnel.
Before installation:
Check the device for any visible damage. If the power cord is damaged, it must be replaced (see section 3.1). If the device has a plug, install it correctly. During installation, ensure that the device is not placed near heat sources, such as radiators, stoves, or other appliances that produce heat. If the device is to be built into furniture, ensure that there is adequate ventilation. Do not install the device outdoors. Do not install the device in places where it may be exposed to water or moisture. After installation, the device must be connected to the mains only after all other connections have been made. The device must be installed in accordance with local regulations and standards.
The device must be installed on a stable and level surface. Before installation, check that the surface can support the weight of the device. The device must not be placed on a surface that is not heat-resistant. The device must be kept away from flammable materials. The device must be installed in a well-ventilated area.
Operation
Before first use, clean the interior and exterior of the device. After cleaning, dry it thoroughly. Then, let the device operate empty for 5 minutes, then for 15 minutes at maximum temperature.
Control panel

Press the ON/OFF button to turn on the device. Press the ON/OFF button to turn off the device. Press the sensor ON/OFF button to activate the motor. After this, the speed selection sensors (1 to 3) will light up weakly, then the mode and timer. Motor 1: press the sensor once. Motor 2: press the sensor twice. Motor 3: press the sensor three times.
To set the cooking mode, press the mode button until the desired mode is selected. After 5 minutes of cooking, the timer will start counting down; after that, the 3-minute countdown will begin.
ON/OFF button (power) timer.
Expert: This function is used for delayed start. With the timer, you can set the delayed start for 1-3 presses, then the cooking mode will start.
For delayed start, press once (15 minutes). After the cooking mode has been running for 5 minutes, the timer will count down; after that, the 10-minute countdown will begin.
CLEANING AND CARE
CAUTION! Before cleaning or moving the appliance, unplug it from the power outlet and let it cool down completely.
If the power cord is damaged, it must be replaced by the manufacturer.
Cleaning
Clean the appliance with a soft cloth and mild detergent (do not use solvents). For cleaning, use a soft sponge or cloth. Do not use abrasive cleaners. Do not immerse in water!
EXPERT! Do not use cleaning agents or solvents that could damage the appliance, as this may cause malfunctions.
Do not use the appliance if it is damaged or malfunctioning; contact the service center.
Storage
Store the appliance in a dry place.
Before storing, clean the appliance with a soft cloth and mild detergent. Do not use abrasive cleaners. Do not immerse in water. Store in a cool, dry place.
This is a technical notice. All rights reserved.
Water pump (for analysis mode, do not touch)
The water pump must be installed in a place where it can be easily serviced.
The water pump maintenance procedure and frequency are given in the maintenance schedule and the pump's operating instructions.
When replacing the water pump, it is necessary to use the original spare part.
Do not operate the water pump without water.
Water pump
Before starting the engine, check the oil level in the crankcase and add oil if necessary.
Check the oil level regularly.
Lubrication
The lubricating oil must be selected according to the ambient temperature, and the oil change interval is 10 hours of operation, with a viscosity of 90% of the recommended value.
If the lubricating oil is contaminated, contact the service center.
Use only genuine spare parts. If non-genuine parts are used, the warranty will be void.
The genuine parts must be installed by an authorized service center.
In case of malfunction, contact the authorized service center for assistance or with the qualified personnel.
Improper use or failure to follow the instructions for use may lead to electric shock.
APPLICATION
The aspirator is intended for use either as a suction system or as a vacuum with a filter.

Version with exhaust filter
In both cases, the suction is performed through the opening, with the help of a special hose connected to the suction connection on the top of the aspirator.
Attention! The exhaust filter is not supplied with the product and must be purchased separately.
The diameter of the exhaust filter must be the same as the diameter of the suction connection.
For horizontal installation, the exhaust hose can be slightly bent (about 10°) and directed upwards, so that the air is easily expelled from the room.
Attention! Since the aspirator has a filter with active carbon, the filter must be removed.
Connect the aspirator and the exhaust hoses to the openings with a diameter equal to the air suction opening (suction
Using hoses and exhaust openings with smaller dimensions results in reduced suction power and less efficient dust collection.
The manufacturer's warranty for this work is excluded.
! Use the hose with the minimum required length. ! Use the hose as short as possible, "knee" (maximum angle of the "knee": 90°). Avoid sharp bends in the hose. ! Use the hose with as smooth an interior as possible. ! The hose must be made of antistatic material.

Version with filter
For this, a filter with active carbon is needed and can be purchased at your local appliance store.
The hood must correspond to the parameters specified in the INSTALLATION section.
If you have any doubts, contact an authorized service technician.
WARNING! Use of screws in fastening parts that do not comply with the requirements of this manual may lead to electric shock.
USE
The hood can operate in air extraction mode or in recirculation mode.

Operation in air extraction mode
In extraction mode, polluted air is removed from the room through a special exhaust pipe that is connected to the air outlet opening in the upper part of the hood.
The exhaust pipe is not included in the supply and is purchased separately.
The hood is heavy, so it must be carried and installed by at least two people.
Install the anti-return flaps, as the cover, the motor grilles, and turn them clockwise.
To remove the filter, turn it counterclockwise.
Replacing the lamps
The hood is equipped with modern LED lamps that provide optimal lighting, last 10 times longer than ordinary lamps, and save up to 90% of electricity.
In case of malfunction of the lighting, contact the service center.
When disassembling, turn counterclockwise.
Replacing the lamps
Designed, tested and manufactured in accordance with the specified standards.
Safety: EN/IEC 60335-1; EN/IEC 60335-2-31, EN/IEC 62233. - Performance: EN/IEC 61591; ISO 5167-1; ISO 5167-3; ISO 5168; EN/IEC 60704-1; EN/IEC 60704-2-13; ISO 3741; EN 50564; IEC 62301. - Electromagnetic compatibility: EN 55014-1; CISPR 14-1; EN 55014-2; CISPR 14-2; EN/IEC 61000-3-2; EN/IEC 61000-3-3.
Recommendations for proper use to reduce environmental impact. At the beginning of cooking, set the minimum suction power. After cooking is finished, leave the hood running for a few minutes. Increase the power when the amount of steam and vapors increases. Use the maximum power only when necessary. If needed, replace the charcoal filters to ensure effective odor removal. If needed, clean the grease filters to ensure they effectively trap grease. To make the hood work more efficiently and quietly, use the maximum duct diameter specified in this manual.
Additional technical characteristics for installation:
If screws for fixing are included in the supply kit, use them. If not, purchase screws of the correct type. Use screws of the correct length as specified in the installation manual.
In case of malfunction, contact an authorized technical service center or a qualified technician.
WARNING! If the hood is not secured with screws or other appropriate fasteners in accordance with the instructions, it may cause electric shock.
APPLICATION
The hood can be used in recirculation mode.

Exhaust mode
All exhaust air must be discharged through a special pipe, connected to the ring at the top of the hood.
Attention! The exhaust pipe is not included in the kit. It must be purchased separately.
The diameter of the exhaust pipe and the connecting ring must match.
The hood is designed for use with an exhaust duct (minimum diameter 10 cm) to ensure proper air extraction.
The hood is supplied with a carbon filter, which can be used if necessary.
Attach the duct to the exhaust outlet, the diameter of which corresponds to the exhaust air outlet (depending on the model).
Flange.
Using exhaust ducts and outlet openings of smaller diameter will reduce extraction efficiency and significantly increase noise levels.
Before installation.
- Check that the dimensions of the purchased hood match the chosen installation. Install the carbon filters (*) if they are supplied (see the relevant section). They must be installed only if the hood is used in recirculation mode.
- Check that all internal parts are free of foreign objects, such as packaging with screws (*), warranty cards (*), etc. If any are present, remove and keep them. If possible, remove or extend the duct from the hood opening to ensure access to the ceiling or wall. If this is not possible, cover the ceiling, adjacent surface, and duct with protective material to prevent damage and soiling. Cover the surface to protect it from the appliance. Apply protective covering and place the hood and mounting accessories on it.
- Also check that there is a power outlet with an earth connection that will be accessible after installation, as well as an exhaust system outlet that will be used for air extraction (only in extraction mode). Perform all necessary work (e.g., install the outlet and make the hole for the duct).
The supply package includes mounting brackets that are suitable for mounting the hood on most types of walls and ceilings. However, before installation, check that they can be used on the specific walls or ceilings. The wall or ceiling to which the hood is attached must support its weight. Do not attach the appliance to the wall using adhesive or silicone sealant, nor directly to plasterboard. Only for mounting on solid surfaces.
Operation
Use the highest extraction speed only when there is a lot of steam. It is recommended to turn on the hood 5 minutes before starting to cook and to leave it on during the entire cooking process and for 15 minutes after it is finished.
Sensor control

To turn on the lighting, press the lighting button. Press it again to turn off the lighting. Press the “On/Off” button to select the fan speed. The speed indicator lights up from 1 to 3, Power boost, and Timer. Press the speed 1 button to operate the fan at speed 1. Press the speed 2 button to operate the fan at speed 2. Press the speed 3 button to operate the fan at speed 3.
Press the Power Boost button to make the hood operate in boost mode. It operates in boost mode for 5 minutes, then returns to the “Speed 3” operating mode.
- YBIMK./BIMK. Tamper WbNIOKCTI BCMOKTyBaHHa (notyXHOCTi).
PnIMtKa: yHkuiy DoCTynHa dIa IWBnKoCTei, kI MoxHa Bn6paTn 3a DonomoroIO CneiaJbHnx KHOOK (1-3 Ta peXm niicneneHH noTyhOcTi).
HaTnCHiB OIN pa3, 106 Bn6paTn Yac BiTePmHyBaHn BmKHeHn (15 XB). Y pexmi niBnueHOi nToxKHOCTi npnaI npaioe npotarom 5 xBnIH, notim nobepTaecbca do peXmy po6oTn «Ubnkic3» Ha 10 xBnIH.
OBCLNYTOBYAHN
YBAGI! NpeiD BIKOHaHHm PO6IT 3 TexHcyHoro 06cnyroBaHHB BMnKaIe BNTKky BiE neEKeTpHoro KnBHeHH, nepeBoaHn nepemukay y nooKeHHB BMKnHeHH Ta BntraOu 3ano6ixHk.
Kx npnna nd ncknoeHdo eJeekpomek 3a donomoroo bnjkn po3eKn, po3cndhaTe ix.
Ouichienhra
BnTay cnid peryIpaH OunuataN BCEpeHNI Ta 33OBHI (npHnHMi 3 KOHNM OUnuHHeHm JxPBOHX pIbtpIB).IgnaTOo nOTpi6Ho BnKOpNCTOVYaTN BOYr TKAHNHy 3 HeITpAlbHM pIKHM MmHMM 3acO6OM. He BnKOpNCTOByTe a6pa3NBHi MaTepiAn. HE
BVKOPNCTOBYITE CINPTI
NONEPENKHH! HeDopummaHNOCHOBHX peKOMeHNdaui 3 OUnueHH BNTAKK Ta 3aMnH fInbtpmOKe npn3BecTNdo NOXeki.
Tomy ix pekomeHdoBaHo DoTpmyBaTnca.
Bipob6nK BiIMOBJrEbCBAI 6yIb-RAIOO BINOBaJIbHOCTI 3a NOKOJKeHH eNEKToDByHna a6o NOKOJKeHH BOrHeM Uepe3 HeHaJeKHe texHiue ObcIyROByBaHHa HNeOTpImaHHa HabeDeHH Bnue peKOMHeu i 3 texHiKn Be3neKn.
KnpoBmΦinbTp
BNoBJIIOE KMPH YAcTKn iXi.
KnpBm pIbTp cId OuHcyBaTn pa3 Ha McIa 3a DOnomorOHearpcBHX MmHnx 3acobIB bpyHy a6o B nocydomnHm MaunHi 3a HauHHKHO TEMpepatypTa Ka KOpOTkoKny. IicJr OuyueHH B NOcydomnHm MaunHi XnpOBn fIbTp MOKe DeIoo BtpaHTn KOIp, ane ce He BpINBaE Ha Noro fIbtpyBaIbHi 3daTHocti.
106 3HnKipOBm fIbTp, nOraHnIt npyKHHpy Ky BvBInbHeHHa fIbtpa.
ByrilbHn n pIbTp (TilbKn B peXmIp eepnpKyaui)
IorHnHae HnpncMHI 3anaxi BiD npiroTyBaHHa iXi.
ByrInbHn Hp3a6pydHoeTbcra nicIbIbI-MeHtprBaIoro BIKOpncTaHHa 3aJIexHO BiD iHTeHCNBHOCTI npiroTOBaHHa KI TapeyIpaHocti uHcHn HxNpoBO rbpTa.
YbIy-b-ayomypa3i Ioro cni3aImHOBATn npHaHmHi pa3 Ha YoTnpmiczi.
ByinbHn mIbTp HE MoXHa MInu BnKOpNCTOBvBaTn NOBtOHO.
KpyroBn ByrilbHn FjIbTp
PnKpIniB no ONDomy 3 KOxHoi CTOpOnn kpnuky dnn o6ox 3axncnX peoitok po6oyoro Koneca DnuryHa Ta nobepHtB 3a roHHNKOBIO CTPIKHO.
LioB demoHTyBaTn,IOBepHItb npOTn rQunHHNKOBoi cTpJIKN.
3amHaJamn
BttjKcO cHaueHO CbITIOIOHO CNTeMOIO OCBtJIeHn.
CbIIOJIOHNI lamnn 3a6e3neuyTOB onTImaJIbHNI pIBeH bOCBITHeHNAHOy 3MOY 3aOuaADHTN 90% eJeKTPoeHeprii cnyryoTb do 10 pa3iB DOBue, HIX 3BvauHi lamnn. Y pa3i HecnpabHocTI CNCTeMn OCBITHeHH 3BepHITcB DO CNYXbI TexHIOI nIDTPMKN.
J 1 J 1 J 1 J 1 J 1 J 1 J 1 J 1 J 1 J 1 J 1 J 1 J 1 J 1 J 1 J 1 J 1 J 1 J 1 J 1 J 1 J 1 J 1 J 1 J 1 J 1 J 1 J 1 J 1 J 1 J 1 J 1 J 1 J 1 J
y
!
EN/IEC 60335-1; EN/IEC 60335-2-31, EN/IEC 62233.
EN/IEC 61591; ISO 5167-1; ISO 5167-3; ISO 5168; EN/IEC 60704-1; EN/IEC 60704-2-13; ISO 3741; EN
50564; IEC 62301.
EMC
EN 55014-1; CISPR 14-1; EN 55014-2; CISPR 14-2; EN/IEC 61000-3-2; EN/IEC 61000-3-3
- 10
- 1
i 1
(2) = 1/8 a + 1/2 b + 1/3 c
1-3 1
Cauchy.
- EN COOKER HOOD
- CAUTIONWARNING
- ADDITIONAL INSTALLATION SPECIFICATIONS
- USE
- DUCTING VERSION
- FILTER VERSION
- INSTALLATION
- ELECTRICAL CONNECTION
- MOUNTING
- OPERATION
- TOUCH CONTROLS
- MAINTENANCE
- CLEANING
- GREASE FILTER
- CHARCOAL FILTER(SIFLBERONLY)
- REPLACING LAMPS
- WARNING
- PRECAUTIONS
- EXHAUST DUCT
- VERSION
- WARNINGS
- OPERATION OF THE DEVICE
- SENSOR BUTTONS
- ACTIVATED CARBON FILTER (ONLY FOR VERSIONS WITH FILTER)
- REPLACING THE BULB
- GREASE FILTER (ONLY FOR FILTER VERSION)
- CLEANING THE GREASE FILTER
- CONTROL PANEL
- CLEANING AND CARE
- STORAGE
- WATER PUMP (FOR ANALYSIS MODE, DO NOT TOUCH)
- WATER PUMP
- LUBRICATION
- APPLICATION
- VERSION WITH EXHAUST FILTER
- VERSION WITH FILTER
- OPERATION IN AIR EXTRACTION MODE
- REPLACING THE LAMPS
- ADDITIONAL TECHNICAL CHARACTERISTICS FOR INSTALLATION
- EXHAUST MODE
- SENSOR CONTROL
- OBCLNYTOBYAHN
- OUICHIENHRA
- BVKOPNCTOBYITE CINPTI
- KNPOBMΦINBTP
- BNOBJIIOE KMPH YACTKN IXI
- BYRILBHN N PIBTP (TILBKN B PEXMIP EEPNPKYAUI)
- IORHNHAE HNPNCMHI 3ANAXI BID NPIROTYBAHHA IXI
- KPYROBN BYRILBHN FJIBTP
- AMHAJAMN
Brand : GORENJE
Model : WHI649X21P
Category : Range hood