Safety Fix - Car seat Kinderkraft - Free user manual and instructions
Find the device manual for free Safety Fix Kinderkraft in PDF.
| Product type | Child car seat |
| Brand | Kinderkraft |
| Model | Safety Fix |
| Weight groups | Group I (9-18 kg), Group II (15-25 kg), Group III (22-36 kg) |
| Recommended age | Approximately 9 months to 11 years |
| Vehicle attachment | ISOFIX + top tether for Group I; 3-point seat belt for Groups II/III |
| Harness | 5-point harness adjustable in height (5 positions for Group I, 5 additional positions after removal) |
| Headrest adjustment | Yes, 10 positions (5 for Group I, 5 for Groups II/III after removal) |
| Recline adjustment | Yes, by rotating knob |
| Reducer insert | Included for very young children |
| Orientation | Forward-facing only |
| Cover material | Washable fabric (wash at 30°C, gentle cycle) |
| Care | Removable cover machine washable at 30°C; clean plastic parts with soapy water |
| Standards | Approved according to UNECE Regulation No. 16 or equivalent |
| Warranty | 24 months (extendable to 120 months upon registration) |
| Warranty country | European Union (excluding overseas territories) |
Frequently Asked Questions - Safety Fix Kinderkraft
User questions about Safety Fix Kinderkraft
0 question about this device. Answer the ones you know or ask your own.
Ask a new question about this device
Download the instructions for your Car seat in PDF format for free! Find your manual Safety Fix - Kinderkraft and take your electronic device back in hand. On this page are published all the documents necessary for the use of your device. Safety Fix by Kinderkraft.
USER MANUAL Safety Fix Kinderkraft
text_image
WATCH MANUAL VIDEO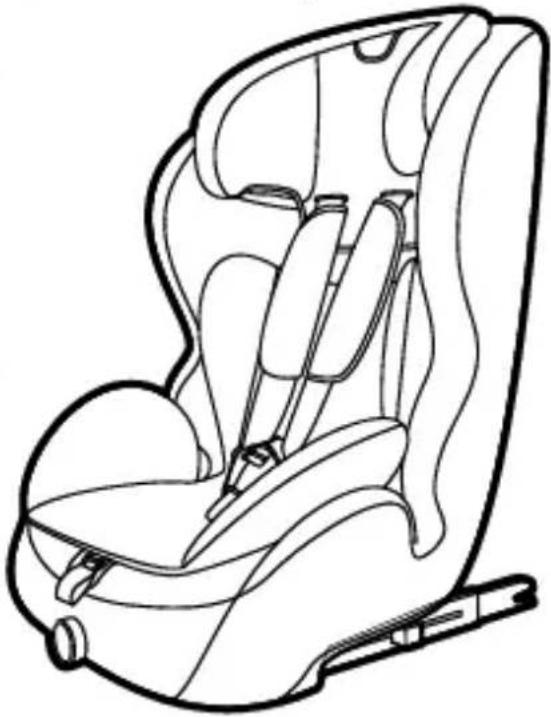
natural_image
Line drawing of a car comfort seat with visible seatbars and straps (no text or symbols)
text_image
10 YEARS WARRANTYAvailable only in selected countries Details on kinderkraft.com

kinderkraft.com

/kinderkraftofficial

kinderkraft

@kinderkraftofficial
(AIR)
لطفلك سيارة مqedد
NL AUTOSTOELTJE
GEBRUKSAANWIJZING
(2) AUTOSEDAČKA
NÁVOD K OBSLUZE
(PL) FOTELIK SAMOCHODOWY
INSTRUKCJA OBSLUGI
(DE) AUTOKINDERSITZ
BEDIENUNGSANLEITUNG
(PT)CADEIRA AUTO
MANUAL DE INSTRUÇÕES
(EN)CAR SEAT
USER MANUAL
(RO) SCALIN AUTO
MANUAL DE UTILIZARE
(ES) SILLA DE COCHE
MANUAL DE USO
(RU)ДЕТСКОЕ АВТОКРЕСЛО
text_image
A B C D E F G H I J K L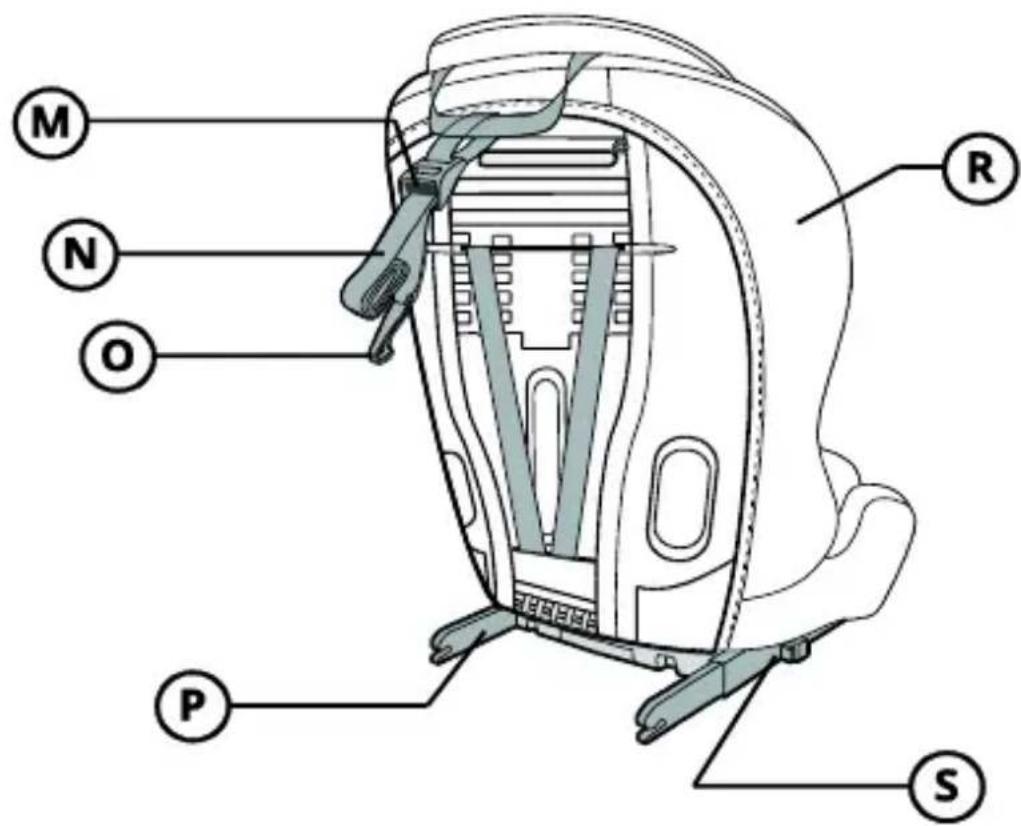
text_image
M N O R P S
natural_image
Line drawing of a car seat with no text or symbols4.1
natural_image
Line drawing of a person's seatbelt with a hand adjusting the seatbelt (no text or symbols)4.2-1

natural_image
Diagram of a hand pressing down on a seated object with an arrow indicating force or movement (no text or symbols)4.2-2
natural_image
Illustration of a person seated in a chair with arms crossed, no text or symbols present4.2-2

natural_image
Simple line drawing of a person sitting on a chair holding up a wall-mounted device (no text or symbols)4.2-2
natural_image
Illustration of a car seatbelt being lifted by a hand, showing motion arrows (no text or symbols)4.2-3
natural_image
Simple diagram of a biological structure with curved arrows indicating rotation or movement (no text or symbols)4.2-3

natural_image
Illustration of a person's seatbelt being lifted by a tool, showing mechanical components and a downward arrow (no text or symbols)4.3
natural_image
Diagram showing two mechanical components with bidirectional arrows indicating movement or force (no text or symbols)4.3
natural_image
Line drawing of a car seat with seats and straps (no text or symbols)4.3

natural_image
Illustration of a child sitting in a car seat with no visible text or symbols4.3

text_image
Click4.3

natural_image
Illustration of a child in a car seat and its side view showing seatbelt and hanging weight (no text or symbols)4.4

text_image
Press5.1

natural_image
Line drawing of a hand pressing down on a car seatbelt (no text or symbols)5.1

text_image
Click5.1
natural_image
Diagram of a mechanical clamp or bracket assembly with wires, no visible text or symbols5.1

natural_image
Illustration of a hand using a tool to adjust or install a mechanical component (no text or symbols visible)5.1

natural_image
Illustration of a hand holding a tool interacting with a mechanical component (no text or symbols visible)5.1

text_image
A B C D5.1
natural_image
Illustration of a hand holding a pen tip above a stylized human head (no text or symbols)5.1
natural_image
Two metallic buckle clips on a striped surface, crossed with a cross symbol (no text or labels)5.1

natural_image
Line drawing of a car seat with seatbelt and side arm, no text or symbols present5.2
natural_image
Line drawing of a car seat assembly with a belt and seatbelt (no text or symbols)5.2

natural_image
Illustration of a child wearing a car seatbelt and holding a diagonal stripe (no text or symbols)5.2

text_image
Click5.2
natural_image
Illustration of a child wearing a seatbelt and holding a diagonal stripe (no text or symbols)5.2
natural_image
Line drawing of a child sitting in a car seat with a diagonal band (no text or symbols)5.3

natural_image
Illustration of a car seatbelt being lifted by a hand using a tool (no text or symbols)5.4

natural_image
Illustration of hands holding a tool with arrows indicating movement or force (no text or symbols)6.1
natural_image
Hand inserting a cable into a bracket with arrows indicating direction (no text or symbols)6.1
natural_image
Illustration of hands installing or adjusting a mechanical component (no text or symbols visible)6.1

natural_image
Illustration of a hand inserting a small object into a device (no text or symbols visible)6.1

natural_image
Diagram of a device with a gray panel and directional arrow, no text or symbols present6.1
natural_image
Illustration of a hand holding a medical device with an inset showing a close-up of a medical device (no text or symbols present)6.1

natural_image
Line drawing of a car seat with no text or symbols6.1

natural_image
Line drawing of a chair with decorative armrests and seat (no text or symbols)6.2

natural_image
Illustration of a hand inserting a plug into a car seatbelt (no text or symbols)6.2

natural_image
Illustration of hands using a tool to adjust or install a component, no text or symbols visible6.2
natural_image
Illustration of hands installing or adjusting a device with directional arrows (no text or symbols)6.2

natural_image
Illustration of a hand adjusting a mechanical component with directional arrows (no text or symbols)6.2
natural_image
Illustration of hands adjusting a cable or connector with directional arrows (no text or symbols)6.2
natural_image
Line drawing of a car seat assembly (no text or symbols)6.2
AR
Please read through these instructions carefully before using the child car seat for the first time. Your child's safety is your responsibility and may be affected if you do not follow these instructions.
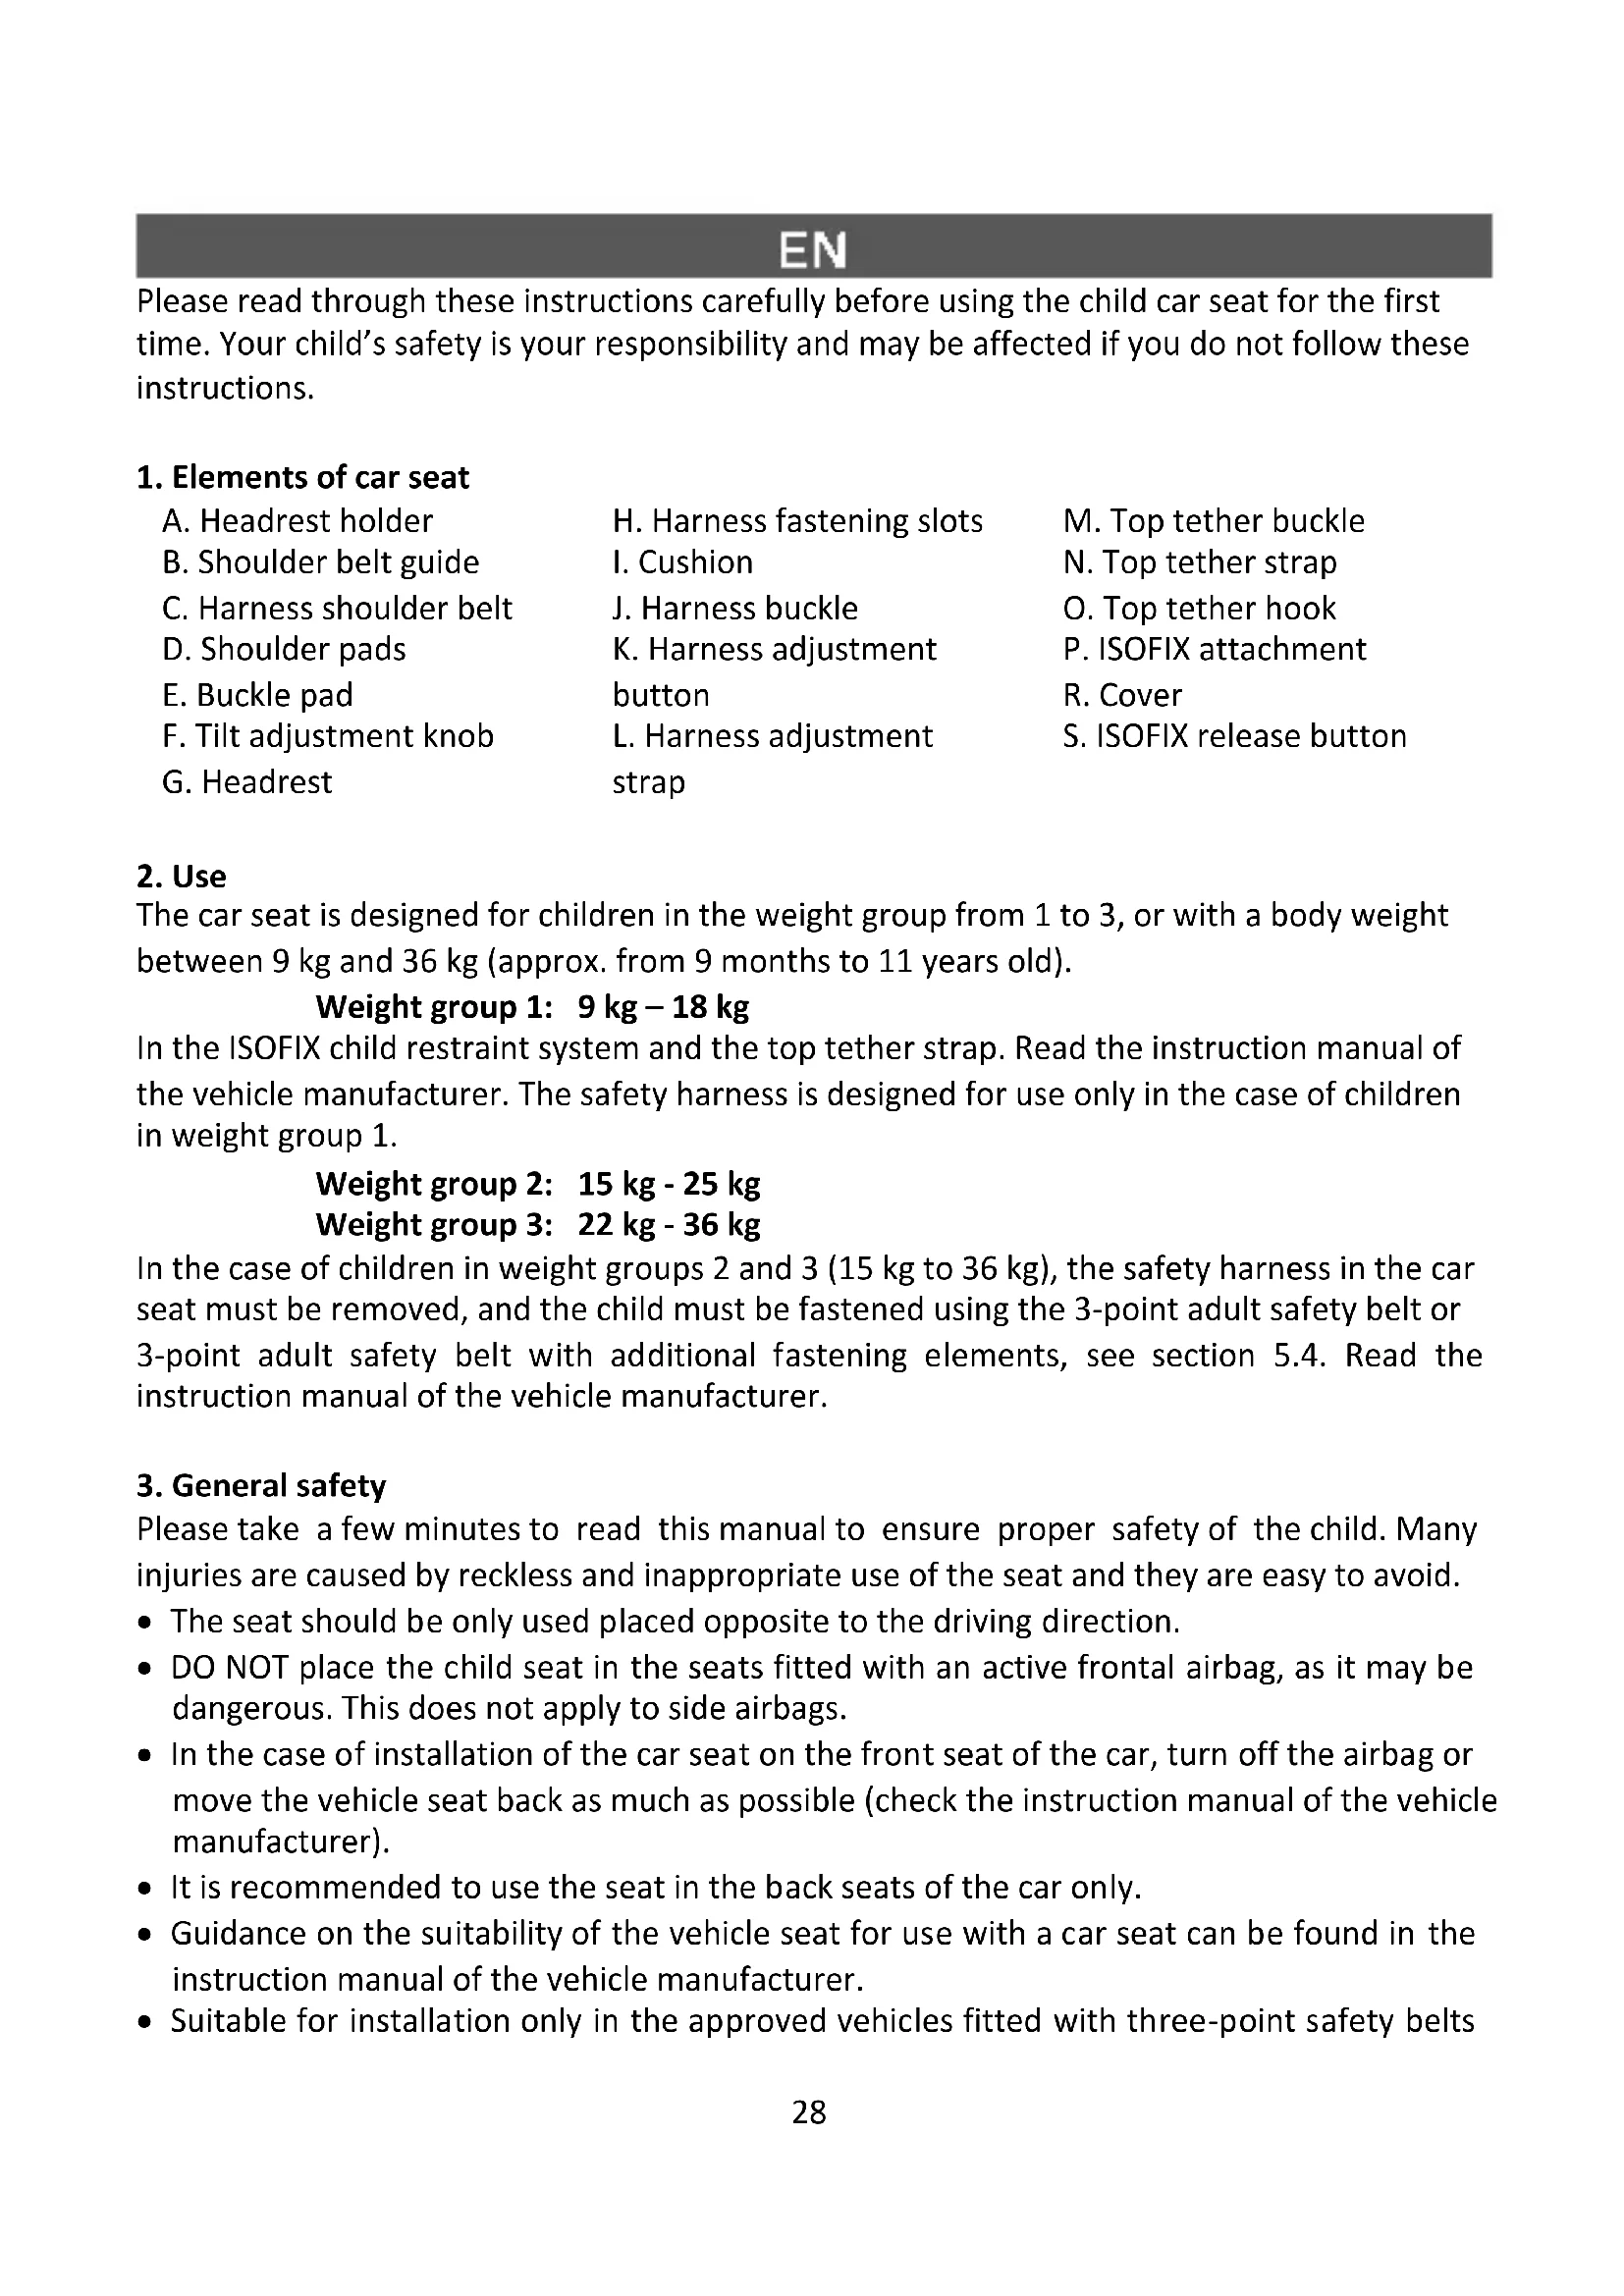
1. Elements of car seat
A. Headrest holder
B. Shoulder belt guide
C. Harness shoulder belt
D. Shoulder pads
E. Buckle pad
F. Tilt adjustment knob
G. Headrest
H. Harness fastening slots
I. Cushion
J. Harness buckle
K. Harness adjustment
button
L. Harness adjustment
strap
M. Top tether buckle
N. Top tether strap
O. Top tether hook
P. ISOFIX attachment
R. Cover
S. ISOFIX release button
2. Use
The car seat is designed for children in the weight group from 1 to 3, or with a body weight between 9 kg and 36 kg (approx. from 9 months to 11 years old).
Weight group 1: 9 kg – 18 kg
In the ISOFIX child restraint system and the top tether strap. Read the instruction manual of the vehicle manufacturer. The safety harness is designed for use only in the case of children in weight group 1.
Weight group 2: 15 kg - 25 kg
Weight group 3: 22 kg - 36 kg
In the case of children in weight groups 2 and 3 (15 kg to 36 kg), the safety harness in the car seat must be removed, and the child must be fastened using the 3-point adult safety belt or 3-point adult safety belt with additional fastening elements, see section 5.4. Read the instruction manual of the vehicle manufacturer.
3. General safety
Please take a few minutes to read this manual to ensure proper safety of the child. Many injuries are caused by reckless and inappropriate use of the seat and they are easy to avoid.
- The seat should be only used placed opposite to the driving direction.
- DO NOT place the child seat in the seats fitted with an active frontal airbag, as it may be dangerous. This does not apply to side airbags.
- In the case of installation of the car seat on the front seat of the car, turn off the airbag or move the vehicle seat back as much as possible (check the instruction manual of the vehicle manufacturer).
- It is recommended to use the seat in the back seats of the car only.
- Guidance on the suitability of the vehicle seat for use with a car seat can be found in the instruction manual of the vehicle manufacturer.
- Suitable for installation only in the approved vehicles fitted with three-point safety belts
with retractor approved according to UN/ECE Regulation No. 16 or other equivalent standards.
- Note that any straps attaching the child seat to the vehicle must be tight; the restraint harness must fit the child's body and the belt/harness must not be twisted.
- The seat should be replaced if it has been subjected to violent stresses in an accident.
- The seat must not be subject to any modifications.
- The child safety seat should be protected from direct sunlight, otherwise heated parts can burn your child.
- Never leave your child in the seat unattended.
- It should be noted that any bags and other items must be sufficiently secured, in particular on the parcel shelf, as otherwise in the event of a collision this can lead to injury.
- The seat cannot be used without the cover.
- Do not use replacement covers other than those recommended by the manufacturer, since it is an integral part of the safety seat.
- It is recommended to keep the car seat instruction manual for the entire period of its use.
- Do not use anchorages other than those described in the instruction manual and marked in the child seat.
- All rigid items and plastic parts of the child seat must be located and installed in such a way to avoid, under normal operating conditions of the vehicle, blocking by a sliding seat or vehicle door.
- Regularly check the technical condition of the harness, paying special attention to the fasteners/holders, seams and adjustment elements.
- Discontinue use of the car seat if its parts are damaged or loosened after an accident.
- In case of an emergency situation, it is important to quickly unfasten the seat belts. This means that the harness release button is not fully secured; make sure your child knows that s/he is not allowed to play with the buckle.
- Do not use the seat at home. It is not suitable for home use and it should only be used when travelling by car.
- The back of the seat must rest flat against the back of the car seat. Please make sure that the headrest dues not create an unwanted space between the car seat backrest and back seat of the vehicle. Some car headrests constitute an obstacle to the installation of a car seat and must therefore be disassembled first.
- The adult safety belt buckle must not be located too close to the bottom of the child seat armrest. If in doubt about this issue, contact the child seat manufacturer.
- You should give your child a good example and always fasten your belts. An adult with unfastened safety belts may also be a threat to the child.
- Before each trip by car, make sure that the seat is properly secured.
- The car seat must be protected even when not in use. Unattached seat can cause injuries to passengers even during emergency braking.
4. Securing your child
4.1 Seat cushion
NOTE The seat cushion (I) should be used for very small children. The cushion improves comfort and provides additional support for very small children.
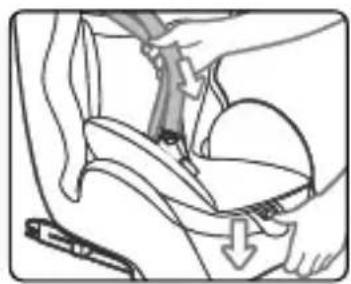
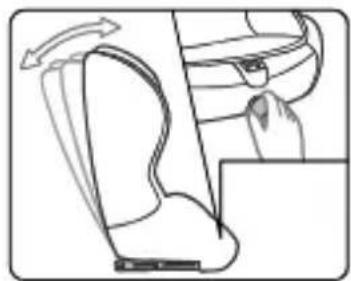
4.2-1 Adjusting the straps
Loosen the harness straps by pressing the release button (K) and pulling the harness as much as possible.
Remember! Do not pull the shoulder pads.
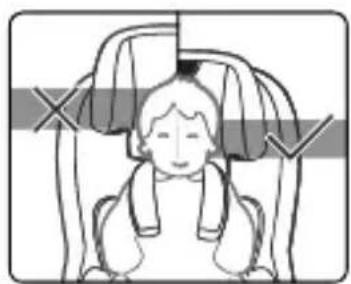
4.2-2 Height of the headrest
- In the case of weight group 1, the headrest can be adjusted at five different heights without removing the shoulder strap crossbar, the buckle and the harness.
NOTE Adjust shoulder strap height so that the strap enters the car seat backrest just above the child's shoulders. Ensure that the shoulder straps fit well to the child's shoulders.
- The remaining five positions for weight groups 2 and 3 can be adjusted by removing the shoulder strap crossbar, the buckle and the harness (see section 6.1).
Press the button on the headrest handle at the top of the seat. The headrest should fit well to the child's head.
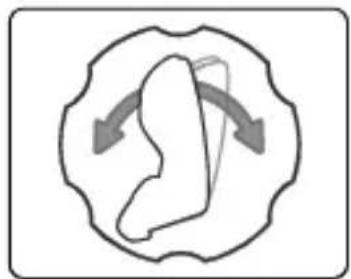
4.2-3 Backrest tilt adjustment mechanism
The tilt of the safety seat can be adjusted with the knob (F). Increase the angle of inclination by turning the knob to the right, and decrease it by turning the knob to the left, which is illustrated on the knob.
4.3 Securing your child with the harness
- Loosen the harness straps by pressing the button (K) and pulling the harness. Remember! Do not pull the shoulder pads.
- Release the buckle (J) and place the harness straps on the sides of the safety seat. Place your child in the seat.
- Adjust the headrest to the child's height (see section 4.2-2).
- Join two buckle latches to engage them and insert them into the buckle (J) until you hear a "click".
4.4 Tightening the harness
- Pull the shoulder straps to eliminate play in the hip strap so that the harness lies flat.
- Pull the harness with the harness adjustment strap (L) until the harness lies flat and close to the child's body. Pull the adjustment strap straight (not up or down).
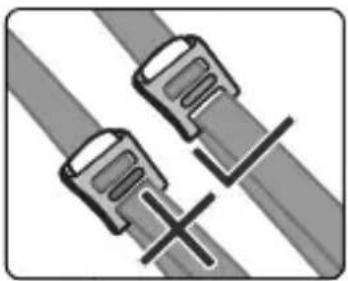
NOTE The harnesses hip straps must be placed as low as possible on the child's hips. Make sure that the harness straps are not twisted.
5. Installation in the vehicle
In case of sudden braking or an accident, persons not using seat belts can cause damage to other passengers.
Always check the following:
- The seat backrests are locked in the vehicle (i.e. foldable back seat is locked).
- All heavy objects and sharp edges are secured (e.g. on the rear parcel shelf).
- All passengers fastened their seat belts.
- The safety seat is always protected, even if the child is not in it.
Vehicle security
Seat covers in some vehicles can be made of soft materials so the safety seat may leave some traces. They can be avoided by placing a blanket or towel under the safety seat.
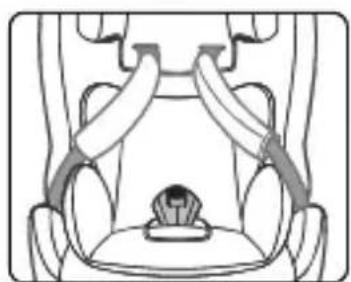
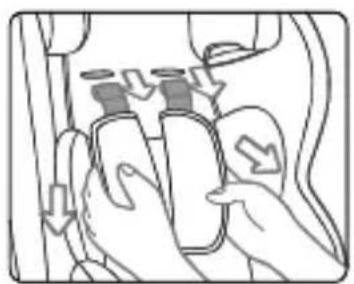
5.1 Installing the child's seat in weight group 1 (9-18kg) using the ISOFIX child restraint system and the top tether strap.
IMPORTANT The instruction manual of the vehicle manufacturer specifies the location of the ISOFIX attachment points and the top tether strap, and other necessary information regarding the installation of the seat in the car. The user MUST read the instruction manual of the vehicle manufacturer.
NOTE Make sure that the 5-point harness in the car seat is installed correctly.
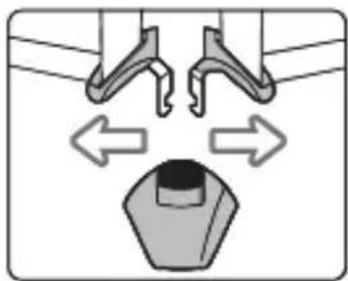
- Press the ISOFIX release button (S) and pull out the ISOFIX attachments (P) as far as possible.
- Grab the seat with both hands and push the two fixing hooks in the back seat.
- When you hear the “click” of each ISOFIX hook, push the seat to the back seat, exerting strong, even pressure on both sides.
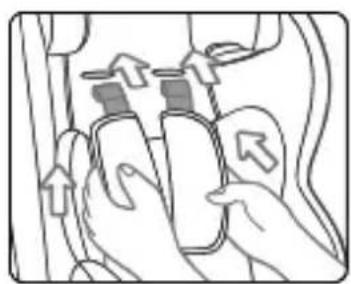
- Grab the safety seat and make sure it is securely fastened without play. If it moves and ISOFIX attachments slip out, repeat the previous steps.
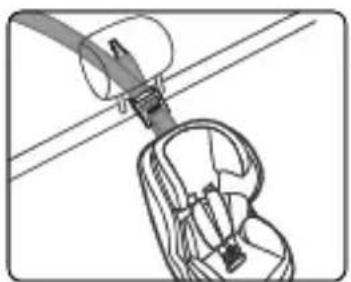
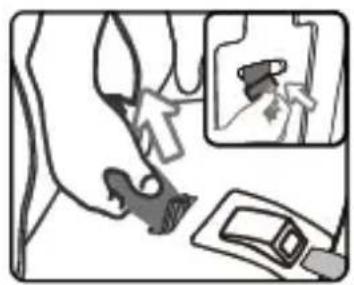
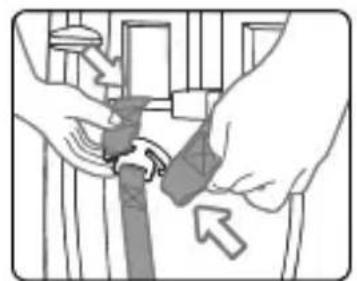
- Remove the top tether strap (N), and press the top tether buckle (M) in order to loosen it. The strap must be long enough to allow placing the hook (O) in the attachment point in the back seat.
- Place the top tether hook in the attachment point of the vehicle recommended in the instruction manual of the vehicle manufacturer.
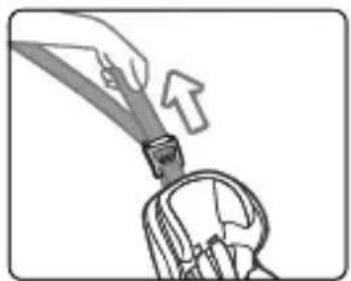
- Pull the other end of the top tether strap in order to tighten it.
- The upper strap is properly tightened, when the green indicator in buckle (M) is visible.
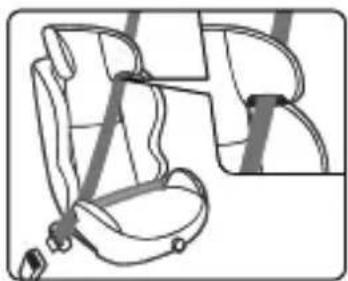
5.2 Installing the child seat in weight group 2 (15-25kg).
- Before installation, remove the seat harness (see section 6.1).
Remember: Store the cushion, harness, buckle and pads in a safe place for the future.
- Adjust the headrest to the child's height (see section 4.2-2).
- Place the car seat on the vehicle seat.
- Place the shoulder strap in the guide under the headrest.
- Place your child in the seat and place the vehicle belt under the armrest of the seat.
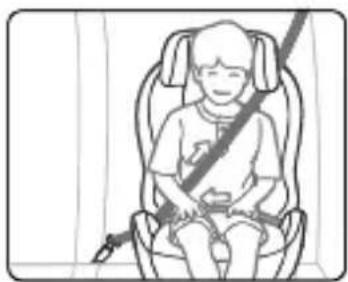
- Fasten your seat belt and make sure you hear a "click".
- Tighten the vehicle seat belt by pulling the first section of the hip belt, and then the shoulder belt section.
Make sure that the hip belt is stretched as low as possible over the child's hips, placed in the guides and fixed in the buckle. The shoulder belt should be positioned between the shoulder and the neck of the child.
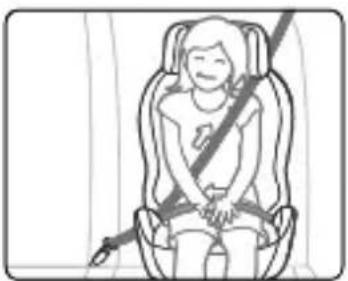
5.3 Installing the child seat in weight group 3 (22-36kg).
- Adjust the headrest to the child's height (see section 4.2-2).
• Installation is carried out similarly as in the case of weight group 2.
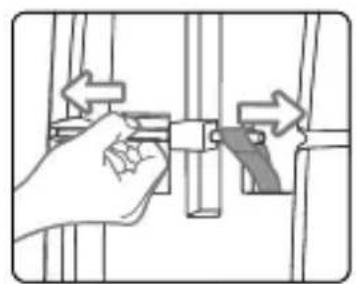
5.4 Installing the car safety seat in weight groups 2 and 3 using the safety belt and extra anchorages.
- Pull out the ISOFIX anchorages and put them in the ISOFIX attachment points until you hear a “click”.
- Press the ISOFIX release button (S) and pull out the ISOFIX attachments (P) as far as possible.
- Grab the seat with both hands and push the two fixing hooks in the back seat.
- When you hear the “click” of each ISOFIX hook, push the seat to the back seat, exerting strong, even pressure on both sides.
- Grab the safety seat and make sure it is securely fastened without play. If it moves and ISOFIX attachments slip out, repeat the previous steps.
- Fasten your child using the vehicle seat belts. Details are described in the section of the safety seat installation instructions for weight groups 2 and 3 (see sections 5.2 and 5.3).
6.1 Removing 5-point harness with cover
- Pull the harness straps out of the metal buckle.
- Pull the crossbar that holds the shoulder belts through the groove in the shell.
- Pull the shoulder belts out through the holes in the backrest.
- Pull the belt hooks through the holes in bottom of the seat.
- Disassemble the plastic cover on the underside of the seat by unscrewing the screws.
- Remove the crotch belt buckle through the hole in bottom of the seat, then re-assemble the plastic cover with the screws.
- Then remove the cover from the headrest and the seat shell.
6.2 Installing 5-point harness and cover
- After cleaning, place the cover on the shell and the headrest of the seat. Pull the cover over the seat. Fasten the latches on the back.
- Pull the belt latches through the holes in the seat.
- Pull the crotch belt buckle (J) through the hole in the seat.
- Pull shoulder pad straps through the holes in the seat back.
- Pull the metal crossbar through the ends of the shoulder belt pads. Lock the crossbar by placing it in the seat shell.
- Pull the ends of the harness straps through holes in the seat back (as for the shoulder strap pads). Harness straps must pass over the metal crossbar.
Then secure the ends of the harness straps in the metal buckle.
- Close the buckle (J), and then check that the harness straps are not twisted.
6.3 Cleaning
Use the original cover only, since they are essential for the safety of the seat.
NOTE Do not use the seat without the cover.
- The cover can be removed and washed in mild powder using delicate washing program (30°C). Observe the washing instructions on the label placed on the cover. In the case of washing at a temperature above 30°C the colour may fade. The cover may not be spun or tumble dried (which can lead to separation of the material from the lining of the pad).
- Plastic parts can be cleaned with water and soap. Do not use aggressive cleaning agents (such as solvents).
- The harness can be removed and washed in lukewarm water with soap.
Warning! Never remove the fastening hooks from the belts.
7. Warranty
- All Kinderkraft products are covered by a 24-month warranty. The warranty period starts from the date the product is handed over to the Buyer.
- The warranty is only valid in the member states of the European Union, excluding overseas territories (as currently defined, including in particular: Azores, Madeira, Canary Islands, French Overseas Departments, Åland Islands, Athos, Ceuta, Melilla, Helgoland, Büsingen am Hochrhein, Campione d'Italia and Livigno) and the territory of the United Kingdom of Great Britain and Northern Ireland excluding the British Overseas Territories (e.g. Bermuda, Cayman Islands, Falkland Islands).
- The manufacturer's warranty does not apply to countries not listed above. The conditions of the additional warranty may be determined by the Seller.
- In some countries, it is possible to extend the warranty to a limited period of 120 months (10 years). The complete terms and conditions and the warranty extension registration form are available at WWW.KINDERKRAFT.COM
- The warranty is valid only in the territory indicated in paragraph 2.
-
Claims must be made by completing the form available at WWW.RMA.KINDERKRAFT.COM
-
The warranty does not cover:
A. Cosmetic damage, including but not limited to: scratches, dents and cracks in plastic, unless the failure is due to a material or manufacturing defect;
B. Damage resulting from misuse or poor maintenance - including but not limited to: mechanical damage to products caused by misuse or poor maintenance;
- Refer to the instructions for use and installation of the product contained in the user manual;
C. Damage caused by improper assembly, installation or disassembly of products and/or accessories;
- Refer to the instructions for use and installation of the product contained in the user manual;
D. Damage caused by corrosion, mould or rust, resulting from improper maintenance, care and storage;
E. Damage caused by normal wear and tear or otherwise resulting from the normal passage of time;
- This includes: tears or punctures in inner tubes; tyre damage; tyre tread damage; fading of fabrics resulting from mechanical use (e.g. on joints and covering of moving parts);
F. Damage or erosion caused by sun, perspiration, detergents, storage conditions or frequent washing, etc;
G. Damage caused by accident, abuse, misuse, fire, contact with liquid, earthquake or other external causes;
H. Products that have been modified to change functionality without 4Kraft's written consent;
I. Products from which the serial number or lot number has been removed or tampered with in any way;
J. Damage caused by the use of third-party components or products - including but not limited to: cup holders, umbrellas, reflectors, bells;
K. Damage caused by transport or by ground handling service providers.
- The warranty period for accessories included with the product is 6 months from the date of sale, excluding the faults described above.
- These warranty conditions are complementary to the Customer's statutory rights with respect to 4KRAFT sp. z o.o. The warranty does not exclude, limit or suspend the Customer's rights under warranty for defects in goods sold.
- The full text of the Terms and Conditions of the Warranty is available on the website WWW.KINDERKRAFT.COM
All rights to the present document belong entirely to 4Kraft Sp. z o.o. Any unauthorized use of them against their purpose, including in particular: using, copying, reproducing, making available - in whole or in part, without the consent of 4Kraft Sp. z o.o. may result in legal consequences.
ES
(EN) In the interests of our Clients - we are at your disposal! If you have a problem with the product you received, contact us in the most convenient way for you!