
630402 - Slicer Hendi - Free user manual and instructions
Find the device manual for free 630402 Hendi in PDF.

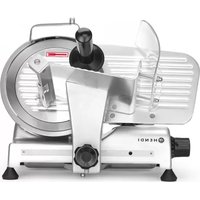
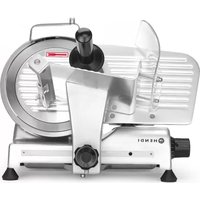
| Product type | Manual slicer for potatoes and hard vegetables |
| Brand | Hendi |
| Model | 630402 |
| Intended use | Commercial use in catering (restaurants, bars, etc.) |
| Device dimensions | Approximately 300 x 200 x 300 mm (estimate) |
| Weight | Approximately 2 kg (estimate) |
| Body material | Stainless steel (estimate) |
| Blade material | Stainless steel |
| Included blade | 3/8" (9.5 mm) standard |
| Additional blades available | 1/4" (6.4 mm) and 1/2" (12.7 mm) |
| Maximum food capacity | Up to 11 cm diameter and 15 cm length |
| Actuation type | Manual lever |
| Non-slip feet | 4 rubber suction cup feet |
| Wall mounting possible | Yes, with optional wall bracket (not included) |
| Cleaning | Hand wash with warm soapy water, do not put in dishwasher |
| Maintenance | Grease metal parts with food-grade silicone lubricant before storage |
| Safety | Protection lever, no direct contact with the blade |
| Warranty | 12 months against manufacturing defects under proper use |
| Spare parts | Blades, pushers, rods, Seger rings available |
| Repairability | Can be disassembled for cleaning and part replacement |
Frequently Asked Questions - 630402 Hendi
User questions about 630402 Hendi
0 question about this device. Answer the ones you know or ask your own.
Ask a new question about this device
Download the instructions for your Slicer in PDF format for free! Find your manual 630402 - Hendi and take your electronic device back in hand. On this page are published all the documents necessary for the use of your device. 630402 by Hendi.
USER MANUAL 630402 Hendi
You should read this user manual carefully before using the appliance.
Thank you for purchasing this Hendi appliance. Please read this manual carefully before connecting the appliance in order to prevent damage due to incorrect use. Read the safety regulations in particular very carefully.
Important Safety Instructions
-
This French fries cutter is only intended for cutting potatoes to make French fries in commercial use such as in the food industry and shops. (e.g. catering, restaurant, bar, etc.).
-
Use the cutter only as described in this manual.
DO NOT use this cutter for cutting other food. -
This cutter should be operated and installed by specialized trained personnel in the kitchen of the food industry such as catering, restaurant, bar, etc.
-
Check for damaged parts. Before using the French fries cutter, check that all parts are included in the package, and that any moving parts are operating properly for performing the intended functions. Check for alignment of moving parts, binding of moving parts, and any other conditions that may affect the operation.
In case of incomplete delivery or damages, contact the supplier and do not use the appliance (See Warranty)
-
Do not place the cutter on a heating object (gasoline, electric, charcoal cooker, etc.)
-
Keep the cutter away from any hot surfaces and open flames. Always operate the cutter on a level, stable, clean, heat-resistant and dry surface.
-
Read all instructions on how to assemble this French fries cutter, before attempting to use or clean.
-
Be sure the c-clips are securely fastened to the long and short pins and cutting plate is secure on the end of the French fries cutter before making fries.
-
Beware! Keep fingers and loose clothing away from moving parts! Injury may result!
-
Keep children away. Never leave the french fries cutter.
-
Clean the cutter before and after each use (See => Cleaning Instructions)
French fries cutter parts
| No. Description |
| 1 Feed Frame Assembly |
| 2 Handle |
| 3 Connecting Plate Assembly |
| 4 Slide Bar Assembly |
| 5 Rubber Foot Assembly |
| 6 Long Pin & C-clip |
| 7 Slide Bar Cover Bushing |
| 8 Short Pin & C-clip |
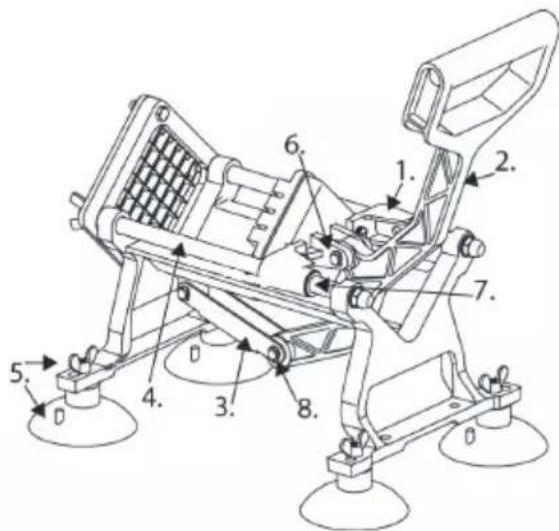
Optional cutting plates - 1/4" and 1/2" are available.

Assembly
Unbox all parts
a. Cutter Base
b. Connecting Plate Assembly
c. Handle
d. Long Pin and Short Pin with C-clips (in place)
e. [1] 3/8" Cutting Plate (Pre-assembled)
f. (4) Large Suction Cup Feet (each has a Wing Nut and Washer for attaching to Cutter Base)

Tools needed:
- Standard screwdriver (Not included)
- Needle-nose pliers (Not included)
1 Remove C-Clip from long pin located on the back of the Pusher Block. Remove C-Clip from short pin located on loose end of the Connecting Plate.
2 Align the center-mounting hole of handle with the mounting bracket holes located on the back of the Pusher Block. Insert Long pin and secure with C-clip. (Use needle nose pliers to place C-clip on pin then press until it snaps to hold pin in place)
3 Align bottom hole of handle with holes in metal connecting plate, which is pre-attached to the bottom of base. Insert Short pin and secure with C-Clip (Use needle nose pliers to place C-Clip on pin then press until it snaps to hold pin in place)
4 Attach the front two feet through each slot at the front of the base. Attach the back two feet through the 2nd hole in from the edge at the back of the base. Note: Pull the notch on the top of each foot to release suction pressure after use. Note: Extra holes in the base can be used for wall or counter mounting without the feet.
5 Unit is ready to use.
Wall Mounting (optional)
Before installation: check plate for any damage. Be sure to inspect the wall-mount bracket for any damage to make sure there are no dents improper bends. Note: mounting screws and hardware are not included
- Important: do not mount the bracket on drywall or paneling without first anchoring to a wall stud!
-
Since significant force is required to pull down on the cutter handle, the mounting bracket must be securely anchored on a wall by attaching three of the vertical holes with 1/4'' 1ag bolts to the center of an interior vertical wall stud and the other three vertical holes to the wall using 1/4'' expanding toggle bolts. (sold separately)
-
Locating wall studs: anchoring the mounting plate on a wall stud assures that your fry cutter will not pry loose during operation. Wall studs are spaced either 16 or 24 inches on center running floor to ceiling as part of a wood structure's framing. It is recommended to use an electric stud finder (sold separately) to locate wood (or steel) studs more quickly and accurately for the location where you want to mount the cutter wall bracket. Note: be aware that items such as ducts, electrical wires and water pipes may be behind the walls in your work area. Exercise care when installing fasteners.
-
For attaching the bracket securely to other wall surfaces such as concrete or brick, see your local hardware store for recommendations on using the appropriate concrete and masonry fasteners and anchors for your particular structure.
-
After you have mounted the cutter wall bracket, simply slide in the French fries cutter from the top. Be sure to place a food tub or large container directly under the cutter to catch cut fries and other produce.
Use
Now that your French fries cutter is fully assembled and ready to use.
1 Wash & dry potatoes. You can peel or leave the skin on. You can also use any hard vegetables that you are planning to use to make into fries. The unit is designed to handle vegetables up to 11 cm in diameter and 15 cm long.
2 It is recommended to cut a small flat edge on the end of larger potatoes.
3 Place prepared potato (cut side down) on the blade and holder assembly.
4 Occasionally if the potato is oversized, or if it is positioned at a slight angle to the blade,
the potato may not be cut entirely. It is recommended to slice oversize produce into smaller pieces for easier cutting.
5 Be sure to remove hands and fingers from the cutting plate area.
6 Be sure you have a tub or plate underneath to catch the cut fries.
7 Use both hands, with one quick steady motion, pull down on the Handle to cut the potato.
8 Clean the machine after all cutting is completed, refers to cleaning instructions listed in this manual.
Changing the cutting plate and push block
- Cutting Plate: Remove two wing nuts, slide off 3/8 cutting plate and replace with either 1/4 or 1/2 size cutting plate. Two-hole design allows for correct placement of Cutting Plate every time. Note: Do not remove the acorn nuts.
- Push Block (Black): Locate the two thumb screws on the back of the mounting plate.
Remove thumbscrews by hand or with screwdriver. Remove Pusher block and replace with optional 1/4'' or 1/2'' size pusher block. NOTE: Make sure the pusher block size matches up and fits with the cutting plate blade grid.
- Replace screws and tighten.
Cleaning instructions
1 Be very careful when handling and operating the fry cutter to keep hands away from the blades.
2 Completely disassemble the Fries Cutter and hand wash all parts that come in contact with food.
3 Remove Thumb Screws to release PUSH BLOCK.
4 Remove Wing Nuts to release the Blade and Holder Assembly or Blade Holder and Blade.
3 Remove Thumb Screws and Blade Holder Plate.
6 Clean with warm, soapy water before and after each use. Rinse with clean water. Dry all parts completely before re-assembly.
7 Minimize the use of alkaline cleaners as they may cause pitting and dulling of the finish.
Not dishwasher safe! Hand-wash all parts that come in contact with food in warm, soapy water before and after each use. Rinse with clear water. Dry all parts thoroughly before re-assembly. It is best to use a food-grade silicone spray or grease to coat all metal parts before storing a long period of time.
Warranty
Any defect affecting the functionality of the appliance which becomes apparent within one year after purchase will be repaired by free repair or replacement provided the appliance has been used and maintained in accordance with the instructions and has not been abused or misused in any way. Your statutory rights are not affected. If the appliance is claimed under warranty, state
where and when it was purchased and include proof of purchase (e.g. receipt).
In line with our policy of continuous product development we reserve the right to change the product, packaging and documentation specifications without notice.
Discarding & Environment
When decommissioning the appliance, the product must not be disposed of with other household waste. Instead, it is your responsibility to dispose to your waste equipment by handing it over to a designated collection point. Failure to follow this rule may be penalized in accordance with applicable regulations on waste disposal. The separate collection and recycling of your waste equipment at the time of disposal will help conserve
natural resources and ensure that it is recycled in a manner that protects human health and the environment. For more information about where you can drop off your waste for recycling, please contact your local waste collection company. The manufacturers and importers do not take responsibility for recycling, treatment and ecological disposal, either directly or through a public system.

Sculele necessities:
7 N36eraTe nCnoB3OBAHnI uEIoUhblx MoIOuX CpeiCTB: OHN MOrY T BbI3BaT TyCKIOCTb IJI Koppo3NoHHbIe Ra3BbI Ha MeTaIINuYeCKNX YaCTaX UcTpoiCTBa.
He ynCTnte B nocydomoeuHoi MaunHe!Bce
yactn MaunHbI dIy pe3Kn, KOtOpbIE BCTynaOT B
KOHTAKT C NIIeBbIMN IpOdyKTAMN, CJIeNyET MbITb
BpyHyIO TcIIOB ODoON CMbIOM nepei I nocJe
NCNoJb30BaHHa, a NOTOM pPOMbITb YnCTOn BODoN.
Ipeed nobtopno c6opkO cnedyet TuaTeNbHO BbICyWNTb BCE 3JIeMeHTbl.
Ipeed xpaehnem yctpoiCTBa, Bce metaJIInueckne qactNdoJXHbI 6bITb Cma3aHbI INN OnpblCKaHbICNIKKOHOBOcMaa3KoI, DOnyUeHHoIN JIA KOHTaKTa C NIISeBbIMN IpoDyKTAMN.
Fapantn
JIIO6aHHeOeJkaIINNoIOMKa, KOToPAB BJeUeT 3a c06oH HePpaBnIbHyo pa6Otu yCTpoiCTBa,KOTopA 6yDet BbIABLeHa B TeueHne nepBOrO rOa OT DaTbI NOKynK, 6yDet ycTpaHena 6ecnIaTHo, IIN JxE BCE yCTpoiCTBO 6yDet 3aMeHEnHO HOBIM, ecN OHO 3KcIIpyATnpOBaIocb N 06cLyXNBauOCb COrIacHO INCTpyKcUN No 06cLyXNBauHIO N He NCNOJb3OBAIocb He npabInbHo, IIN B pa3pe3 C Ha3NaueHEm. DAnHoe nIoXeHne H N KoE Mepe He HApUshaet INbIX npAB Notpe6nteJIa, N3LoXeHNbIX B 3aKOHOaTeJIbCTBe. B clyuae 3aABNeHHa
yctpoicTba B peMOHT nIHa 3aMeHy B paMKax rapaHTn, cJeNyET yKa3aMb MeTo N daty NOkyN K yctpoiCTBa I npINOxntb Cuet, nIIN YeKOByIO KBNTaHcHIO.
Cornacho HaWe noJNTKe COBepHeCTBOBaHnHaWnx npOyKToB ocTabIeM 3a co6o npaBo HaBBOD n3MeHEN B KOHCTpyKUIO, yNaKOBky IN BTexHHueckne NapaMeTpbl, yKa3bIBaemble B TexHHueckoDokymentauu 6e3 npedynpejxdHnA.
Ytuln3aunn 3aunTa OkpykaIouee cpebl
B clyuae BbIBOda obOpyIOBaHnI n3 3KcIIpyatau, npOdyKT HeJIb3a yTINl3NpOBaTb BMeCTe CdpYIMN 6bITOBbIMN OTXODAMN. POnb3OBaTeJIb Hecet OTBETCTBeHHocTb 3a nepeDauy obOpyIOBaHnB COOTBECTByIOUm NpHKT pNiEMa TexHnKn 6bIBWeB yNtpe6JIeHNn. HecobJIoJeHne BblweyKa3AHNOrno NOJoxEHnMoKeT npNBecTN K HaIOxEHnIO WTPaΦOB B COOTBECTBnC DeiCTByIOUmnpABINAmB OTHoWEHN yTINl3aUm OTXoDOb.CeJIeKTHnBbIc6Op n yTINl3aUcnNCNoB30BaHHoro o6OpyIOBaHnI cnOCo6CTByIOT
coxpaheHHIO npnpoHbIX pecypcoB n obecneuBAOT peunPKyIaIIO TaKIM 06pa3OM, KOtOpBI He BpeH dIg 3DopOBbI N OKpyKaIOUe I cpebl.ДЯ noJyEHHN OOnOJIHnTeBHO INΦOpMaUN O TOM, rIe MOKHO OTdAIB NCNoJIb3OBaHHoe 6OpyIDOBAHHe IJIyUTIN3aUIN, 6paTInTEcB M MeCTHyO KOMPAnHIO NO c6OpY OTXoDNOB. PpOIN3BOJNTeB IN MMnOpTeP He Hecyt OTBETCTBeHHOCTH 3a peuPKyIaIIO N nepepaB0TKy OTXoDNOB 3KOJIoRnueCKN 6e3OJaCHbIM CnOCobM, KaK HeNocpeiCTBeHHO, TAK N B paMKaX focydapCTBeHHOH CnCTEmbl.

Ayanné nλatn,
EuxapioTooue nou ayopaoate auto to npoiov Hendi. AiaBaoTe npoeekTu c onyiec xphoc npiv ouvdeote tn ouakeun, npokelévou va npoaBete nOavn BAbn nou mopei va opeiIeTal e avaogevn xpnan. AiaBaoTe 1oiC tC onnyiec aopaaleiac nolu npoeekTu.
PKS Hendi South East Europe SA
5 Metsovou Str.
18346 Moschato, Athens, Greece
Tel: +30 210 4839700
Email: info@pks-hendi.com
Hendi Polska Sp. z o.o.
ul. Firmowa 12
62-023 Robakowo, Poland
Tel: +48616587000
Email: info@hendi.pl
Hendi Italia S.R.L.
Via Leonardo da Vinci 4
39100 Bolzano (BZ), Italy
Tel: +39 800 727 438
Email: office.italy@hendi.eu
Hendi Food Service Equipment GmbH
Ehring 15
1208, 12/F Exchange Tower
33 Wang Chiu Road, Kowloon Bay, Hong Kong
Tel: +852 2154 2618
Email: info-hk@hendi.eu
Hendi Food Service Equipment Romania S.R.L.
www.youtube.com/HendiEquipment
Changes, printing and typesetting errors reserved.
Änderungen und Druckfehler vorbehalten.
Wijzigingen en drukfouten voorbehonden.
- Producent zastrzega sare prawo do zmian oraz bledów drukarskih w instrukcji.
- Variations et fautes d'impression réservés.
- Important Safety Instructions
- Assembly
- Unbox all parts
- Tools needed:
- Wall Mounting (optional)
- Use
- Changing the cutting plate and push block
- Cleaning instructions
- Warranty
- Discarding & Environment
- Sculele necessities:
- Fapantn
- Ytuln3aunn 3aunTa OkpykaIouee cpebl
- PKS Hendi South East Europe SA
- Hendi Polska Sp. z o.o.
- Hendi Italia S.R.L.
- Hendi Food Service Equipment GmbH
- Hendi Food Service Equipment Romania S.R.L.
Brand : Hendi
Model : 630402
Category : Slicer