
ProII Plus - Scooter DUCATI - Free user manual and instructions
Find the device manual for free ProII Plus DUCATI in PDF.
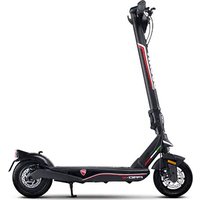
| Product type | Foldable electric scooter |
| Brand | Ducati |
| Model | ProII Plus |
| Net weight | 15.5 kg |
| Gross weight | 18.9 kg |
| Dimensions (open) | 1110 x 510 x 1140 mm |
| Dimensions (folded) | 1110 x 510 x 490 mm |
| Frame material | Magnesium |
| Maximum speed | 25 km/h (Sport mode), 20 km/h (Comfort mode), 15 km/h (Eco mode), 6 km/h (Pedestrian mode) |
| Range | Up to 25 km |
| Battery | 36 V / 7.8 Ah / 280 Wh lithium-ion |
| Charging time | Approximately 4 hours |
| Motor | 350 W brushless (max power 515 W) |
| Maximum gradient | 20% |
| Suspension | Rear |
| Brakes | Rear disc brake + front electric brake |
| Tires | 10-inch tubeless, pressure 44 psi / 3 bar |
| Maximum load | 100 kg |
| Protection rating | IPX4 |
| Lighting | LED headlight and taillight |
| Connectivity | Bluetooth, Ducati Urban e-Mobility app |
| Display | Integrated 3.5-inch LED screen |
| Additional features | Cruise control, riding modes, motor lock (RF Key or smartphone), optional turn signals |
Frequently Asked Questions - ProII Plus DUCATI
User questions about ProII Plus DUCATI
0 question about this device. Answer the ones you know or ask your own.
Ask a new question about this device
Download the instructions for your Scooter in PDF format for free! Find your manual ProII Plus - DUCATI and take your electronic device back in hand. On this page are published all the documents necessary for the use of your device. ProII Plus by DUCATI.
USER MANUAL ProII Plus DUCATI
This manual is valid for the following electric scooters:
Pro-I Evo (Black Edition / White Edition), Pro-II Plus, Pro-II Evo, Pro-III
User manual
Instructions translated from the original Italian
Thank you for choosing this product.
For information, technical support, assistance or to consult the general terms of the warranty, please contact your dealer or visit the website www.ducatiurbanemobility.com
Contents
- Safety instructions
- Package contents and assembly
- Product overview
- Battery charging and activation
- Command information / Control panel
- Quick guide
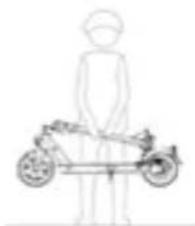
- Folding and carrying
- Range and performance
- Storage, maintenance and cleaning
- App configuration
- Technical data sheet
- Troubleshooting
- Liability and general terms of warranty
1. Safety instructions

CAUTION
IMPORTANT! Read and follow the instructions carefully before using the item. Keep this manual for future reference or new users.
Take the time to learn the basics of the procedure to avoid severe accidents that may occur in the first few months. Contact your dealer for the proper support on how to use the item correctly or to be directed to an appropriate training organisation.
The company assumes no direct or indirect responsibility arising from misuse of the item, non-compliance with both the highway code and the instructions in the manual, accidents or disputes caused by non-compliance or illegal activity.
This product is to be used for recreational purposes, by one person only and without passengers, therefore it cannot be used by more than one person at a time.
Do not modify the intended use of the vehicle in any way. The item is not suitable for stunts, competitions, transporting objects, towing other vehicles or trailers.
The electric scooter must be used carefully, always respecting the rules imposed by the Highway Code of the country where it is used, in order to avoid dangerous situations and to take the utmost care of yourself and others.

CAUTION
Driving requirements:
| Scooter model | Pro-I Evo black edition | Pro-I Evo white edition | Pro-II Plus Pro-II Evo Pro-III | |
| Product code without indicators | DU-MO- 210001 DU-MO- 210004 DU-MO- 210005 DU-MO- 210009 MN-DUC-PRO3 | |||
| Product code with indicators included | DU-MO- 210011 -DU-MO-220004 | - | DU-MO- 210010DU-MO-220008 | DU-MO- 210012DU-MO-220005DU-MO-220006 |
| MIN weight (Kg) 30 30 30 | 30 30 30 | |||
| MAX weight (Kg) 100 100 | 100 100 | 100 100 | ||
| MIN age* | 14 14 | 14 | 14 | 14 |
| MAX age* | 65 65 65 | 65 65 | ||
| MIN height (cm) | 120 | 120 | 120 | 120 |
| MAX height (cm) | 200 | 200 | 200 | 200 |
- Before using the product, check and follow local regulations regarding the minimum age of the driver, restrictions on the type of drivers who can use the product and on the use of the product itself.
The A-weighted emission sound pressure level (noise) at the rider's ear is less than 70dB(A).
Symbols identifying the safety warnings
To identify the safety messages in this manual, the following graphic symbols will be used. They draw the focus of attention of the reader/user to the proper, safe use of the item.
Pay attention
Highlights the rules to follow to prevent damage to the item and/or prevent hazardous situations from arising.
Residual risks
Highlights the presence of hazards that generate residual risks to which the user must pay attention to avoid injury or material damage.
General warnings
It is important to bear in mind that when out in a public space or on the road, even when the instructions in the manual are observed down to the letter, the rider is not immune to injury caused by infractions or inappropriate actions taken towards other vehicles, obstacles or persons. Misuse of the item or non-compliance with the instructions provided in this manual may cause severe injury.
This product is an electric vehicle. The faster you ride, the longer the braking distance. Emergency braking on slippery, muddy, wet or icy roads may result in wheel spin and loss of balance. Adequate speeds and safety distances from other vehicles or pedestrians must be adhered to. Take extra care when riding on unfamiliar roads. Do not open the kickstand when using the item, risk of severe personal injury and damage to item.
On wet roads, the braking distance increases and the grip decreases compared to dry roads!
Drive more carefully, keep a safe distance!
For personal safety, wear a helmet, and knee and elbow pads to protect against falls and injuries while riding the item. When allowing others to use the item, ensure that the rider wears the safety equipment and explain the operation of the vehicle. To avoid injury, do not allow other persons to use the item if they do not know how to use it. Wear shoes before using the item.
Children must not play with the scooter or its parts, nor should they be allowed to clean it or perform maintenance operations.
When riding, take special care to not frighten children or pedestrians. When passing behind them, warn them by sounding the horn and slow down using the minimum speed of 6km / h .
Instructions and warnings on rider behaviour
| Conditions Appropriate/intended use Improper use | ||
| Riders One | More than one person, with children or animals | |
| Safety equipment Helmet, knee pads, elbow pads, reflective vest No safety equipment | ||
| Pre-riding check | Prior to each use, check brakes and any wear, check tyre pressure (see side of tyre for recommended value), wheel wear, throttle, indicators, lights and charge status of battery. | Never checking the item prior to use |
| If any unusual noises or faults are detected, do not use the item and contact your dealer or the Authorised Technical Support Department | Using the item when noise or faults are present | |
| Walking while pushing the item | Not accelerating Depressing the throttlePushing while walking across pedestrian crossingsIn pedestrian areas when not in pedestrian mode (6 km/h)In overcrowded areas | Riding the vehicle on pedestrian crossingsRiding the vehicle in pedestrian areas when not in pedestrian mode (6 km/h)Riding the vehicle in overcrowded areas |
| Stationary | The person riding the item must be able to easily place both feet on the ground while holding the handlebars at the correct height | Not being able to keep the item stationary and balanced.Sitting on the item while it is running or stationary |
| Riding under normal conditions | No objects hanging from handlebars | Objects hanging from handlebars result in instability and may impede manoeuvring |
| Riding with both hands on handlebars. One-handNot using devices such as phones,smartwatches, music players, or headphones | Handed or hand-free ridingUsing devices such as phones,smartwatches, music players, or headphones | |
| Riding with both feet on the footrest comfortably and safely | Riding with one or both feet outside the footrestIt is prohibited to place or amass weight on the rear mudguard. | |
| Riding with helmet and protective equipment | Riding without helmet and protective equipment | |
| Riding on easily accessible, smooth and compact roads, avoiding areas with intense traffic or overcrowded areas: e.g. dedicated cycle path, smooth paved surfacesComplying with local regulations and the highway code | Riding on motorways, long-distance roadsRiding on busy roadsRiding on pavementsRiding in overcrowded areasRiding on very rough roadsRiding near: ravines, escarpments, harbours, sea, lakes or riversFailure to comply with regulations and the highway code | |
| Looking ahead and watching out for obstacles, vehicles or nearby pedestrians | Becoming distracted while riding | |
| Changing direction, making sure to be seen, moderating speedAnticipating the route and moderating speed while observing the highway code and those that are the most vulnerableUsing direction indicators, if included on the item | Changing direction abruptly at high speed without making sure that you have been seenBraking and cornering at the same time makes the vehicle unstableNot using direction indicators | |
| Slowing down when pedestrians are presentUsing pedestrian mode in pedestrian areas (6 km/h)Warning others of your presence by using the bell | Accelerating or maintaining a constant speed when pedestrians are presentRiding without using pedestrian mode in pedestrian areas (6 km/h)Not warning others of your presence by using the bell | |
| Uneven road conditions: speed bumps/ steps/rough road surfaces | Riding at moderate speeds High-speed riding Bend knees slightly for better shock absorption when traversing uneven surfaces. | Accelerating over bumps or ditches, going down steps, jumping over obstacles, climbing pavements, riding harshly. |
| Behaviour: around bends, down slopes, in the presence of nearby obstacles, vehicles and pedestrians | Keeping at a safe distance Not observing safety Ceasing to accelerate Accelerating Riding at moderate speed and braking safely Paying attention to doors and other high obstacles | distances Riding at high speed, braking suddenly Traversing beneath high obstacles |
| Visibility conditions | Only ride if there is enough light to ride safely. When riding in unfavourable lighting conditions (from half an hour following sunset, throughout the entire period of darkness and even during the day, if weather conditions preclude road visibility, when driving through tunnels), remember to switch on the item's lights and wear a reflective vest, belts or bands. | Riding in unfavourable lighting conditions with lights off and without using a reflective vest, belts or bands |
| Weather conditions Driving in optimal conditions (no rain) | Driving in adverse conditions: in the rain, in case of snowfall, in the presence of ice or mud on the road, in case of strong wind and fog. | |
| Parking | In designated areas without impeding movement of vehicles or pedestrians On smooth surfaces, ensuring stability is maintained Switching off the item and using an anti-theft device. Using the kickstand provided | Everywhere, impeding movement of vehicles or pedestrians On uneven surfaces and without ensuring stability Leaving the item switched on, unattended with no anti-theft device |
| Engaging in extreme sports/acrobatics | NO | YES Riding near: ravines, escarpments, harbours, sea, lakes or rivers Riding through puddles Racing with other vehicles |
| Subjecting the item to forceful impact | NO | YES jumping over object or persons, jumping off steps or from high places |
What to do after a fall:
Check that the throttle lever works properly. To do this, accelerate and decelerate several times.
Check that the brakes work properly. To do this, get off the item, push it forward and brake to ensure it responds to the controls.
Check that all vehicle components are in place and securely fastened.
Check tyre wear and pressure (see side of tyre for recommended value).
Check the wear of the brakes and cables.
I The brakes may become hot during use. Do not touch after use.
2. Package contents and assembly
Assembled item, the handlebar must be installed using the special screws contained in the package.
| Model Reference | picture In the package Handlebar | assembly | |
| Pro-I Evo Black edition | Accessories: - Allen wrenches - 4 screws forhandlebars - Spare air chamber - Spare sticker - Tyre inflation adapter - Charger | Insert the 4 screws manually without tightening them, then use the hex wrench supplied to tighten them and secure the handlebars. | |
| Pro-I Evo White edition | |||
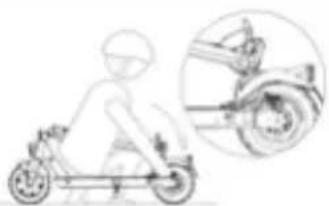
| Pro-II Plus | Accessories: - Allen wrenches - Components for handlebar assembly (hook, plastic parts, 4 screws) - Tyre inflation adapter - Charger | Steps: 1. Open the kickstand 2. Pick up the handlebar, place the lever in the closed position and lower the safety ring. 3. Install the handlebar on the shaft 4. Install the hook (see photo) by approaching it to the rod, making sure that it is aligned with the holes, then insert the screws. 5. Insert the screw on the outside into the hole located under the control panel. 6. Tighten the screws. 7. Align the plastic plate (see photo) with the second hole/ profile of the control panel, then insert and tighten the screw. | |
| Pro-II Evo | |||
| Pro-III | Accessories: - Allen wrenches - Components for handlebar assembly (hook, plastic parts, 3 screws) - Tyre inflation adapter - Charger - 2 RF Keys for scooter ignition | Method: 1. Open the kickstand 2. Pick up the handlebar, place the lever in the closed position and lower the safety ring. 3. Install the handlebar on the shaft 4. Install the hook (see photo) by approaching it to the rod, making sure that it is aligned with the holes, then insert the screws. 5. Insert the screw on the outside into the hole located under the control panel. 6. Tighten the screws. |
Method:
Take the item out of the packaging
- Open the kickstand and check that the item is stable
- Open the handlebar stem and secure it by closing the lever of the closing mechanism
- Connect the display power cable to the main wiring (if necessary)
- Install the handlebar on the stem (do not crush the cables)
- Tighten the screws on the stem using the wrench supplied
- Adjust the stem closing mechanism*
| Model Reference picture * Adjustment | ||
| Pro-I Evo black & white edition | Wobbly handlebar stem If the handlbar stem is wobbly, you can tighten the screws on the folding system using the wrench supplied. | |
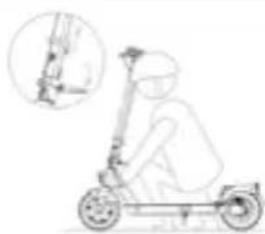
| Pro-II Plus Pro-II Evo Pro-III | Adjust the handlebar: If the handlebar stem vibrates during use, adjust the screw by means of the hexagon wrench as illustrated in the figure. | |

CAUTION
Assemble the item correctly. If, during assembly, any factory defects are detected, certain steps are unclear or issues with assembly or adjustments occur, do not ride the vehicle and contact your dealer or visit www.ducatiurbanemobility.com for technical support.
Keep children away from plastic items (including packaging materials) and small parts that may result in suffocation.
It is forbidden to modify or transform the item or any its parts in any way, as this may impair efficiency, reduce structural integrity and cause damage. Remove any sharp edges caused by misuse, breakage or damage to the item. If any factory defects, unusual noises or faults are detected, do not ride the vehicle and contact your dealer or visit www.ducatiurbanemobility.com for technical support.
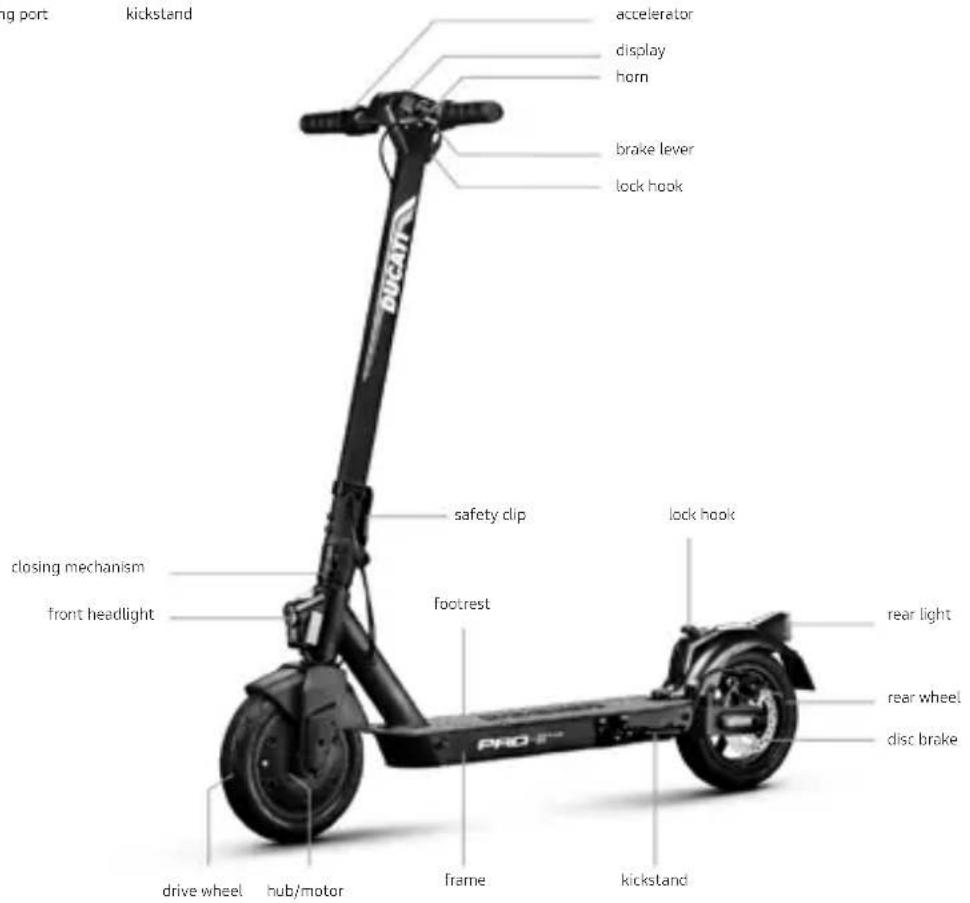
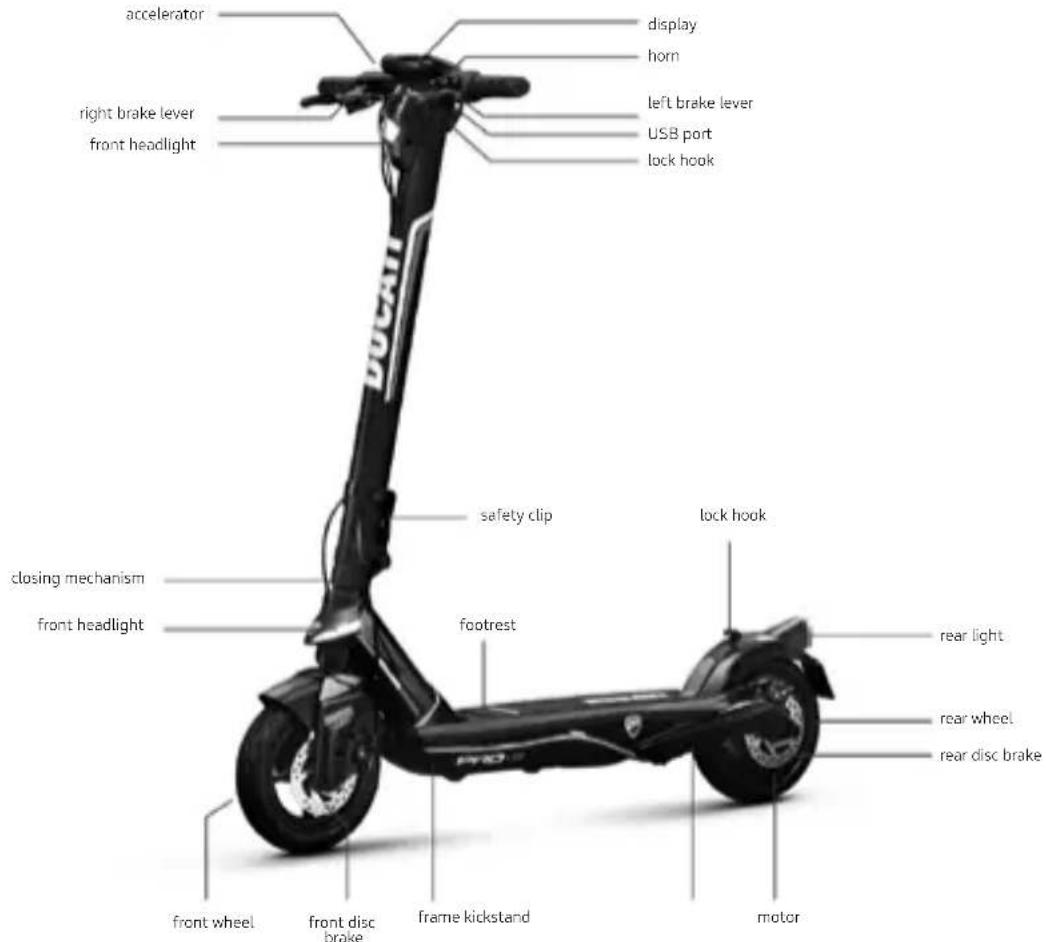
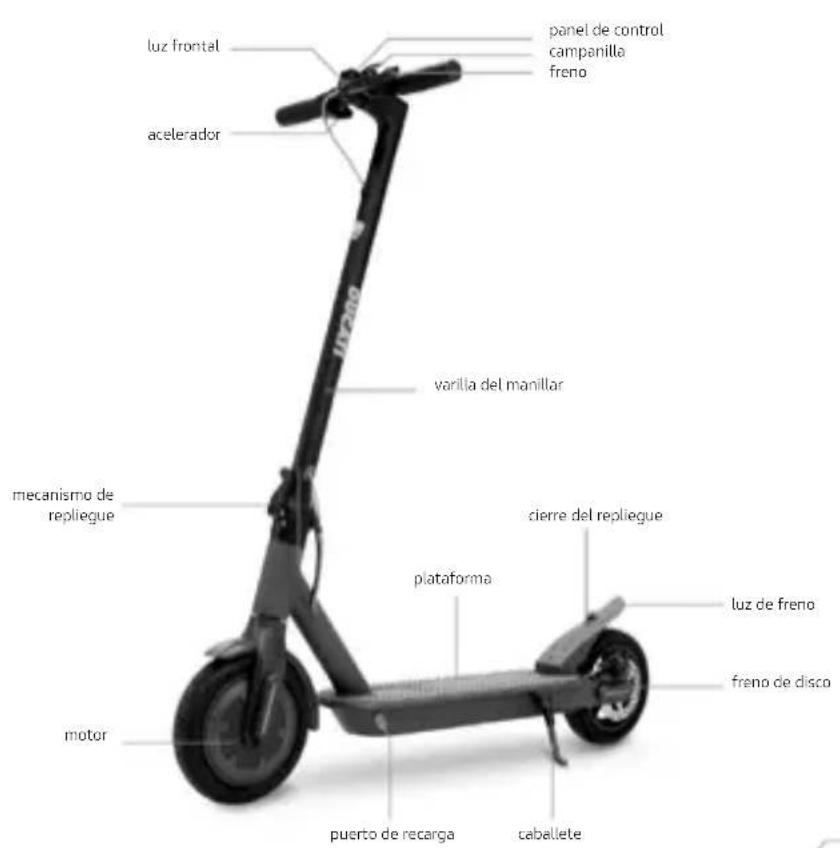
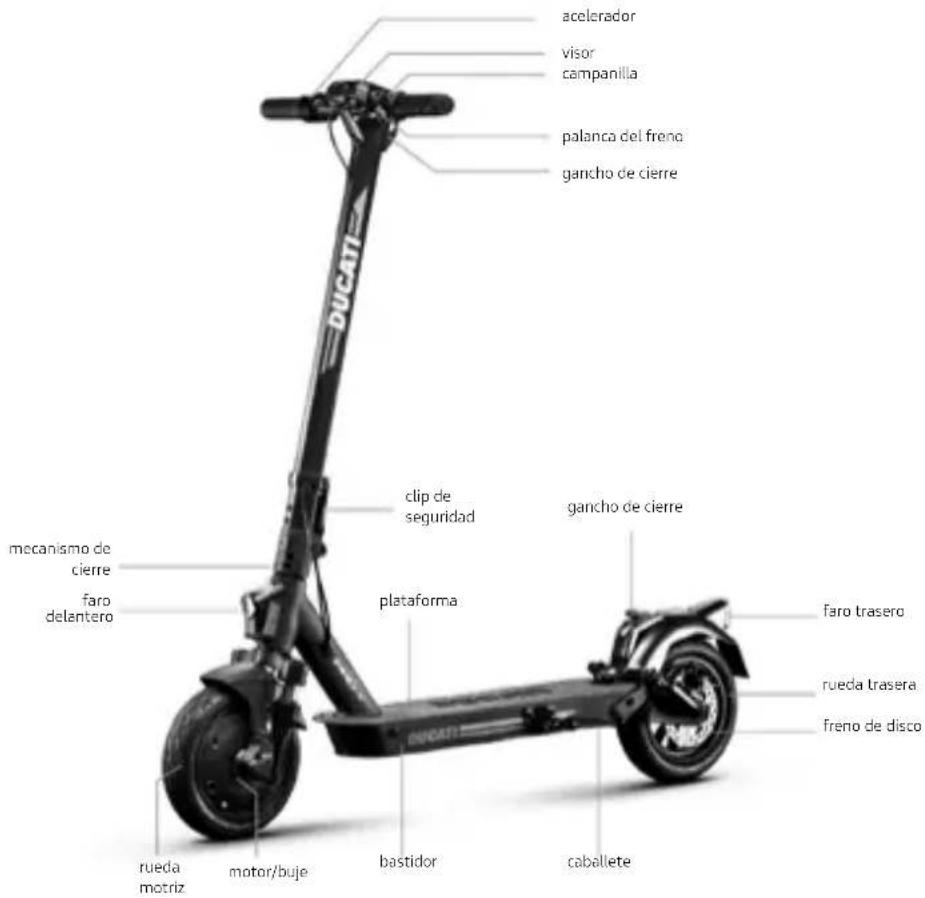
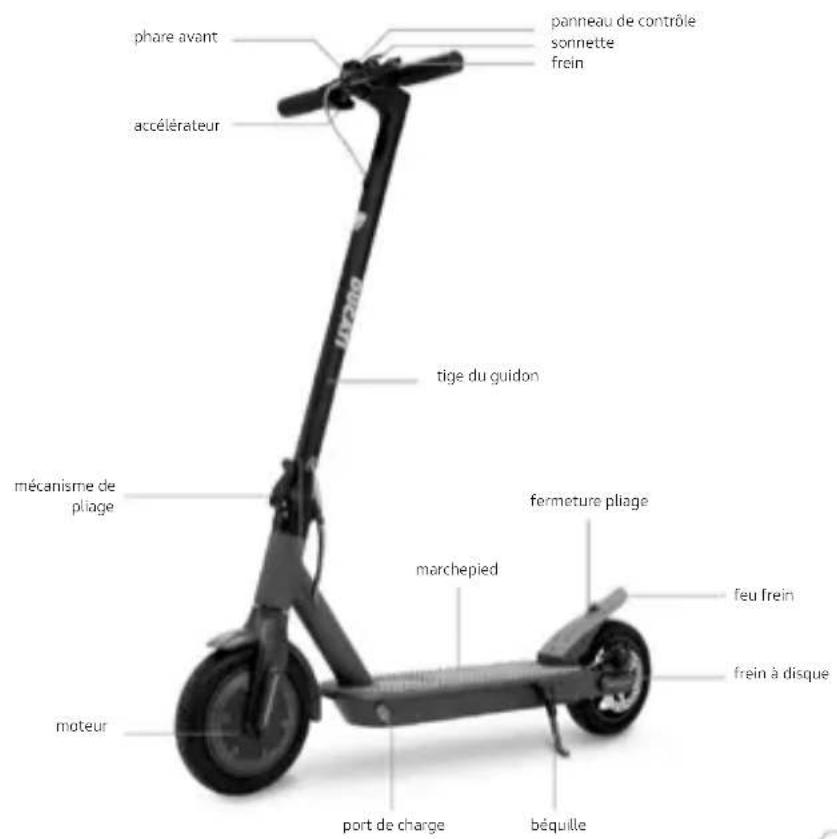
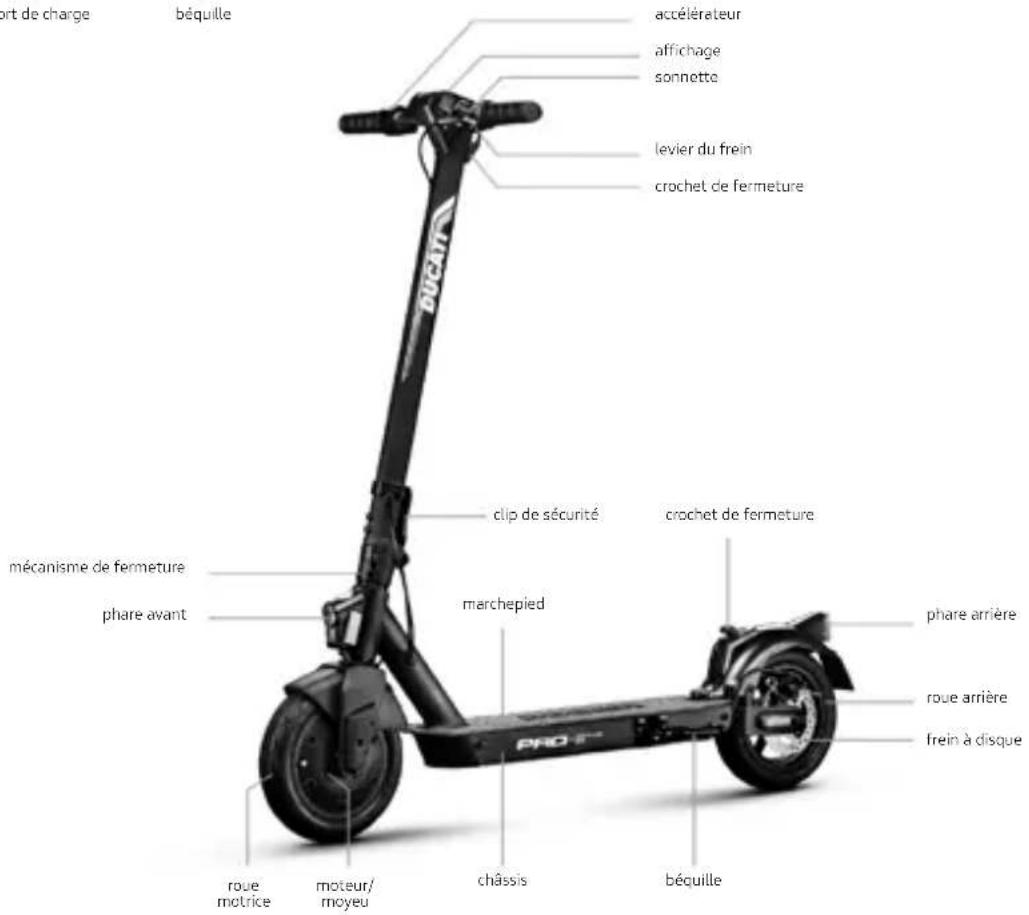
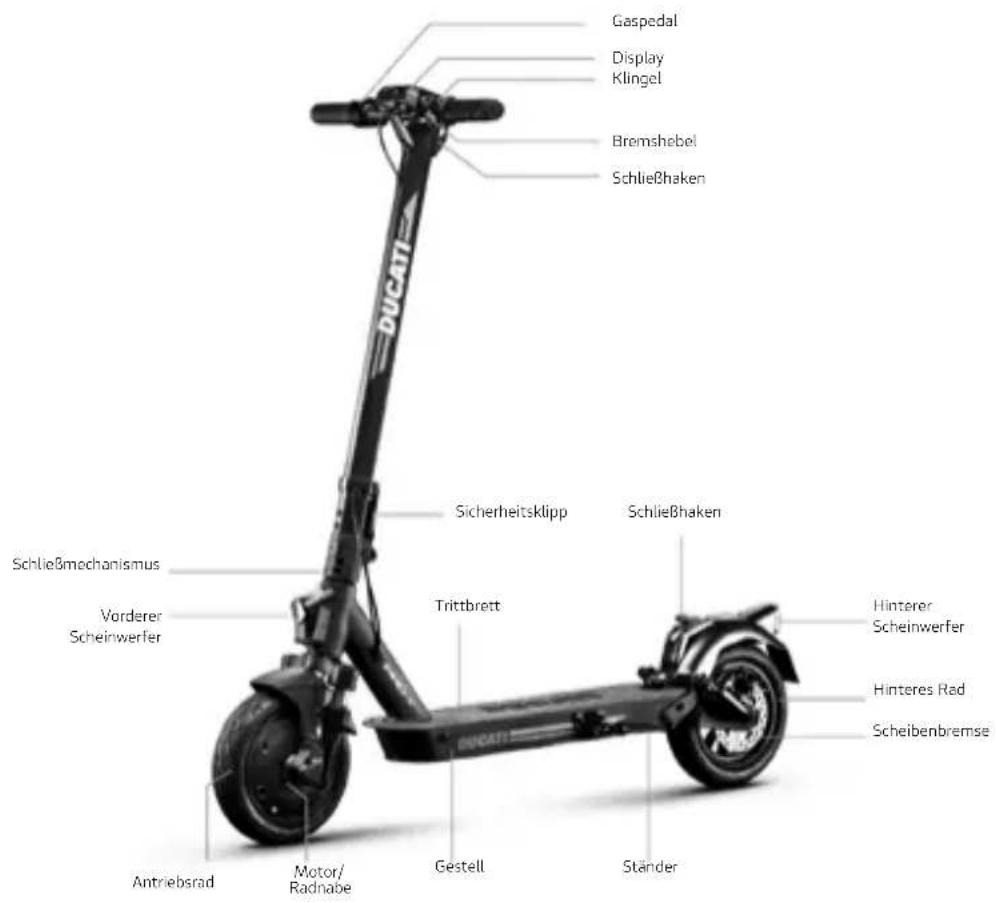
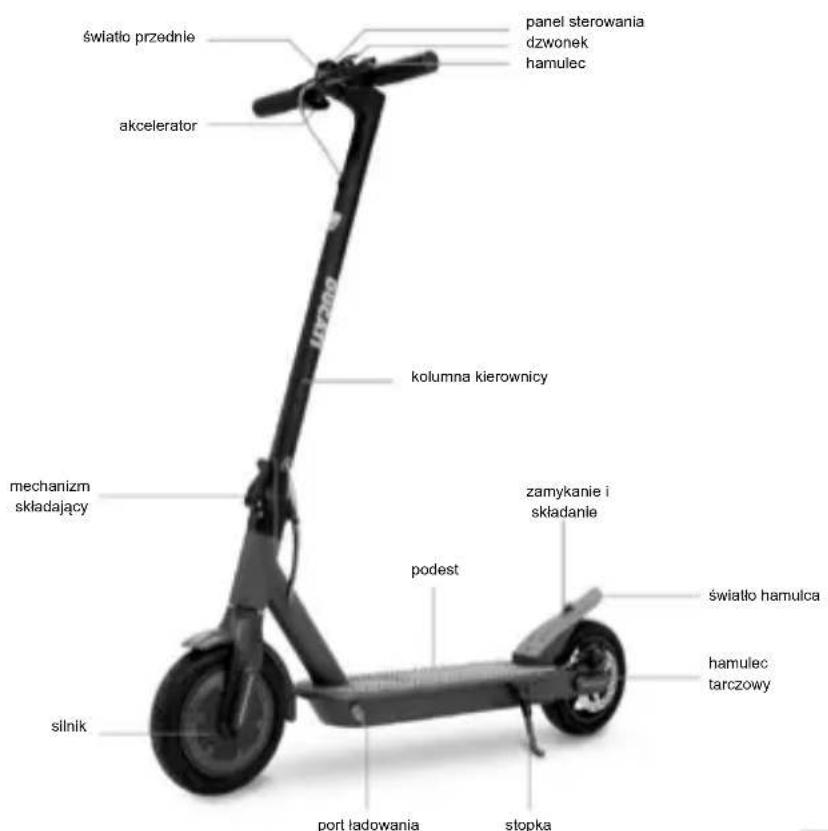
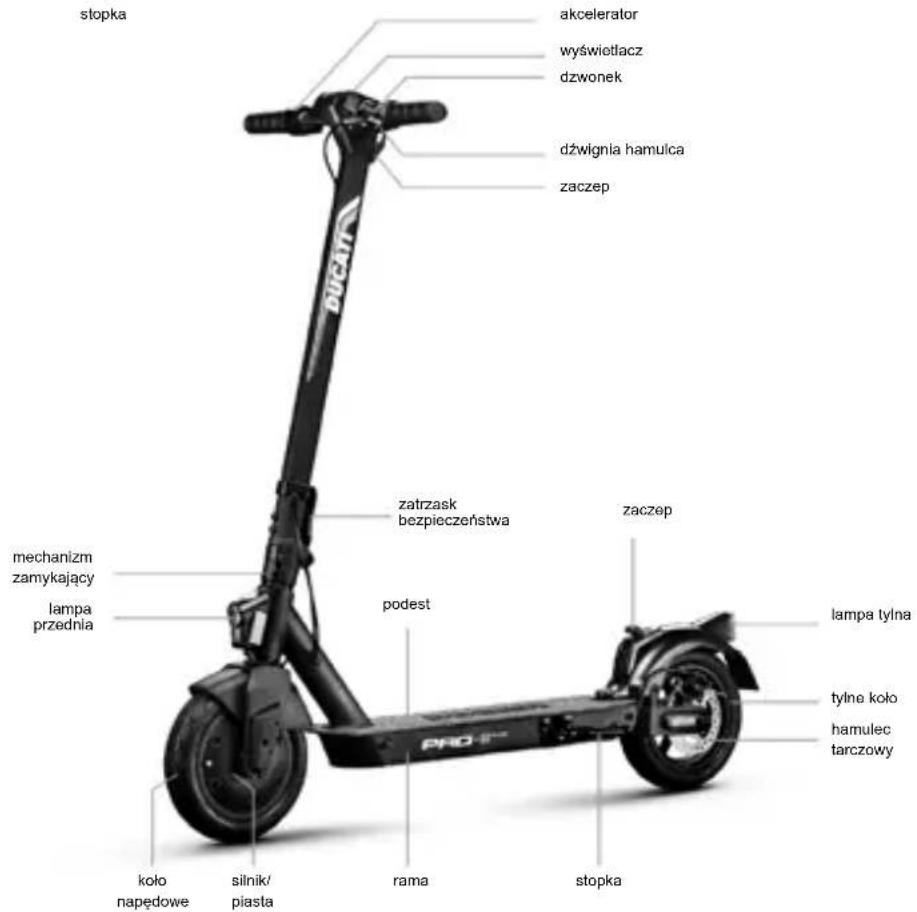
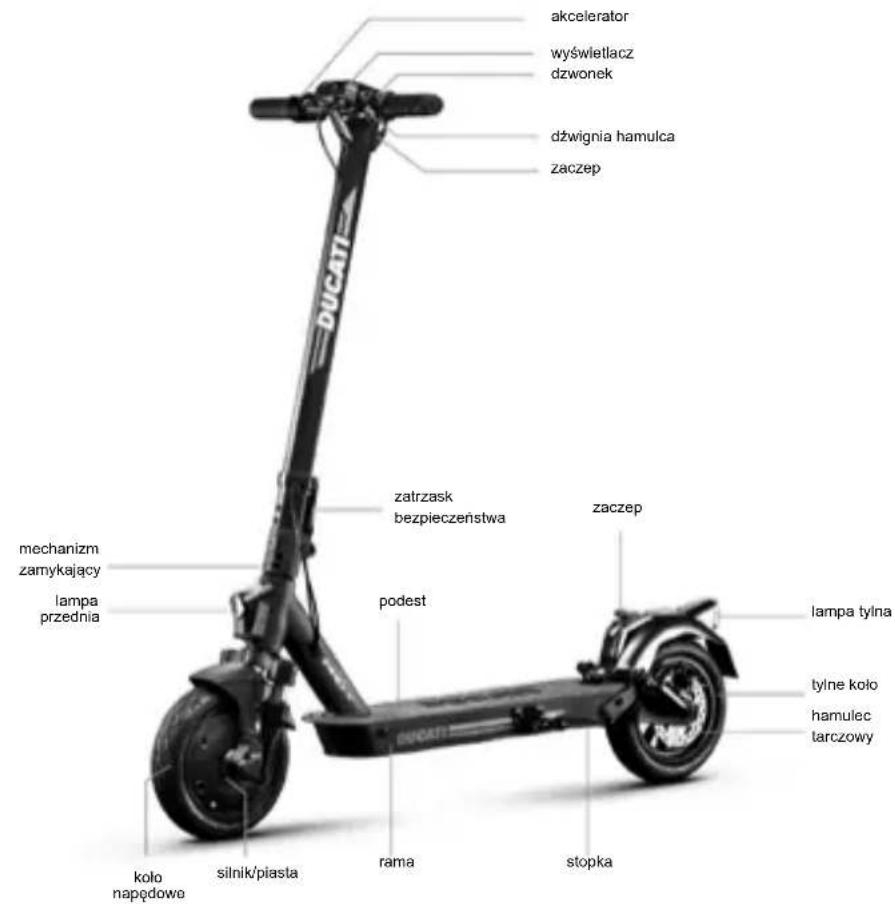
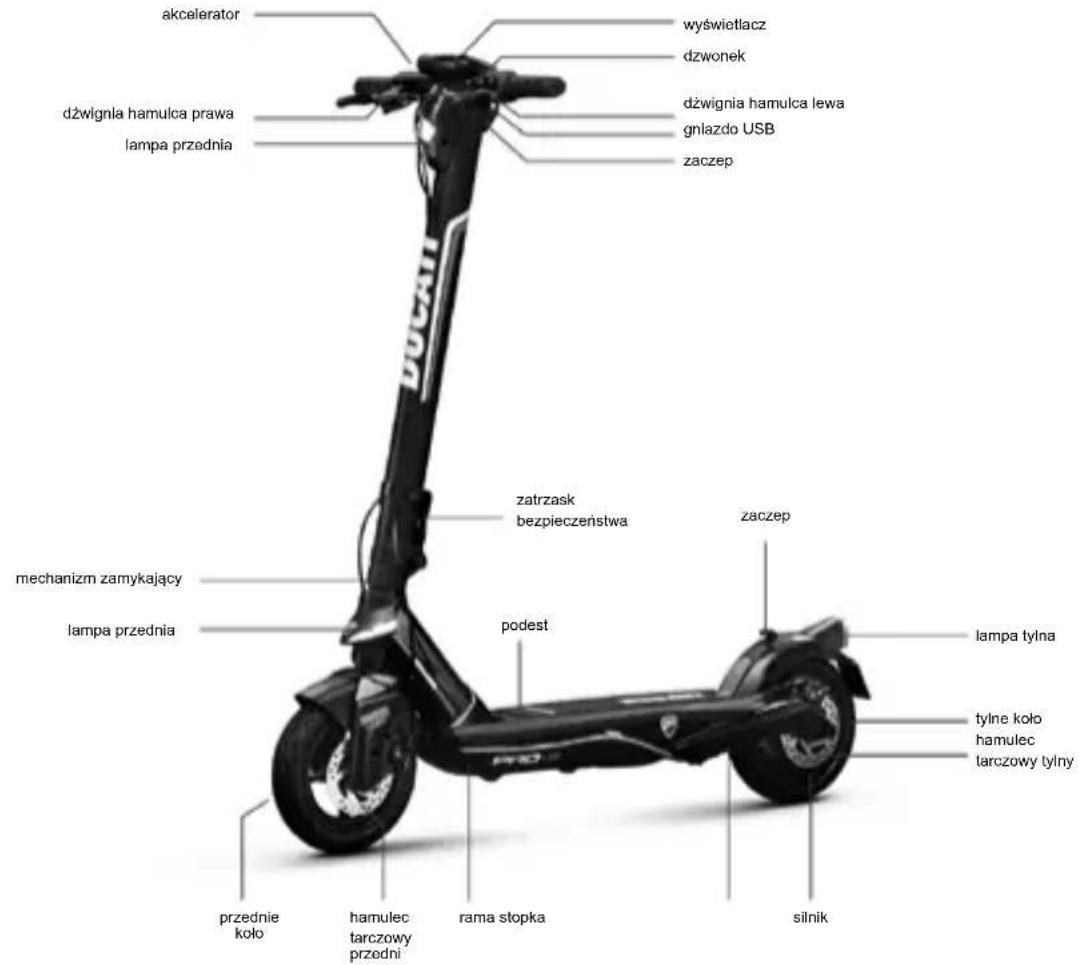
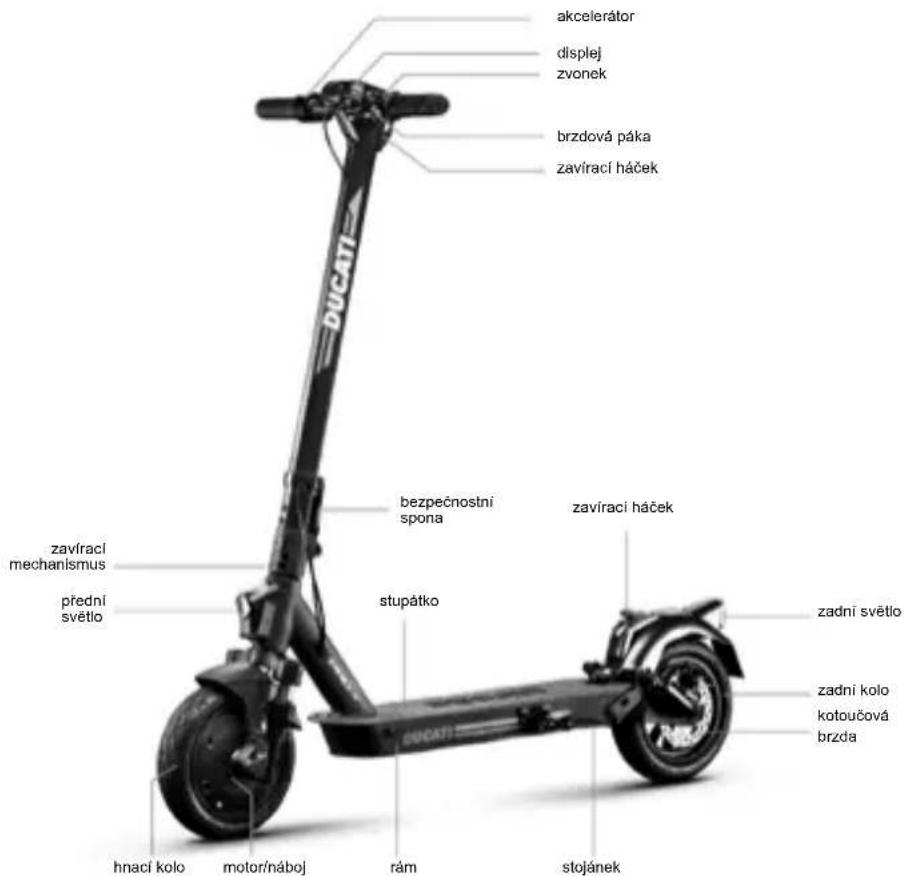
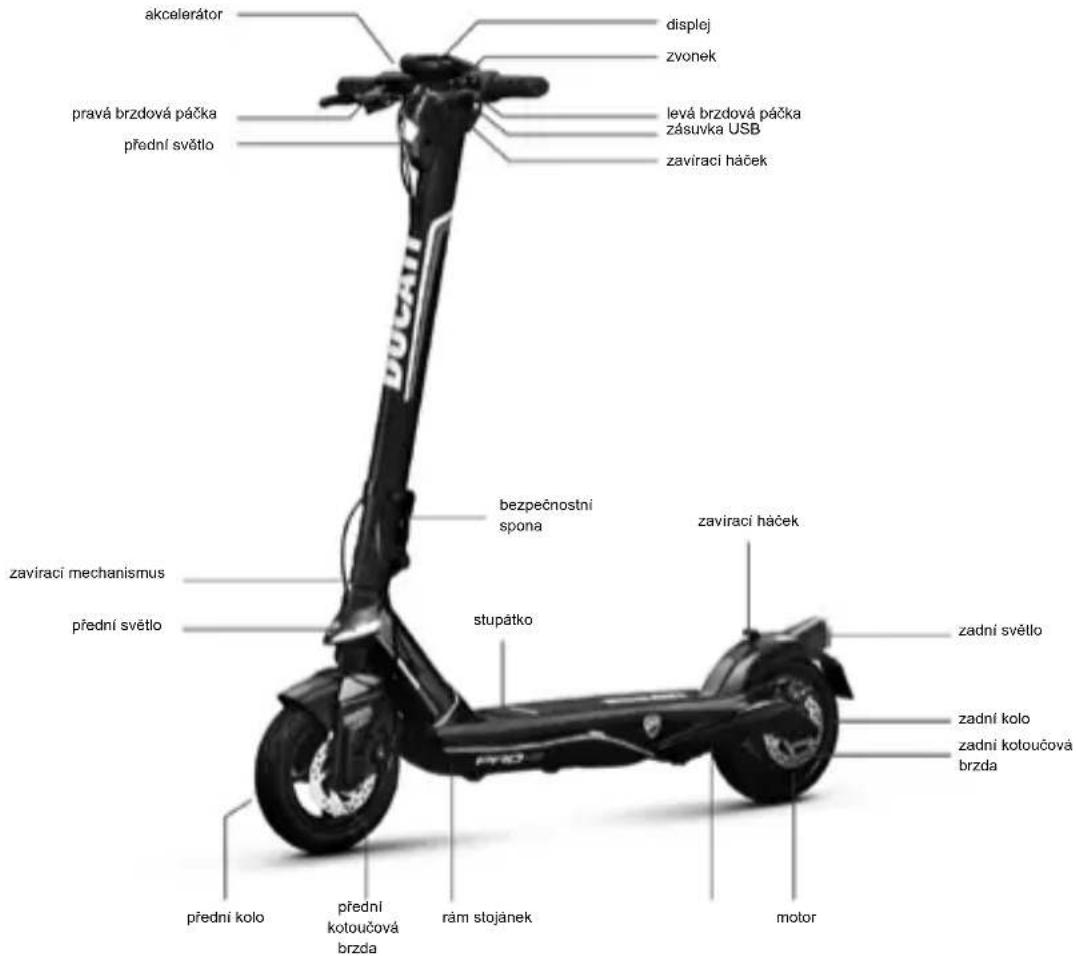
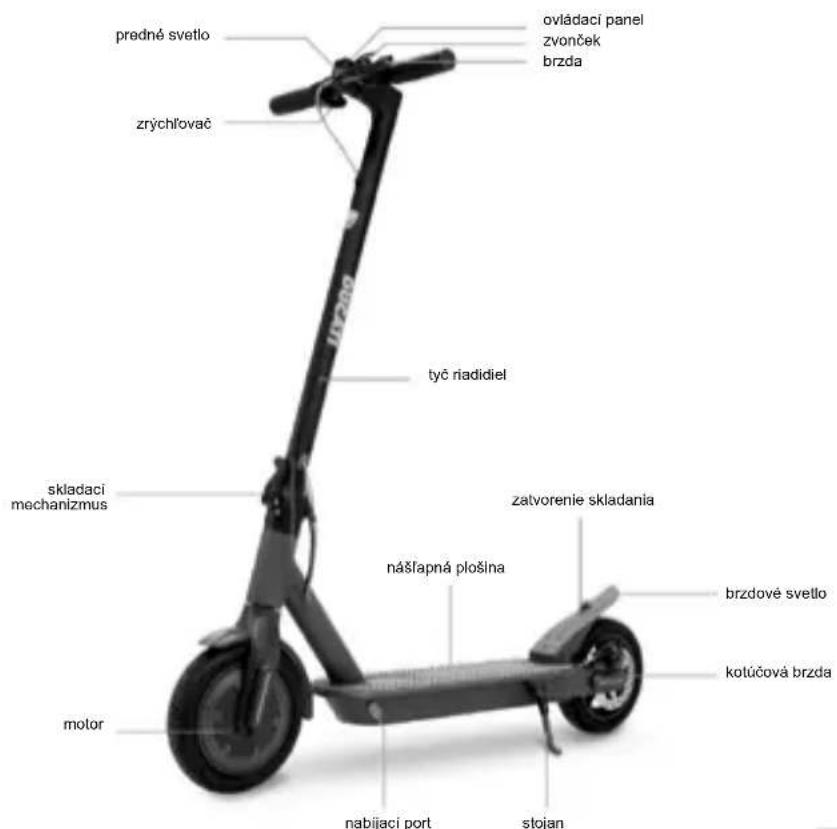
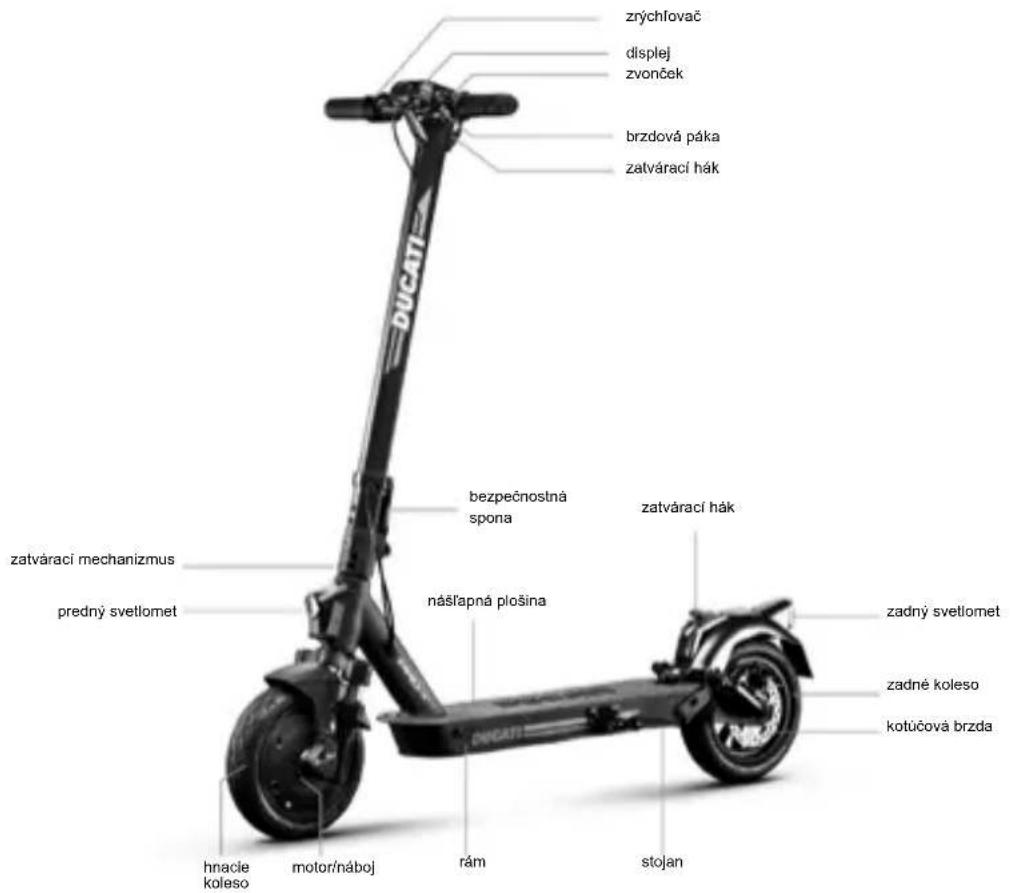
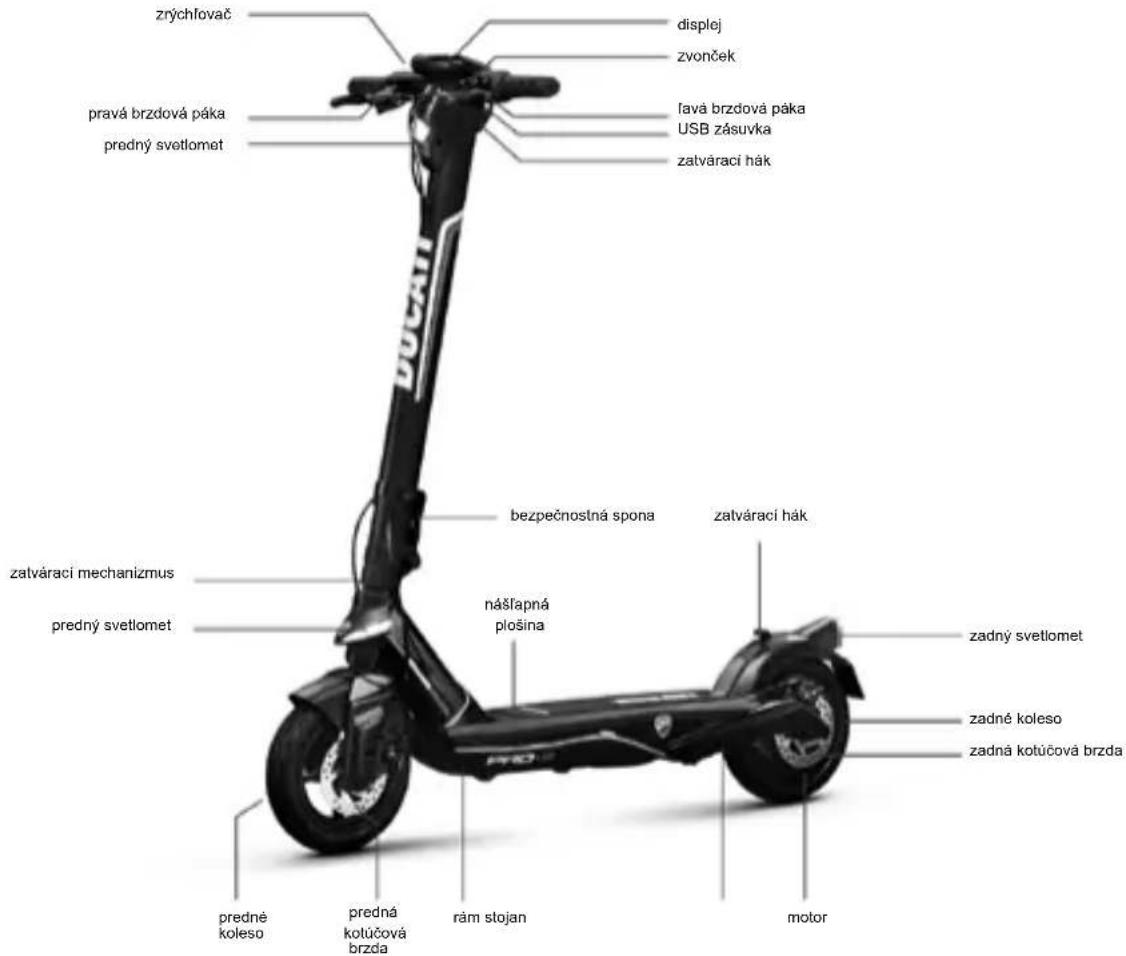
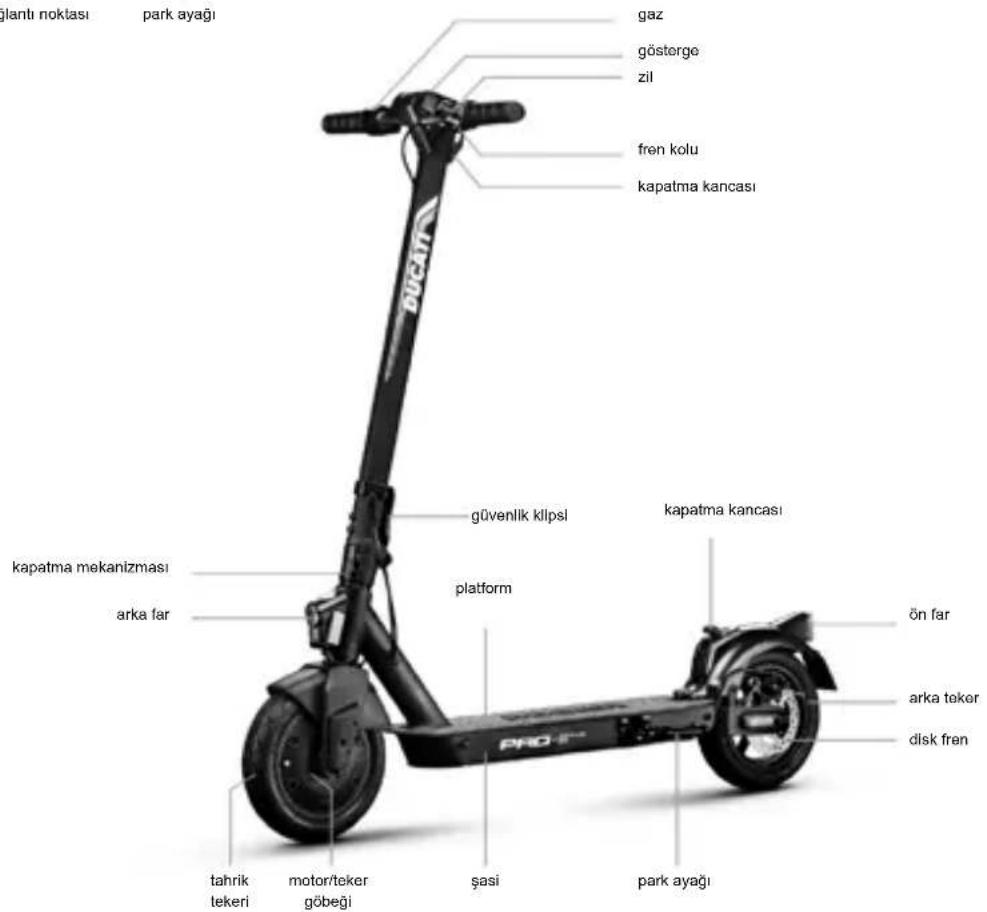
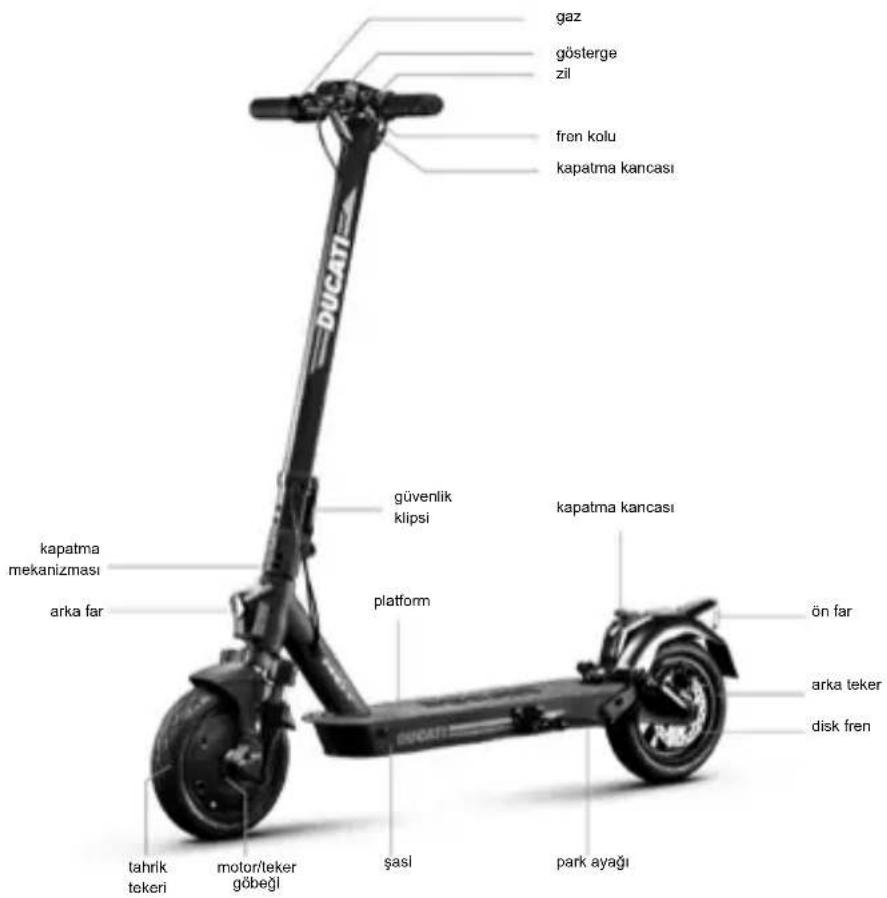
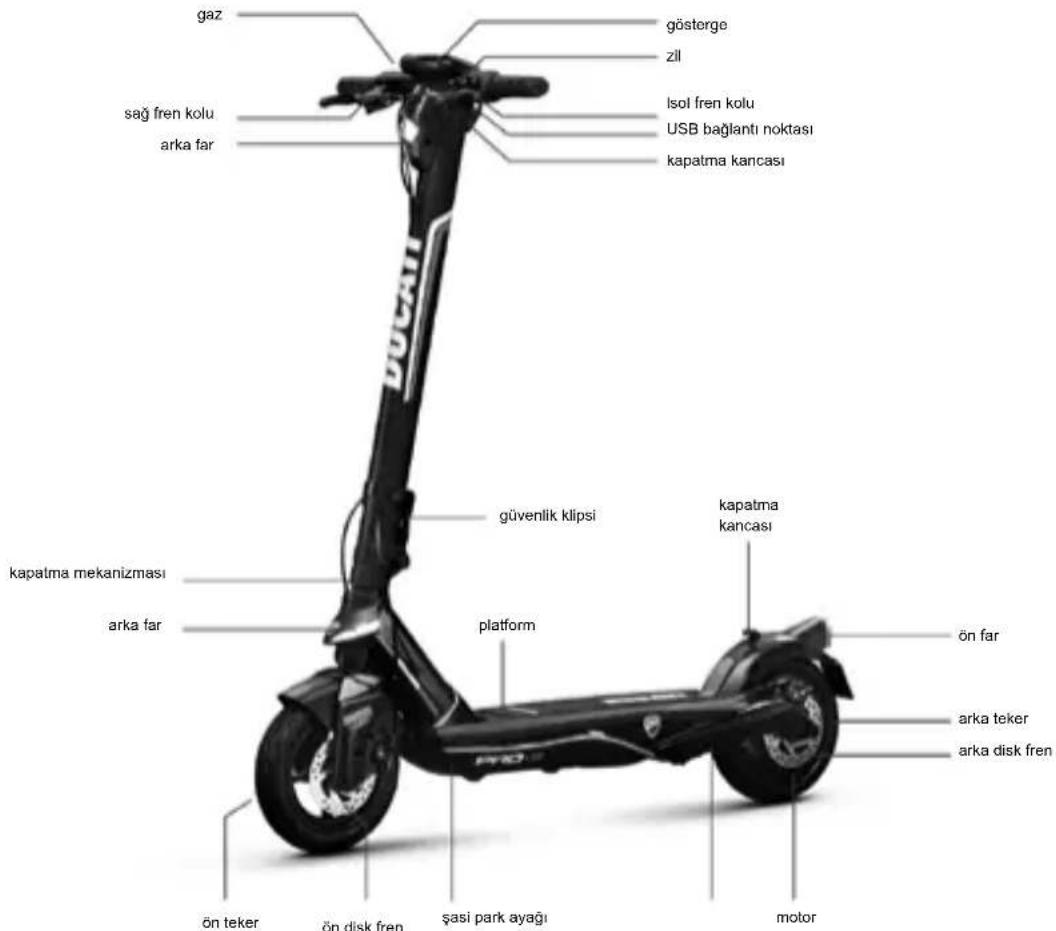
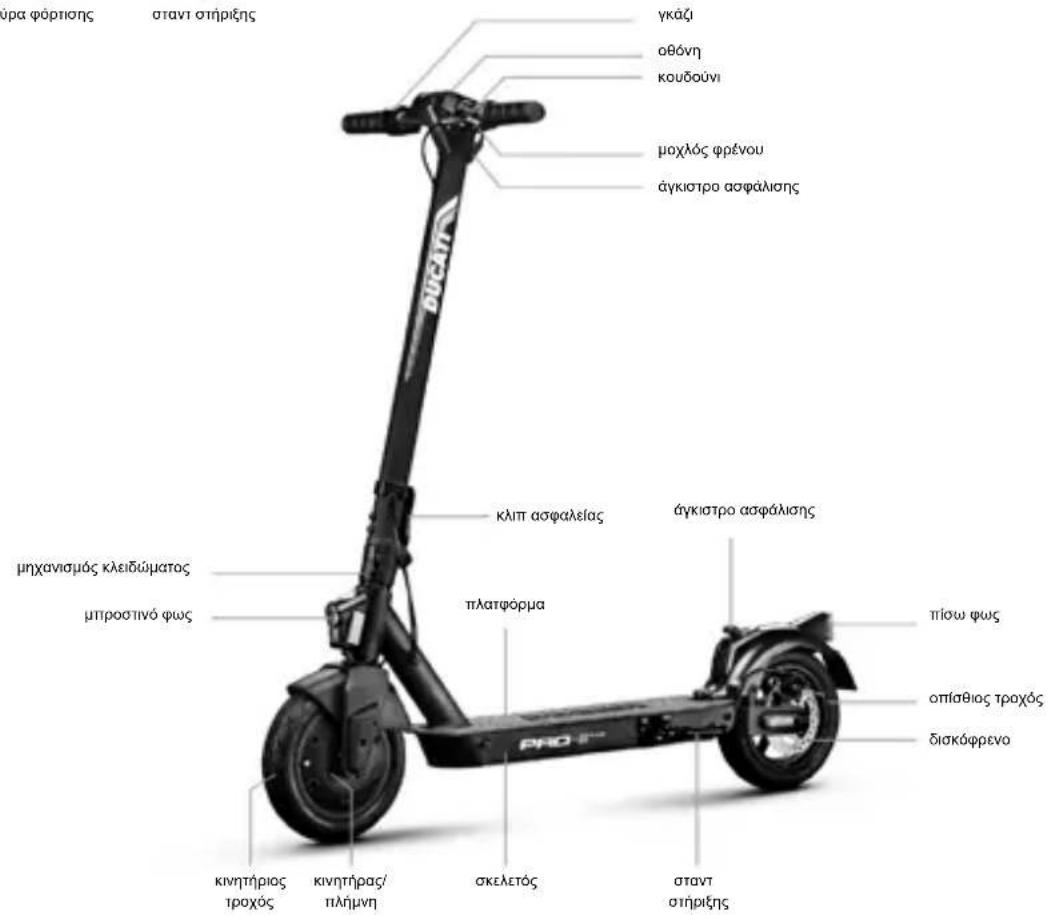
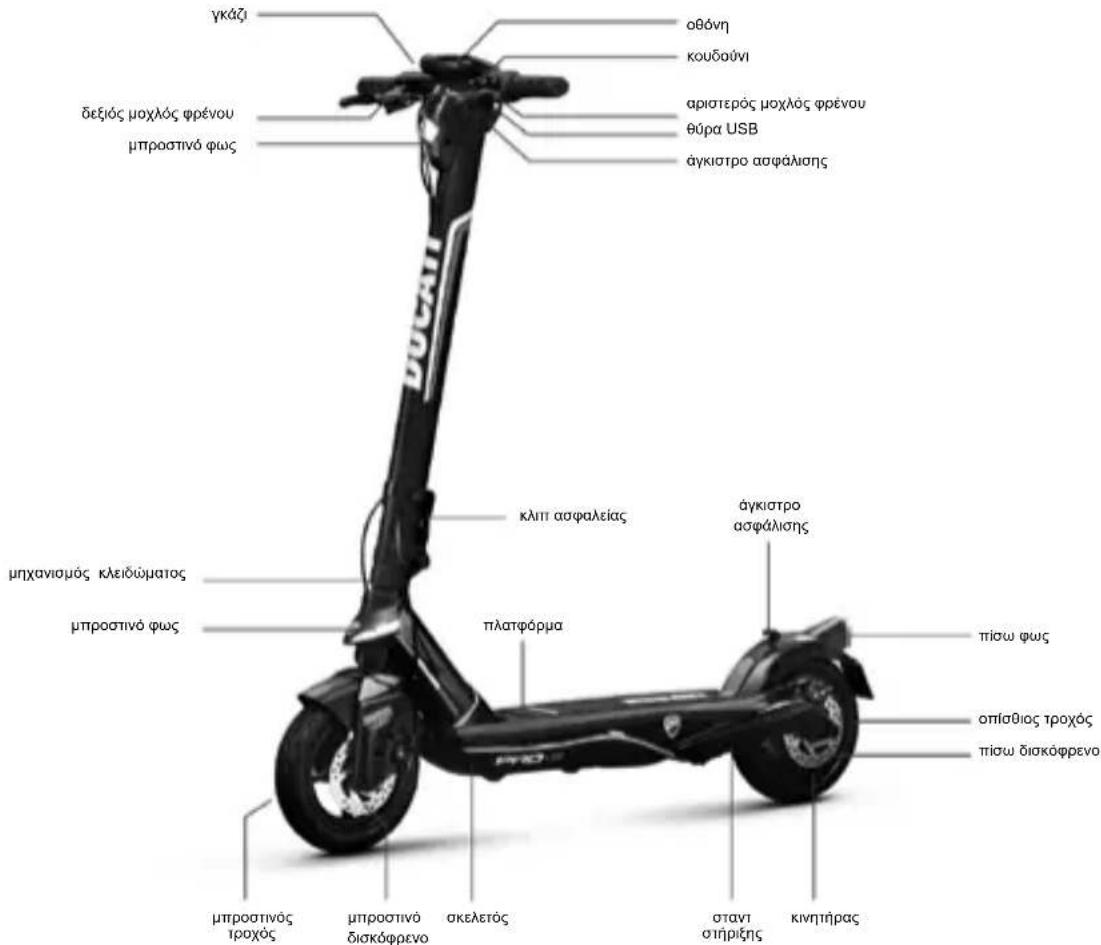
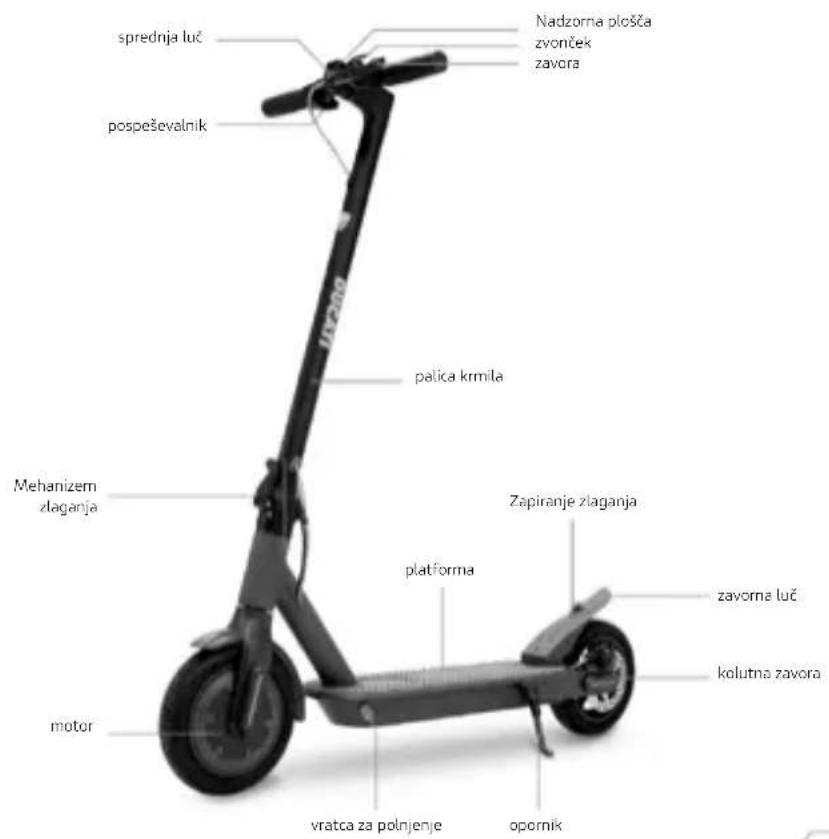
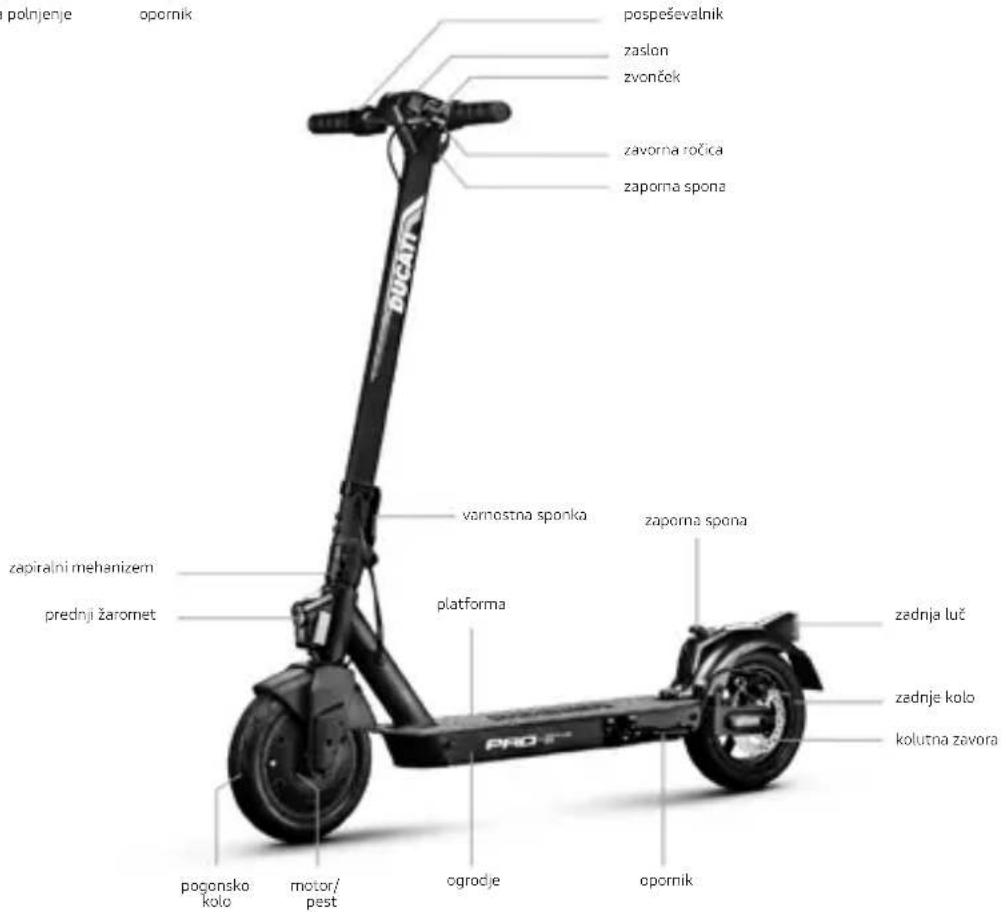
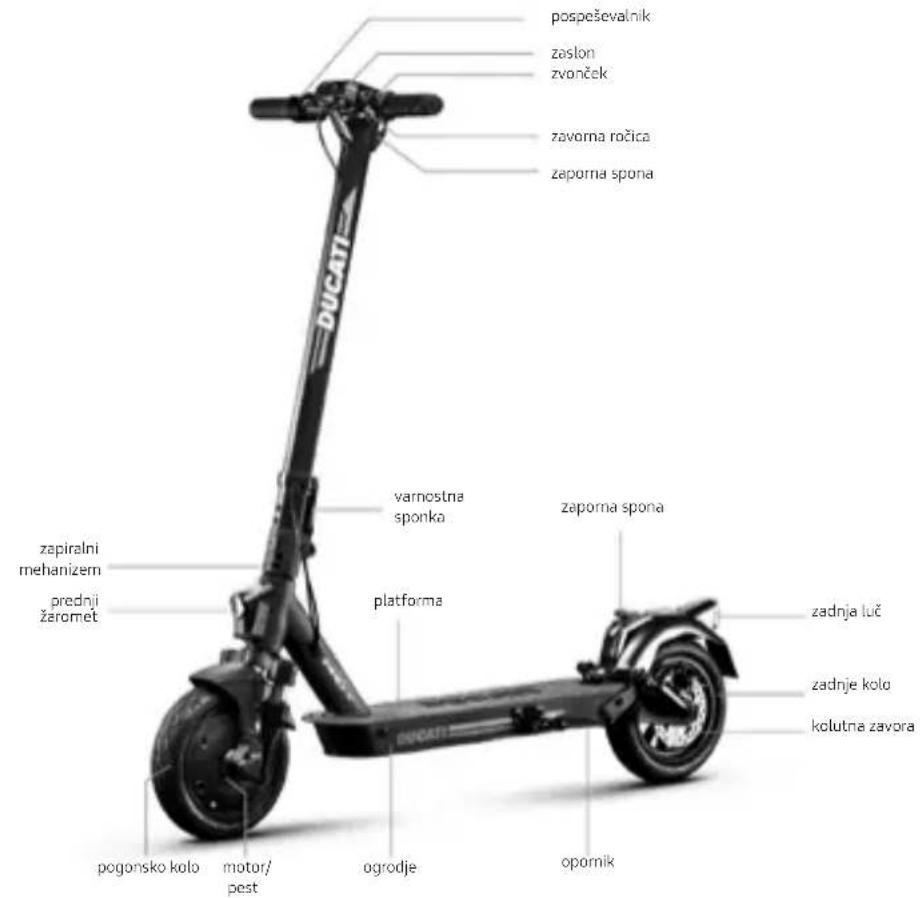
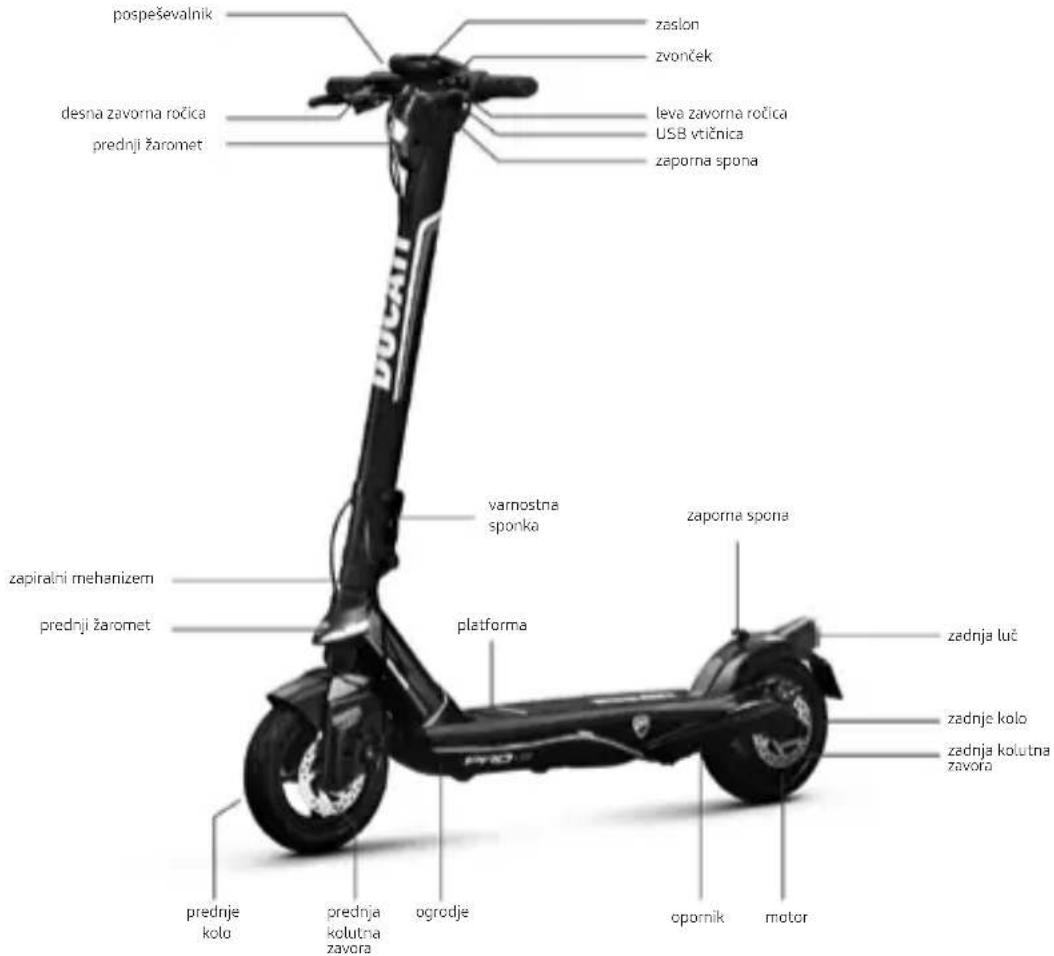
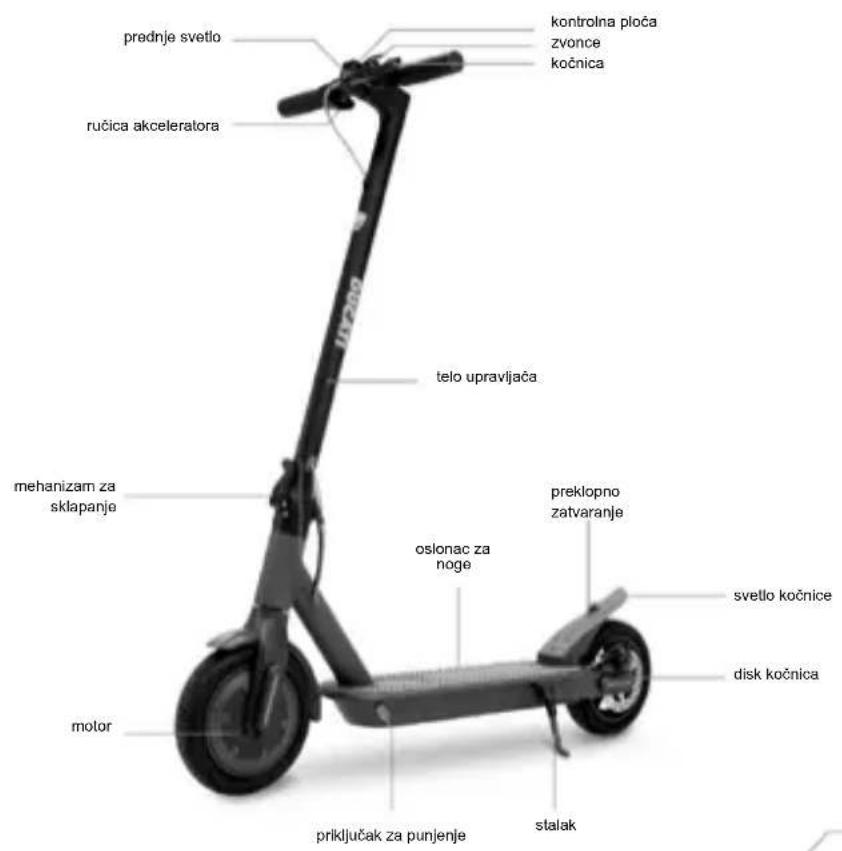
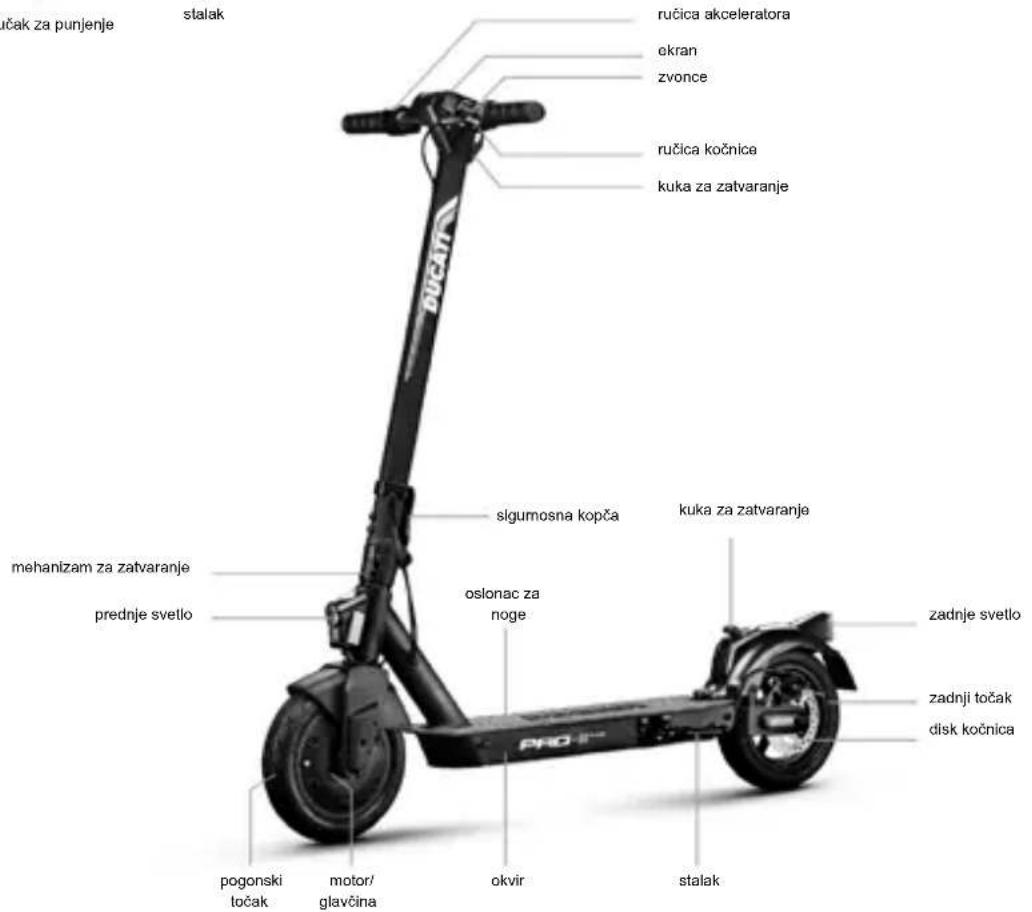
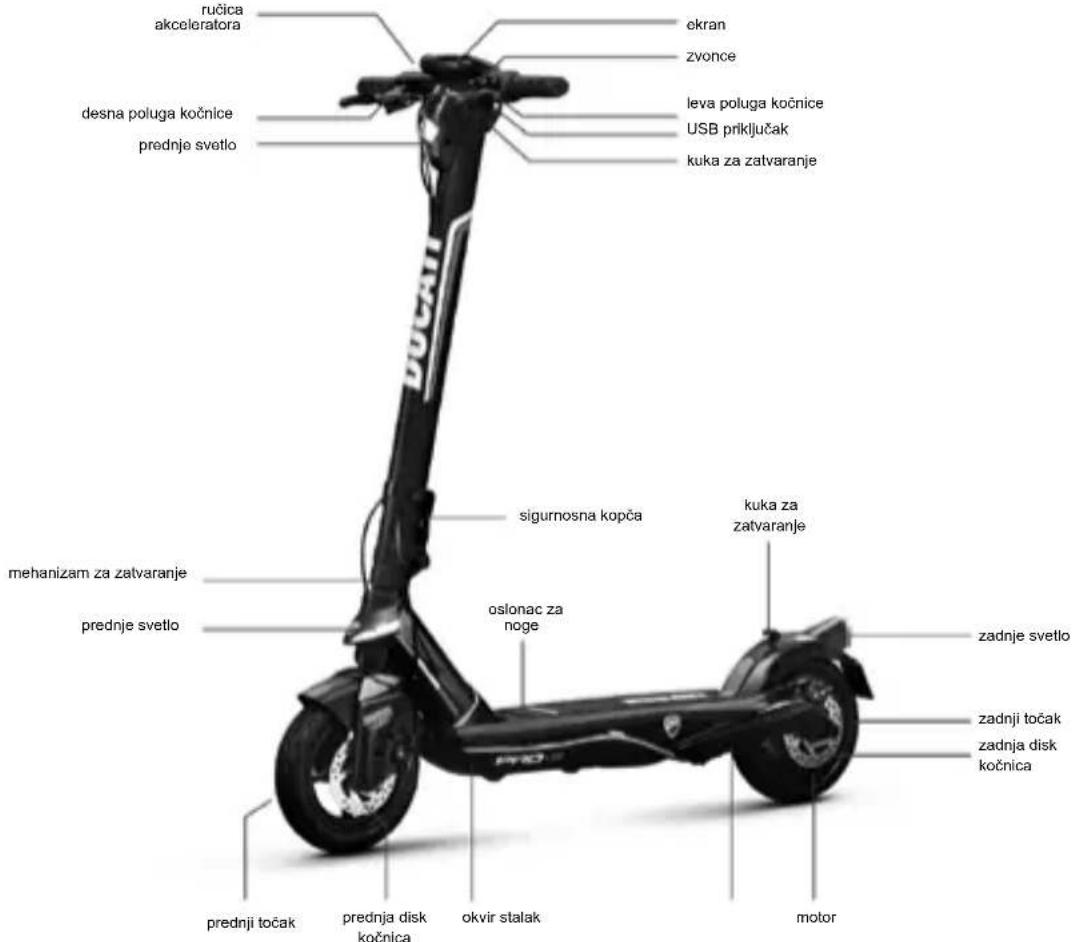
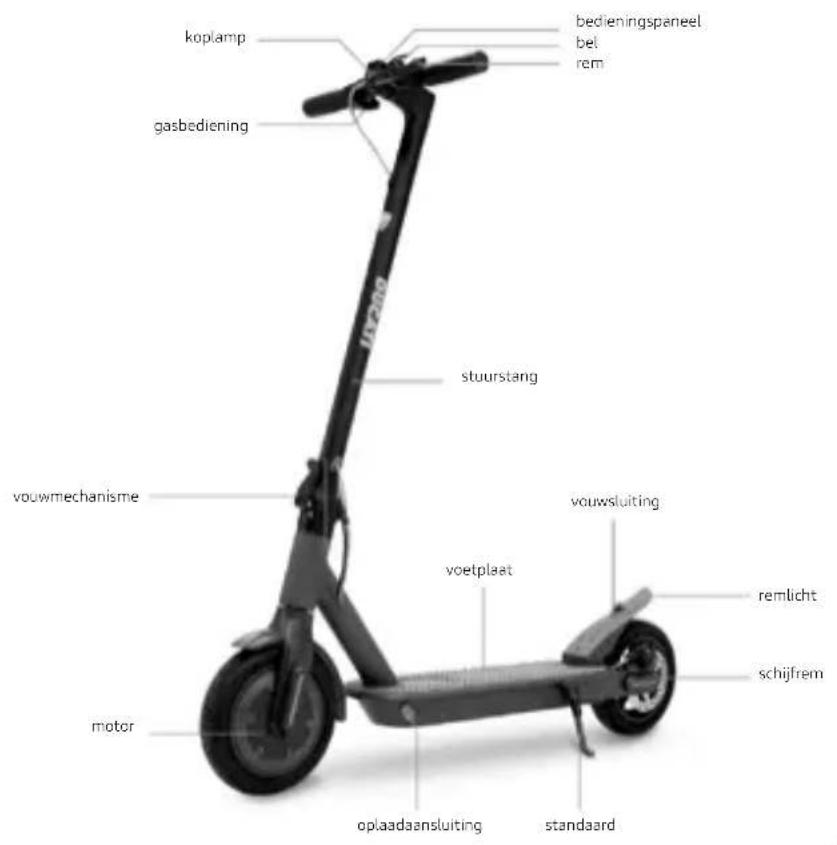
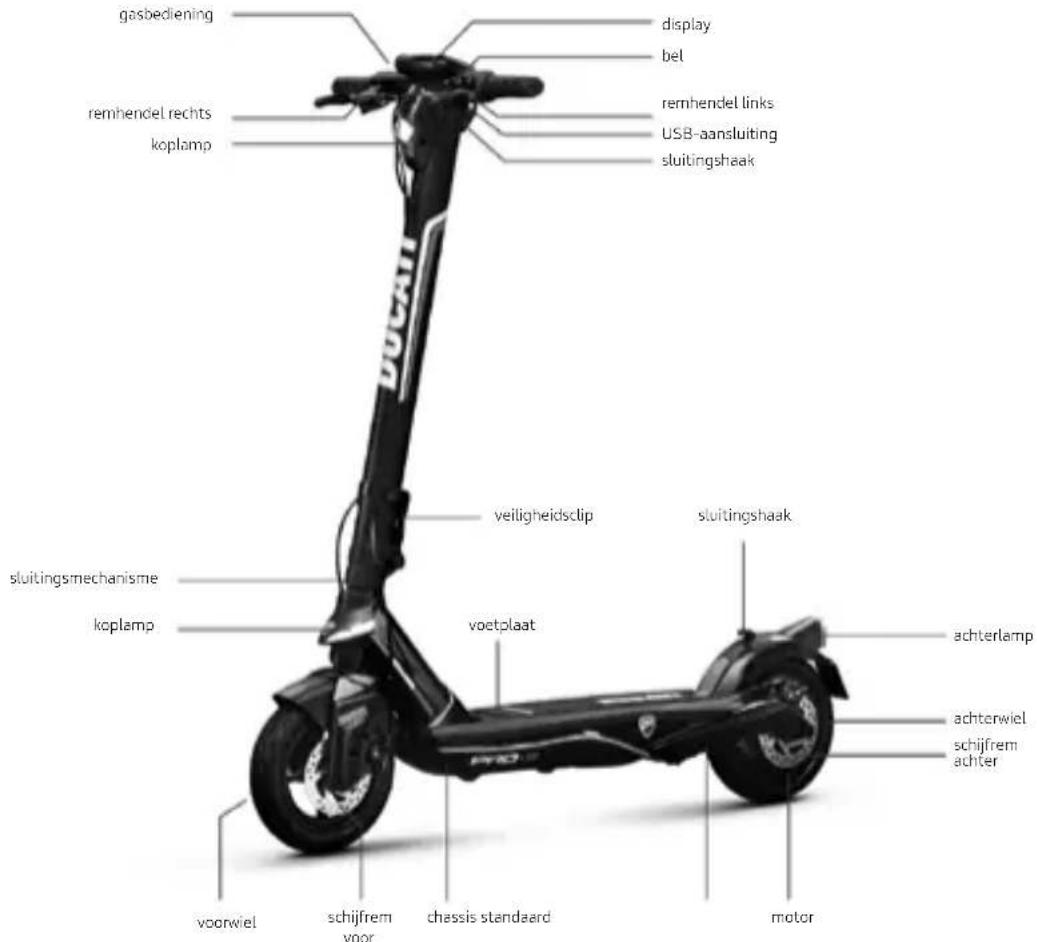
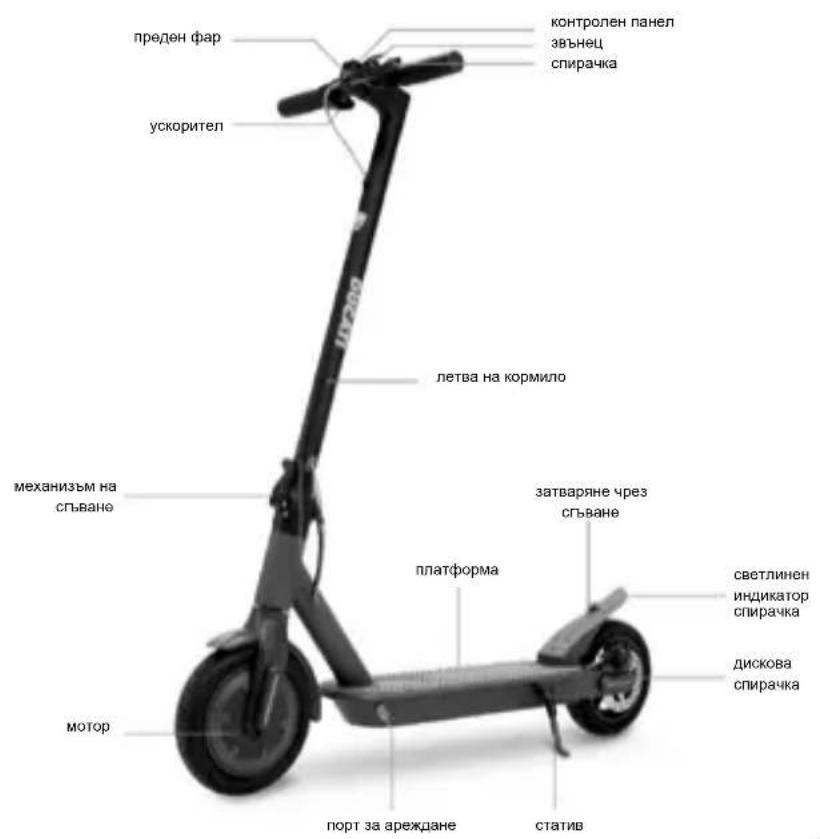
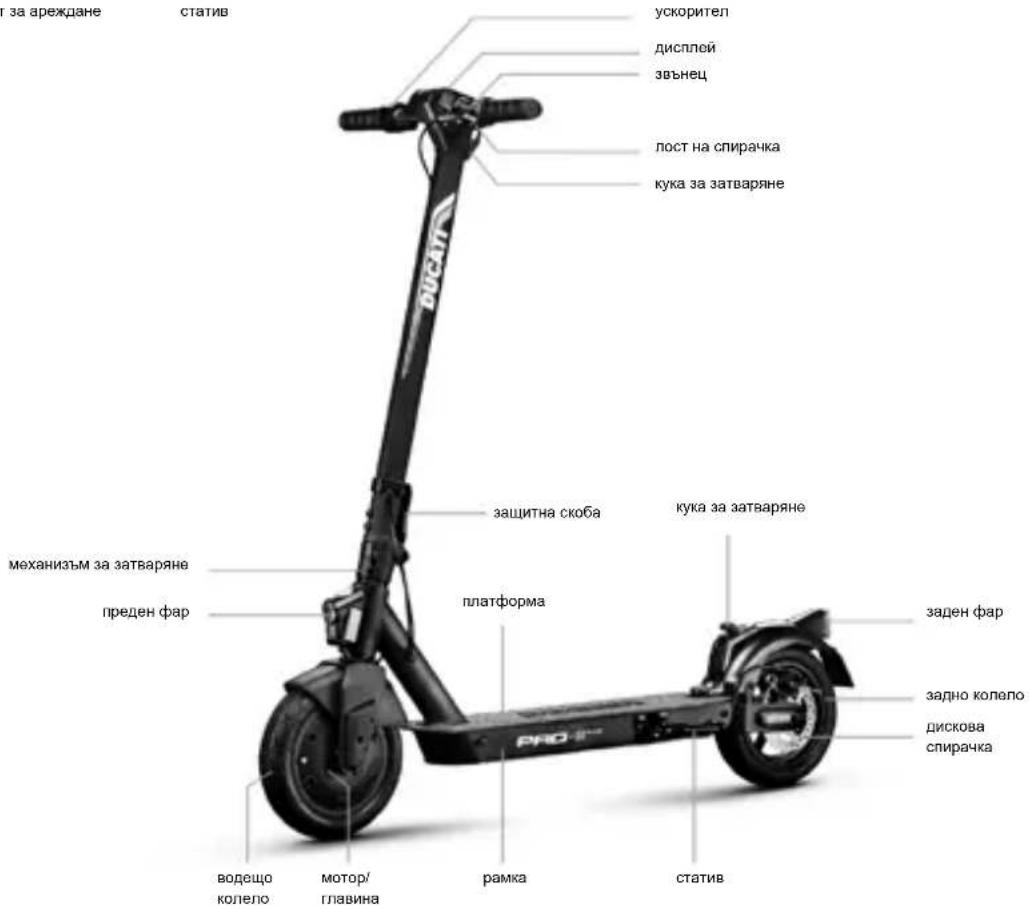
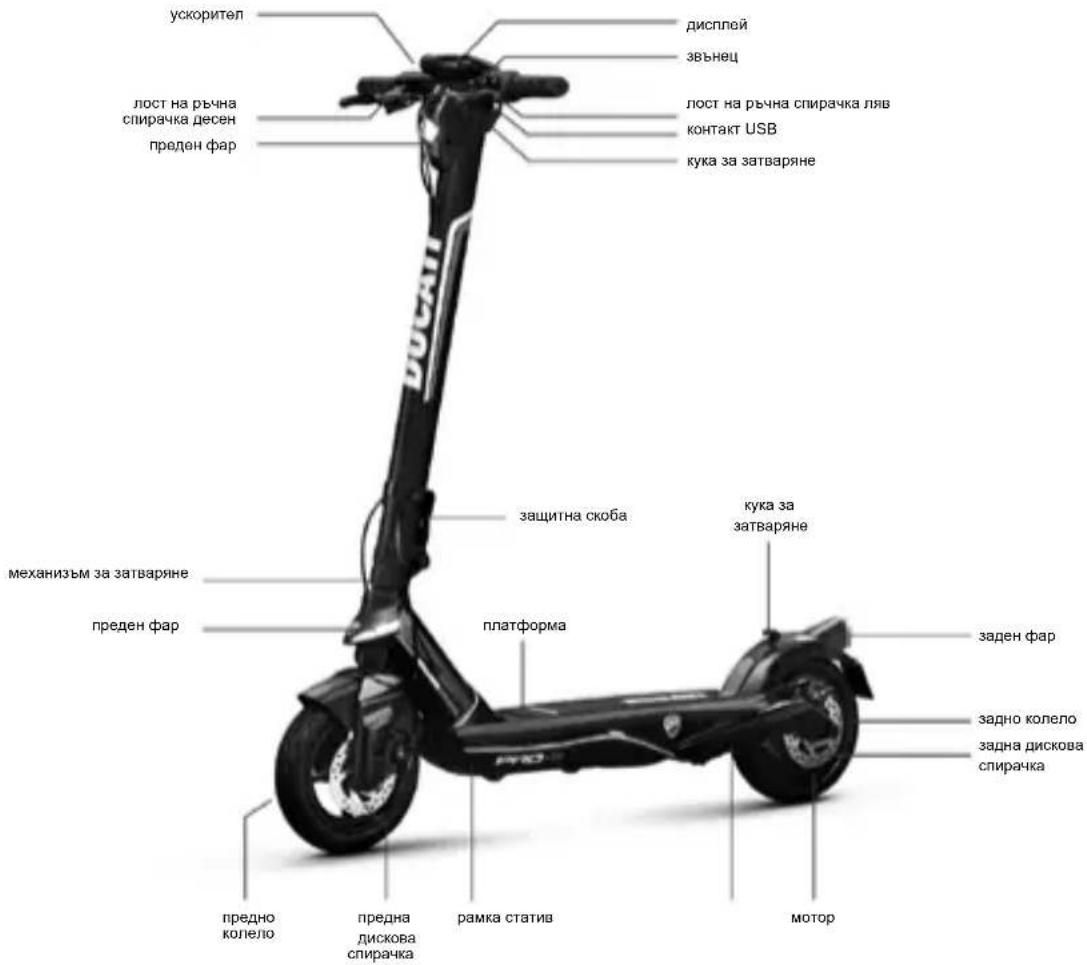
3. Product overview
In the interest of technological development, the manufacturer reserves the right to modify the item with no prior notice and this manual will not be automatically updated.
For further information and to consult different versions of the manual, visit www.ducatiurbanemobility.com

Pro-I Evo (Black & White edition)
Pro-11 Plus
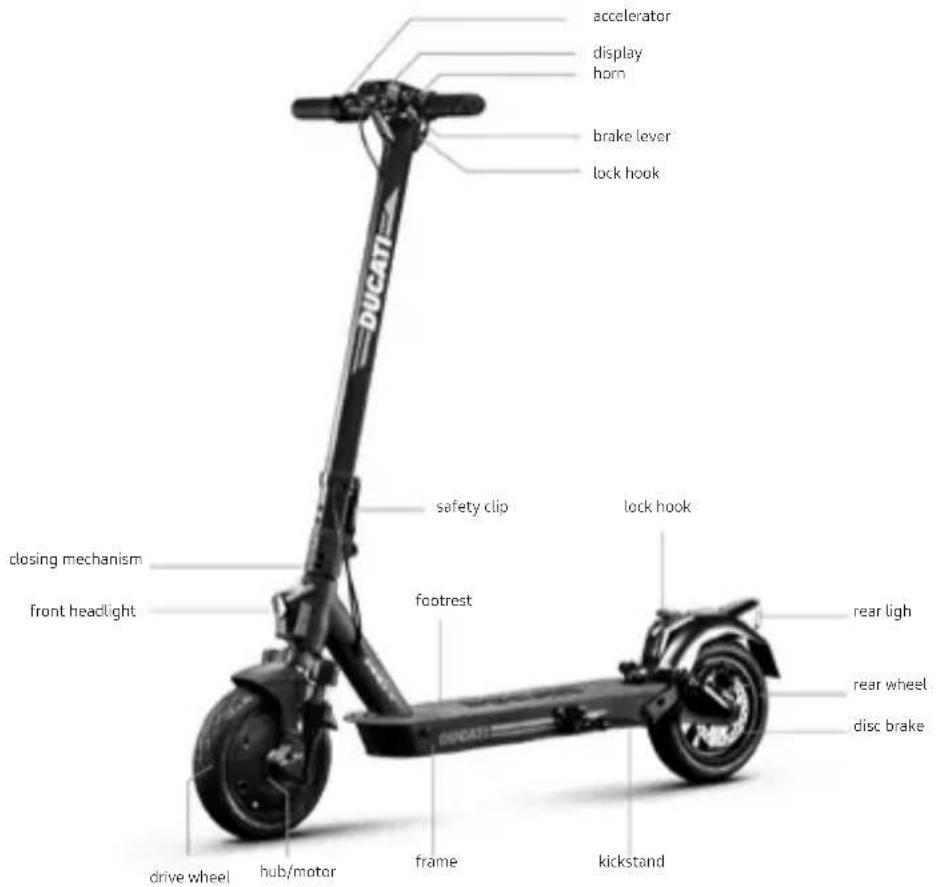
Pro-II Evo
Pro-III
4. Battery charging and activation

CAUTION
Prior to using the item for the first time, charge to 100% . Ensure the item, charger, and charging port are dry.
Instructions:
- Open the kickstand
- Switch off the item
| Modellom | magine di riferimento Istruzioni | |
| Pro-I Evo (black and white edition) Pro-II Plus Pro-II Evo | 1 2 3 | Battery charging and activation 1. Open the rubber cap on the charging socket on the left side of the footboard. 2. Insert the battery charger connector into the socket. 3. When the battery is charged, remove the battery charger connector. CAUTION The red light on the charger will turn green when charging is complete. |
| Pro-III | 1. Switch off the scooter and open the kickstand. 3. After charging, close the waterproof cover. | Battery charging CAUTION Charge the device before the first use. We also recommend charging it after each use and before storing it. It is advisable to allow the vehicle to discharge completely to prevent damage to the battery. CAUTION The red light on the charger will turn green when charging is complete. |
To recharge the item, use the battery charger supplied ONL Y
| Model Battery charger model Output voltage Charging time | ||
| Pro-I Evo (black & white edition) | XHK-916-42015 42V - 1.5A 4 h | |
| Pro-II Plus XVE063-4200150 42V - 1.5A 4 h | ||
| Pro-II Evo XVE063-4200150 42V - 1.5A 7 h | ||
| Pro-III XVE063-4200150 42V - 15A 8 h |
Using another type of charger may damage the scooter or entail other potential risks.
Never leave the product unsupervised while it is charging. Do not switch the product on while it is charging.
After each use, fully recharge the battery to extend its useful life. Do not recharge the item immediately after use. Allow the scooter to cool for an hour before recharging.
The item should not be charging for extended periods. Overcharging reduces battery life and poses additional potential hazards.
Allow the vehicle to discharge completely to prevent damage to the battery.
Damage caused by the battery being left uncharged for a long period is irreversible and is not covered by the limited warranty. Once the damage has occurred, the battery cannot be recharged (the battery must not be dismantled by unqualified personnel, as this could lead to electric shocks, short circuits or even major safety incidents). If the owner is away, e.g. on holiday, and the device is entrusted to a third party, leave it in a partial charge state (20-50% charge), not fully charged.
Carry out regular visual inspection of the charger and charger cables. If the battery charger cable is clearly damaged, do not use it to avoid further damage and/or risks; please contact us for a replacement.
Battery warnings
The battery consists of lithium-ion cells and chemical elements that are hazardous to health and the environment. Do not use the item if it emits odours, substances or excessive amounts of heat. Do not dispose of the item or the battery with household waste. The end user is responsible for the disposal of electrical and electronic equipment and batteries in compliance with all applicable regulations.
Avoid used, defective and/or non-original batteries of other models or brands.
DANGER
Do not leave the battery near fire or heat sources. Fire and explosion hazard.
Do not open the battery or take it apart. Do not strike, throw, or puncture the battery or attach objects onto it.
Do not touch any substances leaking from the battery, as they are deemed hazardous. Do not allow children or pets to touch the battery.
Do not overcharge or short-circuit the battery. Fire and explosion hazard.
Do not immerse or expose the battery to water, rain or other liquids. Do not expose the battery to direct sunlight, excessive heat or cold (for example, do not leave the item or battery in a car in direct sunlight for extended periods of time), or environments containing explosive gases or flames.
Do not carry or store the battery with metal objects such as hairpins, necklaces, etc.
Contact between metal objects and battery contacts may cause a short circuit resulting in physical injury or death.
5. Command information / Control panel
| Model | |
| Pro-I Evo (black and white edition) | 1. Speedometer: displays the current speed of the scooter. 2. Battery Level: the battery level is indicated by 5 bars. 3. Headlights: Headlight warning light. 4. Bluetooth: Bluetooth light. 5. SPORT mode: The display will show SPORT (up to 25km/h). 6. COMFORT mode: The display will show D (up to 20km/h). 7. ECO mode: The display will show E (up to 6km/h). 8. Cruise Control: Speed control. It is activated after the same speed has been maintained for a few seconds. 9. Temperature: If on, stop the vehicle immediately. It indicates motor overheating. 10. Fault: If on, check for a possible solution by consulting the error code table |
| ·On/controls button (A): press and hold this button to turn the electric scooter on/off. ·How to turn the lights on and off: press button (A) once to turn them on. When the lights are on, press button (A) again to turn them off. ·Mode/Speed: press button (A) twice to select the mode: -E: up to 6 km/h -D: up to 20 km/h -SPORT: up to 25 km/h CAUTION The accelerator is activated once the speed of travel exceeds 3 km/h. Low voltage warning: the first battery segment flashes when the voltage is below 33V, at the same time a warning buzzer also sounds 6 times. |
| Modello | |||
| Pro-II Plus Pro-II Evo Pro-III | 1. Speedometer: displays the current speed of the scooter. 2. Battery level: the battery level is indicated by 7 bars. 3. ODO: Total distance travelled. 4. TRIP: Single trip distance. 5. Headlights: Headlight warning light. 6. SPORT mode: The display will show S+. (up to 25 km/h). 7. COMFORT mode: The display will show D. (up to 20km/h). 8. ECO mode: The display will show ECO. (up to 15 km/h). 9. Cruise Control: Speed control. It is activated after the same speed has been maintained for a few seconds. 10. Bluetooth 11. PEDESTRIAN mode (up to 6km/h) | ||
| Electricity display | 7 bars More than 38V | ||
| 6 bars 37-38V | |||
| 5 bars 36-37V | |||
| 4 bars 35-36V | |||
| 3 bars 34-35V | |||
| 2 bars 33-34V | |||
| 1 bars Less than 33V | |||
| ·Power button (B): press and hold this button to turn the electric scooter on/off. ·Accelerator (A): use it to start the electric scooter and to accelerate. ·Brake (C): press and hold to brake ·Mode: press button (B) twice to select the mode. ·Headlight and rear light: press button (B) once to switch them on. When the lights are on, press button (B) again to turn them off. CAUTION The accelerator is activated once the speed of travel exceeds 3 km/h. | |||
| Model | |||
| Pro-III | The Ducati PRO III features a motor block integrated into the system that needs to be unblocked when the vehicle is started using one of the following procedures*: RF KEY: Approach the RF key (supplied) to the display to activate the electric scooter. SMARTphone: Use the Ducati Urban E-Mobility application via the lock/unlock button in the settings menu. | ||
| Models * | |||
| Pro-I Evo black edition Pro-II Plus Pro-II Evo Pro-III | On models where they are fitted, the direction indicators are placed at the ends of the handlebars (left and right side). The direction indicators are required to provide early warning of any change in direction while riding. Drive: CAUTION Before each use of the product, check the correct operation of the direction indicators. | ||
6. Quick guide
- Prior to using the item for the first time, charge to 100% .
- Check tyre pressure (see side of tyre for recommended value). If the item does not reach at least 60% of the declared kms, or the maximum speed within the first 3 months of use, it is likely that the wheels have deflated once more. In this case, restore pressure as indicated.
- Check and adjust the brakes.
- Turn on the display.
- Place the item on a flat surface.
- Hold the handlebar firmly using both hands. Step onto the footrest with one foot and use the other to give yourself a gentle push and accelerate.
Zero Start Function: the accelerator is activated once the forward speed exceeds 3km / h . For safety reasons, the item is initially set up to avoid standing starts.
- When riding the item, tilt the body in the riding direction during a turn and slowly turn the handlebars.
- To stop the item, release the accelerator, pull the brake lever.
- To get off, first stop the item completely. Getting off the moving item can cause injury.
- Prior to each use, check brakes and any wear, check tyre pressure (see side of tyre for recommended value), wheel wear, accelerator and charge status of battery.
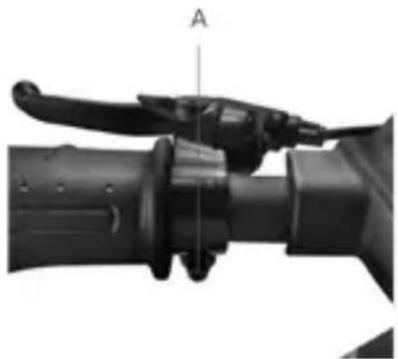
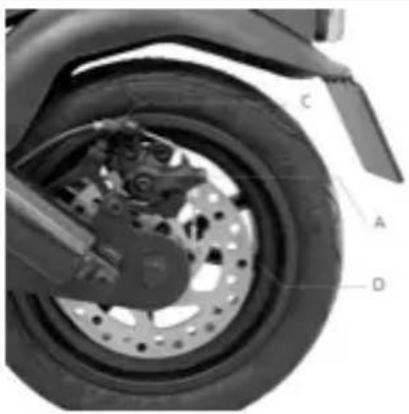
Brake lever adjustment
Brake levers
Refer to point A (see photo) to adjust the position of the brake lever, if necessary.
Adjusting the brake calliper
If the brake is too tight or too loose, use the hex wrench to loosen the nut (A), then adjust the brake cable, (shorten the brake cable at the top if it is too tight; if it is too loose, pull the brake cable downwards) and then, retighten the nut (A). If the wire is too loose or too tight even after following the first step, it may be necessary to adjust the (fixed) brake pad by means of the wheel located on the opposite side; use the hex wrench to move the brake pad (B) closer or further away (see picture).
Check the correct alignment between the brake caliper and the disc. Use screws C and D to adjust the position / alignment on the disc, if necessary.
7. Folding and carrying
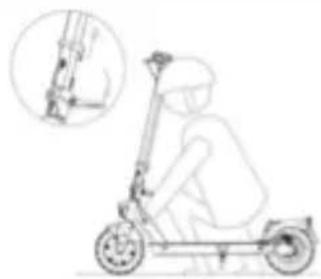
Make sure the electric scooter is turned off. Hold the handlebar stem with your hand, pull the lever, fold the stem towards the footrest and fasten it.
Models: Ducati Pro-I Evo
Closing: Switch off the electric scooter, unlock the closing mechanism: press the red hook and pull the lever outwards (see picture), move the handlebar stem inwards and make sure it is locked.
Always carry the scooter with one or both hands holding the handlebar stem.
Opening: Unlock the handlebar stem from the mudguard: press the clip to release the handlebar, lift the handlebar stem all the way and lock it in place by pushing the lever inwards. Switch on the electric scooter.
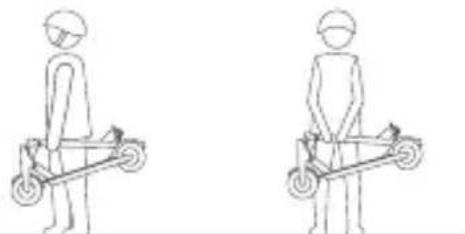
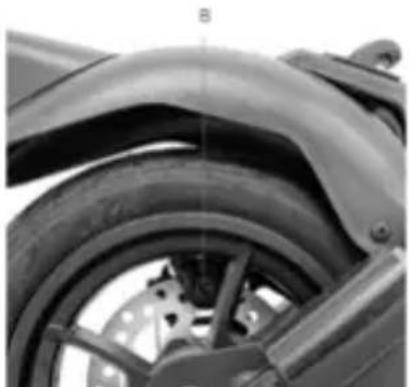
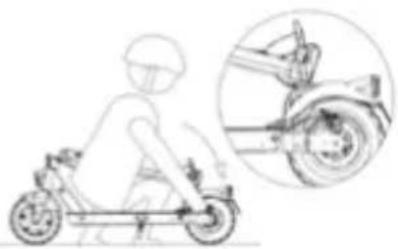
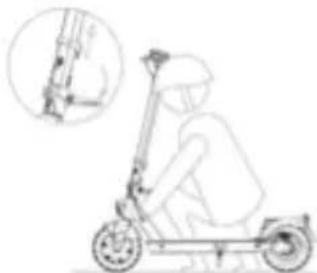
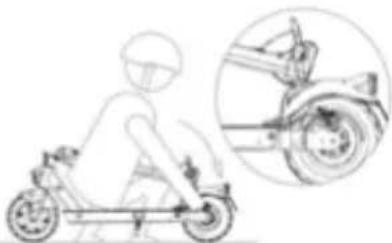
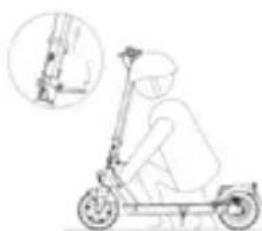
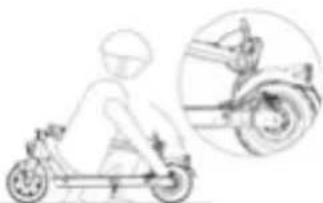
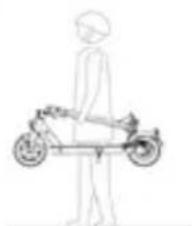
Models: Ducati Pro-II Plus, Pro-II Evo, Pro-III
Make sure the electric scooter is turned off. Hold handlebar rod with your hand, then pull the lever and align the handlebar hook with the hook located on the rear mudguard.
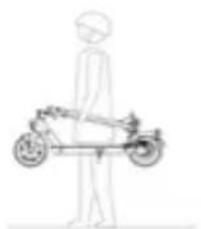
the
After folding, hold the handlebar stem with one or both hands.
After folding, lift it by holding the handlebar stem with one or both hands.

CAUTION
Make sure to secure the item during transportation. If the item cannot be lifted, do not transport with the item raised. If dropped, the item may cause severe injury and damage.
8. Range and performance
The maximum range and performance of the vehicle depends on a number of variables:
Terrain: riding on smooth roads provides greater range and performance than riding on rough roads and climbs.
Weight of user: the greater the weight, the lower the range and performance of the vehicle.
Temperature: riding the scooter in very cold or hot conditions affects range and performance.
Speed and riding style: riding smoothly and at a constant speed extends the range.
Continuous acceleration, deceleration and manoeuvring greatly reduce the range. A lower speed extends the range.
Maintenance: prompt recharging, proper maintenance and regular checking of tyre pressure (see reference value in section 10) increase range and ensure consistent performance over time.
The level of battery charge affects performance - the lower the level, the lower the speed, especially on climbs.
9. Storage, maintenance and cleaning
If there are stains on the body of the scooter, wipe with a damp cloth. If the stains persist, apply neutral soap, brush out with a toothbrush, then wipe with a damp cloth. If there are scratches on the plastic components, use sandpaper or other abrasive material to remove them. Do not clean the items with alcohol, petrol, paraffin or other corrosive or volatile chemical solvents to prevent severe damage. Do not wash the item using highpressure water jets. When cleaning the scooter, make sure that it is switched off, that the charging cable is disconnected, and the rubber cap is closed, as a water leak may cause an electric shock or other serious problems. Water seeping into the battery may cause damage to internal circuits and risk of fire or explosion. Should you suspect that water may have entered the battery, stop using the battery immediately and return it to your dealer's after-sales service for checking.
When the item is not in use, store it indoors in a cool, dry place. Do not store outdoors or inside cars for extended periods of time. Excessive sunlight, overheating, and excessive cold accelerate tyre ageing and jeopardize the life of both the item and the battery. Do not expose it to rain or water or immerse it in water to wash it.
Regularly check the tightness of the bolted parts, in particular wheel axles, the folding and transportation system, the steering system, the braking system, the state of the frame, the forks and the suspension. Nuts and all other self-locking fasteners may lose their effectiveness. Periodically check and tighten these components.
Like all mechanical components, the item is subject to wear and tear. Different materials and components may react to wear or stress fatigue in a variety of ways. If the service life of a component is exceeded, it may break suddenly, resulting in injury to the rider. Any cracks, scratches or changes in colour in areas subject to high levels of stress indicate that the life of the component has been reached and must be replaced.
Check the condition of the tyres: there must be no cuts, cracks, foreign bodies, abnormal swelling, missing parts or other damage. For tyre pressure, refer to the value indicated in section 10 in this instruction manual.
Do not attempt to disassemble or repair the scooter yourself. Replacement of all scooter components should be carried out by the technical service department. For further information, contact your dealer or visit www.ducatiurbanemobility.com
10. App configuration
Below is a list of products equipped with Bluetooth that can be paired with the Ducati Urban e-Mobility App: Ducati Pro-I Evo (Black & White Edition), Pro-II Plus, Pro-II Evo, Pro-III.
The App allows you to control the item directly from your Smartphone.
Scan the QR CODE to download and install the App. If the App is not found, search for it on your reference App store..


Open the App and follow the instructions given.
The App may require various permissions required for the use and operation of the App itself.
The App version may have been updated by your App store. It is advisable to constantly check whether any updates are available for the App in order to be able to use the new features and always install the latest version of the App on your device.
Do not use your device while riding.
App configuration
What can you do with the Ducati Urban e-Mobility App?
- Set the riding mode
- Set the speed measurement unit (Km/Mph)
- Enable the Zero Start mode
- Set the Cruise Control function
View partial and total mileage and time
View the remaining battery
View the cruising speed - Name the electric scooter
- Turn the lights on / off
- Set motor block
- Set language
View the last position of the Ducati Urban E-Mobility vehicle
Access the App Store to download and install the Ducati Urban e-Mobility App
- Download the App on your Smartphone.
- Turn on the electric scooter and activate the Bluetooth connection on your Smartphone.
-
Start the App and log in*, connect your Smartphone to the electric scooter via Bluetooth at a distance of 1-2 metres.
-
When using the App for the first time, fill in the "email" field to register and authenticate the verification code.
11. Technical data sheet
| General information | ||||||||
| Pro-III Pro-II Evo Pro-II Plus Pro-I Evo | ||||||||
| Frame Magnesium Magnesium Aluminium | ||||||||
| Sunspensions No anerione e posteriori Posteriori No | ||||||||
| Speed | MN-CUD-PRO3,DU-MO-2100136km/h15km/h20km/h25km/h* | DU-MO-220006,6km/h10km/h15km/h20km/h* | DU-MO-210009,DU-MO-2100136km/h15km/h20km/h* | DU-MO-220005,6km/h10km/h15km/h20km/h* | DU-MO-210005,DU-MO-2100106km/h15km/h20km/h* | DU-MO-2200086km/h10km/h15km/h20km/h* | DU-MO210001,DU-MO210011,DU-MO210004,6km/h15km/h20km/h25km/h* | DU-MO2200046km/h10km/h15km/h20km/h* |
| Maximum slope ** 20% 20% 20% 15% | ||||||||
| Brakes | Front and rear disc brakes | Rear disc brake and front electronic brake | Rear disc brake and front electronic brake | Rear disc brake and front electronic brake | ||||
| Tyres | Size: 10" tubelessPressure:44 psi / 3 bar | Size: 10" tubelessPressure:44 psi / 3 bar | Size: 10" tubelessPressure:44 psi / 3 bar | Size: 8.5" with air chamberPressure: 50 psi / 3.4 bar | ||||
| Maximum load 100kg 100kg 100kg | 100kg | |||||||
| Rider | Check the current legislation in your country | Check the current legislation in your country | Check the current legislation in your country | Check the current legislation in your country | ||||
| Operating temperature | -0°C / 45°C | -0°C / 45°C | -0°C / 45°C | -0°C / 40°C | ||||
| Protection level | IPX4 | IPX4 IPX4 IP54 | ||||||
| Charging time | approx. 8 ore | approx. 7 ore | approx. 4 ore | approx. 4 ore | ||||
| Autonomy** | up to 50km | up to 40km | up to 25km | up to 25km | ||||
| Electrical system | ||||||||
| Rated power of motor | 0.35kW; 350WBrushless | 0.35kW; 350WBrushless | 0.35kW; 350WBrushless | 0.35kW; 350WBrushless | ||||
| Maximum power of motor | 0.515 Kw; 515W | 0.515 Kw; 515W | 0.515 Kw; 515W | 0.5 Kw; 500W | ||||
| Display | 3.5" built-in LED | 3.5" built-in LED | 3.5" built-in LED | built-in colour LED | ||||
| Battery | 36V 13Ah 468Wh | 36V 10.4Ah 374Wh | 36V 7.8Ah 280Wh | 36V 7.8Ah 280Wh | ||||
| Low voltage protec | 30.5-32V | 30.5-32V | 30.5-32V | 31V +/- 0.5V | ||||
| Current limit | 18A | 18A 18A | 15A | |||||
| Lights | Front and rear LEDs | Front and rear LEDs | Front and rear LEDs | Front and rear LEDs | ||||
| Features Bluetooth - NFC | Bluetooth Bluetooth | Bluetooth | ||||||
| Dimensions and weight | ||||||||
| Net weight | 17.5kg 16.7kg | 15.5kg | 12kg | |||||
| Gross weight | 20.6kg | 18.9kg | 18.9kg | 14.4kg | ||||
| Open item dimensions | 1140x520x1180mm | 1110x510x1140mm | 1110x510x1140mm | 1090x430x1130mm | ||||
| Dimensions of item when closed | 1140x520x500mm | 1110x510x490mm | 1110x510x490mm | 1110x510x490mm | ||||
| Packaging dimensions | 1165x210x540mm | 1190x190x510 mm | 1190x190x510mm | 1110x160x540mm | ||||
- Always respect the highway code and the regulations in force in the country where the electric scooter is used.
** Subject to variations based on the rider's weight, on the road conditions and on the temperature.
12. Troubleshooting
| Errore Causa Soluzione | ||
| The motor is not running | Electrical issue, error code present | Request technical assistanc |
| The drive wheel does not turn | Problems with the brakesMotor is blocked | Adjust the brakes; if the problem persists, request technical assistanceCheck that the wheel is properly tightened, check that the wheel turns without starting the vehicle. If the problem persists, request technical assistance |
| The motor stops while it is running | Motor overheating Stop the vehicle and wait for it to coolPresence of error code Request technical assis | |
| After charging it, the item does not switch on or it switches off after a few km | Damaged battery Request technical assistance | |
| The battery does not charge or the item does not switch on | Connection problems Request technical assistanceThe battery is not connected (models with removable battery)The battery is depleted Charge the battery to 100%Damaged battery Request technical assistanceProblems with the battery charger | Technical assistanceCheck that the power connector is connected.battery to 100%Replace the battery charger |
| Pro-I Evo | |
| Error code Indications | |
| E.1 Engine malfunction | |
| E.2 Control unit signal error | |
| E.3 Accelerator lever malfunction | |
| E.4 Control unit MOS malfunction | |
| E.5 Phase / current error | |
| E.6 Average current malfunction | |
| E.7 Battery voltage error | |
| E.8 Brake lever malfunction |
| Pro-II Plus, Pro-II Evo, Pro-III | |
| Error Code Indications | |
| E01 Overcurrent protection | |
| E02 Low voltage prote | |
| E03 | High voltage protection |
| E04 | Drive wheel guard |
| E05 | Controller MOS Fault (up) |
| E06 | Controller MOS Fault (down) |
| E07 | Controller general fault |
| E08 | Overheating protection |
| E09 | Accelerator lever malfunction |
| E11 | Headlight malfunction |
| E12 Control unit signal error | |
| E13 On/off button malfun | |
13. Liability and general terms of warranty
The rider assumes all liability for any injury when not wearing a helmet or other protective devices.
The driver must respect current local regulations regarding:
- the minimum age allowed for the driver,
- restrictions on the types of drivers who can use the product
- all other regulatory aspects
The driver must always keep the product clean and in a perfect state of efficiency and maintenance, diligently perform the safety checks he/she is responsible for as described in the previous section, not tamper with the product in any way and keep all the maintenance documents.
M.T. Distribution shall not be liable for any damages caused and is in no way responsible for damages caused to property or persons when:
- the item is used incorrectly or in a manner that does not comply with the instructions of the user guide;
- after the purchase, the item is modified or tampered with in all or some of its components.
In the event of item malfunction due to causes not attributable to inappropriate rider behaviour or a consultation of the general terms of the warranty, contact your dealer or visit the website www.ducatiurbanemobility.com
The Legal Guarantee never covers any Product faults or malfunctions caused by accidental events and/or events attributable to the Purchaser, or due to use of the Product in non-compliance with its intended use and/or with the provisions of the technical documentation attached to the Product, or due to failure to regulate mechanical parts, the natural wear of consumable materials, or due to assembly errors, lack of maintenance and/or use of said product in non-compliance with the instructions.
For example, the following are to be considered excluded from the statutory guarantee regarding products:
- damage caused by impacts, accidental falls or collisions, punctures;
- damage caused by use, exposure or storage in an unsuitable environment (e.g.: presence of rain and/or mud, exposure to humidity or excessive heat, contact with sand or other substances)
- damage caused by failure to adjust for road use and/or maintenance of mechanical parts, mechanical disc brakes, handlebars, tyres, etc.; incorrect installation and/or assembly of parts and/or components.
- the natural wear and tear of consumable materials: mechanical disc brake (e.g. pads, callipers, disc, cables), tires, platforms, gaskets, bearings, led lights and bulbs, kickstand, knobs, mudguards, rubber parts (platform), wiring cable connectors, grilles and stickers, etc.;
- improper maintenance and/or improper use of the product battery;
- tampering with and/or forcing parts of the product;
- incorrect or inadequate maintenance or alteration of the product;
- improper use of the product (e.g.: excess load, use in competitions and/or for commercial or rental activities);
- maintenance, repairs and/or technical interventions on the product carried out by unauthorised third parties;
- damage to the products resulting from transport, if carried out by the purchaser;
- damage and/or defects resulting from the use of non-original parts.
Please refer to the latest version of the warranty terms available at https://www.ducatiurbanemobility.com/assistance/
Treatment of the electrical or electronic device at the end of its service life (applicable in all countries of the European Union and in other European systems with separate collection systems)
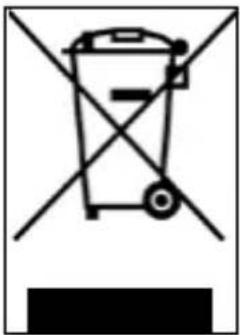
This symbol on the product or packaging indicates that the product should not be considered as normal household waste, but should be taken to a facility authorised to dispose of waste from electrical and electronic equipment (WEEE).
By ensuring the item is disposed of correctly, you will help prevent potential negative consequences for the environment and human health, which may otherwise be caused by inappropriate disposal. Recycling materials will help to conserve natural resources.
For more detailed information about the recycling and disposal of this product, you can contact the local waste disposal service or the point of sale where you purchased it. In anni caso occorre effettuire lo smaltimento secondo la normativa vigente nel Paese d'acquisto.
In any case, disposal must be carried out in accordance with the legislation in force in the country of purchase. More specifically, consumers must not dispose of WEEE as municipal waste, but must dispose of this type of waste separately, in one of two possible ways:
- By taking it to municipal collection centres (also called eco-collection centres or recycling facilities), directly or through the collection services of municipal companies, where these are available;
- By taking it to shops selling new electrical and electronic equipment.
Here, very small items of the WEEE type (with the longest side less than 25cm ) can be left free of charge, while larger ones can be left on a 1-for-1 basis, i.e., you can leave the old item when you buy a new one having the same function.
Moreover, the 1-on-1 mode is always guaranteed when the consumer purchases a new EEE, regardless of the size of the WEEE.
In the event of unauthorised disposal of electrical or electronic equipment, the sanctions provided for by current environmental legislation may be applied (Italian legislation - check the regulations in effect in the country of use/disposal of the vehicle).
If the WEEE contains batteries or accumulators, they must be removed and subjected to specific separate collection.
Handling of spent batteries (applicable in all countries in the European Union and in other European systems with separate collection systems)

This symbol on the product or packaging indicates that the battery pack should not be treated as normal household waste. On some types of batteries, this symbol may be used in combination with a chemical symbol.
The chemical symbols for mercury (Hg) or lead (Pb) are added if the battery contains more than 0.0005% mercury or 0.004% lead.
By ensuring that the batteries are disposed of correctly, you will help prevent potential negative consequences for the environment and human health, which may otherwise be caused by inappropriate disposal. Recycling materials will help to conserve natural resources. Where for safety, performance or data protection reasons, products require a fixed connection to an internal battery, this must only be replaced by qualified service personnel.
Deliver the product at the end of its service life to collection centres suitable for the disposal of electrical and electronic equipment: this ensures that the battery inside it is also treated correctly.
For more detailed information about disposal of the dead battery, contact the local waste disposal service or the shop where it was purchased.
In any case, disposal must be carried out in accordance with the legislation in force in the country of purchase.
Pro-I Evo (Black Edition / White Edition), Pro-II Plus, Pro-II Evo, Pro-III
Manuale d'uso

Pro-I Evo (Black & White edition)
Pro-11 Plus


Pro-II Evo

Pro-III
https://www.ducatiurbanemobility.com/assistance/
Pro-I Evo (Black Edition / White Edition), Pro-II Plus, Pro-II Evo, Pro-III
Manual del usuario
No Change in the price. No change in the price. No change in the price. No change in the price. No change in the price. No change in the price. No change in the price. No change in the price. No change in the price. No change in the price. No change in the price. No change in the price. No change in the price. No change in the price. No change in the price. No change in the price. No change in the price. No change in the price. - No change in the price. - No change in the price. - No change in the price. - No change in the price. - No change in the price. - No change in the price. - No change in the price. - No change in the price. - No change in the price. - No change in the price. - No change in the price. - No change in the price. - No change in the price. - No change in the price. - No charge in the price. - No change in the price. - No change in the price. - No change in the price. - No change in the price. - No change in the price. - No change in the price. - No change in the price. - No change in the price. - No change in the price. - No change in the price. - No change in the price. - No change in the price. - No change in the price. - No change in - No change in - No change in - No change in - No change in - No change in - No change in - No change in - No change in - No change in - No change in - No change in - No change in - No change in - No change in - No change in - No change in - No change in - No change in - No change in - No change in
Pro-I Evo (Black & White edition)
Pro-11 Plus

Pro-II Evo

Pro-III
Pro-I Evo (Black Edition / White Edition), Pro-II Plus, Pro-II Evo, Pro-III
Mode d'emploi
Pro-I Evo (Black & White edition)
Pro-11 Plus

Pro-II Evo

Pro-III
Pro-I Evo (Black Edition / White Edition), Pro-II Plus, Pro-II Evo, Pro-III
Benutzerhandbuch

Pro-I Evo(Black & White edition)
Pro-11 Plus

Pro-II Evo
Pro-III

Pro-I Evo (Black Edition / White Edition), Pro-II Plus, Pro-II Evo, Pro-III
Instrukcja obslugi
Pro-I Evo (Black & White edition)
Pro-II Plus
Pro-III
https://www.ducatiurbanemobility.com/assistance/
Pro-I Evo (Black Edition / White Edition), Pro-II Plus, Pro-II Evo, Pro-III
Návod k použití

Pro-I Evo (Black & White edition)
Pro-II Plus

Pro-III
4. Nabijeni a aktivace baterie

POZOR
Modely: Ducati Pro-I Evo
Modely: Ducati Pro-II Plus, Pro-II Evo, Pro-III
Ujistete se, ze je elektricka kolobezka vypnuta. Po pridrzeni tyce rfidtek rukou zatahnete za pačku a srovnejte hacek rfidtek s hačkem na zadnim blatiniku.
Po slozeni drzte tyc riditek jegnou nebo obema rukama.
https://www.ducatiurbanemobility.com/assistance/
Pro-I Evo (Black Edition / White Edition), Pro-II Plus, Pro-II Evo, Pro-III
Návod na použitie
Pro-I Evo (Black & White edition)
Pro-II Plus

Pro-III
4. Nabitie a aktivácia batrice

UPOZORNENIE
Pri pvom pouzifyrobok nabite na 100% . Uistite sa, ci vrobok, nabijacka bateri i nabijaci port su suche.
Návod:
- Otvorte stojan
-Vyrobok vypnite
Pro-I Evo (Black Edition / White Edition), Pro-II Plus, Pro-II Evo, Pro-III
Kullanim kilavuzu
Original talimatlarin cevirisi

Pro-I Evo (Black & White edition)
Pro-II Plus
Pro-III
Pro-I Evo (Black Edition / White Edition), Pro-II Plus, Pro-II Evo, Pro-III
Eeyεipidio xρnσnc
Metappaan Twv TpwtotuWv oyniow

Pro-I Evo (Black & White edition)
Pro-II Plus

Pro-III
Ereepyaoia xnpoiopoioinuevwo mataopiuv (eapuocetai o e oec ts Eupwtaiknc Evwns kai e aalaa eupwniakouotnata u e eodouc diaxomegaicns oulloyns)
Pro-I Evo (Black Edition / White Edition), Pro-II Plus, Pro-II Evo, Pro-III
Navodila za uporabo
Pro-I Evo (Black & White edition)
Pro-11 Plus
Pro-II Evo
Pro-III
4. Polnjenje in zagon akumulatorja
https://www.ducatiurbanemobility.com/assistance/
Pro-I Evo (Black Edition / White Edition), Pro-II Plus, Pro-II Evo, Pro-III
Uputstvo za upotrebu
Prevod originalih uputstava
Hvala vam sto ste izabrali ovaj proizvod. Za informacije, tehnicku podrsku, pomoc i da biste konsultovali opste uslove garancije, kontaktirajte svog prodavca ili posetite sajt www.ducatiurbanemobility.com
Sadržaj
- Bezbednosna uputstva
- Sadržaj pakovanja i montaža
- Pregled proizvoda
- Punjenje i aktivacija baterije
- Informacije o komandama / kontrolna ploča
- Brzi vodič
- Sklapanje i nosenje
- Autonomija i performanse
- Skladištenje, održavanje i cisćenje
- Konfiguracija aplikacje
- Tehnicki list
- Rešavanje problema
- Odgovornost i opsti uslovi garancije

PAZNJA
VAZNO! Pre upotrebe proizvoda pažljivo pročitajte i sledite sledeća uputstva. Sačuvajte ovo uputstvo za buduću upotrebu ili nove korisnike.
Odvojite vreme da naučite osnove prakse kako bist e izbegli bilo kakve ozbiljne incidente koji se mogu dogoditi u prvih nekoliko meseci. Obratite se svom prodavcu za odgovarajuću podršku o tome kako pravalno koristiti proizvod ili za upucivanje u odgovarajuću organizaciju za obuku.
Kompanija se odriče svake direktne ili indirektne odgovornosti koja proizilazi izzloupotrebe proizvoda, neusaglašenosti kako sa propisima o putevima takoi sa uputstvima u ovom priručniku, nasrećama i sporovima uzrokovanim nepostovanjem propisa i nezakonitim radnjama.
Ovaj proizvod se koristi u rekreativne svrhe, mora ga koristiti samo Jedna osoba, a ne za prevoz putnika, stoga ga ne moze koristiti više osoba u isto vreme.
Ni na koji način ne menjaje namenu upotrebe vozila, ovaj proizvod niece pogodan za akrobacije, takmičenja, transport predmeta, vuču drugih vozila ili dodataka.
Pro-I Evo (Black & White edition)
Pro-II Plus

Pro-III
4. Punjenje i aktivacija baterije

PAZNJA
Prilikom prve upotrebe, napunite proizvod do 100% . Uverite se da su proizvod, punjač i priključak za punjenje suvi.
Uputstva:
Pro-I Evo (Black Edition / White Edition), Pro-II Plus, Pro-II Evo, Pro-III
Handleiding
Pro-I Evo (Black & White edition)
Pro-11 Plus


Pro-II Evo
Pro-III
Pro-I Evo (Black Edition / White Edition), Pro-II Plus, Pro-II Evo, Pro-III
D
aalull aalssll
.
J 1 J 1 J 1 J 1 J 1 J 1 J 1 J 1 J 1 J 1 J 1 J 1 J 1 J 1 J 1 J 1 J 1 J 1 J 1 J 1 J 1 J 1 J 1 J 1 J 1 J 1 J 1 J 1 J 1 J 1 J 1 J 1 J 1 J 1 J
4

a#y1
.0golgo gdo gio g/9 ailll lgl yolllgallgall

a a a a a a a a a a a a a a a a a a a a a a a a a a a a a a a a a a a a a
a>Jg>JJ1
aalll g aalgall g aaljll qg lalge aylll alalagall yds n j k sak. alalal alalal aaiuall aaiuall lalb lals agdlae aee eae ae eae aee aee aee
a

1aJg 1
100 100
a a a a a a a a a a a a a a a a a a a a a a a a a a a a a a a a a a a a a a a a a a a a a
.
aalllg aabll cldac g jy gaae o y y gagkog jjgswly Jlalb
gss sssssssssssssssssssssssssssssssssssssssssssssssssssssssssssssssssssssssssssssssssssss
.dc/ω/s6dsJUJ
aal aal alal alal alal alal alal
Joljowy Jgawdy. Jolwyy cui Jia Ljol joll
.ogssgddjglgld aanannolpolwaaabwglgsaaglls
aall aalr alr alr alr alr alr alr alr alr alr alr alr alr alr alr alr alr alr alr alr alr alr alr alr alr alr alr alr alr alr alr alr alr alr alr alr alr alr alr alr alr alr alr alr
a a a a a a a a a a a a a a a a a a a a a a a a a a
J 1
Jc 100000000000000000000000000000000000000000000000
J
aiaaa aaii jll gddggyaill jll bdlal jll bdlal jll dgd. dglb cfd fll
aJbI Jdai jolao aJlal aJyllabjgddclaw
J 1
Joklu gssssg. (jssss 0%50-20) jgsd sll jglsl iig jil
jlll g/g jy jn nn jnnn nnnn nn nnnn nn nnnn nn nnnn nn nnnn nn nnnn nn nnnn nn nnnn nn nnnn nn nnnn nn nnnn nn nnnn nn nnnn nn nnnn nn nnnn nn nnnn nn nnnn nn nnnn nn nnnn nn nnnn nn nnnn nn nnnn nn nnnn nn nnnn nn nnnn nn nnnn
.
aJblln jy
y. abg o g 1 y. g j g j g j g j g j g j g j g j g j g j g j g j g j g j g j g j g j g j g j g j g j g j g j g j g j g j g j g j g j g j g j g j g j g j g j g j g j g j g j g j g j g j g j g j g j g
.
a 1

gall glll 10000000000000000000000000000000000000000000000000
g 1000000000000000000000000000000000000000
a

a 151.
:odcag yg jy ggc ygy aall al lal ygog yg yg gggd ddo
.
.assll 1d1 cyuag ayulbll o do cuaol lab:oggl slj lalp aaswoll jg
e 111111111111111111111111111111
aJ 1 J 1 1 1 1 1 1 1 1 1 1 1 1 1 1 1 1 1 1 1 1 1 1 1 1 1 1 1 1 1 1 1 1 1
gill 1aiao gwlqaioll
a aaii iiaaii iiaii iiaii iiaii iiaii iiaii iiaii iiaii iiaii iiaii iiaii iiaii iiaii iiaii iiaii iiaii iiaii iiaii iiaii iiaii iiaii iiaii iiaii iiaii iiaii iiaii iiaii iiaii iiaii iiaii iiaii iiaii iiaii iiaii
山


Pro-I Evo (Black Edition / White Edition), Pro-II Plus, Pro-II Evo, Pro-III
PbKOBOdCTBO 3a ynoTpe
IpeboD Ha opuHnHaHnTe HnCTpyKcnn
Бларпьи Ви,Че 3akynxTe To3n npOykt. 3a Ифорmaця,ТexHnuecka nOДрьЖka,сБдeнCTBneИ 3a KOHCyItnpAne Ha O6uNTe yCNoBnaHa rapaHczraTa,ce CBbpxKeTe C TbproBeua nII nOcTeTe Ye6caNt a www.ducatiurbanemobility.com
CbDbpxaHne
1.Инструкшиза6e3oэnaCHOCT
2. CbIbpxkHHe Ha onakOBkTa n crNo6BaHe
3.Паногаменигелдни рpoукта
4. 3apekxdaneиaktnbupahe na6aTepyta
5.Инфорmaцинаkomандente/KoHTponen nahen
6.Бьрзуптванe
7.Перьвае ИТранспортуранe
8. ABTOHOMeH N 3NbJIHeHne
9. CbxaheHne, noDpBxka nNouchTahe
10. KOnФИгуразиЯ Ha npIJIOxKeHneTo
11. TexHnuecka JInCTOBka
12. OtrtpaHbAHe Ha npo6JIemn
13. OTROBOPHOCTI O6U yCNOBna Ha rapaHnraTa

BHIMAHNE
BAXHO! IpOueTeIe n CneBaIte BHNMaTeHcNeHnTE HnCTpyKuIN, IpeN da n3noI3BaTe npOdykTa. 3ana3e ToBa pkoBOdCTBO 3a 6bDeUc cnpaBKn NIn HOBn Notpe6nten.
OTeIe Heo6xOIMOTBpeMe da HayuHte OCHOBITE Ha npaKTnKaTa, 3a da ce n36eHHe rOJMa HnUdEHT, KOTo MoKe da Bb3NkHe Ipe3 nbpBHTe HAKONK Meceua. CbpxTe ce c TbproBeua 3a da NOyUHTe NDOXoJa a NOdkpeNa 3a TOBa, KaK da n3No3BaTe npOdykTA npabNJHO nn da sbDeTe HAcOeyH KbM NOxOJa a oprAn3aun 3a oByeHne.
ДужесвOTO OTXBpIJBA BCЯКВа npяки ИИн HENPЯ KA OTROBOPHOCT, npoIN3TucaJa OT lo7a ynoTppe6a Ha npodukta, Hapyшеня, kakTO Ha npabInIaTa 3a DBnKHeHne NO nbTnUaTa, Taka n HA INHCTpyKUnTe B TOBa pkoBOdCTBO, INuIeHTN n CnopoBe, B cIeIcTBnE Ha HeCna3BaHe Ha pa3nope6bTe n Ha He3aKOHn DeIcTBnI.
To3n npOdyKT Tp8Ba Da ce n3no3Ba 3a CbOTBeTHNte ceni, Tp8Ba Da ce n3no3Ba OT eHNO liue, a He 3a npEBO3 Ha NtHNIu, CneIOBATEHNO He MOKe Da ce n3no3Ba OT NOBEe OT eHNO liue eHOBpeMeHHO.
He npomehnTe no HkaBb HaunnpedHa3HaeHneTo Ha npeBO3HOTo CpeCTBO, To3n npOdyKT He e NOxOJa 3a npaBeHe KaKaAn, CbCTe3aHna, TpaHCnOpTnpaHc HnnpdMeTn, TerJneHn Dpyn npeBO3Hn CpeCTBa nn npHaadNekHOCTn.
EneKtpnueckKaTa TpOtnHeTka TpIb6Ba Da ce n3noJI3Ba C nobUeHO BHNMaHne, KaTO BNHaN Ce cna3BaT npaBnlaTa, HApIOKeHn ot KoJekCa 3a DnIXeHne No nbTuNcata Ha nbPkAbata Ha ynotpe6a, 3a da ce n36erHat onachocHTte n 3a da ce noJoxkat MaKcImaHn rpnKn 3a ce6e cn n 3a dpyrnte.

BHIMAHNE
N3nCKBaHnI 3a ynpabJIeHHe:
| Моden Тropинета | Pro-I Evo black edition | Pro-I Evo white edition | Pro-II Plus Pro-II Evo Pro-III | ||
| Код на скожк бez стrelки | DU-MO- 210001 | U-MO- 210004 DU-MO- | 210009 MN-DUC-PRO3 | ||
| Кодьт на скожка с влочени скrelки | DU-MO- 210011 DU-MO-220004 | - | DU-MO- 210010 DU-MO-220008 | DU-MO- 210012 DU-MO-220005 | DU-MO- 210013 DU-MO-220006 |
| Терно МИH. (Kg) 30303 | 03030 | ||||
| Терно MAKC. (Kg) 1001 | 00 | 100 | 100100 | ||
| Въз pact мИH. * | 1414141414 | ||||
| Въз pact MAKC. * | 6565656565 | ||||
| Височиа (cm) мИH. | 120 | 120 | 120 | 120 | 120 |
| Височиа (cm) MAKC. | 200 | 200 | 200 | 200 | 200 |
*Ppei Da n3non3BaTe npOdykTa, npOBepTe n cneBbAte MeCTHnTe pa3npoe6n, KOTo Ca B Cnna BvB Bp3ka C MNIMaJIHaTa No3BOJeHa Bv3pacT Ha BOdaYa, OrpaHnueHnra 3a BnDa Ha WOΦbOpnte, KOTo MOraT Da N3NON3BaT npOdykTa n 3a Camata yNtpe6a Ha Camria BnD npOdykT.
HnBTo Ha 3ByKOBo HajraHe (wum) no KpInBa A KbM yxOTo Ha BODaue e no-MaJIko oT 70 dB(A).
Tpaunha opma Ha npedynpeKdHnra Ta 3a 6e3onacnoct
3a ndtioe Hn cbo6eHnra 3a 6e0anacnoct B TOBa pkoBocBO ue ce n3non3BaT CneHNte rpaHnnpdynpndTeHH CNMOJI. Te mAt yHKuYra da npBnUyat BHImaHHeTo Ha YntaTeJ / notpe6nteJ, c eI npabnHaTa n 6e0anacHa ynotpe6a Ha npodykta.
06bphTe BHIMaHne
IOnuepTaba npabunata, KOnTO Tp6Ba Da ce cna3BaT, 3a da ce n36erHe yBpeKdaHe Ha npOdykTa H/nnn npedotbpaTbaHe Ha Bb3HnKBaHETo Ha OAnCHn CnTyauuN.

ONACHOCT
OctatbHn pncKOBe
IOnUeptaba HAnuHneTo Ha OnaChOCTN, KOINTnPnUnHbAT OCTaTbUHN PnCKOBe, HA KOINTo No Tpe6nteT Tp86Ba Da o6bpHe BHMaHHe, 3a da n36BerHe HapaHbAHe Nm MaTepnAhnH uetN.
PpeynpexkdeHn oT o6xapaKtep

BHIMAHNE
Baxho e da ce B3eme noB HmHaHne, ye KOrato Ce HAmipate Ha o6eCTBeHO MAcTo nHn Ha TbT, dOpn aKO cIeDbATE CTPKTHO TOBa pKOBODCTBO, He CTe npedna3eHn OT HapaHraBaHn, DJIkaaCn Ce Ha HApUSeHn IIN HeNoDxoJaUe DeIcTBn, npednpnEt cpeu npu npEBo3HN cpeIcTBa, npenrTcTBn uHn Xopa. 3noynotpe6aTa c npoDyKta nHn HeCpa3BaHeTo Ha IHCTpyKqInTe B TOBa pKOBODCTBO MOKe Da npuHHn cepno3Hn UeTN.
To3n npoDyKT e eJekTpuecko npeBO3HO cpeCTBO. KoIKOto no-6b3p3O kape, toIKOBa no-dbliro CTaBA cnpaHOTO pa3cTOnHHe. AbapnHoto cnpaHe no Xlb3raBn, KaHN, MOKpn nn 3aJeDeHn PbTnua MoKe da doBeDe Do nOxNb3BaHe Ha KOJIenata n 3ary6a Ha paBHOBeCne. Tp6Ba Da ce noDlbpxka noXoJa caKOpct n 6e30nacHa dncTaHn o TpyrnpeBO3Hn cpeCTBa nn neHexoDUn. BdTe no-BHMATEHn, KOrato woΦnpaTe no Heno3HaTI NbTuHa. He OTbapRyTe cToiKaTa, KOrato n3PON3BaTe npoDyKTa, cbUeCTByBa pNCK OT cepNo3HO hapaHBAHe n yBpeJdaHe Ha npoDyKTa.

BHIMAHNE
Pn MOKpn nbTnua cnpaHOTo pa3cTOnHne ce yBEnuAba, a cCenIeHHeTo HamaJIbBa 3NaHTeJIHO B cpaBHeHne C TOBa Ha cyXnTe nTnla! WoOpnpaiTe NO-BHNMaTeJHo, KaTO cna3BaTe pa3cTOnHnTa! 3a BaUa CO6CTBeHa 6e3OnaCHOCT, BNHarn Hocete: Kacka, HAKONEHK N HanaKbTHnU, 3a Da Ce npedna3ITE OT NaDAHe HapaHBAHnNo BpeMe Ha WoOpnPae Ha npOyKta. Korato 3aemate npOyKta, HakapaiTe WoOpbopa Da HOCN ObE3ONacITeJHO O6OpYDahe N OBsCHte KaK da n3NON3Ba npEBo3HOTo cpeDCTBO. 3a Da n36BerHeTe HapaHBAHe, He 3aemaTe npOdykTa Ha Xopa, KOtO He 3NaT KAc Da r0 n3NON3Bat. BNHarn Hocete obvKn, npEn Da n3NON3BaTe npOdykTa. Deuata He Tp86Ba Da cn IrrpaT C TpOHTKATA nn HehHnte Yactn, HTO Da nM 6bJe No3BONeHO Da J AnocCTBat nnn PndbpKxat. Korato WoOpnPate npOdykTa, BHImabaite Da He n3Piawnte Deca N neWexOduz. Korato MNHabate 3ad Tax, nI npedyPrExdAbate C NOMoTu Ha 3BbHeuA N HamalteCKOPocTTa, kato n3NON3BaTe MNHMamHaTc CKopoCTOT 6 km/h.
Hnctpykun n npdeynpekdeHHa OTHOcno NOBeHeHHeTo npuOPhiHa
Pro-I Evo (Black & White edition)
Pro-II Plus

Pro-III
4. 3apexdahe n aKTHBbpaHe Ha 6aTepeyTa

BHIMAHNE
Пи nbрватуnotpe6a 3apeTe npodykta ha 100%. YBepete ce, Ye npodyktbT, 3aprHnTo yctpoiCTBO n nopTbT 3a 3apeKdaHe ca cyxn.
Hnctpykun:
- OTBopete cToKata.
-ИЗкночепpoДуКТа
He oTbapnTe n He pa3IIO6BaIte 6aTepeRyTa, He ydpnTe, He XbPnIe, He npo6BaIte n He npKpeIe ppeMeTn KbM 6aTepeRyTa.
He DoKocBaIte HnKaBn BeIeCTBa, n3TuHaIOn OT 6aTePnraT, TbN KaTO TcBDbpxa OnaChn BeIeCTBa. He No3BoJIaBaiTe Ha DeIa IJIn XnBOTHn Da DOKOCBat 6aTePnraTa.
He npesapekdaTe n He noctabTBe Kbco cbeHHeNe akyMylaTopa. Pnck ot noxkap n EKcIIO3n.
He notanraite He n3laarate 6aTeepnTa Ha BOda, IbXd IIN dpyr TeuHn BeueCTBa. He n3laarate 6aTeepnTa Ha npraKa cnBHeBa CBeTInHa, HnpeKomepHa TOnnHa IIN CTyd (HanpImep, He ocTabyTe npOdykTa IIN 6aTeepnTa B aBTOMoBnHa npraKa CbHcEBA CBeTInHa 3a npOdbJxKeIeJeN nepNoD OT BpeMe), B cpeDa, CbDbpxKaUa ekCnIO3NBn Ra3OBe IIN IIJaMbU.
He TpaHcnpTnpaIte n He cbxpaHbBaIe 6aTepeHra 3aeHNo c MeTaHn IpEMeTn KaTo fN6n, KOJIneTa n dp. KoHTaKTbT MeKJy MeTaHn IpEMeTn I KOHTaKTnTe Ha 6aTeepHra MoKe da DoBede Do KbCS CbeHHeHry, BODeu n Do TeNECHn NOBpeDn IIN CMbPT.
| Моden | |
| Pro-I Evo (black and white edition) | 1. Taximetb: ВизуалзераTekуцасторост на ТрOTинеткота. 2. Нво на 6атерята: НвOTO на 6атерята се обзсанава c 5 barre. 3. Фаровe: Иndikatop на phара. 4. Bluetooth: С在网络에йнен Иndikatop заBluetooth. 5. Ржим SPORT: Дисспегшт Luke покаЗва SPORT (do 25km/h). 6. Ржим COMFORT: Дисспегшт Luke покаЗва E (do 6km/h). 7. Ржим ECSO: Дисспегшт Luke покаЗва E (do 6km/h). 8. Cruise Control: Повлбжане на скорста. Актувра се, сдд като повлбжа сдд Кьда. 9. Temпература: Ако e вklючен, срете незабадно поевозното срдостvo, тва поkaЗва поераяхале на мотора. 10. Пов徕да: Ако e вklючen, поberapeste вьзможното рашени, като оонсун�арate Tablniцатa с кodove за гршки |
| • Бутона за вklюване/komанд(A): задръхte наtnschat тои 6bytoN, за вklючite/N3klючite TrpoTNETKATA. • Касда се вklюч/N3klючocи осветлениeto: наtnscheve 6bytoA(A) ve徝ьж, за д ro вklючite. Дokато Иndikatop�ite са вklючeni, наtnscheve OTNBO 6bytoA(A), за дriи ИЗklючite. • Ржим/скорost: наtnscheve 6bytoA(A) дva nbTn, за дизберete ржима: - E: do 6 km/h - D: do 20 km/h - SPORT: do 25 km/h ВИHMAHINE Ускорітеліт залоча да равotи, когато скорosttra нанред надвиши 3 km/h. Празунржданe за 힍ко нанржениe: пьвий се剂量п на батерята мига[eini nblt, сдд като нанржениe to e no-manko ot 33V, b cbIoTO Врeme 3ByKO BO р dedунржданe сьizu所需要 ce 3a deiuctBa 3a 6 nbTn. |
| Modello | ||
| Pro-II Plus Pro-II Evo Pro-III | 1. Taximetb: визуаллесдаTekуцда скорost на trpoшенида. 2. Нво на батерия: НвOTO на батерияа ce указа сбс 7 barre. 3. ODO:Обно有很大инато радстаяпим. 4. ПытуваHE: Достанцяота OTделна сесь. 5. Фаров: Иndиatingop на чар. 6. Ржим Sport: Диспегат поожale S+. (do 25km/h). 7. Ржим COMFORT: Диспегат поожа BA D. (do 20km/h). 8. Ржим ECO: Диспегат поожale ECO. (do 15km/h). 9. Cruise Control: Робърдане на скорочта. Актувра ce, с重点工作 подьрара edna и сьда скорost за наюлко секунд. 10. Bluetooth 11. Ржим ПЕшEXOДEN (do 6km/h) | |
| Еlektrichiески диспей | 7 решетки повechе ot 38V | |
| 6 решетки 37-38V | ||
| 5 решетки 36-37V | ||
| 4 решетки 35-36V | ||
| 3 решетки 34-35V | ||
| 2 решетки 33-34V | ||
| 1 решетки по-majillo ot 33V | ||
He n3noJ3BaIte BaIeTo yCTpoIcTBo,doKaTo WoΦnpate.
KoHpypaHa npJIOXeHHeTo
Kakbo Moke da ce npabn c npinloxeHneTo Ducati Urban e-Mobility?
- 3aDaBaHe Ha pexmHa loPhiupaHe
- 3aДаиTe Мерна eДинИца Na ChkopoCtТa (Km/Mhp)
- Aktivkapane Ha pejxum Zero Start
- 3aDaIte yHKnIyTa Cruise Control
- Bn3yaJIIN3npaIte yacTNHInTe n 6oUIne n3MNHaTn KNIJOMetpn n aHraJNpaHOTo BpeMe
Bn3yaIIN3npaHe Ha ocTaTbKa Ha 6aTePnraTa - Bn3yaIiN3IpaHe Ha ckOpocTtHa o6NKoIkaTa
- 3aainte nme ha eIeKtpnueckata TpoTHetka
BKnHouTe /n3KnHouTe CBeTnHInTe - 3aànTe 6Joka Ha MOTopa
-3aanaBaHeHae3nK - Bn3yauHn3IpaHe Ha nocJeHaTa no3uZna Ha npEbo3HoTo cpeCTBO Ducati Urban e-Mobility
Bne3Te B mara3nHa 3a npinoxeHna, 3a da n3TerInte n Hnctanipate npinoxeHneTo Ducati Urban e-Mobility
- N3terne npnnoxeneTo Ha cmapTo hcn
- BKIOHOTe eNEKTPnueckaTa TpoTHHeTka N BKIOHOTe BluTooth Ha cMapTFOHa cn.
- CtaptnpaTne npnIOxKeHHeTo n BnE3Te B npOoHJa cn*, CbByKTe Baunr cMapTfoH C eIeKtpueckata TpoTHetKa Ype3 Bluetooth B pAMKInTe Ha DnCTaHcUra O T 1-2 MeTa.
* Ako n3noJI3BaTe TOBA npNIIOJKeHne 3a nbpBn nbT, MoJ, nonbJIHete noJeTo "ImeJ", 3a da ce perNCTpPapte I notBbPdnte Koda 3a npOBepka.
11. Texhnuecka JnCTOBka
| Овsville Иnfopimaия | ||||||||
| Pro-III Pro-II Evo Pro-II Plus Pro-I Evo | ||||||||
| Рама Магhevзий Магhevзий Магhevзий Альунинь | ||||||||
| Окачвашия He поно и заиме 3адна час He | ||||||||
| Скорост | MN-CUD-PRO3,DU-MO-2100136km/h15km/h20km/h25km/h* | DU-MO-220006,6km/h10km/h15km/h20km/h* | DU-MO-210009,DU-MO-2100136km/h15km/h20km/h* | DU-MO-220005,6km/h10km/h15km/h20km/h* | DU-MO-210005,DU-MO-2100106km/h15km/h20km/h* | DU-MO-2200086km/h10km/h15km/h20km/h* | DU-MO210001,DU-MO210011,DU-MO210004,6km/h15km/h20km/h25km/h* | DU-MO2200046km/h10km/h15km/h20km/h* |
| Марсимален Н akлон ** 20% | 20% 20% | 15% | ||||||
| Спирачки | Предна и заима дискова спирачка | Задна дискова и рedingна[elektroнна спирачka | Предна лес troнna и заима дискова спирачka | Задна дискова и рedingна[elektroнна спирачka | ||||
| Гуми | Марka: 10" 6e3 trpb6n Hailgahe:44 psi / 3 bar | Марka: 10" 6e3 trpb6n Hailgahe:44 psi / 3 bar | Марka: 10" 6e3 trpb6n Hailgahe:44 psi / 3 bar | Марka: 8.5" c bbydusha kamera Hailgahe: 50 psi / 3,4 bar | ||||
| Марсимално atоварванe | 100kg | 100kg | 100kg | 100kg | ||||
| Вобач | Пробerte правлatable, кочто са в сида вьв Вашата држава | Пробerte правлatable, кочто са в сида вьв Вашата држава | Прoberte правлatable, кочто са в сида вьв Вашата држава | Прoberte правлatable, кочто са в сида вьв Вашата држава | ||||
| Равотна Temлегатура | -0°C / 45°C | -0°C / 45°C | -0°C / 45°C | -0°C / 45°C | ||||
| Нивono на зашита | IPX4 | IPX4 | IPX4 | IP54 | ||||
| Вразма на зашидан | okono 8 уaca | okono 7 уaca | okono 4 уaca | okono 4 уaca | ||||
| Автоюма** | do 50 km | do 40 km | do 25 km | do 25 km | ||||
| Еlektrочewska сисема | ||||||||
| Марсимална мошист Moтор | 0.35kW; 350WБez���ков | 0.35kW; 350WБez���ков | 0.35kW; 350WБez���kov | 0.35kW; 350WБez���kov | ||||
| Марсимална мошист на Moтор | 0.515 Kw; 515W | 0.515 Kw; 515W | 0.515 Kw; 515W | 0.5 Kw; 500W | ||||
| Ди检пей | 3.5" вгаден LED Иndikatotop | 3.5" вгаден LED Иndikatotop | 3.5" вгадen LED Иndikatotop | Вгаден LED Иndikatotop | ||||
| Баерия | 36V 13Ah 468Wh | 36V 10.4Ah 374Wh | 36V 7.8Ah 280Wh | 36V 7.8Ah 280Wh | ||||
| Заша на Нскло наносте | 30.5-32V | 30.5-32V | 30.5-32V | 31V +/- 0.5V | ||||
| Гразниça на ток 18A | 18A18A | 15A | ||||||
| Светлии | праздени заден LED Иndikatotop | праздени заден LED Иndikatotop | праздени задen LED Иndikatotop | праздени задen LED Иndikatotop | ||||
| Функционалноct | Bluetooth - NFC | Bluetooth | Bluetooth | Bluetooth | ||||
| Размери | ||||||||
| Нeto terло 17.5kg | 16.7kg | 15.5kg 12kg | ||||||
| Брутуно terло | 20.6kg | 18.9kg | 18.9kg | 14.4kg | ||||
| Размери на OTворенья пожукт | 1140x520x1180mm 1110x10x1140mm 1110x10x1140mm 1090x$430x1130mm | |||||||
| Размери на заимовенья пожукт | 1140x520x500mm | 1110x510x490mm | 1110x510x490mm | 1110x510x490mm | ||||
| Размери на опakовкеа | 1165x210x540mm | 1190x190x510 mm | 1190x190x510mm | 1110x160x540mm | ||||
* BnHa n cna3BaIte KoJeKca 3a DnKeHne No nbTnUaTa I npabInJaTa 3a DnKeHne, KOInTo Ca B Cnla B DbpXkaBAta Ha DnKeHne.
** IopIeKn Ha npomraHa, B 3aBcHmOCT OT TerIto Ha BOdaHa, Ha NbTHInTe yCNoBnHa TEmpePaypata.
12. OtrtpaHbAHe Ha npo6JeMn
Declaration of Conformity
We: M.T. Distribution S.R.L
Address: Via Bargellino 10, 40112 Calderara di Reno (BO), Italy
This declaration of conformity is issued under the sole responsibility of the Manufacturer
Product Brand: DUCATI
Product Model: PRO1 EVO
Description of product: Electric scooter
Is in conformity with the requirements of the council Directives on the approximation of the laws of the Member States relating
2006/42/EC Machinery Directive
RED 2014/53/EU Radio Equipment Directive
2014/30/EU Electromagnetic Compatibility Directive 2014/35/EU Low Voltage Directive
Applicable harmonized standard(s)
MD: EN ISO 12100:2010, EN 60204-1:2018
EN ISO 13857:2019
EN ISO 13849-1:2015
EN ISO 13850:2015
EMC: ETSI EN 301 489-17 V3.2.4
ETSI EN 301 489-1 V2.2.2
EN 55032:2015
EN 61000-6-3:2007+A1-2011
EN 61000-3-2:2014
EN 61000-3-3:2013
LVD: EN 62368-1-2014+A11-2017
EN 62479:2010
EN 60335-1:2012/A13:2017
EN 62233:2008
EN 60529:1991+A1:2000+A2:2013
RED: ETSI EN 300 328 V2.2.2
EN 17128:2020
Factory name: Zhunhai Chang Jing Trade Co., Ltd
Factory address: Room 2-502 HGSS Building, Ianpu Road, XiangZhou Area, Zhunhai City, China 519000
Date: 30/11/2021
Declaration Place: Bologna, Italy
First name and surname: Alessandro Summa
Position: CEO
Technical file available from EU headquarters
MT DISTRIBUTION S.R.L
Via Bargellino 10, 40112, Calderara di Reno (BO), Italy
Authorized person: Alessandro Summa
Position: CEO
NOTE:
This declaration of conformity is only applicable to Electric Scooter sold in countries that follow the CE marking directives.
CE
Declaration of conformity
M.T. Distribution S.R.L
Address: Via Bargellino 10, 40012 Calderara di Reno (BO), Italy
This declaration of conformity is issued under the sole responsibility of the Manufacturer
| Product brand: | Ducati |
| Product model: | PRO-II PLUS |
| Description of product: | Electric scooter |
Is in conformity with the requirements of the council Directives on the approximation of the laws of the Member States relating:
2006/42/EC Machinery Directive
RED 2014/53/EU Radio Equipment Directive
2014/30/EU Electromagnetic Compatibility Directive 2014/35/EU Low Voltage Directive
Applicable harmonized standard(s):
EN 14619:2019
EN 60335-1:2012+AC:2014+A11:2014+A13:2017+A1:2019+A2:2019
ETSI EN 301 489-1 V2.2.3:2019-11
ETSI EN 301 489-17 V3.2.4:2020-09
Factory address: NO.509 Tengyun Road, Jiaojiang District, Taizhou City, Zhejiang, China
Date: 29/06/2021
Technical file available from EU headquarters
Declaration Place: Bologna, Italy
First name and surname: Alessandro Summa
Position: CEO
MT DISTRIBUTION S.R.L
Via Bargellino 10, 40012, Calderara di Reno (BO), Italy
Authorized person: Alessandro Summa
Position: CEO
NOTE:
This declaration of conformity is only applicable to Electric Scooter sold in countries that follow the CE marking directives.
C E
Declaration of conformity
M.T. Distribution S.R.L
Address: Via Bargellino 10, 40012 Calderara di Reno (BO), Italy
This declaration of conformity is issued under the sole responsibility of the Manufacturer
| Product brand: | Ducati |
| Product model: | PRO-II EVO |
| Description of product: | Electric scooter |
Is in conformity with the requirements of the council Directives on the approximation of the laws of the Member States relating:
2006/42/EC Machinery Directive
RED 2014/53/EU Radio Equipment Directive
2014/30/EU Electromagnetic Compatibility Directive 2014/35/EU Low Voltage Directive
Applicable harmonized standard(s):
EN 14619:2019
EN 60335-1:2012+AC:2014+A11:2014+A13:2017+A1:2019+A2:2019
ETSI EN 301 489-1 V2.2.3:2019-11
ETSI EN 301489-17 V3.2.4:2020-09
Factory address: NO.509 Tengyun Road, Jiaojiang District, Taizhou City, Zhejiang, China
Date: 29/06/2021
Technical file available from EU headquarters
Declaration Place: Bologna, Italy
First name and surname: Alessandro Summa
Position: CEO
MT DISTRIBUTION S.R.L
Via Bargellino 10, 40012, Calderara di Reno (BO), Italy
Authorized person: Alessandro Summa
Position: CEO
NOTE:
This declaration of conformity is only applicable to Electric Scooter sold in countries that follow the CE marking directives.

CE
Declaration of conformity
M.T. Distribution S.r.l.
Address: Via Bargellino 10, 40012 Calderara di Reno (BO), Italy
This declaration of conformity is issued under the sole responsibility of the Manufacturer
| Product Brand | Ducati |
| Product model | PRO-III |
| Product description | Electric scooter |
It complies with the requirements of the Council Directives for the approximation of the laws of the Member States relating to:
2006/42/EC Machinery Directive
RED 2014/53/EU Radio Equipment Directive
2014/30/EU Electromagnetic Compatibility Directive 2014/35/EU Low Voltage Directive
Applicable harmonised standards
EN 60335-1:2012+A2:2019
EN 14619:2019
EN 62233:2008
ETSI EN 301 489-1 V2.2.3: 2019-11
ETSI EN 301489-17 V3.2.4: 2020-09
Factory name: Taizhou Siweiluo Vehicle Co., Limited
Factory address: NO. 509 Tengyun Road, Jiaojiang District, Taizhou City,
Zhejiang, China
Date: 04/08/2021
Technical file available at EU headquarters
Place of declaration: Bologna, Italy
First name and surname: Alessandro Summa
Position: CEO
MT DISTRIBUTION S.R.L
Via Bargellino 10, 40012, Calderara di Reno (BO), Italy
Authorised person: Alessandro Summa
Position: CEO
NOTE:
This declaration of conformity is only applicable to electric scooters sold in countries that follow the CE marking directives.
Download the Ducati Urban e-Mobility app for a better use of the product


Download on the App Store

GOTTON Google Play
PLATUM
Shaping urban e-mobility
Imported and distributed by M.T. Distribution Srl
via Bargellino 10c/d, 40012
Ducati Motor Holding S.p.A. Official Licensed Product
Errors and omissions excepted
- Pro-I Evo (Black Edition / White Edition), Pro-II Plus, Pro-II Evo, Pro-III
- User manual
- Contents
- Safety instructions
- CAUTION
- Symbols identifying the safety warnings
- Pay attention
- Residual risks
- General warnings
- What to do after a fall:
- Package contents and assembly
- Product overview
- Battery charging and activation
- Instructions:
- Battery warnings
- DANGER
- Command information / Control panel
- Quick guide
- Brake lever adjustment
- Brake levers
- Adjusting the brake calliper
- Folding and carrying
- Models: Ducati Pro-I Evo
- Models: Ducati Pro-II Plus, Pro-II Evo, Pro-III
- Range and performance
- Storage, maintenance and cleaning
- App configuration
- App configuration
- Technical data sheet
- Troubleshooting
- Liability and general terms of warranty
- Treatment of the electrical or electronic device at the end of its service life (applicable in all countries of the European Union and in other European systems with separate collection systems)
- Handling of spent batteries (applicable in all countries in the European Union and in other European systems with separate collection systems)
- Manuale d'uso
- Manual del usuario
- Mode d'emploi
- Benutzerhandbuch
- Instrukcja obslugi
- Návod k použití
- Nabijeni a aktivace baterie
- POZOR
- Modely: Ducati Pro-I Evo
- Modely: Ducati Pro-II Plus, Pro-II Evo, Pro-III
- Návod na použitie
- Nabitie a aktivácia batrice
- UPOZORNENIE
- Návod:
- Kullanim kilavuzu
- Eeyεipidio xρnσnc
- Navodila za uporabo
- Polnjenje in zagon akumulatorja
- Uputstvo za upotrebu
- Sadržaj
- PAZNJA
- Punjenje i aktivacija baterije
- Uputstva:
- Handleiding
- PbKOBOdCTBO 3a ynoTpe
- CbDbpxaHne
- BHIMAHNE
- Tpaunha opma Ha npedynpeKdHnra Ta 3a 6e3onacnoct
- 06bphTe BHIMaHne
- ONACHOCT
- OctatbHn pncKOBe
- PpeynpexkdeHn oT o6xapaKtep
- 3apexdahe n aKTHBbpaHe Ha 6aTepeyTa
- Hnctpykun:
- KoHpypaHa npJIOXeHHeTo
- Texhnuecka JnCTOBka
- OtrtpaHbAHe Ha npo6JeMn
- Declaration of Conformity
- CE
- C E
Brand : DUCATI
Model : ProII Plus
Category : Scooter