F120 - Fan BONECO - Free user manual and instructions
Find the device manual for free F120 BONECO in PDF.
User questions about F120 BONECO
0 question about this device. Answer the ones you know or ask your own.
Ask a new question about this device
Download the instructions for your Fan in PDF format for free! Find your manual F120 - BONECO and take your electronic device back in hand. On this page are published all the documents necessary for the use of your device. F120 by BONECO.
USER MANUAL F120 BONECO
READ AND SAVE THESE INSTRUCTIONS
DE Gebrauchsanweisung 3
EN Instructions for use 13
FR Mode d'emploi 23
IT Istruzioni per l'uso 33
NL Gebruiksaanwijzing 43
ES Instrucciones de uso 53
PT Instruções de uso 63
HU Hasznalati utmutató 73
PL Instrukcja obstugi 83
SE Bruksanvising 93
FL Käytöohjeet 103
DK Brugsanvising 113
NO Bruksanvising 123
LV Lietosanas instrukcija 133
LT Naudojimo instrukcijos 143
EE Kasutusjuhend 153
CZ Navod k pouziti 163
SK Navod na použivanie 173
SL Navodila za uporabo 183
HR Upute za uporabu 193
GR 08nyiec xphane 203
RU PykoBoDCTBO no 3Kcnnyatauun 213
JP 取极説明書 223
KR 233
de
GEBRAUCHSANWEISUNG
BONECO F120

INHALTSVERZEICHNIS
Technische Daten 5
Einleitung 6
Lieferumfang 6
Technical data 15
Introduction 16
Items included 16
Overview and part names 17
Start-up 18
Handling 19
Handling 19
Alignment 19
Positioning tips 20
Notes on output 20
Air-Conditioning System (AC) 20
Fresh air 20
Multiple floors 20
Rooms with high ceilings 20
Cleaning 21
Safety instructions 21
Cleaning the housing 21
Cleaning the fan blades 21
TECHNICAL DATA
Technical data*
Model BONECO F120
Power supply voltage 220 - 240V 50Hz
Power consumption 20 W (max. level)
Operation noise level 55 dB(A) (max. level)
Air flow 610 m ^3/h
Air-speed 4.1 m/sec
Dimensions L×W×H 278×278×540 mm
Weight 2.9 kg
- Subject to change
en
INTRODUCTION
DEAR CUSTOMER,
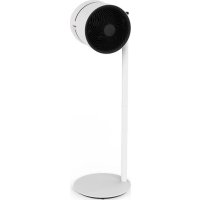
Congratulations on your purchase of the BONECO F120 Air Shower Fan. This high-performance unit seamlessly adapts to meet your needs. When set to the lower output level, it provides a pleasant breeze in your home on hot days. On the other hand, if you use an air conditioning system, the units powerful fan distributes the air throughout the room to ensure a uniform temperature.
In developing the BONECO F120 Air Shower Fan, low maintenance and durability were of primary importance. The fan blade's one-of-a-kind shape creates a uniform air flow using minimal energy, which is also good for the environment. The elegant design harmonizes with any decorative style so that you can use your BONECO F120 Air Shower Fan throughout the entire year.
We hope you enjoy your new BONECO F120 Air Shower Fan

ITEMS INCLUDED
BONECO F120 Air Shower Fan
Manual Safety instructions
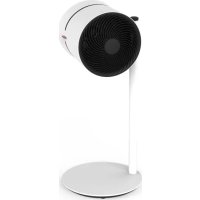
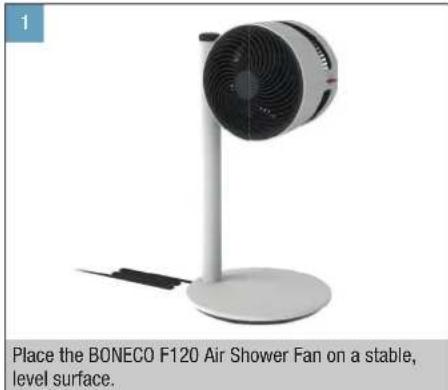
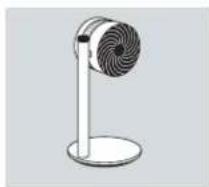
OVERVIEW AND PART NAMES
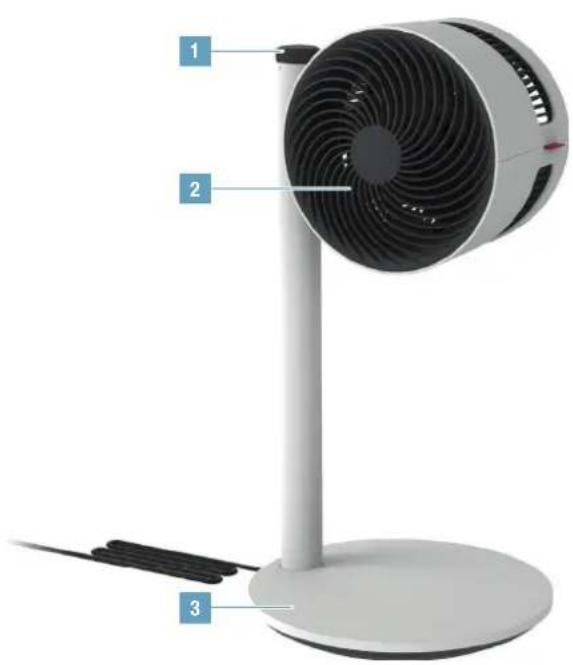
1 Output regulator
2 Fan unit
3 Base with power cord
en

HANDLING
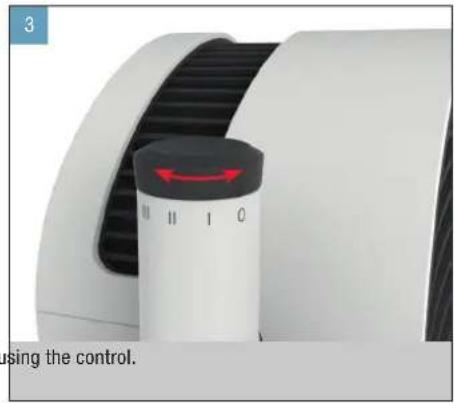
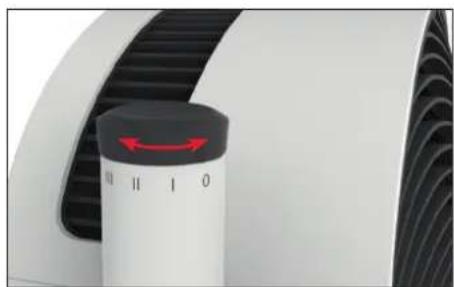
HANDLING
The BONECO F120 Air Shower Fan is designed for easy handling. The output is adjusted in three levels using a single control: 0 > | > II > III
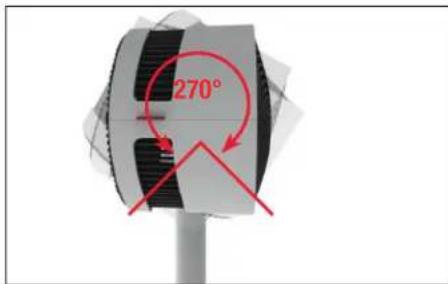
ALIGNMENT
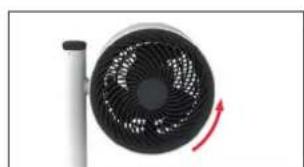
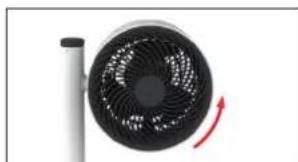
The fan unit can be manually tilted 270 degrees.

The fan unit does not rotate a full 360 degrees.
en
POSITIONING TIPS
NOTES ON OUTPUT
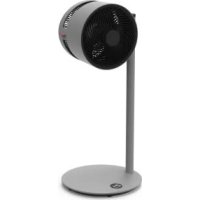
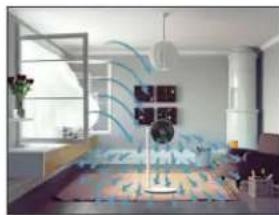
The BONECO F120 Air Shower Fan is equipped with a high-performance fan that can move large amounts of air. Making use of this feature: Guide the air in a specific direction to achieve a uniform room climate. The following examples illustrate how to do this.
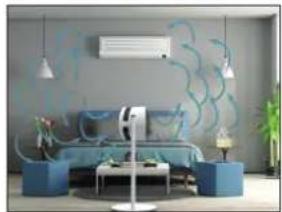
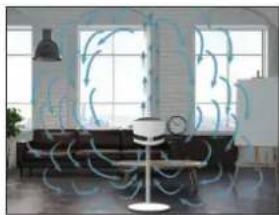
AIR-CONDITIONING SYSTEM (AC)
An air conditioner distributes temperature in various ways. Use the BONECO F120 Air Shower Fan to move the warm air towards the air-conditioning system. This can be done directly or indirectly via air circulation, as shown in this image.
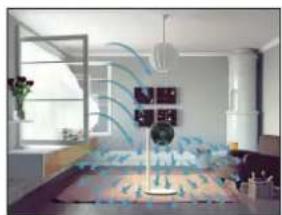
MULTIPLE FLOORS
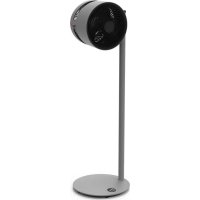
In the summer, it can become hot and muggy on the upper floors. The powerful fan of the BONECO F120 Air Shower Fan directs cool air from the ground floor to multiple floors achieving a uniform temperature.

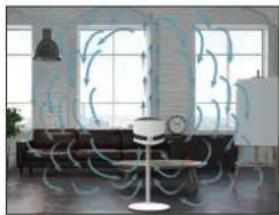
FRESH AIR
The BONECO F120 Air Shower Fan helps you achieve better ventilation indoors. If cross-ventilation is not created, guide fresh air directly from the window into the desired room.
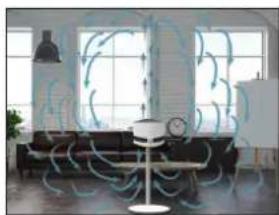
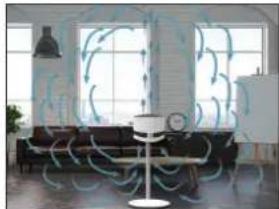
ROOMS WITH HIGH CEILINGS
In air-conditioned rooms with high ceilings, the cold air sinks to the floor while the warm air rises to the ceiling. Turn the BONECO F120 Air Shower Fan straight up for an air-shower sensation.
CLEANING
SAFETY INSTRUCTIONS
Always unplug the BONECO F120 Air Shower Fan before you begin cleaning! Failure to do so can result in electric shock and fatal injury!
Do not use alcohol or corrosive cleaning agents for cleaning.
CLEANING THE HOUSING
The BONECO F120 Air Shower Fan is designed for low-maintenance operation, even after years of use. In most cases, a dry cloth can be used for cleaning.
If stubborn dirt is present, clean the housing using a damp cloth. Add a small amount of dishwashing detergent to the water.
CLEANING THE FAN BLADES
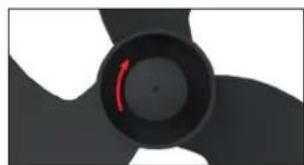
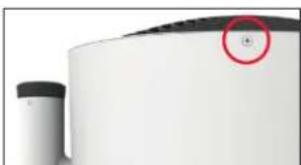
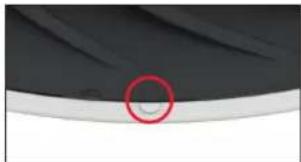
- Tilt the fan unit upwards and loosen the safety screw.
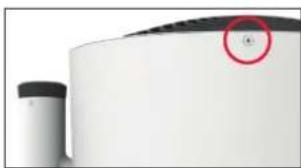
- Remove the front grill by turning it counterclockwise slightly.
- Loosen the safety screw in the middle by turning it clockwise.
- Remove the fan blade and clean it with a damp cloth.
- Put the unit back together by following the steps in reverse order.
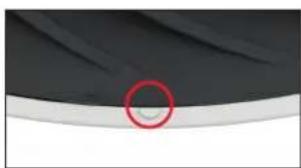
- Attach the front grill with the safety screw. When doing so, pay attention to the position of the screw on the front grill.


MODED'EMPLOI
BONECO F120

SOMMAIRE
\section*{Caracteristiques techniques 25}
Introduction 26
A ventilatorlapatok tiszitasa 81
MUSZAKI ADATOK
Muszaki adatok*
Modell BONECO F120
ÖVERSIKT OCH DELARNAS NAMN

RUM MED HOJT TIL LOFTET
I rum med aircondition og hjt til loftet synker den kolde luft ned til gulvet, mens den varme luft stiger opad. Drej BONECO F120 Air Shower-ventilatoren opad for at opna luftcirkulation.
RENGØRING
SIKKERHEDSANVISNINGER
PATALPOS AUKSTOMIS LUBOMIS
Patalpose su aukstomis lubomis, kurioe jrengtas oro kondcionierius, saltas oras nuseda ant grindu, o siltas -pakyla ir laikosi ties lubomis. Pasukite BONECO F120 Air Shower i virsu, kad butu sukurtas oro srauto i virsaus pojutis.
VALYMAS
SAUGOS INSTRUKCIJOS
Pries pradedami valtyi BONECO F120 Air Shower ventilatori visada ji atjunkite! Jei to nepadarsite, galite patirti elektros smugj ir mirtinai susizalot!
Valymui nenaudokite alkoholio ar esdinanciu valymo priemoniu.
KORPUSO VALYMAS
△aotaoicM×π×Y 278×278×540mm
Bapoc 2,9 kg
*Evδεχεταν αλλδει

EIZAΓΩΓ
AANTHTE NEAATH,
Uyapntipia ytov vao aac avmuotnpa BONECO F120.Aun n uynnc anofoanc movada npooapocetai eukta otc avaykeoc. Kata n pueuon on xanlntaxuteta,napexi evauxpato aepaki oto otitn oac ticcecnepec.Atoyn aa,avxpanoioite evouatma kuiatouo, oixupoc aveipatnpac tnc movalac katavoei tov aepo olo tov wpo diaoafalcovtac ia ooiopopn thepokpaia.
OI nepiaipuevec avayke c auvtnpnnc kai navtox npé- 8nkav oTo eikvro kata tvnv eEeAen tou avemuatnpa BONECO F120.To ouvadoo oxma Touavemuatnpa dn- uoiuyei ia evia napox npa xpa npauotowvct EaXIOTN evpeyia, kai TOn anotele tauroxpova oEloac yia to pepalaaov. H koupi oxdeltaevapoviciar te OTIOIOHNTOE otla diakosunoc, etoi wote va mtopeite va npauonntoei te vauuotpba BONECO F120 dao tov xpovo.
Eanoue va anoalaote to voe aoc avmuippa BONECO F120!
IEPIIAMBANONTAI
BONECO F120
Aveuotnpac
TEXHNUECKNEXAPAKTEPNCUK
Texnueckne xapaKtepncTknx
MoeB BONECO F120
HapjKeHHe cTeBOrO 6noka nHTaHn 220-240V\~50T
IOTpe6JIeMaMoOHeCtB20BT(MaKc.3HaueHne)
MHOTO3TAXKHBIE NOMEUEHN
BJIeTHe BpEMa HApexHxN 3Txax XaCTo CTaHOBITcK Xapko N dyuHo. MouHb BeHTnIaTOp BONECO F120 Air Shower HanpaBNT npoxnaHb Bo3dyxC HmXhero 3TaKa Ha BepxHne, YTOb6I ObecneHTb ODHopOHyo TEMpepatpy BO BCem Dome.

NOMEUENC BbICOKMNIOTOJIKAMN
BnomeueHnX C BbICOKMIM NOTOKAMN, Tne NCIONB3yETcncTeMa KOHNuHOHPOBaHnB O3Dyxa, XoNOHBn BO3Dy ONyCAEcTc BnH3 K NOny, a TEnIbBn BO3DyX NOHNMAeTc K NOTOKy. NObepHTe BEHTmIATOp BONECO F120 Air Shwer BePTkAnbHO BBepx, YTO6bI cO3dA b 3ΦΦeKt BO3DyWHoRTO dywa.
OYNCTKA
HCTPYKUINI NO TEXHNIKE 630NACHOCTN
063aTeNbHO OTKIOHauTe BONECO F120 Air Shower OT cTeI nepe TEM, KAK pNCTynTb K OYnCTke! HecO6JIIOHeNe 3ToK peKOMeHdaun MOKeT npNBeCTn K Uydp Aye NkTPueckm TKOM I TPABME, HECOBMECTHMoC C Xn3HbO
He nCnoJb3ayIe InIgOuCTKn CpeCTBA,coep- Xaunne CnIPT,nnr arpeCCNBHbe BuecCTBA.
OUMCTKA KOPNYCA
BentnTop BONECO F120 Air Shower paccntan Ha makcmalbhy npoctoTy o6cnykuaHHa, daxe cnyCTrafo b3ckniyyataum. B 6oIbshnHCTbe cnuyaeDnO uNCTKn pnp6opao moxHO nCNOJb3OBaTb cyxyoTKaHb.
Ecn coxpanHO TpyHOBbBOIMMbIe 3arp3HeHHO OHCTNE KOPNc npn NMOU BJIaKHO TKAHN. TkaHb MOXHO CMOHTB BOOp C DoabJeHMem He6oJbWoro KOINueCTBA CpndCTBa Dn MblrNoCcybl.
OYNCTKA JIONACTEN BEHTNJIATOPA
- P3BepHnTe BEHTnIaTOp BEPTnKaJIbHo BBePx n Ocna6bTe 3aTJkKy npdoXpaHntEhBOrO BNHTa.
- CHIMITE nepeHIOIO peWetky, aKKypaTHO NOBepHyB ee npOTIB YACOB CTpeJIKN.
3.0cna6bTe CEHTpaIbHbI npedeoxpAHNTeHbH bINT, NOBepHyE rO no YacobO BCTpeKe.

- CHMNTE JONACTB BEHTNIAITopa N OCHNTe ee BnaXHn CanPekKo.
- Copepeite npin6op, cneyra onicaHbIM 3tanam B o6paTHOM npraKe.
6.3aKpHnTe nepeHIOpo PeWETky npn nOmoN npEdoxpaHnTeIbHO BnHTa.BoBpemr 3ToI onepaUMoBaPauTBeBHMaHHe HaNoJoxKeHMe BNHTaHa nepeHnepeWetke.

223
jp
取拔說明書
BONECO F120
仕樣
仕樣\*
Facebook.com/boneco.healthyair
@ instagram.com/boneco_healthyair
p pinterest.com/bonecol956
youtube.com/airoswissboneco
WELOVEBONECO
TADITION S1956 A SWISS COMPANY

CEPTHOKAUNIPODUKUIN
TobapceTMmnpoBaanHaTeppmTopmPoCcm,coOTBetCTByETpeboBAMHOpMaTHBbIXdoKymeHTOB:
TP TC 004/2011 <063eONACHOCTHMHKOBJbTHORO606py- doBaHn>,TP TC 020/2011 <3eKtpomarHHTaCoBMeCTMocBt TEXNHueCKHX cpeCTB>
CPOK CnyXbbl YBnAXHnTeIe COCTABJIET 5 JET.
Ntrotobentb: · BONECO AG* BONECO, zaperwctnpoabHhne noMapkO BONECO AG, 1Bmuaepn r. BuHaay, 3cnHe- ttpaccse, 8C, 9H-9443
MMIOPTEP:
06ueCTBO C orpaHnueHHoI OTBETcBHeHOCTbIO P-KnMMaT
ADEC:
119049, Pocnra, R. MockBa, yn. 5. RaKmHaKa, n. 35 cTp. 1, 3T.3, nom I, KOM. 4


www.jj-00.com
1044306152
BONECO
healthy air
www.boneco.com
BONECO is a registered trademark of BONECO AG, Switzerland
BONECO AG, Espenstrasse 85, 9443 Widnau, Switzerland