
Stockholm 400 DAB - Car stereo BLAUPUNKT - Free user manual and instructions
Find the device manual for free Stockholm 400 DAB BLAUPUNKT in PDF.
| Brand | Blaupunkt |
| Model | Stockholm 400 DAB |
| Product type | Car radio |
| Dimensions (approx.) | 180 x 50 x 160 mm (1 DIN) |
| Weight (approx.) | 0.5 kg |
| Power supply | 10.5 to 14.4 V DC |
| Power consumption | Operation: < 10 A; Standby (ignition off): < 5 mA |
| Fuse | 10 A, flat (red) |
| Analog radio | FM (VHF) / AM (medium wave) with RDS |
| Digital radio | DAB / DAB+ |
| Audio sources | CD (optional), USB, Bluetooth (A2DP/AVRCP), iPod/iPhone (via USB), AUX (rear input), Tuner |
| Bluetooth | Hands-free (calls) and audio streaming; up to 5 paired devices |
| Supported file formats (USB/CD) | MP2, MP3, WMA, FLAC, AAC, WAV |
| Preamp outputs | 4 channels (RF, LF, RR, LR) + subwoofer output |
| Subwoofer output | Yes (SUB-OUT, adjustable level and frequency) |
| Microphone | Built-in + external mic input |
| Display | LCD with backlight, adjustable color (7 colors), manual/auto brightness |
| Remote control | Optional (infrared), compatible with RC-08/09/10/10H/12H |
| Steering wheel connection | Yes (analog resistive SWC; requires CAN interface) |
| Clock | 12/24h display; manual or automatic RDS setting |
| Operating temperature | -10 °C to +18 °C (mounting inclination) |
| Maintenance and cleaning | Dry or slightly damp cloth; avoid solvents and abrasives |
| Safety | Moderate volume; do not open device; use in compliance with traffic regulations |
| General information | Manual available in multiple languages; software updates via Blaupunkt website |
Frequently Asked Questions - Stockholm 400 DAB BLAUPUNKT
User questions about Stockholm 400 DAB BLAUPUNKT
0 question about this device. Answer the ones you know or ask your own.
Ask a new question about this device
Download the instructions for your Car stereo in PDF format for free! Find your manual Stockholm 400 DAB - BLAUPUNKT and take your electronic device back in hand. On this page are published all the documents necessary for the use of your device. Stockholm 400 DAB by BLAUPUNKT.
USER MANUAL Stockholm 400 DAB BLAUPUNKT
PTY TYPES (PTY LISTE):
PTY LANG (PTY SPRACHE):
FM SENS HI/ LO (FM EMPF +/-):
FM HICUT OFF, 1, 2, 3 (FM HICUT AUS, 1, 2, 3):
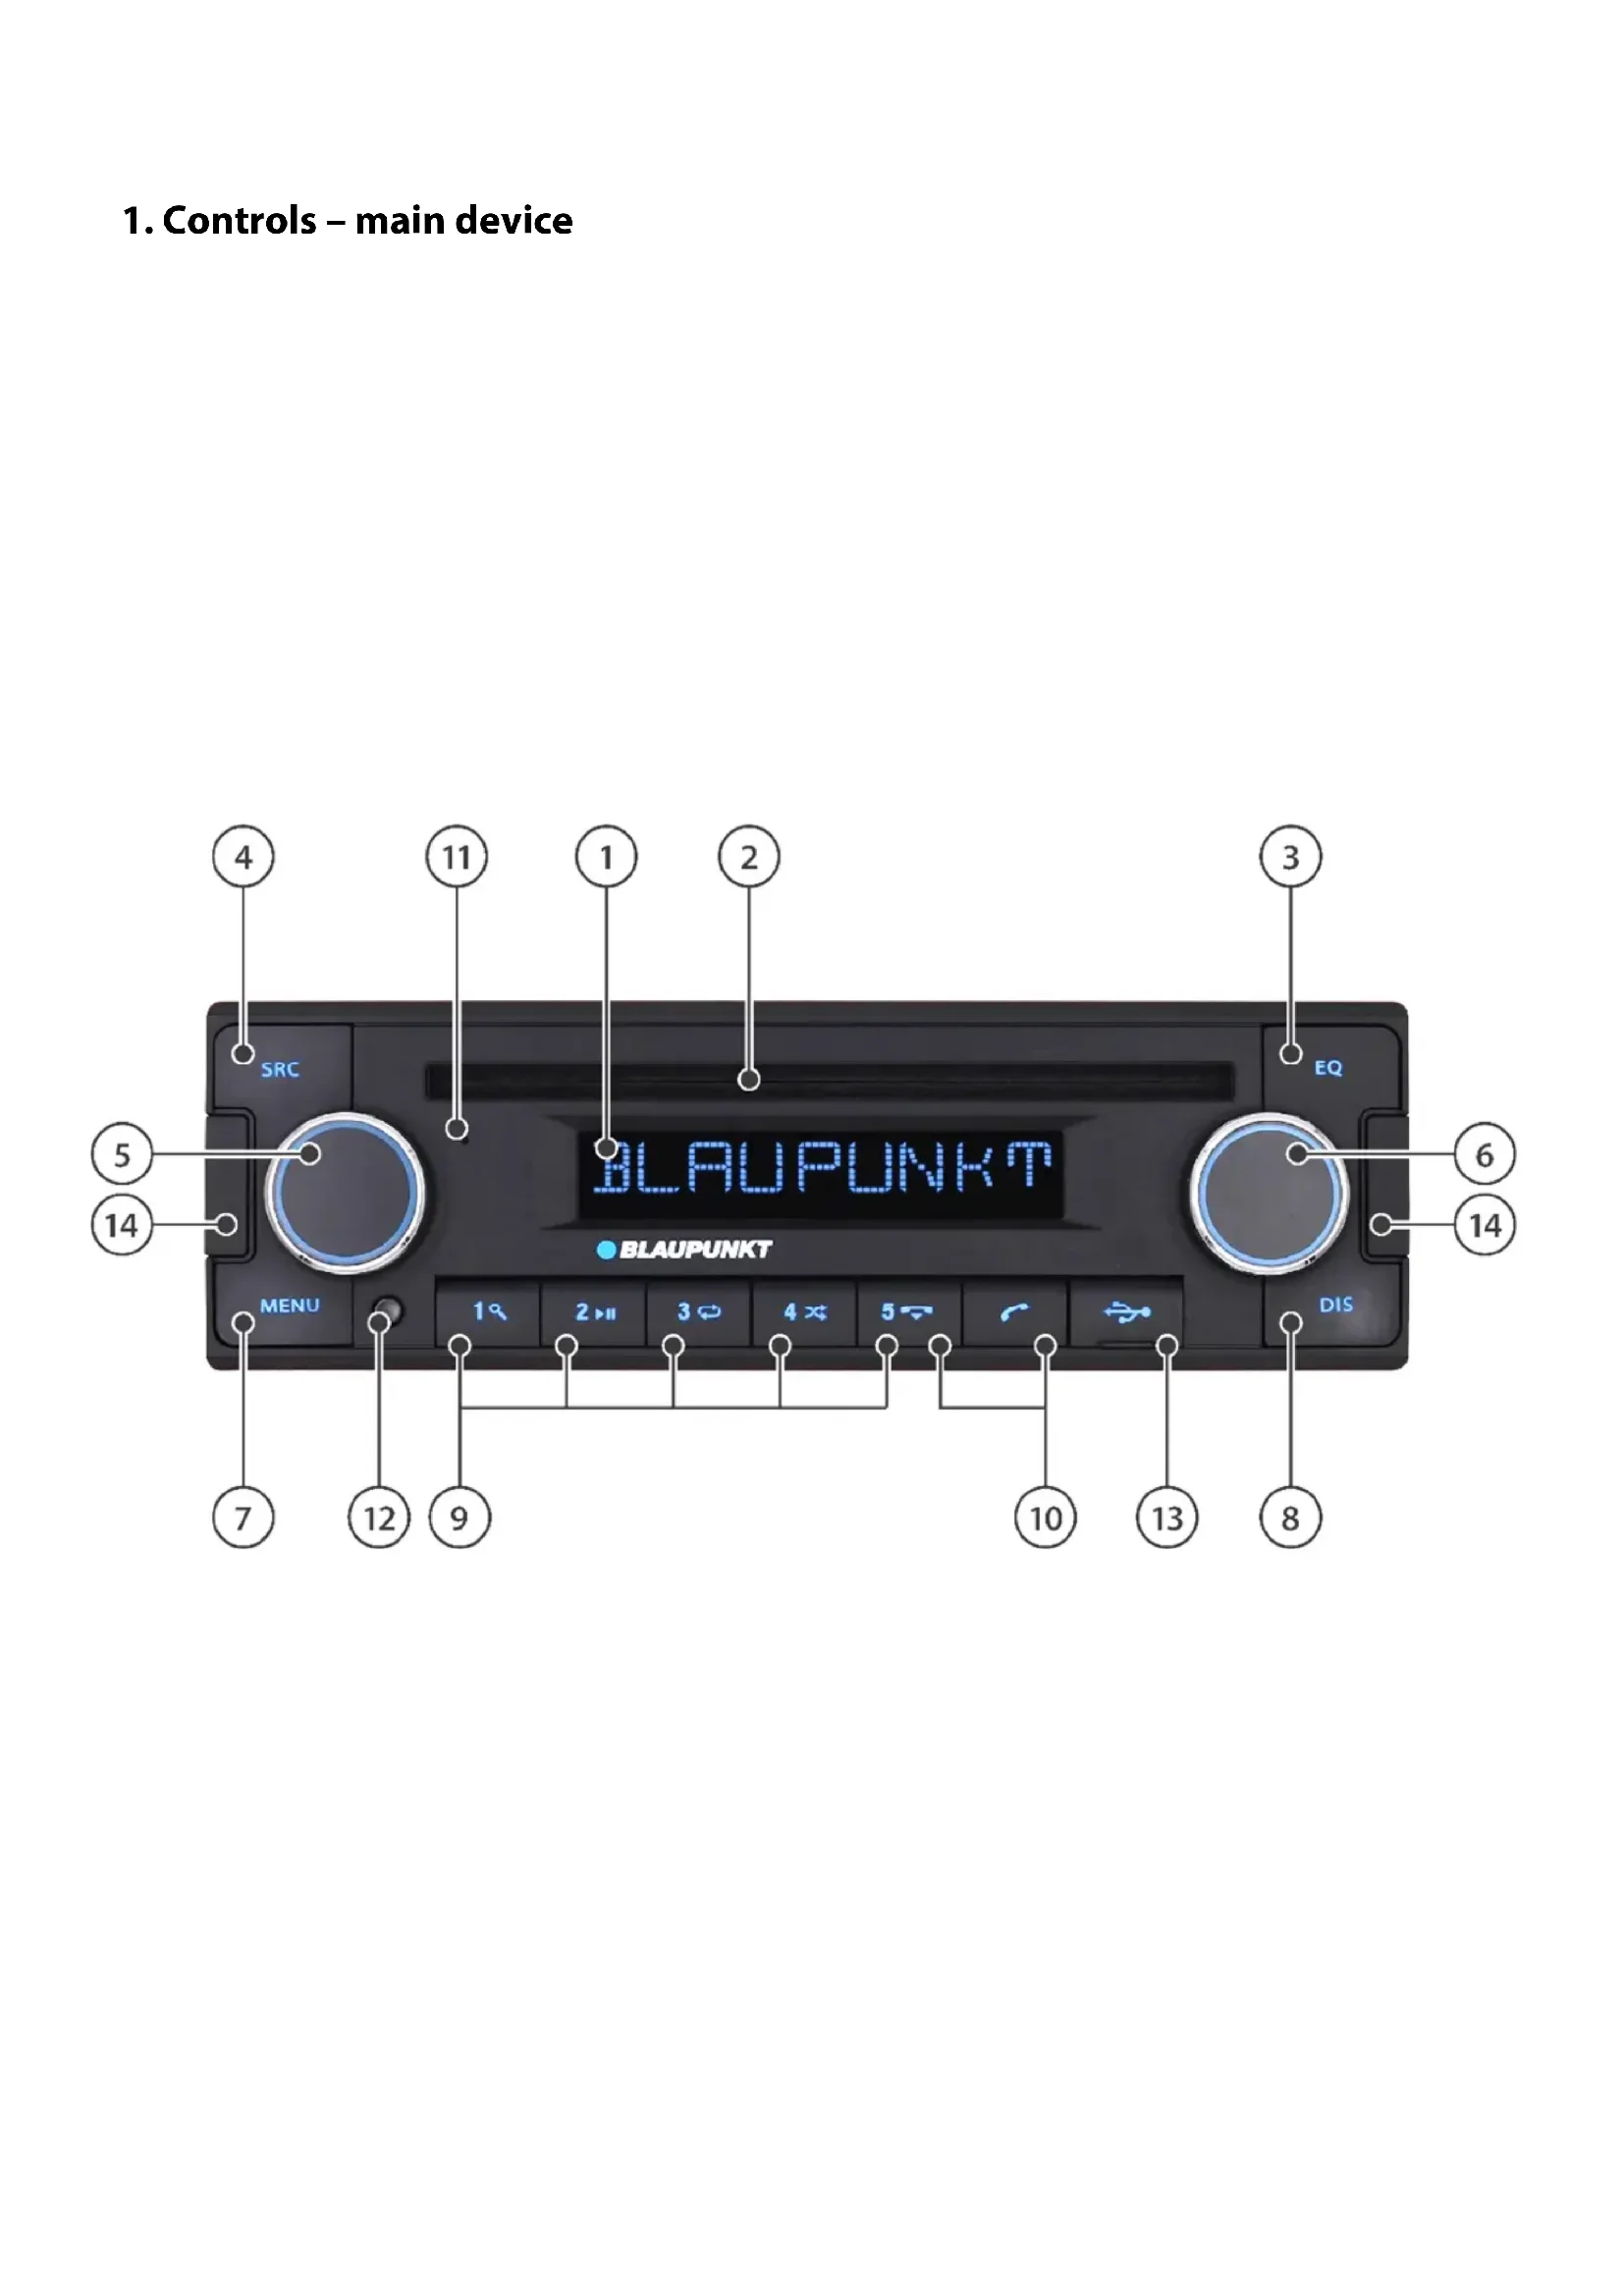
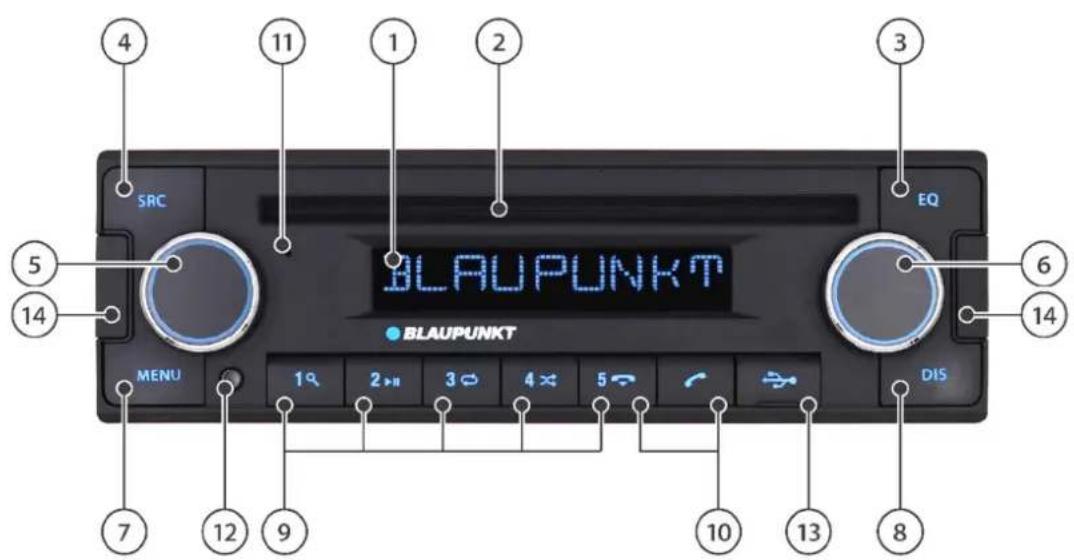
1. Controls - main device
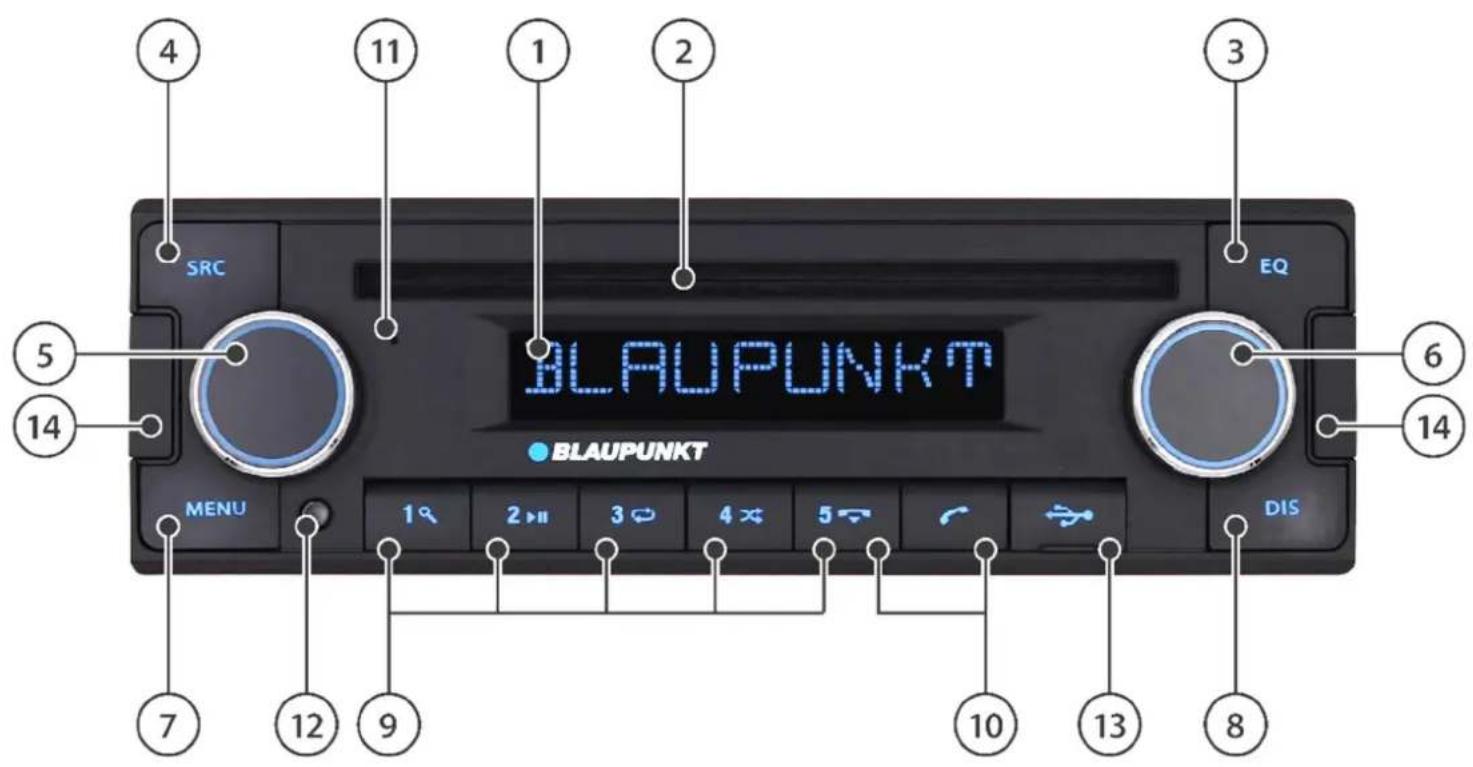
① LC display:
Displays information including the current station, track, time and setting options
② CD slot (models with CD drive):
For inserting CD data carriers
Note: Only commercially available CDs can be used (no CD singles, no CDs with adapters, no different shape CDs)
③ CD eject (models with CD drive):
Ejects the CD
EQ button (models without CD drive):
Tone style selection (in devices with CD drive, this setting is only available in the menu, see "SETTINGs")
④ SRC key:
Audio source selection: toggle between the available audio sources one by one. Some sources can be deactivated, see also " SETTINGS"
⑤ Left button/knob:
Turn:
Volume up/down
Short press:
Turns the device on, mutes the device;
Long press:
Switches the device off
⑥ Right button/knob:
Turn:
Depending on the source and function mode: search, change station, change track, rewind, etc.
Toggle between setting options in the menu
Short press:
Switch over to the second or third function.
Note: After 15 seconds without activation, the standard function is activated again.
In the Option Select/Confirm menu
Long press:
Track or station playback (SCAN) function (depending on the source selected)
One step back in the menu/Delete entry
⑦ MENU button:
Short press:
Opens/closes the menu (see "SETTINGS")
Long press:
Memory recording (P-SCAN) function for FM/DAB
⑧ DIS button:
Short press:
Toggling between different information to be displayed depending on the source selected Long press:
Toggling between the display brightness settings (if the brightness is set to MANUAL in the menu, see " SETTINGS")
⑨ Station buttons:
Short press:
Selects a station, stored telephone number or displays the secondary function/special function such as song search (browsing), play/pause, repeat function, random playback, depending on the source selected
Long press:
Memory function for radio stations and telephone numbers
⑩ Telephone handset button:
"Answer" button:
Short press: Answers calls/dials a number
Long press: Softkey option (see "BLUETOOTH HANDS FREE")
"Disconnect" button:
Short press: Ends/rejects a call
Long press:.
① Microphone:
Hands-free microphone (only active when no external microphone is connected)
12IR sensor:
Receiver for optional infrared remote control
13 USB Port:
Top-opening flap, socket for connecting a USB stick or Apple devices for music playback
⑭ Unlock tool hole caps, see
"INSTALLATION/CONNECTIONS"
2. Controls - remote control (optional)
The device can be operated with a remote control sensor built into the front of the main unit. This is possible with a remote control that is available as an accessory to the device, or with older Blaupunkt remote controls (RC-08, RC-09, RC-10, RC-10H, RC-12H).
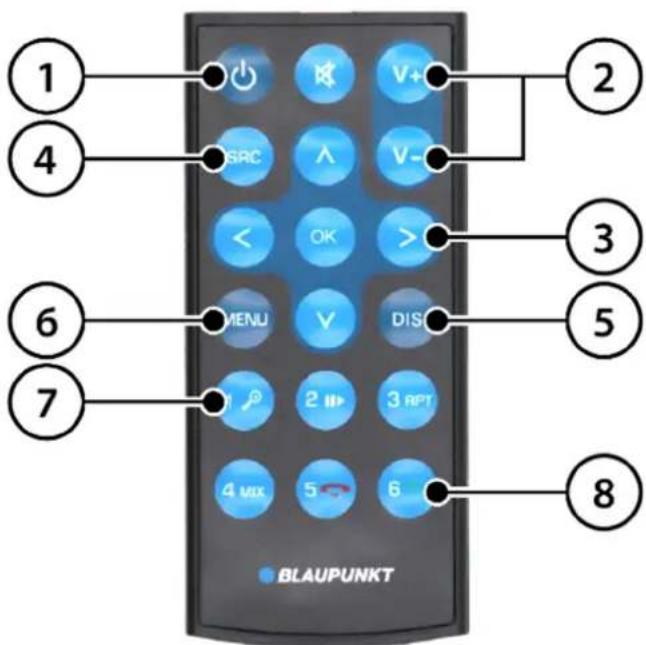
① On/Off button.
Note: The device can only be turned on with the remote control when the ignition is on. This function increases the standby current draw of the device and cannot be used without the ignition switch on to protect the vehicle battery.
② Volume/mute buttons.
③ Multifunction buttons: Control source-specific functions.
④ SRC (source) button:
Audio source selection: toggle between the available audio sources one by one. Some sources can be deactivated, see also " SETTINGS".
⑤ DIS button: Switches over the display
(6) MENU button: Enters the menu
⑦ Station memory buttons:
Selecting a station or the secondary function such as pause/repeat/shuffle playback, depending on the source selected
⑧ Telephone keys:
Answers and ends calls.
3. Congratulations
Congratulations on the purchase of your new Blaupunkt product. Please read this User Manual carefully to enjoy it for a long time.
However, if unexpected problems arise, check this User Manual to see if you can solve the issues yourself. Please also read the TROUBLESHOOTING section at the end of this User Manual.
Your Blaupunkt dealer and the Blaupunkt Service Department will be happy to help you if you cannot solve a problem yourself.
Our contact information can be found at www.blaupunkt.com.
NOTE: This manual applies to different models, so some features and options may not be available or may vary from model to model. We reserve the right to make technical changes to improve the product.
Contents
Section
Controls - main device 1
Controls - remote control (optional) 2
Congratulations | Contents 3
Safety notes 4
General information | Package contents | Software update 5
Switching on/off | Adjusting volume 6
Analogue radio: VHF/medium wave (FM/AM) 7
Digital radio: DAB/DAB+ 8
Playback from external devices and media: CD player (optional) 9
Playback from external devices and media: USB 10
Playback from external devices and media: Bluetooth® 11
Playback from external devices and media: iPod/iPhone 12
Playback from external devices and media: AUX 13
Bluetooth® hands-free set 14
Clock 15
Steering wheel remote control (SWC) 16
Settings | Menu 17
Installation | Disassembly | Connections 18
Useful information | Technical data 19
Troubleshooting 20
4. Safety notes
Safety notes
The car radio has been manufactured according to the current state of the art and specified safety guidelines. However, hazards may occur if the safety instructions in this User Manual are not followed. This manual is to familiarise the user with the device and its intended use.
- Please read this User Manual carefully before using your car radio.
- Keep the User Manual in a place that is accessible to all users.
- When passing the car radio on to someone else, include this User Manual.
- If necessary, follow the manuals of the devices used together with the car radio.
Symbols used
The following symbols are used throughout this Manual:

DANGER! Warning of injuries


CAUTION! Warning of the risk of damage to the DVD/CD drive or media in use

DANGER! High volume warning

The CE mark certifies compliance with EU directives
Tip
Details
Road traffic safety
Please follow the road traffic safety tips provided below

DANGER! Use the device in such a way that you can drive safely at all times.
Using the device functions when driving can distract you from the situation on the road and lead to serious accidents!
Avoid doing anything that distracts you from the traffic situation and from operating your vehicle while driving. To use these features, you must stop in a proper place and operate the unit while the vehicle is stationary.

Use the device in such a way that you can drive safely at all times. When in doubt, stop in a proper place and operate the unit with the vehicle. The drivers of the vehicle must not use any apps to distract them from driving.
Always listen to the radio at a moderate volume to protect your hearing and be able to hear sound warning signals (e.g. from the police). During muting intervals (e.g. when swapping the sound source), adjusting the volume cannot be heard. Do not increase the volume during these intervals.
General safety notes
Do not modify or tamper with the device. There are no user-serviceable parts inside.
Devices with CD drive use a Class 1 laser that can damage your vision.
Use as intended:
This car radio is intended for installation and operation in a vehicle with 12V supply voltage and must be installed in a DIN slot.
Observe the performance limits of the device. Have repairs and, if necessary, installation done by a professional.
5. General information | Package contents | Software update
Declaration of conformity
Blaupunkt Competence Center Car Multimedia Evo Sales GmbH hereby declares that the device complies with the essential requirements and other relevant provisions of Directive 2014/53/EU.
The Declaration of Conformity can be found on the Internet at www.blaupunkt.com.
Trademark information
All other trademarks and their logos, brand names or company names mentioned in this User Manual are used for identification purposes only and are the property of their respective owners.
Cleaning
Solvents, cleaning and abrasive agents, as well as cockpit sprays, air fresheners and plastic care products can contain substances that will damage the surface of your car radio. Use only a dry or slightly damp cloth to clean the car radio.
Disposal

Do not dispose of the used device with the household waste! Use available return and collection systems to dispose of your old device
and accessories.
Package contents
The package includes the following items:
Car radio
- User Manual
- External microphone
- ISO A/ISO B connection cable
- Mounting frame + disassembly tool
- DIN-ISO antenna adapter
Software update
The device software can be updated via external storage media.
If updates for your device are available they can be found at www.blaupunkt.com. Update instructions and further information are included with the update.
Note: No update is required if the device works properly. Every update carries some risk of errors during the process, and in very rare cases - despite careful testing - new or different bugs may appear.
Note: Individual items and device functions may deviate from the User Manual, as functions may have been changed, added, or removed due to further software development. This is not a defect nor a reason for complaint.
Note: Please provide as many details about the problem in your device as possible when requesting an update from Blaupunkt. The support consultant will also need the details of your currently installed software version (see "SETTING"). Unfortunately we cannot help or provide updates without this information.
6. Switching on/off | Adjusting volume
Switching on/off with the button/knob
Press the left button/knob to turn the unit on. To turn the unit off press and hold the left button/knob for more than 2 seconds.
Note that it may take a few seconds after turning the device on before you can turn it off again, as the internal boot processes are still active in the background.
Note: The device can also be switched on with the ignition off. The display then briefly shows 1 HOUR ON. The device automatically shuts off after one hour to protect the vehicle battery.
Switching on/off by the vehicle ignition
If the ignition is turned off while the device is on it will automatically turn off and turn on again the next time the ignition is turned on.
If the unit has been turned off with the left button/knob it will remain permanently off when the ignition is turned on/off until manually turned on again.
Note: If the function does not work as described, the device is not connected correctly.
Adjusting the volume
The volume can be adjusted using the left button/knob from 0 (no sound) to 50 (full volume).
The display shows the set volume level for a few seconds.
Setting the music volume:
During music playback, turn the left button/knob to set the volume.
Setting the volume of traffic announcements (traffic announcements must be active in the settings, see "SETTINGS"):
During a traffic announcement, turn the left button/control knob to set the volume; this value is automatically saved and can be adjusted at any time in the settings (see "SETTINGS").
Set the Bluetooth® (telephone) volume:
During a phone call, turn the left button/knob to set the volume. This value is saved automatically and can be adjusted at any time in the settings (see " SETTINGS").
Muting your car radio
Briefly press the left button/knob to mute the unit or to restore the previous volume level.

Always listen to the radio at a moderate volume to protect your hearing and be able to hear sound
warning signals (e.g. from the police). During muting intervals (e.g. when swapping the sound source), adjusting the volume cannot be heard. Do not increase the volume during these intervals.
7. Analogue radio: VHF/medium wave (FM/AM)
Select one of the sources/memory levels FM1, FM2, FMT, AM or AMT with the SRC button
Note: Some memory sources/levels are inactive depending on the setting; for example, only the FM1 memory level is active. See "SETTINGS".
Note: There are 5 memory slots available for each memory level.
Station search
Use the right button/knob to start a station search by briefly turning it up (clockwise) or down (counter clockwise). The search stops automatically at the next station found.
Note: The search sensitivity can be set in the settings, see " SETTINGS".
You can also set the frequency manually if the station signal is too weak, and the search does not stop at the desired frequency. To do this, briefly press the right button/knob once. The display will show MANUAL. You can now turn the right button/knob until you set the desired frequency.
PTY Search
If the PTY (programme type) function is enabled (see "SETTINGS"), the PTY function can also be selected by pressing the right button/knob.
Turn the right button/knob to start searching for the preset PTY code (see "SETTINGS" for the pre-selection of PTY type).
Storing/selecting saved stations
You can save your favourite stations in the station memory using the 1-5 buttons. Each memory level can store up to 5 stations.
Set the desired station as described in STATION SEARCH. Then press the desired memory button for about a second until you hear a beep confirming that the station has been saved. Release the button after the beep.
You can recall a saved station by briefly pressing the memory button.
Storing stations automatically (Travelstore)
In the memory levels with T (FMT and AMT) designation, you can store up to 5 stations with the best signal strength using the automatic search (Travelstore).
To do this, select the desired memory level using the SRC button, then press and hold the SRC button again until T-STORE appears on the display.
Note: If the Travelstore storage is started at a memory level other than FMT/AMT, the system automatically switches to the Travelstore storage memory level and automatically activates it in the settings if necessary. Only the stations at the Travelstore memory level are saved/changed.
Playing saved stations (P-SCAN)
You can play back all stations at the selected memory level: To do this, press the MENU button for more than one second. The display will show P-SCAN and flash the current radio frequency/station.
The P-SCAN function continues until terminated by pressing the right button/knob.
Playing the available stations (SCAN)
You can play all stations in the selected frequency band: To do this, press the right button/knob for more than one second.
The display will show SCAN and flash the current frequency/radio station.
The scanning (SCAN) continues until stopped by pressing the right button/knob.
Changing the display
Use the DIS button to toggle between different display information:
- Station designation
- PTY (programme type)
- Radio text
- Memory/memory level + frequency
- Memory/memory level + time
Note: The display function availability depends on the station and reception quality
Further features or options:
See " SETTINGS".
8. Digital radio: DAB/ DAB+
Digital Audio Broadcasting (DAB for short) is the digital successor to analogue FM broadcasting. Digital transmission has some differences from the familiar analogue FM radio: Several stations are broadcast on one channel - the so-called ENSEMBLES (= programme packages).
The stations in an ENSEMBLE are called SERVICES (= stations and/or data services).
In Germany, for example, the ENSEMBLES are available regionally from public broadcasters; moreover, there are currently two ENSEMBLES that can be received throughout Germany: DR DEUTSCHLAND and ANTENNE DE.
The stations do not output disagreeable noises known from FM; a station is either heard with a consistent quality or not heard at all when error correction is no longer able to reconstruct the signal, accompanied by short, so-called "bubbling" noises.
Starting to play the DAB/DAB+ radio
Use the SRC button to select one of the memory levels DAB1 dAB2 or DAB3.
Note: Some memory levels are inactive depending on the setting; for example, only the DAB1 memory level is active. See "SETTINGS".
Note: There are 5 memory slots available for each memory level.
Searching/scrolling through stations
By turning the right button/knob, you can scroll up (clockwise) or down (counter clockwise) through the stations in the current Ensemble.
When turning, a new station is displayed; when you stop turning, the displayed station is recalled and played. After passing the first or last station of the current Ensemble, the display will show << or . You can now turn the knob in the opposite direction to stay in the current Ensemble or wait a moment while the unit automatically searches for and plays the previous (<<) or next () Ensemble.
Note: This function is the default setting for the right button/knob in the DAB mode, but it can be changed, see "SETTINGS".
If the basic setting has been changed, first select the function by pressing the right button/knob; the SERVICE indication will appear.
Ensemble Search
Press the right button/knob once, the display briefly shows ENSEMBLE.
Then, turn the right button/knob in the desired direction to find Ensembles on the lower or higher channels. The display shows the current channel as you search until you find a new Ensemble.
This search works the same way as the search that starts when scrolling through stations when <</>> is displayed - see the previous section.
Searching the Preset List (Browse mode)
Press the right button/knob repeatedly until BROWSE appears in the display.
Then, turn the right button/knob to scroll through the list of stations stored in the unit.
Once the desired station is found, select it by pressing the right button/knob.
Note: You can use the menu (see " SETTINGS") to start DAB SERVICE SCAN, which updates the station list and removes inactive stations from it.
Note: You can set the browse mode as the default setting for the right button/knob in the DAB mode - see " SETTINGS".
PTY Search
If the PTY (programme type) function is enabled (see "SETTINGS"), the PTY function can also be selected by pressing the right button/knob.
Turn the right button/knob to start searching for the preset PTY code (see "SETTINGS" for the pre-selection of PTY type).
Storing/selecting saved stations
You can save your favourite stations in the station memory using the 1-5 buttons. Each memory level can store up to 5 stations.
Set the desired station as described above.
Then, press the desired memory button for about one second until a beep confirms that the station has been stored; release the button after the beep.
You can recall a saved station by briefly pressing the memory button.
Playing saved stations (P-SCAN)
You can play back all stations at the selected memory level: To do this, press the MENU button for more than one second. The display will show P-SCAN and the current SERVICE.
The P-SCAN function continues until terminated by pressing the right button/knob.
Playing the available stations (SCAN)
You can play all stations in the selected frequency band: To do this, press the right button/knob for more than one second.
The device first updates the service list with a scan, and then displays SCAN and the current SERVICE.
The scanning (SCAN) continues until stopped by pressing the right button/knob.
Changing the display
Use the DIS button to toggle between different display information:
- Name of service (station)
- PTY (programme type)
- Name of Ensemble (software package)
- Memory/memory level + channel
- Radio text
- Memory/memory level + time
Note: The display function availability depends on the station.
Further features or options:
See " SETTINGS".
9. Playback from external devices and media: CD (optional)
Basic information
Data media/media types used:
CDDA/data CD/CD-R/CD-RW, 12 cm in diameter
- file formats: MP2, MP3, WMA, FLAC, ACC, WAV
Note: Use only CDs with the Compact Disc logo to ensure proper operation of the device.
Note: The trouble-free functioning of all media files, including those listed above, cannot be guaranteed due to the variety of software such files may be created with.
Note: If you have problems with writable CD/DVD media, we recommend burning it at a slower speed or using other media
Note: Blaupunkt cannot guarantee the correct function of copy-protected CDs and all DVDs/CDs, USB data carriers and microSD cards available on the market.
Inserting /starting playback of a CD

Risk of damage to the CD drive!
CDs with non-circular contours and CDs with a
diameter of 8cm (mini CDs) must not be used. We accept no liability for damage to the drive caused by unsuitable CDs.
Insert a CD into the CD slot with the printed side up (see "Controls") until you feel a slight resistance. The CD will be pulled automatically in and the playback will start.
Note: Do not interfere with the automatic feeding of the CD.
If you have already inserted a CD, switch to the CD source using the SRC button.
CD playback
By turning the right button/knob, you can change tracks, forward and backward.
If you press the right button/knob once (CUE/REW or WIND appears in the display), you can fast-forward and rewind tracks by turning the right button/knob.
When using CDs with several directories, you can change the directory by pressing the right button/knob again (FOLDER or Directory appears in the display) and turning the right button/knob.
Special functions
You can use the station buttons 1-4 to activate/deactivate the special functions: TRACK SEARCH (select/search for a track using the right button/knob), PLAY/PAUSE, REPEAT (TRACK or DIRECTORY), and SHUFFLE (ALL or DIRECTORY).
Playback function (SCAN)
You can play back tracks from the data carrier.
To do this, press the right button/knob for more than one second.
The display will show SCAN message and the current track.
The scanning (SCAN) continues until stopped by pressing the right button/knob.
Removing a CD
Press the eject button [ ] to eject the inserted CD.
Note: Ejecting the CD must not be impeded or assisted.
10. Playback from external devices and media: USB
Basic information
Data media/media types used:
- USB storage media with FAT16, FAT32, exFAT file system
- file formats: MP2, MP3, WMA, FLAC, ACC, WAC
Note: The trouble-free functioning of all media files, including those listed above, cannot be guaranteed due to the variety of software such files may be created with.
Note: The USB port supports USB storage media (also known as USB sticks) which are classified as Mass Storage Devices (MSD). Direct connection of MP3 players or cell phones to play music is not possible.
USB mode
The unit is provided with a USB port:
- USB port under the flap on the front of the unit (see "CONTROLS - DEVICE")
Connecting USB storage medium/starting USB playback
Open the cover flap marked USB (tilt it upward).
Carefully plug the USB data carrier into the USB port, do not use force nor bend the USB data carrier.
The unit automatically switches to the USB mode. The data is loaded and the playback begins with the first media file recognised by the device.
If a USB data carrier has already been connected, switch to the USB source with the SRC button.
USB playback
By turning the right button/knob, you can change tracks, forward and backward.
If you press the right button/knob once (CUE/REW or WIND appears in the display), you can fast-forward and rewind tracks by turning the right button/knob. Rotating again in the same direction stops the fast forwarding/rewinding.
If you press the right button/knob again (the display shows FOLDER or Directory), you can change the directory by turning the right button/knob.
Special functions
You can use the station buttons 1-4 to activate/deactivate the special functions: TRACK SEARCH (select/search for a track using the right button/knob), PLAY/PAUSE, REPEAT (TRACK or DIRECTORY), and SHUFFLE (ALL or DIRECTORY).
The DIS button can show different track information on the display depending on the files used.
Playback function (SCAN)
You can play back tracks from the data carrier.
To do this, press the right button/knob for more than one second.
The display will show SCAN message and the current track. The scanning (SCAN) continues until stopped by pressing the right button/knob.
Removing USB storage media
Never remove the data carrier without first turning the device off, otherwise the data carrier or the data on it may be damaged.
11. Playback from external devices and media: Bluetooth®
Bluetooth® supported devices
The Bluetooth® functionality allows you to pair cell phones and media players with your car radio.
If the connected Bluetooth device supports A2DP and AVRCP, you can play music on the car radio and control the playback.
Note: At the time of launch, extensive testing of Bluetooth® functionality was conducted with various phones and media players to ensure the highest possible compatibility. However, some features may be limited or not work at all depending on the device in use. In case of such problems, please check if an update is available for your device or radio.
Note: Up to 5 Bluetooth® devices can be paired, but they cannot be connected simultaneously. Before connecting another Bluetooth® device, disconnect the already connected device.
Note: It is not possible to stream from this device to another device via Bluetooth (e.g. Bluetooth® speakers, etc.), this radio only supports Bluetooth® music signal reception.
Bluetooth® pairing/Starting playback via Bluetooth®
Turn the device on, open the Bluetooth® settings on the Bluetooth® device, search for available devices, pair them as instructed in the Bluetooth® device's manual. After a successful pairing, the car radio displays PAIRED/CONNECTED, the name of the connected telephone and a small Bluetooth® symbol.
Note: The pairing is required only once, after which the devices will reconnect automatically. If a device has already been paired (the small Bluetooth symbol is displayed), switch to the BLUETOOTH® source with the SRC button.
Bluetooth® playback
By turning the right button/knob, you can change tracks, forward and backward.
Special functions
The PLAY/ PAUSE special function can be activated/deactivated with the station button 2.
Depending on the Bluetooth device or the music playback application used on it, different track information can be displayed using the DIS button.
12. Playback from external devices and media: iPod/iPhone
Apple iPod/iPhone supported devices
The unit is equipped with a USB port compatible with Apple iPod/ iPhone:
- USB port under the flap on the front of the unit (see "Controls - device")
Connecting Apple iPod/iPhone/Starting playback
Open the cover flap marked USB (tilt it upward).
Carefully plug the Apple iPod/ iPhone connection cable into the USB port, do not use force or bend the connector.
The unit automatically switches to the Apple iPod/ iPhone mode. Playback starts from the last file played on the iPod/iPhone or from media playback from the last used application.
If the Apple iPod/ iPhone is already connected, switch to the IPOD source with the SRC button to start playback.
Apple iPod/iPhone playback
By turning the right button/knob, you can change tracks, forward and backward.
If you press the right button/knob once (CUE/REW appears in the display), you can fast-forward and rewind tracks by
turning the right button/knob. Rotating again in the same direction stops the fast forwarding/rewinding.
If you press the right button/knob again (the display shows DIRECTION), you can change the directory by turning the right button/knob.
You can use the station buttons 1-4 to activate/deactivate the special functions: TRACK SEARCH (select/search using the right button/knob), PLAY/PAUSE, REPEAT (TRACK or DIRECTORY), and SHUFFLE (ALL or DIRECTORY).
The DIS button can show different track information on the display depending on the device/application you are using.
Note: The functionality and control via radio may change and not all the features described may be available depending on the Apple device you are using and the media playback applications available on it.
Removing Apple iPod/ iPhone
Do not remove the data carrier without first turning off the device, otherwise the device or the data stored on it may be damaged.
13. Playback from external devices and media: AUX
AUX mode
The unit is provided with the AUX connector:
- AUX connector on the back of the unit (see "INSTALLATION/CONNECTIONS")
Connect the desired device, such as an external CD player, MP3 player or cassette player, using the appropriate adapters from the accessory range.
Select the AUX source with the SRC button. If necessary, adjust the volume on the external device if the output of it is adjustable.
Note: To use this function, the AUX function must be activated, refer to " SETTINGS".
Note: To prevent damage to the unit, use only undamaged plugs and cables.
14. Bluetooth® hands-free system
The Bluetooth® functionality allows you to pair cell phones and media players with your car radio. When you pair your cell phone with the car radio, you can make phone calls using the built-in hands-free function. You can access the dial lists and phonebook of the paired cell phone transferred to the radio.
Note: At the time of launch, extensive testing of Bluetooth® functionality was conducted with various phones and media players to ensure the highest possible compatibility. However, some features may be limited or not work at all depending on the device in use. In case of such problems, please check if an update is available for your device or radio.
Note: Access to the numbers of a connected phone is device-specific and may not be supported depending on the phone you are using. Make sure that access to the phonebook is allowed on the phone.
Note: Up to 5 Bluetooth devices can be paired, but they cannot be connected simultaneously. Before connecting another Bluetooth device, disconnect the already connected device.
Bluetooth® connection
Turn the device on, open the Bluetooth® settings on the Bluetooth® device, search for available devices, pair them as instructed in the Bluetooth® device's manual. After a successful pairing, the car sound system displays PAIRED/CONNECTED, and a small Bluetooth® symbol.
Note: Confirm any messages prompted on your phone immediately, otherwise some features may be limited, unavailable, or pairing may not work.
Note: The pairing is required only once, after which the devices will reconnect automatically.
Note: Before using the phonebook, it must be loaded with the DOWNLOAD P-BOOK function. If the phonebook is not available later, the memory may be occupied by another phone's data. In this case, you must first delete the phonebook with the DELETE T-BOOK option. Also, the phonebook access may not have been activated on your phone or there may be a compatibility issue.
Incoming calls
An incoming call is indicated by a ringing tone and a message on the device display.
You can take or reject the call using the phone buttons.
Outgoing calls
You can make a call in several ways from the BLUETOOTH menu:
TB SEARCH:
Use the right button/knob to select the first letter, and then to select the phonebook entry transferred from your phone. PHONEBOOK:
Use the right button/knob to select a phonebook entry transferred from your phone.
DIAL NEW NUMBER:
The number to be dialled can be entered using the right button/knob. Select the desired digit by turning the right button/knob, confirm the digit by briefly pressing the right button/knob, or delete the last digit by pressing and holding the right button/knob.
Press the ANSWER CALL/DIAL button to dial the number after it has been fully entered.
Storing a phone number/Dialling a stored number
A manually entered number (see "DIAL NEW NUMBER" above) can be stored by long pressing one of the memory buttons (1-5). After storing the number, you can enter a name, then long press the corresponding memory button again to save. If saving the name is not completed, only the number will be saved.
You can dial the number by pressing the ANSWER CALL/DIAL button and then briefly pressing the corresponding memory button. The number is then dialled with the ANSWER CALL/DIAL key.
Note: The numbers stored are available on all connected phones.
Secondary function of the "Answer call" soft key
The "Answer call" button can be assigned in the menu to a desired function to start it without having to call up the Bluetooth menu. The selected function can be activated by long pressing the ANSWER CALL/DIAL button. Possible options:
VOICESDIAL, PB SEARCH, PHONEBOOK, DIAL NEW NUMBER. See " SETTINGS".
Note: Voice dialling/recognition is performed/processed by the voice assistant on the connected phone, not by the radio receiver.
15. Clock
The unit has an internal clock so you can view the time on the display by pressing the DIS button until the desired information appears.
The time can also be displayed when the unit is turned off, see " SETTINGS".
To display the time when the unit is off the vehicle's ignition must be on; if the ignition is off, the display turns off completely to reduce power consumption.
To set the clock see "SETTINGS".
16. Steering wheel remote control (SWC)
You can assign the steering wheel remote control buttons (if available) to the existing functions in the unit's SWC configuration.
Storing functions
Open VARIOUS SWC in the device settings.
Then, with the right button/knob select the function you wish to programme and confirm with the right button/knob. The unit will now wait for a signal from the steering wheel remote control and display PRESS KEY AT STEERING WHEEL CONTROL FOR 1SEC. Press the desired button on the steering wheel remote control.
If the button has been successfully programmed, the display will show OK. Repeat the procedure if the unit displays FAIL or does not respond at all.
Repeat this step for all buttons to be programmed.
Note: If storing is not possible even after several attempts or is not performed correctly, check the device connections or the compatibility of the interface used. If FAIL is always displayed, the error is probably in the remote control or in the interface. If the unit does not respond at all, make sure that the remote control/interface is (properly) connected.
Note: The programmable SWC interface of this device includes analogue steering wheel presets. The device works with analogue remote controls that control functions through different resistance values (resistance matrix) at the connector (up to two control lines and 1x GND).
Some remote controls are directly compatible, others require a SWC interface. The steering wheel remote controls cannot be connected without an interface via CAN.
For more information on the accessories suitable for your vehicle, contact your specialist dealer or the vehicle manufacturer.
17.Settings|Menu
Select the settings by pressing the MENU button. Turn the right button/knob to navigate through the settings or change a setting.
To select an option or change a setting select it by briefly pressing the right button/knob.
Press and hold the right button/knob or select << to move up one level again; select << at the highest level to exit the settings menu. You can also exit the settings menu by pressing the MENU button again.
The following settings can be entered or customised (the settings are arranged by different categories):
TUNER (RADIO):
In this submenu you can make settings for the radio receiver.
TRAF:
Enable/disable traffic message prioritisation.
When this function is activated, the unit will switch to the radio station last heard and then back to the previously active source after receiving a traffic announcement. When the function is active, a small symbol with three vehicles appears on the display.
TRAFFIC (VERKEHR) appears on the display during a traffic message.
Note: This feature must be supported by the radio station.
Note: To adjust the volume, refer to the VOLUME (LAUTSTAERKE) menu option.
Note: If the reception of a radio station is interrupted, the unit automatically seeks a new station with traffic information. Enabling this feature also limits your search to the stations that support this feature.
Note: The current traffic announcement can be interrupted by pressing the SRC button.
REG:
When this function is on, only stations with the same regional programme are selected if automatic station switching is required due to poor reception.
Note: The RDS AF function must be set to ON (EIN), the function must be supported by the radio station.
PTY:
When this function is enabled, the PTY function is also available by pressing the right button/knob to search for a specific type of station/music genre.
PTY TYPES (PTY LISTE):
Active only when PTY is ON (EIN).
Selects the station type/music genre for the PTY function.
PTY LANG (PTY SPRACHE):
Active only when PTY is ON (EIN).
Setting the PTY language.
Note: This only affects the display of the PTY types, not station selection or other settings.
FM SENS HI/ LO (FM EMPF +/-):
Set the FM search sensitivity, HI (+) also searches for stations with weak signal, LO (-) only searches for local stations with strong signal.
FM HICUT OFF, 1, 2, 3 (FM HICUT AUS, 1, 2, 3):
To improve the sound of weak/distorted FM station signals (in case of noises/interference), you can automatically lower the treble range according to the reception strength by activating this function.
RDS AF:
When this function is active, the unit always switches to the best transmission frequency (alternative frequency).
Note: This feature must be supported by the radio station.
FM PRESETS (FM SPEICHEREBENEN):
Turning memory levels or FM2, FMT, AM, AMT sources on/off. If the SRC button is inactive, the corresponding memory level cannot be selected with the SRC button.
Activating/deactivating memory levels DAB2, DAB3. If the SRC button is inactive the corresponding memory level cannot be selected with the SRC button.
DAB MODE:
Determines the basic setting of the right button/knob. Options: SERVICE (default setting) or BROWSE. Refer to "DIGITAL RADIO".
DAB SERVICE SCAN:
Updating the station list to DAB, scans the entire DAB band and removes stations that cannot be received from the list.
SERVICE LINK:
When you activate the DAB/FM/ALL function, the unit switches, if available, to another DAB channel (if available DAB is selected) or also to FM frequencies (if FM or ALL is selected) to continue playing the station if DAB reception is weak.
SERVICE NAME:
Switches the DAB SERVICE/DAB ENSEMBLE option display to 16 or 8 digits.
DAB ANTENNA (DAB ANTENNE):
Enables phantom power supply for active DAB antennas. If the DAB antenna is active, switch 12 V to ON (AN).
REGION:
Setting the receiving region where the device is used.
AUDIO (KLANG):
In this submenu you can adjust the sound individually.
Note: BASS (TIEFEN) and TREBLE (HOEHEN) can be adjusted separately for each source.
BASS (TIEFEN):
Amplifies or reduces low frequency range.
TREBLE (HOEHEN):
Amplifies or reduces high frequency range.
BAL (BALANCE):
Adjusts the balance of the sound.
FADER:
Adjusts the audio signal of the front/rear speakers.
LOUD:
Loudness On/Off (bass enhance)
EQ:
Enable preset tone styles.
Note: When the tone styles is on, the manual setting of BASS (TIEFEN)/TREBLE (HOHEN) is off.
SUB-OUT:
Adjust the output level (GAIN) and cut-off frequency (FREQ) of the subwoofer output.
DISPLAY (ANZEIGE):
In this submenu, you can make settings for the display.
DIM MAN/ AUTO:
Toggling between the display brightness settings manually/automatically.
AUTO: The ILLUMINATION input (see INSTALLATION/CONNECTIONS") automatically toggles the display brightness between the preset DAY (TAG) and NIGHT (NACHT) values depending on the lighting in the vehicle.
MAN: pressing the DIS button for 2 seconds toggles between preset DAY (TAG) and NIGHT (NACHT) values.
DAY (TAG):
A preset display brightness during the day.
NIGHT (NACHT):
A preset display brightness at night.
SCROLL:
Scrolls the displayed content if it is longer than can be displayed at a time. Options: Scrolling through the new information once (1X) or always (ON (AN).
LANGUAGE (SPRACHE):
Select the menu language of the device. Available languages: DEUTSCH/ENGLISH.
COLOR (FARBE):
Select the colour of the display and buttons (7 colours are available).
VOLUME (LAUTSTAERKE):
In this submenu, you can make volume settings for the device.
ON VOLUME (AN LAUTST):
Select whether the unit is to restart with the last used LAST VOLUME (LETZTE LAUTSTARKE) or with a preset value.
Note: The startup volume is always limited to max. 30.
TA VOL:
Set the volume of traffic announcements. If the volume of the active traffic announcement is adjusted, this setting will be updated or overwritten.
HF VOL:
Set the volume of the hands-free system. If the volume is adjusted during a phone call, this setting will be updated or overwritten.
BEEP:
Setting the audible feedback (beep) when a key is pressed.
Note: Saving a station is always indicated by a beeping sound, even when the BEEP function is set to OFF (AUS).
CLOCK (UHR):
In this submenu, you can make settings for the clock. See also "CLOCK".
CLOCK (UHR):
Enabling/disabling the time display when the unit is turned off. When the unit is turned off and the ignition is turned on, the display shows the clock.
MODUS:
Toggle between the 12/24 hour displays.
SET 00:00:
Manual time setting. Rotate the button/knob counter clockwise: Minutes setting. Rotate the button/knob clockwise: Hours setting.
Note: If RDSCLOCK (RDSUHR) is active, the time set manually is overwritten.
RDSCLOCK (RDSUHR):
Activating automatic time settings using the radio's RDS data signal.
VARIOUS (DIVERSES):
Various settings are possible in this menu.
DEMO:
Enabling/disabling demo function/sales mode (if no button is pressed for a certain period of time, the message with device functions appears and the display colour changes continuously).
AUX:
Activating/deactivating the AUX input (enabling/disabling the availability to make a selection with the SRC button).
SCAN:
Set the playback function time (4/8/12/16/60 seconds).
SWC:
Storing the steering wheel remote control, see "STEERING WHEEL REMOTE CONTROL (SWC)".
VERSION:
Checking the software version of the device.
NORMSET:
Restoring factory defaults.
BLUETOOTH*:
In this submenu, you can make settings for the Bluetooth® function. See also "BLUETOOTH HANDS-FREE SYSTEM".
PB SEARCH (TB SUCHE):
Searching for a name in the phonebook
PHONEBOOK (TELEFONBUCH)
Calling up a phonebook transferred from a cell phone.
SOFTKEY:
Configuring the secondary function of the "Answer Call" button.
DELETE P-BOOK (T-BUCH LOESCHEN):
Deleting the phonebook on the device.
DOWNLOAD P-BOOK (T-BUCH LADEN):
Loading a phonebook from a cell phone.
VOICEDIAL (SPRACHWAHL)
Starting the voice assistant on the connected phone.
DIAL NEW (NEUE NR WAEHLEN):
Entering the phone number to be dialled manually.
18. Installation | Disassembly | Connections
Installation guide

Install the unit only if you have experience installing car radios and are familiar with the
vehicle's electrical system. Observe the information marked on the unit connections. Connect the device using the appropriate adapters; ensure that all wires transfer the correct signals or voltages. The plugs in the vehicle must not be connected directly to the car radio.
The installation of the radio must not interfere with or prevent the activation of airbags and other safety devices and/or controls.
Disconnect the vehicle battery (negative terminal, ground) before installing the device, as doing otherwise may cause malfunctions or damage to the device or the vehicle electronics.
Observe the vehicle manufacturer's safety instructions (airbag, alarm system, on-board computer, immobiliser, etc.).
Optional and dedicated connection adapters and/or mounting accessories such as mounting frames, covers, etc. may be required depending on the vehicle in which the radio is installed.
Installation errors can result in damage to the unit or the vehicle electronics.
The radio housing gets hot during operation; make sure that no wires come in contact with the housing.
If you need help installing the unit, consult a car Hi-Fi specialist.
To remove the radio, loosen the side covers (see "CONTROLS - DEVICE"); they can be lifted from the side with a fingernail. Insert the release handles into the holes until they snap into place. Then, carefully pull the radio out of the mounting socket. Make sure not to damage any wires.
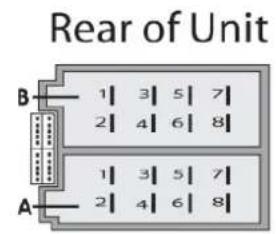
| A | B | ||
| 1 | NC | 1 | Speaker RR+ |
| 2 | Radio Mute | 2 | Speaker RR- |
| 3 | NC | 3 | Speaker RF+ |
| 4 | Perm.+12V(KL30) | 4 | Speaker RF- |
| 5 | Auto Antenna* | 5 | Speaker LF+ |
| 6 | Illumination | 6 | Speaker LF- |
| 7 | Ignition(KL15) | 7 | Speaker LR+ |
| 8 | GND(KL31) | 8 | Speaker LR- |
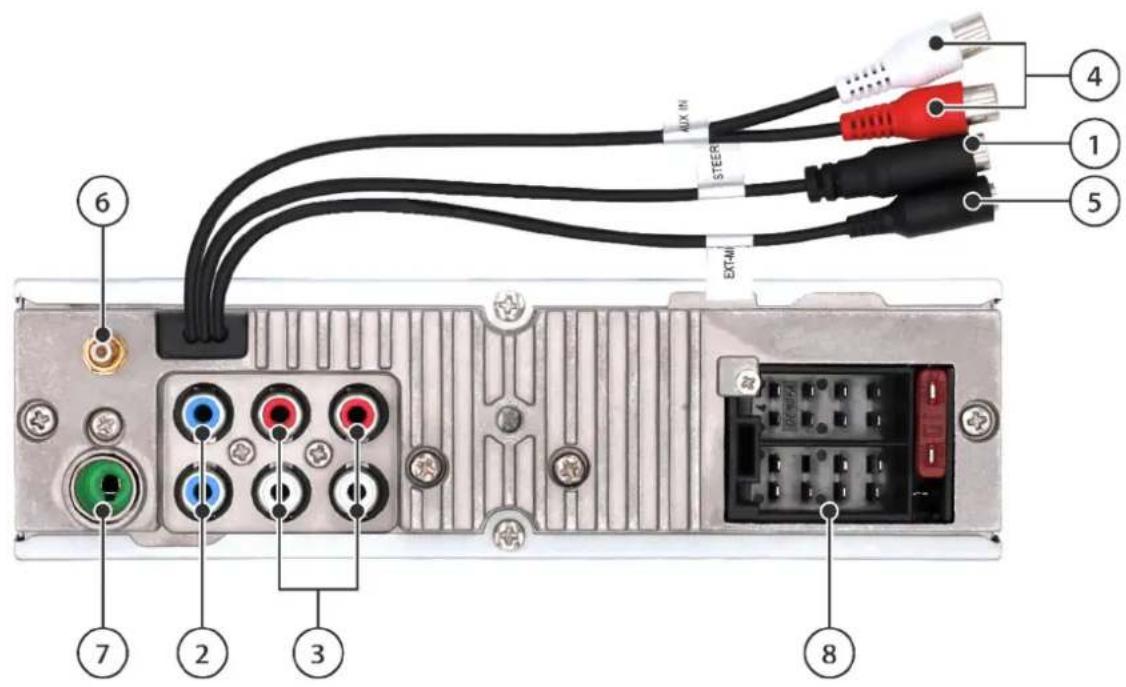
Connections and designations
① SWC: Connection to the steering wheel remote control - external adapter/interface may be required, see "STEERING WHEEL REMOTE CONTROL (SWC)"
② SUB/SW: Subwoofer output for connecting an active subwoofer
③ PREAMP-OUT (RF, LF, RR, LR): Preamp outputs for connecting an external amplifier
4 AUX-IN: Connection for external audio source
⑤ EXT-MIC: Connection for external microphone; switched automatically when microphone is connected
⑥ DAB antenna: SMB connector with 12 V phantom power supply (max. 150 mA)
⑦ FM/AM Antenna: DIN port
⑧ Terminal block section A (power supply), section B (speaker) and device fuse (10 A flat car fuse, red)
RADIO MUTE: Radio muting via ground contact PERM. 12V+ BATT (CI.30): Battery
AUTO ANTENNA: Switchable power supply for active antennas or control voltage for external power amplifiers/subwoofer (12 V, max. 150 mA)
ILLUMINATION: Vehicle lighting input, required for automatic button/display brightness switching. The input requires 0V / 12V . PWM signals may cause the display to flicker and must not be used.
ACC/IGNITION (cl.15): Ignition positive switch GND (cl.31): Ground
Note: This unit does not support CD changers or other components that are compatible with older Blaupunkt units.
Note: Be sure to connect the ignition and fixed positive pole correctly, otherwise the unit will have an increased current draw and not shut down completely, which can discharge the car battery!
19. Useful information | Technical data
Warranty
For current warranty terms, please visit www.blaupunkt.com. If no additional information is provided here, local regulations apply.
Servicing
Contact the Blaupunkt dealer from whom you purchased the product if you need repair service. For more information on service partners in your country, please visit www.blaupunkt.com Information on service partners in your country.
Technical data
Mounting angle of a unit with CD -10 to +18°
Power Supply - remote control (optional, battery not included) 3 V, CR2025
Operating voltage: 10.5; -14.4 V
Current consumption during operation < 10A
Off (cl. 15/ACC off): < 5 mA
USB connector 5 V max. 1 A
20. Troubleshooting
Malfunctions and possible remedies are listed below.
If you continue to have problems with the device, please contact your dealer or Blaupunkt Service.
In case of problems have the installation inspected or completed by a professional.
Most problems occur due to incorrect connection and operation.
- When installed, the airbag indicator lights on the dashboard come on/speedometer stops working et
The device is probably connected incorrectly. Immediately disconnect the vehicle battery and remove the radio. Have the installation performed/checked by a professional.
- When turned on, the unit displays 1 HOUR and turns off after one hour:
The ignition positive pole is not connected or is not activated. Check the connections
- At higher volume levels, the display flickers/the unit shuts down completely:
Check the cross section of the power supply wire.
Have the installation performed/checked by a professional.
The remote control does not work:
Check if the battery is properly seated, remove the small plastic wrap, point the remote control at the device to keep the line of sight.
- The unit does not switch on/ does not respond to the ignition/ The unit always switches off automatically after a certain time/ The unit cannot be switched on without ignition:
Is the ignition/fixed positive pole connected properly? The ignition positive pole must switch properly 0V / 12V there must be no residual voltage on the ignition positive in the "ignition off" state.
Check for correct connection of the device; under no circumstances should you connect the car positive pole directly to the radio without first checking the PIN assignment.
Have the installation performed/checked by a professional.
- Settings and/or preset stations are lost, the time is not displayed properly:
As a rule, the device saves the settings permanently, even without power supply. However, some settings are permanently saved only after properly turned off, so it is important that the device is properly turned off.
Functions such as time, last source, last USB/CD playback position require constant power supply. For proper operation, the unit must be properly connected to a continuous power supply that cannot be interrupted.
- The unit does not receive radio signal or the signal is weak:
Check the antenna for your reception area.
Check to see if a phantom power supply adapter may be needed.
Is the antenna installed correctly? Many antennas require a counterpole (car body).
LED lights or other electrical components may interfere with radio reception, so such interference should be excluded.
When using the radio for the first time, make sure the unit is set to the correct radio region (see " SETTINGS").
- NO SIGNAL or NO SERVICE is suddenly displayed in the DAB mode:
The current ENSEMBLE (programme package) signal is too weak and audio signal decoding is not possible. Select another ENSAMBLE or check the DAB antenna.
- The unit suddenly displays SEEK PI/SEEK TA or changes stations during radio operation:
Check the antenna and device settings. If necessary, deactivate the alternative frequency function (see
"SETTINGS"). Poor reception may cause the unit to change stations if the Traffic Announcement function is enabled.
- In radio mode, the unit does not display the station name correctly:
Adjust the display as required with the DIS button. Check reception (check the antenna).
Note: Some stations broadcast additional information instead of the RDS station name; this is not affected by the unit.
- USB, CD, SD or other storage media do not work:
Check other storage media for correct functioning, format storage media, and play different files.
- Bluetooth® problems (phonebook is not displayed, the phone does not connect, the caller cannot be heard):
Check for software updates for your phone and/or radio.
Remove the radio from the list on the phone, then reconnect. Confirm all authorisation requests on the phone giving the YES reply.
Try using a different phone.
The caller does not hear me:
Check the external microphone for correct connection.
Check the microphone setting in the Bluetooth® settings (if available).
Try using a different phone.
- The SUB-OUT option or its settings on the unit do not work:
Make sure the subwoofer is properly connected to the SUB-Out output of the unit, otherwise the options in the sound settings do not have any effect.
- The issue/malfunction is not specified in this case. The device or its function does not work/behave as expected:
Reset the device to factory defaults in MENU -> VARIOUS -> NORMSET.
Verify that the software is up to date. Current software updates are available on our website or can be ordered through our service.
Note: A detailed description of the malfunction and the current device software version is required to contact the service.
1. Kontrolelementer - Apparatet
① LC-display:
Vis information sasom station, musiknummer, tidspunkt og indstellingsmuligheder.
② CD-slot (modeller med CD-drev):
Indsaettelse of CD-databaere
PTY TYPES (PTY LISTE):
Kun aktiv, nar PTY er ON (EIN).
Vaelg stationtype / musikgenre for PTY.
PTY LANG (PTY SPRACHE):
Kun aktiv, nar PTY er ON (EIN).
FM SENS HI/ LO (FM EMPF +/-):
Indstil folsomheden for FM-sogning, HI (+) soger ogsa after svage stationssignaler, LO (-) soger kun after staeke lokale stationssignaler.
FM HICUT OFF, 1, 2, 3 (FM HICUT AUS, 1, 2, 3):
BLUETOOTH HANDENVRIJ APPARAAT)
"Hang op"toets:
Verdere functions of opties:
Verdere functions of opties:
PTY TYPES (PTY LISTE):
PTY LANG (PTY SPRACHE):
FM SENS HI/ LO (FM EMPF +/- ):
FM HICUT OFF,1,2,3 (FM HICUT AUS,1,2,3):
PTY TYPES (PTY LISTE):
PTY LANG (PTY SPRACHE):
FM SENS HI/LO (FM EMPF +/-):
FM HICUT OFF, 1, 2, 3 (FM HICUT AUS, 1, 2, 3):
DIAL NEW NUMBER (RING UPP NYTT NUMMER):
PTY TYPES (PTY LISTE):
Aktivt endast d'PTY ar ON (EIN).
PTY LANG (PTY SPRACHE):
Aktivt endast nar PTY ar ON (EIN).
FM SENS HI/ LO (FM EMPF +/-):
Stall in kansliget for FM-sokning, HI (+) soker endast svaga stationssignaler, LO (-) soker endast starka signaler av lokala stationer.
FM HICUT OFF, 1, 2, 3 (FM HICUT AUS, 1, 2, 3):
Support Apple iPod/iPhone
PTY TYPES (PTY LISTE):
PTY LANG (PTY SPRACHE):
FM SENS HI/LO (FM EMPF +/-):
FM HICUT OFF, 1, 2, 3 (FM HICUT AUS, 1, 2, 3):
PTY TYPES (PTY LISTE):
PTY LANG (PTY SPRACHE):
FM SENS HI/LO (FM EMPF +/-):
FM HICUT OFF, 1, 2, 3 (FM HICUT AUS, 1, 2, 3):
PTY TYPES (PTY LISTE):
PTY LANG (PTY SPRACHE):
FM SENS HI/ LO (FM EMPF +/-):
FM HICUT OFF, 1, 2, 3 (FM HICUT AUS, 1, 2, 3):
PTY TYPES (PTY LISTE):
PTY LANG (PTY SPRACHE):
FM SENS HI/LO (FM EMPF +/-):
FM HICUT OFF, 1, 2, 3 (FM HICUT AUS, 1, 2, 3):
PTY TYPES (PTY LISTE):
PTY LANG (PTY SPRACHE):
FM SENS HI/ LO (FM EMPF +/-):
FM HICUT OFF, 1, 2, 3 (FM HICUT AUS, 1, 2, 3):
PTY TYPES (PTY LISTE):
Csak akkor aktiv, ha a PTY ON (EIN).
PTY LANG (PTY SPRACHE):
Csak akkor aktiv, ha a PTY ON (EIN).
FM SENS HI/ LO (FM EMPF +/-):
FM HICUT OFF, 1, 2, 3 (FM HICUT AUS, 1, 2, 3):
A membranous membrane (BMB) is a membrane that acts as a receptor for the membrane-bound protein. It is located in the plasma membrane of the cell membrane, and it is also involved in the secretion of various proteins. The membrane has been shown to be responsible for the secretion of several proteins, including the secreted protein of the human brain.
DAB MODE:
③ Vysouvani CD (modely s CD mechanikou):
Tlacitko EQ (modely bez CD mechaniky):
PTY TYPES (PTY LISTE):
PTY LANG (PTY SPRACHE):
Aktivni pouze v pripadé, ze je PTYON (ZAPNUTO).
Nastaveni jazyka PTY.
Upozorneni: Toto nastaveni ovlivnjupe pouze zobrazeni typ PTY, nikoli vyber stanic nebo jin'ych nastaveni.
FM SENS HI/ LO (FM EMPF +/-):
FM HICUT OFF, 1, 2, 3 (FM HICUT AUS, 1, 2, 3):
DE, EN, DA, NL, FI, SV, FR, ES, PT, IT, PL, HU, CS