
Barcelona 270 BT - Car stereo BLAUPUNKT - Free user manual and instructions
Find the device manual for free Barcelona 270 BT BLAUPUNKT in PDF.
| Product type | Car radio with CD/MP3/WMA player, FM/AM/LW tuner, Bluetooth |
| Brand | Blaupunkt |
| Model | Barcelona 270 BT |
| Dimensions (W x H x D) | 178 x 50 x 160 mm |
| Weight | 1.55 kg |
| Power supply | 10.5 – 14.4 V DC, consumption < 10 A (operation), < 3.5 mA (off) |
| Output power | 4 x 24 W RMS (14.4 V, 4 Ω), 4 x 50 W max |
| Radio bands | FM 87.5-108 MHz, AM 531-1602 kHz, LW 153-279 kHz (Europe) |
| Front panel | Detachable with lock, anti-theft protection |
| Display | LCD screen with brightness adjustment (auto/manual) |
| Bluetooth | Built-in, pairing up to 5 devices, audio streaming, hands-free calling |
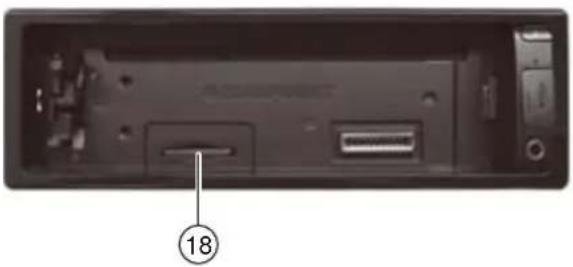
| Ports | 1 x front USB, 1 x front AUX-IN, 1 x SD card slot (behind front panel) |
| CD player | Compatible with CD, CD-R, CD-RW, MP3, WMA |
| Tuner | RDS, PTY, 15 presets (5 x 3 levels), auto/manual search |
| Equalizer | 3-band (bass, mid, treble) with X-Bass, frequency and level adjustments |
| Remote control | Infrared supplied with battery |
| Phone functions | Hands-free, phonebook, voice dialing, quick selection |
| Cleaning | Dry or slightly damp cloth; alcohol for front panel contacts |
| Operating temperature | Not specified, standard automotive use |
| Supplied accessories | Mounting frame, antenna adapter, removal tools, cables, front panel case |
Frequently Asked Questions - Barcelona 270 BT BLAUPUNKT
User questions about Barcelona 270 BT BLAUPUNKT
0 question about this device. Answer the ones you know or ask your own.
Ask a new question about this device
Download the instructions for your Car stereo in PDF format for free! Find your manual Barcelona 270 BT - BLAUPUNKT and take your electronic device back in hand. On this page are published all the documents necessary for the use of your device. Barcelona 270 BT by BLAUPUNKT.
USER MANUAL Barcelona 270 BT BLAUPUNKT
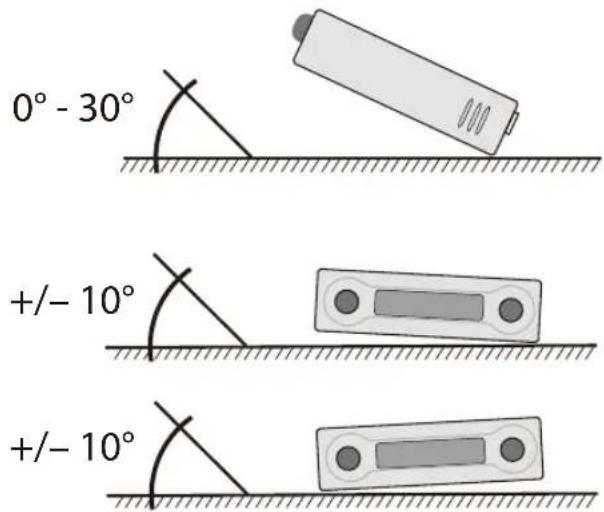
EN Short operating and installation instructions Subject to change and technical modification
natural_image
Back view of a black electronic device showing internal components and a labeled pin (18), no readable text or symbols beyond the number.
natural_image
Back view of a black electronic device showing internal components and a labeled pin (18), no readable text or symbols beyond the number.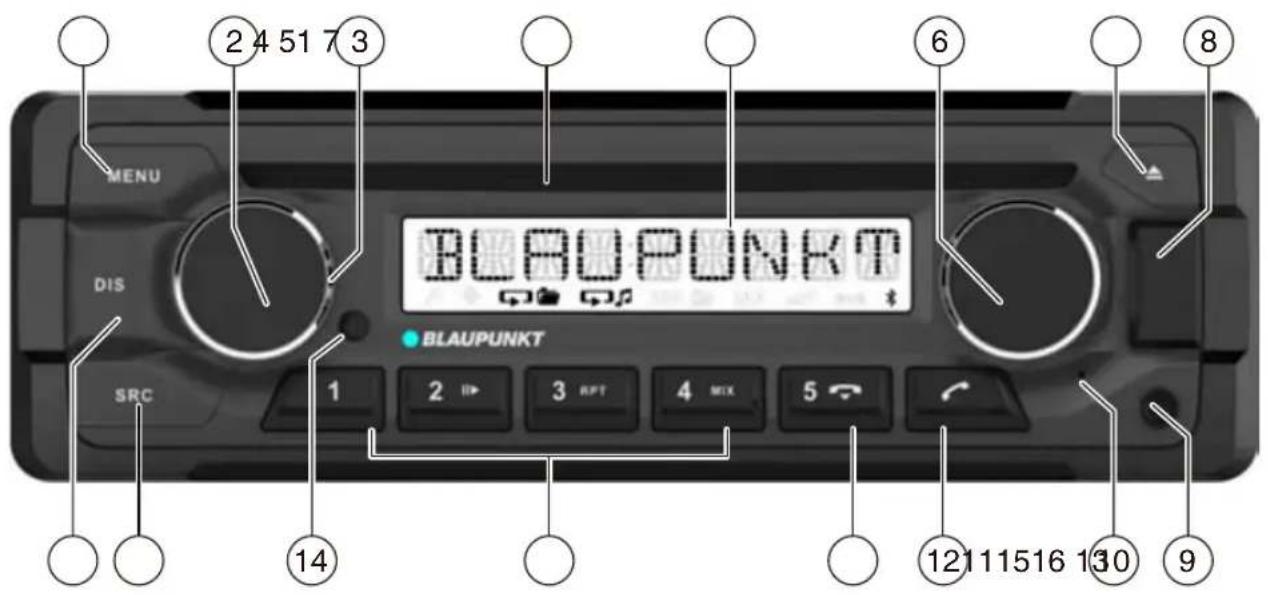
1 Przycisk MENU
AM (MW): 531 - 1602 kHz
LW (tylko Europa): 153 - 279 kHz
Pasma w USA:
FM: 87,7 - 107.9 MHz
AM (MW): 530 -1710kHz
AM (MW): 530 -1710kHz
natural_image
Isometric line drawing of a rectangular electronic component with internal slots and mounting holes (no text or symbols)
natural_image
Line drawing of an open cylindrical object with a slot, no text or symbols present
natural_image
Two identical cylindrical metal tools with circular ends, shown side by side (no text or symbols)
natural_image
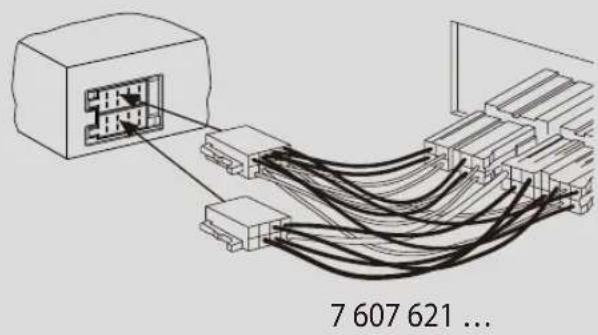
Illustration of a connector with multiple wires extending outward (no text or symbols)
natural_image
Illustration of a 3-pin connector with multiple leads, shown in wire (no text or symbols)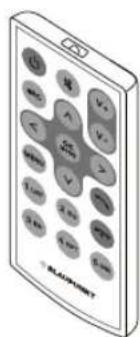
natural_image
Diagram of a connector with multiple Ethernet cable routing through a terminal block (no text or symbols)7 607 621 ...
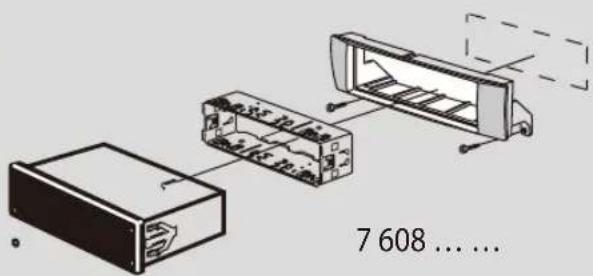
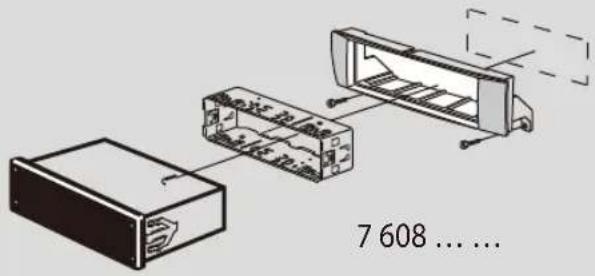
Zestawy montażowe
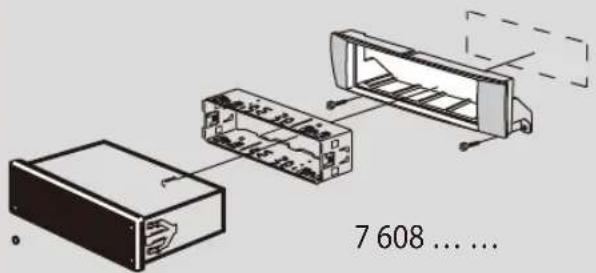
7 608 ....

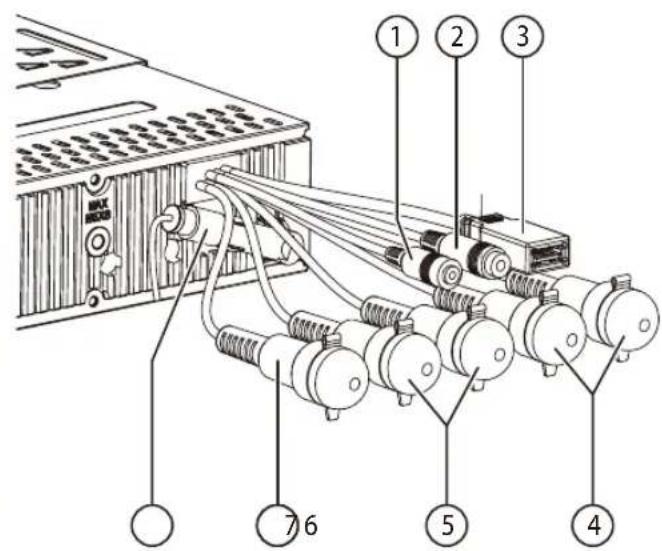
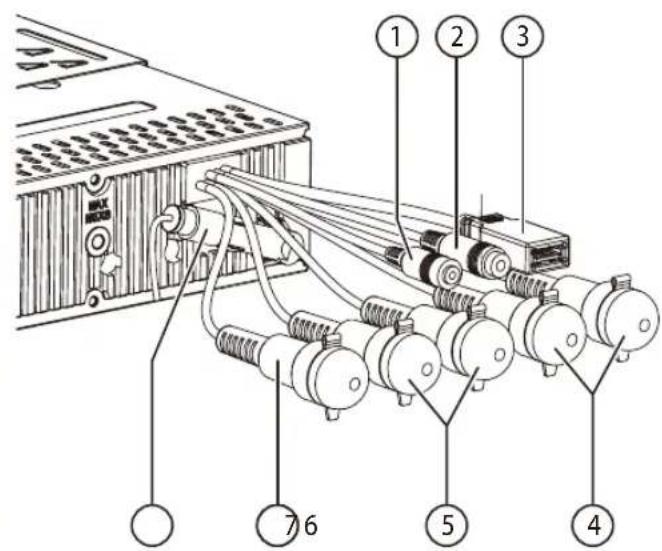
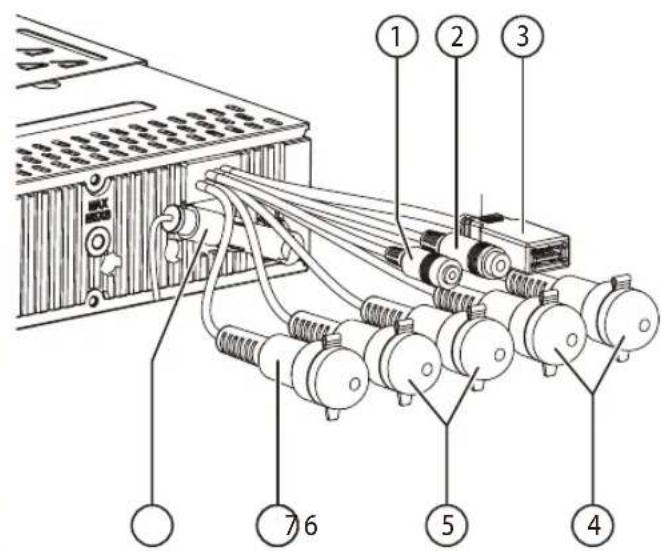
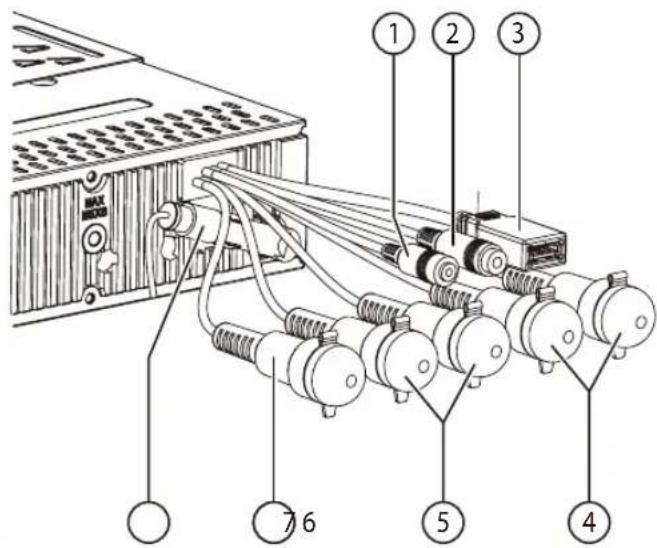
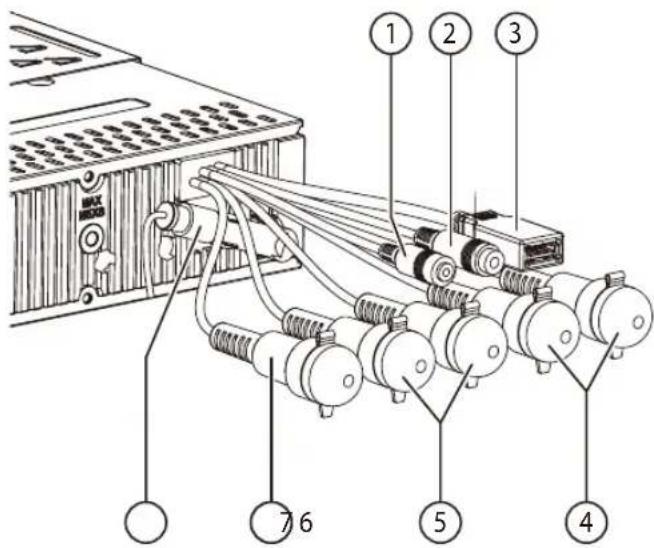
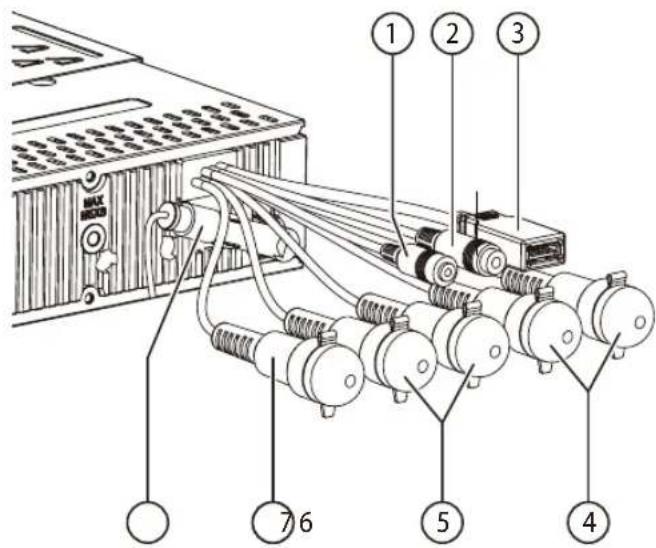
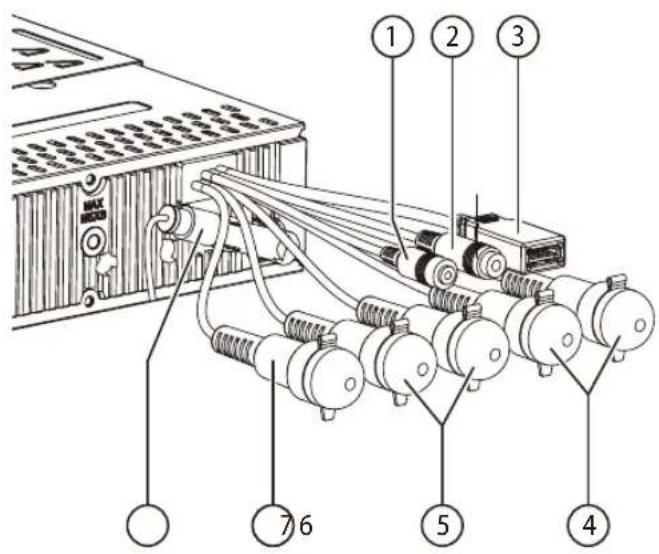
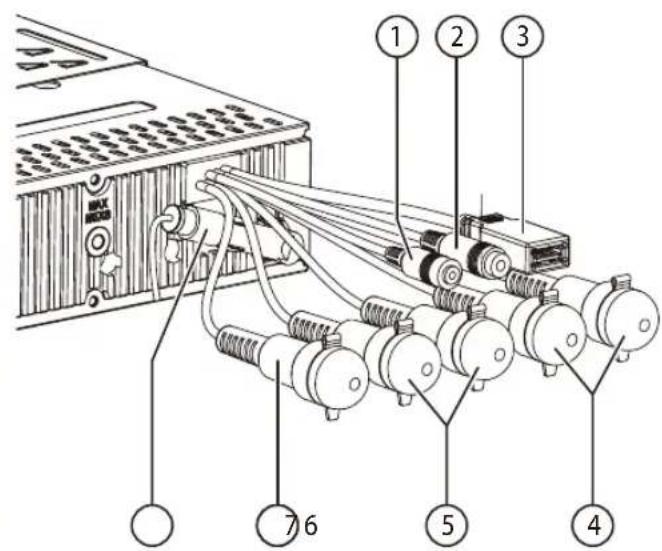
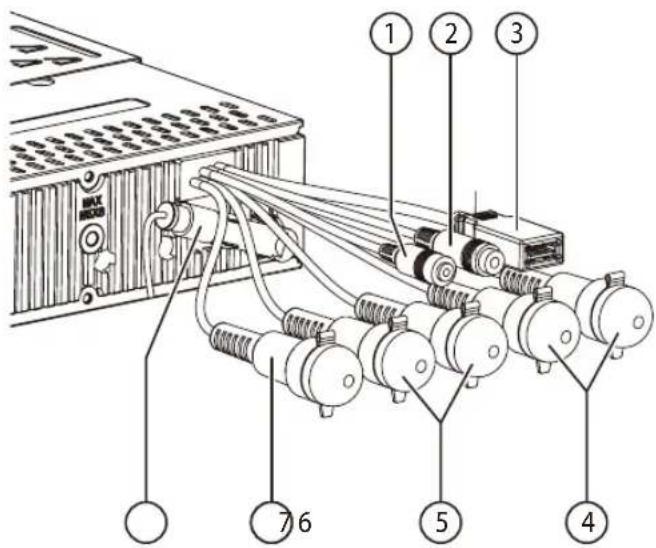
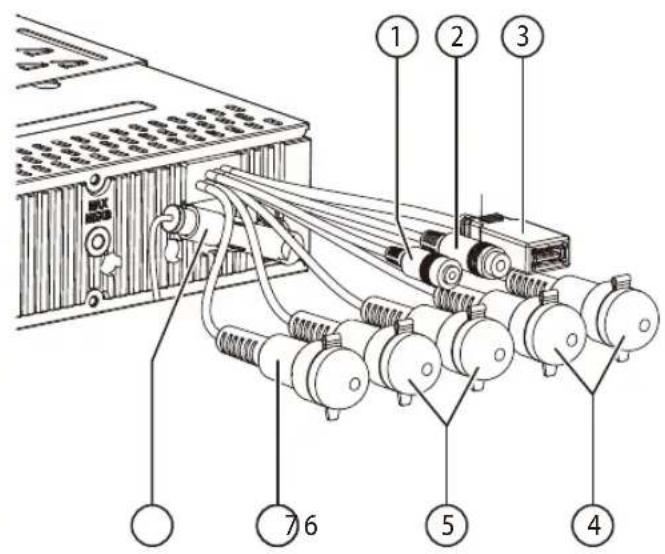
1 Microphone in
2 Steeringwheelremotecontrol
3 Rear USB
4 Preamp Out (Front)
5 Preamp Out (Rear)
6 Sub Out (Subwoofer)
7 Radio antenna
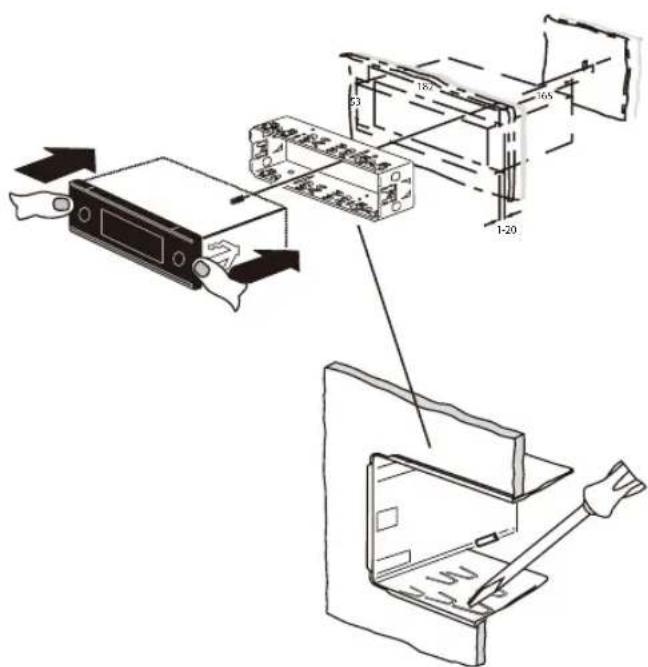
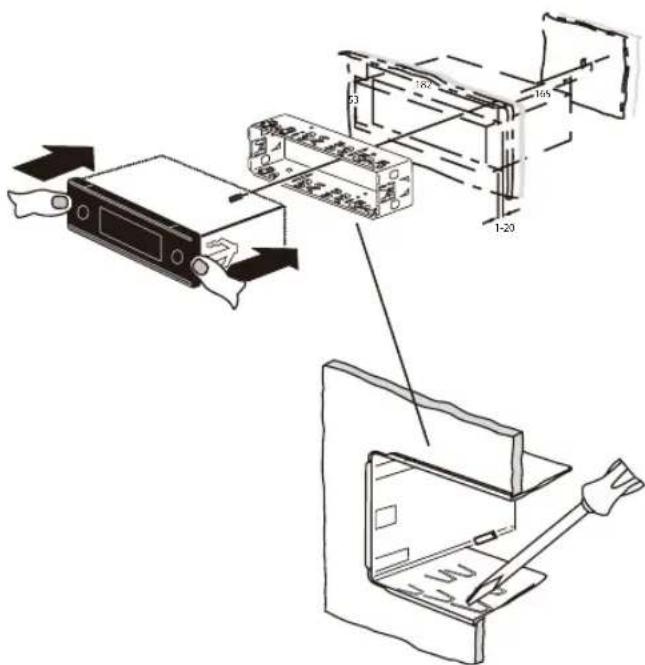
6.
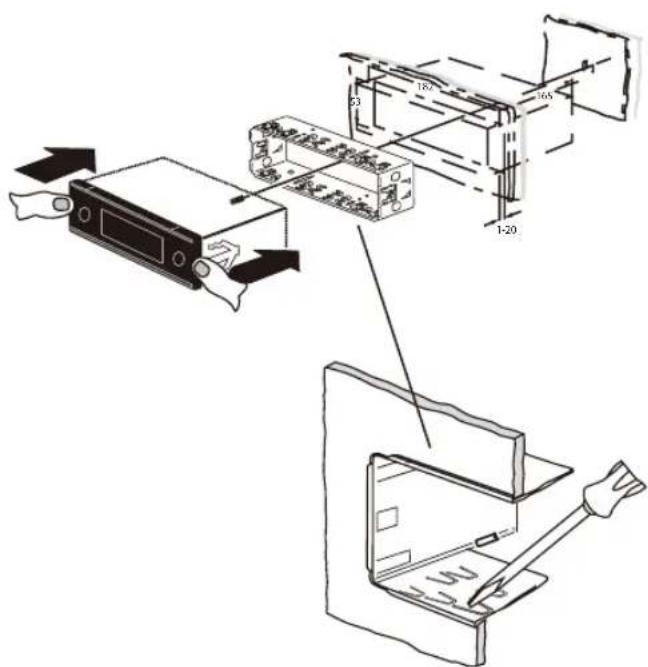
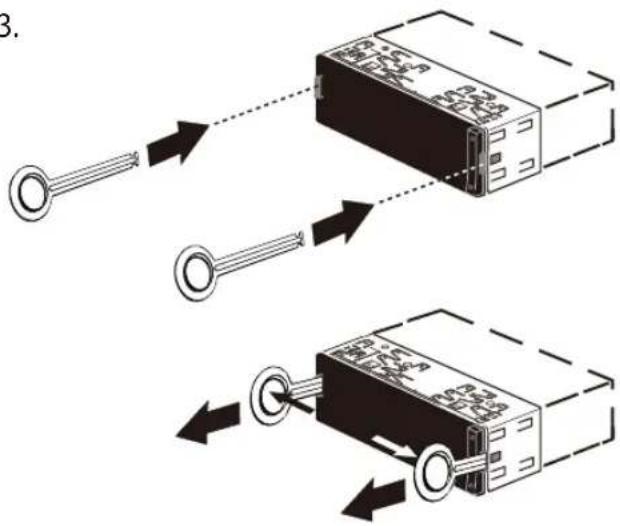
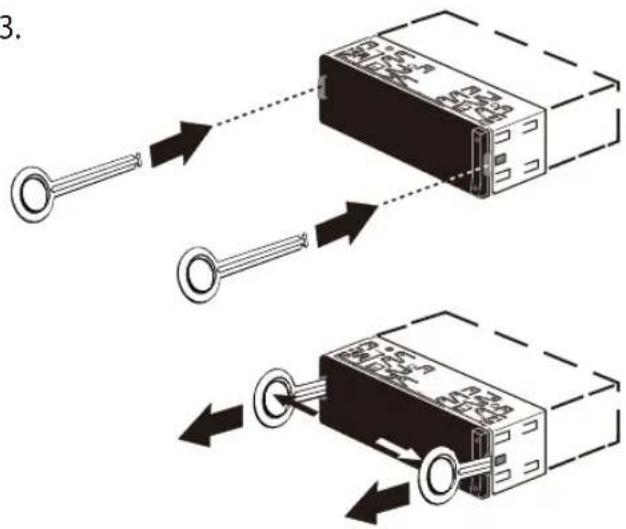
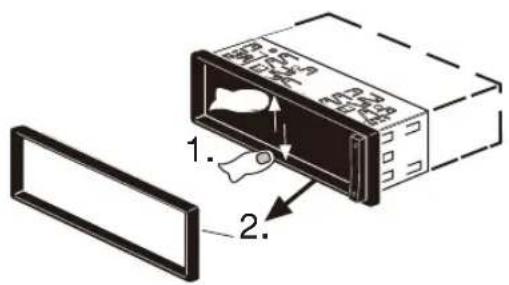
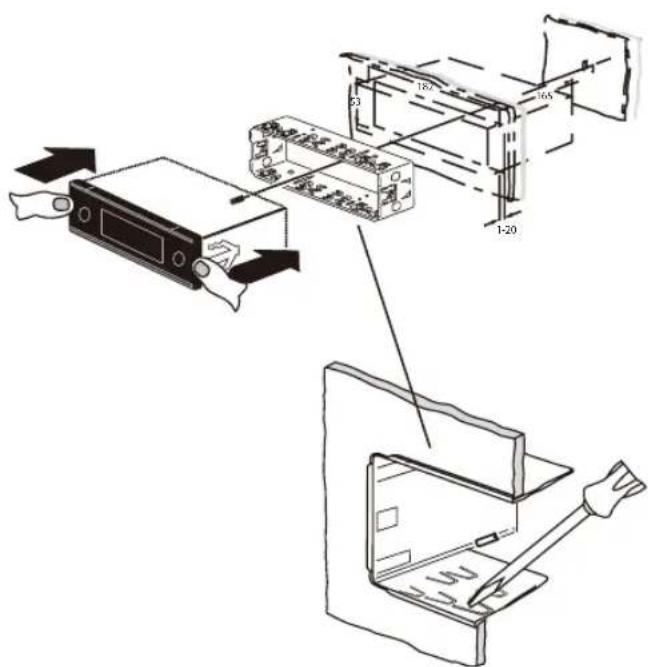
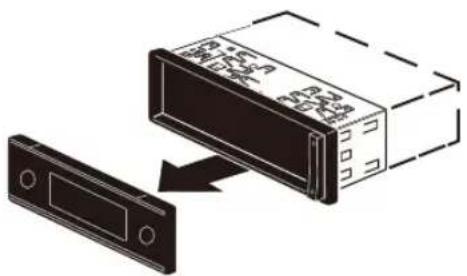
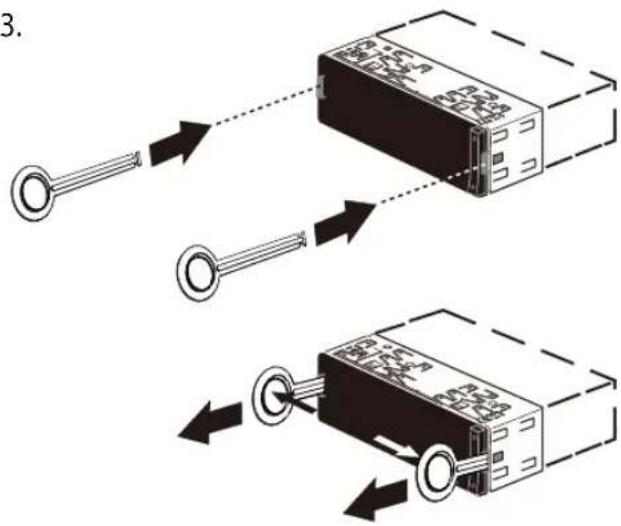
Demontaż • Ausbau • Removal • Demontage • Desmontaje • Desmontagem • Pelepasan
1.

natural_image
Diagram showing a device with an internal component being inserted into a rectangular housing (no text or symbols visible)3.

2.

7.

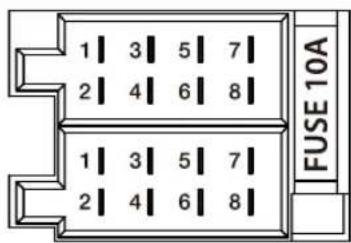
B
A

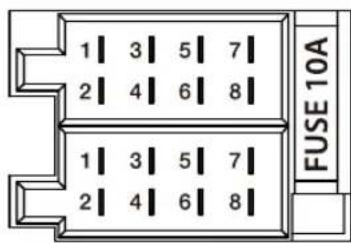
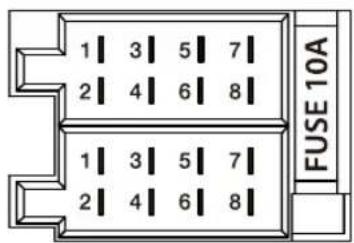
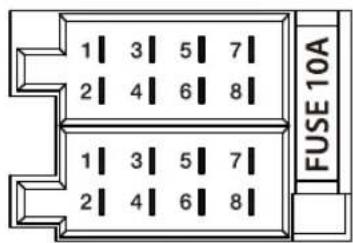
| A | B | ||
| 1 | NC | 1 | Speaker out RR+ |
| 2 | Telephone Mute | 2 | Speaker out RR- |
| 3 | NC | 3 | Speaker out RF+ |
| 4 | Permanent +12V | 4 | Speaker out RF- |
| 5 | Auto antenna* | 5 | Speaker out LF+ |
| 6 | Illumination | 6 | Speaker out LF- |
| 7 | Kl.15/Ignition | 7 | Speaker out LR+ |
| 8 | Ground | 8 | Speaker out LR- |
*

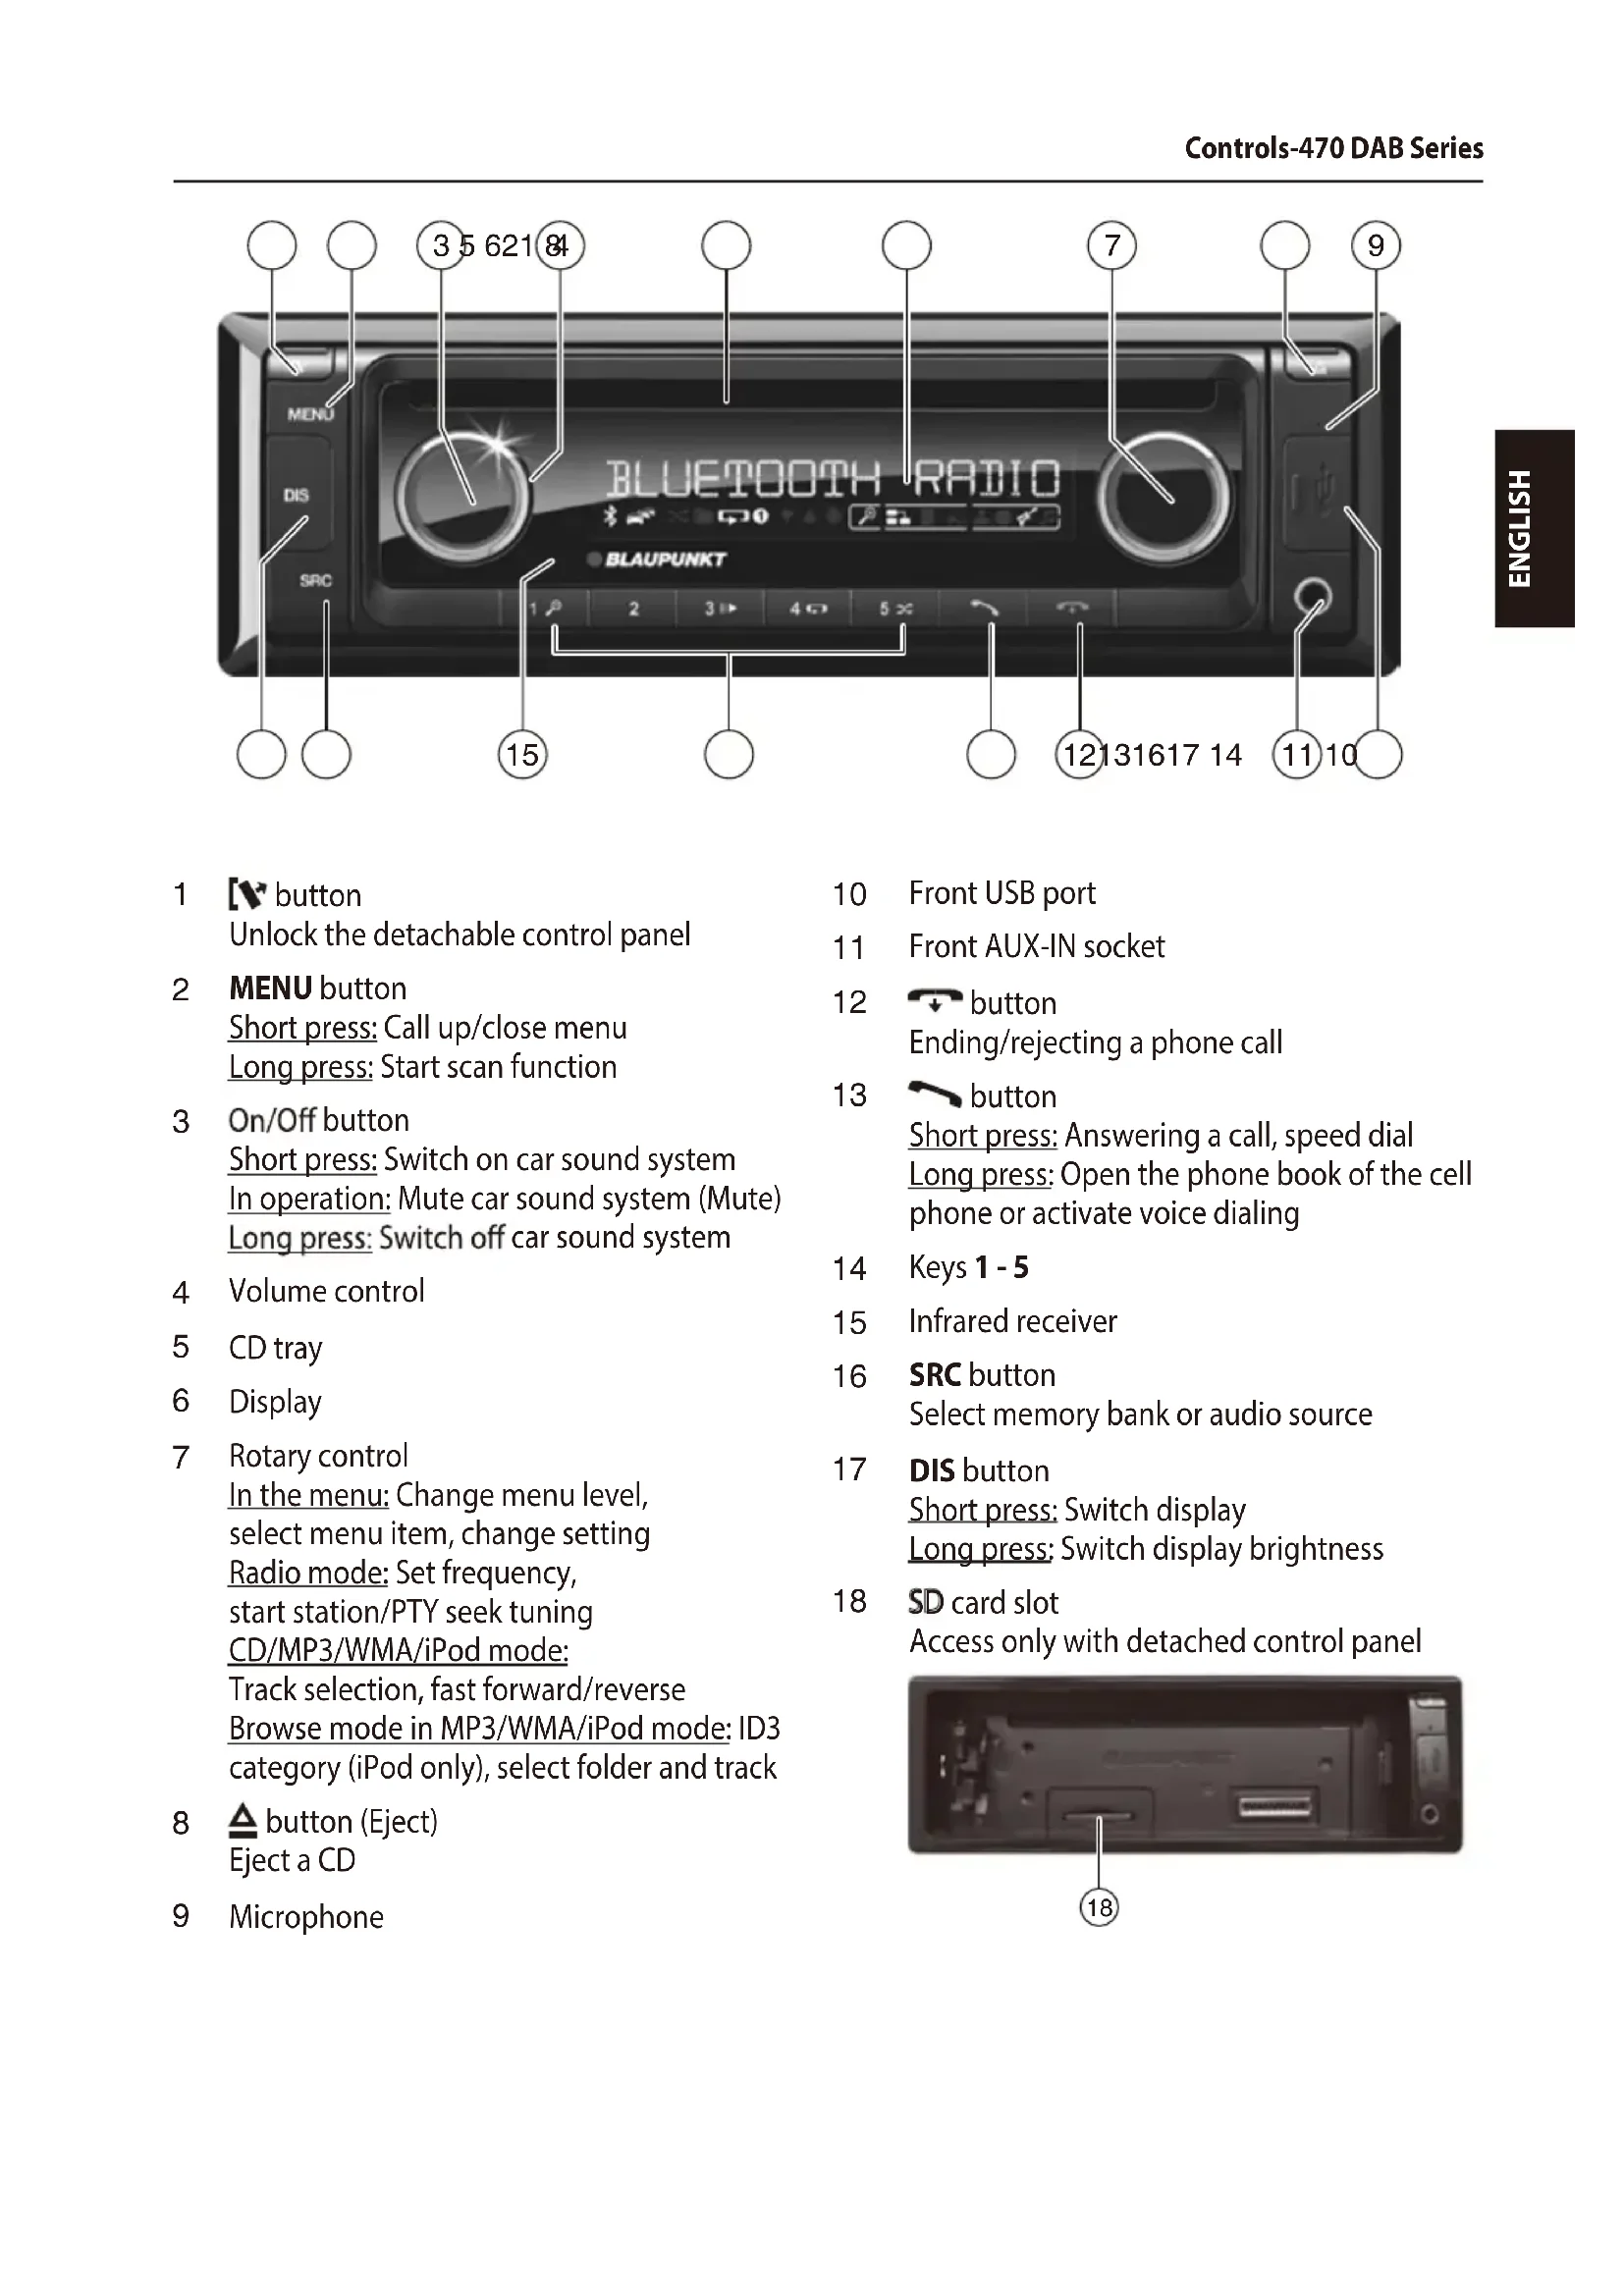
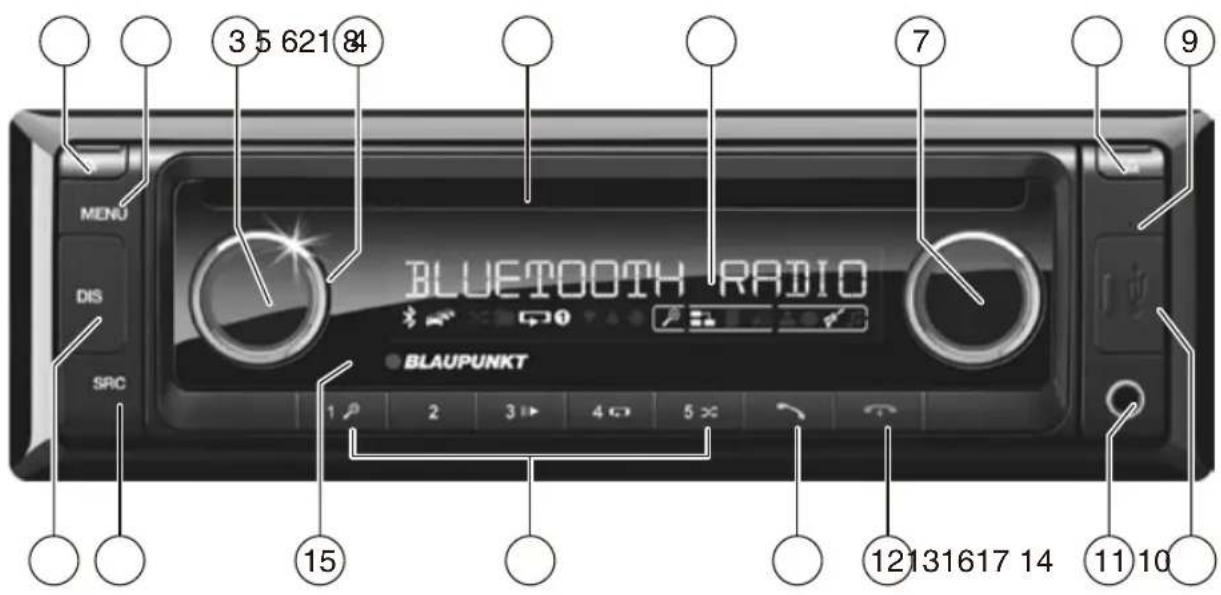
1 [▼ button
Unlock the detachable control panel
2 MENU button
Short press: Call up/close menu
Long press: Start scan function
3 On/Off button
Short press: Switch on car sound system
In operation: Mute car sound system (Mute)
Long press: Switch off car sound system
4 Volume control
5 CD tray
6 Display
7 Rotary control
In the menu: Change menu level, select menu item, change setting
Radio mode: Set frequency, start station/PTY seek tuning
CD/MP3/WMA/iPod mode:
Track selection, fast forward/reverse
Browse mode in MP3/WMA/iPod mode: ID3 category (iPod only), select folder and track
8 ▲ button (Eject)
Eject a CD
9 Microphone
10 Front USB port
11 Front AUX-IN socket
12 button
Ending/rejecting a phone call
13 button
Short press: Answering a call, speed dial
Long press: Open the phone book of the cell phone or activate voice dialing
14 Keys 1 - 5
15 Infrared receiver
16 SRC button
Select memory bank or audio source
17 DIS button
Short press: Switch display
Long press: Switch display brightness
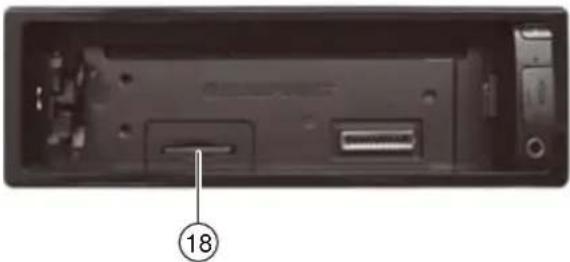
18 SD card slot
Access only with detached control panel
natural_image
Back view of a device showing internal components and a labeled pin (18), no readable text or symbols beyond the number marker.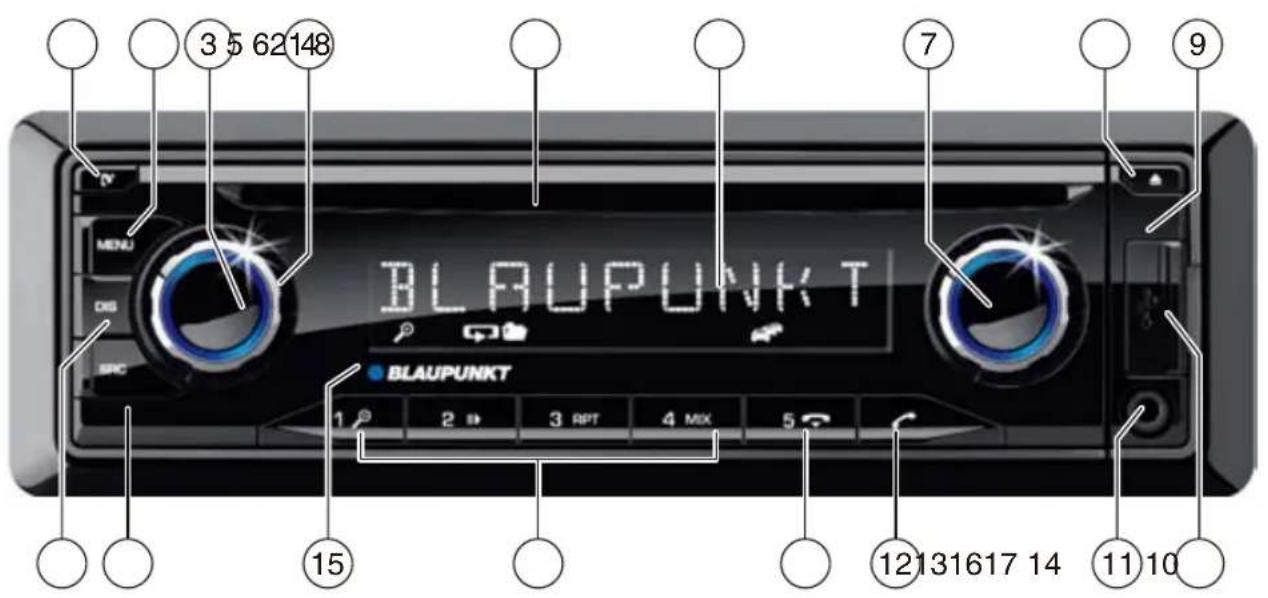
1 [▼ button
Unlock the detachable control panel
2 MENU button
Short press: Call up/close menu
Long press: Start scan function
3 On/Off button
Short press: Switch on car sound system
In operation: Mute car sound system (Mute)
Long press: Switch off car sound system
4 Volume control
5 CD tray *) only for models with CD
6 Display
7 Rotary control
In the menu: Change menu level, select menu item, change setting
Radio mode: Set frequency, start station/PTY seek tuning
CD/MP3/WMA/iPod mode:
Track selection, fast forward/reverse
Browse mode in MP3/WMA/iPod mode: ID3 category (iPod only), select folder and track
8 ▲ button (Eject)
Eject a CD *) only for models with CD
9 Microphone
10 Front USB port
11 Front AUX-IN socket
12 button
Ending/rejecting a phone call
13 button
Short press: Answering a call, speed dial
Long press: Open the phone book of the cell phone or activate voice dialing
14 Keys 1 - 5
15 Infrared receiver
16 SRC button
Select memory bank or audio source
17 DIS button
Short press: Switch display
Long press: Switch display brightness
18 SD card slot
Access only with detached control panel
natural_image
Back view of a black electronic device showing internal components and a labeled pin (18), no text or symbols present.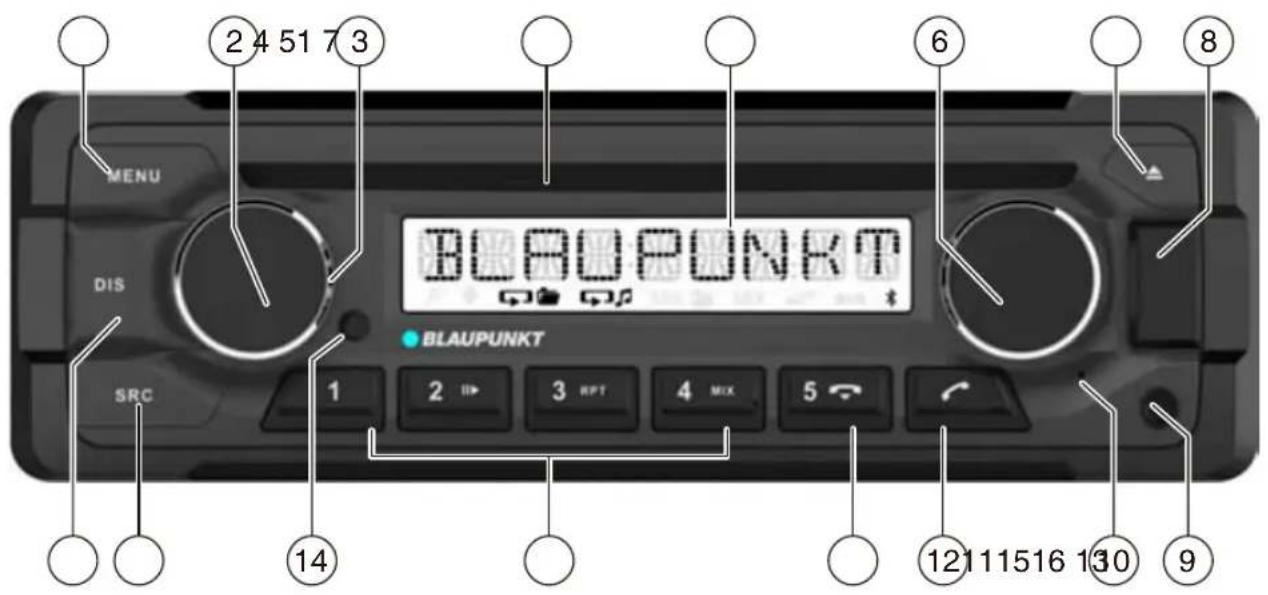
1 MENU button
Short press: Call up/close menu Long press: Start scan function
2 On/Off button
Short press: Switch on car sound system
In operation: Mute car sound system (Mute)
Long press: Switch off car sound system
3 Volume control
4 CD tray
5 Display
6 Rotary control
In the menu: Change menu level, select menu item, change setting Radio mode: Set frequency, start station/PTY seek tuning CD/MP3/WMA/iPod mode: Track selection, fast forward/reverse Browse mode in MP3/WMA/iPod mode: ID3 category (iPod only), select folder and track
7 △ button (Eject)
Eject a CD
8 Front USB port
9 Front AUX-IN socket
10 Microphone
11 button
Ending/rejecting a phone call
12 button
Short press: Answering a call, speed dial Long press: Open the phone book of the cell phone or activate voice dialing
13 Keys 1 - 5
14 Infrared receiver
15 SRC button
Select memory bank or audio source
16 DIS button
Short press: Switch display Long press: Switch display brightness
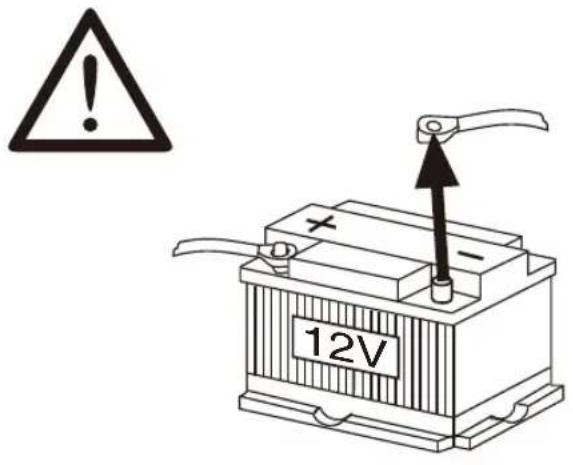
Safety notes
The car sound system was manufactured according to the state of the art and established safety guidelines. Even so, dangers may occur if you do not observe the safety notes in these instructions.
These instructions contain important information to easily and safely install and operate the car sound system.
- Read these instructions carefully and completely before using the car sound system.
- Keep the instructions at a location so that they are always accessible to all users.
• Always pass on the car sound system to third parties together with these instructions.
In addition, observe the instructions of the devices used in conjunction with this car sound system.
Symbols used
These instructions employ the following symbols:

DANGER!
Warns about injuries

CAUTION!
Warns about damaging the CD drive
DANGER!
Warns about high volume

The CE mark confirms the compliance with EU directives.
Identifies a sequencing step
• Identifies a listing
Road safety
Observe the following notes about road safety:
- Use your device in such a way that you can always safely control your vehicle. In case of doubt, stop at a suitable location and operate your device while the vehicle is standing.
- Remove or attach the control panel only while the vehicle is standing.
- Always listen at a moderate volume to protect your hearing and to be able to hear acoustic warning signals (e.g. police sirens). During mute phases (e.g. when changing the audio source), changing the volume is not audible. Do not increase the volume during this mute phase.
General safety notes
Observe the following notes to protect yourself against injuries:
- Do not modify or open the device. The device contains a Class 1 laser that can cause injuries to your eyes.
- Do not increase the volume during mute phases, e.g. when changing the audio source. Changing the volume is not audible during a mute phase.
Use as directed
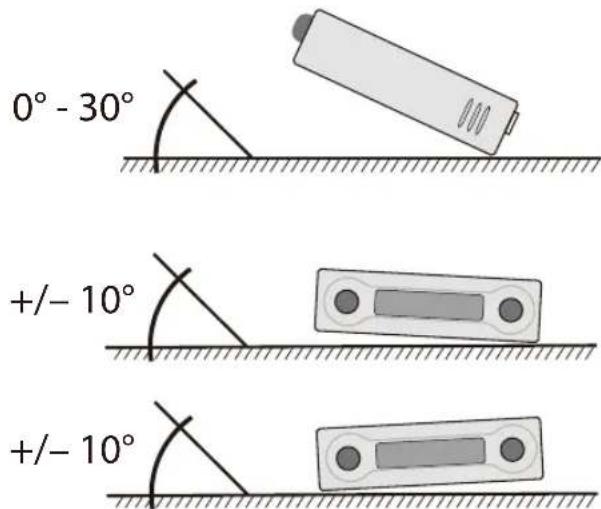
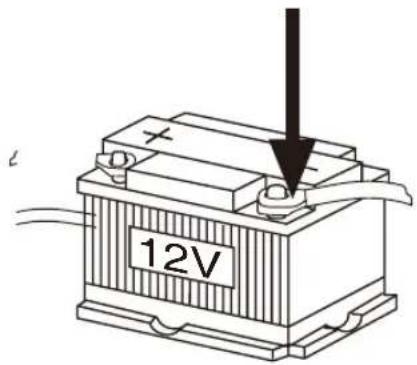
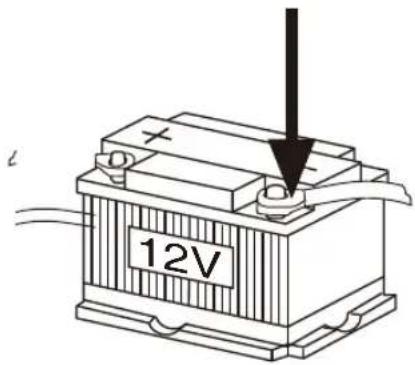
This car sound system is intended for installation and operation in a vehicle with 12 V vehicle system voltage and must be installed in a DIN slot. Observe the performance limits in the technical data. Repairs and installation, if necessary, should be performed by a specialist.
Installation instructions
You may only install the car sound system yourself if you are experienced in installing car sound systems and are very familiar with the electrical system of the vehicle. For this purpose, observe the installation instructions at the end of these instructions.
Declaration of conformity
The Blaupunkt Competence Center Car Multimedia-Evo Sales GmbH declares that the devices complies with the basic requirements and the other relevant regulations of the directive 2014/53/EU.
The declaration of conformity can be found on the Internet under www.blaupunkt.com.
Cleaning notes
Solvents, cleaning and scouring agents as well as dashboard spray and plastics care product may contain ingredients that will damage the surface of the car sound system.
- Use only a dry or slightly moistened cloth for cleaning the car sound system.
- If necessary, clean the contacts of the control panel regularly using a soft cloth moistened with cleaning alcohol.
Disposal notes

Do not dispose of your old unit in the household trash!
Use the return and collection systems available to dispose of the old device.
Scope of delivery
The scope of delivery includes:
1 Car sound system
1 Operating/installation instructions
1 Case for the control panel
1 Support frame
1 Antenna connection adapter
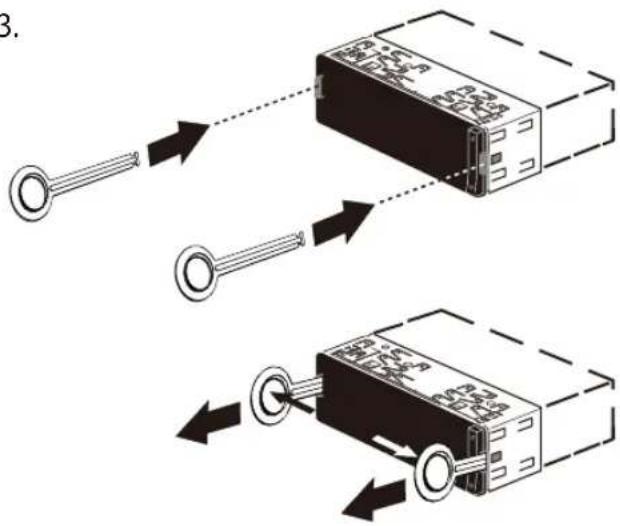
2 Disassembly tools
1 Spacer screw
1 Handheld remote control (incl. battery)
1 Connecting cable chamber A
1 Connecting cable chamber B
Optional equipment (not part of the scope of delivery)
Use only accessories approved by Blaupunkt. Information is available from your Blaupunkt specialised dealer or on the Internet under www.blaupunkt.com.
Placing the device in operation
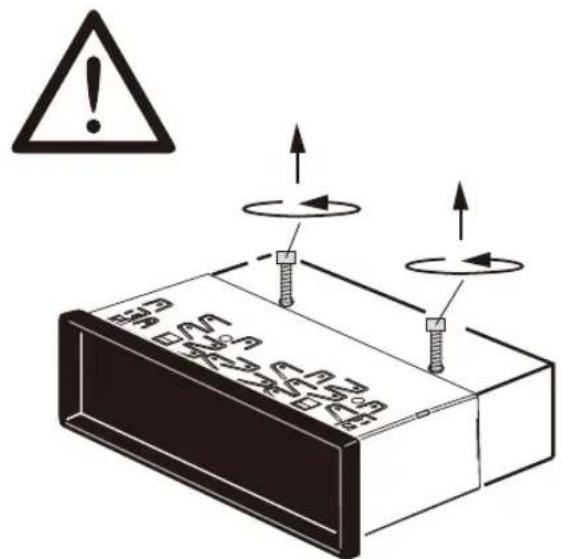
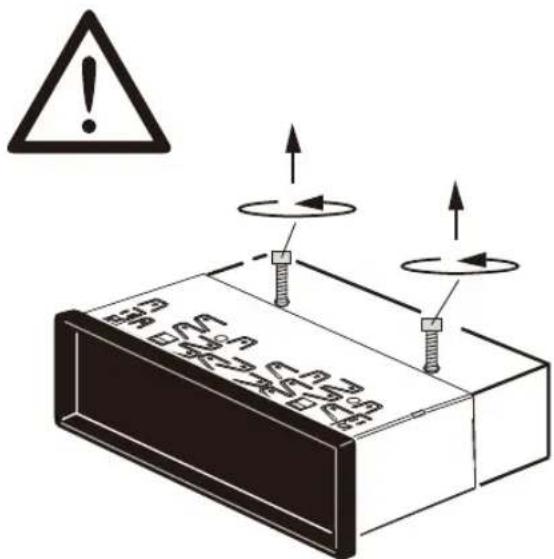
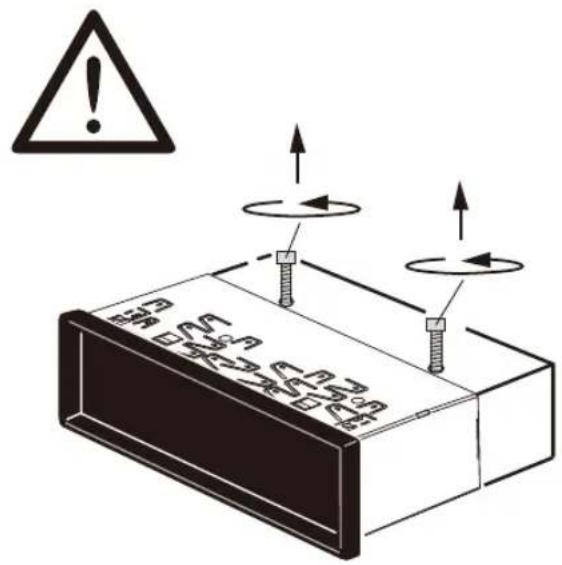
Caution!
Transport securing screws
Before the startup of the car sound system, ensure that the transport securing screws are removed (see the chapter "Installation instructions").
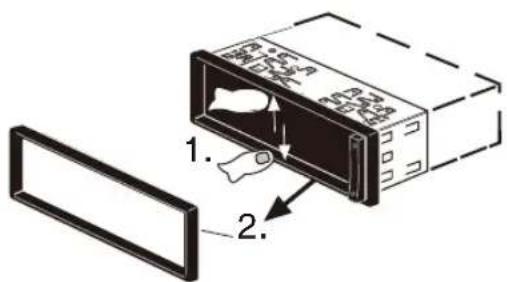
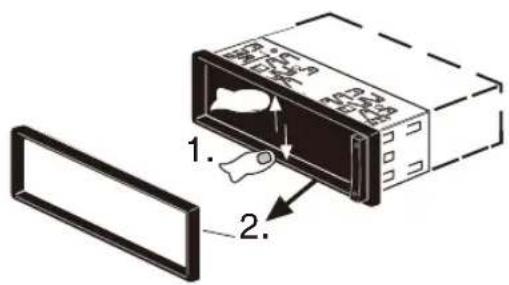
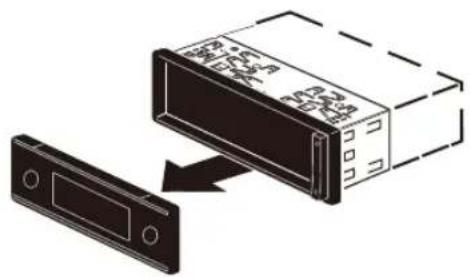
Attaching/detaching the control panel
The car sound system is equipped with a detachable control panel (release panel) to protect your equipment against theft. In the delivery state, the control panel is in the supplied case. To start operating the radio after installation, you must first attach the control panel (see the section "Attaching the control panel" in this chapter).
Always take the control panel with you when leaving the vehicle. The car sound system is worthless to a thief without this control panel.
Caution
Damage to the control panel
Never drop the control panel.
Transport the control panel so that it is protected against impacts and the contacts cannot become dirty.
Do not expose the control panel to direct sunlight or another heat source.
Avoid direct skin contact with the control panel's electrical contacts.
Attaching the control panel
Push the control panel into the bracket at the right edge of the device.
Push the control panel carefully into the left bracket until it clicks into place.
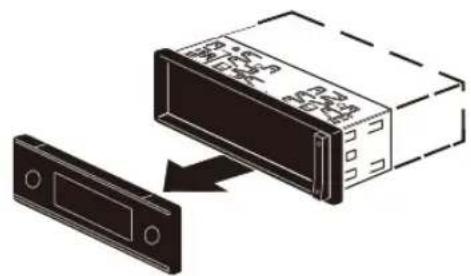
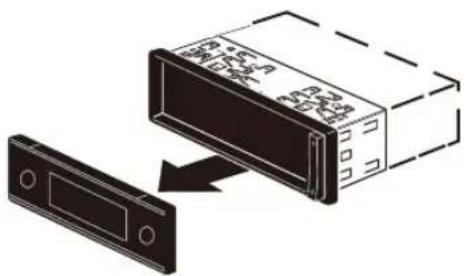
Removing the control panel
Press the [▼ button 1 to unlock the control panel.
The left side of the control panel detaches from the device and is secured by the bracket against falling out.
Move the control panel slightly to the left until it disengages from the right bracket.
Carefully remove the control panel from the left bracket.
Note:
The car sound system automatically switches off after approx. 10 seconds if the control panel is removed.
Switching on/off
Switching on/off with the On/Off button
For switch-on, press the On/Off button 3.
The car sound system switches on.
To switch off the device, press and hold down the On/Off button 3 for longer than 2 seconds.
The car sound system switches off.
Note:
If you switch on the car sound system while the vehicle ignition is switched off, it automatically switches off after 1 hour to preserve the vehicle battery.
Switching on/off via vehicle ignition
The car sound system will switch off/on simultaneously with the ignition if the device is correctly connected to the vehicle's ignition as shown in the installation instructions and you did not switch the device off by pressing the On/Off button 3 .
Volume
Adjusting the volume
You can adjust the volume in steps from 0 (off) to 50 (maximum).
Turn the volume control 4 to change the volume.
Note:
If a telephone is connected with the car sound system as described in the installation instructions, the car sound system is muted in case of a phone call. During muting, the display shows "TELEPHONE".
Muting the car sound system (Mute)
Briefly press the On/Off button 3 to mute the car sound system or to reactivate the previous volume.
While it is muted, the display shows "MUTE".
DAB mode
With DAB, you can enjoy radio in digital sound quality.
In contrast with standard radio broadcasting, several programmes (services) are always broadcast over the same frequency for DAB. These services are combined into a so-called ensemble. In some cases, the same service can be received in different ensembles.
Note:
You will need a special DAB antenna to be able to receive DAB signals. This can be a separate DAB roof/window antenna or a DAB/AM/FM combination antenna.
Below model with DAB function:
| London 470 DAB BT | 2001017123460 |
| Bamberg 470 DAB BT | 2001017123461 |
| Stockholm 370 DAB BT | 2001017123462 |
| Frankfurt 370 DAB BT | 2001017123463 |
| Skagen 370 DAB BT | 2001017123470 |
| Nürnberg 370 DAB BT | 2001017123471 |
| Dubai 324 DAB BT | 2001017123489 |
Changing to DAB mode or selecting a DAB memory bank
Press the SRC button ? repeatedly until the desired DAB memory bank is displayed:
DAB1 DAB2 DAB3
If DAB mode is switched on, the display showsthe symbol DAB
Notes:
- Up to 5 services can be stored in each DAB memory bank.
- DAB memory banks can be activated or deactivated via the user menu (see the chapter "User settings", section "Making settings in the "DAB TUNER" menu, "PRESETS" menu item). Deactivated DAB memory banks are skipped during the source selection with the SRC button? .
Tuning into ensembles/services
With DAB, several services broadcast over the same frequency are always combined into an "ensemble".
Selecting an ensemble
You can directly select ensembles that you have received once already (for this to work, the ensemble must be receivable).
Briefly press the V / Button 7 to change to the previous/next ensemble.
The first available service in the ensemble is played.
Note:
With activated PTY function, the next service with the currently selected programme type is set (see the section "DAB-PTY" in this chapter).
Ensemble seek tuning
You can find new ensembles using seek tuning.
Press the V / button 7 for approx. 2 seconds to start the search for an ensemble.
The seek tuning stops if an ensemble is being received. The first available service in the ensemble is played.
Selecting a service
After you have tuned into an ensemble, you can select a service from the ensemble.
Briefly press the <//> button 7 to change to the previous/next service.
As soon as a service with the desired programme type is found, it remains being tuned into.
Radio mode
RDS
Many FM stations broadcast an RDS (Radio Data System) signal in addition to their programme in the reception area "EUROPE" that allows the following additional functions:
• The station name is shown on the display.
- The car sound system recognises traffic announcements and news broadcasts and can automatically switch them through in other operating modes (e.g. in CD mode).
- Alternate frequency: If RDS is activated, the car sound system automatically selects the best receivable frequency for the station that is currently set.
- Regional: At certain times, some radio stations divide their programme into regional programmes providing different content. If the REGIONAL function is activated, the car sound system changes only to those alternate frequencies on which the same regional programme is being broadcast.
Note:
If you adjust a different reception area than "EUROPE", RDS is automatically switched off. The station name continues to be shown on the display. If you want to use radio stations with RDS features in your region, switch on RDS in the user menu.
Tuning into a station
There are various ways of tuning into a station: Starting station seek tuning
Turn rotary control 7 one notch counterclockwise or clockwise to start station seektuning.
The display briefly shows "SEARCH AUTO". The radio tunes into the next receivable station.
Notes:
- For the reception area "EUROPE": In the FM waveband, only traffic information stations are tuned into if the priority for traffic information ( ) is switched on.
- The sensitivity of seek tuning can be adjusted (see the chapter "User settings", section "Making settings in the "TUNER" menu", menu item "SENSITIVITY").
Tuning into stations manually
Press the rotary button 7 once to activate manual station tuning.
The display briefly shows "SEARCH MANUAL".
Turn the rotary control 7 to change the frequency in increments.
Note:
The manual station tuning is automatically exited approx. 15 seconds after the last frequency change, and the station seek tuning is started by turning the rotary control 7.
Storing stations or calling stored stations
Select the desired memory bank.
If necessary, set the desired station.
Press the station button 1 - 5 > for approx. 2 seconds to store the current station under the button.
- or -
Briefly press the station button 1 - 5 > to call up the stored station.
Changing to CD/MP3/WMA/iPod mode
Press the SRC button @ repeatedly until the desired audio source is displayed:
- "CD": Inserted CD.
- "SD(HC)": Inserted memory card
- "USB FRONT" or "USB REAR": USB data carrier connected to the front or rear.
- "IPOD FRONT / IPHONE FRONT" or "IPOD REAR / IPHONE REAR": Connected iPod / iPhone at the front or rear side
- "AUX": Connected external audio source.
Notes:
- The respective audio source can be selected only if a corresponding CD is inserted or a corresponding device is connected.
- If the car sound system first has to read the data of a connected device or data carrier before the playback, the display shows "READING". The duration of the reading depends on the data volume and design of the device or data carrier. If the device or data carrier is defective or the transferred data cannot be played back, a corresponding message appears on the display (e.g. "CD ERROR").
Inserting/ejecting a CD Inserting a CD

Risk of severe damage to the CD drive!
Noncircular contoured CDs (shape CDs)
and CDs with a diameter of 8 cm (mini CDs) must not be used.
We accept no responsibility for any damage to the CD drive that may occur as a result of the use of unsuitable CDs.
Note:
You must not hinder or assist the drive as it automatically draws in the CD.
Insert the CD with its printed side up into the CD tray 5 until you feel a slight resistance.
The drive automatically draws in the CD and checks its data. Afterwards, the playback starts in CD or MP3 mode.
Note:
If the inserted CD cannot be played back, "CD ERROR" is briefly displayed and the CD is automatically ejected after approx. 2 seconds.
Ejecting a CD
Note:
You must not hinder or assist the drive as it ejects the CD.
Press the ▲ button 8 to eject an inserted CD.
Notes:
- If a CD is ejected and not removed, the drive will automatically draw it back in again after approx. 10 seconds.
- You can also eject CDs while the car sound system is switched off or whilst another audio source is activated.
Bluetooth® menu
In the Bluetooth® menu, you find all the functions for pairing, connecting and managing Bluetooth® devices.
Calling the Bluetooth® menu
Briefly press the MENU button 2 to open the user menu.
Turn the rotary control 7 until the "BLUE-TOOTH" menu item is selected.
Press the rotary control 7 to open the Bluetooth® menu.
Turn the rotary control 7 until the desired menu item is selected.
Perform the setting (see the following sections).
Briefly press the MENU button 2 to exit the menu.
Notes:
- The Bluetooth® menu is automatically exited approx. 30 seconds after the last button activation and you are returned to the display of the current audio source.
- To go back to the next higher-level menu, turn the rotary control 7 until the "<<" option is selected and press the rotary control 7.
- If a Bluetooth® process is running (e.g. re-establishing the connection to the last connected device), the functions of the
Bluetooth® menu are blocked. If you attempt to open the Bluetooth® menu during this time, "LINK BUSY" briefly appears on the display. If you want to cancel the Bluetooth® process and open the Bluetooth® menu, press the 12 button < .
Pairing and connecting a device
Note:
You can pair up to 5 Bluetooth ^® devices with this car sound system. Before you can pair a sixth device, you must first unpair one of the 5 already paired devices (see ch. "Additional functions in the Bluetooth ^® menu", section "Managing paired devices").
If you should attempt to pair a sixth Bluetooth® device, "PHONE LIST FULL – PLEASE DELETE ENTRIES FROM LIST" is displayed.
Pairing and connecting a cell phone
Note:
If a connection with a cell phone currently exists, this connection is automatically disconnected if you pair and connect another cell phone.
In the Bluetooth® menu, select the "PAIRING" menu item.
Press the rotary control7 to open the menu. The "MOBILE PHONE" menu item is selected.
Press the rotary control 7 to register a cell phone.
The display intermittently shows "ENTER PIN" and the currently stored PIN (default "1234"). In addition, the Bluetooth® icon ✦ flashes. The car sound system can now be recognised by a Bluetooth® cell phone for approx. 2 minutes and connected.
Search the car sound system from your cell phone (Bluetooth® name: "BP 440 BT") and establish the connection. Enter the PIN displayed by the car sound system, if necessary. The display may show "PAIRED", followed by "CONNECTED", as soon as the car sound system and the cell phone are paired and connected.
Note:
If no connection can be established, the display briefly shows "CONNECT FAILED".
Pairing and connecting a Bluetooth® streaming device
Note:
If a connection with a streaming device currently exists, this connection is automatically disconnected if you pair and connect another streaming device.
In the Bluetooth® menu, select the "PAIRING" menu item.
Press the rotary control7 to open the menu. The "MOBILE PHONE" menu item is selected.
Turn the rotary control 7 to select the "STREAMING" menu item.
Press the rotary control 7 to register a streaming device.
The display shows the currently stored PIN (default "1234"). If required, enter the PIN of the streaming device:
Turn the rotary control 7 to select a digit for the respective position.
Press the rotary control 7 to go to the next position.
Note:
Not all streaming devices require the entry of a PIN on the car sound system. For some streaming devices, you have to enter the PIN of the car sound system instead. For these devices, press only the rotary control 7 repeatedly until you reach beyond the last position, thereby confirming the current PIN, and then enter this PIN on the streaming device.
The display intermittently shows "ENTER PIN" and the currently stored PIN (default "1234"). In addition, the Bluetooth® icon ✝ flashes. The car sound system can now be recognised by the streaming device for approx. 2 minutes and connected.
Search the car sound system from your streaming device (Bluetooth® name: "BP 440 BT") and establish the connection. Enter the PIN displayed by the car sound system, if necessary.
The display may show "PAIRED", followed by "CONNECTED", as soon as the car sound system and the streaming device are paired and connected.
Notes:
- If no connection can be established, the display briefly shows "CONNECT FAILED".
- If a Bluetooth ^ device is connected with the car sound system, the display shows the Bluetooth ^ icon ✗.
- After switch-on, the car sound system automatically attempts to reconnect the device connected last. If the connection attempt fails, the display briefly shows "NO DEVICE". If necessary, attempt to re-establish the connection from the Bluetooth® device.
Telephone functions
Answering/rejecting an incoming phone call
With an incoming call, the display alternately shows "INCOMING CALL" and the number of the caller. The current audio source is muted and a ring tone is played via the loudspeakers of the car sound system.
Note:
If the number of the caller is not being transmitted, the display shows "PRIVATE NUMBER" instead of the number. If the number of the caller is stored together with a name, the name of the entry and the number are displayed (see the section "Storing a phone number in the car sound system" in this chapter).
Press the 13 button to answer the call. "CALL" and the duration of the ongoing call are displayed.
Press the 12 button to reject the call or to end the current call.
The display shows "CALL END".
Notes:
- During the call, you can adjust the volume with the volume control 4 or mute the microphone and the loudspeakers with a short press of the On/Off button 3.
- You can preset the minimum volume for the call playback in the user menu (see the chapter "User settings", section "Making settings in the "VOLUME" menu", menu item "HANDSFREE VOL").
- You can switch the call playback back and forth between the loudspeakers of the car sound system and the cell phone with the button = .
- If another call is received during an ongoing phone call, the second call cannot be answered via the car sound system.
- If the car sound system is switched off with active ignition, it automatically switches on with an incoming call. This allows you to make the call over the hands-free system.
After the call has ended, the car sound system automatically switches off again.
Making a call
In the Bluetooth® menu, select the "DIAL NEW NUMBER" menu item.
Press the rotary control 7 to open the entry menu.
You can now enter a phone number with up to 20 digits:
Turn the rotary control 7 to select a digit for the respective position.
Press the rotary control 7 to go to the next position.
Note:
To return to the previous position in the entry menu, turn the rotary control 7 until the "<" option is selected, and press the rotary control 7.
Press the 13 button to call the number entered.
"CALLING" and the dialed number are alternately shown on the display.
As soon as your calling party answers the call, the display shows "CALL" and the time of the current phone call.
Upon ending the call, the display briefly shows "CALL END".
Calling an entry in the phone book
Note:
This function is available only if the phone book of the connected cell phone was transferred to the car sound system (see the chapter "Phone book functions").
In the Bluetooth® menu, select the "PHONEBOOK" menu item.
Press the rotary control to open the phone book.
The display shows the first phone book entry.
Note:
If the phone book has not yet been transferred, the display briefly shows "PHONEBOOK NOT AVAILABLE".
- or -
In the Bluetooth® menu, select the "PBSEARCH" (phone book search) menu item.
Press the rotary control 7 to open the entry menu.
Turn the rotary control 7 to select the first letter of the desired entry.
Press the rotary control 7 to confirm the selection.
The display shows the first phone book entry that starts with the selected letter.
Note:
If the phone book does not contain any entry with the selected first letter, the display briefly shows "NOT FOUND".
Turn the rotary control 7 to select a different entry.
Press the rotary control 7 or the 13 button to call the number.
"CALLING" and the dialed number are alternately shown on the display.
Note:
You can also call an entry in the phone book via speed dial (see the section "Speed dial for phone book entries" in this chapter).
Making a call with voice dial
Note:
This function is only available if the connected cell phone supports voice dial.
In the Bluetooth® menu, select the "VOICE DIAL" menu item.
Press the rotary control 7 or the 13 button to activate voice recognition.
The car sound system is muted and the display shows "SPEAK NOW".
Say the name of the desired calling partner.
Notes:
- If no Bluetooth® connection is established when voice recognition is activated, the display briefly shows "VOICE DIAL FAILED – NO BT CONNECTION".
- If the spoken name is not being recognised or the time for the voice recognition has already expired, the display briefly shows "DIAL FAILED".
- You can cancel the voice recognition by pressing the 12 button.
- Please note that the duration of the voice recognition is limited and depending on the respective cell phone.
- You can also activate the voice recognition via speed dial (see the section "Speed dial for voice dial" in this chapter).
Storing a phone number in the car sound system
You can store phone numbers in the car sound system and make calls using the speed dial (see the following section).
A phone number is stored for the currently connected telephone and is available only for this telephone. The car sound system can store up to five numbers for up to five paired devices.
Enter the phone number as described in the section "Making a call".
Press the desired memory button 1 - 5 > for approx. 2 seconds to store only the number.
- or -
Press the rotary control 7 for approx. 2 seconds to enter a name for the entry.
You can now enter a name with up to 15 characters:
Turn the rotary control 7 to select a character for the respective position.
Press the rotary control 7 to go to the next position.
Note:
To return to the previous position in the entry menu, turn the rotary control 7 until the "<" option is selected, and press the rotary control 7.
Press the desired memory button 1 - 5 > for approx. 2 seconds to store the number and name.
The display briefly shows "NUMBER SAVED". Afterwards, you are returned to the Bluetooth® menu and the "DIAL NEW NUMBER" menu item.
Notes:
- A number previously stored on the memory button is replaced.
- If a telephone is unpaired, the numbers stored for this telephone are automatically deleted.
Speed dial for any phone number or for the number dialed last or a stored number
With speed dial, you can make a call without first having to select the corresponding function in the Bluetooth® menu.
To call the number dialed last,
press the 13 button.
The display shows the number dialed last.
Note:
If no cell phone is currently connected, the Bluetooth® menu is opened. The "PAIRING" menu item is selected.
Press the 13 button to call the number.
"CALLING" and the dialed number are alternately shown on the display.
To call a stored number,
press the 13 button.
Press a memory button 1 - 5 > to call the number stored.
Note:
If no number is stored under the selected memory button, the display briefly shows "NO NUMBER".
Press the 13 button to call the number.
"CALLING" and the dialed number are alternately shown on the display.
To call any number,
press the 13 button.
Press the rotary control 7 to open the entry menu and enter a number (enter the phone number as described in the section "Making a call").
Press the 13 button to call the number.
"CALLING" and the dialed number are alternately shown on the display.
Speed dial for phone book entries
Note:
This function is only available
- if the phone book of the connected cell phone was transferred to the car sound system (see the chapter "Phone book functions").
- if the speed dial is set for phone book entries (see the chapter "Additional functions in the Bluetooth® menu", section "Setting the button function for speed dial").
To select an entry of the phone book with the speed dial and call it,
press the 13 button for approx. 2 seconds.
The display shows the first phone book entry or the search function for phone book entries.
If necessary, select another entry as described in the section "Calling an entry in the phone book".
Press the 13 button to call the number.
"CALLING" and the dialed number are alternately shown on the display.
Speed dial for voice dial
Note:
This function is only available
- if the connected cell phone supports voice dial.
- if the speed dial is set for voice dial (see the chapter "Additional functions in the Bluetooth® menu", section "Setting the button function for speed dial").
To activate the voice recognition with the speed dial,
press the 13 button for approx. 2 seconds.
The car sound system is muted and the display shows "SPEAK NOW".
Say the name of the desired calling partner.
External audio sources
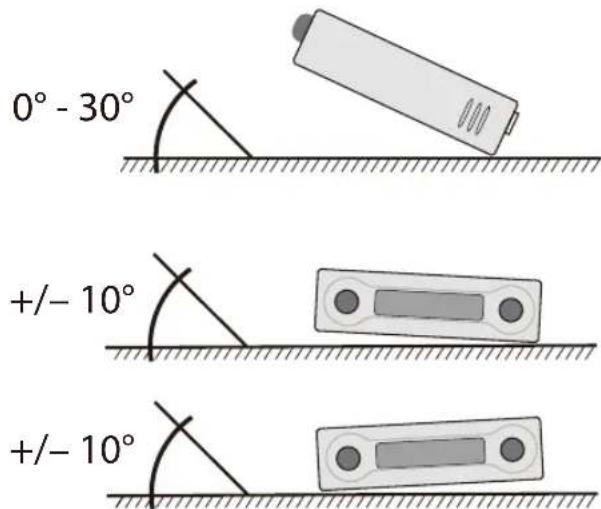
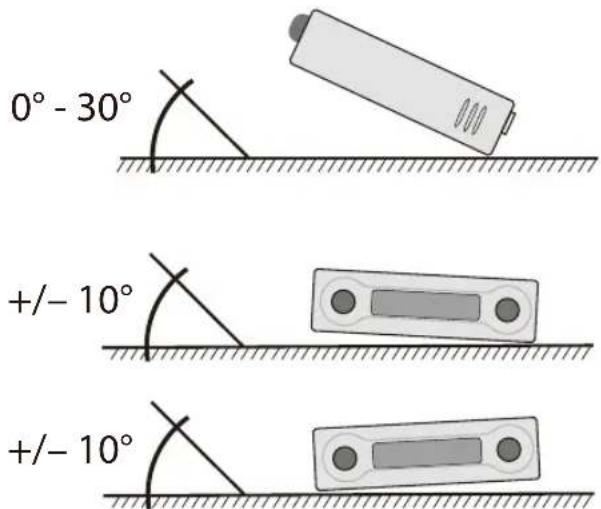
Front AUX-IN socket

Danger!
Increased risk of injury from connector.
In case of an accident, the protruding connector in the front AUX-IN socket may cause injuries. The use of straight plugs or adapters leads to an increased risk of injury.
For this reason, it is recommended to use angled jack plugs.
As soon as an external audio source, such as a portable MP3 player is connected to the front AUX-IN socket; , it can be selected with the SRC button @ . "AUX" then appears on the display.
Making settings in the "VOLUME" menu
ON VOLUME
Setting the power-on volume. Settings: ON VOLUME (power-on volume; 1 – 50) or LAST VOLUME (volume set last before switching off the car sound system).
Danger!
High volume
The power-on volume can be unexpectedly high if the LAST VOLUME setting is selected and a high volume was set the last time the radio was switched off.
Always set the device to a moderate volume.
Press the rotary control7 to open the menu.
Turn the rotary control 7 to switch between the menu items "LAST VOLUME" and "ON VOLUME" (power-on volume).
Upon selecting "LAST VOLUME":
Press the rotary control 7 twice to confirm the setting.
Upon selecting "ON VOLUME":
Press the rotary control 7 to change the setting.
Turn the rotary control 7 to set the volume.
Press the rotary control 7 to confirm the setting.
TRAFFIC VOL (traffic information volume) (reception area EUROPE only)
Setting the minimum volume for traffic announcements. Settings: 1 – 50.
Press the rotary control 7 to change the setting.
Turn the rotary control 7 to set the volume.
Press the rotary control 7 to confirm the setting.
HANDSFREE VOL
Adjusting the minimum volume for telephone calls. Settings: 1 – 50.
Press the rotary control 7 to change the setting.
Turn the rotary control 7 to set the volume.
Press the rotary control 7 to confirm the setting.
Note:
During the phone call, you can change the volume directly by means of the volume control 4.
BEEP (button beep)
Switching the confirmation beep on or off. Settings: ON, OFF.
Note:
When storing radio stations, a confirmation beep sounds even if the OFF setting is selected.
Press the rotary control 7 to change the setting.
Turn the rotary control 7 to change between the settings.
Press the rotary control 7 to confirm the setting.
Useful information
Warranty
The warranty terms can be called up from www.blaupunkt.com.
Service
If you ever need to use a repair service you will find information about service partners in your country under
www.blaupunkt.com.
Additional information on the functions of the device can be found in the instructions at www.blaupunkt.com
Technical data
Voltage supply
Operating voltage: 10.5 - 14.4 V
Operating voltage: 10.5 - 14.4 V
Heavy duty model
Current consumption
In operation: < 10 A
10 sec. after switch-off: < 3.5 mA
Amplifier
Output power: 4 x 24 watts sine at
14.4 V at 4 ohms.
4 x 50 watts max. power
Tuner
Wavebands in Europe/Asia/Thailand:
FM: 87.5 - 108 MHz
AM (MW): 531 - 1,602 kHz
LW (Europe only): 153 – 279 kHz
Wavebands in the US:
FM: 87.7 - 107.9 MHz
AM (MW): 530 - 1,710 kHz
Wavebands in South America:
FM: 87.5 – 107.9 MHz
AM (MW): 530 - 1,710 kHz
FM frequency response: 30 – 15,000 Hz
CD
Frequency range: 20 – 20,000 Hz
Pre-amp out
4 channels: 4 V
Input sensitivity
Front AUX-IN: 300 mV / 10 kΩ
Dimensions and weight
W x H x D: 178 x 50 x 160 mm
Weight: approx. 1.55 kg
EN Installation instructions

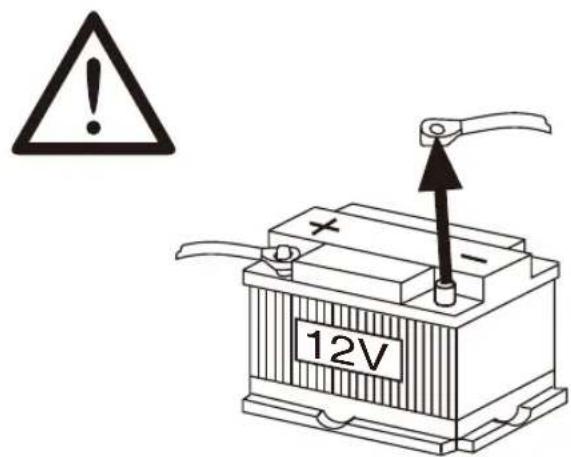
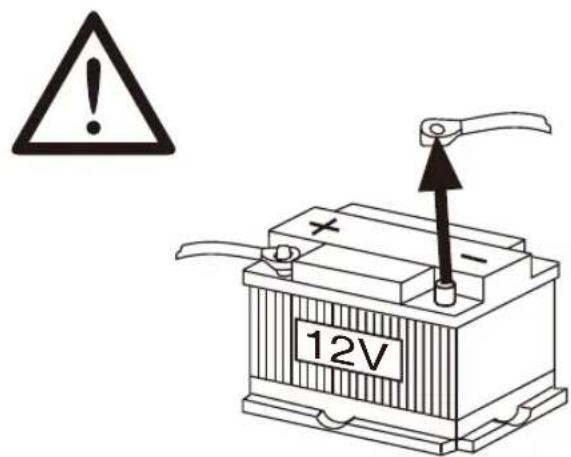
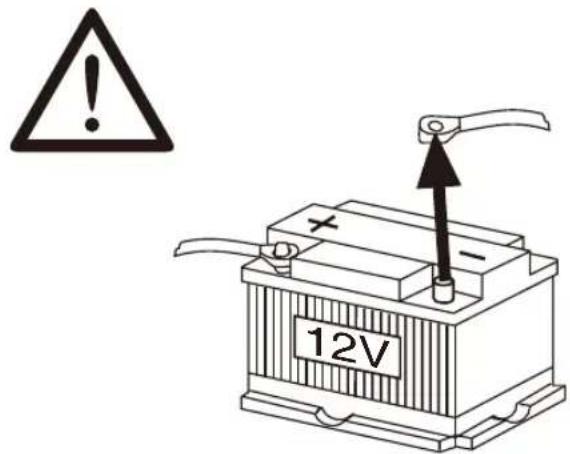
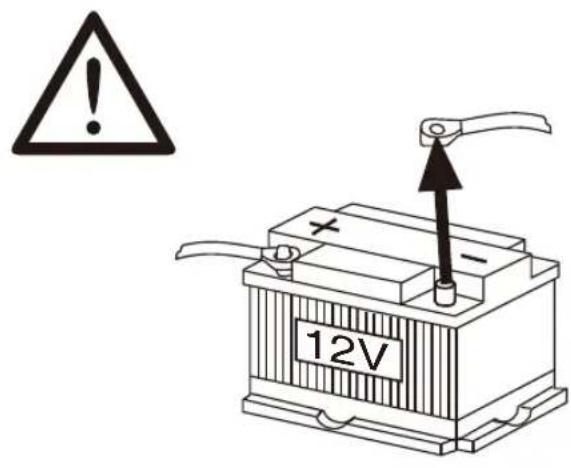
Safety instructions
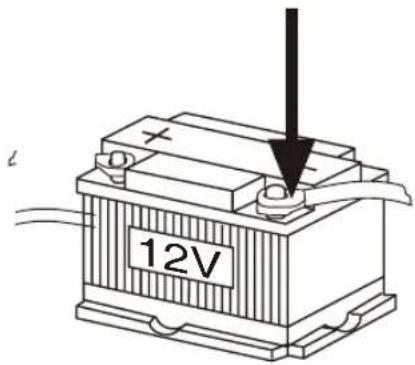
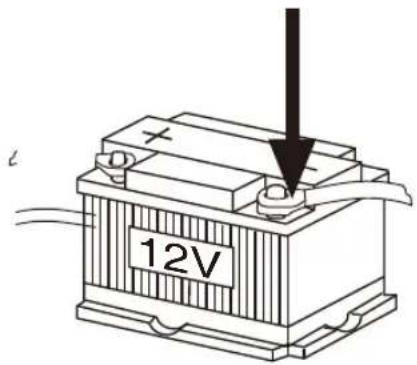
When carrying out installation work and making connections please observe the following safety instructions:
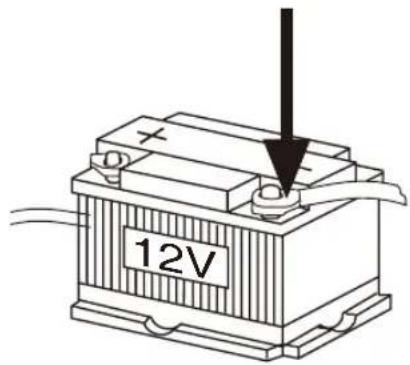
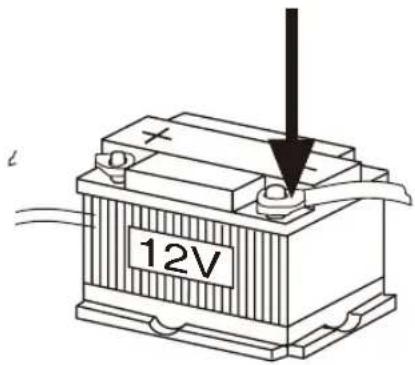
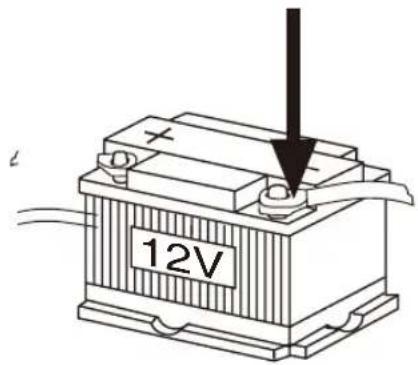
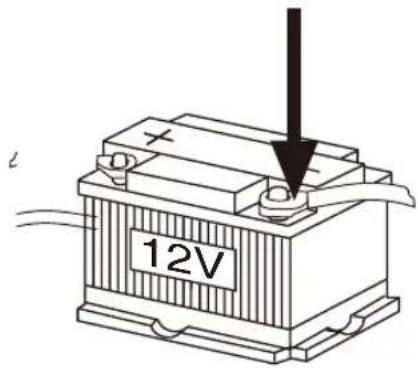
- Disconnect the negative terminal of the battery! When doing so, please observe the vehicle manufacturer's safety instructions.
• Make sure you do not damage vehicle components when drilling any holes. - The cross sections of the positive and negative cables must not be less than 1.5 mm ^2 .
- Do not connect the vehicle's plug connectors to the radio!
You can obtain the adapter cable required for your vehicle type from any BLAUPUNKT dealer.
- Depending on the model, your vehicle may differ from the description provided here. We accept no responsibility for any damages due to incorrect installation or connection or for any consequential damages.
If the information provided here is not suitable for your specific installation requirements, please contact your Blaupunkt dealer, your vehicle manufacturer or our telephone hotline.
When installing an amplifier, you must first connect the device earth connections before connecting the plugs for the line-out jacks.
Earth connection of external devices may not be connected to earth of car sound system (housing).

Available as an optional accessory
natural_image
Diagram of a connector with multiple cable links and an internal component, no text or symbols presentInstallation kits


1 Microphone In
2 Steering wheel remote control
3 Rear USB
4 Preamp Out (Front)
5 Preamp Out (Rear)
6 Sub Out (Subwoofer)
7 Radio antenna

6.
natural_image
Diagram showing a device with an internal component being transferred from a labeled panel (no text or symbols present)3.

2.

7.
B
A

| A | B | ||
| 1 NC 1 Speaker out RR+ | |||
| 2 Telephone Mute 2 Speaker out | RR- | ||
| 3 NC 3 Speaker out RF+ | |||
| 4 Permanent +12V 4 Speaker out | RF- | ||
| 5 Auto antenna* 5 Speaker out LF+ | |||
| 6 Illumination 6 Speaker out LF- | |||
| 7 Kl.15/Ignition 7 Speaker out LR+ | |||
| 8 Ground 8 Speaker out LR- | |||
*

Switched power supply +12 V / max. 150 mA
Supported iPod/iPhone devices
Our product can support below listed iPod/iPhone generations;
- iPhone 7 Plus
- iPhone 7
- iPhone 6S Plus
- iPhone 6S
- iPod touch (5th generation)
- iPhone 6 Plus
- iPhone 6
- iPhone 5s
- iPhone 5c
- iPhone 5
"Made for iPod" and "Made for iPhone" mean that an electronic accessory has been designed connect specifically to iPod, iPhone respectively, and has been certified by the developer to meet Apple performance standards.
Apple is not responsible for the operation of this device or its compliance with safety and regulatory standards.
Please note that the use of this accessory with iPod, iPhone may affect wireless performance. iPhone, iPod are trademarks of Apple Inc., registered in the U.S. and other countries.
This product is protected by certain intellectual property rights of Microsoft. Use or distribution of suchtechnology outside of this product is prohibited without a license from Microsoft.
The Bluetooth ^® word mark and logos are registered trademarks owned by Bluetooth SIG, Inc.
Android is a trademark of Google Inc.
Suitable for below listed models:
Information:
Please note that this is a general manual for different models and that from model to model there can become operating differences, in particular in the graphical representations or existing functions (e.g.CD drive, DAB and / or BT).
• London 470 DAB BT 2001017123460
• Bamberg 470 DAB BT 2001017123461
• Stockholm 370 DABBT 2001017123462
• Frankfurt 370 DAB BT 2001017123463
• Barcelona 270 BT 2001017123464
• Kiel 270 BT 2001017123465
• Skagen 370 DABBT 2001017123470
• Nurnberg 370 DAB BT 2001017123471
• Dubai 324 DABBT 2001017123489
• Dakar 224 BT 2001017123490
• Doha 112BT 2001017123491

1 [v -knapp Låse opp det avtagbare betjeningspanelet
natural_image
Back view of a black electronic device showing internal components and a numbered label (18) pointing to a slot (no text or symbols on the device itself)
1 [▼-knapp
Låse opp det avtagbare betjeningspanelet
2 MENU-knappen
Kort trykk: Åpne/lukke meny
Langt trykk: Starte skannefunksjon
3 On/Off -knappen
Kort trykk: Slå på bilradiosystemet
L drift: Slå av lyden i bilradiosystemet (Mute)
Langt trykk:Slå av bilradioen
4 Volumbryter
5 CD-stasjon *) kun i modeller med CD
6 Skjerm
7 Dreiebryter
I menyen: Skifte menynivå, velge menypunkt, endre innstilling
Radio-modus: Innstille frekvens, starte kanal/PTY søk
CD/MP3/WMA/iPod-modus:
Velge spor, spole frem/tilbake
Browse-modus i MP3/WMA/iPod-modus:
ID3-kategori (kun iPod), velge mappe og spor
8 △ -knapp (Eject)
Skyve ut CD *) kun i modeller med CD
9 Mikrofon
10 USB-port på fronten
11 AUX-IN inngang på fronten
natural_image
Back view of a black electronic device showing internal components and a labeled pin (18), no text or symbols present.
1 MENU -knappen
AM (MW): 531 - 1602 kHz
LW (kun Europa): 153 - 279 kHz
AM (MW): 530 -1710kHz
Frekvensområder i Sør-Amerika:
FM: 87,5 - 107.9 MHz
AM (MW): 530 -1710kHz
FM-overføringsområde 30 - 15,000 Hz CD
Frekvensområde: 20 – 20 000 HZ
B X H X D: 178 X 50 X 160 mm
Vekt: ca. 1.55 kg
NO monteringsanvisning

natural_image
Diagram of a connector assembly showing cable routing between two connectors (no text or labels)7 607 621 ...
monteringssett
6.
Demontering
1.

natural_image
Diagram showing a device with an external box and a separate panel, no text or symbols present3.
2.
7.

B
A
| A | B | ||
| 1 | NC | 1 | Speaker out RR+ |
| 2 | Slå av telefonlyden | 2 | Speaker out RR- |
| 3 | NC | 3 | Speaker out RF+ |
| 4 | Permanent +12V | 4 | Speaker out RF- |
| 5 | Auto antenne | 5 | Speaker out LF+ |
| 6 | Belysning | 6 | Speaker out LF- |
| 7 | Kl.15/Tenning | 7 | Speaker out LR+ |
| 8 | Jording | 8 | Speaker out LR- |
*

Strømforsyning +12 V / max. 150 mA
1 Microphone in
2 Fjernkontroll på rattet
3 USB bak
4 Preamp Out (front)
5 Preamp Out (bak)
6 Sub Out (Subwoofer)
7 Radioantenne
1 [v toets
natural_image
Back view of a black electronic device showing internal components and a labeled pin (18), no text or symbols present.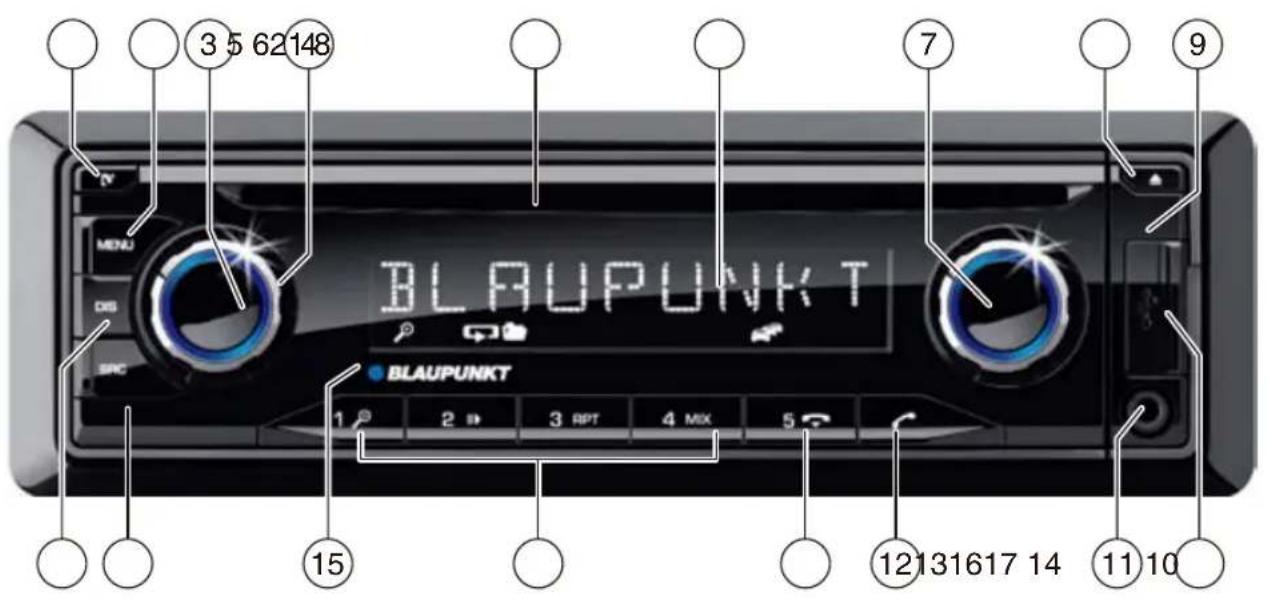
natural_image
Back view of a black electronic device showing internal components and a labeled pin (18), no text or symbols present.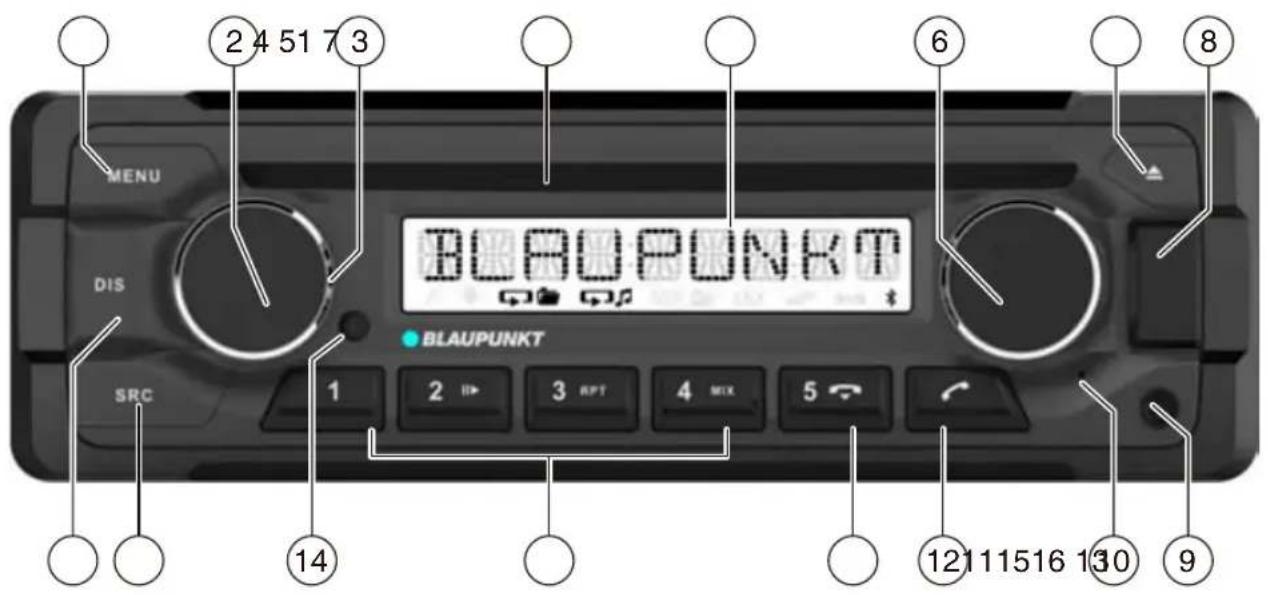
1 MENU toets
Niet-ronde CD's (shape CD's)
AM (MW): 530 -1710kHz
B X H X D: 178 X 50 X 160 mm
natural_image
Technical line drawings of five different electronic components or connectors, including a rectangular box and four connected modules with wires (no text or symbols present)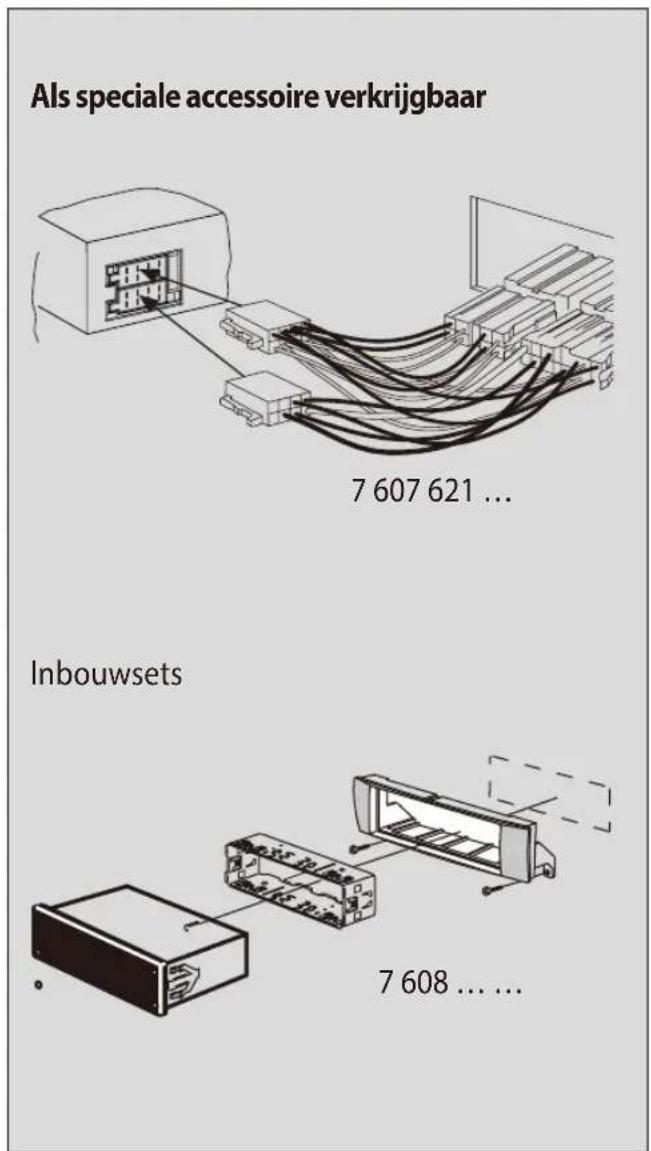
natural_image
Diagram showing a device with an internal component being transferred from a labeled panel (no text or symbols present)3.

2.

7.

B
A

3.
4.

1 [v] nyomógomb
natural_image
Back view of a black electronic device showing internal components and a numbered label (18) pointing to a slot (no readable text or symbols beyond the number)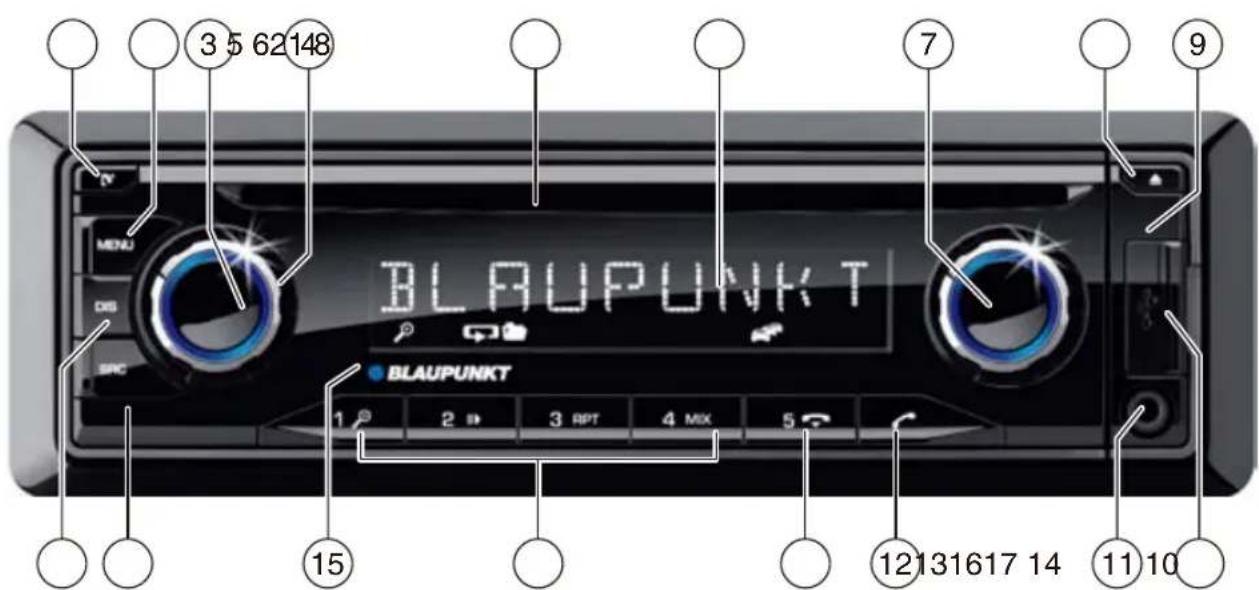
natural_image
Back view of a black electronic device showing internal components and a labeled pin (18), no text or symbols present.
AM (MW): 531 - 1602 kHz
AM (MW): 530 -1710kHz
AM (MW): 530 -1710kHz
natural_image
Technical line drawings of five different electronic components or connectors, including a box, housing, and remote control (no text or symbols present)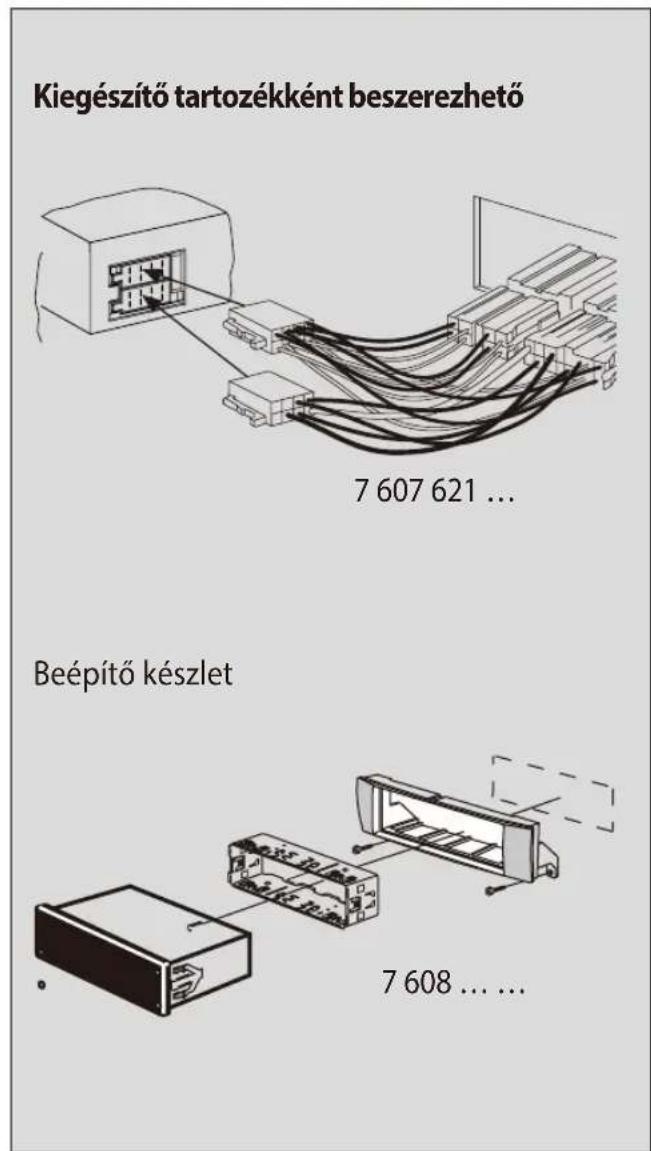
natural_image
Diagram showing a device with an external panel connected to a rectangular box (no text or symbols visible)3.
2.
7.
B
A
| A | B | ||
| 1 | NC | 1 | Speaker out RR+ |
| 2 | Telephone Mute | 2 | Speaker out RR- |
| 3 | NC | 3 | Speaker out RF+ |
| 4 | Permanent +12V | 4 | Speakerout RF- |
| 5 | Auto antenna* | 5 | Speaker out LF+ |
| 6 | Illumination | 6 | Speakerout LF- |
| 7 | Kl.15/Ignition | 7 | Speaker out LR+ |
| 8 | Ground | 8 | Speaker out LR- |
*

Switched power supply +12 V / max. 150 mA


1 [v touche
natural_image
Back view of a black electronic device showing internal components and a labeled pin (18), with no visible text or symbols beyond the number.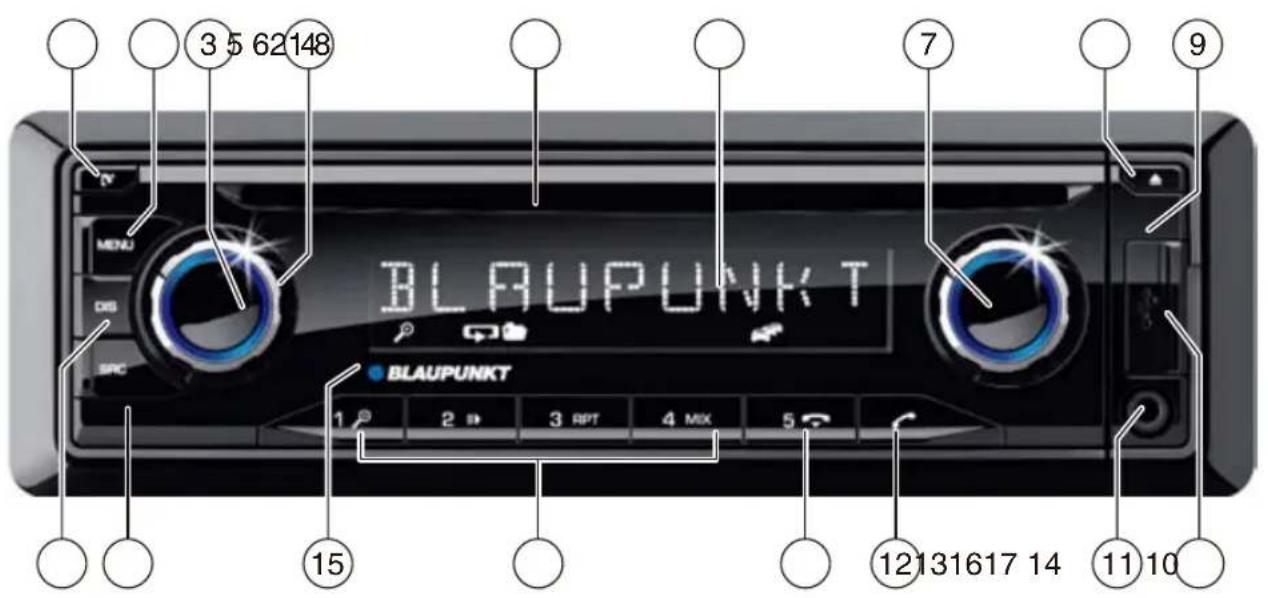
natural_image
Back view of a black electronic device showing internal components and a labeled pin (18), no text or symbols present.
1 Touche MENU
ON VOLUME (VOLUME SONORE A LA MISE EN MARCHE)
natural_image
Technical line drawings of five different electronic components or connectors, including a rectangular box and four connected modules with wires (no text or symbols present)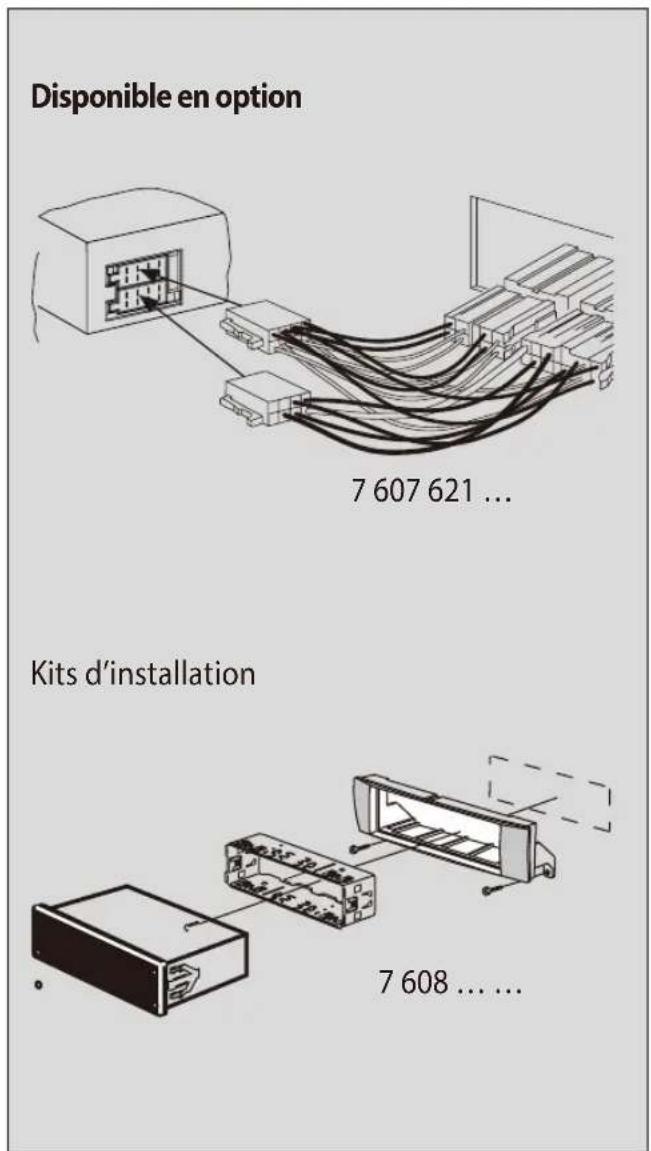


6.
natural_image
Diagram showing a device with an internal component being processed into a labeled panel (no text or symbols present)3.

2.

7.
B
A
3 Virtapainike On/Off
natural_image
Back view of a device showing internal components and a numbered label (18), no readable text or symbols present.
natural_image
Back view of a black electronic device showing internal components and a labeled pin (18), no text or symbols present.
1 MENU -näppäin
AM (MW): 531 - 1602 kHz
LW (vain Eurooppa): 153 - 279 kHz
Aaltoalueet USA:
FM: 87,7 - 107.9 MHz
AM (MW): 530 -1710kHz
AM (MW): 530 -1710kHz
natural_image
Technical line drawings of five different electronic components or connectors, including a rectangular box and four connected modules with wires (no text or symbols present)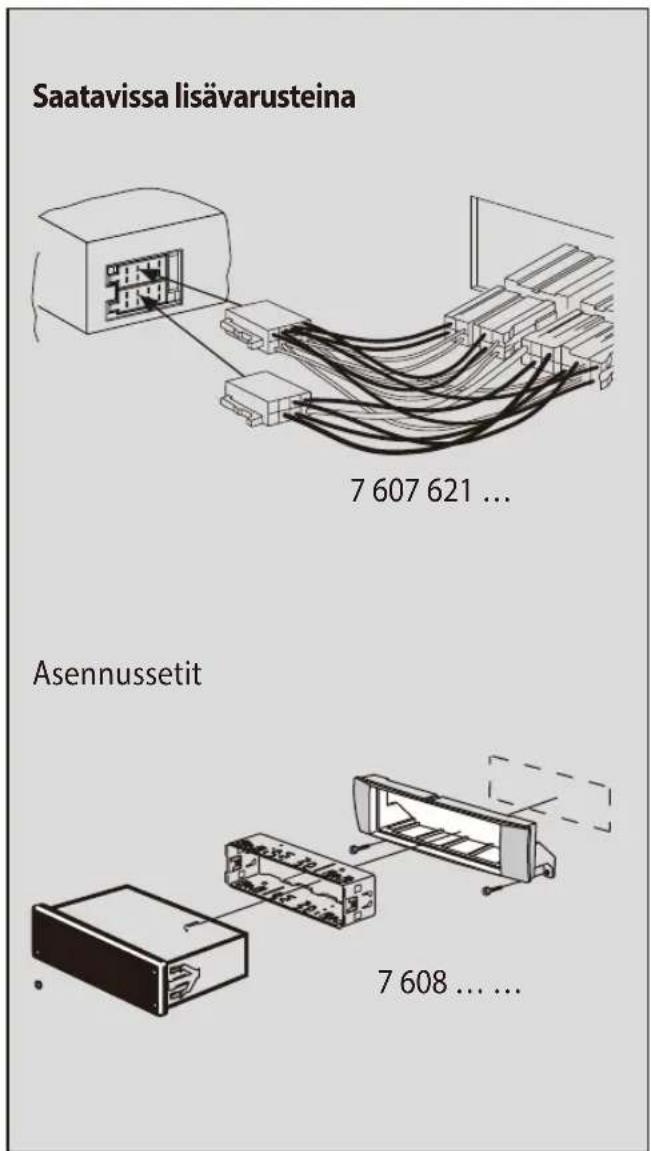
1 Microphone in
2 Steering wheel remote control
3 Rear USB
4 Preamp Out (Front)
5 Preamp Out (Rear)
6 Sub Out (Subwoofer)
7 Radio antenna
6.
Irrotus • Ausbau • Removal • Demontage • Desmontaje • Desmontagem • Pelepasan
natural_image
Diagram showing a device with an external component and a close-up view of its screen (no text or symbols present)


B

A
| A | B | ||
| 1 | NC | 1 | Speaker out RR+ |
| 2 | Telephone Mute | 2 | Speaker out RR- |
| 3 | NC | 3 | Speaker out RR+ |
| 4 | Permanent +12V | 4 | Speaker out RR- |
| 5 | Auto antenna* | 5 | Speaker out RR+ |
| 6 | Illumination | 6 | Speaker out RR- |
| 7 | Kl.15/Ignition | 7 | Speaker out LR+ |
| 8 | Ground | 8 | Speaker out LR- |


natural_image
Back view of a black electronic device showing internal components and a labeled pin (18), no text or symbols present.
1 [▼ Tecla
natural_image
Back view of a black electronic device showing internal components and a labeled pin (18), no text or symbols present.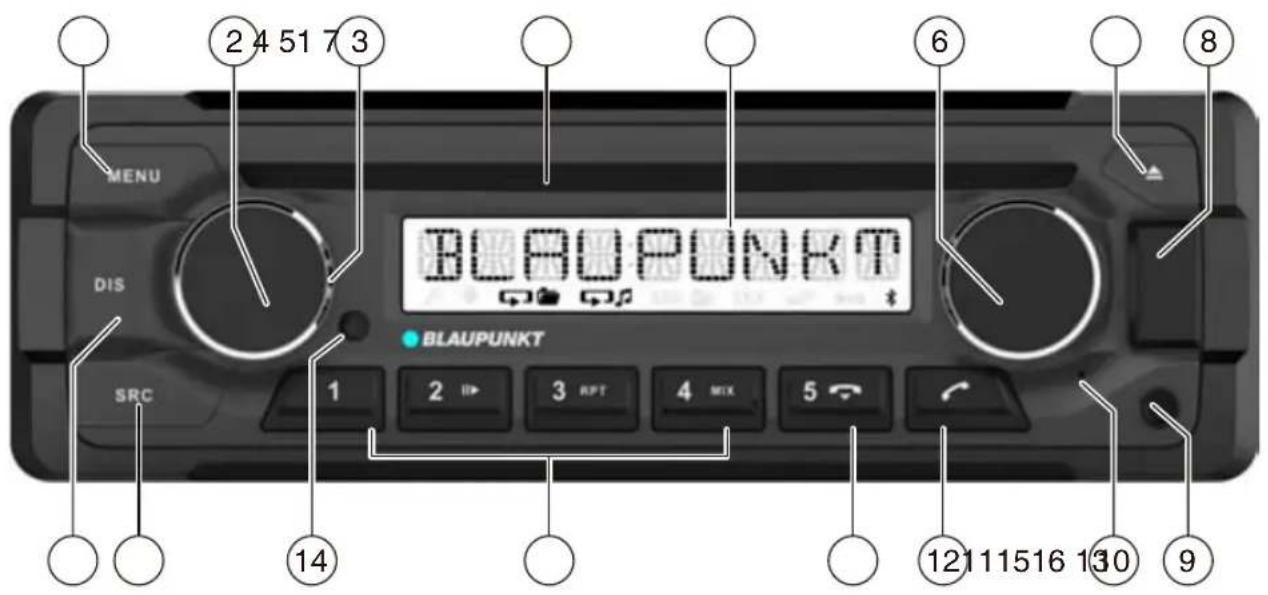
1 Tecla MENU
AM (MW): 531 - 1602 kHz
LW (solo Europa): 153 - 279 kHz
AN X A X P: 178 X 50 X 160 mm
Peso: aprox. 1.55 kg
natural_image
Four technical line drawings of electronic components, including a rectangular box, open case, two cylindrical connectors, and a terminal connector (no text or symbols present)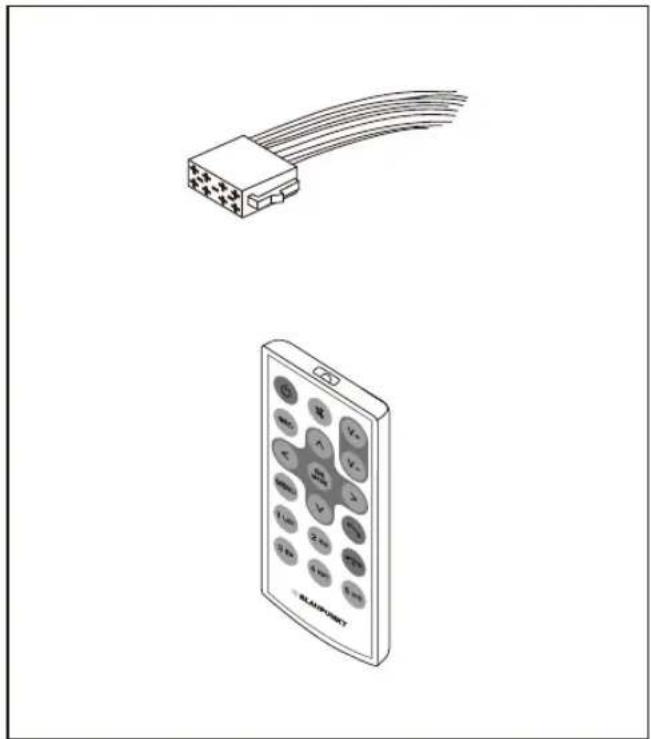
natural_image
Technical illustration of a remote control device with cable and keypad (no text or symbols)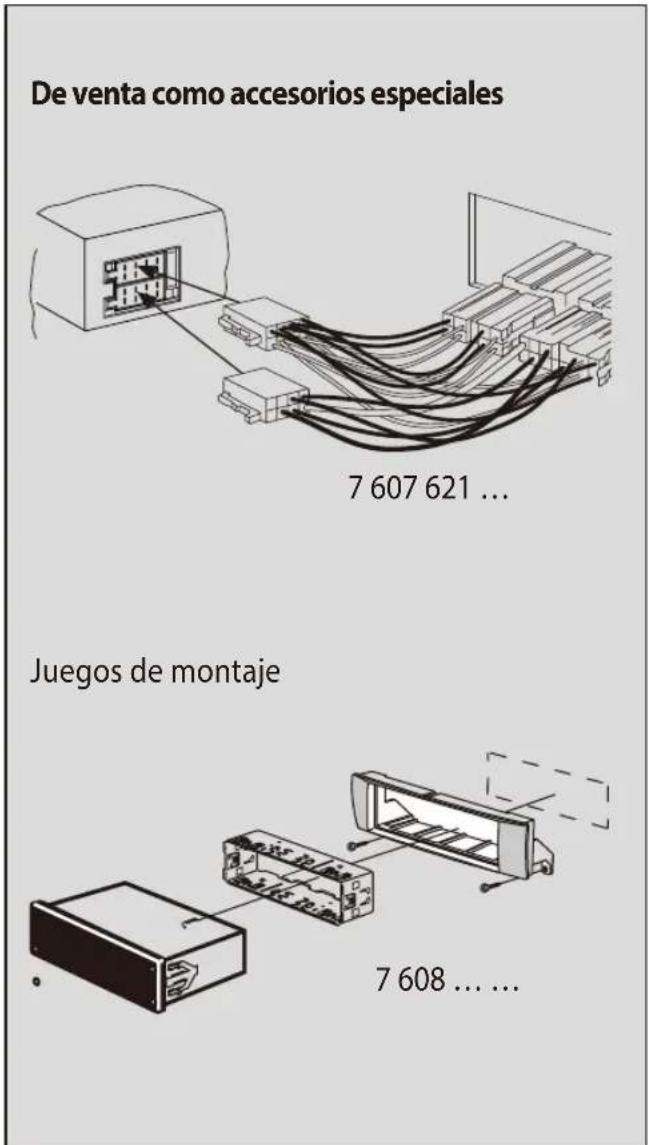
3.

4.
6.
Ausbau • Removal • Demontage • Desmontaje • Desmontagem • Pelepasan

natural_image
Diagram showing a device with an external component and a close-up view of its screen (no text or symbols present)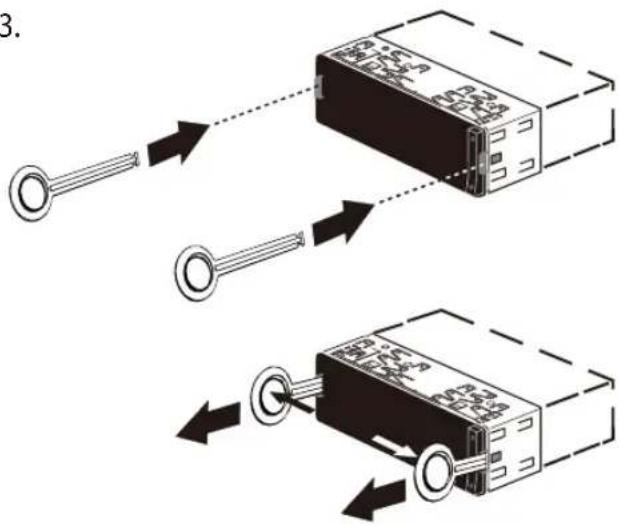

B
A
natural_image
Back view of a black electronic device showing internal components and a labeled pin (18), with no visible text or symbols beyond the number marker.
natural_image
Back view of a black electronic device showing internal components and a labeled pin (18), no text or symbols present.
1 tlačítko MENU
natural_image
Illustration of five different electronic components with no visible text or symbols
6.
Ausbau • Demontáž • Demontage • Desmontaje • Desmontagem • Pelepasan
1.

natural_image
Diagram showing a device with an internal component being transferred into a black rectangular panel (no text or symbols present)3.
2.

7.
B
A
natural_image
Back view of a black electronic device showing internal components and a labeled pin (18), no readable text or symbols beyond the number.
1 [v-knapp
natural_image
Back view of a device showing internal components and a numbered label (18), no readable text or symbols present.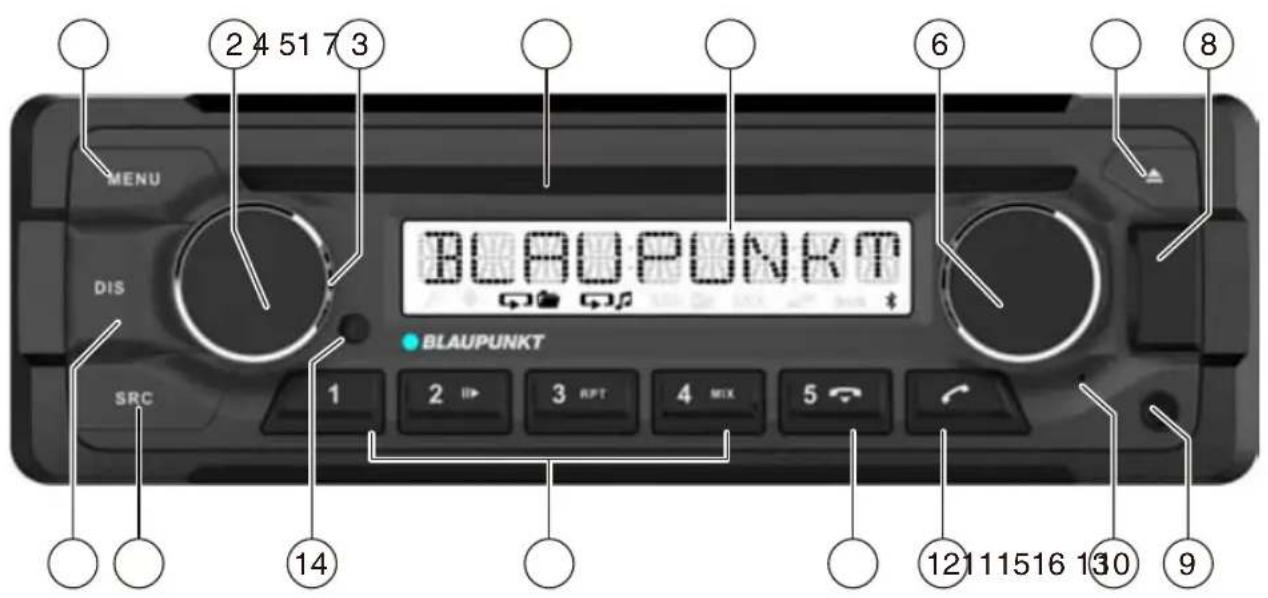
HANDSFREE VOL (VOLYM FÖR HANDSFREE)
AM (MW): 531 - 1602 kHz
LW (endast Europa): 153 - 279 kHz
AM (MW): 530 -1710kHz
AM (MW): 530 -1710kHz
B X H X D: 178 X 50 X 160 mm
Vikt: ca. 1,55 kg
SV Monteringsanvisningar

Skyddsanvisningar
6.
Ausbau • Removal • Demontage • Desmontaje • Desmontagem • Pelepasan
1.

natural_image
Diagram showing a device with an internal component being transferred from a labeled panel (no text or symbols present)3.

2.
7.

B
A

| A | B | ||
| 1 | NC | 1 | Högtalare ut RR+ |
| 2 | Telefon: ljuddämpning | 2 | Högtalare ut RR- |
| 3 | NC | 3 | Högtalare ut RF+ |
| 4 | Permanent +12V | 4 | Högtalare ut RF- |
| 5 | Bilantenn * | 5 | Högtalare ut LF+ |
| 6 | Belysning | 6 | Högtalare ut LF- |
| 7 | Kl.15/Tändning | 7 | Högtalare ut LR+ |
| 8 | Grund | 8 | Högtalare ut LR- |
*

natural_image
Technical line drawings of various electronic components including a rectangular box, open case, and three connected modules with visible pins (no text or symbols)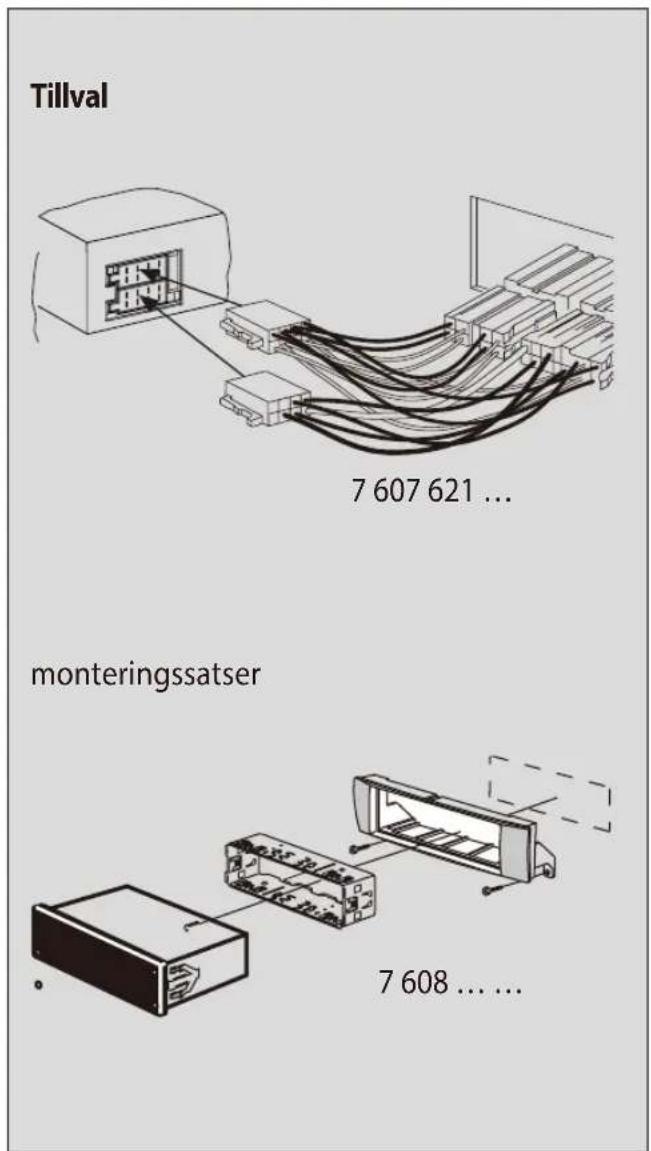
Kompatibla iPod / iPhone-enheter
natural_image
Back view of a black electronic device showing internal components and a labeled pin (18), no text or symbols present.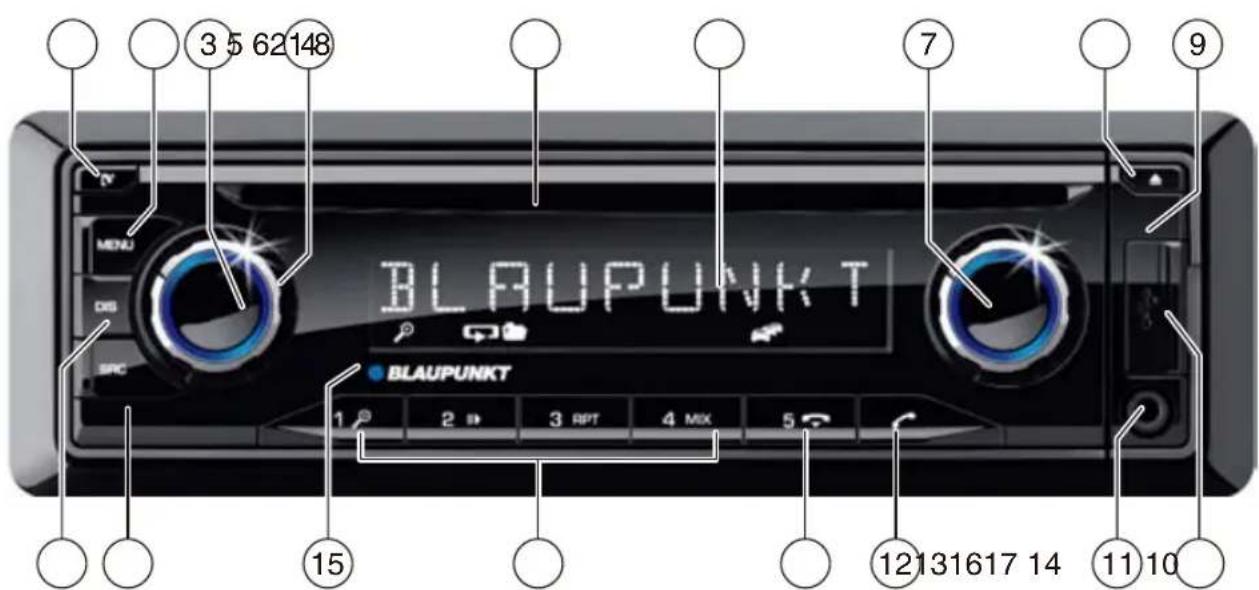
natural_image
Back view of a black electronic device showing internal components and a labeled pin (18), no text or symbols present.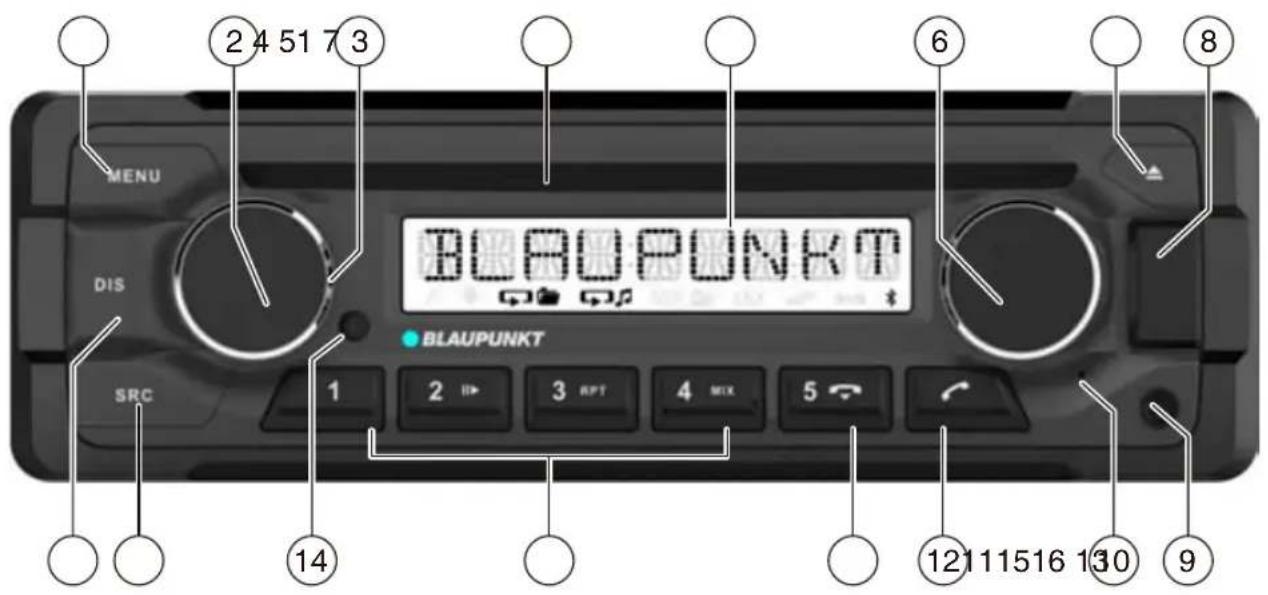
1 MENU -knap
Kort tryk: Opkald / Luk menu Langt tryk: Start scan funktion
2 f knap
Kort tryk: Tænd for bilens lydsystem I drift: Mute bilens lydsystem (Mute) Langt tryk: Sluk bilens lydsystem
3 Volumenkontrol
4 CD-skuffe
5 Skærm
6 Roteringskontrol
AM (MW): 530 -1 710kHz
Bølgeområde I Sydamerika:
FM: 87,5 - 107,9 MHz
AM (MW): 530 -1,710kHz
FN- frekvensrespons: 30 – 15 000 Hz CD
Overførselsområde 20 – 20 000 Hz
Pre-amp Out
4 kanaler: 4 V
Indgangsfølsomhed
Front-AUX-IN: 300 mV / 10 kΩ
Mål og vægt
B xHxL 178 X 50 X 160 mm
Vægt ca. 1,55 kg
natural_image
Diagram of a device housing assembly showing internal components and connection (no text or symbols)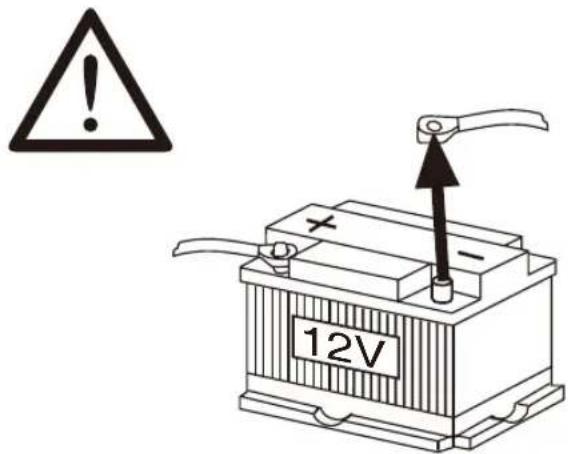

1 Indbygget mikrofon
2 Rat fjernbetjening
3 Bag USB
4 Preamp Out (Front)
5 Preamp Out (bagud)
6 Sub Out (Subwoofer)
7 Radio antenne
6.
Ausbau • Aftagelig • Demontage • Desmontaje • Desmontagem • Pelepasan
1.
natural_image
Diagram showing a device with an attached rectangular box and a separate rectangular panel, no text or symbols present.3.

2.

7.
B
A

natural_image
Back view of a black electronic device showing internal components and a labeled pin (18), with no readable text or symbols beyond the label.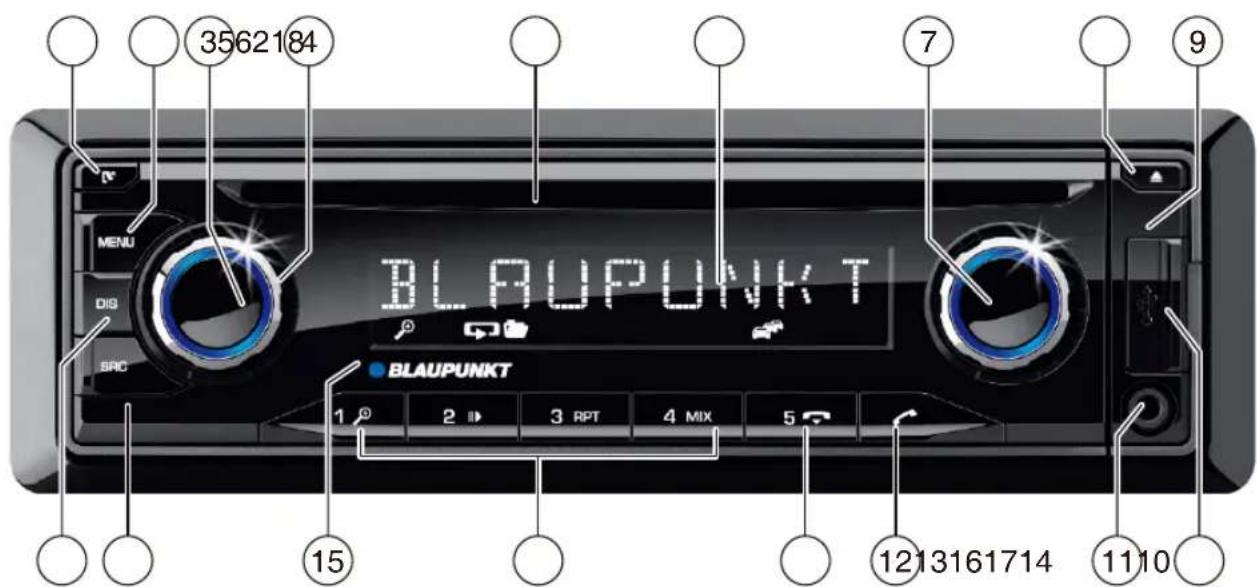
natural_image
Back view of a black electronic device showing internal components and a labeled pin (18), with no readable text or symbols beyond the label.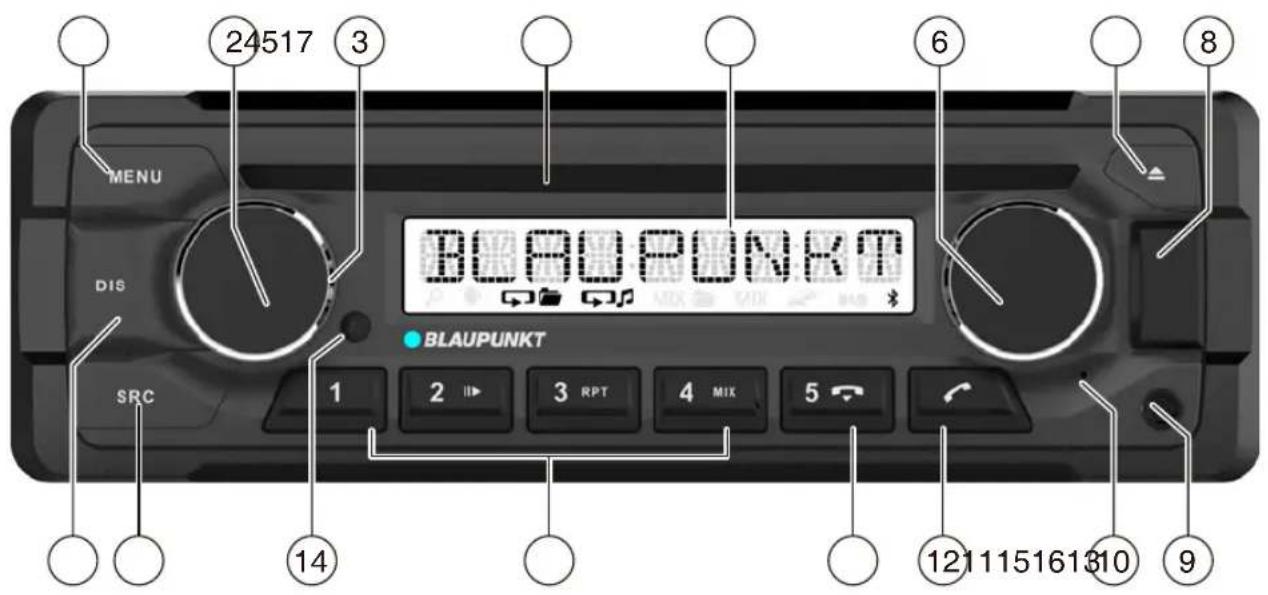
1 MENU -Taste
natural_image
Diagram of a device showing two components connected to a central housing, with no visible text or symbols.7 608 ....
6.
Ausbau • Removal • Demontage • Desmontaje • Desmontagem • Pelepasan
1.
natural_image
Diagram showing a device with an external component and a close-up view of its screen (no text or symbols present)3.
2.

7.
B
A
natural_image
Back view of a black electronic device showing internal components and a labeled pin (18), with no readable text or symbols beyond the label.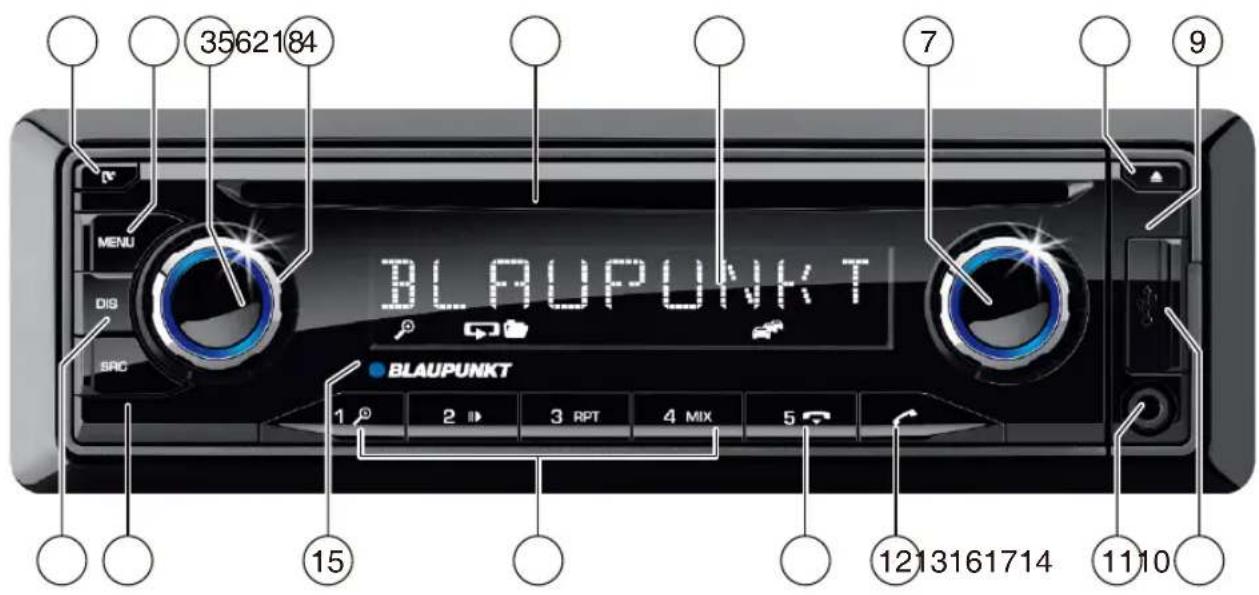
natural_image
Back view of a black electronic device showing internal components and a labeled pin (18), with no readable text or symbols beyond the label.
1 MENU Tasto
AM (MW): 530 -1 710kHz
AM (MW): 530 -1,710kHz
natural_image
Isometric line drawing of a rectangular electronic component with internal slots and mounting holes (no text or symbols)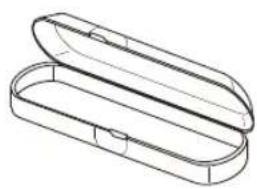
natural_image
Line drawing of an open cylindrical object with a handle and side slot (no text or symbols)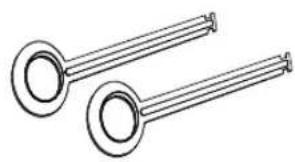
natural_image
Two identical cylindrical metal tools with circular ends, shown in line drawing style (no text or symbols)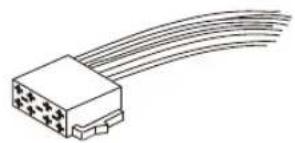
natural_image
Illustration of a connector with multiple leads (no text or symbols)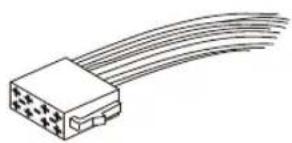
natural_image
Illustration of a connector with multiple leads (no text or symbols)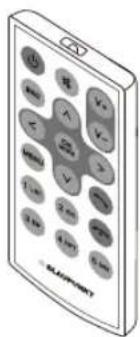
natural_image
Diagram of a network connection showing multiple Ethernet ports connected to a central connector (no text or labels present)7 607 621 ...
Set di monatggio
7 608 ....

6.
Ausbau • Removal • Demontage • Desmontaje • Desmontagem • Pelepasan • Smontaggio
1.
natural_image
Diagram showing a device with an external panel connected to a rectangular box (no text or symbols visible)3.

2.

7.
B
A
Competence Center Car Multimedia
Evo-Sales GmbH
Hastenbecker Weg 33