USER MANUAL KMK721880B AEG
OBCJYKBAHE HA KJINEHTN
Bnharu n3noJ3BaIte opunHaJIHn pe3epBHN qactn.
Korato ce cBbP3BaTe c Hauin oToPn3npaH oTdeI „ObcnykBaHe“, Tp6Ba da nMaTe npd pbKa cnEHaTa INΦopMaζη: Moen, PNC, cepneH Homep.
HOpmaTAtMOKe da 6bde OTkPnta Ha Ta6eJkata C OCHOBn daHHN
IpeDynpexJeHne/BnMaHne-IVHOpMaun 3a6e3oNaChocT
① O6uHa HΦopMaζη N CbBETN
HOpMaun3aOKoJHaTa cpea
3ana3BaMe cn npaBOTO Ha n3MeHeHn.
CbДьРЖAHNE
- INHΦOPMALÇIŋA 3A BE3ONACHOCT......3
1.1 Be3onacnoct 3a Deca n Xopa B HepaBHOCTOHO NOJKeHne... 3
1.2 O6ua 6e3oNaChocT. 4
- INHCTPYKUN 3A BE3ONACHOCT... 6
2.1 INHCTanaia.. 6
2.2 EneKtpnuecko Cbbp3BaHe 8
2.3 IVIJIIN3BaHe 8
2.4 Prnka n nouchTbaHe 9
2.5 BbtpeHNO oCBeTneHne 9
2.6 06cnykBaHe.. 10
2.7 IV3XBbPJIaHe 10
- ONICAHNE HA YPEDA 10
3.1 O6u nperepei 10
3.2 Akcecoapn 10
- KAK DA BKJIHOBATE N N3KJIHOBATE ΦYPHATA 11
4.1 KoHTpOJIeH nAHeJ 11
4.2 Ekpan 12
IocTabeTe roTbapcknTe cbdoBe bceHTbpa Ha BbpTaTa Ce nobbpxHocT.
DOnnpt MeKdy DBA npkeaneHO ropeuIN nIN npkeaneHO cTydeH INpeDMeTa MOKe Da CUnN BbptTaaT Ce NOBbpxHocT.
O6bpe Te nIpa36bpaKeTe xpaHaTn o cpeTa Na BpeMeTo 3a pa3Mpa3raBaHe IJI rOTBeHe.
OTBpeMeHaBpeMe pa36bpkBaIte TeuHInTe JCTnJ.
Pa36bpbKaIe XpaHaTa IpeDi cepBupaHe.
IokpnTe xpaHaTa npri rotBeHe n npetOnJnHe.
IocTaBeTe IbXnCata KbM 6yTnKata Nnn YaWata, KOrato 3aToNnTe HAnNTKn, 3a Da Ce rapaHTnpa No-dObo po pa3nPedeHne Ha TonJnHaTa.
IocTaBeTe xpaHATA BbB ypHata 6e3 onakOBKn. NaKeTnpaHnTe roTOBn xpaHn MORa T da 6bDat noCTaBeHn BbB ypHaTa cAmO, KOrato onakOBkata e nOxODa 3a MmKPOBbNHOBa ypHa (npoTeTe INOpMaunra Ta Bbpxy onakOBkata).

TOrBeHe B MmKpObBnHOBa cypHa
TOrBte B NOKpNT cbD. Ako nckate xpaHaTa da e xpynkaBa, rotBeTe 6e3 Kanak.
He npekajBaIte C rotBeHTo Ha JCTnra, KaTO n36epTe npekajHo BnCOka HacTpoiKa Ha MOUHOCTTa I npekaiNeO Dblro BpeMe. XpaHata MoKe Da N3cbxHe, Da N3ropu NIN Da npedn3Bnka NoXap.
He n3no13BaIte fypHaT a 3a npnroTBHe Ha yIca IIN OXIOBn C cepynK, 3aOTo Te MoRat Da ce npbchAt. PpOdyuYte KJNTbKa Ha NpPxKeHIne RaIca, ppei Da rN npTeONJIte.
Ipei ngTBeHe npOdyuHcTe XpaHaTa C Koxa NIN Kopa HraKoJIko NbTN.
HapexTe 3eJenHuIte Ha napYeHa c noo6n pa3Mepn.
CneI KaTo I3KJIIOHTe FyPHaTa, I3BaTe XpaHaTa I a ocTaBeTe Da IpceToHЯKOJko MInHyTu, KaTo Taka ToTnINHaTa ige ce pa3nPpeDen paBHomepHo.

Pa3mpa3raBaHe B MmKpoBbJIHOBa φypha
IocTaBeTe 3aMpa3eHaTaNHepa3OJaKOBaHa XpHa Bbpxy MaIka O6bPaTa HAO6paTHO YHINBCbCbD NOd HeA NoCTaBkata 3a pa3Mpa3raBaHe IIN PnactMaCOBO CnTO, 3a da ce Cb6npaTeuHOCTTa OT pa3Mp3raBaHe.
Otctpahepepa3mpa3eHnTe napyeTnocneIOBaTeJHo.
3a npiroTbHe Ha nIOIOBe H 3eJIeHcyuN 6e3 Da rI pa3Mpa3BaTe, MoKe da N3nOJ3BaTe MKNPOBbHLHOBAta OpyHa Ha NO-BNCOKa MOUHOCT.
10.3Подхори ГТВарски CBДОBEи MaTeрпали 3a MнКрOBьЛНова
N3noI3BaIte cAmo nOxOJyI rO TBapckn CbIOBe mATEpnaHn 3a MIKPOBbHOBaTa φypHa. N3noI3BaIte doJIHATA tabnua 3a cnpaBAka.
PpOBepeTe CneuKauuHte Ha cBIOBeTe 3a rotBeHe / MaTePnAna npEyn ynoTpe6a.
Φурнata He ce BключBa nIи He 3a rgPraBa

Bb3MOxHa npuHa
ΦypHaTa He e Cbbp3aHa KbM eNeKtpo3aXpaHBaHeTo Nn E Cbbp3aHa HenpaBUNHO.
YacOBHKnBt He e HAcTpoeH. HAcTpoIte YacOBHn

PeseHne
PpOBepTe dAnn cyphHatae cCBpb3aHa npaBUNHO KbM eJNEKtpo3axpaHbaHeTo.
YacOBHKnBt He e HactpoeH. Hactpoite YacOBHnKa, 3a noDpo6hOCTN BHXTe TnaBa ,Функши Na YacOBHnKa";Kak da HanpaBNTe HactpoiKaTa:Функши Na YacOBHnKa.
BpataHa He e do6pe 3aTbopeHa. 3aTbopeTe nIbTHo BpaTaTa.
IpeDna3nteT e n3ropan. IpoBepTe daHn npdna3nteT e npuHa 3a Hn3npabHocCTa. Ako npo6JIembT ce noRbN OTHOBO, o6aTe ce Ha KBaIIINuCupanTex- HNK.
ФункцяТа,3aинта 3a Deca" e BkHoueHa. BnKTe rnaBa ,MeHIO",noDmeHIO 3a:OnuIN.
Thank you for choosing this AEG product. We have created it to give you impeccable performance for many years, with innovative technologies that help make life simpler – features you might not find on ordinary appliances. Please spend a few minutes reading to get the very best from it.
Visit our website to:

Get usage advice, brochures, trouble shooter, service and repair information: www.aeg.com/support

Register your product for better service: www.registeraeg.com

Buy Accessories, Consumables and Original spare parts for your appliance: www.aeg.com/shop
CUSTOMER CARE AND SERVICE
Always use original spare parts.
When contacting our Authorised Service Centre, ensure that you have the following data available: Model, PNC, Serial Number.
The information can be found on the rating plate.
Warning / Caution-Safety information
i General information and tips
Environmental information
Subject to change without notice.
CONTENTS
1.SAFETY INFORMATION. 94
1.1 Children and vulnerable people safety. 94
1.2 General Safety 95
2.SAFETYINSTRUCTIONS. 97
2.1 Installation 97
2.2 Electrical connection. 98
2.3 Use 99
2.4 Care and cleaning.. 99
2.5 Internal lighting 100
2.6 Service. 100
2.7 Disposal. 100
3.PRODUCT DESCRIPTION. 101
3.1 General overview.. 101
3.2 Accessories 101
- HOW TO TURN OVEN ON AND OFF.... 101
4.1 Control panel 101
4.2 Display 102
- BEFORE FIRST USE 103
5.1 Initial Cleaning 104
5.2 First connection 104
6.DAILYUSE. 104
6.1 How to set the function: Grill + MW, Grill 104
6.2 How to set: Microwave heating functions 106
6.3 How to use: Microwave quick start 106
6.4 Heating functions 107
- CLOCK FUNCTIONS 108
7.1 Clock functions description 108
7.2 How to set: Clock functions.. 108
- HOW TO USE: ACCESSORIES 110
8.1 Inserting accessories.. 110
- ADDITIONAL FUNCTIONS 110
9.1 How to save: Favourites 110
9.2 Function lock 111
9.3 Cooling fan 111
- HINTS AND TIPS 111
10.1 Cooking recommendations.....111
10.2 Microwave recommendations ...111
10.3 Microwave suitable cookware and materials 112
10.4 Recommended power settings for different kinds of food 113
10.5 Cooking tables for test institutes 114
- CARE AND CLEANING 115
11.1 Notes on cleaning 115
- TROUBLESHOOTING 116
12.1 What to do if 116
12.2 How to manage: Error codes....117
12.3 Service data 117
- ENERGY EFFICIENCY 117
13.1 Energy saving.. 117
14.MENU STRUCTURE. 118
14.1 Menu 118
14.2 Submenu for: Options.. 118
14.3 Submenu for: Setup 119
14.4 Submenu for: Service 119
- IT'S EASY! 119
- ENVIRONMENTAL CONCERNS. 121
Before the installation and use of the appliance, carefully read the supplied instructions. The manufacturer is not responsible for any injuries or damage that are the result of incorrect installation or usage. Always keep the instructions in a safe and accessible location for future reference.
1.1 Children and vulnerable people safety
1.2 General Safety
- This appliance is for cooking purposes only.
- This appliance is designed for single household domestic use in an indoor environment.
- This appliance may be used in, offices, hotel guest rooms, bed & breakfast guest rooms, farm guest houses and other similar accommodation where such use does not exceed (average) domestic usage levels.
- Only a qualified person must install this appliance and replace the cable.
- Do not use the appliance before installing it in the built-in structure.
- Disconnect the appliance from the power supply before carrying out any maintenance.
- If the mains power supply cable is damaged, it must be replaced by the manufacturer, its Authorised Service Centre or similarly qualified persons to avoid an electrical hazard.
- WARNING: Ensure that the appliance is switched off before replacing the lamp to avoid the possibility of electric shock.
- WARNING: The appliance and its accessible parts become hot during use. Care should be taken to avoid touching heating elements.
-
Always use oven gloves to remove or insert accessories or ovenware.
-
Use only the turntable and the turntable support designed for this appliance.
- Do not activate the microwave function when the appliance is empty. Metal parts inside the cavity can create electric arcing.
- Metallic containers for food and beverages are not allowed during microwave cooking. This requirement is not applicable if the manufacturer specifies size and shape of metallic containers suitable for microwave cooking.
- WARNING: If the door or door seals are damaged, the appliance must not be operated until it has been repaired by a qualified person.
- WARNING: Only a qualified person can carry out any service or repair operation that involves the removal of a cover which gives protection against exposure to microwave energy.
- WARNING: Do not heat liquids and other foods in sealed containers. They are liable to explode.
- Use only utensils that are suitable for use in microwave ovens.
- When heating food in plastic or paper containers, observe the appliance due to the possibility of ignition.
- The appliance is intended for heating food and beverages. Drying of food or clothing and heating of warming pads, slippers, sponges, damp cloth and similar may lead to risk of injury, ignition or fire.
- If smoke is emitted, switch off or unplug the appliance and keep the door closed in order to stifle any flames.
- Microwave heating of beverages can result in delayed eruptive boiling. Care must be taken when handling the container.
-
The contents of feeding bottles and baby food jars shall be stirred or shaken and the temperature checked before consumption, in order to avoid burns.
-
Eggs in their shell and whole hard-boiled eggs should not be heated in the appliance since they may explode, even after microwave heating has ended.
- The appliance should be cleaned regularly and any food deposits removed.
- Do not use a steam cleaner to clean the appliance.
- Do not use harsh abrasive cleaners or sharp metal scrapers to clean the glass door since they can scratch the surface, which may result in shattering of the glass.
- Failure to maintain the appliance in a clean condition could lead to deterioration of the surface that could adversely affect the life of the appliance and possibly result in a hazardous situation.
2. SAFETY INSTRUCTIONS
2.1 Installation

WARNING!
Only a qualified person must install this appliance.
- Remove all the packaging.
- Do not install or use a damaged appliance.
- Follow the installation instructions supplied with the appliance.
- Always take care when moving the appliance as it is heavy. Always use safety gloves and enclosed footwear.
- Do not pull the appliance by the handle.
- Install the appliance in a safe and suitable place that meets installation requirements.
- Keep the minimum distance from other appliances and units.
- Before mounting the appliance, check if the oven door opens without restraint.
- The appliance is equipped with an electric cooling system. It must be operated with the electric power supply.
- The built-in unit must meet the stability requirements of DIN 68930.
| Cabinet minimum height (Cabinet under the work-top minimum height) | 444 (460) mm |
| Cabinet width 560 mm | |
| Cabinet depth 550 (550) mm | |
| Height of the front of the appliance 455 mm | |
| Height of the back of the appliance 440 mm | |
| Width of the front of the appliance 595 mm | |
| Width of the back of the appliance 559 mm | |
| Depth of the appliance 567 mm | |
| Built in depth of the appliance 546 mm | |
| Depth with open door 882 mm | |
| Ventilation opening minimum size. Opening placed on the bottom rear side | 560x20 mm |
| Mains supply cable length. Cable is placed in the right corner of the back side | 1500 mm |
| Mounting screws 3.5x25 mm | |
2.2 Electrical connection

WARNING!
Risk of fire and electric shock.
- All electrical connections should be made by a qualified electrician.
- The appliance must be earthed.
- Make sure that the parameters on the rating plate are compatible with the electrical ratings of the mains power supply.
- Always use a correctly installed shockproof socket.
- Do not use multi-plug adapters and extension cables.
- Make sure not to cause damage to the mains plug and to the mains cable. Should the mains cable need to be replaced, this must be carried out by our Authorised Service Centre.
- Do not let mains cables touch or come near the appliance door or the niche below the appliance, especially when it operates or the door is hot.
- The shock protection of live and insulated parts must be fastened in such a way that it cannot be removed without tools.
- Connect the mains plug to the mains socket only at the end of the installation. Make sure that there is access to the mains plug after the installation.
- If the mains socket is loose, do not connect the mains plug.
- Do not pull the mains cable to disconnect the appliance. Always pull the mains plug.
- Use only correct isolation devices: line protecting cut-outs, fuses (screw type fuses removed from the holder), earth leakage trips and contactors.
- The electrical installation must have an isolation device which lets you disconnect the appliance from the mains at all poles. The isolation device must have a contact opening width of minimum 3 mm.
- This appliance is supplied with a main plug and a main cable.
2.3 Use

WARNING!
Risk of injury, burns and electric shock or explosion.
- Do not change the specification of this appliance.
- Make sure that the ventilation openings are not blocked.
- Do not let the appliance stay unattended during operation.
- Deactivate the appliance after each use.
- Be careful when you open the appliance door while the appliance is in operation. Hot air can release.
- Do not operate the appliance with wet hands or when it has contact with water.
- Do not apply pressure on the open door.
- Do not use the appliance as a work surface or as a storage surface.
- Open the appliance door carefully. The use of ingredients with alcohol can cause a mixture of alcohol and air.
- Do not let sparks or open flames to come in contact with the appliance when you open the door.
- Do not put flammable products or items that are wet with flammable products in, near or on the appliance.
- Do not use microwave function to preheat the oven.

WARNING!
Risk of damage to the appliance.
- To prevent damage or discoloration to the enamel:
- do not put aluminium foil directly on the bottom of cavity of the appliance.
- do not put water directly into the hot appliance.
- do not keep moist dishes and food in the appliance after you finish the cooking.
- be careful when you remove or install the accessories.
- Discoloration of the enamel or stainless steel has no effect on the performance of the appliance.
- Always cook with the appliance door closed.
- If the appliance is installed behind a furniture panel (e.g. a door) make sure the door is never closed when the appliance operates. Heat and moisture can build up behind a closed furniture panel and cause subsequent damage to the appliance, the housing unit or the floor. Do not close the furniture panel until the appliance has cooled down completely after use.
2.4 Care and cleaning

WARNING!
Risk of injury, fire, or damage to the appliance.
- Before maintenance, deactivate the appliance and disconnect the mains plug from the mains socket.
- Make sure the appliance is cold. There is the risk that the glass panels can break.
- Replace immediately the door glass panels when they are damaged. Contact the Authorised Service Centre.
-
Be careful when you remove the door from the appliance. The door is heavy!
-
Make sure the cavity, the turntable and the door are wiped dry after each use. Steam produced during the operation of the appliance condensates on cavity walls and can cause corrosion.
- Clean regularly the appliance to prevent the deterioration of the surface material.
- Fat and food remaining in the appliance can cause fire and electric arcing when the microwave function operates.
- Clean the appliance with a moist soft cloth. Use only neutral detergents. Do not use abrasive products, abrasive cleaning pads, solvents or metal objects.
- If you use an oven spray, follow the safety instructions on its packaging.
2.5 Internal lighting

WARNING!
Risk of electric shock.
- Concerning the lamp(s) inside this product and spare part lamps sold separately: These lamps are intended to withstand extreme physical conditions in household appliances, such as temperature, vibration, humidity, or are intended to signal information about the operational status of the appliance. They are not intended to be used in other applications and are not suitable for household room illumination.
- This product contains a light source of energy efficiency class G.
- Use only lamps with the same specifications.
2.6 Service
- To repair the appliance contact the Authorised Service Centre.
- Use original spare parts only.
2.7 Disposal

WARNING!
Risk of injury or suffocation.
- Contact your municipal authority for information on how to dispose of the appliance.
- Disconnect the appliance from the mains supply.
- Cut off the mains electrical cable close to the appliance and dispose of it.
- Remove the door catch to prevent children or pets from becoming trapped in the appliance.
3.PRODUCT DESCRIPTION
3.1 General overview
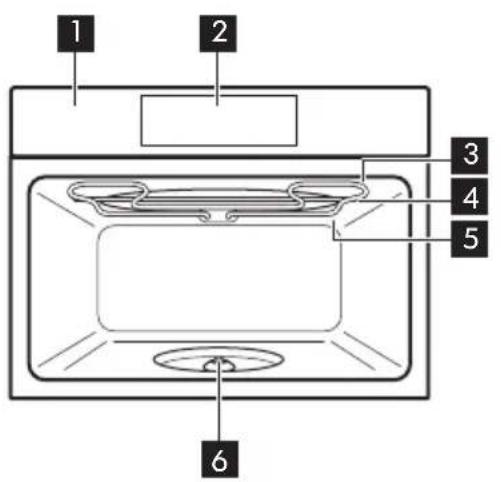
Control panel
Display
Heating element
Microwave generator
Lamp
Turntable shaft
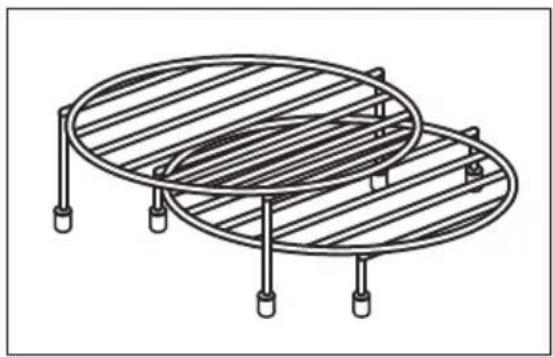
3.2 Accessories
Turntable set
To prepare food.

Grill rack set
To grill.
4. HOW TO TURN OVEN ON AND OFF
4.1 Control panel
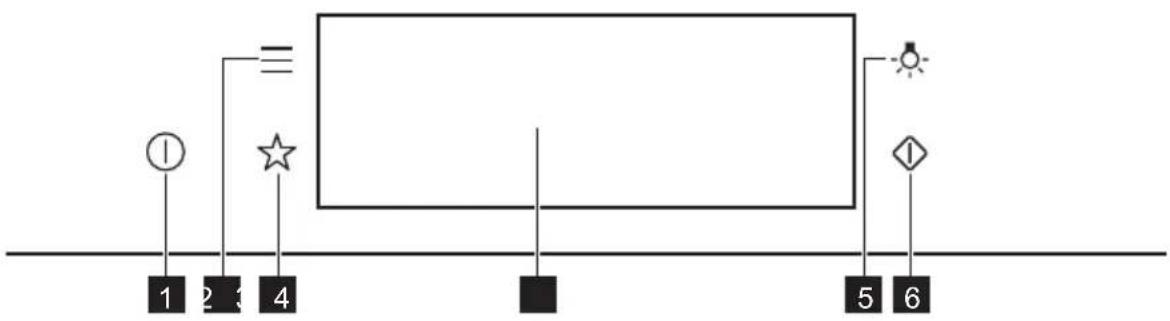
| 1 | ON / OFF Press and hold to turn the oven on and off. |
| 2 | Menu Lists the oven functions. |
| 3 | Favourites Lists the favourite settings. |
| 4 | Display Shows the current settings of the oven. |
| 5 | Lamp switch To turn the lamp on and off. |
| 6 | Microwave quick start |
| Press Move | Press and hold | 3s
Press and hold |
| Touch the surface with finger-tip. | Slide fingertip over the surface. | Touch the surface for 3 seconds. |
4.2 Display
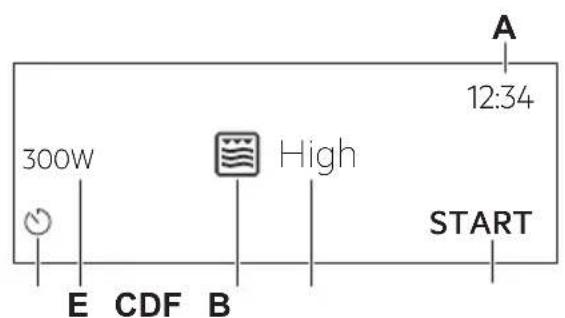
After turning on, the display shows the main screen with the function and the default grill intensity.
A. Time of day
B. START/STOP
C. Grill intensity
D. Heating functions
E. Microwave power
F. Timer
| 12:34
○ | If you do not use the oven for 2 minutes, the display goes to standby. |
| 12:34+1
○1m23s +30s10
STOPS | When you cook, the display shows the set functions and other available options. |
| Display indicators |
| Basic indicators - to navigate on the display. |
| OK
To confirm the selection / setting. | < To go one level back in the menu. | To undo the last action. | To turn the options on and off. |
| Sound alarm function indicators - when the set time of cooking ends, the signal sounds. |
| The function is on. | STOP
The function is on.
Cooking stops automatically. | Sound alarm is off. |
| Timer indicators |
| To set the function: Delayed start. | To cancel the setting. |
5. BEFORE FIRST USE

WARNING!
Refer to Safety chapters.
5.1 Initial Cleaning
| | |
| Step 1 Step 2 Step 3 | | |
| Remove all accessories from the oven. | Clean the oven and the accessories with a soft cloth, warm water and a mild detergent. | Place the accessories in the oven. |
5.2 First connection
The display shows welcome message after the first connection.
You have to set: Language, Display brightness, Key tones, Buzzer volume, Time of day.
6. DAILY USE

WARNING!
Refer to Safety chapters.
6.1 How to set the function: Grill + MW, Grill
The oven can make noises when using the function: Grill + MW. They are normal for this function.
| Setting the function: Grill + MW |
| Step 1 Insert the low grill rack. |
| Step 2 Turn on the oven. The display shows the default heating function. |
| Step 3 Press the symbol of the heating function to enter the submenu. |
| Step 4 Select the function: Press: OK |
| Step 5 Select the grill intensity level. |
| Function Grill intensity level |
| Lo Low |
| Hi High |
| Step 6 | Press: OK |
| Step 7 | Press: START |
| STOP - press to turn off the oven. |
| Step 8 Turn off the oven. |
Microwave power is limited to 500 W when you use the function: Grill + MW.
| Setting the function: Grill |
| Step 1 Insert the high grill rack. |
| Step 2 Turn on the oven. The display shows the default heating function. |
| Step 3 Press the symbol of the heating function to enter the submenu. |
| Step 4 | Select the function:Press: OK |
| Step 5 Select the grill intensity level. |
| Function Grill intensity level | |
| Lo Low | |
| Hi High | |
| Step 6 | Press: OK |
| Step 7 | Press: START |
| STOP - press to turn off the function. |
| Step 8 Turn off the oven. |
6.2 How to set: Microwave heating functions
| Step 1 Turn | on the oven. |
| Step 2 Press | the symbol of the heating function to enter the submenu. |
| Step 3 | Select the microwave heating function and press OK The display shows: microwave power. |
| Step 4 | Set: microwave power. Press OK |
| Step 5 | Press: START |
| STOP - press to turn off the function. |
| Step 6 Turn | off the oven. |
The maximum time of microwave functions depends on microwave power you set:
| MICROWAVE POWER MAXIMUM TIME | |
| 100 - 600 W 59 minutes | |
| More than 600 W 7 minutes | |
| If you open the door, the function stops. To start it again, press START |
Take a shortcut!

6.3 How to use: Microwave quick start
| Step 1 | Press and hold: The microwave runs for 30 s. |
| Step 2 To | extend the cooking time: |
| Press on the running time value to go to the time settings. Set the cooking time. | Press +30 s. |
| The microwave can be switched on at any time with: Microwave quick start. |
6.4 Heating functions
STANDARD
| Heating function Application |
| Grill | To grill thin pieces of food and to toast bread. |
| Grill + MW | To cook food in a short time and to brown it. You can set 2 levels of grill intensity: low and high. |
| Microwave | Heating up, cooking, power range: 100 - 1000 W |
MICROWAVE
| Heating function Application |
| Defrosting meat, fish, cakes, power range: 100 - 200 W |
| Melting chocolate and butter, power range: 100 - 400 W |
| Heating up pre-prepared meals and delicate food, power range: 300 - 700 W |
| Heating function Application |
| Popcorn | Preparing popcorn, power range: 700 - 1000 W |
| Liquid | Heating up drinks and soups, power range: 800 - 1000 W |
7. CLOCK FUNCTIONS
7.1 Clock functions description
| Clock function Application | |
| Cooking time To set the length of cooking. Maximum is 23 h 59 min. | |
| End action To set what happens when the timer ends counting. | |
| Time extension To extend | cooking time. |
| Reminder To set a count | own. Maximum is 23 h 59 min. This function has no effect on the operation of the oven. |
| Uptimer Monitors how long | the function operates. Uptimer - you can turn it on and off. |
7.2 How to set: Clock functions
| How to set the clock |
| Step 1 Press: Time of day. |
| Step 2 | Set the time. Press: OK |
| How to set cooking time |
| Step 1 Choose the heating function. |
| Step 2 | Press: |
| Step 3 | Set the time. Press: OK |
| How to choose end option |
| Step 1 Choose the heating function. |
| Step 2 | Press: |
| Step 3 Set the cooking time. |
| Step 4 | Press: • • • |
| Step 5 Press: End action. |
| Step 6 Choose the preferred: End action. |
| Step 7 | Press: OK Repeat the action until the display shows the main screen. |
| How to extend cooking time |
| When 10% of cooking time is left and the food seems not to be ready, you can extend cooking time. You can also change the heating function. |
| Press +1min to extend the cooking time. |
| How to change timer settings |
| Step 1 | Press: ⋒ |
| Step 2 Set the timer value. |
| Step 3 | Press: OK |
| You can change the set time during cooking at any time. |
8. HOW TO USE: ACCESSORIES
8.1 Inserting accessories
Use only suitable cookware and material. Refer to "Hints and tips" chapter, Microwave suitable cookware and materials.
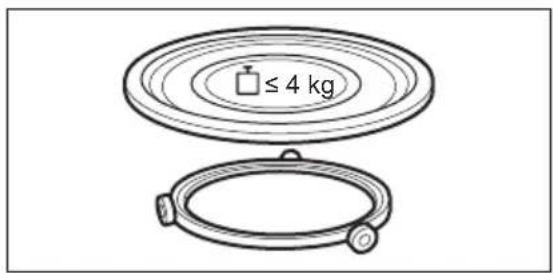
| Turntable set:
Always cook food on the turntable set.
Place the roller guide around the turntable shaft. Place the turntable glass on the roller guide.
Use only the turntable set supplied with the oven. | |
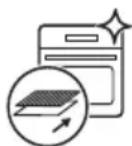
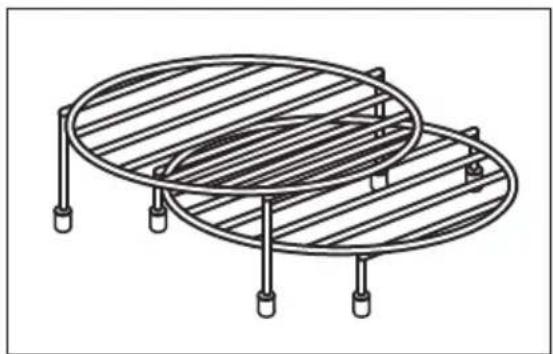
| Grill rack set:
Place the grill rack with the silicon caps down on the turntable set. | |
9. ADDITIONAL FUNCTIONS
9.1 How to save: Favourites
You can save your favourite settings, such as the heating function, the cooking time or the cleaning function. You can save 3 favourite settings.
| Step 1 Turn on the oven. |
| Step 2 Select the preferred setting. |
| Step 3 Press:Select:Favourites. |
| Step 4 Select:Save current settings. |
| Step 5 Press+to add the setting to the list of:Favourites. Press OK |
| - press to reset the setting.
- press to cancel the setting. |
9.2 Function lock
This function prevents an accidental change of the heating function.
| Step 1 Turn on the oven. |
| Step 2 Set a heating function. |
| Step 3 =, °press at the same time to turn on the function. |
| To turn off the function repeat step 3. |
9.3 Cooling fan
When the oven operates, the cooling fan turns on automatically to keep the surfaces of the oven cool. If you turn off the oven, the cooling fan can continue to operate until the oven cools down.
10. HINTS AND TIPS
10.1 Cooking recommendations
①
The temperature and cooking times in the tables are guidelines only. They depend on the recipes and the quality and quantity of the ingredients used.
Your oven may cook differently to the oven you had before. The hints below show recommended heating functions and settings for cooking time for specific types of the food.
If you cannot find the settings for a special recipe, look for the similar one.
For more cooking recommendations refer to cooking tables on our website. To find the Cooking Hints check the PNC number on the rating plate on the front frame of the oven cavity.
10.2 Microwave recommendations
Let's cook!
Do not place the food directly on the turntable. Always use the microwave suitable cookware.
Place the cookware in the middle of the turntable.
Contact with too hot or too cold items can break the turntable.
Turn or stir the food halfway through the defrosting and cooking time.
Stir liquid dishes from time to time.
Stir the food before serving.
Cover the food for cooking and reheating.
Put the spoon to the bottle or glass when heating drinks to ensure better heat distribution.
Put the food into the oven without packaging. The packaged ready meals can be put into the oven only when the packaging is microwave safe (check information on the packaging).

Microwave cooking
Cook food covered. If you want to keep a crust cook food without a cover.
Do not overcook the dishes by setting the power and time too high. The food can dry out, burn or cause fire.
Do not use the oven to cook eggs or snails in their shells, because they can burst. Pierce the yolk of fried egg before reheating it.
Pierce food with skin or peel several times before cooking.
Cut vegetables into similar-sized pieces.
After you turn off the oven, take the food out and let it stand for a few minutes to allow the heat distribute evenly.

Microwave defrosting
Put the frozen, unwrapped food on a small upturned plate with a container below it, or on a defrosting rack or plastic sieve so that the defrosting liquid can leak out.
Remove defrosted pieces subsequently.
To cook fruit and vegetables without defrosting them first, you can use a higher microwave power.
10.3 Microwave suitable cookware and materials
For the microwave use only suitable cookware and materials. Use below table as a reference. Check the cookware / material specification before use.
| Cookware / Material | | | | |
| Ovenproof glass and porcelain with no metal components, e.g. heat-proof glass | √ | √ | √ | √ |
| Non-ovenproof glass and porcelain without any silver, gold, platinum or other metal decorations | √ | XXXX | | |
| Glass and glass ceramic made of ovenproof / frost-proof material | √ | √ | √ | √ |
| Ceramic and earthenware without any quartz or metal components and glazes which contain metal | √ | √ | X | X |
| Ceramic, porcelain and earth-enware with unglazed bottom or with small holes, e.g. on handles | XXXX | | | |
| Heat-resistant plastic up to 200℃ | √ | √ | X | X |
| Cardboard, paper XXX | √ | | | |
| Clingfilm XXX | √ | | | |
| Roasting film with microwave safe closure | √ | √ | X | X |
| Roasting dishes made of metal, e.g. enamel, cast iron | XXX | | √ | |
| Baking tins, black lacquer or silicon-coated | XXX | | √ | |
| Cookware for microwave use, e.g. crisp pan | XXX | √ | | |
| Grill rack set XX | | | √ | √ |
10.4 Recommended power settings for different kinds of food
The data in the table is for guidance only.
| 800 - 1000 W |
| Searing at the start of the cooking process Heating liquids | |
| 500 - 700 W |
| Cooking vegetables | Cooking egg dishes | Simmering stews | Simmering rice | Heating one-plate meals | Defrosting and heating frozen meals |
| 300 - 400 W |
| Melting cheese, chocolate, but-ter | Cooking / Heating delicate food | Continuing cooking |
| 100 - 200 W |
| Heating baby food | Defrosting bread | Defrosting fruit and cakes | Defrosting cheese, cream, butter | Defrosting meat, fish |
10.5 Cooking tables for test institutes
Tests according to IEC 60705.
| MICROWAVE FUNCTION | POWER
(W) | (kg) | | (min) | |
| Sponge cake 600 0.475 Turntable | set | 5-7- | |
| Meatloaf 500 0.9 Turntable | set | 18-20- | |
| Egg custard 500 1 Turntable | set | 15-17- | |
| Meat defrosting 200 | 0.5 Turntable | | set | 8 - 9 - | |
| Use the function: Microwave grilling.
Use the low grill rack. |
| MICROWAVE COMBI FUNCTION | POWER
(W) Grill intensity level | | (min) | i |
| Potato gratin, 1.1 kg 300 low 30 - 35 - | | | | |
| Chicken, 1.1 kg 300 high 30 - 35 Put the meat in | | | | round glass container. |
11. CARE AND CLEANING

WARNING!
Refer to Safety chapters.
11.1 Notes on cleaning
| Cleaning Agents | Clean the front of the oven with a soft cloth with warm water and a mild detergent. |
| Use a cleaning solution to clean metal surfaces. |
| Clean stains with a mild detergent. |
| Everyday Use | Clean the cavity after each use. Fat accumulation or other residue may cause fire.
Clean the oven ceiling carefully from residue and fat. |
| Do not store the food in the oven for longer than 20 minutes. Dry the cavity with a soft cloth after each use. |

Accessories
Clean all accessories after each use and let them dry. Before cleaning, wait until the turntable is cold. There is a risk that the turntable can break. Use a soft cloth with warm water and a mild detergent. Do not clean the accessories in a dishwasher.
Do not clean the non-stick accessories using abrasive cleaner or sharp-edged objects.
12. TROUBLESHOOTING

WARNING!
Refer to Safety chapters.
12.1 What to do if...

The oven does not turn on or does not heat up

Possible cause
The oven is not connected to an electrical supply or it is connected incorrectly.
The clock is not set. Set the clock, for details refer

Remedy
Check if the oven is correctly connected to the electrical supply.
to "Clock Func
tions" chapter, How to set: Clock functions.
The door is not closed correctly. Fully close the door.
The fuse is blown. Make sure the fuse is the caus
of the prob
lem. If the problem recurs, contact a qualified electrician.
The oven Child Lock is on. Refer to "Menu" chapter.
r, Submenu for: Options.
| Components |
| Description Remedy | |
| The lamp is burnt out. Replace the lamp, for details refer to "Care and Cleaning" chapter, How to replace: Lamp. |
| The turntable set makes noise. There is food residue below the turntable set. |
12.2 How to manage: Error codes
When the software error occurs, the display shows error message.
In this section, you will find the list of the problems that you can handle on your own.
| Code and description Remedy | |
| F240, F439 - the touch fields on the display do not work properly. | Clean the surface of the display. Make sure there is no dirt on the touch fields. |
| F908 - the oven system cannot connect with the control panel. | Turn the oven off and on. |
12.3 Service data
If you cannot find a solution to the problem yourself, contact your dealer or an Authorised Service Centre.
The necessary data for the service centre is on the rating plate. The rating plate is on the front frame of the oven cavity. Do not remove the rating plate from the oven cavity.
| We recommend that you write the data here: |
| Model (MOD.) | |
| Product number (PNC) | |
| Serial number (S.N.) | |
13. ENERGY EFFICIENCY
13.1 Energy saving

The oven has features which help you save energy during everyday cooking.
Make sure that the oven door is closed when the oven operates. Do not open the oven door too often during cooking. Keep the door gasket clean and make sure it is well fixed in its position.
When possible, do not preheat the oven before cooking.
Keep breaks between baking as short as possible when you prepare a few dishes at one time.
Cooking with the lamp off
Turn off the lamp during cooking. Turn it on only when you need it.
Press to open Menu.
| Menu item Application | |
| Favourites Lists the favourite settings. | |
| Options To set the oven configuration. | |
| Settings Setup To set the oven configuration. | |
| Service Shows the software version and configuration. |
| Submenu Application | |
| Light Turns the lamp on and off. | |
| Child Lock Prevents accidental activation of the oven. When the option is on, the text "Child Lock" appears on the display when you turn on the oven. To enable the oven use, choose the code letters in the alphabetical order. Access to the timer, the remote operation and the lamp is available with the Child Lock on. |
| Time indication Turns the clock on and off. | |
| Digital clock style Changes the format of the displayed time indication. |
| Submenu Description | |
| Language Sets the oven language. | |
| Display brightness Sets the display brightness. | |
| Key tones Turns the tone of the touch fields on and off. It is not possi-ble to mute the tone for:① |
| Buzzer volume Sets the volume of key tones and signals. | |
| Time of day Sets the current time and date. | |
| Submenu Description | |
| Demo mode Activation / deactivation | code: 2468 |
| Software version Information about software version. |
| Reset all settings Restores factory settings. |
15. IT'S EASY!
| Before first use you have to set: |
| Language | Display brightness | Key tones Buzzer volume Time of day |
| Familiarize yourself with the basic icons on the control panel and the display: |
| ①
ON / OFF Menu | =
Favourites | ☆ | ○
Timer | START / STOP |
| Start using the oven |
| MW quick start S | Start Microwave at any time with default settings: 30 sec / 1000W. | Press: |
|
| |
| heating / cooking
100 - 1000 W | cooking / browning
intensity: low / high | cooking / browning | heating liquids
800 - 1000 W |
| | | |
| reheating
300 - 700 W | defrosting
100 - 200 W | melting
100 - 400 W | preparing popcorn
700 - 1000 W |
|
| Settings of the microwave Microwave tips |
| Microwave power: Maximum time: | Cover the food for cooking and reheating.
Turn or stir the food halfway through the de-frosting and cooking time.
Put the spoon to the dish when heating liquids.
Put the food into the oven without packaging (only microwave safe). |
| 100 - 600 W 59 min | |
| > 600 W 7 min | |
|
| Start cooking |
| Step 1 Step 2 | Step 3 Step 4 Step 5 | | |
| ①
- press to turn
on the oven. | ②
- select the func-
tion. | W
- set the micro-wave power. | OK
- press to confirm. | START
- press to start
cooking. |
|
| Use quick functions to set the cooking time |
| 10% Finish assist
Use 10% Finish assist to add extra time when
10% of the cooking time is left. | To extend the cooking time press +1min. |
16. ENVIRONMENTAL CONCERNS
Recycle materials with the symbol Put the packaging in relevant containers to recycle it. Help protect the environment and human health by recycling waste of electrical and electronic appliances. Do not dispose of appliances marked with the symbol with the household waste. Return the product to your local recycling facility or contact your municipal office.
- BESCHRIJVING VAN HET PRODUCT...249
12.PROBLEEMOPLOSING. 265
12. PROBLEEMOPLOSSING

WAARSCHUWING!
| A
12:34
300W
High
START | Po walks up and down in the forest. It starts to rain from 100mm to 200mm.
Po walks up and down in the forest. It starts to rain from 100mm to 200mm.
Po walks up and down in the forest. It starts to rain from 100mm to 200mm.
Po walks up and down in the forest. It starts to rain from 100mm to 200mm.
Po walks up and down in the forest. It starts to rain from 100mm to 100mm.
Po walks up and down in the forest. It starts to rain from 100mm to 100mm.
Po walks up and down in the forest. It starts to rain from 100mm to 100mm.
Po walks up and down in the forest. It starts to rain from 100mm to 100mm.
Po walks up and down in the forest. It starts to rain from 101mm to 100mm.
Po walks up and down in the forest. It starts to rain from 101mm to 100mm.
Po walks up and down in the forest. It starts to rain from 101mm to 100mm.
Po walks up and down in the forest. It starts to rain from 101mm to 100mm.
Po walks up and down in the forest. It starts to rain 100mm to 100mm.
Po walks up and down in the forest. It starts to rain 100mm to 100mm.
Po walks up and down in the forest. It starts to rain 100mm to 100mm.
Po walks up and down in the forest. It starts to rain 100mm to 100mm.
Po walks up and down in the forest. It starts to rain 101mm to 100mm.
Po walks up and down in the forest. It starts to rain 101mm to 100mm.
Po walks up and down in the forest. It starts to rain 101mm to 100mm.
Po walks up and down in the forest. It starts to rain 101mm to 100mm.
Po walks up and down in the forest. It starts to rain 100mm to 100mm.
Po walks up and down in the forest. It starts to rain 100mm to 100mm.
Po walks up and down in the forest. It starts to rain 100mm to 100mm.
Po walks up and down in the forest. It starts to 100mm to 100mm.
Po walks up and down in the forest. It starts to 100mm to 100mm.
Po walks up and down in the forest. It starts to 100mm to 100mm.
Po walks up and down in the forest. It starts to 100mm to 100mm.
Po walks up and down in the forest. It starts to 101mm to 100mm.
Po walks up and down in the forest. It starts to 101mm to 100mm.
Po walks up and down in the forest. It starts to 101mm to 100mm.
Po walks up and down in the forest. It starts to 101mm to 100mm.
Po walks up and down in the forest. It starts to 101mm to 99mm.
Po walks up and down in the forest. It starts to 99mm to 100mm.
Po walks up and down in the forest. It starts to 99mm to 100mm.
Po walks up and down in the forest. It starts to 99mm to 100mm.
Po walks up and down in the forest. It starts to 99mm to 100mm.
Po walks up and down in the forest. It starts to 99mm to 100mm.
Po walks up and down In the forest. It starts to 99mm to 100mm.
Po walks up and down In the forest. It starts to 99mm to 100mm.
Po walks up and down In the forest. It starts to 99mm to 100mm.
Po walks up and down In the forest. It starts to 99mm to 100mm.
Po walks up and down In the forest. It starts to 100mm to 99mm.
Po walks up and down In the forest. It starts to 99mm to 100mm.
Po walks up and down In the forest. It starts to 99mm to 100mm.
Po walks up and down In the forest. It starts to 99mm to 100mm.
Po walks up and down In the forest. It starts to 99mm to 100mm.
Po walks up and down I the forest. It starts to 99mm to 100mm.
Po walks up and down I the forest. It starts to 99mm to 100mm.
Po walks up and down I the forest. It starts to 99mm to 100mm.
Po walks up and down I the forest. It starts to 99mm to 100mm.
Po walks up and down I the forest. It starts to 100mm to 99mm.
Po walks up and down I the forest. It starts to 99mm to 100mm.
Po walks up and down I the forest. It starts to 99mm to 100mm.
Po walks up and down I the forest. It starts to 99mm to 100mm.
Po walks up and down I the forest. It starts to 99mm to 100mm.
Po walks up and down L the forest. It starts to 99mm to 100mm.
Po walks up and down L the forest. It starts to 99mm to 100mm.
Po walks up and down L the forest. It starts to 99mm to 100mm.
Po walks up and down L the forest. It starts to 99mm to 100mm.
Po walks up and down L the forest. It starts to 100mm to 99mm.
Po walks up and down L the forest. It starts to 99mm to 100mm.
Po walks up and down L the forest. It starts to 99mm to 100mm.
Po walks up and down L the forest. It starts to 99mm to 100mm.
Po walks up and down L the forest. It starts to 99mm to 100mm.
Po walks up and down I the forest. It starts to 99mm to 100mm.
Po walks up and down I the forest. It starts to 99mm to 100mm.
Po walks up and down I the forest. It starts to 99mm to 100mm.
Po walks up and down I the forest. It starts to 89mm to 99mm.
Po walks up and down I the forest. It starts to 89mm to 99mm.
Po walks up and down I the forest. It starts to 89mm to 99mm.
Po walks up and down I the forest. It starts to 89mm to 99mm.
Po walks up and down I the forest. It starts to 89mm to 99mm.
Po walks up and down I the forest. it starts to 89mm to 99mm.
Po walks up and down I the forest. It starts to 89mm to 99mm.
Po walks up and down I the forest. It starts to 89mm to 99mm.
Po walks up and down I the forest. It starts to 89mm to 99mm.
Po walks up and down I the forest. It starts to 89mm to 99mm
Po walks up and down I the forest. It starts to 89mm to 99mm.
Po walks up and down I the forest. It starts to 89mm to 99mm.
Po walks up and down I the forest. It starts to 89mm to 99mm.
Po walks up and down I the forest. It starts to 89mm to 99mm.
Po walks up and down I the forest. It starts 89mm to 99mm.
Po walks up and down I the forest. It starts to 89mm to 99mm.
Po walks up and down I the forest. It starts to 89mm to 99mm.
Po walks up and down I the forest. It starts to 89mm to 99mm.
Po walks up and down I the forest. It starts to 89mm to 99mm.
Po works up with my friends.
Po walks up with my friends.
Po walks up with my friends.
Po walks up with my friends.
Po walks up with my friends.
Po walks up with my friends.
Po walks up with my friends.
Po walks up with my friends.
Po walks up with my friends.
Po walks up with my friends.
Po walks up with my friends.
Po walks up with my friends.
Po walks up with my friends.
Po walks up with my friends.
Po walks up with my friends.
Po walks up With my friends.
Po walks up with my friends.
Po walks up with my friends.
Po walks up with my friends.
Po walks up with my friends.
Po walks up with my friends.
Po walks up with my friends.
Po walks up with my friends.
Po walks up with my friends.
Po walks up with my friends.
Po walks up with my friends.
Po walks up with my friends.
Po walks up with my friends.
Po walks up with my friends.
Po walks up with my friend.
Po walks up with my friend.
Po walks up with my friend.
Po walks up with my friend.
Po walks up with my friend.
Po walks up with my friend.
Po walks up with my friend.
Po walks up with my friend.
Po walks up with my friend.
Po walks up with my friend.
Po walks up with my friend.
Po walks up with my friend.
Po walks up with my friend.
Po walks up with my friend.
Po walks up with my friend.
po walks up with my friend
Po walks up with my friend
Po walks up with my friend
Po walks up with my friend
Po walks up with my friend
Po walks up with my friend
Po walks up with my friend
Po walks up with my friend
Po walks up with my friend
Po walks up with my friend
Po walks up with my friend
Po walks up with my friend
Po walks up with my friend
Po walks up with my friend
Po walks up with my friend
Po walks Up with my friend
Po walks up with my friend
Po walks up with my friend
Po walks up with my friend
Po walks up with my friend
Po walks up with my friend
Po walks up with my friend
Po walks up with my friend
Po walks up with my friend
Po walks up with my friend
Po walks up with my friend
Po walks up with my friend
Po walks up with my friend
Po walks up with my friend
Po walks up with My friend
Po walks up with my friend
Po walks up with my friend
Po walks up with my friend
Po walks up with my friend
Po walks up with my friend
Po walks up with my friend
Po walks up with my friend
Po walks up with my friend
Po walks up with my friend
Po walks up with my friend
Po walks up with my friend
Po walks up with my friend
Po walks up with my friend
Po walks up with my friend |
HaHnHnHOpMaunn npuBedeHa Ha Ta6nUKe C TexHnueckmN daHHbIMN.
BHHMaHHe / BaXHbIe CBeDeHnI NO TexHnke 6e3OnaCHOCTN
① OśuţańΦopMaци n pekOMeHdaци
HΦopMaunno oxpaHe OkpykaHoue cpebl
IpaBoHa n3MeHeHn coXpaHЯETcR.
CODEPXXAHNE
1.CBEDEHNAIPOTEXHNIKE
BE3OPIACHOCTN. 331
1.1 Be3oNaChocTb DeTei n nnC orpaHnueHHbIMN BO3MOxHOCrMaMn.... 332
1.2 06za 6e3oNaChocTb. 332
- YKA3AHNЯ NO BE3ONACHOCTN......335
2.1 YcTaHOBka 335
2.2 PoiKJIoueHHe K 3JIeKTpocetn.....336
2.3IcnoJb3ObaHne 337
2.4 YxOД n YnCtKa 338
2.5 BnytpenHee ocBeueHne 338
2.6 CepBnC 338
2.7 Ytnnnaa.. 339
- ONICAHNE ППЕОРА 339
3.1 O6uyn o63op 339
3.2 Akceccyapbl 339
4.BKJIIOUOHEHNEI BbIKJIIOUOHEHNE. 340
4.1 Panaelb ynpableneia 340
4.2 Ducnnne 341
4. BKJIIOUeyHnE N BbIKJIOUeyHnE.
NcnoJb3yIte MraKyo TkaHb, CMOueHHyO B TeIIOB BOe C Do6aBneHem MraKoro MOU- Ue OpeCTBa, IJIa ONUCTKN DuxOBOro Wkaopa N npHaJn JExKHocTei.
IomeCTIte npHaIeXHocTn BdyxOBOI uKaΦ.
5.2 NepBoe nodkJIOUeHne
Iocne nepBoro noKIOUeHnHa nucnlee OTo6paxaeTc npNBetCTBeHHoe coo6uHHe. Heo6xOIMO hAcTpoNTb: Bbl6paTb Ja3bIK, ApkocTB dncnpe, Tohbi KhoNOK, PpOMKOCTb cnHaJa, YcTaHOBka BpemeH CyTok.
6. EXEДHEBHOЕ ИСПОЛьЗOBAHNE

BHIMAHHE!
Cm. rnaBbl, copejkaune CbeHnno texnke 6e3onachoctn.
6.1 YcTaHOBka cyHKcun: rplb + MnkpoBOJhbI, rplb
DyXOBoI uKaΦ MoKet npOn3BOdntb Wym BO BpeM pa6Otbl: rpln + MmKpOBoHbI. IaHHOf yHKcIn 3TO HopMaIbHo.
8.1 YctaHOBka npHaJexKHOCTeI
IcnoJIb3yIte TOnbKO NODXODaYIO NocUdY I MaTePnaIbI. CM. rNaBy «Yka3aHnI peKoMeHdaaUNI, pa3DeI «IOnxOJaA dIg MInKpOBoJHOBOI o6pa6OTKn KxOHHaI nocUda I MaTePnaIbI|.
10.1 PeKoMeHdaaun no npnroTOBJIeHHIO
①
PnBedeHbIe B Ta6nucax 3NaueHnem TEmpeatpyb I BpeMeHn npiroTOBHeHnraBnIoTcOpneHTnpoBOuHbIMN. OHn 3aBnCrt OT peCenTa, a TaKke OT KaueCTBa N KOJIInueCTBa INCNOJb3yeMbx INHrpeDnEHTOB.
Baw dyxobow kkafo MeKet OTnuaTbca xapaKTePOM npiroTOBHeHra O TnpdeIduyero. B pekoMeHaauHX Hxke npBOaTcpeKoMeHdyEmbIe FyHKuN HarpeBa N HaCTpOuKn BpeMeH npiroTOBHeHra ONpeDeJIeHHbIX BVIOB pOdyKTOB.
EcnHauTn yctaHOBNKoHKpeTHOro peeNTa He ydaETc, nonuTe noxoxn peeNT.
Bollee noopnbie pekomehdaunno npiroTOBneHNO bbl haJeTe B Ta6nucx npiroTOBneHn Hnui Ha hawem Be6caute. Iy Bb6opa KnHrpeentob npOBepbTe KoD PNC Ha Ta6nueC TexHNueckmHa aHHbIMn Ha nepeDnePamke BHyTpeHne KaMepbI dYXOBORo oka.
10.2 Pekomehdaunno nncnoj3OBaHnIO MnkpoBoJN
i DaaBaiTe roTOBNTb!
He nomeaIte npodykbl HeNocpeIcTBeHHo Ha Bpaauuunscn noDIOH. Bcerda nCnoJb3yIte Nocdy, npiroNDHyO DnA 3KcPnyatauINB MmKpOBONHOBOn neuN.
CTaBbTe nocuyu B ceHtp BpaauoJeroC noDOna.
BcneDCTBNE KOHTaTcA C cINsKOM TOpaHm INN cINsKOM XOIOdHbIMN IpeMeTaMn IOdoH MOKeT TpeChyTb.
IpeBopauBaIte IINI nepeMeuBaIte npOyKtBI NO nCTeHn IIOBnHbIBpeMeHN npiroTOBJIeHNAII pa3MOpaxnBaHn.
Bpemr O T BpemHn NomeuBaIe XnDkne 6JIOda.
PepemeeuBaIte nIy nepeI noaueK cToIy.
BoBpMa npiroToBnEnn pa3OrpeBa hakpbBaIte nIu.
Ipn Harae HanntKOB dnyyueHn paCnpedeHn Tenna nOOnKeT B 6ytbIKy IIN CTaKaH NOxOJaU yIO Jn MKNPOBOJHOBON neu loKky.
IomeCTnte npOdyKtBI B dyxOBoN uKaΦ 6e3 yNaKOBKn. TOTOBbIE 6JIIOda MOXHO NOMEaTb B dyxOBoN uKaΦ B yNaKOBKe TOJIbKO ecnYnaKOBKa pnproHa dJa NCpOJIb3OBaHnB MmKPOBOJHOBOI neu (CM. CBeDeHnHa Ha yNaKOBKe).

PnroTOBJIeHne B MnkpoBOJHOBOI neu
HaKpbIbAe npOdykTB B XoJe npriroTOBJIeHn. Ecn Tpe6yETc co3daTb KOpOky, roToBBTe, He HaKpbIbAe.
He neperpebaTe 6JIIOda, yCTaHABJIIBaB CNIJKOM BbICOKyHO MOUHOCb N BpeM. PpOdyKtBi MOryT NotepaTB BlaIgry, cropeb nn CTaTb npuHHoN IOkapa.
He nCnoB3yIte dYxOBoi uKaΦ dIЯ npuroToBJeHnra B CKOpnye m MoJIIOCKOB/yJNUTOK, TAK KAK OHN MOryT B3PbIBaTbcr. Npeed pa3orpeBOM npoTbIkaTe JeNTKN B rHuHnCe.
IpeepnpirotoBneHnem cdeNaite B KOxNcE nn KOKype npOdyKTOB HeckoJbKO OTBepCTNI.
Hape3aTe OBOUn Ha KycouKn CxOndHoro pa3Mepa.
Iocne BbIKHoueHnry dYXOBOro 1kaqba BbIHbTe npOyKbI N OCTaBbTe Ha HECKoJIbKO MmHyT IJpaBHOmePHoro pacnpedeHnry Tenla.

Pa3mOpaxnBaHne B MnkpoBOnHOBoI neu
IonoXnTe 3amOpoxeHHbI Hepa3BepHytbI npOdyKT B He6oNbwo InepeBepHyto TapeKe B KOHTeHep,Ha NODHoc dIpa3MopaxKBaHnI NII B pIaCTNKOBoe CTO, YTO6bl O6pa3yUoJcAraC npI pa3MopaxKBaHnI XnIDKOCTb MOIa CBO6OdHO CTeKaTb.
I3BneKaaiTe n3 np6opa pa3MOpO3NBwneCnpoDyKtbl.
Для пиготовпени OBOцeи n Фpyктб 6e3 npeДварптьного pa3MopaxKuBaHЯ MoxHo 3aДаТь 6Олee ВВICOKуO MOUHOCTB MUKpoBOJHOBOI O6pa6OTKN.
10.3 Kyxohna nocya n MaTePnaJIbI, NOxOJaUne dIra NCNoJIb3OBaHnB MmKpOBoJHOBOI neu
Дя npriroTOBneHnC MmKpOBONHaMn NcNoJb3yIe ToJbKO nOxOJaU OncyuN MaTePnaIbI. BocnoJb3yIteCb dЯ cnpaBKn Ta6nueHnKe.
IpeepncnoB3OBAHnem KxohHOH NOcydb/MaTePnaJIOB CbepaTecb cnx CneuΦkaunei.
10.5 Ta6nucbl npnroTOBneHnaI TeCTnpyoUx opraHn3aun.
HOpMaunI nCnblTaTeIbHbIX OprAHN3aun
IcnbitaHn corlacho IEC 60705.
Pn BO3MOxHocTn He npOn3BOAnTe ppeBapnteHbI pa30rpeB dYXOBOrO uKaΦa nepeD npuroTOBLeHneM.
Bo Bpem npiroToBneHn HeckoIbKx 6JIou 3a pa3 CBOIDTe nepepbIBbl MeJy BblneUKOJ/
kapo K MmHmMy.
PnroToBJIeHne C BbIKIOUeHHo JAmno OcBeueHna
BbIKIOUHTe IaMny Ha Bpem npiroTOBHeHn. BkIIOuAte ee ToJIbKO npn Heo6xOIMocTn.
14. CTPYKTYPEA MEHIO
14.1 MeHIO
HaXMMTe To6bl OTKpbItb MeHIO.
- YBIMKHEHHA TA BUMKHEHHA DYXOBOI
UAPH
4.1 Panaelb kepyBaHHra 401
4.2 Ducnnei 402
- INPEED INEPUNM BUKOPUCTAHNAM. 403
5.1 PepBHHne ouHueHHra 404
5.2 Perwe nikkluoyehn.. 404
10.5 Ta6nui npiroToyBaHHa iKi dna DocniHnucbKnx yCTaHOB 414
11.Доглад.TA.YNCTKA. 415
11.1 Ppimitkn ⅢoDo YnueHHra...416
12. UCYEHHN IPOBJIEM 416
12.1 II B pa3i BuHnKHeHHn npo6Jem 416
12.2 RaK KepyBaTu: KoDi nomnok.... 417
12.3ДaniцоюТexhiHoro
obcnyroByBaHHra 418
13.EHEPFOEΦEKTBHICTb. 418
KoHcTpyKci Turntable Inna npiroToyBaHHa iXi.
KoHcTpykcipewiTkIraIrpnn IJa npiroToyBaHHHa rpni.
4. yBIMKHEHHA TBA BIMKHEHHaDyXOBOI 7AΦN
4.1 Панель керваимя

8.1 BctaHOBJIeHHaKcecyapiB
BukopncToByte Inne BiiNobiHn Nocyd i MaTepiAn. DnB. po3dIn «Nocyd i MaTepiAn, 0o nixOyTb DnA MkpoxBnB» rnaBv «IopaDn Ta peKomeHdaui|.
i DaaBaiTe roTyBaTn!
He knaiditb npodyktn 6e3nocepedHbHO na nobopoTHn CTOLIK. 3abxdn KopncTyntecra nocydom, npndaTHm dny BnKOpNCtAHN y mikpoxBnIbOBI neyi.
IocTaBTe nocyd y ceHtp nobOpOTHO r cToNka.
Yepe3 KOHTaKT i3 3aHaITo rapyHIMn a6o 3aHaITo XOIoHIMn IpeIMeTAMN NOBOPOTNI CTOLIK MOKe IIOJaMaTINcR.
IpeBepHitb abo nepemiwaTe ctpaby nicna 3aBepWeHHn noOBHH uacy po3MopOxyBaHHn roTyBaHHn.
Pomiuyte piDHHuac BiD uacy.
Pomiiatae ctpaBy nepei noaueo.
HakpmbaIte ctpaby nizac npiroTyBaHHn po3irpiBaHHn.
IocTabe TIOKky y nlaUky a6o cknHky npn niirpibaHni Hanoiv 3a6e3neueHH naorpo3noiny tenna.
KnaiTb npOyKTn y niv 6e3 ynapOBKn. Facobahi roTObi cTpaBN MOxHa cTabNTu y niv nnwe kso iXnry ynapOBKa nixoINTb dIy BnKOpNCtAHNry MIKPOXBnIBOBi nevi (nepeBipTe inopmaio Ha ynapOBci).

TotyBaHHa 3 BnKOpNCtAHHm MikpoxBnJIb
ToTyIe cTpaBn iD KpUkoIO. JaKIo Bn XOueTe 36peerTu cKOpHky, roTyIe cTpaBy 6e3 KpUkN.
He neperpibaTe cTpaBn, BCTaHOBbUn 3aHaTo BucOky NOTyXHicTb i yac. Ika MoKe MiczmaNepecoxHyTu, NiDropitu a6o 3aropitncra.
He BnKOpncToBnyTe niv dny npriroTuBaHHrae y uKapayni, ockinbKn icHy e 3arpo3a ix po3pnuBaHHra. PpokoiTb KOBtOK aChHi nepei ii niirpiBaHHam.
Nepsh hix roTybaTn npOdykTN 3i uKipkoH, cnid kInbka pa3ib npOKoJIoTN ix.
Oboqi cniHapiaTuHa oDHaKoBi 3a po3Mipom LMaTKn.
PicnBumKHeHHy DuxOBKn BnMItb CtpaBy Ta daNte iIN NOCTOaT NekJIbKa XBNiH, 0o6 TeNPO3noJInuoc pIBHomipHO.

Po3MopoOxyBaHHa 3 BnKOpNCtAHHm MikpoxBnJIb
IoknaiItb 3amopoxeHy ctpaby 6e3 ynaKOBn Ha MaIeHbky nepeBepHyTu Tapiky, po3MiueHy Na KOHTeINHePOM, a6o Ha niCTaBky dIy po3MOpoxeHHN YI NpactIKOBe CnTO, 06 pIDHa, 0ytBOPIOEtbcr npn po3MOpoxyBaHHi, MOrla CTikatN.
Notim BnmiTb po3MopOxKeHi smaToUKN.
KoJI MoxJInBO, He po3irpiBaIte dYxOBy 7aΦy nepeI roTyBaHHaM.
KuO BV nociIOBHO roTyTe KJIbKa CtpaB, 3BeiITb nepepbMixn Do mHIMyMy.
ToTyBaHH3 BmKHeHOJ lamnoIO
BmKhHt b lamny nid yac roTybaHH. BmkaTe ii Inne 3a notpe6n.
14. CTPYKTYPEA MEHIO
14.1 MeHIO
HaTnCHiB 106 BiKpTuM MeHIO.
14.3ПiДмeHIOДЯ:YcTaHOBKa