
Multipro Compact FP215 - Food Processor KENWOOD - Free user manual and instructions
Find the device manual for free Multipro Compact FP215 KENWOOD in PDF.
| Product type | Food processor |
| Brand | Kenwood |
| Model | Multipro Compact FP215 |
| Materials | Plastic, stainless steel blades |
| Blender capacity | 1.2 L |
| Speeds | 2 speeds + Pulse function |
| Included accessories | Knife, whisk, reversible slicing/shredding disc, spatula |
| Functions | Chop, mix, knead, beat, emulsify, grate, slice, blend |
| Maximum capacities | Pie dough: 250 g flour Yeast dough: 340 g flour Cake: 1 kg flour Minced meat: 400 g Thick soups: 1 L Thin soups: 600 ml Egg whites: 6 |
| Safety | Safety lock, stops if lid is not properly fixed |
| Cleaning | Bowl, lid, accessories: dishwasher safe (top rack) or hand wash. Motor unit: wipe with a damp cloth. |
| Maintenance | Do not immerse the motor unit; wrap the cord around the cord wrap after use |
| Country of manufacture | China |
| Design | United Kingdom |
| After-sales service | Contact the store or an authorized Kenwood repairer |
Frequently Asked Questions - Multipro Compact FP215 KENWOOD
User questions about Multipro Compact FP215 KENWOOD
0 question about this device. Answer the ones you know or ask your own.
Ask a new question about this device
Download the instructions for your Food Processor in PDF format for free! Find your manual Multipro Compact FP215 - KENWOOD and take your electronic device back in hand. On this page are published all the documents necessary for the use of your device. Multipro Compact FP215 by KENWOOD.
USER MANUAL Multipro Compact FP215 KENWOOD
Head Office Address:
Kenwood Limited, New Lane, Havant, Hampshire PO9 2NH, UK
www.kenwoodworld.com
Designed and engineered by Kenwood in the UK
Made in China
KENWOOD
FP215
English 2 - 4
Nederland5-7
Français 8 - 10
Deutsch 11 - 13
Italiano 14 - 16
Portugues 17 - 19
Espanol 20 - 22
Dansk 23 - 25
Svenska 26 - 28
Norsk 29 - 31
Suomi 32 - 34
Türkce 35 - 37
Česky 38 - 40
Magyar 41 - 43
Polski 44 - 46
Pycckn 47-49
Eληνικα 50-52
00 - r
before using your Kenwood appliance
- Read these instructions carefully and retain for future reference.
- Remove all packaging and any labels.
safety
- The blades and discs are very sharp, handle with care. Always hold the knife blade by the finger grip at the top, away from the cutting edge, both when handling and cleaning.
Always remove the knife blade before pouring contents from the bowl. - Keep hands and utensils out of the processor bowl and liquidiser jug whilst connected to the power supply.
- Switch off and unplug:
before fitting or removing parts
after use
before cleaning
- Never use your fingers to push food down the feed tube. Always use the pusher/s supplied.
- Before removing the lid from the bowl or liquidiser from the power unit:-
switch off;
wait until the attachment/blades have completely stopped;
- Be careful not to unscrew the liquidiser jug from the blade unit.
- Allow all liquids to cool to room temperature before placing them in the liquidiser.
- Do not use the lid to operate the processor, always use the on/off speed control.
- This machine will be damaged and may cause injury if the interlock mechanism is subjected to excessive force.
- Never use an unauthorised attachment.
- Never leave the machine on unattended.
- Never use a damaged machine. Get it checked or repaired: see 'service'.
- Never let the power unit, cord or plug get wet.
- Don't let excess cord hang over the edge of a table or worktop or touch hot surfaces.
- This appliance is not intended for use by persons (including children) with reduced physical, sensory or mental capabilities, or lack of experience and knowledge, unless they have been given supervision or instruction concerning use of the appliance by a person responsible for their safety.
Children should be supervised to ensure that they do not play with the appliance. - Only use the appliance for its intended domestic use. Kenwood will not accept any liability if the appliance is subject to improper use, or failure to comply with these instructions.
- Misuse of your processor/liquidiser can result in injury.
before plugging in
Make sure your electricity supply is the same as the one shown on the underside of your machine.
- This appliance conforms to EC directive 2004/108/EC on Electromagnetic Compatibility and EC regulation no. 1935/2004 of 27/10/2004 on materials intended for contact with food.
before using for the first time
1 Remove all packaging including the plastic blade covers from the knife blade. Take care the blades are very sharp. These covers should be discarded as they are to protect the blade during manufacture and transit only.
2 W ash the parts see 'cleaning'
3 Push excess cord into the back of the machine.
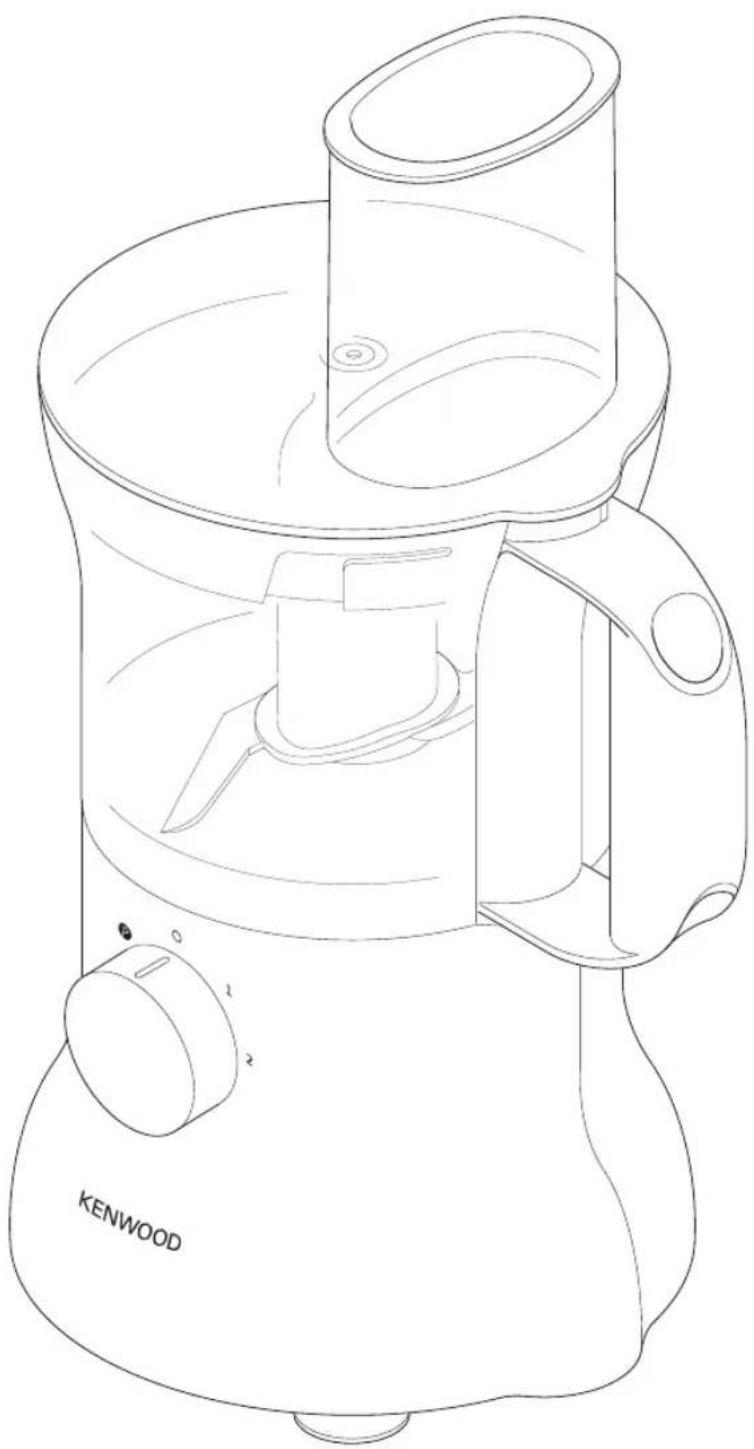
key
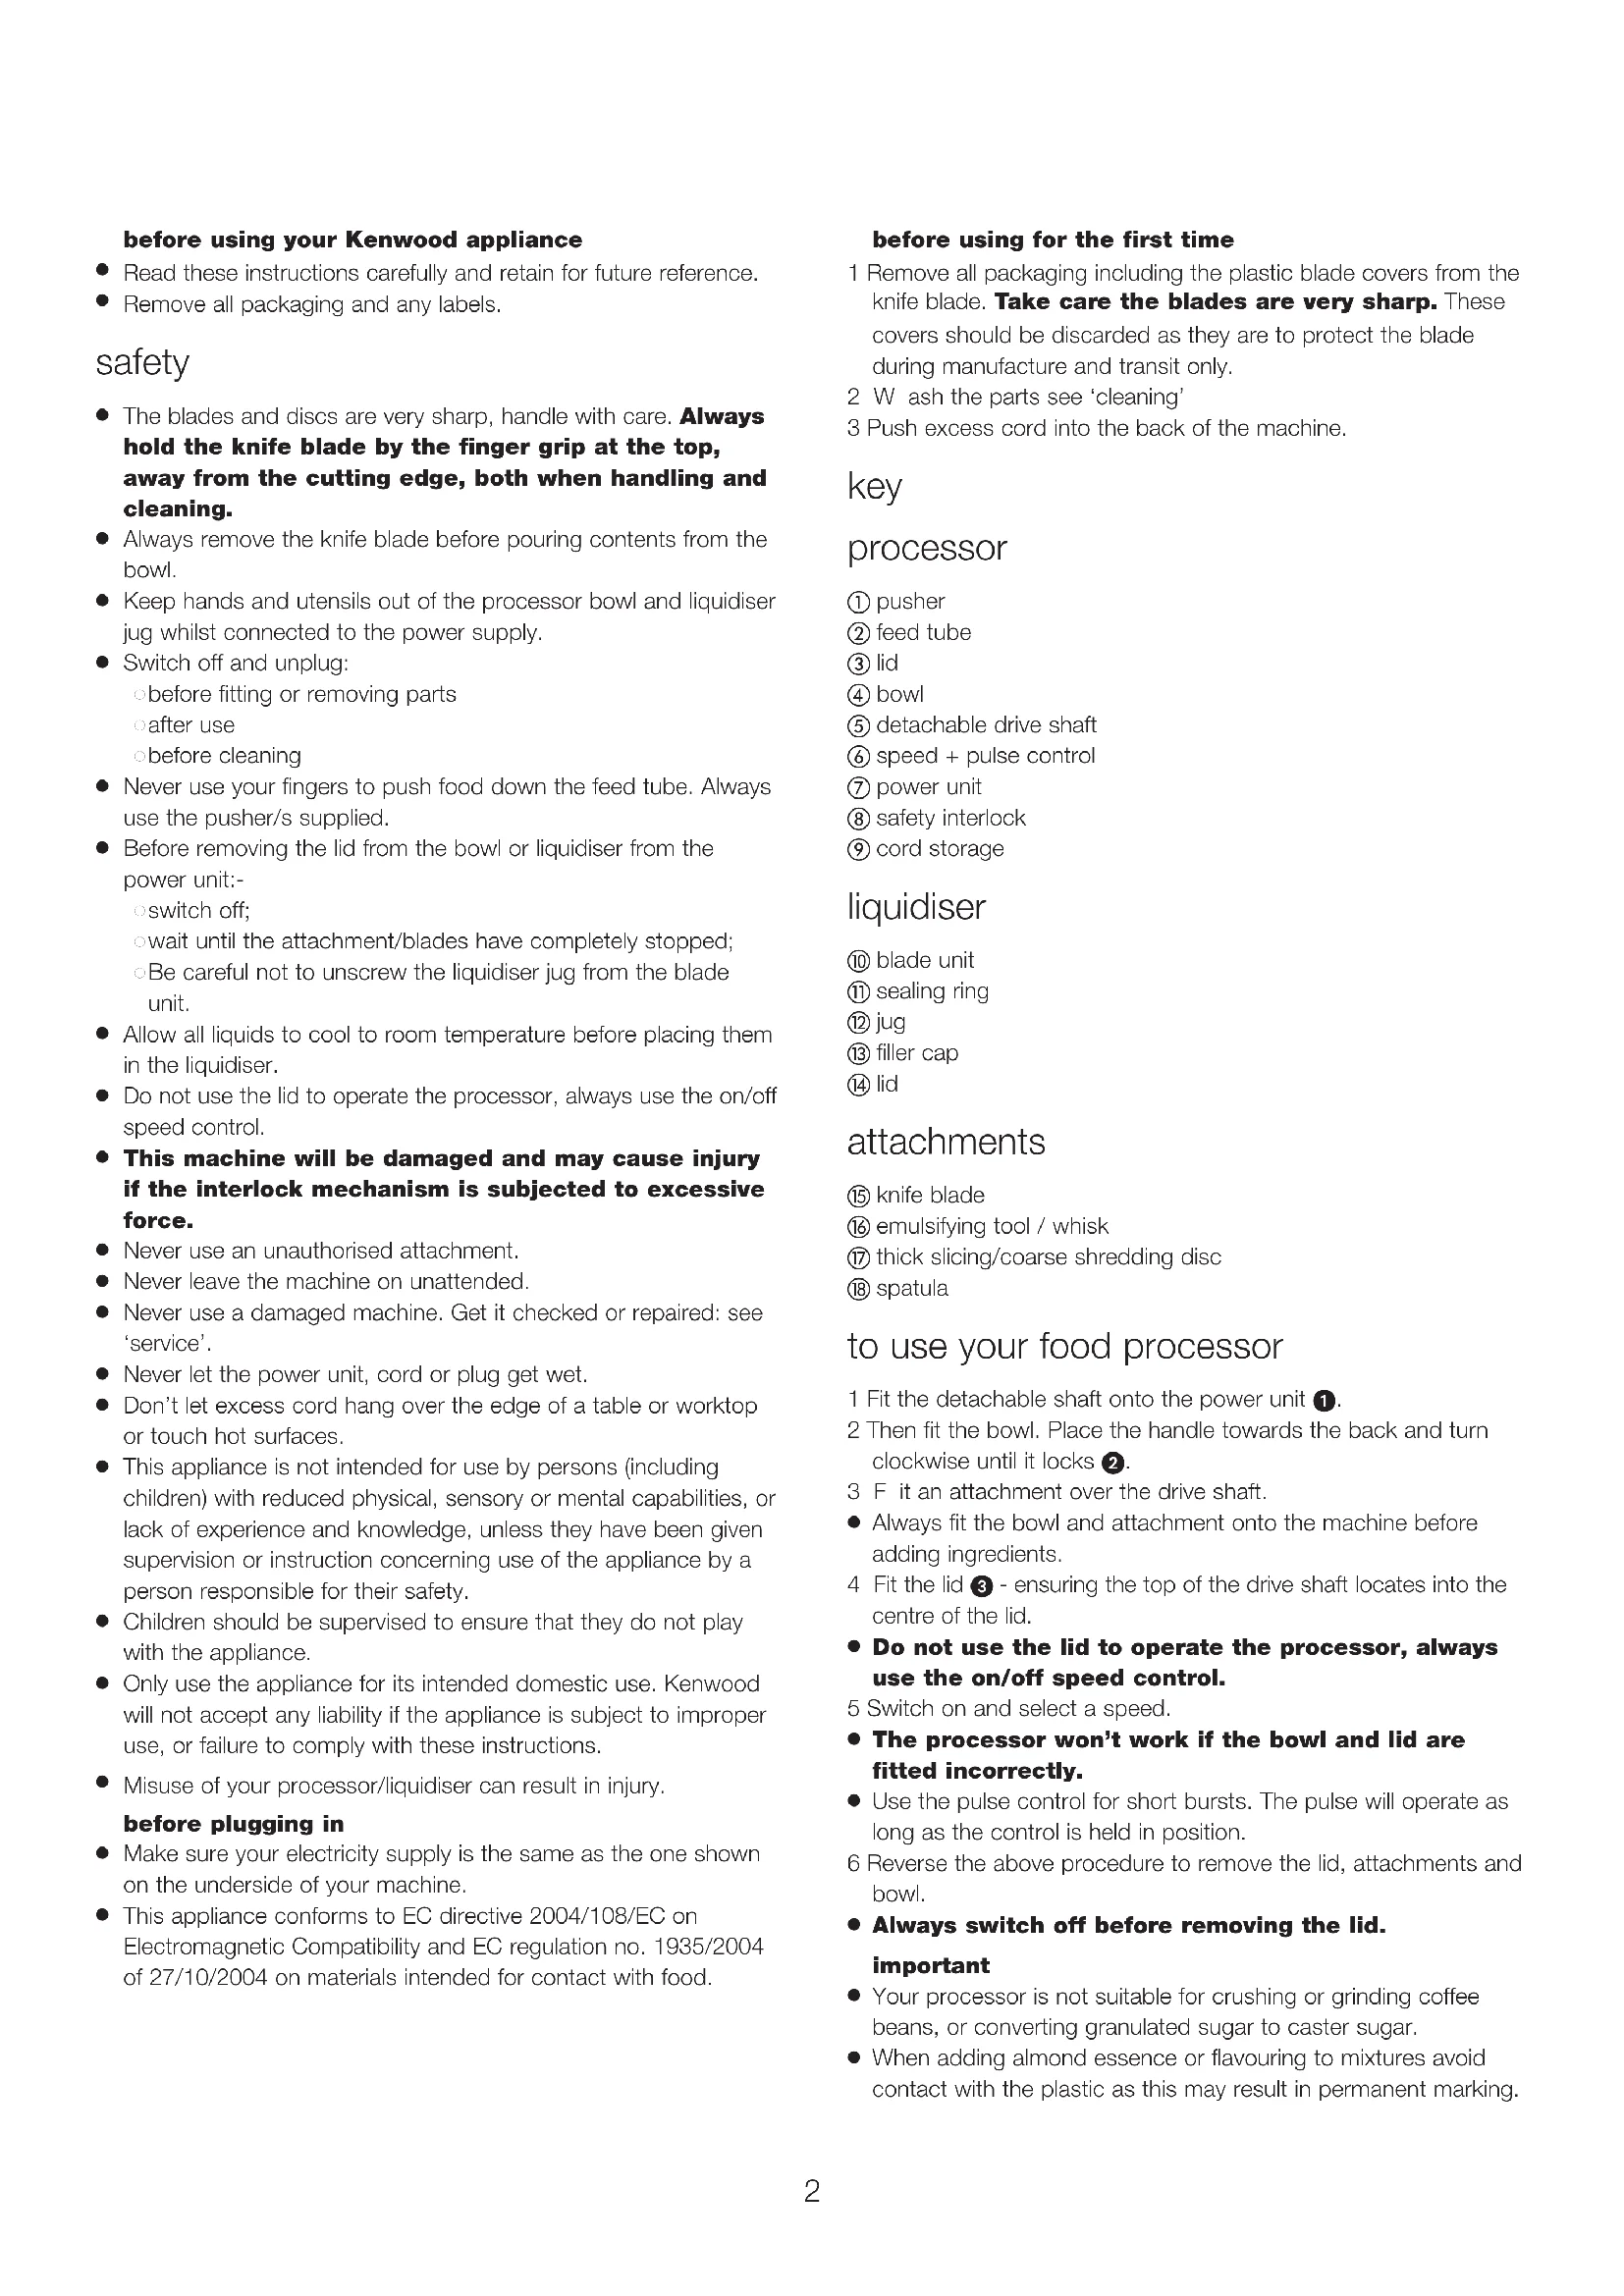
processor
① pusher
② feed tube
③ lid
④ bowl
(5) detachable drive shaft
⑥ speed + pulse control
⑦ power unit
⑧ safety interlock
⑨ cord storage
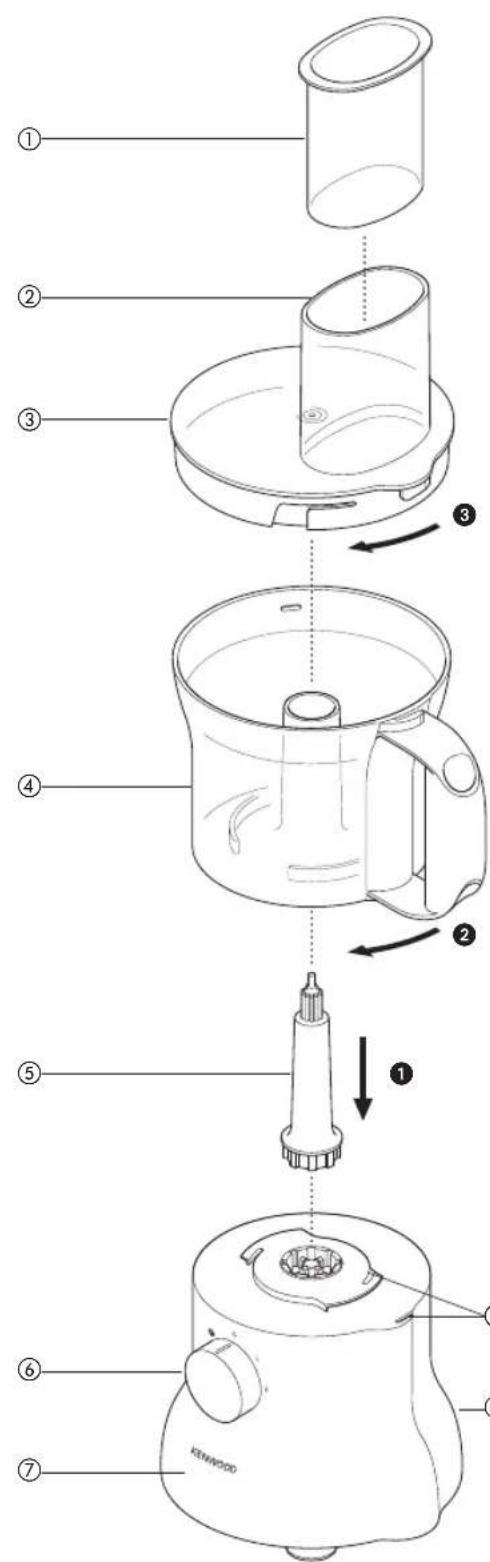
liquidiser
blade unit
⑪ sealing ring
12 jug
⑬ filler cap
14 lid
# attachments
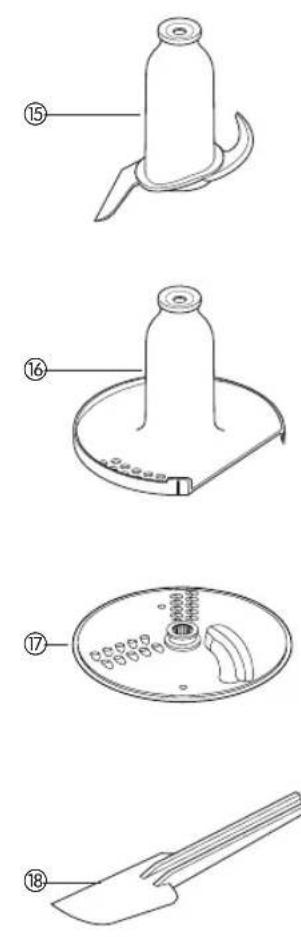
⑤ knifeblade
16 emulsifying tool / whisk
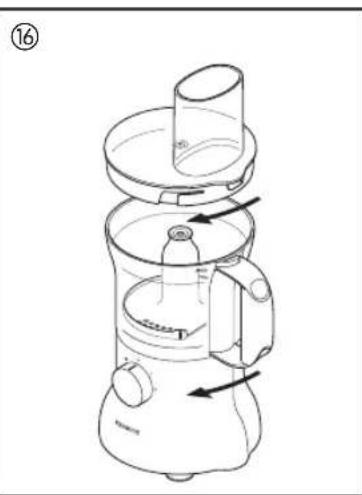
⑦ thick slicing/coarse shredding disc
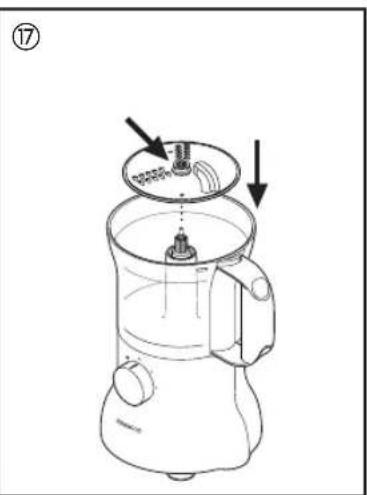
⑧ spatula
to use your food processor
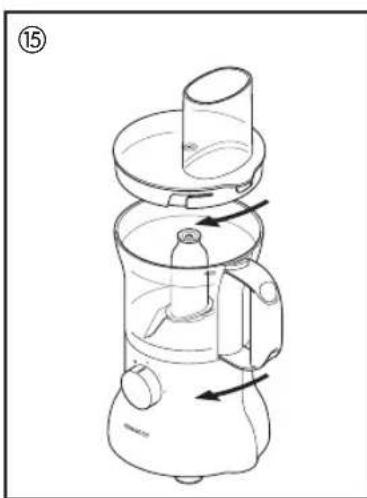
1 Fit the detachable shaft onto the power unit 1.
2 Then fit the bowl. Place the handle towards the back and turn clockwise until it locks 2.
3 F it an attachment over the drive shaft.
- Always fit the bowl and attachment onto the machine before adding ingredients.
4 Fit the lid 3 - ensuring the top of the drive shaft locates into the centre of the lid.
- Do not use the lid to operate the processor, always use the on/off speed control.
5 Switch on and select a speed.
- The processor won't work if the bowl and lid are fitted incorrectly.
- Use the pulse control for short bursts. The pulse will operate as long as the control is held in position.
6 Reverse the above procedure to remove the lid, attachments and bowl.
Always switch off before removing the lid. important
- Your processor is not suitable for crushing or grinding coffee beans, or converting granulated sugar to caster sugar.
- When adding almond essence or flavouring to mixtures avoid contact with the plastic as this may result in permanent marking.
to use your liquidiser
1 Fit the sealing ring into the blade unit - ensuring the seal is located correctly. Leaking will occur if the seal is damaged or not fitted correctly.
2 Hold the underside of the blade unit ⑩ and insert the blades into the jug - turn clockwise to lock.
3 Put your ingredients into the jug.
4 Fit the lid onto the jug and turn clockwise to lock 4. Fit the filler cap.
5 Place the liquidiser onto the power unit and turn to lock 6
6 Select a speed or use the pulse control.
Hints
- When making mayonnaise, put all the ingredients, except the oil into the liquidiser. Then with the machine running, pour the oil into the filler cap and let it run through.
- Thick mixtures, eg pates and dips, may need scraping down. If it's difficult to process, add more liquid.
- When crushing ice use the pulse in short bursts.
important
- Allow all liquids to cool to room temperature before placing them in the liquidiser.
To ensure the long life of your liquidiser, never run it for longer than 60 seconds. Switch off as soon as you've got the right consistency.
- Don't process spices - they may damage the plastic.
The machine won't work if the liquidiser is fitted incorrectly.
- Don't put dry ingredients into the liquidiser before switching on. If necessary, cut them into pieces; remove the filler cap; then with the machine running, drop them through one by one.
- Don't use the liquidiser as a storage container. Keep it empty before and after use.
- Never blend more than 1.2 litres - less for frothy liquids like milkshakes.
choosing a speed for all functions
| tool/attachment function speed | |
| knife blade Cake making 1-2 | |
| Rubbing fat into flour 2Adding water to combine pastry ingredients 1-2 | |
| Chopping/pureeing/pâtés | 2 |
| Yeasted dough mixes 2 | |
| Thick soup mixes (500mls liquid to 500g dry ingredients) Thinner soup mixes/ milk (max 600mls) 1-2 | |
| emulsifying tool Egg / whisk | whites 2Cream (max 250mls) |
| discs - slicing/shredding | Firm food items such as carrots, hard cheeses Soffer items such as cucumbers, tomatoes |
| liquidiser | All processing |
maximum capacities
- Shortcrust pastry Flour wt 250g/9oz
- Yeast dough Flour wt 340g/12oz
One Stage Cake Total wt 1Kg/2lb 4oz - Chopping lean meat Total wt 400g/14oz
- Thick soup mixes 1 litre
Thinner soup mix/milk 600ml
Whisk egg white 6
Liquidiser 1.2 litres
using the attachments
see chart for speed of each attachment.
⑤ knifeblade
The knife blade is the most versatile of all the attachments. The length of the processing time will determine the texture achieved. For coarser textures use the pulse control.
Use the knife blade for cake and pastry making, chopping raw and cooked meat, vegetables, nuts, pate, dips, pureeing soups and to also make crumbs from biscuits and bread.
It can also be used for yeasted dough mixes.
Hints
knife blade
Cut food such as meat, bread, vegetables into cubes approximately 2cm / 3 / 4in before processing.
- Biscuits should be broken into pieces and added down the feed tube whilst the machine is running.
- When making pastry use fat straight from the fridge cut into 2cm/3/4in.cubes.
Take care not to over-process.
dough
- Place the dry ingredients in the bowl and add the liquid down the feed tube whilst the machine is running. Process until a smooth elastic ball of dough is formed this will take 60 secs.
- Re-knead by hand only. Re-kneading in the bowl is not recommended as it may cause the processor to become unstable.
⑥ emulsifying tool / whisk
Use for egg whites and cream only.
Hints
- Best results are obtained when the eggs are at room temperature.
- Ensure the bowl and whisk are clean and free from grease before whisking.
⑦ slicing/shredding discs
To use the discs.
reversible slicing/shredding discs - thick
Use the shredding side for cheese, carrots, potatoes and foods of a similar texture.
Use the slicing side for cheese, carrots, potatoes, cabbage, cucumber, courgette, beetroot and onions.
safety
- Never remove the lid until the cutting disc has completely stopped.
- Handle the cutting discs with care - they are extremely sharp
to use the cutting discs
1 Fit the drive shaft and bowl onto the power unit.
2 Holding by the centre grip, place the disc onto the drive shaft with the appropriate side uppermost.
3 Fit the lid.
4 Put the food in the feed tube.
5 Switch on and push down evenly with the pusher - never put your fingers in the feed tube.
Hints
Use fresh ingredients
- Don't cut food too small. Fill the width of the feed tube fairly full. This prevents the food from slipping sideways during processing.
- Food placed upright comes out shorter than food placed horizontal.
- There will always be a small amount of waste on the disc or in the bowl after processing.
care & cleaning
Always switch off and unplug before cleaning.
- Handle the blades and cutting discs with care - they are extremely sharp.
- Some foods may discolour the plastic. This is perfectly normal and won't harm the plastic or affect the flavour of your food. Rub with a cloth dipped in vegetable oil to remove the discolouration.
power unit
- Wipe with a damp cloth, then dry. Ensure that the interlock area is clear of food debris.
- Store excess cord in the storage area at the back of the machine (9).
liquidiser
1 Empty the jug before unscrewing it from the blade unit.
2 W ash the jug by hand.
3 Remove and wash the sealing ring.
4 Don't touch the sharp blades - brush them clean using hot soapy water, then rinse thoroughly under the tap. Don't immerse the blade unit in water.
5 Leave to dry upside down.
bowl/lid and attachments
- Wash by hand, then dry.
- Alternatively they can be washed on the top rack of your dishwasher. A short low temperature program is recommended.
service & customer care
- If the cord is damaged it must, for safety reasons, be replaced by KENWOOD or an authorised KENWOOD repairer.
If you need help with: -
Using your appliance
Servicing or repairs Contact the shop where you brought your appliance. -
Designed and engineered by Kenwood in the UK.
Made in China.

IMPORTANT INFORMATION FOR CORRECT DISPOSAL OF THE PRODUCT IN ACCORDANCE WITH EC DIRECTIVE 2002/96/EC.
At the end of its working life, the product must not be disposed of as urban waste.
It must be taken to a special local authority differentiated waste collection centre or to a dealer providing this service.
Disposing of a household appliance separately avoids possible negative consequences for the environment and health deriving from inappropriate disposal and enables the constituent materials to be recovered to obtain significant savings in energy and resources. As a reminder of the need to dispose of household appliances separately, the product is marked with a crossed-out wheeled dustbin.
⑰ discos deURTAR as rodelas/picar
Para使用者 discos.
- Ipeed Tem KAK 3aJIHTb JxNkOCTn B ROMOREH3aTOp daIte Nm OCTbITb DO KOMHaTHOH TEMNEpaTypbl.
- Дя поденис рokedа снжбь мнкера вкюаит e ro He 60neeЧем на 60 cekyн. Вькюаит мнкер сразу ще пocne тoro, кak 6ydeTdoCTnHryTa hyxHaJ KOKCnCTeHnIa.
He do6abnIe npn o6pa6oTke cneuM, OHN MOryT NOBpeDnTb nlaCTNKOBbIe DeTaII. - Pπiδop He 6ydt paδoTaTb, ecπi Mɪκεp yCTaHOBJIe HηpαBЛbHO.
He KlaIaNTE CyXne INHrpeJeNHTb IMKcepe Do erO BKIOUeHn. Ipn Heo6xOIMOCtN IpoeKbTe IN HA KycOuKN; CHMmTE BOPOHky, a 3aTeM, PnBkIOUeHHOM Ipnbope, ONyckaTc KycOuKN IO OHepeKn.
He nCnOJIb3yIe MmKcEp B KaueCTBe EMKoCTn IIN XpaHEnHn. OctaBnIte erO npCTbIM Do IN NocJe nCnOJIb3OBaHn.
Hikorda He CMeunBaTe 60ee 1,2I,Ia IneHCTbIX Cmecen TnA MoOnOHbIX KOKTeINe 3TO 3HaueHeN OJIKHO 6bITb Ee MeHbIe.
Bb6op ckopoctn npn pa3hbx onepaunx
KaK nCNoB3OBaTb DnCKN.
IpebeBopauHbAeMbIe DnCKn DnI Hape3Kn IOMTKaMn/pe3aHn - KpynnHa Hape3ka
IcnoIb3yIte CTOpOHy dIa pe3aHnI npI o6pa6OTke cbIpOB, MOPKOB, KapTopeJIu IdpYnx IpOdyKTOB aHaIOnuHoi CTpykTpybl.
IcnoIb3yIte CTOpOHy dIa Hape3Kn IOMTHKaMn npI o6pa6OTke cbIpOB, MOPKOB, KapTopeJIa, KaNyCTbl, OrypuOB, Ka6aKOB, CBekJIbI n penTuToR Onyka.
Be30nacHOCTb pa60TbI
- HNKorda He cHmMaTe KpbIuKy npexKe, Yem npOn3oJET noHa octaHObKa peKyUero DnCKa.
-ДиСКИ АВЛЯTOТСОЧЕНБ OCTРБIMN Tpe6yIOT KpaHHe OCTOPOKHORO OБразЕн<|im_start|>
IcnoB3OBaHnepexuyuxDnCKOB
1 YctahOBInTe npBnHOH BaN u yaWky Ha cINOBoB 6Iok.
2Держасьа рукуВцentpe,yctaHOBITeДИСКНа npINBOIDHOB BAN HUJKHOH CTOPOHOB BBepx.
3 YcTaHOBnTe KpbilKy.
4I onoxnTe npodykTB I nOdaouyU Tpy6Ky.
5 BkIIOHHTe npB6op n paBHOBMEpHO haxImaIte Bn3 Ha TOnKaTeIb; HNKOrda He DonyckaiTe, YTO6b1 Baun naIbCuI oka3aJIncb B IodaIoUe Tpy6ke.
Pone3HbIE COBETbl
- NcnoIb3yIte CBexKne npOdykTbI.
He pekomehnyetc Hape3aTb npoDyKtbl CnNikom MeNko. 3anolHnTe noaIouyIO ty6y Do KpaEB. 3To npedOTbpatNT pa36paCbBaHne npoDyKTOB NO CTOpOHAM BO Bpemr o6pa60Kn.
Kycoukn, NoctabneHHbIe BepTnKaIbHO, noIyauHOTcKopoue, cEM KycouKn, NoCTabNeHHbIe ROpu3OHTaJIbHO. - Pocne obpa6oTKn Ha duKce HIn B EMKoCTN Bcerda npucyTcByOT OCTaTKn PpOdyKTOB.
Yxo3a np6opom
-Перед чисков пьобopa BCERда ВыклочаиTe erо и OТсоевнэт eT ceTN.
-ДИСКИ И HOЖИ АВЛЯТСА OЧЕНБ OCTpbIMN Tpe6yIOT KpaHHe OCTOPOXKHOrO OбpaUSeHIN.
HeKOTOpBIE npOyKTbMOrT o6ecUBeHnBaT nIacTKOBbIe deTaII. 3TO CHTaETCa HOpMaJIbHbIM ABLeHnEM, He pNBoDNT K NOBpeKdENIO DeTaN I He BnHET Ha BKc NmI. IJa ydaJeHn
OeueHHoTnTHa NotPte ETO TKAhbIO, CMOeHHoJ pACTNTeJIbHbIM MacIOM.
CINIOBOI 6JOK
IpoTnE BnaKHO TpAnKOa a 3aTeM Hacyxo.CneDnTe 3a Tem, YTO6bI 30Ha B6JIIN6 BNOKIpOBOUHOro MexAHm3Ma He 6bJa 3acopeHa OCTaTKAMn PIIuN.
V36bIToHnA YaCTb UHypa NITAHN IOnXHa HxOINbC B CnEuaJIbHOM Na3y, pacNOIOKeHHOM Ha 3aDHe CTOpOHe np60pa⑨.
H3MeJIbUHTeJIb
1IpeD cHrTHeM cOcya c 6Ioka IJonacte onOpoxHnte erO.
2 MoTe cocyB BpyHyIO.
3 CHIMITE N BbIMOnTE yNIOHTHeJIbHOe KOJIbIIO.
4 He doTpaHbAaTeCb Do octpbix HOKe; noocntte INx UeTKo C Tropaeh MblbHO BDOi, a 3aTeM TuataeBHO OONOCHNTe B npOTouHO BOe NOJ KpaHOM. He onyckaIte 6JOK c HOXOM B BODY.
5 OctaBbTe cyuHbCBA npeBepHyTOM NOIOKeHHM.
EMKOCtB/KpbIuKa H npHaIeXHOCTN
BbIMoTe pykamn, a 3aTeM BbCyuWnte.
DaHHbIe DeTaNr TaKKe MoXHO Mblr Ha NepBoN NOKe nocydomoeyHo MaunHbI. PeKOMeHdyem NcNoB3ObaTb nporpamMy yckOpehHo MOKn pnp Hn3KoT empeatype.
O6cnyxmbaHne n 3a60ta o nokynataeX
- Пи NOВпжденишувьцелхбezонасхгон Длжк 6ыт bзамен bпсдсtabentьстBE KOMпани ИлиВ cneцmaирobahhoн мacrpckoNo pemoHTy arperaTOB KENWOOD.
EcnnBAMHyxHaNoMoUbB:
- NOIb3OBaHn np6Opom nn
- Texo6cnykubAHn nn peMOHTe O6paNTecb B Mara3nH, B KOTOpOM Bbl npNo6peN np6op.
CnpoeKtpoBaHo npa3pa60TaHO kOmnaHnei Kenwood, CoeHHHeHoe KoponeBCTBO.
CdeJanaHO B Kntae.

BAKHHA INHΦOPMAUЯ NO IPNABUNBHOI YTNJIN3AUIMN 3DEJIIN4 COIJIACHO INPEKTNBE EC 2002/96/EC.
IIO nCTeueHn npoka cnjx6bl n3dennne HeNb3B BbipacBaTb KaK 6blTOBbIE (ropoDckne) OTXoDbI.
I3dene nce dyetyepeaTb CneuaHbHbKOMMyHaHbHbI pyHKt pa3dehboro c6opoa OTXoOB MeCTHOypeJDeHne IINB PpePnraTne, OKa3bIBaIOOee NODObHbe ycnytn.
OTdEBHnay yTIN3aun 6bITOBbIX np6OBPOB no3BOJRAETnpedOTbpaNTb BO3MOXhIe HErATNBHbIe NocJeCTBnA DnOKpykaUoIe Cpebl I 3DOpOBbY, KOtOpBMN YpeBaTaHeHaJIeKJaAaRy yTIN3aun, INo3BOJRAET BOCCTAHOBITbMaTePnAbI, BXOJaUNe B COCTabe n3deJIn, OBeCneuHBa3HaHTeJIbHyIO KHOHOMHIO 3Heprnn I pecypcoB. B KaueCTBeHaONMHNAHr O Heo6xOAnMocTN OTdEBHOY TIN3aun 6bIToBbIX np6OBpOB Ha n3DeJIne HaHeceH 3HaK B VidepepeepkHyTORO MycOpHOrO 6aka Ha KOnecax.
Eλληνικα
Pniv ano tv avaywwn, napakaaw eimwote nvy mpoovin oaiia otou npexetai n Eikovopapnon
TPIV XPOIIOIOEETN OOUKEUN Kenwood
abw y kwlly bokaoa aayy aayy
KENWOOD KENWOOD
l2 : y = - 4x + 1 l2( x) = - 4x + 1 > 0
jle11p12
1J 1
sio jiei 1jui ci iil jaiy
Kenwood

aaii aaiiaai ai iiaai jao aolaglo
2002/96/EC aaggyy ayuay y aggaaall g
gblallllglg gaiioll no jalilll pae yiee iialll gaiiill lai
y

- KENWOOD
- before using your Kenwood appliance
- safety
- - This machine will be damaged and may cause injury if the interlock mechanism is subjected to excessive force.
- before plugging in
- before using for the first time
- key
- processor
- liquidiser
- # attachments
- to use your food processor
- to use your liquidiser
- Hints
- important
- - Allow all liquids to cool to room temperature before placing them in the liquidiser.
- choosing a speed for all functions
- maximum capacities
- using the attachments
- ⑤ knifeblade
- knife blade
- dough
- ⑥ emulsifying tool / whisk
- ⑦ slicing/shredding discs
- reversible slicing/shredding discs - thick
- to use the cutting discs
- care & cleaning
- power unit
- bowl/lid and attachments
- service & customer care
- IMPORTANT INFORMATION FOR CORRECT DISPOSAL OF THE PRODUCT IN ACCORDANCE WITH EC DIRECTIVE 2002/96/EC.
- ⑰ discos deURTAR as rodelas/picar
- - Ipeed Tem KAK 3aJIHTb JxNkOCTn B ROMOREH3aTOp daIte Nm OCTbITb DO KOMHaTHOH TEMNEpaTypbl.
- IpebeBopauHbAeMbIe DnCKn DnI Hape3Kn IOMTKaMn/pe3aHn - KpynnHa Hape3ka
- Be30nacHOCTb pa60TbI
- IcnoB3OBaHnepexuyuxDnCKOB
- Pone3HbIE COBETbl
- Yxo3a np6opom
- CINIOBOI 6JOK
- H3MeJIbUHTeJIb
- EMKOCtB/KpbIuKa H npHaIeXHOCTN
- O6cnyxmbaHne n 3a60ta o nokynataeX
- BAKHHA INHΦOPMAUЯ NO IPNABUNBHOI YTNJIN3AUIMN 3DEJIIN4 COIJIACHO INPEKTNBE EC 2002/96/EC.
- Eλληνικα
- Pniv ano tv avaywwn, napakaaw eimwote nvy mpoovin oaiia otou npexetai n Eikovopapnon
- TPIV XPOIIOIOEETN OOUKEUN Kenwood
Brand : KENWOOD
Model : Multipro Compact FP215
Category : Food Processor