SHT 700 AE - Hedge trimmers STIGA - Free user manual and instructions
Find the device manual for free SHT 700 AE STIGA in PDF.
| Product type | Cordless hedge trimmer |
| Brand | STIGA |
| Model | SHT 700 AE |
| Intended use | Cutting and trimming hedges and bushes |
| Max branch diameter | 15 mm |
| Power source | Lithium-ion battery (not included) |
| User type | Homeowners (amateur use) |
| Blade length | 700 mm |
| Number of blades | Double blade |
| Motor | Brushless electric |
| Weight (without battery) | 4.2 kg |
| Adjustable rear handle | 3 positions |
| Safety | Safety button, safety switch, blade guard |
| Blade guard | Yes, for transport and storage |
| Battery bag | Optional (allows using two batteries) |
| Charger | Available in fast or standard version (optional) |
| Blade maintenance | Cleaning and lubrication after each use |
| Storage | In a dry place, protected from the weather, out of reach of children |
Frequently Asked Questions - SHT 700 AE STIGA
User questions about SHT 700 AE STIGA
0 question about this device. Answer the ones you know or ask your own.
Ask a new question about this device
Download the instructions for your Hedge trimmers in PDF format for free! Find your manual SHT 700 AE - STIGA and take your electronic device back in hand. On this page are published all the documents necessary for the use of your device. SHT 700 AE by STIGA.
USER MANUAL SHT 700 AE STIGA
IT Tosasiepi portatile con alimentazione a batteria
MANUALE DI ISTRUZIONI
ATTENZIONE: prima di usare la macchina, leggere attentamente il presente libretto.
BG Електрическа машина за рязане на жив плет УПЪТВАНЕ ЗА УПОТРЕБА
ВНИМАНИЕ: преди да използвате машината прочетете внимателно настоящата книжка.
BS Ručni trimer za živicu na bateriju
UPUTSTVO ZA UPOTREBU
PAŽNJA: prije nego što koristite ovu mašinu, pažljivo pročitajte priručnik s uputama.
CS Přenosné akumulátorové plotové nůžky NÁVOD K POUŽITÍ
UPOZORNĚNÍ: před použitím stroje sl pozorně přečtěte tento návod k použití.
DA Bærbar batteridreven Hækkeklipper BRUGSANVISNING
ADVARSEL: læs instruktionsbogen omhyggelligt igennem, før du tager denne maskine I brug.
DE Tragbare batteriebetriebene Heckenschere GEBRAUCHSANWEISUNG
ACHTUNG: Vor Inbetriebnahme des Geräts die Gebrauchsanleitung aufmerksam lesen.
EL Φορητό ψαλίδι μπορντούρας μπαταρίας
ΟΔΗΓΙΕΣ ΧΡΗΣΠΣ
ΠΡΟΣΟΧΗ: πριν χρησιμοποιησετε το μηχανημα, διαβαστε προσεκτικα το παρον εγχειριδιο.
EN Battery powered hedge trimmer OPERATOR'S MANUAL
WARNING: read thoroughly the instruction booklet before using the machine.
ES Cortasetos portátil con alimentación por batería MANUAL DE INSTRUCCIONES
ATENCIÓN: antes de utilizar la máquina, leer atentamente el presente manual.
ET Elektriline hekilõikur KASUTUSJUHEND
TÄHELEPANU: enne maslna kasutamist lugeda tähelepanelikult antud kasutusjuhendlt.
FI Käsin kannateltava akkukäyttöinen pensasleikkuri
KÄYTTÖOHJEET
VAROITUS: lue käyttöopas huolellisesti ennen koneen käyttöä.
FR Taille-haie portatif alimenté par batterie MANUEL D'UTILISATION
ATTENTION: lire attentivement le manuel avant d'utiliser cette machine.
HR Prijenosne škare za živicu s baterijskim napajanjem PRIRUČNIK ZA UPORABU
POZOR: prije uporabe stroja, pažljivo pročitajte ovaj priručnik.
HU Hordozható akkumulátoros sövénynyíró HASZNÁLATI UTASÍTÁS
FIGYELEM! a gép használata előtt olvassa el figyelmesen a jelen kézikönyvet.
LT Rankinės akumuliatorinės gyvatvorių žirklės NAUDOJIMO INSTRUKCIJOS
DĖMESIO: prieš naudojant įrenginį, atidžiai perskaityti šį naudotojo vadovą.
LV Ar bateriju darbināms rokturamais dzīvžoga apgriezejs LIETOSANAS INSTRUKCIJA
UZMANIBU: pirms aparāta lietošanai rūpīgi izlasiet doto instrukciju.
MK Преносен поткаструвач на грмушки на батерии УПАТСТВА ЗА УПОТРЕБА
ВНИМАНИЕ: прочитајте го внимателно ова упатство пред да ја користите машината.
NL Draagbare heggeschaar met accuvoeding
GEBRUIKERSHANDLEIDING
LET OP: vooraleer de machine te gebruiken, dient men deze handleiding aandachtig te lezen.
NO Bærbar batteridrevet hekksaks INSTRUKSJONSBOK
ADVARSEL: les denne bruksanvisningen nøye før du bruker maskinen.
PL Ręczny sekator akumulatorowy INSTRUKCJE OBSŁUGI
OSTRZEŻENIE: przed użvciem maszvnv. należv uważnie przeczytać ninielsza Instrukcie.

natural_image
Diagram of a vehicle interior showing two compartments with internal components and directional arrows (no text or symbols)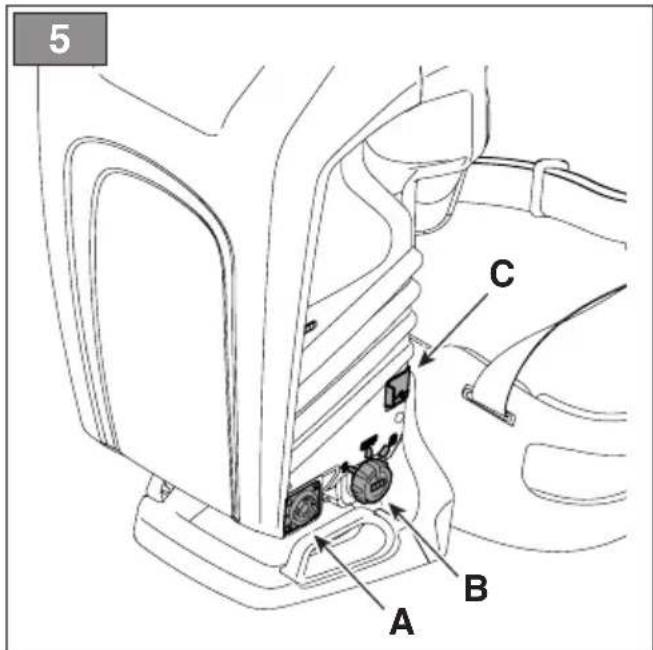
7
8
natural_image
Line drawing of a person wearing a full-body safety harness with belt and straps (no text or symbols)9


natural_image
Illustration of a person using a power saw to clean granular material, with no text or symbols present.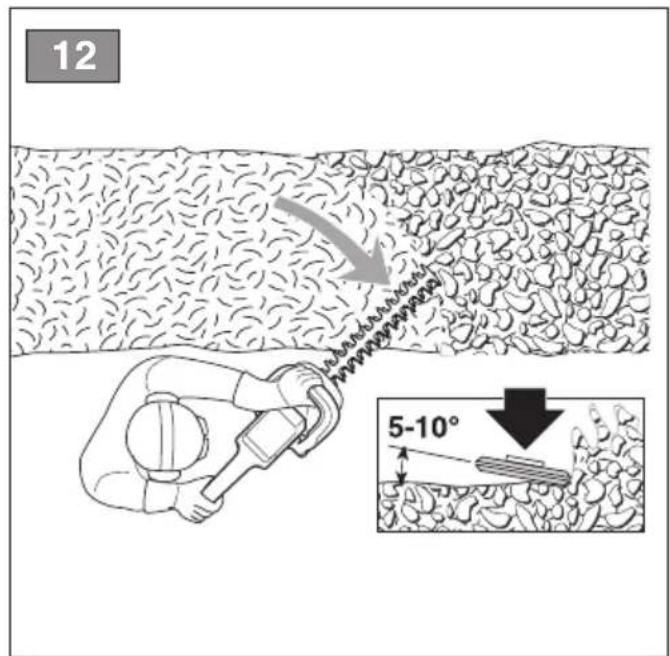
natural_image
Line drawings of two electronic devices with ventilation grilles and mounting holes (no text or symbols)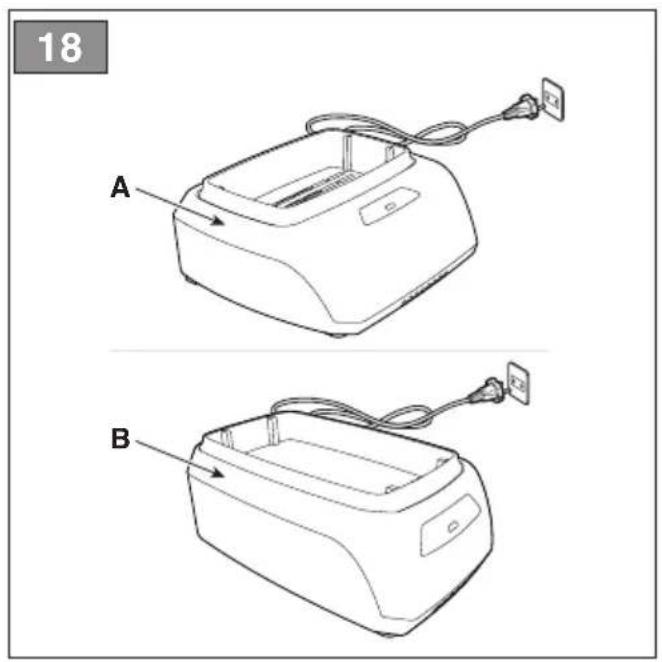
[1] LT - TECHNINIAL DUOMENYS
[2] MAKS. maitinimo jtampa
[3] NOMINALI maitinimo jtampa
[19] Akumulatora simulators
[19] Symulator akumulatora
- USO DELLA MACCHINA....7
7. USO DELLA MACCHINA
7.4 PRACOVNÍ ČINNOST
3.3 TYPESKILT PÅ PRODUKTET
- XEIPISTHPIA EΛΕΓΧΟΥ 6
6. XEIPISTHPIA EΛΕΓΧΟΥ
- GENERAL INFORMATION .... 1
- SAFETY REGULATIONS....2
- ABOUT THE MACHINE 4
3.1 Machine description and intended use...... 4
3.2 Safety signs....5
3.3 Product identification label 5
3.4 Main components....5
-
UNPACKING....6
-
ASSEMBLY 6
5.1 FITTING OF THE BATTERY BACKPACK (if available)....6
- CONTROLS....6
6.1 Safety button (activation / deactivation) ...... 6
6.2 Blade control lever (cutting means) 6
6.3 Rear handgrip release lever 6
- USING THE MACHINE .... 7
7.1 Preliminary operations.... 7
7.2 Safety checks.... 7
7.3 Start-up 8
7.4 Operation 8
7.5 Stop....9
7.6 After use....9
- ROUTINE MAINTENANCE....9
8.1 General Information....9
8.2 Battery.... 10
8.3 Cleaning the machine and the engine ..... 10
8.4 Cleaning and lubrication of the cutting means 11
8.5 Nuts and bolts 11
- OCCASIONAL MAINTENANCE 11
9.1 Cutting means occasional maintenance..... 11
- STORAGE.... 11
10.1 Storing.... 11
10.2 Storing the battery.... 12
- HANDLING AND TRANSPORT 12
- ASSISTANCE AND REPAIRS 12
- WARRANTY COVERAGE....12
- MAINTENANCE TABLE....13
- TROUBLESHOOTING 13
- ACCESSORIES ON REQUEST....15
16.1 Alternative batteries.... 15
16.2 Battery charger.... 15
16.3 Battery backpack 15
16.4 Battery simulator 15
1. GENERAL INFORMATION
1.1 HOW TO READ THIS MANUAL
Some of the paragraphs in this manual contain particularly important information in terms of safety and operation, and are highlighted differently, according to the following criteria:
NOTE or IMPORTANT These give details or further information on what has been previously indicated and aim to prevent damage to the machine or cause other damage.
The symbol highlights danger. Failure to observe the warning can lead to possible personal and/or third party injury and/or damage.
The paragraphs highlighted in a dotted grey square indicate optional characteristics not available on all models documented in this manual. Check if the characteristics are available on this model.
Whenever reference is made to a position on the machine "front", "back", "left" or "right" hand side, this refers to the operator's working position.
1.2 REFERENCES
1.2.1 Figures
The figures in these instructions for use are numbered 1, 2, 3, etc.
Components shown in the figures are marked A, B, C, etc.
Reference to component C in figure 2 is indicated with the wording: "See fig. 2.C" or simply "(Fig. 2.C)".
The figures are provided by way of example. The actual pieces can differ from those illustrated in this document.
1.2.2 Titles
The manual is arranged in chapters and paragraphs. The title of paragraph '2.1 Training" is a sub-title of "2. Safety regulations". References to titles or paragraphs are marked with the abbreviation chap. or par. and the relevant number. Example: "chap. 2" or "para. 2.1."
2. SAFETY REGULATIONS
2.1 TRAINING
THIS MACHINE MAY CAUSE SERIOUS DAMAGE AND INJURIES.
Carefully read the instructions for proper use, preparation, maintenance, start up and stopping of the machine.
Become acquainted with the controls and the proper use of the machine. Learn how to stop the machine quickly.
- Never allow the machine to be used by children or individuals who are not familiar with the instructions. Local laws may establish a minimum age for users.
- Never use the machine if the user is tired or unwell, or has taken medication, drugs, alcohol or substances that impair reflexes and concentration.
- Remember that the operator or user is responsible for accidents and unexpected events that can occur to other people or property. It is the user's responsibility to assess the potential risk of the area where work is to be carried out and to take all the necessary precautions to ensure his own safety and that of others, particularly on slopes or rough, slippery and unstable ground.
- If the machine is sold or lent to others, make sure that the operator looks over the user instructions contained in this manual.
2.2 PRELIMINARY OPERATIONS
Personal Protective Equipment (PPE)
- Always wear slim-fitting protective clothes with slash-proof protection, anti-vibration gloves, helmet, protective goggles, half-mask respirator, protective earplugs, cut resistant safety boots with non-slip soles.
- Never wear scarves, shirts, necklaces, bracelets, loose flowing clothing, laces or ties or any hanging or flapping accessory that could catch in the machine or in any objects or materials in the work area.
- Tie your hair back if it is long.
Work / Machine Area
- Thoroughly inspect the entire work area and remove anything that could get caught up in the blade, damage it and cause serious injuries to the operator (cables, electric wires, cords etc.).
• Always be aware of your surroundings and stay alert for possible hazards of which you may not be aware due to the noise of the machine.
• To avoid the risk of fire, do not leave the machine with the motor hot on leaves or dry grass.
2.3 DURING OPERATION
Work Area
- Do not use the machine in environments that pose the risk of explosion, in the presence of flammable liquids, gases or powders. Power tools create sparks which may ignite the dust or fumes.
• Work only in daylight or with good artificial light in good visibility conditions. - Keep people, children and animals away from the work area. Children must be supervised by another adult.
- Check that there is nobody within at least 15 metres of the machine's range of operation.
- Where possible, avoid working on wet, slippery ground or on uneven or steep ground that does not guarantee stability for the operator.
- Do not expose the machine to rain or wet environments. Water entering a power tool will increase the risk of electric shock.
- Pay careful attention to uneven ground (hills, dips), slopes, hidden hazards and obstacles that could limit visibility.
- Be very careful near ravines, ditches or embankments.
- Look out for traffic when using the machine near the road.
• Exercise caution when near live electric cables.
Conduct
- During work operations, always hold the machine firmly with both hands.
- Hold the power tool by insulated gripping surfaces only, because the blade may come in contact with hidden wiring. Cutter blades contacting a "live" wire may make exposed metal parts of the machine "live" and could give the operator an electric shock.
- Avoid body contact with earthed or grounded surfaces, such as pipes, radiators, cookers and refrigerators. There is an increased risk of electric shock if your body is earthed or grounded.
• Always use caution and take on a firm and well-balanced position. - Avoid using unstable ladders or platforms.
-
Never run, always walk.
-
Always keep hands and feet away from the cutting means, when starting and when using the machine.
- Attention: the blades will continue to move for a few seconds after you have switched off the motor.
- Make sure the blades do not come into violent contact with foreign bodies and try to prevent any material from being hurled after trimming.
- If something breaks or an accident occurs during work, turn off the motor immediately and move the machine away to prevent further damage; if an accident occurs with injuries or third parties are injured, carry out the first aid measures most suitable for the situation immediately and contact the medical authorities for any necessary health care. Carefully remove any debris which could cause damage or injury to persons or animals if ignored.
- Prolonged exposure to vibrations can cause injuries and neurovascular disorders (also called "Raynaud's syndrome" or "white hand"), especially to people suffering from circulation disorders. The symptoms can regard the hands, wrists and fingers and are shown through loss of sensitivity, torpor, itching, pain and discolouring of or structural changes to the skin. These effects can be worsened by low ambient temperatures and/or by gripping the hand grips excessively tightly. If the symptoms occur, the length of time the machine is used must be reduced and a doctor consulted.
Restrictions of use
- Do not use the machine if you are unable to hold it with both hands or keep steady on your legs while working.
- Never use the machine with damaged, missing or incorrectly positioned guards.
- Do not use the power tool if the switch does not turn it on and off. Any power tool that cannot be controlled with the switch is dangerous and must be repaired.
- Never disengage, deactivate, remove or tamper with the safety systems/micro switches installed.
- Do not strain the machine too much and do not use a small machine for heavy-duty work; if you use the right machine, you will reduce the risk of hazards and improve the quality of your work.
Ensure regular maintenance and correct storage to maintain machine safety and high performance levels.
Maintenance
- Never use the machine with worn or damaged parts. Faulty or worn-out parts must always be replaced and never repaired.
- The noise and vibration levels shown in these instructions are the maximum levels when using the machine. The use of an unbalanced cutting element, the excessive speed of movement, or the absence of maintenance have a significant influence on noise emissions and vibrations. Consequently, it is necessary to take preventive steps to eliminate possible damage due to high levels of noise and stress from vibration; maintain the machine well, wear ear protection devices, and take breaks whilst working.
Storage
- To reduce fire risks, do not leave containers with debris inside a room.
2.5 BATTERY / BATTERY CHARGER
IMPORTANT The following safety instructions are in addition to the safety requirements provided in the specific battery and battery charger manual delivered with this machine.
- Only use battery chargers recommended by the manufacturer to recharge batteries. An inadequate battery charger may cause electric shock, overheating or corrosive liquid to leak from the battery.
- Use only batteries specifically designed for your power tool. The use of other batteries may cause injuries and fire risks.
- Make sure that the machine is switched off before inserting the battery. Inserting a battery in a machine which is switched on can cause a fire.
- Keep all unused batteries at a distance from paper clips, coins, keys, nails, screws or other small metal objects as contact with the same can cause short circuits. Short circuits between battery contacts can lead to explosion or fires.
- Do not use the battery charger in places where there are inflammable vapours, substances or on easily inflammable surfaces like paper, fabric, etc. During
recharge, the battery charger becomes heated and may cause fire.
- When transporting batteries, make sure the contacts never come into contact with each other and never use metal containers to transport them.
2.6 ENVIRONMENTAL PROTECTION
Protecting the environment must be a significant and top priority for machine use, to the benefit of civil co-habitation and of the environment that we live in.
- Avoid being an element of disturbance to the surrounding area. Use this machine at reasonable times of the day only (not early morning or late evening when the noise could cause disturbance).
- Scrupulously comply with local regulations for the disposal of packaging, deteriorated parts or any elements with a strong environmental impact; this waste must not be disposed of with regular waste, but must be separated and taken to collection centres, which will recycle the materials.
- Scrupulously comply with local regulations for the disposal of waste materials
- When the machine is withdrawn from service, do not dispose of it in the environment, but take it to a waste disposal facility in accordance with the local regulations in force.

Do not throw electrical equipment away with domestic waste. According to the European Directive 2012/19/EU on electrical and electronic equipment waste and its implementation in
compliance with national standards, old electrical equipment must be collected separately, for eco-compatible recycling. If electrical equipment is disposed of in a landfill or in the ground, the harmful substances can reach the water table and enter the food chain, damaging your health and well-being. For further information on the disposal of this product, contact your dealer or a domestic waste collection service.
At the end of their working life, dispose of batteries safely in an eco-friendly manner. Batteries contain material classified as hazardous for you and the environment. They must
be removed and disposed of separately at a facility that accepts lithium-ion batteries.

Separate waste collection of the products and packaging used allows the materials to be recycled and reused. Reuse of recycled materials
help to prevent environmental pollution and reduces the demand for raw materials.
3. ABOUT THE MACHINE
3.1 MACHINE DESCRIPTION AND INTENDED USE
This machine is a garden tool and more precisely a battery-powered portable hedge trimmer.
The machine is essentially composed of a motor which drives a cutting means.
The operator can operate the machine and use the main controls, always keeping a safe distance from the cutting means.
3.1.1 Intended use
This machine was designed and manufactured for:
- the cutting and trimming of bushes and hedges consisting of shrubs with smaller sized branches (no wider than 15 mm);
- being used by one operator.
3.1.2 Improper use
Any other use that does not comply with the above, can be dangerous and cause damage to people and/or property. Examples of improper use may include, but are not limited to:
• cutting grass in general and in particular close to kerbs;
• shredding of materials for composting;
- pruning;
- using the machine with the cutting means above the operator's shoulder level;
- use of the machine for cutting non-plant material;
- using cutting means other than those found in the "Technical Data" table. Risk of serious injury and injuries;
- using of the machine by more than one person.
IMPORTANT Improper use of the machine will void the warranty and relieves the Manufacturer of any liability, placing all responsibility for damage or injury, to him/herself or third parties, on the user.
3.1.3 Type of users
This machine is intended for use by consumers, i.e. non-professional operators. It is intended for "hobby-related activities".
3.2 SAFETY SIGNS
The machine has various symbols on it (fig. 2). Their function is to remind the operator of the correct conduct for use, with due care and caution.
Meanings of the symbols:

WARNING! DANGER! The failure to use this machine correctly can be hazardous for oneself and others.

WARNING! Read the owner's manual before using the machine.

Use ear protection devices and goggles.

Use thick non-slip protective gloves.

Do not leave the machine in the rain (or in damp conditions)
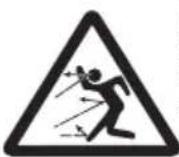
PROJECTION HAZARD! Be careful of flying debris projected by the cutting means, that can cause serious injuries to persons or damage to things.

PROJECTION HAZARD! Keep any people or pets at least 15 m away when using the machine.

Danger of cutting yourself! Keep hands and feet away from the blades.

Class II Dual insulation
IMPORTANT Any damaged or illegible decals must be replaced. Order replacement decals from an Authorised Service Centre.
3.3 PRODUCT IDENTIFICATION LABEL
The product identification label provides the following data (fig. 1):
- CE conformity marking
- Name and address of Manufacturer
- Sound power level
- Article code
- Type of machine
- Serial number
- Year of manufacture
- Supply voltage
Write the identification data of the machine in the specific space on the label on the back of the cover page.
IMPORTANT Quote the information on the product identification label whenever you contact an Authorised Service Centre.
IMPORTANT An example of the Declaration of Conformity is provided on the last pages of this manual.
3.4 MAIN COMPONENTS
The machine is composed of a series of main components that have the following functions (Fig.1):
A. Engine: supplies the drive power to the cutting means.
B. Blade (cutting means): the element designed to cut the vegetation.
C. Front hand grip: used to handle the machine and equipped with the safety switch.
D. Rear hand grip: used to handle the machine and equipped with the main control buttons.
E. Blade protection (for machine transport and handling): protects against accidental contact with the cutting means that can cause serious injuries.
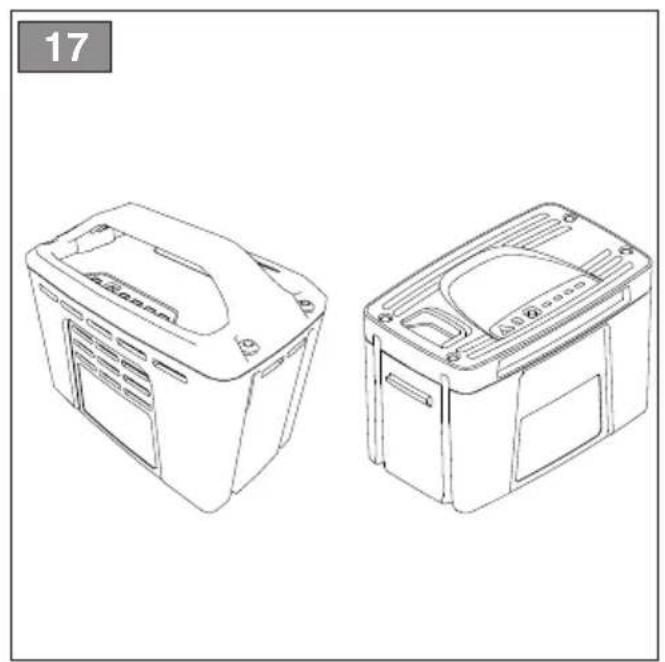
F. Battery (attachment on request, par. 16.1): device that supplies electric current to the tool; its specifications and regulations for use are described in a specific manual.
G. Battery charger (attachment on request, par. 16.2): device used to recharge the battery; its specifications and regulations for use are described in a specific manual. Two battery charger models are available: G1 (fast battery charge); G2 (standard battery charge);
H. Battery backpack (attachment on request, par. 16.3): device in which the batteries are placed.
I. Connection cable: cable used to connect the machine to the battery backpack.
J. Battery simulator (attachment on request, par. 16.4): device that, if inserted in the machine housing, allows the use of the battery backpack.
4. UNPACKING
IMPORTANT The safety regulations to follow are described in chap. 2. Strictly comply with these instructions to avoid serious risks or hazards.
⚠️ Unpacking should be done on a flat and stable surface, with enough space for machine handling and its packaging, always making use of suitable equipment.
- Carefully open the packaging, paying attention not to lose components.
- Consult the documentation in the box, including these instructions.
- Remove the machine from the box.
- Dispose of the box and packaging in compliance with local regulations.
5. ASSEMBLY
5.1 FITTING OF THE BATTERY BACKPACK (IF AVAILABLE)
The battery backpack is delivered already assembled (Fig. 1.H) and can be released from the strap support (Fig. 3) and carried by hand. To release the battery backpack, press on the two upper buttons (Fig. 3.A). The battery compartments are located on both sides of the backpack (Fig. 4) The following can be found on the right side of the backpack:
• cable socket (Fig. 5.A)
- battery selector (Fig. 5.B)
- one USB port for charging other devices (e.g. mobile phones) (Fig. 5.C).
To avoid any loose cables, there are grooves on both sides and at the rear, in which the power cable can be inserted.
6. CONTROLS
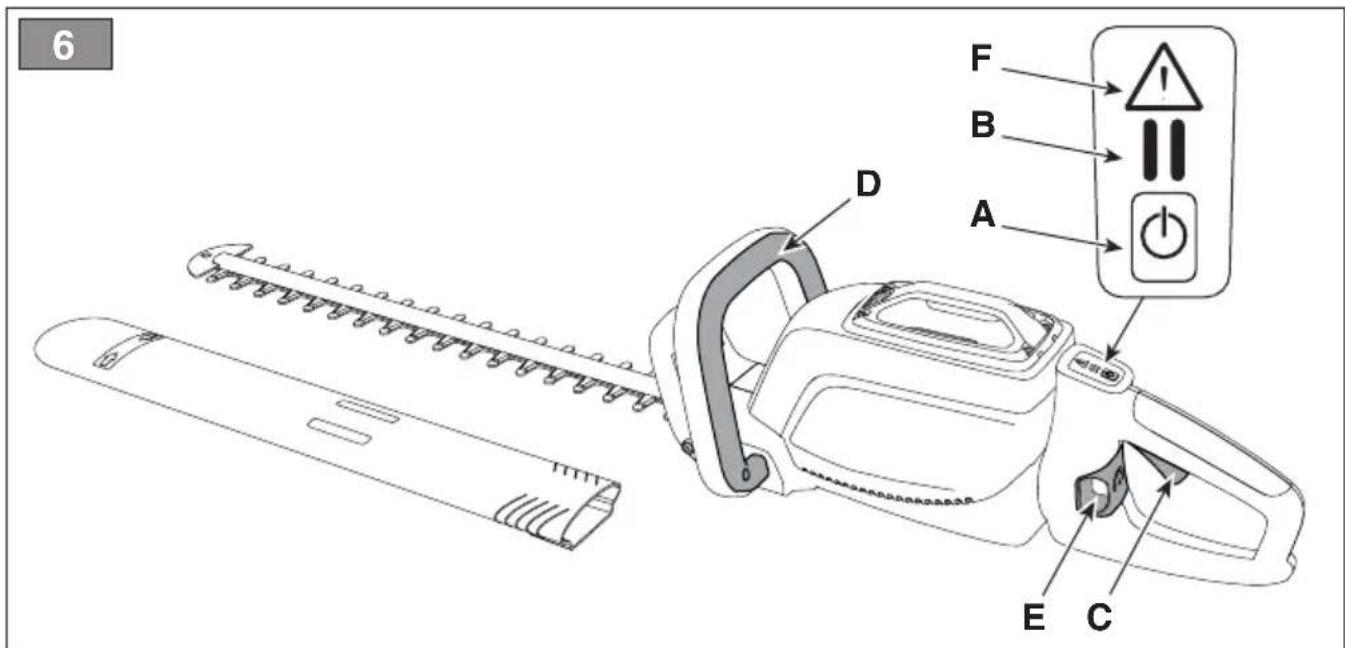
6.1 SAFETY BUTTON (ACTIVATION / DEACTIVATION)

Press this button to activate and deactivate the machine's electrical circuit (Fig. 6.A).

One LED lit: the machine's electrical circuit is activated (Fig. 6.B). The machine is ready for use. Both LEDs lit: the machine is working.
LEDs off: The electrical circuit is completely deactivated.

IMPORTANT Do not keep your finger on the button when moving the machine to avoid accidentally enabling the machine.
The "Warning" icon (Fig. 6.F) comes ON in the event of machine fault (refer to the troubleshooting table, par. 15).
6.2 BLADE CONTROL LEVER (CUTTING MEANS)
Used to start and regulate the blade speed.
It is only possible to activate the cutting means (Fig. 1.B) when both the blade control lever (Fig. 6.C) and the safety switch (Fig. 6.D) are pressed simultaneously.
The cutting means stops automatically when the lever or safety switch are released.
6.3 REAR HANDGRIP RELEASE LEVER
The release lever (Fig. 6.E) is used to adjust the rear hand grip (Fig. 1.D) to 3 different positions in relation to the cutting means to make trimming your hedges easier.
The handgrip must only be adjusted when the safety button is deactivated (light off).
7. USING THE MACHINE
IMPORTANT The safety regulations to follow are described in chap. 2. Strictly comply with these instructions to avoid serious risks or hazards.
7.1 PRELIMINARY OPERATIONS
Before starting to work, it is necessary to carry out several checks and operations to ensure you can work efficiently and in maximum safety.
Place the machine in a stable horizontal position on the ground.
7.1.1 Checking the battery
The machine is supplied without the battery. Purchase the battery with the capacity that most suits your operational requirements and fully charge it according to the instructions in the battery booklet. The list of approved batteries for this machine can be found in the "Technical Data" table.
- Before each use: - check the battery charge status following the instructions provided in the battery booklet.
7.1.2 Adjusting the handgrip
⚠️ Only perform this operation when the safety button is deactivated (light off).
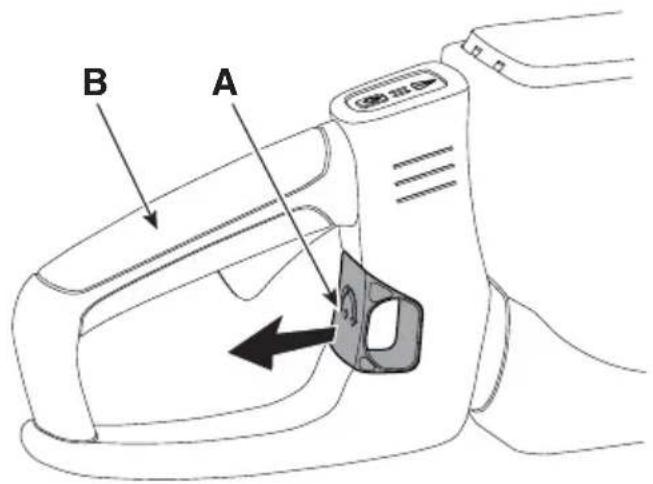
- Pull the rear handgrip release lever backwards (Fig. 7.A);
- start rotating the rear handgrip (Fig. 7.B);
- Release the release control lever (Fig. 7.A);
- rotate the handgrip until it clicks into the desired position.
IMPORTANT Before using the machine check that the release lever has completely returned to the block position, and the rear handgrip is firmly attached.
When working, the rear handgrip must always be in a vertical position, whatever the position of the cutting means.
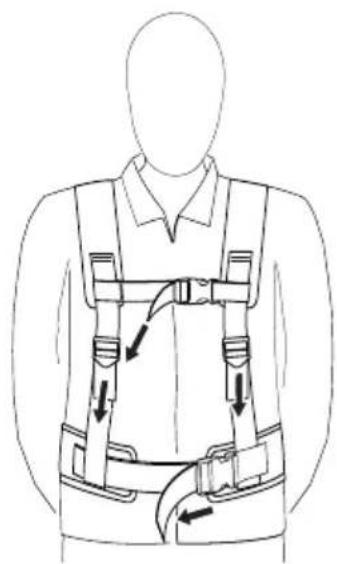
7.1.3 Use of the backpack (if available)
- Insert the battery in one of the compartments of the battery backpack (Fig. 4) and push it completely, until hearing the click that signals its locking in position, ensuring thus the electrical contact;
- Connect the cable to the backpack in the specific socket (Fig. 5.A) and rotate it until hearing the specific click that signals its locking in position, ensuring thus the electrical contact;
- adjust the straps and close the harness in the front (Fig. 8).
7.2 SAFETY CHECKS
Run the following safety checks and ensure that the results correspond to those outlined in the tables.
⚠️ Always carry out the safety checks before use.
7.2.1 General check
| Object Result | |
| Handgrips (Fig. 1.C, Fig. 1.D) and guards | Are clean, dry and fixed firmly to the machine |
| Screws on the machine and blade | Correctly tightened (not loose) |
| Cooling air ducts Not clogged | |
| Blade (Fig. 1.B) Sharp, without signs of damage or wear | |
| Guards | Intact, undamaged. |
| Battery (Fig. 1.F) | No damage to the casing, no liquid leakage |
| Machine | No signs of damage or wear |
| Electrical cables | All insulation intact. Intact to prevent sparks from occurring |
| Blade control lever (Fig. 6.C), safety switch (Fig. 6.D) | The levers must move freely and not be forced. |
| Test driving | No abnormal vibrations. No abnormal sound |
7.2.2 Machine operating test
| Action Result | |
| 1. Fit the battery inside its compartment (Fig. 10.A);2. press the safety button (Fig. 9.A) | The green light must come on (electrical circuit activated) and the cutting means must not move |
| Start the machine (para. 7.3);1. engage the blade control lever (Fig. 9.B) and the safety switch simultaneously (Fig. 9.C);2. release the blade control lever (Fig. 9.B) or the safety switch (Fig. 9.C) | 1. The blade should move2. The controls should return automatically and rapidly to the neutral position and the blade should stop |
| 1. When the blade is engaged, pull the rear handgrip release lever backwards (Fig. 7.A) | 1. The blade should stop |
⚠️ If any of the results fail to match the indications provided in the tables below, do not use the machine! Take it to a service centre to be checked and repaired if necessary.
7.3 START-UP
7.3.1 Start-up with battery
- Remove the blade guard (Fig. 1.E) (if used);
- make sure the blade is not touching the ground or any other object;
- Fit the battery inside its compartment (Fig. 10.A);
- press the safety button (Fig. 9.A)
- engage the blade control lever (Fig. 9.B) and the safety switch simultaneously (Fig. 9.C).
7.3.2 Start-up with battery simulator (if available)
- Adopt a firm and well-balanced position;
- make sure the blade is not touching the ground or any other object;
- insert the battery simulator correctly in its housing on the machine (Fig.10.J)
- connect the connection cable to the battery simulator (Fig.10.1)
- select the battery using the selector (Fig. 5.B)
- press the safety button (Fig. 9.A)
- engage the blade control lever (Fig. 9.B) and the safety switch simultaneously (Fig. 9.C)
7.4 OPERATION
To use the machine proceed as follows:
- always hold the machine firmly with two hands, using the machine with the cutting means under the operator's shoulder level;
Do not remove cut material or hold material to be cut when blades are moving. Make sure the safety button is disengaged (light off) when clearing jammed material.
NOTE During use, the battery is protected against total drainage with a protective device that switches off the machine and stops it from working.
NOTE After one minute of inactivity, if turned on, the machine will automatically switch off.
7.4.1 Work techniques
It is recommended to trim the two vertical sides of the hedge before trimming the top.
NOTE The battery power reserve (and therefore the mowable vegetation area before recharging is required) depends on many factors described in par. 8.2.1.
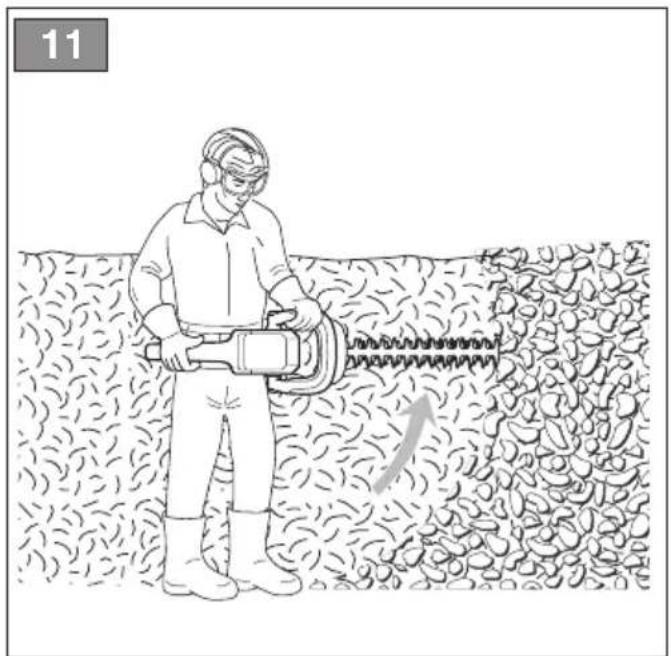
7.4.1.a Vertical cutting
Proceed by cutting using curved movements from the bottom towards the top, keeping the blade as far from the body as possible (Fig. 11).
7.4.1.b Horizontal cutting
The best results will be obtained with the blade slightly inclined ( 5^ - 10^ ) in the direction you are cutting, proceed with a curved movement, slowly and without interruptions, especially in the case of very thick hedges (Fig. 12).
7.4.2 Operating suggestions
If the blades block while running or get caught up in the hedge branches:
- stop the machine immediately (para. 7.5);
- wait for the cutting means to come to a halt;
- remove the battery (para. 8.2.2);
- Remove the jammed material.
7.4.3 Lubricating the blades whilst working
If the cutting means overheats whilst working, it is necessary to lubricate the internal surfaces of the blades (para. 8.4).
This operation can only be done with the machine off and the battery removed from its housing (para. 8.2.2).
7.5 STOP
To stop the machine:
- Release the blade control lever (Fig. 9.B) or the safety switch (Fig. 9.C);
• disengage the safety button (light off) (Fig. 9.A).
When you have stopped the machine, it will take a few seconds for the cutting means to stop.
Always stop the machine:
- when moving between work areas.
Do not keep your finger on the safety button when moving the machine to avoid accidentally enabling the machine.
7.6 AFTER USE
7.6.1 After use with the battery
- Remove the battery from its housing and recharge it (para. 8.2.2).
- When the cutting means has halted, fit the blade guard (Fig. 1.E).
- Allow the engine to cool before storing in an enclosed space.
- Clean (par. 8.3).
- Check there are no loose or damaged components. If necessary, replace the damaged components and tighten any screws and loose bolts or contact the authorised service centre.
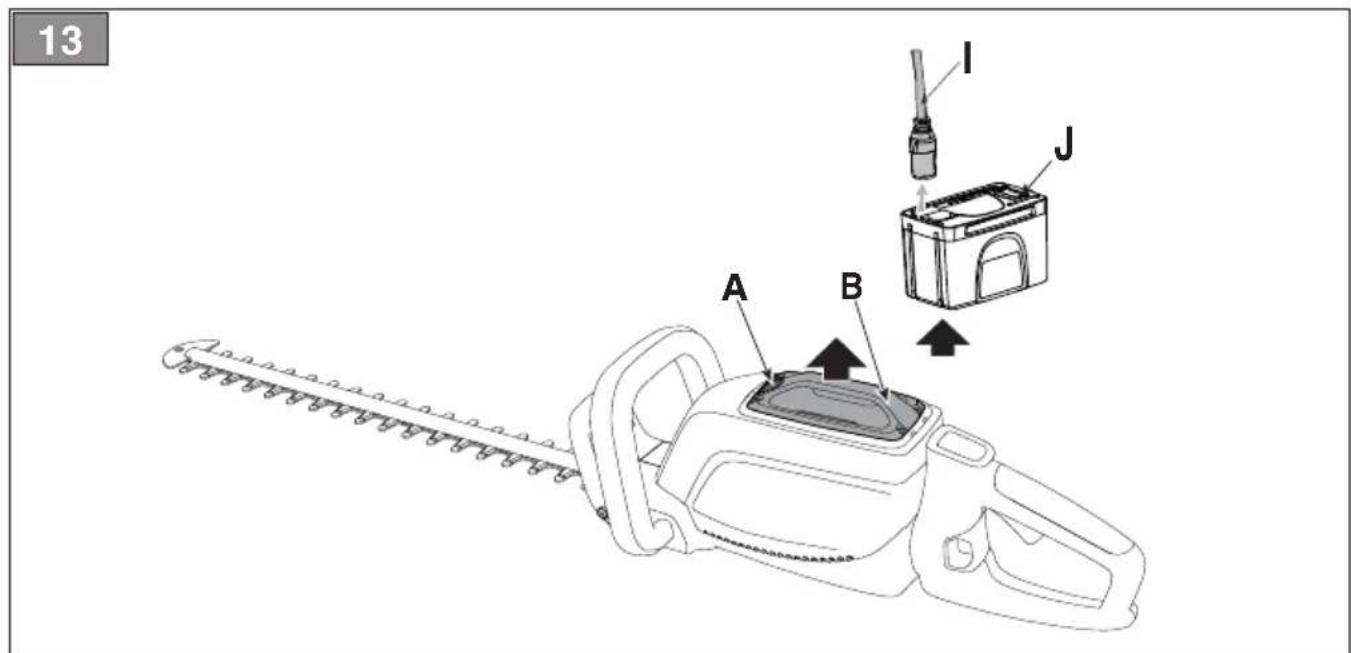
7.6.2 After use with battery simulator (if available)
- Move the battery backpack selector to "OFF" (Fig. 5.B);
- remove the battery simulator from the machine (Fig. 13.J);
- remove the battery backpack;
- disconnect the connection cable from the battery simulator (Fig.13.1) and from the backpack (fig. 5.A)
- remove the battery from the backpack (Fig. 14) and charge it (par. 8.2.2);
- allow the engine to cool before storing the machine in an enclosed space;
- Clean (para. 8.3);
- Make sure there are no loose or damaged components. If necessary, replace the damaged components and tighten any screws and loose bolts or contact the authorised service centre.
IMPORTANT Always remove the battery (para. 8.2.2) and fit the blade guard whenever the machine is unused or left unattended.
8. ROUTINE MAINTENANCE
8.1 GENERAL INFORMATION
IMPORTANT The safety regulations to follow are described in chap. 2. Strictly comply with these instructions to avoid serious risks or hazards.
⚠️ Before performing any maintenance operations:
- stop the machine;
- Remove the battery from its housing and recharge it (para. 8.2.2);
- when the cutting means is stationary, apply the blade protection device, (except when working directly on the blade);
- allow the engine to cool before storing in an enclosed space;
- use suitable clothing, protective gloves and goggles;
-
read the relevant instructions.
-
The frequency and types of maintenance are summarised in the "Maintenance Table" (see chapter 14). The table will help you maintain your machine's safety and performance. It summarises the main interventions to be made and the frequency applicable to each of them. Carry out the relevant task as soon as it is scheduled to be performed.
– The use of non-original parts and accessories could have negative effects on machine operation and safety. The manufacturer declines any responsibility for damage or injury caused by said products.
– Genuine spare parts are supplied by Authorised Assistance Centres and Dealers.
IMPORTANT Any maintenance and adjustment operations not described in this manual must be carried out by your dealer or Authorised Service Centre.
8.2 BATTERY
8.2.1 Battery power reserve
Battery power reserve (and therefore the cuttable vegetation area before recharging is required) mainly depends on:
a. Environmental factors, that cause higher energy requirements:
- cutting/trimming of very thick or wet hedges;
- cutting/trimming of bushes with branches that are too thick;
b. operator behaviour that should be avoided:
– switching the machine on and off frequently whilst working;
- adopting a cutting technique that is unsuitable for the work to be performed (para. 7.4.1);
– cutting speed unsuitable for the condition of the hedge to be cut.
To optimise battery power reserve it is always recommended to:
• cut the hedge when dry;
- set a cutting speed suitable for the condition of the shrubs;
- use the most appropriate technique for the work to be performed.
If the need arises to use the machine for sessions which exceed the capability of a standard battery, it is possible to:
• purchase a second standard battery to immediately replace the discharged
battery, without compromising the continuity of operations;
• purchase a battery with an extended power reserve compared to the standard version (para. 16.1).
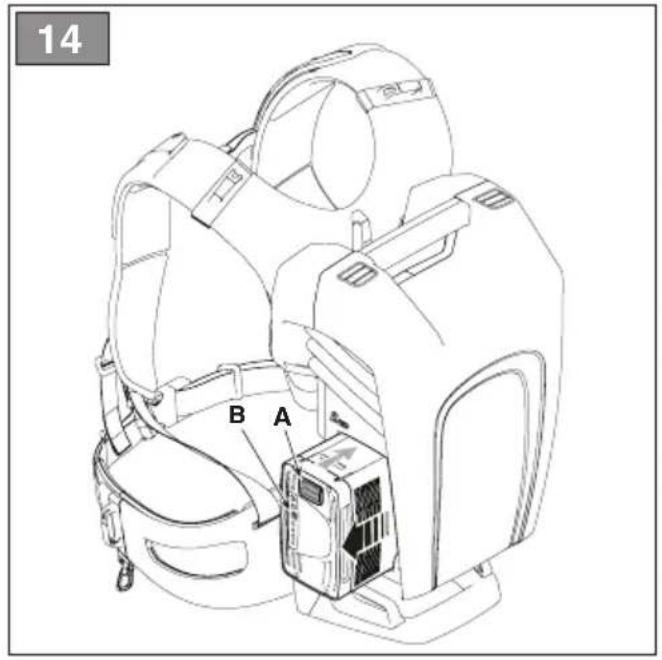
8.2.2 Battery removal and recharging
- Press the locking button located in the battery on the machine (Fig. 13.A) or on the backpack (Fig. 14.A) (if available);
- remove the battery from the machin (Fig. 13.B) or from the battery backpack (Fig. 14.B) (if available);
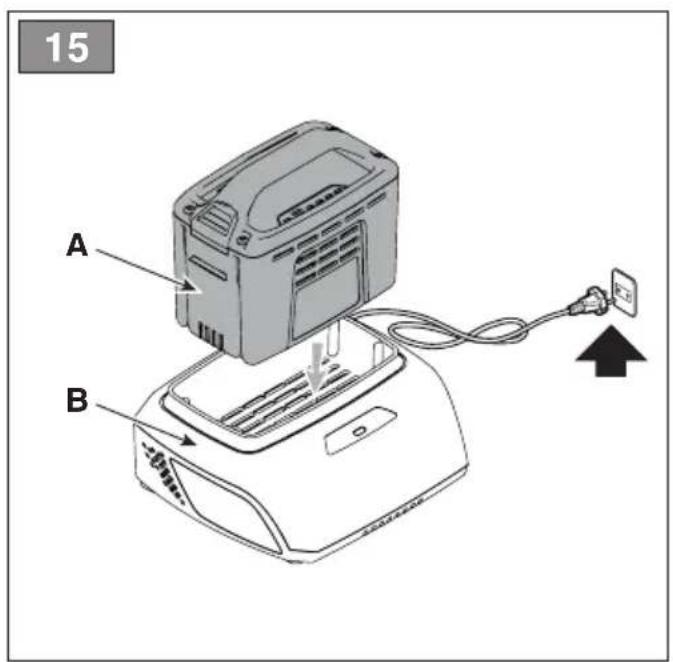
- fit the battery (Fig. 15.A) in the battery charger housing (Fig. 15.B);
- Connect the battery charger (Fig. 15.B) to a power socket with the voltage indicated on the rating plate;
- fully charge the battery according to the instructions in the battery/battery charger booklet.
NOTE The battery is equipped with a guard that inhibits recharging if the environmental temperature is not between 0 and +45°C.
NOTE The battery can be recharged at any time, even partially, with no risk of damaging it.
8.2.3 Refitting the battery on the machine
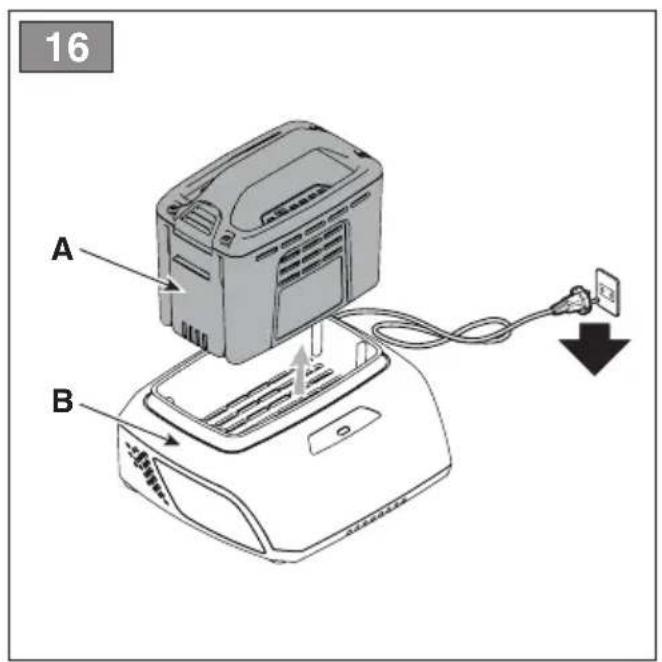
When recharging is completed:
- Remove the battery from its housing in the battery charger (Fig. 16.A) (do not continue recharging once recharging is completed);
- Disconnect the battery charger (Fig. 16.B) from the electrical mains;
- insert the battery in its housing on the machine (Fig. 10.A) or in one of the housing of the battery backpack (Fig. 4) (if available)
- push it completely, until hearing the click that signals its locking in position, ensuring thus the electrical contact.
8.3 CLEANING THE MACHINE AND THE ENGINE
To reduce fire hazards, keep the machine and, in particular, the motor free of leaves, branches or excessive grease.
• Always clean the machine after use with a damp cloth dipped in neutral detergent.
- Remove all traces of humidity using a soft damp cloth. Humidity can generate risks of electric shocks.
- Do not use aggressive detergents or solvents to clean the plastic parts or hand grips.
- Do not spray water onto the motor and electrical components and prevent them from getting wet.
- To avoid overheating and damage to the motor or the battery, always keep the cooling air vents clean and free of debris.
8.4 CLEANING AND LUBRICATION OF THE CUTTING MEANS
To increase the efficiency and working life of the blades, clean and lubricate them carefully after each work session:
Do not touch the cutting means until the battery has been removed and the cutting means is completely stationary.
- Place the machine in a stable horizontal position on the ground.
- Use a soft cloth to clean the blades, along with a brush to remove more difficult dirt and debris.
- Lubricate the blades by applying a light layer of specific oil, preferably the non-pollutant type, along the upper edge of the blade.
8.5 NUTS AND BOLTS
- Keep all nuts, bolts and screws tight to be sure the equipment is in safe working condition.
- Check regularly that the handles are fixed firmly.
9. OCCASIONAL MAINTENANCE
9.1 CUTTING MEANS OCCASIONAL MAINTENANCE
⚠ Do not touch the cutting means until the battery has been removed and the cutting means is completely stationary.
If the blades are used correctly, following all the instructions provided, they will not require any maintenance work and will not need sharpening.
9.1.1 Checks
Periodically check that the blades are not bent, damaged or deformed and that the screws are adequately tightened.
Adjustment of the distance between blades is not necessary, as this is predetermined by the manufacturer.
9.1.2 Sharpening
It is necessary to sharpen the blades when the trimming performance decreases and the branches tend to stick together.
⚠ For safety reasons, sharpening should be done by an Authorised Service Centre with suitable skills and equipment for the job; without risking any damage to the blade which would make it unsafe when used.
Always replace and never repair a blade which has blunt cutting edges.
9.1.3 Replacement
The blade must never be repaired, but must be replaced as soon as signs of breaking are noted or the sharpening limit is exceeded. For safety reasons replacements should be performed by an Authorised Service Centre.
Blades displaying the code indicated on the Technical Data table should be used on this machine.
Given product evolution, the blades listed in the "Technical Data" table may be replaced in time with others having similar interchangeable and operating safety features.
10. STORAGE
IMPORTANT The safety regulations to follow for putting into storage are described in paragraph 2.4. Strictly comply with these instructions to avoid serious risks or hazards.
10.1 STORING
When the machine is to be stored away:
- remove the battery from its housing and recharge it (para. 8.2.2);
- when the cutting means has halted, fit the blade guard;
- allow the engine to cool before storing in an enclosed space;
- Clean (para. 8.3);
- Make sure there are no loose or damaged components. If necessary, replace any damaged components and
tighten any screws and loose bolts or contact the authorised service centre;
6. Store the machine:
– in a dry place;
– protected from inclement weather;
– in a place out of children's reach;
– making sure that keys or tools used for maintenance are removed.
10.2 STORING THE BATTERY
The battery must be kept in a cool, shaded place without humidity.
NOTE If unused for any length of time, recharge the battery every two months to prolong its working life.
11. HANDLING AND TRANSPORT
Whenever the machine is to be handled or transported you must:
- stop the machine (para. 7.5);
– remove the battery from its housing and recharge it (para. 8.2.2); - when the cutting means has halted, fit the blade guard;
- wear protective work gloves;
– only hold the machine using the hand grips and position the cutting means in the opposite direction to that used during operations.
When transporting the machine on a vehicle, always:
– fasten the machine securely with cables or chains;
– position it so that it does not cause a hazard to anyone.
12. ASSISTANCE AND REPAIRS
This manual provides all the necessary information to run the machine and for correct basic maintenance operations which can be performed by the user. Any regulations and maintenance operations not described herein must be carried out by your Dealer
or Authorised Service Centre, which have the necessary knowledge and equipment to ensure that the work is carried out correctly, maintaining the correct degree of safety and the original operating conditions of the machine.
Any operations performed in unauthorised centres or by unqualified persons will totally invalidate the Warranty and all obligations and responsibilities of the Manufacturer.
- Only Authorised Service Centres can carry out guaranteed repairs and maintenance.
- The Authorised Service Centres only use genuine spare parts. Genuine spare parts and attachments have been designed specifically for machines.
- Non-original parts and attachments are not approved; use of non-original spare parts and attachments will jeopardise the safety of the machine and relieve the Manufacturer from all obligations or liabilities.
- It is advisable to send your machine once a year to an Authorised Service Centre for servicing, assistance and safety device inspection.
13. WARRANTY COVERAGE
The warranty covers all material and manufacturing defects. The user must follow all the instructions provided in the accompanying documentation.
The warranty does not cover damage caused by:
- failure to become familiar with the documentation accompanying the machine;
- carelessness;
- incorrect or forbidden use or assembly;
- use of non-genuine spare parts;
- use of attachments not supplied or not approved by the manufacturer.
The warranty does not cover:
- normal wear and tear of consumables such as wheels, blades, safety bolts and wires;
• normal wear and tear.
The purchaser is protected by his or her own national legislation. The purchaser's rights under the national laws or his or her own country are not in any way restricted by this warranty.
14. MAINTENANCE TABLE
| Intervention Frequency Notes | ||
| MACHINE | ||
| Check all fasteners | Before each use para. 8.5 | |
| Safety checks/check controls | Before each use par. 7.2 | |
| Check the battery charge status | Before each use * | |
| Recharge the battery | After each use para. 8.2.2* | |
| Cleaning the machine and the engine | After each use par. 8.3 | |
| Cleaning and lubrication of the cutting means | After each use para. 8.4 | |
| Checking for any damage to the machine. If necessary, contact the authorised service centre. | After each use - | |
| Checking the cutting means | After each use para. 9.1.1 | |
| Sharpening the cutting means | - para. 9.1.2 | ** |
| Replacing the cutting means | - para. 9.1.3 | ** |
* Refer to the battery/battery charger manual.
** The operation must be carried out by your Dealer or an Authorised Service Centre
15. TROUBLESHOOTING
If problems persist after implementing the solution, contact your Dealer.
| PROBLEM PROBABLE CAUSE SOLUTION | ||
| 1. When the safety button is pressed, the green light does not come on | Battery is not inserted or is inserted incorrectly | Make sure that the battery is inserted correctly (para. 8.2.3) |
| 2. When the safety button is pressed, the green light does not come on, the LED indicator (Fig. 6.F) blinks | Low battery Check the battery status and recharge if necessary (para. 8.2.2) | |
| 3. The motor shuts down whilst working | Battery is not inserted correctly Make sure that the battery is inserted correctly (para. 8.2.3) | |
| 4. The motor stops during work and the LED indicator (Fig. 6.E) blinks | Low battery Check the battery status and recharge if necessary. (para. 8.2.2) | |
| 5. The cutting means is stationary when the blade control lever and safety switch are engaged | Hedge trimmer is damaged. | Do not use the hedge trimmer. Immediately turn off the machine remove the battery and Contact an Authorised Service Centre. |
| 6. The cutting means overheats whilst working | Insufficient blade lubrication | Turn off the machine, wait until the cutting means is stationary, remove the battery and lubricate the blades (para. 8.4) |
| PROBLEM PROBALE CAUSE SOLUTION | ||
| 7. The cutting means comes into contact with a line or electric cable | - DO NOT TOUCH THE BLADE AS IT | MAY BE LIVE AND BE EXTREMELY DANGEROUS! Grasp the machine using the insulated rear hand grip only and position it at a safe distance from yourself.Disconnect the current that powers the severed line or mains cable and remove the battery before freeing the blade teeth. |
| 8. The cutting means comes into contact with a foreign body. | - Turn off the machine remove the battery and:– inspect for damage;– check for and tighten any loose parts;– have any damaged parts replaced or repaired with parts having equivalent specifications. | |
| 9. Excessive noise and/or vibration is experienced whilst working | Loose or damaged parts Turn off the machine remove the battery and:– inspect for damage;– check for and tighten any loose parts;– have any damaged parts replaced or repaired with parts having equivalent specifications. | |
| 10. The machine gives off smoke whilst working | Hedge trimmer is damaged. Do not use the hedge trimmer. Immediately turn off the machine remove the battery and Contact an Authorised Service Centre. | |
| 11. Battery power reserve is low | Severe working conditions requiring greater current absorption | Optimise operations (para. 8.2.1) |
| Battery is insufficient for operating requirements | Use a second battery or an extended battery (para. 16.1) | |
| Decrease in battery capacity Purchase a new battery | ||
| 12. The battery charger is not recharging the battery | Battery is not correctly inserted in the battery charger | Check it is correctly inserted (para. 8.2.3) |
| Unsuitable environmental conditions Recharge the battery in places with suitable temperatures (see battery/battery charger instruction manual) | ||
| Dirty contacts Clean the contacts | ||
| The battery charger is not energised Check it is plugged in and the power socket is energised | ||
| Faulty battery charger Replace with an original spare part | ||
| If the problem persists, refer to the battery/battery charger manual | ||
| 13. The LED indicator (Fig. 6.F) remains ON in steady mode | Self-check failed | Do not use the machine. Immediately turn off the machine, remove the battery and contact a service centre. |
| 14. The LED indicator (Fig. 6.F) remains ON in flashing mode | Battery communication error | Do not use the machine. Immediately turn off the machine, remove the battery and contact a service centre. |
| Rotor blocked | Do not use the machine. Immediately turn off the machine, remove the battery and contact a service centre. | |
| Current overload | Optimize machine usage. | |
16. ACCESSORIES ON REQUEST
16.1 ALTERNATIVE BATTERIES
Different capacity batteries are available to suit specific operating requirements (Fig. 17). The list of approved batteries for this machine can be found in the "Technical Data" table.
16.2 BATTERY CHARGER
Device used to recharge the battery: fast (Fig. 18.A), standard (Fig. 18.B).
16.3 BATTERY BACKPACK
The device is used to place the two batteries and provides the electrical power required for the operation of the machine. It is provided with a cable used for the connection to the machine (Fig. 1.I) and with a selector (Fig. 5.B) to select one of the two batteries (position "1" and "2") and "OFF".
16.4 BATTERY SIMULATOR
Device that, if inserted in the machine housing, allows the use of the battery backpack.
ÍNDICE
1.1 KUIDAS JUHENDIT LUGEDA
- SÄÄNNÖLLINEN HUOLTO....9
- YLIMÄÄRÄINEN HUOLTO....11
16.1 VALINNAISET AKUT
11. MANUTENTION ET TRANSPORT
8. PLĀNOTĀ TEHNISKĀ APKOPE
8.1 VISPĀRĒJA INFORMĀCIJA
2.5 ACCU / ACCULADER
2.6 BESCHERMING VAN DE OMGEVING
10.2 STALLING VAN DE ACCU
- GENERELT....1
- SIKKERHETSBESTEMMELSER....2
- BLI KJENT MED MASKINEN....4
- EKSTRAORDINÄERT VEDLIKEHOLD 11
2.4 VEDLIKEHOLD, LAGRING
3. BLI KJENT MED MASKINEN
3.1 BESKRIVELSE AV MASKINEN OG BEREGNET BRUK
8. ORDINÆRT VEDLIKEHOLD
8.1 GENERELT
7.4 PRACOVNÁ ČINNOSŤ
INNEHÅLLSFÖRTECKNING
D. Lgs. 262/2002, ANNEX V (Italy)
[Unreadable due to severe distortion and noise]
| SL (Příčnost výd nám) | BS (Právsko o sodnámnosti)EZ izvaju o sodnámnosti(dlěstnýu o měsídna 200642/EE, Prílog II, ddo a):a) Šmimob) Dajla zląg pod vlastnídem odgovornostku da je stejro: vepešetnýu motové na vlastnížu odvodnostku, je stroj: prostelomomotro revojne třave:a) Tří o svenýi model.b) Menec lete toklavne.c) Kredná výd neve. daje.c) Mošet. baterje.5. Skladen je zocoditli Čratisky :c) Ustanova klíza patritila.e) Eša právedí třa.s) Šklovanje na usklajnéde predokce i zemžením na zvočne mead.c) Zapstovným lityse zvočne mead.h) Indistat na moć.d) Ostej, početlakčnega za sestovo tohnětine.e) Krin in datum | SK (Právsko půdňněna výd stnučná)ES výdstnámie o skhod(Šmirnica o Srojných zariadeních 200642/EE,Prílog II, dso a):1. Splochnost2. Vysklasih pod vlastnížu odvodnostku, je stroj: Premonční motové platná nečnice strahničnítravlava zhřivo plota3. Typ / Zakstiny model4. Motor, spazvnoči6. Vysklasih šlátja7. Metor, akumulator8. Motor, skumulator9. Szkladen na spončenat zahřejnina direktiva: a) Certifikacije tříja e) EZ špitňanje třa.Pazvanje na sukladne norme (j) Imjenovní nivů zvočne osprej. b) Ustatovrani nivů zvočne slage k) Instalatsnane smage c) Mečia výdstena za tradu tohnětike broture: a) Mlečia a Datum | |
| RO (Trudstavne manušnáci tečnámstná)CE Declarizte de Conformitate(Indlachne Magno 2006202CE, Arneč II, partes A)1. Sedolstoca2. Sectanice propria rupendore ca mšina: Magina de tětir garduriti portabita, cu motor, telērtutins de gard viu a) Tip / Med de bazai b) Partesi imobilati c) Numer de serie a) Motor, balenje.3. Eto je conformitate cu specifizatilie direktiva: o Organism do certificare2. Examigna CE da Třo.4. Telenje la Sondentle a ammonizate.5. Nivel de putere sonorý můsnerat b) Nivel de putere sonorý genantot b) Poinere instaltati c) Persand autoritzati sa intomessol Desarul Tehnic. e) Ločil i Data | LT (Originičný rosmunljý vědnišná)EB artiklás deklarajta(Masury diskryvku 200642/EE, Přídes II, děla a):1. Bondrově2. Pristila asakomytke, kad (tranginyos: Rakindis motorins'gevstavkyčníklo, gyvovraty'gavjnes/megafedivnimasa) a) Tipa / Basnis Modala b) Panačným Pageminnemetal b) Berlín numará. b) Varlitie - baterje.3. Artihina direktvýa za pateliktas spot fiklácijas: a) Sertifikavimo plajekc.6) CE tipo tyrīmas. b) Numorola i suskintas Normas c) Heliustanas garam gallos lybls b) Užtitertnamas garse gallos lybls c) Instaluntatgella e) Autorizadas amuo sudaryti Technine Dokumentacije; b) Vidra ir data | LV (Mukkočki, ličklome na mýjlnstskoties)EK arbitlstbas deklarajta (Odrěchka 200642/EE par matinám, platikums II, děla A)1. Uzsknama2. Uzemneme por to plu útiblubu, pasžino, ka mašina; Ar sledžiny apnkotals rotkuramals deriváloga apjkatici,dživžboga glučuna spazvnoči4. Typ / Izlas modala5. Murensi / Režnikovne geda6. Srljšles numara7. Matim: akumulatora3. Abitist štou direktvý prestatná: b) Certifikacijas jeptlós c) Ct. hydnejte peškula.4. Absuce uz harmonizitem standardim j) zamštěna skunas in terasite finanla g) Garanticka skunas internatites finans k) Uzstaditá jeda p) Přovravlne daritelnics, kao segalavuje tředniške dokumentacića; b) Vidra un datum | |
| SK (Próveda o građin uplatnási)EC dušenčnja o anglošenosti (Direktva o maštnuma 200642/EE, Prílog II, dso a):1. Pedružnega2. Daje izgru pod vlastnídem odgovornostku da je mašnár: Rúmi motomi bítmar za 2ku ogradu razvalnájba.3. Tipt / Osservi model.b) Menec rúčedna provozdne c) Sejltal sur a) Soodlator.4. Usučkady a sounovní zahřejnina direktiva: a) Sertifikacijas loto.c) Eclagom.4. Podživanje na usladene norme b) Ummeni niše zucine osnige c) Gaspovora niva zutoze osnega b) Instalatsnane osnaga c) Ostej výdsklavná za sustadu janje telnicka bradura c) Mečia i datum | RO (Právsko na originale na instruktivne)EO djenikovne na segtylenstnica (Projektom Nešminu 200642/EE. Pristovsknne II, věd a):1. Druvestnoto2. Na cošmetenovotorovacep režemnira, che mimišneta: Pristovskn na motrera trymnara kin nien na snača na osa niet b) Bed. I basnien osnai b) Mesuji radnna na konopostro3. Serenie nospirc3. Montor, se slobetstnate běs spredniskata na derpientstnega4. Oserovna pracovna pracovna5. E so sbotetstnate běs spredniskata na derpientstnega5. ECO slobednana na idee6. Beženremo na zdrokomlavnirni metrna7. Jupan na kvarnerja uystvnima mošnost c) Gervarpično nimo na uystevnene mošnost4. Instalatsnana mošnost5. Impa. yuhničnapičnem da steystemi technikniceta (Jepovmenta): e) Mesto no data | ET (Nejudečnica karosluj hand kčio)ED vlastničnaklaktenkton (Matradnotdy 200642/EU, Usa II, osa A):1. Firma2. Kinnish obml vastulatn, ml masn: Kaoszaskantu motoriga heklidžkur, hek linnemmetogojmena3. Tlupa a studa4. Kuu snega / Todnămadaa5. Katnikoli6. Moštar, aku7. Vešljeni snačkvidne můstelie4. Klinnar asatius9. EO tiadihlindamine4. Više vlastničnega prostednla6. Mäddelni valdihlindmose lese8. Ganontimut hardihlidimmuus bens9. Komjati Pash výrnus4. Telmilnas Leše sudorčenir liud konslajta; a) Kohl je knupava | |
EN • The content and images in this User Manual were produced expressly for ST. S.p.A. and are protected by copyright – any unauthorised reproduction or modification to the document, either partially or in full, is prohibited.
Type: