Mimzy 2In1 - High chair Joie - Free user manual and instructions
Find the device manual for free Mimzy 2In1 Joie in PDF.
User questions about Mimzy 2In1 Joie
0 question about this device. Answer the ones you know or ask your own.
Ask a new question about this device
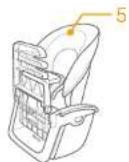
Download the instructions for your High chair in PDF format for free! Find your manual Mimzy 2In1 - Joie and take your electronic device back in hand. On this page are published all the documents necessary for the use of your device. Mimzy 2In1 by Joie.
USER MANUAL Mimzy 2In1 Joie
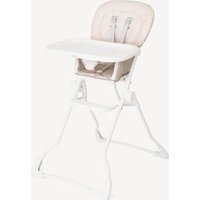
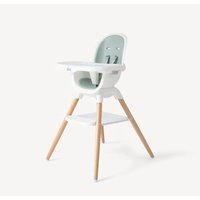
mimzyTM mimzyTM 2in1 highchair
GB Instruction Manual
FR Manuel d'instructions
Bedienungsanleitung
Manual de instrucciones
Manual de Instruções
PL Instrukcja obstugi
Libretto di istruzioni
NL Handleiding
RyKOBoACTBO NO 3KcIpyTaUH
Kullanma Kilavuzu
EL Exyepiio O8nyiw
KR
Cz Navod k použití
SK Navod na použitie
HU Hasznalati utmutató
AR
IMPORTANT! READ CAREFULLY AND KEEP FOR FUTURE REFERENCE

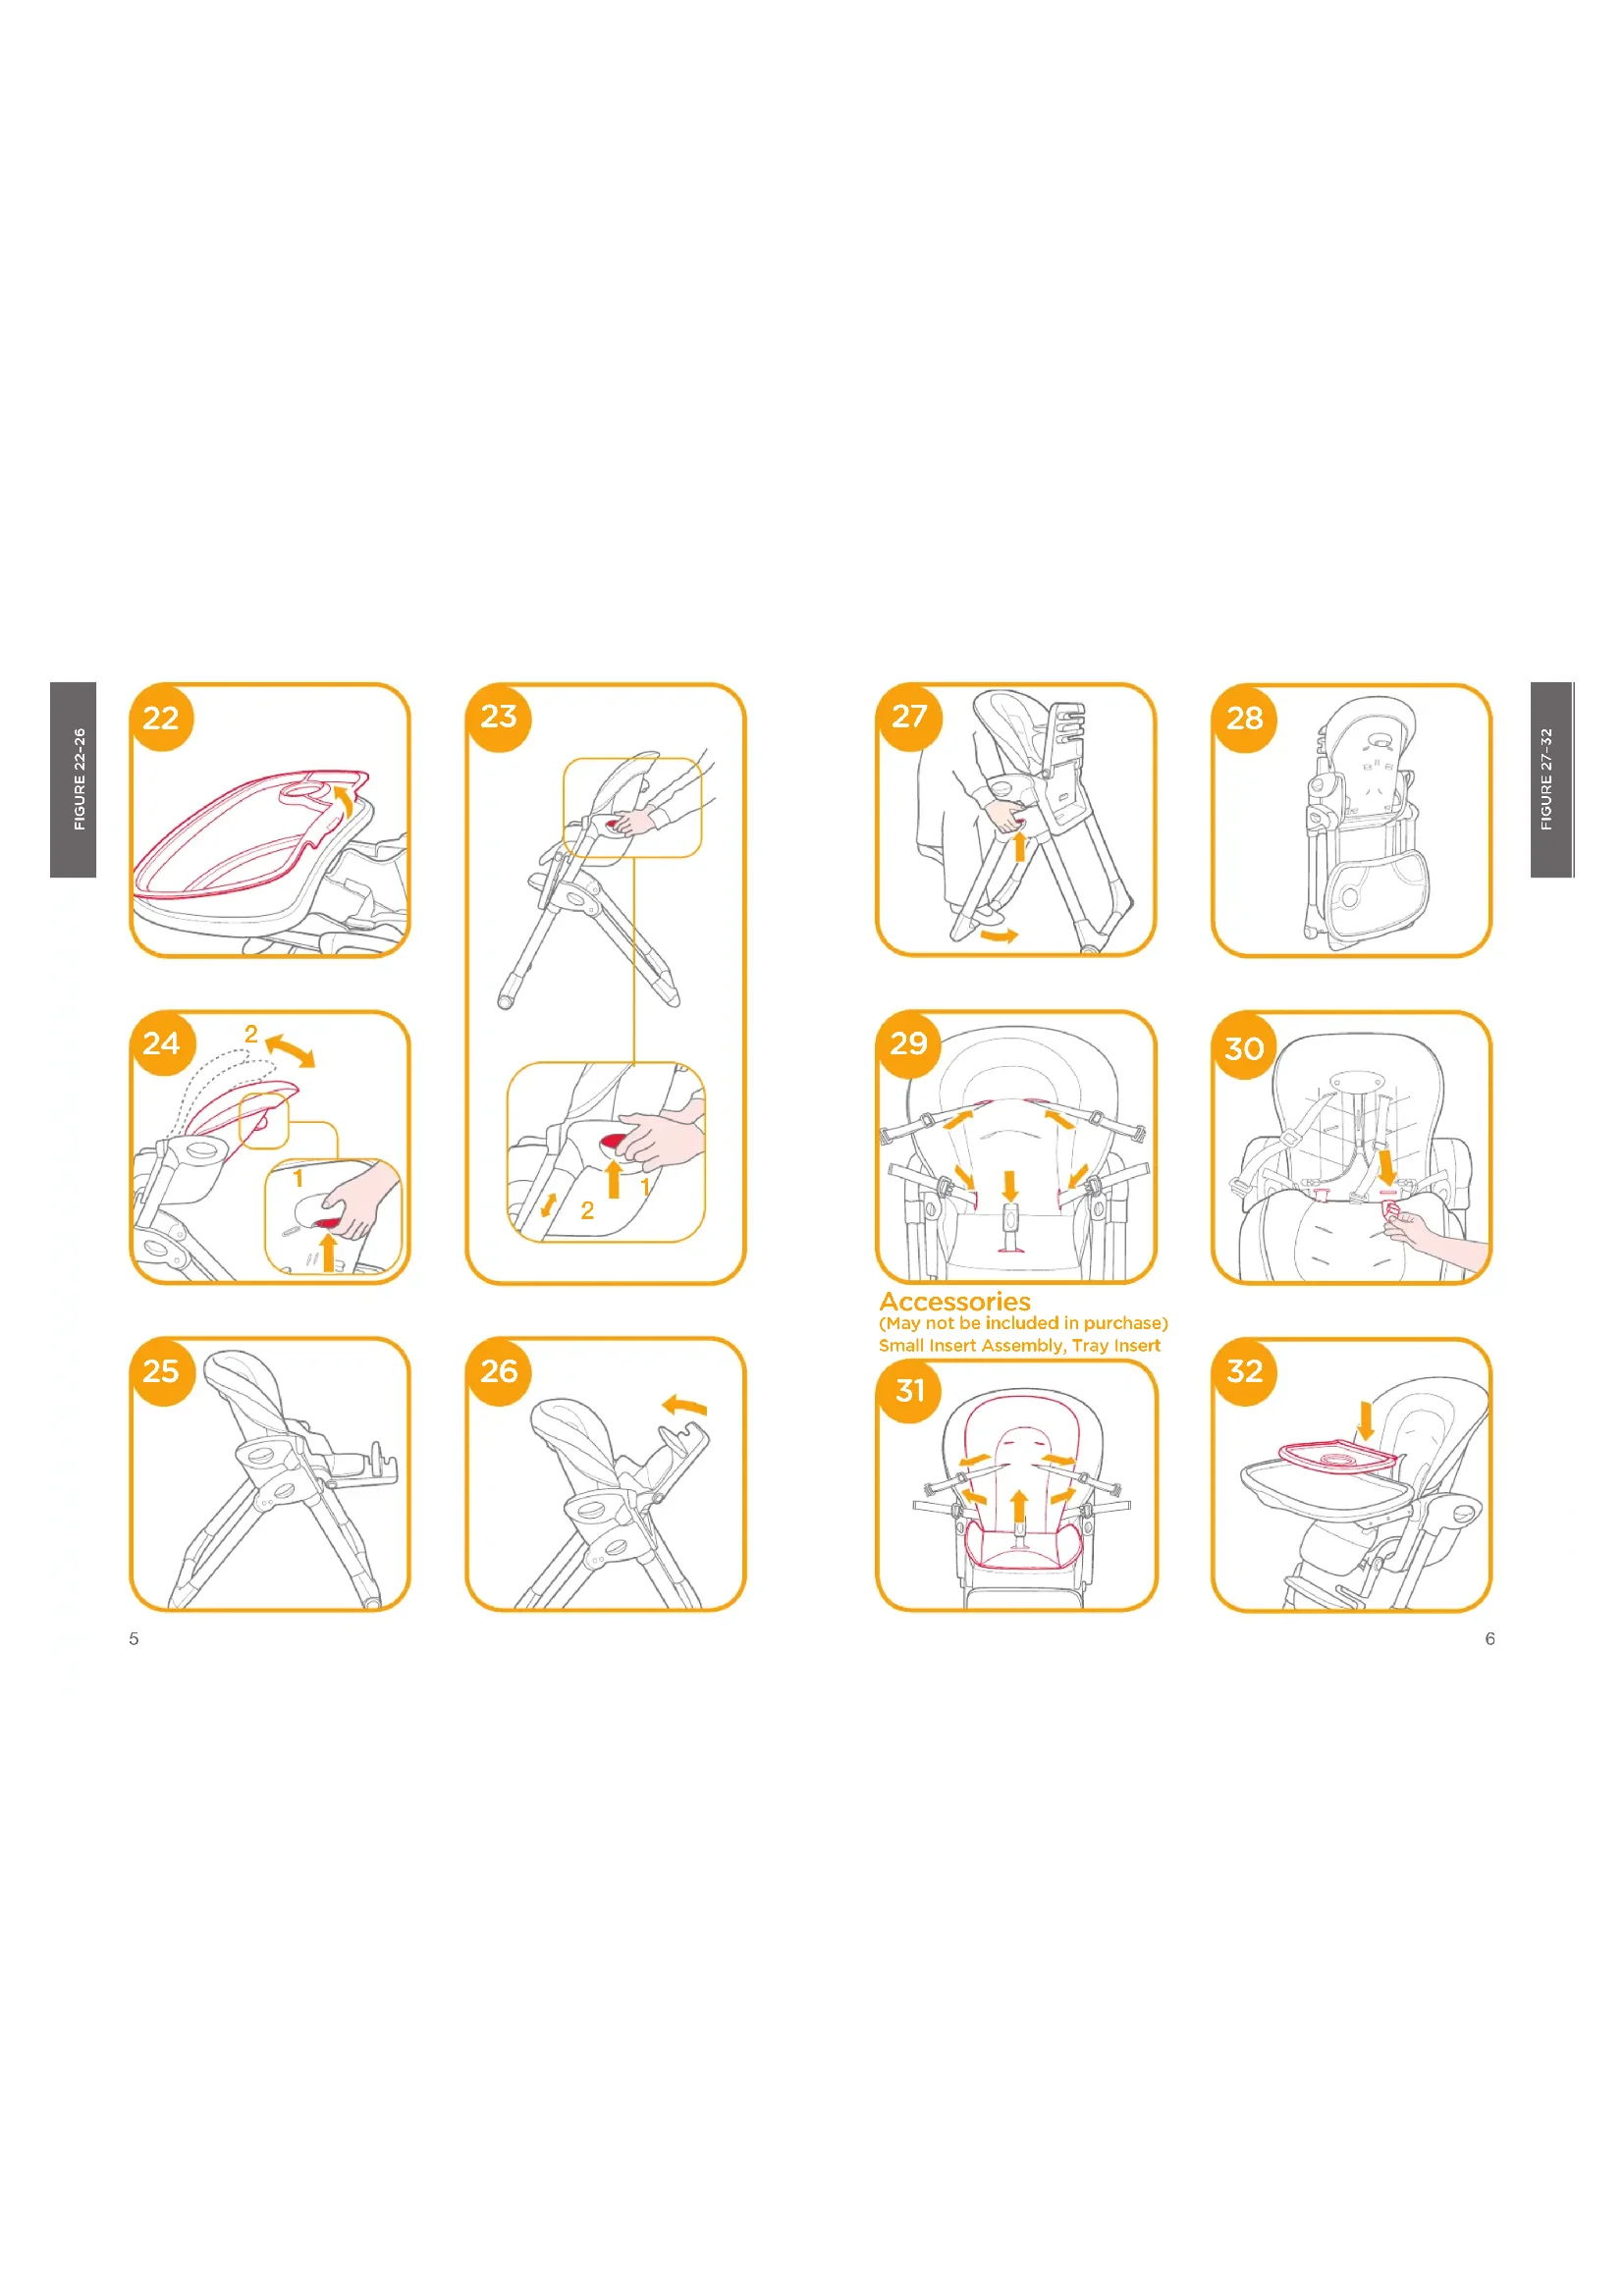
Accessories (May not be included in purchase) Small Insert Assembly, Tray Insert

Welcome to Joie
Congratulations on becoming part of the Jois family! We are so excited to be part of your life with your little one. While using with the Jois MIMZY®, you are using a high quality, fully certified high chair, approved to European safety standards EN 14988.2017+A1.2020. This product is suitable for use with children between 6-38 months. Please carefully read this manual and follow each step to ensure a pleasant experience and best protection for your child.
IMPORTANT! READ CAREFULLY AND KEEP FOR FUTURE REFERENCE
Visit us at joliebaby.com to download manuals and see more exciting Joie products!
For warranty information, please visit our website at joiebaby.com
Contents
Figures
1-6
WARNING
10
Highchair Assembly
Open Frame 10
Assembly Seat 10
Assembly Seat Pad
Highchair Operation 10
Adjust Calf Support
Adjust Footrest 10
UseBuckle 10
Adjust Height for Shoulder Harnessed 11
Adjust Length for Harnesses 11
Use Tray 11
Use Tray Cover 12
Adjust Height for Seat
Adjust Recline
Fold Highchair
Detach Seat Pad 13
Accessories
Care and Maintenance
12
12
12
13 14
Emergency
In case of emergency or accident, it is most important to have your child taken care of with first aid and medical treatment immediately.
Product Information
Read all the instructions in this manual before using this product. If you have any further questions, please contact your local distributor.
Product Mimzy Highchair, Mimzy 2in1 Highchair
Suitable for Child weighing under 15 kg (6 - 36 months)
Materials Plastics, metal, fabrics
Patent No. Patents pending
Made in China Brand Name:
WebeTie www.oteboby.com
Manufacturer Allison GmbH
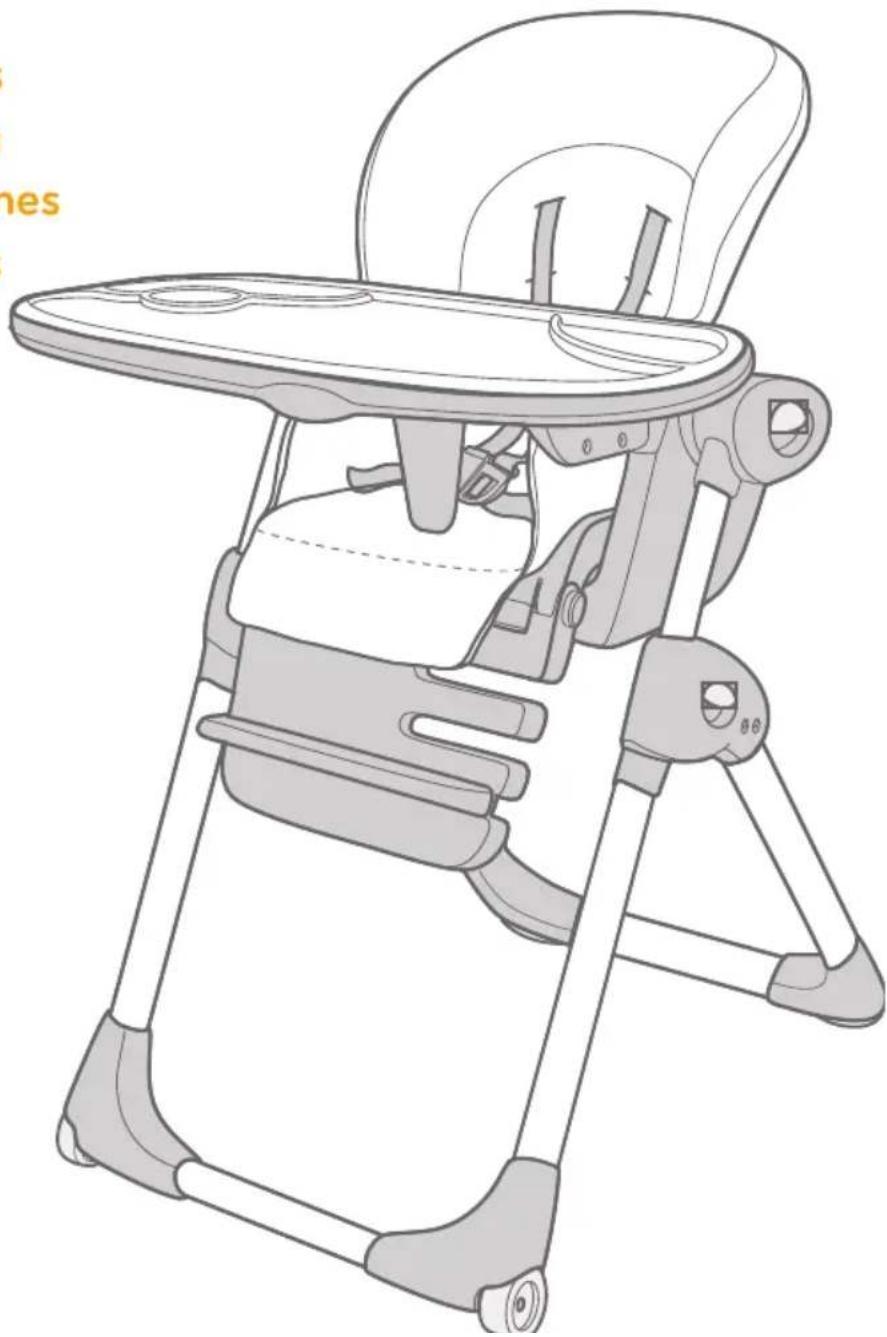
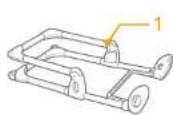
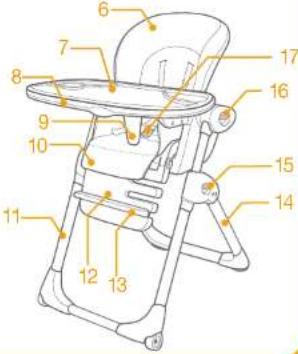
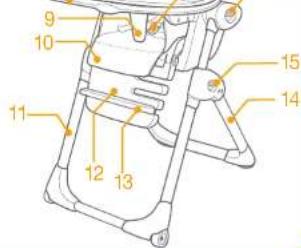
Parts List
Make sure all parts are available before assembly. If any part is missing please contact your local distributor. No tools are required for assembly.
1 Frame 6 Backrest
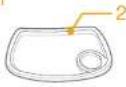
2 Tray 7 Tray
3 Tray Cover 8 Tray
4 Tray Hom 9 Tray Hom
5.Seal 10.Seal Pad
11 Front Leg 15 Height Adjustment
12 Calf Support Button
13 Footrest 17 5-point Buckle
14 Bear Leg
15.FoldButton


Accessories
(Only included in Mimzy 2 in 1)
1 Small Insert (on certain models)
2 Tray Insert (on certain models)
WARNING
Adult assembly required.
Please read all the instructions in this manual before assembling and using this product.
! Please keep instruction manual for future reference.
This product is suitable for children between 6-36 months of age (under 15kg).
Failure to follow these warnings and the assembly instructions could result in serious injury or death.
DO NOT make any modification to this highchair or use it along with component parts from other manufacturers.
DO NOT use the highchair if any parts are broken, torn or missing.
DO NOT use the product unless all components are correctly fitted and adjusted.
WARNING! Never leave the child unattended. Always keep your child in view.
To prevent serious injury or death from falling or sliding out, always secure child in the restraint.
Follow these instructions carefully to make sure the restraint harness is fitted correctly.
Secure your child at all times using the restraint harness provided in both the reclining or upright positions. The tray is not designed to hold your child in the product.
DO NOT use the highchair until the child can sit up unaided.
It is recommended that the product be used in the upright position only by children capable of sitting upright unsaid.
1. DQ NOT allow your child to stand in or on the highchair.
DO NOT lift and carry highchair while occupied.
DO NOT allow children to play with or around highchair while occupied.
DO NOT allow children to lean over sides of highchair. It may become unbalanced and tip over.
DO NOT place any heavy bags, packages, or other items on the highchair tray. They may cause the chair to lip over.
Always use on a flat and level floor.
Be aware of the risk of open fire and other sources of strong heat in the vicinity of the product.
To avoid strangulation hazard,DO NOT place product in any location where there are cords,such as window blind cords,drapes,phone cords,etc.
All assembly fittings should be unfolded completely, tightened and latched properly before using the product.
Regularly check the locks and fittings for security.
Regularly inspect the product for damaged hardware, loose joints, missing parts or sharp edges.
1 Remove your child from product before folding or adjusting the highchair.
Make sure the product has been folded or unfolded completely before letting your child approach the highchair.
Consult your local distributor for issues concerning maintenance, repair and part replacement.
To avoid burns, DO NOT place hot food on tray
WARNING Make sure the safety harness is correctly fitted.
To prevent serious injury or death from falling or sliding out, always use the restraint system and ensure it is correctly fitted.
! Falling hazard: Prevent your child from climbing on the high chair,
Keep children away when unfolding and folding the product to avoid injury.
Be aware of the risk of tilting when your child can push its feet against a table or any other structure.
! Always use the restraint system.
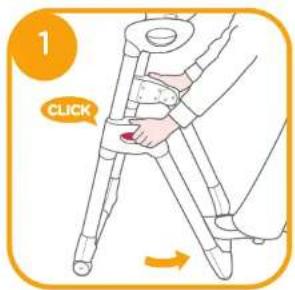
Highchair Assembly
Please read all the instructions in this manual before assembling and using this product.
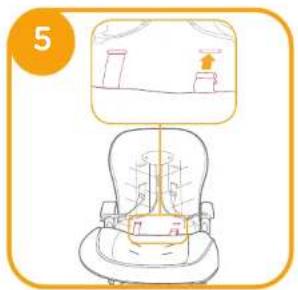
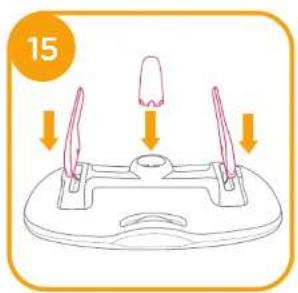
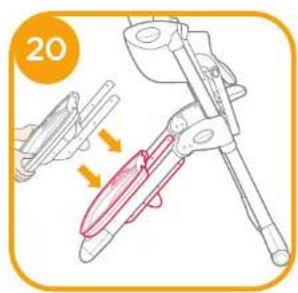
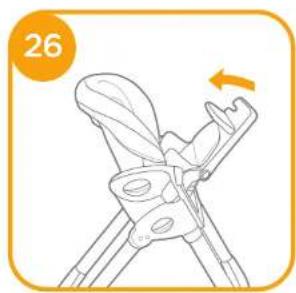
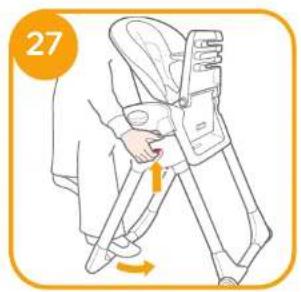
Open Frame
- Rotate rear leg back until an audible click is heard.
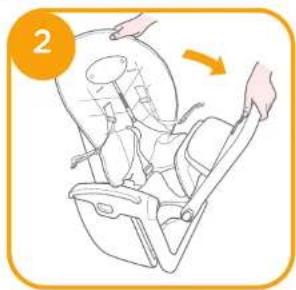
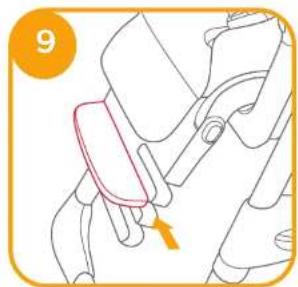
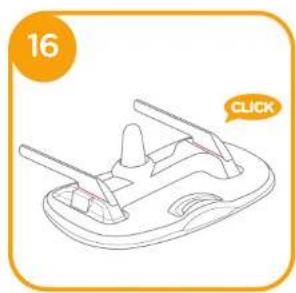
Assemble Seat
- Open the seat.
- Fit the seat onto the frame. An audible click means the seat is secured to the frame.
! Lift the seat up to be sure it is locked into place.
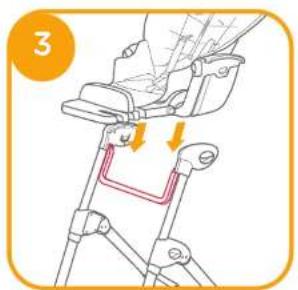
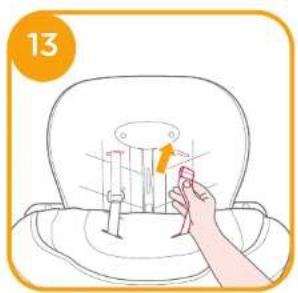
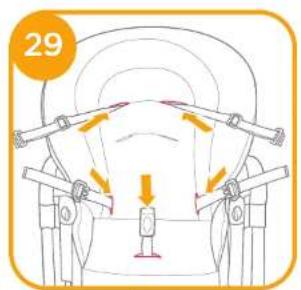
Assemble Seat Pad
Assemble the seat pad by following these steps:
- Open the seat.
- Insert the two straps through openings in seat back
Please make sure the straps are secured to the seat back to prevent the seat pad from slipping. - Pull all the harnesses through the slots in seat pad.
- Wrap the seat pad over the top of seat back.
Highchair Operation
Adjust Calf Support
- The calf support has 2 position settings.
- Press the adjustment buttons on both sides of the seat ① -1 and rotate the calf support downward or upward.
Adjust Footrest
- The footrest can be adjusted to 3 positions.
- To adjust the footrest, remove the footrest from the calf support, choose a desired position, and then reinsert the footrest into the calf support.
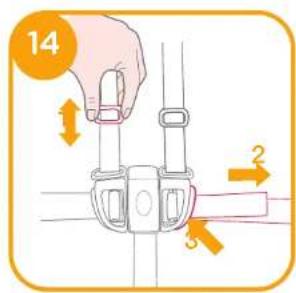
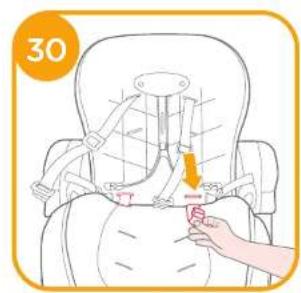
Use Buckle
Note
- To prevent serious injury or death from falling or sliding out always secure child in the restraint.
- Make sure the restraint harness is fitted correctly and the space between the harness and the
child does not exceed the thickness of an adult hand. - DO NOT cross the shoulder belts. This will cause pressure on child's neck
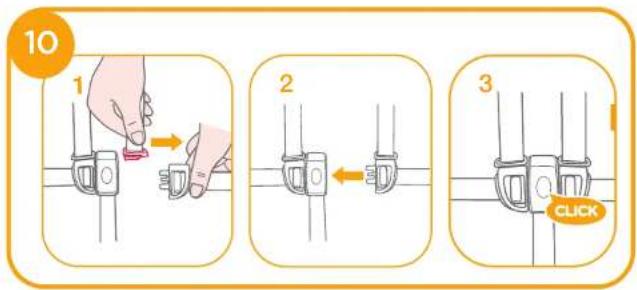
Lock Buckle
Match the waist belt buckle with up the shoulder buckle and slide together 1-1. Insert buckle into the center buckle 2-2. A "click" means the buckle is locked completely 3-3. Repeat for other side.
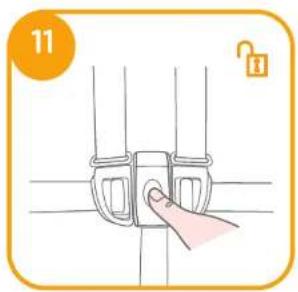
Release Buckle
Press the center button to release the buckles.
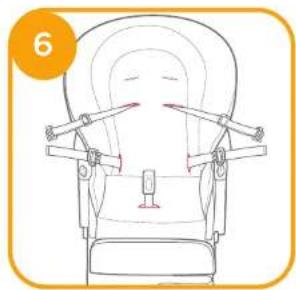
Adjust Height for Shoulder Harnesses
Note
- The shoulder harness must go into the slot that is even with or slightly above the shoulders.
- In order to protect your child from falling out, after your child is placed into the seat, check whether the shoulder harnesses are at proper height.
-
For larger child, use the upper shoulder slots. For smaller child, use the lower shoulder slots.
-
Choose a pair of proper shoulder slits. Insert the shoulder harnesses into slots in seat pad and seal back.
When changing shoulder harness slots, make sure shoulder harnesses are going through same slots in seat pad and seat back.
Adjust Length for Harnesses
1.Use slide adjuster to change the harness length. 3-1
2. Pull waist harness to tighten to proper length 2. Press the button to loosen the waist harness.
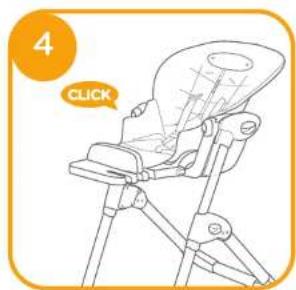
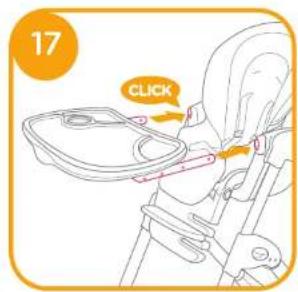
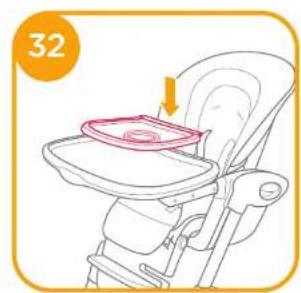
Use Tray
Assemble Tray
- Fit the crotch restraint and tray mount onto the tray by pushing into the opening on the tray bottom until you hear a "click" sound.
Both the crotch restraint and tray mount can only be assembled in one direction. The slots on the crotch restraint and tray mount attachment should be aligned with the ribs in the opening of the tray bottom. - Insert the tray guides into the holes in the seat, slide forward until a "click" is heard. To remove tray, squeeze the button under the tray and slide off.
The tray horn must be inserted into tray before use. Once the tray horn is inserted, do not attempt to remove it.
Use caution when adjusting tray, as the tray can be completely removed from the seat.
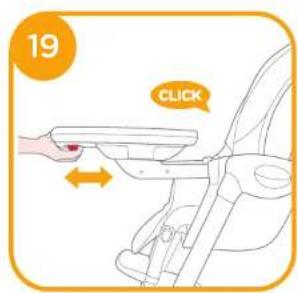
Tray Adjustment
1, The tray has 3 positions. The distance between your child and tray can be adjusted as needed.
2. Squeeze the button under the tray and move the tray until a desired position is reached, and then release the button. If the tray is not automatically locked in the holes, move the tray until a "click" is heard.
1 Ensure both sides of tray are in matching positions.
Pull the tray towards you to ensure bath guldies are secure.
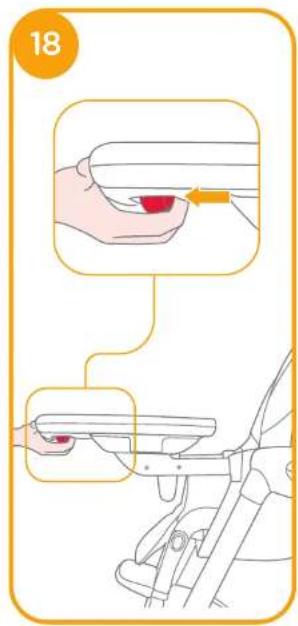
Tray Storage
- When the tray is not in use, It can be stored on the rear legs.
- Place the tray over the rear legs and snap the tray guides into place.
- The stored tray is shown in
Use Tray Cover
Note
- The tray cover can be used together with the tray, it can also remain attached when the tray is stored.
-
When placed on the dinner table, the tray cover can be used as a serving tray.
-
To attach the tray cover, place it over the tray and push down until tab snaps into place.
- To remove the tray cover, grasp the tab near the sealing area and pull up, then lift the tray cover upwards.
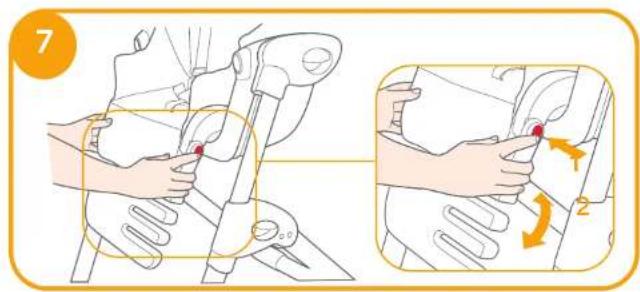
Adjust Height for Seat
- There are T height positions. The seat can be adjusted to the proper height according to the height of your dinner table, which makes it more convenient for your child to have meals together with family.
DO NOT adjust the height of the seat with child in it. - To adjust height, squeeze the height adjustment buttons on both sides of the chain - 1, and lower or raise seat to a desired position.
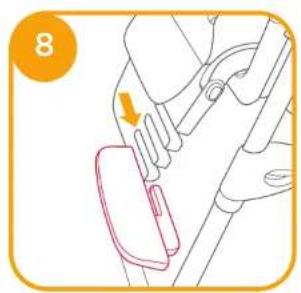
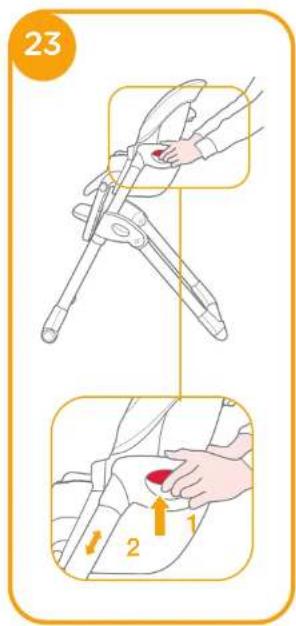
Adjust Recline
NOT adjust the seat recline with child in it.
1. There are 3 recline positions
2. Squeeze button on the back of seat 1 and push down or pull up to adjust the seat back to a desired recline position.
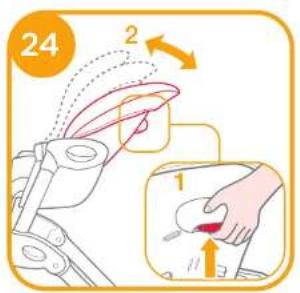
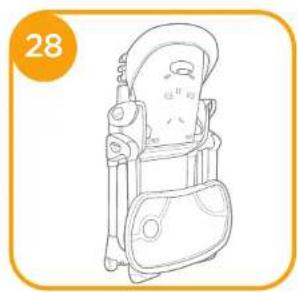
Fold Highchair
DO NOT fold the highchair with child in it.
Fold the highchair by following these steps:
- Remove tray before folding the highchair.
2 For most compact storage, lower the seat to the lowest position and adjust the calf support to horizontal or flat position. - Fold the seat.
- Fold the frame.
- Store the tray on the rear legs.
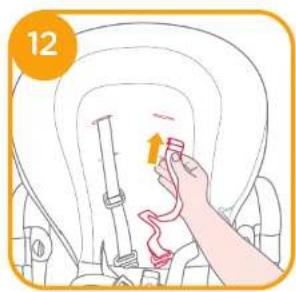
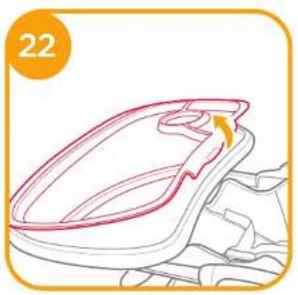
Detach Seat Pad
- Release the 5-point buckle.
- Pull harnesses through the back of seat pad.
- Remove the two straps from the seat back to detach the seat pad.
Notes
Accessories
Accessories may be sold separately or may not be available depending on region.
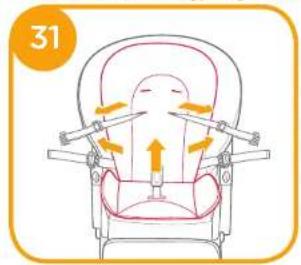
Small Insert Assembly
If need to use small insert, please assemble it as 31
Tray insert
The tray insert can be used together with the tray. It can also remain attached when the tray is stored.
When placed on the dinner table, the tray insert can be used as a serving tray.
To attach the tray Insert, place it over the tray and push down until the tab snaps into place.
Care and Maintenance
The tray cover and tray insert are dishwasher safe.
! Your seat pad can be spot cleaned with a sponge and soapy water, DO NOT use bleach.
! Drip dry the washed seat pad. DO NOT put in dryer.
! To clean the frame, wipe with a damp cloth and mild detergent then wipe out any traces of moisture on the frame with a dry cloth.
DO NOT USE undiluted neutral detergent, gasoline or other organic solvent to wash the highchair. It may cause damage to the higichair.
! From time to time, check your highchair for worn parts, tom material or stitching. Replace the parts as needed.
If the hightcrair is not in use for a long period of time, please put it somewhere your child cannot access it.

m = 311 ;
Notfall
Strongly Ine Product
www.aisler.com
Liastęcsci
Assemble the seat pad by following these steps:
- Open the seat.
- Insert the two straps through openings in seat back 5
Please make sure the straps are secured to the seat back to prevent the seat pad from slipping. - Pull all the harnesses through the slots in seat pad.
- Wrap the seat pad over the top of seat back.
Dziatanie siedziska
R. Rieves Product in
Peopminas
Sito web
Produitore
Segglione con lo schlenale rialzato Minzy,
Seggiolone con lo schienale rialzato Mimzy 2in1
Bamnrrn rnnrnnn nnnn nn nnnn nnnn nnnn nnnn nnnn nnnn nnnn nnnn nnnn nnnn nnnn nnnn nnnn nnnn nnnn nnnn nnnn nnnn nnnn nnnn nnnn nnnn nnnn nnnn nnnn nnnn nnnn nnnn nnnn nnnn nnnn nnnn nnnn nnnn
Plastica, metallo, materiales tessile
Cina
Ine
www.joebaby.com
Allison GmioH
Elenco dei pezzi
(Incluso solo in Mimzy 2 in 1)
HnHnHnHnHnHnHnHnHnHnHnHnHnHnHnHnHnHnHnHnHnHnHnHnHnHnHnHnHnHnHnHnHnHnHnHnHnHnHnHnHnHnHnHnHnHnHnHnHnHnH n Hm 50(6-36 m)
MATEPNO METAOJXGXNDH
Pnepnne nnnn nnnn
Qanmho B
m = 311
2.YCTAHOBHTE CNDHbE Ha pamy 3,ILJHOK bdyet OHaaytB, yTO OHxpanneho
!yoeHTEc,yTO CmEe 3aepennne
C6opka qyexna cnndHb
Tc0bcbopatbcexoncnpehba,blncnHte cnepyoune deactbn
1.PacKpOHTeCmEHeB.
2.ПрдьБьтб2рмнчepescHNYCpHbB
YBENHCTCBHYPOAMHNXOPPOOJ3A#KPCPQBAHbI
3. IpoaBHeTc Bce pemn BeasonachOCTn HepeaHexon
4. Hadehbe Teyexon CaeHbHa CmHKy CndehbR
UcnoJIb3OBAHnE CTyIbYnKa
PerynpoBkA BepxHnNnHOKK
1.YaepxHnnoHNOKmECTb2ypoBHaHKnnoHa.
2. 100bl otpyrohyoepb8n pnoHcy, HAMMTE HA HINN NO OBE cTPOHOI (OIO-000) -1, a3aTeM
PerympoBka HxKHe NoDHOxKm
T. Y aepChen npHokk
763yp
BSHR.
m = 311
(1)
(1)
m = 311
IcnoB3oBaHnepn
Baxho!
- 4066n36e9aBcpeb3HbX Tp8M OT napeHn, o8aaTeBHO 39KpenrrnTae baiWero pe6eHpaemHmV.
- 26000000000000000000000000000000000000000000000000000000000000000
PnIMBpHO DABHO TOUINHE ODHON DYKN - He nepenpeuunbae po mm Bocchocn, oMxry daHbHb Hueo peHHa
3acteryb npkxy
Coepnntne noahyo nneeybny npnky 1-1.Ts aenienhre c eentpanbno npxckn. -2 lcnvck
C3Ha4aET,HTO npKa nonHocTeo coOpHa. 3
PacctenHyTb npKxy
Haxmnte uentpaibHykONky,HTo6bI paeeChrytb npxk.
PerynpobKa BbICoTbpeMHe6e3onacHocTH
Baxkho!
1.PaHndoKbBbYbTaHcENBbHaOgKaBcTOCmHOAAHmQyTBbUe
2.BoH663AHHN HAPINH NABIOPOB6H,POXETAHNO ETO y600nOCHOTPOPMNHHPARNNHBOGOT
3.ДИКУТСЕРБЕЦА,ПОПОЛСЕСЕСМЕСКЕСССССССССССССССССССССССССССССССССССССССССССССССССССCS
- Bb6epTe NoDxOaIe cnoTbe CnHKe CnDBeHn npOaHBe pEmHH BeaonacOchOn Hpe3 Hx.
KordaaactpaaeBbctpyenHnYbEurte,TOPENHHPOXoTcpeAOpHAnAaBnCnO bNo BocTe.
PerynpoBka dnnHHbI pemHne 6e3onacHOCTM
- Mcnonbayre polyriop, Tio6h Hacippon BbCOTy pmmn
- TaHHTpepeheh, TToBb HAcTpoaht DnHHHy -2. HaxMnte HaKnonky, TToBb OToCoepHHTpeMeHe.
HcnoB3OBAHnE IOHOCA
C6opka nOHaoca
- PnKpENNTpepaenntanbHor K noDnocy
HJIOK 6yepo3HaHnTa,TO OH sakpenne
2.BctaBte noHoc do wenHka, UroBoI yOpaTb noDnOC, zAaMInTe pbHaR N BbTaunTe erO.
PnKpenTe paedentbHor do TOrKaYcTaHABnBaTb noHoc;
Hacpoika noDhoca
- ynagocacctb 3 noaunnn
2.3aMHTpepaHn daanrAte npDHC OTyCtpe paar, korda noHoc doCTHT HxHHoNosuHm
Ecnno npHoc He aapnncpoBcA, dHbTe eO HmHOro do qenHka.
XpahenHne noDnOca
- Ecnn noDnHc HmONonbEyTc,To ero moXHO XpaHHTb Ha 3aDnHX HOKkAX.
- NopecbTe noHOC HHa UHTbpyax HA 3aDHX HOxox
3.МетодгхраненnoKаынHa pmo
Inonb3oBaHne KpbIuKn noHocA
BaxHo!
1.KpbuKMy MxHn npKpemtn K noHocy.Takke ee MxHo XpaHnBmte C noHocm Ha 3aHnx
2.KpbuKy MoNHO HONOBaBbHAK NOHOC DBy BbH He 6eHaHOM CTone.
1.HTO6b npKpENHb KpyuKy, NOMECTYe Hn NOHOC n HADBNTe DO 8
2.HTbBCHRbKpHnky,NOTAHNTe 3a nETNIO INoDHMMTEKpHnky
PerynpoBkBA BICOTb CNDHb
- y CHeHbE tct 7 MoHHu. CnDEHeB MOHO IOOCTOPHTN OTOPOBEHbO OBeDHHORO OTOA, UTObBAI pEBIOHO MOK ONUyau B Ipyr Emya.
He HactpaaTe ypoBHe, CndeHb c peboHOM HeM.
2.HTO6bHACIPOHTB BILCOTy CNDHB,3AMMNTB XCNX C06HX CTOPOH CHD6HB 1,a3a18M
nDHHMHTe mN ONyCTHcTe er.2
PerynpobKa HaknoHa cnHnK
He hactpambate HAKNON CNHKN Cpe6HKOM B CHNDHe.
- ycnHHn eTb 3 noHnn
2.3aAMHTpepaHHe cHHHO-1,a aTOM nOHAMATE MOn OHOTHTe CHAHK.
CknaDbBaHne cTbUHKa
HecknaabbaTe cTyn,ecn pe6bHOK cnnt B HEM.
Tc0bcnokntbctybnk. bunnonHnTe cnyduoune derctBna
- Ybepure noHoc.
2.DnB6onBeKOMnaxTHOROCKnabBaHnOyCTHeCmBHeNnNOHOHOXy
3.CHOHNTC
4.CnoxHrpe pamy. - NOBBCTOHOHOCHA3aHHHOKNN
ChyTne yexna cndeHb
1.PacCTeHTHITpeMmHB630nachOCHOTN.
2. BbTaunTe peMHn 6eONaCHOCTn n3 uexn.29
3.BbtaaHTe 2peHRAuCnHMK,UToBbCHrTByExon.
Для заимсян.
AkceccypbI
AOKCCpyMORYnpoabatc0rTDEbHOHHe6bTyDcOTyHbIMdn npodAA B3BCHMOCTN O pBOHO.
SHMANTIKO!KPATHSE TIG OAHIEI TO MEAON
Etnk@e394tme 1ytoaPADI www.joebabby.com vvi vo KOTELDAETTE TDCNPKC AALK VIO VO BENE AALA evicpaeovina Joa Jopvioia
Tia panopippe syuunong, napokakm macekBte tv lotorono pa jolababy.com
NepieXoueva
T
1-6
NPOEIDONOHHEIS
89
Uvapuoloyonkaiog
90
AvnuaEKEAEO
90
EvapuauovnonKaioa
90
Aeroupyia Kaioipato
90
Avukien onoioicu
90
Poumuon Yrnnroicou
90
XpnoZovov 90
PuepnYyoucivn
91
Poujien Mkaqivtiv
91
Xpiotn Dicou
91
XpHn kAuamu 5iokou
92
Pouian ouus kaBipatos
92
Pouon Avkian
92
Kaeiojno ka@ipayos
92
Aepiopn MaIapkKaioa
93
XpnoHOToInote To KaUmu Tou diaKou
ημειωσ
- To kauuuaou you dikouu umoov o xynpomoiyue paue pue to dokko. Mtoepi emnct wot maoauiu uuniepeevoc ov anmnnnne o dokko
-
Ovovomboepei oio pnto, to kauuuiou ou bokou mupoi v xnnnnpaonlue uok, bokac
-
iia 100 tao nntnne to kaaumu ta bokou, tonoe nnte to ravu oto biokka ka atpnoke npoc ta katu jepy a vapaoa eon yauo mte ont eon
- Via va agapateo To KaUaIou To kIOkOu, MlTe Tnv TpOeOy KVA OAt Tnv TpOeOy KaIoiAcoTc KaI pOteNt PnOx EiEhVau, EtEIEc OKeKOnr To KIAuAou To kIOkOu
Pouion Yousia to kaiqa
- Yr4pyouy 7 t#e i08uian ouoc to koejua umopoi va npocaaoar st o emtufno uoc avovoy ro uoc rou nappouo oac kavovac va aiebvei ta ma vto ta mai ra; ka npovotac dn anokvotecnmu
Mny pubuigceto uos orav kaiotn taio - 1a va publcttoe to opio meite to koumi pouloioukai kai oio naupeuou kou kaioupoukouo -1, yia va qauanayn a va quanaynte tare oia vao pratoy eotr emtBumit Bm
PUBIaN Avaklions
Mnypu6pIeTe Tny avakkion Tou kaolpatoc drav elvai to taidi ptoa.
- YmApxouv 3 Etaeic ovakianc
- Niace to coumou mio rro xieepo -1 npaHnnpoc ta eovn n npoKt npoc k Kto 2 2nnn ennnn 80cm
Kaeiaipo kaθiαμatos
Mny kaiyTe to kiguag ng yivg hgg to tgi
Kaeite To KaBIOA OAOuBuWvTc Ta TApoxaTu Bnata
- Agcipote To Dko TOny Kaelgete to Cibua
-
Tio oou mavc Kaioi kate pato To koi xauo ente so kuiuut to taenix oukpoatopaoivn e tne
-
KAEIOTE TO KAIBIpa.
4.KAEIOTE TO OKAETO.
5.AmBxueoTaTo BIOKa 01nou nO
Apaipoeon maXiaIaI KaiomuatoC
1.ApaipoeTnZwn5onueiwv.
2. TpoaBnCTe touc ipovTe cTAto Tlwo aTo paojAdp. 23
3. Metakwote rou duivte maintou kaogatoc ia va aapieeote to qaiakiou kogatoc
Σημειώσεις
Aegouap
Ta aeeouap ev6xoyevuac va mauovta xwpiota h va npnu oumpeiaabdvovtai ony durekauaia.
avohoya mmpiox.
Ppooaoyn ieWnppa
Av xpeiaetai va TOTOBETNEE TOVmuotip, aKoAouHOTeTIC oynieC otncn 3
Eiyj
To evBto Tou digkou utopei yx xonguotponBe uclu to bitxo. Mtopei enignc yx npnueive
ouoBéEevocotayatnoBKeTuaO BIOKc
Orav tomoetelra tto parnl, to eveto tou slakou mtopel va xponpomoinel wic kok sepipiaatoc.
TIA VO TOTOBETIOTETE TO EVOETO TUO DIKOU, TOTOBETIOTE TO EITAVU DTO DIKO KOI OTPOSE TPOC TA KATU
Materialy: kov, plasty, latky
Patent number: P 107862453
Vyrobeno: v Cine
Tzokai: tsk
Znacka:Joie
m = 311
10
1
(1)
2
?
(续表)
了
1.3.4
m = 311
(1)


yglg yla
(Mimzy2in1ggo)
Taeoo
()
( 5) ( g) ( 1)
#
JSLIddyjghe gannll
gall pluag g aal llll
y
(ps510)36-6Jabal
ggl 8yba cgl gaa jay aal clagig lll aol p
y 1
1.436 10
gaoa daa aaiy
AaBaae aeg Aae aag 1
y
pKg 12y110000000000000000000
pall jgl s gsh glll 1
paaa aee aa aee aee aee aee aee
yolol yolol yolol yolol yolol yolol
auiy gaii iia aiei iiaai
m = 311
sinh yplp qg jyegj knil pfyt g
y
10
y
48x0.5()
y
2.011()()()()()()
0
1
1234567890
10000000000000000000000000000000000000
1 2
y
glatt 2008
21
1
aee aee eae ee eae eae eae eae eae eae eae eae eae eae
ppl
Lalalalal
100 100
1
()
1 + u1 - 1 = ( 1 + u) u1 < 1 = u
一、制造业增长情况
≥slant 0 d
p#d