
Pixma iP4300 - Printer CANON - Free user manual and instructions
Find the device manual for free Pixma iP4300 CANON in PDF.
| Product Type | Color Inkjet Printer |
| Brand | Canon |
| Model | Pixma iP4300 |
| Printing Technology | Inkjet (FINE cartridge) |
| Supported Paper Sizes | A4, Letter, 10 x 15 cm, 13 x 18 cm, 20 x 25 cm, credit card, stickers |
| Supported Paper Types | Plain Paper, Photo Paper Plus Glossy, Photo Paper Satin, Professional Photo Paper, Standard Glossy Photo Paper, Sticky-Back Photos |
| Paper Input | Cassette (150 sheets) and Auto Sheet Feeder (100 sheets) |
| Connectivity | USB 2.0, PictBridge (direct USB) |
| Direct Printing | PictBridge (without computer) |
| System Compatibility | Windows (XP, 2000, Me, 98), Macintosh |
| Power Supply | 100-240 V AC, 50/60 Hz |
| Consumables | Individual ink tanks (BK, C, M, Y, PC, PM) – available for 5 years after production ends |
| Special Features | Automatic head alignment, Exif Print, ENERGY STAR |
| Maintenance | Print head alignment, replacement of ink tanks |
| Safety | Do not use with wet hands, do not damage the cable, keep out of reach of children |
| Standards | Class B compliant (NMB-003), ENERGY STAR program |
| Documentation | Quick Start Guide, online manual (HTML) |
Frequently Asked Questions - Pixma iP4300 CANON
User questions about Pixma iP4300 CANON
0 question about this device. Answer the ones you know or ask your own.
Ask a new question about this device
Download the instructions for your Printer in PDF format for free! Find your manual Pixma iP4300 - CANON and take your electronic device back in hand. On this page are published all the documents necessary for the use of your device. Pixma iP4300 by CANON.
USER MANUAL Pixma iP4300 CANON
| Introduction 1 |
| Preparing the Printer 2 |
| Installing the Printer Driver 3 |
| Loading Printing Paper 4 |
| Basic Printing 6 |
| Printing Photographs Directly from a Compliant Device 8 |
| Replacing an Ink Tank 12 |
| Reading the On-screen Manuals 14 |
Exif Print
This printer supports Exif Print.
Exif Print is a standard for enhancing the communication between digital cameras and printers. By connecting to an Exif Print-compliant digital camera, the camera's image data at the time of shooting is used and optimized, yielding extremely high quality prints.
Canadian Radio Interference Regulations/Réglementations canadiennes relatives aux interférences radio
This digital apparatus does not exceed the Class B limits for radio noise emissions from a digital apparatus as set out in the interference-causing equipment standard entitled “Digital Apparatus,” ICES-003 of the Industry Canada.
As an ENERGY STAR ^® Partner, Canon Inc. has determined that this product meets the ENERGY STAR guidelines for efficiency.

The International ENERGY STAR® Office Equipment Program is a global program that promotes energy saving through the use of computer and other office equipment. The program backs the development and dissemination of products with functions that effectively reduce energy consumption. It is an open system in which business can participate voluntarily. The targeted products are office equipment such as computers, monitors, printers, faxes and copiers.
Their standards and logos are uniform among participating nations.
Power Requirements
Never use a power supply voltage other than that supplied in the country of purchase. Using the incorrect voltage could cause a fire or electric shock. The correct power supply voltages and frequencies are as follows:
AC 100-240 V, 50/60 Hz
About Consumables
Consumables (ink tanks / FINE Cartridges) are available for 5 years after production has stopped.
Safety Precautions

Warning
● Never attempt to plug the power cord into the power outlet or unplug the power cord when your hands are wet.
- Never damage, modify, stretch, or excessively bend or twist the power cord. Do not place heavy objects on the power cord.
- Never use any power supply other than the standard power supply available in the country of purchase. Using the incorrect voltage and frequency could cause a fire or electric shock.
● Always push the plug all the way into the power outlet.

Caution
- For safety reasons, store ink tanks out of the reach of small children.
- Do not drop or shake ink tanks as this may cause the ink to leak out and stain your clothes and hands.
Also read the Safety Precautions in the User's Guide on-screen manual. Observe the warnings and cautions to avoid personal injury or damage to the printer.
Introduction
Thank you for purchasing a Canon Inkjet Printer.
This Quick Start Guide uses the following symbols to indicate important information. Always observe the instructions indicated by these symbols.

Warning
Instructions that, if ignored, could result in death or serious personal injury caused by incorrect operation of the equipment. These must be observed for safe operation.

Caution
Instructions that, if ignored, could result in personal injury or material damage caused by incorrect operation of the equipment. These must be observed for safe operation.

Important
Instructions that must be observed for safe operation.
Trademark Notices
- “Windows” and “Internet Explorer” are trademarks of Microsoft Corporation, registered in the United States and other countries.
- “Macintosh” and “Mac” are trademarks of Apple Computer, Inc., registered in the U.S. and other countries.
- “Adobe” and “Adobe RGB (1998)” are either registered trademarks or trademarks of Adobe Systems Incorporated in the United States and/or other countries.
Copyright ©2006 CANON INC.
All rights reserved. No part of this publication may be transmitted or copied in any form whatsoever without the express written permission.
Preparing the Printer
Be sure to read your setup sheet first for setting up your printer and getting it ready for use.
1 Turn on the printer.

Caution
Be sure to remove the tapes before you turn on the printer.

Note
The tape position is subject to change.
2 Install the Print Head.

Caution
Do not touch internal parts other than the Print Head Lock Lever.

Important
If the Top Cover is open for more than 10 minutes, the Print Head Holder moves to the right side. In this case, close the Top Cover, and open it again.

Note
- There might be some transparent or light blue ink on the inside of the bag the print head comes in, or the inside of the protective cap - this has no effect on print quality. Be careful not to get ink on yourself when handling these items.
- Do not reattach the protective cap once it has been removed.
3 Install the ink tanks.

Important
● Make sure that all the ink tanks are installed in the correct position, matching the label. The printer cannot be used unless all the ink tanks are installed.
- Once you have installed the ink tanks, the POWER lamp will flash green. Wait for about 2 minutes, until the POWER lamp stops flashing and changes to steady, non-flashing green and the printer has stopped making operating noises, before proceeding.

Note
- Be sure to remove the clear film from the ink tank in the exact order as shown in step 3 of your setup sheet.
- Do not squeeze the side of ink tanks as this may cause the ink to leak out and stain your clothes and hands.
- Do not reattach the protective cap once you have removed it.
- The ALARM lamp on the printer still flashes orange if an ink tank is not installed properly. Open the Top Cover and make sure that position of all the ink tanks match the label.
4 Load printing paper.
In the following process, you will be required to perform the Print Head Alignment, and you will need a sheet of A4 or Letter-sized plain paper loaded in the Auto Sheet Feeder.

Important
- When loading paper in the Auto Sheet Feeder, make sure that the Auto Sheet Feeder lamp is lit.
● Always load paper in portrait orientation. Loading paper in landscape orientation can cause the paper to be jammed.
Installing the Printer Driver
■ Information Common to Windows® and Macintosh®
Notes on the Installation Process
- If the Select Language screen appears, select a language, then click Next.
- If the Select Your Place of Residence screen appears, select your place of residence, then click Next.
● There are two ways of installing the printer driver and other software:
Easy Install: the items included on the Setup CD-ROM are installed automatically Custom Install: you can select particular items to install
- When the User Registration screen appears, click Register. If your computer is connected to the Internet, the on-screen instructions to register your product will appear.
Notes on the Print Head Alignment
- Print Head Alignment will take about 6 minutes to complete. Do not open the Top Cover while printing.
- If the pattern is not printed successfully, refer to "Eleven flashes" in "ALARM Lamp Flashes Orange" in the User's Guide on-screen manual.
■ Information for Windows

Note
- When installing the printer driver in Windows XP or Windows 2000, log on to the system as a member of the Administrators group.
● Before installing the driver, disable all anti-virus programs and automatically loading programs.
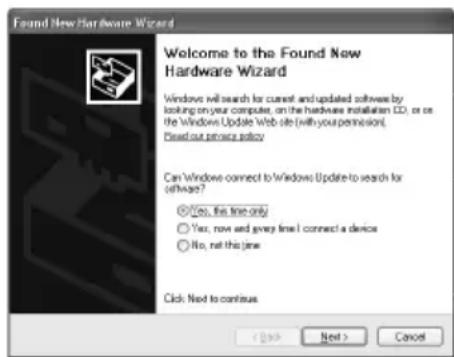
- If the following screen appears automatically, remove the USB cable connected to your computer. Next, click Cancel to quit the screen and turn off the printer. Then start the installation process again. For details on the installation process, refer to your setup sheet.
- To install PhotoRecord or Adobe RGB (1998), click Custom Install and follow the instruction on the screen.
- Adobe RGB (1998) cannot be installed in Windows Me and Windows 98.
- When a message asking for your confirmation to restart your computer appears during the installation process, click OK. The system is restarted automatically.
- If the connection is not recognized, refer to "Cannot Install the Printer Driver" in the User's Guide on-screen manual.
■ Information for Macintosh

Note
- Do not remove or insert the USB cable during installation, as this may result in the computer or printer not operating normally.
- Before installing the driver, disable all anti-virus programs and automatically loading programs or remove them from your system folder.
- When you perform the Print Head Alignment and cannot find your printer name in Printer List, click Add to add the printer. For details, refer to the Printer Setup Utility Help in the Mac® Help.
- To install the User's Guide on-screen manual in a language other than the installed one, double-click the Manual folder in Setup CD-ROM, Canon folder, and then copy a language folder to your hard disk.
Loading Printing Paper
Some types and sizes of paper are not loadable in the Cassette and requires the use of the Auto Sheet Feeder. If you intend to use only the Cassette, check for any usage restrictions in advance.

Important
- If you cut plain paper to 4" x 6" / 101.6 x 152.4 mm, 5" x 7" / 127.0 x 177.8 mm, or 2.13" x 3.39" / 54.0 x 86.0 mm (credit card-size) for a trial print, it can cause paper jams.
● Always load paper in portrait orientation. Loading paper in landscape orientation can cause the paper to be jammed.
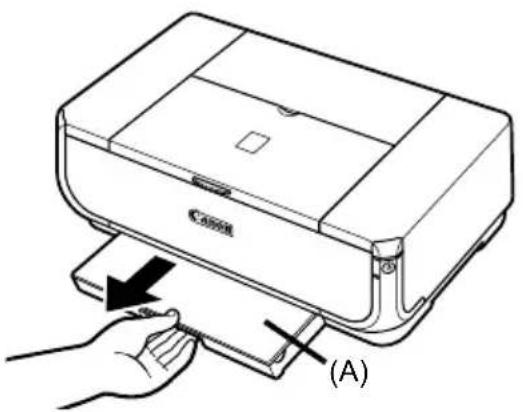
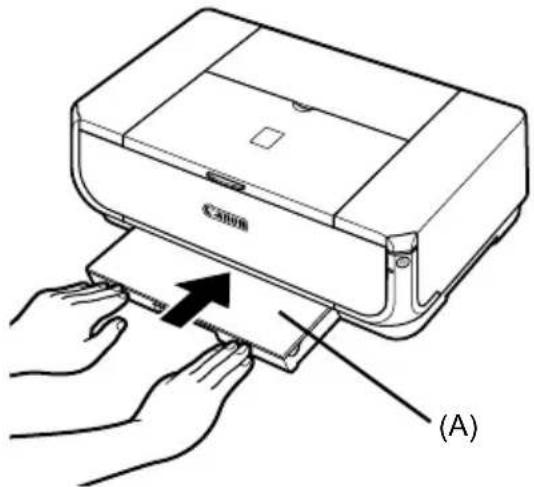
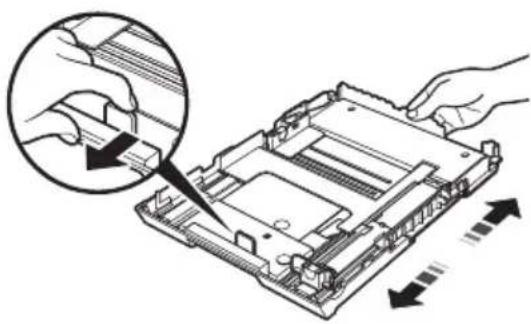
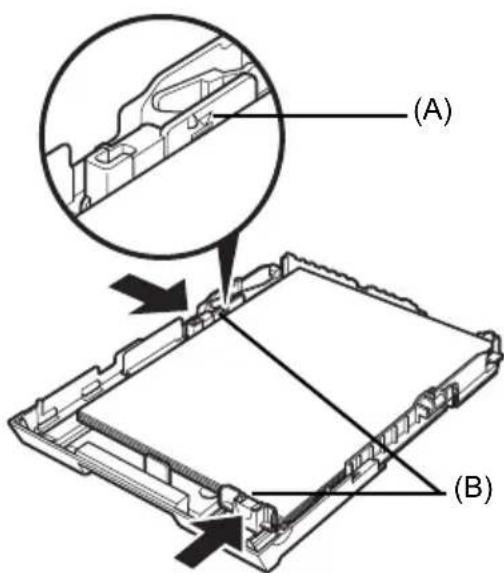
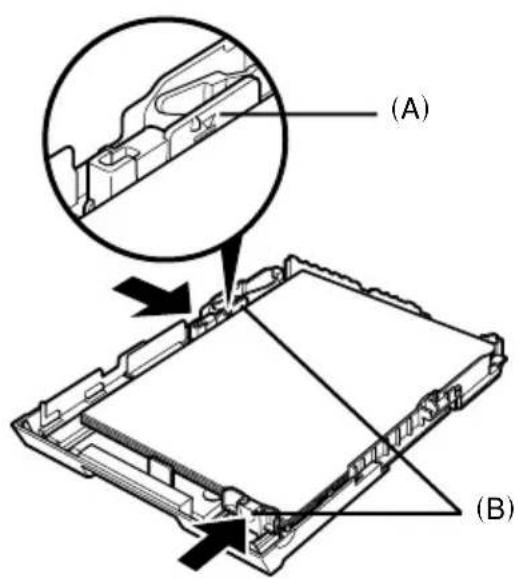
1 Pull out the Cassette from the printer and remove the Cover (A) on the Cassette.
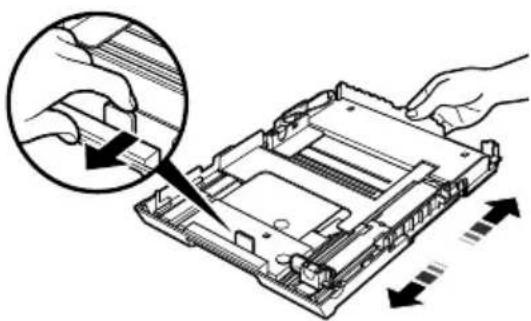
2 Adjust the size of the Cassette.
natural_image
Diagram showing a hand inserting a component into a computer motherboard with directional arrows indicating motion (no text or symbols present)3 Load the paper into the Cassette with the print side facing DOWN, aligning the paper stack against the right side of the Cassette. Do not load higher than the Load Limit Mark (A).
4 Slide the paper guides (B) to fit to the loaded paper stack.

5 Set the Cover (A) on the Cassette and insert the Cassette into the printer.
Push the Cassette all the way into the printer. If the Cassette has been extended, the front edge of the Cassette will extend beyond the front of the printer.
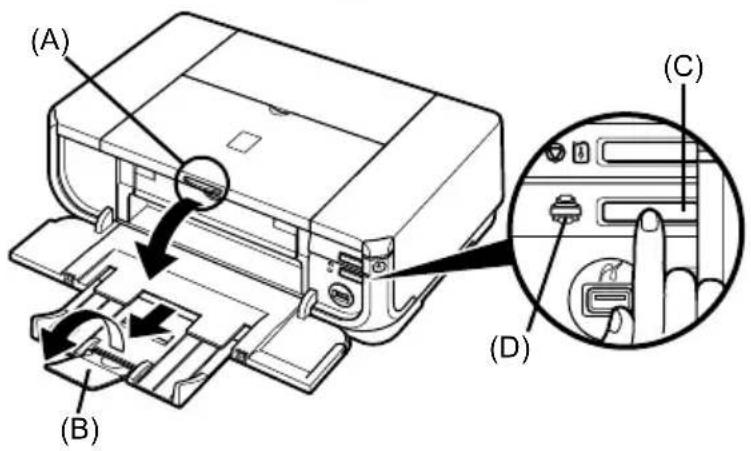
6 Press the Open Button to open the Paper Output Tray (A), and pull out the Paper Output Tray Extension (B) completely.
7 Press the Paper Feed Switch (C) so that the Cassette lamp (D) lights.
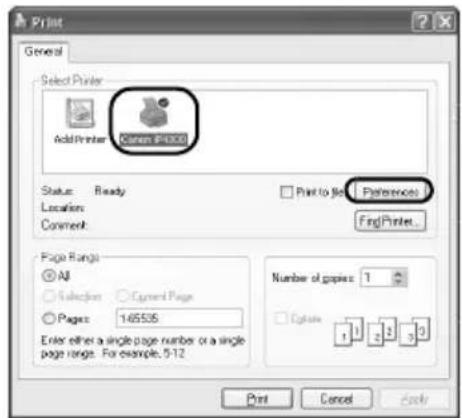
Basic Printing
This section describes the procedure for basic printing.
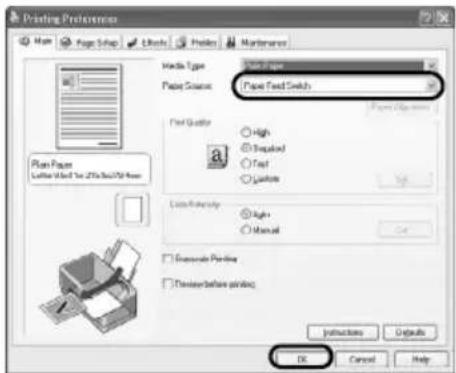
Printing with Windows
1 Turn on the printer and load the paper in the printer.
2 Make sure that the proper paper source is selected.
3 Create a document or open a file to print using an appropriate application software.
4 Select Print on the application software's File menu.
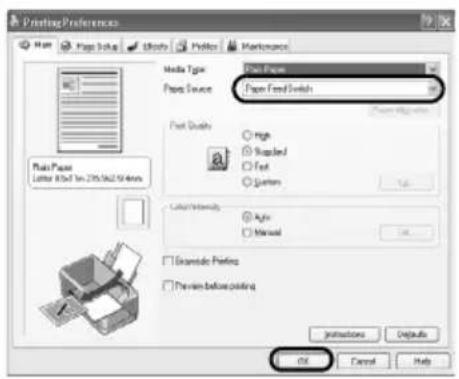
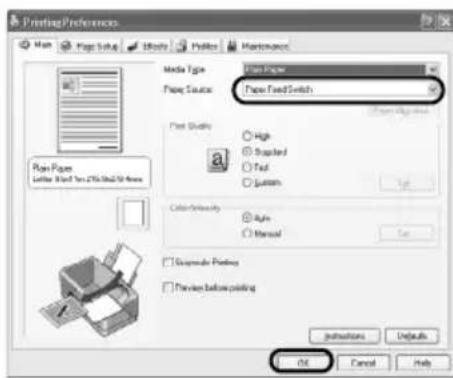
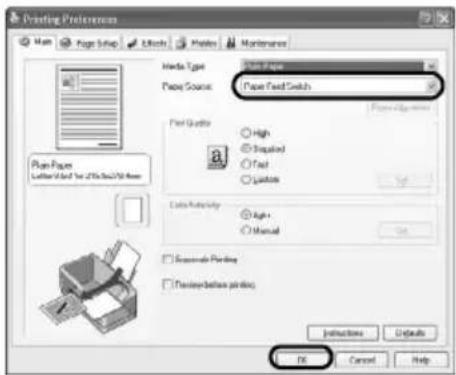
5 Make sure that Canon iP4300 is selected, and click Preferences (or Properties).

6 Specify the required settings and click OK. Make sure that Paper Feed Switch is selected in Paper Source.

Note
For details on other printer driver functions, click Help or Instructions to view the online help or the Printer Driver Guide on-screen manual. Instructions is only displayed when the on-screen manuals are installed.

7 Click Print (or OK).
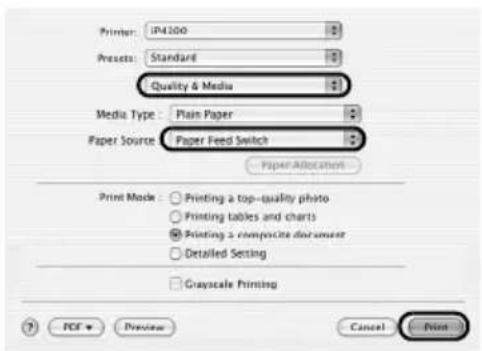
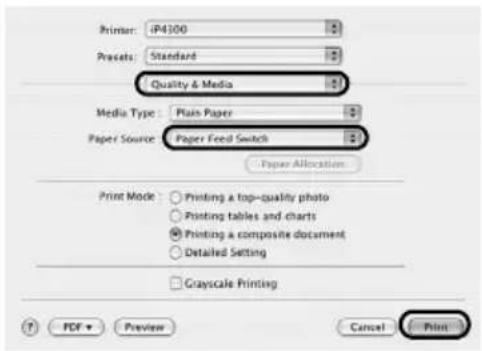
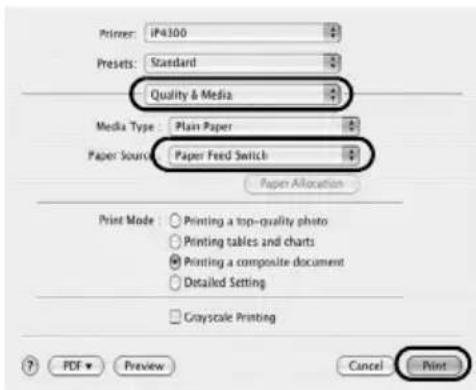
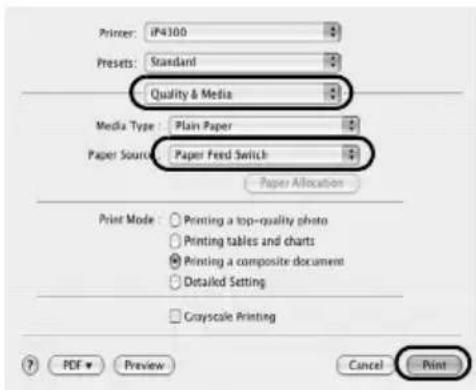
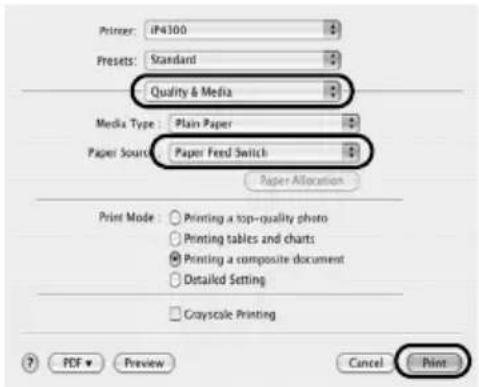
1 Turn on the printer and load the paper in the printer.
2 Make sure that the proper paper source is selected.
3 Create a document or open a file to print using an appropriate application software.
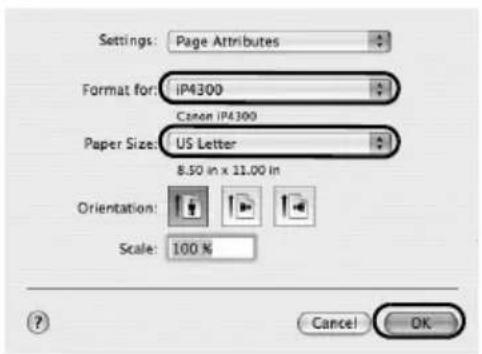
4 Select Page Setup on the application software's File menu.
5 Confirm that iP4300 is selected in Format for.
6 Select the desired paper size in Paper Size.
7 Click OK.
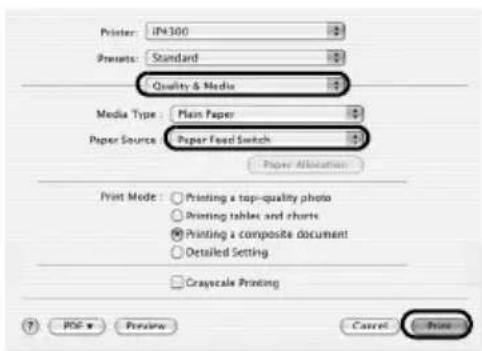
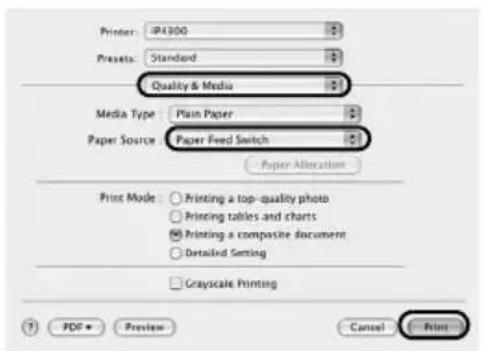
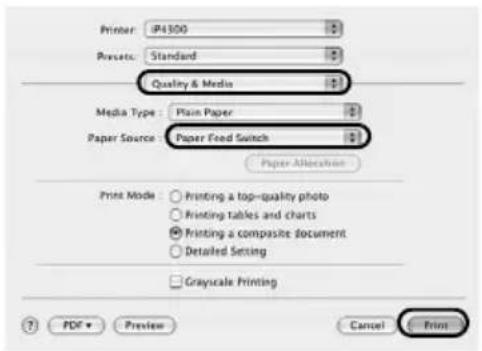
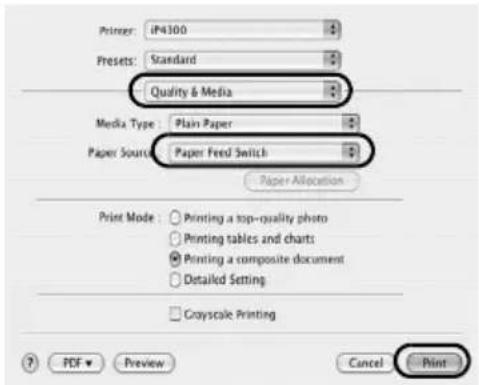
8 Select Print on the application software's File menu.
9 Select Quality & Media in the pop-up menu.
10 Specify the required settings.
Make sure that Paper Feed Switch is selected in Paper Source.

Note
For details on other printer driver functions, click to view the Printer Driver Guide on-screen manual. If the on-screen manuals are not installed, the Printer Driver Guide on-screen manual is not displayed even if is clicked.
11 Click Print.
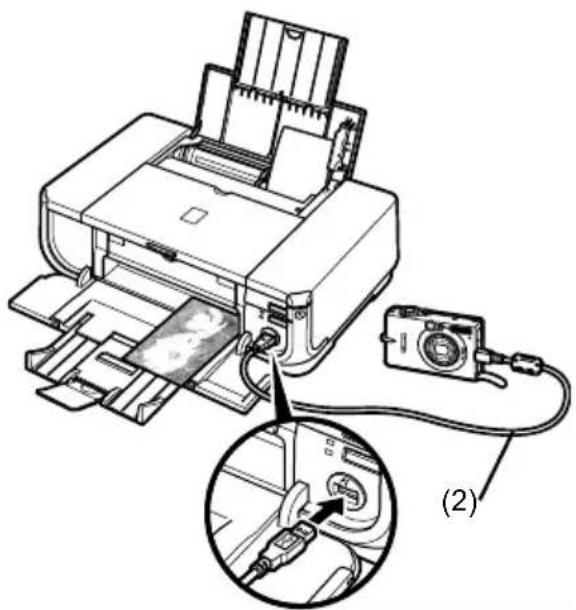
Printing Photographs Directly from a Compliant Device
Printing from a PictBridge Compliant Device
You can connect a PictBridge compliant device such as a digital camera, camcorder, or mobile phone and print recorded images directly without using a computer.
Note
- PictBridge is an industry standard enabling a range of digital photo solutions, including the direct printing of photos from a digital still camera, camcorder or mobile phone* without the need to use a computer. A device can be connected to this printer for direct printing regardless of the manufacturer or the model as long as it complies with the PictBridge standard.
- You can select the images to print and specify various print settings from your camera or mobile phone. * PictBridge compatible digital still cameras, digital camcorders, and camera-equipped mobile phones are hereafter collectively referred to as “PictBridge compliant device”.

A device with this mark is PictBridge-compatible.
■ Connecting a PictBridge Compliant Device
To connect a PictBridge compliant device to this printer, use a USB cable recommended by the device's manufacturer.
Caution
Do not connect any equipment other than PictBridge compliant devices to the Direct Print Port of the printer. If you do so, electric shock, fire, or damage to the device could result.
Note
When printing photos with the digital device connected to the printer, we recommend the use of the AC adapter supplied with the device. If you are using the device battery, be sure to charge it fully.
1 Set up the printer.
Refer to the Easy Setup Instructions to set up the printer and make it ready for printing.
Note
The Print Head cannot be aligned using the controls of the PictBridge compliant device. If Print Head alignment is not yet performed and the printer driver is not installed in the computer, be sure to align the Print Head as follows.
Make sure that the printer is on, and then load a sheet of A4 or Letter-sized plain paper in the Auto Sheet Feeder. Hold down the RESUME/CANCEL button until the POWER lamp flashes green four times, and then release it immediately. The print head alignment pattern is printed, and the print head position is adjusted automatically.
2 Turn on the printer and load the paper in the printer.
3 Connect the PictBridge compliant device to the printer.

Note
Depending on the model or brand of your device, you may have to select a print mode compliant with PictBridge before connecting the device. You may also have to turn on the device or select Play mode manually after connecting the device to the printer.
Perform necessary operations on the PictBridge compliant device before connecting it to this printer according to instructions given in the device's instruction manual.
(1) Make sure that the PictBridge compliant device is turned off.
(2) Connect the PictBridge compliant device to the printer using a USB cable recommended by the manufacturer of the device.
The device turns on automatically.
If your device does not turn on automatically, turn it on manually.
(3) Set up the PictBridge compliant device for direct printing.
will appear on the LCD of the device when the printer is correctly connected.

Note
If does not appear, refer to "Cannot Print Properly from a Digital Camera" in the User's Guide on-screen manual.
■ Printing Photographs Directly from a PictBridge Compliant Device
When operating the device, be sure to follow the instructions given in the instruction manual of your PictBridge compliant device. This section describes the page size, media type, layout, image optimization modes, and date printing mode that can be set on a PictBridge compliant device connected to the printer.
- Confirming or Changing PictBridge Print Settings from Your Camera
To change the page size or media type, operate the device to select the PictBridge print setup mode and confirm or change the settings.
About the Settings Explained Below
Some setting items explained below may not be available on some devices. In this case, the Default setting explained below is applied for the setting item.
* In the following description, names of settings items are given according to those used in Canon-brand PictBridge compliant devices. Setting item names may be different depending on the brand or model of your device.
- Printable Image Data Format
This printer prints images taken with a DCF ^® (Design rule for Camera File system)-compatible digital camera ^* , as well as PNG files.
* Exif2.21 compliant
● Paper size and Paper type Settings
If these settings are set to Default (the setting to follow that of the printer) on the PictBridge compliant device, 4" x 6" is applied for Paper size and Photo (Photo Paper Plus Glossy) is applied for Paper type.
The following sizes and types of printing paper can be loaded according to the Paper size and Paper type settings.
| Paper size Setting Paper type | Setting Loadable Paper | |
| 10 x 15 cm/4" x 6" Photo Photo | Paper Plus Glossy | |
| Fast Photo Photo Paper Pro | ||
| Photo Photo Paper Plus Semi-gloss | ||
| Photo Glossy Photo Paper | ||
| Glossy Photo Paper “Everyday Use” | ||
| Photo Stickers*1 | ||
| 13 x 18 cm/5" x 7"*2 | Photo Photo Paper Plus Glossy | |
| A4/8.5" x 11" (Letter)*3, *4 | Photo Photo Paper Plus Glossy | |
| Fast Photo Photo Paper Pro | ||
| Photo Photo Paper Plus Semi-gloss | ||
| Photo Glossy Photo Paper | ||
| Glossy Photo Paper “Everyday Use” | ||
| 5.4 x 8.6 cm/Credit card Photo | Glossy Photo Paper | *5 |
| 20 x 25 cm/8" x 10"*6 | Fast Photo Photo Paper Pro | |
| 10.1 x 18 cm/4" x 7.1" Fast Photo | Photo Photo Paper Pro |
*1 Exclusively used to print photo stickers. When printing on sticker paper, select 10x15 cm/4" x 6" in Paper size.
*2 Can be selected only on certain Canon-brand PictBridge compatible devices.
*3 Plain Paper can be selected for Paper type only when Paper size is set to A4 or 8.5" x 11" (Letter). When Paper type is set to Plain Paper, borderless printing will be disabled even when Layout is set to Borderless.
*4 You can print in 4-up layout when Paper size is set to A4 or 8.5" x 11" (Letter).
*5 Feeding this paper from the Cassette can damage the printer. Load in the Auto Sheet Feeder.
*6 When printing on Photo Paper Plus Semi-gloss 8" x 10" / 203.2 x 254.0 mm (SG-201), select 20 x 25 cm/8" x 10" for Paper size and Default for Paper type.
- Layout and Trimming Settings
If these settings are set to Default (the setting to follow that of the printer) on the PictBridge compliant device, Borderless is applied for Layout and Off (No trimming) is applied for Trimming.
When printing onto Photo Stickers (PS-101), select N-up for Layout, then select 16-up.
* Some PictBridge compliant devices may display the Layout option 2-up, 4-up, 9-up, and 16-up. In this case always select 16-up.
* If there are no options on the PictBridge compliant device that correspond to 16-up, printing on stickers is not possible.
* When printing on Photo Stickers (PS-101), do not set Layout to Borderless.
● Image Optimize Setting
If Image optimize is set to Default (the setting to follow that of the printer) on the PictBridge compliant device, ExifPrint is applied.
If you are using a Canon-brand PictBridge compatible device, additional options of VIVID, NR, or VIVID+NR may be available, depending on the model.
* VIVID prints green and blue portions of photos more vividly.
NR (Noise Reduction) reduces noise in blue portions, such as the sky, and dark portions.
VIVID+NR is a combination of the VIVID and NR functions.
● Date/File No. Print Setting
If Date/File No. print is set to Default (the setting to follow that of the printer) on the PictBridge compliant device, Off is applied.
If the images already have dates superimposed when shot, set this PictBridge setting item to Off. If you select Date, File No., or Both, the date and/or file number will be printed over the date printed by the camera's function.

Note
- Never disconnect the USB cable during printing unless when explicitly allowed to by the PictBridge compliant device.
When disconnecting the USB cable between the PictBridge compliant device and printer, follow the instructions given in the device's instruction manual. - You cannot set or do the following by operating on the PictBridge compatible device.
- Print quality setting
- Printer maintenance
- Confirming and Changing PictBridge Print Settings on the Printer
You can confirm and change the default settings for items such as media type and size that are preset to the printer and applied to PictBridge printing. To change the settings, you need to install the Canon Setup Utility from the Setup CD-ROM and connect the printer to your computer. For details, refer to the User's Guide on-screen manual.
Replacing an Ink Tank
When ink tanks run out of ink, replace them using the following steps.
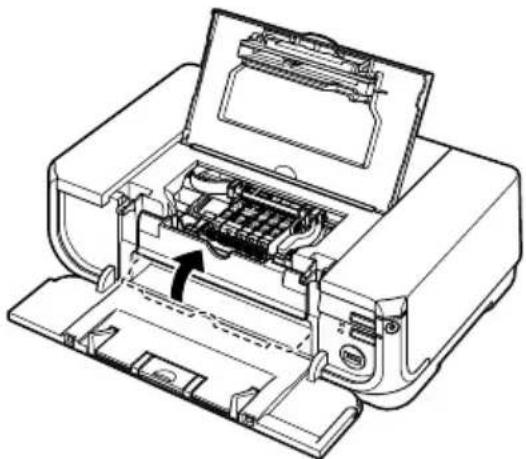
1 Open the Paper Output Tray and the Inner Cover.
2 Make sure that the printer is on, and then open the Top Cover.
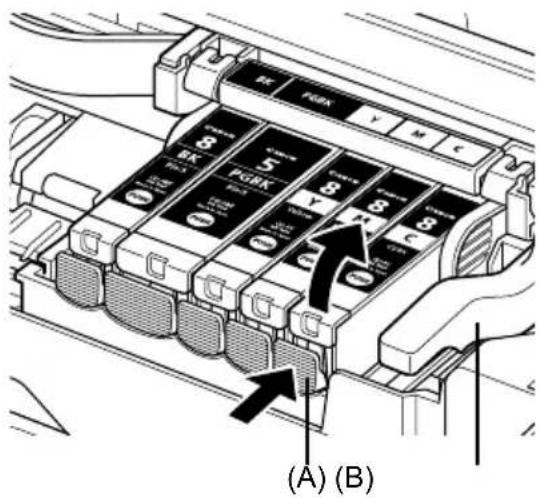
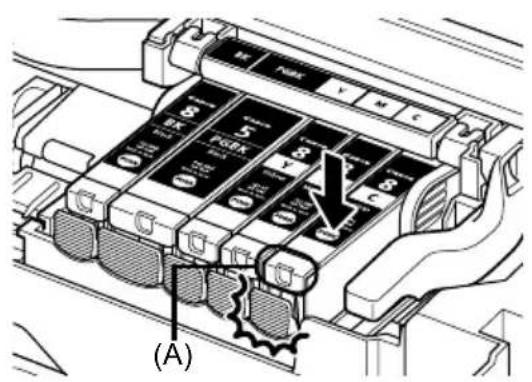
3 Push the tab of the ink tank whose lamp is flashing fast (A) and remove it.
Do not touch the Print Head Lock Lever (B).
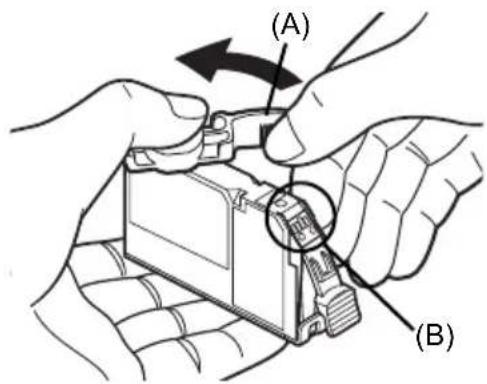
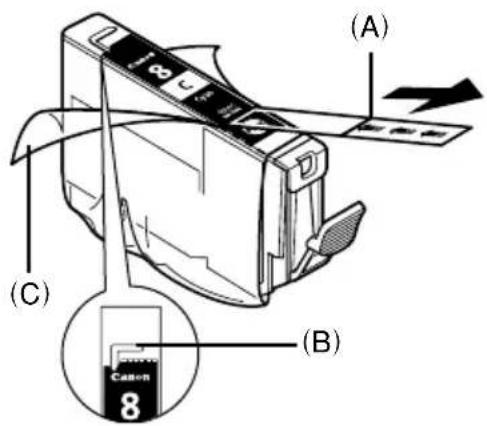
4 Remove the new ink tank from its packaging, then pull the orange tape in the direction of the arrow (A) so that the protective film does not remain on the air hole (B). Then remove the film completely (C).
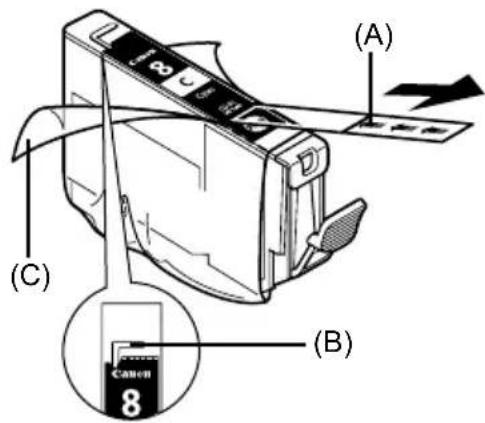
5 Remove the orange protective cap (A) from the bottom of the ink tank.
Carefully hold the protective cap when removing it to prevent the ink from staining your fingers.
Discard the cap once it is removed.

Important
Do not touch the electrical contacts (B) on the ink tank. Doing so can cause the printer to malfunction or become unable to print.
6 Insert the front end of the ink tank into the Print Head. Make sure the position of the tank matches the label (A).
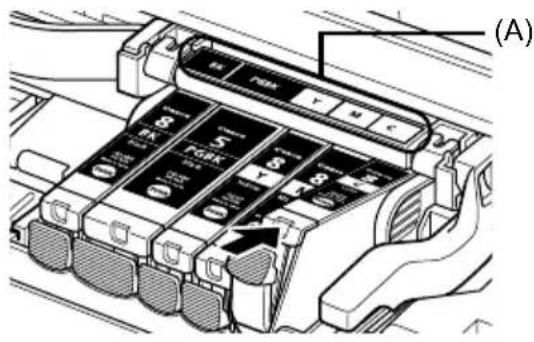
7 Press on the mark on the ink tank until the ink tank snaps firmly into place. Confirm that the ink lamp (A) lights up red.
8 Close the Inner Cover.
natural_image
Line drawing of a printer internal structure showing internal components and paper feeding (no text or symbols)9 Close the Top Cover.
Reading the On-screen Manuals
Along with this Quick Start Guide, on-screen manuals are also supplied with your printer. For detailed instructions on installing the on-screen manuals, refer to your setup sheet.
You can view the on-screen manuals in the following way:
Windows
To view the on-screen manual, double-click the iP4300 On-screen Manual shortcut icon on the desktop, or click Start > All Programs (or Programs) > Canon iP4300 Manual > iP4300 On-screen Manual.
System Requirements
Browser: Windows HTML Help Viewer

Note
- Microsoft Internet Explore® 5.0 or later must be installed.
- The on-screen manual may not be displayed properly depending on your operating system or Internet Explorer version. We recommend that you keep your system up to date with Windows Update.
Macintosh
To view the on-screen manual, double-click the iP4300 On-screen Manual alias on the desktop.
Note
If you installed the User's Guide from the Manual folder in the Setup CD-ROM, open the folder in which you copied the User's Guide and double-click top.htm.
System Requirements
Browser: Help Viewer

Note
- The on-screen manual may not be displayed properly depending on your operating system. We recommend that you keep your system up to date.
- We recommend using Safari as your Web browser to view the HTML format on-screen manuals. If Safari is not installed on your computer, download it from Apple Computer, Inc. website and install it.

natural_image
Symbol of a trash bin crossed with no text or numbers, representing waste sorting or disposal (no text present)This symbol indicates that this product is not to be disposed of with your household waste, according to the WEEE Directive (2002/96/EC) and your national law. This product should be handed over to a designated collection point, e.g., on an authorized one-for-one basis when you buy a new similar product or to an authorized collection site for recycling waste electrical and electronic equipment (EEE). Improper handling of this type of waste could have a possible negative impact on the environment and human health due to potentially hazardous substances that are generally associated with EEE. At the same time, your cooperation in the correct disposal of this product will contribute to the effective usage of natural resources. For more information about where you can drop off your waste equipment for recycling, please contact your local city office, waste authority, approved WEEE scheme or your household waste disposal service.
For more information regarding return and recycling of WEEE products, please visit www.canon-europe.com/environment.
(EEA: Norway, Iceland and Liechtenstein)
For Customers in Europe, Middle-East, Africa and Russia only
For Canon Customer Support contacts, please see the back cover of the European Warranty Systems (EWS) Booklet or visit www.canon-europe.com.

АЯ46
Canon Europa N.V., Bovenkerkerweg 59-61, 1185 XB Amstelveen, The Netherlands
PIXMA iP4300
This digital apparatus does not exceed the Class B limits for radio noise emissions from a digital apparatus as set out in the interference-causing equipment standard entitled “Digital Apparatus”, ICES-003 of the Industry Canada.
Copyright ©2006 CANON INC.
natural_image
Diagram showing hands installing a component on a computer chassis with directional arrows indicating movement (no text or symbols present)
Remarque

Important
natural_image
Line drawing of a printer with internal components and an arrow indicating a process (no text or symbols present)natural_image
Symbol of a trash bin crossed with no text or numbers, representing environmental restriction (no text present)Copyright ©2006 CANON INC.
natural_image
Diagram showing hands installing a component into a device, with an inset magnified view of the component being inserted (no text or symbols present)Impresión básica
natural_image
Diagram of a printer with an attached digital camera and cable, showing internal components (no text or symbols)
Nota
natural_image
Line drawing of a printer with internal circuitry and an arrow indicating a component (no text or symbols present)natural_image
Symbol of a trash bin crossed with no text or numbers, representing waste sorting or disposal (no text present)Copyright ©2006 CANON INC.
natural_image
Diagram showing hands installing a component on a computer motherboard with directional arrows indicating motion (no text or symbols present)Impressão básica

natural_image
Diagram of a printer with an attached camera and cable, showing internal components (no text or symbols)
Nota
natural_image
Line drawing of an open printer with internal circuitry and a black arrow indicating a component (no text or symbols present)natural_image
Symbol of a trash bin crossed with no text or numbers, representing waste sorting or disposal (no text present)Copyright ©2006 CANON INC.
2 Juster størrelsen i kassetten.
natural_image
Illustration of a computer motherboard with hands and a magnified inset showing a component being inserted (no text or symbols)


Bemærk

Vigtigt
natural_image
Line drawing of an open printer with internal circuitry and a paperclip, showing no text or symbols9 Luk topdækslet.
Browser: Help Viewer

Bemærk
natural_image
Symbol of a trash bin crossed with no text or numbers, representing waste sorting or disposal (no text present)Copyright ©2006 CANON INC.
natural_image
Illustration of hands installing or adjusting a computer motherboard with an arrow indicating direction (no text or symbols present)Druckgrundlagen


Hinweis
natural_image
Line drawing of a printer with internal circuitry and an arrow indicating a component (no text or symbols present)Browser: Help Viewer
Hinweis
natural_image
Symbol of a trash bin crossed with no visible text or labelsCopyright ©2006 CANON INC.
natural_image
Diagram showing hands installing or adjusting a computer motherboard with an inset magnified view of the component (no text or symbols present)Σημείωση

natural_image
Diagram of a printer with an attached camera and cable, showing internal components and wiring (no text or symbols)
Σημείωση

natural_image
Line drawing of a printer with internal circuitry and an arrow indicating a component (no text or symbols present)natural_image
Symbol of a trash bin crossed with a diagonal line, representing no waste or discharge (no text or numbers present)
Copyright ©2006 CANON INC.
natural_image
Diagram showing hands installing a computer motherboard with an inset magnified view of the component (no text or symbols present)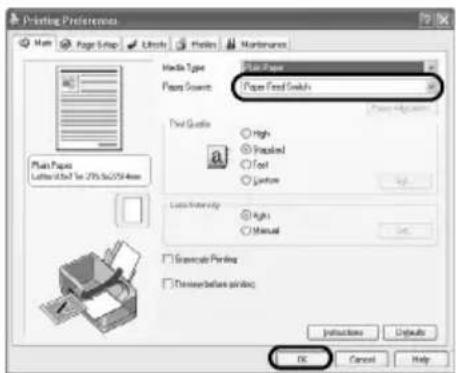

Nota
natural_image
Line drawing of an open printer with internal circuitry and a paperclip, showing no text or symbolsnatural_image
Symbol of a trash bin crossed with no text or numbers, representing waste sorting or disposal (no text present)Copyright ©2006 CANON INC.
natural_image
Diagram showing hands installing a component on a computer motherboard with directional arrows indicating movement (no text or symbols present)Basisafdrukfuncties


Opmerking
natural_image
Line drawing of an open printer with internal circuitry and a black arrow indicating a component (no text or symbols present)Browser: Help Viewer

Opmerking
natural_image
Symbol of a trash bin crossed with no text or numbers, representing waste sorting or disposal (no text present)Copyright ©2006 CANON INC.
natural_image
Diagram showing hands installing a component on a computer chassis with directional arrows indicating movement (no text or symbols present)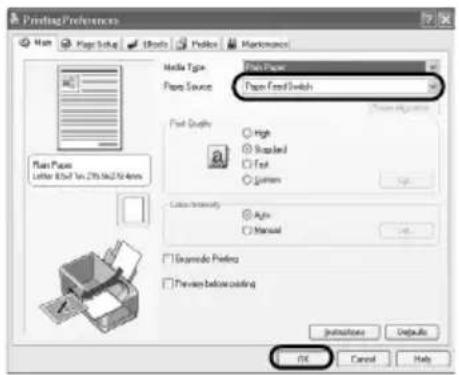

Skrive ut bilder direkte fra en kompatibel enhet
Skrive ut fra en PictBridge-kompatibel enhet
Du kan koble til en PictBridge-kompatibel enhet, for eksempel et digitalt kamera, et videokamera eller en mobiltelefon, og skrive ut lagrede bilder direkte uten å bruke datamaskin.

Merk:
- PictBridge er en bransjestandard som tillater en rekke digitale fotoløsninger, inkludert direkte utskrift av bilder fra et digitalkamera, et digitalt videokamera eller en mobiltelefon* uten at det er nødvendig å bruke datamaskin. En enhet kan kobles til denne skriveren for direkte utskrift uansett hvilken produsent eller modell det er, så lenge den er kompatibel med PictBridge-standarden.
- Du kan velge hvilke bilder som skal skrives ut, og angi diverse utskriftsinnstillinger på kameraet eller mobiltelefonen.
* PictBridge-kompatible digitale stillbildekameraer, digitale videokameraer og mobiltelefoner med kamera kalles heretter "PictBridge-kompatible enheter".

Enheter med dette merket er PictBridge-kompatible.
■ Koble til en PictBridge-kompatibel enhet
Hvis du skal koble en PictBridge-kompatibel enhet til denne skriveren, må du bruke en USB-kabel som er anbefalt av produsenten av enheten.

Forsiktig

Merk:
natural_image
Line drawing of a printer with internal circuitry and an arrow indicating a component (no text or symbols present)Nettleser: Windows HTML Help Viewer

Merk:
Nettleser: Help Viewer

Merk:
natural_image
Symbol of a trash bin crossed with no text or numbers, representing waste sorting or disposal (no text present)Copyright ©2006 CANON INC.
■ Macintosh-tiedot

Huomautus
natural_image
Diagram showing hands installing a computer motherboard with an inset magnified view of the component (no text or symbols present)Perustulostus


Huomautus
natural_image
Technical line drawing of a printer internal structure showing internal components and paper plane (no text or symbols)natural_image
Symbol of a trash bin crossed with no text or numbers, representing waste sorting or disposal (no text present)The Ground Truth image displays a single, solid horizontal line. According to Rule 2 (UNDERSCORE & LINE RULES), this is a stylistic or background line, not a placeholder underscore. Therefore, the OCR result must ignore it and output nothing or only meaningful text. The provided OCR content is "\_\_\_\_", which consists of four underscores. This is an incorrect interpretation of the line as a placeholder, violating the rule that stylistic lines must be ignored. The OCR has hallucinated underscores where none should exist based on the GT's visual context. Hence, the OCR result is inconsistent with the Ground Truth.
Exif Print
The Ground Truth image displays a single, solid horizontal line. According to Rule 2 (UNDERSCORE & LINE RULES), this is a stylistic or background line, not a placeholder underscore. Therefore, the OCR result must ignore it. The provided OCR content is "\_\_\_\_", which consists of four underscores. This is an incorrect interpretation of the line as a placeholder, violating the rule that stylistic lines must be ignored. The OCR has hallucinated underscores where none should exist based on the GT's visual context. Hence, the OCR result is inconsistent with the Ground Truth.
Kanadensiska regler om radiostörningar/Réglementations canadiennes relatives aux interférences radio
m = 311
Internationellt ENERGY STAR®-program
The Ground Truth image displays a single, solid horizontal line. According to Rule 2 (UNDERSCORE & LINE RULES), this is a stylistic or background line, not a placeholder underscore. Therefore, the OCR result must ignore it and output nothing or only meaningful text. The provided OCR content is "\_\_\_\_", which consists of four underscores. This is an incorrect interpretation of the line as a placeholder, violating the rule that stylistic lines must be ignored. The OCR has hallucinated underscores where none should exist based on the GT's visual context. Hence, the OCR result is inconsistent with the Ground Truth.
The Ground Truth image displays a single, solid horizontal line. According to Rule 2 (UNDERSCORE & LINE RULES), this is a stylistic or background line, not a placeholder underscore. Therefore, the OCR result must ignore it and output nothing or only meaningful text. The provided OCR content is "\_\_\_\_", which consists of four underscores. This is an incorrect interpretation of the line as a placeholder, violating the rule that stylistic lines must be ignored. The OCR has hallucinated underscores where none should exist based on the GT's visual context. Hence, the OCR result is inconsistent with the Ground Truth.
Copyright ©2006 CANON INC.
natural_image
Diagram showing hands installing a computer motherboard with an inset magnified view of the component (no text or symbols present)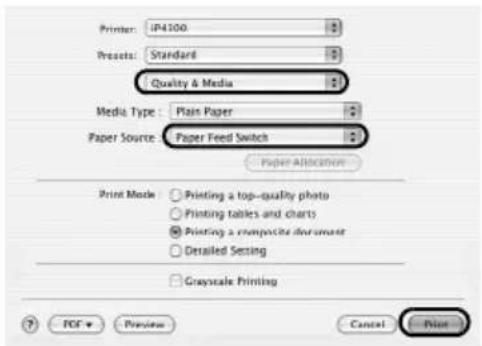

Obs!
natural_image
Diagram of a printer with an attached digital camera and cable, showing internal components (no text or symbols)
Obs!
natural_image
Technical line drawing of a printer with internal components and an arrow indicating a specific part (no text or symbols present)natural_image
Symbol of a trash bin crossed with no text or numbers, representing environmental protection (no text present)Copyright ©2006 CANON INC.
natural_image
Diagram showing hands installing a component on a computer motherboard with directional arrows indicating movement (no text or symbols present)Základní tisk


Poznámka
natural_image
Line drawing of a printer internal structure showing internal components and paper plane (no text or symbols)natural_image
Symbol of a trash bin crossed with no text or numbers, representing waste sorting or disposal (no text present)■ Teave Macintoshi kohta

Märkus.
natural_image
Diagram showing hands installing a computer motherboard with an inset magnified view of the component (no text or symbols present)
Märkus.

Märkus.
● [Date/File No. print/Kuupäev/failinr printimine]
natural_image
Technical line drawing of a printer with internal circuitry and an arrow indicating a component (no text or symbols present)natural_image
Symbol of a trash bin crossed with no text or numbers, accompanied by a black rectangular block below (no text or symbols present)natural_image
Diagram showing hands installing or adjusting a mechanical component with an inset magnified view (no text or symbols)3


Nemiet vērā

Nemiet vērā

natural_image
Technical line drawing of a printer with internal circuitry and an arrow indicating a component (no text or symbols present)natural_image
Symbol of a trash bin crossed with no text or numbers, representing waste sorting or disposal (no text present)natural_image
Diagram showing hands installing a computer motherboard with an inset magnified view of the component (no text or symbols present)7 Spustelékite [Print/Spausdinti] (arba [OK]).


Pastaba

Svarbu
natural_image
Technical line drawing of a printer internal structure showing internal components and a paperclip (no text or symbols)natural_image
Symbol of a trash bin crossed with no text or numbers, representing waste sorting or disposal (no text present)Copyright ©2006 CANON INC.
natural_image
Diagram showing hands installing a component on a computer motherboard with directional arrows indicating movement (no text or symbols present)

Megjegyzés
natural_image
Diagram of a printer with an attached digital camera and cable, showing internal components (no text or symbols)
Megjegyzés

natural_image
Technical line drawing of a printer with internal circuitry and an arrow indicating a component (no text or symbols present)natural_image
Symbol of a trash bin crossed with no text or numbers, accompanied by a black rectangular block below (no text or symbols present)Copyright ©2006 CANON INC.
natural_image
Diagram showing hands installing a component on a computer motherboard with directional arrows indicating movement (no text or symbols present)


Uwaga
natural_image
Line drawing of a printer internal structure showing internal components and paper plane (no text or symbols)natural_image
Symbol of a trash bin crossed with no text or numbers, representing waste sorting or disposal (no text present)natural_image
Diagram of a computer motherboard with hands and a magnified inset showing a component being inserted (no text or symbols present)7 Нажмите кнопку [Print/Печать] (или [ОК]).

Примечание
natural_image
Line drawing of a printer with internal components and an arrow indicating a specific part (no text or symbols present)natural_image
Symbol of a trash bin crossed with no text or numbers, representing waste sorting or disposal (no text present)
Copyright ©2006 CANON INC.
Vse pravice pridržane. Brez izrecnega pisnega dovoljenja ni dovoljeno prenašati ali kopirati nobenega dela tega dokumenta.
Priprava tiskalnika
■ Informacije za OS Macintosh

Opomba
natural_image
Illustration of hands installing or adjusting a computer motherboard with an arrow indicating motion (no text or symbols present)3 Naložite papir v kaseto s stranjo za tiskanje NAVZDOL in kup papirja poravnajte ob desni strani kasete.
Ne nalagajte višje od mejne oznake za nalaganje (A).
4 Potisnite vodili za papir (B), da se prilegata naloženemu kupu papirja.
Osnovno tiskanje
Ta razdelek opisuje postopek osnovnega tiskanja.
Tiskanje v OS Windows
1 Vklopite tiskalnik in vanj naložite papir.
2 Preverite, ali je izbran ustrezen vir papirja.
3 Z ustrezno aplikacijo ustvarite dokument ali odprite datoteko za tiskanje.
4 Izberite [Print / Natisni] v meniju aplikacije [File / Datoteka].
5 Preverite, ali je izbrano [Canon iP4300], in kliknite [Preferences / Nastavitve] (ali [Properties / Lastnosti]).
6 Izberite želene nastavitve in kliknite [OK / V redu].
Preverite, ali je izbrano [Paper Feed Switch / Stikalo za podajanje papirja] v [Paper Source / Vir papirja].

Opomba
7 Kliknite [Print / Natisni] (ali [OK / V redu]).
1 Vklopite tiskalnik in vanj naložite papir.
2 Preverite, ali je izbran ustrezen vir papirja.
3 Z ustrezno aplikacijo ustvarite dokument ali odprite datoteko za tiskanje.
4 Izberite [Page Setup / Priprava strani] v meniju aplikacije [File / Datoteka].
5 Preverite, ali je [iP4300] izbrano v [Format for / Format za].
6 Izberite želeno velikost papirja v [Paper Size / Velikost papirja].
7 Kliknite [OK / V redu].
8 Izberite [Print / Natisni] v meniju aplikacije [File / Datoteka].
9 V pojavnem meniju izberite [Quality & Media / Kakovost in mediji].
10 Določite zahtevane nastavitve.
Preverite, ali je izbrano [Paper Feed Switch / Stikalo za podajanje papirja] v [Paper Source / Vir papirja].
Opomba

Opomba
natural_image
Line drawing of a printer internal structure showing internal components and an open lid (no text or symbols)natural_image
Symbol of a trash bin crossed with no text or numbers, representing waste sorting or disposal (no text present)Copyright ©2006 CANON INC.
natural_image
Diagram of a computer motherboard with hands and a magnified inset showing a component being inserted (no text or symbols present)Bežná tlač

natural_image
Diagram of a printer with an attached camera and cable, showing internal components (no text or symbols)
Poznámka
Dôležité
natural_image
Line drawing of a printer with internal circuitry and an arrow indicating a component (no text or symbols present)natural_image
Symbol of a trash bin crossed with no text or numbers, representing waste sorting or disposal (no text present)Telif Hakki ©2006 CANON INC.
natural_image
Diagram showing hands installing a computer motherboard with an inset magnified view of the component (no text or symbols present)Temel Yazdırma

Not
natural_image
Line drawing of a printer with internal components and an arrow indicating a specific part (no text or symbols present)natural_image
Symbol of a trash bin crossed with no text or numbers, representing waste sorting or disposal (no text present)natural_image
Diagram showing hands installing a computer motherboard with an inset magnified view of the component (no text or symbols present)
Примітка

Примітка
natural_image
Line drawing of a printer with internal components and an arrow indicating a specific part (no text or symbols present)natural_image
Symbol of a trash bin crossed with a diagonal line, representing no waste or discharge (no text or numbers present)
natural_image
Technical line drawing of a printer with internal components and an arrow indicating a specific part (no text or symbols present)أغلق الغطاء الداخلي
أغلق الغطاء العلوي.
(A)(B)
[ Cancer / Paper size] [ Cancer / Paper type] [ Cancer / Plain Paper]
natural_image
Diagram of a printer with an attached camera and cable, showing internal components (no text or symbols)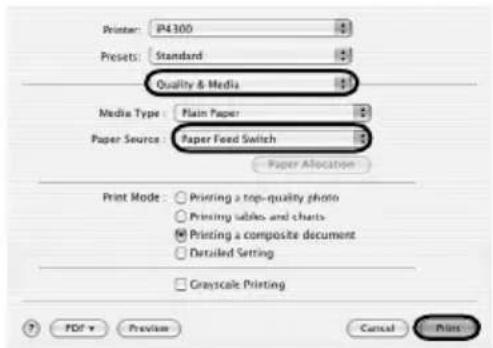
natural_image
Illustration of a computer motherboard with hands and a magnified inset showing a component being inserted (no text or symbols)٣ اضبط حجم الحاوية.
Regulatory Information
FCC Notice (U.S.A. Only)
For 120V, 60Hz model
Model Number: K10284
This device complies with Part 15 of the FCC Rules. Operation is subject to the following two conditions: (1) This device may not cause harmful interference, and (2) this device must accept any interference received, including interference that may cause undesired operation.
Note: This equipment has been tested and found to comply with the limits for a Class B digital device, pursuant to Part 15 of the FCC Rules. These limits are designed to provide reasonable protection against harmful interference in a residential installation. This equipment generates, uses and can radiate radio frequency energy and, if not installed and used in accordance with the instructions, may cause harmful interference to radio communications.
However, there is no guarantee that interference will not occur in a particular installation. If this equipment does cause harmful interference to radio or television reception, which can be determined by turning the equipment off and on, the user is encouraged to try to correct the interference by one or more of the following measures:
■ Reorient or relocate the receiving antenna.
■ Increase the separation between the equipment and receiver.
■ Connect the equipment into an outlet on a circuit different from that to which the receiver is connected.
■ Consult the dealer or an experienced radio/TV technician for help.
Use of a shielded cable is required to comply with Class B limits in Subpart B of Part 15 of the FCC Rules.
Do not make any changes or modifications to the equipment unless otherwise specified in the manual. If such changes or modifications should be made, you could be required to stop operation of the equipment.
Canon U.S.A., Inc.
One Canon Plaza
Lake Success, NY 11042
1-516-328-5600
Users in Canada

Caution
Customer Technical Supports
Canon Canada Inc., offers a full range of customer technical support* options:
■ For interactive troubleshooting, e-mail technical support, the latest driver downloads and answers to frequently asked questions (www.canon.ca)
■ Automated interactive telephone support on most current products 24 hours, 7 days a week (1-800-OK-CANON)
■ Free live technical support Mon - Fri 9am-8pm EST (excluding holidays) for products still under warranty (1-800-OK-CANON)
■ The location of the authorized service facility nearest you (1-800-OK-CANON) If the problem cannot be corrected by using one of the above technical support options, repair options are available at the time of your call to the Free live technical support number above or via the website at www.canon.ca
* Support program specifics are subject to change without notice.
• CANON CANADA INC.
1-800-OK-CANON (1-800-652-2666)
24 HOURS A DAY, SEVEN DAYS A WEEK
http://www.canon.ca
The following ink tanks are compatible with this product.