
BGA 85 - Blower STIHL - Free user manual and instructions
Find the device manual for free BGA 85 STIHL in PDF.
| Product type | Cordless battery blower |
| Brand | STIHL |
| Model | BGA 85 |
| Length | 987 mm |
| Height | 285 mm |
| Depth | 167 mm |
| Weight (without battery) | 3.2 kg |
| Battery type | STIHL AP or AR lithium-ion |
| Max. volumetric flow rate (round nozzle) | 650 m³/h |
| Max. volumetric flow rate (flat nozzle) | 715 m³/h |
| Max. volumetric flow rate (without nozzle) | 845 m³/h |
| Air velocity (round nozzle) | 46 m/s |
| Air velocity (flat nozzle) | 45 m/s |
| Sound pressure level Lp | 83 dB(A) |
| Sound power level Lw | 98 dB(A) |
| Vibration level (left/right handle) | 2.5 m/s² |
| Power supply | Lithium-ion battery, charger (AL 100, AL 300, AL 500) |
| Main functions | Blowing leaves, grass, debris; round and flat nozzle (optional); variable speed via trigger |
| Maintenance and cleaning | Clean the protective grid with a soft brush; do not use a pressure washer; keep contacts clean |
| Safety | Emergency stop via latch lever; trigger lock; removable battery; use with PPE (goggles, shoes, hearing protection) |
| Spare parts and repairability | Nozzle, battery, charger; all repairs by authorized STIHL dealer |
| General information | 300-page manual available in multiple languages; EU declaration of conformity; battery transportable according to regulations |
Frequently Asked Questions - BGA 85 STIHL
User questions about BGA 85 STIHL
0 question about this device. Answer the ones you know or ask your own.
Ask a new question about this device
Download the instructions for your Blower in PDF format for free! Find your manual BGA 85 - STIHL and take your electronic device back in hand. On this page are published all the documents necessary for the use of your device. BGA 85 by STIHL.
USER MANUAL BGA 85 STIHL
Guide to Using this Manual 24
Safety Precautions and Working
Techniques 24
Using the Unit 28
Connecting Charger to Power
Supply 28
Charging the Battery 29
LEDs on Battery 30
LED on Charger 31
Switching On 32
Switching Off 33
Storing the Machine 33
Inspection and Maintenance by
User 34
Maintenance and Care 35
Minimize Wear and Avoid Damage 36
Main Parts 37
Specifications 38
Troubleshooting 39
Maintenance and Repairs 41
Disposal 41
EC Declaration of Conformity 41
STIHL
BGA 85
Dear Customer,
Thank you for choosing a quality engineered STIHL product.
It has been built using modern production techniques and comprehensive quality assurance.
Every effort has been made to ensure your satisfaction and troublefree use of the product.
Please contact your dealer or our sales company if you have any queries concerning this product.
Your

Dr. Nikolas Stihl
This instruction manual is protected by copyright. All rights reserved, especially the rights to reproduce, translate and process with electronic systems.
English
Guide to Using this Manual Safety Precautions and Working Techniques
Pictograms
All the pictograms attached to the machine are shown and explained in this manual.
Symbols in text

WARNING
Warning where there is a risk of an accident or personal injury or serious damage to property.

NOTICE
Caution where there is a risk of damaging the machine or its individual components.
Engineering improvements
STIHL's philosophy is to continually improve all of its products. For this reason we may modify the design, engineering and appearance of our products periodically.
Therefore, some changes, modifications and improvements may not be covered in this manual.

Special safety precautions must be observed when working with a power tool.

It is important that you read the instruction manual before first use and keep it in a safe place for future reference. Non-observation of the instruction manual may result in serious or even fatal injury.

WARNING
- Minors should never be allowed to operate this machine. Watch children to be sure that they do not play with the power tool.
-This power tool may be operated only by persons who have been instructed in its use and proper handling. - Persons who are not able to operate the power tool safely due to limited physical, sensory or mental ability may work with it only under supervision or after being instructed appropriately by a responsible person.
-Lend or rent your power tool only together with this instruction manual and only to persons who are familiar with this model and its operation.

Remove the battery from the power tool:
-before performing any cleaning work
-leaveing the machine unattended
-before transporting the machine
-before storing the machine
-before performing repairs or maintenance work
-in the event of danger or in an emergency
This avoids the risk of the motor starting unintentionally.
Observe all applicable local safety regulations, standards and ordinances.
When the machine is not in use, store it so that it does not endanger others. Secure it against unauthorized use.
The user is responsible for avoiding injury to third parties or damage to their property.
If you have not used this model before: Have your dealer or a trained expert show you how to operate it properly and safely.
The use of noise emitting power tools may be restricted to certain times by national or local regulations.
Do not operate your power tool if any of its components are damaged.
Do not use a pressure washer to clean your power tool. The solid jet of water may damage parts of the power tool.
Do not spray the power tool with water.
Physical Condition
To operate this power tool you must be rested, in good physical condition and mental health.
If you have any condition that might be aggravated by strenuous work, check with your doctor before operating a power tool.
Do not operate the power tool if you are under the influence of any substance (drugs, alcohol) which might impair vision, dexterity or judgment.
Intended Use
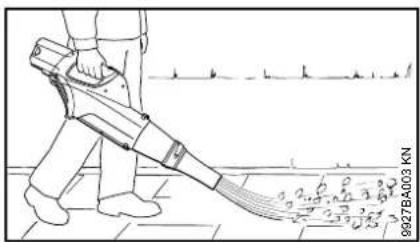
The blower is designed for blow-sweeping leaves, grass, paper and similar materials, e.g. in gardens, sports stadiums, car parks and driveways.
Do not blow-sweep hazardous materials.
Do not operate your power tool indoors.
Do not use your power tool for any other purpose because of the increased risk of accidents and damage to the power tool itself. Never attempt to modify the product in any way since this may result in accidents or damage to the product.
Operating Conditions
This power tool may be used in the rain and wet. Dry off your power tool after finishing work.
Do not leave the power tool outdoors in the rain.
Clothing and Equipment
Wear proper protective clothing and equipment.

Clothing must be sturdy but allow complete freedom of movement. Wear snug-fitting clothing, an overall and jacket combination, do not wear a work coat.
Avoid clothing that could get into the air intake. Do not wear a scarf, necktie or jewelry. Tie up and confine long hair (e.g. with a hair net, cap, hard hat, etc.).
Wear sturdy shoes with non-slip soles.
WARNING

To reduce the risk of eye injuries, wear close-fitting safety glasses in accordance with European Standard EN 166. Make sure the safety glasses are a comfortable and snug fit.
Hearing protection is recommended, e.g. earplugs or ear muffs.
STIHL offers a comprehensive range of personal protective clothing and equipment.
Transporting
Always switch off the power tool, move the retaining latch to 0 and remove the battery - even when you carry the machine for short distances. This avoids the risk of the motor starting unintentionally.
Carry the machine by the control handle.
Transporting by vehicle: Properly secure the power tool to prevent turnover and damage.
Accessories
Only use parts and accessories that are explicitly approved for this power tool by STIHL or are technically identical. If you have any questions in this respect, consult a servicing dealer. Use only high quality parts and accessories in order to avoid the risk of accidents and damage to the machine.
STIHL recommends the use of original STIHL replacement parts and accessories. They are specifically designed to match the product and meet your performance requirements.
Never attempt to modify your machine in any way since this may increase the risk of personal injury. STIHL excludes all
English
liability for personal injury and damage to property caused while using unauthorized attachments.
Drive
Battery
Observe the information in the leaflet or instruction manual supplied with the STIHL battery and keep it in a safe place.
For further notes on safety visit www.stihl.com/safety-data-sheets.
Charger
Observe the information in the leaflet supplied with the STIHL charger and keep it in a safe place.
Before Starting Work
Check that your power tool is properly assembled and in good condition - refer to appropriate chapters in the instruction manual.
-Check contacts in battery compartment for foreign matter.
-Fit the battery correctly - it must engage audibly.
- Never use defective or deformed batteries.
The trigger switch and trigger lockout must move freely (retaining latch to - switches must return to the idle position when they are released.
The nozzle must be properly mounted.
- Keep the handles dry and clean - free from oil and dirt - for safe control of the power tool.
- Never attempt to modify the controls or the safety devices in any way.
-Check condition of impeller housing.
A worn blower housing (cracks, nicks, chips) may result in an increased risk of injury from thrown foreign objects. If the blower housing is damaged, consult your dealer - STIHL recommends you contact a STIHL servicing dealer.
To reduce the risk of accidents, do not operate your power tool if it is not properly assembled and in good condition.
During Operation
In case of imminent danger or in an emergency, switch off the motor immediately, move retaining latch to 日 and remove the battery.
Your power tool is designed to be operated by one person only. Do not allow other persons in the work area.
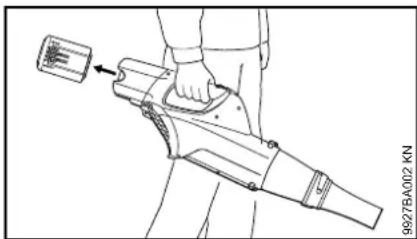
Keep bystanders, especially children, and animals away from the work area.
To reduce the risk of injury from thrown objects, do not allow any other persons within a radius of 5 meters of your own position.
To reduce the risk of damage to property, also maintain this distance from other objects (vehicles, windows).
Do not direct the air blast towards bystanders or animals since the air flow can blow small objects at great speed.
When blow-sweeping (in open ground and gardens), watch out for small animals to avoid harming them.
Never leave a running machine unattended.
Walk slowly forwards as you work - observe the nozzle outlet at all times - do not walk backwards - risk of stumbling.
Hold your power tool in a normal, relaxed working position. Make sure you always have good balance and secure footing.
Take care in slippery conditions - on slopes and uneven ground.
Watch out for obstacles: Be careful of refuse, tree stumps, roots and ditches which could cause you to trip or stumble.
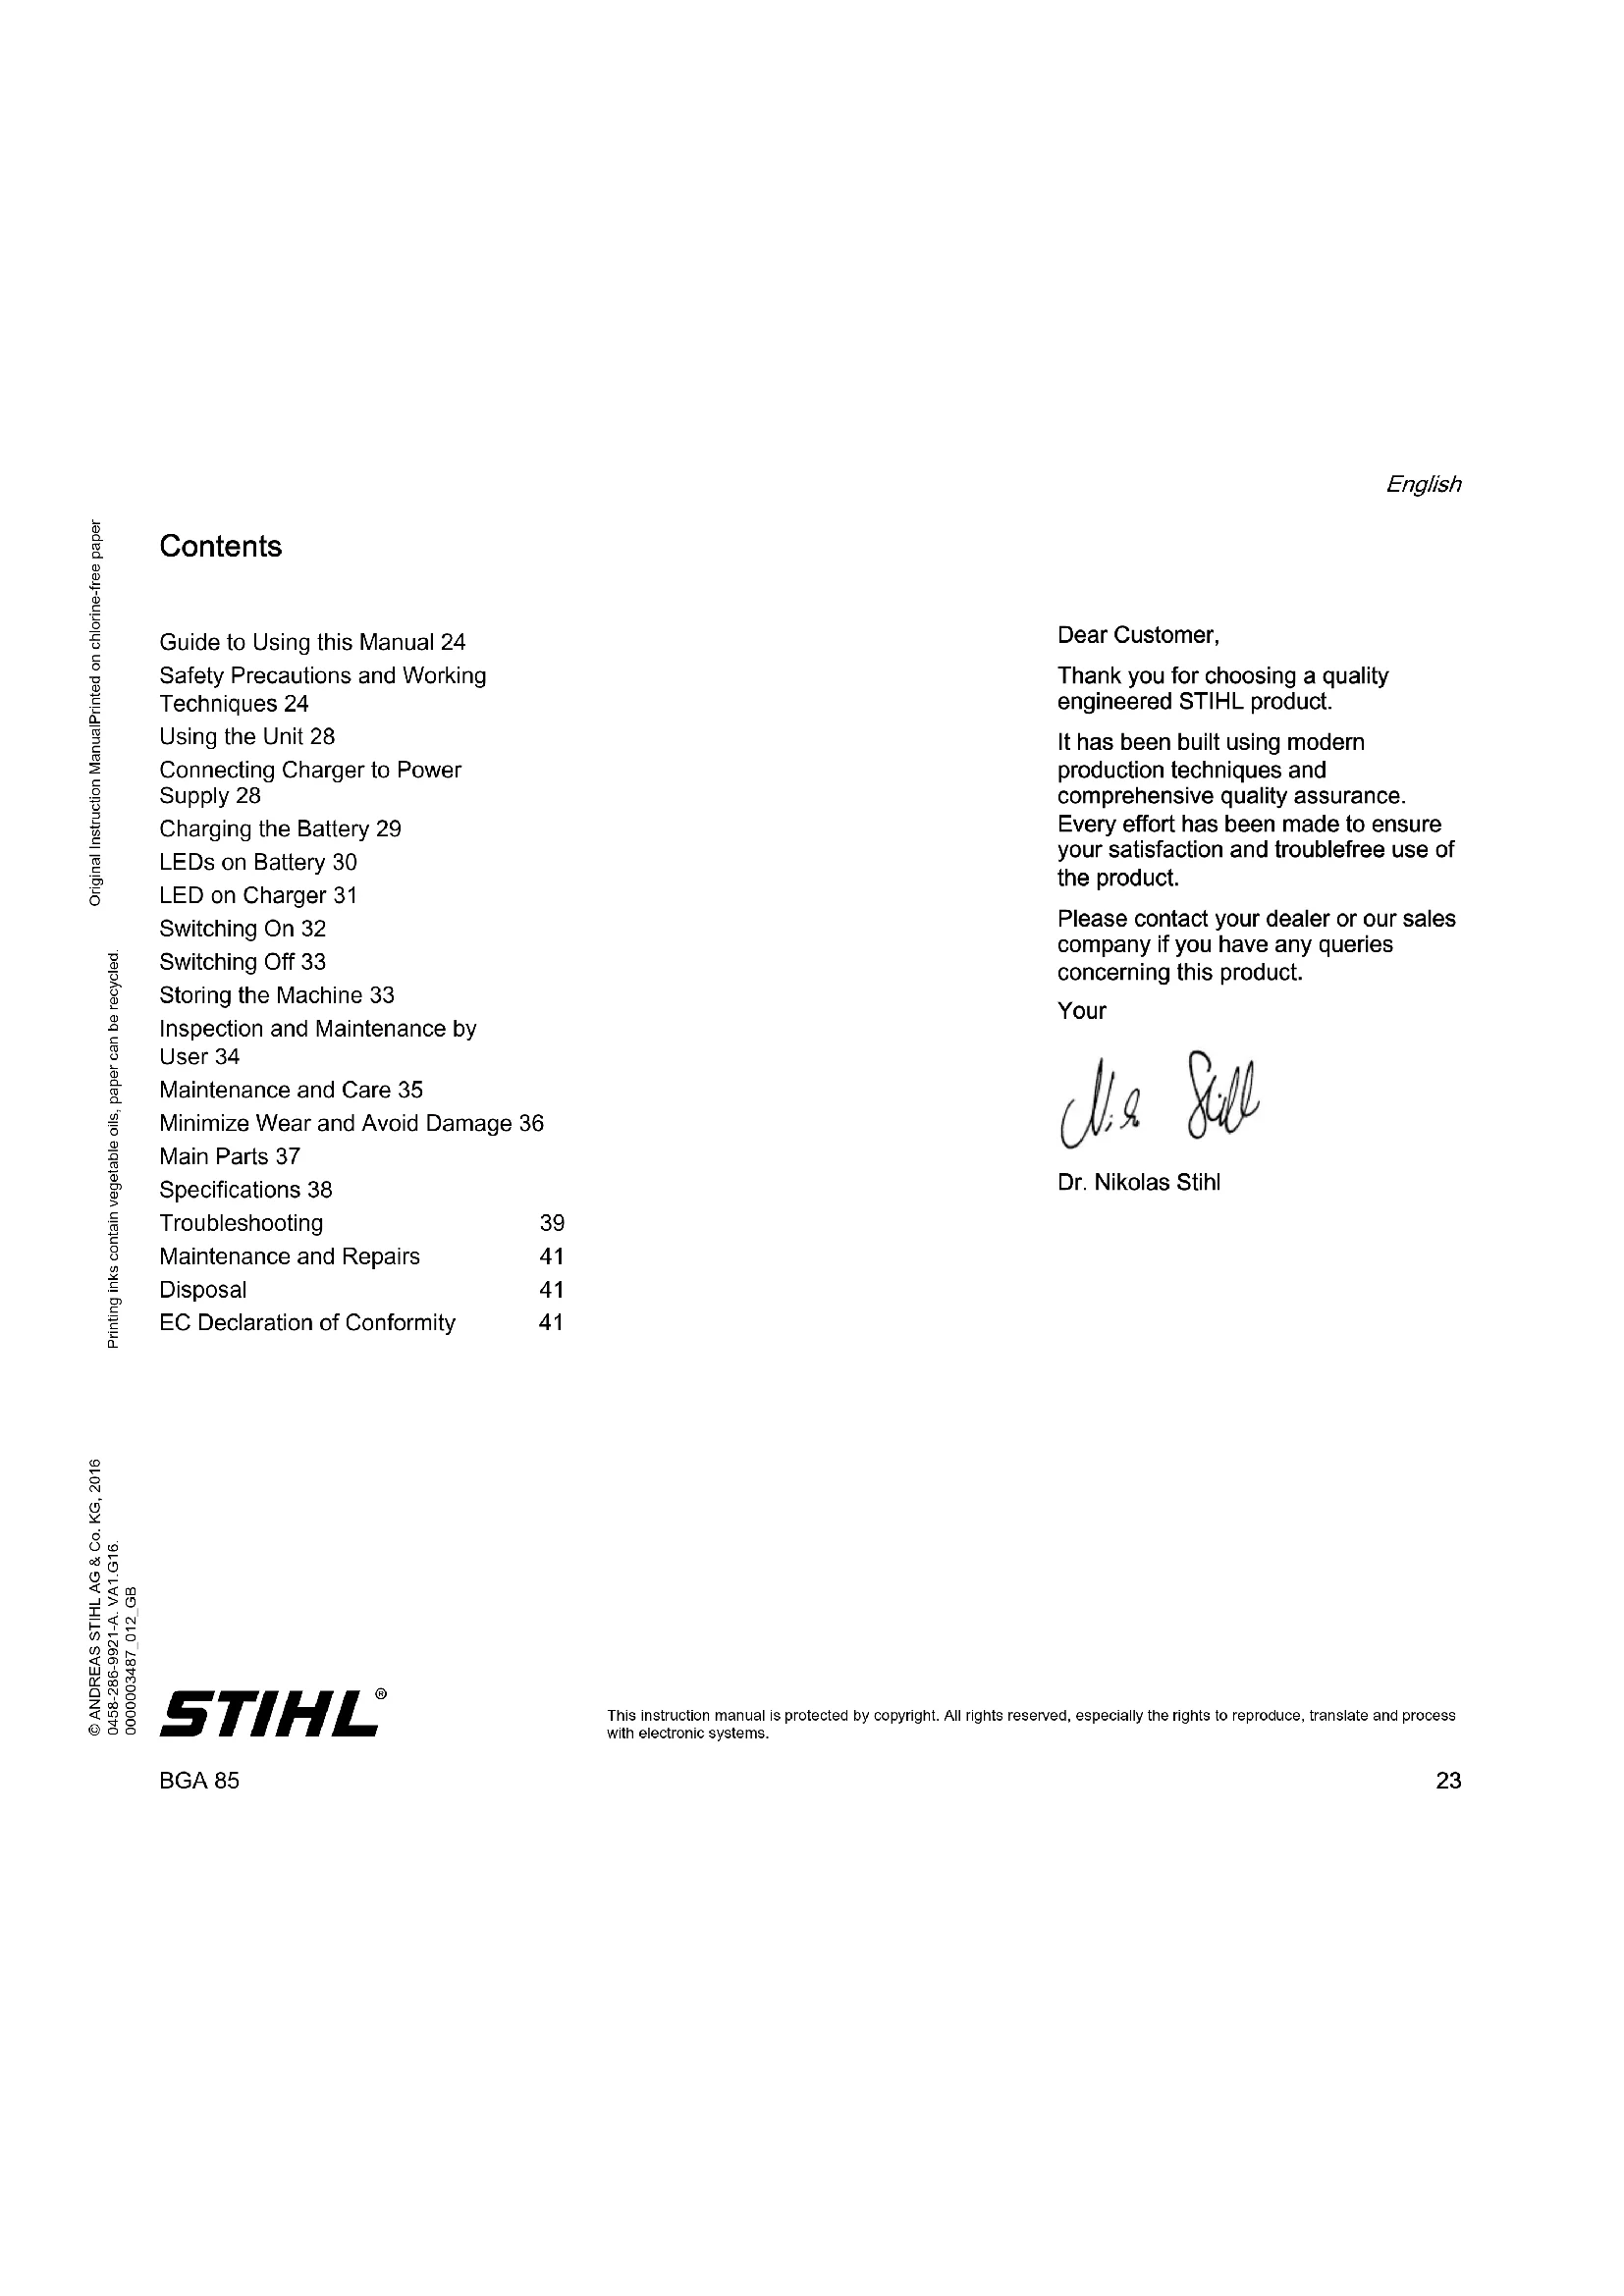
Never work on a ladder or any other insecure support.
Work calmly and carefully - in daylight conditions and only when visibility is good. Stay alert so as not to endanger others.
To reduce the risk of accidents, take a break in good time to avoid tiredness or exhaustion.
Static electricity may build-up while blow-sweeping large quantities of very dusty material and suddenly discharge in certain unfavorable conditions (e.g. very dry work area).
If dust levels are very high, always wear a suitable respirator.
Never attempt to insert objects into the impeller housing through the intake screen or the nozzle. They may be expelled at very high speed by the blower - risk of injury.
If there is a noticeable change in running behavior (e.g. higher vibrations), stop work and rectify the cause of the problem.
If your power tool is subjected to unusually high loads for which it was not designed (e.g. heavy impact or a fall), always check that it is in good condition before continuing work - see also "Before Starting Work". Make sure the safety devices are working properly. Do not continue operating your power tool if it is damaged. In case of doubt, consult your servicing dealer.
Before leaving the power tool unattended: Always switch off the power tool, set the retaining latch to and remove the battery.
After Finishing Work
Always clean dust and dirt off the power tool - do not use any grease solvents for this purpose.
Vibrations
This power tool minimizes the vibrations transmitted to the operator's hands.
However, the operator should seek medical advice in the event of suspected circulatory problems in the hands (e.g. tingling sensation in the fingers).
Maintenance and Repairs
Always move the retaining latch to and remove the battery before carrying out any repairs or maintenance work on the power tool. This avoids the risk of the motor starting unintentionally.
Service the machine regularly. Do not attempt any maintenance or repair work not described in the instruction manual. Have all other work performed by a servicing dealer.
STIHL recommends that you have servicing and repair work carried out exclusively by an authorized STIHL servicing dealer. STIHL dealers are regularly given the opportunity to attend training courses and are supplied with the necessary technical information.
Only use high-quality replacement parts in order to avoid the risk of accidents and damage to the machine. If you have any questions in this respect, consult a servicing dealer.
STIHL recommends the use of genuine STIHL replacement parts. They are specifically designed to match your model and meet your performance requirements.
Never attempt to modify your power tool in any way since this will increase the risk of personal injury.
Regularly check the electrical contacts and ensure that the insulation of the connecting cord and plug of the charger is in good condition and show no sign of ageing (brittleness).
Electrical components, e.g. connecting cord of charger, may only be repaired or replaced by a qualified electrician.
Clean plastic components with a cloth. Do not use aggressive detergents. They may damage the plastic.
Carefully clean the intake screen in the impeller housing with a soft brush whenever required.
Keep the battery guides free from foreign matter - clean as necessary.
Store the power tool in a dry, locked location with the retaining latch on and the battery removed.
English
Using the Unit
Your blower is designed for one-handed operation. It can be carried by the control handle in either the right or left hand.
Always hold the power tool firmly in your hand.
Watch out for small animals when blow-sweeping in open areas, yards and gardens.
Nozzles

WARNING
To reduce the risk of injury, operate the unit only with a properly mounted nozzle.
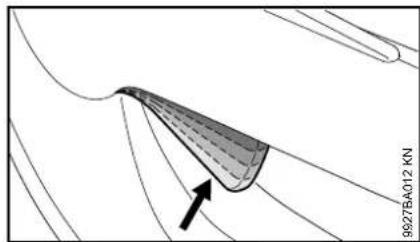
The round nozzle is particularly suitable for use on uneven surfaces (e.g. fields and lawns).
The fan nozzle (special accessory) produces a broad and powerful airstream at ground level. It can be aimed and controlled very accurately. This nozzle is highly effective for blow-sweeping sawdust, leaves, grass cuttings and similar materials from flat surfaces.
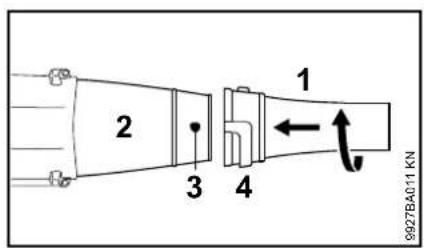
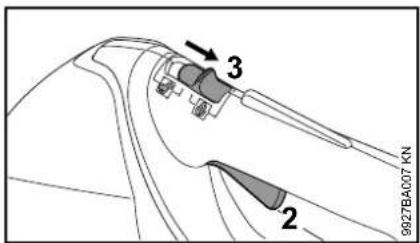
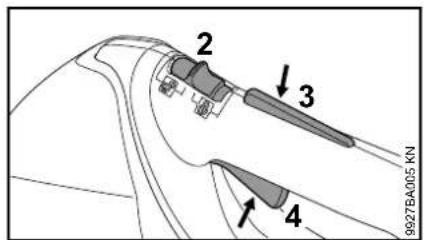
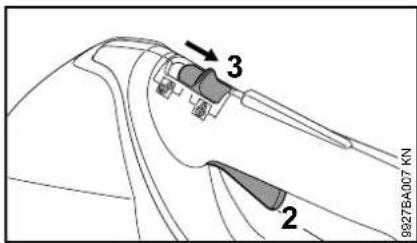
Mounting the nozzle
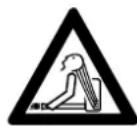
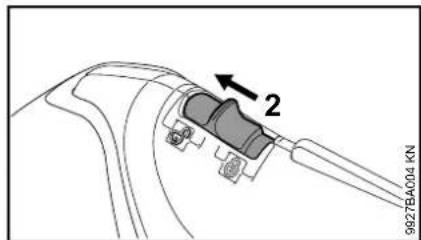
- Push the nozzle (1) onto the blower tube (2) - the lug (3) must engage the groove (4).
- Lock the nozzle (1) by rotating it in the direction of the arrow as far as the stop.
Remove the nozzle in the reverse sequence.
Connecting Charger to Power Supply
Power supply (mains) voltage and operating voltage must be the same.
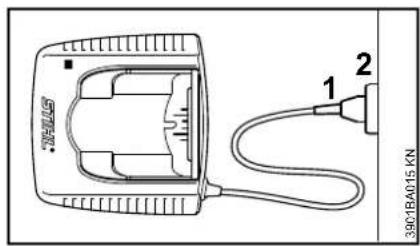
- Insert the plug (1) in the wall outlet (2).
A self test is performed after the charger is connected to the power supply. During this process, the light emitting diode (1) on the charger lights up green for about 1 second, then red and goes off again.
Charging the Battery
A factory-new battery is not fully charged.
Recommendation: Fully charge the battery before using it for the first time.
- Connect the charger to the power supply – mains voltage and operating voltage of the charger must be the same – see "Connecting Charger to Power Supply".
Operate the charger only in enclosed and dry rooms at ambient temperatures between +5^ to +40^ (+41^ to +104^)
Only charge dry batteries. Allow a damp battery to dry before charging.

- Push the battery (1) into the charger (2) until noticeable resistance is felt - then push it as far as stop.
The LED (3) on the charger comes on when the battery is inserted - see "LED on Charger"
Charging begins as soon as the LEDs (4) on the battery glow green - see "LEDs on Battery".
The charge time is dependent on a number of factors, including battery condition, ambient temperature, etc., and may therefore vary from the times specified.
The battery heats up during operation in the power tool. If a hot battery is inserted in the charger, it may be necessary to cool it down before charging. The charging process begins only after the battery has cooled down. The time required for cooling may prolong the charge time.
The battery and charger heat up during the charging process.
AL 300, AL 500 Chargers
The AL 300 and AL 500 chargers are equipped with a battery cooling fan
AL 100 Charger
The AL 100 charger has no fan and waits for the battery to cool down before starting the charging process. The battery is cooled by heat transfer to the ambient air.
End of Charge
The charger switches itself off automatically when the battery is fully charged:
-LEDs on the battery go off.
- The LED on the charger goes off.
The charger's fan is switched off (if charger is so equipped)
Remove the fully charged battery from the charger.
English
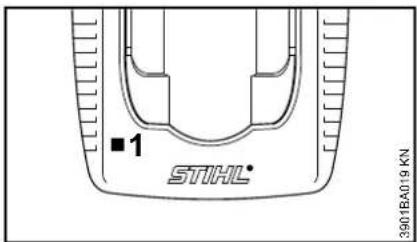
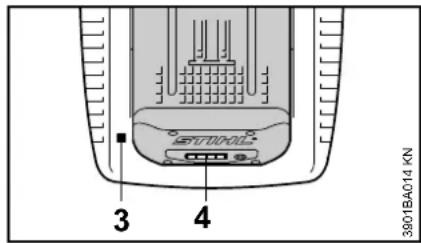
LEDs on Battery
Four LEDs show the battery's state of charge and any problems that occur on the battery or power tool.

- Press button (1) to activate the display - the display goes off automatically after 5 seconds.
The LEDs can glow or flash green or red.

LED glows continuously green.

LED flashes green.

LED glows continuously red.

LED flashes red.
During Charging Process
The LEDs glow continuously or flash to indicate the progress of charge.
A green flashing LED indicates the capacity that is currently being charged.
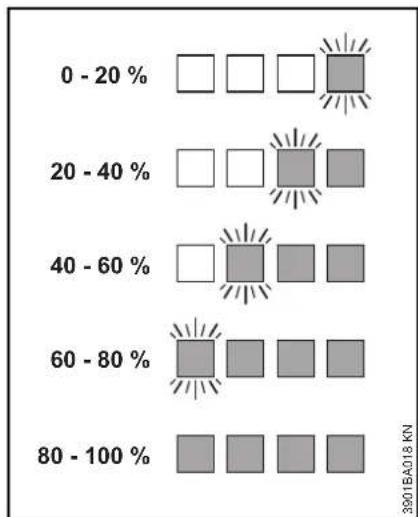
The LEDs on the battery go off automatically when the charge process is completed.
If the LEDs on the battery flash or glow red - see "If the red LEDs glow continuously / flash".
During Operation
The green LEDs glow continuously or flash to indicate the state of charge.

If the LEDs on the battery flash or glow red - see "If the red LEDs glow continuously / flash".
If the red LEDs glow continuously / flash
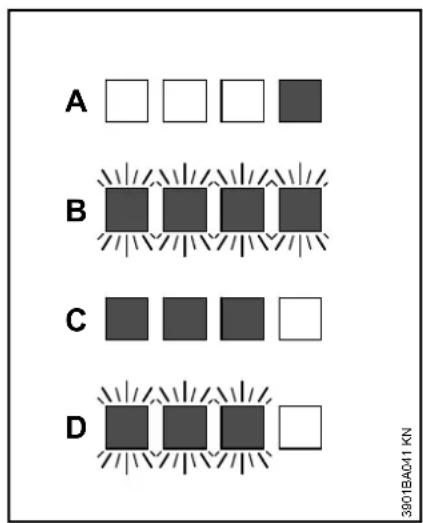
| A 1 | LED glows continuously red: | Battery is too \( {\text{hot}}^{1)}{}^{2)}/{\text{cold}}^{1)} \) |
| B 4 | LEDs flash red | Malfunction in battery 3) |
| C 3 | LEDs glow continuously red: | Power tool is too hot - allow it to cool down. |
| D 3 | LEDs flash red | Malfunction in power tool \( {}^{4)} \) |
1) When charging: Charge process starts automatically after the battery has cooled down / warmed up.
2) During operation: Power tool cuts out - allow battery to cool down; it may be necessary to take the battery out of the power tool for this purpose.
3) Electromagnetic interference or fault. Take the battery out of the power tool and refit it. Switch on the machine - if the LEDs continue to flash, the battery has a malfunction and must be replaced.
4) Electromagnetic interference or fault. Take the battery out of the machine. Use a blunt tool to remove dirt from the contacts in the battery compartment. Refit the battery. Switch on the power tool - if the LEDs still flash, the power tool has a malfunction and must be checked by a servicing dealer - STIHL recommends an authorized STIHL servicing dealer.
English
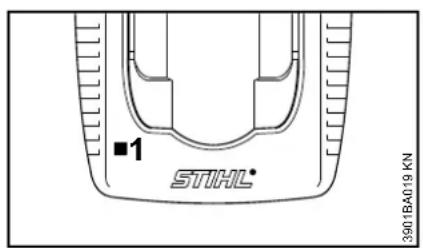
LED on Charger
The LED (1) on the charger may glow continuously green or flash red.
Green continuous light ...
... indicates the following:
The battery
-is being charged
-is too hot and must cool down before charging
See also "LEDs on battery".
The green LED on the charger goes off as soon as the battery is fully charged.
Red flashing light ...
... may indicate the following:
- No electrical contact between battery and charger - remove and refit the battery
-Malfunction in battery - see also "LEDs on Battery".
-Malfunction in charger - have checked by a servicing dealer. STIHL recommends an authorized STIHL servicing dealer.
English
Switching On
The starter battery of a factory-new machine is not fully charged.
Recommendation: Fully charge the battery before using it for the first time.
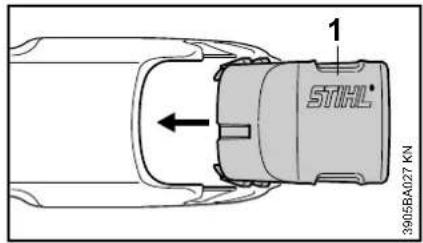
If necessary, remove the cover from the battery compartment before fitting the battery, i.e. depress both locking tabs to unlock and remove the cover.
Fitting the Battery
- Insert the battery (1) in the power tool - the battery slides into the compartment - press it down carefully until it snaps into position - the battery must be flush with the top of the housing.
Switching on the Machine
Make sure you have a secure and firm footing.
- Stand upright - hold the power tool in a relaxed position.
- Unlock the power tool by moving the retaining latch (2) to .
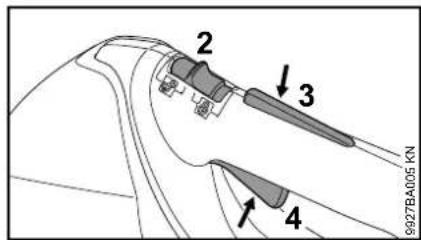
- Push down the trigger switch lockout (3) and depress the trigger switch (4) and hold them in that position.
The motor runs only if the retaining latch (2) is on and the trigger switch lockout (3) and trigger switch (4) are operated simultaneously.

Trigger
Motor speed can be controlled with the trigger switch. Depress the trigger switch to accelerate the motor.
Switching Off
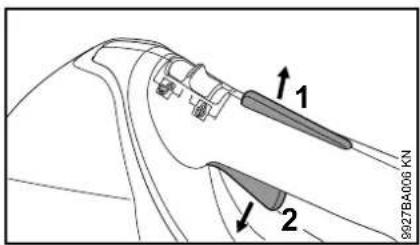
- Release the trigger switch lockout (1) and the trigger switch (2).
- Move the retaining latch (3) to - the trigger switch (2) cannot be operated - the power tool is locked to prevent start-up.
Always remove the battery from the power tool during work breaks and after finishing work.
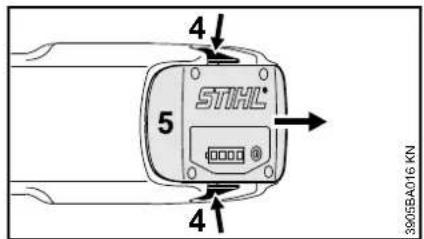
Remove the battery.
- Press in both locking tabs (4) at the same time to unlock the battery (5).
Take the battery (5) out of the housing.
When the power tool is not in use, shut it off so that it does not endanger others.
Secure it against unauthorized use.
Storing the Machine
- Move the retaining latch to .
- Remove the battery.
- Thoroughly clean the machine.
- Store the machine in a dry and secure location out of the reach of children and other unauthorized persons.
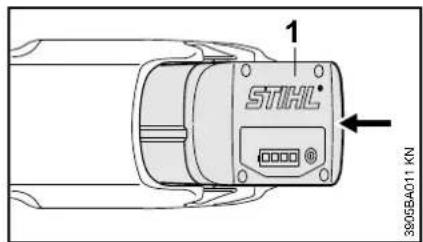
Cover for Battery Compartment
In some markets the machine comes with a cover for the battery compartment. It protects the battery compartment from contamination.
After finishing work, slide the cover (1) home until it engages audibly in position.
English
Storing the Battery
- Take the battery out of the power tool or the charger.
- Store indoors in a dry and safe location. Keep out of the reach of children and other unauthorized persons and protected from contamination.
- Do not store spare batteries unused - use in rotation.
To optimize the life of the battery, store it at a state of charge of about 30% .
Storing the Charger
- Remove the battery.
- Disconnect the plug from the wall outlet.
- Store the charger indoors in a dry and secure location. Keep out of the reach of children and other unauthorized persons and protected from contamination.
Inspection and Maintenance by User
- Inspect the intake screen for damage before and after each use - have a damaged intake screen replaced by your servicing dealer1).
- Carefully clean a dirty intake screen with a soft brush whenever required.
Maintenance and Care
| The following intervals apply to normal operating conditions only. If your daily work- ing time is longer or operating conditions are difficult (very dusty work area, etc.), shorten the specified intervals accordingly. Move the retaining latch to \( \square \) before performing any work on the power tool. | before starting work | after finishing work or daily | weekly | monthly | every 12 months | if problem | if damaged | if required | |
| Complete machine | Visual inspection (condition) X | ||||||||
| Clean X | |||||||||
| Controls (retaining latch, trigger switch lockout, trigger switch) | Check operation X | ||||||||
| Clean X | X | ||||||||
| Intake screen | Visual inspection (condition) X ✘ | ||||||||
| Clean X | |||||||||
| Have replaced by dealer \( {}^{1)} \) | X | ||||||||
| All accessible screws and nuts Retighten X | |||||||||
| Battery Visual inspection X | ✘ | ✘ | |||||||
| Battery compartment | Clean X | ✘ | |||||||
| Check operation (eject battery) X | |||||||||
| Safety labels Replace X | |||||||||
1) STIHL recommends a STIHL servicing dealer.
English
Minimize Wear and Avoid Damage
Observing the instructions in this manual helps reduce the risk of unnecessary wear and damage to the power tool.
The power tool must be operated, maintained and stored with the due care and attention described in this instruction manual.
The user is responsible for all damage caused by non-observance of the safety precautions, operating and maintenance instructions. This includes in particular:
-Alterations or modifications to the product not approved by STIHL.
-Using tools or accessories which are neither approved or suitable for the product or are of a poor quality.
-Using the product for purposes for which it was not designed.
-Using the product for sports or competitive events.
Consequential damage caused by continuing to use the product with defective components.
Maintenance Work
All the operations described in the "Maintenance Chart" must be performed on a regular basis. If these maintenance operations cannot be performed by the owner, they should be performed by a servicing dealer.
STIHL recommends that you have servicing and repair work carried out exclusively by an authorized STIHL servicing dealer. STIHL dealers are
regularly given the opportunity to attend training courses and are supplied with the necessary technical information.
If these maintenance operations are not carried out as specified, the user assumes responsibility for any damage that may occur. Among other things, this includes:
-Damage to the motor due to neglect or deficient maintenance (e.g. not cleaning cooling air inlets).
-Damage to the charger caused by incorrect electrical connection (voltage).
Corrosion and other consequential damage to the machine, battery and charger due to improper storage and use.
-Damage to the product resulting from the use of poor quality replacement parts.
Parts Subject to Wear and Tear
Some parts of the power tool are subject to normal wear and tear even during regular operation in accordance with instructions and, depending on the type and duration of use, have to be replaced in good time. Among other parts, this includes:
-Nozzle
-Battery
Main Parts
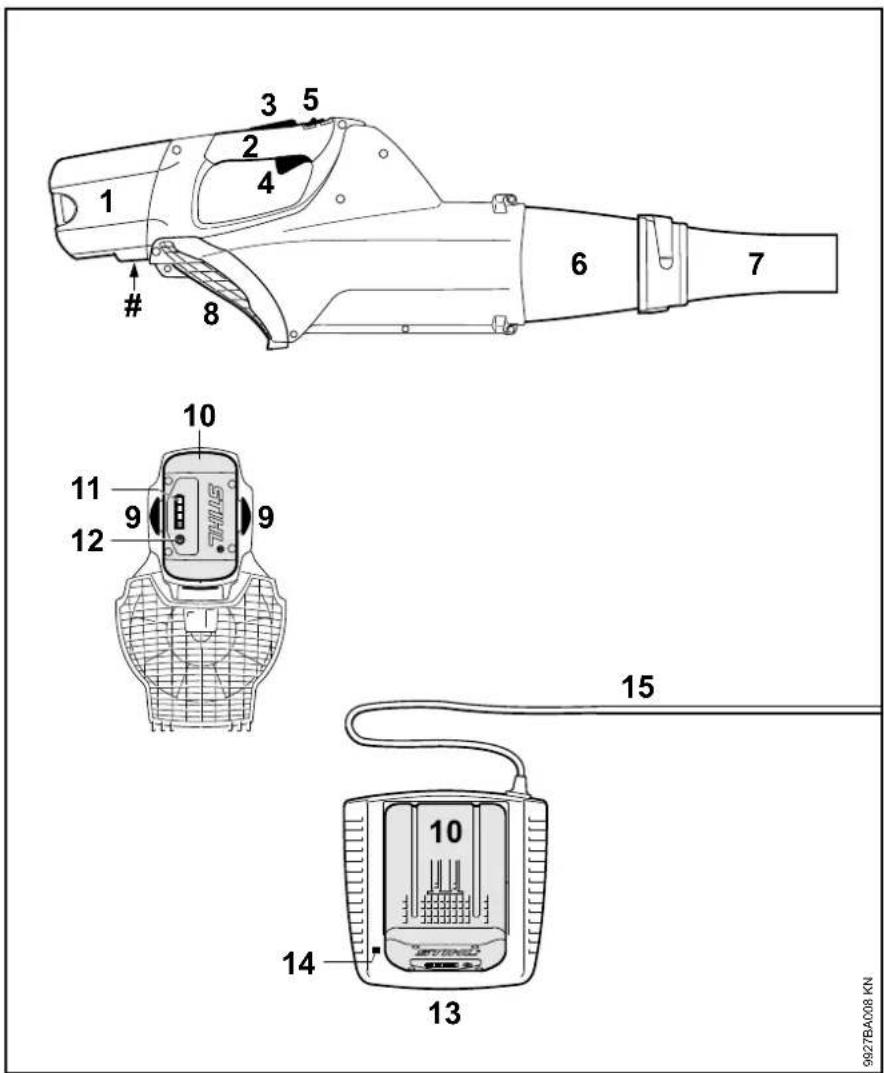
1 Battery compartment
2 Control handle
3 Trigger switch lockout
4 Trigger
5 Retaining latch
6 Blower tube
7 Nozzle
8 Protective screen
9 Battery locking tabs
10 Battery
11 Light emitting diodes (LEDs) on battery
12 Pushbutton for activating LEDs on battery
13 Charger
14 LED on charger
15 Connecting cord with plug
Serial number
English
Specifications
Battery
Type: Lithium-ion
Designation: AP, AR
The machine may be operated only with original STIHL AP and AR rechargeable batteries.
Power tool running time is dependent on the energy content of the battery.
Maximum air flow rate
| with round nozzle 650 m | 3/h |
| with fan nozzle 715 m | 3/h |
| without nozzle 845 m | 3/h |
Air velocity
with round nozzle 46m / s with fan nozzle 45m / s
Dimensions
Length 987 mm
Height 285 mm
Depth 167 mm
Weight
without battery 3.2kg
Noise and Vibration Data
Noise and vibration data are determined on the basis of the rated maximum speed.
For further details on compliance with Vibration Directive 2002/44/EC visit www.stihl.com/vib.
Sound pressure level L_p to EN 506362100
83 dB(A)
Sound power level L_w to EN 506362100
98 dB(A)
Vibration measurement a_h to EN 506362100
Handle, left Handle, right
2.5 m/s² 2.5 m/s²
The K-factor in accordance with Directive 2006/42/EC is 2.5dB(A) for the sound pressure level and sound power level; the K-factor in accordance with Directive 2006/42/EC is 2.0m/s^2 for the vibration measurement.
The vibration values quoted above have been measured according to a standardized test procedure and may be used to compare electric power tools.
Depending on the type of usage, the vibrations that actually occur may differ from the values quoted.
The vibration values quoted may be used for an initial assessment of the user's exposure to vibrations.
The actual exposure to vibrations has to be evaluated. This process may also take into account times during which the
electric power tool is switched off and times during which it is switched on but running without load.
Transport
STIHL batteries fulfill the requirements stated in UN-Manual ST/SG/AC.10/11/Rev.5 Part III, Subsection 38.3.
The user can transport STIHL batteries by road transport to the place where the machine is to be used without additional requirements.
The lithium ion batteries included are subject to the provisions of the legislation relating to dangerous goods.
When shipped by a third party (e.g. air transport or haulage firm), special packaging and identification requirements must be observed.
When preparing the item for shipment, a dangerous goods expert must be consulted. Please observe any further national regulations.
Pack the battery so that it cannot move inside the packaging.
Further transport instructions - see www.stihl.com/safety-data-sheets
REACH
REACH is an EC regulation and stands for the Registration, Evaluation, Authorisation and Restriction of Chemical substances.
For information on compliance with the REACH regulation (EC) No. 1907/2006 see www.stihl.com/reach.
Troubleshooting
Always remove the battery before carrying out any work on the power tool.
| Condition Cause Remedy | ||
| Machine does not start when switched on | No electrical contact between power tool and battery | Remove the battery, visually check contacts and refit battery |
| Battery has low charge(1 LED on battery flashes green) | Charge the battery | |
| Battery too hot / too cold(1 LED on battery glows red) | Allow battery to cool down / allow battery to warm up slowly at temperature of about 15°C - 20°C | |
| Fault in battery(4 LEDs on battery flash red) | Take the battery out of the power tool and refit it. Switch on the machine - if the LEDs continue to flash, the battery has a malfunction and must be replaced. | |
| Power tool too hot(3 LEDs on battery glow red) | Power tool is too hot - allow it to cool down. | |
| Electromagnetic problem or fault in machine(3 LEDs on battery flash red) | Take the battery out of the power tool and refit it. Switch on the power tool - if the LEDs still flash, the power tool has a malfunction and must be checked by a servicing dealer 1). | |
| Moisture in power tool and/or battery | Allow power tool / battery to dry | |
| Machine cuts out during operation | Battery or machine's electronics too hot | Take battery out of machine, allow battery and machine to cool down |
| Electrical or electromagnetic malfunction | Remove the battery and refit it | |
| Runtime is too short | Battery not fully charged Charge the battery | |
| Useful life of battery has been reached or exceeded | Check battery 1) and replace | |
| Battery jams when being inserted in power tool / charger | Guides / contacts dirty Carefully clean the guides / contacts | |
| Battery is not being charged even though LED on charger glows green | Battery too hot / too cold(1 LED on battery glows red) | Allow battery to cool down / allow battery to warm up slowly at temperature of about 15°C - 20°COperate charger only in closed, dry rooms at ambient temperatures between +5°C and +40°C |
English
Always remove the battery before carrying out any work on the power tool.
| Condition Cause Remedy | ||
| LED on charger flashes red | No electrical contact between charger and battery | Remove the battery and refit it |
| Fault in battery(4 LEDs on battery flash red for about 5 seconds) | Take the battery out of the power tool and refit it. Switch on the machine - if the LEDs continue to flash, the battery has a malfunction and must be replaced. | |
| Fault in charger Have charger checked by servicing dealer1) | ||
1) STIHL recommends an authorized STIHL servicing dealer.
Maintenance and Repairs Disposal
Users of this machine may only carry out the maintenance and service work described in this user manual. All other repairs must be carried out by a servicing dealer.
STIHL recommends that you have servicing and repair work carried out exclusively by an authorized STIHL servicing dealer. STIHL dealers are regularly given the opportunity to attend training courses and are supplied with the necessary technical information.
When repairing the machine, only use replacement parts which have been approved by STIHL for this power tool or are technically identical. Only use high-quality replacement parts in order to avoid the risk of accidents and damage to the machine.
STIHL recommends the use of original STIHL replacement parts.
Original STIHL parts can be identified by the STIHL part number, the STIHL logo and the STIHL parts symbol (the symbol may appear alone on small parts).
Observe all country-specific waste disposal rules and regulations.

STIHL products must not be thrown in the garbage can. Take the product, accessories and packaging to an approved disposal site for environment-friendlyly recycling.
Contact your STIHL servicing dealer for the latest information on waste disposal.
EC Declaration of Conformity
Declare in exclusive responsibility that the product
Category: Cordless electric blower
Make:STIHL
Model: BGA 85
Serial identification: 4853
conforms to the relevant provisions of Directives 2011/65/EU, 2006/42/EC, 2014/30/EU and 2000/14/EC and has been developed and manufactured in compliance with the following standards in the versions valid on the date of production:
EN 62233, EN 55014-1, EN 55014-2, EN 60335-1, EN 50636-2-100
The measured and guaranteed sound power levels were determined according to Directive 2000/14/EC, Annex V.
Measured sound power level
BGA 85:98 dB(A)
Guaranteed sound power level
BGA 85:100 dB(A)
Technical documents deposited at:
The year of manufacture and serial number are applied to the product.
English
Done at Waibingen, 29.06.2016
Director Product Management and Services
C E
Table des matieres
Indications concerning la presente
Notice d'emploi 44
Chere cliente, cher client,
(Service Homologation Products)
tar alene ansvar for at
Modell: Batteridreven
IovblaseR
Varemerke: STIHL
Type: BGA 85
Tölstefalzakkumulatort194
Kekoeio Kueeou Kaepeepowu A
915.14VAA-266-982-890
9102'K 8 8 7HLLS 5VENN
STIHL
Eliminar as perturbacoes de
servico 228
Eliminar as perturbacoes de service
Led brand continu rood.

Led knippert rood.
Tijdens het laden
EeVxoc kai ouvtnpn an to tov xpntn 266
Odyies ouvtnpnnc kai kathetaapiaou 267
Iepiopiogc oopackai aTOpuyn Znuiw 268
Kupia npouxavnato 269
TeXVIkαxapaktnpiotikα 270
AvntuotnBaaWv 272
OdyieC EIOKEUNCS 274
Atroppiyn 274
△λωσ Σμρφωης EE 274
Ayantne TELaTn,
EUXAPIOUe 0epua yia nvy aTPOaON aoc va ayopaoTe eva TPOIOIOTnac ts STIH.L
To npoiov auto exei kataokvaootei me ouxypoevesofofoouc napaywynkai katw ano ektevi netpa diaaqalionns troiotnac. ATO nTv nleupa ma esoume katabaeikbe duvatni pooattaeia wote to uxavnauto va avtatoekpvetai otic pooobokiec oac kai va oac egaopaiae epyaia xwpi ctpoanata.
Av exete oTOIOE0HnToTE aTIOpiec oxETiKa
UE TO mXavnaOaC, aTeUeuvtheIe OTov
avITpOoWTo aTto Tov OTIO to
ayopaoTe, n aTeuTheiaC OTOV
EIAAYEAaC.
IKOS a

.Nikolas Stihl
orlymyx
X3124 1
OidmyX Sjmdx Oa3rnnnny Jdox A 3uugmunl Supdxd SaIAgo S3xXdy
STIHL
OIIIAPouoE OOByE XpHON TIPPOATEUovTAt IOI DkAIuMaTnVeuMAtKIG IDIOKToNtG. EITINAPAOoVtA Oa I DAIKAIuMa, EIiKa To DkAIuaMVATAPayWvNc, MeTApPAnG KAI TESEpyAiaS Pe NkTPOVkiKA OauTmata.
Aataaepaiate to mnxavnma, yupicovtac tov diaokottn kEldomegaatc (2) 0tn 0e0n
Piote Tauroxpova TnV aopaAia Tns oavdaan (3) kai n Oavdaan (4) kai kpatnoTEc TATnmuEvC.
O KIVnnpac Aetoupyei Movo otav O diakottns KaeiduatoC (2) Bpioketai OTn Eeon kai exouev evepytointhetaia tautoxpova n aqaaia Tc skavdaan (3) kai n okaovdAaN (4).
KavodAaN
MTopeite va puOuiZETIc atpoqcs Tou KIVnTnpa ME tN OkaVdaan. Ooo TEPIAOOTepo TIIeZETI nKavdaan,TOO aUcavovtai oTPOpSc Tou KIVnTnpa.
Σβnσiμo Tou μnxavnμaTOC

ApntE eueoepn tyn aopaia nC oavdaan (1) kai tn okaovdaan (2).
FupioTe Tov 0iakOttn a0paAeiac (3) Otn Θeon H oavdaan (2) eivai Twa pIaokapiaouevn kai To mXavna iivai KkEIOwEv oEvavni akouia c Evpyotoinan.

- STIHL
- English
- Guide to Using this Manual Safety Precautions and Working Techniques
- Pictograms
- Symbols in text
- WARNING
- NOTICE
- Engineering improvements
- Physical Condition
- Intended Use
- Operating Conditions
- Clothing and Equipment
- Transporting
- Accessories
- Drive
- Battery
- Charger
- Before Starting Work
- During Operation
- After Finishing Work
- Vibrations
- Maintenance and Repairs
- Using the Unit
- Nozzles
- Connecting Charger to Power Supply
- Charging the Battery
- AL 300, AL 500 Chargers
- AL 100 Charger
- End of Charge
- LEDs on Battery
- During Charging Process
- If the red LEDs glow continuously / flash
- Green continuous light ...
- Red flashing light ...
- Switching On
- Switching on the Machine
- Switching Off
- Storing the Machine
- Cover for Battery Compartment
- Storing the Battery
- Storing the Charger
- Inspection and Maintenance by User
- Minimize Wear and Avoid Damage
- Maintenance Work
- Parts Subject to Wear and Tear
- Main Parts
- Specifications
- Air velocity
- Dimensions
- Weight
- Noise and Vibration Data
- Transport
- REACH
- Troubleshooting
- Maintenance and Repairs Disposal
- EC Declaration of Conformity
- Table des matieres
- Eliminar as perturbacoes de service
- Tijdens het laden
- KavodAaN
- Σβnσiμo Tou μnxavnμaTOC
Brand : STIHL
Model : BGA 85
Category : Blower