IPTDS2 - Other camera accessories SONY - Free user manual and instructions
Find the device manual for free IPTDS2 SONY in PDF.
User questions about IPTDS2 SONY
0 question about this device. Answer the ones you know or ask your own.
Ask a new question about this device
Download the instructions for your Other camera accessories in PDF format for free! Find your manual IPTDS2 - SONY and take your electronic device back in hand. On this page are published all the documents necessary for the use of your device. IPTDS2 by SONY.
USER MANUAL IPTDS2 SONY
© 2011 Sony Corporation Printed in China
4274319020

IPT-DS2IPT-DS2
natural_image
Illustration of a Sony camera with directional arrows indicating rotation (no text or symbols on the device itself)natural_image
Silhouette illustration of a group of people celebrating with a TV, showing a person gesturing toward a screen (no text or symbols)「オーダー撮影」で撮りたい写真を残す
natural_image
Diagram of battery disc assembly with two cylindrical batteries and rotating disc (no text or symbols)4 バッテリーカバーを閉じる。
④ ご注意
natural_image
Technical illustration of a pipe fitting with an attached component labeled 'SONY' and an upward arrow indicating motion (no text beyond label)natural_image
Illustration of a digital camera with a Sony brand base (no text or symbols on the device itself)natural_image
Technical line drawing of a battery pack and its circuit board with a Sony component (no text or symbols)natural_image
Diagram of a Sony camera on a base with an arrow indicating motion (no text or symbols beyond label)natural_image
Diagram showing two views of a device with a circular component and a prohibition symbol (no text or labels present)カメラを取りはずすには
natural_image
Illustration of a digital camera being inserted into a holder, showing the lens and handle (no text or symbols)④ ご注意
natural_image
Diagram showing a table with three legs and a circular object on top, connected by arrows (no text or symbols)natural_image
Diagram of a mechanical component with three rods and a circular housing, no text or symbols presentご注意
Before operating the product, please read this manual thoroughly and retain it for future reference.
WARNING
To reduce fire or shock hazard, do not expose the unit to rain or moisture.
CAUTION
RISK OF EXPLOSION IF BATTERY IS REPLACED BY AN INCORRECT TYPE.
DISPOSE OF USED BATTERIES ACCORDING TO THE INSTRUCTIONS.
For Customers in the U.S.A.
CAUTION
You are cautioned that any changes or modifications not expressly approved in this manual could void your authority to operate this equipment.
Note:
This equipment has been tested and found to comply with the limits for a Class B digital device, pursuant to Part 15 of the FCC Rules. These limits are designed to provide reasonable protection against harmful interference in a residential installation. This equipment generates, uses, and can radiate radio frequency energy and, if not installed and used in accordance with the instructions, may cause harmful interference to radio communications. However, there is no guarantee that interference will not occur in a particular installation. If this equipment does cause harmful interference to radio or television reception, which can be determined by turning the equipment off and on, the user is encouraged to try to correct the interference by one or more of the following measures:
- Reorient or relocate the receiving antenna.
- Increase the separation between the equipment and receiver.
- Connect the equipment into an outlet on a circuit different from that to which the receiver is connected.
- Consult the dealer or an experienced radio/TV technician for help.
For Customers in Europe
Notice for the customers in the countries applying EU Directives
The manufacturer of this product is Sony Corporation, 1-7-1 Konan Minato-ku Tokyo, 108-0075 Japan.
The Authorized Representative for EMC and product safety is Sony Deutschland GmbH, Hedelfinger Strasse 61, 70327 Stuttgart, Germany. For any service or guarantee matters please refer to the addresses given in separate service or guarantee documents.
Attention
The electromagnetic field at the specific frequencies may influence the picture and sound of this unit.
Disposal of Old Electrical & Electronic Equipment (Applicable in the European Union and other European countries with separate collection systems)
natural_image
Simple line drawing of a trash bin with two crossed lines indicating no waste or restriction (no text or symbols)This symbol on the product or on its packaging indicates that this product shall not be treated as household waste. Instead it shall be handed over to the applicable collection point for the recycling of electrical and electronic equipment. By ensuring this product is disposed of correctly, you will help prevent potential negative consequences

for the environment and human health, which could otherwise be caused by inappropriate waste handling of this product. The recycling of materials will help to conserve natural resources. For more detailed information about recycling of this product, please contact your local Civic Office, your household waste disposal service or the shop where you purchased the product.
Table of contents
Notes on using the Intelligent Pantilter....4
Compatible camera models and functions ....4
Enjoy with Party-shot ....5
Identifying parts ....6
Preparing the unit....7
Inserting batteries....7
Attaching the camera to this unit....8
Starting automatic shooting.... 10
Shooting using On-demand shot function.... 11
Changing the settings 12
Settings.... 12
Attaching the dedicated stand 13
Troubleshooting.... 14
Specifications 15
Notes on using the Intelligent Pantilter
Refer to the operating instructions for your camera as well as this manual.
This unit is not dust-proof, splash-proof, or waterproof.
Precautions on use and storage locations
Do not use or keep this unit in locations subject to the following conditions. Otherwise, this unit could malfunction.
Locations subject to extreme high temperature
Temperatures in a hot sun or closed automobiles during summer may be extremely high, causing
deformation or malfunction of this unit.
Locations under direct sunlight or near heaters
This may cause deformation or a malfunction of this unit.
Locations subject to vibration •
Locations subject to strong magnetism •
Locations subject to dust particles in a sandy place or the beach •
Precautions on recorded data
Please note that Sony will not be liable for recorded data such as images and audio data if you cannot record or play back due to a malfunction of the camera, memory cards, or this unit and its accessories.
About installation
Use this unit where:
it is stable and flat.
the camera has a clear view of people's faces. •
there are no objects nearby that may fall over.
Compatible camera models and functions
This unit can be used with the Sony digital still cameras (referred to below as “camera”) in the following table. Compatible functions vary depending on the camera model. For details, refer to the operating instructions of the camera.
| Camera models DSC- | Attachment | Functions | |
| On-demand shot | |||
| Still image Intelligent Sweep Panorama | |||
| H70/W515PS/W560/W570/W570D/W580 | A | ○ | — |
| HX7/HX7V/HX9/HX9V/WX7/WX9/WX10 | A | ○ | ○ |
| TX100/TX100VB | ○ | ○ | |
Not all of those models are available in all countries and regions.
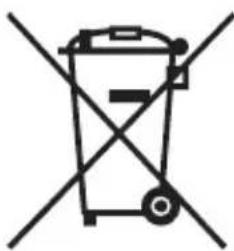
Enjoy with Party-shot
Party-shot rotates and shoots photos automatically. It detects the faces of subjects using the function of the Cyber-shot camera and adjusts the composition automatically.
natural_image
Illustration of a Sony camera with directional arrows indicating rotation (no text or symbols on the device itself)Capture natural photos of everyone using "Automatic shooting" function
The automatic shooting function captures everyone since no one has to be the photographer. Because people are less aware of the camera, Party-shot makes it easier to shoot more natural, smiling faces.

natural_image
Silhouettes of people celebrating with a TV, no text or symbols presentCapture photos at a time of your choice using "On-demand shot" function
If you press the On-demand shot button during automatic shooting, the camera shoots photos at the timing of your choice. This lets people pose for photos and lets you be in photos, too.
Identifying parts
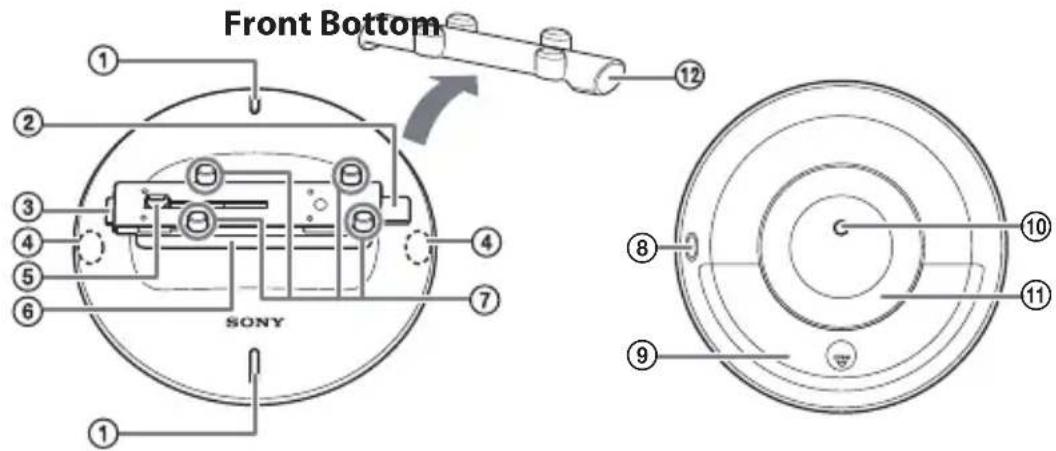
① On-demand shot button or MENU (stop) button
② Release button (dark gray)
③ Lock button (light gray)
④ Operation/battery indicator
⑤ Multi connector
⑥ Tilt arm
⑦ Camera clips
⑧ ON/OFF (power) switch
⑨ Battery cover
⑩ Tripod receptacle
Use a commercially available tripod with 5.5 mm or shorter screws.
⑪ Foot
⑫ Protective cover
On-demand shot button and MENU (stop) button
Button function assignment varies depending on your camera. You can tell which button has which function from whether it is lit or not.
Lit: On-demand shot button •
Not lit: MENU (stop) button •
Operation/battery indicator
Indicators light up or flash depending on the status of this unit.
| Color Indicator status This unit status | ||
| White On | Automatic shooting | |
| Flashes once When a shot is taken | ||
| Flashes slowly When the ON/OFF (power) switch of this unit is used* / During setting screen display | ||
| Flashes rapidly The memory of the camera is full. / Lens cover is closed. | ||
| Red Flashes | slowly Battery level is low. | |
| Flashes rapidly Abnormal condition / Batteries have run out. / Some force is being applied to this unit. | ||
* The indicator may not flash depending on the status of this unit.
Preparing the unit
Inserting batteries
You can use the following batteries.
Two LR6 (size AA) alkaline batteries •
Two AA Nickel-Metal Hydride batteries •
1 Turn this unit off by sliding the ON/OFF (power) switch to OFF.
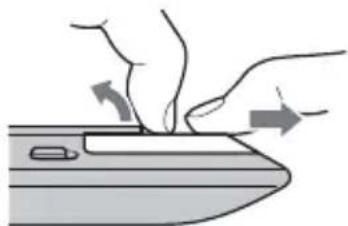
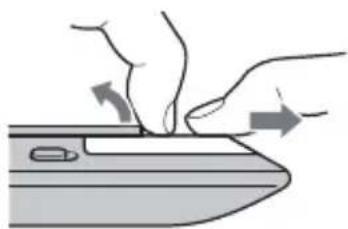
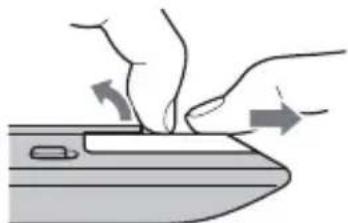
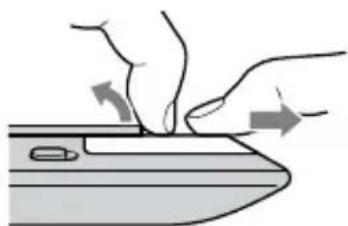
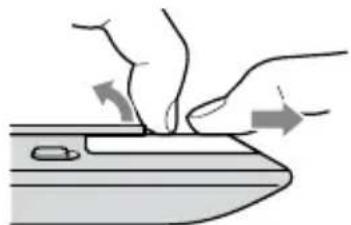
2 Open the battery cover.
OK

natural_image
Illustration of a hand pressing down on a stylus with directional arrows indicating motion (no text or symbols)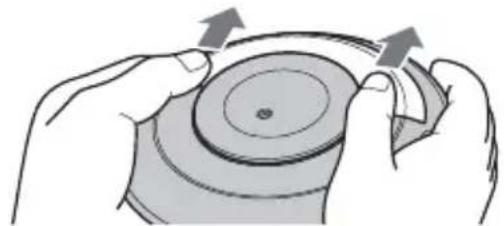
natural_image
Illustration of hands holding a circular object with arrows indicating rotation or movement (no text or symbols)(no text)

natural_image
Illustration of hands using a tool to press or interact with a device (no text or symbols visible)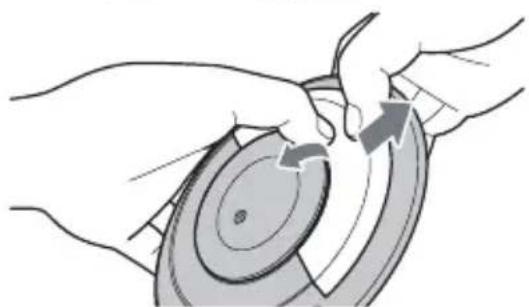
natural_image
Illustration of hands performing a circular mechanical operation with directional arrows (no text or symbols)Note
Be careful not to pull or exert a force on the foot of this unit when opening the battery cover. Doing so can cause a malfunction.
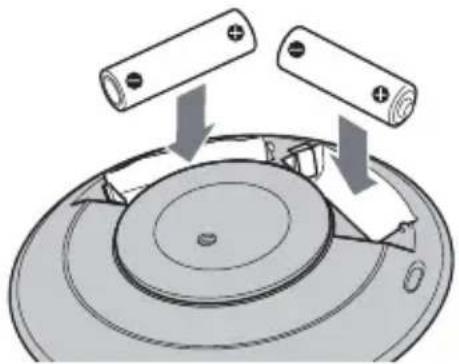
3 Insert the batteries into the battery compartment according to the marks inside the compartment.
natural_image
Diagram of battery disc assembly with two cylindrical components and rotating wheel (no text or symbols)4 Close the battery cover.
Notes
The batteries inserted in this unit only power this unit. They cannot power or charge the camera. Be careful not to touch the multi connector when holding this unit.
You cannot use manganese batteries.
Always use the same kind of batteries together.
Check the polarities of the batteries when inserting them into this unit. If you insert the batteries in the wrong direction, this unit does not work.
Do not use a new or charged battery together with a dead battery.
To remove batteries
Turn this unit off and then remove the batteries.
Note
When removing the batteries, be careful they do not fall and cause injury.

Remove the batteries if this unit will not be used for a long period of time.
Battery level
If the battery level is low, the operation/battery indicator flashes slowly. If the battery level gets lower, indicator flashes more rapidly and this unit automatically enters standby mode.
Attaching the camera to this unit
Before attaching the camera
The internal memory and memory card have sufficient free space.
Install a fully charged battery pack into the camera.
Turn off the power of the camera.
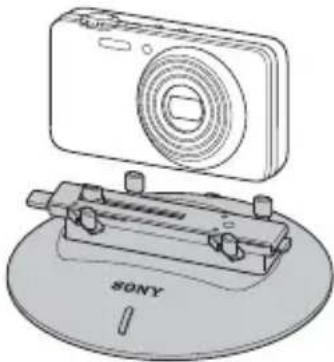
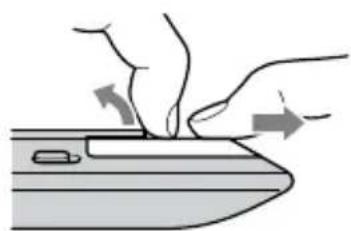
1 Remove the protective cover.

natural_image
Technical illustration of a pipe fitting with an attached switch labeled 'SONY' (no text or symbols beyond label)2 Press the release button (dark gray) of this unit to open the camera clips.
3 Check the "Attachment" item in the table of compatible functions (page 4). Turn the camera to face in the desired direction.
Attachment A models according to the table of compatible models
Position the camera with its lens facing the SONY logo on this unit.
natural_image
Illustration of a digital camera with a Sony brand base (no text or symbols on the device itself)Attachment B models according to the • table of compatible models
Position the camera with its LCD screen facing the SONY logo on this unit.

natural_image
Line drawing of a Sony electronic device with an open top and base plate (no text or symbols on the device itself)4 Align the multi connector at the bottom of the camera with the multi connector on this unit. Attach the camera perpendicularly to the tilt arm of this unit.
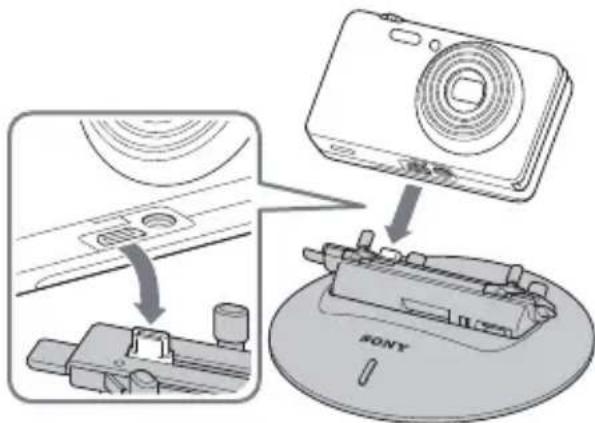
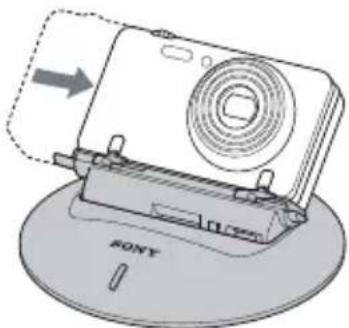
5 Slide the camera slowly until it is positioned almost at the center of this unit.
natural_image
Diagram of a Sony printer with a circular fan and base mount, showing no text or symbols on the device itself.6 Press the lock button (light gray) of this unit to close the camera clips.
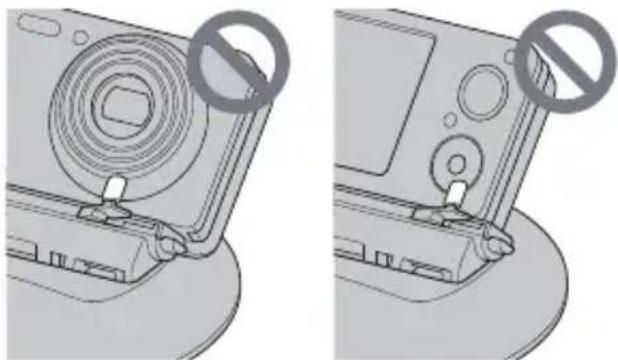
Notes
Do not slide the camera with the camera clips closed. Doing so may cause a malfunction.
Make sure that the camera clips do not touch the lens or operating buttons of the camera.
natural_image
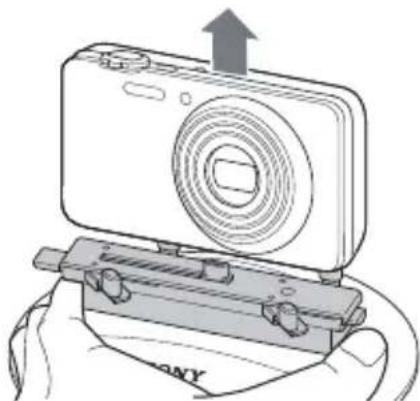
Diagram showing two views of a device with a circular component and a prohibition symbol (no text or labels present)To remove the camera
① Turn off the power of the camera.
② After this unit stops, turn it off.
③ Press the release button of this unit to open the camera clips.
④ Lift up the camera with one hand while supporting the tilt arm with the other.
⑤ Press the lock button of this unit to close the camera clips.
natural_image
Illustration of a digital camera being held by hands, showing the camera and its cable (no text or symbols present)Notes
When removing the camera, always lift it • perpendicular to the tilt arm.
Forcibly removing the camera at an angle or sliding it sideways may damage it.
If you carry this unit somewhere, or if you do not intend to use it for a long time, reattach the protective cover.
Attach the protective cover to this unit from the side of the lock button (light gray).
Starting automatic shooting
1 Slide the ON/OFF (power) switch of this unit to ON.
This unit enters standby mode.
2 Set the power switch of the camera to ON.
Automatic shooting starts after initialization*.
* This unit rotates approximately 180 degrees left and 180 degrees right from the internal basing position before returning to the original position.
To finish automatic shooting
① Press the MENU (stop) button of this unit to stop automatic shooting.
② Turn off the power of the camera.
Notes
Turning this unit off during automatic shooting • forcibly turns off the power to this unit. Do not do this except in an emergency.
If you lift this unit up during automatic shooting, the unit may determine it to be an abnormal condition and its motor may stop and automatic shooting may temporarily stop. In this case, automatic shooting is resumed when you put this unit back in place.
The operation/battery indicator rapidly flashes red if you forcibly stop the rotation or if an external force is applied to this unit during automatic shooting. In this case, remove the force and then turn this unit off and back on.
When using this unit in public, be considerate of other people around you.
You cannot change the camera to play mode during • automatic shooting.
Face detection function
Depending on the shooting environment, • sometimes the camera may not detect faces or may detect things other than faces.
If the camera does not detect any faces for a period of time, operation of this unit may pause to save power.
The camera cannot detect faces that are too close or too far away. The appropriate distance between a face and the camera is between 1 m and 2 m.
This unit automatically turns back on from pause • status when a face is detected or if you press the MENU (stop) button or lift the unit up.
Note
Pressing the button too strongly may cause this unit to fall off the dedicated stand.
Tip
When “To stop shooting, press Shooting button on Party-shot” is displayed on the LCD of your camera, press the On-demand shot button of this unit.
Shooting using On- demand shot function
On-demand shot is a function that lets you send recording instructions to the unit at any time you like.
You can send instructions to record not only still images but also Intelligent Sweep Panorama shots using the pan function of this unit. (Only with compatible camera models)
Press the On-demand shot button during automatic shooting or setting screen display.
The self-timer lamp of the camera flashes and face detection begins. When the camera detects a face and finishes choosing the composition, there is a fast beeping and shooting begins.
After finishing the On-demand shot, this unit returns to automatic shooting mode.
Notes
There is no beep if the camera is set to mute. • Pressing the button too strongly may cause this • unit to fall off the dedicated stand.
Tips
Even if the camera cannot find a face, it takes a shot.
To cancel On-demand shot during operation, press the On-demand shot button once more.
On panorama shooting, you cannot cancel On- demand shot after the composition is set.
The camera may not be able to capture panoramic images properly if the subject or camera moves too much. For details, refer to the user's manual of your camera.
Changing the settings
1 During automatic shooting, press the MENU button on this unit.
This unit stops rotating and tilts the camera forward. Then the setting screen is displayed on the LCD screen of the camera.
2 Select a setting item on the camera.
The settings vary depending on the camera model.
Automatic shooting is resumed after you change the settings.
Tips
Operation varies depending on the camera model. For details refer to the operating instructions of the camera.
The camera automatically turns off to save its • battery pack when not operated for more than 2 minutes during setting screen display. In this case, turn on the camera again.
Settings
If you change the default setting, a setting value icon is displayed on the LCD of the camera. An underline indicates the default setting.
Rotation angle setting

(No Limit)
Rotates unlimited to follow a subject.

(180°)
Limits the face detection range to 180 degrees (90 degrees left and right from the central position).

(90°)
Limits the face detection range to 90 degrees (45 degrees left and right from the central position).
Tip
The forward position (the central point of rotation) is reset after the following operations.
When the power is turned on — When the rotation angle is changed — When this unit is lifted up and relocated
Shooting frequency setting

(High)
High shooting frequency. A large number of pictures will be taken.

(Standard)
Standard shooting frequency. An average number of pictures will be taken.

(Low)
Low shooting frequency. A small number of pictures will be taken.
Flash setting

(Auto)
Automatically flashes according to shooting conditions.

(Off)
Does not flash in any conditions.
Intelligent Sweep Panorama shot setting
(Only camera models that support Intelligent Sweep Panorama shooting)

(Still image)
Shoot still images during On-demand shot.

(iSweep Panorama)
Shoot Intelligent Sweep Panorama images during On-demand shot.
Panorama image size setting (Only camera models that support Intelligent Sweep Panorama shooting)

(Standard)
Shoot panorama images in standard size.

(Wide)
Shoot panorama images in wide size.
Attaching the dedicated stand
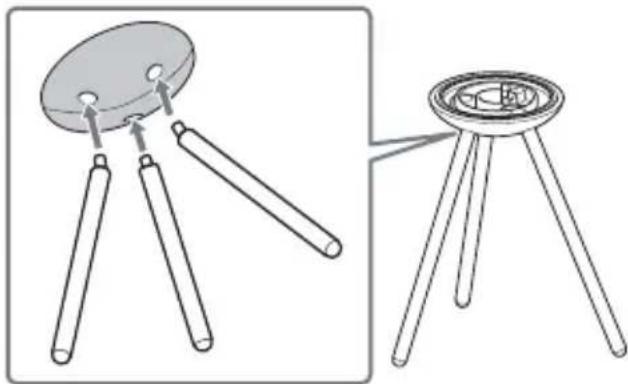
1 Insert the legs of the dedicated stand firmly into the mount.
natural_image
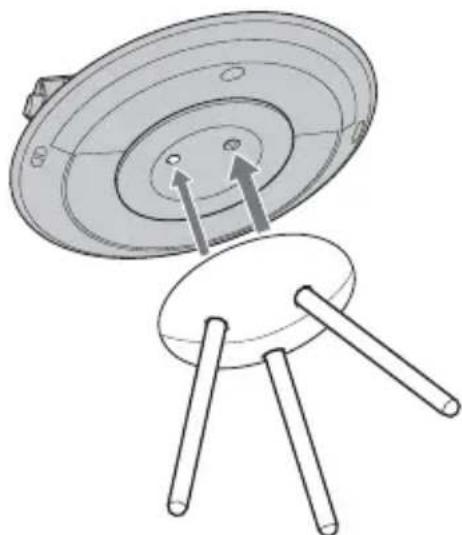
Illustration of a table with three legs and a plate, showing a folding or lifting process (no text or symbols present)2 To set this unit on the dedicated stand, align the projections on the mount of the dedicated stand with the tripod receptacle of this unit.
natural_image
Technical illustration of a mechanical component with three rods and a circular housing (no text or symbols)Notes
Attach the camera to this unit before setting the • unit on the dedicated stand.
Use the dedicated stand in a level place.
Do not apply a strong force to the dedicated stand.
Pressing the button too strongly may cause this • unit to fall off the dedicated stand.
Hold the camera when operating it to prevent it • from falling and causing injury.
Keep this unit away from people's faces, especially children's faces, to prevent injury in case it falls.
To use a commercially available tripod
You can use a commercially available tripod instead of the dedicated stand. However, some tripods cannot be used depending on the shape of the camera platform.
Notes
Do not use force to tighten the tripod screw.
When this unit is attached to a tripod, do not lift the unit or swing the tripod around.
Be careful not to pull or exert a force on the foot of this unit. Doing so can cause a malfunction.
Troubleshooting
If any problems occur with your products, refer to the following solutions. If the problem persists, contact your Sony dealer.
| Symptom Cause/Solution | |
| The operation/battery indicator flashes rapidly in white. | The camera has no more available memory. Remove the camera from this unit and delete some images. →The lens cover of the camera is closed. Open the lens cover. → |
| The operation/battery indicator slowly flashes in red. | The batteries are low. Prepare new batteries. → |
| The operation/battery indicator continues to flash rapidly in red. | The camera is not attached to this unit. Attach the camera to this unit. →Something is caught on the tilt arm, or your hand is pressing against this unit. |
| The operation/battery indicator rapidly flashes red and then goes out. | The batteries inserted in this unit have run out. Replace the batteries. (page 7) → |
| This unit does not work. | The batteries inserted in this unit have run out. Replace the batteries. (page 7) →The battery pack installed in the camera has run out. Install a fully charged battery pack into the camera. |
| The camera does not turn on. | The camera is not properly attached to this unit. Attach the camera properly to this unit. (page 8)The camera's battery level is low. Install charged battery pack in the camera. |
| The camera cannot be attached properly to this unit or is unstable. | The camera is not fixed properly. Attach the camera properly. (page 8) |
| No images are shot. | The camera is set too far from or too close to the subject. Set the camera within the face detection range of the camera.→If there is only a small change in facial expression or composition, a shot may not be taken right away even when a face is detected.The camera is in [Set to on for demo mode].→Change the setting of the camera. For details, refer to the user's manual of the camera. |
| This unit stops moving during use. | If the camera does not detect any faces, this unit may stop operating. Press the MENU (stop) button twice.The batteries inserted in this unit have run out. Replace the batteries. (page 7) →The camera is not attached properly. Attach the camera correctly. (page 8) |
Specifications
Intelligent Pantilter
Input/Output connectors
Multi connector
General
Dimensions (approx.):
128 mm × 47 mm × 128 mm (w/h/d) (5 1/8 in. × 1 7/8 in. × 5 1/8 in.)
(excluding projecting parts) (when the tilt arm is erect)
Mass (approx.):
210 g (7.4 oz) (without batteries)
Batteries in continuous use (at 25 °C)
Approx. 11 hours with Sony LR6 (size AA) alkaline batteries
Approx. 12 hours with Sony AA Nickel-Metal Hydride batteries
* Using this unit in a cold place may shorten the life of the alkaline batteries. In that case, we recommend using nickel-metal hydride batteries.
Operating temperature:
5^ to 40^ (41°F to 104°F)
Storage temperature:
-20^ to +60^ (-4^ to +140^)
Power supply:
Two LR6 (size AA) alkaline batteries or two AA Nickel-Metal Hydride batteries (sold separately)
Accessories
Dedicated stand (1) •
Protective cover (1) •
Set of printed documentation •
Design and specifications are subject to change without notice.
Trademarks
"Party-shot" are trademarks of Sony Corporation.
- In addition, system and product names used in this manual are, in general, trademarks or registered trademarks of their respective developers or manufacturers. However, the ^TM or ^® marks are not used in all cases in this manual.
Français
natural_image
Symbol of a trash bin crossed with no text or labelsnatural_image
Illustration of a Sony camera with directional arrows indicating rotation (no text or symbols on the device itself)Prenez des photos naturelles de tous en utilisant la «Prise de vue automatique»
natural_image
Silhouette illustration of a group of people celebrating with a TV, showing a person gesturing toward a screen (no text or symbols)natural_image
Illustration of a hand pressing down on a stylus with arrows indicating motion (no text or symbols)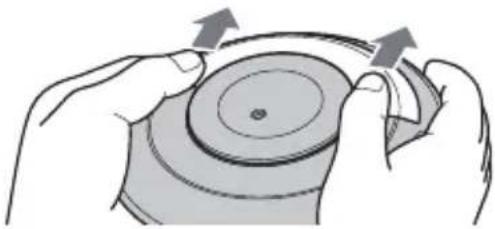
natural_image
Illustration of hands performing a circular mechanical operation with arrows indicating motion (no text or symbols)(no
natural_image
Illustration of hands using a tool to press or adjust a component (no text or symbols visible)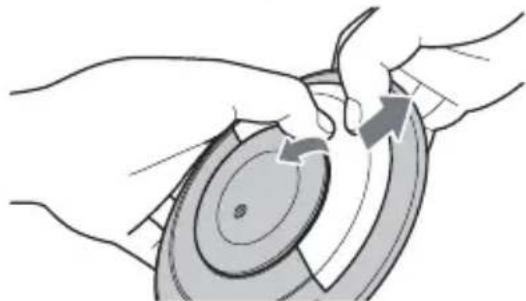
natural_image
Illustration of hands performing a circular mechanical operation with an arrow indicating direction (no text or symbols present)Remarque
natural_image
Diagram of battery disc assembly with two cylindrical components and rotating base (no text or symbols)natural_image
Technical illustration of a mechanical component with a cylindrical rod and a base plate labeled 'SONY' (no text or symbols beyond label)natural_image
Line drawing of a digital camera with a Sony brand base (no text or symbols on the device itself)natural_image
Technical line drawing of a Sony electronic device with a mounted case and a flat top panel (no text or symbols)natural_image
Diagram of a Sony printer with a camera module and an arrow indicating motion (no text or symbols)natural_image
Diagram of a camera module with a circular lens and handle, no text or symbols present
natural_image
Mechanical device with a circular component and a prohibition symbol overlay (no text or symbols present)natural_image
Illustration of a digital camera with an upward arrow indicating motion (no text or symbols)Remarques
natural_image
Diagram showing a table with three legs and a plate with a lid, connected by arrows (no text or symbols present)natural_image
Technical diagram of a mechanical component with three rods and a circular housing (no text or symbols)Remarques
natural_image
Symbol of a trash bin crossed with a diagonal line, representing waste sorting or disposal (no text or labels)natural_image
Illustration of a Sony camera with directional arrows indicating rotation (no text or symbols on the device itself)natural_image
Illustration of a group of people celebrating with a TV, showing a person gesturing toward a screen (no text or symbols)natural_image
Hand pressing down on a stylus with arrows indicating motion (no text or symbols)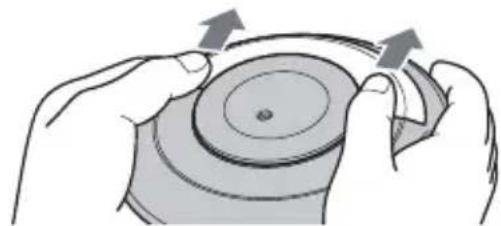
natural_image
Illustration of hands performing a circular mechanical operation with arrows indicating rotation (no text or symbols)(no text)
natural_image
Illustration of hands using a tool to press or adjust a component (no text or symbols visible)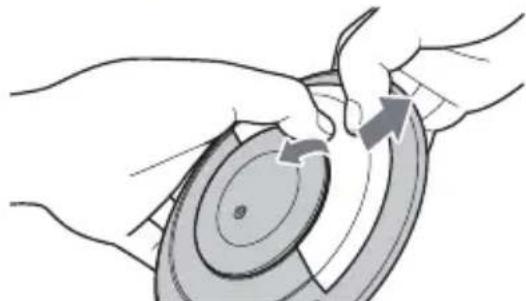
natural_image
Illustration of hands performing a circular mechanical operation with an arrow indicating rotation (no text or symbols present)Hinweis
natural_image
Diagram of battery disc assembly with two cylindrical batteries and a circular base (no text or symbols)natural_image
Technical diagram showing a pipe fitting with a 3D model and a 2D view of the component labeled 'SONY' (no text or symbols beyond labels)natural_image
Illustration of a digital camera with a Sony brand base (no text or symbols on the device itself)natural_image
Diagram of a Sony device with an open screen and a base tray (no text or symbols)natural_image
Diagram of a Sony printer with a camera module and an arrow indicating motion (no text or symbols)natural_image
Diagram of a camera module with a circular lens and handle, no text or symbols present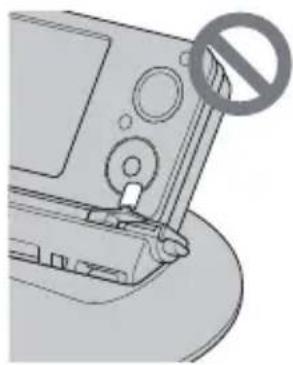
natural_image
Mechanical device with a circular component and a prohibition symbol overlay (no text or symbols present)natural_image
Illustration of a digital camera being held by hands, showing the camera and its cable (no text or symbols present)Hinweise
natural_image
Diagram showing a table with three legs and a plate with a lid, connected by arrows (no text or symbols present)natural_image
Technical illustration of a mechanical component with three rods and a circular base (no text or symbols)Hinweise
natural_image
Simple line drawing of a trash bin with two crossed lines indicating no waste or restriction (no text or symbols)natural_image
Illustration of a Sony camera with directional arrows indicating rotation (no text or symbols on the device itself)natural_image
Silhouettes of people celebrating with a TV, showing a person gesturing toward a group of people and a screen (no text or symbols)natural_image
Illustration of a hand pressing down on a device with arrows indicating motion (no text or symbols)
natural_image
Illustration of hands performing a circular mechanical operation with arrows indicating motion (no text or symbols)(no text)
natural_image
Illustration of hands using a tool to press or install a device (no text or symbols visible)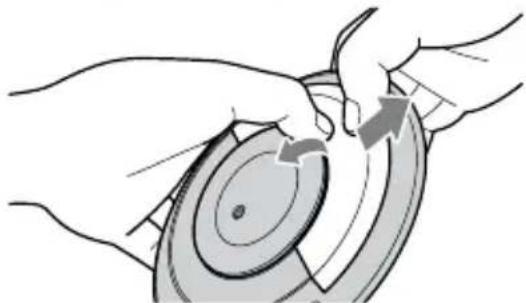
natural_image
Illustration of hands performing a circular mechanical operation with arrows indicating motion (no text or symbols)Nota
natural_image
Diagram of a disc with two batteries and rotating components, no text or symbols presentnatural_image
Technical illustration of a mechanical component with a cylindrical shaft and a base plate, labeled 'SONY' (no text or symbols on the diagram itself)natural_image
Line drawing of a digital camera with a Sony display stand (no text or symbols on the device itself)natural_image
Diagram of a Sony device with an open screen and a base tray (no text or symbols on the device itself)natural_image
Diagram of a Sony printer with an arrow indicating motion, no text or symbols presentnatural_image
Diagram of a camera module with a circular vent and a stopper, no text or symbols present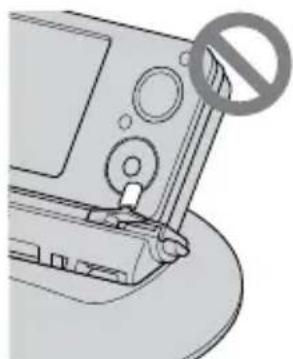
natural_image
Mechanical component with a circular feature and a prohibition symbol overlay (no text or labels)natural_image
Illustration of a digital camera being held by hands, showing the lens and handle (no text or symbols)Notas
natural_image
Illustration of a table with three legs and a bowl on top, showing a close-up view (no text or symbols)natural_image
Technical diagram of a mechanical component with three rods and a circular housing (no text or symbols)Notas
natural_image
Simple line drawing of a trash bin with two crossed lines indicating no waste or restriction (no text or symbols)natural_image
Illustration of a Sony camera with directional arrows indicating rotation (no text or symbols on the device itself)natural_image
Illustration of a group of people celebrating with a TV, showing a person gesturing toward a screen (no text or symbols)natural_image
Illustration showing two hands performing a circular tool manipulation process, with no text or symbols present.Opmerking
natural_image
Diagram of a disc with two batteries and rotating components, no text or symbols presentnatural_image
Technical illustration of a mechanical component with a cylindrical shaft and a base plate, labeled 'SONY' (no text or symbols on the diagram itself)natural_image
Line drawing of a digital camera with a Sony brand base (no text or symbols on the device itself)natural_image
Diagram of a Sony smartphone mounted on a base plate (no text or symbols on the device itself)natural_image
Diagram of a Sony printer with a camera module and an arrow indicating motion (no text or symbols)natural_image
Technical illustration of a device with no visible text or symbols, showing two views of a mechanical component (no text or symbols present)natural_image
Illustration of a digital camera being held by hands, showing the lens and handle (no text or symbols)Opmerkingen
natural_image
Diagram showing a table with three legs and a plate with a lid, connected by rods (no text or symbols present)natural_image
Technical diagram of a mechanical component with three rods and a circular housing (no text or symbols)Opmerkingen
natural_image
Symbol of a trash bin crossed with a diagonal line, representing no waste or discharge (no text or labels)natural_image
Illustration of a Sony camera with directional arrows indicating rotation (no text or symbols on the device itself)natural_image
Silhouettes of people celebrating with a TV, no text or symbols presentnatural_image
Diagram of a disc with two batteries and a rotating wheel, showing mechanical components (no text or symbols)natural_image
Diagram of a Sony electrical switch with a pipe fitting and mounting base (no text or symbols)natural_image
Illustration of a digital camera with a base labeled 'SONY' (no text or symbols on the device itself)natural_image
Diagram of a Sony device with an open screen and a base tray (no text or symbols on the device itself)natural_image
Diagram of a Sony printer with an arrow indicating the process (no text or symbols on the device itself)natural_image
Two technical diagrams showing a device with a circular component and a switch, both without any text or symbols.Hur kameran tas ur
natural_image
Illustration of a digital camera being held by hands, with an upward arrow indicating motion (no text or symbols present)Observera
natural_image
Diagram showing a table with three legs and a plate with a lid, connected by arrows (no text or symbols present)natural_image
Technical illustration of a mechanical component with three rods and a circular base (no text or symbols)Observera
natural_image
Symbol of a trash bin crossed with a diagonal line, representing no waste or discharge (no text or labels)natural_image
Illustration of a Sony camera with directional arrows indicating rotation (no text or symbols on the device itself)natural_image
Silhouettes of people celebrating with a TV, no text or symbols presentnatural_image
Diagram of a disc with two batteries and a rotating disk, showing mechanical components (no text or symbols)natural_image
Technical illustration of a mechanical component with a cylindrical shaft and a base plate, labeled 'SONY' (no text or symbols on the diagram itself)natural_image
Diagram of a digital camera with a Sony brand base, showing front and top views (no text or symbols on the device itself)natural_image
Diagram of a Sony electronic device with a mounted case and a screen, no text or symbols presentnatural_image
Diagram of a Sony printer with a camera module and an arrow indicating motion (no text or symbols)natural_image
Diagram of a device with a circular component and a prohibition symbol (no text or labels)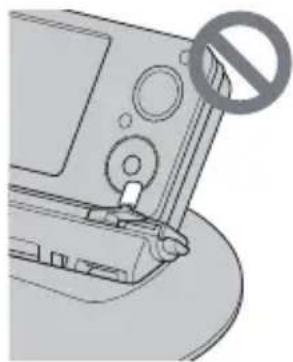
natural_image
Mechanical component with a circular feature and a prohibition symbol (no text or labels)natural_image
Illustration of a digital camera being held by hands, showing the camera and its cable attachment (no text or symbols)Note
natural_image
Diagram showing a table with three legs and a plate with a lid, connected by arrows (no text or symbols present)natural_image
Technical diagram of a mechanical component with three rods and a circular housing (no text or symbols)Note
natural_image
Symbol of a trash bin crossed with no text or labelsnatural_image
Illustration of a Sony camera with directional arrows indicating rotation (no text or symbols on the device itself)natural_image
Illustration of a group of people celebrating with a TV, showing a person gesturing toward a screen (no text or symbols)natural_image
Diagram of battery disc assembly with two cylindrical batteries on top, showing internal components (no text or symbols)Para retirar as pilhas
natural_image
Diagram of a Sony electrical switch mechanism with pipe connection and mounting base (no text or symbols)natural_image
Illustration of a digital camera with a Sony display stand (no text or symbols on the device itself)natural_image
Line drawing of a Sony device with a flat-screen display and a base tray (no text or symbols)natural_image
Diagram of a Sony printer with a camera module and base mount (no text or symbols)natural_image
Two technical diagrams showing a device with a circular component and a switch, both without any text or symbols.natural_image
Illustration of a digital camera being held by hands, showing the camera body and handle (no text or symbols)Notas
natural_image
Diagram showing a table with three legs and a plate with a lid, connected by arrows (no text or symbols present)natural_image
Technical diagram of a mechanical component with three rods and a circular housing (no text or symbols)Notas
natural_image
Simple line drawing of a trash bin with two crossed lines indicating no waste or restriction (no text or symbols)Sony Corporation 1-7-1, Konan, Minato-ku, Tokyo, Japan, 108-0075
natural_image
Illustration of a Sony camera with directional arrows indicating rotation (no text or symbols on the device itself)natural_image
Silhouette illustration of a group of people celebrating with a TV, no text or symbols presentnatural_image
Illustration of a hand pressing down on a stylus with directional arrows indicating motion (no text or symbols)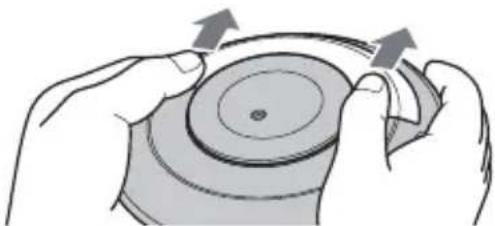
natural_image
Illustration of hands holding a circular object with arrows indicating rotation or movement (no text or symbols)(no text)
natural_image
Illustration of hands using a tool to press or install a device (no text or symbols visible)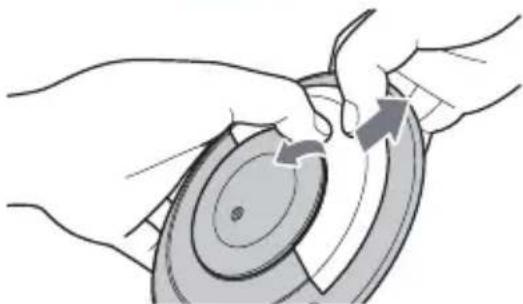
natural_image
Illustration of hands performing a circular mechanical operation with arrows indicating direction (no text or symbols)Примітка
natural_image
Diagram of battery disc assembly with two cylindrical batteries and a circular base (no text or symbols)natural_image
Technical illustration of a Sony switch mechanism with pipe connection and mounting bracket (no text or symbols)natural_image
Illustration of a digital camera with a Sony brand base (no text or symbols on the device itself)natural_image
Diagram of a Sony electronic device with a flat panel and base mount (no text or symbols)natural_image
Diagram of a Sony printer with a paper holder and an arrow indicating motion (no text or symbols)natural_image
Two technical diagrams showing a device with a circular component and a switch, both without any text or symbols.Зняття камери
natural_image
Illustration of a digital camera with an upward arrow indicating motion (no text or symbols)Примітки
natural_image
Illustration of a table with three legs and a plate, showing a folding or lifting process (no text or symbols present)natural_image
Technical illustration of a mechanical component with three rods and a circular housing (no text or symbols)Примітки
natural_image
Simple line drawing of a trash bin with two crossed lines indicating no waste or restriction (no text or symbols)natural_image
Illustration of a Sony camera with directional arrows indicating rotation (no text or symbols on the device itself)natural_image
Silhouette illustration of a group of people celebrating with a TV, showing a person gesturing toward a screen (no text or symbols)natural_image
Diagram of battery disc assembly with two cylindrical components and rotating base (no text or symbols)natural_image
Technical illustration of a mechanical component with a cylindrical shaft and a base plate labeled 'SONY' (no text or symbols beyond labels)natural_image
Line drawing of a digital camera with a Sony brand base (no text or symbols on the device itself)natural_image
Line drawing of a Sony device with a flat-screen case and a base plate (no text or symbols)natural_image
Diagram of a Sony printer with a camera module and base mount (no text or symbols)natural_image
Diagram of a camera module with a circular lens and a diagonal no-smoking symbol (no text or labels)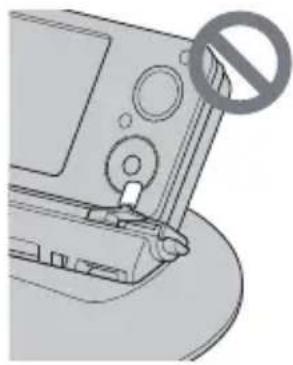
natural_image
Close-up of a mechanical device with a circular component and a prohibition symbol overlay (no text or symbols present)Для снятия камеры
natural_image
Illustration of a digital camera being held by hands, showing the camera and its cable attachment (no text or symbols)Примечания
natural_image
Illustration of a table with three legs and a plate, showing a folding or lifting process (no text or symbols present)natural_image
Diagram of a mechanical component with three rods and a circular housing, no text or symbols presentПримечания
natural_image
Illustration of a Sony camera with directional arrows indicating rotation (no text or symbols on the device itself)natural_image
Silhouette illustration of a group of people celebrating with a TV, showing a person gesturing toward a screen (no text or symbols)natural_image
Illustration of a hand pressing down on a stylus with directional arrows indicating motion (no text or symbols)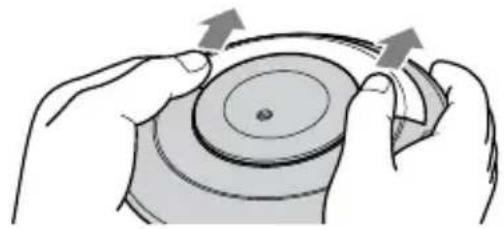
natural_image
Illustration of hands performing a circular mechanical operation with arrows indicating rotation (no text or symbols)(no text)

natural_image
Illustration of hands using a tool to press or adjust a component (no text or symbols visible)
natural_image
Illustration of hands performing a circular mechanical operation with arrows indicating motion (no text or symbols)備註
natural_image
Diagram of a mechanical component with two cylindrical batteries and a rotating disc (no text or symbols)4 關上電池蓋。
備註
natural_image
Technical illustration of a Sony electrical switch component with pipe connection and mounting bracket (no text or symbols)natural_image
Diagram of a digital camera with a Sony display stand (no text or symbols on the device itself)依據相容機型表的固定件B·
natural_image
Line drawing of a Sony device with an open screen and a base plate (no text or symbols)natural_image
Diagram of a digital camera with an arrow indicating compression or disassembly, mounted on a base labeled 'SONY' (no text beyond label)natural_image
Diagram of a camera module with a circular lens and handle, showing no text or symbols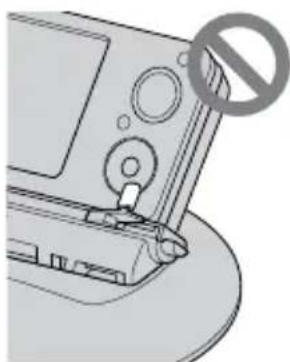
natural_image
Mechanical component with a circular hole and a diagonal no-smoking symbol (no text or labels)卸下相機
natural_image
Line drawing of a digital camera with an upward arrow indicating motion (no text or symbols)備註
natural_image
Illustration of a tableware setup with a plate and three legs, showing a magnified view of the lid (no text or symbols present)natural_image
Technical line drawing of a mechanical component with three rods and a circular base (no text or symbols)備註
natural_image
Diagram of a Sony printer with rotating arrows indicating motion (no text or symbols on the diagram itself)natural_image
Silhouettes of people celebrating with a TV, no text or symbols presentnatural_image
Illustration of a hand pressing down on a stylus with directional arrows indicating motion (no text or symbols)
natural_image
Illustration of hands performing a circular mechanical operation with arrows indicating rotation (no text or symbols)(no text)
natural_image
Illustration of hands using a tool to press or adjust a component (no text or symbols visible)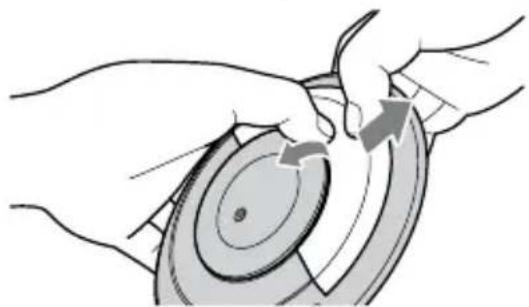
natural_image
Illustration of hands performing a circular mechanical operation with arrows indicating motion (no text or symbols)注
natural_image
Diagram of a mechanical component with two cylindrical batteries and a rotating disc (no text or symbols)4 关闭电池舱盖。
注意
natural_image
Technical illustration of a pipe fitting with an attached component labeled 'SONY' and an upward arrow indicating motion (no text beyond label)natural_image
Illustration of a digital camera with a Sony brand base (no text or symbols on the device itself)附件 B 型号(参照兼容功能表)·
natural_image
Line drawing of a Sony electronic device with an open screen and a base plate (no text or symbols)natural_image
Diagram of a digital camera with an arrow indicating direction, mounted on a base labeled 'SONY' (no text or symbols beyond label)natural_image
Diagram of a device with a circular component and a switch, no text or symbols present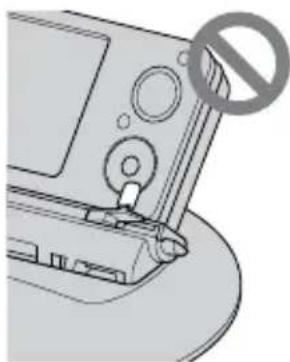
natural_image
Mechanical device with a circular component and a diagonal no-smoking symbol (no text or labels)卸下相机
natural_image
Illustration of a digital camera being held by hands, showing the camera and its screen (no text or symbols present)注意
natural_image
Illustration of a table with three legs and a plate, showing a simple setup (no text or symbols)natural_image
Technical line drawing of a mechanical component with three rods and a circular base (no text or symbols)注意
natural_image
Illustration of a Sony camera with directional arrows indicating rotation (no text or symbols on the device itself)natural_image
Silhouettes of people celebrating with a TV, no text or symbols presentnatural_image
Hand pressing down on a device component with directional arrows indicating motion (no text or symbols)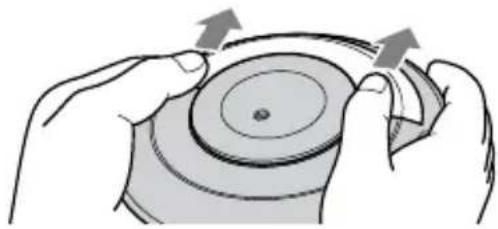
natural_image
Illustration of hands performing a circular mechanical operation with arrows indicating motion (no text or symbols)(no text)

natural_image
Illustration of hands using a tool to press or adjust a component (no text or symbols visible)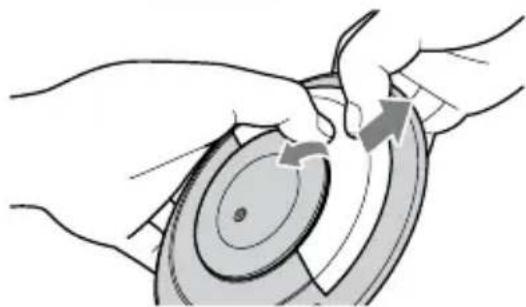
natural_image
Illustration of hands performing a mechanical operation on a circular component (no text or symbols visible)참고
natural_image
Diagram of two batteries on a circular base with arrows indicating rotation or disassembly (no text or symbols)4 배터리 커버를 닫습니다.
참고
natural_image
Diagram of a Sony electrical switch component with an arrow indicating upward movement (no text or symbols on the diagram itself)natural_image
Illustration of a digital camera with a Sony display stand (no text or symbols on the device itself)natural_image
Line drawing of a Sony electronic device with a flat-screen case and a base plate (no text or symbols on the device itself)natural_image
Diagram of a Sony camera module with an arrow indicating direction, mounted on a base (no text or symbols present)natural_image
Diagram showing two views of a device with a circular component and a prohibition symbol (no text or labels present)카메라를 제거하려면
natural_image
Illustration of a digital camera being inserted into a holder, with an upward arrow indicating motion (no text or symbols present)참고
natural_image
Diagram showing a table with three legs and a plate with a lid, connected by arrows indicating assembly or measurement (no text or symbols present)natural_image
Technical diagram of a mechanical component with three rods and a circular base, showing internal concentric layers (no text or symbols)참고
natural_image
Illustration of a Sony camera with rotating arrows indicating rotation (no text or symbols on the device itself)natural_image
Silhouette illustration of a group of people celebrating with a TV, showing a person gesturing toward a screen (no text or symbols)natural_image
Diagram of a disc with two batteries and a rotating wheel, showing mechanical components (no text or symbols)اغلق غطاء البطارية.
4
ملاحظات
natural_image
Illustration of a hand pressing down on a device with directional arrows indicating motion (no text or symbols)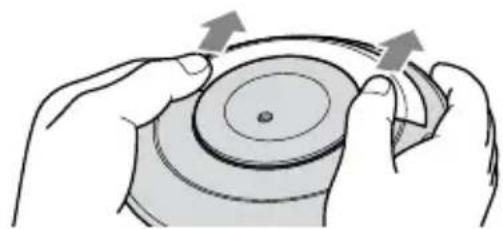
natural_image
Illustration of hands performing a circular mechanical operation with arrows indicating motion (no text or symbols)(no
natural_image
Illustration of hands using a tool to press or adjust a component (no text or symbols visible)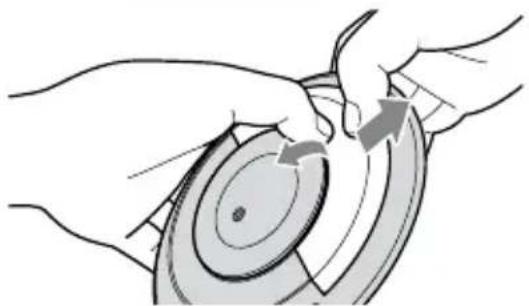
natural_image
Illustration of hands performing a circular mechanical operation with arrows indicating motion (no text or symbols)ملاحظة
natural_image
Diagram of a digital camera with an arrow indicating direction, mounted on a base labeled 'SONY' (no text or symbols beyond label)natural_image
Diagram of a camera module with a circular lens and connector, no text or symbols present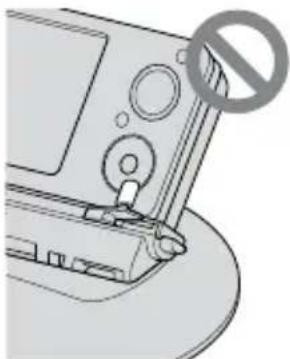
natural_image
Diagram of a device with a prohibition symbol overlay (no text or labels)لنزع الكاميرا
natural_image
Technical illustration of a mechanical component with a cylindrical rod and a base plate labeled 'SONY' (no text or symbols beyond label)natural_image
Line drawing of a digital camera with a Sony brand base (no text or symbols on the device itself)natural_image
Line drawing of a Sony device with an open lid and base tray (no text or symbols)natural_image
Illustration of a digital camera being inserted into a holder, with an upward arrow indicating the device's direction (no text or symbols present)ملاحظات
natural_image
Illustration of a table with three legs and a plate, showing a folding or mounting mechanism (no text or symbols present)natural_image
Technical line drawing of a mechanical component with three rods and a circular housing (no text or symbols)ملاحظات