
WAHTSBP1 - Other camera accessories SONY - Free user manual and instructions
Find the device manual for free WAHTSBP1 SONY in PDF.
| Product Type | Wireless Surround Speaker Kit |
| Brand | Sony |
| Model | WAHTSBP1 |
| Channel Configuration | 7.1 channels (front, center, surround, rear surround) |
| Included Components | Two rear surround speakers (SS-TSB92), surround amplifier, S-AIR wireless transceiver (EZW-RT10/EZW-RT10A) |
| Speaker Type | Full-range bass reflex, 65 mm (2 5/8 in.) cone speaker |
| Nominal Speaker Impedance | 3 - 16 Ω |
| Amplifier Power Output | 143 W per channel (at 3 ohms, 1 kHz, 10% THD) |
| Amplifier Power Supply | 120 V AC, 60 Hz (North American model) or 220-240 V AC, 50/60 Hz (other models) |
| Power Consumption | 50 W (operating) |
| Amplifier Dimensions (approx.) | 85 mm × 100 mm × 345 mm (w/h/d) with cover and stand |
| Amplifier Weight (approx.) | 1.7 kg |
| Wireless Operating Frequency | 2.4000 GHz - 2.4835 GHz (ISM band) |
| Wireless Range | Approximately 50 m (line of sight), up to 30 m indoors |
| Main Functions | S-AIR wireless connection, pairing, headphone listening via PHONES jack, SURROUND/SURROUND BACK selector |
| Maintenance and Cleaning | Clean with a dry cloth only; do not use abrasive pads, scouring powder, or solvents (alcohol, benzene) |
| Safety | Avoid moisture, do not block ventilation slots, keep away from heat sources, install on a flat and stable surface |
| Spare Parts and Repairability | EZW-RT10 wireless transceiver included; S-AIR adapter (EZW-T100) optional; have checked by a Sony dealer in case of failure |
| General Information | Designed for indoor use with a Sony Home Theatre system; do not use outdoors |
Frequently Asked Questions - WAHTSBP1 SONY
User questions about WAHTSBP1 SONY
0 question about this device. Answer the ones you know or ask your own.
Ask a new question about this device
Download the instructions for your Other camera accessories in PDF format for free! Find your manual WAHTSBP1 - SONY and take your electronic device back in hand. On this page are published all the documents necessary for the use of your device. WAHTSBP1 by SONY.
USER MANUAL WAHTSBP1 SONY
Wireless Surround Speaker Kit
Operating Instructions GB
Mode d'emploi FR
S-AIR DIGITAL WIRELESS
Table of Contents
Enjoying a 7.1 Channel System .......5
Unpacking 6
Hooking Up 6
Setting Up the Wireless System 8
Troubleshooting 12
Specifications 13
Index to Parts 15
WARNING
Do not install the appliance in a confined space, such as a bookcase or built-in cabinet.
To reduce the risk of fire, do not cover the ventilation opening of the apparatus with newspapers, tablecloths, curtains, etc. Do not place the naked flame sources such as lighted candles on the apparatus.
To reduce the risk of fire or electric shock, do not expose this apparatus to dripping or splashing, and do not place objects filled with liquids, such as vases, on the apparatus.
Excessive sound pressure from earphones and headphones can cause hearing loss.
Indoor use only.
For the customers in the U.S.A. and Canada
WARNING
To reduce the risk of fire or electric shock, do not expose this apparatus to rain or moisture.
For the customers in the U.S.A.
This symbol is intended to alert the user to the presence of uninsulated "dangerous voltage" within the product's enclosure that may be of sufficient magnitude to constitute a risk of electric shock to persons.

This symbol is intended to alert the user to the presence of important operating and maintenance (servicing) instructions in the literature accompanying the appliance.
Owner's Record
The model and serial numbers are located on the side exterior of the unit. Record the serial number in the space provided below. Refer to them whenever you call upon your Sony dealer regarding this product.
Model No. WAHT-SBP1
Serial No.
Date of Manufacture Marking is located on the bottom exterior.
The following FCC statement applies only to the version of this model manufactured for sale in the U.S.A. Other versions may not comply with FCC technical regulations.
NOTE:
This equipment has been tested and found to comply with the limits for a Class B digital device, pursuant to Part 15 of the FCC Rules. These limits are designed to provide reasonable protection against harmful interference in a residential installation. This equipment generates, uses and can radiate radio frequency energy and, if not installed and used in accordance with the instructions, may cause harmful interference to radio communications. However, there is no guarantee that interference will not occur in a particular installation.
If this equipment does cause harmful interference to radio or television reception, which can be determined by turning the equipment off and on, the user is encouraged to try to correct the interference by one or more of the following measures:
- Reorient or relocate the receiving antenna (aerial).
- Increase the separation between the equipment and receiver.
- Connect the equipment into an outlet on a circuit different from that to which the receiver is connected.
- Consult the dealer or an experienced radio/ TV technician for help.
CAUTION
You are cautioned that any changes or modifications not expressly approved in this manual could void your authority to operate this equipment.
Important Safety Instructions
1) Read these instructions.
2) Keep these instructions.
3) Heed all warnings.
4) Follow all instructions.
5) Do not use this apparatus near water.
6) Clean only with dry cloth.
7) Do not block any ventilation openings. Install in accordance with the manufacturer's instructions.
8) Do not install near any heat sources such as radiators, heat registers, stoves, or other apparatus (including amplifiers) that produce heat.
9) Do not defeat the safety purpose of the polarized or grounding-type plug. A polarized plug has two blades with one wider than the other. A grounding type plug has two blades and a third grounding prong. The wide blade or the third prong are provided for your safety. If the provided plug does not fit into your outlet, consult an electrician for replacement of the obsolete outlet.
10) Protect the power cord from being walked on or pinched particularly at plugs, convenience receptacles, and the point where they exit from the apparatus.
11)Only use attachments/accessories specified by the manufacturer.
12) Use only with the cart, stand, tripod, bracket, or table specified by the manufacturer, or sold with the apparatus. When a cart is used, use caution when moving the cart/apparatus combination to avoid injury from tip-over.

13)Unplug this apparatus during lightning storms or when unused for long periods of time.
14)Refer all servicing to qualified service personnel. Servicing is required when the apparatus has been damaged in any way, such as power-supply cord or plug is damaged, liquid has been spilled or objects have fallen into the apparatus, the apparatus has been exposed to rain or moisture, does not operate normally, or has been dropped.
For the wireless transceiver (EZW-RT10/EZW-RT10A)
This equipment must not be co-located or operated in conjunction with any other antenna or transmitter.
This equipment complies with FCC radiation exposure limits set forth for uncontrolled equipment and meets the FCC radio frequency (RF) Exposure Guidelines in Supplement C to OET65.
This equipment should be installed and operated with at least 20cm and more between the radiator and person's body (excluding extremities: hands, wrists, feet and ankles).
For the customers in Canada For the wireless transceiver (EZW-RT10/EZW-RT10A)
This Class B digital apparatus complies with Canadian ICES-003.
This device complies with RSS-Gen of IC Rules. Operation is subject to the following two conditions: (1) this device may not cause interference, and (2) this device must accept any interference, including interference that may cause undesired operation of this device.
This equipment complies with IC radiation exposure limits set forth for uncontrolled equipment and meets RSS-102 of the IC radio frequency (RF) Exposure rules.
This equipment should be installed and operated with at least 20cm and more between the radiator and person's body (excluding extremities: hands, wrists, feet and ankles).
For the customers in Europe

Disposal of Old Electrical & Electronic Equipment (Applicable in the European Union and other European countries with separate collection systems)
This symbol on the product or on its packaging indicates that this product shall not be treated as household waste. Instead it shall be handed over to the applicable collection point for the recycling of electrical and electronic equipment. By ensuring this product is disposed of correctly, you will help prevent potential negative consequences for the environment and human health, which could otherwise be caused by inappropriate waste handling of this product. The recycling of materials will help to conserve natural resources. For more detailed information about recycling of this product, please contact your local Civic Office, your household waste disposal service or the shop where you purchased the product.
Notice for customers: the following information is only applicable to equipment sold in countries applying EU directives.
The manufacturer of this product is Sony Corporation, 1-7-1 Konan Minato-ku Tokyo, 108-0075 Japan. The Authorized Representative for EMC and product safety is Sony Deutschland GmbH, Hedelfinger Strasse 61, 70327 Stuttgart, Germany. For any service or guarantee matters, please refer to the addresses given in separate service or guarantee documents.
For the wireless transceiver (EZW-RT10/EZW-RT10A)
Refer to "Wireless Product Safety Information".
For the customers in Australia
This equipment should be installed and operated with at least 20cm and more between the radiator and person's body (excluding extremities: hands, wrists, feet and ankles).
For the customers in Singapore
Precautions
On power sources
- The unit is not disconnected from the mains as long as it is connected to the AC outlet, even if the unit itself has been turned off.
- As the main plug is used to disconnect the unit from the mains, connect the unit to an easily accessible AC outlet. Should you notice an abnormality in the unit, disconnect the main plug from the AC outlet immediately.
On placement
- Do not place the system in locations that are hot and subject to direct sunlight, dusty, very humid, or extremely cold.
- Use caution when placing the system on a specially treated (waxed, oiled, polished, etc.) floor, as staining or discoloration may result.
- Allow adequate air circulation to prevent internal heat buildup.
- Do not place the system on surfaces (rugs, blankets, etc.) or near materials (curtains, draperies) that may block the ventilation slots.
- Do not install the system near heat sources such as radiators or air ducts, or in a place subject to direct sunlight, excessive dust, mechanical vibration or shock.
- Do not install the system in an inclined position. It is designed to be operated in a horizontal position only.
- Keep the system away from equipment with strong magnets, such as microwave ovens, or large loudspeakers.
- Do not place heavy objects on the system.
- If you use more than one set of S-AIR products, position them away from each other to avoid cross talk.
- Install this surround amplifier and S-AIR products at least 50cm away from people.
- To prevent fire or shock hazard, do not place objects filled with liquids, such as vases, on the apparatus.
- Do not place the system on carpet, as discoloration may result.
- If you use more than one surround amplifier, do not place one on top of the other.
On cleaning
Clean the cabinets only with a soft dry cloth. Do not use any type of abrasive pad, scouring powder or solvent such as alcohol or benzene.
Safety
- If anything falls into the cabinet, unplug the unit and have it checked by qualified personnel before operating it any further.
- Unplug the unit from the wall outlet (mains) if you do not intend to use it for an extended period of time. To disconnect the cord, pull it out by the plug, never by the cord.
Enjoying a 7.1 Channel System
The Wireless Surround Speaker Kit (WAHT-SBP1) includes two surround back speakers and a surround amplifier. By using this kit along with a Sony Home Theatre System, you can enjoy the more realistic surround sound effect of a 7.1 channel speaker configuration.
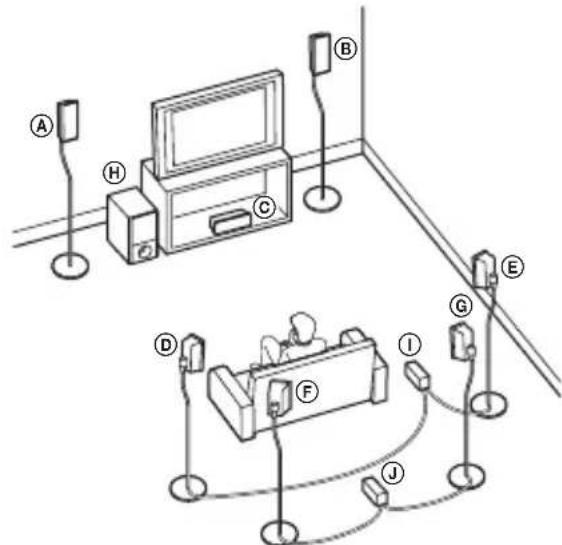
AFront left speaker
BFront right speaker
Center speaker
Surround left speaker
Surround right speaker
Surround back left speaker
Surround back right speaker
Subwoofer
① Surround amplifier (for surround speakers)
① Surround amplifier (for surround back speakers)
Unpacking
Surround back speakers (SS-TSB92) (2)
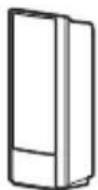
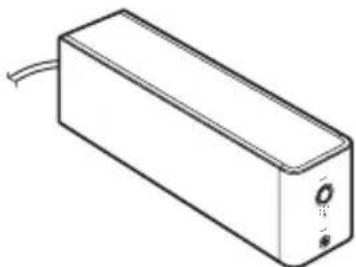
Surround amplifier (TA-SA100WR) (1)

Speaker cord cover (1)
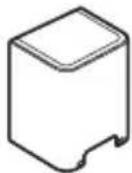
Speaker cord holder (1)

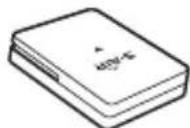
Wireless transceiver (EZW-RT10/EZW-RT10A*) (1)
- For North American and European models.
Speaker cords (2)
Operating Instructions (1)
Hooking Up
Before installing, make sure to remove the AC power cords (mains lead) of all S-AIR products from wall outlets (mains).
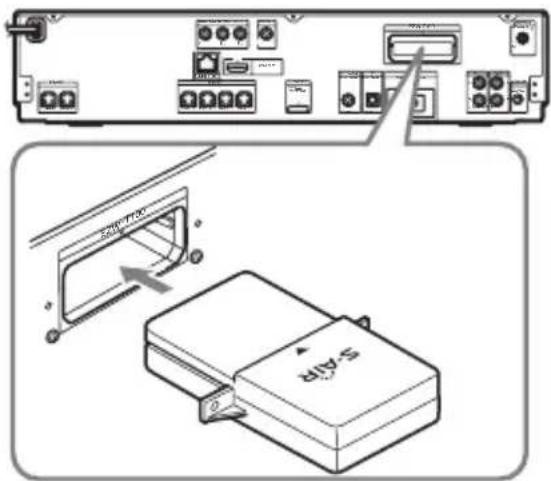
1 Insert the wireless transceiver (supplied) in the slot on the rear of the surround amplifier.
Note
- Do not touch the terminals of the wireless transceiver.
- Insert the wireless transceiver so that the marks are aligned.
- Do not insert anything other than the wireless transceiver into the EZW-RT10 slot.

2 Insert the wireless transmitter (supplied with the S-AIR main unit) in the slot on the S-AIR main unit.
For S-AIR main units that do not include a wireless transmitter, prepare the optional S-AIR Adapter (EZW-T100).
For details, refer to the operating instructions of the S-AIR main unit. The illustration of the rear panel of an S-AIR main unit is an example. Not all S-AIR main units look exactly the same.
Rear panel
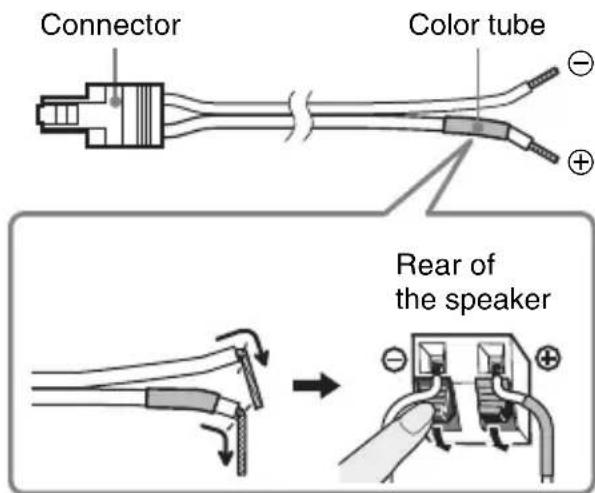
3 Connect the speakers.
Connect the speaker cords to match the color of the SPEAKER jacks of the unit.
To connect the speaker cords to the surround amplifier
When connecting to the surround amplifier, insert the connector until it clicks.

To connect the speaker cords to the speakers
Be sure to match the speaker cords to the appropriate terminals on the speakers: the speaker cord with the color tube to and the speaker cord without the color tube to . Do not catch the speaker cord insulation in the speaker terminals.
Note
- Do not connect the speaker cords supplied with the Wireless Surround Speaker Kit to any of the speaker jacks on your S-AIR main unit.
4 Connect the AC power cords (mains leads).
Before connecting the AC power cords (mains leads) of your S-AIR main unit and the surround amplifier to wall outlets (mains), make sure that all speakers are connected.
Setting Up the Wireless System
To use the wireless system, you need to set up the surround amplifier and your S-AIR main unit. Before setting, make sure that the wireless adapters are correctly inserted in the S-AIR main unit and surround amplifier(s).
Setting up the S-AIR main unit
For details on using the S-AIR main unit, refer to the operating instructions of the S-AIR main unit.
1 Turn on the S-AIR main unit.
The system turns on.
2 Set [Surround Back] in [Speaker Settings] of the S-AIR main unit to [Yes].
3 Set up the S-AIR main unit so it is ready for ID setting.
4 Select the ID for the S-AIR main unit.
You can select any ID (A, B, or C).
5 If there is a surround amplifier included with the S-AIR main unit, make sure the SURROUND SELECTOR switch is set to SURROUND.
Setting up the surround amplifier
Front panel
Rear panel
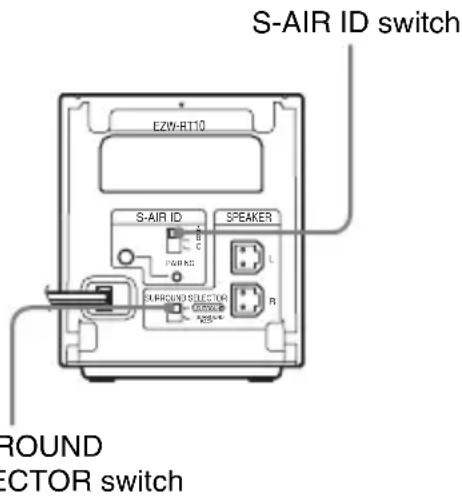
1 Set the SURROUND SELECTOR switch of the surround amplifier of this kit to SURROUND BACK.
2 Set the S-AIR ID switch of the surround amplifier to match the ID (A, B, or C) of the S-AIR main unit.
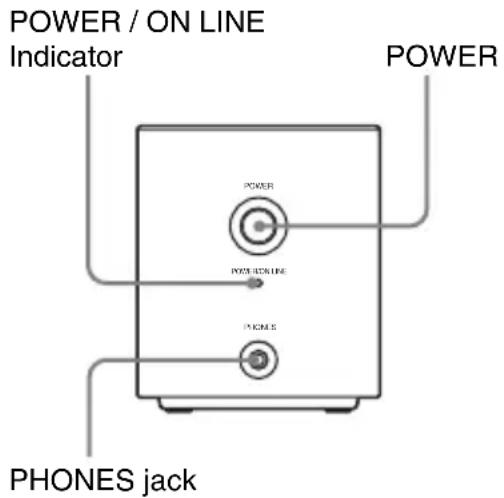
3 Press POWER on the surround amplifier.
The POWER / ON LINE indicator turns green. If not, see "Checking the transmission status" (page 9).
4 Set up the speakers.
If the S-AIR main unit has the Auto Calibration function, perform Auto Calibration.
If the S-AIR main unit does not have the Auto Calibration function, perform the appropriate speaker setting.
For details, refer to the operating instructions of the S-AIR main unit.
Checking the transmission status
You can check the status of sound transmission between the S-AIR main unit and surround amplifier by checking the POWER / ON LINE indicator on the surround amplifier.
| POWER / ON Status LINE indicator |
| Turns green Sound transmission is established. |
| Flashes green Sound transmission is not established. |
| Turns red The surround amplifier does not output sound. |
| Turns off The surround amplifier turns off or its protection is active. |
For details, see "Troubleshooting" (page 12).
Enjoying the sound by using headphones
You can enjoy the system's sound in a place away from the S-AIR main unit by connecting the headphones to the PHONES jack on the surround amplifier.
Note
- When you connect headphones to the surround amplifier, none of the speakers output sound.
- The volume of the S-AIR main unit is minimized if you turn off the surround amplifier with headphones connected, or radio reception is poor. In either case, check radio reception, and set the volume again.
Preventing transmission to neighbors (Pairing)
If your neighbors also have S-AIR products and their IDs are the same as yours, your neighbors could receive the sound of your S-AIR main unit. To prevent this, you can identify your S-AIR products by performing the pairing operation.
Before the pairing operation (example)
The sound transmission is established by the ID.
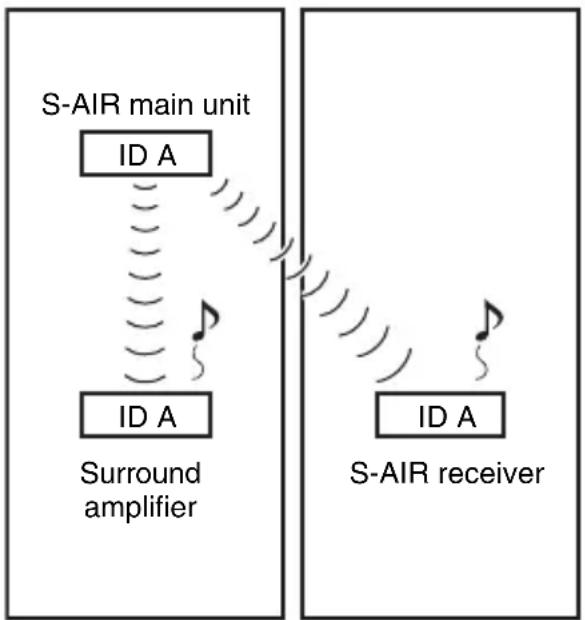
Your room Neighbor
■After the pairing operation (example)
Sound transmission is established between the surround amplifier and the S-AIR main unit that performed the pairing operation.
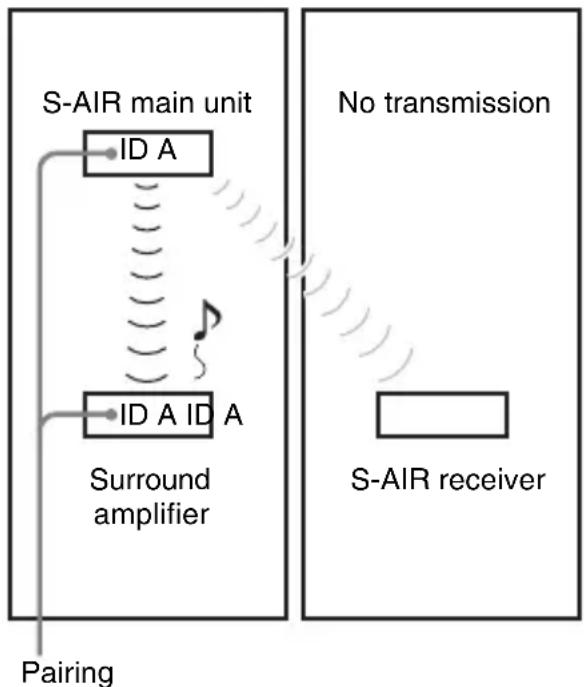
Your room Neighbor
1 Turn on the S-AIR main unit and the surround amplifier.
The system turns on.
2 Match the IDs of the S-AIR main unit and the surround amplifier.
3 Set up the S-AIR main unit so it is ready for pairing.
For details, refer to the operating instructions of the S-AIR main unit.
The POWER / ON LINE indicator on the surround amplifier flashes green.
4 Press PAIRING on the rear panel of the surround amplifier.
The PAIRING indicator flashes red when pairing starts.
When sound transmission is established, the POWER / ON LINE indicator turns green and the PAIRING indicator turns on.
If you use more than one surround amplifier, perform Steps 3 and 4 for those also.
Note
- If you perform the pairing operation between the surround amplifier and another S-AIR main unit, sound transmission established by the ID is canceled.
- Pairing will not be canceled unless you change the ID setting.
Tip
- To press the PAIRING button, a slim instrument, such as a paper clip, can be used.
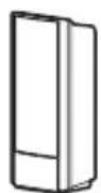
Attaching the cover to the surround amplifier
After connecting and setting, you can attach the cover to the surround amplifier to organize and store excess speaker cords.
1 Attach the speaker cord cover by sliding it down along the grooves on the edges of the surround amplifier.
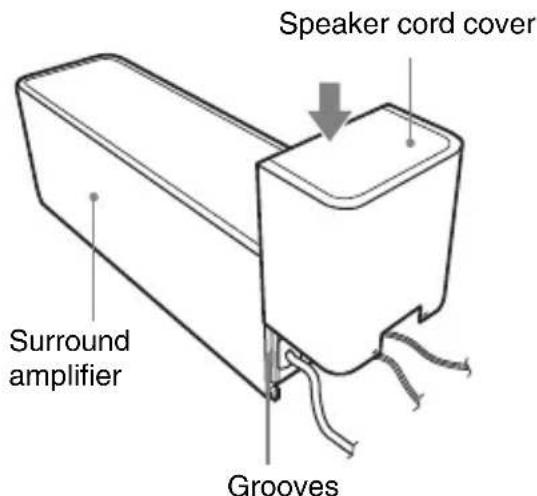
Push the speaker cord cover down until you hear a click. Turn the surround amplifier upside down, and store the cords in the speaker cord cover.
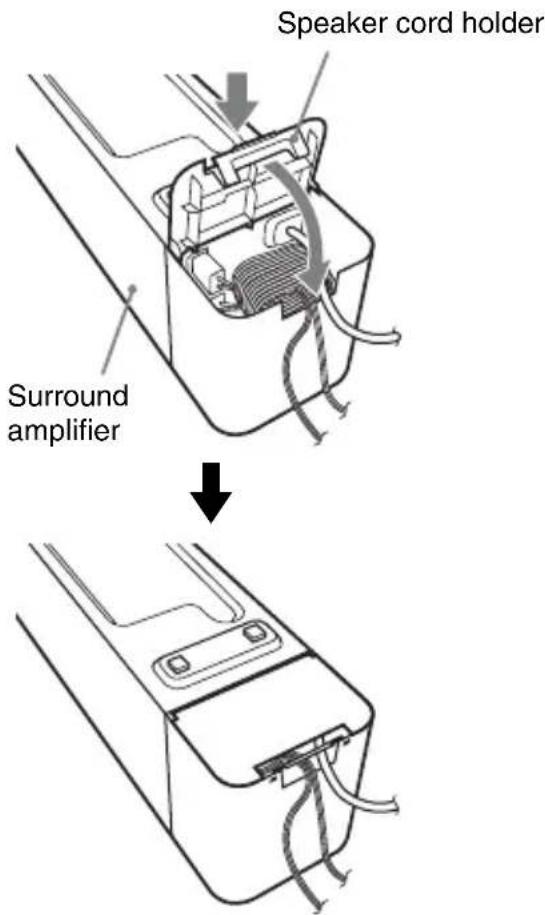
2 Insert the tabs of the speaker cord holder in the slots of the speaker cord cover, and press it into place.
Troubleshooting
If you experience any of the following difficulties while using the system, use this troubleshooting guide to help remedy the problem before requesting repairs. Should any problem persist, consult your nearest Sony dealer.
Note that if service personnel changes some parts during repair, these parts may be retained.
In the event of a problem with the surround amplifier, have a Sony dealer check the entire system together (system, speakers, and wireless adapters).
Power
The power is not turned on.
- Check that the AC power cord (mains lead) is connected securely.
The POWER / ON LINE indicator does not turn on.
Turn off the surround amplifier and remove the AC power cord (main leads) of the surround amplifier, then check the following items.
- Are the + and - speaker cords short-circuited?
- Is anything blocking the ventilation holes of the surround amplifier?
- After checking the above items and fixing any problems, connect the AC power cord (mains lead) of the surround amplifier and turn on the surround amplifier. If the cause of the problem cannot be found even after checking all the above items, consult your nearest Sony dealer.
Sound
There is no sound.
Check the status of the POWER / ON LINE indicator on the surround amplifier.
-
turns green
-
Set [Surround Back] in [Speaker Settings] of the S-AIR main unit to [Yes].
- Change the SURROUND SELECTOR switch (SURROUND or SURROUND BACK) of the surround amplifier to match the S-AIR main unit.
- Check the speaker connections and settings.
The volume of the S-AIR main unit is set to minimum.
- The S-AIR main unit is in mating status.
- Depending on the source or the settings of the S-AIR main unit, the effect of the speakers may be less noticeable.
- Headphones are connected.
-
flashes green
-
The S-AIR main unit is not turned on.
- The S-AIR main unit is paired to another S-AIR product.
- The surround amplifier is paired to another S-AIR main unit.
- Confirm the IDs of the S-AIR main unit and surround amplifier (pages 8, 9).
- Pairing operation is not completed.
- Sound transmission is poor. Move the surround amplifier so that the POWER / ON LINE indicator turns green.
- Install the system and surround amplifier(s) apart from another wireless product.
- Stop using another wireless product.
-
The wireless transceiver and/or the wireless transmitter are/is not inserted correctly.
-
turns red
-
Change the SURROUND SELECTOR switch (SURROUND or SURROUND BACK) of the surround amplifier to match the S-AIR main unit.
No sound is heard from the S-AIR main unit.
Volume becomes the minimum when you turn off the surround amplifier with headphones connected before you turn off the S-AIR main unit or if radio reception is poor. In these cases, check radio reception, and set the volume again.
Severe hum or noise is heard.
- Check that the S-AIR products are connected securely.
- Check that the connecting cords are away from a transformer or motor, and at least 3 meters (10 ft) away from your TV set or a fluorescent light.
- Move your TV away from the audio components.
- The plugs and jacks are dirty. Wipe them with a cloth slightly moistened with alcohol.
Clean the disc.
No sound or only a very low-level sound is heard from the speakers.
- Check the speaker connections and settings.
- Check the decoding mode setting.
Depending on the source, the effect of the speakers may be less noticeable. - Wireless setting of the speaker is not correct.
A 2 channel source is being played.
No sound is heard or sound is cut off.
- The S-AIR main unit and/or the surround amplifier is installed in a place such as on a metal shelf.
- Wireless LANs, a microwave (oven) and Bluetooth applications, etc. are placed near the surround amplifier.
- Move away the other components from the surround amplifier or turn off the other components.
Operation
The system does not work normally.
- Disconnect the AC power cord (mains lead) from the wall outlet (mains), then reconnect after several minutes.
Specifications
SS-TSB92 (Speakers)
Speaker system Full range Bass
reflex
Speaker unit 65mm (2
5/8 in)
cone type
Rated impedance 3 ohms
Dimensions (approx.) 105mm× 225mm
× 85 ~mm (41/4 in ×
8^7 / 8in× 3^3 / 8in)
(w/h/d)
Mass (approx.) 0.6kg 1 lb 6 oz
TA-SA100WR
(Surround amplifier)
AUDIO POWER SPECIFICATIONS for the US model
POWER OUTPUT AND TOTAL
HARMONIC DISTORTION:
With 3 ohm loads, both channels
driven, from 120 -
20,000 Hz; rated 50
watts per channel
minimum RMS
power, with no
more than 0.7%
total harmonic
distortion from 250
milli watts to rated
output.
Amplifier section
US models:
Surround mode (reference) RMS output power
: 143 W (per
channel at 3 ohms,
1 kHz, 10%
THD)*
Other models:
Stereo mode (rated) 80W + 80W at
3 ohms, 1 kHz, 1%
THD)
Surround mode (reference) RMS output power
: 143 W (per
channel at 3 ohms,
1kHz, 10%
THD)*
Design and specifications are subject to change
without notice.
"S-AIR" and its logo are trademarks of Sony
Corporation.
- Depending on the source, there may be no sound output.
Rated impedance 3 - 16 Ω
General
Power requirements:
North American models 120V AC, 60Hz
Other models 220V - 240VAC
50 / 60Hz
Power consumption On: 50 W
Dimensions (approx.) 85mm× 100mm×
330mm (3 3/8 in ×
4 in × 13 in) (w/h/
d) (incl. Wireless
transceiver)
85mm× 100mm×
345mm (3^3 / 8 in ×
4 in × 13 5/8 in) (w/
h/d) incl. speaker
cord cover and
speaker cord
holder
Mass (approx.) 1.7kg 3 lb 12 oz)
incl. speaker cord
cover and speaker
cord holder
EZW-RT10/EZW-RT10A*
(Wireless transceiver)
Communication System S-AIR
Specification
version 1.0
Frequency band 2.4000 GHz -
2.4835 GHz
Modulation method DSSS
Power requirements DC 3.3V 350~mA
Dimensions (approx.) 50mm× 13mm×
60mm (2 in × 17 / 32
in× 23 / 8 in) (w / h /
d)
Mass (approx.) 24g 1 oz
- For North American and European models.
Surround amplifier
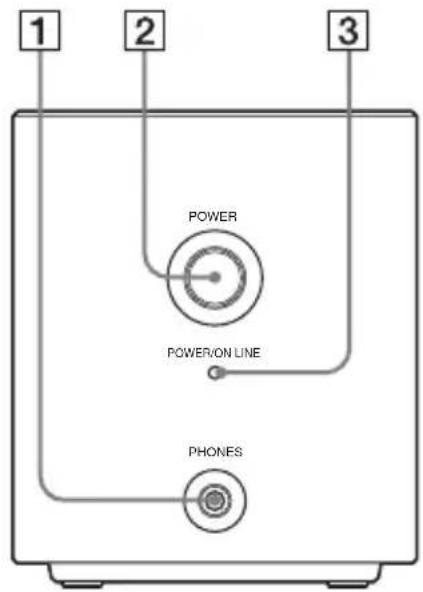
Front panel
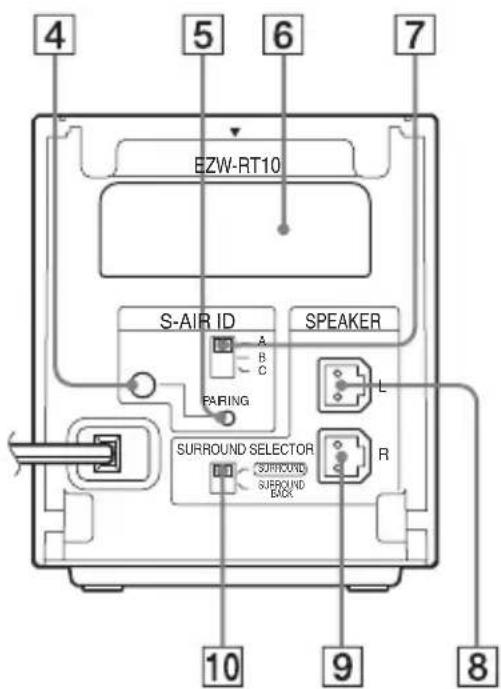
Rear panel
1PHONESjack
2 POWER button (ON/OFF)
3 POWER/ON LINE indicator
4 PAIRING indicator
5 PAIRING button
6 Wireless transceiver (EZW-RT10) slot
7S-AIR ID switch
8 SPEAKER L jack
9 SPEAKER R jack
10 SURROUND SELECTOR switch
Table des matieres
Amplificateur surround (TA-SA100WR) (1)
(Amplificateur surround)
a 3 ohms, 1kHz
10% DHT)*
Autres modèles :
Mode stereo (nominal) 80W + 80W
(a 3 ohms, 1kHz
1% DHT)
(a 3 ohmios, 1kHz
1% THD)
- Wireless Surround Speaker Kit
- Table of Contents
- WARNING
- For the customers in the U.S.A. and Canada
- For the customers in the U.S.A.
- Owner's Record
- NOTE:
- CAUTION
- Important Safety Instructions
- For the wireless transceiver (EZW-RT10/EZW-RT10A)
- For the customers in Canada For the wireless transceiver (EZW-RT10/EZW-RT10A)
- For the customers in Europe
- For the customers in Australia
- For the customers in Singapore
- Precautions
- On power sources
- On placement
- On cleaning
- Safety
- Enjoying a 7.1 Channel System
- Unpacking
- Surround back speakers (SS-TSB92) (2)
- Surround amplifier (TA-SA100WR) (1)
- Speaker cord cover (1)
- Speaker cord holder (1)
- Wireless transceiver (EZW-RT10/EZW-RT10A*) (1)
- Speaker cords (2)
- Operating Instructions (1)
- Hooking Up
- Before installing, make sure to remove the AC power cords (mains lead) of all S-AIR products from wall outlets (mains).
- Note
- Insert the wireless transmitter (supplied with the S-AIR main unit) in the slot on the S-AIR main unit.
- Connect the speakers.
- To connect the speaker cords to the surround amplifier
- To connect the speaker cords to the speakers
- Connect the AC power cords (mains leads).
- Setting Up the Wireless System
- Setting up the S-AIR main unit
- Setting up the surround amplifier
- Set up the speakers.
- Checking the transmission status
- Enjoying the sound by using headphones
- Preventing transmission to neighbors (Pairing)
- Before the pairing operation (example)
- ■After the pairing operation (example)
- Tip
- Attaching the cover to the surround amplifier
- Attach the speaker cord cover by sliding it down along the grooves on the edges of the surround amplifier.
- Insert the tabs of the speaker cord holder in the slots of the speaker cord cover, and press it into place.
- Troubleshooting
- Power
- The power is not turned on.
- The POWER / ON LINE indicator does not turn on.
- Sound
- There is no sound.
- Check the status of the POWER / ON LINE indicator on the surround amplifier.
- No sound is heard from the S-AIR main unit.
- Severe hum or noise is heard.
- No sound or only a very low-level sound is heard from the speakers.
- No sound is heard or sound is cut off.
- Operation
- The system does not work normally.
- Specifications
- SS-TSB92 (Speakers)
- TA-SA100WR
- (Surround amplifier)
- AUDIO POWER SPECIFICATIONS for the US model
- Amplifier section
- General
- EZW-RT10/EZW-RT10A*
- (Wireless transceiver)
- Surround amplifier
- Table des matieres
- Amplificateur surround (TA-SA100WR) (1)
- (Amplificateur surround)
Brand : SONY
Model : WAHTSBP1
Category : Other camera accessories