
TJS1 - Other camera accessories SONY - Free user manual and instructions
Find the device manual for free TJS1 SONY in PDF.
| Product Type | TransferJet Wireless Transfer Station |
| Brand | Sony |
| Model | TJS-1 |
| Dimensions (L x W x H) | 110 mm × 62 mm × 16 mm |
| Weight | Approximately 100 g (without cable) |
| Power Supply | 5 V DC, 0.25 A (via USB port) |
| External Interface | USB 2.0 (High Speed) |
| Wireless Technology | TransferJet (4.48 GHz, 4.20-4.76 GHz band) |
| Supported Protocol Classes | SCSI Block Device Initiator |
| Compatible Operating Systems | Windows 7, Windows Vista (SP2), Windows XP (SP3), Mac OS X v10.3-v10.6 |
| Operating Temperature | 0°C to 40°C |
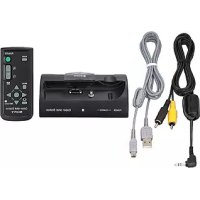
| Supplied Accessories | TransferJet Station (1), USB cable (0.5 m) (1), instruction manual (1) |
| Main Functions | Wireless transfer of photos and movies from a TransferJet device to a PC, photo frame, or TV |
| Maintenance and Cleaning | Soft cloth lightly moistened with diluted detergent, then wipe with a dry cloth |
| Safety | Do not use in an aircraft; complies with FCC Part 15 Class B |
| Important Notes | Use only the supplied USB cable; do not use a USB hub |
| Warranty | See conditions in the manual |
Frequently Asked Questions - TJS1 SONY
User questions about TJS1 SONY
0 question about this device. Answer the ones you know or ask your own.
Ask a new question about this device
Download the instructions for your Other camera accessories in PDF format for free! Find your manual TJS1 - SONY and take your electronic device back in hand. On this page are published all the documents necessary for the use of your device. TJS1 by SONY.
USER MANUAL TJS1 SONY
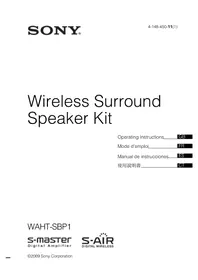
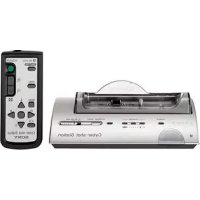
TransferJet™ Station
Operating Instructions
Mode d'emploi
The model number and the serial number are located on the bottom.
Record the serial number in the space provided below. Refer to them whenever you call upon your Sony dealer regarding this product.
Model No.: TJS-1
Serial No.:
Do not use this product in an airplane.
For customers in the U.S.A.
If you have any questions about this product, you may call: Sony Customer Information Service Center 1-800-222-SONY (7669).
The number below is for the FCC related matters only.
For customers in the U.S.A. and Canada
The following FCC and IC statement applies only to the version of this model manufactured for sale in the USA and Canada. Other versions may not comply with FCC and IC technical regulations.
Regulatory Information
Declaration of Conformity
Trade Name: SONY
Model No.: TJS-1
Responsible Party: Sony Electronics Inc.
Address: 16530 Via Esprillo, San Diego, CA 92127 U.S.A.
Telephone number: 858-942-2230
This device complies with Part 15 of the FCC Rules. Operation is subject to the following two conditions: (1) this device may not cause harmful interference, and
(2) this device must accept any interference received, including interference that may cause undesired operation.
This device complies with Part 15 of FCC Rules and RSS-Gen of IC Rules.
Operation is subject to the following two conditions: (1) this device may not cause interference, and (2) this device must accept any interference, including interference that may cause undesired operation of this device.
CAUTION
You are cautioned that any changes or modifications not expressly approved in this manual could void your authority to operate this equipment.
NOTE
This equipment has been tested and found to comply with the limits for a Class B digital device, pursuant to Part 15 of the FCC Rules. These limits are designed to provide reasonable protection against harmful interference in a residential installation. This equipment generates, uses and can radiate radio frequency energy and, if not installed and used in accordance with the instructions, may cause harmful interference to radio communications. However, there is no guarantee that interference will not occur
in a particular installation. If this equipment does cause harmful interference to radio or television reception, which can be determined by turning the equipment off and on, the user is encouraged to try to correct the interference by one or more of the following measures:
- Reorient or relocate the receiving antenna.
- Increase the separation between the equipment and receiver.
- Connect the equipment into an outlet on a circuit different from that to which the receiver is connected.
- Consult the dealer or an experienced radio/TV technician for help.
This Class B digital apparatus complies with Canadian ICES-003.
Table Of Contents
Before use 5
Getting started 6
How to place a TransferJet technology compatible device on this product
Example: Importing photos or movies in a camera to a PC 9
Example: Displaying photos in a camera on a digital photo frame ...11
Troubleshooting 12
On cleaning 13
Specifications 13
Before use
US
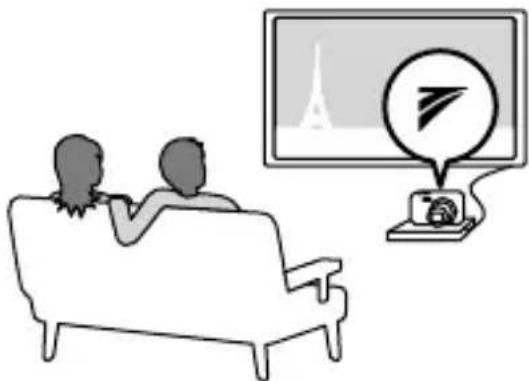
This product enables you to transfer data from/to a TransferJet technology compatible device. Connect this product to a PC, etc., with a USB cable, and then place a TransferJet technology compatible device (camera, etc.) on this product. Device files can be managed via the PC without the need for direct USB connection to a camera, etc.*
- TransferJet technology compatible devices bear the mark.
This product can communicate with a TransferJet technology compatible device of SCSI Block Device Target.
** Operation may differ from connecting directly with a USB cable.
What is TransferJet?
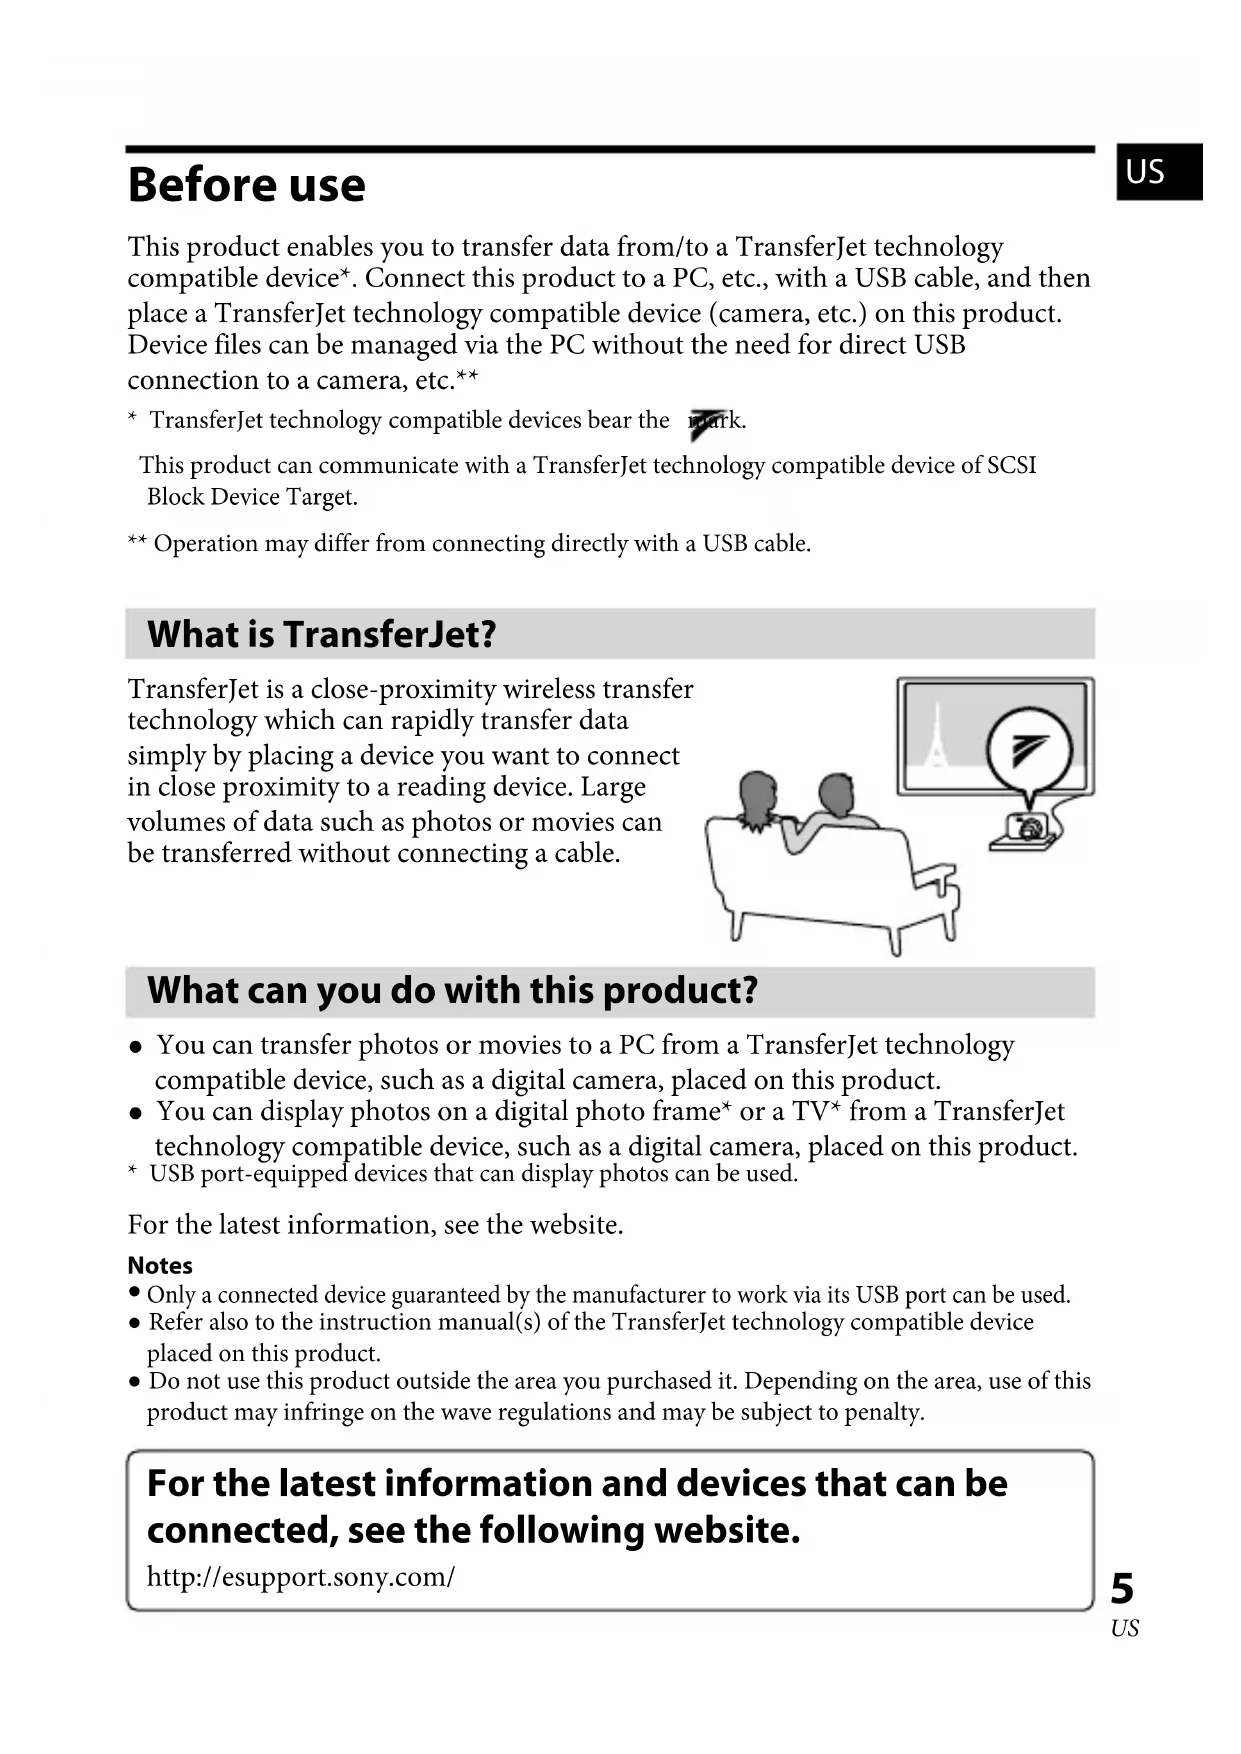
TransferJet is a close-proximity wireless transfer technology which can rapidly transfer data simply by placing a device you want to connect in close proximity to a reading device. Large volumes of data such as photos or movies can be transferred without connecting a cable.
What can you do with this product?
- You can transfer photos or movies to a PC from a TransferJet technology compatible device, such as a digital camera, placed on this product.
- You can display photos on a digital photo frame or a TV from a TransferJet technology compatible device, such as a digital camera, placed on this product.
- USB port-equipped devices that can display photos can be used.
For the latest information, see the website.
Notes
- Only a connected device guaranteed by the manufacturer to work via its USB port can be used.
- Refer also to the instruction manual(s) of the TransferJet technology compatible device placed on this product.
- Do not use this product outside the area you purchased it. Depending on the area, use of this product may infringe on the wave regulations and may be subject to penalty.
For the latest information and devices that can be connected, see the following website.
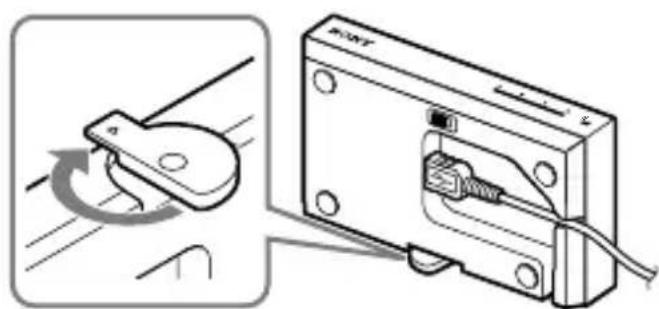
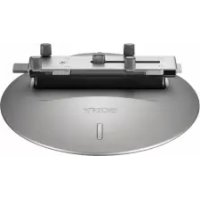
Before use, connect the supplied USB cable to the bottom of this product, and then connect the USB cable to a device, such as a PC.
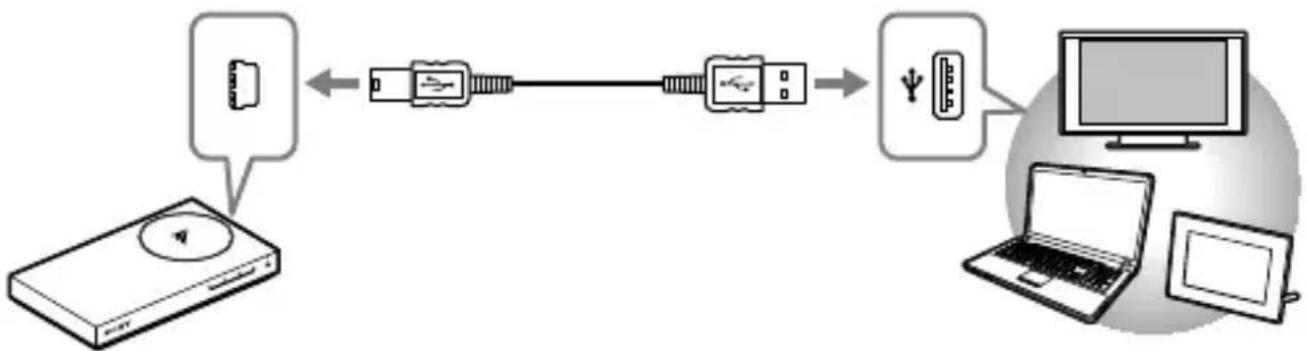
Bottom
Mode Switch
This switch is for future expansion. Before using this product, check the switch is set to "MODE 1" (factory default).
Notes
-
Use the supplied USB cable.
-
When connecting to a PC, connect the USB cable to the USB port of the PC directly. Operation during connection via a USB hub is not assured.
-
If using a Windows PC when disconnecting a USB cable from a PC, click the icon [Safely remove USB Mass Storage Device] at the bottom right of the desktop of the computer, then unplug the USB cable. The screenshots are from Windows Vista. Screen and operation procedure may vary depending on the operating system of the computer.
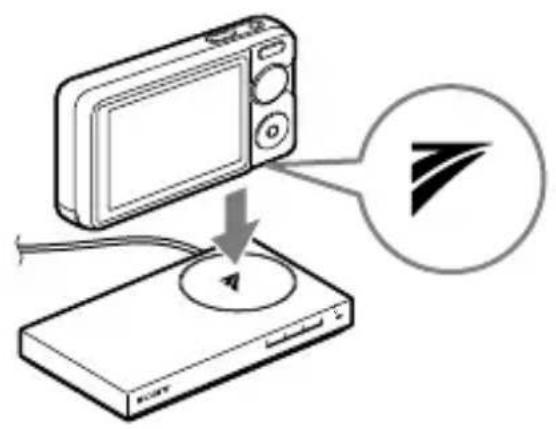
How to place a TransferJet technology compatible device on this product
US
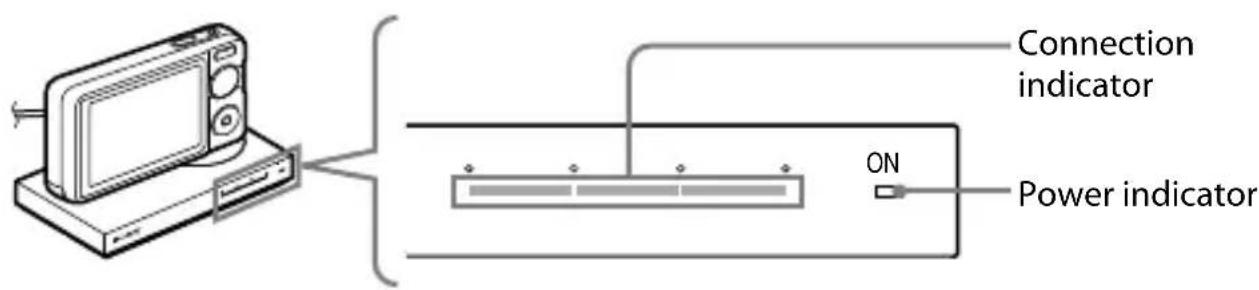
Before placing a TransferJet technology compatible device on this product, turn on the connected device and check that the power indicator of this product lights up. When placing the device on this product, align the mark on the device with the mark on this product.
Then adjust the position of the TransferJet technology compatible device for the highest reading on the connection indicator. The higher the reading, the more rapidly the data can be transferred.*
- Depending on the TransferJet technology compatible device and surrounding wireless device, the connection indicator status may vary.
Notes
- Turn on the TransferJet technology compatible device, and activate the TransferJet function in advance.
- If the device is a camera, operation on the camera may be required.
- If the device is a camera, a Memory Stick™ with TransferJet may be required to be inserted in the camera beforehand.
- The connection indicator may stay lit for a few seconds after the TransferJet technology compatible device has been removed from this product. This is not a malfunction.
Tip
When the mark is on the side of a device:
Set up this product and then place this product and device with their marks in close proximity.
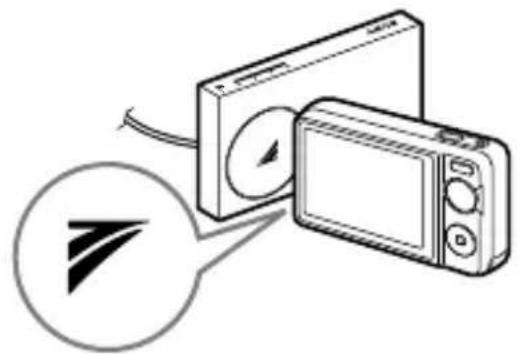
Rotate the stand 90-degrees for stability. Pass the USB cable through the groove as illustrated above.
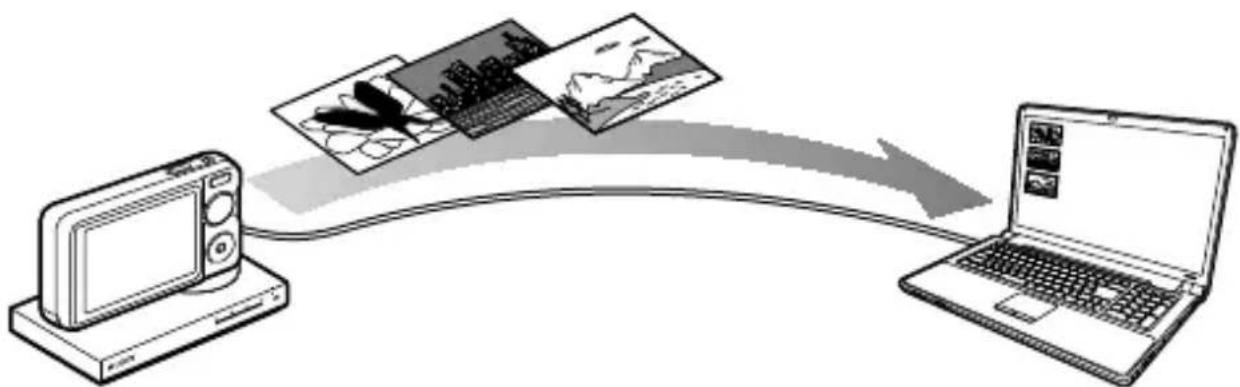
Example: Importing photos or movies in a camera to a PC
US
You can import photos or movies in a TransferJet technology compatible camera to a PC.
Recommended PC environment
OS: Windows
Windows 7
Windows Vista (Service Pack2)
Windows XP (Service Pack3)
Macintosh
Mac OS X (v10.3-v10.6)
USB port
Notes
Operation with all computer environments is not assured.
- Depending on the combination of hardware and software, this product may not operate correctly, even if the environment meets the above requirements.
- Depending on the PC, this product may not operate properly if the connected PC has been in standby or sleep mode. In this case, disconnect and then reconnect the USB cable.
1 Turn on the PC.
The power indicator of this product lights up.
2 Place a TransferJet technology compatible camera on this product.
Notes
- Turn on the TransferJet technology compatible device, and activate the TransferJet function in advance.
- Depending on a camera, a Memory Stick™ with TransferJet may be required to be inserted in the camera beforehand.
- For details on how to place on this product, see "How to place a TransferJet technology compatible device on this product" (page 7).
3 Transfer the data to the PC.
When using a Windows PC with PMB (Picture Motion Browser) installed: The [Import Media Files to PMB] window is displayed. PMB is a software supplied with certain Sony products such as a camera.
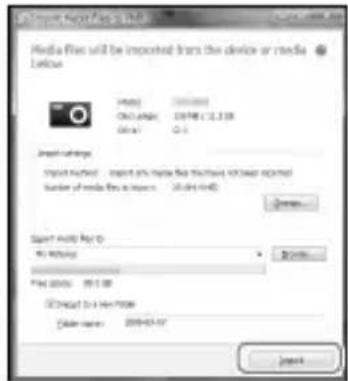
Click [Import] to import photos or movies. If the window is not displayed, select the media on the liquid-crystal display of the camera.
When using a Windows PC not installed with PMB:
Open the folder for this product from Explore.
Drag and drop the image data in the folder to copy to the PC. The folder in which data is stored varies depending on your PC environment or TransferJet technology compatible device. For Windows Vista and Windows XP, four folders for this product appear. For Windows 7, only the folder in which the data is stored appears.
When using Macintosh:
Open the newly recognized drive icon on the desktop. Drag and drop the image data in it to copy to the Macintosh. The folder in which data is stored varies depending on your Macintosh environment or TransferJet technology compatible device.
Note
Depending on the TransferJet technology compatible device, it may not be possible to write and delete files to the device from the PC.
Example: Displaying photos in a camera on a digital photo frame
US
You can display photos in a TransferJet technology compatible camera by connecting this product to a USB port-equipped digital photo frame.
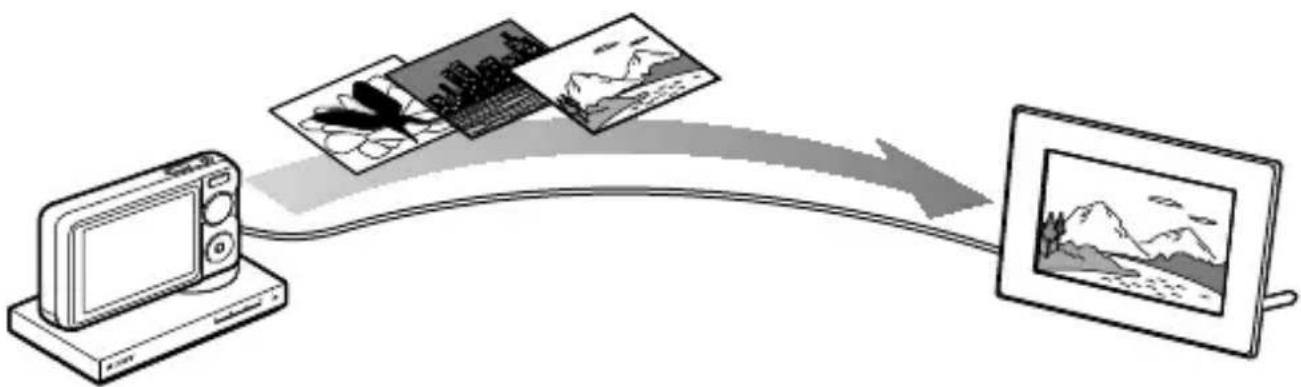
1 Turn on the digital photo frame.
The power indicator of this product lights up.
2 Place a TransferJet technology compatible camera on this product.
3 Operate the digital photo frame to display photos.
For details on how to operate, refer to the instruction manual(s) of the digital photo frame.
Notes
- Turn on the TransferJet technology compatible device, and activate the TransferJet function in advance.
- Depending on the camera, a Memory StickTM with TransferJet may be required to be inserted in the camera beforehand.
- Only a USB port-equipped device that can display photos can be used.
- For details on how to place on this product, see "How to place a TransferJet technology compatible device on this product" (page 7).
You can display photos by connecting a TV*.
*Only a USB port-equipped TV that can display photos can be used. Some TV can display a slide show.
Operate the TV to display photos.
For details on how to operate, refer to the instruction manual(s) of the TV.
Troubleshooting
If you run into any problems using this product, check the following points once again.
The power indicator does not light up.
- Check that the USB cable is plugged into the USB port firmly.
Data cannot be transferred.
- Check that the marks of this
product and TransferJet technology compatible device are properly aligned, according to the connection indicator. - Check that a metallic device other than a TransferJet technology compatible device is not placed on this product.
- Check that a metallic device other than a TransferJet technology compatible device is not close to this product.
- Check only one device is placed on this product at one time.
- Check that a TransferJet technology compatible device is placed on this product. Depending on the device, a Memory Stick™ with TransferJet may be required to be inserted in the device beforehand.
- Check that the TransferJet technology compatible device is turned on and the TransferJet function is activated.
- If the device is a camera, selecting a destination media may be required. For details on how to operate, refer
to the instruction manual(s) of the camera.
Others
Depending on the TransferJet technology compatible device, it may not be possible to write and delete files to a TransferJet technology compatible device such as camera from a device such as a PC.
- This product may become warm during operation. This is not a malfunction.
- This product is not designed to charge the battery of the placed device.
- The connection indicator may stay lit for a few seconds after the TransferJet technology compatible device has been removed from this product. This is not a malfunction.
- Do not disconnect the USB cable or remove the device from this product while transferring files as files may be corrupted.
- If this product cannot be recognized from the connected device, disconnect and then reconnect the USB cable.
Depending on the specifications of the TransferJet technology compatible device, it may not be possible to communicate with this product. For details, see the website (page 5).
* A Memory Stick _TM with TransferJet is not released depending on the regulations of the country/region.
On cleaning
- Clean this product with a soft dry cloth. If it is heavily soiled, clean this product with a soft cloth slightly moistened with a mild detergent solution, and then wipe it with a dry cloth.
-
Avoid the following to avoid damage to the finish:
-
Using chemicals such as thinner, benzine, alcohol or insecticide.
- Leaving the casing in contact with rubber or vinyl objects for a long period of time.
- When using chemical cloths, follow the warnings.
Specifications
Communication system
TransferJet Specifications
PHY-CNL Spec.Rev.1.0
Compliant
PCL Spec Rev.1.0 Compliant
Frequency band
4.48 GHz (central frequency)
(4.20 GHz - 4.76 GHz)
Supported protocol class
(communication type or tool)
SCSI Block Device Initiator*
External interface
USB2.0 (High-Speed)
Dimensions (w/d/h)
Approx. 110mm× 62mm×
16 mm
(4^3 / 8in.× 2^1 / 2in.×^21 / _32in.)
Mass
Approx. 100g (3.5 oz) (excluding
cable)
Operational temperature
0^ - 40^ (32°F - 104°F)
Power supply
DC 5 V, 0.25 A
(supplied from USB)
- This product can communicate with a TransferJet technology compatible device of SCSI Block Device Target protocol class.
Design and specifications of this product are subject to change without notice.
Supplied items
TransferJet Station (1), USB cable
(length: approx. 0.5m (1.6 ft)) (1),
Operating Instructions (this manual)
(1)
License and Trademark Notice
- "Memory Stick", "TransferJet" and TransferJet logo are registered trademarks or trademarks of Sony Corporation.
- Microsoft, Windows, and Windows Vista are registered trademarks or trademarks of Microsoft Corporation in the United States and/or other countries.
- Macintosh and Mac OS are registered trademarks of Apple Inc. in the U.S. and other countries.
- Reproduction of this manual, in whole or in part, without written permission by Sony Corporation is prohibited.
The content of this manual is subject to change without notice. - All other company names, product names and system names mentioned herein may be the trademarks or registered trademarks of their respective companies. Furthermore, TM and ® are not mentioned in each case in this manual.
For the latest information and devices that can be connected, see the following website.
Responsible : Sony Electronics Inc.
Adresse: 16530 Via Esprillo, San Diego, CA 92127 E.-U.
Parte responsible: Sony Electronics Inc.
- TransferJet™ Station
- For customers in the U.S.A.
- For customers in the U.S.A. and Canada
- Regulatory Information
- Declaration of Conformity
- CAUTION
- NOTE
- Table Of Contents
- Before use
- What is TransferJet?
- What can you do with this product?
- Notes
- For the latest information and devices that can be connected, see the following website.
- Mode Switch
- How to place a TransferJet technology compatible device on this product
- Tip
- When the mark is on the side of a device:
- Example: Importing photos or movies in a camera to a PC
- Recommended PC environment
- Turn on the PC.
- Place a TransferJet technology compatible camera on this product.
- Transfer the data to the PC.
- Example: Displaying photos in a camera on a digital photo frame
- You can display photos by connecting a TV*.
- Troubleshooting
- The power indicator does not light up.
- Data cannot be transferred.
- Others
- On cleaning
- Specifications
- Supplied items
- License and Trademark Notice
Brand : SONY
Model : TJS1
Category : Other camera accessories