CSSPHB - Other camera accessories SONY - Free user manual and instructions
Find the device manual for free CSSPHB SONY in PDF.
| Product Type | Digital camera docking station (Cyber-shot Station) |
| Brand | Sony |
| Model | CSS-PHB (CSSPHB) |
| Compatibility | Sony DSC-P200 digital camera |
| Dimensions (W × H × D) | 146 × 50 × 82 mm |
| Weight | 150 g |
| Power supply | AC-LS5 AC adapter (100-240 V AC, 50/60 Hz) |
| Output voltage | 4.2 V DC |
| Main functions | Battery charging, TV viewing, PictBridge printing, USB transfer, interval shooting |
| Remote control | Wireless RMT-CSS2 with CR2025 button battery |
| Connectors | A/V OUT (MONO) jack, mini-B USB jack, DC IN jack, multi-connector |
| Compatible TV system | NTSC and PAL |
| Shooting intervals | 5, 30, 60 minutes |
| Number of interval shots | 12 maximum |
| Maintenance | Clean with a soft, slightly damp cloth; do not use solvents |
| Precautions | Avoid moisture, extreme temperatures, magnetic fields, dust |
| Safety | Do not expose to rain or moisture (risk of fire or electric shock) |
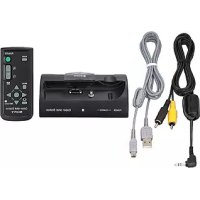
| Included items | Station, remote control, audio/video cable, USB cable, AC adapter, power cord, documentation |
| Repairability | In case of issues, contact a Sony dealer |
| Operating temperature | 0 to +40 °C |
Frequently Asked Questions - CSSPHB SONY
User questions about CSSPHB SONY
0 question about this device. Answer the ones you know or ask your own.
Ask a new question about this device
Download the instructions for your Other camera accessories in PDF format for free! Find your manual CSSPHB - SONY and take your electronic device back in hand. On this page are published all the documents necessary for the use of your device. CSSPHB by SONY.
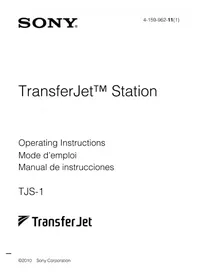
USER MANUAL CSSPHB SONY
Operating Instructions GB
Mode d'emploi FR
English
Before operating the product, please read this manual thoroughly and retain it for future reference.
WARNING
To prevent fire or shock hazard, do not expose the unit to rain or moisture.
For Customers in the U.S.A.

This symbol is intended to alert the user to the presence of uninsulated "dangerous voltage" within the product's enclosure that may be of sufficient magnitude to constitute a risk of electric shock to persons.

This symbol is intended to alert the user to the presence of important operating and maintenance (servicing) instructions in the literature accompanying the appliance.
If you have any questions about this product, you may call: Sony Customer Information Services Center 1-800-222-SONY (7669) The number below is for the FCC related matters only.
Regulatory Information
Declaration of Conformity
Trade Name: SONY
Model No.: CSS-PHB
Responsible Party: Sony Electronics Inc.
Address: 16450 W. Bernardo Dr, San Diego, CA 92127 U.S.A.
Telephone No.: 858-942-2230
This device complies with Part 15 of the FCC Rules. Operation is subject to the following two conditions: (1) This device may not cause harmful interference, and (2) this device must accept any interference received, including interference that may cause undesired operation.
CAUTION
You are cautioned that any changes or modifications not expressly approved in this manual could void your authority to operate this equipment.
Note:
This equipment has been tested and found to comply with the limits for a Class B digital device, pursuant to Part 15 of the FCC Rules. These limits are designed to provide reasonable protection against harmful interference in a residential installation. This equipment generates, uses, and can radiate radio frequency energy and, if not installed and used in accordance with the instructions, may cause harmful interference to radio communications. However, there is no guarantee that interference will not occur in a particular installation. If this equipment does cause harmful interference to radio or television reception, which can be determined by turning the equipment off and on, the user is encouraged to try to correct the interference by one or more of the following measures:
—Reorient or relocate the receiving antenna.
—Increase the separation between the equipment and receiver.
—Connect the equipment into an outlet on a circuit different from that to which the receiver is connected.
—Consult the dealer or an experienced radio/TV technician for help.
The supplied interface cable must be used with the equipment in order to comply with the limits for a digital device pursuant to Subpart B of Part 15 of FCC Rules.
Notice on the supplied AC adaptor for customers in the United Kingdom
A moulded plug complying with BS1363 is fitted to this equipment for your safety and convenience.
Should the fuse in the plug supplied need to be replaced, a fuse of the same rating as the supplied one and approved by ASTA or BSI to BS1362, (i.e., marked with ☐ or ☑ mark) must be used.
If the plug supplied with this equipment has a detachable fuse cover, be sure to attach the fuse cover after you change the fuse. Never use the plug without the fuse cover. If you should lose the fuse cover, please contact your nearest Sony service station.
For Customers in Europe
This product has been tested and found compliant with the limits sets out in the EMC Directive for using connection cables shorter than 3 meters (9.8 feet).
Attention
The electromagnetic field at the specific frequencies may influence the picture and sound of the camera used with this Cyber-shot Station.
Notice
If static electricity or electromagnetism causes data transfer to discontinue midway (fail), restart the application or disconnect and connect the communication cable (USB, etc.) again.
Features
The CSS-PHB can be used with the DSC-P200 digital still camera.
When you place a digital still camera (here in after referred to as the "camera") on the Cyber-shot Station, you can use the Cyber-shot Station in the following way.
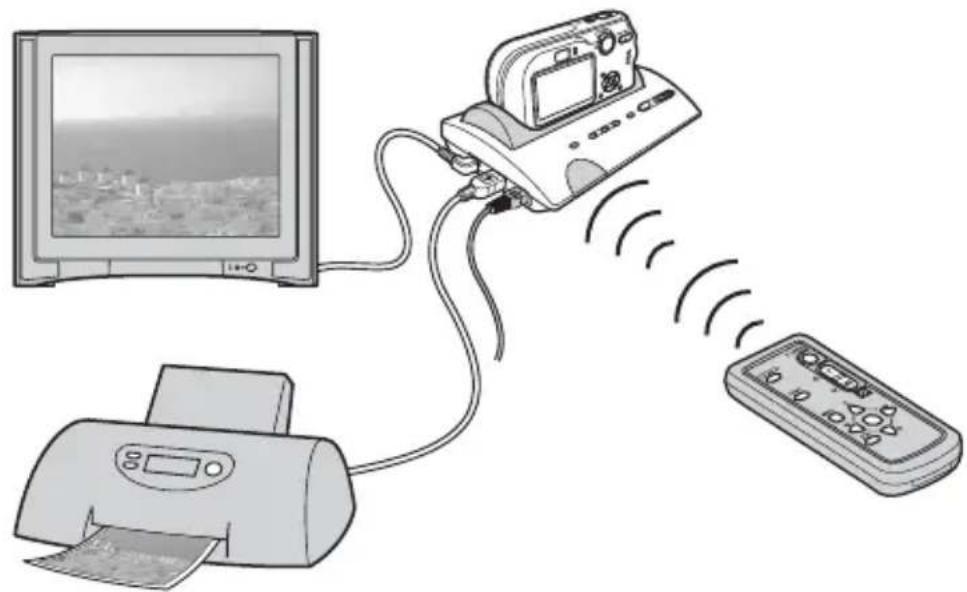
●You can easily view images on a TV screen by wireless remote control.
Using the remote control, you can operate the followings;
- Viewing images
- Slide Show
- Playback zoom
- Shooting images
- When the CSS-PHB is connected to a PictBridge enabled printer, you can easily print still images just by pressing PRINT button on the remote control.
The still image currently shown on the TV can be printed by remote control.
Note: If you want to print one of the still images in a Slide Show, cancel the Slide Show first, then press PRINT button.
● Using the Cyber-shot Station, you can charge the battery pack inside the camera. While charging the battery pack, you can check the battery level with the CHARGE lamps of the Cyber-shot Station.
- You can connect the Cyber-shot Station to your computer using the supplied USB cable for image forwarding.
●You can take time-lapse photos by the built-in intervalometer of CSS-PHB.
natural_image
Illustration of a printer, a monitor, and a remote control with signal waves (no text or symbols)Trademarks
• and Cybershot Station are trademarks of Sony Corporation.
- "Memory Stick" and are trademarks of Sony Corporation.
- In addition, system and product names used in this manual are, in general, trademarks or registered trademarks of their respective developers or manufacturers. However, the ^TM or ^® marks are not used in all cases in this manual.
Index
Precautions 6
Before using the Cyber-shot Station 6
Identifying the parts 7
Set up 8
Placing the camera on the Cyber-shot Station 8
Charging the battery pack 9
Viewing images on a TV screen 9
Shooting images.... 10
Printing still images 11
Connecting the camera to your computer via the Cyber-shot Station 12
Care and maintenance 12
Troubleshooting 13
Specifications 15
Precautions
- The Cyber-shot Station is not a dust-proofed, moist-proofed or water proofed product.
- Do not use or keep the Cyber-shot Station in locations subject to the following conditions:
- Locations with extremes of temperature In closed automobiles during summer, the ambient temperature may be very hot, causing deformation or malfunction of the Cyber-shot Station.
- Locations in direct sunlight or near heaters This may cause deformation or malfunction of the Cyber-shot Station.
- Locations subject to vibration
– Locations subject to strong magnetism - Locations subject to dust or sand If you use the Cyber-shot Station, for example, on a beach or in a desert, make sure that you keep the Cyber-shot Station away from sand. The Cyber-shot Station that is covered with sand may malfunction.
- Do not use the Cyber-shot Station in locations that are subject to strong radio waves or radiation. Images may not be played back properly.
- The set is not disconnected from the AC power source (mains) as long as it is connected to the wall outlet, even if the set itself has been turned off.
Before using the Cyber-shot Station
Refer to the operating instruction for your camera as well as this manual.
- Recording contents cannot be compensated for if shooting or playback is not possible due to damaged "Memory Stick", a malfunction of your camera or of the Cyber-shot Station, etc.
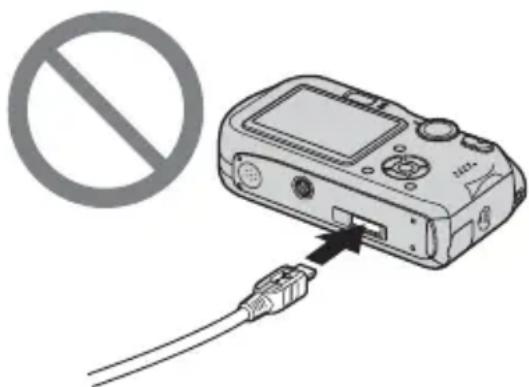
- Do not connect the supplied USB cable to the multi connector on the bottom of the camera. This may cause a malfunction of the multi connector.
- The screw hole on the bottom of the Cyber-shot Station is for retail display only.
Identifying the parts
Cyber-shot Station
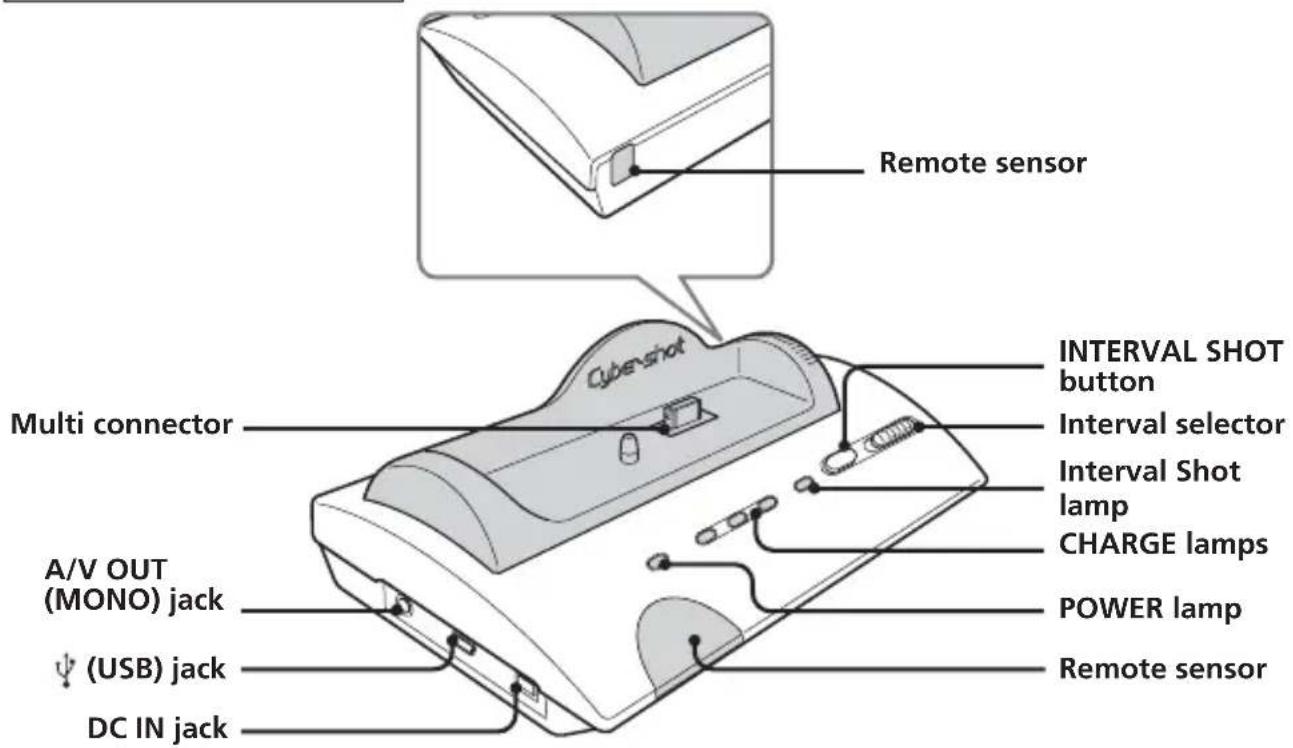
Remote Control
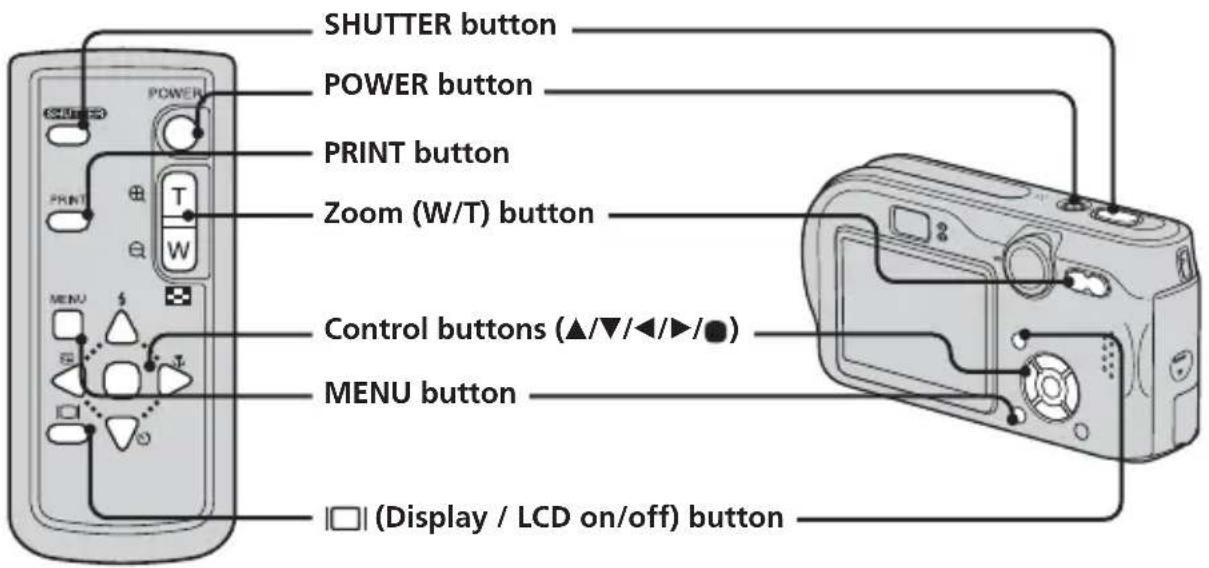
The remote control buttons share the functions as the ones on your camera.
Set up
Preparing the Cyber-shot Station
Connect the AC adaptor to the DC IN jack of the Cyber-shot Station.
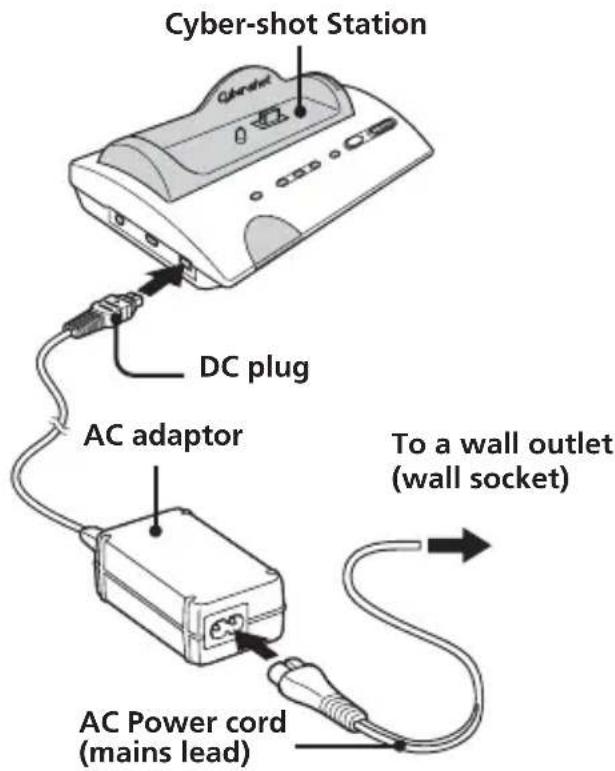
Do not use the AC adaptor placed in a narrow space, such as between a wall and furniture.
To use your Cyber-shot Station abroad - Power sources
You can use the Cyber-shot Station and the AC adaptor (supplied) in any country or region where the power supply is within 100 V to 240 V AC, 50/60 Hz.
Use a commercially available AC plug adaptor, if necessary, depending on the design of the wall outlet (wall socket).
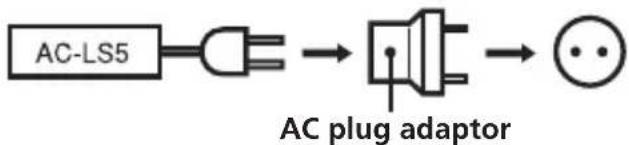
Do not use an electronic transformer (travel converter), as this may cause a malfunction.
Preparing the remote control
Notes on the remote control
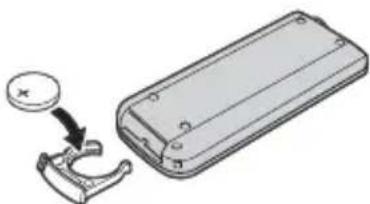
- The remote control is powered by a button type lithium battery (CR2025) installed at the factory. To avoid draining the battery, an insulation sheet is inserted. Before using the remote control for the first time, remove the insulation sheet.
- Point the remote sensor of the Cyber-shot Station away from strong light sources such as direct sunlight or overhead lighting. Otherwise, the remote control may not function properly.
- The remote control range is less than five meters (for indoor use). Point the remote control at the remote sensor of the Cyber-shot Station. Try adjusting the angle of the remote control if you cannot operate the Cyber-shot Station.
Removing the insulation sheet

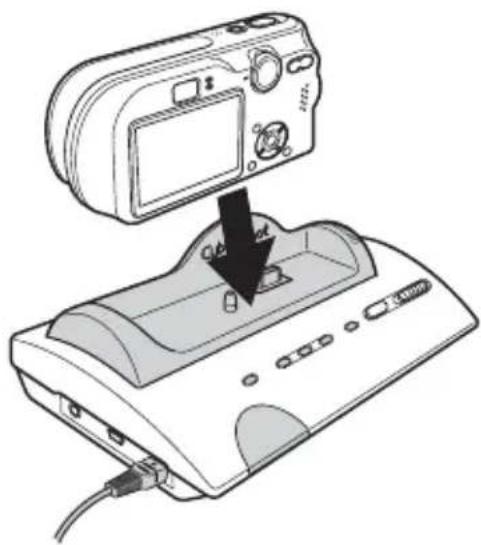
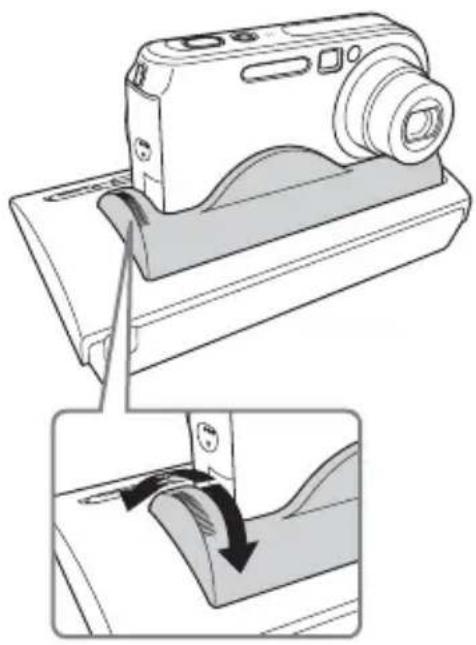
Placing the camera on the Cyber-shot Station
natural_image
Diagram showing a device with a camera and cable inserted into a device casing, no text or symbols present.- Insert the "Memory Stick" into your camera.
- Be sure to turn off the camera before placing it on the Cyber-shot Station or removing it from the Cyber-shot Station.
- Be sure the camera is securely attached to the Cyber-shot Station.
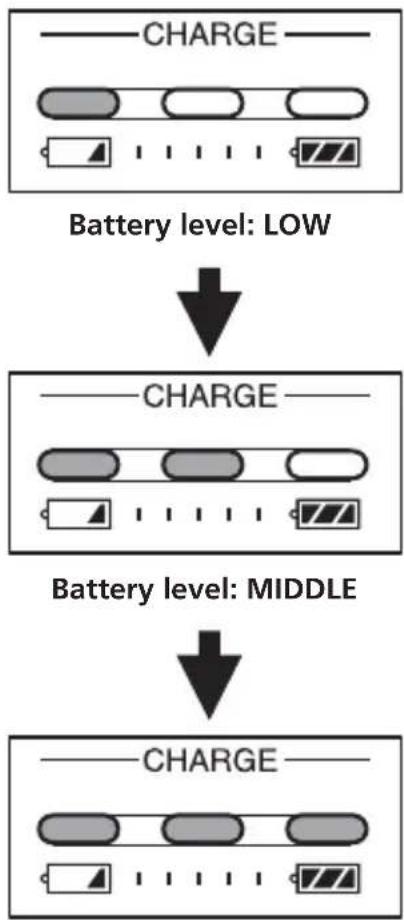
Charging the battery pack
Place the camera with the battery pack inserted on the Cyber-shot Station.
Charging starts automatically. Both the CHG lamp of the camera and the CHARGE lamps of the Cyber-shot Station light up.
flowchart
graph TD
    A["Battery level: LOW"] --> B["Battery level: MIDDLE"]
    B --> C["Battery level: HIGH"]
Battery level: HIGH
• The light starts coming on from the left.
- It might take a few seconds for showing an accurate battery level.
- The battery level will be displayed in three levels on the CHARGE lamps of the Cyber-shot Station while charging the battery pack. When charging is completed, the CHARGE lamps go off.
- When charging the battery pack, make sure the camera is turned off.
Viewing images on a TV screen
1 Connect the A/V connecting cable (supplied) to the A/V OUT (MONO) jack of the Cyber-shot Station and the audio/video input jacks of the TV.

If your TV provides stereo input jacks, connect the audio plug (black) of the A/V connecting cable to the left audio jack.
- Turn off both camera and TV before connecting the Cyber-shot Station and the TV by the A/V connecting cable.
2 Set the mode dial of the camera to .
3 Turn on the power with the remote control.
4 Turn on the TV and set the TV/Video switch to "Video".
5 Press ◀/▶ on the Control buttons of the remote control to select the desired image.
- You can also select the image by pressing ◀/▶ on the Control buttons of the camera.
- The Cyber-shot Station is compatible with both NTSC and PAL TV systems. For further details, see the operating instructions supplied with the camera.
Shooting images
By connecting the Cyber-shot Station to a TV, you can shoot an image while checking it on the big screen.
1 Set the mode dial of the camera to the position you desire and turn on the camera.
For further details, see the operating instructions supplied with the camera.
2 Adjust the camera angle using the rotating base of the Cyber-shot Station.
natural_image
Diagram showing a digital camera on a base with a close-up of the blade being inserted, no text or symbols present.Shooting an image with the remote control
3 Press the SHUTTER button of the remote control.
You cannot press the SHUTTER button halfway down.
Taking time-lapse photos by Interval Shot
3 Set shooting interval using the interval selector of the Cyber-shot Station.
You can choose the shooting interval from 5 minutes, 30 minutes or 60 minutes.
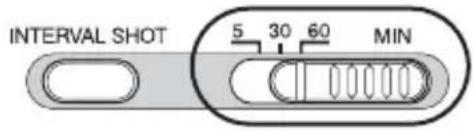
4 Press the INTERVAL SHOT button.
When you press the INTERVAL SHOT button, the camera will be turned off and interval shooting (time-lapse shooting) will start. Then the Interval Shot lamp will blink green.
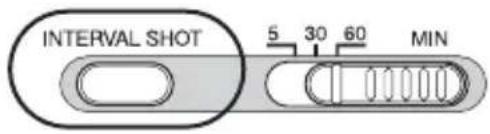
When the camera is turned on, the Interval Shot lamp now blinks red.
When the shooting is completed, the Interval Shot lamp remains red for five seconds. The camera is soon turned off to start blinking green again.
5 Finish interval shooting.
Interval shooting will finish automatically when the 12 times of shooting has completed, and then the Interval Shot lamp will go off.
You can also quit interval shooting in the following ways.
- Press the INTERVAL SHOT button again.
- Change the interval time.
- Remove the camera from the Cyber-shot Station.
- When you set the camera for interval shooting, the shooting will be repeated 12 times in spite of the conditions of the camera. Make sure that the camera is ready for the shooting before you start interval shooting. For further details, see the operating instructions supplied with the camera.
- During interval shooting, the camera is turned off each time an image is shot. For this reason, zoom and self-timer will return to the default settings.
- You cannot use the remote control, while the interval shooting is in process.
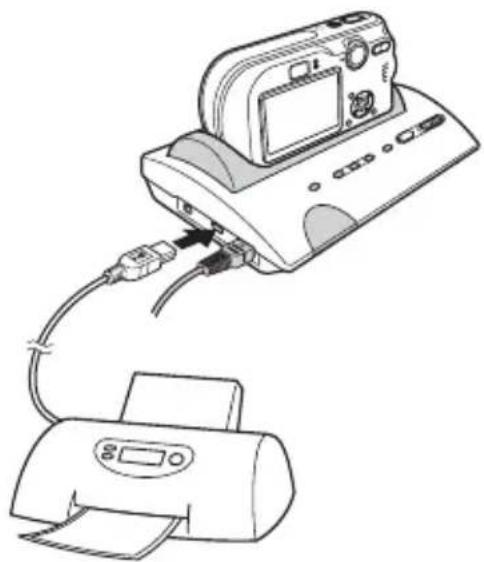
Printing still images
Even if you do not have a computer, you can easily print still images by connecting your camera directly or via Cyber-shot Station to a PictBridge compliant printer.

PictBridge
- Refer to the operating instructions supplied with the camera for details on the printer settings, such as number of printing images, paper size and USB setting.
- The available printing functions may differ depending on the printer.
1 Turn on the camera.
2 Set the USB mode on the camera to [PictBridge].
3 Connect the Cyber-shot Station to your printer by the USB cable supplied with Cyber-shot Station.
natural_image
Line drawing of a printer connected to a digital camera via cable (no text or symbols)After the connection is made, the indicator appears on the LCD screen.
When the Cyber-shot Station is communicating with your printer using the USB cable, do not remove the camera from the Cyber-shot Station. Removing the camera may damage the images. For further details, see the operating instructions supplied with the camera.
4 Display a still image you want to print using ◀/▶.
5 Press PRINT button.
The print setting screen appears.
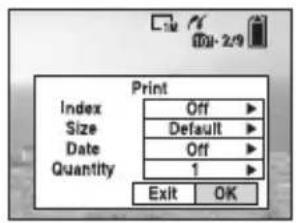
- Setting items that the printer does not support cannot be displayed.
6 Select [OK] with ▼/▶, then press ■. The still image is printed.

- When printing is completed, the screen returns to the previous screen.
- Do not disconnect the USB cable while the (Not disconnect USB cable) indicator is displayed on the LCD screen.
To cancel printing
Select [Exit] in step 5 or 6.
Connecting the camera to your computer via the Cyber-shot Station
1 Connect the Cyber-shot Station to your computer by the USB cable supplied with the Cyber-shot Station.
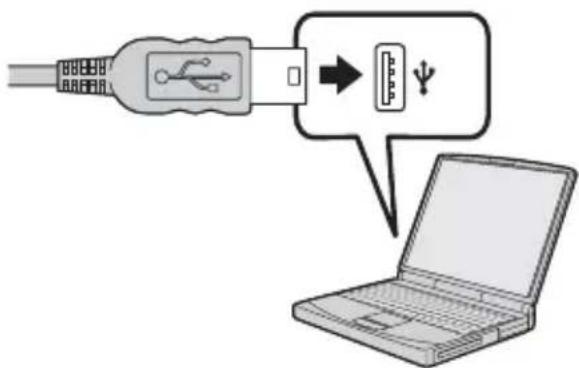
2 Turn on the camera.
The USB connection between the camera and your computer will be established. Then you can transfer images to your computer. For further details, see the operating instructions supplied with the camera.
When the Cyber-shot Station is communicating with your computer using the USB cable, do not remove the camera from the Cyber-shot Station. Removing the camera may damage the images.
Care and maintenance
Clean the Cyber-shot Station with a soft cloth slightly moistened with water, and wipe the surface with a dry cloth. Do not use any type of solvent such as thinner, alcohol or benzine as this may damage the surface.
WARNING
Battery may explode if mistreated. Do not recharge, disassemble or dispose of in fire.
CAUTION
Danger of explosion if battery is incorrectly replaced.
Replace only with the same or equivalent type recommended by the manufacturer.
Discard used batteries according to the manufacturer's instructions.
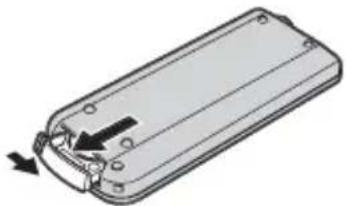
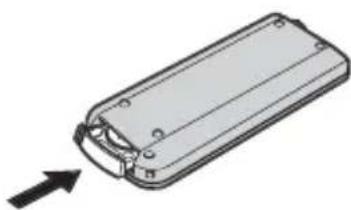
Replacing the button type lithium battery
* Do not use any batteries other than CR2025.
1 Pull out the battery holder while pushing the tab on the holder.
natural_image
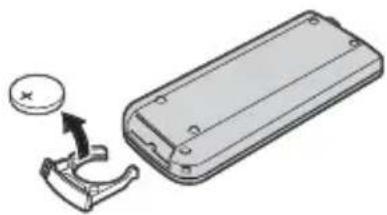
Diagram of a battery pack with an arrow indicating internal components (no text or symbols)2 Take out the button type lithium battery from the holder.
natural_image
Diagram of a mechanical component with a circular button and an arrow indicating assembly (no text or symbols present)3 Put a new battery into the holder with its + side facing upward.
natural_image
Diagram showing a device being inserted into a mobile phone case, with a magnifying glass highlighting the component (no text or symbols present)4 Insert the holder into the remote control until it clicks.
natural_image
Diagram of a rectangular electronic component with a curved internal structure and an arrow indicating direction (no text or symbols)Troubleshooting
If you have trouble with your camera, try the following solutions.
If the trouble persists, contact your Sony dealer.
| Symptom | Cause/Solution |
| Unable to charge the battery pack | The camera is turned on.Turn the camera off.The AC adaptor is disconnected.Properly connect the AC adaptor.The camera is not placed on the Cyber-shot Station correctly.Place the camera correctly.The battery pack is not installed correctly.Install the battery pack correctly.The battery pack is completely charged. |
| Unable to turn on the camera, or it suddenly gets turned off | The camera is not placed on the Cyber-shot Station correctly.Place the camera correctly.The AC adaptor is disconnected.Properly connect the AC adaptor. |
| The images/sounds cannot be played back on a TV | The connection is not correct.Check the connection. |
| Your computer does not recognize your camera | The camera is turned off.Turn on the camera.You are not using the supplied USB cable.Use the supplied USB cable.The USB cable is not connected firmly.Disconnect the USB cable from both the computer and the Cyber-shot Station, and connect it again firmly. Make sure that “USB Mode” is displayed on the LCD screen.The camera is not placed on the Cyber-shot Station correctly.Place the camera correctly.The USB jacks on your computer are connected to other equipment besides the keyboard, the mouse, and the Cyber-shot Station.Disconnect all equipment other than the keyboard, the mouse, and the Cyber-shot Station from the USB jacks. |
| The remote control does not work | The AC adaptor is disconnected.Connect the AC adaptor properly.The battery in the remote control is dead.Replace it with a new one.The interval shooting has been turned on.Quit the interval shooting. |
| The connection between the printer and the Cyber-shot Station cannot be established | The printer may not be PictBridge-compliant.→ Ask the printer manufacturer whether your printer is PictBridge-compliant.The printer is not set for the connection with the camera.→ Be sure that the printer is on to connect with the camera. |
| Unable to print images | The Cyber-shot Station is not connected to the printer properly.→ Check that the Cyber-shot Station and the printer are properly connected using the USB cable.The camera is not placed on the Cyber-shot Station correctly.→ Place the camera correctly.The printer is not turned on.→ Turn on the printer.For further infomation, refer to the operating instructions supplied with the printer.Movies cannot be printed.Still images modified with a computer or still images taken using other than the camera compatible with this Cyber-shot Station may not be able to be printed. |
| Printing is canceled | You disconnected the USB cable before the mark disappeared.You removed the camera from the Cyber-shot Station before the mark disappeared. |
| The CHARGE lamps light up when no camera is placed on the Cyber-shot Station | When the camera was not placed on the Cyber-shot Station, you have pressed the Control buttons (in the order of ▲/◄/▼/►), then pressed the POWER button and now the Cyber-shot Station is in the demonstration mode.→ To cancel the demonstration mode, disconnect the AC adaptor once and connect it again.Alternatively, place the camera on the Cyber-shot Station. |
| Unable to shoot an image when pressing the SHUTTER button | The AC adaptor is disconnected.→ Connect the AC adaptor properly.The camera is turned off.→ Turn on the camera.The camera is not set to the Shooting mode.→ Set the Shooting mode.For further infomation, refer to the operating instructions supplied with the camera. |
| Unable to start the interval shooting | The AC adaptor is disconnected.→ Connect the AC adaptor properly.The interval selector is not set correctly.→ Set the interval selector correctly. |
| Interval shooting is continuously working even when “Memory Stick” is full | Interval shooting automatically work up to 12 times. When the “Memory Stick” is full, still images will not be recorded. |
Specifications
Cyber-shot Station
Input/Output connectors
A/V OUT (MONO) jack (Monaural)
Minijack
Video*: 1 Vp-p, 75 Ω, unbalanced, sync negative
Audio*: 327 mV (47 kΩ loaded) Output impedance: 2.2 kΩ
* When the DSC-P200 is connected.
USB jack: mini-B
DC IN jack
Multi connector
General
Dimensions (Approx.):
146×50×82 mm
(5 3/4 × 2 × 3 1/4 inches)
(w/h/d)
Mass (Approx.): 150 g (5.3 oz)
Operating temperature:
0^ to +40^ (32°F to +104^ )
Storage temperature:
-20^ to +60^ (-4^ to +140^)
AC-LS5 AC adaptor
Input rating:
100 V to 240 V AC, 50/60 Hz
Output rating:
4.2 V DC*
* See the label on the AC adaptor for other specifications.
Dimensions (Approx.):
48× 29× 81mm
(1 15/16×1 3/16×3 1/4 inches)
(w/h/d, excluding projecting parts)
Mass (Approx.):
130 g (5 oz) excluding AC Power cord
(mains lead)
Operating temperature:
0^ to +40^ (32°F to +104^ )
Storage temperature:
-20^ to +60^ (-4^ to +140^)
Included items
• Cyber-shot Station (CSS-PHB) (1)
- Wireless Remote Commander (RMT-CSS2) (A button type lithium battery installed) (1)
• A/V connecting cable (1)
- USB cable (1)
• AC adaptor (AC-LS5) (1)
• AC Power cord (mains lead) (1)
- Set of printed documentation
Design and specifications are subject to change without notice.
Français
natural_image
Illustration of a printer, a monitor, and a remote control with wireless signal lines (no text or symbols)Marques commerciales
natural_image
Diagram showing a device with a no-smoking symbol and connected to a cable, no text or labels present.natural_image
Diagram showing a digital camera mounted on a device with a black arrow indicating the cable or switch (no text or symbols present)natural_image
Diagram showing a digital camera being inserted into a base plate, with a close-up of the insertion process (no text or symbols present)natural_image
Line drawing of a printer and a digital camera connected via cable (no text or symbols)natural_image
Diagram of a rectangular electronic device with internal components and an arrow indicating rotation (no text or symbols)natural_image
Diagram of a mechanical component with a curved bracket and a circular button, no text or symbols presentnatural_image
Diagram showing a device being inserted into a housing with a coin for scale (no text or symbols present)natural_image
Technical line drawing of a rectangular electronic component with a curved handle and mounting holes, shown with an arrow indicating direction (no text or symbols present)Dépannage
Printed on 100% recycled paper using VOC (Volatile Organic Compound)-free vegetable oil based ink.