CSSPHA - Other camera accessories SONY - Free user manual and instructions
Find the device manual for free CSSPHA SONY in PDF.
User questions about CSSPHA SONY
0 question about this device. Answer the ones you know or ask your own.
Ask a new question about this device
Download the instructions for your Other camera accessories in PDF format for free! Find your manual CSSPHA - SONY and take your electronic device back in hand. On this page are published all the documents necessary for the use of your device. CSSPHA by SONY.
USER MANUAL CSSPHA SONY
Operating Instructions GB
Mode d'emploi____FR
CSS-PHA CSS-FEB

©2004 Sony Corporation
English
Before operating the unit, please read this manual thoroughly and retain it for future reference.
WARNING
To prevent fire or shock hazard, do not expose the unit to rain or moisture.
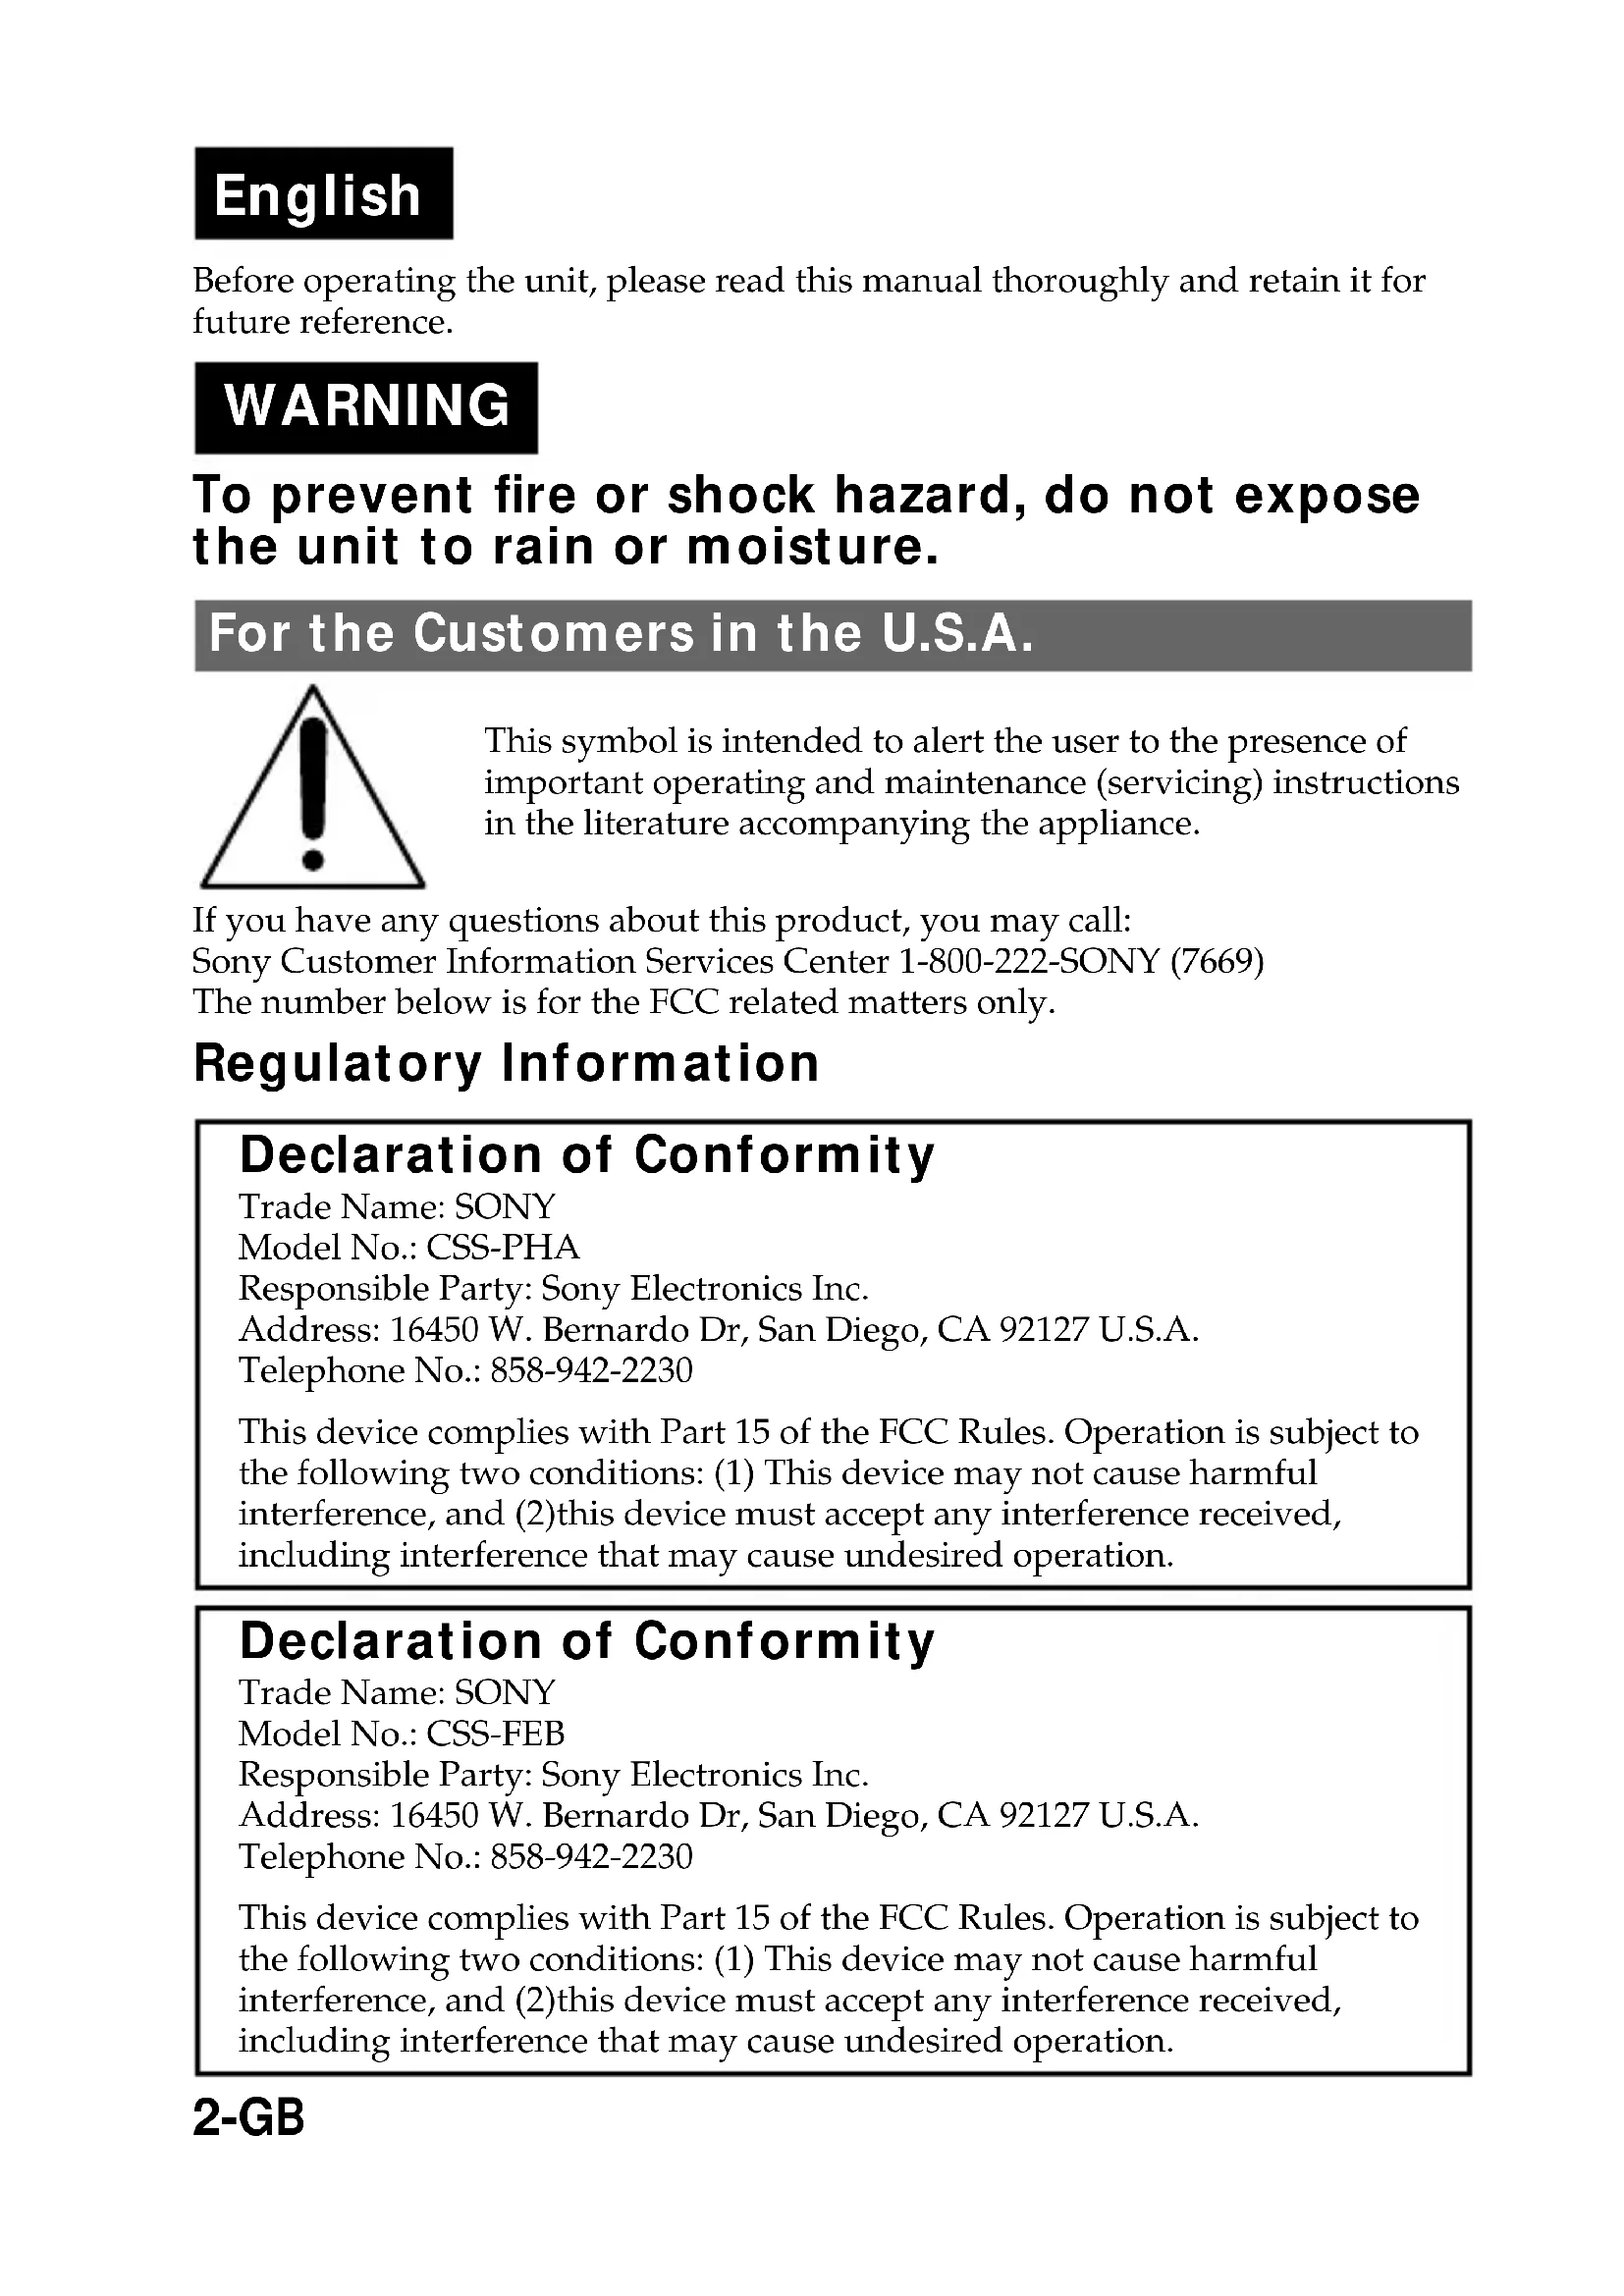
For the Customers in the U.S.A.

This symbol is intended to alert the user to the presence of important operating and maintenance (servicing) instructions in the literature accompanying the appliance.
If you have any questions about this product, you may call: Sony Customer Information Services Center 1-800-222-SONY (7669) The number below is for the FCC related matters only.
Regulatory Information
Declaration of Conformity
Trade Name: SONY
Model No.: CSS-PHA
Responsible Party: Sony Electronics Inc.
Address: 16450 W. Bernardo Dr, San Diego, CA 92127 U.S.A.
Telephone No.: 858-942-2230
This device complies with Part 15 of the FCC Rules. Operation is subject to the following two conditions: (1) This device may not cause harmful interference, and (2) this device must accept any interference received, including interference that may cause undesired operation.
Declaration of Conformity
Trade Name: SONY
Model No.: CSS-FEB
Responsible Party: Sony Electronics Inc.
Address: 16450 W. Bernardo Dr, San Diego, CA 92127 U.S.A.
Telephone No.: 858-942-2230
This device complies with Part 15 of the FCC Rules. Operation is subject to the following two conditions: (1) This device may not cause harmful interference, and (2) this device must accept any interference received, including interference that may cause undesired operation.
CAUTION
You are cautioned that any changes or modifications not expressly approved in this manual could void your authority to operate this equipment.
Note:
This equipment has been tested and found to comply with the limits for a Class B digital device, pursuant to Part 15 of the FCC Rules. These limits are designed to provide reasonable protection against harmful interference in a residential installation. This equipment generates, uses, and can radiate radio frequency energy and, if not installed and used in accordance with the instructions, may cause harmful interference to radio communications. However, there is no guarantee that interference will not occur in a particular installation. If this equipment does cause harmful interference to radio or television reception, which can be determined by turning the equipment off and on, the user is encouraged to try to correct the interference by one or more of the following measures:
—Reorient or relocate the receiving antenna.
—Increase the separation between the equipment and receiver.
—Connect the equipment into an outlet on a circuit different from that to which the receiver is connected.
—Consult the dealer or an experienced radio/TV technician for help.
The supplied interface cable must be used with the equipment in order to comply with the limits for a digital device pursuant to Subpart B of Part 15 of FCC Rules.
Attention for the Customers in Europe
This product has been tested and found compliant with the limits sets out in the EMC Directive for using connection cables shorter than 3 meters (9.8 feet).
Attention
The electromagnetic field at the specific frequencies may influence the picture and sound of this camera.
Notice
If static electricity or electromagnetism causes data transfer to discontinue midway (fail), restart the application or disconnect and connect the USB cable again.
Notice
Certain countries and regions may regulate disposal of the battery used to power this product. Please consult with your local authority.
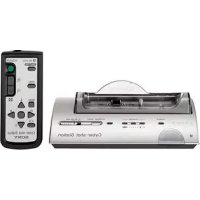
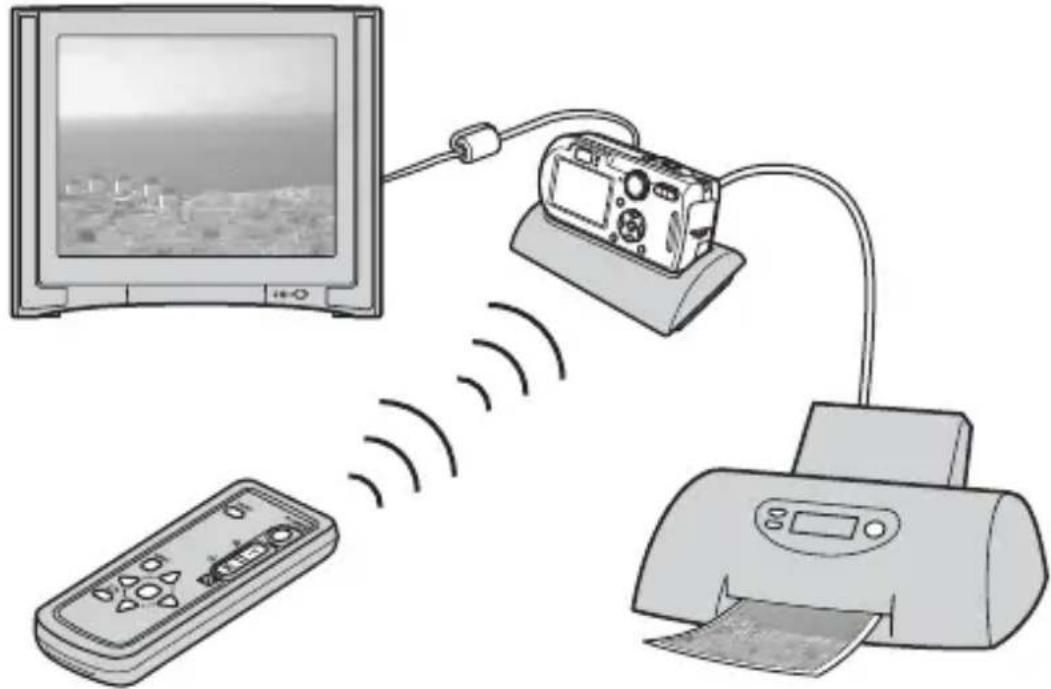
Features
Easily view and print your photos via Cyber-shot Station.
This convenient Cyber-shot Station is supplied with wireless remote cotrol for effort-less viewing on a TV.
Also attaches to PictBridge enabled printers and USB enabled computers.
In-camera charging while stationed.
The CSS-PHA can be used with the DSC-P100 digital still camera.
The CSS-FEB can be used with the DSC-F88 digital still camera.
* The illustrations of the CSS-PHA are mainly used in this operating instructions. However, these illustrations are applied to the CSS-FEB.
natural_image
Illustration of a remote control system with monitor, printer, and receiver connected via wireless signals (no text or symbols)An AC adaptor is not supplied. Use either the AC adaptor (AC-LS5/LS5B) comes with the Cyber-shot (DSC-P100/DSC-F88), or an optional AC adaptor (AC-LS5).
●You can easily view photos on a TV screen by remote control (p.15).
●The buttons on the Remote Commander have the same functions as those on your camera (p.13).
Using the remote control, you can operate the followings;
- Viewing images
-Slide Show - Trimming images
- Playback zoom
For further details, see the operating instructions supplied with the camera.
- When the CSS-PHA or CSS-FEB is connected to a PictBridge enabled printer, you can easily print images just by pressing PRINT button on the Remote Commander (p.19). The photo currently shown on the TV can be printed by remote control.
Note: If you want to print one of the images in a Slide Show, cancel the Slide Show first, then press PRINT button.
* You must connect an AC adaptor to the Cyber-shot Station for remote control operations.
Index
Precautions 6
Notes on using the Cyber-shot Station....6
Care and maintenance 6
Identifying the parts....7
Before using the Cyber-shot Station 8
Placing the camera on the Cyber-shot Station / Removing the camera from the Cyber-shot Station .... 8
Charging the battery pack 10
Connecting the camera to your computer via the Cyber-shot Station..... 11
Using the Remote Commander 13
Viewing images on a TV screen 15
Connecting to a PictBridge compliant printer.... 16
Printing images using the Remote Commander ....19
Troubleshooting 22
Specifications....25
Trademarks 25
Precautions
- Do not use or keep the Cyber-shot Station in locations subject to the following conditions:
- Locations with extremes of temperature In closed automobiles during summer, the ambient temperature may be very hot, causing deformation or malfunction of the Cyber-shot Station.
- Locations in direct sunlight or near heaters This may cause deformation or malfunction of the Cyber-shot Station.
- Locations subject to vibration
- Locations subject to strong magnetism
- Locations subject to dust or sand If you use the Cyber-shot Station, for example, on a beach or in a desert, make sure that you keep the Cyber-shot Station away from sand. The Cyber-shot Station that is covered with sand may malfunction.
- Do not use the Cyber-shot Station in locations that are subject to strong radio waves or radiation. Images may not be played back properly.
Notes on using the Cyber-shot Station
- Do not connect the supplied USB cable to the multi connector on the bottom of the camera. This may cause a malfunction of the multi connector.
- Be sure to connect the USB cable to the (USB) jack on the back of the Cyber-shot Station.
- Use caution when removing the AC adaptor.
- When you disconnect the cable, do not grasp the cable itself.
- Do not bend the cable or add stress to it.
Charging the battery
For the full performance of the battery pack, we recommend that you charge it at temperatures between 10 °C and 30 °C ( 50 °F and 86 °F ).
Care and maintenance
Clean the Cyber-shot Station with a soft cloth slightly moistened with water, then wipe the surface with a dry cloth. Do not use any type of solvent such as thinner, alcohol or benzine as this may damage the surface.
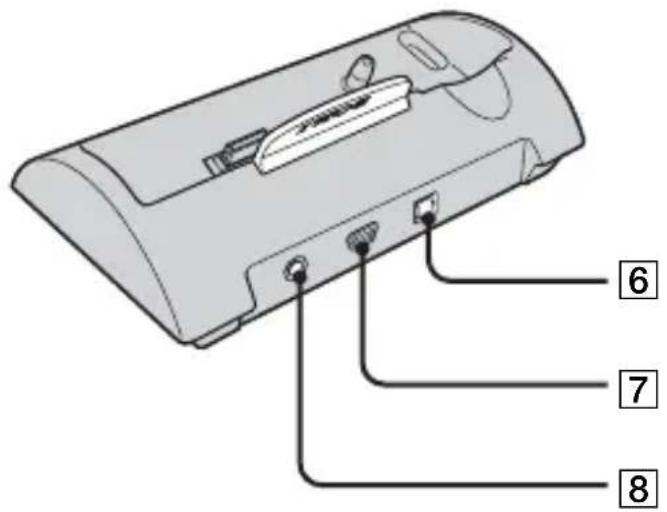
Identifying the parts
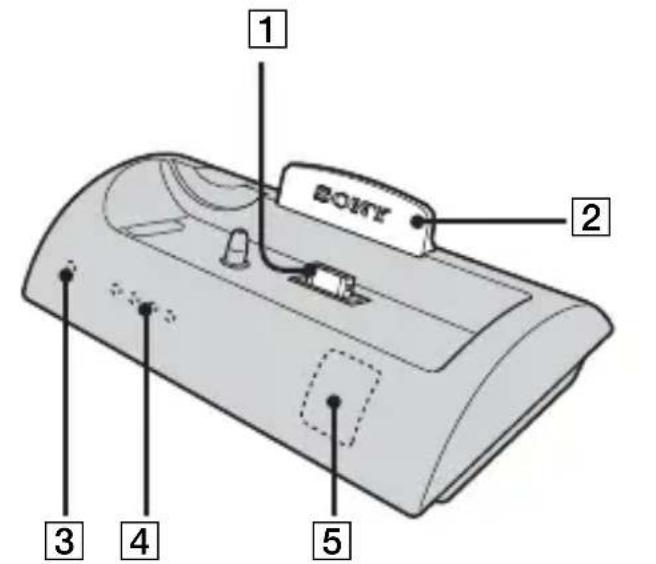
See "Using the Remote Commander" (p.13) to identify parts of your Remote Commander.
1 Multi connector
② Blue illumination
Lights up in blue when the AC adaptor is connected.
Goes off when the camera is placed on the Cyber-shot Station.
3 POWER lamp
Lights up in green when the AC adaptor is connected.
4 CHARGE lamps
Light up while the battery is charging.
5 Remote sensor
6 DC IN jack
7 ♂ (USB) jack
8A/V OUT (MONO) jack
Before using the Cyber-shot Station
Refer to the operating instruction for your camera as well as this manual.
Placing the camera on the Cyber-shot Station / Removing the camera from the Cyber-shot Station
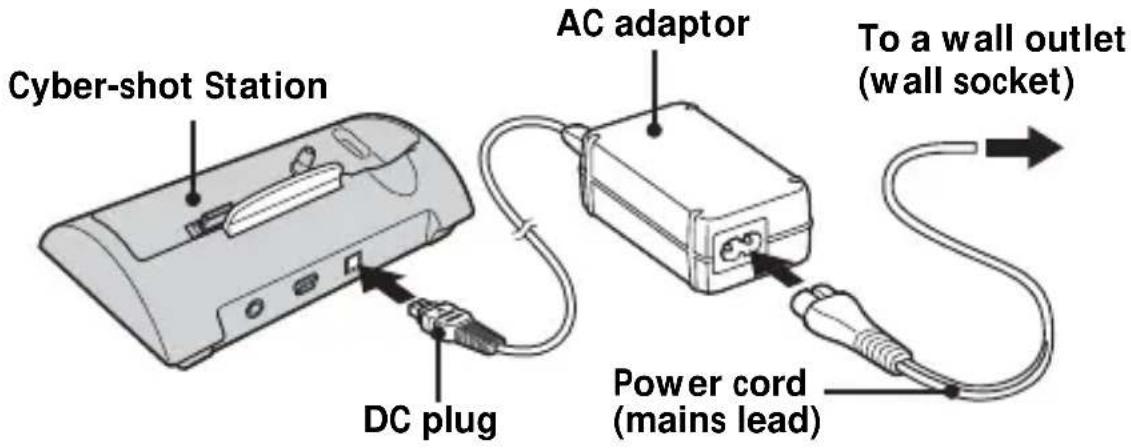
1 Connect the AC adaptor to the DC IN jack of the Cyber-shot Station.
You must use either the AC adaptor (AC-LS5/LS5B) comes with the Cyber-shot, or an optional AC adaptor (AC-LS5).
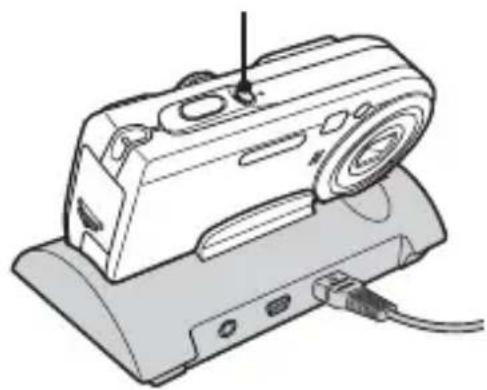
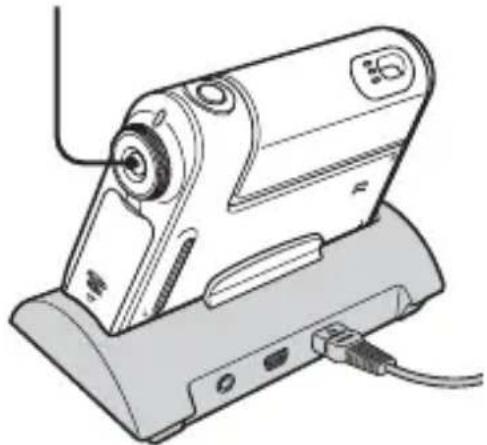
2 Place the camera on the Cyber-shot Station as illustrated.

natural_image
Two technical illustrations of a digital camera with control buttons and display screen (no text or symbols)- Make sure the camera is securely attached to the Cyber-shot Station.
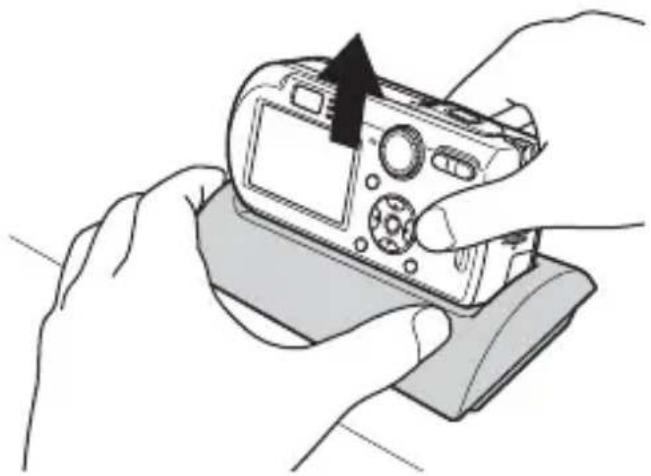
3 Remove the camera from the Cyber-shot Station.
Holding both the camera and the Cyber-shot Station, then remove the camera as illustrated.
natural_image
Illustration of hands holding a digital camera with an arrow pointing to the top panel (no text or symbols present)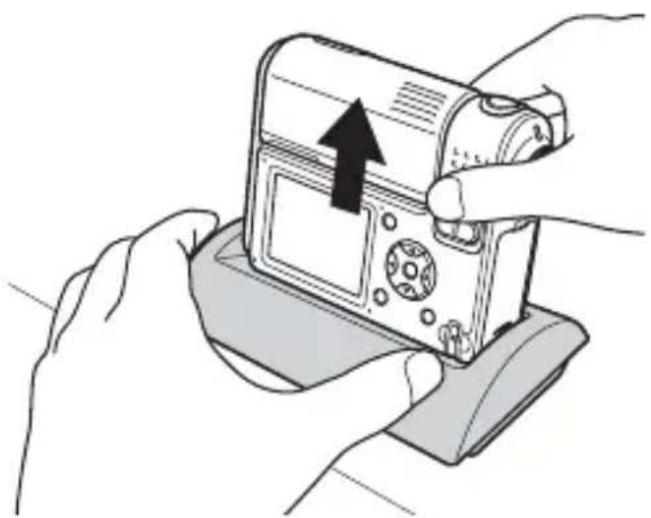
natural_image
Illustration of hands holding a digital camera with an upward arrow indicating the device's direction (no text or symbols present)- Be sure to turn off the camera before placing it on the Cyber-shot Station or removing it from the Cyber-shot Station.
– During the USB connection, do not remove the camera from the Cyber-shot Station. The image data in the camera may be damaged.
Charging the battery pack
1 Open the battery/“Memory Stick” cover of the camera.
2 Install the battery pack into the camera, then close the battery/ "Memory Stick" cover.
3 Connect the AC adaptor to the DC IN jack of the Cyber-shot Station. Connect the power cord (mains lead) to the AC adaptor and to a wall outlet (wall socket).
- You must use either the AC adaptor (AC-LS5/LS5B) comes with the Cyber-shot, or an optional AC adaptor (AC-LS5).
- Do not short the DC plug of the AC adaptor with a metallic object, as this may cause a malfunction.
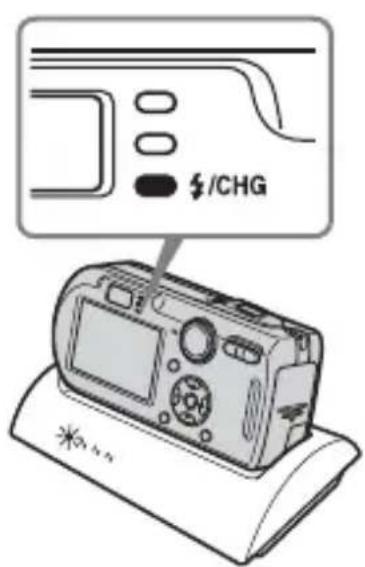
4 Place the camera on the Cyber-shot Station.
Charging starts automatically. Both the ♣/CHG lamp of the camera and the CHARGE lamps of the Cyber-shot Station light up.
natural_image
Line drawing of a digital camera with control panel and display (no text or symbols)While charging, the CHARGE lamps of the Cyber-shot Station light up one by one, from the left to the right. When charging is completed, the 12 /CHG lamp of the camera and the CHARGE lamps of the Cyber-shot Station go off.
Note: The CHARGE lamps do not indicate the charging level of the battery.
- When charging the battery pack, make sure the camera is turned off.
- Make sure the camera is securely attached to the Cyber-shot Station.
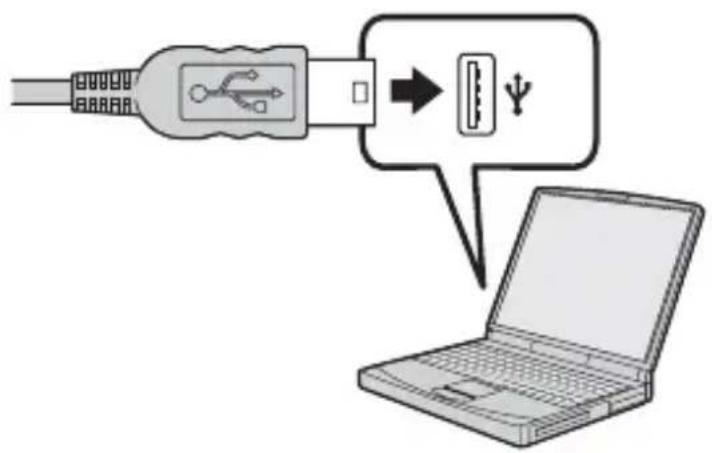
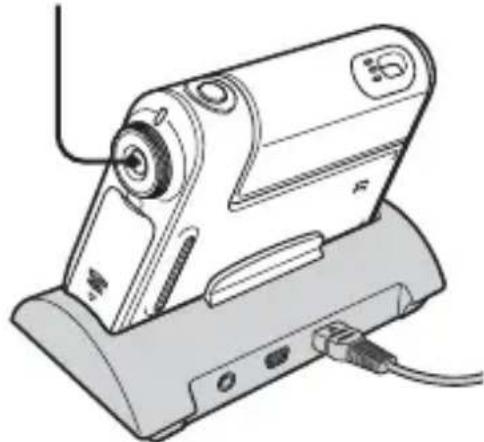
Connecting the camera to your computer via the Cyber-shot Station
1 Turn on your computer.
2 Insert the "Memory Stick" with the images you want to copy into the camera. Connect the AC adaptor, then plug the adaptor into a wall outlet (wall socket).
- You must use either the AC adaptor (AC-LS5/LS5B) comes with the Cyber-shot, or an optional AC adaptor (AC-LS5).
- For further details on the "Memory Stick", see the operating instructions supplied with the camera.
3 Connect the USB cable (supplied) to the USB jack of the Cyber-shot Station.
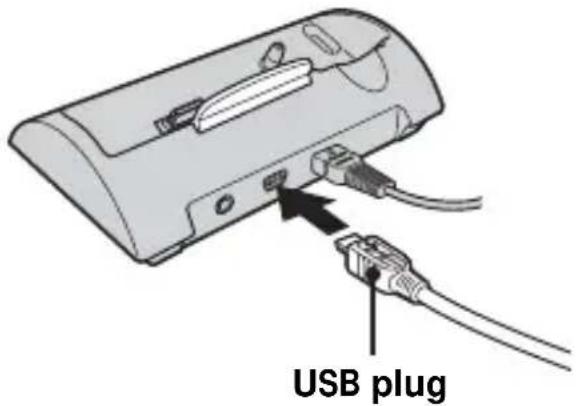
4 Connect the USB cable to your computer.
5 Place the camera on the Cyber-shot Station and turn on the camera.
* You can turn the camera on either by pressing POWER button or rotating the lens portion for DSC-F88. For further details, see the operating instructions supplied with the camera.
- Make sure the camera is securely attached to the Cyber-shot Station.
6 "USB Mode Normal" appears on the LCD screen of the camera.
When a USB connection is established for the first time, your computer automatically runs the used program to recognize the camera. Wait for a while.
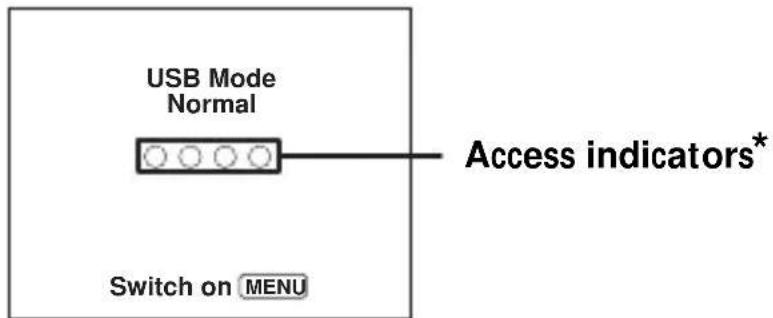
- If "USB Mode Normal" does not appear, press MENU button, select [USB Connect], and set it to [Normal].
* During communication, the access indicators turn red. Do not operate the computer until the indicators turn white.
- During the USB connection, do not remove the camera, the USB cable or the AC adaptor from the Cyber-shot Station. The image data in the camera may be damaged.
- For further details, see the operating instructions supplied with the camera.
12-GB
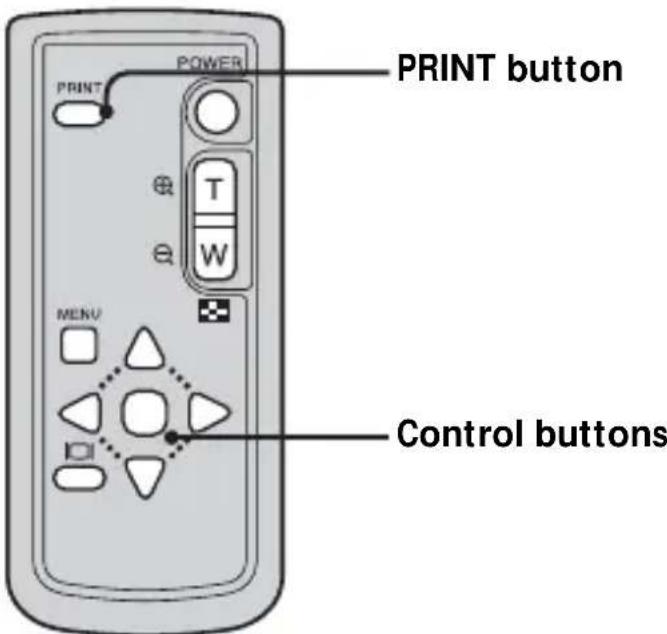
Using the Remote Commander
■ Identifying the parts
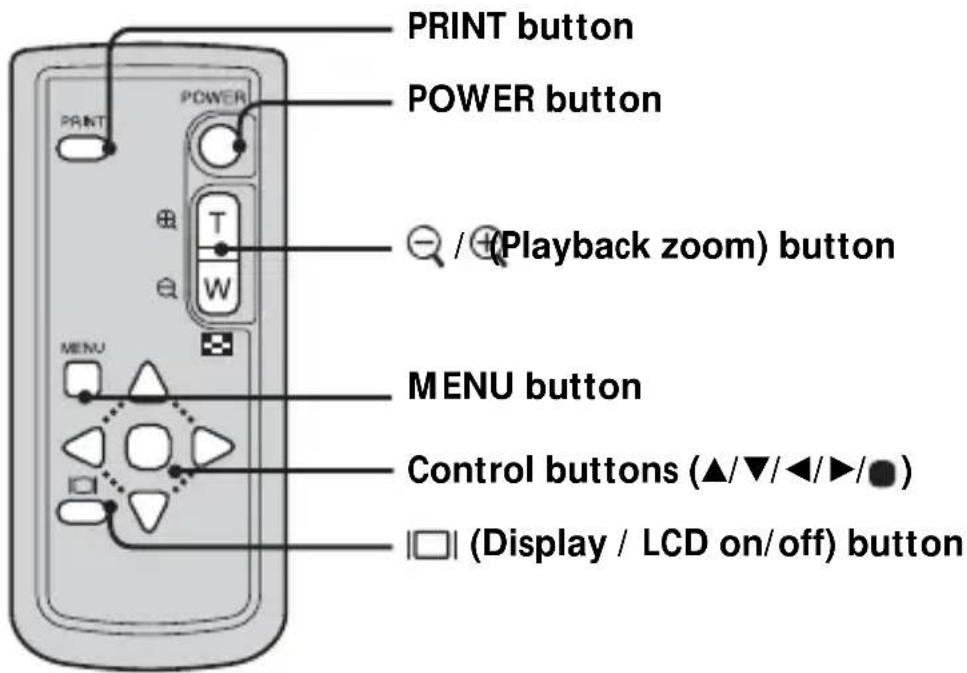
The buttons on the Remote Commander have the same functions as those on your camera.
WARNING
Battery may explode if mistreated. Do not recharge, disassemble or dispose of in fire.
CAUTION
Danger of explosion if battery is incorrectly replaced.
Replace only with the same or equivalent type recommended by the manufacturer.
Discard used batteries according to the manufacturer's instructions.
Notes on the Remote Commander
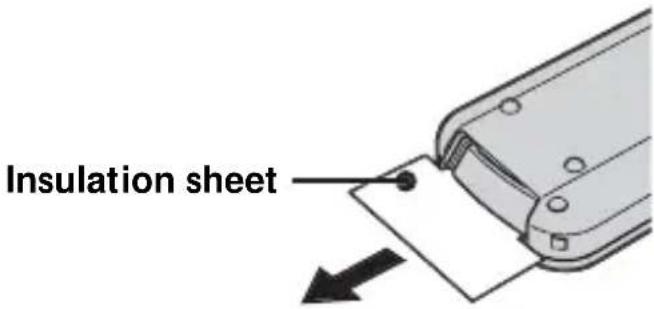
- The Remote Commander is powered by a button type lithium battery (CR2025) installed at the factory. To avoid draining the battery, an insulating sheet is inserted. Before using the Remote Commander for the first time, remove the insulation sheet.
- Point the remote sensor away from strong light sources such as direct sunlight or overhead lighting. Otherwise, the Remote Commander may not function properly.
- The remote control range is less than five meters (when using indoor). Point the Remote Commander at the remote sensor of the Cyber-shot Station. Try adjusting the angle of the Remote Commander if you cannot operate the Cyber-shot Station.
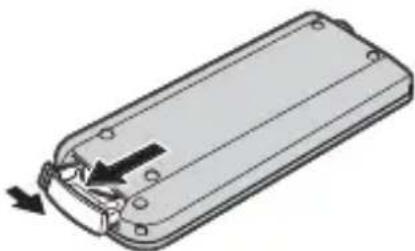
■ Removing the insulation sheet
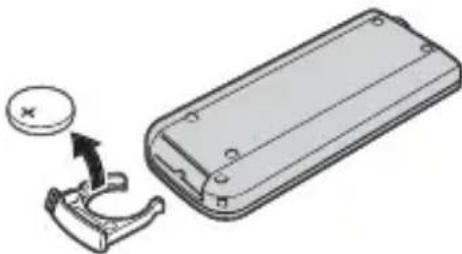
■ Replacing the button type lithium battery
* A button type lithium battery (CR2025) is already installed in the Remote Commander. Do not use any batteries other than CR2025.
1 Pull out the battery holder while pushing the tab on the holder.
natural_image
3D diagram of a rectangular electronic device with internal components and an arrow indicating rotation (no text or symbols)2 Take out the button type lithium battery from the holder.
natural_image
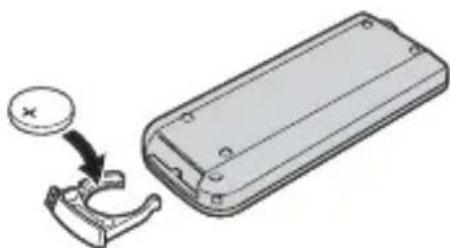
Diagram showing a mechanical component being inserted into a rectangular housing, with a circular component and an arrow indicating direction (no text or symbols present)3 Put a new battery into the holder with its + side facing upward.
natural_image
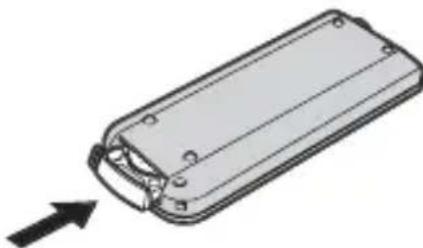
Diagram showing a mechanical clamp or bracket being inserted into a rectangular housing, with a coin icon pointing to the component (no text or symbols present)4 Insert the holder into the Remote Commander until it clicks.
natural_image
Diagram of a rectangular electronic component with a curved internal structure and an arrow indicating direction (no text or symbols)14-GB
Viewing images on a TV screen
1 Connect the AC adaptor, then plug the adaptor into a wall outlet (wall socket).
Connect the A/V connecting cable (supplied) to the A/V OUT (MONO) jack of the Cyber-shot Station and the audio/video input jacks of the TV.
You must use either the AC adaptor (AC-LS5/LS5B) comes with the Cyber-shot, or an optional AC adaptor (AC-LS5).
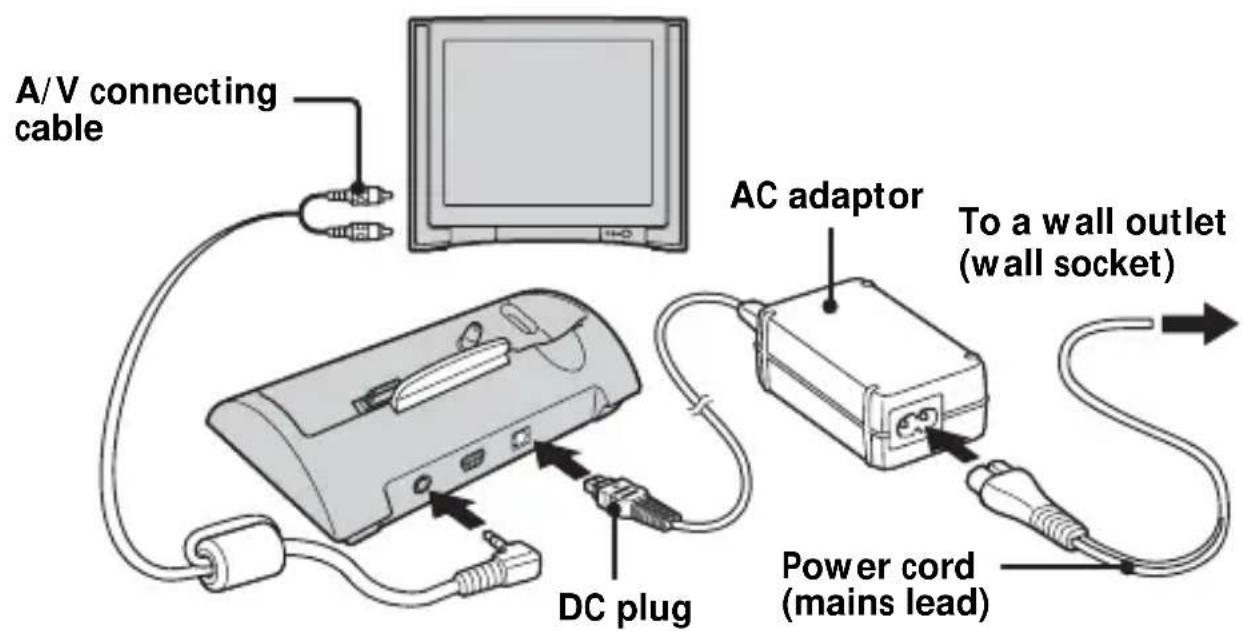
If your TV has stereo input jacks, connect the audio plug (black) of the A/V connecting cable to the left audio jack.
- Turn off both the camera and the TV before connecting the camera and the TV with the A/V connecting cable.
2 Place the camera on the Cyber-shot Station.
- Make sure the camera is securely attached to the Cyber-shot Station.
3 Turn on the TV and set the TV/Video switch to "Video".
4 Set the mode dial of the camera to , and turn on the power.
Press ◀/▶ on the Control buttons to select the desired image. You can also operate the camera using the Remote Commander.
- The Cyber-shot Station is compatible with both NTSC and PAL TV systems. For further details, see the operating instructions supplied with the camera.
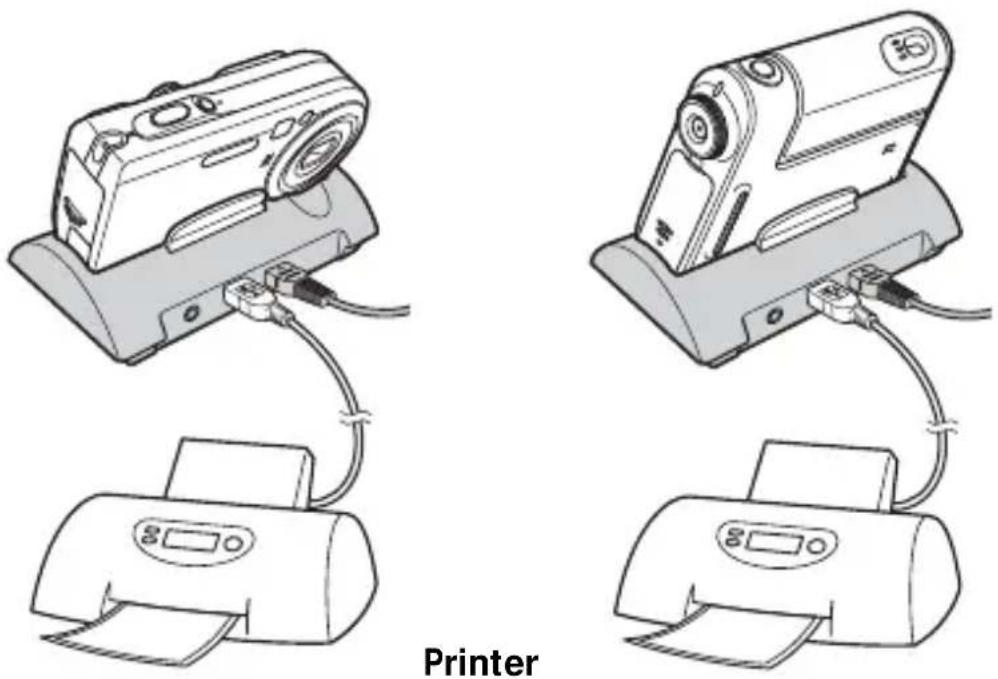
Connecting to a PictBridge compliant printer
Even if you do not have a computer, you can easily print images shot using your camera by connecting the camera directly or via Cyber-shot Station to a PictBridge compliant printer.

PictBridge
- The available print functions may differ depending on the printer.
- Using the AC adaptor is recommended to prevent the power from turning off partway through printing.
1 Insert the "Memory Stick" with the images you want to copy into the camera.
- You must use either the AC adaptor (AC-LS5/LS5B) comes with the Cyber-shot, or an optional AC adaptor (AC-LS5).
2 Place the camera on the Cyber-shot Station.
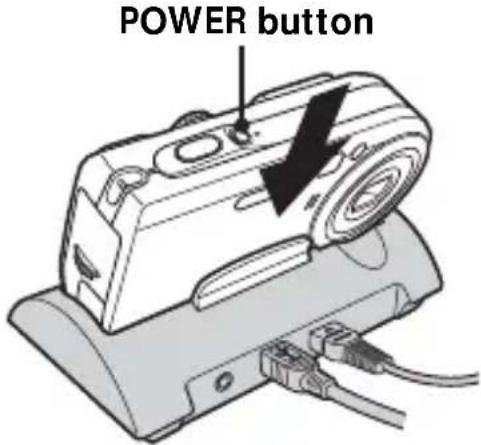
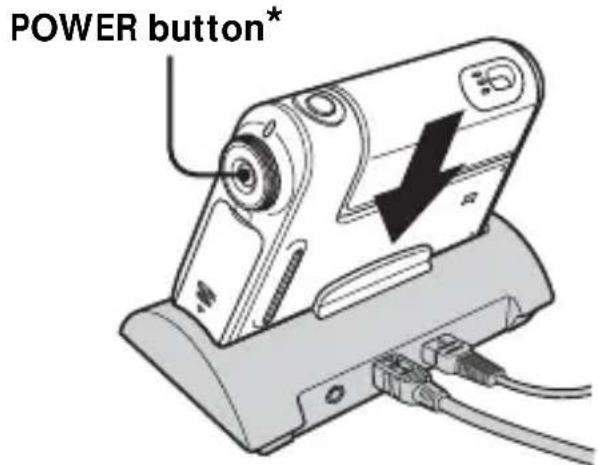
3 Turn on the camera.
POWER button
natural_image
Line drawing of a sewing machine with a base and cable (no text or symbols)POWER button*
natural_image
Line drawing of a handheld electronic device with a cable and power cord (no text or symbols)* You can turn the camera on either by pressing POWER button or rotating the lens portion for DSC-F88. For further details, see the operating instructions supplied with the camera.
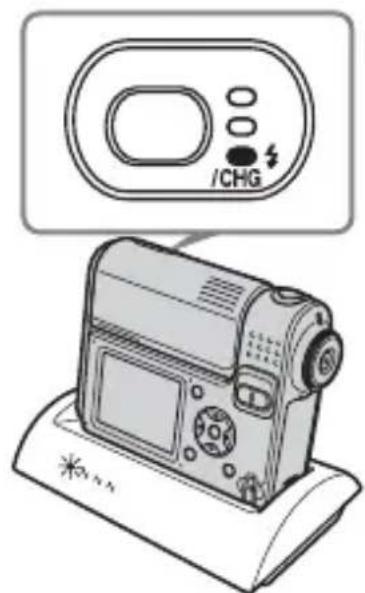
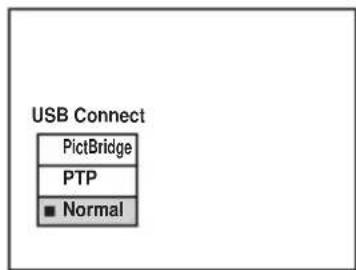
4 Set the USB mode on the camera to PictBridge.
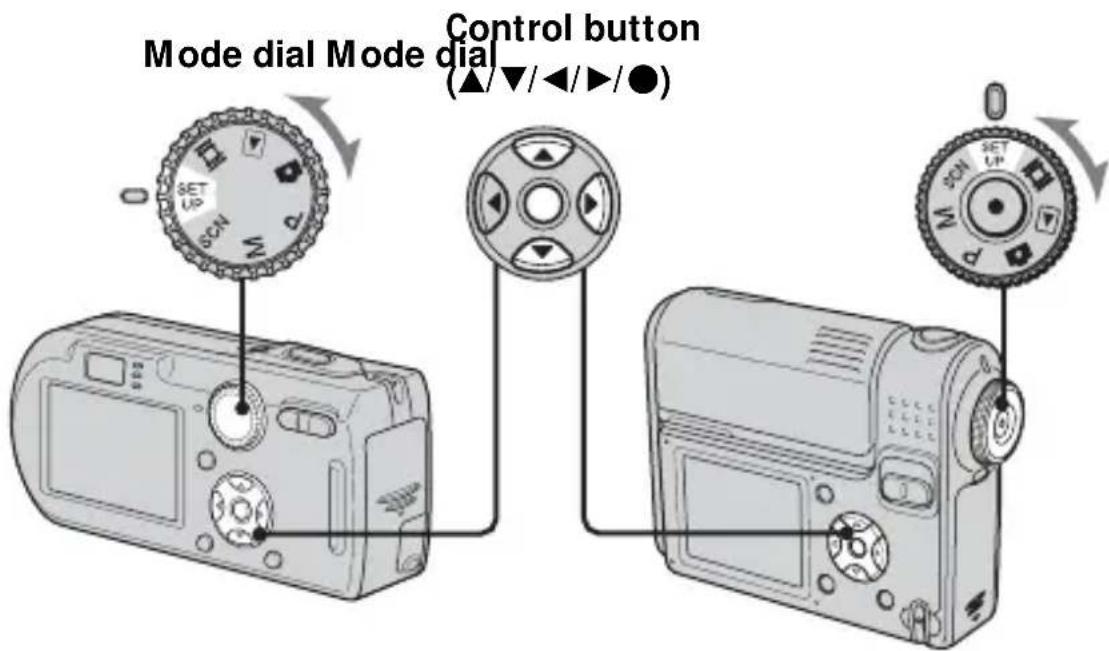
①Set the mode dial to SET UP.
②Select ▲₂ (Setup 2) with ▼, then select [USB Connect] with ▲/▼/▶.
③ Select [PictBridge] with ▶/▲, then press ●.
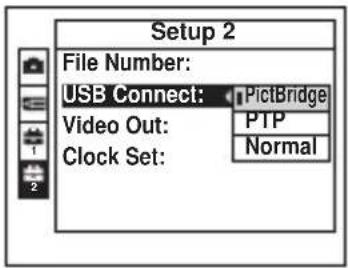
The USB mode is set.
5 Connect the USB cable (supplied) to the USB jack of the Cyber-shot Station.
6 Connect the USB cable to the USB jack of the printer.
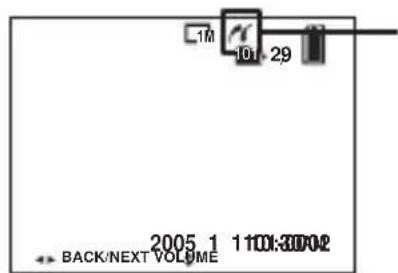
After the connection is made, the indicator appears on the LCD screen.
When [USB Connect] is not set to [PictBridge] on the SET UP screen, you cannot use the PictBridge function even if you turn on the camera. Set [USB Connect] to [PictBridge].
When the camera is turned on, the camera turns to playback mode regardless of the mode dial position and an image in the selected playback folder is displayed on the LCD screen.
Printing images using the Remote Commander
• You cannot print movies.
- When an error notification is received from the connected printer, the indicator flashes for approximately 5 seconds. Check the connected printer.
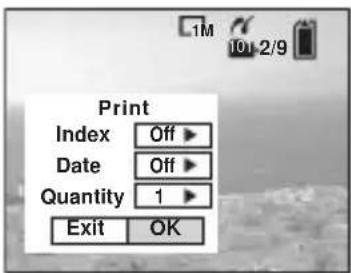
■ Printing still images using the Remote Commander (In single-image mode)
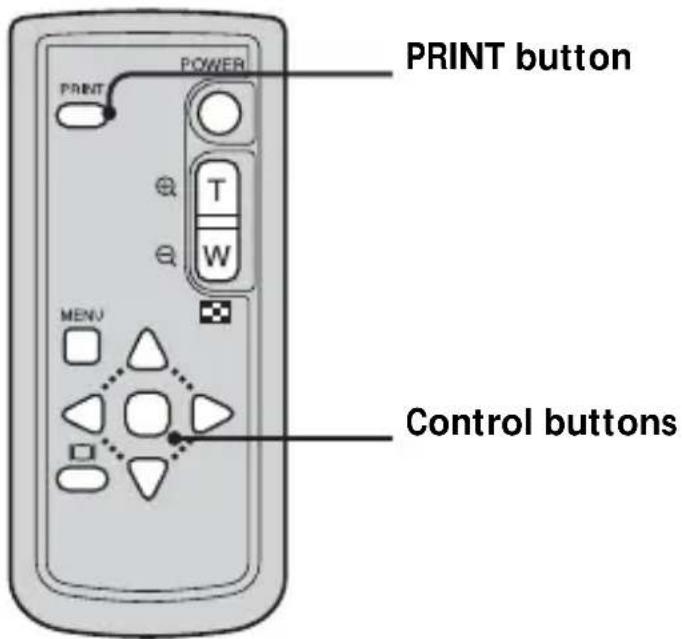
1 Display the image you want to print with ◀/▶.
2 Press PRINT.
The print setting screen appears.
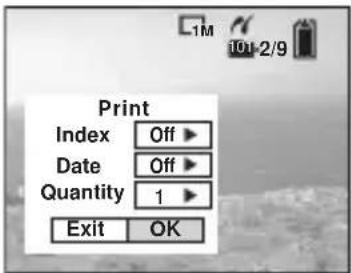
- Setting items that the printer does not support cannot be displayed.
3 Select [Quantity] with ▲/▼, select the number of sheets with ◀/▶. You can select the number up to 20.
4 Select [OK] with ▼/▶, then press ●.
The image is printed.

- When printing is completed, the screen returns to the previous screen.
- Do not disconnect the USB cable while the (Net disconnect USB cable) indicator appears on the LCD screen.
To cancel printing
Select [Exit] in step 2 or 4.
To insert the date and time on images
- Select [Date] in step 3, then select the date format with ◀/▶. You can select from [Day & Time] or [Date]. The date of recording will be inserted on the image.
• This function may not be available, depending on the printer.
- For details, refer to the operating instructions for your camera.
■ Printing still images using the Remote Commander (In index mode)
1 Select the image you want to print with ▲/▼/◄/►.
2 Press PRINT.
The print setting screen appears.
- Setting items that the printer does not support cannot be displayed.
3 Select [Quantity] with ▲/▼, select the number of sheets with ◀/▶. You can select the number up to 20.
4 Select [OK] with ▼/▶, then press ●. The image is printed.
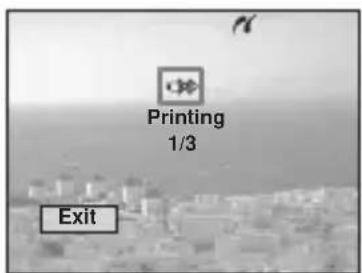
- Do not disconnect the USB cable while the indicator appears on the LCD screen.
To cancel printing
Select [Exit] in step 2 or 4.
To insert the date and time on images
- Select [Date] in step 3, then select the date format with ◀/▶. You can select from [Day & Time] or [Date]. The date of recording will be inserted on the image.
- This function may not be available, depending on the printer.
- For details, refer to the operating instructions for your camera.
Troubleshooting
If you have trouble with your camera, try the following solutions. If the trouble persists, contact your Sony dealer.
| Symptom | Cause/Solution |
| You cannot charge the battery pack | The camera is turned on.Turn the camera off.The battery pack is not installed correctly.Install the battery pack correctly. |
| The 1CHG lamp does not light up when charging a battery pack | The AC adaptor is disconnected.Properly connect the AC adaptor.The camera is not placed on the Cyber-shot Station correctly.Place the camera correctly.The battery pack is not installed correctly.Install the battery pack correctly.The battery pack is completely charged. |
| The CHARGE lamps do not light up when charging a battery pack | The AC adaptor is disconnected.Properly connect the AC adaptor.The camera is not placed on the Cyber-shot Station correctly.Place the camera correctly.The battery pack is not installed correctly.Install the battery pack correctly.The battery pack is completely charged. |
| You cannot turn on the camera | The camera is not placed on the Cyber-shot Station correctly.Place the camera correctly.The AC adaptor is disconnected.Properly connect the AC adaptor. |
| The power turns off suddenly | The camera is not placed on the Cyber-shot Station correctly.Place the camera correctly. |
| The images/sounds cannot be played back on a TV | The connection is not correct.Check the connection. |
| Your computer does not recognize your camera | The camera is turned off.Turn on the camera.You are not using the supplied USB cable.Use the supplied USB cable.The USB cable is not connected firmly.Disconnect the USB cable from both the computer and the Cyber-shot Station, and connect it again firmly. Make sure that “USB Mode” is displayed on the LCD screen.The camera is not placed on the Cyber-shot Station correctly.Place the camera correctly.The USB connectors on your computer are connected to other equipment besides the keyboard, the mouse, and the Cyber-shot Station.Disconnect all equipment other than the keyboard, the mouse, and the Cyber-shot Station from the USB connectors. |
| The camera does not work, and no operations can be performed | The camera is not placed on the Cyber-shot Station correctly.Place the camera correctly. |
| The Remote Commander does not work | The AC adaptor is disconnected.Properly connect the AC adaptor.The battery in the Remote Commander is dead.Replace it with a new one. |
| The connection between the printer and the Cyber-shot Station cannot be established | The printer is not PictBridge-compliant.Consult with the printer manufacturer.The printer is not set for the connection with the camera.Check that the printer is turned on and can connect with the camera.[USB Connect] is not set to [PictBridge] in the SET UP settings.Set it to [PictBridge]. |
| You cannot print images | The camera is not connect to the printer.→ Check that the camera and the printer are properly connected using the USB cable.The printer is not turned on.→ Turn on the printer.For further infomation, refer to the operating instructions supplied with the printer.Movies cannot be printed.Images modified with a computer or images shot using other than this camera may not be able to be printed. |
| Printing is canceled | You disconnected the USB cable before the mark disappears.You removed the camera from the Cyber-shot Station before the mark disappears. |
| You cannot insert the date or print images in the index mode | The printer does not provide these functions.→ Consult with the printer manufacturer whether the printer provides these functions or not.The date may not be inserted in the index mode, depending on the printer.→ Consult with the printer manufacturer. |
| “---- -- --” is printed on the date-inserted part | The recording date data is not recorded on the image.→ The images that do not have the recording date data cannot be printed with the date inserted. Set [Date] to [Off] and print the image. |
| The CHARGE lamps light up when no camera is placed on the Cyber-shot Station | You have pressed the Control button (in the order of ▲/◄/▼/► and ●) when the camera was placed on the Cyber-shot Station, and now the Cyber-shot Station is in the demonstration mode.→ To cancel the demonstration mode, disconnect the AC adaptor once and connect it again. Alternatively, place the camera on the Cyber-shot Station again. |
Specifications
Cyber-shot Station Input/Output connectors
A/V OUT (MONO) jack (Monaural)
Minijack
Video ^* : 1 Vp-p, 75 Ω, unbalanced, sync negative
Audio ^* : 327 mV (47 kΩ loaded) Output impedance: 2.2 kΩ
* When the DSC-P100 or the DSC-F88 is connected.
USB jack: mini-B
DC IN connector
Multi connector
General
Dimensions (Approx.): 114 × 36 × 66 mm
(4 1/2 × 1 7/16 × 2 5/8 inches) (w/h/d)
Mass (Approx.): 77 g (2.8 oz)
Operating temperature: 0 ^ to +40 ^ ( 32 ^ to +104 ^ )
Storage temperature: -20^ to +60^ (-4^ to +140^)
Supplied accessories
- Wireless Remote Commander (RMT-CSS1)
(A button type lithium battery installed) (1)
• A/V connecting cable (1)
- USB cable (1)
- Operating Instructions (1)
* Two operating instructions are supplied depending on the area.
- Warranty (1)
* An AC adaptor is not supplied. Use either the AC adaptor (AC-LS5/LS5B) comes with the Cyber-shot, or an optional AC adaptor (AC-LS5).
Design and specifications are subject to change without notice.
Trademarks
• is the trademark of Sony Corporation.
- "Memory stick" and are trademarks of Sony Corporation.
- In addition, system and product names used in this manual are, in general, trademarks or registered trademarks of their respective developers or manufacturers. However, the ^TM or ^® marks are not used in all cases in this manual.
Français
natural_image
Illustration of a remote control system with a monitor, a printer, and a remote device emitting signal waves (no text or symbols)natural_image
Two technical illustrations of a digital camera with control buttons and display screens (no text or symbols)natural_image
Illustration of hands holding a digital camera with a black arrow pointing to the screen (no text or symbols present)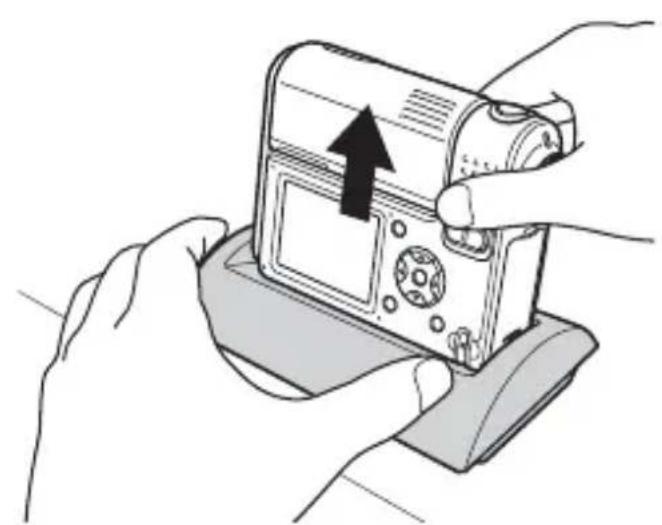
natural_image
Illustration of hands holding a digital camera with an upward arrow indicating action (no text or symbols present)natural_image
Illustration of a digital camera with a control panel and display screen (no text or symbols)natural_image
Diagram of a device with two cables connected to a port, showing internal components and an arrow indicating connection (no text or symbols present)Fiche USB
natural_image
Technical line drawing of a rectangular electronic component with internal contacts and mounting holes (no text or symbols)natural_image
Diagram of a mechanical device with a circular component and a curved handle, showing no text or symbols.natural_image
Diagram showing a mechanical clamp interacting with a rectangular device (no text or symbols present)natural_image
Technical line drawing of a rectangular electronic component with a curved handle and mounting holes, shown with an arrow pointing to the end (no text or symbols present)natural_image
Line drawing of a sewing machine with a base and cable (no text or symbols)Touche POWER*
natural_image
Line drawing of a handheld electronic device with a circular head and cable, no text or symbols presentPrinted on 100% recycled paper using VOC (Volatile Organic Compound)-free vegetable oil based ink.