
TML90II LFC - Printer EPSON - Free user manual and instructions
Find the device manual for free TML90II LFC EPSON in PDF.
| Brand | Epson |
| Model | TML90II LFC |
| Product type | Thermal printer |
| Printing method | Thermal line |
| Resolution | 203 × 203 dpi |
| Print width | 72 mm (80 mm paper), 52.5 mm (58 mm paper), 35 mm (40 mm paper) |
| Supported paper widths | 80 mm, 58 mm, 40 mm |
| Max roll diameter | 102 mm |
| Dimensions (W × D × H) | 140 × 203 × 148 mm |
| Weight | Approximately 1.9 kg |
| Power supply | DC +24 V ±7%, consumption approx. 1.8 A |
| Operating temperature | 5 to 45 °C |
| Operating humidity | 10 to 90% RH |
| Main functions | Ticket printing, self-test, automatic paper cutting |
| Maintenance and cleaning | Clean the casing with a dry or damp cloth; clean interior (thermal head, platen roller) with a cotton swab moistened with isopropyl alcohol every six months |
| Safety | Immediately disconnect power if smoke or odor; do not disassemble; use a compliant power supply |
| Spare parts and repairability | Removable paper guide, roll cover; contact a qualified technician for any repair |
| General information | Manual available in multiple languages; registered trademark Epson |
Frequently Asked Questions - TML90II LFC EPSON
User questions about TML90II LFC EPSON
0 question about this device. Answer the ones you know or ask your own.
Ask a new question about this device
Download the instructions for your Printer in PDF format for free! Find your manual TML90II LFC - EPSON and take your electronic device back in hand. On this page are published all the documents necessary for the use of your device. TML90II LFC by EPSON.
USER MANUAL TML90II LFC EPSON
Most of the illustrations are at the beginning of this manual. See the list below for the meaning of the numbers in the illustrations.
-
Control panel label
-
Paper guides
-
Lever 7. Slot
3.Hole A 8.Knob - Notch 9. Triangle mark
5.Hole B
Restriction of Use
When this product is used for applications requiring high reliability/safety, such as transportation devices related to aviation, rail, marine, automotive, etc.; disaster prevention devices; various safety devices, etc.; or functional/precision devices, etc.; you should use this product only after giving consideration to including fail-safes and redundancies into your design to maintain safety and total system reliability. Because this product was not intended for use in applications requiring extremely high reliability/safety, such as aerospace equipment, main communication equipment, nuclear power control equipment, or medical equipment related to direct medical care, etc., please make your own judgment on this product's suitability after a full evaluation.
Caution
No part of this publication may be reproduced, stored in a retrieval system, or transmitted in any form or by any means, electronic, mechanical, photocopying, recording, or otherwise, without the prior written permission of Seiko Epson Corporation. No patent liability is assumed with respect to the use of the information contained herein. While every precaution has been taken in the preparation of this book, Seiko Epson Corporation assumes no responsibility for errors or omissions. Neither is any liability assumed for damages resulting from the use of the information contained herein.
Neither Seiko Epson Corporation nor its affiliates shall be liable to the purchaser of this product or third parties for damages, losses, costs, or expenses incurred by purchaser or third parties as a result of: accident, misuse, or abuse of this product or unauthorized modifications, repairs, or alterations to this product, or (excluding the U.S.) failure to strictly comply with Seiko Epson Corporation's operating and maintenance instructions.
Depending on the area, the interface cable may be included with the product. If so, use that cable.
Seiko Epson Corporation shall not be liable against any damages or problems arising from the use of any options or any consumable products other than those designated as Original Epson Products or Epson Approved Products by Seiko Epson Corporation.
EPSON is a registered trademark of Seiko Epson Corporation. Exceed Your Vision is a registered trademark or trademark of Seiko Epson Corporation. All other trademarks are the property of their respective owners and used for identification purpose only.
NOTICE: The contents of this manual are subject to change without notice.
©Seiko Epson Corporation 2013-2019. All rights reserved.
Important Safety Information
This section contains important information intended to ensure safe and effective use of this product. Please read this section carefully and store it in an accessible location.
Key to Symbols
The symbols in this manual are identified by their level of importance, as defined below. Read the following carefully before handling the product.

WARNING:
Warnings must be observed carefully to avoid serious bodily injury.

CAUTION:
Cautions must be observed to avoid minor injury to yourself, damage to your equipment, or loss of data.
Safety Precautions

WARNING:
Shut down your equipment immediately if it produces smoke, a strange odor, or unusual noise. Continued use may lead to fire. Immediately unplug the equipment and contact qualified service personnel.
Never attempt to repair this product yourself. Improper repair work can be dangerous. Never disassemble or modify this product. Tampering with this product may result in injury or fire.
Be sure to use the specified power source. Connection to an improper power source may cause fire.
Do not allow foreign matter to fall into the equipment. Penetration by foreign objects may lead to fire.
If water or other liquid spills into this equipment, unplug the power cord immediately, and then contact qualified service personnel. Continued usage may lead to fire.
Do not use aerosol sprayers containing flammable gas inside or around this product. Doing so may cause fire.

CAUTION:
Do not connect cables in ways other than those mentioned in this manual. Different connections may cause equipment damage and burning.
Be sure to set this equipment on a firm, stable, horizontal surface. The product may break or cause injury if it falls.
Do not use in locations subject to high humidity or dust levels. Excessive humidity and dust may cause equipment damage or fire.
Do not place heavy objects on top of this product. Never stand or lean on this product. Equipment may fall or collapse, causing breakage and possible injury.
Take care not to injure your fingers on the manual cutter
- When you remove printed paper
- When you perform other operations such as loading/replacing roll paper
To ensure safety, unplug this product before leaving it unused for an extended period.
Caution Labels
The caution labels on the product indicate the following precautions.

CAUTION:
The thermal head can be very hot during printing and immediately after printing. Touching it may cause burns.
Downloading Drivers, Utilities, and Manuals
The latest versions of drivers, utilities, and manuals can be downloaded from one of the following URLs.
For customers in North America, go to the following web site: www.epson.com/support/
For customers in other countries, go to the following web site: www.epson-biz.com/
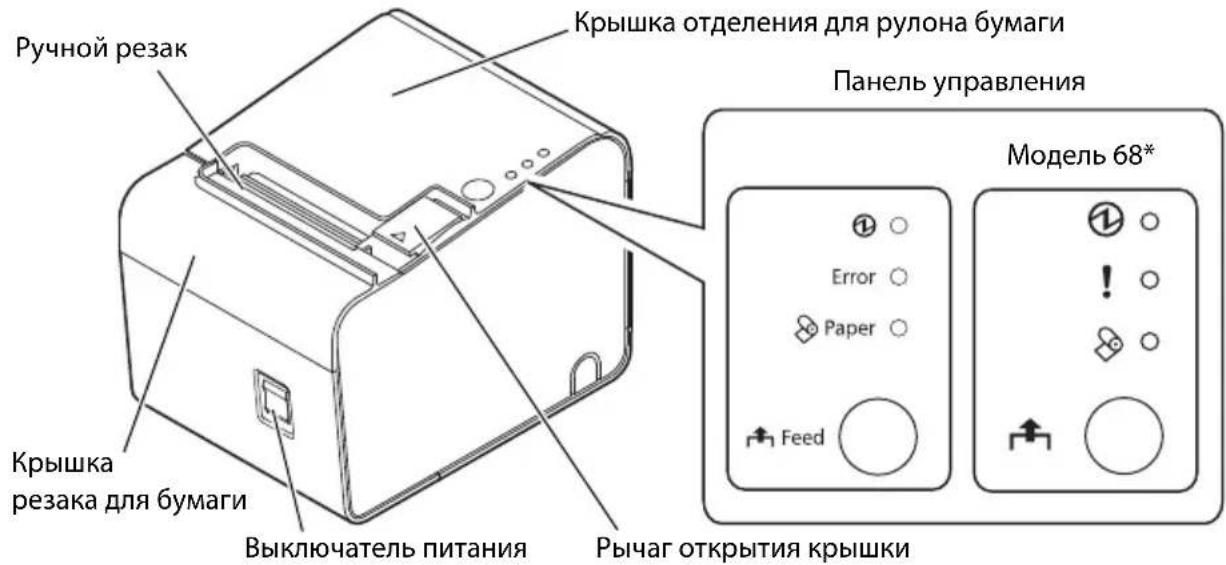
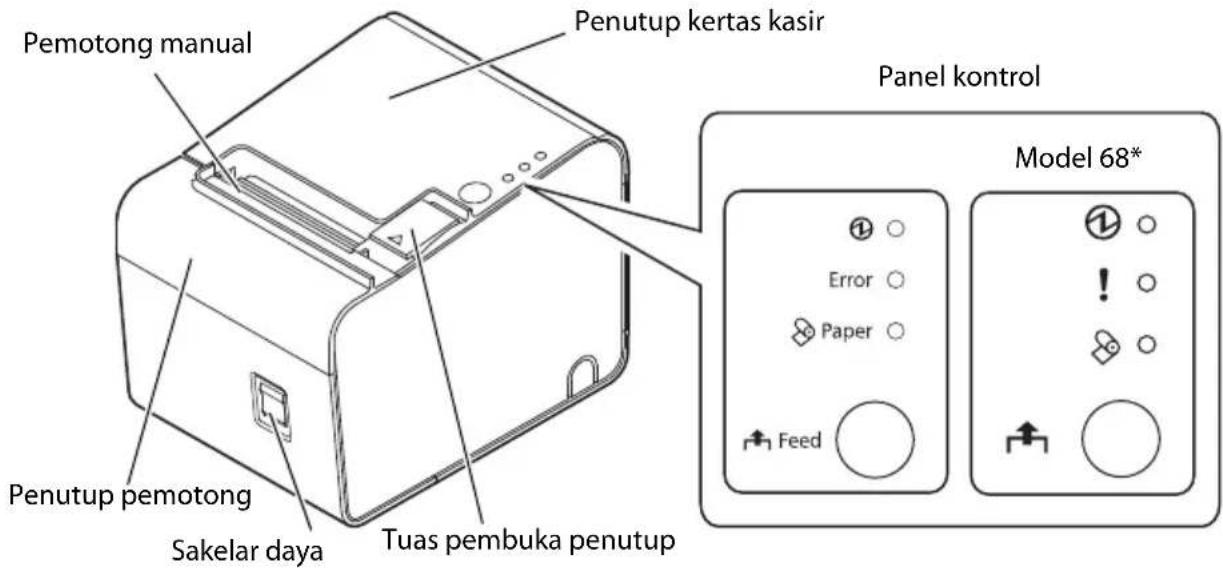
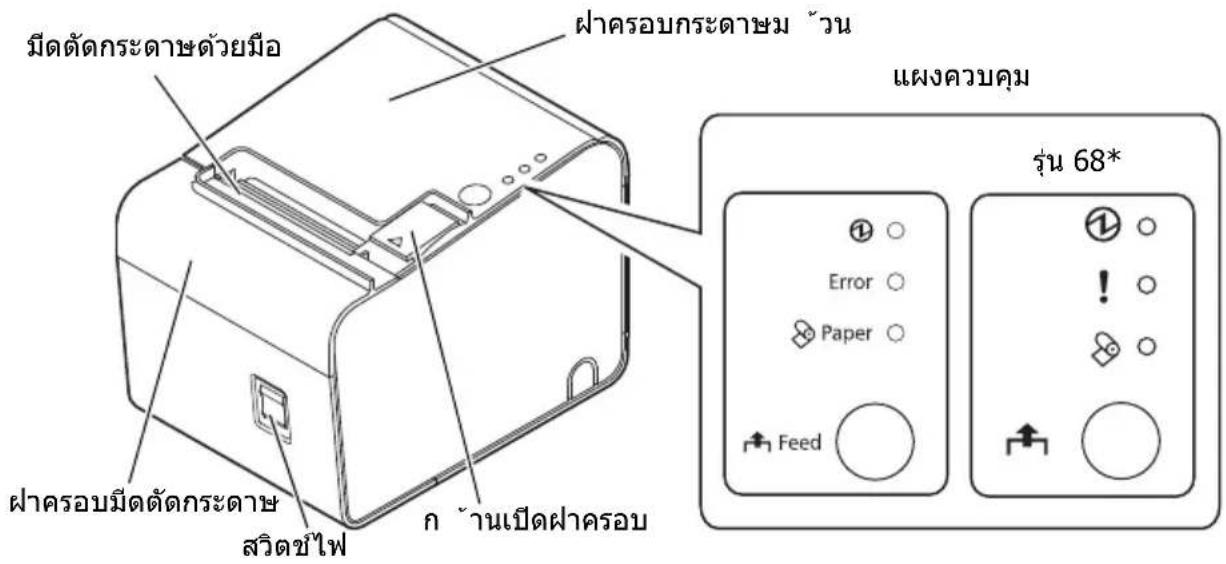
Printer Parts

Control Panel
①LED
Lights when the power is on, and is off when the power is off.
! (Error) LED
Off when the printer is online, lights when the printer is offline, and flashes when an error occurs.
(Paper) LED
Lights when roll paper is out.
(Feed) button
Feeds the roll paper.
Installing the Printer Horizontally or Vertically
You can install the printer horizontally (with the paper exit on top) or vertically (with the paper exit at the front).
When installing the printer vertically, attach the included control panel label to the printer case, and install it on a flat surface. (See illustration A.)
Removing or Installing the Paper Guide
Install or remove the paper guide to match the width of the roll paper in use.
For the 65^ model
A 40~mm paper guide is installed.
- When using a roll paper that is 40mm wide, use the printer as it is.
- When using a roll paper that is 80mm wide, remove the installed guide.
For the 66^ / 67^ / 68^ model
A 58~mm paper guide is installed.
- When using a roll paper that is 58mm wide, use the printer as it is.
- When using a roll paper that is 80mm wide, remove the installed guide.
- When using a roll paper that is 40mm wide, remove the installed guide, and install the included 40mm paper guide.

CAUTION:
Changing to a roll paper that is wider than the roll paper in use can cause decreased print quality.
Removing the Paper Guide
- Open the roll paper cover using the cover open lever. (See illustration ±bB .)
- Pull the paper guide in the direction of the arrow in illustration C while pulling the lever of the paper guide to remove it.
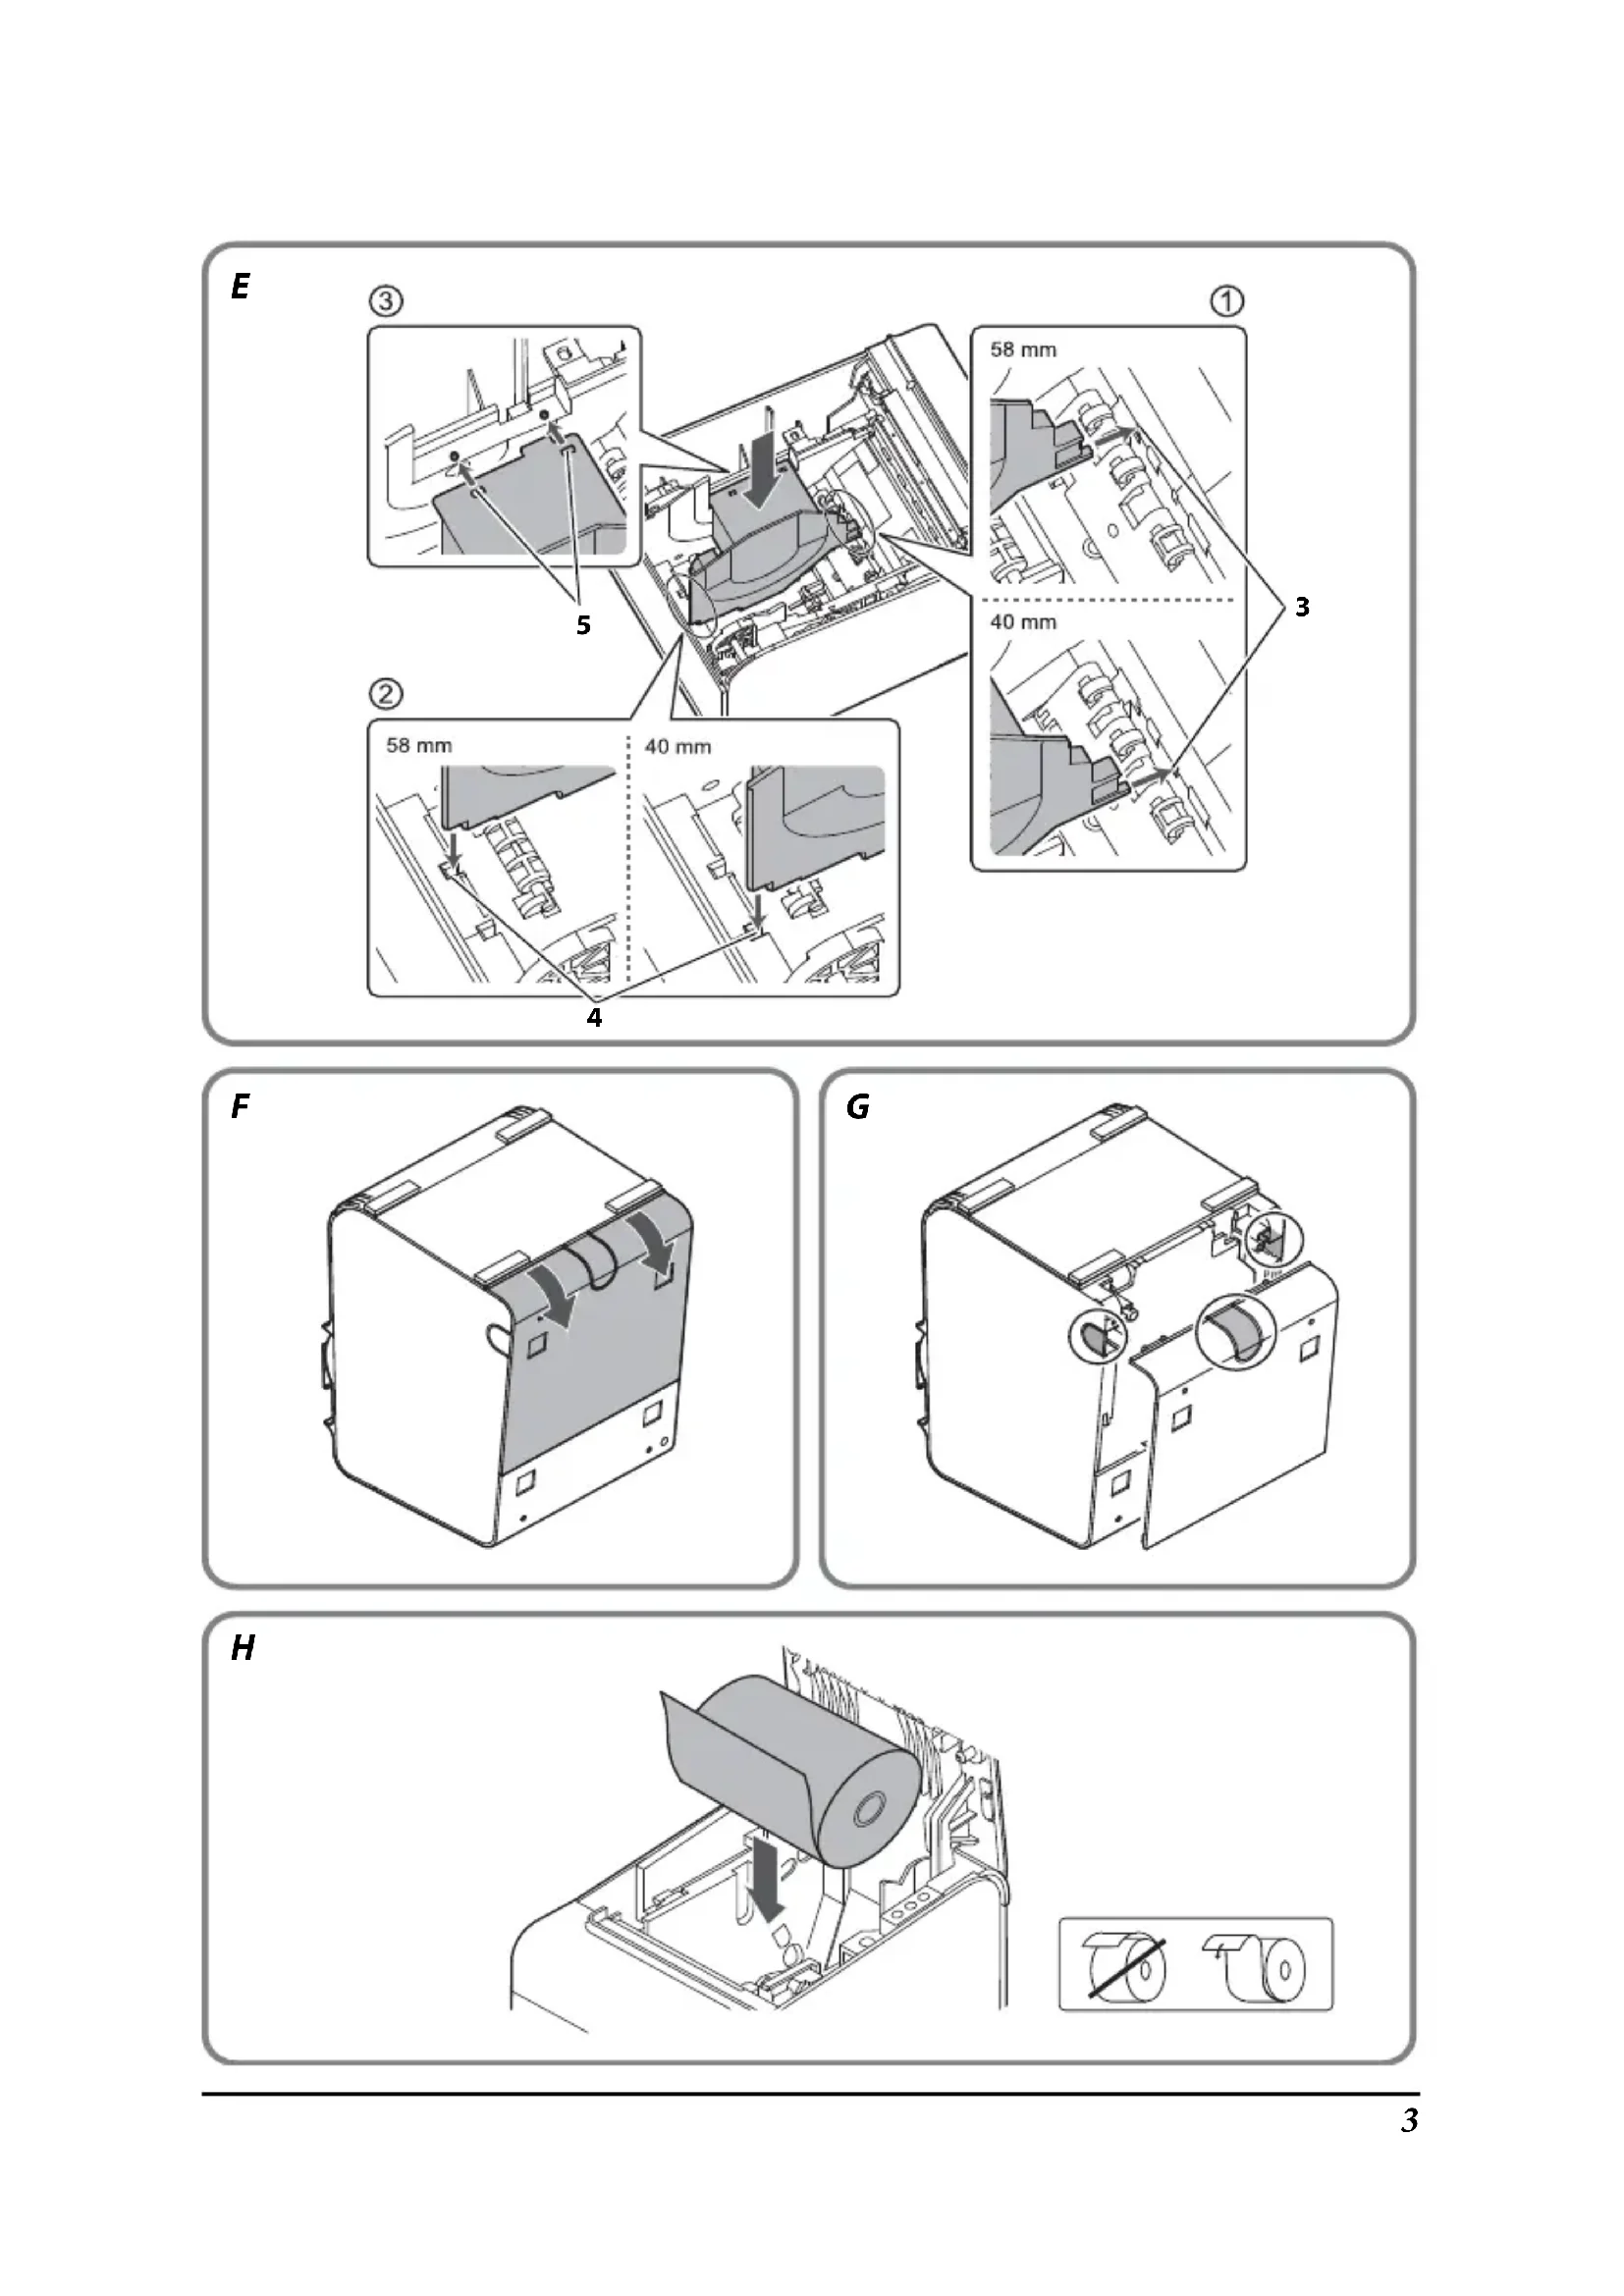
Installing the Paper Guide

CAUTION:
Installation position of the paper guide varies depending on the width of the paper guide. Do not install the 58mm paper guide in the position for the 40 mm paper guide.
- Open the roll paper cover using the cover open lever. (See illustration ±bB .)
- Align the projection of the paper guide with the hole (Illustration E3) in the roll paper holder.
- Align the corner of the paper guide with the notch (Illustration E4) in the roll paper holder.
- Align 2 holes (Illustration E5) in the paper guide with 2 projections of the roll paper holder.
- Push the lever of the paper guide down until the paper guide clicks into place. (See illustration ±bD .)
Connecting Cables
- Place the printer as shown in illustration ±bF , and pull the cover in the direction of the arrow in the illustration to remove the cover.
- Break off by hand any of the three portions indicated by circles in illustration ±bG to pass the cables through.
- Connect the cables to the printer.
- Attach the cover while passing the cables through the holes.
Installing or Replacing the Roll Paper

CAUTION:
Be sure to use roll paper that meets the specifications.
If you change the paper type from linerless label paper to thermal roll paper, cleaning around the paper path is recommended. (See "Cleaning Inside the Printer" on page 11.)
- Open the roll paper cover using the cover open lever. (See illustration ±bB .)
- Remove the used roll paper core if there is one.
- Insert a roll of paper in the correct direction. (See illustration ±bH .)
- Pull out a small amount of paper, aligning the paper with the paper guides on both sides. (See illustration 1.)
- Close the roll paper cover.
When the printer is powered on, the paper will feed and cut automatically.
Note:
Be sure to close the roll paper cover completely by pushing on the middle of the cover.
Cleaning
Cleaning the Printer Case
When cleaning the printer case, be sure to turn off the printer, and wipe the dirt off the printer case with a dry or damp cloth.

CAUTION:
Never clean the product with alcohol, benzine, thinner, or other such solvents. Doing so may damage or break the parts made of plastic and rubber.
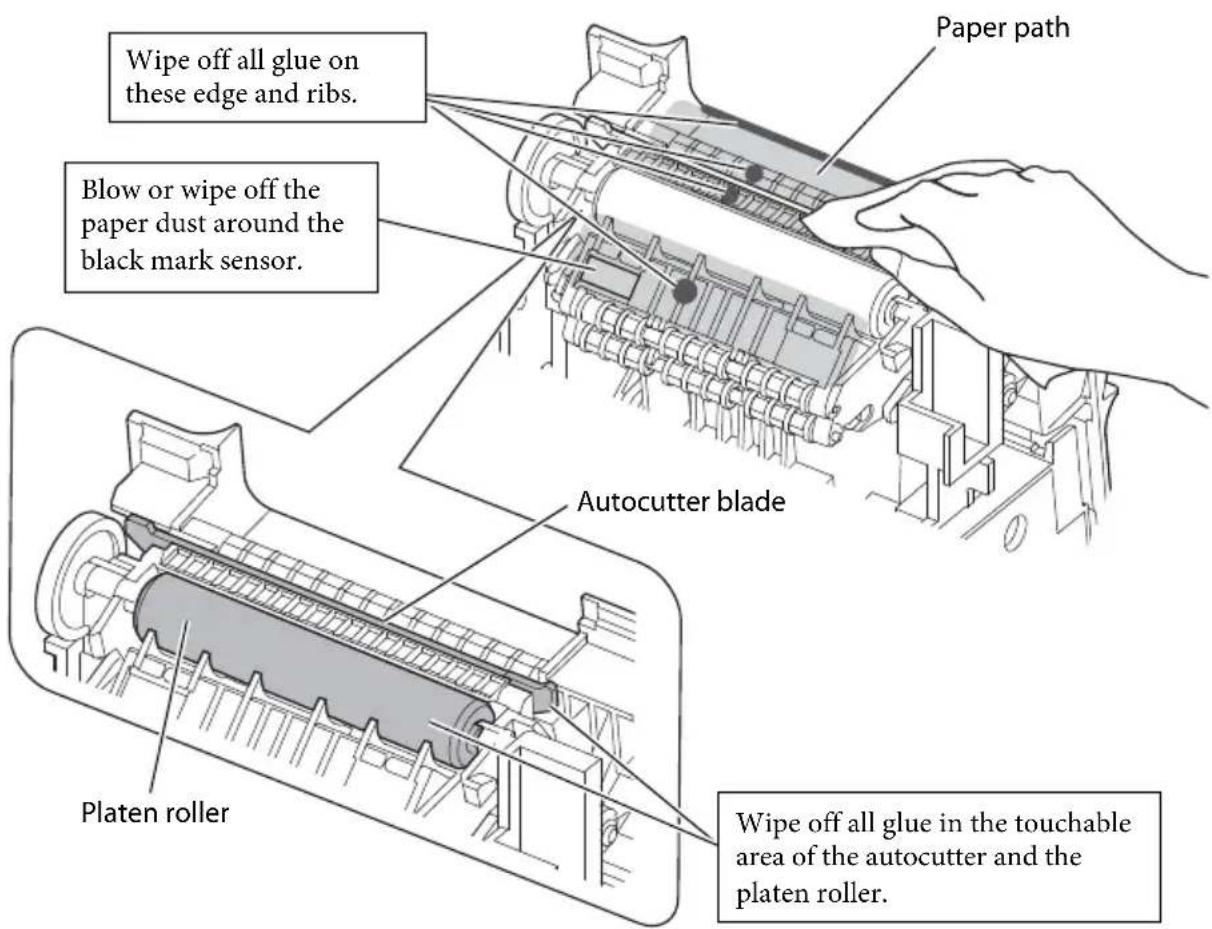
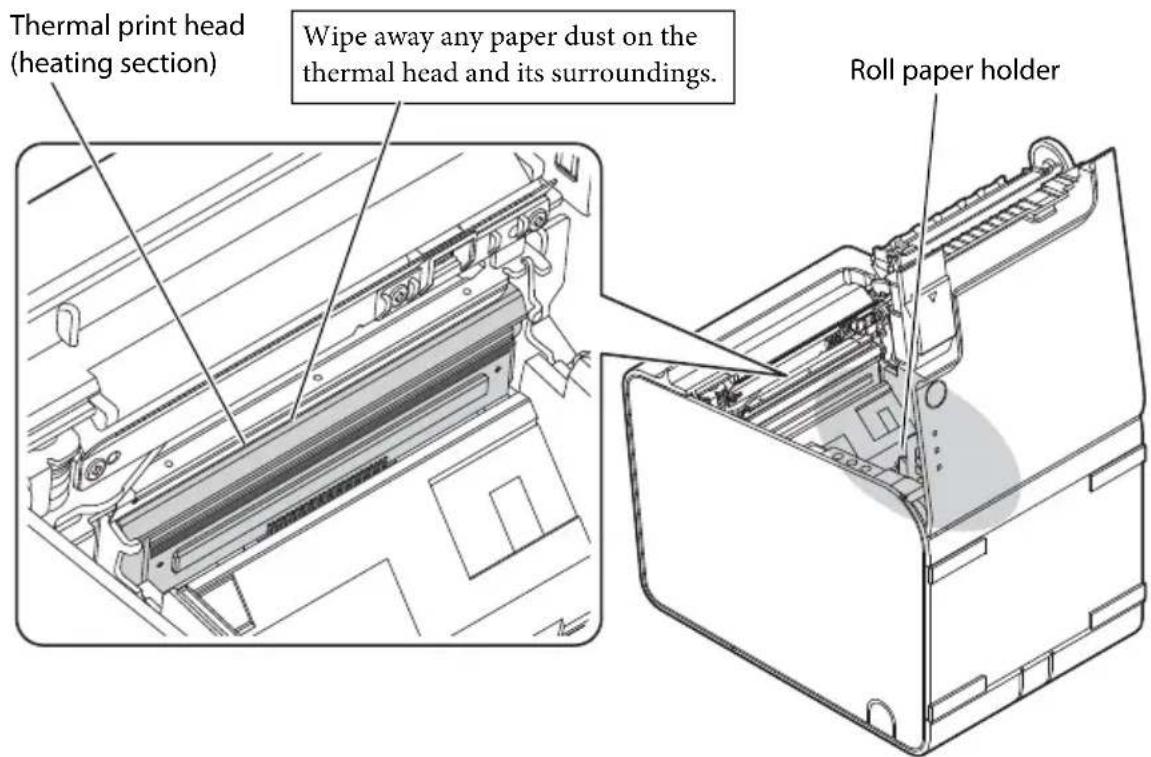
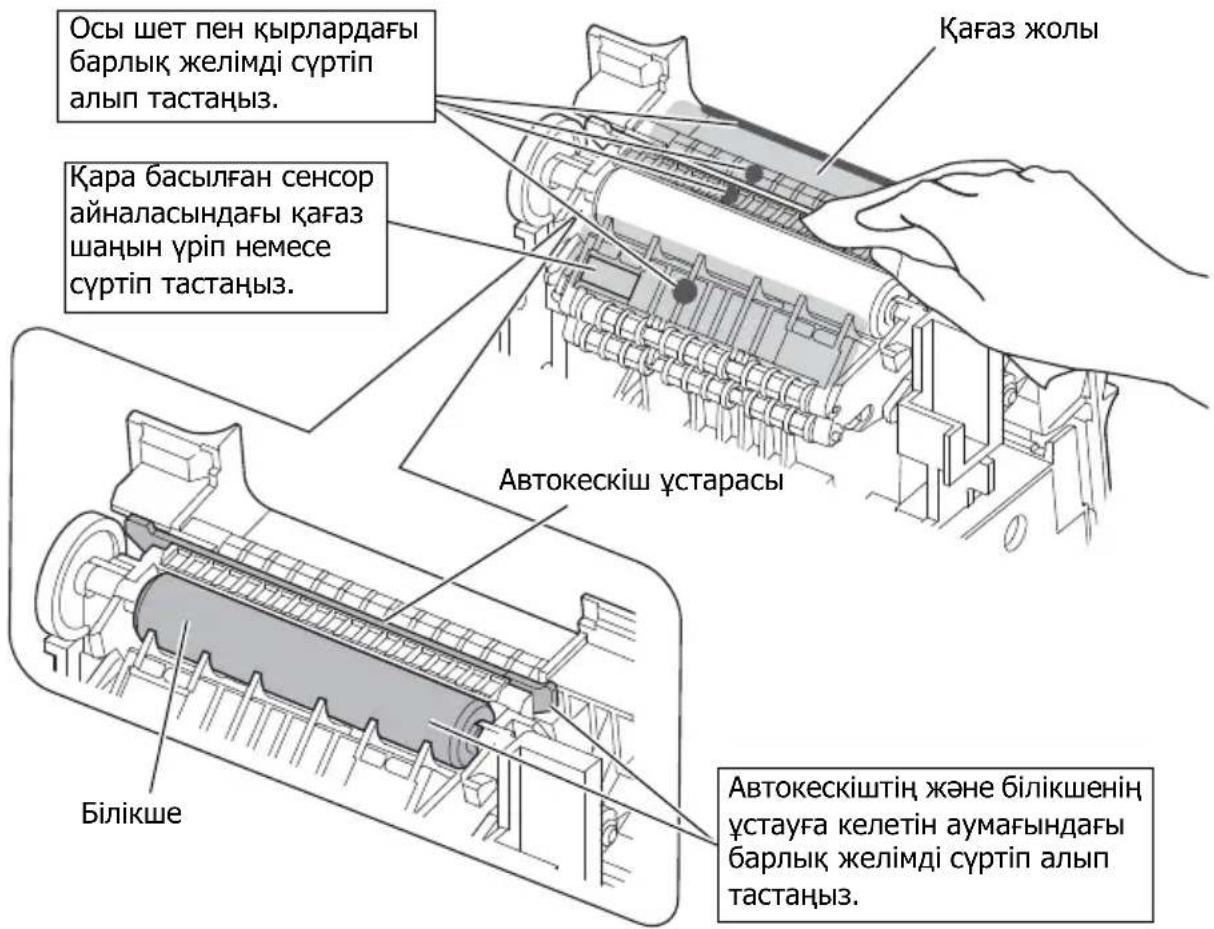
Cleaning Inside the Printer
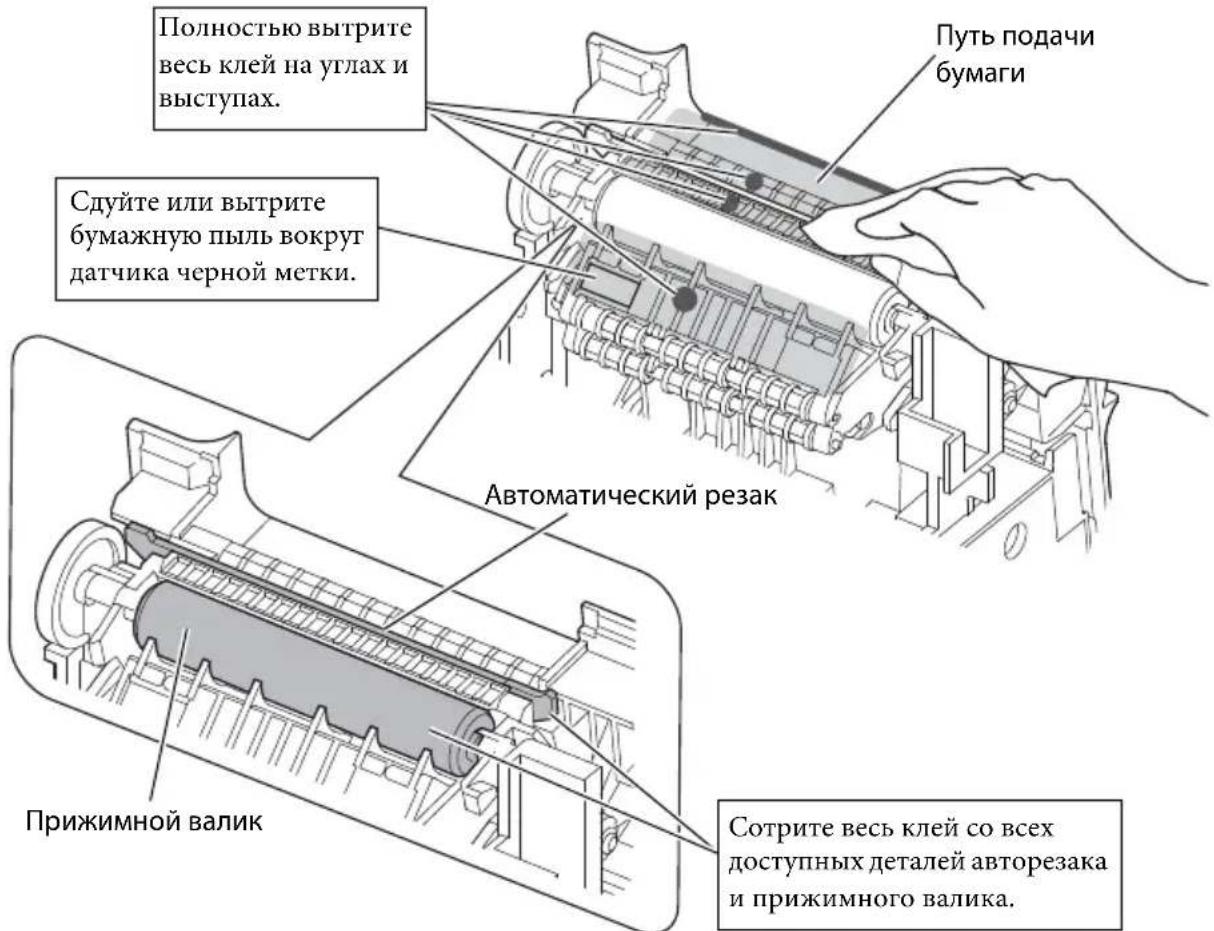
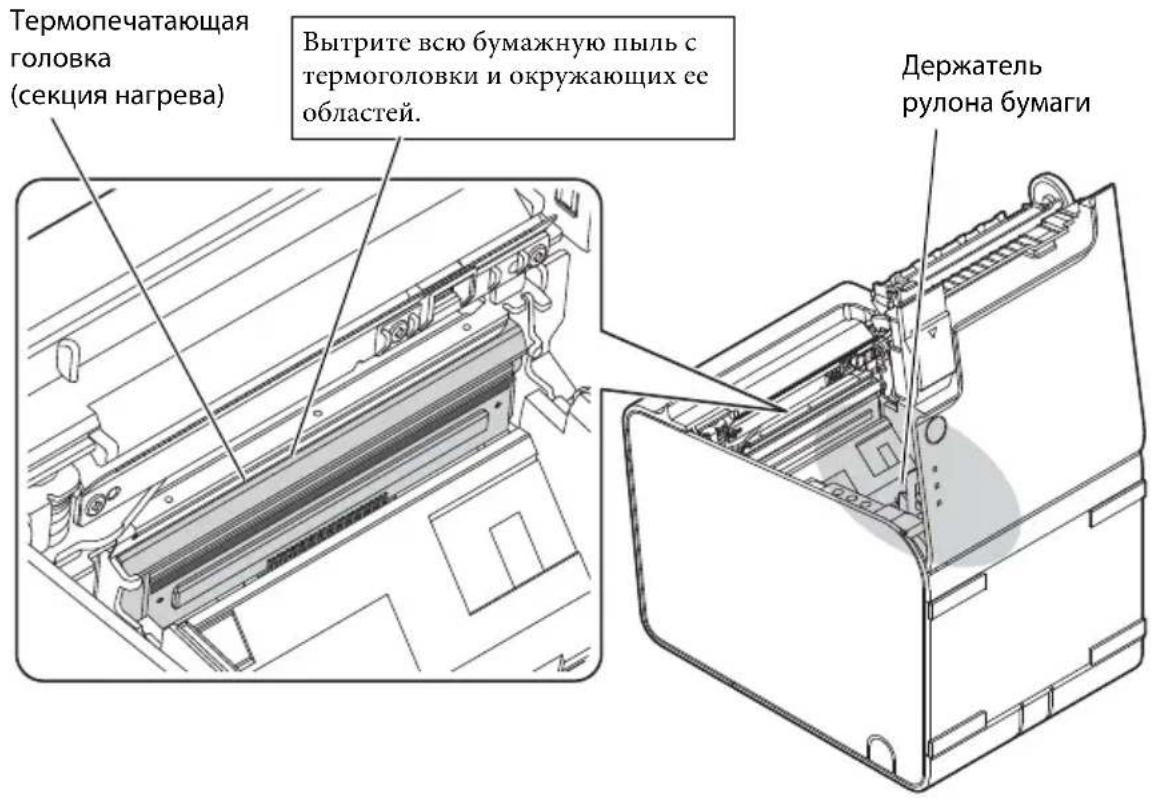
Clean and care for the parts inside the printer (autocutter blade, platen roller, thermal head and surrounding area, roll-paper holder, etc.) in order to maintain good print quality. Clean and care for parts periodically approximately once every six months.
To clean these parts, turn off the printer, unplug the AC cable, open the roll paper cover, and remove the paper dust, adherent glue, or other foreign substance with a cotton swab or cloth moistened with an alcohol solvent (ethanol or IPA).
If paper dust adheres around the black mark sensor, blow or wipe it off to keep the operation of the printer normal.
For the locations of each part, see the illustration.

CAUTION:
If adherent glue is attached, be sure to wipe it all off.
Take care not to injure your fingers on the manual cutter when cleaning.
Before turning on the printer after cleaning, allow alcohol on the printer to dry completely.

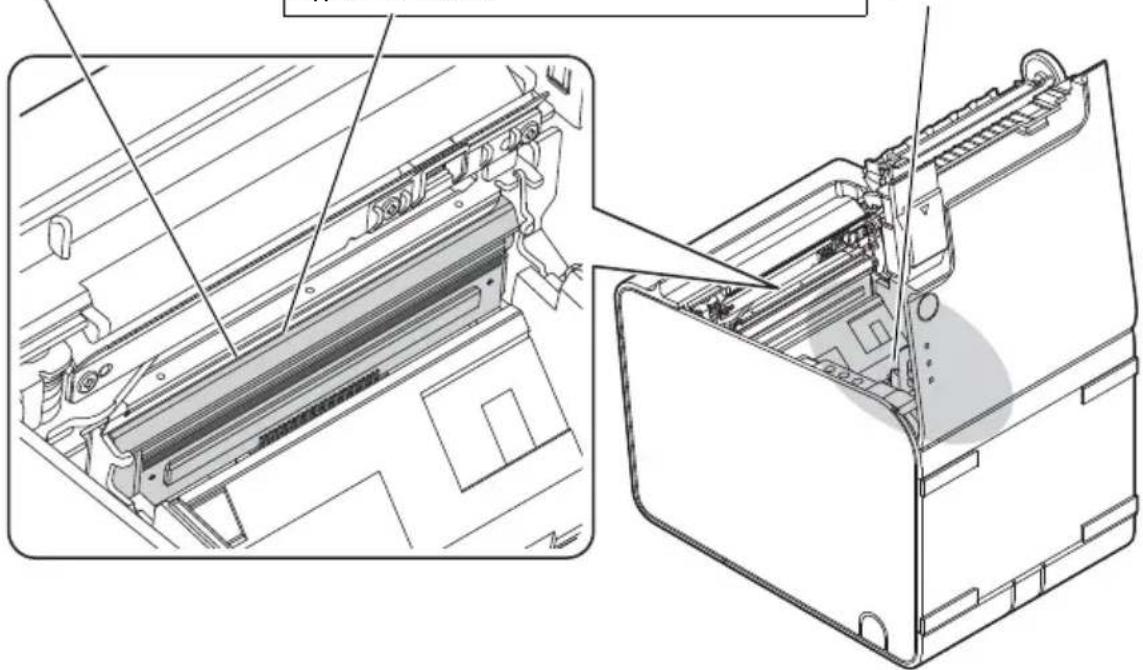
CAUTION:
The thermal head can be very hot after printing. Be careful not to touch it and to let it cool before you clean it. Do not damage the thermal head by touching it with your fingers or any hard object.
Running a Self-test
In self-test mode the printer will perform a series of internal diagnostics, and then provide a listing of printer settings.
Having a printed self-test in hand when calling for technical support can help speed the troubleshooting process.
Use the following procedure to start a self-test.
-
Close the roll paper cover.
-
While pressing the (Feed) button on the control panel, turn on the printer. (Keep pressing the (Feed) button until the printer starts printing.)
The printer prints out the various printer states.
- When all printer states have been printed, make sure that the following message is displayed and the (Paper) LED flashes.
"If you want to continue SELF-TEST printing, please press Feed button." The printer is now in the self test wait mode.
-
To start a test print, press the (Feed) button when the printer is in the self test wait mode.
-
Check that the following has been printed.
" completed "
This indicates that the printer has been initialized and made the transition to the normal mode.
Resetting the Printer
Certain error conditions can be reset by turning the printer off then back on. Not all error conditions can be reset using this method. For further details, see "Troubleshooting" on page 14.
Troubleshooting
Printout is faint
When printout is faint, adhesive glue or another foreign substance may be present on the thermal head, platen roller, or paper path of the printer.
In such case, first clean the thermal head by following the instructions described in "Cleaning Inside the Printer" on page 11.
If the print quality does not improve, clean the platen roller and paper path of the printer by following the instructions described in "Cleaning Inside the
Printer" on page 11.
Printed character size is not appropriate for 40~mm / 58~mm width paper
When using 40~mm / 58~mm width roll paper, if the printed character size is not appropriate or if the printout does not fit within the paper width, the paper guide may not be installed correctly.
See "Installing the Paper Guide" on page 9 for installation instructions.
! (Error) LED on or flashing
Check to see that the roll paper cover is closed and check the (Paper) LED. Close the cover or replace the roll paper if necessary.
□If the printer has been printing a lot, the thermal head may be hot. Wait for the head to cool. Printing will resume automatically.
Open the roll paper cover, and check to see if the paper is jammed. If a paper jam occurs or if the roll paper cover will not open, see the section below.
Turn the printer off and back on. If the LED is still flashing, notify your manager. The printer may require servicing.
Paper jam
Turn off the power and open the roll paper cover to remove the jammed paper. After that, install the roll paper correctly. If the roll paper cover will not open, see the section below.
If glue or another foreign substance is present on the autocutter blade, platen roller, or the paper path, a paper jam is likely to occur. See "Cleaning Inside the Printer" on page 11 for cleaning instructions.
Note:
Use of the printer for long periods can result in platen roller wear, resulting in linerless label paper readily adhering to the platen roller. If the printer is left for a long period with linerless label paper set in the printer, a paper jam may occur due to the label paper adhering to the roller.
If a paper jam occurs, clean inside the printer. ("Cleaning Inside the Printer" on page 11)
If paper jams occur frequently even after cleaning inside the printer, the platen roller must be replaced. Contact qualified service personnel.
You can also prevent paper jams in advance by re-setting the roll paper. ("Installing or Replacing the Roll Paper" on page 10)
For 68^ specifications: This printer is equipped with a function that periodically feeds paper if the printer's power is on for a long period (approx. 12 hours) without printing in order to prevent label paper from adhering to the platen roller. The top margin for the next printed page after this paper feeding will be large, even if back feeding is enabled.
The roll paper cover will not open
Follow the steps below when the roll paper cover will not open.
- Turn off the printer.
- Insert a tool such as a screwdriver into the slots on both sides of the printer, and lift the cover in the direction of the arrow to remove it. (See illustration J .)
- Turn the knob in the direction of the arrow, by using a ballpoint pen or tweezers, until you see a triangle mark in the opening. (See illustration ±bK .)
TM-L90 Specifications
| 80 mm paper width 58 | mm paper width 40 mm paper width | |||
| Print method Thermal line printing | ||||
| Dot density 203×203 dpi [dots per 25.4 mm {1"}] | ||||
| Print width 72 mm {2.84}", 57" | 6 dot positions | 65*/66*/68* model: 52.5 mm {2.07}", 420 dot positions 67* model: 50.0 mm {1.97}", 400 dot positions | 35 mm {1.38}", 280 dot positions | |
| Paper dimensions 79.5 ± 0.5 | × max. Φ102 mm {3.13 ± 0.02 × 4"} | 57.5 ± 0.5 × max. Φ102 mm {2.26 ± 0.02 × 4"} | 39.5 ± 0.5 × max. Φ102 mm {1.56 ± 0.02 × 4"} | |
| Paper type Thermal paper | NTP080-80 NTP058-80 - (do not use) | |||
| Linerless label paper | 9023 - 1274 (6 rolls) 9023 - 1253 (12 rolls) | 9023 - 1823 (12 rolls) 9023 - 1397 (30 rolls) | 9023 - 1275 (6 rolls) 9023 - 1257 (12 rolls) | |
| Power supply*1 | DC + 24 V ± 7% | |||
| Current consumption Approximately | ||||
| Temperature/ Humidity | Thermal paper | Operating: 5 to 45°C {41 to 113°F}, 10 to 90% RH Storage: -10 to 50°C {14 to 122°F}, 10 to 90% RH (except for paper) | ||
| Linerless label paper | Operating: 5 to 35°C {41 to 95°F}, 20 to 80% RH Storage: -10 to 50°C {14 to 122°F}, 10 to 90% RH (except for paper) | |||
| Humidity 10 to 90% | ||||
| Overall dimensions 140 × 203 | × 148 mm {5.51 × 7.99 × 5.83"} (W × D × H) | |||
| Weight (mass) Approximately | 1.9 kg {4.19 lb} | |||
dpi: dots per 25.4mm (dots per inch)
*1: Be sure to use a safety-standards-applied power source that meets the following specifications.
Rated output: 24V / 2.0 - 10.0A Maximum output: 240 VA or less
Français
Illustrations
www.epson.com/support/
www.epson.com/support/
www.epson.com/support/
www.epson.com/support/
Ipoodonjxue ucnolb3oahua moxem npubecmu K noxapy. HemeJeHHO
omKlioyume obopydoBaHue u cBaxumecb c KbaIuΦuucupoBaHbIM o6cnyxueaouum nepcoHaIOM.
Hukozda He nbimaumebc camocmoenbHo pemohmupobamb 3mo obopydobaue.
HenpaBulbHoe BblonHeHue pemohma moXem npubecmu K 803HukHObeHuO onachou cumyaquu.
Huko2a He pa36upaume obopydoBaHue u He u3MeHrae e2o KOhcmpykuu.
Heymene obpaueHue c obopydobaHuem moxem npubecmu KHaheceHuO mpaBmbl uU noXapy.
Iolb3yumecb moIbKO yka3aHbIM ucmouHukOM 3JekmponumaHua. IodcoeduHeue o6OpydoBaHua K HenpaBulbHomUcmouHky 3JekmponumaHua MoXem npubecmu K noXapy.
He donyckaume nonadahua nocmopohhux npedmemoe bhympb obopydohaun.
NonadaHue b o6opydoBaHue nocmopoHHezo npedema moxem npubeecmu K noxapy.
B cnyuae nonadahua 8o8bui npouux kudokmeu Ha daHoe ycmpoucm80
HemeDneHNO omKnIOuyme Ka6eIb numAHua U o6pamumecb K KbauuupoBaHHOMy 06cIyXuBaIoUeMy nepcoHany. IpoDoJIxHeue uCnoJIb3ObaHua MoKem npubecmu K noXapy.
He ucnolb3yume bHympu daHno2o u3deu na pYdOM c HUM a3pO30nbHbIX paCnblumeneu, codepKaux o2HeonacHbI 2a3. 3mo moXem npubecmu K noxapy.

BHUMAHNE:
Iodknioaume ka6enu moIbko B coombemcmbuu c uHcmpykuuMa, npubeDeHHbIMU 8 mom pykoobocme. Dpy2oe nooknoueue ka6eneu moxem npubeecmu K noBpejdeHuO u BOcnIaMeHeuO obopydoBaHua.
YcmaHabnubaume obopydoBaHue moIbKO ha ycmouuBoU, mbepoU 2OpuzOnMaJIbHOu nobepxHocMu. IadeHue obopydoBaHua moKem npubecmu K eo noJOMke uLI K HaHeceHuO mpaEM nepcoHany.
He ucnolb3yume obopydobaHue b nomeueHuX, omluauouuxc b6icokoBnaxHocmbu 1u 3anbileHHocmbu 603dyxa. Ype3Mepna BnaxHocmbu 1u 3anbileHHocmb Moym npubecmu K nobpejdeHuU 1u BocnlaMeHeHuO obopydobaHua.
He knaadume Ha obopydobahue mxeiye npedmembl. Hukozda He bcmabaune Ha obopydobahue u He onupaumecb Ha Hezo. Obopydobahue moxem ynacmb uU cIomambc; b 6ooux cnuyax Bo3MOxHO HaheceHue mpaBm nepcohany.
Bhumahue, He nopahbme nalbu pyuHbIM pe3aKOM
- Bbimackkua paeeamky
- BbinoJIHЯ ἀργεύγι ρaδomy, Hanp. ycmaHO8kγ/3aMeHy pyJIoHa 6yMa2u
B uejx obecneuehua 6e3onacncmu omcoedunhaume obopydoabaue om cemu b mom cnyuae, eclu oHO He 6ydem ucnolb3oabmbcra 8 meyeHue dIumelbHo2o BpeMeHu.
Ipeynpekdaouue ma6nuku
Ha IIpeIyIIpeKJaIOIInx HaKJIeIKAx Ha I3IeIIN yKa3aHbI cJIeIyIOIIne MepbI IIpeIOCTOpOJHOcTn.

BHUMAHVE:
Bo vpema neyamu u cpa3y nocne ee 3aepwehna mepmo2o1obka 6b1baem ouehb zoayeu. Ppuokochobene K Heu moxem npubecmu K oko2am.
3a2py3ka dpaubepo8, ymulum u pyko0odcm8
IpaBbI, yTNIITbI IN pyKOBOCTBa IocJIHINX BepCm MOxHO 3aRpy3NTb CO cIeIyIOIInx caITOB:
www.epson-biz.com/
http://support.epson.ru
Демаши npuinmepa
PanaheIb ynpaBneHua
①CBETOДNOD
Tognt,ecnPiokIIOyeHO IITaHne H He TOpNT,ecnPiTaHna HeT.
!CN(Error)
He ropnt ecnn npnHTep eoKIOUeH K cetn, ropnt ecnn pnpHTep He B cetn Mmraet PpN BO3HNKHOBeHm OIN6Kn.
CNJ(Paper)
TOpNTecIN3aKoHnIacb6ymara.
Khonka (Feed)
IpaetpyoH6ymar.
Topu3ohmabha u bepmuKaIbHa ycmaHOBka npuHmepa
BbMoKeTe yCTaHOBTb IIpHTEp TOpN3OHTaJIbHo (KOrIa 6yMaRa BbIXoJIT CBepxU) NII BePtNKaJIbHo (KOrIa 6yMaRa BbIXoJIT cIpeEIN).
Ipn ycTaHOBKe IpnHTepa BepTKaJIbHO IpnKpeIIITe JeI6JI NaHeJIyIpaJIeHnHa KOpIyc IpnHTepa N YcTaHOBNTe erO Ha POBHyIOIOBepxHOCTb. (cm. pucyHOK A.)
Сяamusу улу усmaноьканпавсяюцх дя 6умазу
YcTaHOBNTe Nn CHMNTe HaIpaBIAIOU OIO 6yMaN IIN COOTBeTCTBn IINpHHe NcIOb3yeMOrO pyIOHa 6ymaN.
口MOneN65*
YcTaHOBJIeHa HApBaJIIOIIaI 6yMaIg 40 MM.
- Ipu ucnolb3oBaHuu pyloHa 6yMa2u wupuHo 40 MM ucnolb3yUme npuHmep kaekcmb.
- Ppu ucnnoB3oBaHuu pyNoHa 6yMa2u wupuHo8 80 MM cHumme ycmaHOeHHyIO HanpaBnIouyIO.
口MIOeIN 66*/67*/68*
YcTaHOBHeHaHnPaBIAIOIaJn 6ymar58MM.
- Ipu ucnolb3oBaHuu pynoHa 6yMa2u wupuHo 58 MM ucnolb3yuIm npuHmep kaekcmb.
- Ipu ucnolb3oBaHuu pynoHa 6yma2u wupuHou 80 MM cHumume ycmahOBenneHyIO HanpaBnIouyIO.
- Ppu ucnnoIb3ObaHuu pyNoHa 6yMa2u wupuHOu 40 MM cHumume ycmahOBneHHyU HnpaBnaIOuyU yCmaHObume nocmaBnEMyU b KOMnIeKme HanpaBnaIOuyo dRy 6yMa2u wupuHOu 40 MM.

BHUMAHNE:
IcnoIb3OBAHne pyloHa 6yMaHn IInpe IpeYcMOTpeHHoro pa3Mepa MoKeT IIpNBecTn K cHJKeHIO KaYeCTBa NeYaTn.
Chamue HanpaBraIoueJd76yma2u
- OTKpoIe KpbIIK Ky OTJeIeHn IJI pyIOHHo 6yMaIc IIOMOIIbIO pbIyara OTKpbITnK KpbIIKN. (CM. pncyHOK B.)
- BbITaHHTe HaIIpaBIAIOUIne 6yMaI IN B HApPaBIEHIN, YKa3aHHOM CTpeIKoHa pncyHKe C, IOTaHyB 3a pbYar HaIIpaBIAIOUIx 6yMaI IN YTO6bI CHrTb eRO.
YcmaHOBKa HanpaBraIoueJd76yma2U

BHUMAHNE:
IIOJKeHHe yCTaHOBKn HaIIpaBJIIOUeI IJI 6yMaI N OTINuAeTcB B 3aBnCmOCTn OT IIINpNbI HaIIpaBJIIOUeI. He yCTaHaBJIINBaIte HAIIpaBJIIOUyIO 58 MM B IIOJKeHHe HaIIpaBJIIOUeI 40 MM.
- OTKpoIe KpbIIK Ky OTJeIeHn IJI pyIOHHo 6yMaIc IIOMOIIbIO pbIHa r OTKpbITnKpbIIKN. (CM. PncyHOK B.)
- CoBmecTnTe BbICTyH NaIIpaBIAIOIe IJIa 6ymar n c OTBepCTnem (pncyHOK E3) B IepXkATEIe pyloHa 6ymar n.
- COBmecHTe yToI HAnpabIIaIOuIe IJIa 6yMaIc IIpope3bIO (pncyHOK E4) B IepKaTeIe pyloHa 6yMaI.
- CoBmecTHe 2 OTBepCTnA (pncyHOK E5) B HnIpaBIAIOUeN IIa 6ymar n c 2 BbICTyIIaMn B IepKaTeIe pyIoHa 6ymar n.
- HaKMITE Ha pbIyar HaIIpaBIAIOx 6yMaI IN IO IIeJIyKa, yKa3bIBaIOIIeM Ha TO, YTO HaIIpaBIAIOxne 6yMaI IN yCTaHOBIIeHbI Ha MecTe. (CM. pncyHOK D.)
IodKnHueKe6eue
- YcTaHOBnTe IIpHnTepeK KaK IOKa3aHO Ha pucyHKe F, nIOTAHnTe KpbHkY B HApabHeHH cTpeJIKN KaK IOKa3aHO Ha pucyHKe, YTO6bI CHrTb KpbHkY.
- OToPbIte pyKoI IIO60I IN3 TpeX Ja3bIYKOB, 06BeJeHHbIX Ha pIscyHKe KpyKoUKaMn G YTO6bI IPOBecTn Yepe3 HIX Ka6eII.
3.ПоДКЛЮЧТe Ka6eIN K npHTepy. - YctaHOBNTe KpbIiKy, npOnycka Ka6eJIu Chepe3 OTBepCTnJ.
YcmaHOBka uIu 3aMeHa pyloHa 6yMa2u

BHUMAHNE:
y6edumecb b mom, ymo ucnolb3yemay pyloHna 6yma2a ombeyaem bcem xapakmepucmuKam.
Ipu u3MeHeHu muna 6yMa2u, c 6yMa2u dna neu6no8 6e3 npoknaDku Ha mepaHbHyIO pyNoHHyIO 6yMa2y, peKomeHdyemc noUcMumb nymb 6yMa2u. (cm. pucyHOK"Ouchmka npunmepa u3Hympu"Ha cmp.91.)
- OTKpoIe KpbIIK Ky OTJeHnI pyIOHHo 6yMaIc IIOMOIIbIO pbIyara OTKpbITnI KpbIIKN. (cM. pncyHOK B.)
- BbItaIITe IcNoJIb3OBAHHy6a6HpyuHa, ecII OH eCTb.
- YcTaHOBInTe pyIOH 6yMaIIN B HUxKHom HaIIpaBJIeHN. (CM. pncyHOK H.)
- BbITaHHTe HEMHO 6yMaH, BBipabHJTe 6yMaIy IIO HaIIpaBJIIOIIM 6yMaIc O6eIX CTOPOH. (CM. pncyHOK I.)
- 3aKpoIe KpbIIky OTdJIeHnI pyIOHa 6yMaI. KorIa IIpInIteBkIIIOUeH, 6yMaIra IOnJaETcN I OTpe3aETcA bTOMaTIueCKN.
IIpumeaune:
Y6edumecb b mom, umo Bbl nonHocmbio 3akpbuu Kpbuuky omdeeneu
dpaynonhoB ymau, hkaab Ha cpeHyiou acmb Kpbuku.
Yucmka
Yucmka kopnyca npuHmepa
Bo Bpemy yxoja 3a KOpIycom IpnHTepa, y6eIITecb TOM, YTO IpnHTep BbIKIOueH IN IIPOTpne KOpIYc IpnHTepa cyxO HIN BlaJKHOH TKaHbIO.

BHUMAHNE:
3anpeuamc ouyumb u3deue cnupmom, 6en30om, pa36abumelem dny kpacku u dpyzmu pacmbopumela mu. mO moXem bbl3bamb noBpeKdeHue yacmeu, cdehaHbix ux nlaemmaccbi unu pe3uHbi.
Ouucmka npuHmepa u3Hympu
OuHCTNTe IeTaII IN BHyTpI INPHTepa (Je3BHe aBTOMaTNUeCKORo pe3aKa, OIOpHbI BAIIK, TepMOrOIOBka N OKpyKaIOUaJy o6JIaCTb, IepKaTeIb pyIoHHo 6yMaI IN T. I.), YTO6bI o6ecPiYtB XopoIiEe KaueCTBO IIeHaTI. IEPnoDInueCkn OOnIaJIte IeTaII IN PImePHo pa3 B IWeCTb MecaIeB.
Дя Oуистки отпх Детаileи Выклioчnte прнтep, OTлioчnte ceTeBOй Ka6eJIb, OTKpoIte KpbIshky OTdelenHЯ Дя руLoHa 6bMaIи, И уdaIINTe 6bMaJxHyo IIbIb, ПрИIMIIшКЛeN IINpyTOm MycOp c IOMOIIbIO BaTHOH IaIOUKN IIN caIΦetKn, CMOueHHOВ B cIInpTOBOM pactBope (эТанОЛ nI IN N3OПРОПИLOВьй спИТ).
EcnI rpa3b HaIIINIIa BOKpyr IaTUnka YepHOJ MeTKN, cIyIte NIIcOTpNTe ee, YTO6bI BOCCTaHOBnTB HopMaJIbHyIO pa6Oty IIpHTEpa.
Pa3MeIeHne KaJIOJ IeTaJIIM MOXHO IOCMOTpeTB Ha IJIIOCTpaIIN HIXe.

BHUMAHNE:
Ecnu Hanun kneu, y6edumecb b mom, ymo Bby e2o noJHocmby bImeprn.
OcmopoxHo, He npaHme naIbUbi pyuHbIM HOXOM BO 6pemr ouucmku.
Ipeod mem, kak bknouumb npuHmep nocne ouucmku, daume nonHocmbio bbicoxhymb cnupmy ha npuHmepe.

BHUMAHVE:
Tepmozolobka moxem cunbno Hazepbambcnaocne neyamu. He npukacaumecb K zoayeu zolobke u haunhaume ee ouucmky monbko nocne mzo, kaKa OHa ocmbiHem. IpuKocHObeHue K mepmoneyamaoueu zolobke naIbuaMu unu IIObIM mbepdbim npedmemom moxem npubecmu Ke en nobpekdehuo.
3anyck camonpocepku
BpeKIme cAmOIIpOBepKn IIpHTEp IIpoBeIeT cepNIO BHeIHINX IIPOBepOK, 3aTeM,IpeIOcTaBNT paCIIeYaTKy C InapaMeTpamN IIpHTEpa.
Ipn o6paueHnB clyk6y TexHuecko IOpIepKKn, paIeHaTaHHbIe pe3yIbTaTbI caMOIIpoBepKn IOMOry T yCKOpITb peIeHne IpO6JIem.
IIaIycka cAmIOOBepKn Heo6xOIMMO IprnepKNaBcra CneIyUoiE IIpoueIypbI.
1.3aKpoIe KpbIuKy pyIoHa 6ymaHn
2. YIepKINBaHaKaToHKOIIky (Feed) Ha IaHeIyYIIpaBHeHn, BKIOHTe IIpInTep. (IpoIoJIkaTe HaKMMaTb KHOIIKy (Feed) IO Tex IOp, IOKa IIpInTep He NaUHeT NeuTaTb.) IIpnHTep NaUHeT paCIIeAe TaBb Pa3IiHbIe TecTOBBe JInCTbI.
3. Korla Bce coctoHn Hpntepa 6bHn HaIeYaTahbl, y6eHTecb, YTO oTo6paKaetcra cneIyUoOee coo6uHne n CII (Paper) Mnraet. «If you want to continue SELF-TEST printing, please press Feed button.» IpnHtep nepeiTeB peKm OxuaHn caMOTectnpoBaHn.
4. ηTO6bI HaHaTb TecTOBvIO NeaTb, HaxMMTe KHOIIKy (Feed), KOrJa IIpHnTEp HaxOДNTcA B peKIMe OxNJaHnA caMOnPObepKn.
- Y6eIntecb, YTO 6bIIO paCneYataHo cIeIyUoee.
*** completed ***
TO O3HaayeT, YTO IpnHTeP IIpNBedeH B rOToBHOCTb N IpeKJIIOUHINcB 06bIHyI peKIM.
Ipepe3a2py3ka npuHmepa
HeKOTOpbIe OIIIN6KN MOryT 6bITb NcIIpaBJIeHbI BblIOUeHNEm N BKJIIOUeHNEm IIpnHTepa.
He BCE OIIIN6KIMOryT 6bITb yCTpaHEHbI IaHHbIM MeTOJOM. BoJIe IeTaJIbHaI HΦOpMaIgB B pa3dIe "YcTpaHHeHne HeIOJaOK" Ha cTp. 94.
YcmpaHeue Henoladok
Heuerkay neaatb
EcIII NeuTb HeueTeKaia, BO3MOxHO Ha TepMOrOIOBKe, IIpIXKIMHom BaJIke IIN IO IYTN IIOaun 6yMaRn IIpInTEpa HAIIN KJIe INIIN dpyToMycop.
B ΘOM cIyuae cHaJaIa OUnCTnTe TepMOrOIOBky, B COOTBeTCTBm C HcTpPyKIIaMn, OINcaHHbIMN B “OUnCTKa IprHTEpa N3HyTpN” Ha cTp. 91.
Ecni KaueCTBO NeaTu He yIyUHINIOcb, OUnCTHe IprKUMHO BaIIK II PyTb IOnaHu 6yMaHn COJIacHo IHcTpYKIIJm, OIIncAHHBIM B “OUnCTKa IprHTepa N3HyTPn” Ha cTp. 91.
Pa3Mep IIeayathbIX cIMBOLOB He IIOXoIIT IJIa 6yMaRn IINpHNoi 40/58 MM
Ecnn nncno3oHaHnn pyloHa 6yMaHn IInpHNoH 40/58 MM pa3mep
IeYaTHbIX CmMBOIOB He IIOxOHT Nn IeYaTb He COOTBeTCTBYET IIINPHe
6yMaHn,TO,BO3MOKHO,HaIIpaBIAIOIIaJ IJIg 6yMaHn yCTaHOBJIeHa
HEIIpaBnIbHo.
Cbimlodoohui iDukamop (Paper)
Cbitntbcra, Bka3yIOuHa Te, IIO pyIOHHn IaIIp 3aKiHcNBCra.
Khonka (Feed)
BnKOpncTObyETbcra IJI IOaui pyIoHHOIaIepy.
YcmaHOBJIeHn npuHmepa 20pu30HmajbHo a6o bepmuKaJbHo
IIpHTeP MoKHa BCTaHOBtN TOpN3OHTaJIbHo (3 BnXoJOM IaIepy 3BepxU) a6o BeptNKaJIbHo (3 BnXoJOM IaIepy cIpepy).
Y pa3i BEpTNKaJIbHOrO BCTaHOBJIeHHI IIpHTepa IIpNKpIITb IO IIO IORO KOpIyCy eTKeTKy IaHeI KEpyBaHH, IIO IOnaETbcra, i BCTaHOBITb IORO Ha pIBHy IOBepxHIO. (IINB. iIOCTpaIIO A.)
3нямma abo bcmahOBleHnHa npamhoi dny nanepy
YcTaHOBIb a6o 3HIMITb HApMHy IJIaIaIepy, JaKa BiIOBIdae IINpHi pyIOHHORO IIaIepy, IIO BnKOpNCTOByETbcra.
口MnMoJIeIi 65^
YcTaHOBJIeHO HApPmHy IJII IaIepy Ha 40 MM.
Kolu bukopucmoeyembcpaynHnui nanip 3aewupku 40 MM, bukopucmoyume npunmep, k.
Kolu bukopucmoByembca pynoHnui nanip 3aewupwu 80 MM, 3himmb ycmahOBneHy HanpMHy.
口IЯ moJIeI 66/67/68*
YcTaHOBHeNo HaIpyMHy IJIy IIaIepy Ha 58 MM.
- Kolu bukopucmoBye mbcra pylonHu nanip 3abwupku 58 MM, bukopucmoByume npunmep, k.
Kolu bukopucmoemybce pynoHHu nanip 3aewupwu 80 MM, 3Himmb ycmahOBneHy HanpymHy.
Kolu bukopucmoemybpaynHnui nanip 3aBwupku 40 MM, 3himmb ycmaHOJIeHy HanpMaHy i bcmahOeMb HanpMaHy dna nanepy Ha 40 MM, uo exodum do kOMnneKmy.

3ACTEPEXEHH:
IepexiHa pyIOHHn Iaip, IIIpIII 3a Toi, IO BnKOpNCTOByeTbcra, MoKe Ipn3BecTI DO 3HNJKeHHRAKOcTi dpyky.
3nmmnHanpamhoi dnyanepy
- BiKpnIe KpNkUy BiCikU y IJIpy pUIOHOrO IIanepy 3a IOIOMoTOBaKeJIa BiKpNTTg KpNtKN. (INB. iIOCTpaIio B.)
- IocyHbTe HaipmHy IJIa IIaIepy B HaIppmKy, IOKa3aHOMy cTpiIKoIO Ha iIOCTpaII C, BOIOHOac IOTARHYBIII BaKJIb HaIppmHOI IIJIa IIaIepy, IIIO6 3HrTu II.
YcmaHobIeHHa HnpaMHOi dna nanepy

3ACTEPEXEHH:
IIIOJOKeHHBCTaHOBJIeHHHaIIPMHOI IJI IaIepy 3aJIeKHTb BiI II IINpHn. He BcTaHOBJIHOte HaIIPMHy IJI IaIepy Ha 58 MM y IIOJOKeHHa IJI HAIIpMHOI Ha 40 MM.
- BiKpnIe KpNkUy BiIcIKy IJIpy pUIOHOrO IaIepy 3a IOIOMoTOBaKeJIa BiKpNTTg KpNkN. (INB. iIOCTpaIio B.)
- Cymictitb BnctyHnnpaMHOi IIAI NaIepy 3 OTBOPOM (iIOCTpaizE3) y TpMaui pyIOHHoro IaIepy.
- CymictiB kyT haipmHoi iIra Iaepy 3 BnIMKOIO (iIOCTpaizia E4) y Tpmaui pyIoHHoro Iaepy.
-
Cymictb 2 OTBOpn (iIOCTpaiz E5) y HApPmHi IJIa IIaIepy 3 2 BnCTYIIaMHa TpIMaui pyIOHOrO IIaIepy.
-
HatackaiTe Ha BaJIb HApIaMHOI IJIaPiepy IOHN3Y,IOKHaIpaMHa IJIaPiepy He 3aΦiKcyETbc3 KlaIaHHaM. (INB. iIIOCTpaIio D.)
Пдклоченя ka6eJIb
- Пocтав tradeприпгетер,як пokа3aHo Ha iIIOCTpauiF, i notarHITb KpniKky BHaIIpЯMky,пOKa3ahomy ctrpiIkoIO Ha iIIOCTpaui, ilo6 3HATn ii.
- BiДlaMaIte pyKoIO 6yIb-IAKY 3 TpBx IeTaJIeN, IIO3HaueHIX KOJaMn Ha iIIOCTpaIiG, IIO6 IIpoIyCtITN Ka6eIi Kpi3b OTBip.
3.Пиклioчить ka6eili IO npHTepa.
4.Прпкріпіть кршky,проч'tин Ka6eili Kpi3b OTBOPn.
YcmaHOBJIeHnA a6o 3amiHa pyJIoHHO2O nanepy

3ACTEPEXEHH:
Obo8'3ko8o bukopucmoByme pyloHnui nanip, uo biOnobidae mexHicum xapakmepucmuKam.
y paizi nepexody 3 nanepy dnia dpky emukemok 6e3 nioknaadku Ha pyloHnmu mepmonanip pekomehdoabaHO oucummu diHNY haekono mpaKmy npoxoKeHHa nanepy. (Duev. «OuueHHBhympiuHix demaneu npunmepa» Ha cmop. 103.)
- BiKpnIe KpNk Ky BiCicKy IJIpy pyIOHnOTo IaIepy 3a IOnOMoTOBaKeJIA BiKpNTTg KpNtKN. (INB. iIOCTpaIio B.)
- BntyHtB oCHOBy BiI pyIOHHoro IaIepy, kIO BOHa e.
- BcTaBTe pyIOH IIaIepy B IpaBnIbHOMy HApIpyMKy. (IINB. iIOCTpaIIO H.)
- BntTgHiTb HeBeNk Ky KIIbKicTb IaIepy, BnpiIBHbIN NOrO 3a HaIppMaHmN dIa IaIepy 3 o6ox 60KiB. (IINB. iIOCTpaIio I.)
- 3akpnTe KpNkky Biiciky IpyIOHoro IaIepy. KoJn JKNBHeHH npHTepa BBIMKHeHO, IaIip IIOaETbcry O6pi3aETbcra ABTOMaTHNo.
IIpumimka:
Obo8'3kofo nobHicmno 3akpuime kpuuky biodciky dpaynhozo nanepy, hamuchyuuu Ha ii cepeduhy.
OyuueHn
OyuueHnKaOpnycy npuHmepa
IIO6 OUHCTNTN KOpIYc IpiHTepa, 06OB'3KOBO BUMKHITb IpiHTep i BNTPiTB 6pyd 3 KOpIYcy cyXOIO a6o BOJIOTO TKAHNHOIO.

3ACTEPEXEHH:
YxodHomy pa3i He bukopucmoByume dny ouuueHn npodykmy cnupm, 6eH3un, po3pidxyba ma iHui nodi6Hi po3yuHHuKu. Lc moKe npu3becmu do nowkoedxehn a6o pyuhybaHHnnaemukobux i zymobux demaneu.
OyuueHnBHympiuHix demaneu npuhmepa
ДяЗбeyeHЯHaJIeKHOIЯKocTiДpyky cIIBnKOHyBaTи OUnIeHЯ BHyTpIHIXIeTaIeI npHTepa(JIe3O aBTOMaTHUHO pI3aKa,ОПОн BaIHK,Термалha rOlOBKa Ta IIJIAHKA HabKOIO Hei,ТрIMaч pyLOHORO IaIepyToIO)iTexHiuHnДогIa 3a HmN.ОчиSeHЯДetalei iTexHiuHn IOrIa3a HmN cIIIpeIOdUnHO BnKOHyBaTи Prn6IIN3HO pa3 Ha IIcTB MicraIIb.
IIO6 ouHCTHTN iI eTaII, BIMKHiTb IIpHTEP, BiE'EnHaIe Ka6eJIb 3MiHHORO cTpMy BiE eIEeKTPomepeXi, BiIKpnIe KPNIIKY BiICiKY IJIpy pUONHO rIaepy Ta BuaIIITb IaIepOBn IIN, KJIe Ta iHIII CTOpOHHi peOBNH 3a IOIOMOTO BAthoro TaMIOHa a6o TKAHNH, 3MOeHNx CInpTOBm PO3UnHHNKOM (eTIOBn a6o i3OIIPOPiIOBn cInpT).
Якшо паперови пл пис tab Habkoю Датчнka уорно miTKи, 3ДуITE a60 BHTpiTb Ioro, lo6 3a6e3IeHTN HopMaJIbHy po6OTy IIpHTEpa.
Micra po3TaIyBaHHBcix IeTale Noka3aHo Ha iIOCTpaii.

3ACTEPEXEHH:
KuO do demaneu npucmae Kneu, oob'3koB bumpmb u0zo.
Iid yac ouuueHn 6ydbme obepeXhi, uo6 he nopahmu naIbci pyHUM p3akom. Iaped mum k ymuKamu npuHmep nicra yuueHHauekaume, noku cnupm Ha npuHmepi noBicmIO buoxHe.

3ACTEPEXEHH:
Iicra dpyky mepaHbHa 2oNo6ka Moke 6ymu dyxge zapraoio. Bybme obepekhi, uo6 He mopKnymuci ii, daume iu oxonoHmu, a nomim ouucmib ii. He nowkoDbme mepaHy 20jBky naIbqamu a6o IHwum mbepdum npedMemom.

TepMaIbHa dpyKyBaIbHa roIobka (ceKzirHaarpiBaHHa)
BntpiTb yBecb nanepeOBn nn 3 TepMaIbHOI rOIOBKn Ta II OTOUcHH.
Tpmau pynoHoro nanepy

Bukohann camonepebipku
Y peKIMi caMOIpeBipKn IIpHTEp BnKOHyE cepio OIIepaIi BHyTpiiHboi IiaHocTNKn, a IOTIM IIpyKye CINCOK IapaMeTpib IIpHTEpa.
I KIIO IIJ Yac BHKINKy Cnyk6n TexHicHOI IIITpHMKn y Bac IIJ pyKOIO 6ydyTB HaIPyKObaHI pe3yJIbTaTu camOIIpeBipKN, Ie MoKe IIpNcKOpNTI pOec IOniKy J ycHeHHa HecPpaBHocTei.
IIO6 po3IOuATn caOJIpeBipKy, BIKOHaIte OIIncAHy HIXKYe IpoIeIpy.
- 3akpuTe KpIuKy BiIciKy IJI pyIoHOrO paIepy.
- YtpmyuHnHaTncHyTOO Kbky (Feed) Ha nHeJI KepyBaHHa, yBIMKHTb IIpHTEp. (YtpmyTe HOnKy (Feed) HaTncHyTOO, IOKn IIpHTEp He p03IOUHe IpyK.) IIpHTEp IpyKye BiIOMoCTi Ipo pi3HomAHITHi cTaHN IIpHTEpa.
3.ПicЯДpyky BiIOMocTeI Ipo Bci CTaHn IIpIHTepa IpekeHaItecA, IIO BiIO6paKaEcTbc8HaBeJe HIXKYe IOBIOMJIeHHra Ta 6JIIMae CBITIOIOHN iINIKaTOp (Paper). "If you want to continue SELF-TEST printing, please press Feed button." Picra Iboro IIpnHTep IpeeyIe IOp peKIMy OUYBaHHra camOIIpeBipKN. -
Μιοδ ροπούατη TeCTOBι ἀργκ, ὃτιςχΙΤβ Κίουν (Feed), κοῦν πρηntερ περεδυBaΕ B peχμMi oʊικyBaHŋa camοπepeBipKN.
-
Ipepebipte, uHaIpykoBaHO TaKe IOBIDOMJIeHHa: " completed " 1e Bka3ye Ha Te, IIO npHTeP iHiaIi3ObaHo i BiH IpeeyIIOB IO 3BnuaHoro peKIMy po6OTn.
BiiKpnIe KpNkUy BiCikU yIpyuONHOrO pAnepy IpeBipTe, Hn HeMaE 3MnHaHHaPipepy. KaIO BnHKnIO 3MnHaHHaPipepy a6o KpNkKa BiCikU yIpyoHOrO pAnepy He BiKpNBaETbcA, INB. po3iHnKxue.
BumKhitb npHTep, a Notim 3HOBy BBimKhitb noTo. Kaio CBiTIOIOHN iHnKaTOp BCE OAno 6nMae, IOBIOOMTe Ipo Ie CBOrO KepiBnka. MoJInBO, pInHTep IOTpe6ye o6cIyTOBYaHHa.
3MnHaHHaepy
BmKHiTb KInBHeHH i BiIkpNte KpnKy BiCicKy IpyoHOrO pAnepy, 06 BnAHTn 3im'ATn IIanip. Iicra IboRo IpaBnBHO BCTaHOBTb pyoHnn IIanip. JkIo KoPiKa BiCicKy IpyoHOrO pAnepy He BiKpNBaETbcra, nVB. po3di HnKue.
Якwo Ha Ie3o aBTOMaTHUHOro pi3aka, onOpHn BaIIK a6o TpaKT IIpoXoJKeHHI paIepy IIOtpaIINb KJIeI a6o iHIIa CTOpOHNpeYOBnHa, MoKe cTaTncs 3MnHaHHI paIepy. IINB. iHcTpkyIi 3 OUnIeHHB pO3IiI «OuIeHH BHyTpIiHix IeTaIe IpnHTepa» Ha cTOp. 103.
IIpumimka:
BukopucmaHH npunmepa npomzom mpuaba0o uacy moke npu3becmu do 3nouybaHH onopho2o bauka, bnaclidok y02o nanip dny dpky emukemok 6e3 nidkndku 6yde ne2ko npucmabamu do onopho2o bauka. Ikuo npunmep 3auiuumu ha mpuabaui uac 3 ycmaHObnm y hboMy nanepom dya dpyky emukemok 6e3 nidkndku, mohe cmamuc3MuHaHH nanepy uepe3 npucmabHH nanepy dny dpyky emukemok do bauka. Ikuo cmaembc3MuHaHH nanepy, ouucmbme bHympiuHi demani npunmepa. (OchuueHnBhympiuHix demaneu npunmepa> Ha cmop.103) Ikuo 3MuHaHH nanepy mpanlaembca yacmo habimb nicra ouuueHH bHympiuHix demaneu npunmepa, onopnuBaIHK heobxioho 3amihuMu. 3bepHmbcdo Kbaifikobaozo o6cly2Obyouo2o nepcohany.
TaKoJx MoXHa 3aIIO6irTn 3MnHaHHIO IaIepy, 3a3JaJIeIb IIpeBcTaHOBnBHI pyIOH 3 IaIepom. («YcmaHOBneHnA abo 3amHa pyIoHNOZ nanepy» Ha cmop. 102)
IIOIO texhiuHx xapaKtepncTK moJIe 68*: IeI npHTep o6laHaHO yHKiEIO, kA 3iiinHoe nepiounHy IoJaCy IIanepy 6e3 IpyKy, kIIO KINBHeHHI pInHTepa BBIMKHeHO IpoTAYOM TpNBaIoro Yacy (Ipr6I.12 roHN), IIra 3aIO6iraHHI IIpcTaBaHHIO Ianepy IJIa IpyKy eTNKeTOK IO ONOPHOrO BaIIka. BepXHe IIOle cTOpIHKn, HauPyKObaHOI HaCTYIIHOI IIei IIOaui Ianepy, 6yJe BeIINKm, HabITb IAKU OBBIMKHeHO 3BOPOTHy IIOaCy.
KpIIka Biiciky IJI pyIooHoro IIanepy He BiIKpNBaETbc8
KaFa3 6aFbITaybIbIN naIdaIaNbIbIN KaTkaH opam KaFa3 eHHe caI 6oIaTbIHdai OPhaTbIHbI3 Hemece aIbIHbI3.
65* ynrici ywiH
40 MM KaFa3 6aFbTTaybIbI opHaTbINFaH.
Ehi 40 MM KaFa3 6aFbITaybIbIH naJaIaNHaHda npHTepdi 6ap KyiHde naJaIaNbIbI3.
EHI 80 MM KaFa3 6aFbITTaybIbIH naJaIaNHaHda opHaTbINFaH 6aFbITTayblITbI aNblHbI3.
66/67/68* ylrici ywiH
58 MM KaFa3 6aFbITayblbI opHaTbINFaH.
EHI 58 MM opam kaFa3dbI naJdaHFaHda npHTepdi 6ap KyiHne naJaHaHbIHbI3.
Ehi 80 MM opam KaFa3dbi NaIaIaNHaHda OPhaTbINFaH 6aFbITaybltbl aIbIHbI3.
EHI 40 MM opam KaFa3dbI NaJaIaNHaHda OPhaTbINFaH 6aFbITaybIITbI aNbIHbI3 XaHE KaMTbINFaH 40 MM KaFa3 6aFbITaybIWBH OPhaTbIHbI3.

HA3AP AYdAPbIHbI3:
PaiIaIbIbIn KaTkaH opam KaFa3daH KeHipeK opam KaFa3Fa aybicy 6acbIbI bIFapy canacbIH TeMeHDeTyi MymKiH.
KaFa3 6aFbITTaybIWBiH aIbIn TaCTay
- KaKnaKTbI aWy Tetiri apKbIbI opam KaFa3bIHbIH KaKNaFbIH aWbIHbI3. (BcypTeIH KapaHbI3).
- KaFa3 6aFbITTaybIbH anbIn Tactay ywiH KaFa3 6aFbITTaybIbHbH TetiriH TapTbIn C-cypetIHderi KepcETKi 6aFbITbIHda TapTbIHbI3.
KaFa3 6aFbITTayblWBih OPHA TY

HA3AP AYdAPbIHbI3:
KaFa3 6aFbITTayblWBihOpHaTy OPhbl KaFa3 6aFbITTayblWBihEHIe
6aINaHbICTbl e3repin OTbipadbl.58 MM KaFa3 6aFbITTayblWBih 40 MM KaFa3
6aFbITTayblWBihOpHbHa OPhTnAHbI3.
- KaKaTbI aWy Tetiri apKbIbI opam KaFa3bIHbIH KaKaNaFbIH aWbIHbI3. (B-cypTeIH KapaHbI3).
- KaFa3 6aFbITTayblbHbIH WOKbICbIH Opam KaFa3bIHbIH YCTaFbIWBHdaFbl OibIKneH (E3cypeTih KapaHbI3) TypalaHbI3.
- KaFa3 6aFbITTaybIiBihIN 6ypbIuBH opam KaFa3bIHbIH YCTaFbIuHdaFbl OIMaMeH (E4 cypeTih KapaHbI3) TypaHaHbI3.
- KaFa3 6aFbITTaybIbIHdaFbl 2 ONBkTbI (E5cypeTih KapaHbI3) opam KaFa3bIHbIH YCTaFblWBHDAFbl 2 WOKbIMeH TypaJaHbI3.
- KaFa3 6aFbITTaybIbIHbIH TetiriH KaFa3 6aFbITTaybIbIbOpHbHa TYCKeHwe 6acblHbI3. (D-cypeTih KapaHbI3).
Ka6eIbIepdi KaIay
- PpInTePdi F-cypEtIHe KepcetIinReHdei OPhaIaNCTbIPbIHb3 XeHe KaKNaFbIH Weu yuH OHbI CypETte KepcetIinRe H KepcETKi 6aFBtBtHa TaPtBuHbI3.
- Ka6eIbIepdi eTKi3y yuIN GcypTeIHDe dHreNeKTEp apKbInbI KepceTinreH yu 6oJIkTIh bipeYih y3iHi3.
- Ka6eIbIepi npHTepeX JaIFaHbI3.
- Ka6eJIbIepdi OoiBtap apKbIbI eTKi3reH Ke3de KaKaNaFbIH TIPKeHi3.
Opam kaFa3bIH opHaTy HeMece aybICTbIPY

HA3AP AYdAPbIHbI3:
TexHnKaJIbIK CInaTTapFa KAYAN BepeTih Opam KaFa3IbI NaJdaNaHbIHbI3.
Erep KaFa3 TypiH iwnekci3 6enri KaFa3bHaH XbIy opam KaFa3bHa aybICTbIpcAhbl3, KaFa3 XoNbIHbH aHnacbH Ta3aHaFah XeH. ("PpHtep iwiH ta3anay"114-6etteri KapaHbI3 KapaHbI3).
- KaKnaKTbI awy tetiri apKbIbI opam KaFa3bIHbIH KaKNaFbIH aWbIHbI3. (B-cypTeIH kapaHbI3).
- Erep 6oIca, naIdaIaNbIINFaH opam KaFa3bIHbIH e3erIH anbI TaCTaHbI3.
- KaFa3 opaMbH dypbic 6aFbITTa caNbIHbI3. (HCypeTIH kappaHbI3).
- KaFa3DbI eKi KaFbIHdAfbI KaFa3 6aFbITaybiHTapbIMeH TypaJIan, KaFa3DbIH a3FaHTaB 6oJIirH TapTbIHbI3. (fCypeTIH KapaHBI3).
- Opam KaFa3bHbIH KaKnaFbIH Xa6bHbI3. PnHTep KocbIFAH Ke3de KaFa3 aBTOMaTTbI Tpye 6epinei JxHe keciJei.
EckepTne:
KaKnaK opTacbIH 6acbl, opam KaFa3biHbIH KaKnaFbIH TObnIK Xa6biHbI3.
Ta3aIay
Приптор Кабын Тазалay
IpnHep Ka6bIH Ta3aHaFAn Ke3e npHTepei oipin, npHTepe Ka6bIHdaFbl NaCTbl Kypfak Hemece DbIMKbl Wybepeken CyptiHi3.

HA3AP AYdAPbIHbI3:
O himdi aankorolbmeH, 6eH30lmH, epitkiuHHeMece 3re yKcac epitihimn MyIem Ta3aJamaHbI3. ByI apeket nlaactMaCcaH JxHe pe3ehKeJeH XacaIHaH 6oikTepi 3akbIMdaybl HeMece cbIHdbipybl MymKiH.
Приптор iшin Тазалay
Kakcbi 6acbin uibfapy canacih caTay yuH npntep iwiHderi 6oikTepe
(aBTOkeckiW KY3, TIpeK 6NIikwe, TepMO 6acbIn WbIFapy 6acbIXeH aINHaIaCbIHdaFbI ayMaK, KaFa3 opaMbH YCTaFBiW, T.6.) Ta3aIaNbI3 XeH e KytIi3. BoliKTePdi Ke3eHdi TYPDe, WaMaMeH aNTbI aN caBbH Ta3aIaNbI3 XeH e KytIi3.
ByI 6oJIkTepei Ta3anay ywiH, npInTepdi oWipiHi3, aHbImaIbI TOK Ka6eIH aXbIpaTbIHbI3, opam KaFa3bIHbIH KaKNaFbIH aWbIHbI3 XHe Iapan epiTkiiHe
(3TaHOL Hemece n3Opponn cnpTi) MaIbIHFaH MaKta dKececimeH Hemece
Uy6eperimEn KaFa3 7aHbIn, Xa6bickan XeJIIMdi Hemece 03re 6rpeHapceHi cyptin Ta3anaHbI3.
Erep KaFa3 7aHbI Kapa 6acBInFaH cHcOp aHaHaacbHa XnHaIca, npntepdiH KaIbINTbI XyMbICbIH KaMTaMaCbI3 ety yuH OHbl Ypin Hemece CypTin Xi6epiHi3.
Op6ip 6JIik opHbIH cpeTTe KapaHbI3.

HA3AP AYdAPbIHbI3:
ErepKeiimKaabickaH6oJc,OhbIToJIbIKCyptin aIbIn TaCTaHbI3.
Ta3aJafan Ke3ne KONMeH KeckIWe CayCAKapbHb3dbj KapaKaTTan anMaHb3.
Ta3aaydaH KeiH npHTepdi Kocy aIdbHda npHTepderi anKorOnb TOnbIK KenKeHwe KyTHi3.

HA3AP AYdAPbIHbI3:
Bacbn WbIFapFaHHa KeiH XbIy Bacbl OTe bICTbIK 6OlybIMMkiH. Ohbl YCTaMaHb3
XaHe Ta3aay aIbIHda OHbl CyblTbHb3. XbIy BacbiH KOJIbHb36eH Hemece KaTTb1
3aTneh YCTan, OHbl 3aKbIMdAn anMaHb3.
TepMo 6acbln
mbiFapy 6acbl
(ksblty 6eJimi)
TepMo 6acbIuMbIFapy 6acbIHdaFbl XaHe OHbIH aHaHAcbIHdaFbl 6yKIN KaFa3 uHaHbIH CyPTIn aBbHbI3.
OpamKaFa3bIHbIH YCTaFbIWBbl
ABTOMaTTbI CbiHaKTbI OpbIHday
ABTOMaTTbI cblHaK pexmimHe npHTep 6ipKaTap iwiKi DnaHocTKaHbI opbHdaIbI
XaHe npHTep 6anTaynapbIHbN Ti3iMIn 6epeDi.
TexHnKaIbIK KOJIay Kbl3MeTIHe KOHbIPay WaIFaH Ke3De KOJIbIHb3Da aBTOMaTTbI cbIHak 6acnacbl 6oJca, akayIbIKTapdbI KOIO ydepiciH KblIaMdaTyfA KEMeri TneDi. ABToMaTTbI cbHaKtbl icke KOCy ysiH MblHa pAcIMdi naIdaIaNbIHbI3.
- Opam KaFa3bIHbIH KaKaNfBbIH Ka6bIHbI3.
- Baçapy TaKTacbHda (Feed) TyImeciH 6acbIn TypbIn, npnHTepdi KocbHb3. (Ppntep 6acbIn 6bIfapydbI 6actaFaHwa (Feed) TyImeciH 6acbHb3.)
Ppntep Tpyi npntep KyIepin 6acbin sbifapaabi.
- Барлбк пинтет кунелер 6acbIn nbIFapblfHaHah KeiH keleci xa6ap КорсетiTINREHIN XaHe (Paper) XXUДЖынblkTan TpyFaHbH TEKcepiH3. «If you want to continue SELF-TEST printing, please press Feed button.» Пинтет ka3ip abTomaTTb CBHaKTb KTY peKIMHde.
- CbHaK 6acBIn 7bIFapydbI 6actay ywiH npHTep 03iHik CbHaKTbI KYTy peXmHHe 6oNfAHa (Feed) TYMecih 6acBHB3.
- MbHaHbH 6acbIn 7bIFapbIfaHbH TeKcepiHi3. *** completed ***" By npntepin 6anTaHdbipbIn, KaIbITbI peXmRe otKeHH 6iJapei.
Приптугді bісьірі
PpHTe pIeipin XaHe KaTc KocbIn, Kei6ip KaTe wapTTapbIH bICbIPyFa 6oJaBbl. OcbI aicnien 6apbIK kate wapTTapbIH bCbIPy MymKIn eMec. KocbIMwa mAnimet any ysiH "AkaybIKTapdbI JKOIO" 117-6eTTeri KapaHb3 KapaHb3.
AkaYnbIKTapdbI KOHO
Bacna eHci3
BaCnA eHcI3 6oJFaH Ke3e JxabckbIi XeJIIM Hemece 6aCa 6oIe HApce npInTepeIN KByIy 6acBHa, 6iiKueciHde Hemece KaF3 K0JbIHda 6oJyMymKiH. ByI JkaFdaIaIdbMeH "PpInTeP iwiH Ta3aIay" 114-6eTteri kapaHbI3 iwiHde CnNaTTaIFaH HvCKayapDbI opbIHan, KByIy 6acBt Ta3aIahbI3.
Erep 6acbIn 乌bIfapy canacbI JkaKcapMaca, "PpHTepe iwiH ta3aIay" 114-6eTteri KapaHb3 iwiHde cunattanFaH HycKaynapdbOpbHdAn, npHTepeH 6iikwecin XHe KaFa3 K0JIbH Ta3aHaB3.
Басьлfan Tанба олшemi ehi 40 MM/58 MM kafa3 ушin жармды emec
Ehi 40 MM/58 MM opam KaFa3bIH naIdaIaNHaH Ke3de 6acblfA H TaH6a OJIWeMi
XapaMdbI 6oJMaCa Hemece 6acna KaFa3 eHIHe KnbICnaca, KaFa3 6aFbITayblBbI
Dypbic opHaTbIMaFaH 6Olybl MyMKiH.
Ophaty HycaynapbIH "KaFa3 6aFbTTaybIbIH opHaTy" 113-6eTTeri kapaHb3 iwiHde KapaHb3.
! (Error)Жшд кocулbl HeMece XbInbInbIKTayda
KaFa3 opaMbHbIH KaKnaFbl Xa6blk eKeHH XaHe (Paper) KLUTeKcepiH3. KaKnaKTbl Xa6blHbI3 HemeCe KaXeT 60JCa, opam KaFa3blH ayblCTblpblH3.
Erep npnTep ken 6acbln wblfapca, kblny 6acbl bictbIK 60nybl MymkiH. Bactbl cybltn anblhbl3. Bacbl n blfapy aBTOMaTTbl Typde xanFaCabi.
Opam KaFa3bHbIH KaKNaFbIH aWbIHbI3 XaHE KaFa3DbIH TypbIN KaIybiH aHbIKay ywiH TeKcepHiz. Erep KaFz Tpybn KaIca Hemece erep opam KaFa3bIHbIH KaKaNfaBI aWbIMaca, TeMeHderi 6JIIMdi KapaHbI3.
PnHTepdi eipin, KaTaN KocbHb3. Erep LED wamblkTaBkTe 6epce, 6actbIfbHb3Fa xa6apnaHb3. PnHTep KbI3MeKcpctyDi Taan eTy i MymkiH.
KaFa3dbIn TypbIn KaIybl
TpybIn KaIFaH KaFa3DbI any yuIH KyaTTbI eWipin, opam KaFa3bIHbIH KaKNaFbIH aUbIHbI3. OdaH KeiH opam KaFa3bIH dypbc OPHaTBHbI3. Erep opam KaFa3bIHbIH KaKaNaFbI aUbIMaca, TEmeHderi 6JIIMdi KapaHBI3.
Erep xenim Hemece 6aca 6ege Hape aBtokecki yctapacbHda, 6ilikwecihde Hemece KaFa3 K0nbHda 6oIcA, KaFa3 TypbIn KaIybl MymKIn. Ta3aay HycKaynapbIH "PpHTeP iwiH ta3anay" 13-6eTTeri kapaHb3 iwiHne kappaHb3.
Eckeptne:
PpHTePi y3ak yakbit 60bI naDalaHny Tipek 6iikweHn To3ybiHa eKein, 6yn actbHfbl Ka6aTbI JOK XancbipMa KaFa3bHbH TipeK 6iikwere OhaJ Xa6bcYbHa eKeJeI. PpHTeP aCTbHfbl Ka6aTbI JOK XancbipMa KaFa3bl PpHTePde opHaTyIbI Kyyide y3ak YAKbitKa KaIdbipBInca, XancbipMa KaFa3bHbH 6iikwere Xa6bcYbHa BaIIaHbICTbl KaFA3 KeNTeNici OpBH anbyMymKiH.
Erep KaFa3 KeItenici opbH anca, npnHTepDIn iwiH ta3aHaB13. ("PpInHTeP iWIn Ta3aay" 114-6eTTeri KapaHb3)
Tinti npnHTepDih iwiH ta3anaydaH KeiH de KaFa3 KeNTeNtIcTepi Kni opbIH anca, tipeK biikwehi aybictbipy Kepek. BiiikTi Kb13MeT KOpCey Kb13MeTKePnepine Xa6apnacblb3.
CoHda-ak, KaFa3 opaBih KaI Ta opHaTy apKbIbI KaFa3 KeNTeJIcTePiH anDbIH anyfa 60ana. ("Opam KaFa3bIH opHaTy Hemece aybictby"113-6eTteri KapaHb3) 68* texHnKaIbIK CnPaTTaMaJapbl ywiH: 6yI npInTeP JxanCbIpMa KaFa3bIHbIH TipeK 6iikwee Xa6bcYbIH 6oIbIPmay ywiH npInTePin KyaTbI y3ak YaKbIT 60bl (waAMMeH 12 caFt) 6acbl NbiFapycbl3 Kocylbl 6oLca, Ke3eHdi Typde KaFa3dbI 6epin TypaTBH fYHKUmaMeH Xa6DbIKTaIfAH. TiTI kepi bepy Kocylbl 6oLca da, ocbi KaFa3dbI 6epyden KeiH KeNeci 6acblfAH 6eTTIH KOFApFbl WeTI YIKeH 60ana.
Opam KaFa3bIHbIH KaKNaFbl aWbIImaIdbI
Opam KaFa3bIhbln KaKnaFbI aWbIImaFaH Ke3Je TEmeHderi KaaMdapIbI opbHdaHbI3.
- PpHnTepdi eWipiHi3.
- BypaftbIcKtbl KypaIbI npHTeepiH eki XaftbHaftbI caHbIaynapFa cIbIbI3 XHe aIbI TaCTay YwiH KaKaTbI KOpceTIk 6aftbIHda KeTepiH3. (J-cypetIH kappaHbI3).
- Kanam Hemece Kbickblapkblbcahblayda yu6ypbbl6enrici kopiHreHwe TTKaHbI KepceTki 6aFbITbIHda 6ypaHbI3. (K-cypeTIN KapaHbI3).
TM-L90 texHnKaIbIK cnPaTTaMaJapbl
| 80 MM kaFA3 eHI | 58 MM kaFA3 eHI | 40 MM kaFA3 eHI | ||
| Басьишы�ару anecdici | Жозлма-жол тетмо басьишы�ару | |||
| Нуктелер тыIFыЗдIFыI | 203 × 203 H/Д [нукт/25,4 ММ] | |||
| Басьишы�ару anecdi | 72 MM, 576 НУкт eОпьI | 65*/66*/68* улгici:52,5 MM, 420 НУкт oрьI67* улгici:50,0 MM, 400 НУкт oрьI | 35 MM, 280 НУкт oрьI | |
| КаFaЗ салшемерi | 79,5 ± 0,5 × eн кeбiΦ102 MM{3.13 ± 0.02 × 4"} | 57,5 ± 0,5 × eн кeбiΦ102 MM{2.26 ± 0.02 × 4"} | 39,5 ± 0,5 × eн кeбiΦ102 MM{1.56 ± 0.02 × 4"} | |
| КаFaЗ typi Термияльк KaFA3 | NTP080-80 NTP058-80 - (пайдаланбаньИ) | |||
| Аctынфыka6aТсызжалсырma KaFA3bl | 9023 - 1274 (6 opam)9023 - 1253 (12 opam) | 9023 - 1823 (12 opam)9023 - 1397 (30 opam) | 9023 - 1275 (6 opam)9023 - 1257 (12 opam) | |
| Куат кeзi*1 | TT + 24 B ± 7% | |||
| АfыIMдаfbI TUTbIHY | Шамамен 1,8 A | |||
| Temneyратура/bILFaДыIlbIK | Тер_mяльк KaFA3 | Жуmbic kezihde: 5 - 45°C, 10 - 90% RHСакту кeзihde: -10 - 50°C, 10 - 90% RH (kaFA3du kocspaHaДa) | ||
| Аctынфыka6aТсызжалсырma KaFA3bl | Жуmbic kezihde: 5 - 35°C, 20 - 80% RHСакту кeзihde: -10 - 50°C, 10 - 90% RH (kaFA3du kocspaHaДa) | |||
| bILFaДыIlbIK 10 - 90% | ||||
| Жалны салшемерi | 140 × 203 × 148 MM (E × D × B) | |||
| Салмafы (maccabI) | Шамамен 1,9 кr | |||
H/D: HγKTeJIep/25,4 MM (HγKTe ΜIouM)
*1: Keneci TexHnkaJIbIK CnnaTTaMaIapFa caN Kayinci3iK CTAHdApTTapbl KOnDaHbUNFaH KyaT Ke3IH naJaIaHaHbHbI3.
HOMHaIbI bIbIbIc: 24 B/2,0-10,0 A, MaKcIMaIbI bIbIbIc: 240 BA HeMece a3bIpaK
Bahasa Indonesia
Ilustrasi
Bagian-bagian Printer
Panel Kontrol
①LED
Menyala bila dayanya说我ya, dan mati bila dayanya mati.
!LED(Error)
nwnwsnnaaunnuynauanuunnnnauanuauauauauuuuauuauuuuuuuuuuuuuuuuuuuuuuuuuuuuuuuuuuuuuuuuuuuuuuuuuuuuuuuuuuuuuuuuuuuuuuuuuuuuuuuuuuuuuuuuuuuuuuuuuuuuuuuuuuuuuuuuuuuuuuuuuuuuuuuuuuuuuuuuuuuuuuuuuuuuuuuuuuuuuuuuuuuuuuuuuuuuuuuuuuuuuuuuuuuuuuuuuuuuuuuuuUU
1.
6.
- mu
7.
- A8.1 u
4.
9.
- B
2aannrnu
1
2017年/5月2日
n nn nnnnnnnnnnnnnnnnnnnnnnnnnnnnnnnnnnnnnnnnnnnnnnnnnnnnnnnnnnnnnnnnnnnnnnnnnnnnnnnnnnnnnnnnnnnnnnnnnnnnnnnnnnnnnnnnnnnnnnnnnnnnnnnnnnnnnnnnnnnnnnnnnnnnnnnnnnnnnnn
nauunrnnnnaaayanannnanaaennnseko Epson Corporation nnnnnnnnnnnnnnnnnnne annnnnnnnnnnnnnnnnnnnnnnnnnnnnnnnnnnnnnnnnnnnnnnnnnnnnnnnnnnnnnnnnnnnnnnnnnnnnnnnnnnnnnnnnnnnnnnnnnnnnnnnnnnnnnnnnnnnnnnnn nn
n75977uHaan1a5125yHaa
nannnnnnaa nnnnnae nnnnne nnnnne nnnnne nnnnne nnnnne nnnnne nnnnne nnnnne nnnnne nnnnne nnnnne nnnnne nnnnne nnnnne nnnnne nnnnne nnnnne nnnnne nnnnne nnnnne nnnnne nnnnne nnnnne nnnnne nnnnne nnnnnee
nunnnnnaaannnnnnae nnuuau
www.epson.com/support/
aunannnauuunnnn a u nauuauuauuau
www.epson-biz.com/
2UuUvW
UNVAJN
1 W LED
aunnnnnae aannnne nnnnne
! ?w LED (Error)
aannnnaananaananaananaananaananaananaananaananaananaananaananaananaananaananaananaananaananaananaananaananaananaananaananaananaananaananaananaananaananaananaananaananaananaananaananaananaananaananaananaananaananaananaananaananaananaananaananaananaananaananaanara anaae aae
InLED(Paper)
a
u (Feed)
Juaunn7
750vWwUuuu
nauananaananaananaananaananaananaananaananaananaananaananaananaananaananaananaananaananaananaananaananaananaananaananaananaananaananaananaananaananaananaananaananaananaananaananaananaananaananaananaananaananaananaananaananaananaananaananaananaananaananaan ana an aannnnnaaannnnnnaaannnnnnaaannnnnnaaannnnnnaaannnnnnaaannnnnnaaannnnnnaaannnnnnaaannnnnnaaannnnnnaaannnnnnaaannnnnnaaannnnnnaaannnnnnaaannnnnnaaannnnnnaaannnnnnaaannnnnnaaannnnnnaaannnnnnaaannnnnaaannnnnnaaannnnnnaaannnnnnaaannnnnnaaannnnnnaaannnnnnaaannnnnnaaannnnnnaaannnnnnaaannnnnnaaannnnnnaaannnnnnaaannnnnnaaannnnnnaaannnnnnaaannnnnnaaannnnnnaaannnnnnaaannnnnnaaennnnnnaaannnnnnaaannnnnnaaannnnnnaaannnnnnaaannnnnnaaannnnnnaaannnnnnaaannnnnnaaannnnnnaaannnnnnaaannnnnnaaannnnnnaaannnnnnaaannnnnnaaannnnnnaaannnnnnaaannnnnnaaannnnnnaaannnnnnaaennnn
nnaa aannnnn nnnnnn nn nnnnnnnnnnnnnnnnnnnnnnnnnnnnnnnnnnnnnnnnnnnnnnnnnnnnnnnnnnnnnnnnnnnnnnnnnnnnnnnnnnnnnnnnnnnnnnnnnnnnnnnnnnnnnnnnnnnnnnn
7777777777777
nnaaannnnnnnnnnnnnnnnnnnnnnnnnnnnnnnnnnnnnnnnnnnnnnnnnnnnnnnnnnnnnnnnnnnnnnnnnnnnnnnnnnnnnnnn
□a 65*
40 m.
- 40 u.
aan
□a 66/67/68*
58 HJ
- 58 u.
aan - 40 uu. nauuunrnnnnaa an uan uan uan uan uan uan

220755
nssnnnsnnnnnnnnnnnnnnnnnnnnnnnnnnnnnnnnnnnnnnnnnnnnnnnnnnnnnnnnnnnnnnnn
75nauuun5274
-
(Feed) uuuuunnnn nn (Feed) (Feed) (Feed)
-
1 W LED (Paper) n W "If you want to continue SELF-TEST printing, please press Feed button."
-
4.
-
- completed ***
775216aVW
W W W W W W W W W W W W W W W W W W W W W W W W W W W W W W W W W W W W W W W W W W W W W W W W W W W W W W W W W W
unuue uui iuvnnae aanau nuaaunu 1uui uuuuunu 1tu "nuuuaa aana uuaaawww" nn 138
www.epson.com/support/
其他国家的用户请访问下列网站:
www.epson-biz.com/
打印机部件
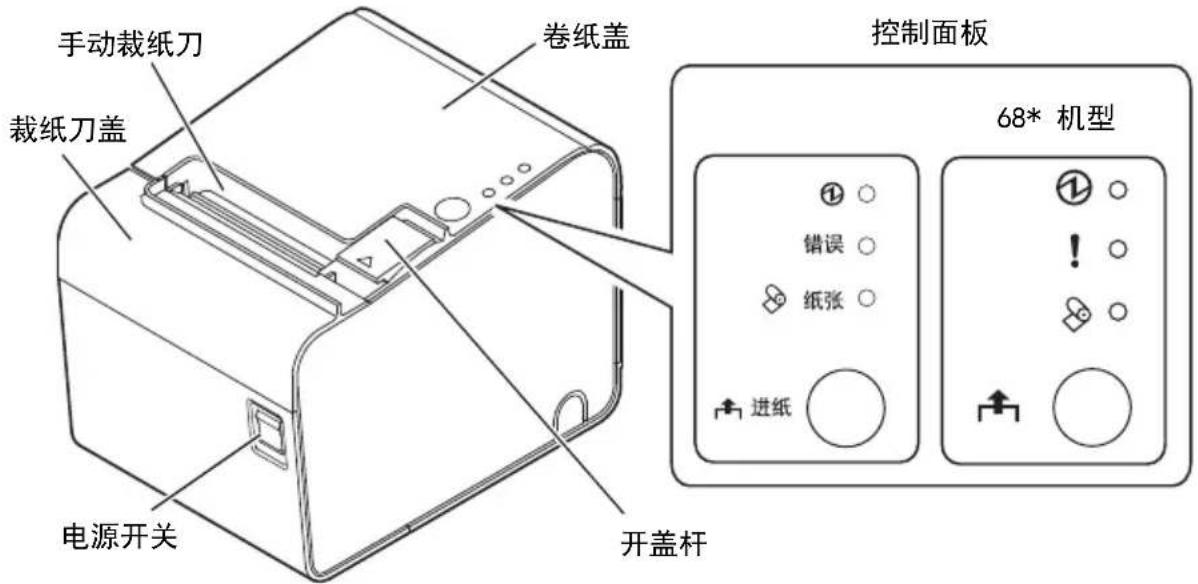
控制面板
① 电源指示灯
接通电源时点亮,切断电源时则熄灭。
错误指示灯
www.epson.com/support/
其他國家的顧客請訪問以下的網站:
www.epson-biz.com/
印表機的各部份
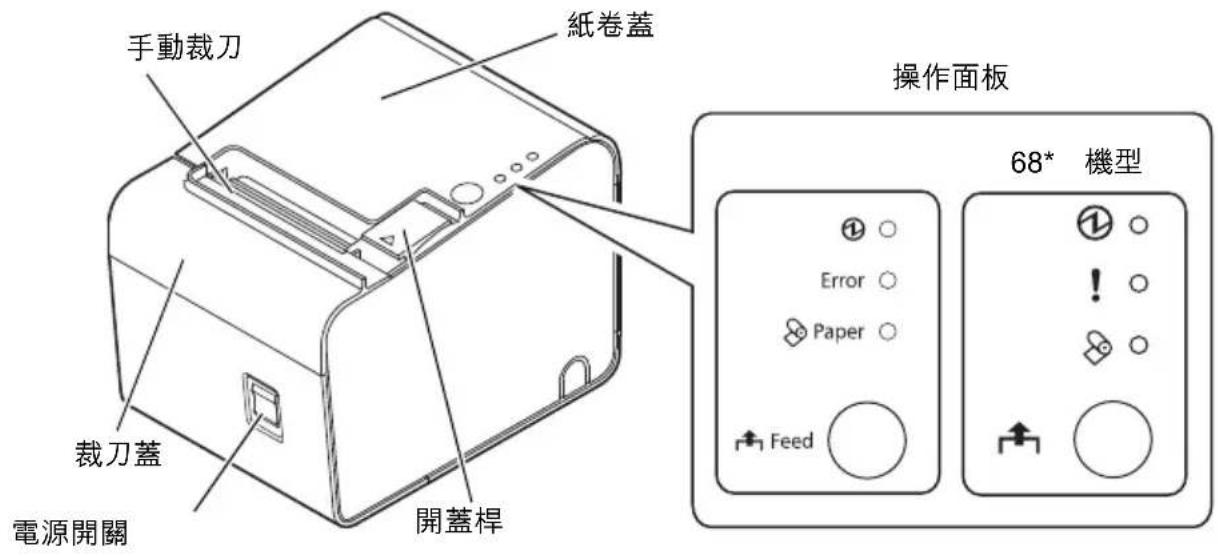
操作面板
① 指示燈
電源開啟時亮起,電源關閉時熄滅。