
BXAE00021 - Battery charger BLACK & DECKER - Free user manual and instructions
Find the device manual for free BXAE00021 BLACK & DECKER in PDF.

| Product Type | Battery Charger |
| Brand | Black & Decker |
| Model | BXAE00021 |
| Power Supply | 220-240 V AC, 50/60 Hz |
| Charging Voltage | 6 V / 12 V |
| Charging Current | 1.5 A |
| Recommended Battery Capacity | 2 to 70 Ah |
| Compatible Battery Types | Rechargeable lead-acid 6 V or 12 V |
| Operating Temperature | -10 to 40 °C |
| Storage Temperature | -20 to 50 °C |
| IP Protection Rating | IP20 |
| Minimum Battery Voltage | 3 V |
| LED Indicators | Green LED: power on Red LED: charging in progress Green LED: charge complete / maintenance |
| Safety Features | Spark-proof, short-circuit protection, overheat protection, reverse polarity protection |
| Output Cable Included | 30 A clamps and 6 mm ring terminal cable with cap |
| Clamp Cable Reference | BXAE00025 |
| Indoor Use | Yes |
| Warranty | 2 years, limited warranty by Schumacher Europe |
Frequently Asked Questions - BXAE00021 BLACK & DECKER
User questions about BXAE00021 BLACK & DECKER
0 question about this device. Answer the ones you know or ask your own.
Ask a new question about this device
Download the instructions for your Battery charger in PDF format for free! Find your manual BXAE00021 - BLACK & DECKER and take your electronic device back in hand. On this page are published all the documents necessary for the use of your device. BXAE00021 by BLACK & DECKER.
USER MANUAL BXAE00021 BLACK & DECKER
Black & Decker and BLACK+DECKER™ and the Black & Decker® and BLACK+DECKER™ logos are registered trademarks of The Black & Decker Corporation and are used under licence. All rights reserved. Developed and distributed by: Schumacher Europe, 3 rue de la Baronnerie 4920 Harze - Belgium
979000-1
EN - English
Instructions for use
1. CAUTION
PLEASE READ THE INSTRUCTIONS AND SAFETY GUIDELINES CAREFULLY BEFORE USE. KEEP THESE INSTRUCTIONS.
This manual will explain how to use the unit safely and effectively. Please read and follow these instructions and precautions carefully.

1.1. IMPORTANT SAFETY INSTRUCTIONS - SAVE THESE INSTRUCTIONS
This manual contains important safety and operating instructions.

WARNING: Only use the charger to recharge 6V or 12V rechargeable lead-acid batteries. Do not use it for any other purpose. Do not use with non-rechargeable batteries. This charger is designed for use only with a supply voltage of 220V-240V, 50/60Hz circuit.
The charger is suitable for indoor use only, in a well-ventilated area and on a flat surface.

RISK OF ELECTRIC SHOCK OR FIRE.
- Keep out of reach of children.
- This charger is not intended for use by persons (including children) with reduced physical, sensory or mental capabilities, or lack of experience and knowledge, unless they have been given supervision or instruction concerning the use of the charger by a person responsible for their safety.
- The charger must be kept in a dry area away from liquids. Do not expose the charger to rain or snow.
- Use only recommended attachments. Use of an attachment not recommended or sold by the manufacturer may result in a risk of fire, electric shock or injury to persons or damage to property.
- Connect and disconnect charging connectors (clamps, eyelets, cigarette lighter plug...) only after removing AC plug from the mains.
- Never pull on the DC cord.
- Unplug the charger from the outlet before attempting any maintenance or cleaning.
- Do not operate the charger with a damaged supply plug or output lead; have the damaged part replaced immediately by a qualified service person.
- Do not disassemble the charger; take it to a qualified service person when service or repair is required. Incorrect reassembly may result in a risk of fire or electric shock.
- Never put the charger on top of the battery while charging it.
- Do not attempt to charge a damaged battery.
1.2. PERSONAL PRECAUTIONS

RISK OF EXPLOSIVE GASES. A SPARK NEAR THE BATTERY MAY CAUSE A BATTERY EXPLOSION. RISK OF CONTACT WITH BATTERY ACID. BATTERY ACID IS A HIGHLY CORROSIVE SULFURIC ACID.
-
Explosive gases can be emitted during the charging duration.
-
NEVER smoke or allow a spark or flame in the vicinity of a battery.
-
Never charge a frozen battery.
-
Remove personal metal items such as rings, bracelets, necklaces and watches when working with a lead-acid battery. A lead-acid battery can produce a short-circuit current high enough to weld a ring or the like to metal, causing a severe burn.
-
Be extra cautious, to reduce the risk of dropping a metal tool onto the battery. It might spark or short-circuit the battery or other electrical part that may cause an explosion.
-
To prevent sparking, NEVER allow clamps to touch together or contact the same piece of metal.
-
Wear protective clothes, gloves and goggles to use the charger. Avoid touching your eyes while working near the battery.
-
If battery acid contacts your skin or clothing, immediately wash the area with soap and water. If acid enters your eye, immediately flood the eye with cold running water for at least 10 minutes and get medical attention right away.
-
If battery acid is accidentally swallowed, drink milk, the whites of eggs or water. DO NOT induce vomiting. Seek medical attention immediately.
-
Read, understand and follow all instructions for the charger, battery, vehicle and any equipment used near the battery and the charger.
-
Determine the voltage of the battery by referring to the vehicle owner's manual and make sure that the output voltage of the charger is correct.
2.Description

| 1. | Power LED - Green: the charger is connected to the AC power (mains). |
| 2. | Charge LED: lightening up red or green during charging. |
| 3. | In position 12V: Suitable for charging all types of 12V lead batteries. Charging current for batteries: from 2Ah to 30Ah. Maintenance mode for batteries: from 2Ah to 70Ah. |
| 4. | In position 6V: Suitable for charging all types of 6V lead batteries. |
| Charging current for batteries: from 2Ah to 30Ah. Maintenance mode for batteries: from 2Ah to 70Ah. | |
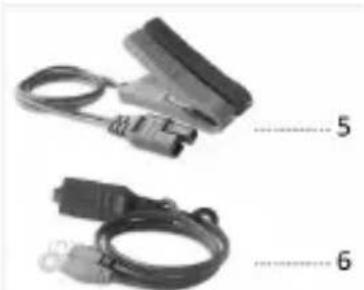
| 5. | Output lead: Cable with clamps 30A - Ref: BXAE00025. |
| 6. | Output lead: Cable with rings 6mm and protective, insulating, watertight cap. |
2.1. Technical specifications
| Reference | BXAE00021 |
| Model | Charger 6/12V-1.5A |
| Voltage (Mains) | 220~240V AC 50/60Hz |
| Charging voltage | 6V / 12V |
| Charging current | 1.5A |
| Battery size | 2Ah to 70Ah batteries |
| Operating temperature | -10° to +40°C |
| Storage temperature | -20° to +50°C |
| IP indication | IP20 |
| Minimum battery voltage | 3V |
2.2. Battery types
This electronic battery charger is designed to charge all types of lead batteries, conventional batteries and batteries of the latest generation. This battery charger is ideal for both everyday use, as a key working tool, and extensive charging cycles.
2.3. Charge cycles
The charge cycles of the battery charger have been specially developed to optimize the charge of all types of batteries currently available in the market.
2.4. Safety devices
The battery charger is equipped with safety devices to ensure the utmost safety during use and operation.
Full protection against sparks
Protection against short-circuits
Protection against overheating
Protection against polarity reversal
2.5. Battery tests and error indications
If the charge LED is OFF (not lightening); the following raisons/faults are possible:
| CAUSE | SOLUTION |
| The clamps/rings of the output lead are not connected correctly to the battery. Polarity reversal. | Position the clamps/rings correctly and start charging the battery again. |
| Leads disconnected, leads short-circuited. | |
| Battery completely short-circuited. | The battery may be defective. Contact a battery service center. |
| Battery flat. |
3. Instructions manual
Turn OFF ignition (heating, lighting...) before using the charger when battery is installed in the vehicle.
Clean the battery terminals before using the charger.

3.1. Charging a battery
- Before connecting the charger: make sure that the power supply lead is not plugged into the mains!
- Connection to the battery
Check first if the negative terminal is connected/grounded to the chassis. If not, contact your reseller.
Connect the outlet cable to the charger.
Output cable with clamps
Connect the red clamp (+) to the positive terminal (+) of the battery, then connect the black clamp (-) to the earth/chassis of the vehicle (a heavy gauge metal part of the frame or engine block. Do not connect to the carburetor or fuel lines).
Output cable with rings
Loosen and remove each nut from the bolts at the battery terminals. Connect the positive ring (+) to the positive terminal (+) of the battery, then connect the negative ring (-) to the negative (-) terminal of the battery. Replace and tighten back the nuts to secure them.
In both cases: make sure that the charger outlet lead make tight connections.
- Connection to the mains
Plug the power plug of the battery charger into the mains. The power LED is lighting up green = "Stand by" mode.
- 6V or 12V Selection
Make sure the voltage position on the charger matches with the voltage of the battery. The charging process will start automatically.
- End of charging
Unplug the AC power plug of the charger from the mains.
- Disconnect the output lead
Disconnect first the negative outlet lead from negative (-) terminal of the battery of from the earth/chassis, then the positive outlet lead of the positive (+) terminal.
3.2. Charge indicators description
| CHARGE | When the charge LED light on red, the battery is charging. |
| When the charge LED become green the battery is fully charged (100%); the battery charger will switch to the maintenance step, keeping the state efficiency of the battery constantly monitored, so that it is always at an optimal level of charge. |
3.3.Storage
When the battery charger is not being used, it must be stored in a dry place to protect it against humidity. Disconnect the battery charger and use a soft cloth to clean its outer casing.
4. Warranty
Schumacher Europe, Belgium, offers a limited warranty for the benefit of the original purchaser of this product. The warranty is not transferable. The warranty applies to manufacturing and material faults during a two-year period from the date of purchase. To benefit from the guarantee, the purchaser is required to return the device with proof of purchase to the place of purchase. The devices on which will have been seen any abuse, improper use or improper handling or modifications, as well as entrusting the device to be repaired to third parties other than authorized representatives will void the warranty. Schumacher Europe gives no other guarantee than this limited warranty and expressly excludes all implied warranties, including warranties against indirect damage. Schumacher Europe is not bound by any other guarantee which exceeds the scope of this limited warranty.

This marking indicates that this product should not be disposed with other household wastes throughout the EU. To prevent possible harm to the environment or human health from uncontrolled waste disposal, recycle it responsibly to promote the sustainable reuse of material resources. To return your used device, please use the return and collection systems or contact the
retailer where the product was purchased. They can take this product for environmental safe recycling.
DE - Deutsch
Gebrauchsanweisung
1. VORSICHT
2.1. Specifications techniques


- EN - English
- Instructions for use
- CAUTION
- IMPORTANT SAFETY INSTRUCTIONS - SAVE THESE INSTRUCTIONS
- RISK OF ELECTRIC SHOCK OR FIRE.
- PERSONAL PRECAUTIONS
- 2.Description
- Technical specifications
- Battery types
- Charge cycles
- Safety devices
- Battery tests and error indications
- Instructions manual
- Charging a battery
- Charge indicators description
- 3.3.Storage
- Warranty
- DE - Deutsch
- Gebrauchsanweisung
- VORSICHT
- Specifications techniques
Brand : BLACK & DECKER
Model : BXAE00021
Category : Battery charger