SOR 2400 D2 - Electric heater SILVERCREST - Free user manual and instructions
Find the device manual for free SOR 2400 D2 SILVERCREST in PDF.
| Brand | SilverCrest |
| Model | SOR 2400 D2 |
| Product type | Oil-filled electric radiator |
| Usage | Supplementary heating for enclosed and dry spaces |
| Rated power | 1500 W |
| Heating levels | 3 (I: 600 W, II: 900 W, III: 1500 W) |
| Power supply | 220-240 V ~ 50 Hz |
| Protection class | I |
| Power cord length | 1.8 m |
| Thermostat | Yes, adjustable mechanical |
| Overheat protection | Yes, automatic shut-off |
| Tilt protection | Yes, automatic shut-off when tilted |
| Frost protection | Yes, maintains at about 3 °C |
| Control type | Manual via switch and thermostat |
| Operation indicator | Yes (red light) |
| Material | Steel (heating fins) |
| Castors | 4 castors for easy mobility |
| Maintenance and cleaning | Damp cloth and mild detergent, vacuum for vents |
| Warranty | 3 years |
| Certification | Applicable European directives |
| Weight (approx) | Approx. 10 kg |
| Dimensions (approx) | Approx. 60 x 30 x 70 cm |
| Package contents | Radiator, 2 feet, 4 castors, 2 support plates, 2 brackets, manual |
Frequently Asked Questions - SOR 2400 D2 SILVERCREST
User questions about SOR 2400 D2 SILVERCREST
0 question about this device. Answer the ones you know or ask your own.
Ask a new question about this device
Download the instructions for your Electric heater in PDF format for free! Find your manual SOR 2400 D2 - SILVERCREST and take your electronic device back in hand. On this page are published all the documents necessary for the use of your device. SOR 2400 D2 by SILVERCREST.
USER MANUAL SOR 2400 D2 SILVERCREST
OIL-FILLED RADIATOR SOR 1500 E4
ÖLRADIATOR SOR 1500 E4
RADIATEUR À BAIN D'HUILE SOR 1500 E4

PDF ONLINE
www.lidl-service.com
GB IE CYNI MT

OIL-FILLED RADIATOR
Operating and Safety Instructions

This product is only suitable for well insulated spaces or occasional use.
FR BECH

RADIATEUR À BAIN D'HUILE
Before reading, fold out the page with the images and familiarise yourself with all the features of the device.
DEATCH
natural_image
Diagram of a mechanical device with a curved handle and directional arrows indicating motion or force (no text or symbols)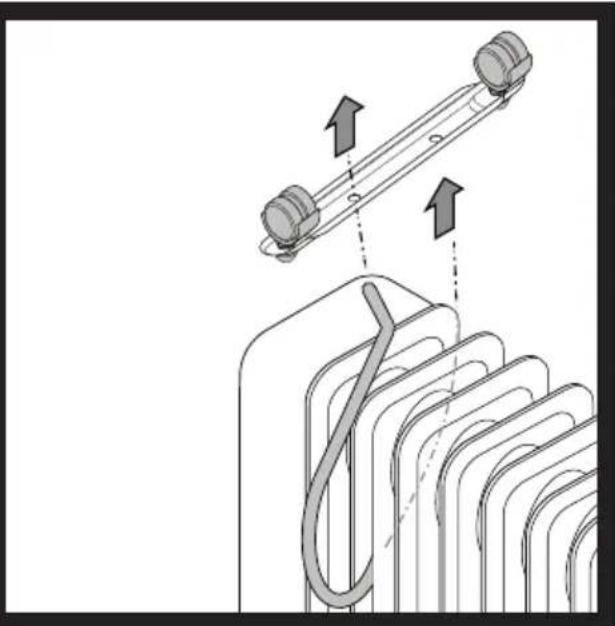
natural_image
Diagram showing a mechanical assembly with two cylindrical components and a coiled cable, no text or symbols present.The image contains no text or characters. It is a blank white square with a black border. Therefore, there is no OCR result to output.
IVIII
natural_image
Technical line drawing of a mechanical component with multiple curved surfaces and two cylindrical features (no text or symbols)
natural_image
Technical diagram of a mechanical assembly with rotating components and a valve mechanism (no text or labels)1. Introduction 6
1.1 Intended use...6.....
1.2 Scope of delivery...6.
1.3 Features 6
1.4 Technical data...6
2. Safety indications for room heating appliances .8
2.1 General safety indications...9.....
2.2 Additional safety indications...10....
3. Before commissioning ...12
3.1 Assembling the rollers...12....
3.2 Setting up the appliance 12
4. Commissioning ...12
4.1 Switching the appliance on 12
4.2 Setting the temperature controller 13
4.3 Switching the appliance off 13
4.4 Frost protection function 13
5. Protective devices for the appliance 14
5.1 Overheating protection 14
5.2 Tip-over protection 14
6. Maintenance, cleaning and storage 14
7. Disposal 15
8. EU conformity ...15.
9. ROWI Germany GmbH Warranty 15
10. Service 16
OIL-FILLED RADIATOR SOR 1500 E4
1. Introduction
Congratulations on purchasing your new appliance. You have decided in favour of a high-quality product. The operating instructions are part of this product. They contain important information regarding the safety, use and disposal. Familiarise yourself with all the operating and safety indications prior to using the product. Only use the product as described and for the specified areas of use. If you pass the product on to third parties, hand out all the documents too.
1.1 Intended use
This appliance is only determined for heating closed, dry, rooms during the transitory period. It can be used as supplementary heating or a temporary heating option in well-insulated, small rooms. The appliance can exclusively be used as a floor-mounted appliance. The appliance is not intended for use in rooms in which special conditions prevail, e.g. a corrosive or explosive atmosphere (dust, steam or gas). Do not use this appliance outdoors. Use the device only with mounted rollers. Every further use or change to the appliance is viewed as not in accordance with its intended use and involves considerable accident risks. We assume no liability for damages arising from improper use. The appliance is only intended for private and not for commercial use.
1.2 Scope of delivery
1 Oil-filled radiator SOR 1500 E4
2 Pedestals
4 Rollers with cap nuts
2 Retaining plates
2 Retaining brackets with wing nuts
1 Set of operating instructions
1.3 Features
1 Fin
2 Retaining plate
3 Rollers with pre-assembled cap nuts
4 Cable clamp
5 Ventilation louvre
6 Heating level switch
7 Temperature controller (thermostat)
8 Control lamp
9 Recessed grip
10 Holder
11 Wing nut
1.4 Technical data
Input voltage: 220-240 V \~
Mains frequency: 50 Hz
Dimensioning uptake: 1500 W
Heating level I: 600 W
Heating level II: 900 W
Heating level III: 1500 W
Protection rating: I
Mains cable length: 1.8 m
Information requirements for electric local space heaters
Model identifier(s): SOR 1500 E4
Item Symbol Value Unit
Heat output
| Nominal heat output P | nom | 1.5 | kW |
| Minimum heat output (indicative) | Pmin | 0.6 | kW |
| Maximum continuous heat output | Pmax,c | 1.5 | kW |
Auxiliary electricity consumption
| At nominal heat output | eI_max | 0.000 kW |
| At minimum heat output | eI_min | 0.000 kW |
| In standby mode | eI_SB | N/A kW |
Item Unit
Type of heat input, for electric storage local space heaters only (select one)
manual heat charge control, with integrated thermostat [no]
manual heat charge control with room and/or outdoor temperature feedback [no]
electronic heat charge control with room and/or outdoor temperature feedback [no]
fan assisted heat output [no]
Type of heat output/room temperature control (select one)
single stage heat output and no room temperature control [no]
Two or more manual stages, no room temperature control [no]
with mechanic thermostat room temperature control [yes]
with electronic room temperature control [no]
electronic room temperature control plus day timer [no]
electronic room temperature control plus week timer [no]
Other control options (multiple selections possible)
room temperature control, with presence detection [no]
room temperature control, with open window detection [no]
with distance control option [no]
with adaptive start control [no]
with working time limitation [no]
with black bulb sensor [no]
ROWI Germany GmbH
2. Safety indications for room heating appliances
Read all the safety indications and instructions.

Failure to adhere to the safety indications and instructions may cause serious injuries and/or property damages.
Please keep all the safety indications and instructions for future use.
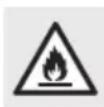
WARNING! Danger of overheating!
To avoid the heater overheating, it must not be covered.
- The heater may not be placed directly beneath a wall mains socket.
- Do not use this heater in the direct vicinity of a bathtub, a shower or a swimming pool.
This heater is filled with a specific quantity of special oil. Repairs which require opening the oil tank may only be made by the manufacturer or his customer service partner, to whom you should refer if oil leakages occur.
■ Guidelines regarding the disposal of the oil when scrapping the appliance must be followed.
If the supply cable for this appliance is damaged, it must be replaced by the manufacturer or his customer service or a similarly qualified person in order to avoid any dangers. - ATTENTION: In order to avoid danger due to undeliberate resetting of the protection temperature limiter, the appliance may neither be supplied via an external switching device such as a timer nor connected to an electric circuit which is switched on and off regularly by a device.
2.1 General safety indications
WARNING:
To reduce the danger of fire, keep textiles, curtains and other combustible materials at least 1 m away from the radiator.
- WARNING: The heater may not be used in small rooms where people live who are not able to leave the room independently unless constant monitoring is guaranteed.
- This appliance can be used by children of 8 years and more as well as by persons with reduced physical, sensory or mental abilities or lacking experience and knowledge, if they are supervised or are instructed in the safe use of the appliance and understand the ensuing dangers.
■ Children may not play with the appliance. - The cleaning and maintenance of the appliance by the user may not be carried out by children not under supervision.
- Children of less than 3 must be kept away unless they are constantly monitored.
Children between 3 and 8 may only switch the appliance on and off if they are under supervision or have been instructed in the safe use of the appliance and have understood the resulting dangers, with the prerequisite that the appliance is placed or installed in its normal operating position.
Children between 3 and 8 my not plug the plug into the mains socket, control the appliance, clean it and/or not carry out user maintenance. - No action is required on the part of the user in order to adjust the product to 220 or 240 V. The product automatically to the correct voltage.
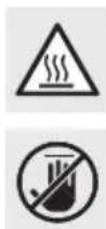
Warning against hot surfaces!
ATTENTION: Some parts of the product may become extremely hot and cause burns. Special care is required if children and vulnerable persons are present.
2.2 Additional safety indications
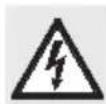
Danger to life due to electrical current!
Danger to life in case of contact with live cables or components!
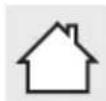
The appliance is only suitable for indoor operation!
Before connecting the appliance, compare the connection data on the name plate (voltage and frequency) with the data from your electricity grid. Ensure that the data tallies so that no damages to the appliance are incurred.
- Do not commission an appliance which has been dropped.
- Do not use if visible signs of damages can be seen on the heater.
■ The heater must be placed on a firm, flat and level base.
- Never open the appliance's casing. If live connections are touched and/or the electrical and mechanical setup changed, the risk of electric shock exists!
- Ensure that the supply cable is not laid over hot surfaces and/or sharp edges.
■ Pay attention that the supply cable is neither bent nor jammed.
- Only have the appliance repaired by authorised specialist companies or customer service. Inappropriate repairs may result in considerable danger for the user. Moreover, the guarantee rights become null and void.
- Protect the appliance against damp and the penetration of liquids.
- Only remove the supply cable from the mains socket from the mains plug.
- Do not operate the appliance in the vicinity of open flames.
- Only operate the appliance with a fully unrolled supply cable. Never wind the supply cable around the appliance. Ensure that the supply cable does not come into contact with hot surfaces. Lay the supply cable so that it is not possible to stumble over it.
3. Before commissioning
■ Remove all packaging material and transport safety devices from the appliance.
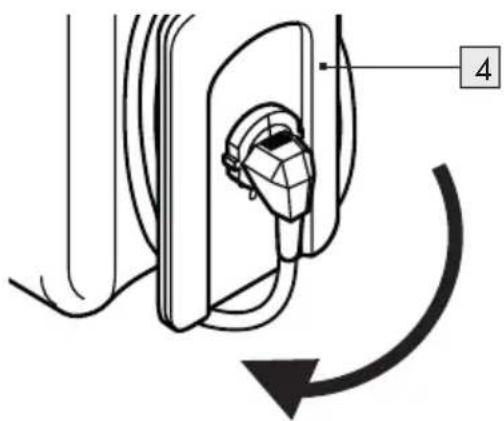
- Unwind the supply cable fully from the cable clamp 4.
3.1 Assembling the rollers
Place the oil-filled radiator with its lower side upwards on a clean, scratch-resistant base.
natural_image
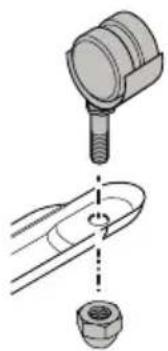
Technical illustration of a mechanical assembly showing a bolt inserted into a housing and then being inserted into a nut (no text or symbols present)■Attachrespectively2 rollers 3 to each outer recess in the retaining plates 2. Use the pre-assembled cap nuts for this purpose.
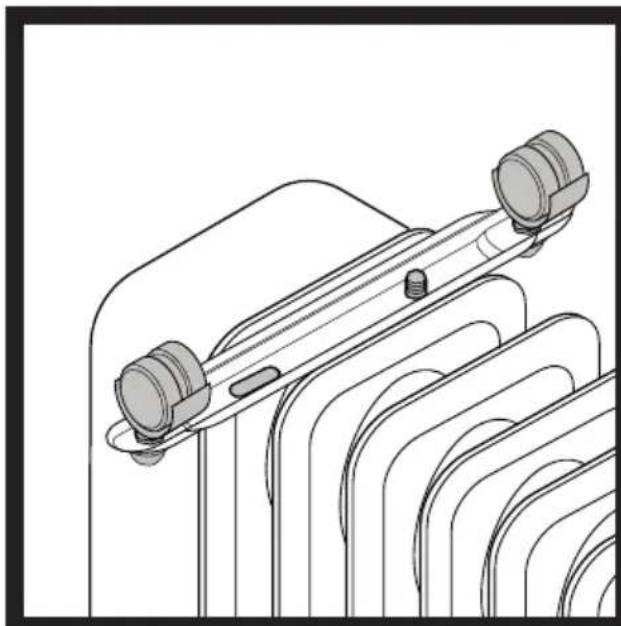
Now unscrew the wing nuts 1 from the retaining brackets 10.
Now position a retaining bracket 10 on the heating fin (see figure no. 1)
Note: Note here that the front retaining plate 2 must be fitted between the 1st and 2nd ribs and the rear retaining plate 2 between the last two heating ribs. This is the only means to ensure correct positioning.
Then push the retaining bracket 10 with the threadless side threadless side into one of the two inner recesses of the retaining plates 2 with rollers 3 (see figure no. II).
Both threaded fittings for the holders 10 must finally protrude through the recesses on the retaining 2 plate (see figure no. III).
Now screw the wing nut 11 back onto the retaining bracket 10 (see figure no. IV).
- Repeat the entire procedure from the Chapter for the second retaining plate 2 with rollers 3.
ATTENTION: Only operate the appliance with assembled rollers 3 and retaining plates 2.
3.2 Setting up the appliance
For safe, fault-free operation of the appliance, its location must meet the following prerequisites:
■ The base must be firm, flat and level.
■ Minimum clearance from the casing of 1 m at the side, 1 m at the top, 1 m at the back and 1 m at the front must be adhered to.
- Do not place the appliance in a hot, wet or very wet surroundings or in the vicinity of combustible material.
The mains socket must be easily accessible, enabling easy removal of the supply cable if necessary.
■ Temperature range: 0 to +40 °C
■ Humidity (no condensation): 5–75 %
Note: During initial use, slight odours may arise in the short-term.
4. Commissioning
4.1 Switching the appliance on
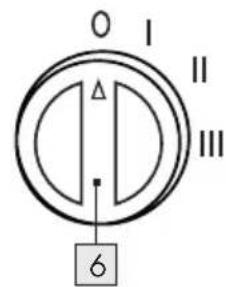
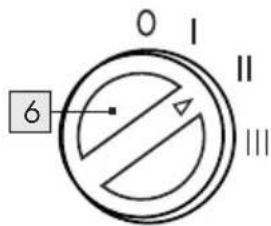
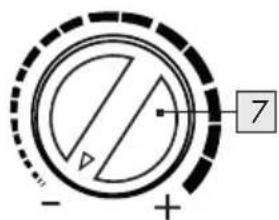
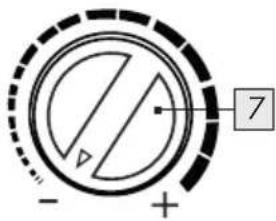
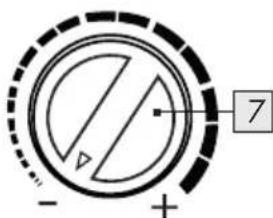
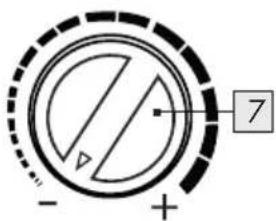
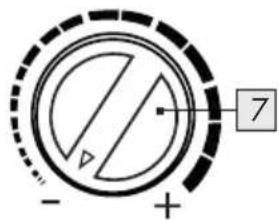
Ensure that the heating level switch 6 is set to "0" and the temperature control 7 points to "-". Then, connect the oil-filled radiator to an earthed socket protected by an FI circuit breaker.
Then, switch the appliance on by rotating the temperature controller 7 clockwise until it clicks audibly. The red indicator lamp 8 lights up. Move the heat level switch 6 to the desired position (I, II or III). The following applies:
| 0 | Off position | If the heating level switch6is in this position,the oil-filled radiator is switched off. |
| 1 | Heating level 1: | If the heating level switch6is in this position,the oil-filled radiator provides a heat output of 600 W. |
| II | Heating level 2: | If the heating level switch6is in this position, the oil-filled radiator provides a heat output of 900 W. |
| III | Heating level 3: | If the heating level switch6is in this position, the oil-filled radiator provides a heat output of 1500 W. |
| "- " position temperature controller | |
| "+" position temperature controller |
Note: The control lamp 8 does not go out until the the temperature controller 7 is in the "-" position. position.
Note: The oil radiator only heats up when the temperature controller 7 is turned clockwise until an audible until an audible click is heard.
4.2 Setting the temperature controller
Start the appliance using the heating level switch to set 6 the desired heat output.
Rotate the temperature controller 7 clockwise up to the limit stop.
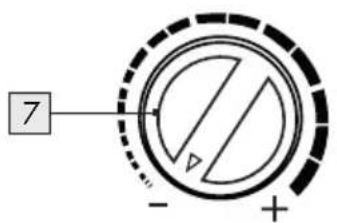
If the desired temperature has been reached, rotate the temperature controller 7 back so far anticlockwise until you hear a clear click. The control lamp 8 goes off.
An integrated mechanical thermostat now switches the heating function and control lamp 8 on/off automatically.
4.3 Switching the appliance off
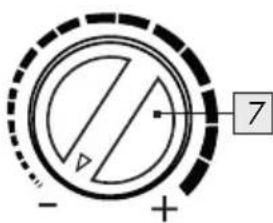
■ Set the heating level switch 6 to position "0".
Set the infinitely variable temperature controller 7 to position "-". The control lamp 8 goes off.

■ Remove the mains plug from the mains socket.
Before covering or putting the appliance away, wait until it has cooled down!
4.4 Frost protection function
You can set the oil-filled radiator so that it goes on automatically and heats when the room temperature reaches approx. 3 °C.
Then, connect the oil-filled radiator to an earthed socket protected by an FI circuit breaker.
Then, switch the appliance on by setting the heating level switch 6 to "I", "II" or "III" and the temperature controller 7 to "-".
The oil-filled radiator now switches on when the room temperature is approx. 3 °C. As soon as the room temperature exceeds approx. 3 °C, the oil-filled radiator switches off.
5. Protective devices for the appliance
5.1 Overheating protection
This appliance is equipped with overheating protection. If the appliance becomes too hot, it is automatically switched off.
To switch the appliance off, set the heating level switch 6 to position "0" and the temperature controller 7 to the position "-".
■ Remove the mains plug from the mains socket.
- Let the appliance cool down for at least 10 minutes.
Check the ventilation louvres 5 and outlets and rectify the cause of overheating before recommissioning the appliance.
ATTENTION! There's normally a reason for overheating! It can mean fire danger!
- Check whether the appliance can give off its heat sufficiently: Is the appliance covered or is it too close to a wall or a further obstacle?
If possible, rectify the problem or revert to the service hotline (see chapter "Service").
Even if you cannot find a cause, but overheating protection is triggered again, you must switch the appliance off and revert to the service hotline (see chapter "Service").
5.2 Tip-over protection
This appliance is equipped with overturning protection. If the appliance is accidentally knocked over or subjected to significant inclination during operation, it is automatically switched off. The appliance works exclusively in an upright position.
6. Maintenance, cleaning and storage
■ Always unplug the mains cable when the appliance is not in use, prior to each cleaning or in case of operational faults!
■ Only clean the appliance when switched off and cold.
■ Ensure when cleaning that no moisture ingresses into the appliance in order to avoid irreparable damages to the appliance.
- Clean the casing with a slightly damp cloth and a mild flushing fluid. Do not use aggressive and/or abrasive cleaning agents under any circumstances whatsoever.
■ Remove dust deposits on the protective mesh and on the ventilation louvres with a vacuum cleaner.
Wind the supply cable tightly and clockwise around the cable clamp 4. Then, place the mains plug in the cable clamp recesses 4.
■ Store the appliance in a clean and dry surroundings.
7. Disposal
The packaging consists of environmentally friendly materials which you can dispose of via local recycling points.


The Triman logo is valid in France only.
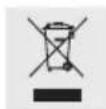
This product is subject to the European Directive 2012/19/EU. Do not dispose of the product in household waste, but via municipal collection points for material recycling! For information on how to dispose of the discarded device can be obtained from your local authority or city council.

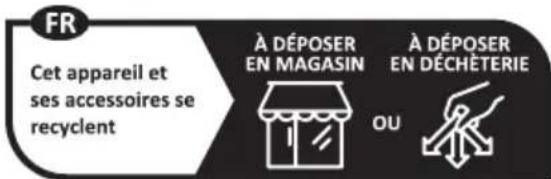
If scrapping the appliance, observe the valid regulations for oil disposal.
Observe the marking on the packaging materials when separating the waste, they are marked with abbreviations (a) and numbers (b) with the following meanings: 1-7: Plastics/20-22: Paper and cardboard/80-98: Composite materials.
8. EU conformity

This product meets the requirements of the valid European and national regulations.
9. ROWI Germany GmbH Warranty
Dear Customer,
This appliance has a 3-year warranty valid from the date of purchase. If this product has any faults, you, the buyer, have certain statutory rights. Your statutory rights are not restricted in any way by the warranty described below.
Warranty conditions
The validity period of the warranty starts from the date of purchase. Please keep your original receipt in a safe place. This document will be required as proof of purchase.
If any material or production fault occurs within three years of the date of purchase of the product, we will either repair or replace the product for you or refund the purchase price at our discretion. This warranty service is dependent on you presenting the defective appliance and the proof of purchase (receipt) and a short written description of the fault and its time of occurrence.
If the defect is covered by the warranty, your product will either be repaired or replaced by us. The repair or replacement of a product does not signify the beginning of a new warranty period.
Warranty period and statutory claims for defects
The warranty period is not prolonged by repairs effected under the warranty. This also applies to replaced and repaired components. Any damage and defects present at the time of purchase must be reported immediately after unpacking. Repairs carried out after expiry of the warranty period shall be subject to a fee.
Scope of the warranty
This appliance has been manufactured in accordance with strict quality guidelines and inspected meticulously prior to delivery.
The warranty covers material faults or production faults. The warranty does not extend to product parts subject to normal wear and tear or fragile parts such as switches, batteries or those made of glass.
The warranty does not apply if the product has been damaged, improperly used or improperly maintained. The directions in the operating instructions for the product regarding proper use of the product are to be strictly followed. Uses and actions that are discouraged in the operating instructions or which are warned against must be avoided.
This product is intended solely for private use and not for commercial purposes. The warranty shall be deemed void in cases of misuse or improper handling, use of force and modifications/repairs which have not been carried out by one of our authorised Service centres.
Warranty claim procedure
To ensure quick processing of your case, please observe the following instructions:
Please have the till receipt and the item number (IAN 420424_2201) available as proof of purchase.
- You will find the item number on the type plate on the product, on the front page of the instructions (bottom left), or as a sticker on the rear or bottom of the appliance.
If functional or other defects occur, please contact the service department listed either by telephone or by e-mail.
- You can return a defective product to us free of charge to the service address that will be provided to you. Ensure that you enclose the proof of purchase (till receipt) and information about what the defect is and when it occurred.

At www.lidl-service.com you can download this manual as well as many other manuals, product videos and installation software. This QR code will take you directly to the Lidl service page (www.lidl-service.com) and allow you to open your operating instructions simply by entering the article number (IAN 420424_2201).
10. Service
Should you incur any problems when operating your ROWI Germany product, please do the following:
Making contact
You can reach the ROWI Germany service team under:
ROWI Germany GmbH
(free from landlines)
IAN 420424_2201
Most problems can already be resolved by competent, technical advice from our service team.
1. Einleitung ...18
natural_image
Technical diagram showing a mechanical assembly with a bolt and nut, no text or symbols present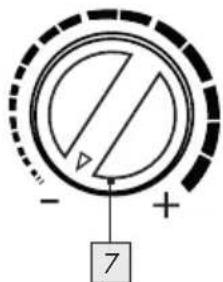

natural_image
Technical illustration of a mechanical assembly showing a bolt inserted into a housing and then being inserted into a nut (no text or symbols present)
4.4 Protection anti-gel
5.1 Protection anti-surchauffe
7. Élimination

natural_image
Technical illustration of a mechanical assembly showing a bolt inserted into a housing and then being inserted into a nut (no text or symbols present)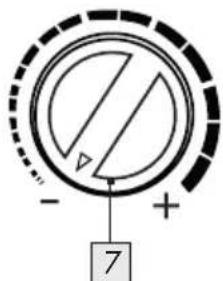

7. Afvoer

natural_image
Technical diagram showing a mechanical assembly with a cylindrical component inserted into a housing, and a separate view of a bolted joint (no text or labels)
7. Likvidace

natural_image
Diagram showing a mechanical assembly with a bolt and nut, no text or symbols present

natural_image
Technical illustration of a mechanical assembly showing a bolt inserted into a housing and then being inserted into a nut (no text or symbols present)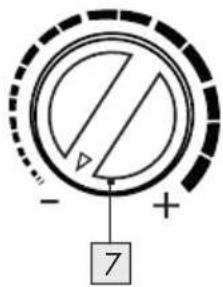
7. Zneškodnenie

natural_image
Diagram showing a mechanical assembly with a cylindrical component and a separate view of a bolted joint (no text or symbols)
7. Eliminación

natural_image
Technical diagram showing a mechanical assembly with a bolt and nut, no text or symbols present
7. Bortskaffelse

natural_image
Technical illustration of a mechanical assembly showing a cylindrical component inserted into a socket and then being inserted into a nut (no text or symbols present)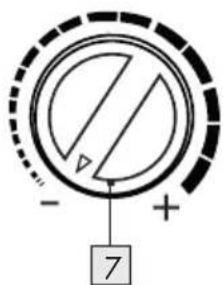
natural_image
Technical illustration showing a mechanical assembly with a bolt and nut, no text or symbols present


natural_image
Technical illustration of a mechanical assembly showing a bolt inserted into a housing and then being inserted into a nut (no text or symbols present)
Oljni radiator se zdaj vklopi, ko je sobna temperatura približno 3 °C. Takoj, ko je sobna temperatura nad približno 3 °C, se oljni radiator znova samodejno izklopi.
5. Varovalna oprema naprave
ID No.: SOR1500E4-062022-LB08-03