
IR 8300 HS - Cooker TEKA - Free user manual and instructions
Find the device manual for free IR 8300 HS TEKA in PDF.
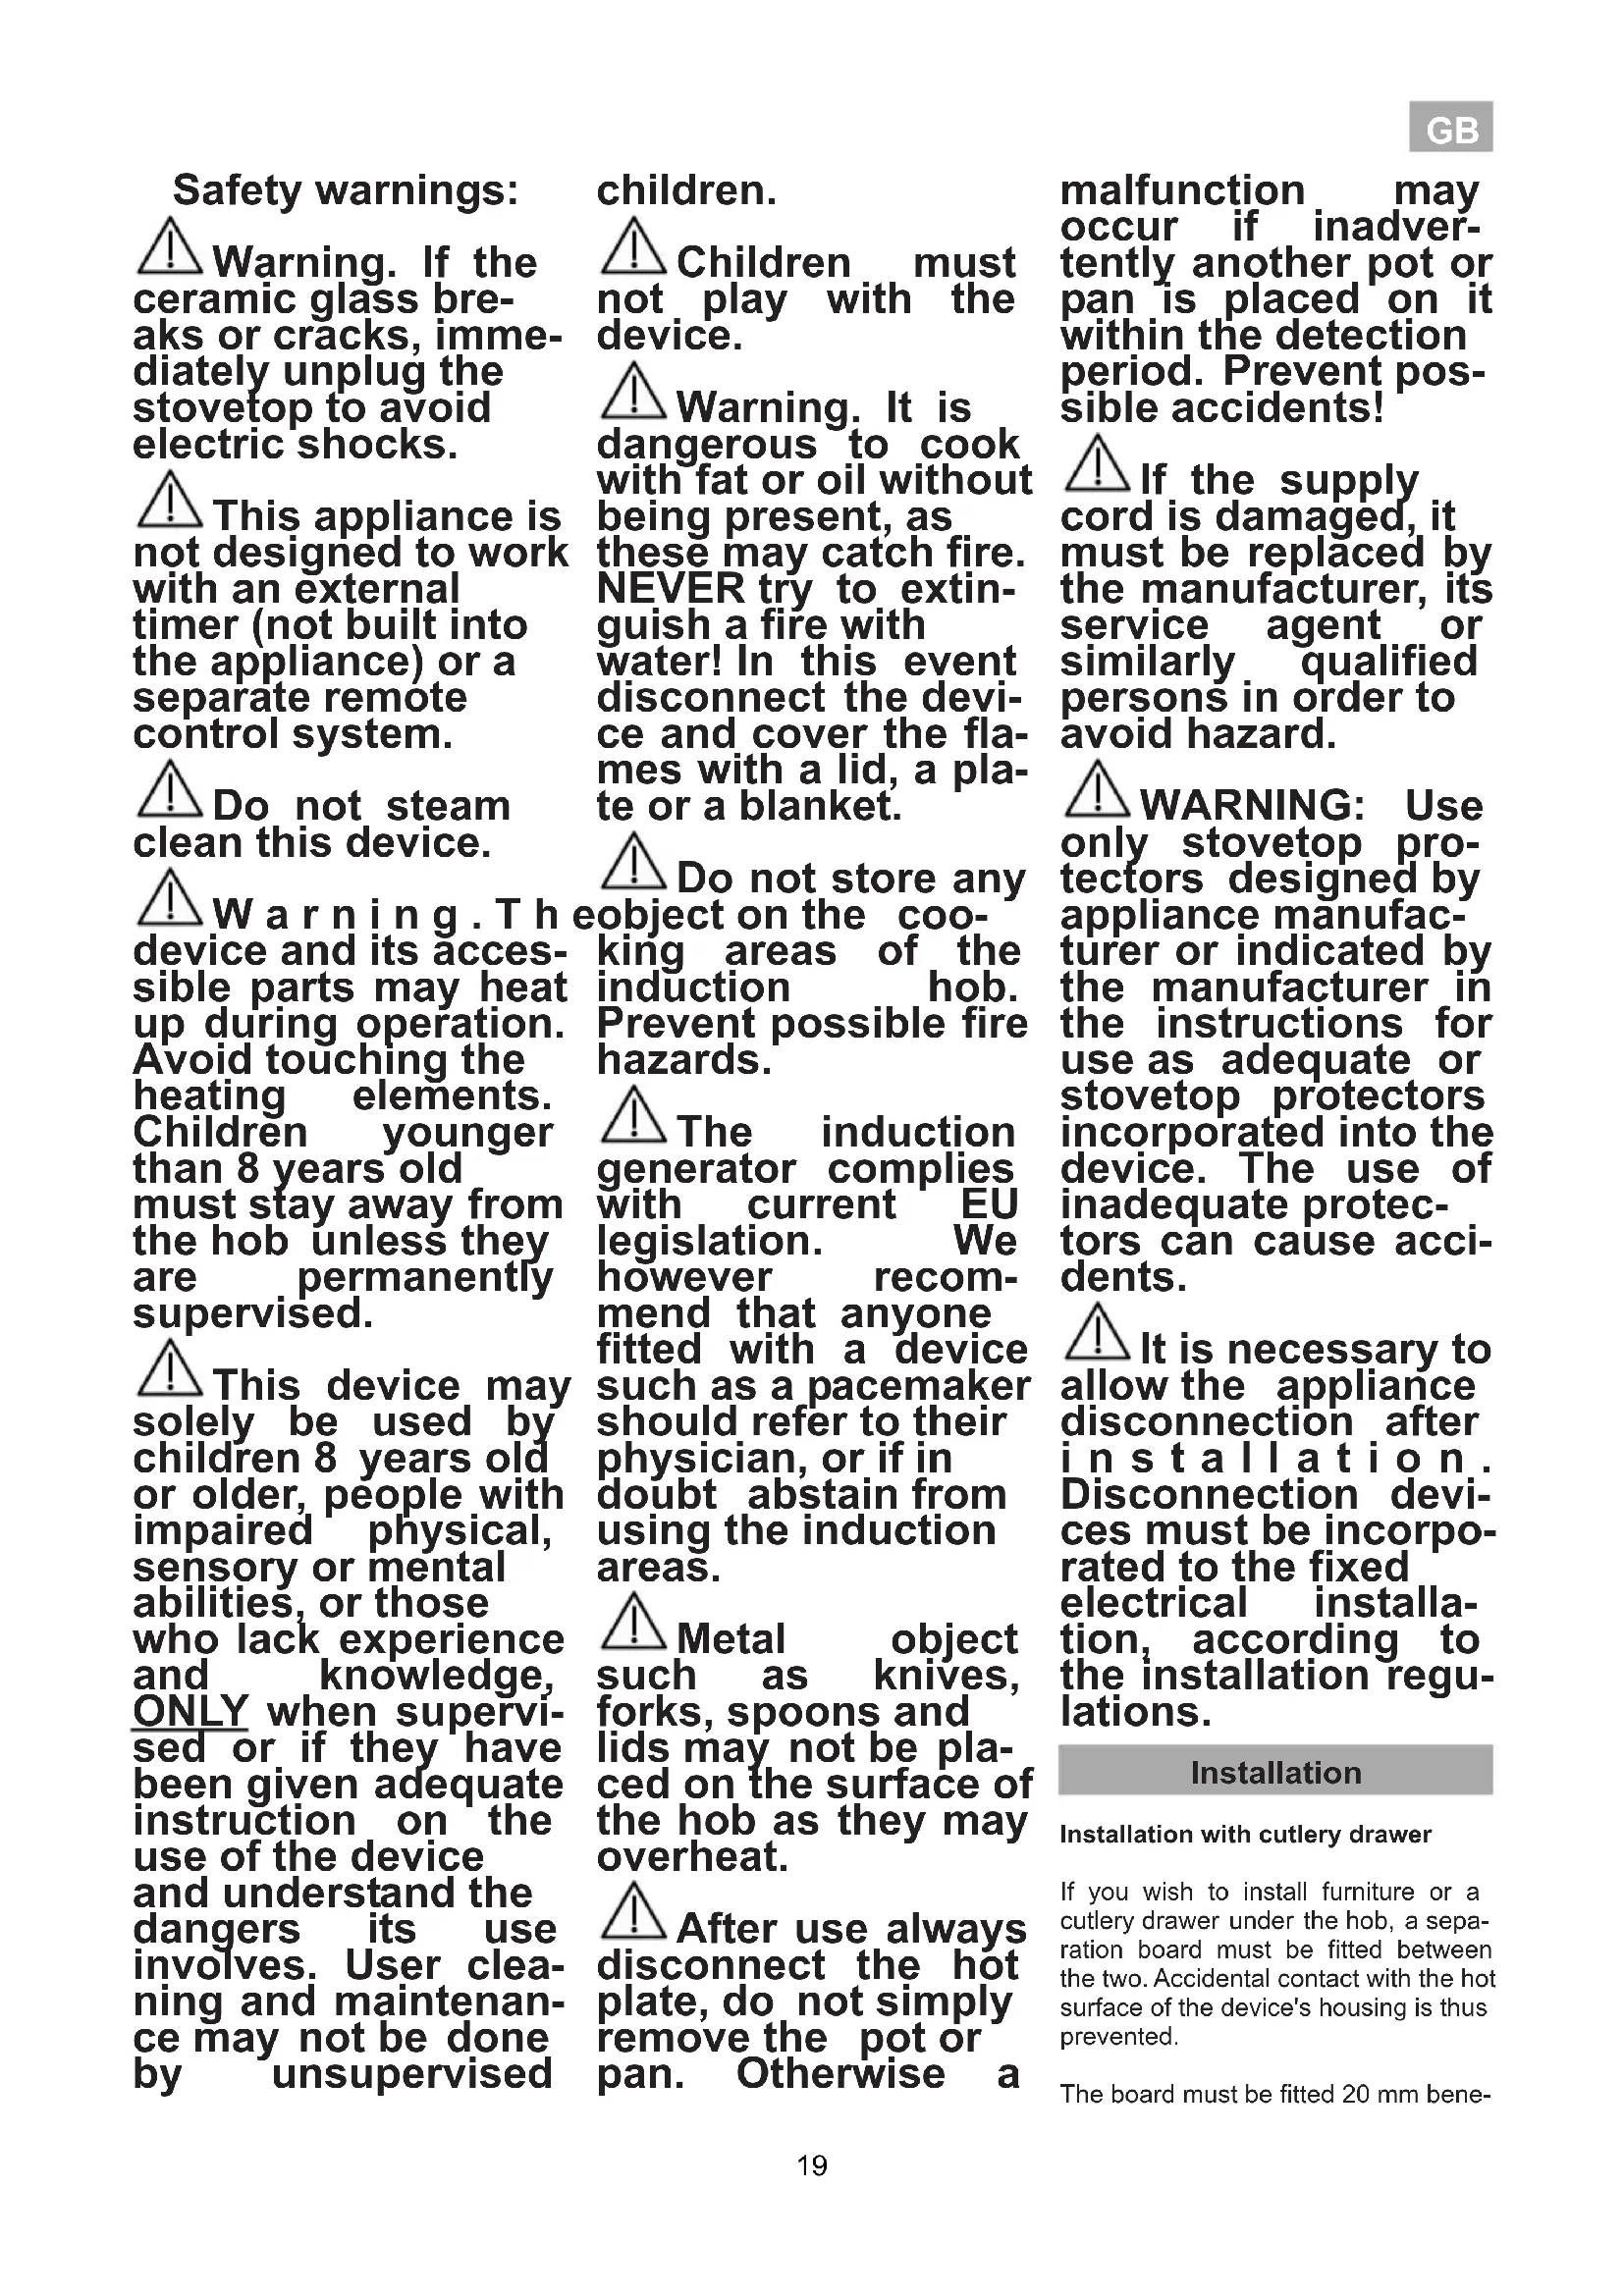
| Product Type | Induction Cooktop |
| Brand | Teka |
| Model | IR 8300 HS |
| Power supply | 230V-400V, 50/60 Hz (depending on connection, see diagram) |
| Number of cooking zones | 4 induction zones |
| Control type | Touch controls with child lock |
| Main functions | Power (concentrated power), individual timer, fondue, synchro, power management |
| Display | Power and residual heat indicators, clock |
| Safety | Key lock, automatic safety shut-off, pan detection, hot surface indicator (H) |
| Cleaning | Clean after cooling with mild products; use a scraper for baked-on stains |
| Maintenance | Avoid steam cleaner; remove melted sugar immediately |
| Installation | Built-in; provide a separation board if drawer underneath (20 mm) |
| Repairs | Carried out only by TEKA technical service |
| Dimensions (W x D) | Approx. 77 x 51 cm (standard estimate) |
| Net weight | Approx. 10 kg (standard estimate) |
| Documents provided | User manual (152 pages), warranty certificate |
| Environmental considerations | Recyclable product; do not dispose of with household waste |
Frequently Asked Questions - IR 8300 HS TEKA
User questions about IR 8300 HS TEKA
0 question about this device. Answer the ones you know or ask your own.
Ask a new question about this device
Download the instructions for your Cooker in PDF format for free! Find your manual IR 8300 HS - TEKA and take your electronic device back in hand. On this page are published all the documents necessary for the use of your device. IR 8300 HS by TEKA.
USER MANUAL IR 8300 HS TEKA
natural_image
Four circles arranged in a 2x2 grid with a small rectangle below (no text or symbols)ES INSTRUCCIONES PARA LA INSTALACIÓN Y RECOMENDACIONES DE USO Y MANTENIMIENTO
ENCIMERAS VITROCERÁMICAS TOUCH CONTROL....7
PT INSTRUÇÕES DE INSTALAÇÃO E RECOMENDAÇÕES PARA A UTILIZAÇÃO E MANUTENÇÃO PLACAS DE COZINHA VITROCERÂMICAS TOUCH CONTROL ....13
GB INSTALLATION INSTRUCTIONS AND RECOMMENDATIONS FOR USING AND MAINTAINING CERAMIC HOT PLATES TOUCH CONTROL 19
DE MONTAGEANLEITUNG UND EMPFEHLUNGEN ZUR VERWENDUNG UND WARTUNG GLASKERAMIK-KOCHFELDER MIT TOUCH CONTROL....25
FR INSTRUCTIONS POUR L'INSTALLATION ET CONSEILS D'UTILISATION ET D'ENTRETIEN PLAQUES DE CUISSON VITROCÉRAMQIUE TOUCH CONTROL....31
GR OΔΗΓΙΕΣ ΕΓΚΑΤΑΣΤΑΣΗΣ ΚΑΙ ΣΥΣΤΑΣΕΙΣ ΓΙΑ ΤΗ ΧΡΗΣΗ ΚΑΙ ΣΥΝΤΗΡΗΣΗ ΤΩΝ
ΚΕΡΑΜΙΚΩΝ ΕΣΤΙΩΝ ΠΛΗΚΤΡΑ ΑΦΗΣ ......37
BG ИНСТРУКЦИИ ЗА МОНТАЖ И ПРЕПОРЬКИ ЗА ИЗПОЛЗВАНЕ И ПОДДРЬЖКА СТЪКЛОКЕРАМИЧНИ ПЛОТОВЕ СЪС СЕНЗОРНО ПРАВЛЕНИЕ ....43
TR KULLANMA VE MUHAFAZ İÇİN KURULUM TALİMATLARI VE TAVSİYELERİ
SERAMİK ISITMA PLAKALARI DOKUNMATİK KONTROL ....50
PL INSTRUKCJA OBSŁUGI, MONTAŻU ORAZ WSKAZÓWKI DOTYCZĄCE PIEŁĘGNACJI CERAMICZNYCH PŁYT KUCHENNYCH TOUCH CONTROL....56
HU BESZERELÉSI UTASÍTÁSOK VALAMINT A HASZNÁLATTAL ÉS A KARBANTARTÁSSAL KAPCSOLATOS JAVASLATOK ÜVEGKERÁMIA LAPOS FÖZÖLAPOK TOUCH CONTROL....62
CS NÁVOD K INSTALACI A DOPORUČENÍ K PROVOZU A ÚDRŽBĚ
SKLOKERAMICKÉ VARNÉ DESKY TOUCH CONTROL....68
SK INSTRUCTIUNI DE INSTALARE ŞI RECOMANDĂRI DE UTILIZARE ŞI ÎNTRETINERE
PLITE DE GĂTIT INCORPORABILE VITROCERAMICE TOUCH CONTROL....74
RO ИНСТРУКЦИЯ ПО УСТАНОВКЕ И РЕКОМЕНДАЦИИ ПО УХОДУ И ИСПОЛЬЗОВАНИЮ
КЕРАМИЧЕСКИХ ВАРОЧНЫХ ПАНЕЛЕЙ СЕНСОРНОЕ ПРАВЛЕНИЕ ....80
RU NÁVOD NA INŠTALÁCIU A ODPORÚČANIA PRE POUŽÍVANIE A ÚDRŽBU KERAMICKÝCH VARNÝCH PLATNÍ DOTYKOVÉ OVLÁDANIE....86
UA ПОСІБНИК З УСТАНОВКИ ТА РЕКОМЕНДАЦІЇ З ВИКОРИСТАННЯ ТА ОБСЛУГОВУВАННЯ
СКЛОКЕРАМІЧНИХ ВАРИЛЬНИХ ПОВЕРХОНЬ TOUCH CONTROL ....93
SV INSTALLATIONSANVISNINGAR OCH REKOMMENDATIONER FÖR ANVÄNDNING OCH UNDERHÅLL KERAMIKHÄLLAR MED TOUCHKONTROLL....99
NO INSTALLASJONSANVISNINGER OG ANBEFALT BRUK OG VEDLIKEHOLD
BER∅RINGSSTYRT KJERAMISK KOMFYR 105
DA MONTERINGSVEJLEDNING OG ANBEFALET ANVENDELSE OG VEDLIGEHOLDELSE GLASKERAMISKE KOGEPLADER TOUCH-KONTROL....110
FI ASENNUSOHJEET JA KÄYTTÖÄ JA HUOLTOA KOSKEVAT SUOSITUKSET KERAAMISET KEITTOTASOT KOSKETUSPAINIKKEILLA....116
IT ISTRUZIONI PER L'INSTALLAZIONE E CONSIGLI PER L'USO E LA MANUTENZIONE
PIANI DI COTTURA IN VETROCERAMICA TOUCH CONTROL ....121
NL AANWIJZINGEN VOOR DE INSTALLATIE EN RAADGEVINGEN VOOR GEBRUIK EN ONDERHOUD KERAMISCHE KOOKPLATEN TOUCH CONTROL 127
INA PETUNJUK PEMASANGAN, CARA PENGGUNAAN DAN PERAWATAN
INA KOMPOR INDUKSI....133
AR
عَلَيْمَاتِ الْتَرْكَيْبِ وَنْصَانُحِ الْسَرْتَعُمِالِ وَالْصَيْرِيَانَة
افَرَانِ زَجَاجِيةِ للطْغِفِ فِيْتَرُوسِيرامِيك تُوتُشِ كُونْتَرُولِ
139
VN HƯỚNG DĂN LẮP ĐẠT VÀ CÁC KHUYẾN NGHI SỬ DUNG, BẢO DƯỞNG BẢNG ĐIEU KHIEN CẢM ỨNG MẠT BẾP CERAMIC (SỰ THUY TINH)......145
Presentación / Apresentação / Presentation / Präsentation / Présentation / Παρουσίαση / Представяне / Wprowadzenie / Bemutatás / Provedení / Predstavenie / Prezentare / Внешний вид / Зовнішній вигляд / Presentation / Presentasjon / Præsentation / Esitys / Presentazione / Presentatie / Tampilan produk / العرض / Trình bày
Instalación / Instalação / Installation / Montage / Installation / Εγκατάσταση / Монтаж / Kurulum / Montaz / Beszerelés / Instalace / Inštalácia / Instalare / Установка / Установка / Installation / Installasjon / Montering / Asennus / Installazione / Installatie / Pemasangan / التركيب
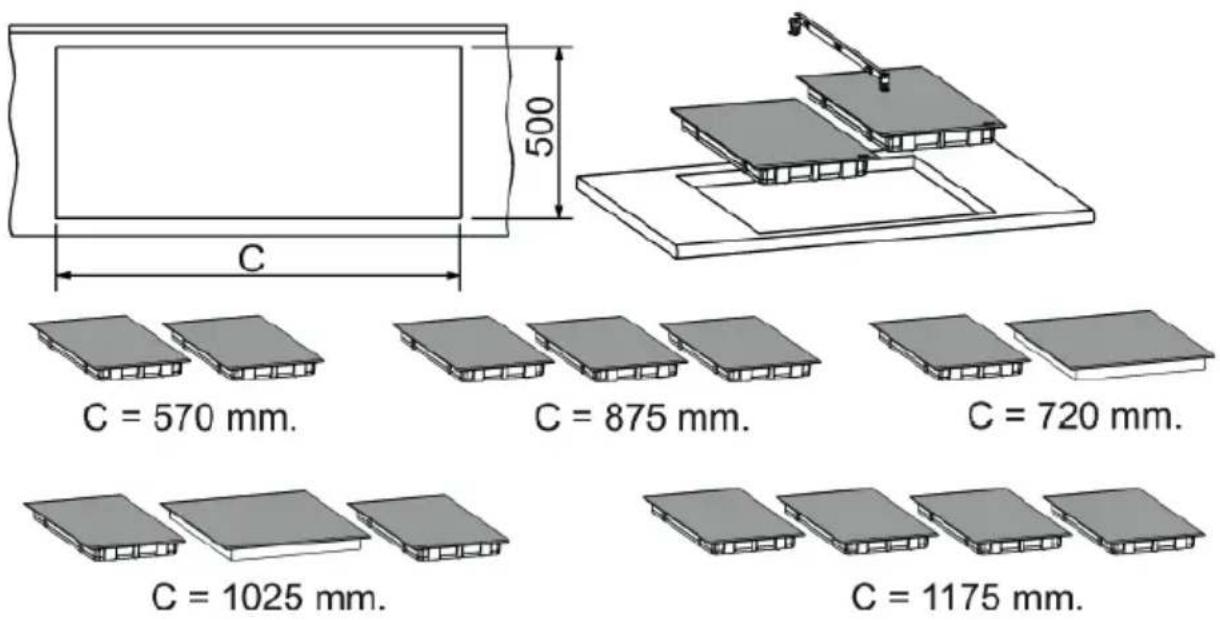
Distancias mínimas / Distâncias mínimas / Minimum distances / Mindestabstände / Distances minimales / Ελάχιστες αποστάσεις / Минимални разстояния / Minimum mesafeler / Minimalne odległości / Minimális távolságok / Minimální vzdálenosti / Minimálne vzdialenosti / Distanțe minime / Минимальные расстояния / مінімальні відстані / Minimumavständ / Minimumsavstander / Mindste afstande / Vähimmäisetäisyydet / Distanze minime / Minimumafstanden / Jarak minimal / المسافة airline


| A | B | C | D |
| 60051 | 0560490 | ||
| 60043 | 5580415 | ||
| 80040 | 0780380 | ||
| 59051 | 0570490 | ||
| 90040 | 0860380 | ||
| 80051 | 0750490 | ||
| 73043 | 0695360 | ||
| 30052 | 0270500 | ||
| 45052 | 0420500 |
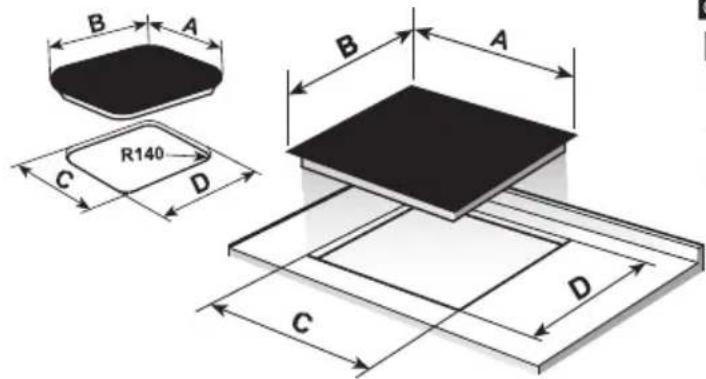
Unidades en mm / Unidades em mm / Units in mm / Einheiten in mm / Unités en mm / Mováðes σε mm / Елементите в мм / mm cinsiden birimler / Wymiary w mm / Egységek mm-ben / Jednotky v mm / Jednotky v mm / Unitāṭi în mm / Размеры в мм / розміри в мм / Enheter i mm / Enheter i mm / Enheder i mm / Mittayksikkö mm / Unità in mm / Eenheden in mm / Satuan dalam mm /
Instalación / Instalação / Installation / Montage / Installation / Εγκατάσταση / Монтаж / Kurulum / Montaż / Beszerelés / Instalace / Inštalácia / Instalare / Установка / Установка / Installation / Installasjon / Montering / Asennus / Installazione / Installatie / Pemasangan / التركيب
Distancias mínimas / Distâncias mínimas / Minimum distances / Mindestabstände /Distances minimales / Ελάχιστες αποστάσεις / Минимальни разстояния /Minimum mesafeler / Minimalne odległości / Minimalis távolságok / Minimalní vzdálenosti / Minimalne vzdialenosti / Distanțe minime / Минимальные расстояния / mínимальні відстані / Minimumavständ / Minimumsavstander / Mindste afstande / Vähimmäisetäisyydet / Distanze minime / Minimumafstanden / Jarak minimal / المسافة deterioration
STANDARD INSTALLATION SYSTEM FAST-CLICK SYSTEM
Homo Teka / Forno TEKA / TEKA Oven / TEKA-Herd / Four TEKA / Фоúрvos
TEKA / Фурна TEKA / TEKA FIRIN /Piekarnik TEKA / TEKA sütő / Trouba
TEKA / Rúra na pečenie TEKA / TEKA Cuptor / Духовка TEKA / Духова
шафа Teka / TEKA Ugn / TEKA Ovn / TEKA-ovn / Teka-uuni /Forno Teka /
TEKA Oven /
natural_image
Two technical diagrams labeled A and B showing a wooden bracket assembly with internal components (no text or symbols present)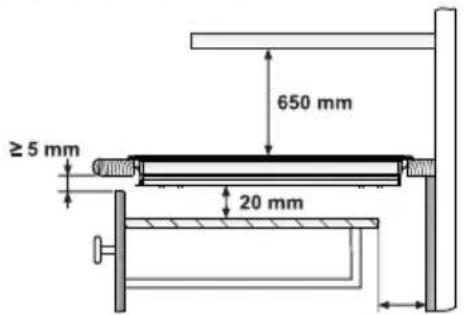
Homo Teka / Forno TEKA / TEKA Oven / TEKA-Herd / Four TEKA / Фоúрvos TEKA / Фурна TEKA / TEKA FIRIN /Piekarnik TEKA / TEKA sütő / Trouba TEKA / Rúra na pečenie TEKA / TEKA Cuptor / Духовка TEKA / Духова шафа Teka / TEKA Ugn / TEKA Ovn / TEKA-ovn / Teka-uuni /Forno Teka / TEKA Oven /
natural_image
Simple diagram with four circles and a dotted circle, no text or symbols present
natural_image
Technical line drawing of a boat hull with visible ribs and hull supports (no text or symbols)
⚠ Warning. If the ceramic glass breaks or cracks, immediately unplug the stovetop to avoid electric shocks.
This appliance is not designed to work with an external timer (not built into the appliance) or a separate remote control system.
⚠ Do not steam clean this device.
⚠ Warning. Th device and its accessible parts may heat up during operation. Avoid touching the heating elements. Children younger than 8 years old must stay away from the hob unless they are permanently supervised.
This device may solely be used by children 8 years old or older, people with impaired physical, sensory or mental abilities, or those who lack experience and knowledge, ONLY when supervised or if they have been given adequate instruction on the use of the device and understand the dangers its use involves. User cleaning and maintenance may not be done by unsupervised
children.
Children must not play with the device.
⚠ Warning. It is dangerous to cook with fat or oil without being present, as these may catch fire. NEVER try to extinguish a fire with water! In this event disconnect the device and cover the flames with a lid, a plate or a blanket.
⚠ Do not store any eobject on the coo- king areas of the induction hob. Prevent possible fire hazards.
⚠ The induction generator complies with current EU legislation. We however recommend that anyone fitted with a device such as a pacemaker should refer to their physician, or if in doubt abstain from using the induction areas.
⚠ Metal object such as knives, forks, spoons and lids may not be placed on the surface of the hob as they may overheat.
After use always disconnect the hot plate, do not simply remove the pot or pan. Otherwise a
malfunction may occur if inadvertently another pot or pan is placed on it within the detection period. Prevent possible accidents!
⚠️ If the supply cord is damaged, it must be replaced by the manufacturer, its service agent or similarly qualified persons in order to avoid hazard.
⚠ WARNING: Use only stovetop protectors designed by appliance manufacturer or indicated by the manufacturer in the instructions for use as adequate or stovetop protectors incorporated into the device. The use of inadequate protectors can cause accidents.
⚠ It is necessary to allow the appliance disconnection after installation. Disconnection devices must be incorporated to the fixed electrical installation, according to the installation regulations.
Installation
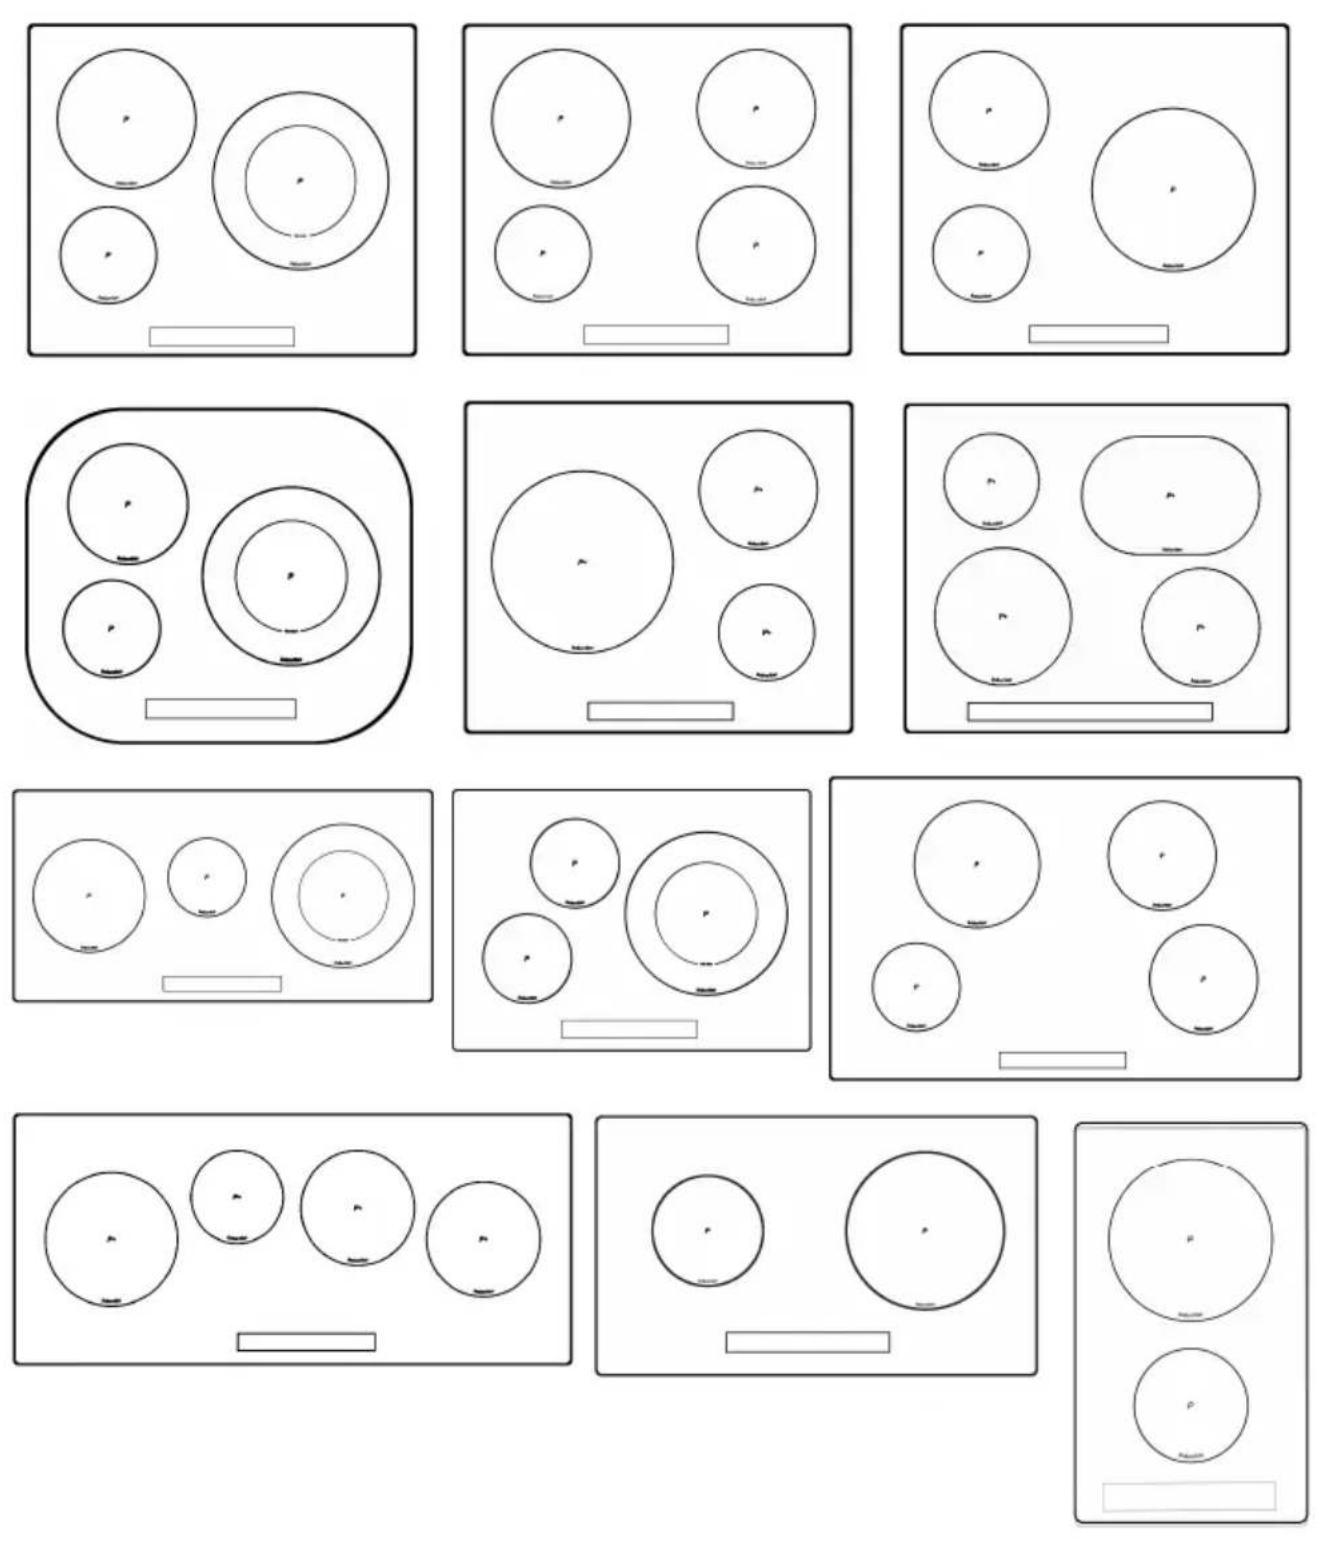
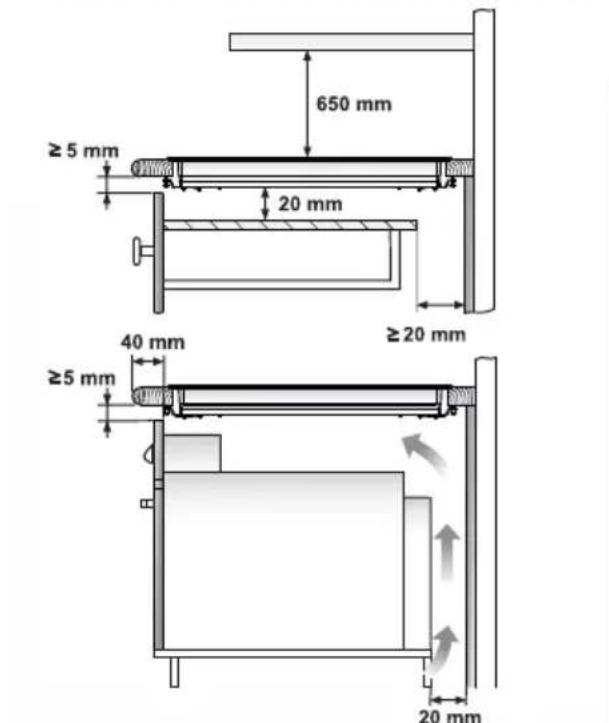
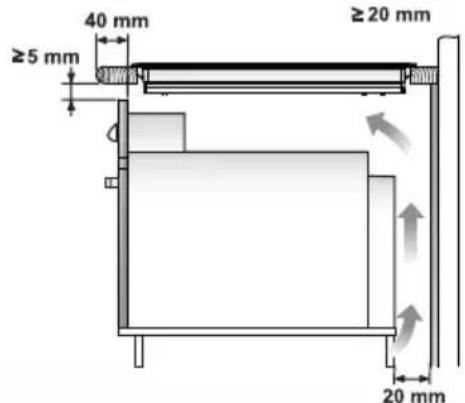
Installation with cutlery drawer
If you wish to install furniture or a cutlery drawer under the hob, a separation board must be fitted between the two. Accidental contact with the hot surface of the device's housing is thus prevented.
The board must be fitted 20 mm bene-
ath the under part of the stovetop.
Electrical connection
Before you connect the stovetop to the mains, check that the voltage and frequency match those specified on the stovetop nameplate, which is underneath it, and on the Guarantee Sheet, or if applicable on the technical data sheet, which you must keep together with this manual throughout the product's service life.
Ensure that the inlet cable does not come into contact with the induction top housing or the oven housing, if it is installed in the same unit.
Warning:

The electrical connection be properly grounded, follo-current legislation, otherwise duction hob may malfunction.

Unusually high power surges damage the control system (like any electrical appliance).

It is advised to refrain from the induction hob during the lytic cleaning function in the of pyrolytic ovens, due to the temperature that this type of e attains.

Only the TEKA official techni- service can handle or repair the
fig. 2
flowchart
graph TD
    A["①"] --> B["1"]
    A --> C["2"]
    A --> D["2"]
    E["②"] --> F["3*"]
    E --> G["4"]
    E --> H["8."]
    I["③"] --> J["9*"]
    I --> K["4"]
    I --> L["8."]
    M["④"] --> N["3*"]
    M --> O["5*"]
    P["⑤"] --> Q["7*"]
    P --> R["8.8."]
    S["⑥"] --> T["3*"]
    S --> U["4"]
    S --> V["8."]
    W["⑦"] --> X["9*"]
    W --> Y["4"]
    W --> Z["8."]
    AA["⑧"] --> AB["9*"]
    AA --> AC["10*"]
    AD["⑨"] --> AE["9*"]
    AD --> AF["10*"]
appliance, including replacement of the power cable.

Before disconnecting the hob form the mains, we recommend switching off the cut-off switch and waiting for approximately 25 seconds before disconnecting from the mains. This time is required to allow for the complete discharge of the electronic circuitry and thus preclude the possibility of electric shock from the cable terminals.

Keep the Guarantee
Certificate or the technical data sheet together with the instructions manual throughout the product's service life. These contain important technical information.

Use and Maintenance
User instructions of the Touch Control
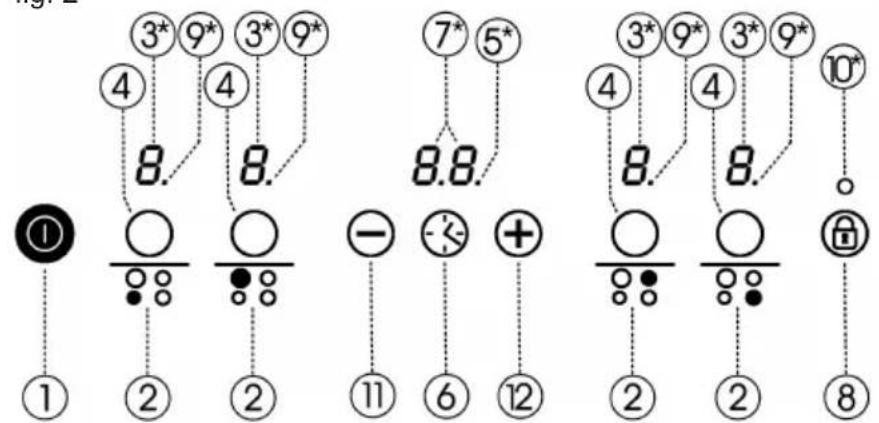
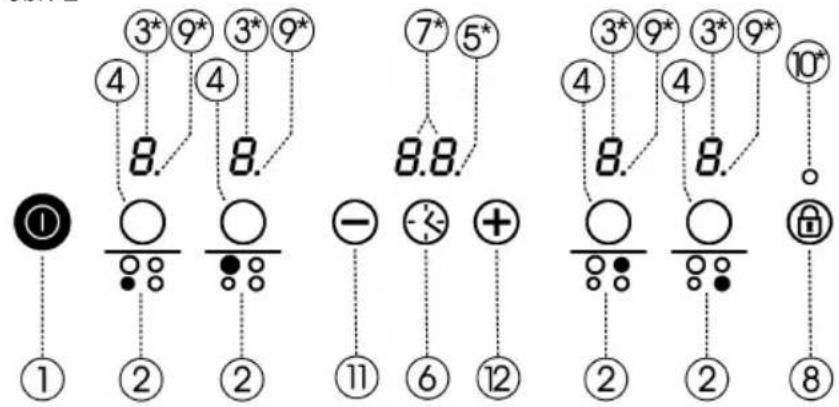
HANDLING ELEMENTS (fig. 2)

On/off touch key.

Hotplate signaller.

Power and/or residual heat displays*.

Hotplate selection touch keys.

Decimal point for the clock*.

Clock touch key.

Clock indicator.

Locking touch key for the rest of touch keys.

Decimal point of the power and/or residual heat indicators*.

Lock activated display*.

"Minus" power/time reduction touch key.

“Plus” power/time increase touch key.
* Only visible while running.
The manoeuvres are done by means of the touch keys. You do not need to exert force on the desired touch key, you only need to touch it with your fingertip to activate the required function.
Each action is verified by a beep.
If one or several touch keys remain pressed for more than ten seconds, the hob will automatically switch off for safety reasons and the beep alarm will go off as a warning of the possible danger situation.
SWITCHING ON THE DEVICE
1 Touch the On touch key (1) for at least one second. The touch control
will become active, a beep will be heard and the indicators (3) will light up displaying a “-”. If any cooking area is hot, the related indicator will flash an H.
If you do not take any action in the next 10 seconds the touch control will switch off automatically.
When the touch control is activated, you can disconnect it at any time by touching the touch button (ID), even if it has been locked (lock function activated). The touch button (1) always has priority to disconnect the touch control.
ACTIVATING HOT PLATES
Once the touch control has been activated with touch key Ⓐ, the desired hotplates can be switched on.
1 Select the desired hotplate by pressing the related touch key (4).
An 0 will appear in the related power indicator and the decimal point will stay on indicating that the hotplate is selected.
2 With the touch key


(12/11) select the desired power level (from 1 to 9).
The ⊖ and ⊕ touch keys are repetitive, so if you keep them pressed they increase or decrease in a continuous manner.
Only one hotplate can be selected at a time, in other words only one decimal point will be lit up (9) (except when more than one hotplate is being timed).
Quick switch-on at maximum power: Select the hotplate and press touch key (11) once. The hotplate will be activated at its maximum power (level 9).
SWITCHING OFF THE HOTPLATE
1 The hotplate must previously be selected. Its decimal point (9) must be lit up.
2 Using the touch key (11) , lower the power to level 0. The hotplate will switch off.
Quick switch-off: Whatever the power level setting is, by simultaneously pressing touch keys ⏻ and ⚠ (12/11), the hotplate will switch to level 0.
When a hot plate is switched off an H will appear in its power indicator, if the glass surface of the related cooking area is hot and there is a risk of burns. When the temperature drops, the indicator switches off (if the hob is disconnected), or otherwise a “-” will light up if the hob is still connected.
SWITCHING OFF THE DEVICE
The device can be switched off at any time by pressing the general on/off touch key (1). In standby mode an H will appear in the areas that are hot. The indicators for the rest of the hot-plates will not light up.
The switching off of the device or of each individual hotplate will be accompanied by a longer beep than the rest.
After use, disconnect the device by using its control and do not rely on the pot/pan detector.
Locking of the touch keys of the induction hob
By using touch key lock ⓝ (8) you may lock all the touch keys of the touch control panel. This prevents functions from being activated accidentally and children from playing with the controls.
Bear in mind that when the touch control is on, you can still switch it on/off using touch key (1) even if the lock function is activated (pilot light 10 is on). On the other hand, if the touch control is switched off, the locking function does not allow the on/off touch key (1) to be used. You must first deactivate the lock.
To activate or deactivate the function, keep touch key Ⓞ (8) pressed for about 1 second. When the function is activated, the pilot light (10) lights up.
Silencer of the beep
When the hob is on, if one presses the touch key “+” and the locking touch key Ⓤ (8) simultaneously for three seconds, the beep that accompanies each action will be deactivated.
This deactivation will not be applied to all the functions, as for example the beep for on/off, the ending of the timer or the locking/unlocking of the touch keys always remain activated.
To once again activate all the beeps
that accompany each action, again simultaneously press the touch key and the locking touch key (8) for three seconds.
Power Function (Power concentration)
This function allows the hot plate to be given extra power, in excess of its nominal power. The said power depends on the size of the hot plate and it can reach the maximum value allowed by the generator.
POWER BOOST FUNCTION CONNECTION
1 Activate the related hotplate to power level 9.
2 From power level 9, press touch key ⊕ (12), and the P symbol will be displayed in the indicator.
The Power boost function has a maximum duration of 10 minutes. After this time has elapsed, the power level will automatically reset to level 9.
On activating the Power boost function in one hotplate, it is possible that the performance of some of the others may be affected, reducing its power to a lower level, in which case this will be displayed on its indicator (3).
POWER BOOST FUNCTION DIS- CONNECTION
The Power boo st function can be disconnected by pressing touch key (11) to return to power level 9.
The function may also automatically be disconnected if the temperature of the cooking area becomes too high.
Timer function
This function makes it easier to cook, as you do not need to be present throughout the process: the timed hot plate(s) will switch off automatically after the set time has lapsed. There is a separate timer for each hot plate, which allows all of the hot plates to be timed simultaneously.
With these models you can use the clock as a timer for the hotplates for times ranging from 1 to 99 minutes. All the cooking areas can be programmed individually and in a simultaneous manner.
Timing one hotplate
1 The cooking zone to be timed must be selected. The related decimal point must be lit up.
2 Select a power level for the hotplate from 1 to 9 using the touch keys or (12/11).
3 Press clock touch key (6). Timer indicator (7) will display 00.
4 Immediately afterwards, enter a cooking time between 1 and 99 minutes by using the touch keys ☑ or (2/11). With the former the value will start at 1, whereas with the latter it will start at 60. By pressing both at the same time the value will be reset to 00.
When the clock indicator (7) stops flashing, it will start to count down the time automatically. The indicator (3) relating to the timed hotplate will alternately display the selected power level and the symbol.
When the clock reaches 01, it will switch from counting down minutes to seconds.
Once the selected cooking time has elapsed, the heating zone being timed is turned off and the clock emits a series of beeps for several seconds. The timer indicator will display a flashing 00 beside the indicator of the hotplate that has been disconnected.
If you wish to time another hotplate at the same time, repeat steps 3 and 4.
If the heating zone turned off is hot, its indicator shows an H or otherwise an 0. To turn off the audible signal touch any sensor.
Changing the programmed time.
To change the programmed time, you must press the touch key of the timed hotplate (4) to select it and then the clock (6). You may then read and change the time.
DISCONNECTION OF THE TIMER
If you want to stop the timer before the programmed time is up.
1 First select the hotplate and then press clock touch key ③ (6).
2 Use the touch key (11) to reduce the time to 00. The clock is can-
celled.
For quick switch-off: repeat step 1 as above. Simultaneously pressing the ⏻ and touch keys (12 and 11) the timer will be disconnected.
Fondue function (depending on model)
This function is specially intended for melting butter, cheese, chocolate, etc. It uses a power level that is lower than level 1. To access the function:
1 Activate the desired hotplate to power level 1.
2 Press touch key ⊖ (11). The indicator will switch to displaying the □ symbol.
To deactivate the function it is sufficient to press the touch keys ⊖ or ⊕ (12/11), and the indicator will switch to respectively displaying the lower power level 0 or the higher one 1.
Synchro function (depending on model)
Using this function, it is possible that two hotplates, identified in the screen printing, work jointly, both to select a power level as well as to activate the timer function.
To activate this function simultaneously press the two related selection touch keys (4). On doing this, the two decimal points (9) of the hotplates will light up and they will both be set to power level 0.
To deactivate this function, again simultaneously press the two related selection touch keys (4).
Power Management function (depending on model)
Some models are equipped with a power limiting function. This function allows the total power generated by the hob to be set to different values selected by the user. To do this, for the first minute after having connected the hob to the power supply, it is possible to access the power limiting menu.
1 Press the “+” touch key for three seconds. The letter PL will appear on the clock ⚙ (6), if the model has a timer or on the hotplate indicators (if it is not equipped with one).
2 Press the locking touch key (3). The different power values to which the hob can be limited will appear and these can be changed using the "+" and "-" touch keys.
3 Once the value has been selected, once again press the locking touch key ⏻ (8). The hob will be limited to the chosen power value.
If you want to change the value again, you must unplug the hob and plug it in again after a few seconds. Thus you will again be able to enter the power limiting menu.
Every time the power level of a hotplate is changed, the power limiter will calculate the total power the hob is generating. If you have reached the total power limit, the touch control will not allow you to increase the power level of that hotplate. The hob will beep and the power indicator (3) will blink at the level that cannot be exceeded. If you wish to exceed that value, you must lower the power of the other hotplates. Sometimes it will not be enough to lower another by a single level as this depends on the power of each hotplate and the level it is set at. It is possible that to raise the level of a large hotplate that of several smaller ones must be turned down.
If you use the quick switch-on at maximum power function and the said value is above the value set by the limit, the hotplate will be set to the maximum possible level. The hob will beep and the said power value will blink twice on the indicator (3).
Safety switch off function
If due to an error one or several heating zones do not switch off, the appliance will be automatically disconnected after a set amount of time (see table 1).
Table 1
| Selected power level | MAXIMUM OPERATING TIME (in hours) | |
| Models with Fondue function | Models without Fondue function | |
| 8 | - | |
| 1 | 8 | 8 |
| 2 | 5 | 8 |
| 3 | 4 | 5 |
| 4 | 4 | 4 |
| 5 | 3 | 4 |
| 6 | 3 | 3 |
| 7 | 2 | 2 |
| 8 | 2 | 2 |
| 9 | 1 | 1 |
| P | 10 or 5 mins.* | 10 or 5 mins.* |
* Depends on model
When the "safety switch off" function has been triggered, a 0 is displayed if the glass surface temperature is not dangerous for the user or an H if there is a burn risk.

Keep the control panel of the ing areas clean and dry at all

In the event of operating pro- or incidents not mentioned in manual, disconnect the ance and contact the TEKA ical service.
Suggestions and recommendations
* Use pots or pans with thick, completely flat bottoms.
* Pots/pans with a smaller diameter than the shown heating area are not recommended.
* Do not slide pots and pans over the glass because they could scratch it.
* Although the glass can take knocks from large pots and pans without sharp edges, try not to knock it.
* To avoid damaging the ceramic glass surface, do not drag pots and pans over the glass and keep the undersides of them clean and in good condition.

Try not to spill sugar or pro- containing sugar on the glass le the surface is hot these damage it.
Cleaning and maintenance
To keep the appliance in good condition, clean it using suitable products and implements once it has cooled down. This will make the job easier and avoid the build-up of dirt. Never use harsh cleaning products or tools that could scratch the surface, or steam-operated equipment.
Light dirt not stuck to the surface can be cleaned using a damp cloth and a gentle detergent or warm soapy water. However, for deeper stains or grease use a special cleaner for ceramic hot plates and follow the instructions on the bottle. Dirt that is firmly stuck due to being burned repeatedly can be removed using a scraper with a blade.
Slight tinges of colour are caused by pots and pans with dry grease residue underneath or due to grease between the glass and the pot during cooking. These can be removed using a nickel scourer with water or a special cleaner for ceramic hot plates. Plastic objects, sugar or food containing a lot of sugar that have melted onto the surface must be removed immediately using a scraper.
Metallic sheens are caused by dragging metal pots and pans over the glass. These can be removed by cleaning thoroughly using a special cleaner for ceramic glass hot plates, although you may need to repeat the cleaning process several times.
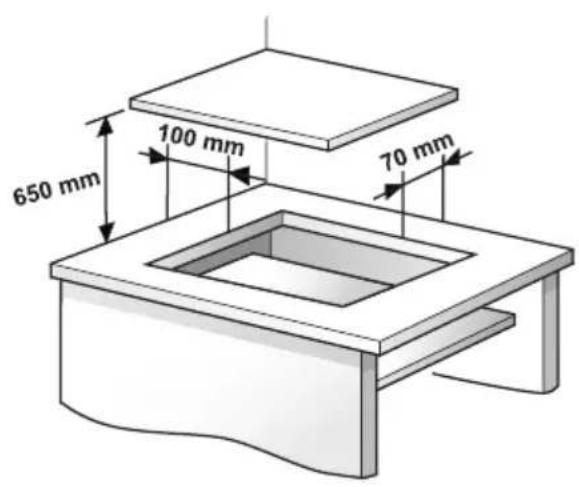
Warning:
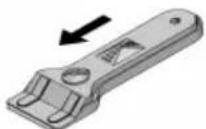
Handle the glass scraper carefully. The blade could cause injury!
If you use the scraper incorrectly, the blade could break and a fragment could get caught between the surrounding trim and the glass. If this happens, do not try to remove it using your hands, carefully use tweezers or a knife with a fine edge. (See fig. 3)
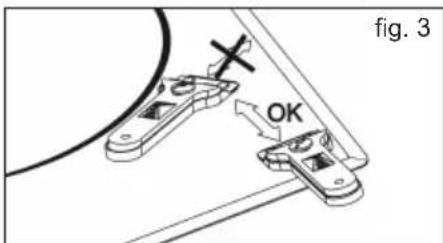
Only use the blade on the ceramic surface, avoiding the scraper casing coming into contact with the glass because this could scratch it.
Use blades in perfect condition. Immediately replace the blade if it is damaged in any way.
After you have finished with the scraper, withdraw the blade and lock it. (See fig. 4)
fig. 4 Using the scraper
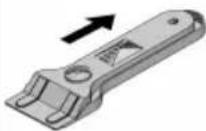
Blade protected
Blade unprotected
A pot or pan may become stuck to the glass due to a product having melted between them. Do not try to lift the pot while the heating zone is cold! This could break the glass.
Do not step on the glass or lean on it as it could break and cause injury. Do not use the glass as a surface for placing objects.
TEKA INDUSTRIAL S.A. reserves the right to make changes to its manuals that it deems necessary or useful, without affecting the product's essential features.
Environmental considerations
The symbol on the product or its packaging means that this product cannot be treated like ordinary household waste. This product must be taken to a recycling collection point for electrical and electronic appliances. By ensuring that this product is disposed of correctly, you will avoid harming the environment and public health, which could happen if this product is not handled properly. For more detailed information about recycling this product, please contact your local authority, household waste service or the store where you purchased the product.
The packaging materials used are environmentally-friendly and can be recycled completely. Plastic components are marked >PE<, >LD<, >EPS<, etc. Dispose of packaging materials, like household waste, in your local container.
GB
Fulfillment with Energy Efficiency of the appliance:
-Appliance has been
tested according to standard B 60350-2 and the obtained value, in Wh/Kg, is available in the appliance's rating plate.
If something does not work
Before calling the technical service, perform the verifications described below.
The appliance does not work:
Ensure that the power cable is plugged in.
The induction zones do not produce heat:
The container is not appropriate (it does not have a ferromagnetic bottom or is too small). Check that the bottom of the container attracts a magnet, or use a larger container.
A humming is heard when starting to cook in the induction zones:
With containers which are not very thick or not of one piece, the humming results from the transmission of energy directly to the bottom of the container. The humming is not a defect, but if you wish to avoid it anyway, reduce the power level slightly or use a container with a thicker bottom, and/or of one piece.
The touch control does not light up or, despite lighting, does not respond:
No heating zone has been selected. Be sure to select a heating zone before operating it.
There is humidity on the sensors, and/or your fingers are wet. Keep the touch control surface and/or your fingers clean and dry.
The locking function is activated. Unlock the controls.
The sound of a fan is heard while cooking, which continues even after cooking has ended:
The induction zones have a fan to keep the electronics cool. This only operates when the electronic circuits get hot. It stops again when the circuits cool whether the hob is turned on or not.
The symbol will appear — on the power indicator of a hotplate:
The induction system does not find a pot or pan on a hotplate or it is of an unsuited type.
The hotplate will switch off and the message C81 or C82 will appear on the indicators:
ENExcessive temperature in the electronics or on the glass. Wait for a while for the electronics to cool down or remove the pot or pan so that the glass can cool.
C85 appears on the indicator of one of the hotplates:
The pot or pan used is of an unsuited type. Switch off the hob, switch it on again and try with another pot or pan.
natural_image
Two identical mechanical clamp components with arrows indicating direction (no text or symbols)natural_image
Two identical mechanical clamp components with black arrows indicating direction (no text or symbols)After you have finished with the scraper, withdraw the blade и ro заключете. (Вж. Фигура 4)
A FÖZÖFELÜLETEK BEKAPCSOLÁSA
natural_image
Two identical mechanical component diagrams with arrows indicating direction (no text or symbols)other
| Component | Type | Description | |---|---|---| | zeleno-žlty | Top Left | Top Left diagram | | modrý | Top Right | Top Right diagram | | sivý | Top Right | Top Right diagram | | hnedý | Top Right | Top Right diagram | | čierny | Top Right | Top Right diagram | | L1 | Bottom Left | Bottom Left diagram | | L2 | Bottom Left | Bottom Left diagram | | ⊕ | Bottom Right | Bottom Right diagram | | N | Bottom Right | Bottom Right diagram | | 400V 2N~ | Top Left | Top Left diagram | | zeleno-žlty | Top Right | Top Right diagram | | modrý | Top Right | Top Right diagram | | sivý | Top Right | Top Right diagram | | hnedý | Top Right | Top Right diagram | | čierny | Top Right | Top Right diagram | | ⊕ | Bottom Left | Bottom Left diagram | | N1 | Bottom Left | Bottom Left diagram | | N2 | Bottom Left | Bottom Left diagram | | L1 | Bottom Left | Bottom Left diagram | | L2 | Bottom Left | Bottom Left diagram | | ⊕ | Bottom Right | Bottom Right diagram | | N | Bottom Right | Bottom Right diagram | | L1 | Bottom Right | Bottom Right diagram | | L2 | Bottom Right | Bottom Right diagram | | ⊕ | Bottom Left | Bottom Left diagram | | N3 | Bottom Left | Bottom Left diagram | | L3 NEPOŽÍVAJTE | Bottom Right | Bottom Right diagram | | obr. 1: The diagram shows a top-down view of the 400V 2N~ and 230V 1~ components with varying thicknesses (±) and spacing (±).obr. 2

Слідкуйте, щоб
SLUKNING AF KOGEZONEN
POWER-TOIMINNON KYTKENTÄ
POWER-TOIMINNON POIS PÄÄLTÄ KYTKENTÄ
INSCHAKELEN VAN HET APPARAAT
1 Raak de inschakelsensor

