Pick your language and provide your email: we'll send you a specifically translated version.
This manual is not available in your language
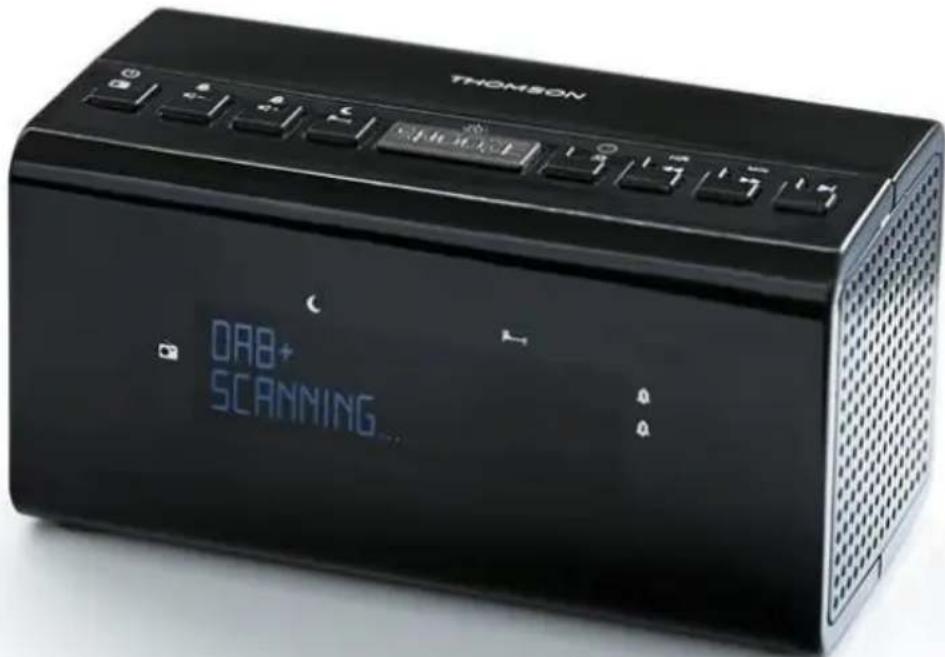
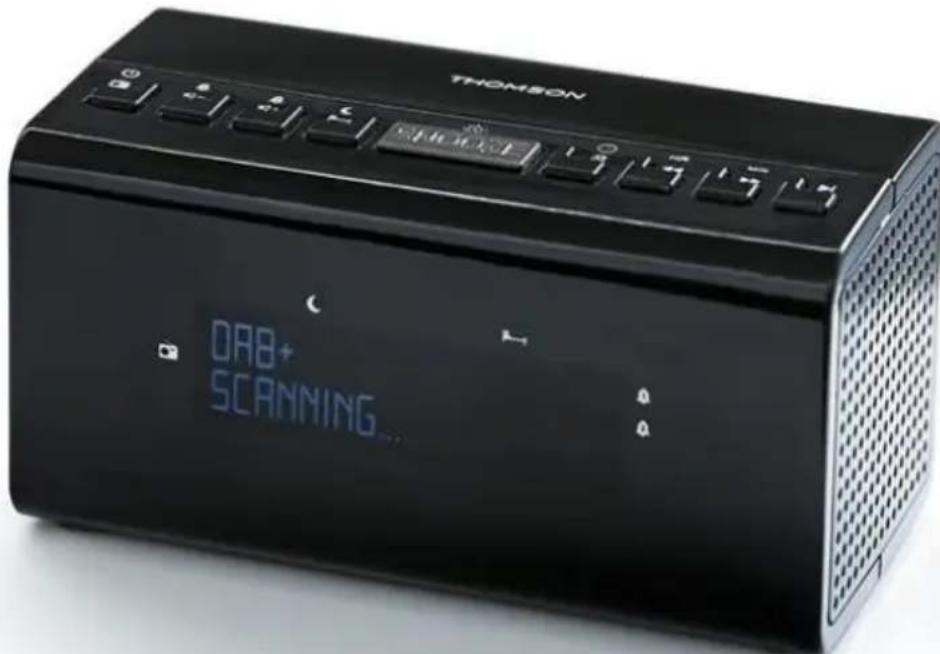
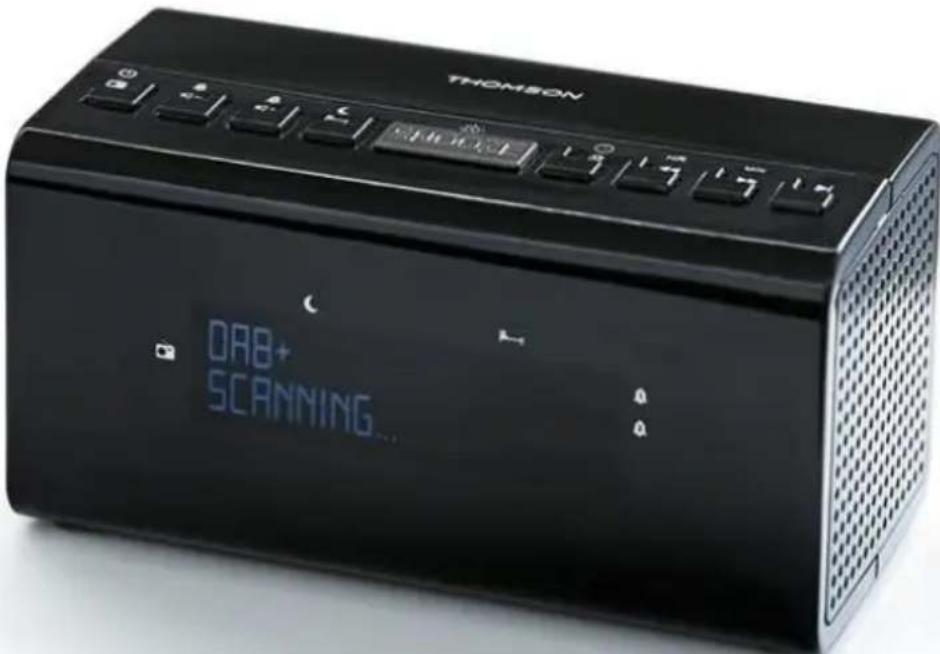
User questions about CR50 THOMSON
1 question about this device. Answer the ones you know or ask your own.
Ask a new question about this device
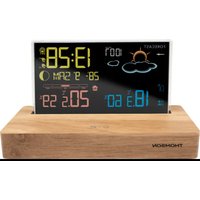
How to set the time on the THOMSON CR50 clock radio?
Frequently Asked Questions -31/03/2026
Response Notice-Facile
To set the time on your THOMSON CR50 clock radio, follow this precise procedure using the control buttons at the top of the device:
Accessing the settings menu:
Press the MENU/INFO button until the menu appears on the LED screen.
Use the TUNING+ (>>) or TUNING- (<<) buttons to navigate until you see the <System> option.
Press the SELECT button to confirm.
Setting the hours and minutes:
Always navigate with TUNING+ or TUNING- until you find the <Time> (Time) option.
Press SELECT to access the setting. The screen will display <Set Time>.
The hour digits will blink on the LED display. Use TUNING+ or TUNING- to increase or decrease the hours.
Press SELECT to confirm and move to the minutes.
The minute digits will blink in turn. Set them with TUNING+ or TUNING-, then press SELECT.
Setting the date:
After confirming the minutes, the day will start blinking. Use TUNING+ or TUNING- to set it, then press SELECT.
Repeat the operation for the month, then for the year in the same way.
Once the complete date is confirmed, the message "SAVE" will briefly appear.
Additional options: After setting the time and date, you can navigate through the menu to configure the 12/24 hour format or enable automatic synchronization with the DAB or FM signal (the device will then automatically synchronize the time considering seasonal time changes).
Respond (be the first)
Download the instructions for your Alarm clock radio in PDF format for free! Find your manual CR50 -
THOMSON and take your electronic device back in hand. On this page are published all the documents necessary for the use of your device. CR50 by THOMSON.
USER MANUAL CR50 THOMSON
Waterloo Office Park/Batiment H
Drive Richelle 161 bte 15 1410 Waterloo, Belgium
Bigben Interactive NEDERLAND b.v.
BELGIQUE, customerservice@bigben-interactive.be
NEDERLAND, customerservice@bigben-interactive.nl
ESPANA, sat@bigbeninteractive.es
ITALIA, support@bigbeninteractive.it
www/bigben.eu
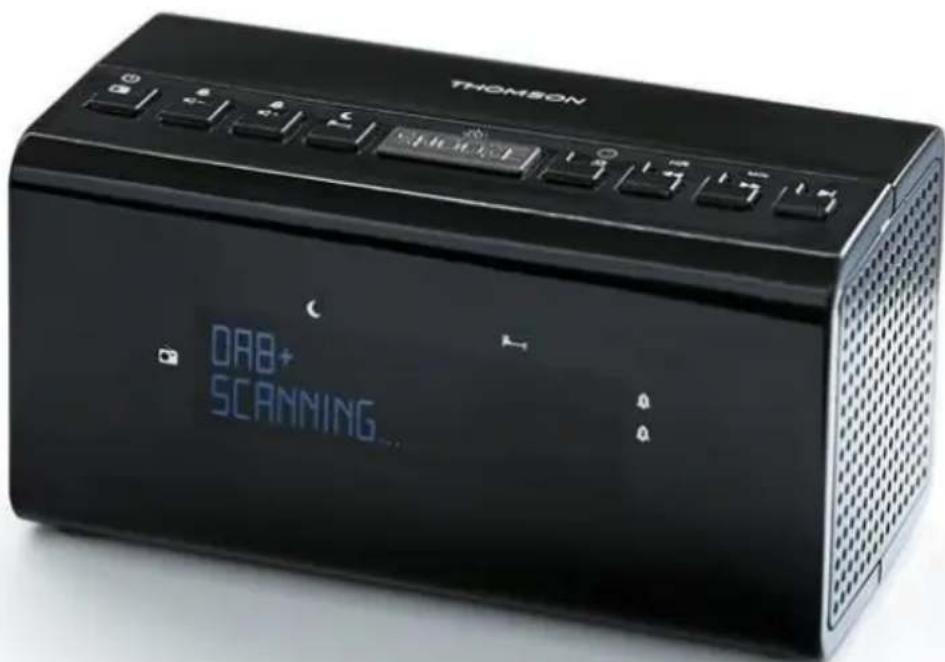
THOMSON
CR50DAB
ALARM CLOCK DAB RADIO
OPERATING INSTRUCTIONS
PLEASE READ THIS USER MANUAL CAREFULLY BEFORE
OPERATING THIS UNIT AND RETAIN FOR
FUTURE REFERENCE
Contents
Getting Started 1
Safety and Notice 1
Care for your product 2
Care of the environment 2
What's in the box 3
Description of Parts 3
Power
Power supply 4
Using the DAB radio 4
Using the FM radio 6
Setting the alarm 7
System settings 8
Remarks 10
4
Getting Started
Remove the appliance from the box.
Remove any packaging from the product.
Place the packaging inside the box and either or dispose of safely.
Safety Warning and Notice
Read and understand all instructions before you use this product. If damage is caused by failure to follow the instructions, the warranty does not apply.
Never remove the casing of this device.
Never place this device on other electrical equipment.
Protect the power cord from being walked on or pinched, particularly at plugs, convenience receptacles, and the point where they exit from the device. Make sure that the power voltage corresponds to the voltage printed on the back label. When you unplug the AC power cord always pull the plug from the socket. Never pull the cord. Before connecting the AC power cord, ensure you have completed all other connections
Only use attachments/accessories specified by the manufacturer.
Refer all servicing to qualified service personnel. Servicing is required when the device has been damaged in any way, such as:
damaged power-supply cord,
spilled liquid or objects have inserted into the device,
the device has been exposed to rain or moisture,
the device does not operate normally,
or the device has been dropped.
The rating label is placed on the bottom side of apparatus.
Make sure there is enough space around the product for ventilation.
The use of this device must be done in moderate climates, away from direct sunlight, naked flames or heat. Do not install near any heat sources.
Batteries (battery pack or batteries installed) shall not be exposed to excessive heat such as sunshine, fire, etc.
Unplug before cleaning. Never lubricate any part of this device. Clean the appliance with a soft cloth. Do not use abrasives or harsh cleaners.
Ensure that you always have easy access to the power cord, plug or adaptor to disconnect this device from the power if necessary.
Do not use this apparatus near water. It must not be in contact with dripping or splashing. Do not use this unit in wet or damp conditions.
Unplug this device during lightning storms or when unused for long periods of time.
CLASS II MATERIAL
DC POWER SUPPLY
ALTERNATING CURRENT
FOR INDOOR USE ONLY
The lightning symbol inside an equilateral triangle warns the user of the presence inside the product of uninsulated hazardous electric voltages powerful enough to represent an electrocution risk.
The exclamation point within a triangle indicates the presence of important operating and maintenance (servicing) instructions in the literature accompanying the unit.
Place the unit in the desired position and unravel the mains cable. Insert the cable into the supply socket and switch on if applicable.
Safety Warning
Note the following information Only use the power supplies listed below.
The AC/DC adaptor is used as disconnect device.
The AC/DC adaptor of apparatus should not be obstructed OR should be easily accessed during intended used.
To be completely disconnect the power input, the AC/DC adaptor of apparatus shall be disconnected from the mains.
This product is intended for use only with the adaptor provided:
Manufacturer: OBELIEVE
Model: OBL-0501000E
The rating label has marked on the bottom panel of the apparatus.
Insert one end of the supplied power cord to the 5V DC-IN Jack located at the rear of the unit and the other end into the wall socket.
When used for the first time the cord has to be firmly pushed into the socket. If it does not work on AC, try again to be sure of a positive connection
Operation
Press the STANDBY/MODE button to turn ON the unit. Press and hold it for 2 seconds to turn OFF the unit.
Adjusting the volume
Press the VOLUME- button to decrease the volume.
Press the VOLUME+ button to increase the volume. When you adjust the volume, please check the display which will confirm the volume setting.
Using the DAB radio
Wire antenna
Please make sure that the antenna is fully extended before you attempt to tune into a DAB station. This will ensure that the maximum signal strength is available when the radio begins to scan. Extending the wire antenna also ensures the best possible sound quality.
DAB Radio mode
Check that your radio is in DAB mode. If you are not already in DAB mode, press and release the 'STANDBY/MODE' button to go into DAB mode (check the display).
The first time you use the radio or if the station list is empty, your radio will automatically begin to scan for DAB radio stations.
If you were listening to a DAB station when you switched the radio off then this station will be automatically selected when you switch the radio back on.
Changing DAB stations
In DAB mode:
1) Press the TUNING+/TUNING- button on the top of the radio to scroll through the available stations.
2) When the station that you would like to listen to is displayed press the SELECT button to confirm. There will be a short delay whilst your radio tunes into your selected station.
Scanning for DAB stations
With DAB radio, additional stations and services regularly become available so it's a good idea to carry out a manual scan every now and then to make sure that you have the most up to date station listing stored within the memory of your radio. If you have moved your radio to another location, e.g. if you go on holiday, then it's also a good idea to carry out a manual scan.
If you are not already in DAB mode, press and release the 'STANDBY/MODE' button to go into DAB mode.
1) Press and hold the MENU/INFO button until the display changes to .
2) Press the SELECT button to begin a search for stations.
Prune DAB stations
You can remove the DAB stations in the station list that cannot be received in your area. These are listed with a '?' prefix.
1) Press and hold the 'Menu/Info' button until the display changes to and use the TUNING+ or TUNING- button to scroll to 'Prune'. Press the SELECT button to select.
2) 'Prune < N > Y is displayed. Use the TUNING+ or TUNING- button to scroll to 'Y'. Press the SELECT button to select and prune the station list. Stations with a ?' prefix will now no longer be displayed.
Storing a preset DAB station
Your radio can store up to 20 DAB stations in its preset memories for instant access to your favourite stations.
Note: When you store preset DAB radio stations, these do not overwrite your preset FM stations.
1) Tune your radio to the station that you wish to preset.
2) Press and hold the PRESET button on the top of your radio.
3) Then press the TUNING+/TUNING- button to scroll to the preset location where you would like to store the radio station (1-20).
4) Press the SELECT button to select and the display will confirm 'STORED'.
Note: If there is already an existing preset DAB station, it will be overwritten when you store the new station.
Tune in to a preset DAB station
In DAB mode
1) Press the PRESET button.
2) Use the TUNING+/TUNING- button to scroll to the Preset location and station that you would like to listen to (1-20). Press and release the SELECT button to select. The radio will tune to that station and begin to play.
Note: If no DAB station has been stored under the preset button, 'Empty' will be displayed and the radio will revert to the previously selected radio station.
DAB display information
When listening to a DAB station you can change the information that will appear on the second line of the display. There are several different types of information that are sent by the broadcaster.
Dynamic Label Segment (DLS)
This is scrolling text information supplied by the broadcaster. The information could be the name of an artist or music title, DJ's name, the contact details for the radio station, etc.
Signal Strength
The indicator *** will appear on the display to indicate the minimum signal strength for acceptable listening. The symbol of indicates the actual signal strength that you are receiving. The stronger the signal, the further to the right the arrow will be.
Programme Type (PTY) - such as 'Rock', 'Pop', 'Talk' or 'News'
- Multiplex Name - displays the broadcasting area and collection of radio stations on this frequency, e.g.: BBC National DAB, Digital 1 Network.
- Channel and Frequency, e.g.: 12B 225.648 MHz
- Signal information
The data rate at which the signal is being transmitted.
Signal error
This is displayed as a number between 0 and 99. It would not be possible to satisfactorily listen to a radio station with a signal error rate of 30 or above. Try adjusting the antenna or relocating your radio to improve reception.
Time and date
Supplied by the broadcaster.
1) Repeatedly press and release the 'Menu/Info' button on the top of the radio to cycle through the different information options.
Dynamic range control (DRC)
In DAB mode:
The dynamic range for each radio programme is set by the broadcaster for each radio station and may be different for the types of programme broadcast, such as pop or classical music or a chat show. The dynamic range control signal is transmitted in parallel with the audio signal for each programme and with your radio you can use this control signal to expand or compress the dynamic range (the difference between the loudest and quietest sounds) of the reproduced audio signal. Changing the dynamic range can affect the 'loudness' and/or 'quality of sound' of the programme that you hear so that it will be more suited to your listening conditions and your own personal listening requirements. For example, in a noisy environment, where quiet sounds might be swamped, setting the compression to maximum will 'boost' the quiet sounds, whilst keeping the loudest sounds at their original level.
There are 3 levels of compression:
DRC Off: no compression. This is the default setting.
DRC Low: medium compression.
DRC High: maximum compression.
1) Press and hold the 'Menu/Info' button until the display changes to `’.
2) Use the TUNING+/TUNING- button to scroll to 'DRC' and press the SELECT button to select.
3) Use the TUNING+/TUNING- button to scroll through the 3 compression level options available and press the SELECT button to select.
Using the FM radio
FM Radio mode
If you are not already in FM mode, briefly press and release the 'STANDBY/MODE' button to go to FM mode (check the display).
If you were listening to an FM station when you switched the radio off then this station will be automatically selected when you switch the radio back on.
Tuning in to an FM station
Press and hold the TUNING+/TUNING- button on the top of your radio to scan up the frequency band.
Press the TUNING+ or TUNING- button to fine tune each frequency in 0.05 MHz steps.
Note: If reception is still poor, adjust the position of the antenna or try moving the radio to another location.
Preset stations
Your radio can store up to 20 FM stations in its preset memories for instant access to your favourite stations.
Note: When you store preset FM radio stations, these do not overwrite your preset DAB stations.
1) Tune your radio to the station that you wish to preset.
2) Press and hold the PRESET button on the top of your radio.
3) Then press the TUNING+/TUNING- button to scroll to the Preset location where you would like to store the radio station (1-20).
4) Press the SELECT button to select and the display will confirm 'STORED'.
Note: If there is already an existing preset FM station, it will be overwritten when you store the new station.
Tune to a preset FM station
In FM mode:
1) Press the PRESET button.
2) Use the TUNING+/TUNING- button to scroll to the Preset location and station that you would like to listen to (1-20). Press and release the SELECT button to select. The radio will tune to that station and begin to play.
Note: If no FM station has been stored under the preset button, 'EMPTY' will be displayed and the radio will revert to the previously selected radio station.
FM display information
When listening to an FM station you can change the information that will appear on the display.
Radiotext (RT)
This is scrolling text information supplied by the broadcaster. Information could be the name of an artist or music title, the DJ's name, the contact details for the radio station etc.
Program Type (PTY) such as 'Rock', 'Pop', 'Talk' or 'News'
Station name or frequency such as BBC R4 or 93.30MHz
Audio mode---Stereo or Mono
Time and Date----Supplied by the broadcaster
1) Repeatedly press and release the Menu/Info button on the top of the radio to cycle through the different information options.
Set the time and date
The first time you listen to the DAB radio, the time and date of your product will be synchronised automatically to that broadcast by the DAB service in 24 hour clock mode; which is in line with daylight saving, but you can set the time and date manually.
In DAB mode:
1) Press and hold the Menu/Info button until <SCAN>' is displayed.
2) Use the TUNING+/TUNING- button to scroll to < System>. Press the SELECT button to select.
3) Use the TUNING+/TUNING- button to scroll to '
When you confirm the correct date, 'SAVE' is displayed and the display returns to .
You can now use the TUNING+/TUNING- button to scroll and the same method as you did to set the time and date to change the settings for:
12/24 hour clock display
The date format, DD-MM-YYYY or MM-DD-YYYY
- To auto update the time from the DAB signal, FM signal, DAB or FM signal or no update.
Setting the alarm
Note: Check that the radio has the correct time and date before you set an alarm.
With your radio switched on (Not in standby mode)
1) Press and hold the MENU/INFO button until the menu is shown.
2) Use the TUNING+/TUNING- button to scroll to . Press the SELECT button to select.
3) Use the TUNING+/TUNING- button to scroll to . Press the SELECT button to select.
4) Use the TUNING+/TUNING- button to scroll to scroll to or as required. Press and release the SELECT button. The hour digits for the alarm will flash.
5) Use the TUNING+/TUNING- button to adjust and press the SELECT button to confirm.
6) The minutes will now flash. Use the TUNING+/TUNING- button to adjust and press the SELECT button to confirm.
7) Use the TUNING+/TUNING- button to scroll to choose the alarm duration, from 15, 30, 45, 60, 90 and 120 minutes. Press and release the SELECT button.
8) Press the TUNING+/TUNING- button to scroll to the sound source for the alarm. You can choose from Buzzer, DAB or FM. Press and release the SELECT button.
Note: If you select DAB or FM radio for the alarm source, 'Last' will flash on the display. Press the TUNING+/TUNING- button to select, and the last radio station listened to in DAB or FM, as appropriate, will be used for your alarm.
9) Use the TUNING+/TUNING- button to scroll to the frequency for the alarm. You can choose from Daily, Once, Weekends or Weekdays. Press and release the SELECT button.
10) Use the TUNING+/TUNING- button to scroll to the volume for the alarm. Press and release the SELECT button.
11) Use the TUNING+/TUNING- button to scroll to ON. Press and release the SELECT button. The display will confirm 'SAVE'.
Note: If you select "Once", you will then be prompted to set the date for your alarm.
Note: An alarm symbol at the bottom of the radio display together with the digit "1" or "2" will confirm that an alarm has been set.
Note: If the time is not set or has failed to update from the radio signal,
Stop the Alarm
When the alarm sounds, press and release the STANDBY/MODE button, Alternatively, you can press and release the Snooze/Sleep button (see Snooze function below).
Note: If you press the STANDBY/MODE button to stop the alarm, the alarm symbol will remain on the display and the alarm will sound again at the same time the next day, unless it was set for "Once".
Snoopze function
If you want to snooze for a few more minutes when an alarm sounds, press the SNOOZE BUTTON while the alarm is sounding. The alarm will sound again after 10 minutes. Press the STANDBY/MODE button to turn the Snooze function off.
Sleep timer
You can set your radio to turn off automatically using the sleep timer. You can choose from Sleep, Off, 15, 30, 45, 60 and 90 minutes.
In DAB or FM mode:
press and release the SNOOZE/SLEEP button repeatedly to cycle through the different sleep timer options such as Sleep, Off 15, 30, 45, 60 and 90 minutes. Then press the SELECT button to confirm. Note: To cancel the sleep timer, follow the steps to set the sleep time but stop when 'OFF' is displayed then press the SELECT button to confirm.
System settings
Your Radio must be switched on (not in Standby mode), to change the system settings.
Display backlight timeout
You can adjust the display backlight timeout. The options OFF, 10, 20, 30, 45, 60, 90, 120, and 180 seconds are available.
In DAB or FM mode:
1) Press and hold the Menu/Info button to enter the menu options.
2) Use the TUNING+/TUNING- button to scroll to . Press the SELECT button to select.
3) Use the TUNING+/TUNING- button to scroll to 'Backlight'. Press the SELECT button to select.
4) is displayed. Press the SELECT button to select. Use the TUNING+/TUNING- button to scroll through the available backlight timeout options of OFF, 10, 20, 30, 45, 60, 90, 120 and 180 seconds. Press and release the SELECT button to select.
Software version
You can check the software version of your radio.
In DAB or FM mode:
1) Press and hold the Menu/Info button to enter the menu options.
2) Use the TUNING+/TUNING- button to scroll to . Press the SELECT button to select.
3) Use the TUNING+/TUNING- button to scroll to . Press the SELECT button to select. The software version will be displayed.
Factory reset
You can reset your radio and restore all of the original factory settings.
Note: If you reset your radio all of your stored station presets will be deleted.
In DAB or FM mode:
1) Press and hold the 'Menu/Info' button to enter the menu options.
2) Use the TUNING+/TUNING- button to scroll to . Press the SELECT button to select.
3) Use the TUNING+/TUNING- button to scroll to 'RESET'. Press the SELECT button to select.
4) 'Reset <N> Y' will be displayed. Use the TUNING+/TUNING- button to scroll to <Y> . Press the SELECT button to select.
5) After a few seconds the display will change to 'Welcome' and will then go into standby mode.
Under the environment with electrostatic discharge, the device may be power off. (EUT could not operate properly). It requires user reset the device by turn on the device to choose the appropriate mode & set time again.
Care of the environment
Your product is designed and manufactured with high quality materials and components, which can be recycled and reused.
Attention should be drawn to environmental aspects of battery disposal.
When this crossed-out wheeled bin symbol is attached to a product it means that the product is covered by the European Directive 2002/96/EC. Please inform yourself about the local separate collection system for electrical and electronic products. Please act according to your local rules and do not dispose of your old products with your normal household waste. Correct disposal of your old product helps to prevent potential negative consequences for the environment and human health.
THOMSON is a trademark of TECHNICOLOR SA or its affiliates used under license to Bigben Interactive.
You can find the information on the plate located at the back of the unit.
DECLARATION OF CONFORMITY
The undersigned, Bigben Interactive declares that the radio equipment of the CR50DAB type complies with the 2014/53/EU directive.
The complete text is available at https://www/bigben-interactive.co.uk/support/
Made in China
Manufactured by BIGBEN INTERACTIVE SA
396, Rue de la Voyette
CRT2-FRETIN
CS 90414
59814 LESQUIN Cedex - France
www/bigben.eu
REACH
Fabricant: Bigben Interactive FRANCE
Rue de la Voyette, C.R.T. 2, Fretin, CS90414 - 59814 Lesquin Cedex, France
Waterloo Office Park/Batiment H
Dréve Richelle 161 bte 15 1410 Waterloo, Belgium
Bigben Interactive NEDERLAND b.v.
BELGIQUE, customerservice@bigben-interactive.be
NEDERLAND, customerservice@bigben-interactive.nl
ESPANA, sat@bigbeninteractive.es
ITALIA, support@bigbeninteractive.it
www/bigben.eu
THOMSON
CR50DAB
Waterloo Office Park/Batiment H
Drive Richelle 161 bte 15 1410 Waterloo, Belgium
Bigben Interactive NEDERLAND b.v.
BELGIQUE, customerservice@bigben-interactive.be
NEDERLAND, customerservice@bigben-interactive.nl
ESPANA, sat@bigbeninteractive.es
ITALIA, support@bigbeninteractive.it
www/bigben.eu
THOMSON
CR50DAB
RADIOSVEGLIA DAB
ISTRUZIONI D'USO
PRIMA DI UTILIZZARE L'APPARECCHIO, LEGGERE PER INTERO IL PRESENTE MANUALE E CONSERVARLO PER CONSULTAZIONI FUTURE.
Index
Dynamic Label Segment (DLS)
Waterloo Office Park/Batiment H
Drive Richelle 161 bte 15 1410 Waterloo, Belgium
Bigben Interactive NEDERLAND b.v.
BELGIQUE, customerservice@bigben-interactive.be
NEDERLAND, customerservice@bigben-interactive.nl
ESPANA, sat@bigbeninteractive.es
ITALIA, support@bigbeninteractive.it
www/bigben.eu
THOMSON
PT
CR50DAB
Reduzir as estaceos DAB
Dynamic Label Segment (DLS)
Waterloo Office Park/Batiment H
Drive Richelle 161 bte 15 1410 Waterloo, Belgium
Bigben Interactive NEDERLAND b.v.
BELGIQUE, customerservice@bigben-interactive.be
NEDERLAND, customerservice@bigben-interactive.nl
ESPANA, sat@bigbeninteractive.es
ITALIA, support@bigbeninteractive.it
www/bigben.eu
THOMSON
CR50DAB
DAB RADIOWECKER
BEDIENUNGSANLEITUNG
DLS (Dynamic Label Segment)
Waterloo Office Park/Batiment H
Dréve Richelle 161 bte 15 1410 Waterloo, Belgium
Bigben Interactive NEDERLAND b.v.
BELGIQUE, customerservice@bigben-interactive.be
NEDERLAND, customerservice@bigben-interactive.nl
ESPANA, sat@bigbeninteractive.es
ITALIA, support@bigbeninteractive.it
www/bigben.eu
THOMSON
CR50DAB
DAB WEKKERRADIO
HANDLEIDING
GELIEVE DEZE GEBRUKSAANWIJZING GOED DOOR TE NEMEN VOOR U HET TOESTEL IN GEBRUK NEEMT EN BEWAAR HET ZODAT U HET LATER NOG KAN RAADPLEGEN.
Inhoud
Dynamic Range Control (DRC)
In de DAB-modus:
Waterloo Office Park/Batiment H
Drive Richelle 161 bte 15 1410 Waterloo, Belgium
Bigben Interactive NEDERLAND b.v.
BELGIQUE, customerservice@bigben-interactive.be
NEDERLAND, customerservice@bigben-interactive.nl
ESPANA, sat@bigbeninteractive.es
ITALIA, support@bigbeninteractive.it
www/bigben.eu
CR50DAB
LARMKLOCKA MED DAB-RADIO
ANVÄNDARMANUAL
LAS DENNA ANVANDARMANUAL NOGA INNAN ENHETEN TAS I BRUK OCH SPARA DEN FÜR FRAMTIDA BRUK
Innehäll
Sökning after DAB-stationer
Waterloo Office Park/Batiment H
Dreve Richelle 161 bte 15 1410 Waterloo, Belgium
Bigben Interactive NEDERLAND b.v.
BELGIQUE, customerservice@bigben-interactive.be
NEDERLAND, customerservice@bigben-interactive.nl
ESPANA, sat@bigbeninteractive.es
ITALIA, support@bigbeninteractive.it
www/bigben.eu
THOMSON
CR50DAB
DAB-RADIO MED VAEKKEUR
BETJENINGSVEJLEDNING
LAES VENLIGST DENNE BRUGERVEJLEDNING OMHYGGELIGT, FØR DU BETJENER ENHEDEN, OG GEM DEN TIL EVT. SENERE BRUG.
Indholdsfortegnelse
Waterloo Office Park/Batiment H
Drive Richelle 161 bte 15 1410 Waterloo, Belgium
Bigben Interactive NEDERLAND b.v.
BELGIQUE, customerservice@bigben-interactive.be
NEDERLAND, customerservice@bigben-interactive.nl
ESPANA, sat@bigbeninteractive.es
ITALIA, support@bigbeninteractive.it
www/bigben.eu
THOMSON
CR50DAB
DAB-RADIO MED VEKKERKLOKKE
BRUKSANVISNING
LES DENNE BRUKSANVISNINGEN NÖYE FÜR DU TAR I BRUK ENHETEN, OG TA VARE PÄ DEN TIL SENERE BRUK
Innhold
Dynamic Label Segment (DLS)
Waterloo Office Park/Batiment H
Dréve Richelle 161 bte 15 1410 Waterloo, Belgium
Bigben Interactive NEDERLAND b.v.
BELGIQUE, customerservice@bigben-interactive.be
NEDERLAND, customerservice@bigben-interactive.nl
ESPANA, sat@bigbeninteractive.es
ITALIA, support@bigbeninteractive.it
www/bigben.eu
THOMSON
CR50DAB
DAB RADIOBUDÍK
NÁVOD K POUŽITÍ
PRED POUZITIM TOHOTO ZARIZENI SI PRECTETETENTO NAVOD K POUZITIA USCHOVEJTE SI HO PROPOZDEJSI POUZITI
Obsah
Zaciname 1
Napajeni ze sítě
4
Waterloo Office Park/Batiment H
Drive Richelle 161 bte 15 1410 Waterloo, Belgium
Bigben Interactive NEDERLAND b.v.
BELGIQUE, customerservice@bigben-interactive.be
NEDERLAND, customerservice@bigben-interactive.nl
ESPANA, sat@bigbeninteractive.es
ITALIA, support@bigbeninteractive.it
www/bigben.eu
THOMSON
CR50DAB
ÉBRESZTOÜRÁS DAB RADIÓ
HASZNÁLATI UTMUTATÓ
KÉRJÜK, A KÉSZÜLEK MÜKÖDTETÉSE ELOTT OLVASSA EL FIGYELMESEN EZT AZ UTMUTATÖT, ES ÖRIZZE MEG KÉSÖBBI TAJÉKOZÓDÁS CéljÁBOL
Tartalomjegyzék
Elsö lépések 1
Dynamic range control (DRC)
DABmodban:
Waterloo Office Park/Batiment H
Drive Richelle 161 bte 15 1410 Waterloo, Belgium
Bigben Interactive NEDERLAND b.v.
BELGIQUE, customerservice@bigben-interactive.be
NEDERLAND, customerservice@bigben-interactive.nl
ESPANA, sat@bigbeninteractive.es
ITALIA, support@bigbeninteractive.it
www/bigben.eu
THOMSON
CR50DAB
RADIO DAB Z BUDZIKIEM
INSTRUKCJA OBSŁUGI
PRZED UZYCIEM URZADZENIA NALEZY UWAZNIE PRZECZYTAÇ NINIEJSZA INSTRUKCJE OBSLUGI I ZACHOWAC JA DO POZNIEJSZEGO WGLADU.
Spistresci
Waterloo Office Park / Batiment H
Drève Richelle 161 bte 15 1410 Waterloo, Belgium
Bigben Interactive NEDERLAND b.v.
BELGIQUE, customerservice@bigben-interactive.be
NEDERLAND, customerservice@bigben-interactive.nl
ESPANA, sat@bigbeninteractive.es
ITALIA, support@bigbeninteractive.it
www/bigben.eu
Other manuals THOMSON
Discover other manuals and user guides for the brand THOMSON
💬 Hi! I'm your manual assistant.I know your THOMSON CR50.
How can I help you? (use, settings, error codes, maintenance, explaining a step from the manual, etc.)💡 Examples :
• How do I use it ?
• Error code E3 ?
• How do I clean it ?