
CPFIP001 - Hi-Fi System SONY - Free user manual and instructions
Find the device manual for free CPFIP001 SONY in PDF.

User questions about CPFIP001 SONY
0 question about this device. Answer the ones you know or ask your own.
Ask a new question about this device
Download the instructions for your Hi-Fi System in PDF format for free! Find your manual CPFIP001 - SONY and take your electronic device back in hand. On this page are published all the documents necessary for the use of your device. CPFIP001 by SONY.
USER MANUAL CPFIP001 SONY
Checking Supplied Items 3
Installation 4
Listening to Music 6
Troubleshooting 9
Specifications 9
WARNING
To reduce the risk of fire or electric shock, do not expose this apparatus to rain or moisture.
To prevent fire or shock hazard, do not place objects filled with liquids, such as vases, on the apparatus.
To prevent fire, do not cover the ventilation of the apparatus with newspapers, table-cloths, curtains, etc. And don't place lighted candles on the apparatus.
Do not install the appliance in a confined space, such as a bookcase or built-in cabinet.
The nameplate is located on the bottom exterior.
CAUTION
Danger of explosion if battery is incorrectly replaced. Replace only with the same or equivalent type recommended by the manufacturer. Discard used batteries according to the manufacturer's instructions.

Don't throw away the battery with general house waste, dispose of it correctly as chemical waste.
Do not expose the battery to excessive heat such as direct sunlight, fire or the like.
Notice for the customers in the United Kingdom
A moulded plug complying with BS1363 is fitted to this equipment for your safety and convenience.
Should the fuse in the plug supplied need to be replaced, a fuse of the same rating as the supplied one and approved by ASTA or BSI to BS1362, (i.e., marked with mark) must be used.
If the plug supplied with this equipment has a detachable fuse cover, be sure to attach the fuse cover after you change the fuse. Never use the plug without the fuse cover. If you should lose the fuse cover, please contact your nearest Sony service station.

Disposal of Old Electrical & Electronic Equipment (Applicable in the European Union and other European countries with separate collection systems)
This symbol on the product or on its packaging indicates that this product shall not be treated as household waste. Instead it shall be handed over to the applicable collection point for the recycling of electrical and electronic equipment. By ensuring this product is disposed of correctly, you will help prevent potential negative consequences for the environment and human health,
which could otherwise be caused by inappropriate waste handling of this product. The recycling of materials will help to conserve natural resources. For more detailed information about recycling of this product, please contact your local Civic Office, your household waste disposal service or the shop where you purchased the product.
- iPod is a trademark of Apple Computer, Inc., registered in the U.S. and other countries.
- All other trademarks and registered trademarks are trademarks or registered trademarks of their respective holders. In this manual, ^TM and ^ marks are not specified.
Precautions
On safety
- AC power cord must be changed only at the qualified service shop.
- Use only the supplied subwoofer. Do not use any other AC power adaptor.

On placement
- Do not place the system in an inclined position.
- Do not place the system in locations that are hot and subject to direct sunlight, dusty, very humid, or extremely cold.
- Use caution when placing the unit or subwoofer on a specially treated (waxed, oiled, polished, etc.) floor, as staining or discoloration may result.
On cleaning
Clean the cabinets with a soft cloth lightly moistened with a mild detergent solution or water. Do not use any type of abrasive pad, scouring powder or solvent such as alcohol or benzene.
Compatible iPod models
The compatible iPod models are as follows.


iPod nano 2nd generation (aluminium)
iPod 5th generation (video)

iPod nano 1st generation


iPod 4th generation (color display)
iPod 4th generation

Checking Supplied Items
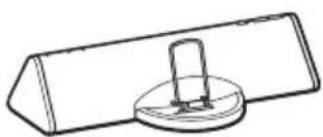
Main unit (Active speaker)
(See page 2 for compatible iPod models.)
Subwoofer
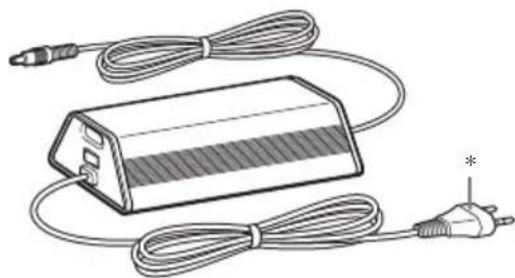
- The shape of the plug differs depending on the area.
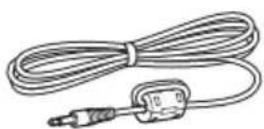
LINE IN cable Remote
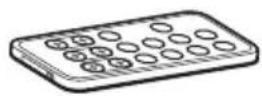
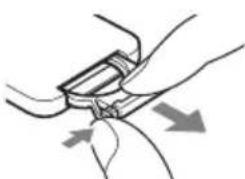
Preparing the remote
Pull out the insulating sheet to allow power to flow from the battery.
The remote already contains a battery.

To replace the battery, follow the instructions below.
1Slide out and remove the battery case.
2Insert a new lithium battery with the ^+ side facing up.
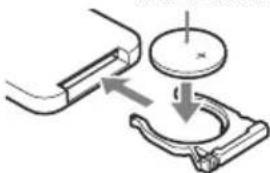
CR2025 lithium battery
Note
If you do not use the remote for a long period of time, remove the battery to avoid possible damage from battery leakage and corrosion.
Notes on lithium battery
- Keep the lithium battery out of the reach of children. Should the battery be swallowed, immediately consult a doctor.
- Wipe the battery with a dry cloth to assure a good contact.
- Be sure to observe the correct polarity when installing the battery.
- Do not hold the battery with metallic tweezers, otherwise a short-circuit may occur.
Tip
When the remote can no longer operate the system, replace the battery with a new one.
WARNING
Battery may explode if you mistreated.
Do not recharge, disassemble or dispose of in fire.
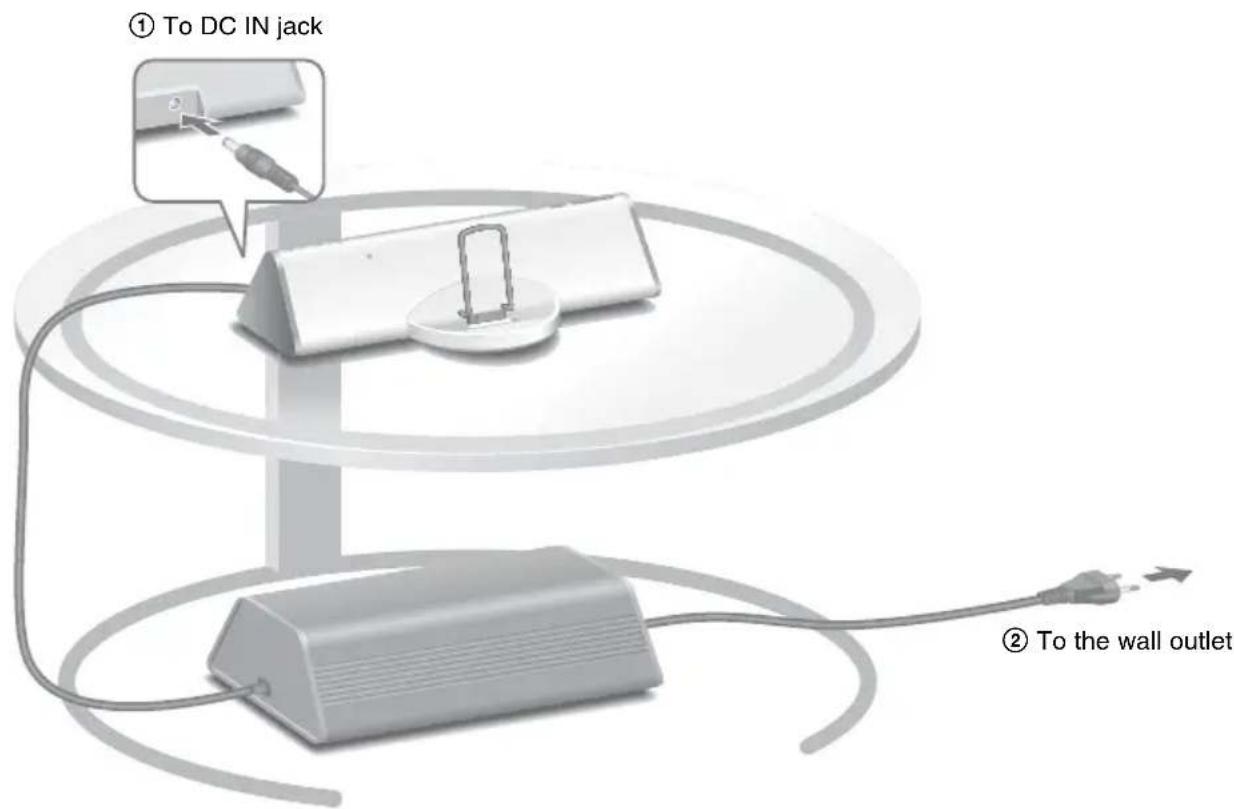
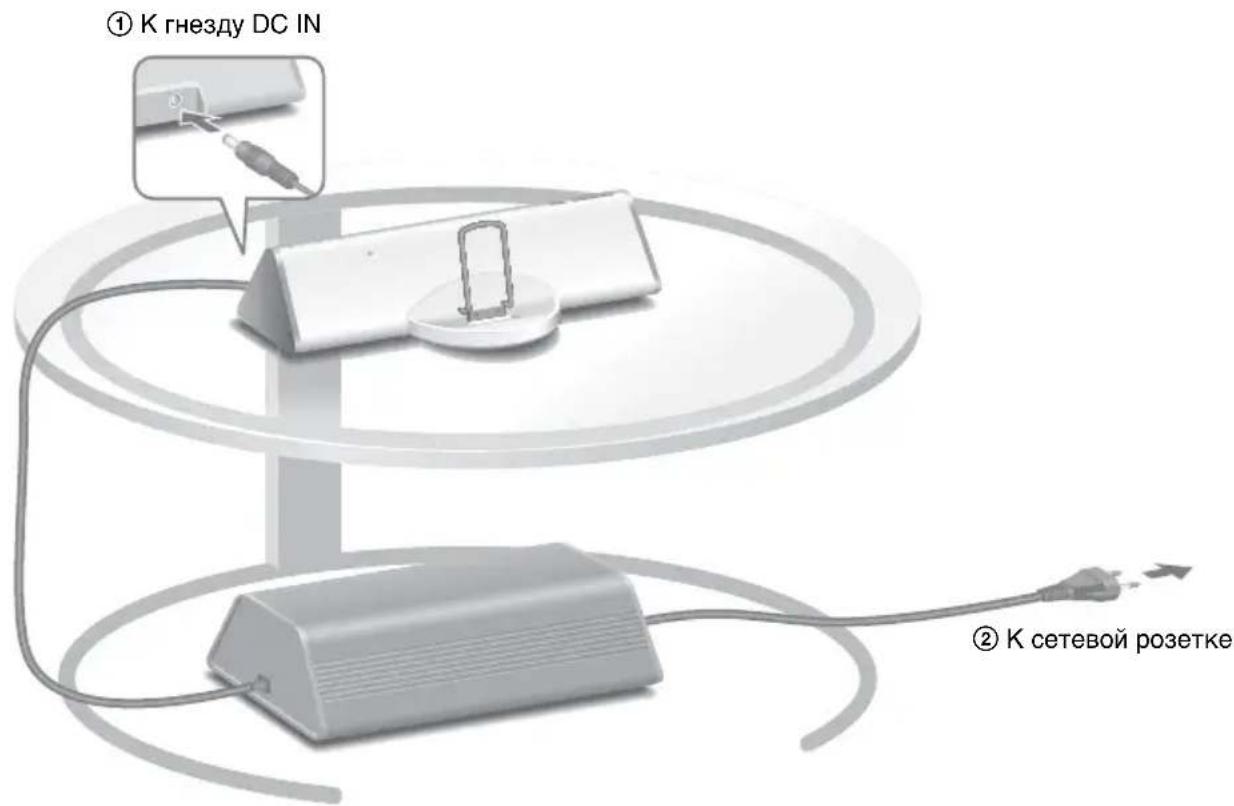
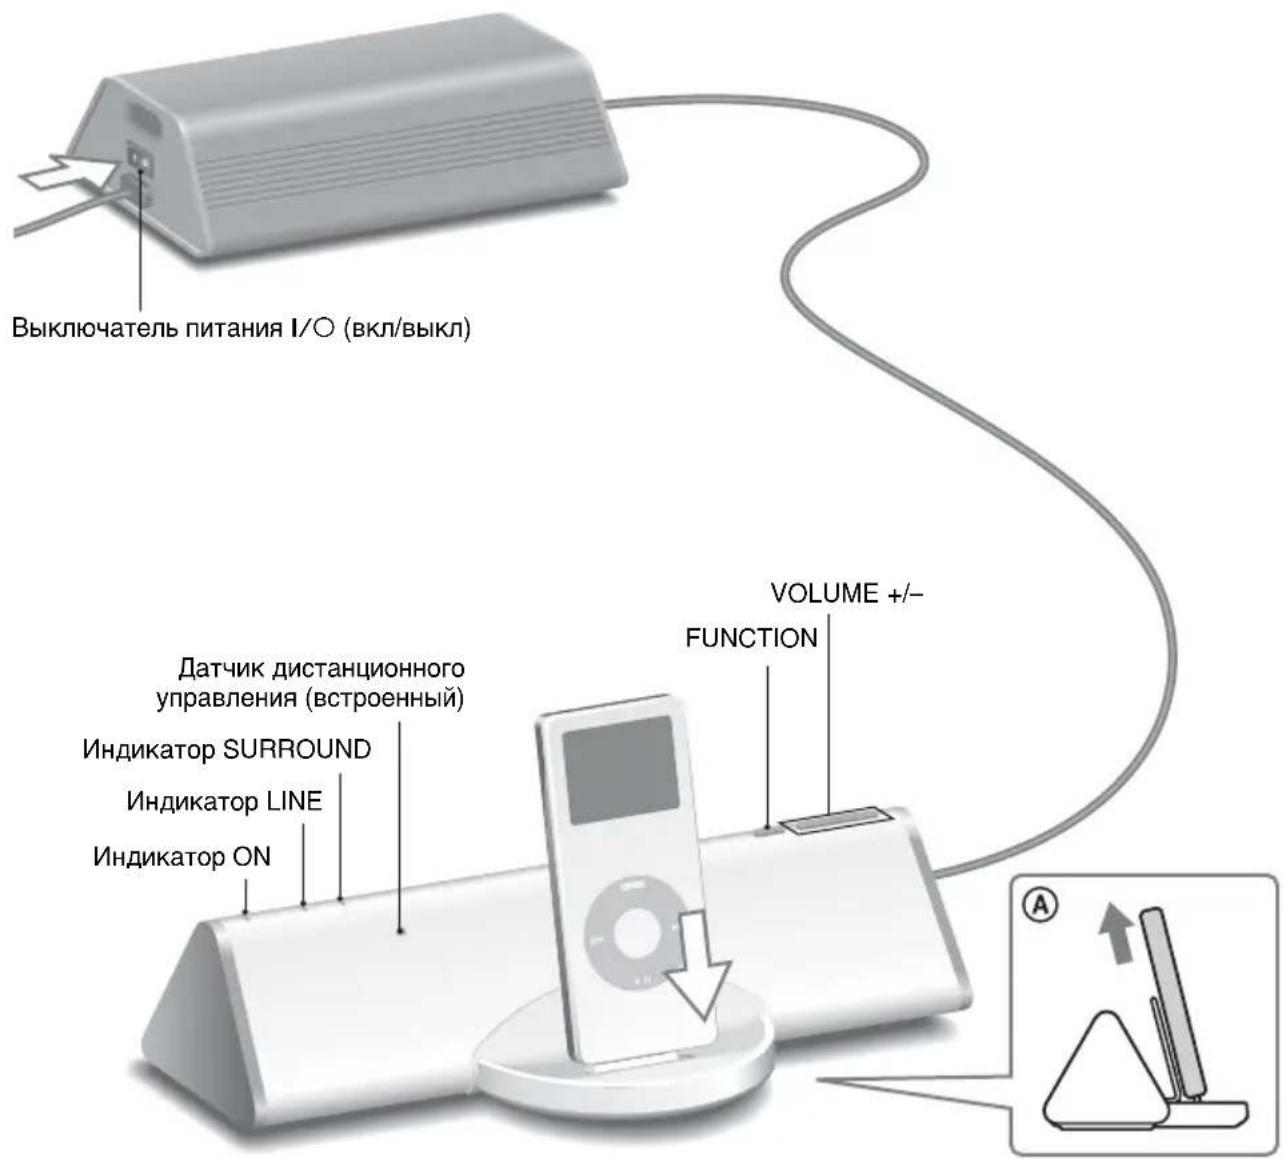
Installation
The illustration below is an example of how to position the system. You can place the subwoofer anywhere on the floor.
Notes
- Do not use the subwoofer for any other device.
- Do not connect any other AC adaptor to the main unit.
- The system is not designed to be used as a portable device.
- Do not place the main unit directly on the subwoofer.
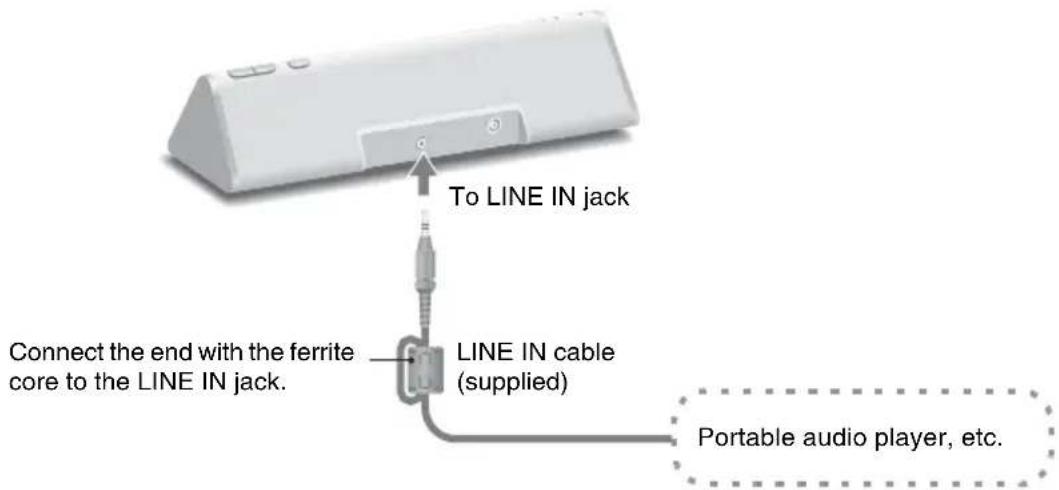
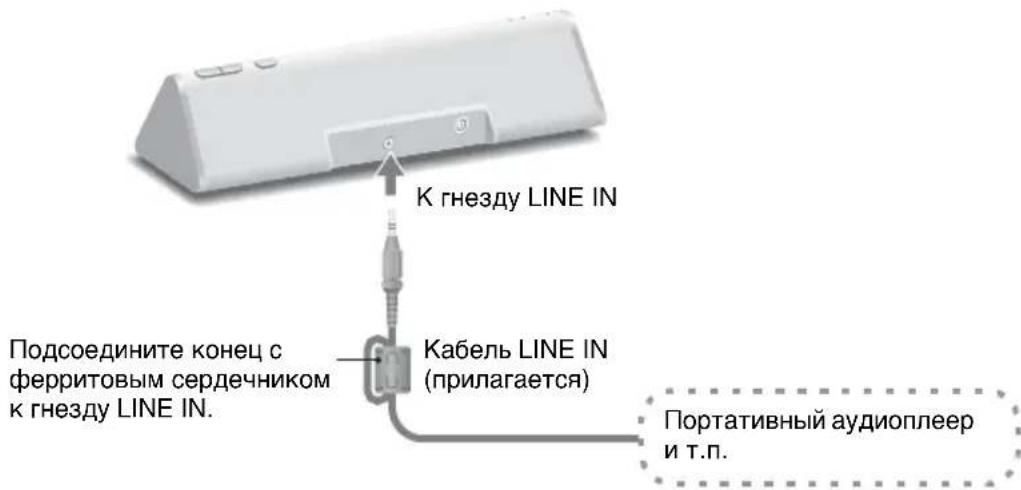
You can connect portable audio players to the system. Connect the player to the LINE IN jack using the supplied LINE IN cable.
Adjusting the rear support
Adjust the rear support forward or backward so that it fits against the back of the connected iPod. (See page 2 for compatible iPod models.)

Notes
- Hold the rear support on both sides at the bottom when adjusting the position.
- Although the rear support can be detached, do not do so. The tips of the support can cause an injury if it is detached.
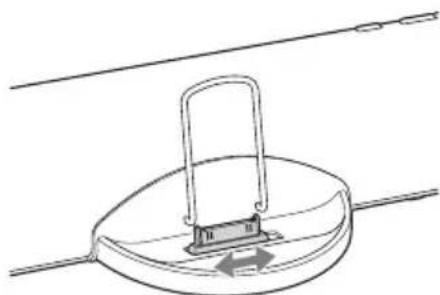
Adjusting the connector
Adjust the connector to the right or left so that the iPod is in the center of the speaker.

Notes
- Make sure the subwoofer is turned off when you adjust the connector.
- Do not slide the connector with an iPod set on the connector. Doing so may cause a malfunction.
- Even if the iPod isn't exactly in the center of the speaker, you can still operate it.
1 Turn on the power switch I/O on the subwoofer.
The ON indicator on the main unit lights up.

2 Press FUNCTION to switch the function from LINE to the iPod.
The LINE indicator turns off.
3 Select songs and start play on your iPod (see page 2 for compatible models), and put the iPod into the main unit's connector.
The system charges the battery of iPod at the same time.
Use the remote or your iPod to play, stop and perform other operations.
When operating the iPod while it is in the connector, brace it with your other hand.
4 Adjust the volume using VOLUME + / - on the main unit.
Updating iPod software
Update your iPod to use the latest software before you use it.
Notes
- When the power switch I / O is turned off, the AC power shuts down.
- Install this system so that the power switch I/O can be turned off immediately in the event of trouble.
- When taking out or putting in the iPod, keep it straight and parallel with the rear support (A).
- Do not carry the system with an iPod set on the connector. Doing so may cause a malfunction.
- When taking out or putting in the iPod, brace the main unit with one hand and take care not to press the controls of the iPod by mistake.
- The volume cannot be adjusted using the volume control on the iPod when it is connected to the system. Press VOLUME + or - on the main unit to adjust the volume.
- Remove the protect case of the iPod before you insert it on the main unit.
To use the system as a battery charger
Turn on the subwoofer and put the iPod into the main unit's connector. Battery charging starts automatically. The charging conditions appear in the iPod display. For details, see the user's guide of your iPod.
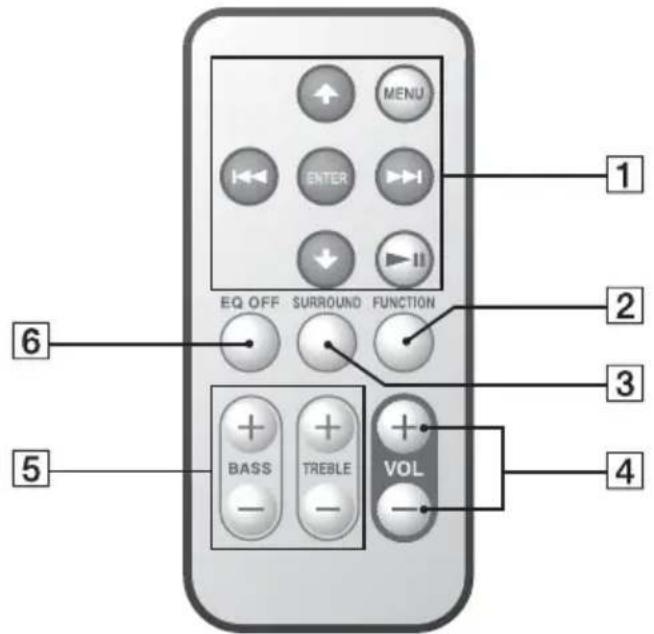
Using the remote
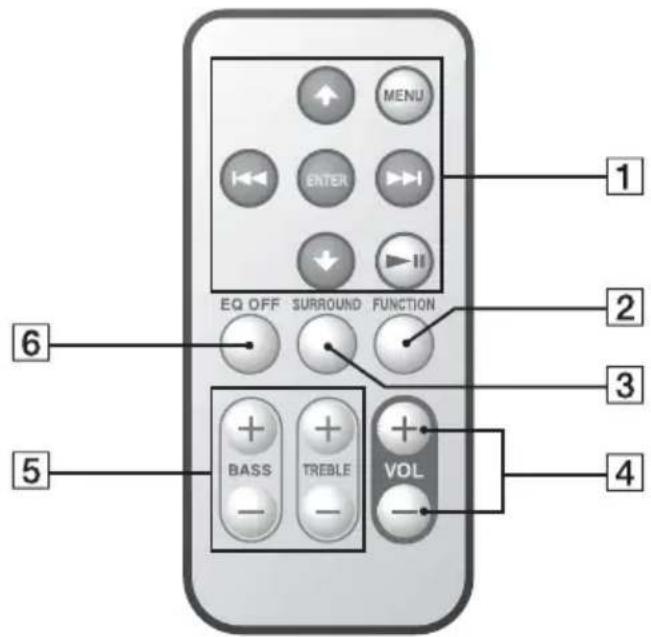
The default settings are underlined.
1 / ^* : Works much like running your thumb around the Click Wheel on the iPod anticlockwise (clockwise).
一 一 / 一 一 一 一 一 一 : Hold down to fast-rewind (fast-forward), or press and release to skip to the beginning of the current (or next) song.
ENTER*: Works much like the center button on the iPod.
MENU*: Works much like the Menu button on the iPod.
^* : Hold down to turn the iPod off, or press and release to playback or pause.
2FUNCTION: Switches the input source.
iPod LINE^** (The LINE indicator lights up.)
3 SURROUND:Turns the surround sound effect on and off.
OFF ON (The SURROUND indicator lights up.)
4VOL + / - Adjusts the volume. (20 levels)
5BASS + / - Adjusts the bass. (± 3 steps)
TREBLE +/-: Adjusts the treble. (± 3 steps)
6EQ OFF: Recsets the bass and treble.
- See the user's guide of your iPod for information on the operation of the button.
** When the function is set to LINE, you can operate the iPod, but you cannot listen to music on it. Make sure the function is set to iPod when you want to listen to music on your iPod.
To listen to music on a portable audio player
Switch the function to LINE in step 2, and then start play on your portable audio player. The LINE indicator lights up.
Note
The buttons 1 of the remote do not function for portable audio players other than iPod models compatible with this system.
Tip
You can listen to music on iPod models other than those listed as compatible iPod models (see page 2 for compatible models) by connecting the iPod to the LINE IN jack using the supplied LINE IN cable.
Troubleshooting
Should you encounter a problem with your system, find your problem in the troubleshooting checklist below and take the indicated corrective action. If the problem persists, contact your Sony dealer.
Note that if service personnel changes some parts during repair, these parts may be retained.
When bringing the system in for repairs, be sure to bring in the entire system.
This product is a system product, and the entire system is needed to determine the location requiring repair.
The ON indicator flashes.
- The system is in protect mode. Turn the subwoofer off and on.
There is no sound.
- Make sure the subwoofer is on.
- Check the connections.
- Press VOLUME + on the main unit. If the volume is still low even after the system's volume is turned up to the maximum level, adjust the volume of the connected portable audio player (when using the LINE IN jack).
- Remove the protect case of the iPod*, and make sure the iPod is securely connected.
- Make sure the iPod* is playing music.
- Check that the correct function is selected.
- When there is no sound from the subwoofer, turn the subwoofer off, and then turn it on again.
The remote does not function.
- Remove any obstacles.
- Point the remote at the main unit's sensor.
- Replace the battery.
- Locate the system away from fluorescent lights.
- Connect the iPod to the connector securely.
There is a severe hum or noise.
- Move the system away from the source of noise.
- Connect the system to a different mains.
The sound is distorted.
- Press VOLUME - on the main unit to reduce the volume.
- Set the sound mode of the iPod to off or flat sound quality.
FAQ
Can I use the buttons on the main unit to operate the iPod\*?
You cannot use the buttons on the main unit to operate the iPod. Use the remote to operate the iPod.
Do I need to operate the iPod* to listen to music?
You can also use the remote to listen to music. For details about the operation of your iPod, refer to the user's guide.
- See page 2 for compatible iPod models.
Specifications
Main unit
Continuous RMS power output (reference):
5W + 5W
(1 kHz, 10% THD)
Inputs
iPod (dock connector): See page 2 for compatible
iPod models.
LINE: input mini jack (stereo)
Speaker units: 28mm dia.
Rated impedance (L / R) .. 8
Dimensions (w/h/d): Approx. 206 × 58 × 91 ~mm
Mass: Approx. 0.45kg
Operating temperature: 10^ to 35^
Power requirements: DC IN: 12 V, 1.0 A
Subwoofer
Continuous RMS power output (reference):
15 W (100 Hz, 10% THD)
Speaker units: 70mm dia.
Rated impedance (SW): 4
Dimensions (w/h/d): Approx. 218 × 74 ×
131mm incl. projecting parts
Mass: Approx. 1.3kg
Operating temperature: 10^ to 35^
Power requirements: AC 220 V-240 V, 18 W,
50/60 Hz
(DC OUT: 12 V, 1.0 A)
Design and specifications are subject to change without notice.
Table des matieres

iPod nano 2nd generation (aluminium)

iPod 5th generation (video)

iPod nano 1st generation

iPod 4th generation (color display)

iPod 4th generation
Cable LINE IN Telecommande


iPod nano 2nd generation (aluminium)

iPod 5th generation (video)

iPod nano 1st generation

iPod 4th generation (color display)

iPod 4th generation
(Salida CC: 12 V, 1,0 A)
iPod nano 2nd generation (aluminium)

iPod 5th generation (video)

iPod nano 1st generation

iPod 4th generation (color display)

iPod 4th generation


iPod nano 2nd generation (aluminium)

iPod 5th generation (video)

iPod nano 1st generation

iPod 4th generation (color display)

iPod 4th generation
iPod nano 2nd generation (aluminium)

iPod 5th generation (video)

iPod nano 1st generation

iPod 4th generation (color display)

iPod 4th generation

(CC OUT: 12 V, 1,0 A)

iPod nano 2nd generation (aluminium)

iPod 5th generation (video)

iPod nano 1st generation

iPod 4th generation (color display)

iPod 4th generation
15 W (100 Hz, 10% THD)
Högtalare: 70mm diam.
Markimpedans (SW): 4 Ω
Yttermatt (b / h / d) : Ca. 218× 74× 131mm
inklusive utstickende delar
Vikt: Ca. 1,3 kg
Användningstemperatur: 10^ till 35^
(Likström ut: 12 V, 1,0 A)
Ratt till andringar forbehalles.
Spis tresci
iPod nano 2nd generation (aluminium)

iPod 5th generation (video)

iPod nano 1st generation

iPod 4th generation (color display)

iPod 4th generation

iPod nano 2nd generation (aluminium)

iPod 5th generation (video)

iPod nano 1st generation

iPod 4th generation (color display)

iPod 4th generation

15 W (100 Hz, 10% THD)
Hojttalerenheder: 70~mm dia.
Nominal impedans (SW): 4
Mäl (b/h/d): Ca. 218 × 74 × 131 ~mm ,
(DC OUT: 12 V, 1,0 A)
Design og specificationsanandresumenvarel.
Sisallysluettelo
Vakiovarusteiden tarkistaminen 3
Asennus 4
iPod nano 2nd generation (aluminium)

iPod 5th generation (video)

iPod nano 1st generation

iPod 4th generation (color display)

iPod 4th generation

(1 kHz, 10% harmoninen
kokonaissro)
Tuloliitannat

iPod nano 2nd genera (aluminium)

iPod 5th generation (video)

iPod nano 1st generation

iPod 4th generation (color display)

iPod 4th generation
(Saia CC: 12 V, 1,0 A)
iPod nano 2nd generation (aluminium)

iPod 5th generation (video)

iPod nano 1st generation

iPod 4th generation (color display)

iPod 4th generation

3 BcTaBbTe Ha MeCTO DePKeTb6aTapeKn.
PpmeaHne
EcHnB TeueHHe JInTeJbHO TepnoHa BpeMeHH BbHe 6yIcTe IOJIb3OBAtbcra IIyJIbTOM Y, BbIHbTe 6aTapcKky, TTO6bI H36cKaTb BO3MOxHOro IOBpeXeHH NpJIbTa H3-3a yTeUKN BHyTpEHHero BEIeCTBa H3 6aTapeKn Kopp0HN.
PpmeaHn OTHOCHTbHO JNTHeBOB 6aTapeKn
XpaHHTe 6aTapeKy B HeIOCTUINOM IJIaITeEH MeCTe. B cIyuae,ecJIN KTO-JINBO IIporJIOHTJb6aTapeKky, cJeDyET HMeJIIeHHO ObaTHbC K BpaYy.
-ДяобспесенхopoшeroKoHTaKaTа npotpnteбaTapeky cyxOu TkaHbIO.
- Pn yctaHOBKe 6aTapeKu y6eHrTeCb B co6JIIODeHHI IOJIaRPhOCTn.
He 6epHtC 6aTapeKy MeTaJIINueCKHM HHTOM, TaK KaK 3TO MOKeT IIpHBecTH K KOPOTKOMY 3aMbIKAHHIO.
K Baewemy cBeDeHnIO
EcHn cHCTeMOyXc HcJIb3a YIpaBJIaTb C IHOOMIO IIyIbTa IY, 3aMeHHTe 6aTapeKy Ha HOByIO.
IPEdUnPEXKeHNE
Ipn He npaBnJIbHOM 6paueHH 6aTapeKa MoKeT B3OpBaTbcr.
He 3apJkaHTe, He pa36npaHTe H He 6pocaiTe ee BOroHb.
Ha pncyHke BnH3y IOKa3aH IIpHMeP paCIOJIOKeHH cHCTeMbI. Bbl MOKeTe pa3MecTHTb ca6Bydep B JIO6OM MecTe Ha IIOJIy.
PpIMeuaHn
He hnoJb3yIte ca6Byepe nkaKoro-Jnbo npyroro yctpoictba.
He IOIOceINHnIte K OCHOBHOMy MOyJIO HnKaKo IpyrO cTeBOaIITep.
- 3Ta cHCTema He IpeHa3HaueHa IJIa HcIOJIb3OBAHHa B KaueCTbe IopTaTHBHorO yctpoHCTBa.
- He pacnoIaRaIte OCHOBHOMoNyJIb HEnOcpeCTBeHHO Ha ca6Byfepe.
BbIMoKeTe IOIcoeINHrTb K CnCTeMe IOpTaTHNBhIe ayINOnJIeepbI. IIOIcoeHNHTe IIeep K rHe3Ny LINE IN c IOMOuIbIO IIpIIaRaEMOrO Ka6eJIA LINE IN.
Perylnpobka 3aDne noDCTabKn
OtperyIpyTe 3aIIIOIO IOCTaBky B HApPaBHeHH BnpeH Ha3aI, TaK, YTO6bI OHa IIOTHO IIOIIJa K 3aIHe cTOpOHe IOcOeHNHeHHOro IIeepa iPod. (Cm. cTp. 2 IJIra MoJeJ, COBMeCTHMbIX C IIeepom iPod.)

PpimeyaHn
- IepKHTe 3aHIOIO IOCTABky c o6eHX CTOPOH CHN3y IIp np peryJINPOBKe ee IIOJOKeHHA.
HeCMOTpHaTo,HTO3aHnHnIOCTabKa MoKet 6bITb OTcoEHHHeHa,HeJeJaIe TTOr. HaKoHeuHNKn IOCTaBKN MOryT IIpHnHHnTb TpaBMy,ecIIe OTcoEHHnTb.
Perynipobka pa3bema
OtperyIpyte pa3bem BJIeBO IIIN BIIpaBO TaK, YTO6bl IIeep iPod pacIOJIOxHJIcB IeHTpe aKyCTnuecko CHCTEmbl.
PpIMeuaHn
BoBpemperyJnnpOBKn pa3bema ca6ByepdoJIkeH 6bITb BIKIOueH.
- He DBHraIe pa3bem IIpi IIOcEHHOM K Hemy IIeepc iPod. 3To MOKet IIpNBecT K HcNIIpaBHOCTn.
- IaKe ecIn nIeep iPod 6yIeT haxoHITbcra He B IIeHTpe aKycTHueCKOIN cHCTeMbI, Hm BCE JKe MOxHO yIpaBIArTb.
1 BkIIOHTe BbIKIOHTeNB NITaHn I/O Ha ca6Bypepe.
Ha oCHOBIOH MOnyJHe BbICBeHTTcra HnHKaTOP ON.
2HaxmTe KhoNky FUNCTION dIe nepeKIOUeHnI3 peXIma LINE B peXIM nIeepa iPod.
INHdkaTop LINE norachet.
3 BbI6epuTe neChn n HauHnTe BocnpoN3BeDeHne Ha nleepe iPod (cM. cTp. 2 dJa COBMeCTnMbIX MoJeNe), a 3aTeM ycTaHOBnTe nleep iPod B pa3bem OCHOBHoro MOdUJr.
CnCTema 6yIeT OINHOBpeMeHHO 3apXaTb 6aTapeIO pJeepa iPod.
IcnoJIb3yIte nyJIbT nIcTaHIOHOHorO ynpaBHeHn IJI nIIeep iPod nJIra BocnpOn3BeHeHn, OCTaHOBKn N BblIOJIHeHn dpyrnx OpeaHn.
Pn ynpabIeHH nIeepom iPod B TO BpeM, KOrna OH HaxoHTcB pa3beme OCHOBHORO MOyJIA, npIepKHBaIte erO pyKoI.
4OtperynnpyTe rpoMKocTb c nmoosbIO KhONOK VOLUME + / - Ha oCHOBHom moyuJe.
OboBHeHne nporpaMMHoro oecneueHnI nIeepa iPod
Ipei HcIOJIb3OBaHHe mIIeepa iPod o6HOBHTe ero IIporpaMMHoe o6ecIeueHne, TTO6bl HcIOJIb3OBaTb erO IocJIeHNHO BepnIO.
PpmeuHn
- EcJH BBKJIIOHYaTeIb IITaHHN I/O IOBepHyTb B BBIKJIIOueHHoe IIOJOKeHHe, HCTOCHNK IHTaHHN IIpeMeHHORo TOKa 6yJeT OTKJIIOueH.
- YctaHOBHTe 3Ty cHCTemy TaK, yTO6bI B cIyuae c6oB B pa6Ote BBIKJIIOuataTeJIb I/O MOxHO 6blIO IOBepHyTB B BYIKJIIOUeHHOE NIOJOKeHHHe HeMeJJIeHHO.
- IIprn cHrTHN HJH ycTaHOBKe B IIJeeP iPod depKHTe ee IprMo HJIH npaJIJIeJIbHO 3aIIHeI NOCTaBKe, KaK IOKa3aHO Ha pncyHKe (A).
He IepeHocHTe cHCTeMy B To BpeM, KOrIa B pa3beme HaxoIHTcI IIeep iPod. 3To MoKet IprHBeCTn K HeIcIIpaBHOCTn. - IIpn cnTTH HJN ycTaHOBKe B IIJeep iPod npnIepKHBaIte oChOBHO annapat OIOH pyKO H 6yIbTe octopOxHbI, YTO6bl OINIOUHO He HaKaTb peryJIaTOpb IJIeepa iPod.
- PpOMKocTb HeJIb3a peRyIINpoBaTb c IIOMOIIbIO peRyJITopA ha IIeepe iPod, ecJH OH IOIcoEINHeK cnCTeMe. Haxmaite KhoNky VOLUME + JIN - Ha OCHOBHom MOJyJe IJIpeRyJINPOBKN rPOMKocTH.
- IpeepyctaHOBkoIJIeepa iPod B OCHOBHO MOJyJIb cHMMTe c HeRo 3aIHTbIyΦyTJIp.
ДлЯ Исторьагия сим teMbI в КауестBE зардого усторьа за rape
BkJIOUHTe ca6Byfep n ycTaHOBHTe IIeep iPod B pa3bEm OCHOBHOro MoIyJIa. 3apJka
6aTapeH NaHeTcA bTOMaTHueckn. CoCTOaHHe 3apJKN oTO6paXaEtcra Ha IINcIIpee IIeepa
iPod. IOpPo6Hee cm. pyKOBoDCTBO IOJIb3OBaTeJIa IIeepa iPod.
IcnoJb3ObaHne npJIbTa Dv
YCTaHOBKn IO yMOJIuaHNIO IOJIePKHyTbI.
1 / ^* : PeryJInpOBKa IIOIo6Ho IpoKpyTke 6OJIbIIM IaJIbIeM pyKn MaHIIyJIrTopa Click Wheel Ha IIJeepe iPod IpoTnB YacOBoCtpeJIKN (IIO YacOBoCtpeJIke).
一 一 一 一 一 一 一 一 一 :Дерхитс haЖаTOH KHOПКу перemOTkn Ha3aI (перemOTkn BпepeI) нлн habKMHTe H OTnycTnTe KHOПКу ДЛЯ перexOДа K NaчajTy TeKyIeN (нлн сл'dуIOIeN)пecн.
ENTER*: PeryJInpOBKa aHaJIOrHNo ΙeHTpaJIbHO KnOHKe Ha IIeepe iPod.
MENU*: PeryJIHPOBka aHaJIIOrIHO KHOIIKe Menu Ha IIeepe iPod.
:IepKHTe KHOINky HaKaToi IJIy BbIKJIOueHnIJIeepa iPod HnI HAKMHTe NOTHyCTHTe KHOINKy IJIy BOCIIPOUN3BeJeHHN IIIN IIay3bl.
2FUNCTION: IpeekJIOueHHe HcTOUHKa BXOJHOrO cHTHaJa. Ieep iPod LINE** (BbICBeuHbAetc HnHKaTOp LINE.)
3 SURROUND: Bклioчehн e BbIKIOueHHe əΦΦeKTa OKpykaIOIeRo 3Byka. BbIKJI BKJI (BbICBeTHTcR INHINKaTop SURROUND.)
4VOL+/-:PeryJInpOBKa rPOMKocTH. (20 yPobHei)
5BASS+/-:PeryJnpoBka Hn3Knx
yactOT. (± 3 Iura)
TREBLE + / - :PeryJnpoBka BbICOKHX
yactOT. (± 3 Iara)
6EQ OFF:Bo3BpaT K HcXoHbIM yCTaHOBkAm Hn3KN H BbICOKHX YaCTOT.
- CM. pykoBOJCTBO NOJIb3OBaTeJIЯ IIeepa iPod JIIIA O3HaKOMJIeHnC Ha3HaUeHEm KHOIIOK.
**PnIepeKJIIOUcHINBpcxHM LINE BbIMOKeTe yIpaBIArTBIIeepom iPod,HO cIyIaTbMy3bIKyHaHEMe CMOxKeTe.IpeKJte HcIyIaTb My3bIKyHaIIeepe iPod,y6eIITecbIpeKJIIOUeHINHapeXHMIIeepa iPod.
Дл порочушваима My3bIKn Ha nopTaTHBHom aydnoNneepe
IpeekJIOHTecb BpeKIM LINE B IyHKTe 2, a 3aTeM HaHTte BOCIIPOH3BeJeHHe Ha BaIcEM IOPTaTHBHom ayINHOJIcepe. BbICBeHTcR HnIKKaTOp LINE.
Ppmeuahne
KHOIIK 1 nyIbTa HnCTaHIOHHO ynpaJIeHH He cyHKIOOHpyOT IJIa IOpTaTHBbIX ayINHOJIeepOB,OTJNUAOHIXcO TMOeJIe INIEePOB iPod,coBMeTMBix C daHHo CHCTeMOH.
K Baewemy cBeDeHHIO
BbMoKeTe cIyMaTb My3bIKy Ha IpyrHX MoJeJX IIeepa iPod, KOtOpBHe Ie OTHocrK TnIy COBMeCTHMbIX MOeJIeC IIeepoM iPod (cM. cTp. 2 IIa COBMeCTHMbIX MOeJIe), IOIcOeIIINH IIeep iPod K rHe3ny LINE IN c IOMoIbIO IIpHaIraemoro KaBeJL LINE IN.
Оъickaнец устараенец Hencправноcte
EcIn Bb cToJIKHeTecb C npO6JIeMoH pRn
3KcIIyataaHn cHCTeMbI,HaHNTe ee B
PpHBedeHHOM Hxke cHNCKe HeHCIIpaBHOCTeH
BbIOJIHHTe COOTBeTCTByIOUe eeHCTBHe IO ee
ycTaPaHEHIO.EcIN Ipo6JIema He 6yTe
ycTaPHeHa,OBpaHTeCb K dJIepy KOMIIaHHN Sony.
IMeHTe BVnDy,TOB cIyae 3aMeHbI HEKOTOpbIX
IeTaJIe BO BpeM peMOHTa,3TH IeTAJI MOrYT
6bITb OCTaJIeHbI y O6cIyXhBAIOUeTo IepcoHaJa.
PiH cIaue cHCTeMbIBpeMOHT y6eIHNTecbBTOM,
TO cHCTeMa cIaETcB IIIOJHOM KOMIIJEKeTe.
DaHHoe H3JeJIne IpeIcTabJIeT co6oH
KOMIIIEKCHyIO cHCTeMy,IO9TOMy IJI IOHcKa H
ycTaPHeHHa HeHCIIpaBHOCTH HeO6XOJUMa BCs
cHCTeMa.
Mnraet nHdkaTop ON.
- CnCTema HaxoHTcB 3aIITHom pcKIMe. BbIKIOHTe H CHOBA BKIOHTe ca6Byep.