
MHC-VX5J - Hi-Fi System SONY - Free user manual and instructions
Find the device manual for free MHC-VX5J SONY in PDF.


| Product Type | Mini Hi-Fi Component System |
| Model | MHC-VX5J |
| Brand | Sony |
| Dimensions (Main Unit) | Approx. 280 x 340 x 395 mm (11 x 13.4 x 15.6 in) |
| Weight (Main Unit) | Approx. 10.0 kg (22.0 lb) |
| Power Supply | 120 V, 220 V, or 230-240 V AC, 50/60 Hz (adjustable with voltage selector) |
| Power Consumption | 160 W |
| Amplifier Output (RMS) | 140 W + 140 W (8 ohms, 1 kHz, 10% THD) |
| Amplifier Output (DIN) | 110 W + 110 W (8 ohms, 1 kHz, DIN) |
| Speaker System | 3-way, bass-reflex, magnetically shielded |
| Speaker Units | Woofer: 17 cm cone; Tweeter: 5 cm cone; Super Tweeter: 2 cm dome |
| Speaker Impedance | 8 ohms |
| Disc Playback | Audio CD, VIDEO CD (Ver. 1.1 and 2.0) |
| Number of Discs | Up to 3 (multi-CD changer) |
| Radio Tuner | FM/AM (2-band model: FM, AM; 3-band model: FM, MW, SW) |
| Radio Presets | 20 FM + 10 AM (2-band) or 20 FM + 10 MW + 10 SW (3-band) |
| Tape Deck | Double cassette deck (Deck A and B), auto reverse |
| Karaoke | Microphone inputs (2), key control, echo, vocal reduction (KARAOKE PON) |
| DJ Effects | CD Loop, CD Flash (adjustable length) |
| Sound Enhancement | DBFB (Dynamic Bass Feedback), SYNC BASS, GROOVE, Graphic Equalizer (only MHC-VX7), Preset Sound Effects (Rock, Pop, Jazz, etc.) |
| Timer Functions | Sleep Timer (auto off up to 90 min), Daily Timer (wake-up), Timer Recording |
| Connectivity | MD IN/OUT (phono), VIDEO IN (audio), MIC 1/2, PHONES, Optical Digital Out, S-Video Out, Video Out, Super Woofer Out |
| Supplied Accessories | AM loop antenna, FM lead antenna, Remote commander (batteries included), Speaker cords (2 for front speakers with jacks), Video cable, Front speaker pads (8) |
| Cleaning Instructions | Clean cabinet with soft cloth and mild detergent; clean CD with soft cloth from center outward; clean tape heads every 10 hours of use |
Frequently Asked Questions - MHC-VX5J SONY
User questions about MHC-VX5J SONY
0 question about this device. Answer the ones you know or ask your own.
Ask a new question about this device
Download the instructions for your Hi-Fi System in PDF format for free! Find your manual MHC-VX5J - SONY and take your electronic device back in hand. On this page are published all the documents necessary for the use of your device. MHC-VX5J by SONY.
USER MANUAL MHC-VX5J SONY
Mini Hi-Fi Component System
Operating Instructions


MHC-VX7 / VX5 / VX5J
WARNING
To prevent fire or shock hazard, do not expose the unit to rain or moisture.
To avoid electrical shock, do not open the cabinet. Refer servicing to qualified personnel only.
Do not install the appliance in a confined space, such as a bookcase or built-in cabinet.
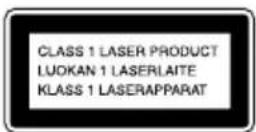
This appliance is classified as a CLASS 1 LASER product. The CLASS 1 LASER PRODUCT MARKING is located on the rear exterior.
This stereo system is equipped with the Dolby B-type noise reduction system*.
* Manufactured under license from Dolby Laboratories Licensing Corporation. DOLBY and the double-D symbol □□ are trademarks of Dolby Laboratories Licensing Corporation.
About this manual
The instructions in this manual are for MHC-VX7/VX5/VX5J. MHC-VX7 is the model used for illustration purposes. The location of some buttons on MHC-VX5/VX5J is different from that of MHC-VX7, but the name of the buttons are the same.
This system can play the following discs
VIDEO CDs Audio CDs
Disc logo


Contents Audio + Video Audio (moving pictures)
Disc size 12 cm/8 cm 12 cm/8 cm
Play time 74 min./20 min. 74 min./20 min.
Note on VIDEO CDs
This system conforms to VIDEO CDs without PBC functions (Ver. 1.1) and VIDEO CDs with PBC functions (Ver. 2.0) of VIDEO CD standards. You can enjoy two kinds of playback according to the disc type.
Disc type You can
VIDEO CDs without Enjoy video playback PBC functions (moving pictures) as (Ver. 1.1 discs) well as audio CDs.
VIDEO CDs with Play interactive PBC functions software using menu (Ver. 2.0 discs) screens displayed on the TV screen (menu playback), in addition to the video playback function of VIDEO CDs without PBC functions. Moreover, you can play high or standard quality still picture.
* PBC = Play Back Control
Table of Contents
Getting Started
Step 1: Hooking up the system...... 4
Step 2: Setting the time ....8
Step 3: Presetting radio stations ..... 9
Basic Operations
Playing a VIDEO CD 11
Playing a CD 13
Recording a CD/VIDEO CD ...... 15
Listening to the radio 16
Recording from the radio 17
Playing a tape.... 18
Recording from a tape 20
Singing along: Karaoke 21
The VIDEO CD/CD Player
Playing a VIDEO CD with PBC functions (Ver. 2.0) ...... 23
Checking the remaining time ...... 24
Using the on-screen display 25
Locating a specific part of a disc ..... 27
Resuming playback from the point you stopped a VIDEO CD .... 31
Setting the sharpness 32
Playing the CD tracks repeatedly ..... 33
Playing the CD tracks in random order 34
Programming the CD tracks ...... 35
Playing CDs without interruption ..... 36
The Tape Deck
Recording on a tape manually ..... 37
Recording a CD by specifying track order 38
DJ Effects
Looping part of a CD 40
Flashing part of a CD 40
Sound Adjustment
Adjusting the sound 41
Selecting the audio emphasis ...... 42
Changing the spectrum analyzer display 44
Selecting surround effects ...... 44
Adjusting the graphic equalizer* ...... 45
Making a personal audio emphasis file* 46
Other Features
Mixing and recording sounds ...... 47
Falling asleep to music 48
Waking up to music 48
Timer-recording radio programs ..... 50
Optional components
Connecting audio components ..... 51
Connecting a VCR 53
Connecting external antennas .... 53
Additional Information
Precautions 55
Troubleshooting 56
Specifications 59
Glossary 61
Index...... Back cover
* MHC-VX7 only
Getting Started
Step 1: Hooking up the system
Do the following procedure 1 to 6 to hook up your system using the supplied cords and accessories.
To the video input
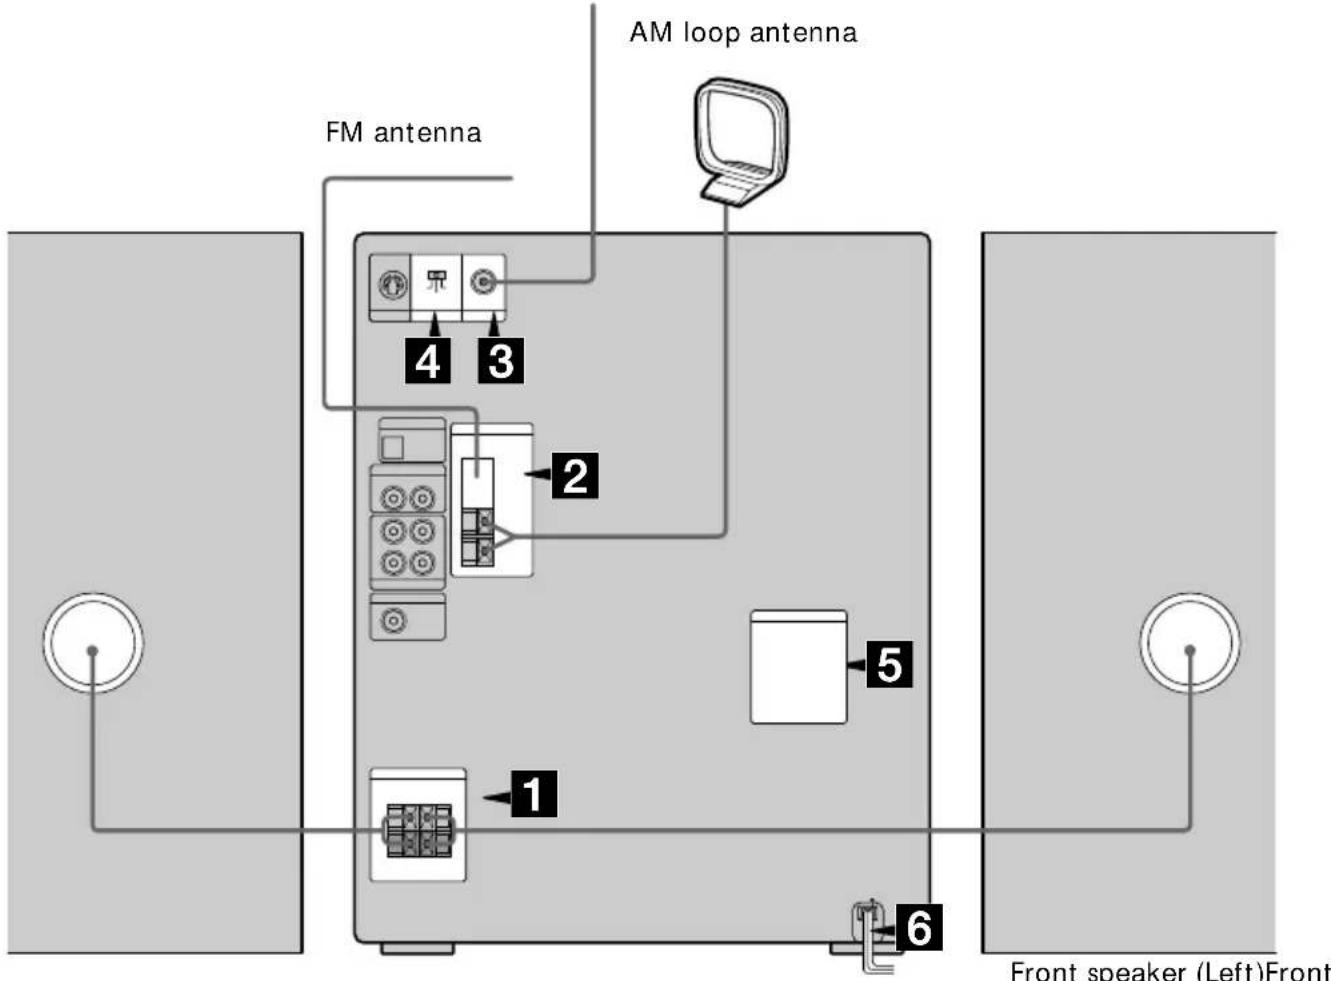
1 Connect the speakers.
Connect the speaker cords of front speakers to the SPEAKER jacks as below. For the front speakers with jacks, connect the speaker cords to the speaker in the same way.
Notes
- Keep the speaker cords away from the antennas to prevent noise.
- The type of speakers supplied vary according to the model you purchased (see "Specifications" on page 59).

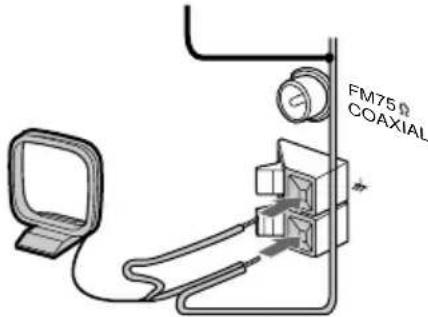
2 Connect the FM/AM antennas.
Set up the AM loop antenna, then connect it.
Jack type Ⓐ
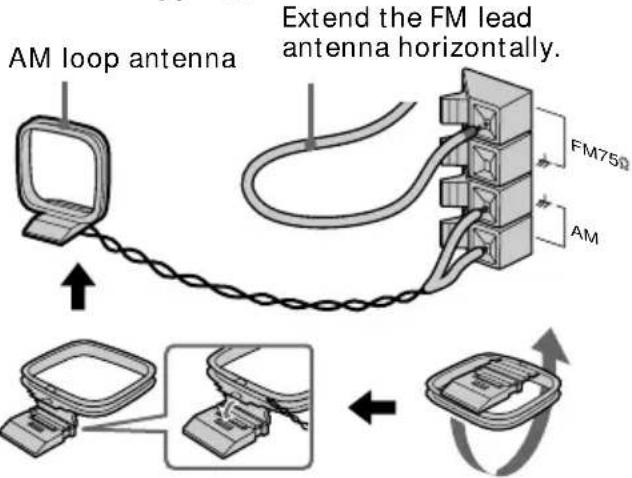
Jack type Ⓑ
Extend the FM lead antenna horizontally.

3 Connect the video input jack of your TV to the VIDEO OUT jack with the supplied video connecting cable.

When using a TV
Turn on the TV and select the video input so you can view the pictures from this system.
Tip
For even higher quality video images, you can use an optional S VIDEO cord to connect the S VIDEO input jack on your TV to the S VIDEO OUT jack.
continued
Step 1: Hooking up the system (continued)
4 Set SYSTEM SELECT (color system) to the appropriate position (PAL or NTSC), according to your TV.

If your TV automatically changes the color system according to the input signal:
The factory setting (AUTO) automatically changes the color system of the video output according to the color system of the current VIDEO CD.
If the color system of your TV is NTSC:
Set SYSTEM SELECT to NTSC.
Pictures recorded in the PAL color system will be stretched vertically and will be displayed with the upper and lower parts of the picture cut off.
If the color system of your TV is PAL:
Set SYSTEM SELECT to PAL.
Pictures recorded in the NTSC color system will be stretched horizontally and will be displayed with the upper and lower parts of the screen masked in black.
Note
Be sure to turn off the system before changing the SYSTEM SELECT setting.
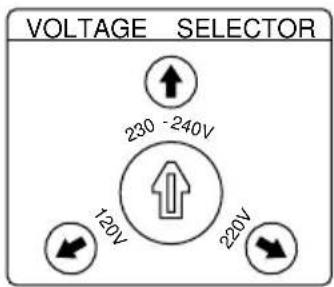
5 For models with a voltage selector, set VOLTAGE SELECTOR to position of your local power line voltage.
6 Connect the power cord to a wall outlet.
The demonstration appears in the display. When you press |,the system turns on and the demonstration automatically ends.
If the supplied adapter on the plug does not fit your wall outlet, detach it from the plug (only for models equipped with an adapter).
To connect optional components
See page 51.
To deactivate the demonstration
When you set the time (Step 2: Setting the time), the demonstration is deactivated.
To activate/deactivate the demonstration again, press DEMO (STANDBY) while the system is off.
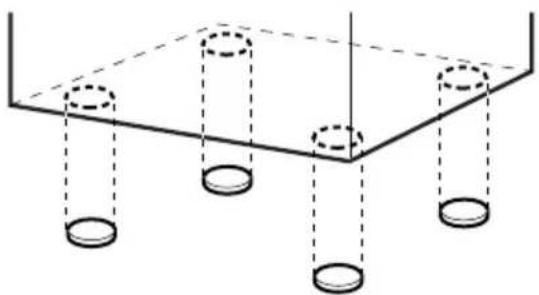
To attach the front speaker pads
Attach the supplied front speaker pads to the bottom of the speakers to stabilize the speakers and prevent them from slipping.
natural_image
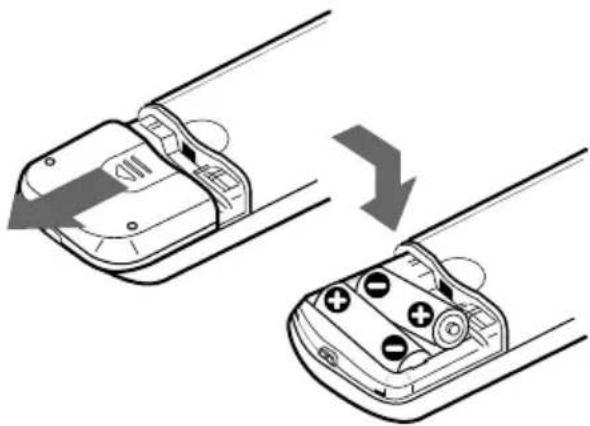
Pure diagram of a rectangular structure with four vertical cylinders and dashed lines, no text or symbols present.Inserting two size AA (R6) batteries into the remote
natural_image
Diagram showing two car interior compartments with directional arrows indicating movement or change (no text or symbols present)Using the remote
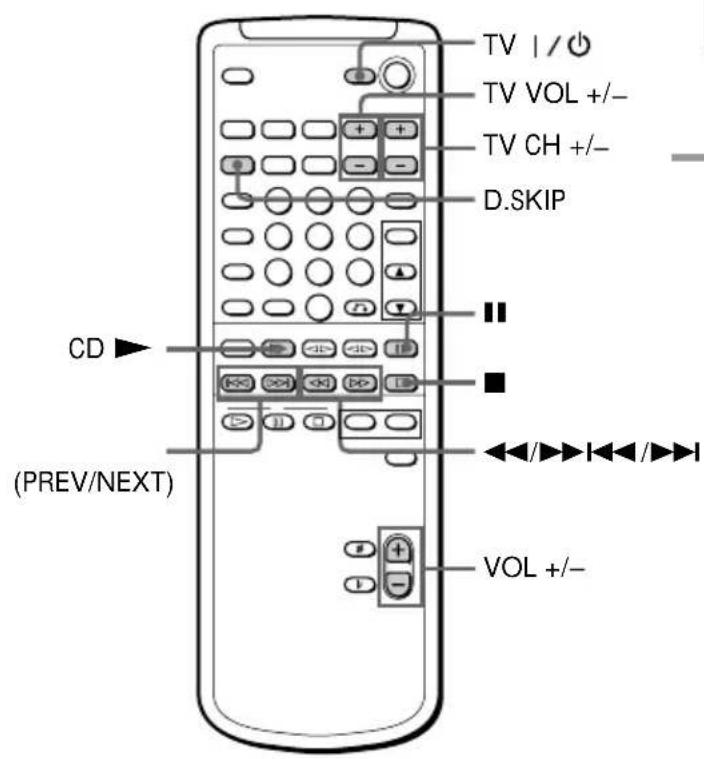
You can use the shaded buttons shown below to operate Sony TV.

To Press
| Turn the TV on or TV . off |
| Switch the TV's TV/VIDEO. video input |
| Change the TV TV CH +/- channels |
| Adjusts the volume TV VOL +/- of the TV speaker(s) |
Tip
With normal use, the batteries should last for about six months. When the remote no longer operates the system, replace both batteries with new ones.
Note
If you do not use the remote for a long period of time, remove the batteries to avoid possible damage from battery leakage.
When carrying this system
Do the following to protect the CD mechanism.
Make sure that all CDs are removed from the unit.
1 Press FUNCTION repeatedly until "CD" appears in the display.
2 Hold down CD LOOP and press |to| turn off the system.
3 Disconnect the cord.
Step 2: Setting the time
You must set the time before using the timer functions.

1 Press CLOCK/TIMER SET. The hour indication flashes.
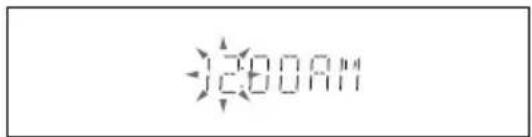
2 Turn the jog dial to set the hour.
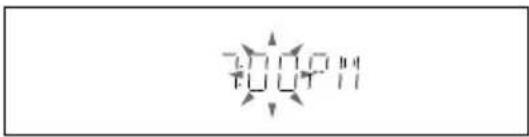
3 Press ENTER/NEXT. The minute indication flashes.
natural_image
Abstract geometric pattern with arrow-like shapes and no text or symbols4 Turn the jog dial to set the minute.
5 Press ENTER/NEXT. The clock starts working.
Tip
If you've made a mistake, start over from step 1.
To change the time
The previous explanation shows you how to set the time while the power is off. To change the time while the power is on, do the following:
1 Press CLOCK/TIMER SET.
2 Turn the jog dial to select SET CLOCK.
3 Press ENTER/NEXT.
4 Perform steps 2 through 5 above.
Note
The clock settings are cancelled when you disconnect the power cord or if a power failure occurs.
Step 3: Presetting radio stations
You can preset the following number of stations:
- 2 band model: 20 for FM, 10 for AM.
- 3 band model: 20 for FM, 10 for MW, and 10 for SW.
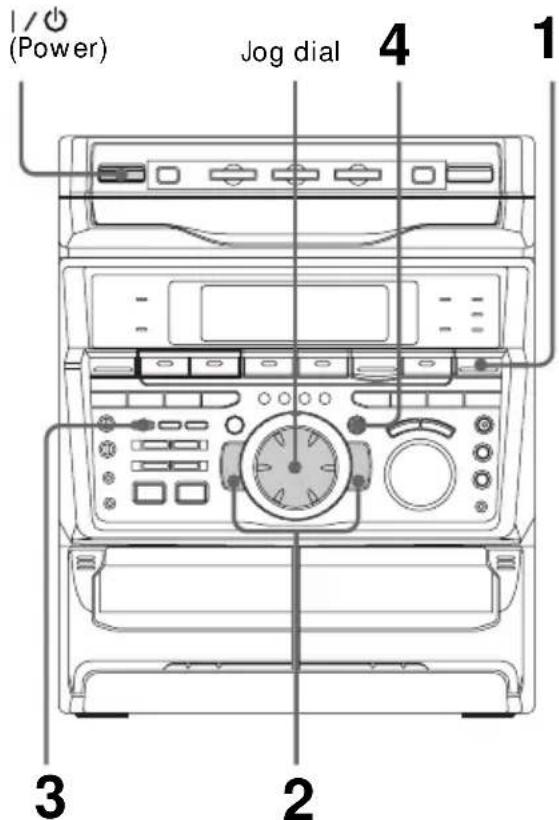
1 Press TUNER/BAND repeatedly until the band you want appears in the display.
The bands you can receive vary depending on the model you purchased. Be sure to check which bands you can receive.
Every time you press this button, the band changes as follows:
2 band model:
FM AM
3 band model:

2 Press and hold + or - until the frequency indication starts to change, then release.
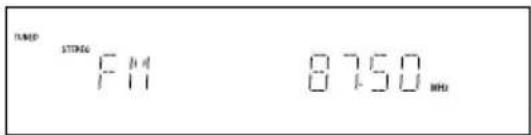
Scanning stops when the system tunes in a station. "TUNED" and "STEREO" (for a stereo program) appear.
3 Press TUNER MEMORY. A preset number appears in the display. The stations are stored from preset number 1.

4 Press ENTER/NEXT.
The station is stored.
5 Repeat steps 1 to 4 to store other stations.
continued
Step 3: Presetting radio stations (continued)
To tune in a station with a weak signal
Press + or – repeatedly in step 2 to tune in the station manually.
To set another station to the exist preset number
Start over from step 1. After step 3, turn the jog dial to select the preset number you want to store the other station.
You can add a new preset number after the last preset number.
To erase a preset station
1 Keep pressing TUNER MEMORY until a preset number appears in the display.

2 Turn the jog dial to select the preset number you want to erase.
Select "ALL ERASE" when you want to erase all the preset stations.
3 Press ENTER/NEXT. "COMPLETE" appears.
When you erase a preset number, the preset number decreases by one and all preset numbers following the erased one are renumbered.
To change the AM tuning interval (Except for Middle Eastern models)
The AM tuning interval is factory set to 9 kHz (10 kHz in some areas). To change the AM tuning interval, tune in any AM station first, then turn off the power. While holding down the ENTER/NEXT button, turn the power back on. When you change the interval, AM preset stations will be erased. To reset the interval, repeat the same procedure.
Tip
The preset stations are retained for half a day even if you unplug the power cord or if a power failure occurs.
Basic Operations
Playing a VIDEO CD
You can play both VIDEO CDs without PBC functions (Ver. 1.1) and VIDEO CDs with PBC functions (Ver. 2.0).
You can enjoy two kinds of playback according to the disc type.

1 Turn on your TV and select the video input.
Refer to the operating instructions supplied with your TV if you need help.
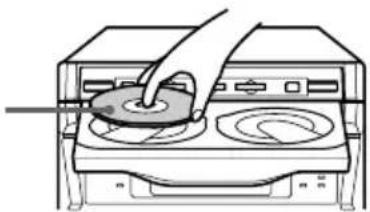
2 Press and place up to two VIDEO CDs on the disc tray.
If a disc is not placed properly, it will not be recognized.
With the label side up. When you play a VIDEO CD single, place it on the inner circle of the tray.
natural_image
Line drawing of a hand using a tool to press or spread a circular object on an open appliance (no text or symbols)To insert a third disc, press DISC SKIP/EX-CHANGE to rotate the disc tray.
3 Press one of the DISC 1\~3 buttons.
The disc tray closes and playback starts. If you press CD ▶II (or CD ▶ on the remote) when the disc tray is closed, playback starts from the CD whose button is lit green.
Playing timeTrack number

Disc tray number
continued
Playing a VIDEO CD (continued)
To Do this
Stop play Press ■.
| Pause Press CD ▶III (or II on the remote)*1. Press again to resume play. |
Select a track or Press NEXT to go forward, scene PREV to go back.
Or, during play or pause, turn the jog dial clockwise (to go forward) or counterclockwise (to go back) and release it when you reach the desired track. (Or press ▶▶▶ (to go forward) or ◀◀◀ (to go back) on the remote.)*2
Find a point in a Press ◀◀ or ▶▶ during track or scene*2 playback.
(Lock Search function) ① Press once to start searching. search speed. Each time you press the button, the speed changes as follows: 1 (slow) → 2 (normal) → 3 (high) → 1 (slow) ... ③ Press CD ▶■ to stop searching at the desired point.
Select a VIDEO Press a DISC 1\~3 button or CD in stop mode DISC SKIP/EX-CHANGE (or D.SKIP on the remote).
Play only the Press PLAY MODE VIDEO CD you repeatedly until "1 DISC" have selected appears.
Play all VIDEO Press PLAY MODE repeatedly CDs ^*3 until “ALL DISCS” appears.
Remove the Press . VIDEO CD
Exchange other Press DISC SKIP/VIDEO CDs EX-CHANGE. while playing
Adjust the Turn VOLUME (or press VOL volume +/- on the remote).
Tips
- Pressing CD ▶■ when the power is off automatically turns the power on and starts VIDEO CD playback if there is a VIDEO CD in the tray (One Touch Play).
- You can switch from another source to the VIDEO CD player and start playing a VIDEO CD just by pressing CD ▶■ or the DISC 1\~3 buttons (Automatic Source Selection).
- If there is no VIDEO CD in the player, "CD NO DISC" appears in the display.
- When a disc tray holding a VIDEO CD is selected (or playing), the DISC 1\~3 button for that tray lights green. When a disc tray holding a VIDEO CD is not selected, the DISC 1\~3 button for that tray lights orange. When all disc trays are empty, the DISC 1\~3 buttons all light green.
Playing a CD
— Normal play
You can play up to three CDs in a row.

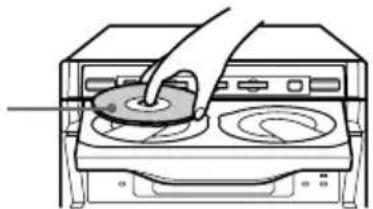
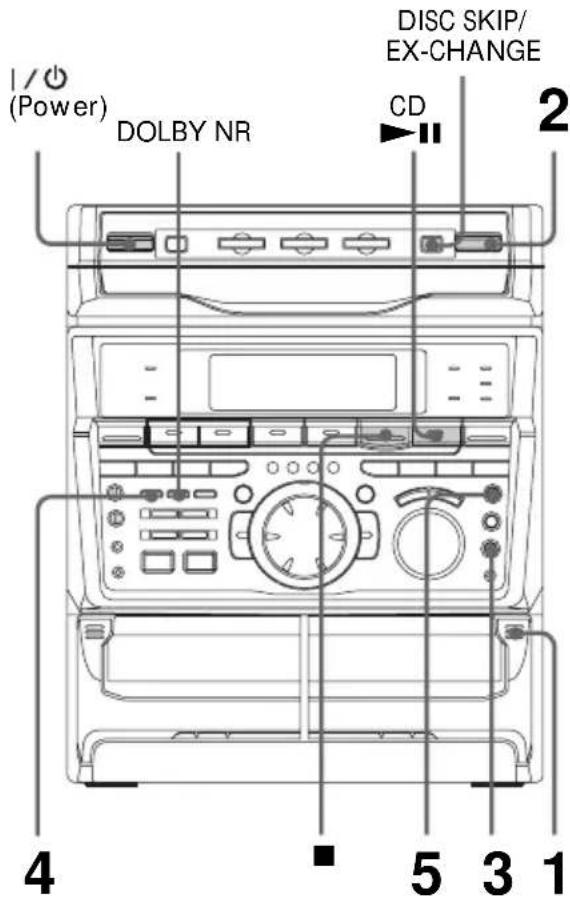
1 Press and place up to two CDs on the disc tray. If a disc is not placed properly it will not be recognized.
With the label side up. When you play a single CD, place it on the inner circle of the tray.
natural_image
Line drawing of a hand using a tool to press or install a circular component on an induction cooktop (no text or symbols)To insert a third disc, press DISC SKIP/EX-CHANGE to rotate the disc tray.
2 Press one of the DISC 1\~3 buttons. The disc tray closes and play starts. If you press CD ▶II (or CD ▶ on the remote) when the disc tray is closed, play starts from the CD loaded on the tray whose button is lit green.
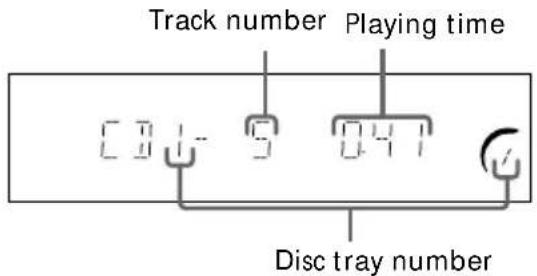
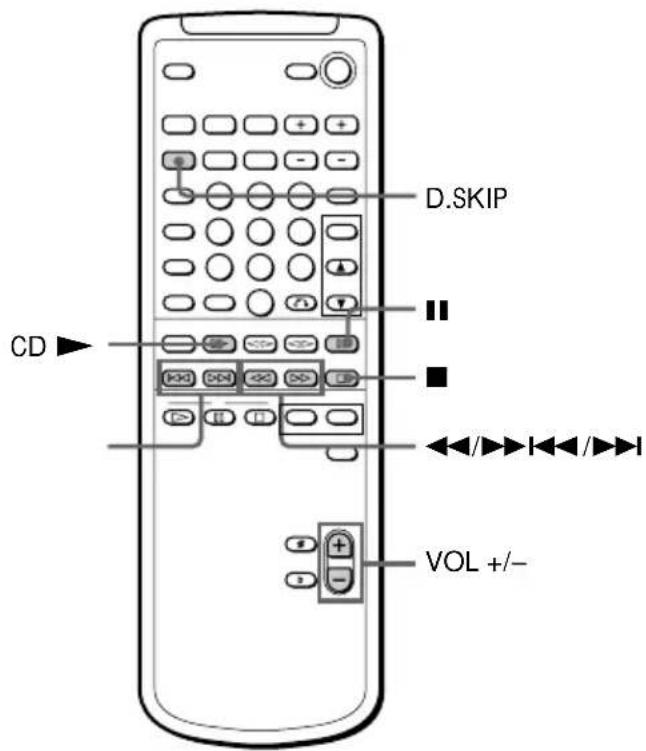
continued
Playing a CD (continued)
To Do this
| Stop play Press ■. |
| Pause Press CD ▶■ (■ on the remote). Press again to resume play. |
| Select a track During play or pause, turn the jog dial clockwise (to go forward) or counterclockwise (to go back) and release it when you reach the desired track. (Or press ▶■ (to go forward) or ◀◀ (to go back) on the remote.) |
| Find a point in Press ▶▶ or ◀◀ during a track playback.(Lock Search Press CD ▶■ to stop function) searching at the desired point. |
| Select a CD Press a DISC 1~3 button or in stop mode DISC SKIP/EX-CHANGE. |
| Play only the Press PLAY MODECD you have repeatedly until “1 DISC” selected appears. |
| Play all CDs Press PLAY MODE repeatedly until “ALL DISCS” appears. |
| Remove the CD Press ≜. |
| Exchange other Press DISC SKIP/CDs while EX-CHANGE.playing |
| Adjust the Turn VOLUME (or press VOL volume +/- on the remote). |
Tips
- Pressing CD ▶■ when the power is off automatically turns the power on and starts CD playback if there is a CD in the tray (One Touch Play).
- You can switch from another source to the CD player and start playing a CD just by pressing CD ▶ or the DISC 1\~3 buttons (Automatic Source Selection).
- If there is no CD in the player, "CD NO DISC" appears in the display.
- When a disc tray holding a CD is selected (or playing), the DISC 1\~3 button for that tray lights green. When a disc tray holding a CD is not selected, the DISC 1\~3 button for that tray lights orange. When all disc trays are empty, the DISC 1\~3 buttons all light green.
Recording a CD/ VIDEO CD
— CD Synchro Recording
The CD SYNC button lets you record from a CD to a tape easily. You can use TYPE I (normal) or TYPE II (CrO2) tapes. The recording level is adjusted automatically.
1 Press and insert a recordable tape into deck B.
With the side you want to record facing forward

natural_image
Technical line drawing of a mechanical assembly with rollers and housing (no text or symbols)2 Press ≜ and place a CD.
Then press again to close the disc tray. If the indicator for the tray you want to record is not lit green, press DISC SKIP/EX-CHANGE repeatedly so that it lights green.
With the label side up. When you play a single CD, place it on the inner circle of the tray.

natural_image
Line drawing of a hand pouring liquid into a microwave oven with two circular plates (no text or symbols)3 Press CD SYNC.
Deck B stands by for recording and the CD player stands by for playback. The indicator on TAPE B ▶ (for front side) lights up.
4 Press DIRECTION repeatedly to select to record on one side.
Select (or RELAY) to record on both sides.
5 Press REC PAUSE/START. Recording starts.
To stop recording
Press ■.
Tips
- If you want to record from the reverse side, press TAPE B ◀ to light its indicator after pressing CD SYNC.
- When you record on both sides, be sure to start from the front side. If you start from the reverse side, recording stops at the end of the reverse side.
- When you want to reduce the hiss noise in low-level high-frequency signals, press DOLBY NR so that "DOLBY NR" appears after pressing CD SYNC.
Note
You cannot listen to other sources while recording.
Listening to the radio
— Preset Tuning
Preset radio stations in the tuner's memory first (see "Step 3: Presetting radio stations").


1 Press TUNER/BAND repeatedly until the band you want appears in the display.
The bands you can receive vary depending on the model you purchased. Be sure to check which bands you can receive.
Every time you press the button, the band changes as follows:
2 band model:
$$ \mathrm{FM} \leftrightarrow \mathrm{AM} $$
3 band model:
$$ \begin{array}{c}\text {FM} \rightarrow \text {MW} \rightarrow \text {SW}\\uparrow\end{array} $$
2 Turn the jog dial (or press ◀◀ or ▶▶ on the remote) to tune in the desired preset station.
Turn counterclockwise (or press ◀◀◀ on the remote) for lower preset numbers.

Turn clockwise (or press ▶▶▶ on the remote) for higher preset numbers.
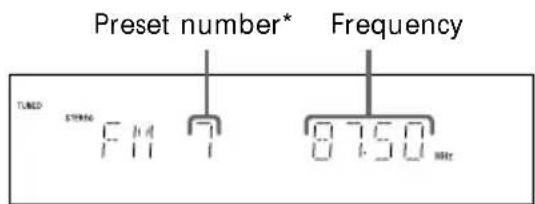
* When only one station is preset, "ONE PRESET" appears in the display.
To Do this
Turn off the radio Press. |/
Adjust the volume Turn VOLUME (or press VOL +/- on the remote).
To listen to non-preset radio stations
Use manual or automatic tuning in step 2. For manual tuning, press + or – repeatedly. For automatic tuning, press and hold + or –.
Tips
- Pressing TUNER/BAND when the power is off automatically turns the power on and tunes to the last received station (One Touch Play).
- You can switch from another source to the radio just by pressing TUNER/BAND (Automatic Source Selection).
- When an FM program is noisy, press STEREO/MONO so that "MONO" appears in the display. There will be no stereo effect, but the reception will improve. Press the button again to restore the stereo effect.
• To improve broadcast reception, reorient the supplied antennas.
Recording from the radio
You can record the radio program on a tape by calling up a preset station. You can use TYPE I (normal) or TYPE II (CrO2) tapes. The recording level is automatically adjusted.
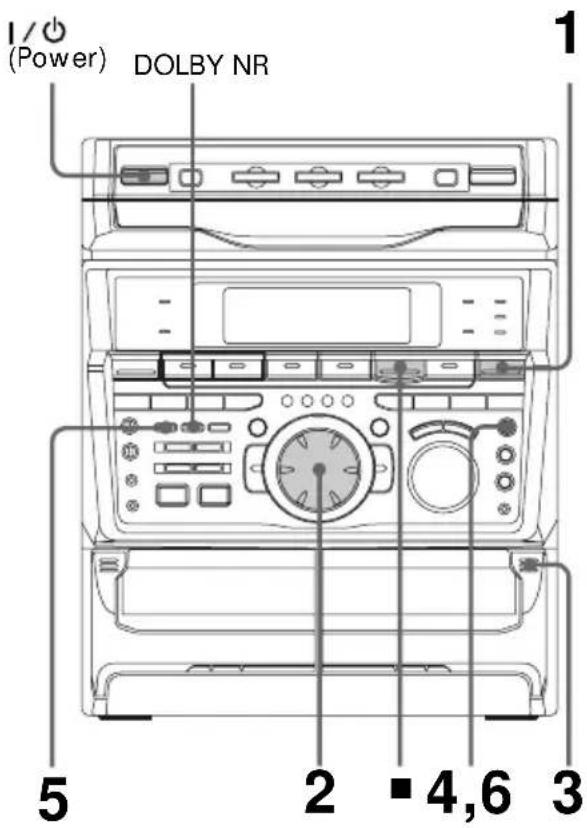
1 Press TUNER/BAND to select the band you want.
2 Turn the jog dial to tune in a preset station.
Turn counterclockwise for lower preset numbers.

Turn clockwise for higher preset numbers.

continued
Recording from the radio (continued)
3 Press and insert a recordable tape into deck B.
With the side you want to record facing forward

natural_image
Line drawing of a mechanical device with rollers and a housing (no text or symbols)4 Press REC PAUSE/START.
Deck B stands by for recording.
5 Press DIRECTION repeatedly to select to record on one side. Select () (or RELAY) to record on both sides.
6 Press REC PAUSE/START. Recording starts.
To stop recording
Press ■.
Tips
- If you want to record from the reverse side, press TAPE B ◀ to light its indicator after pressing REC PAUSE/START in step 4.
- When you record on both sides, be sure to start from the front side. If you start from the reverse side, recording stops at the end of the reverse side.
- To record non-preset stations, use + and - in step 2 to tune in the desired station manually.
- When you want to reduce the hiss noise in low-level high-frequency signals, press DOLBY NR so that "DOLBY NR" appears after pressing REC PAUSE/START in step 4.
- If noise is heard while recording from the radio, move the respective antenna to reduce the noise.
Playing a tape
You can use any type of tape, TYPE I (normal), TYPE II (CrO2) or TYPE IV (metal), since the deck automatically detects the tape type. You can also use the jog dial's AMS functions to quickly search for songs you want to hear. To select either deck A or B, press DECK A ◀▶ or DECK B ◀▶ on the remote.


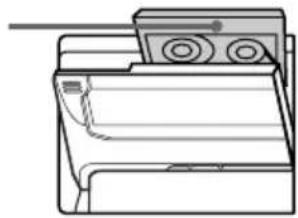
1 Press ≅ and insert a recorded tape in deck A or B.
With the side you want to play facing forward
natural_image
Line drawing of a mechanical device with rollers and a handle (no text or symbols)2 Press DIRECTION repeatedly to select to play one side. Select ()* to play both sides.
To play both decks in succession, select RELAY (relay play).**
3 Press TAPE A (or TAPE B) ▶ (DECK A (or DECK B) ▶ on the remote).
Press TAPE A (or TAPE B) ◀ to play the reverse side. (Press DECK A (or DECK B) ▶ again on the remote to play the reverse side.) The tape starts playing.
* The deck stops automatically after repeating the sequence five times. ** Relay play always follows the following sequence: Deck A (front side), Deck A (reverse side), Deck B (front side), Deck B (reverse side).
To Do this
| Stop play Press ■. |
| Fast-forward Press ◀◀ or ▶▶. |
| Rewind Press ◀◀ or ▶▶. |
| Remove the cassette Press ≜. |
| Adjust the volume Turn VOLUME (or press VOL +/- on the remote). |
Tips
- Pressing TAPE A (or TAPE B) ▶ or ◀ when the power is off automatically turns the power on and starts tape playback if there is a tape in the deck (One Touch Play).
- You can switch from another source to the tape deck just by pressing TAPE A (or TAPE B) ▶ or ◀ (Automatic Source Selection).
- When you want to reduce the hiss noise in low-level high-frequency signals, press DOLBY NR so that "DOLBY NR" appears.
Searching for the beginning of a track (AMS\*)
During playback, turn the jog dial the same direction as the ◀ or ▶ indicator to go forward. Turn the opposite direction to go back. (Or press ◀◀ or ▶▶ on the remote.) The search direction, + (forward) or - (back), and number of songs being skipped (1\~9) appear in the display.
Example: searching forward 2 songs
$$ \text { TAPE } \quad A:;; + 2 $$
* AMS (Automatic Music Sensor)
Notes
The AMS function may not operate correctly under the following circumstances:
- When the unrecorded space between songs is less than 4 seconds long.
- If completely different information is recorded on the left and right channels.
- When there are continuous sections of extremely low level or low frequency sound (like those of a baritone sax).
- When the unit is placed near a television. (In this case, we recommend moving the unit farther away from the television or turning off the television.)
Recording from a tape
— High-speed Dubbing
You can use TYPE I (normal) or TYPE II (CrO2) tapes. The recording level is automatically adjusted.

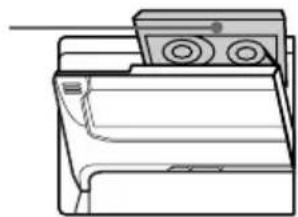
1 Press and insert a recorded tape in deck A and a recordable tape in deck B.
With the side you want to play/record facing forward
natural_image
Technical line drawing of a mechanical assembly or component (no text or symbols visible)2 Press HI-DUB. Deck B stands by for recording.
3 Press DIRECTION repeatedly to select to record on one side. Select (or RELAY) to record on both sides.
4 Press REC PAUSE/START. Dubbing starts.
To stop dubbing
Press ■.
Tips
- When you dub on both sides, start recording from the front side. If you record from the reverse side, recording stops at the end of the reverse side.
- If you set DIRECTION to (↔) when the tapes you use have different lengths, the tape in each deck reverses independently. If you select RELAY, the tapes in both decks reverse together.
- You don't have to set DOLBY NR, since the tape in deck B is automatically recorded in the same state as the tape in deck A.
Singing along: Karaoke
You can sing along with any stereo CD or tape by turning down the singer's voice. You need to connect an optional microphone.

1 Turn MIC LEVEL to 0 to turn down the microphone control level.
2 Connect an optional microphone to MIC 1 or MIC 2.
3 Press KARAOKE PON/MPX repeatedly to obtain the karaoke effect you desire. Every time you press the button, the display changes as follows:
KARAOKE PON → MPX R → MPX L EFFECT OFF (ON)*
* When an audio emphasis is selected, the effect name appears. The ◀ indicator appears in the display when a karaoke mode is activated. To sing karaoke with decreasing the vocal level of a CD, select "KARAOKE PON". To sing karaoke of multiplex CD or tape, select "MPX R" or "MPX L".
4 Start playing the music and adjust the volume.
5 Adjust the microphone volume by turning MIC LEVEL.
When you use VIDEO CDs
Turn on your TV and switch it to the appropriate video input.
Refer to the operating instructions supplied with your TV for details.
When you are done
Turn MIC LEVEL to 0 and disconnect the microphone from MIX MIC, then press KARAOKE PON/MPX repeatedly so that "disappears.
Tip
You can use two microphones connecting to MIC 1 and MIC 2 at the same time.
Note
With some songs, vocals may not be cancelled when you select "KARAOKE PON".
continued
Singing along: Karaoke (continued)
Adjusting the microphone echo

→ Turn ECHO LEVEL to adjust the echo effect.
To cancel the echoing
Turn ECHO LEVEL to 0.
Adjusting the key
This function allows you to adjust the key to suit your vocal range when playing a VIDEO CD or standard audio CD.
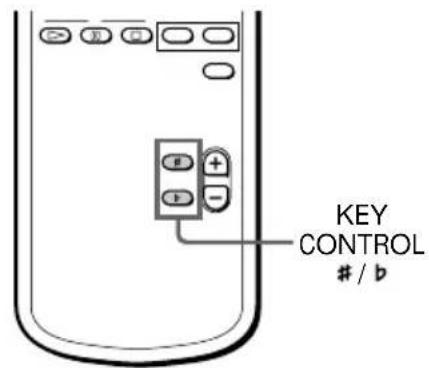
→ Press KEY CONTROL or. You can adjust the key higher of lower in 13 halftone steps (b 6 \~ #6).
Note
This function cannot be used with the tape deck.
The VIDEO CD/CD Player
Playing a VIDEO CD with PBC functions (Ver. 2.0)
— PBC Play
The PBC (Play Back Control) function display menus on your TV screen to let you enjoy interactive software.
Be sure to read the instructions supplied with each disc for details regarding its use since different discs have different menu formats and structures.

1 Start playing a VIDEO CD with PBC functions (Ver. 2.0).
The VIDEO CD and PBC indicators light up and a PBC menu appears on your TV.
• VIDEO CD : Lights during playback of a VIDEO CD.
- PBC: Lights during PBC playback of a PBC compatible VIDEO CD (Ver. 2.0).
- PBC OFF: Lights when a PBC compatible VIDEO CD (Ver. 2.0) is played without using the PBC functions (see next page).
2 Turn the jog dial to select a number from the menu, then press ENTER/ NEXT or SELECT.
3 Continue according to the instructions on the menus to enjoy interactive playback.
To Do this
Stop play Press ■.
See the rest of a menu Pres NEXT.
Go back to the top of a Press PREV. menu
Go back to a previous Press RETURN (or menu ⬇ RETURN on the remote).
continued

Playing a VIDEO CD with PBC functions (Ver. 2.0) (continued)
To cancel PBC Playback of VIDEO CDs with PBC functions (Ver. 2.0)
There are two ways to cancel the PBC functions.
- Before you start playing, select the track you want using the jog dial, ◀◀◀/▶▶▶, then press ENTER/NEXT (or CD ▶ on the remote).
- Before you start playing, select the track number using the number buttons on the remote.
The PBC OFF indicator lights up and playback begins from the selected track. Still images, such as the menu screens, will not be shown.
To select a menu number using the remote
Press the numeric buttons in the order you want in step 2. To enter track numbers 10 or over, first press >10, then press the numerical buttons. To enter 0, use the 10/0 button.
Tips
- When pears on the TV screen, you have pressed an invalid button. Press a button indicated by the instructions on the menu screen.
- When you press NEXT during menu playback or while playing moving pictures, the next scene on the disc appears. Also refer to the instructions supplied with the disc.
Note
During menu playback, you cannot go to the next disc, even if you've selected "ALL DISCS." Press D. SKIP on the remote to go to the next disc.
Checking the remaining time
You can check the remaining time of the current track or that of the CD.
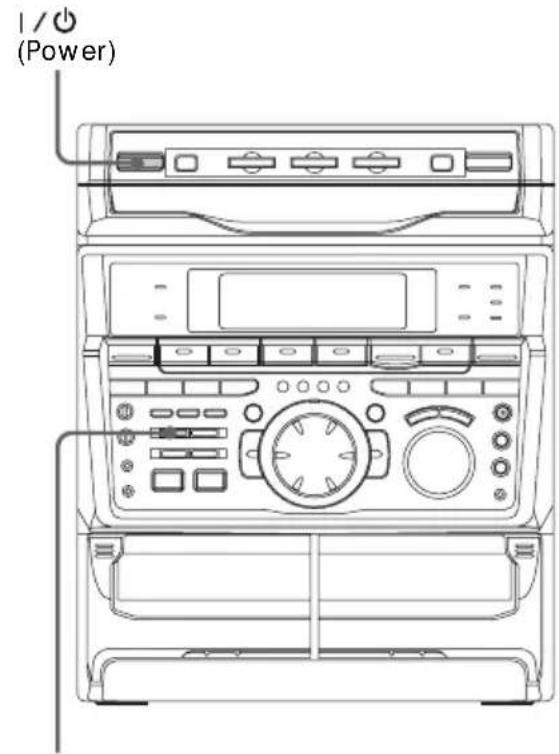
DISPLAY

Press DISPLAY.
Each time you press the button during normal playback or in the stop mode, the display changes as follows:
During normal playback

flowchart
graph TD
    A["Playing time on the current track"] --> B["Remaining time on the current track"]
    B --> C["Remaining time on current CD (1 DISC mode) or "--.--" display (ALL DISCS mode)"]
    C --> D["Clock display (for eight seconds)"]
    D --> E["Effect (P FILE) name or "EFFECT ON (OFF)")"]

flowchart
graph TD
    A["(VIDEO CDs with PBC functions (Ver. 2.0))"]
    B["Playing time on the current track*"]
    B --> C["Clock display (for eight seconds)"]
    B --> D["Effect (P FILE) name or "EFFECT ON (OFF)""]
    C --> E["* May not appear with still images, etc."]
In the stop mode
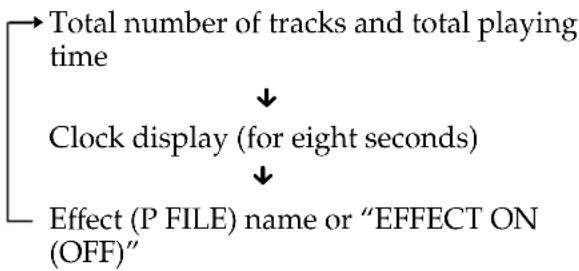
flowchart
graph TD
    A["Total number of tracks and total playing time"] --> B["Clock display (for eight seconds)"]
    B --> C["Effect (P FILE) name or "EFFECT ON (OFF)")"]
    A -->|↓| B
    B -->|↓| C
Tip
While playing an audio CD or a VIDEO CD without PBC functions (Ver. 1.1), the current track number and playing time of the current track appear in the display.
Using the on-screen display
You can check the current operating status and disc information of VIDEO CDs or audio CDs during playback or in stop mode by superimposing a display on top of the images on your TV screen.


Press ON SCREEN.
Each time you press this button, the on-screen display changes as follows:

flowchart
graph LR
    A["ON SCREEN 1"] --> B["ON SCREEN 2"]
    B --> C["ON SCREEN OFF"]
ON SCREEN 1 display
- During playback of an audio CD (except Program Play mode)

① Current disc and track number
② Play mode
③ Elapsed time of current track
④ Music calendar*
* The track numbers in the numerical calendar disappear after they are played.
continued
Using the on-screen display (continued)
- During playback of an audio CD in Program Play mode

① Current disc and track number
② "PROGRAM"
③ Programmed disc and track numbers
④ Elapsed time of current track
- During stop mode of a VIDEO CD with PBC functions

flowchart
graph TD
    A["①"] --> B["RESUME"]
    C["②"] --> D["AUTO PBC"]
    E["③"] --> D
    F["STOPVCD\n40:00D100"] --> F
① "RESUME" or no display
② "ACTIVE" or no display
③ "AUTO PBC"
④ Total playing time of current disc
- During stop mode of a VIDEO CD or audio CD (except Program Play mode)

① "RESUME" or no display
② "ACTIVE"* or no display
③ Play mode
④ Music calendar
⑤ Total playing time of current CD
* For VIDEO CD only
- During stop mode of a VIDEO CD or audio CD in Program Play mode
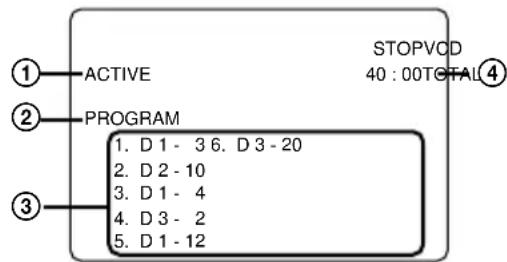
① "ACTIVE"* or no display
② "PROGRAM"
③ Programmed disc and track numbers
④ Total playing time of program
* For VIDEO CD only
ON SCREEN 2 display
• During playback of a VIDEO CD

① Current disc and track number*
② Elapsed time of current track
* "SCENE" and number is displayed during playback of a VIDEO CD with PBC functions
• During playback of an audio CD
Display is the same as ON SCREEN 1.
- During stop mode of a VIDEO CD (except Program Play mode)

① "RESUME" or no display
② "ACTIVE" or no display
③ Play mode*
④ Total track numbers of each disc
⑤ Current disc number and total playing time of current disc
⑥ "REPEAT 1" or no display
* "AUTO PBC" display for a VIDEO CD with PBC functions
- During stop mode of an audio CD (except Program Play mode)

① Current disc number
② Play mode
③ Disc number and track numbers*
④ Total playing time of current disc
⑤ "REPEAT 1" or no display
* Music calendar appears when SHUFFLE mode is selected
- During stop mode of a VIDEO CD or audio CD in Program Play mode
Display is the same as ON SCREEN 1.
ON SCREEN OFF
No display (except for special menus).
Notes
- Normally, leave the display mode set to either ON SCREEN 1 or 2. When you select ON SCREEN OFF, you cannot check the operating status while operating the CD player. In this case, check the information on the front panel display.
- When you record video signals played back from this system onto a video tape (etc.), be sure to select ON SCREEN OFF. Otherwise, the display information will also be recorded on the video tape.
To switch language of on-screen display (Chinese model only)
You can switch the messages in the on-screen display from Chinese to English.
1 Press SPECIAL MENU.
2 Press 6.
The messages switch from Chinese to English.
To switch back to Chinese messages, repeat this operation.
Locating a specific part of a disc
— Special Menu
This player has 4 different search features. Select the search feature you want from the SPECIAL MENU.
The TV screen must be ON to use these functions.

continued
Locating a specific part of a disc (continued)
Locating by Scene Number
— Scene Search
On VIDEO CDs with PBC functions (Ver. 2.0), the menu screens, moving pictures, and still pictures are divided into "scenes" and each scene has an assigned scene number. This function lets you start playback from a specific scene.
1 Start playing a VIDEO CD with PBC functions (Ver. 2.0).
2 Press SPECIAL MENU.
3 Press 1 to select "1) SCENE SEARCH".
"SCENE –" and the total number of scenes appear on the TV screen.

4 Press the numeric buttons (1 - 10/0) to select the scene you want.
To enter scene number 103:
Press 1 → 10/0 → 3. The selected scene number appears on the TV screen.
Selected scene number
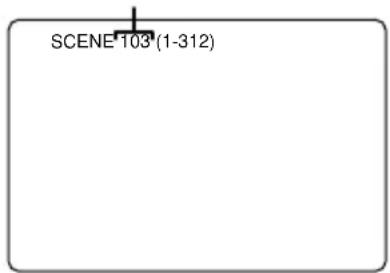
5 Press CD ▶.
Playback starts from the selected scene.
To stop playback
Press ■.
To check the scene number during playback
Press ON SCREEN repeatedly to select the ON SCREEN 2 display mode. The scene number appears on the TV screen. (See "Using the On-Screen Display" for details.)
Notes
- On some CDs, you may not be able to start playing from the scene you select because starting playback from certain scenes is prohibited. In this case, play either starts from scene 1 (during stop mode) or continues from the current scene (during playback).
- Some CDs may not display the scene you select on the TV screen.
- When you select the ON SCREEN OFF display mode, no information is shown on the TV screen.
Locating by elapsed time
— Time Search
This function lets you use elapsed time as a guide to find a certain parts of a VIDEO CD without PBC functions (Ver. 1.1). "Elapsed time" means the time from the beginning of the disc. It is not the playing time of the current track as shown in the display.
It is especially useful when playing discs that have only a few track divisions.
This function cannot be used during playback of VIDEO CDs with PBC functions (Ver. 2.0).
1 Press SPECIAL MENU.
2 Press 2 to select "2) TIME SEARCH."
3 Press the numeric buttons (1 - 10/0) to enter the time (in minutes) for the section you want.
To enter 10 minutes: Press 1 → 10/0.
The selected elapsed time appears on the TV screen.
To reenter the time: Press CLEAR, and then press numeric buttons again.
4 Press CD ▶.
Playback starts from the selected time.
To stop playback
Press ■.
To use time search with VIDEO CDs with PBC functions (Ver. 2.0)
Select "2) TIME SEARCH" before you start playing the VIDEO CD, to light the PBC OFF indicator and play without PBC functions.
Locating the track you want
— Disc Digest
You can select the track you want by viewing the first frame of each track. Either 9 or 12 different tracks can be displayed on the TV screen at one time.
This function cannot be used during playback of VIDEO CDs with PBC functions (Ver. 2.0).
1 Press SPECIAL MENU.
2 Press 3 to select "3) DISC DIGEST."
The first frame of tracks 1 through 9 (in default setting) on the current disc are displayed.
The sound of the first three seconds of each track on an audio CD plays, but there is no sound when using a VIDEO CD.
Current disc number

3 Press the numeric buttons (1 - 10/0) to select the track you want.
To stop playback
Press ■.
continued
Locating a specific part of a disc (continued)
To switch to a 12 frame display
You can switch the digest display from 9 to 12 frames.
1 Press SPECIAL MENU.
2 Press 5.
3 Proceed with steps 1 and 2 of "Locating the track you want". The first frames of tracks 1 through 12 are displayed.
To switch back to the 9 frame display, repeat this operation.
To display the next 9 or 12 tracks
Press NEXT. The first frame of tracks 10 through 18 (or 13 through 24) are displayed.
When there are more tracks in the disc,
“▶▶▶” appears in the upper right corner of the TV screen.
To display previous tracks, press PREV.
To switch to the digest of another disc during disc digest
Press D. SKIP during disc digest.
To use disc digest with VIDEO CDs with PBC functions (Ver. 2.0)
Select "3) DISC DIGEST" before you start playing the VIDEO CD, to light the PBC OFF indicator and play without PBC functions.
Tip
In step 2, you can select tracks even if they have not been displayed yet. Use the numeric buttons to select the track you want.
Notes
• Video images will not be shown for audio CDs.
- The play mode automatically switches to CONTINUE mode if you start disc digest during Shuffle or Program Play.
Locating a section within a track
— Track Digest
You can have the CD player divide a VIDEO CD track into either 9 or 12 different sections and display the first scene of each section on the TV screen. This might be useful when playing discs with few track divisions, such as movies.
This function cannot be used during playback of VIDEO CDs with PBC functions (Ver. 2.0).
1 Start playing the VIDEO CD track you want.
2 Press SPECIAL MENU.
3 Press 4 to select "4) TRACK DIGEST."
The current track is divided into 9 sections (in default setting) and the first frame of each section is displayed. The sound of the first three seconds of each track on an audio CD plays, but there is no sound when using a VIDEO CD.
Current track number
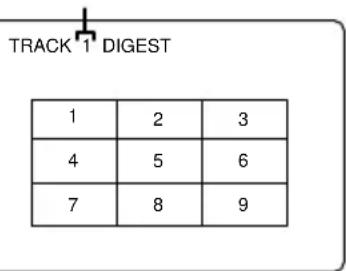
4 Press the numeric buttons to select the section you want.
4 Press the numeric buttons to select the section you want.
Playback starts from a point near the selected frame.
To stop playback
Press ■.
Press ■.
Press ■.
Press ■.
Press ■.
Press ■.
Press ■.
Press ■.
Press ■.
Press ■.
To stop Press ■.
To stop Press ■.
To stop Press ■.
To switch to a 12 frame display
You can switch the digest display from 9 to 12 frames.
1 Press SPECIAL MENU.
2 Press 5.
3 Proceed with steps 2 and 3 of "Locating a section within a track". The track is divided into 12 sections and the first frame of each section is displayed.
To switch back to the 9 frame display, repeat this operation.
To switch to the digest of another track during track digest
Press PREV or NEXT during track digest; however, this does not work during Shuffle Play or Program Play.
To use track digest with VIDEO CDs with PBC functions (Ver. 2.0)
Select "4) TRACK DIGEST" before you start playing the VIDEO CD, to light the PBC OFF indicator and play without PBC functions.
Tip
In step 3, you can select sections even if they have not been displayed yet.
Use the numeric buttons to select the track you want.
Note
Tracks less than 40 seconds long may be divided into fewer than 12 sections.
Resuming playback from the point you stopped a VIDEO CD
— Resume Play
The unit memorizes the point where you stopped the VIDEO CD so you can resume from that point. Resume play is not cancelled when you turn off the system.
Note that resume play is not available when playing an audio CD.

Resuming playback from the point you stopped a VIDEO CD (continued)
1 While playing a VIDEO CD, press ■ to stop playback.
"RESUME" appears on your TV screen. If "RESUME" does not appear, Resume Play is not available.
2 Press CD ▶II (or CD ▶ on the remote).
The player starts playback from the point you stopped the VIDEO CD in step 1.
To view from the beginning of the VIDEO CD
When "RESUME" appears in the display, press ■, then press CD ▶■ (or CD ▶).
Notes
- Resume Play is not available in the Digest, Shuffle, or Program Play modes.
- Depending on where you stopped the VIDEO CD, the player may resume playback from a different point.
- The point at which you stopped playback is cleared when:
- you press number buttons, PLAY MODE, or ■.
- you press DISC SKIP/EX-CHANGE (or D.SKIP on the remote).
- you press SPECIAL MENU.
- you turn the jog dial.
- you remove the VIDEO CD.
- you unplug the unit's AC power cord.
Setting the sharpness
— Active Picture
This function emphasizes the outline of the picture to create a sharper image.

→ Press ACTIVE so that "ACTIVE PICTURE" appears in the display.
To cancel
Press ACTIVE again to display "ACTIVE OFF".
Notes
- The active picture function is not available when playing audio CDs.
- "ACTIVE OFF" is selected automatically when you turn the system off.
Playing the CD tracks repeatedly
— Repeat Play
This function lets you repeat a single CD or all CDs in normal play, Shuffle Play and Program Play.
1/0 (Power) PLAY MODE
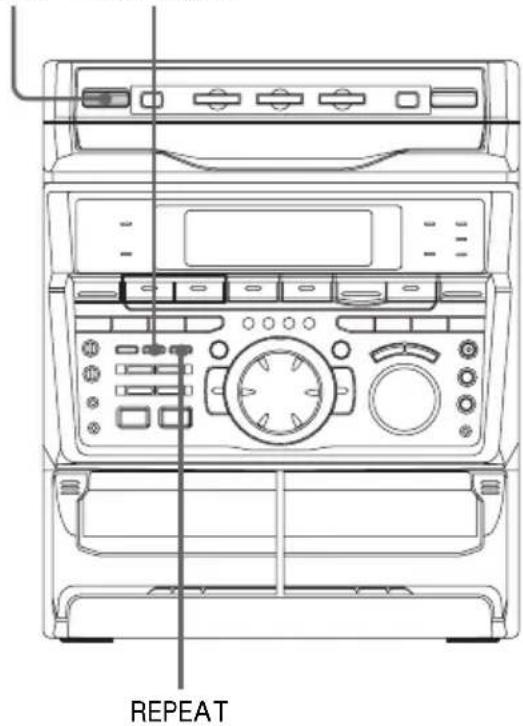
→ Press REPEAT during playback until "REPEAT" appears in the display.
Repeat Play starts. Do the following procedure to change the repeat mode.
To repeat Press
| All the tracks on PLAY MODE repeatedly the current CD until “1 DISC” appears in the display. |
| All the tracks on PLAY MODE repeatedly all CDs until “ALL DISCS” appears in the display. |
| Only one track REPEAT repeatedly until “REPEAT 1” appears in the display while playing the track you want to repeat. |
To cancel Repeat Play
Press REPEAT so that "REPEAT" or "REPEAT 1" disappears from the display.
Playing the CD tracks in random order
— Shuffle Play
You can play all the tracks on one CD or all CDs in random order.

1 Press FUNCTION repeatedly until "CD" appears in the display, then place a CD.
2 Press PLAY MODE repeatedly until "1 DISC SHUFFLE" or "ALL DISCS SHUFFLE" appears in the display. "ALL DISCS" shuffles all the CDs in the player. "1 DISC" shuffles the CD whose DISC indicator is green.
3 Press CD ▶II.
All the tracks play in random order.
To cancel Shuffle Play
Press PLAY MODE repeatedly until "SHUFFLE" or "PROGRAM" disappears from the display. The tracks continue playing in their original order.
To select a desired CD
Press DISC 1\~3.
Tips
- You can start Shuffle Play during normal play by pressing PLAY MODE repeatedly to select "SHUFFLE".
- To skip a track, turn the jog dial clockwise (or press ▶▶ on the remote).
Programming the CD tracks
— Program Play
You can make a program of up to 32 tracks from all the CDs in the order you want them to be played.
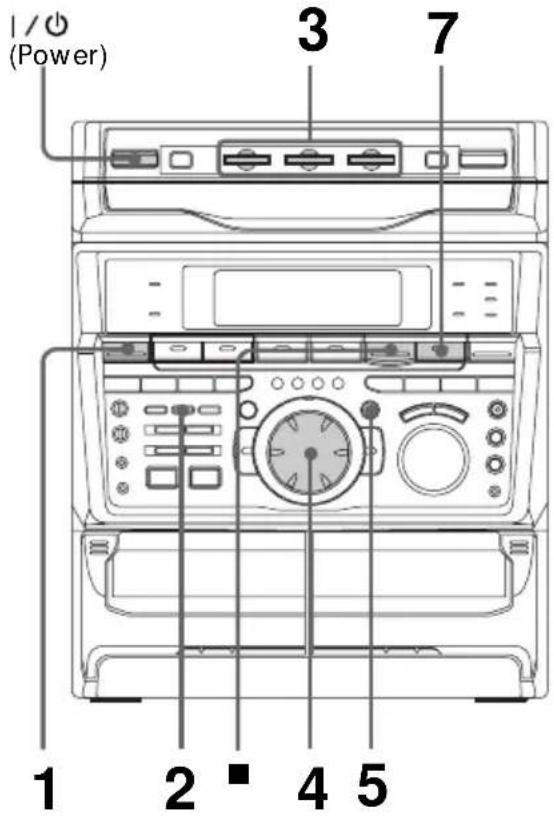

1 Press FUNCTION repeatedly until "CD" appears in the display, then place a CD.
2 Press PLAY MODE repeatedly until "PROGRAM" appears in the display.
3 Press one of the DISC 1\~3 buttons to select a CD.
4 Turn the jog dial until the desired track appears in the display.

5 Press ENTER/NEXT.
The track is programmed. The program step number appears, followed by the total playing time.
6 To program additional tracks, repeat steps 3 to 5.
Skip step 3 to select tracks from the same disc.
7 Press CD ▶II.
All the tracks play in the order you selected.
continued
Programming the CD tracks (continued)
To cancel Program Play
Press PLAY MODE repeatedly until "PROGRAM" or "SHUFFLE" disappears from the display.
To Press
| Check the CHECK on the remote program repeatedly. After the last track, “CHECK END” appears. |
| Clear a track from CLEAR on the remote in the end stop mode. |
| Clear a specific CHECK on the remote track repeatedly until the number of the track to be erased lights up, then press CLEAR. |
| Add a track to the 1 Select the disc tray with a program DISC 1~3 button.2 Select the track by turning the jog dial.3 Press ENTER/NEXT. |
| Clear the entire ■ once in stop mode or program twice while playing. |
Tips
- The program you made remains in the CD player even after it has been played back. Press CD ▶II to play the same program again.
- If "--..." appears instead of the total playing time during programming, this means:
– you have programmed a track number which exceeds 20.
– the total playing time has exceeded 100 minutes.
Playing CDs without interruption
— CD Non-Stop Play
You can play CDs without pausing between tracks.
You cannot use this function with VIDEO CDs.
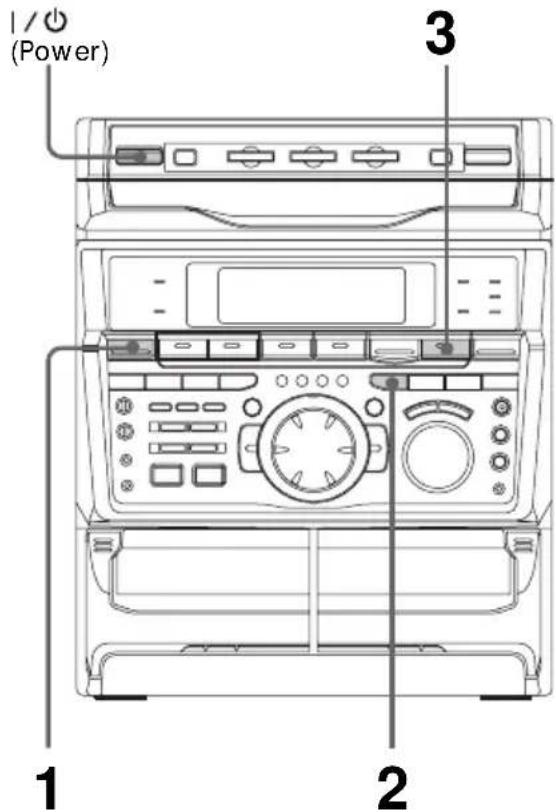
1 Press FUNCTION repeatedly until "CD" appears in the display, then place a CD.
2 Press CD NON-STOP to light the indicator.
"NON-STOP PLAY" appears in the display.
3 Press CD ▶II.
To cancel Non-Stop Play
Press CD NON-STOP so that the indicator goes out and "NON-STOP OFF" appears in the display.
The Tape Deck
Recording on a tape manually
You can record from CD, tape, or radio as you like. For example, you can record just the songs you want or record from the middle of the tape. The recording level is adjusted automatically.

1 Insert a recordable tape into deck B.
2 Press FUNCTION repeatedly until the source you want to record (e.g., CD) appears.
3 Press REC PAUSE/START.
Deck B stands by for recording. The indicator on TAPE B ▶ (for front side) lights up.
4 Press DIRECTION repeatedly to select to record on one side. Select (or RELAY) to record on both sides.
5 Press REC PAUSE/START. Recording starts.
6 Start playing the source to be recorded.
To Press
Stop recording ■.
Pause recording REC PAUSE/START.
Tips
- If you want to record from the reverse side, press TAPE B ▶ to light its indicator after pressing REC PAUSE/START in step 3.
- When you want to reduce the hiss noise in low-level high-frequency signals, press DOLBY NR so that "DOLBY NR" appears after pressing REC PAUSE/START in step 3.
- When recording from a CD, you can use the jog dial to select tracks during rec pause mode (after pressing REC PAUSE/START in step 3 and before pressing again in step 5).
Recording a CD by specifying track order
— Program Edit
You can record tracks from all the CDs in the order you want. When programming, make sure the playing times for each side do not exceed the length of one side of the tape. PBC function is cancelled when VIDEO CDs (Ver. 2.0) are programmed.


1 Place a CD and insert a recordable tape into deck B.
2 Press FUNCTION repeatedly until "CD" appears in the display.
3 Press PLAY MODE repeatedly until "PROGRAM" appears in the display.
4 Press one of the DISC 1\~3 buttons to select a CD.
5 Turn the jog dial until the desired track appears in the display.

6 Press ENTER/NEXT.
The track is programmed. The program step number appears, followed by the total playing time.
7 To program additional tracks to be recorded on side A, repeat steps 4 to 6.
Skip step 4 to select tracks from the same disc.
8 Press II on the remote to insert a pause at the end of side A.
"P" appears in the display and the total playing time resets to "0.00" in the display.
9 Repeat steps 5 and 6 for tracks from the same disc or steps 4 to 6 for tracks from another disc to program the remaining tracks to be recorded on side B.
10 Press CD SYNC. Deck B stands by for recording and the CD player stands by for playback. The indicator on TAPE B ▶ (for front side) lights up.
11 Press DIRECTION repeatedly to select to record on one side. Select (or RELAY) to record on both sides.
12 Press REC PAUSE/START. Recording starts.
To stop recording
Press ■.
To check the order
Press CHECK on the remote repeatedly. After the last track, "CHECK END" appears.
To cancel Program Edit
Press PLAY MODE repeatedly until "PROGRAM" or "SHUFFLE" disappears from the display.
Tip
When you want to reduce the hiss noise in low-level high-frequency signals, press DOLBY NR so that "DOLBY NR" appears after pressing CD SYNC.
Selecting tape length automatically
— Tape Select Edit
You can check the most suitable tape length for recording a CD. Note that you cannot use Tape Select Edit for discs containing over 20 tracks.
1 Insert a CD.
2 Press FUNCTION repeatedly until "CD" appears in the display.
3 Press EDIT once, so that "EDIT" flashes.
The required tape length for the currently selected CD appears, followed by the total playing time for side A and side B respectively.
Note
You cannot use this function after programming. In order to use this function, you must first cancel the program by pressing PLAY MODE repeatedly until "PROGRAM" or "SHUFFLE" disappears from the display.
DJ Effects
Looping part of a CD
— CD Loop
With the loop function, you can repeat part of a CD during playback. This lets you create original recordings.
You cannot use this function with VIDEO CDs.
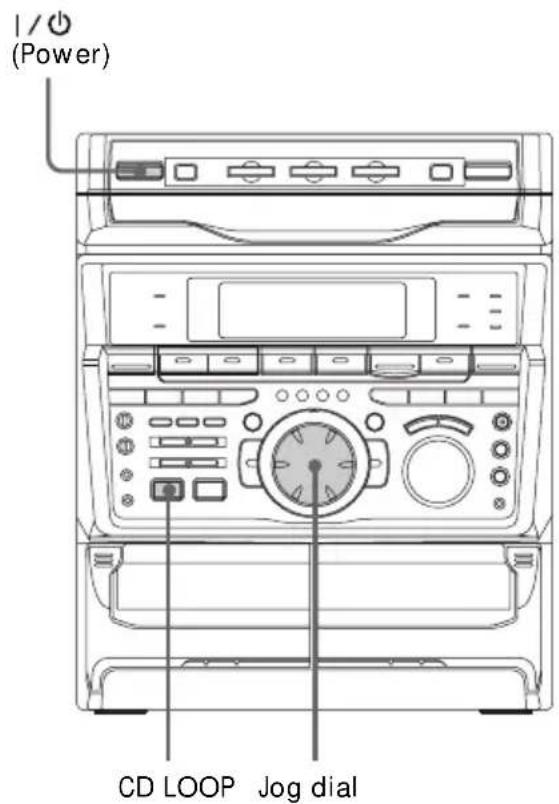

Press and hold CD LOOP during playback at the point you want to start the Loop function, and release to resume normal play.
To adjust the loop length
Turn the jog dial while holding CD LOOP (or press SELECT ▲ or ▼ while holding LOOP on the remote) to select different loop lengths (LOOP 1\~20).
Flashing part of a CD
— CD Flash
With the flash function, you can "flash" the CD sound during playback. This lets you create original recordings.
You cannot use this function with VIDEO CDs.


Press and hold CD FLASH during playback at the point you want to start the Flash function, and release to resume normal play.
To adjust the flash length
Turn the jog dial while holding CD FLASH (or press SELECT ▲ or ▼ while holding FLASH on the remote) to select different flash lengths (FLASH 1\~20).
To use CD LOOP and CD FLASH together
Press and hold both CD LOOP (LOOP on the remote) and CD FLASH (FLASH on the remote) at the same time.
Notes
- The loop and flash length cannot be adjusted during this operation. Adjust the loop and flash lengths independently beforehand if necessary.
- To record the flash effect, use the analog (MD OUT) connections or this unit's tape deck.
Sound Adjustment
Adjusting the sound
You can reinforce the bass, create a more powerful sound, and listen with headphones.

To reinforce bass (DBFB)
Press DBFB*.
Every time you press the button, the display changes as follows:

flowchart
graph TD
    A["DBFB NORMAL DBFB"] --> B["DBFB HIGH ( ) DBFB"]
    B --> C["DBFB OFF (off)"]
* DBFB = Dynamic Bass Feedback
For the most suitable bass sound (SYNC BASS)
Press SYNC BASS.
The bass frequencies of the music you are listening to are measured and those areas with heavy bass tones are effectively reinforced. The indicator SYNC BASS H or SYNC BASS L lights up according to the areas with heavy bass tones. Press SYNC BASS again to return to the previous level.
For a powerful sound (GROOVE)
Press GROOVE. The volume switches to power mode, DBFB is automatically set to full strength, the equalizer curve changes, and GROOVE button lights up. Press GROOVE again to return to the previous volume.
Notes
- With some songs, the music will sound distorted when you use the DBFB system with the sound effect if the bass is too strong. Set the DBFB to " "ABFBF", or cancel the sound effect (see page 43).
- Cancelling GROOVE sets DBFB to "DBFB" and flattens the equalizer curve. To cancel the DBFB level, press DBFB until the indication disappears.
To listen through the headphones
Connect the headphones to PHONES jack. No sound will come from the speakers.
Selecting the audio emphasis
The audio emphasis menu lets you select the sound characteristic according to the sound you are listening to.
Besides, you can also enjoy audio emphasis using the synchronized equalizer function. When using this function, the system switches the equalizer according to the genre automatically.
Selecting the effect from the music menu
MHC-VX7

MHC-VX5/VX5J

1 Press FILE SELECT.
The last effect chosen appears in the display.
2 Use the jog dial to select the preset you desire.
The preset name appears in the display. See the chart "Music menu options".
3 Press ENTER/NEXT.
When using the remote
Press FILE SELECT ▲ or ▼ to switch effects.

To cancel the effect
Press EFFECT (for MHC-VX7 only) or ON/OFF on the remote repeatedly so that "EFFECT OFF" appears in the display.
Music menu options
“” appears if you select an effect with surround effects.
For MHC-VX7
| Effect | For |
| ROCK | Standard music sources |
| POP | |
| JAZZ | |
| DANCE | |
| SOUL | |
| ACTION | Soundtracks and special listening situations |
| ROMANCE | |
| SF | |
| DRAMA | |
| SPORTS | |
| SHOOTING | Video games |
| RACING | |
| RPG | |
| BATTLE | |
| ADVENTURE | |
| P FILE 1~5 | Personal file* |
* The personal file function lets you store your own effects (for MHC-VX7 only) (see "Making a personal audio emphasis file" on page 46).
For MHC-VX5/VX5J
| Effect | For |
| ROCK | Standard music sources |
| POP | |
| JAZZ | |
| DANCE | |
| SOUL | |
| ACTION | Soundtracks and special listening situations |
| ROMANCE | |
| DRAMA | |
| SPORTS | |
| FLAT | Listening without effects |
Using the synchronized equalizer
You can set the audio emphasis to change automatically according to the beat and tempo at the music.

Press SYNC EQ.
The indicator blinks while measuring the beat and tempo of the source. Once measured, the indicator lights up in the display.
SYNC EQ classifies the music as follows:
| Beat Density | LO (Low)HI (High) |
| Beat Strength | SMOOTHMEDIUMSTRONG |
To cancel the synchronized equalizer
Press SYNC EQ again. The indicator turns off. The synchronized equalizer is cancelled also when:
— cancel the effect
— select the effect from the music menu
— select the surround effect
— adjust the graphic equalizer
— sing along (karaoke).
Notes
• SYNC EQ does not work in KARAOKE mode.
- For MHC-VX7, P FILE MEMORY does not work in SYNC EQ mode.
- The names of classification are not related with the genre of the music source.
Changing the spectrum analyzer display
You can enjoy changing the display while listening to the music.


Selecting surround effects
You can enjoy surround effects.

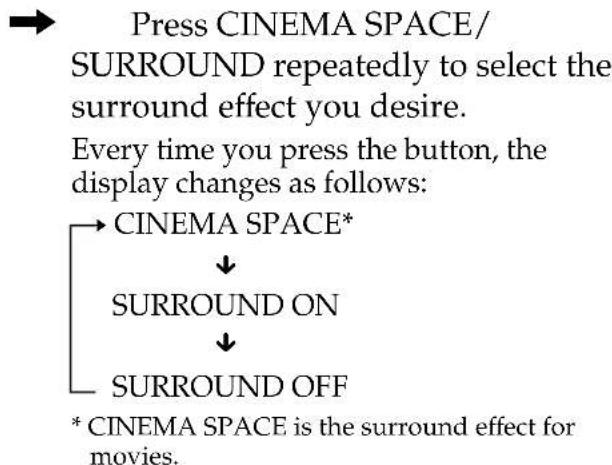
flowchart
graph TD
    A["Press CINEMA SPACE/SURROUND repeatedly to select the surround effect you desire."] --> B["Every time you press the button, the display changes as follows:"]
    B --> C["CINEMA SPACE*"]
    C --> D["SURROUND ON"]
    D --> E["SURROUND OFF"]
    E --> F["* CINEMA SPACE is the surround effect for movies."]
Tip (for MHC-VX7 only)
For MHC-VX7, if you want to memorize the effect, you can store it into a personal file (see "Making a personal audio emphasis file" on page 46).
Notes
- When you choose other sound effects, the surround effects will be cancelled.
- When you choose CINEMA SPACE, you cannot adjust effect levels.
Adjusting the graphic equalizer
(MHC-VX7 only)
You can adjust the sound by raising or lowering the levels of specific frequency ranges.
Before operation, first select the audio emphasis you want for your basic sound.

1 Select the audio emphasis you want for your basic sound (see "Selecting the audio emphasis" on page 42).
2 Press GEQ CONTROL.
3 Press + or – repeatedly to select a frequency band.

4 Turn the jog dial to adjust level.
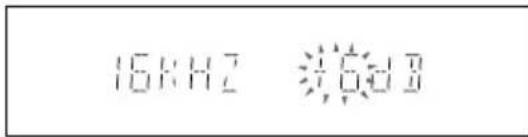
5 Repeat steps 3 and 4.
6 Press ENTER/NEXT when finished.
Note
If you choose another menu audio emphasis (other than "EFFECT OFF"), the adjusted sound effect is lost. To retain the adjusted sound effect for future use, store it in a personal file. (See "Making a personal audio emphasis file" on page 46.)
Making a personal audio emphasis file
— Personal file
(MHC-VX7 only)
You can create a personal file of audio patterns (surround effect and graphic equalizer) and store them in the memory of the unit. Later, call up an audio pattern to play a favorite tape, CD, or radio program. Create up to five audio files.
Before operation, first select the audio emphasis you want for your basic sound.
1/ (Power) 2 3 4

natural_image
Line drawing of a multi-tiered electronic device front panel with control knobs and indicator lights (no text or labels)FILE SELECT
1 Obtain the sound effect you want by using the graphic equalizer and surround effect.
2 Press P FILE MEMORY.
The personal file number appears in the display.
MEMORY
3 Use the jog dial to select the file number (P FILE 1\~5) where you want to store the sound effect.
4 Press ENTER/NEXT.
The adjusted sound effects are stored under the selected file number. The settings previously stored at this memory location are erased and replaced by the new settings.
To call up the personal file
1 Press FILE SELECT.
2 Use the jog dial to select the personal file you desire.
3 Press ENTER/NEXT.
Tip
The sound effects you stored are retained for half a day even if you unplug the power cord or if a power failure occurs.
Other Features
Mixing and recording sounds
You can "mix" sounds by playing one of the components and singing or speaking into a microphone (not supplied). The mixed sounds can be recorded on a tape.
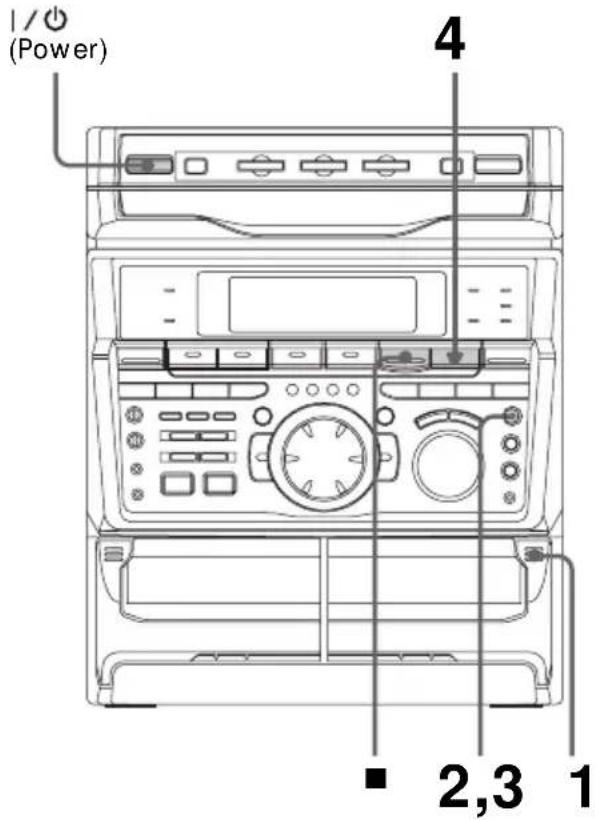
1 Do the procedures for singing along (steps 1 to 5 on page 21). Then, insert a tape in deck B.
2 Press REC PAUSE/START.
3 Press REC PAUSE/START again. Recording starts.
4 Press CD ▶II to start playing the CD player (or TAPE A ▶ for tape deck A).
Playback starts. Start singing along with the music.
To stop recording
Press ■.
Tips
- If acoustic feedback (howling) occurs, move the microphone away from the speakers or change the direction of the microphone.
- If you want to record your voice through the microphone only, you can do so by selecting the CD function and not playing a CD.
- When high level sound signals are input, the unit automatically adjusts the recording level to prevent distortion of the recorded sound signal (Auto Level Control function).
Notes
- If you press EFFECT (or ON/OFF on the remote) or recall a sound effect, the karaoke mode is cancelled.
- The instrumental sound may be reduced as well as the singer's voice when the sound is recorded in monaural.
- The singer's voice may not be reduced when:
—only a few instruments are playing
—a duet is being played
—the source has strong echoes or chorus
—the singer's voice deviates from the center
—the voice on the source is singing in high soprano or tenor.
Falling asleep to music
— Sleep Timer
You can let the system turn off at the preset time, so you can sleep to the music. You can preset the time to be turned off by 10 minutes.
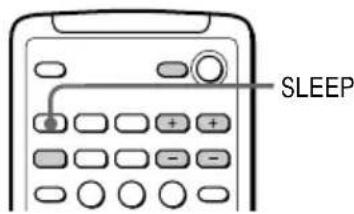

Press SLEEP.
Every time you press the button, the minute display (the turn-off time) changes as follows:
$$ \begin{array}{l} \mathrm{AUTO} \rightarrow 9 0 \mathrm{min} \rightarrow 8 0 \mathrm{min} \rightarrow 7 0 \mathrm{min} \ \rightarrow \dots \rightarrow 1 0 \mathrm{min} \rightarrow \text { OFF } \rightarrow \text { AUTO } \dots \ \end{array} $$
When you choose "AUTO"
The power turns off when the current CD or tape finishes playback (for up to 100 minutes).
To check the remaining time
Press SLEEP once.
To change the time to turn off
Select the time you want by pressing SLEEP.
To cancel the Sleep Timer function
Press SLEEP repeatedly until "SLEEP OFF" appears.
Waking up to music
— Daily Timer
You can wake up to music at a preset time every day. Make sure you have set the clock (see "Step 2: Setting the time").

1 Prepare the music source you want to play.
- CD: Insert a CD. To start from a specific track, make a program (see "Programming the CD tracks" on page 35).
- Tape: Insert an tape with the side you want to play facing forward.
- Radio: Tune in the preset station you want (see "Step 3: Presetting radio stations" on page 9).
2 Adjust the volume.
3 Press CLOCK/TIMER SET. "SET (DAILY 1)" appears.
4 Turn jog dial to select "DAILY 1 (or 2)", then press ENTER/NEXT. "ON" appears and the hour digits flash in the display.

5 Set the time to start playback. Turn jog dial to set the hour, then press ENTER/NEXT. The minute indication starts flashing.

Turn jog dial to set the minute, then press ENTER/NEXT. The hour indication flashes again.
6 Set the time to stop playback following the above procedure.
7 Turn jog dial until the music source you want appears. The indications change as follows:

8 Press ENTER/NEXT. The type of timer (DAILY 1 or DAILY 2), followed by the start time, stop time and the music source, appears, then the original display appears.
9 Turn off the power.
To check the setting
Press TIMER SELECT and turn the jog dial to select the respective mode (DAILY 1 or DAILY 2), then press ENTER/NEXT.
To change the setting, start over from step 1.
To cancel the timer operation
Press TIMER SELECT and turn the jog dial to select "TIMER OFF", then press ENTER/NEXT.
Tip
The power turns on 15 seconds before the preset time.
Timer-recording radio programs
To timer-record, you must preset the radio station (see "Step 3: Presetting radio stations") and set the clock (see "Step 2: Setting the time") beforehand.

1 Tune in the preset radio station (see "Listening to the radio" on page 16).
2 Press CLOCK/TIMER SET. "SET (DAILY 1)" appears.
3 Turn jog dial to select "REC", then press ENTER/NEXT. "ON" appears and the hour digits flash in the display.
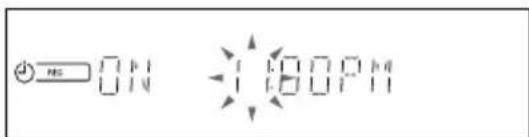
4 Set the time to start recording. Turn the jog dial to set the hour, then press ENTER/NEXT. The minute indication starts flashing.
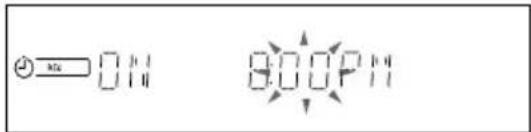
Turn the jog dial to set the minute, then press ENTER/NEXT. The hour indication flashes again.
5 Set the time to stop recording following the above procedure. The start time appears, followed by the stop time, the preset radio station to be recorded (e.g., "TUNER FM 5"), then the original display appears.
6 Insert a recordable tape into deck B.
7 Turn off the power. When the recording starts, the volume level is set to the minimum.
To check the setting
Press TIMER SELECT and turn the jog dial to select "REC", then press ENTER/NEXT. To change the setting, start over from step 1.
To cancel the timer operation
Press TIMER SELECT and turn the jog dial to select "TIMER OFF", then press ENTER/NEXT.
Note
If the power is on at the preset time, the recording will not be made.
Optional components
Connecting audio components
Select one of the following connections, depending on the equipment to be connected and method of connecting. Refer to the instructions of each component.
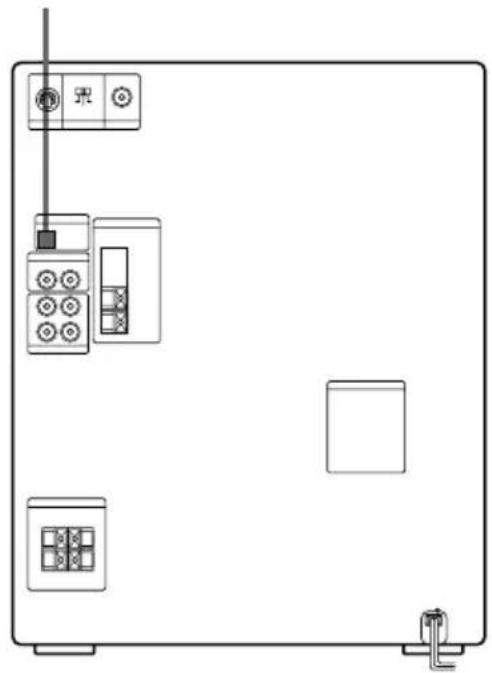
Connecting an MD deck for digital recording
You can record from CD into the MD deck digitally by connecting an optical cable.
To the DIGITAL IN jack of the MD deck
natural_image
Simple line drawing of a front view of a refrigerator with doors, wheels, and a door (no text or symbols)Note
You cannot record from a VIDEO CD to an MD deck digitally. When you record from a VIDEO CD to an MD deck, connect an optional audio cable to the audio output. (See "Connecting an MD deck for analog recording.")
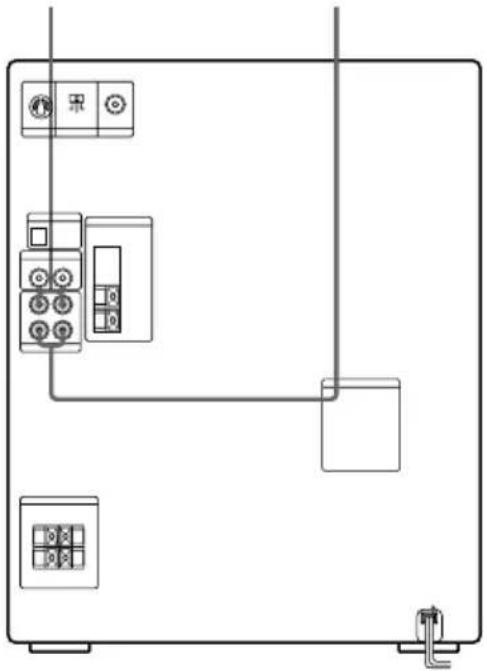
Connecting an MD deck for analog recording
Make sure to match the color of the plugs and the connectors. To listen to the sound of the connected MD deck, press FUNCTION repeatedly until "MD" appears.
To the audio output of the MD deck
To the audio input of the MD deck
natural_image
Pure electrical circuit lines without any symbolsTip
When you connect a Sony MD deck, you can use the MD ▶, ▪, and ■ buttons on this unit's remote to perform play, pause, and stop operations.
continued
Connecting audio components (continued)
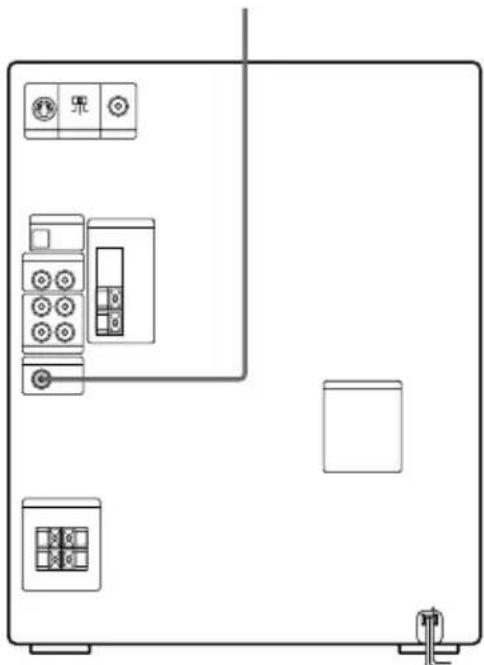
Connecting a super woofer speaker
You can connect an optional super woofer speaker.
To super woofer
natural_image
Line drawing of a cabinet or enclosure with labeled components (no text or symbols)Connecting the surround speakers
(MHC-VX7 only)
Connect the speaker cords from the surround speakers to the appropriate SURROUND SPEAKER jacks. Connect the solid cords to the red jacks and connect the striped cords to the black jacks.
Keep the speaker cords away from the antennas to prevent noise.

natural_image
Pure electrical circuit lines without any symbolsTo surround speaker (R)
To surround speaker (L)
Connecting a VCR
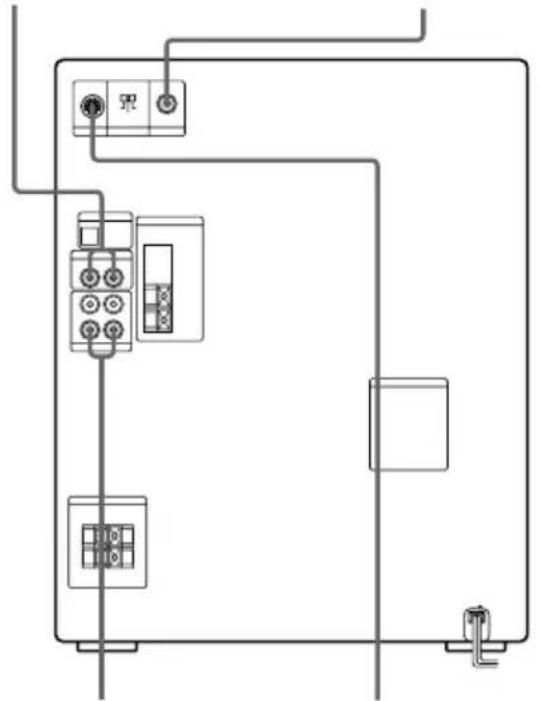
Make sure to match the color of the plugs and the connectors. To listen to the sound of the connected VCR, press FUNCTION repeatedly until "VIDEO" appears.
By connecting the audio output jacks of your VCR to the VIDEO (AUDIO) IN jacks using an optional audio cable, you can enjoy video playback in powerful stereo sound.
Moreover, if you connect the video input on the VCR to the MD OUT jacks and VIDEO OUT (or S VIDEO OUT) jack using the supplied video connecting cable (or an optional S VIDEO connecting cable), you can record the audio and video signals from a VIDEO CD onto video tape.
To the audio outputs of the VCR using an optional audio cable
To the video input of the VCR using the video cable
natural_image
Pure electrical circuit lines without any symbolsTo the audio inputs of the VCR using an optional audio cable
To the S VIDEO input of the VCR using an optional S VIDEO cable
Connecting external antennas
Connect the external antenna to improve the reception. Refer to the instructions of each component.
FM antenna
Connect the optional FM external antenna. You can also use the TV antenna instead.
Jack type Ⓐ

Jack type Ⓑ
IEC standard socket connector (not supplied)

continued
Connecting external antennas (continued)
AM antenna
Connect a 6- to 15- meter (20- to 50- feet) insulated wire to the AM antenna terminal. Leave the supplied AM loop antenna connected.
Jack type Ⓐ
Insulated wire (not supplied)

Jack type Ⓑ
Insulated wire (not supplied)
Additional Information
Precautions
On operating voltage
Before operating the system, check that the operating voltage of your system is identical with the voltage of your local power supply.
On safety
- The unit is not disconnected from the AC power source (mains) as long as it is connected to the wall outlet, even if the unit itself has been turned off.
- Unplug the system from the wall outlet (mains) if it is not to be used for an extended period of time. To disconnect the cord (mains lead), pull it out by the plug. Never pull the cord itself.
- Should any solid object or liquid fall into the component, unplug the stereo system and have the component checked by qualified personnel before operating it any further.
- The AC power cord must be changed only at the qualified service shop.
On placement
- Place the stereo system in a location with adequate ventilation to prevent heat build-up in the stereo system.
- Do not place the unit in an inclined position.
- Do not place the unit in locations where it is; — Extremely hot or cold
— Dusty or dirty
— Very humid
— Vibrating
— Subject to direct sunlight.
On operation
- If the stereo system is brought directly from a cold to a warm location, or is placed in a very damp room, moisture may condense on the lens inside the CD player. Should this occur, the system will not operate properly. Remove the CD and leave the system turned on for about an hour until the moisture evaporates.
- When you move the system, take out any discs.
If you have any questions or problems concerning your stereo system, please consult your nearest Sony dealer.
Notes on CDs
- Before playing, clean the CD with a cleaning cloth. Wipe the CD from the center out.
- Do not use solvents such as benzene, thinner, commercially available cleaners or anti-static spray intended for vinyl LPs.
- Do not expose the CD to direct sunlight or heat sources such as hot air ducts, nor leave it in a car parked in direct sunlight.
Cleaning the cabinet
Use a soft cloth slightly moistened with mild detergent solution.
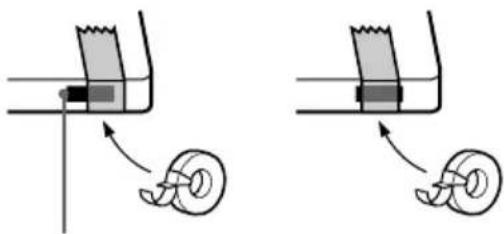
To save a tape permanently
To prevent a tape from being accidentally recorded over, break off the cassette tab from side A or B as illustrated.


If you later want to reuse the tape for recording, cover the broken tab with adhesive tape. However, be careful not to cover the detector slots which allow the tape player to automatically detect the type of tape.
Tape type:
CrO _2 /METAL NORMAL
natural_image
Two mechanical diagrams showing a spring-loaded component and a worm-like worm, with no text or symbols present.Detector slots
continued
Precautions (continued)
Before placing a cassette in the tape deck
Take up any slack in the tape. Otherwise the tape may get entangled in the parts of the tape deck and become damaged.
When using a tape longer than 90 minutes
The tape is very elastic. Do not change the tape operations such as play, stop, and fast-winding etc. frequently. The tape may get entangled in the tape deck.
Cleaning the tape heads
Clean the tape heads after every 10 hours of use. When the tape heads become dirty;
— the sound is distorted
— there is a decrease in sound level
— the sound drops out
— the tape does not erase completely
— the tape does not record.
Make sure to clean the tape heads before you start an important recording or after playing an old tape. Use separately sold dry-type or wet-type cleaning cassette. For details, refer to the instructions of the cleaning cassette.
Demagnetizing the tape heads
Demagnetize the tape heads and the metal parts that have contact with the tape every 20 to 30 hours of use with a separately sold demagnetizing cassette.
For details, refer to the instructions of the demagnetizing cassette.
In case color irregularity is observed on nearby a TV screen.
With the magnetically shielded type of speaker system, the speakers can be installed near a TV set. However, color irregularity may still be observed on the TV screen depending on the type of your TV set.
If color irregularity is observed...
Turn off the TV set once, then turn it on after 15 to 30 minutes.
If color irregularity is observed again...
Place the speakers farther away from the TV set.
Troubleshooting
If you run into any problem using this stereo system, use the following check list.
First, check that the power cord is connected firmly and the speakers are connected correctly and firmly.
Should any problem persist, consult your nearest Sony dealer.
General
The display starts flashing as soon as you plug in the power cord even though you haven't turned on the power (demonstration mode).
- Press DEMO (STANDBY) when the power is turned off. The demonstration disappears.
The demonstration mode appears automatically the first time you plug in the power cord or if there is a power outage lasting longer than half a day.
The clock setting/radio presetting/timer is cancelled.
- The power cord is disconnected or a power failure occurs longer than half a day.
Redo the followings:
— "Step 2: Setting the time"
— "Step 3: Presetting radio stations"
If you have set the timer, also redo "Waking up to music" and "Timer-recording radio programs".
There is no sound.
- Rotate VOLUME clockwise.
• The headphones are connected. - Insert only the stripped portion of the speaker cord into the SPEAKER jack. Inserting the vinyl portion of the speaker cord will obstruct the speaker connections.
- There is no audio output during timer recording.
There is severe hum or noise.
- A TV or VCR is placed too close to the stereo system. Move the stereo system away from the TV or VCR.
"0:00" (or "12:00") flashes in the display.
- A power interruption occurred. Set the clock and timer settings again.
The timer does not function.
- Set the clock correctly.
DAILY 1, DAILY 2, and REC do not appear when you press the TIMER SELECT button.
- Set the timer correctly.
- Set the clock.
The remote does not function.
- There is an obstacle between the remote and the system.
- The remote is not pointing in the direction of the system's sensor.
- The batteries have run down. Replace the batteries.
There is acoustic feedback.
• Decrease the volume level.
- Move the microphone away form the speakers or change the direction of the microphone.
The color irregularity on a TV screen persists.
- Turn off the TV set once, then turn it on after 15 to 30 minutes. If the color irregularity still persists, place the speakers farther away from the TV set.
"PROTECT" and "PUSH POWER" appear alternately.
- A strong signal was input. Press |to| turn off the power, leave the system turned off for a while, then press |/○ again to turn on the power.
Speakers
Sound comes from one channel or unbalanced left and right volume.
- Check the speaker connection and speaker placement.
Sound lacks bass.
- Check that the speaker's + and - jacks are connected correctly.
VIDEO CD/CD Player
There is no picture.
- Check that the player is connected securely.
• Make sure you operate the TV correctly. - Make sure you set the SYSTEM SELECT correctly, according to your TV (color) system.
- Press FUNCTION repeatedly until "CD" is displayed.
An after image of the last picture remains on the screen, or the picture is unclear.
- Press ACTIVE on the remote repeatedly until “ACTIVE OFF” appears.
The CD tray does not close.
• The CD is not placed properly.
The CD will not play.
• The CD is not lying flat in the disc tray.
• The CD is dirty.
• The CD is inserted label side down.
- Moisture condensation has built up. Remove the CD and leave the system turned on for about an hour until the moisture evaporates.
Play does not start from the first track.
- The player is in program or shuffle mode. Press PLAY MODE repeatedly until "PROGRAM" or "SHUFFLE" disappear.
"OVER" is displayed.
- You have reached the end of the CD. Press and hold ◀◀ to return.
continued
Troubleshooting (continued)
Tape Deck
The tape does not record.
- No tape in the cassette holder.
- The tab has been removed from the cassette (see "To save a tape permanently" on page 55).
• The tape has reeled to the end.
The tape does not record nor play or there is a decrease in sound level.
- The heads are dirty. Clean them (see "Cleaning the tape heads" on page 56).
- The record/playback heads are magnetized. Demagnetize them (see "Demagnetizing the tape heads" on page 56).
The tape does not erase completely.
- The record/playback heads are magnetized. Demagnetize them (see "Demagnetizing the tape heads" on page 56).
There is excessive wow or flutter, or the sound drops out.
- The capstans or pinch rollers are dirty. Clean them (see “Cleaning the tape heads” on page 56).
Noise increases or the high frequencies are erased.
- The record/playback heads are magnetized. Demagnetize them (see "Demagnetizing the tape heads" on page 56).
After pressing ▶ (◀) or ≜, there is a mechanical noise, “EJECT” appears in the display, and the unit enters standby mode automatically.
- The cassette tape was not inserted correctly. Eject the tape and turn the power back on.
Tuner
Severe hum or noise ("TUNED" or "STEREO" flashes in the display).
- Adjust the antenna.
- The signal strength is too weak. Connect the external antenna.
A stereo FM program cannot be received in stereo.
- Press STEREO/MONO so that "STEREO" appears.
If other troubles not described above occur, reset the system as follows:
1 Unplug the power cord.
2 Plug the power cord back in.
3 Press ■, ENTER/NEXT, and at the same time.
4 Press |to turn on the power.
The system is reset to the factory settings. All the settings you made, such as the preset stations, clock, and timer are cleared. You should set them again.
Specifications
Amplifier section
MHC-VX7:
The following measured at AC 120, 220, 240 V 50/60 Hz
DIN power output (rated) 130 + 130 watts (6 ohms at 1 kHz, DIN)
Continuous RMS power output (reference) 170 + 170 watts (6 ohms at 1 kHz, 10% THD)
MHC-VX5/VX5J:
The following measured at AC 120, 220, 240 V 50/60 Hz
DIN power output (rated) 110 + 110 watts (8 ohms at 1 kHz, DIN)
Continuous RMS power output (reference) 140 + 140 watts (8 ohms at 1 kHz, 10% THD)
Inputs
MD IN: voltage 450 mV, (phono jacks) impedance 47 kilohms
VIDEO (AUDIO) IN: voltage 250 mV, (phono jacks) impedance 47 kilohms
MIC 1/2 (phone jack): sensitivity 1 mV, impedance 10 kilohms
Outputs
MD OUT (phono jacks):
voltage 250 mV impedance 1 kilohms
VIDEO OUT (phono jack):max. output level 1Vp-p, unbalanced, Sync negative, load impedance 75 ohms
S-VIDEO OUT (4-pin/mini-DIN jack): Y: 1Vp-p, unbalanced, Sync negative, C: 0.286Vp-p, load impedance 75 ohms
PHONES (stereo phone jack): accepts headphones of 8 ohms or more
SPEAKER:
MHC-VX7: accepts impedance of 6 to 16 ohms
MHC-VX5/VX5J: accepts impedance of 8 to 16 ohms
SUPER WOOFER: Voltage 1 V, impedance 1 kilohm
SURROUND SPEAKER (MHC-VX7 only): accepts impedance of 16 ohms
VIDEO CD/CD player section
System Compact disc and digital audio and video system
Laser Semiconductor laser
( =780nm ) Emission duration: continuous
Laser output Max. 44.6
W^*
*This output is the value measured at a distance of 200 mm from the objective lens surface on the Optical Pick-up Block with 7 mm aperture.
Wavelength 780 - 790 nm
Frequency response 2 Hz - 20 kHz (±0.5 dB)
Signal-to-noise ratio More than 90 dB
Dynamic range More than 90 dB
Video color system format
NTSC, PAL
CD OPTICAL DIGITAL OUT
(Square optical connector jack, rear panel)
Wavelength 660 nm
Output Level -18 dBm
continued
Specifications (continued)
Tape player section
Recording system 4-track 2-channel stereo
Frequency response 40 - 13,000 Hz (±3 dB),
(DOLBY NR OFF) using Sony TYPE I
cassette
40 - 14,000 Hz (±3 dB),
using Sony TYPE II
cassette
Wow and flutter ±0.15% W.Peak (IEC)
0.1% W.RMS (NAB)
±0.2% W.Peak (DIN)
Tuner section
FM stereo, FM/AM superheterodyne tuner
FM tuner section
Tuning range 87.5 - 108.0 MHz
Antenna FM lead antenna
Antenna terminals 75 ohm unbalanced
Intermediate frequency 10.7 MHz
AM tuner section
| Tuning range | |
| 2 Band type: | 531 – 1,602 kHz(with the interval set at 9 kHz)530 – 1,710 kHz(with the interval set at 10 kHz) |
| 3 Band type: | |
| Middle Eastern models: | |
| MW: | 531 – 1,602 kHz(with the interval set at 9 kHz) |
| SW: | 5.95 – 17.90 MHz(with the interval set at 5 kHz) |
| Other models: | |
| MW: | 531 – 1,602 kHz(with the interval set at 9 kHz)530 – 1,710 kHz(with the interval set at 10 kHz) |
| SW: | 5.95 – 17.90 MHz(with the interval set at 5 kHz) |
| Antenna AM loop antenna | |
| Antenna terminals | External antenna terminal |
| Intermediate frequency | 450 kHz |
Speaker
SS-VX7A/VX7AG for MHC-VX7
Speaker system 4-way, 5-unit,
bass-reflex type, magnetically shielded type
Speaker units
Woofer: 17 cm, cone type
Center Tweeter: 5 cm, cone type
Side Tweeter: 5 cm, cone type x2
Super Tweeter: 4 cm, cone type
Nominal impedance 6 ohms
Dimensions (w/h/d) Approx. 230 x 340 x 320 mm
Mass Approx. 5.5 kg net per
speaker
SS-VX5A/VX5AG for MHC-VX5/SS-VX5AJ for MHC-VX5J
Speaker system 3-way, bass-reflex type,
magnetically shielded type
Speaker units
Woofer: 17 cm, cone type
Tweeter: 5 cm, cone type
Super Tweeter: 2 cm, dome type
Nominal impedance 8 ohms
Dimensions (w/h/d) Approx. 220 x 340 x 280 mm
Mass Approx. 4.5 kg net per
speaker
General
Power requirements
Thai and Chinese models: 220 V AC, 50/60 Hz
Other models: 120 V, 220 V or
230 - 240 V AC, 50/60 Hz
Adjustable with voltage
selector
Power consumption:
MHC-VX7: 170 watts
MHC-VX5/VX5J: 160 watts
Dimensions (w/h/d) Approx. 280 x 340 x 395 mm
(13^1/8× 13^1/2× 15^5/_8in.)
Mass:
MHC-VX7: Approx. 10.7 kg
MHC-VX5/VX5J: Approx. 10.0 kg
Supplied accessories: AM loop antenna (1)
Remote commander (1)
Batteries (2)
FM lead antenna (1)
Speaker cords (2 for the front
speakers with jacks only)
Video cable (1)
Front speaker pads (8)
Optional accesory (MHC-VX7 only):
Surround Speaker (SS-SR125)
Speaker system 1-way, 1-unit,
bass-reflex type
Speaker units
Full-range: 8 cm, cone type
Nominal impedance 16 ohms
Dimensions (w/h/d) Approx. 220 x 100 x 195 mm
Mass Approx. 1.0 kg net per
speaker
Design and specifications are subject to change without notice.
Glossary
Auto Pause
An automatically pauses according to the signal encoded on the disc while playing a VIDEO CD. If the CD player does not resume play for a long time, press CD ▶ to resume play manually.
Menu Playback
Playback using the menu screens recorded on VIDEO CDs with PBC functions. You can enjoy simple interactive software using the menu playback function.
Playback Control (PBC)
Signals encoded on VIDEO CDs (Version 2.0) to control playback.
By using menu screens recorded on VIDEO CDs with PBC functions, you can enjoy playing simple interactive software, software with search functions, and so on.
When you select a VIDEO CD with PBC functions on this player, the PBC indicator lights up.
Track
Sections of a picture or a music piece on disc. Each track is assigned a track number to help you locate the track you want.
VIDEO CD
A compact disc which contains moving pictures.
VIDEO CDs contain compact picture information using the MPEG 1 format, one of the world wide standards of digital compact technology. The picture information is compressed about 120 times. Consequently, a 12 cm VIDEO CD can contain up to 74 minutes of moving pictures.
VIDEO CDs also contain compact audio information. Sounds outside the range of human hearing are compressed while the sounds we can hear are not compressed.
VIDEO CDs can hold six times the audio information of conventional audio CDs.
There are two versions for VIDEO CDs:
Version 1.1 (VIDEO CDs without PBC functions):
You can play only moving pictures and sounds.
Version 2.0 (VIDEO CDs with PBC functions):
You can play still pictures and enjoy PBC functions.
This player can play to both versions.
Index
A
Active Picture 32
Adjusting
the audio emphasis 42
the on-screen display 25-27
the operating voltage 6
the sound 41
the volume 12, 14, 16, 19
Antennas 5, 53
Automatic Source Selection 12, 14, 17, 19
B
Batteries 7
C
CD player 13, 23-36
CD Synchro Recording 15
Clock setting 8
Connecting. See Hooking up
D
Daily timer 48
DBFB 41
Digest
disc 29
track 30
Display 24
E
Edit 38
F
Flash 40
G
GROOVE 41
H, I, J
Hooking up
optional components 51-54
the antennas 5, 53
the system 4-7
K
Karaoke
adjusting the key 22
adjusting the
microphone echo 22
reducing the vocals
(KARAOKE PON) 21
singing along with a multiplex CD or tape
(MPX R/MPX L) 21
L
Lock Search 12, 14
Loop 40
M
Microphone mixing 47
N
Non-stop play 36
Normal Play 11, 13
0
One Touch Play 12, 14, 17, 19
P, Q
Personal file 46
Playing
a CD 13
a VIDEO CD 11
a preset radio station 16
tracks in random order
(Shuffle Play) 34
tracks in the desired
order (Program Play) 35
tracks repeatedly
(Repeat Play) 33
Presetting radio stations 9
Preset tuning 16
Program Play 35
Protecting recordings 55
R
Radio stations
presetting 9
tuning in 16
Recording
a CD/VIDEO CD 15
a radio program 17
timer recording 50
Repeat Play 33
Resetting the system 58
s
Saving recordings 55
Searching
Scene search 28
Time search 29
Selecting
the audio emphasis 42
the color system 6
Setting the time 8
Shuffle Play 34
Sleep Timer 48
Sound adjustment 41
Speakers 4, 52
Special Menu 27
T, U
Timer
falling asleep to music 48
timer recording 50
waking up to music 48
Troubleshooting 56
Tuner 9, 16
Tuning interval 10
V, W, X, Y, Z
VIDEO CD/CD player 11, 13, 23-36

- Mini Hi-Fi Component System
- WARNING
- About this manual
- This system can play the following discs
- VIDEO CDs Audio CDs
- Note on VIDEO CDs
- Disc type You can
- Table of Contents
- Getting Started
- Basic Operations
- The VIDEO CD/CD Player
- The Tape Deck
- DJ Effects
- Sound Adjustment
- Other Features
- Optional components
- Additional Information
- Step 1: Hooking up the system
- Connect the speakers.
- Notes
- Connect the FM/AM antennas.
- Connect the video input jack of your TV to the VIDEO OUT jack with the supplied video connecting cable.
- When using a TV
- Tip
- Step 1: Hooking up the system (continued)
- Note
- To connect optional components
- To deactivate the demonstration
- To attach the front speaker pads
- Using the remote
- When carrying this system
- Step 2: Setting the time
- To change the time
- Step 3: Presetting radio stations
- Step 3: Presetting radio stations (continued)
- To tune in a station with a weak signal
- To set another station to the exist preset number
- To erase a preset station
- To change the AM tuning interval (Except for Middle Eastern models)
- Playing a VIDEO CD
- Playing a VIDEO CD (continued)
- Tips
- Playing a CD
- — Normal play
- Playing a CD (continued)
- Recording a CD/ VIDEO CD
- — CD Synchro Recording
- To stop recording
- Listening to the radio
- — Preset Tuning
- To Do this
- To listen to non-preset radio stations
- Recording from the radio
- Recording from the radio (continued)
- Playing a tape
- Searching for the beginning of a track (AMS\*)
- Recording from a tape
- To stop dubbing
- Singing along: Karaoke
- When you use VIDEO CDs
- When you are done
- Adjusting the microphone echo
- Adjusting the key
- / b
- Playing a VIDEO CD with PBC functions (Ver. 2.0)
- Playing a VIDEO CD with PBC functions (Ver. 2.0) (continued)
- To cancel PBC Playback of VIDEO CDs with PBC functions (Ver. 2.0)
- To select a menu number using the remote
- Checking the remaining time
- Press DISPLAY.
- During normal playback
- In the stop mode
- Using the on-screen display
- Press ON SCREEN.
- ON SCREEN 1 display
- - During playback of an audio CD (except Program Play mode)
- Using the on-screen display (continued)
- - During playback of an audio CD in Program Play mode
- - During stop mode of a VIDEO CD with PBC functions
- - During stop mode of a VIDEO CD or audio CD (except Program Play mode)
- - During stop mode of a VIDEO CD or audio CD in Program Play mode
- ON SCREEN 2 display
- • During playback of a VIDEO CD
- • During playback of an audio CD
- - During stop mode of a VIDEO CD (except Program Play mode)
- ON SCREEN OFF
- To switch language of on-screen display (Chinese model only)
- Locating a specific part of a disc
- Locating a specific part of a disc (continued)
- Locating by Scene Number
- — Scene Search
- Press CD ▶.
- To stop playback
- To check the scene number during playback
- Locating by elapsed time
- — Time Search
- To use time search with VIDEO CDs with PBC functions (Ver. 2.0)
- Locating the track you want
- — Disc Digest
- To switch to a 12 frame display
- To display the next 9 or 12 tracks
- To switch to the digest of another disc during disc digest
- To use disc digest with VIDEO CDs with PBC functions (Ver. 2.0)
- Locating a section within a track
- — Track Digest
- To switch to the digest of another track during track digest
- To use track digest with VIDEO CDs with PBC functions (Ver. 2.0)
- Resuming playback from the point you stopped a VIDEO CD
- Resuming playback from the point you stopped a VIDEO CD (continued)
- While playing a VIDEO CD, press ■ to stop playback.
- Press CD ▶II (or CD ▶ on the remote).
- To view from the beginning of the VIDEO CD
- Setting the sharpness
- — Active Picture
- To cancel
- Playing the CD tracks repeatedly
- To cancel Repeat Play
- Playing the CD tracks in random order
- — Shuffle Play
- To cancel Shuffle Play
- To select a desired CD
- Programming the CD tracks
- — Program Play
- Programming the CD tracks (continued)
- To cancel Program Play
- Playing CDs without interruption
- To cancel Non-Stop Play
- Recording on a tape manually
- To Press
- Recording a CD by specifying track order
- — Program Edit
- To check the order
- To cancel Program Edit
- Selecting tape length automatically
- — Tape Select Edit
- Looping part of a CD
- To adjust the loop length
- Flashing part of a CD
- To adjust the flash length
- To use CD LOOP and CD FLASH together
- Adjusting the sound
- To reinforce bass (DBFB)
- For the most suitable bass sound (SYNC BASS)
- For a powerful sound (GROOVE)
- To listen through the headphones
- Selecting the audio emphasis
- Selecting the effect from the music menu
- When using the remote
- To cancel the effect
- Music menu options
- Using the synchronized equalizer
- To cancel the synchronized equalizer
- Changing the spectrum analyzer display
- Selecting surround effects
- Tip (for MHC-VX7 only)
- Adjusting the graphic equalizer
- Making a personal audio emphasis file
- To call up the personal file
- Mixing and recording sounds
- Falling asleep to music
- — Sleep Timer
- When you choose "AUTO"
- To check the remaining time
- To change the time to turn off
- To cancel the Sleep Timer function
- Waking up to music
- — Daily Timer
- To check the setting
- To cancel the timer operation
- Timer-recording radio programs
- Connecting audio components
- Connecting an MD deck for digital recording
- Connecting an MD deck for analog recording
- Connecting audio components (continued)
- Connecting a super woofer speaker
- Connecting the surround speakers
- (MHC-VX7 only)
- Connecting a VCR
- Connecting external antennas
- FM antenna
- Connecting external antennas (continued)
- AM antenna
- Precautions
- On operating voltage
- On safety
- On placement
- On operation
- Notes on CDs
- Cleaning the cabinet
- To save a tape permanently
- Precautions (continued)
- Before placing a cassette in the tape deck
- When using a tape longer than 90 minutes
- Cleaning the tape heads
- Demagnetizing the tape heads
- In case color irregularity is observed on nearby a TV screen.
- If color irregularity is observed...
- If color irregularity is observed again...
- Troubleshooting
- General
- The display starts flashing as soon as you plug in the power cord even though you haven't turned on the power (demonstration mode).
- The clock setting/radio presetting/timer is cancelled.
- There is no sound.
- There is severe hum or noise.
- "0:00" (or "12:00") flashes in the display.
- The timer does not function.
- DAILY 1, DAILY 2, and REC do not appear when you press the TIMER SELECT button.
- The remote does not function.
- There is acoustic feedback.
- The color irregularity on a TV screen persists.
- "PROTECT" and "PUSH POWER" appear alternately.
- Speakers
- Sound comes from one channel or unbalanced left and right volume.
- Sound lacks bass.
- VIDEO CD/CD Player
- There is no picture.
- An after image of the last picture remains on the screen, or the picture is unclear.
- The CD tray does not close.
- The CD will not play.
- Play does not start from the first track.
- "OVER" is displayed.
- Troubleshooting (continued)
- Tape Deck
- The tape does not record.
- The tape does not record nor play or there is a decrease in sound level.
- The tape does not erase completely.
- There is excessive wow or flutter, or the sound drops out.
- Noise increases or the high frequencies are erased.
- After pressing ▶ (◀) or ≜, there is a mechanical noise, “EJECT” appears in the display, and the unit enters standby mode automatically.
- Tuner
- Severe hum or noise ("TUNED" or "STEREO" flashes in the display).
- A stereo FM program cannot be received in stereo.
- If other troubles not described above occur, reset the system as follows:
- Specifications
- Amplifier section
- MHC-VX7:
- MHC-VX5/VX5J:
- VIDEO CD/CD player section
- Specifications (continued)
- Tape player section
- Tuner section
- FM tuner section
- Speaker
- SS-VX7A/VX7AG for MHC-VX7
- SS-VX5A/VX5AG for MHC-VX5/SS-VX5AJ for MHC-VX5J
- Surround Speaker (SS-SR125)
- Glossary
- Auto Pause
- Menu Playback
- Playback Control (PBC)
- Track
- VIDEO CD
- Index
- A
- B
- C
- D
- E
- F
- G
- H, I, J
- K
- L
- M
- N
- 0
- P, Q
- R
- s
- T, U
- V, W, X, Y, Z
Brand : SONY
Model : MHC-VX5J
Category : Hi-Fi System