
TINF2600 - Iron HOOVER - Free user manual and instructions
Find the device manual for free TINF2600 HOOVER in PDF.
| Brand | Hoover |
| Model | TINF2600 |
| Product Type | Steam Iron |
| Power Supply | 220-240 V ~ 50/60 Hz |
| Power | 2200 W (estimated) |
| Water Tank Capacity | 250 ml (estimated) |
| Weight | Approximately 1.3 kg |
| Dimensions (L x W x H) | Approximately 30 x 12 x 15 cm |
| Cord Length | Approximately 2 m |
| Soleplate | Stainless steel soleplate |
| Main Functions | Dry ironing, steam, steam jet, spray, vertical steam |
| Automatic Shut-off Function | Yes: shut-off after 30 s horizontal, 8 min vertical |
| Anti-drip Function | Yes: stops steam if temperature too low |
| Anti-calcare Function | Integrated anti-scale cartridge, non-replaceable |
| Self-cleaning Function | Yes (self-cleaning button) |
| Booster Function | Yes (steam boost button) |
| Cooling Fan | Yes (fan switch) |
| Safety | Automatic shut-off, steam lock, burn protection |
| Recommended Water Type | Tap water (distilled water in very hard areas, 50/50) |
| Maintenance and Cleaning | Clean with a damp cloth, empty after use, regular self-cleaning |
| Spare Parts and Repairability | Non-replaceable tank, integrated anti-scale cartridge, Hoover after-sales service |
| Warranty | Manufacturer warranty according to conditions (contact dealer) |
| General Information | Domestic use, CE standards, WEEE recycling |
Frequently Asked Questions - TINF2600 HOOVER
User questions about TINF2600 HOOVER
0 question about this device. Answer the ones you know or ask your own.
Ask a new question about this device
Download the instructions for your Iron in PDF format for free! Find your manual TINF2600 - HOOVER and take your electronic device back in hand. On this page are published all the documents necessary for the use of your device. TINF2600 by HOOVER.
USER MANUAL TINF2600 HOOVER
OAHHIEXPHSEΩE(GR) .P 89
PYKOBODCTBO NOJb3OBATEJRA (RU) .P 97
INSTRUKCAOBSLUGI (PL) P 105
NAVOD K OBSLUZE (CZ) P 113
NAVODILA ZA UPORABO (SI) .P 121
KULLANIM KILAVUZU(TR) .P 129

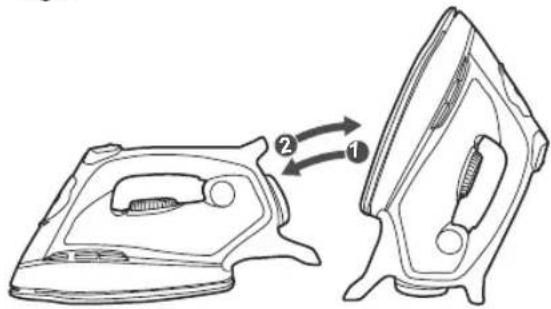
Fig.1
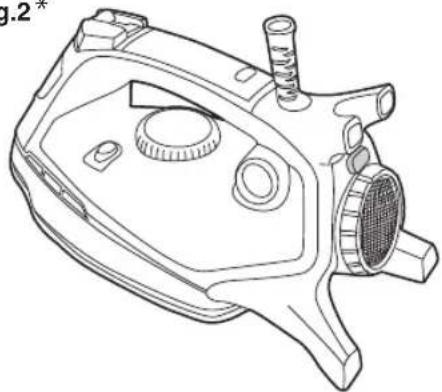
Fig.2*
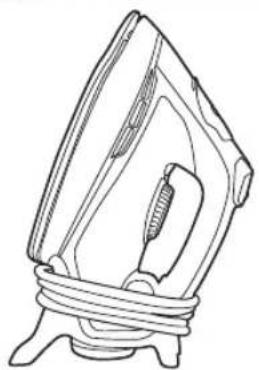
Fig.3
Introduction
Dear customer,
First of all, we would like to congratulate you for purchasing this Hoover iron and to thank you for the confidence you have in Hoover brand.
This appliance has been manufactured with great care, respecting all of our quality criteria and has been tested several times. We hope its use will fulfil your expectations. We are strongly convinced that it will make your ironing much faster and better.
Before using your new Hoover appliance, please read carefully this user's manual. If you need further information or if you encounter any trouble which are not noticed in this manual, please contact the after-sales service or your standard dealer.
Important Safety Instructions
Read this user manual carefully before you first use and save it for future reference.
This appliance can be used by children aged from 8 years and above and persons with reduced physical, sensory or mental capabilities or lack of experience and knowledge if they have been given supervision or instruction concerning use of the appliance in a safe way and understand the hazards involved. Children shall not play with the appliance. Cleaning and user maintenance shall not be made by children without supervision.
- This product has been designed for domestic use only. In case of any commercial use, inappropriate use or failure to comply with the instructions, the manufacturer is not responsible and the guarantee will not apply.
- Before connecting your appliance, check if the mains voltage is the same as the voltage indicated on your appliance and that the power outlet is connected to the earth.
-
Ensure before each use that the electric cord or any other important part is not damaged.
-
Certain Models Only
Important Safety Instructions
- Keep the iron and its cord out of reach of children less than 8 years of age when it is energized or cooling down.
- Never direct the steam towards persons or animals. Never direct the steam jet towards any other electrical or/ and electronic appliances.
- The iron is not to be used if it has been dropped, if there are visible signs of damage or if it is leaking.
- If the appliance shows evidence of breakdown, malfunction, leakages. Please make sure it is checked by an authorized Service Centre to avoid any danger.
- Always make sure the appliance is switched off, unplugged and cooled down before doing any maintenance work.
- The iron must not be left unattended while it is connected to the supply mains and before it has cooled down.
- Do not unplug the appliance by pulling on the cord or on the appliance.
- Never immerse the iron, the stand, the cable or the plugs in water. Never hold them under the water tap.
- The soleplate of the iron can become extremely hot and may cause burns if touched. Never touch the electric cords with the soleplate.
- If the supply cord is damaged, it must be replaced by the manufacturer, service agent or similarly qualified persons in order to avoid a hazard.
- When placing the iron on its heel, ensure that the surface on which the heel is placed is stable.
Important Safety Instructions
- The plug must be removed from the socket-outlet before the water reservoir is filled with water.
- The surfaces with are liable to get hot during use.
- To have a electronic copy of the instruction manual contact the after sales service in guarantee card.
- The iron must be used and rested on a stable surface.
Parts Description
| 1 Soleplate |
| 2 Air Outlet |
| 3 Spray Nozzle |
| 4 Water Fill Cover |
| 5 Front Cover |
| 6 Boost Button |
| 7 Steam Control |
| 8 Spray Button |
| 9 Soft Touch |
| 10 Lamp Cover |
| 11 Swivel |
| 12 Water Tank |
| 13 Temperature Dial |
| 14 Self Clean |
| 15 Fan Switch |
| 16 Fan Frame |
| 17 Fan Grid |
| 18 Back Plate With Fan |
| 19 Back Plate Without Fan |
Chapter 1: Preparation for Use
Place the iron on a stable and level surface, for example on the hard part of an ironing board or on a heat-resistant surface.
Chapter 1.1 : What Kind of Water May be Used?
The Hoover iron has been designed to be used with tap water only.
There is no need to use distilled or pure distilled water.
Nevertheless, in case you live in a hard water area, you can mix 50% of distilled water with 50% of tap water.
Do not use any other kind of water or do not add any other contents to water tank as it can damage your appliance.
Chapter 1.2 : Filling the Water Tank
Remove the mains plug from the wall socket before filling the iron.
Set the steam button to position "0" or "..." and open the water fill cover.
Please fill your iron with normal tap water before using for the first time.
Use the water beaker supplied to fill clean tap water into water tank until "MAX" filling level.
Push the water fill cover firmly to close and dry any spilt water around the enclosure of the appliance, do not overfill.
WARNING: Do not add vinegar, hot water, perfume, or any other kind of chemical agents or any other contents in the water tank. It could damage the steam generator and shorten its life.
Chapter 2: Using Your Iron [Fig.1]
Connect the appliance with the mains cord to an earthed socket and switch the power on. Stand the iron in the vertical position, turn the temperature dial to your desired setting, the iron will make an alarm sound and the power light on the handle will start flashing in an green colour.
Move your iron in one complete motion from the vertical position to horizontal returning to the vertical position, on completion of this movement the light on the handle will illuminate Red and the soleplate will begin heating. When the red light switches off, your appliance is ready for use.
N.B
1) The first time you use your appliance you may find some dust and smell of fumes, this is quite normal and they will quickly disappear.
2) Your Iron is fitted with a number of features for Safe use and these can be noted by the colour of light being illuminated on the handle:
a) Green light, this illuminates when the Iron is initially switched on and requires to be moved as described above.
b) Red light, this illuminates when the Iron is in the heating mode and will turn off after it has reached the set temperature.
c) Green light, this illuminate when the iron has been in the Stationary position for more than 30 secs and the power to the heating element has been cut off until the iron movement is started again.
Chapter 2.1: Regulating the Soleplate Temperature
Select the temperature of the soleplate by turning the dial on the iron to the desired position.
Wait a few moments until the temperature indicator is off.
It will indicate to you that the soleplate has reached the requested temperature.
While ironing, the temperature dial indicator may turn on and off, the temperature adjusts without interrupting your ironing.
Help
To know the best suitable temperature for each textile, check the laundry care label of the article to be ironed. Please note that during use, the temperature light goes on from time to time. It signifies that the iron is heating up to the set temperature.
If a fabric is made with various kinds of fibres always select the soleplate temperature to suit the most delicate one. If you select a lower temperature while ironing, wait until the iron has cooled down to the set temperature before you continue ironing.
If the temperature is too low, some drops of water could escape from the soleplate. Please raise up the temperature above the 2 dots ( ) to avoid this issue.
Chapter 2.2 - Ironing
Dry Ironing
For dry ironing, turn the steam control knob to "0" or "X". This will cut off the steam flow if water is in the water tank.
Turn the temperature control knob to select the desired fabric/temperature setting. The indicator power light will illuminate, ensure the iron is on a smooth and stable surface vertically.
After the indicator power light goes out, you can begin to iron.
Steam Ironing
As indicated on the temperature control and the table on the rear of the iron, steam-ironing is only possible at higher ironing temperatures (between “ ” to “MAX”).
Ensure that there is enough water in the water tank.
Stand the iron on its end; Insert the mains plug into the wall socket.
Set the temperature control knob at the required position within the steam area.
After the indicator power light has gone out and has come on again, you may start ironing.
ATTENTION: Never direct the steam towards people. Burns or serious injury may occur.
Cooling Feature \* [Fig.2]
Turn on the fan by pushing FAN SWITCH to cool the handle and user environment.
Push again to turn it off.
Chapter 2.3 - How to Choose the Correct Soleplate Temperature
To obtain the best results, it is important to set the correct temperature of the soleplate.
| Textile Soleplate T°C | |
| Jeans Max | |
| Cotton • • | |
| Linen Max | |
| Starched Clothes • • | |
| Velvet/Alcantara • | |
| Wool • | |
| Silk • | |
| Cashmere • | |
| Rayon • | |
| Polyester • | |
| Nylon • | |
| Acrylic • | |
| Lycra • | |
| Polyamid • | |
Help
When steam ironing clothes on which shiny patches may occur, we recommend you to set the soleplate temperature to a lower temperature or to iron the garment on the reverse.
Start with the fabrics that need to be ironed at a lower temperature () and finish with those that needed to be ironed at the higher temperature ( /Max) .
- Certain Models Only
Chapter 2.4 - Shot of Steam
Ensure that there is enough water in the water tank.
When the temperature control knob is set to steam setting (between "●●" to "MAX") strong steam can be used. Press the steam boost button, the soleplate will emit a strong flow of steam.
NOTE
Only use the steam boost button when the steam iron has reached the steam or maximum temperature.
Do not press the steam boost button more than 3 times repeatedly. For optimum steam output, leave an interval of at least 5 seconds between pressing the steam boost button.
The steam boost button feature can be used with Dry or Steam ironing as desired.
ATTENTION: Never direct the steam towards people. Burns or serious injury may occur.
Chapter 2.5 - Spraying
Ensure there is enough water in the water tank.
Press the spray boost button to produce a fine spray of water from the nozzle and continue ironing.
NOTE: Do not spray silk.
Chapter 2.6 - Vertical Shot Of Steam
When the temperature control knob is set to a steam setting (between “●●” to “MAX”) vertical steam can be used.
Simply hold the iron vertically, positioned in front with a slight distance from the item to be steamed, and press the steam boost button.
ATTENTION: Never direct the steam towards people. Burns or serious injury may occur.
NOTE: This is especially useful for getting wrinkles out of hanging clothes, curtains, wall hangings etc.
Chapter 2.7 - Automatic Anti-Calc Function
Your iron contains an anti-calc cartridge to reduce scale deposits. This considerably prolongs the operational life of your iron.
The anti-calc cartridge is an integral part of the water tank and does not need to be replaced.
Chapter 2.8 - Automatic Anti-Drip Function
Your iron has an anti-drip function. The iron automatically stops generating steam when the temperature is too low to prevent water from dripping out of the soleplate.
NOTE: When using the Steam function, your appliance may stop generating steam for several seconds, this is normal.
Chapter 2.9 - Self-Clean Function
Use the self clean function once every two weeks. If the water in your area is very hard, the self clean function should be used more frequently.
Make sure the iron is unplugged.
Set the steam control knob to OFF position.
Fill the water tank to the maximum level.
Put the plug in the wall socket.
Select the maximum ironing temperature.
Unplug the iron when the temperature pilot light has gone out.
Hold the iron over the sink, press and hold the self clean button and gently shake the iron to and fro.
Release the self clean button after 5-10seconds.
Repeat the self clean process if the iron still contains a lot of impurities.
NOTE
Steam and boiling water will come out of the soleplate, impurities and flakes(if any)will be flushed out.
ATTENTION: Keep hands and body away from hot water.
Do not push and hold the self clean button while ironing.
Chapter 2-10 Auto Shut off function
a. The auto-shut-off function automatically switches off the iron if it has not been moved after 30 secs in horizontal position or after 8 mins in vertical position.
b. The power light starts flashing to indicate that the iron has been switched off by the auto-shut-off function.
c. To let the iron heat up again:
1. Move your iron in one complete motion from the vertical position to horizontal returning to the vertical position.
2. if the temperature of the soleplate has dropped below the setting ironing temperature, the power light will turn on, please waiting until it goes out before you start ironing.
3. If the power light does not turn on after you move the iron, the soleplate still has the right temperature and the iron is ready to use.
Chapter 3: Maintenance and Cleaning
To prevent any risk of burns, all maintenance and cleaning operations should only be carried out when the unplugged appliance has cooled down for at least 2 hours.
Before cleaning, set the steam control knob to the "0" or "×", unplug the iron from wall socket, and allow the appliance to completely cool down, and then clean with a damp cloth, do not immerse the unit into water or other liquids.
Clean and empty the water tank after every use.
If ironing clothes with high temperature, which is not recommended on the garment table, this will cause burns to your clothes and residue left on the soleplate of the unit, it is recommended that you iron over an old cloth to remove any residue from the soleplate.
After use, set the steam control knob to the "0" or "X", disconnect the unit from mains socket, empty remaining water from water tank and then store the iron after it has been completely cooled down.
Never use scouring pads, abrasive or chemical cleaners, or solvents.
Chapter 4: Storage [Fig.3]
Empty the water tank.
Coil the power cord on the back plate.
Put the iron in the upright position on it's heel.
Wait at least 30 minutes allowing the sole plate to cool down.
Then you can take away your appliance in order to store it safely and easily.
7-GB
Important Information
Hoover Service
Should you require service at any time, please contact your local Hoover Service Office. Please see all the contact details below.
Safety
Hoo ver believes that independent approval is the best way of demonstrating safety in design and manufacture. All Hoover irons have been manufactured in compliance of all safety regulations and approved by the most qualified independent approval certification bodies.
ISO 9001
Hoover's factories have been independently assessed for quality. Our products are made using a quality system which meets the requirements of ISO 9001.
The Environment
The symbol on this appliance indicates that this appliance may not be treated as household waste. Instead it must be handed over to the applicable collection point for the recycling of electrical and electronic equipment. Disposal must be carried out in accordance with local environmental regulations for waste disposal. For more detailed information about treatment, recovery and recycling of this appliance, please contact your local city office, your household and waste disposal service or the shop where you purchased the appliance.


This product complies with the European Directives 2006/95/EC, 2004/108/EC and 2011/65/EC.
HOOVER Limited, Pentrebach, Merthyr Tydfil, Mid Glamorgan, CF48 4TU, UK
Your Guarantee
The guarantee conditions for this appliance are as defined by our representative in the country in which it is sold. Details regarding these conditions can be obtained from the dealer from whom the appliance was purchased. The bill of sale or receipt must be produced when making any claim under the terms of this guarantee.
Subject to change without notice.
Introduction
Cher Client,
Pa3delen2:IcnoIb3OBAHne yTIOra [Pnc.1]
IopKIOUHTe np60p K cetn 3eKtponHnH, BCTaNB BVNKy B po3eTKy N BkIOUH B KOHky nHTAHn. NocTaBte YTOB B BEPTNKAIBHOE NOLOXKeHne, NOBepHnte peryIaTOp TEMpePaTyb B HxHoe NOLOXKeHne. YTOB BbIaCT CnHrHaI TpeBOrn Ha pyKOATke HaHET MIRaTB INDkaTOp NITAHn 3eJIeHoro CBeta.
OdHIM DvNKeHnEM NepemecHTe yTOr n3 BepTKaJIbHOr ONoJKeHnB RtognOHTaJIbHoE, a 3aTeM CHOBa B BepTKaJIbHOe. B KOHcE eToro DvNKeHnJaMnoUka Ha pyKoAITke 3aROpNTc KpaChbIM, I NOIoWBA YTHOra NaHcHET HarpeBaTbcra.
Kak ToIbko KpaCha JAmNoUka NorachET, 3To O3HauaET, YTO BaIe yCTpoNCTBO rTOBO K pa6Ote.
PnmuMeaHne.
1)Пипгвом Испьзовани пибopa bbl можete оБарукпь седы nbлл n 3anax dbma. 3To HopmaNbHo n 6bICTpo nCue3HET.
2) BaW yTHoR ocHaunepaHOMyHKnI 6e3OanacHocTn, KOToPbI paCNo3HaOTcN oUBeTy lamMbI Ha pyKoRTke:
a) 3eJeha J lamnocha 3aropaetc npn nepBOM BkHoueHH yTIOra n Tpe6yeT OINcaHHbIX BbIe DeiCTBn.
b) KpacHaj lamnoquka 3aropaeTcR, KOrDa yTHor HaxoDHTcB peXnMe HarpeBa, n racHeT, KaK Tolbko OH Na6npaet 3aDaHHyToemnpaTyP.
c) 3eIeHaj lamnOuKa 3aropaeTcra, KOrda yTHor HaxoDHTc863 DnBHeHna B TeueHne 30 cek., nntaHnHarpeBaTeBHoro 3IeMeHtA OTKIOUaETcra. LamnOuKa rachet npu BO3ObHOBLeHnn DnBHeHna YTHora.
Pa3dien 2.1: Peryu npobka TempepatypbI nooosBbl
Bb6epnte TemnepaTyPy nooWbbl, nobepHyB peryIaTOp B HxHoe nIoXeHne.
Iodoknte HeckoBko cekyH, noka noracheTnHdkaTop TemnepaTpybl.
3To 03HaayeT, yTo nooowBa Harpenaacb Do HyxHoro ypOBnA.
B npouecce rnaKn HndkaTop TempeaTpybHa peryIaTope MoKeT nepNoDnueckN BkIOuTaBcN BBKIOUaTbc, KoppeKnpyraTeeneH harpBa noOoBbl 6e3 Heo6xOIMocTn pepBaTb npouecc.
Pone3hbi COBET
Haubonee nodxodnaa memnepamypda kao doo muna mkanu yka3bjaemc ha bupke c daHHbmu no yxody 3a konkpermhbim u3denuem. Obpamume bHumahue,mo e npoucese ucnoIb30baHua nepuoduuecku EKnUcaemc unDukamop memnpamypbl. 3mo 3Naum,mo ymio Ha2peBaemc do 3adaHhoi memnpamypbl.
Ipu 2naKke kombunupoabHHbIX u3deu 6ce2a bbyibupaume memnepamypy, npuememyio dna hauboonee deukamho mkahu.
Ipeeknouuucb 8 npouecce 2aakku Ha 6oee HuaKyu memnpampy, nooKdume hekomopoe bemr, noka ym02 ocmbihem do BHO6ycmahOBneHHO2 3haueHna.
Ipu cnuwkom Huzkou memnepamype Ha nodowbe ym02a mozym oba3oabcbcKaannu bOdbi. Ymo6bI He donycmumb 3mo2o, noobbcme memnpampy do 2 moek ( )
Cyxg rnaXka
Iyna cyxoh ngkno hkyho nobephyb perynapa ha "0" nnn .B 3om cnyae npn Hauyn BOnB peepByape nepekpbiBaetcnoTOK npa.
NobepHnTe peryIaTOp TemnepaTybpHaJeHeHne,OTBeuAoUe TnTuTKaHN/3NaueHIno,IpiEMeMOMy InI3JeIIN, KOTOpoe Bb co6HpaeTecrJaIITb.3aOpntc HndIkAToP nItAHn, PnI eTOM yTOrdoJIKeH hAxOHTcB BBeTpKaIbHOM noLOXKeHn HaPoBHO uYcToHvBOI NobepxHoCTn.
Pocne OTKIOUeHn HINDAKATopa NITaHn MOXHO HaNuHaTb rJaNTb.
Napobaa rnaKa
Kak yka3aHo Ha peryIaTope TemnepaTpybI Ha Ta6JIuChe, pa3MeueHHOcAIN Ha YTORE, napOBaR rJaXKa BO3MOxHa ToIbKO npi 6oJee BbICOKnx TemnepaTpyax (OT "●" do "MAX").
PpOBepbTe KOJIInHeCTBO BOdBi B pe3epByape.
IocTaBbTe yTIO Ha 3aDnK. BcTaBbTe BnIKy Bpo3eKy.
YcTaHOBnTepeyIaTOpTemnepaTpybIBHyKHOeNoIOXeHneB3OHe npoBOIraJxKn.
Kak ToIbKO INHdNkATOp NITaHnI NORaCHET N CHOBA 3aROpNTc, MoXHO NaHHaTb IaIaNTb.
BHIMAHNE: HnKoIa He HapraBJIte CtpyIO npa Ha IIOe. 3To MoKeT CtaTb PnUHoiOxorOB nIN cepBe3hIX TpaBM.
Функцяохлaxдeнг\* [Pnc.2]
BKNIOHTe BENTNIATOP c nomoubIO KHOPIKIN BKIOUeyHnBEHTNIATOPA, yTo6bIO ocTyuNTb pyKy yTiora n 3OHy BOKpyr Hee.
ДлгоТКнluчehнФункци,ешpa3нхмITEKhoNky.
Pa3dien 2.3 - KaK BbI6paTb npaBnIbHyIO Tempepatyp nooowbl yToRa?
IynoIyueHnIyUnxpe3yIbTaTOBBAKHO npaBnIbHO yCTaHOBTempeaTyPOIOuBBbyTiorA.
He haxmaite (H He ydepknaite) KhoNky caMOOuNCtKN B npocece rlaekn.
Pa3dE1 2-10 ABtOMaTnuecKoe BbIKIIOUeHne
a.ФyHKUHA BTOMaTHuCeCKOrO OTKHoueHHYTuIra Cpa6aTbIbAeT,ecnYTHor HaxoJITc863 DBNKeHHB TeueHHe 30 cek.B TROPHTaJIbHOM NIOJOKeHHN INN 8 MHN.B BEpTKaJIbHOM NIOJOKeHHN.
b. INIINKATOp NITAHnHaHnHaET MIRaTb. 3TO O3HaHaeT, 4TO YTHOr 6bll OTKIIoueH ABOTMaTIueckn.
c. Yro6bl ythor cHOBa HarpeIcra:
1.ОднIM ДвижЕнем поспгуTюг ИЗ ВерТикальНOrо пложеняВ ГорИЗOTальhoe И оБpaTHOВ ВерТикальHoe..
2. EcnI TemnepaTpaNooBbI Naaet Hnke 3aDaHHo, BkInuOaETcNnDnKaTOp nntAHA. Dokntecb noka 3Ta lamnoka noracHet npexJe Yem Haatb rAaNTb.
3. EcnI lamnoyka nHTaHn He BkHouaeTcnaocne H3MeHeHHn noLoXeHHn yTHoA, 3TO 3HaHT, 7TO NOOWBa BCE eue ropeHn, n yTOr rotOB K pa6Ote.
Pa3dE1 3:06cnyxmbaHne n ouhctka
YTo6bI He DOnyCTnTb OXorOB, BCE onepaunno 06cnykuaHIO u nCtke cneJeT npOBOITb, KOrda npH6op OTKIOUeyen (BnIka BbHyTa n3 po3eTK) nOCtbI B TeueHne He MeHee Yem 2 Yacob.
Ipeed ouhctkoy yctahOBHTpe perylAToP npa Ha "0" nIn "BbHbTe BnIKy n 03 po3eTKn i daTe yTIOY NOHOCTBIO OCTbITb. 3aTe m npotpnte ero BnaXHOi caNfekoi. He norpykaTe np6op B BOdy nIN dpyrne KNDKOCTN.
CnBaIe N uHcTne pe3epByap Iy BoDbI nOcNe KaKDoRo NcNoB3oBAHN.
IaKc TEmnepatpyo, npeBbIaIOUe peKomeHdyemble 3HaueHHN, MoKeT npBODnTB K npOxuRaHIO TkaHN, Bpe3yIbTaTe Yero Ha noDooBe Moryt ocTabc cnebl Harapa. B 3OM cnyae peKomeHdyetc nporlaNTb yTOROM KycOK CTapoT KAHN, YTO6blYdaIITb npriropeBwne OCTaTKN.
Iocne nCnoJIb3OBaHnY uCTaHOBnTe peryIaTOp npa Ha "0" nn "F", OTcoeHNHTe npnbop ot cetn 3JIeKtpoNTaHnry, BblJeTe ocTaTKn BOdbI n3 pe3epByapa n, DoJdaBUnc b, KOrDa YTHor noJIHoCTbIO OCTbIHET, NOCTaBBte erO Ha xpaHeHne.
HnkOrda He nCnoB3yIe Ia 3Toro a6pa3nBhIe MaTePnaIbI, XmMueckne OuncntTeIN nn pactBopntEn.
Pazdien 4: Xpachenne [Pnc. 3]
OnopoknHTpe3epByapIa BOdbI.
HamotaTe shyp nntaHn BOKpyr 3aDnHa Ka nbilecoca.
IocTaBbTe yTIOB BepTKKaJIbHO Ha 3aDnK.
IpoJokDnTe He MeHee 30 MNHT, Noka ocTbHET npDoWBa.
Iocne 3TO yTIOr MOxHO y6npaTb B uKaΦ Ha xpaHeHne.
Baxhna nHΦopMaζη
CepBnchoe 06cIyKbHaHne KOMnHaHo Hoover
B cnyuae Heo6xOIMOCn cepBnCHORO 6cIyXnBaHn IbIeCocA n03BOHnTe B MeCThBi CepBnCHbi CEHTp npodykun Hoover. KoTHaTKHyIO HOpMauno CM. HnKe.
Tpe6oBaHn8 6e3oNaChOCTn
IIO MHeHIO Hoover, He3aBcMma OeHka -3TO LyuHn cnoCo6 nOdTBePdntb HaJeXHOCTb KOHcTpyKun KaucctBO n3rotOBJIeHn np6opa.
Bce yTtH Hoover n3roTOBHeHc co6JIIODeHHem Bcex BO3MOXHbIX Tpe6OBaHn 6e3OnachOCTn Odo6peHb HAn6oJe KBAHnHnIUPOBAHbIMn He3aBNCMbIMn CePTnHkauHOHHbIMn OpraHAM.
ISO 9001
3aObI KOMnHn Hoover npoJn HezABncmMyo OceHky Ha npEmdT co6JIIOeHn Tpe6OBaHn K KaueCTBy BvInyckaemOn npOdyKcHn. Haa npOdyKcHn I3roTaBnBaetc c npImeHeHnem CnCTEmbl KaueCTBa, yDoBneTBopraUe Tpe6OBaHnM cTaNapTa ISO 9001.
Okpykaioua cpea:
CnMBOH Na daHHOM np6ope yka3bIbaet Ha To, YTO eRO HeJIb3a YTNIN3npoBaTb BMeCTe C 6blTOBbIMN OTXODAM. ERO HeO6xOIMO cdaBaTb B COOTBeTCTBYIOUm NpHK T pInema dlaNbHeJWe nepepa6OTKn 3JeKTPnuuecknx n 3JeKTPoHNbIX uacte. YtIN3aun D0JHXa IPOBOIDTBcB COOTBeTCTBN C MeCTHbIMn PnpOdooxpAHNTbHbIMn PpaBnIaMn NO YtIN3aun OTXODOB. 3a 6OJIe eoPb6HOH INΦOpMauneNo ObaPaeHIO C daHHbIM np6obopom, ero YtIN3aun n nepepa6OTKe 6paTntecb M MeTbIe opraHbI Blactn, B CJIyK6y YtIN3aun OTXODOB nIN B MaRa3H, rDe Bbl npno6peHn daHHbI np6op.


Даньий подукт OTbeuaet TpeбованямЕрпэйскnxДиpeктNB 2006/95/EC,2004/108/EC n 2011/65/EC.
HOOVER Limited, Pentrebach, Merthyr Tydfil, Mid Glamorgan, CF48 4TU, UK
Bawa rapaHTn
YcNoBn rapaHTn Dla DaHOro 6bITOBoro 3JeKTPnueckoro npnbopa onpeJenOTc Hauim
npedCTaBnteJIbCTBOM B Toi cTpaHe, B KOTOpO 3TO T 3JeKTPoPnp6op 6bl KynIeN. BoIee noDpo6HyIO
HΦopMaunio 06 3TxX YcNoBnx Bbl MoKeTe NOyUHTb OT HaWero dInepa. PpI npEdbAeHNn PpeTeH3n No
ycNoBnM DaHHbIX rapaHTnHbIX 6Ba3aTeJIbCTB Heo6xOdImo npEdbAHTb Yek NIN KBNTaHcIIO Ha npDaHHbI TOBap.
N3MeHeHnMOrTy 6bItb BHeceHbI 6e3 npeBapntelbHoro yBeOMHeHn.
Wprowadzenie
Szanowny Kliencie!
