Perfect Clean CP1010 - Steam cleaner Concept - Free user manual and instructions
Find the device manual for free Perfect Clean CP1010 Concept in PDF.


| Product type | Steam cleaner |
| Brand | Concept |
| Model | Perfect Clean CP1010 |
| Power supply voltage | 220-240 V ~ 50 Hz |
| Rated power | 1000-1200 W |
| Water tank capacity | 300 ml |
| Cleaning agent tank capacity | Approximately 150 ml (not exactly specified) |
| Heating time | 3 to 5 minutes |
| Weight of the appliance | Approximately 1.5 kg |
| Included accessories | Flexible tube, squeegee, brush, extension (45 cm), measuring cup, cleaning cloth, extension handle, precision brush, nylon brush, metal brush, scraper |
| Main functions | Hot steam, steam regulation, cleaning agent tank with flow adjustment, trigger safety lock |
| Usage | Household only, for steam cleaning of heat-resistant surfaces |
| Maintenance | Empty tanks after use, clean the nozzle, wipe with a dry cloth, descale if necessary |
| Safety | Safety cap, do not direct steam at people/animals/plants, unplug before filling, do not use chemicals in the water tank |
| Warranty | 24 months on the product, 6 months on consumables (battery etc.) |
| Repairability | Repairs only by authorized center, spare parts available via after-sales service |
| Environmental information | Recyclable, do not dispose of with household waste, return to recycling center |
Frequently Asked Questions - Perfect Clean CP1010 Concept
User questions about Perfect Clean CP1010 Concept
0 question about this device. Answer the ones you know or ask your own.
Ask a new question about this device
Download the instructions for your Steam cleaner in PDF format for free! Find your manual Perfect Clean CP1010 - Concept and take your electronic device back in hand. On this page are published all the documents necessary for the use of your device. Perfect Clean CP1010 by Concept.
USER MANUAL Perfect Clean CP1010 Concept
Thank you for purchasing a Concept product. We believe you will be satisfied with our product throughout its service life.
Please, study the entire Operating Manual carefully before using the product. Keep the manual in a safe place for future reference. Make sure that any person handling the vacuum cleaner is also familiar with the Operating Manual.
| Technical parameters | |
| Voltage | 220-240 V ~ 50 Hz |
| Power input | 1 000 - 1 200 W |
IMPORTANT SAFETY PRECAUTIONS
When using the product, basic precautions should:
-
Use the steam cleaner only for its intended use. Do not use outdoors.
-
Do not immerse the power cord, charging adapter, or appliance into water or any other liquid.
-
Do not pull the cable while disconnecting it from the socket, but grasp the plug and pull it.
-
Do not let the cable to touch hot surfaces. Let the appliance to cool down properly before manipulation or opening the safety cap. To store, wrap the cable around the appliance loosely.
-
Hot steam can have a detrimental effect on some materials. Always make sure that the surface or material is suitable for hot steam treatment before using the appliance. You can do the test on a small part of the material to which you want to apply the hot steam.
-
Always unplug the appliance from the electrical outlet when filling with water, emptying it or if the appliance is not in use. When opening the water tank, always turn the safety lock slowly. This will allow the residual steam to escape freely.
EN
concept
-
Do not use the appliance with a damaged cable or plug, or if the appliance or any part of it has been damaged or dropped. Do not attempt to disassemble or repair the steam cleaner to avoid electric shock.
-
Contact the manufacturer / retailer (see warranty and service terms). Incorrect installation and repair can cause electrical shock to people using the steam cleaner.
-
Take extra care if any appliance is used by children or near them. If the appliance is plugged into an electrical outlet, do not leave it unattended.
-
Touching hot metal parts, hot water or steam may cause burns. Be careful when inverting the appliance upside down, hot water may be present in the unit.
-
Never apply the steam cleaner on another person. Steam is very hot and can cause burns.
-
Do not use the appliance in the presence of explosive or flammable vapors.
-
Never use any chemical or compound in the appliance, only water from the water supply.
-
Use of chemicals may damage the appliance. If you use the chemicals you will also lose the warranty.
-
Persons with reduced mobility, reduced sensory perception, poor mental capacity or persons not familiar with the operation must use the appliance only under the supervision of responsible and experienced person.
-
This appliance may be used by children 8 years of age and older and by persons with physical or mental impairments or by inexperienced persons if they are properly supervised or have been informed about how to use of the product in a safe manner and understand the potential dangers. Children must not play with the appliance.
concept
EN
This appliance may be cleaned by children 8 years of age and older if they are properly supervised. Keep this appliance and the power cord out of reach of children younger than 8 years of age.
WARNING
- Do not leave the steam cleaner plugged in the mains. If the cleaner is not being used and you attend to fill the water tank, disconnect the appliance from the mains.
- Do not allow the cleaner to be used as a toy. Take special care when the cleaner is operated by children or near children, animals or plants.
- Use only as described in this manual. Only use accessories recommended by the manufacturer.
- Do not pull on the cable, do not use the cable as a handle, do not close the door if there is the cable, do not pull the cable over sharp edges or corners. Protect the cable from hot surfaces.
- Do not pull the cable to disconnect. To disconnect, grasp the plug, not the cable.
- Do not handle with a plug or steam cleaner with wet hands or barefoot.
- Do not insert any objects into the openings. Do not use the appliance with blocked openings.
- Store the appliance indoors in a dry, cool place.
- Keep your work area well lit.
- When using the appliance, always keep it leveled. Never steam directly on people, animals or plants.
- Do not immerse the steam cleaner in water or other liquids. When filling the steam cleaner with water, always unplug it from the electrical outlet.
EN
concept
- DO NOT add any detergents, fragrances, oils, or other chemicals in the water used in the appliance, otherwise it could damage the unit or become potentially hazardous when used. If water is too hard in your area, use normal water or distilled/cleaned water.
Failure to follow the manufacturer's instructions may lead to refusal of warranty repair.
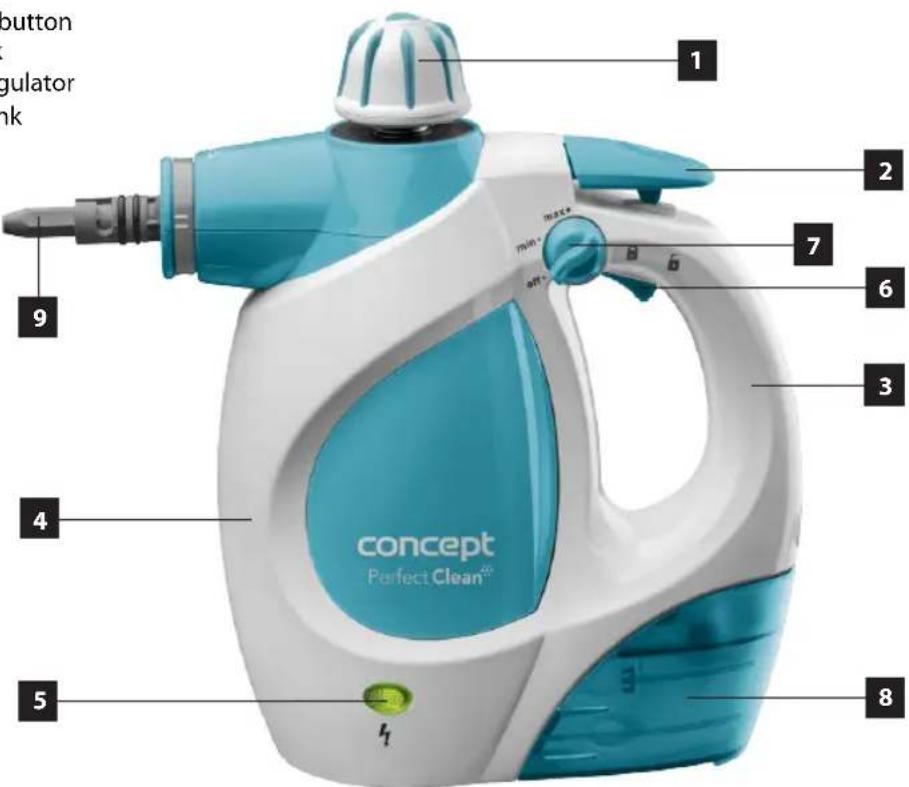
PRODUCT DESCRIPTION
1 Water fill safety cap
2. Steam trigger
3. Handle
4. Unit body
5. Power / Warm up button
6. Steam button lock
7. Cleaning agent regulator
8. Cleaning agent tank
9. Steam nozzle
76
CP 1010
concept
EN
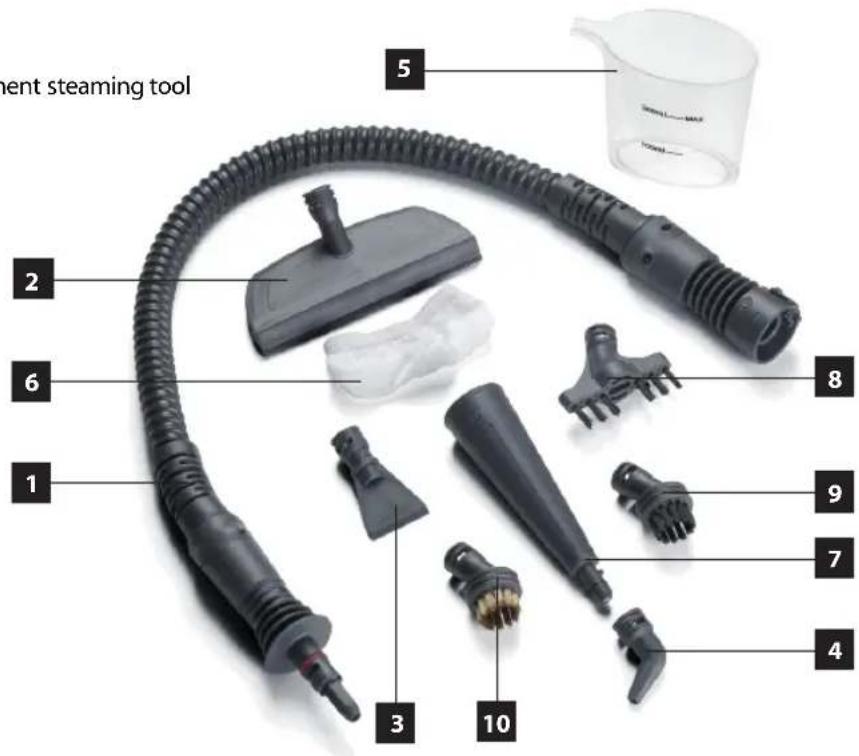
Accessories
1 Hose
2. Window squeegee /Garment steaming tool
3. Scaper
4. Elbow nozzle (45^)
5. Measuring jug
6. Cleaning cloth
7. Extension nozzle
8. Grout cleaning brush
9. Nylon brush
10. Wire brush
OPERATING MANUAL
BEFORE FIRST USE
The steam cleaner must be operated in accordance with the instructions and used only for domestic household cleaning. The steam cleaner is not fit to be used as an industrial cleaner hence it will void the manufacturer's warranty if used inappropriately.
Please read these instructions thoroughly.
You will be able to use all the features of the steam cleaner for the fullest. Keep the Instruction Manual for future reference.
Important
Always switch the cleaner off and remove the plug from the wall outlet before cleaning your appliance, when not in use, or attempting any maintenance task. Connect the steam cleaner only to an appropriate AC outlet with a voltage value that corresponds to the information on the appliance rating plate. The cleaner should only be used for its intended purpose as described in the instructions.
EN
concept
ASSEMBLY
Turn off, unplug, and allow the steam cleaner to cool before removing its parts. Always have the nozzle pointed away from you and the others during installation. See the "Accessories Chart" for suggested use and extensions required.
STEAM NOZZLE
The steam nozzle is permanently attached to the body of the steamer and can be used for direct steam application or to attach desired accessories. See "Accessory Chart" for which accessories can be attached.
EXTENSION FOR THE STEAM NOZZLE
How to attach and remove the extension nozzle
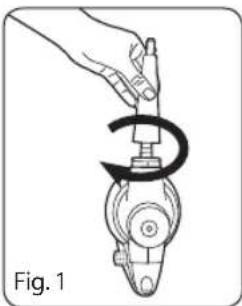
- Install the extension nozzle on the steam nozzle of the steam cleaner (Fig. 1). Align the marks on the steam nozzle and the extension nozzle and rotate the extension piece clockwise until it clicks into place. Once the extension nozzle is installed, you can use it separately for direct application or as an attachment for additional accessories. In the "Accessories Table", you can find a list of accessories that can be attached to the extension nozzle.
- To remove extension nozzle, rotate counter-clockwise and gently pull away from the steam cleaner.
How to attach and remove the hose
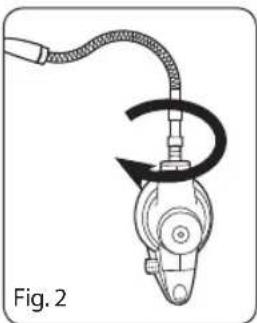
- Install the hose with integrated handle on the steam nozzle of the steam cleaner (Fig. 2). Align the marks on the nozzle and on the hose and turn the extension clockwise until it clicks into place.
- To remove the hose, press the release button at the base of hose and rotate counter-clockwise and pull it away.
Attaching other accessories to the hose / extension nozzle
- Once the hose is attached, you can attach together accessories to the Hose (see "Accessory Table"). First install the extension nozzle on the steam nozzle of the hose. As soon as the extension nozzle is firmly attached, you can add desired extension accessory. Align the markers on the extension nozzle and the desired accessory and rotate clockwise until it clicks in place.
- Remove the accessories by turning it counter-clockwise and gently pulling it out of the extension nozzle. See the "Cleaning and Maintenance" for cleaning instructions.
ACCESSORIES TABLE - Extensions and their usage
CAUTION: Before cleaning any electrical appliance, check and follow the manufacturer's cleaning guidelines. Never apply hot steam to electrical parts.
| Accessory Suggest extended Nozzle | Required Extension | |||
| Extension Nozzle | Steam Nozzle | Hose | ||
| Extension Nozzle | X | Direct steam application, but primarily as an extension to attach smaller accessories. | ||
| Window Squeezee / Garment Steaming Tool | X | Shower glass doors, mirrors, glass, removing soap residue. Smoothing of wrinkled clothes, curtains, table cloths and much more (without the use of cleaning solutions). | ||
| Nylon and Wire Brushes | X | Oven, microwaves, stove tops, showers, bathtubs, tap fittings, tile, grout, toys, refrigerators, etc. Caution: Wire brush can scratch the surface! It is necessary to first test it on small parts of the area intended for cleaning. | ||
| Elbow Nozzle | X | Stove tops, around the tap edges, grout, microwaves, sinks, hard to reach areas, etc. | ||
| Grout Cleaning Tool | X | Cleaning all grout lines, sanded or nonsanded. | ||
| Scrapper | X | Scraping food residues, dirt and grease. Removal of residues or other resistant materials from different surfaces. | ||
INSTRUCTIONS FOR USE
WARNING: Turn the appliance off, unplug, and allow it to cool before servicing or filling the water tank. Do not use a hot steam to clean the electrical outlets. Always use appropriate cleaning solutions according to the type of the surface.
WARNING: Do not use hot or boiling water to fill the clean water tank.
WARNING: Do not add any cleaning solution, detergent, vinegar and bleach to the water tank. This will cause damage to the filter and the internal components of the steam cleaner.
EN
concept
FILLING CLEAN WATER TANK
Be careful when removing water fill safety cap. Even if the cap can be unscrewed, the steam cleaner may still be hot, especially the metal ring.
IMPORTANT: Do not add cleaning solution to the water tank.

- Place the steam cleaner on a level surface. If you fill the water tank during or after use, see "Refilling Water During Operation" instructions. After you have ensured the steam cleaner has cooled and pressure has been released, the water fill safety cap should turn freely for removal. Unscrew the water fill safety cap counter-clockwise (Fig. 3).
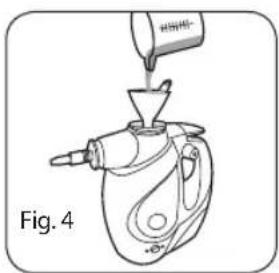
- Add 300ml of water into the measuring jug and pour the water into the water tank (Fig. 4). (Max. capacity of the tank is 300ml . Do not overfill the water tank.)
- Overfilling may cause excess water to be emitted from the steam cleaner. When refilling the steam cleaner, make sure to empty all remaining water from the water tank before refilling.
- Re-install the water fill safety cap in a clockwise direction and tighten until it is completely sealed.
- DO NOT OVERTIGHTEN THE SAFETY CAP.
REMOVING AND FILLING THE CLEANING AGENT TANK
IMPORTANT: Do not combine different cleaning agents together.

- Squeeze the tabs on the sides of the cleaning solution tank to remove it out of the steam cleaner as shown (Fig. 5).
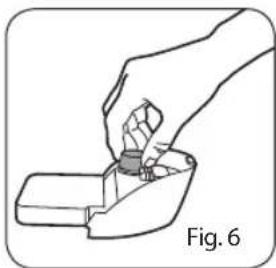
- Remove the cap from the top of the cleaning agent tank (Fig. 6).
- Fill the cleaning agent tank with desired cleaning solution.
- Install the cap back (Fig. 6).
- Put the cleaning agent tank back by sliding it into its place. Apply light pressure to the back of the tank until it clicks into the body of the steam cleaner properly.
IMPORTANT: Do not leave the Cleaning agent regulator between the positions.
Make sure it clicks into a proper setting before use.
concept
EN
THE CLEANING AGENT REGULATOR
(When using cleaning agents for different types of surface.)
- The cleaning agent regulator controls the amount of cleaning solution that is added to the steam.
- It does not adjust the amount of steam, only the amount of the cleaning solution.
- If you wish to clean with steam alone, simply turn the regulator to the "OFF" position. Now every time you press the steam trigger, you will release steam alone.
- If you wish to use the cleaning agent, simply turn the regulator to the desired setting. Now when you press the steam trigger, the steam cleaner will release the amount of solution that is indicated on the regulator as well as steam.
- Press the power button. The power indicator lights up red.
- If the indicator does not light up, check the "Troubleshooting" section for more details.
- The steam cleaner should take between 3-5 minutes to heat up, the indicator lights up green.
- When operating the steam cleaner, make sure to keep it levelled during use. Angling the steam cleaner too far will cause water to leak from the cleaner.
WARNING: Do not operate the steam cleaner without any water in the water tank.
WARNING: If you want to avoid steam discharge from the appliance for safety reasons, use the steam release button lock. By moving the lock lever to the "locked" position, it will not be possible to press the steam discharge button. To release this button again, slide the lock lever back to the "unlocked" position.
For best results
(When using a cleaning agent for the type of surface intended to clean).
- Follow the instructions in "Removing and filling the cleaning agent tank" and fill the tank with the detergent solution for the type of surface. Turn the regulator to "MAX".
REFILLING WATER DURING OPERATION
CAUTION: To avoid burn injury, do not refill water tank before steam cleaner has cooled completely. Be careful when removing water fill safety cap. Even when cap is able to be turned the steam cleaner may still be hot, especially the metal surfaces.
- Unplug power cable from wall outlet.
- If the water tank is still under pressure, the cap will be raised upwards and cannot be unscrewed. As soon as the steam cleaner cools down and the pressure in the appliance drops, the cap retracts and can be unscrewed.
- It takes about 7-10 minutes to the steam cleaner to cool down, the safety cap will drop totally. If it does not drop after 10 minutes, release the remaining pressure by pressing the steam discharge button again. Turn clockwise to unscrew the filler cap and remove the cap gently. DO NOT EXCEED THE FILLING OF THE FILLING HOLE. Allow the steam cleaner to cool for another 5 minutes. After the steam cleaner has cooled down and the pressure is reduced in the appliance, the filler cap will easily release. Fully unscrew the filler cap.
- Pour all the remaining water to prevent the tank from overfilling and pour 300ml of water into the steam cleaner tank using a measuring jug. (The maximum capacity of the water tank is 300ml . Do not overfill the reservoir, leave a smaller gap at the top.)
- Re-install the water fill safety cap in a clockwise direction and tighten until it is completely sealed.
- DO NOT OVERTIGHTEN THE SAFETY CAP.
IMPORTANT: DO NOT ADD CLEANING SOLUTION TO THE WATER TANK.
CLEANING AND MAINTENANCE
Cleaning After Use
CAUTION: To avoid burn injury, do not refill water tank before steam cleaner has cooled completely. Be careful when removing water fill safety cap. Even when cap is able to be turned the steam cleaner may still be hot, especially the metal surfaces.
IMPORTANT: Make sure safety cap is tightened securely before use or for storage.
- After the steam cleaner is used, press the power button to turn power "OFF" and then unplug the power cable from wall outlet.
- Press down the steam trigger to release all pressure.
- It takes about 7-10 minutes to the steam cleaner to cool down, the safety cap will drop totally. If it does not drop after 10 minutes, release the remaining pressure by pressing the steam discharge button again. Turn clockwise to unscrew the filler cap and remove the cap gently. DO NOT EXCEED THE FILLING OF THE FILLING HOLE. Allow the steam cleaner to cool for another 5 minutes. After the steam cleaner has cooled down and the pressure is reduced in the appliance, the filler cap will easily release. Fully unscrew the filler cap.
- Empty the water tank and let it dry. Dry the outer surface of the steam cleaner with a dry cloth. Allow it to dry freely. Then fit the cap on and screw it firmly in the clockwise direction.
- DO NOT OVERTIGHTEN THE SAFETY CAP.
Cleaning microfiber cloth:
- Cloth is washable. Always use a mild detergent.
- For best results, let the cloth to dry.
IMPORTANT: Allow the steam cleaner to fully cool down before performing any maintenance or troubleshooting checks.
IMPORTANT: Never use bleach or fabric
STORAGE
- Remove the power cord from the socket.
-
Press down the steam trigger to release all pressure.
-
It takes about 7-10 minutes to the steam cleaner to cool down, the safety cap will drop totally. If it does not drop after 10 minutes, release the remaining pressure by pressing the steam discharge button again. Turn clockwise to unscrew the filler cap and remove the cap gently. DO NOT EXCEED THE FILLING OF THE FILLING HOLE. Allow the steam cleaner to cool for another 5 minutes. After the steam cleaner has cooled down and the pressure is reduced in the appliance, the filler cap will easily release. Fully unscrew the filler cap.
- Empty the water tank and let it dry. Dry the outer surface of the steam cleaner with a dry cloth. Allow it to dry freely. Then fit the cap on and screw it firmly in the clockwise direction.
- DO NOT OVERTIGHTEN THE SAFETY CAP.
- Leaving a solution residue in the cleaning agent tank will not affect future performance.
- Store upright in a protected, dry area. Keep water funnel and measuring jug for future use.
TROUBLESHOOTING
Use troubleshooting guide as a first step to solve any problems you may be experiencing. If the steam cleaner is not working as it should, has been dropped, damaged, left outdoors, or immersed in water, send the product to the nearest service center.
WARNING: To reduce risk of personal injury - unplug the steam cleaner before servicing and allow cooling.
| Problem | Possible reason | Possible solution |
| The appliance produces little or no steam. | 1. Water tank may be empty. 2. There is no power. 3. The water fill safety cap may not be attached correctly. 4. Steam nozzle may be blocked. | 1. Refer to the “Refilling Water During Operation” section. 2. Turn power button on or check fuse or breaker in your home. 3. Refer to the “Refilling Water During Operation” section. 4. With steam cleaner unplugged and all steam discharged, clean visible dirt on the output of the steam nozzle using a straightened paper clip. |
| The steam cleaner's activity begins to slow down until it stops working completely. | 1. Not enough water in the tank. | 1. Refer to the “Refilling Water During Operation” section. |
| The steam cleaner cannot be turned on. | 1. Blown fuse or breaker. 2. Power cable is not plugged in. | 1. Replace fuse or reset breaker in home. 2. Plug the cable into an outlet. |
| Steam cleaner emits water. | 1. The steam cleaner is angled too far down. 2. Too much water in the tank. | 1. Keep the steam cleaner leveled during use. 2. Empty the water from tank and refill with 300 ml of water. |
concept
EN
SERVICE
Maintenance of a more extensive nature or repair, which requires intervention on the internal parts of the product, must be performed by a specialist.
ENVIRONMENTAL PROTECTION
- Packaging materials and old appliances should be recycled.
- The transport box may be disposed of as sorted waste.
- Polyethylene bags should be also recycled.
Recycling of the appliance at the end of its service life:
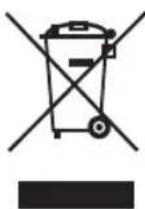
A symbol on the product or its packaging indicates that this product should not go into household waste. It must be taken to the collection point of an electric and electronic equipment recycling facility. By making sure this product is disposed of properly, you will help prevent the negative effects on the environment and human health that would otherwise result from inappropriate disposal of this product. You can learn more about recycling this product from your local authorities, waste disposal service or in the shop where you bought this product.

This product meets all the basic EU regulation requirements that relate to.
Changes to the text, design and technical specifications may occur without prior notice and we reserve the right to make these changes.
concept
concept
DE
DANKSAGUNG
The manufacturer (or importer) is responsible for ensuring the product complies with the requirements of applicable legal regulations as well as those of the relevant technical standards. Moreover, they are responsible for ensuring the product has the properties the manufacturer described in documents related to the goods or those reasonably expected by the customer with regard to the nature of the goods or based on advertising produced by the manufacturer, and further they are responsible for ensuring the product is fit for the purpose proposed by the manufacturer or that a product of the same type is normally used for.
The quality warranty term is 24 months from product takeover by the customer.
In terms of these warranty conditions, a defective accumulator is an accumulator that is electronically malfunctioning (i.e. it does not communicate with the basic unit, its charging or discharging circuits are faulty, etc.) or has an internal short-circuit.
Defects or changes of parameters resulting from normal use and/or wear (e.g. natural decrease in capacity) are not, in any event, considered to be defects in terms of warranty.
The warranty for the accumulators is granted for 6 months. In terms of these warranty conditions, an accumulator has the nature of consumables. For details, see "Consumables".
Consumables
For consumables (batteries, etc.) we guarantee the maintenance of technical parameters for 6 months, unless the product has been damaged as a result of improper use or its service life has expired.
The warranty does not apply to wear and tear caused by regular use. The customer shall not be entitled to any warranty claims if, prior to taking the product over, they knew the product contained a defect or if the defect is attributable to the customer.
Product data
| Model: | |
| Production number: | |
| Date of purchase: | Seal and signature of vendor: |
concept
The warranty specifically does not apply:
- if the product installation, operation and service conditions stipulated in the product operating manual have not been adhered to,
- to malfunctions caused due to mechanical, heat or chemical damage, short circuit, over voltage or incorrect installation,
to malfunctions caused by an inexpert third-party intervention,
to malfunctions caused by natural disaster,
to malfunctions caused by insufficient or inappropriate maintenance in violation of the operating manual, including malfunctions caused by water and other sediments.
to changes in colour of the heating surface or to scratching of the surface caused as a result of using the products in an unusual manner,
to appearance and functional changes caused by exposure to sunlight, thermal radiation of water and other sediments. - if the service life of certain product parts expires, e.g. for accumulators, bulbs, etc.
The warranty does not apply to any products and services provided along with the product (gifts, promotional articles, etc.).
Filing a complaint
A complaint against a product defect must be filed as soon as identified, yet no later than before the end of the warranty term.
The customer must file a product complaint with the dealer from which they have purchased the product, or with any authorised service centre, a list of which is included in the product package, or available www.my-concept.com.
While filing a product complaint, the product must be duly cleaned and securely packed so as to prevent any damage during its transport to an authorised service centre, where relevant, unless the product is delivered in person.
The customer must submit proof of having concluded a purchase contract for the product by producing the receipt.
While filing their complaint, the customer must indicate the noted defect and identify the preferred complaint application method.
Complaints processing
As long as the noted defect may be removed, the user has the right to have the defect duly removed free of charge on a timely basis.
Where such a procedure is not reasonable with regard to the nature of the defect, the user may require to be supplied a new defect-free product (replacement), or, where the defect applies to a part of the product only, replacement of the part concerned. However, if replacement of the product or any part thereof is not proportionate with regard to the nature of the defect, especially if the defect can be removed without undue delay, the customer has the right to have the defect removed free of charge.
If the noted defect is not removable, or if the customer becomes entitled to replacement of the product or a part thereof, yet the replacement is not possible, for example due to the product having been sold out, the customer has the right to return the product (withdrawal from the contract).
The customer shall have the right to a new product (replacement) or to replacement of a part of the product even if the defect can be removed, provided they cannot properly use the product due to repeated occurrence of the defect or due to a high number of such defects. In such a case, the customer also has the right to return the product (by withdrawing from the contract).
If the product is not returned (the customer does not withdraw from the contract), or if the customer does not apply the right to a new defect-free product (replacement), to replacement of a part thereof or to repair of the product, they may request a reasonable discount. The customer also has a right to a reasonable discount if a new defect-free product cannot be supplied to them, or if a product part cannot be replaced or the product repaired unless the situation is remedied within a reasonable time limit, or if rem edying the situation would create major discomfort on the part of the customer.
concept
The seller, authorised service centre or a staff member authorised by them must decide about each complaint immediately or within three business days in complicated cases. This term does not include a reasonable period of time, depending on the type of product concerned, required for the defect to be assessed by an expert. A complaint, including defect removal, must be dealt with without any undue delay, yet no later than within 30 calendar days of the complaint filing date, unless the seller and the customer agree on a later deadline.
On returning the product (withdrawing from the contract) the customer must return any accessories and documents supplied along with the product.
The customer does not have the right to keep the defective parts and components of the product replaced as part of a repair of the product.
This shall be without prejudice to any other rights the customer may have in relation to the purchase of the product.
Remark: Complaints against products damaged in transport are governed by the carrier's complaints procedure.
Manufacturer
Jindrich Valenta - Concept
Vysokomytska 1800,565 01 Chocen
Czech Republic
tel.: +420 465 471 400
fax +420 465 473 304
Company ID No. 13216660
email: servis@my-concept.cz
www: www.my-concept.com
concept

GARANTIEBEDINGUNGEN
Garantie
CONDITIONS DE GARANTIE
Garantie
CZ Jindrich Valenta - Concept Czech Republic
Vysokomytska 1800,565 01 Chocen Tel. +420 465 471 400,Fax: +420 465 473 304 www.my-concept.cz
ELKO Valenta - Slovakia, s.r.o.
Hurbanova 1563/23, 911 01 Trenčin
Tel.: +421 326 583 465, Fax: +421 326 583 466
www.my-concept.sk
Elko Valenta Polska Sp. Z. o. o.
Ostrowskiego 30,53-238 Wroclaw Tel.: +48713390444,Fax:713390414 www.my-concept.pl
Metaker Kft
2851 Kornye, Alkotmany ut 6-10.
Telefon/fax: 06 (34) 473-675, 473-550, 473-695
Verners VT Ltd.
Piedrujas iela 5a, Riga, Latvia Tel. ^+ 37167021021,fakss ^+ 37167021000 e-pasts:info@verners.lv, www.verners.lv
- IMPORTANT SAFETY PRECAUTIONS
- EN
- concept
- WARNING
- Failure to follow the manufacturer's instructions may lead to refusal of warranty repair.
- PRODUCT DESCRIPTION
- Accessories
- OPERATING MANUAL
- BEFORE FIRST USE
- Please read these instructions thoroughly.
- Important
- ASSEMBLY
- STEAM NOZZLE
- EXTENSION FOR THE STEAM NOZZLE
- How to attach and remove the hose
- Attaching other accessories to the hose / extension nozzle
- ACCESSORIES TABLE - Extensions and their usage
- INSTRUCTIONS FOR USE
- FILLING CLEAN WATER TANK
- REMOVING AND FILLING THE CLEANING AGENT TANK
- THE CLEANING AGENT REGULATOR
- For best results
- REFILLING WATER DURING OPERATION
- CLEANING AND MAINTENANCE
- Cleaning After Use
- Cleaning microfiber cloth:
- STORAGE
- TROUBLESHOOTING
- SERVICE
- ENVIRONMENTAL PROTECTION
- Recycling of the appliance at the end of its service life:
- DANKSAGUNG
- Consumables
- Filing a complaint
- Complaints processing
- Manufacturer
- GARANTIEBEDINGUNGEN
- Garantie
- CONDITIONS DE GARANTIE
Brand : Concept
Model : Perfect Clean CP1010
Category : Steam cleaner